

Page 1
Washer-Extractor
Pocket Hardmount
Instructions for Operating the
WE-4 and WE-5 Microcomputers
UW50P4
Operation
COLD / HOT / WARM /
LOW HIGH OVER
WASH / HEAT / SUPPLY
FLUSH RINSE
SOAK MEDIUM HIGH
PAUSE SPEED SPEED
CLEAR
STOP
DRAIN
BUZZER
REVERSE
NO
DISPLAY
TEMP. /
CYCLE
ADD
CYCLE
NUMBER /
ADVANCE
ERASE
CYCLE
NUMBER
ENTER
START
PHM542N
www.comlaundry.com
Part No. F232161
September 2002
Page 2

Page 3

Table of
Contents
Introduction......................................................................................... 3
Nameplate Location.............................................................................. 3
Replacement Parts ................................................................................ 3
Customer Service.................................................................................. 3
Safety Information .............................................................................. 5
Important Safety Instructions ............................................................... 5
Operation............................................................................................. 7
General Information.............................................................................. 7
Theory of Operation ............................................................................. 7
Start-Up................................................................................................. 8
Loading ................................................................................................. 8
Select Cycle .......................................................................................... 8
Start Cycle ............................................................................................ 8
Test Cycle ............................................................................................. 9
End of Cycle ......................................................................................... 9
LED Display ......................................................................................... 9
Test Procedure ...................................................................................... 11
Motor Thermal Overload Indicator ...................................................... 13
© Copyright 2002, Alliance Laundry Systems LLC
All rights reserved. No part of the contents of this book may be reproduced or transmitted in any form or by any
means without the expressed written consent of the publisher.
F232161
© Copyright, Alliance Laundry Systems LLC – DO NOT COPY or TRANSMIT
1
Page 4

Notes
2
© Copyright, Alliance Laundry Systems LLC – DO NOT COPY or TRANSMIT
F232161
Page 5
Introduction
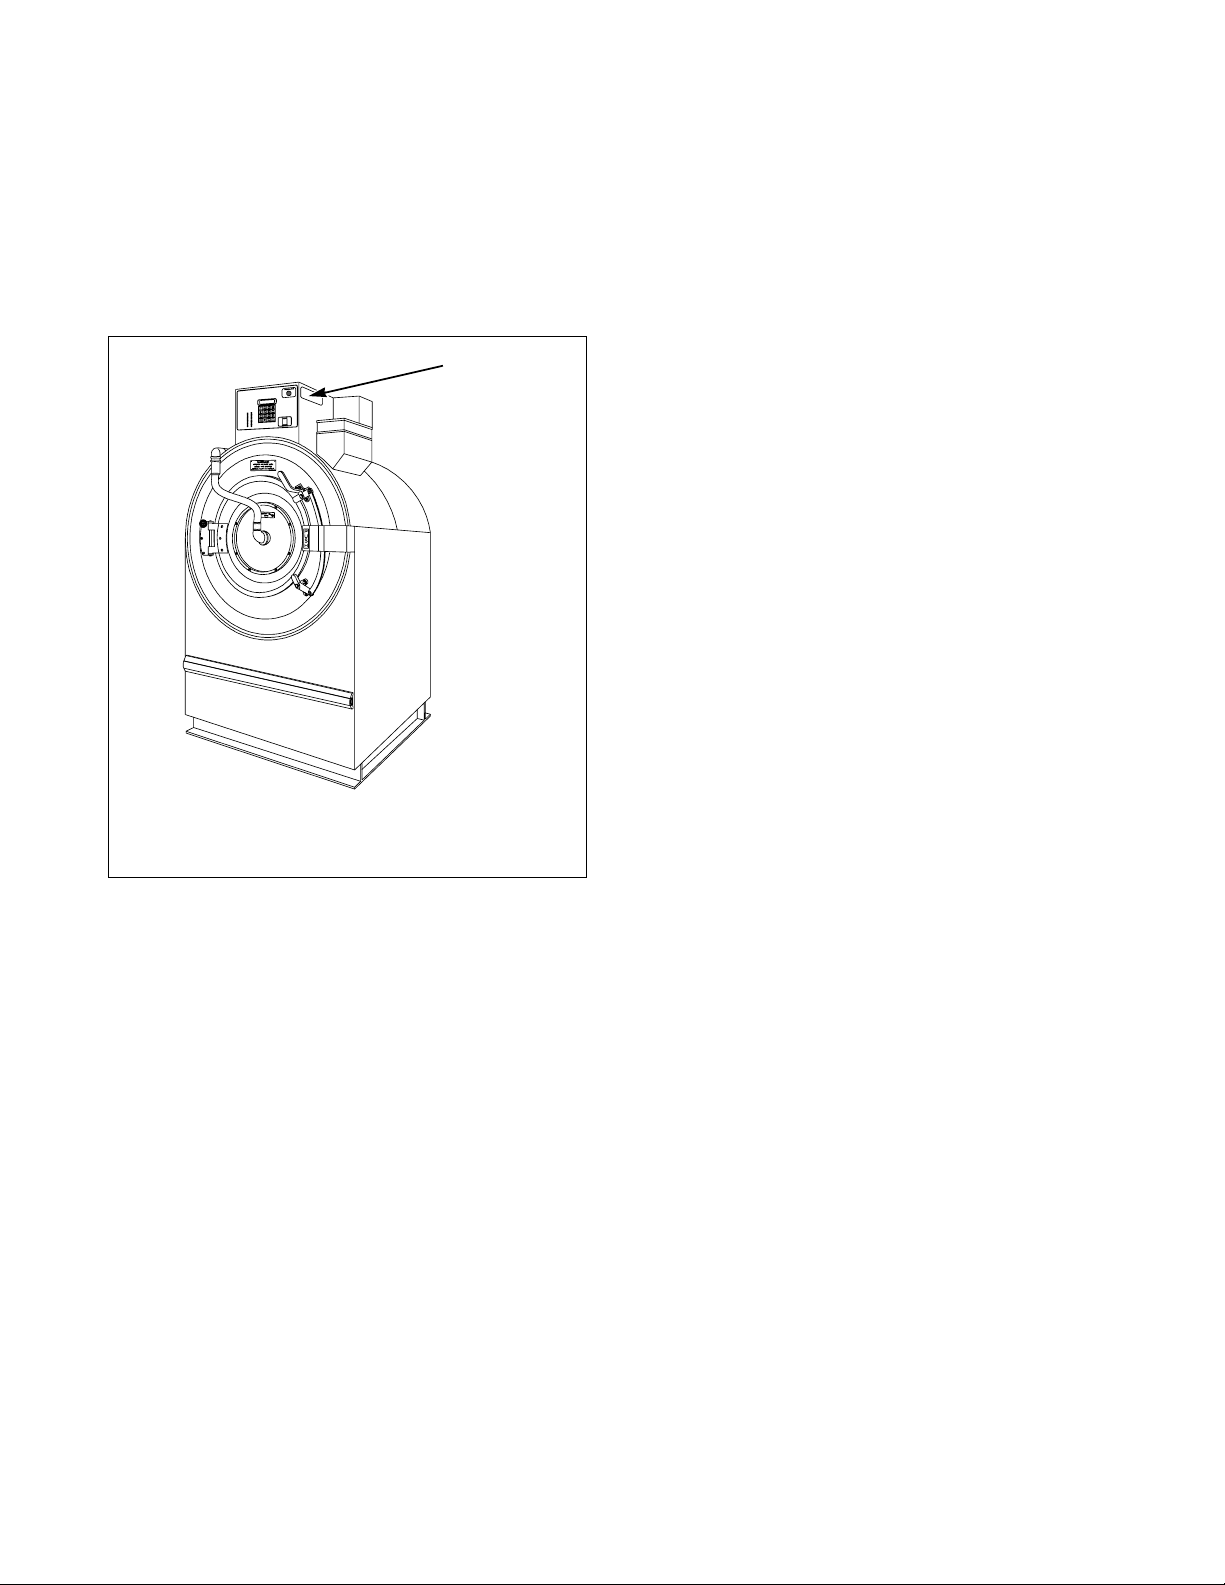
Nameplate Location
The nameplate is located at the top of the machine.
Always provide the machine’s serial number and
model number when ordering parts or when seeking
technical assistance.
1
Replacement Parts
If literature or replacement parts are required, contact
the source from which the machine was purchased or
contact Alliance Laundry Systems at (920) 748-3950
for the name and address of the nearest authorized
parts distributor.
Customer Service
For technical assistance, call any of the following
numbers:
(850) 718-1025
(850) 718-1026
Marianna, Florida U.S.A.
(920) 748-3121
Ripon, Wisconsin U.S.A.
1 Nameplate
PHM516N
PHM516N
F232161
© Copyright, Alliance Laundry Systems LLC – DO NOT COPY or TRANSMIT
3
Page 6

Notes
4
© Copyright, Alliance Laundry Systems LLC – DO NOT COPY or TRANSMIT F232161
Page 7

Safety Information
DANGER indicates the presence of a
hazard that will cause severe personal
injury, death, or substantial property
damage if the danger is ignored.
DANGER
WARNING indicates the presence of a
hazard that can cause severe personal
injury, death, or substantial property
damage if the warning is ignored.
WARNING
CAUTION indicates the presence of a
hazard that will or can cause minor
personal injury or property damage if the
caution is ignored.
CAUTION
Precautionary statements (“DANGER,” “WA R N I N G ”
and “CAUTION”), followed by specific instructions,
are found in this manual and on machine decals. These
precautions are intended for the personal safety of the
operator, user, servicer, and those maintaining the
machine.
Important Safety Instructions
WARNING
To reduce the risk of fire, electric shock,
serious injury or death to persons when
using your washer, follow these basic
precautions:
W023E
1. Read all instructions before using the washer.
2. Refer to the Grounding Instructions in the
installation manual for the proper grounding of
the washer.
3. Do not wash textiles that have been previously
cleaned in, washed in, soaked in, or spotted with
gasoline, dry-cleaning solvents, or other
flammable or explosive substances as they give
off vapors that could ignite or explode.
4. Do not add gasoline, dry-cleaning solvents, or
other flammable or explosive substances to the
wash water. These substances give off vapors that
could ignite or explode.
Additional precautionary statements (“IMPORTANT”
and “NOTE”) are followed by specific instructions.
IMPORTANT: The word “IMPORTANT” is used
to inform the reader of specific procedures where
minor machine damage will occur if the procedure
is not followed.
NOTE: The word “NOTE” is used to communicate
installation, operation, maintenance or servicing
information that is important but not hazard
related.
5. Under certain conditions, hydrogen gas may be
produced in a hot water system that has not been
used for two weeks or more. HYDROGEN GAS
IS EXPLOSIVE. If the hot water system has not
been used for such a period, before using a
washing machine or combination washer-dryer,
turn on all hot water faucets and let the water
flow from each for several minutes. This will
release any accumulated hydrogen gas. The gas is
flammable; do not smoke or use an open flame
during this time.
6. Do not allow children to play on or in the washer.
Close supervision of children is necessary when
the washer is used near children. This is a safety
rule for all appliances.
7. Before the washer is removed from service or
discarded, remove the door to the washing
compartment.
8. Do not reach into the washer if the wash drum is
moving.
F232161
© Copyright, Alliance Laundry Systems LLC – DO NOT COPY or TRANSMIT
5
Page 8

Safety Information
9. Do not install or store the washer where it will be
exposed to water and/or weather.
10. Do not tamper with the controls.
11. Do not repair or replace any part of the washer, or
attempt any servicing unless specifically
recommended in the user-maintenance
instructions or in published user-repair
instructions that the user understands and has the
skills to carry out.
12. To reduce the risk of an electric shock or fire, DO
NOT use an extension cord or an adapter to
connect the washer to the electrical power source.
13. Use washer only for its intended purpose,
washing textiles.
14. ALWAYS disconnect the washer from electrical
supply before attempting any service. Disconnect
the power cord by grasping the plug, not the cord.
15. Install the washer according to the Installation
Instructions. All connections for water, drain,
electrical power and grounding must comply
with local codes and be made by licensed
personnel when required.
16. To reduce the risk of fire, textiles which have
traces of any flammable substances such as
vegetable oil, cooking oil, machine oil,
flammable chemicals, thinner, or anything
containing wax or chemicals such as in mops and
cleaning cloths, must not be put into the washer.
These flammable substances may cause the
fabric to catch on fire by itself.
17. Do not use fabric softeners or products to
eliminate static unless recommended by the
manufacturer of the fabric softener or product.
18. Keep washer in good condition. Bumping or
dropping the washer can damage safety features.
If this occurs, have washer checked by a qualified
service person.
19. Replace worn power cords and/or loose plugs.
20. Be sure water connections have a shut-off valve
and that fill hose connections are tight. CLOSE
the shut-off valves at the end of each wash day.
21. Loading door MUST BE CLOSED any time the
washer is to fill, tumble or spin. DO NOT
bypass the loading door switch by permitting the
washer to operate with the loading door open.
22. Always read and follow manufacturer’s
instructions on packages of laundry and cleaning
aids. Heed all warnings or precautions. To reduce
the risk of poisoning or chemical burns, keep
them out of the reach of children at all times
(preferably in a locked cabinet).
23. Always follow the fabric care instructions
supplied by the textile manufacturer.
24. Never operate the washer with any guards and/or
panels removed.
25. DO NOT operate the washer with missing or
broken parts.
26. DO NOT bypass any safety devices.
27. Failure to install, maintain, and/or operate this
washer according to the manufacturer’s
instructions may result in conditions which can
produce bodily injury and/or property damage.
NOTE: The WARNINGS and IMPORTANT
SAFETY INSTRUCTIONS appearing in this
manual are not meant to cover all possible
conditions and situations that may occur. Common
sense, caution and care must be exercised when
installing, maintaining, or operating the washer.
Any problems or conditions not understood should be
reported to the dealer, distributor, service agent or the
manufacturer.
6
© Copyright, Alliance Laundry Systems LLC – DO NOT COPY or TRANSMIT
F232161
Page 9

Operation
General Information
This manual is designed as a guide to operating and
maintaining your washer-extractor. It also serves as an
aid to troubleshooting.
Read and be sure you understand this manual and any
other literature included with your machine before
attempting to start the machine. For warranty
purposes, keep this manual, along with any other
literature and the wiring diagrams which accompany
the machine, in a safe place for ready reference. The
first copy is included with your machine. Additional
copies are available at a nominal charge.
3
2
1
Theory of Operation
NOTE: When power has been turned off from the
machine and then reapplied, the display will read
“WA I T ” for approximately 30 seconds before the
display changes to “NEXT 00”.
4
5
6
COLD / HOT / WARM /
LOW HIGH OVER
WASH / HEAT / SUPPLY
FLUSH RINSE
SOAK MEDIUM HIGH
PAUSE SPEED SPEED
CLEAR
STOP
DRAIN
BUZZER
REVERSE
NO
DISPLAY
TEMP. /
CYCLE
ADD
CYCLE
NUMBER /
ADVANCE
ERASE
CYCLE
NUMBER
ENTER
START
PHM543N
1 Hot Spray Valve On 4 Cold Fill Valve On
2 Cold Spray Valve On 5 Low Level Fill Indicator
3 Hot Fill Valve On 6 High Level Fill Indicator
U152R
F232161
Figure 1
© Copyright, Alliance Laundry Systems LLC – DO NOT COPY or TRANSMIT
7
Page 10

Operation
Start-Up
Turn on the main power source (breaker panel or cutoff switch on the wall). The front panel display should
light up and show “WAI T 0 0” for 30 seconds followed
by “NEXT 00” which means Select Cycle. This
display will be on at all times that power is on
indicating the machine is ready for loading and
unloading.
NOTE: Throughout this manual, when display
indications are referred to, these indications will
pertain to the first four digits of the display reading
left to right. The last two digits on the right side of
the display will indicate either the last cycle used or
the current cycle in process.
Loading
To load the washer, use left hand to press the door
unlock button located on the lower right front of the
control panel. Use right hand to turn door handle to the
right. The door can then be opened.
Load linen until the machine is full. Partial loads are a
waste of energy, water and chemicals and cause
greater machine wear than full loads. If you do not
have enough to fill the basket, wait until you do.
Partial loads, if necessary, should only occur at the end
of the day. Even then, they can usually be held until
the next day when more linen is received.
IMPORTANT: If stringy items such as mop heads
are to be washed, laundry nets should be used in
order to prevent fouling of seals and drains.
Once loading is complete (you cannot overload the
machine as far as harm to the machine is concerned;
however, overloading can cause improper mechanical
action and an inferior quality wash), close and lock the
door making sure that all fabric is inside the basket.
The machine should not start or run if the door is not
both closed and locked.
Select Cycle
Find the cycle number (cycle numbers must be twodigit numbers) of the desired wash cycle from the
cycle code list provided. Press (do not punch) with
your finger the numbers desired on the keypad and
note that this number is displayed instead of “NEXT”.
When keys are pressed on the keypad, a beep will be
heard. If an error is made, simply press the CLEAR
key and then press the numbers again. As numbers are
entered, they move from right to left on the display.
Display will show “CY12” if cycle 12 is pressed.
NOTE: In order to Clear or Enter data, the display
must be filled – i.e., no blank spaces.
Start Cycle
To start the cycle that has been selected, simply press
the START key. If the cycle number selected is not in
the computer memory, the display will show
“NOGO”. If this happens, select another cycle.
Otherwise, the display will now show the first step.
(Example: “HL01”.) This number indicates the step
number in the cycle as listed in the Selection List. As
the cycle proceeds, the display will show the step
being run and the cycle number selected.
If the door is not locked, the display will indicate
“DOOR”. If this occurs, be sure the door is closed and
locked and again press the START key. If the computer
starts but the machine does nothing, this indicates the
door hinge microswitch cam may need adjusting. The
door hinge microswitch interlocks all 120 volt power
to the controls with the exception of the computer
itself.
As the cycle progresses, the display will show the step
in the cycle that is being run as well as the cycle
number. In addition, as water is being turned on to fill
the machine, one or more of the four indicator lights
above the first four digits (left to right) in the display
will come on and stay on until the required water level
is reached. Indicator lights above the last two digits on
the right will indicate the water level(s) reached. When
the indicator light in the next to last digit is
illuminated, the low water level has been reached.
Likewise, when the light in the last digit to the right
illuminates, high water level has been reached. The
cycle will continue until its completion and, at this
time, the display will show “NEXT”.
8
© Copyright, Alliance Laundry Systems LLC – DO NOT COPY or TRANSMIT
F232161
Page 11

Operation
NEVER insert hands or objects into
basket until it has completely stopped.
Doing so could result in serious injury.
SW012
WARNING
Test Cycle
Cycle number 01 is a test cycle to check out all
machine functions. The program for the cycle is shown
following the copy of the Program Worksheet.
The first step is a cold fill to low level and is designed
to give not quite enough time to complete a fill and
cause the display to read “FILL”. When the START
key is pressed again, it should continue to fill and
proceed with the test cycle.
The steps in the test cycle are relatively short with the
exception of step 3, step 15, and step 17. These can be
shortened by pressing the ADVANCE key to go on to
the next step.
End of Cycle
When the cycle is completed, the display will show
“NEXT” plus the cycle number just run. To unload the
machine, press the door unlock button and again open
the door to remove contents and place them in the
dryer.
LED Display
When display shows letters and/or numbers with or
without the beeper, refer to Tab l e 1 . The computer
control in this machine is continuously on the alert for
problems both within the machine and with the total
installation. As the computer sees a problem, it
immediately flashes a letter or number or both on the
display and may activate the beeper as well. Tab l e 1
shows the various displays and what they mean. The
operator should become familiar with these computer
displays.
To display temperature, press the DISPLAY TEMP.
key. Display will read “---F” as long as the key is
pressed and will update display automatically.
It is possible to skip to the next step in the cycle except
a drain step. To do so, press the ADVANCE key. Drain
procedures must be allowed to complete.
F232161
© Copyright, Alliance Laundry Systems LLC – DO NOT COPY or TRANSMIT
9
Page 12

Operation
Display Interpretations
Display Meaning Display Meaning
DOOR Door not locked problem SK Soak
EMTY Empty problem S1 Supply #1 (Soap/Break)
FILL Fill problem S2 Supply #2 (Bleach)
SDLY Spin coast delay S3 Supply #3 (Softener/Sour)
NEXT Select cycle or open door or program S4 Supply #4 (as needed)
NOGO
STOP Stop key has been pressed or end of cycle TH Controlled Temperature Fill to High Level
01/4 One quarter hour (soak intervals) TL Controlled Temperature Fill to Low Level
A1 Buzzer or Auxiliary Output TO Controlled Temperature Overflow
CF
CH Cold Fill to High Level W1 Wash #1 (Regular Reversing)
CL Cold Fill to Low Level W2 Wash #2 (Gentle Reversing)
Cycle not available
Cold flush
S5 Supply #5 (as needed)
NO FILL Indicates machine cannot add heat due to low
level fill not being reached
CO Cold Fill to Overflow W3 Wash #3 (No Agitation)
CR Cold Rinse WF Warm Flush
CY Cycle Number WH Warm Fill to High Level
DR Drain WL Warm Fill to Low Level
F Heat select temperature (F--) in degrees F WO Warm Fill to Overflow
OH Auxiliary heat in minutes (no hours) WR Warm Rinse
HF Hot Flush
HH Hot Fill to High Level
HL Hot Fill to Low Level
HO Hot Fill to Overflow
HR Hot Rinse
HS High Speed Spin
HT Heat (steam or electric)
M Minutes (used when programming time) PAUSE 5 Paused during Cycle (see explanation in this
MS Medium Speed Spin
• • • • • •
•
•
•
•
Dots indicate water valves turned on
Left dot – hot spray valve
2nd dot from left – cold spray valve
3rd dot from left – hot fill valve
4th dot from left – cold fill valve
5th dot from left – low level fill reached
•
6th dot from left – high level fill reached
•
manual)
NOTE: For further explanation of problem
indication displays, consult Test Procedure section
of this manual.
10
© Copyright, Alliance Laundry Systems LLC – DO NOT COPY or TRANSMIT
Table 1
F232161
Page 13

Operation
Serious shock may occur. Open primary
disconnect switch before attempting any
repairs.
W447
WARNING
Test Procedure
1. The WE-4 and WE-5 Programmable Computer,
with its display/fuse board should be easier to
maintain than other type controls. The following
procedure should help to eliminate problems and
determine if components are defective.
2. Test equipment required:
a. 20K OHM/Volt AC-DC voltmeter
b. Programmable computer diagram, WE-4
page 43, WE-5 page 44.
c. Display board diagram, drawing #2091
3. Power Up
a. When AC power is turned on, after
30 seconds the computer should read
“NEXT”.
b. Door unlock solenoid should work if Door
Unlock button is depressed.
c. If these are correct, go to step 5.
4. If computer does not read “NEXT” or does not
light:
a. Examine display board; the door light (DR)
should be on and all others off.
b. If not, check 2 AMP fuse on side of module.
c. Check for 115 volts AC between AC HOT
(ACH) and AC NEUTRAL (ACN) at top
center of display board. (Ref. Drawing #2091)
d. Be certain that all plugs are correctly installed
on the computer board.
e. If all above check OK, remove the 6 pin plug
(J-1) just above the transformer on the
computer board. Carefully check for 115 volt
AC between pins 1 and 6; if correct voltage is
there, replace computer board.
5. If computer reads “NEXT”:
a. Test the keypad, first with the keyed mode
switch in the Run position. A beep tone
should sound as each key is pressed.
NOTE: Keys should be pressed at their centers and
only hard enough to activate them. With the
computer showing “NEXT”, press each of the
15 keys not including the START key and listen for
each beep. After pressing all 15 keys (except
START), press 0 twice then press the START key.
Display should read “NOGO00”.
b. When the DISPLAY TEMP. key is pressed,
the computer display should change to show
the temperature inside the sump. When key is
released, the display should return to previous
read-out.
c. Turn the keyed mode switch to Program and
press “Display/Cycle”. Read-out should show
“CY--”. Then press 0 twice.
d. Press the CLEAR/STOP key. Display should
return to “NEXT”.
e. Return Mode switch to the Run position.
6. If keypad does not function as above:
a. Check the plug at the bottom center of
computer board for proper installation. (P-1)
b. If the plug is correct, proceed to “Replacing
Keypad” section.
7. Test Cycle
a. Cycle 01 is a preprogrammed test cycle. If it
has not been erased, it may be used to check
all functions of the machine.
b. Start this cycle by pressing 0, then 1, then the
START key.
c. Display should show “CL01” with two dots
indicating water valves turned on. (Refer to
Table 1.)
d. On the display/fuse board inside the control
module, these lights should be lit: Cold Fill
(CF), Cold Spray (CS), Drain (DN), plus
Forward (FW) and Reverse (RV) should
alternate on and off. (Ref. Drawing No. 2091)
e. Printed program will indicate which lights to
expect for each step. (Ref. Cycle 01 as shown
in this manual)
8. If read-out is OK but no lights are lit on display/
fuse board:
a. Check 2 AMP fuse and door hinge
microswitch.
b. Check thermal overload indicator light on side
of control module. If lit, thermal overload
circuit is open.
F232161
© Copyright, Alliance Laundry Systems LLC – DO NOT COPY or TRANSMIT
11
Page 14

Operation
9. If only one light on display/fuse board not lit:
a. Check the fuse on the fuse board associated
with that light.
b. If fuse is OK, check jumpers between
computer and display board, J4 and J5,
making sure J4 on display board is connected
to J4 plug on computer board, etc.
c. If the fuse is blown, check the related valve or
relay for shorted condition before replacing
the fuse with one of the same size.
d. Use similar procedure for any individual
function which does not work.
10. “DOOR” Alarm
a. Computer has not been told that door is
locked.
b. Check switch activator tab on extension arm.
c. Check door lock switch.
d. Check input plug, J3, on computer board.
11. “FILL” Alarm
a. Computer has not been told that water level
was reached in the allotted time.
b. Check for leaks in air system between level
switches and water level air chamber.
c. Check for obstruction in water level air
chamber or tubing.
d. Check for obstructions or low pressure in
water supply system.
e. Check for failed drain solenoid.
12. “EMTY” Empty Alarm
a. Computer has not been told that level reached
empty in the allotted time.
b. Check for obstructions in air system to level
switches.
c. Check for slow drain.
NOTE: Sufficient time for filling and draining must
be allowed when a program is written into the
computer. If a “FILL” or “EMTY” alarm occurs
only in one program, edit that program and reenter it into the computer making sure enough time
has been allowed for fill and/or drain.
13. No Spin, Rest of Program OK:
a. When a spin is called for (medium or high
speed) the computer looks for an
out-of-balance condition and an empty
condition.
NOTE: Computer will look for out-of-balance
three (3) times. If balance condition is not
corrected, computer will advance to next step
without completing spin cycle.
b. Check input plug, J3, on computer.
c. Check balance switch inside “A” Frame.
d. Check water level and drain line.
14. “NO FILL” Alarm
a. The computer has not received a low level fill
signal prior to an auxiliary “HEAT” step.
b. Check as for “FILL” Alarm as in step 11.
15. Spins too soon after “SOAK” step:
a. Check for leaks in pressure system to water
level switches.
16. Temperature indication inconsistent:
a. Temperature probe is short circuited.
b. If reading is 53
°
F and does not change,
temperature probe circuit is open.
c. Check input plug, J3, on computer.
d. Replace temperature probe in sump.
17. If the above procedures and troubleshooting have
failed to determine the problem, call the factory.
12
© Copyright, Alliance Laundry Systems LLC – DO NOT COPY or TRANSMIT
F232161
Page 15

Motor Thermal Overload Indicator
MOTOR THERMAL INDICATOR
AUTOMATIC RESET
PHM521N
Figure 2
Operation
WARNING
This machine must be installed, adjusted,
and serviced by qualified electrical
maintenance personnel familiar with the
construction and operation of this type of
machinery. They must also be familiar
with the potential hazards involved.
Failure to observe this warning may result
in personal injury and/or equipment
damage, and may void the warranty.
SW004
Located on the side of the control module is a small
indicator lamp with the above descriptive decal.
When this lamp is lit, it indicates that there is an open
thermal overload switch on the motor(s) which shuts
off the A.C. power to the computer board thereby
preventing damage to the motor(s) caused by
overheating and/or an overload condition.
This feature is provided to protect the motor and
extend the life of the motor. The thermal overload
switch will automatically reset itself after the
excessive heat condition has subsided; however, before
attempting to restart the machine, always check to find
out the reason for the overload (e.g., machine not fully
drained before spin, defective motor, continual out of
balance condition, low voltage, loss of one phase on
three phase motor, failed bearings, air circulation
blocked to motor fan). The thermal overload switch
should not open under normal operating conditions.
Failure to take corrective action when the indicator
lamp is lit will ultimately result in damage to the
motor(s).
If you have difficulty in locating the problem, do not
hesitate to call the factory.
F232161
© Copyright, Alliance Laundry Systems LLC – DO NOT COPY or TRANSMIT
13
Page 16

Notes
14
© Copyright, Alliance Laundry Systems LLC – DO NOT COPY or TRANSMIT F232161
 Loading...