

Page 1
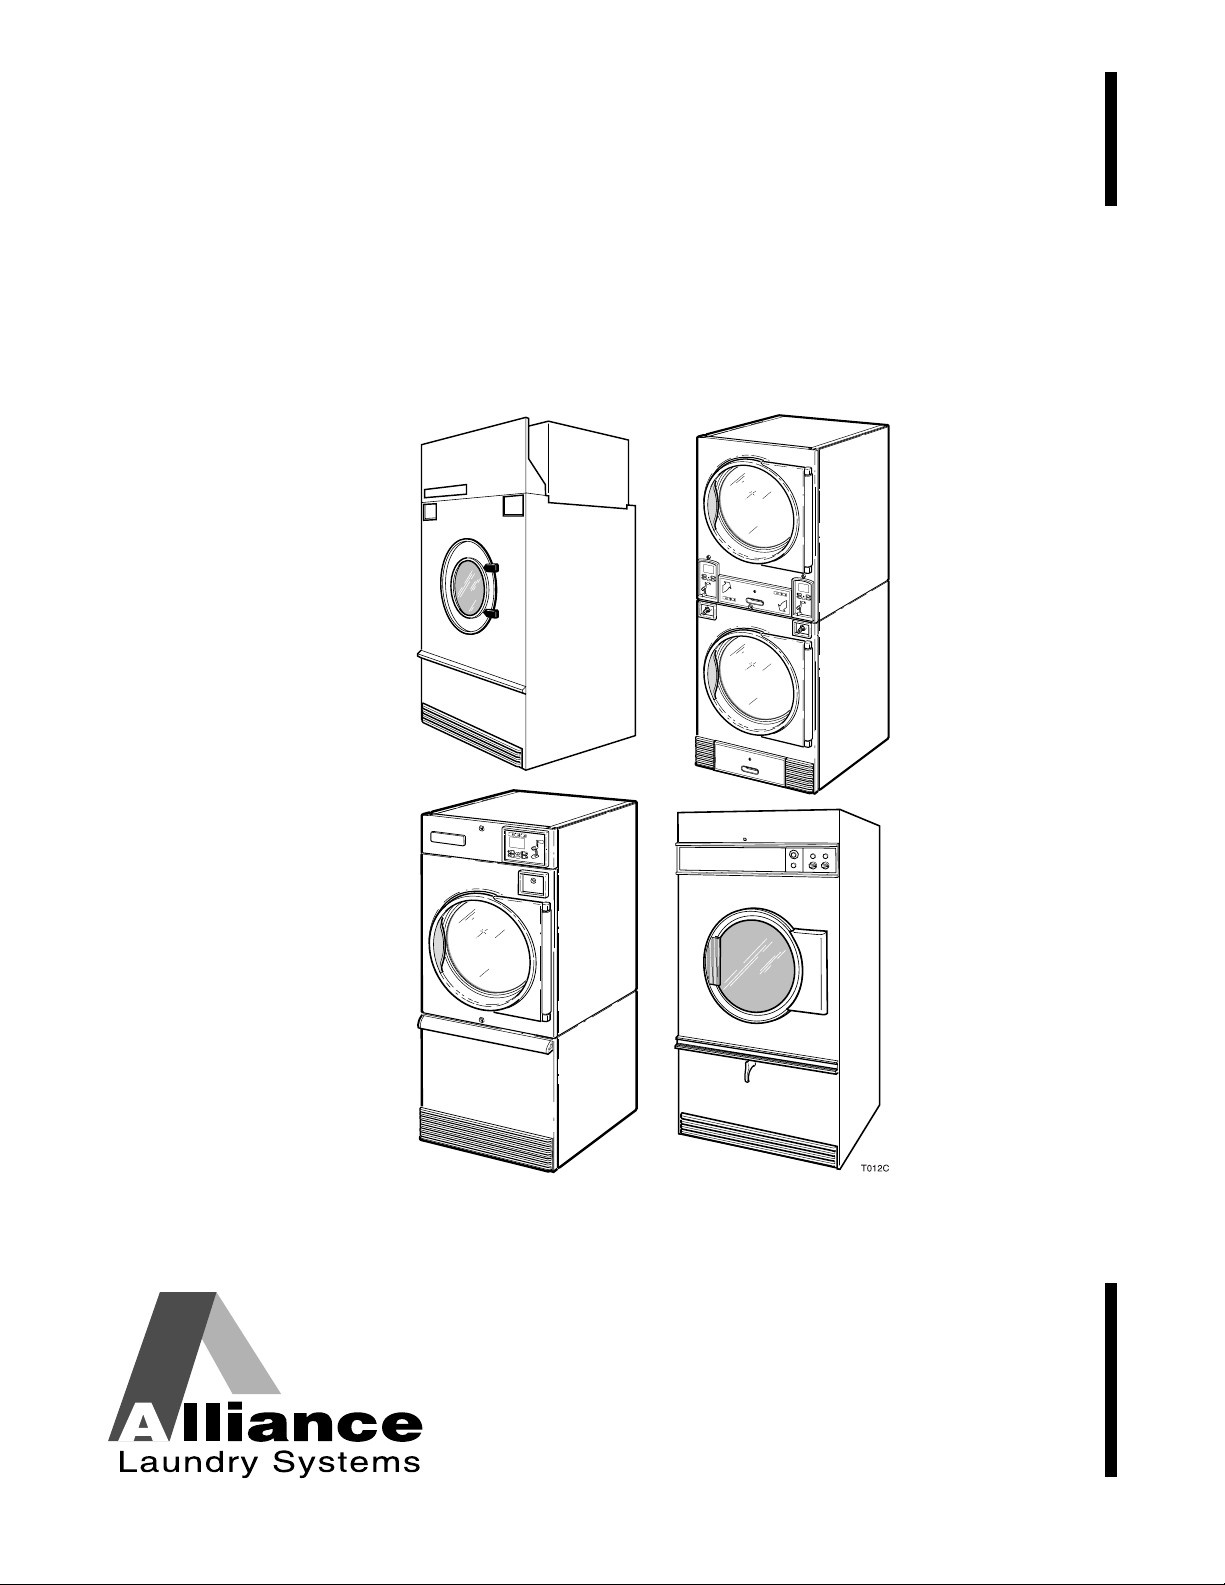
Drying Tumblers
Refer to Page 3 for Model Numbers
NOTA: El manual en
español aparece después
del manual en inglés.
T433I
Operation/Maintenance/Programming
H
I
G
H
TE
M
P
S
T
A
R
T
L
O
W
TE
MP
M
E
D
T
E
M
P
N
O
H
E
A
T
C
2
5
1
S
E
L
2
E
C
T
T
I
E
N
M
S
E
P
3
R
T
C
O
P
I
H
U
N
IG
S
H
H
S
T
T
E
A
MP
R
T
S
T
A
R
T
LO
W
1
S
E
L
2
E
C
T
T
I
E
N
M
S
E
P
3
R
T
C
O
P
I
U
N
S
H
S
T
A
R
T
T
EM
P
M
E
D
T
E
M
P
NO
H
E
A
T
C
2
5
T477C
T478C
Keep These Instructions for Future Reference.
(If this machine changes ownership, this manual must accompany machine.)
www.comlaundry.com
Part No. M414462R1
March 2001
Page 2

Page 3

In the U.S.A., installation must conform to the latest edition of the American National Standard Z223.1
FOR YOUR SAFETY, the information in this
manual must be followed to minimize the
risk of fire or explosion or to prevent
property damage, personal injury or death.
W033
• Do not store or use gasoline or other
flammable vapors and liquids in the
vicinity of this or any other appliance.
• WHAT TO DO IF YOU SMELL GAS:
– Do not try to light any appliance.
– Do not touch any electrical switch; do
not use any phone in your building.
– Clear the room, building or area of all
occupants.
– Immediately call your gas supplier from
a neighbor’s phone. Follow the gas
supplier’s instructions.
– If you cannot reach your gas supplier,
call the fire department.
• Installation and service must be
performed by a qualified installer, service
agency or the gas supplier.
W052
FOR YOUR SAFETY
Do not store or use gasoline or other
flammable vapors and liquids in the
vicinity of this or any other appliance.
W053
WARNING
“National Fuel Gas Code” and Standard ANSI/NFPA 70 “National Electric Code”.
In Canada, installation must comply with Standards CAN1-B149.1 or CAN1-B149.2 codes for gas burning
appliances and equipment and CSA C22.1, latest edition, Canadian Electric Code, Part I.
In Australia, installation must comply with the Australian Gas Association Installation Code for Gas
Burning Appliances and Equipment.
IMPORTANT: Information must be obtained from a local gas supplier on instructions to be followed if the
user smells gas. These instructions must be posted in a prominent location.
Step-by-step instructions of the above safety information must be posted in a prominent location near the
tumbler for customer use.
MISE EN GARDE
POUR VOTRE SÉCURITÉ il est impératif de
suivre les instructions de ce manuel pour
minimiser les risques d’incendie ou
d’explosion et pour éviter les dommages
matériels, les blessures corporelles ou la
mort.
W033Q
• Ne pas entreposer ni utiliser d’essence ni
d’autres vapeurs ou liquides
inflammables dans le voisinage de cet
appareil ou de tout autre appareil.
• QUE FAIRE SI VOUS SENTEZ UNE
ODEUR DE GAZ :
– Ne pas tenter d’allumer d’apareil.
– Ne touchez à aucun interrupteur. Ne
pas vous servir des téléphones se
trouvant dans le bâtiment où vous vous
trouvez.
–Évacuez la pièce, le bâtiment ou la
zone.
– Appelez immédiatement votre
fournisseur de gaz depuis un voisin.
Suivez les instructions du fournisseur.
– Si vous ne pouvez rejoindre le
fournisseur de gaz, appelez le service
des incendies.
• L’installation et l’entretien doivent être
assurés par un installateur ou un service
d’entretien qualifié ou par le fournisseur
de gaz.
W052Q
POUR VOTRE SÉCURITÉ
Ne pas entreposer ni utiliser d’essence ni
d’autres vapeurs ou liquides inflammables
dans le voisinage de cet appareil ou de
tout autre appareil.
W053Q
M414462
© Copyright, Alliance Laundry Systems LLC – DO NOT COPY or TRANSMIT
1
Page 4

Table of
Contents
Introduction......................................................................................... 3
Model Identification ............................................................................. 3
Customer Service.................................................................................. 4
Wiring Diagram.................................................................................... 4
Nameplate Location.............................................................................. 5
Safety Information.............................................................................. 7
Important Safety Instructions ............................................................... 8
Operating Instructions....................................................................... 11
Step 1: Clean Lint Screen/Compartment .............................................. 11
Step 2: Load Laundry ........................................................................... 11
Step 3: Determine Required Temperature............................................ 11
Step 4: Determine Control Type........................................................... 11
Manual Timer Tumblers .................................................................. 12
Electro-Mechanical Coin Control Tumbler ..................................... 13
NetMaster Coin Control................................................................... 14
NetMaster Card Control................................................................... 15
Electronic OPL Control ................................................................... 16
Electronic Coin Control................................................................... 17
Reversing Operation ........................................................................ 18
Reverse Control Switch ................................................................... 18
Programming the Electronic OPL Control...................................... 19
Signal.................................................................................................... 20
Reversing .............................................................................................. 20
Status Lights ......................................................................................... 20
Automatic Dry and Condition Mode.................................................... 21
Time Dry and No Heat Modes.............................................................. 22
Custom.................................................................................................. 23
Custom Cycle Record ..................................................................... 23
Special Cycle Mode.............................................................................. 24
Special Time Mode............................................................................... 24
Security Lock-Out ................................................................................ 24
Show Mode........................................................................................... 24
Temperature Sensor.............................................................................. 25
Temperature Adjustment ...................................................................... 25
Temperature Display (°F/°C)................................................................ 25
Cylinder Temperature Display ............................................................. 25
Maintenance ........................................................................................ 27
Daily ..................................................................................................... 27
Monthly................................................................................................. 28
Every Three Months ............................................................................. 29
Every Six Months ................................................................................. 29
Before You Call for Service ............................................................... 31
© Copyright 2001, Alliance Laundry Systems LLC
All rights reserved. No part of the contents of this book may be reproduced or transmitted in any form or by any
means without the expressed written consent of the publisher.
2
© Copyright, Alliance Laundry Systems LLC – DO NOT COPY or TRANSMIT
M414462
Page 5

Introduction
Model Identification
Information in this manual is applicable to these
models:
†
25 Pound
(220 Liter)
Stacked
30 Pound
(300 Liter)
30 Pound
(270 Liter)
35 Pound
(350 Liter)
Gas Steam Electric/Other
DT0220SFG DT0220SRG DT0220SSH DT0220SSL DT0220SEL DC0220SEL
JT0220SFG JT0220SRG JT0220SSH JT0220SSL JT0220SEL JC0220SEL
ST0220SFG ST0220SRG ST0220SSH ST0220SSL ST0220SEL SC0220SEL
DC0220SFG DC0220SRG DC0220SSL JC0220SSL
JC0220SFG JC0220SRG SC0220SSL
SC0220SFG SC0220SRG
DT0300DFG DT0300DRG DT0300DSH DT0300DSL DT0300DEL DC0300DEL
JT0300DFG JT0300DRG JT0300DSH JT0300DSL JT0300DEL JC0300DEL
ST0300DFG ST0300DRG ST0300DSH ST0300DSL ST0300DEL SC0300DEL
DC0300DFG DC0300DRG DC0300DSL JC0300DSL
JC0300DFG JC0300DRG SC0300DSL
SC0300DFG SC0300DRG
NT0300DRG
DT0270SFG DT0270SRG DT0270SSH DT0270SSL DT0270SEL DC0270SEL
JT0270SFG JT0270SRG JT0270SSH ST0270SSL JT0270SEL JC0270SEL
ST0270SFG ST0270SRG ST0270SSH DC0270SSL ST0270SEL SC0270SEL
DC0270SFG DC0270SRG JC0270SSL SC0270SSL
JC0270SFG JC0270SRG JT0270SSL
SC0270SFG SC0270SRG
DT0350SFG JT0350SRG DT0350SSH JT0350SSL DT0350SEL DC0350SEL
JT0350SFG ST0350SRG JT0350SSH ST0350SSL JT0350SEL JC0350SEL
ST0350SFG DC0350SRG ST0350SSH DC0350SSL ST0350SEL SC0350SEL
DC0350SFG JC0350SRG DT0350SSL JC0350SSL
JC0350SFG SC0350SRG SC0350SSL AT0350SSL
SC0350SFG AT0350SRG
DT0350SRG
† Includes models with MT, EC, OM, CD, RM, EP, CX, CY, EX, EY, NX, NY, ZC, ZR, ZX, ZY, NC and NR
control suffixes.
M414462
© Copyright, Alliance Laundry Systems LLC – DO NOT COPY or TRANSMIT
3
Page 6

Introduction
Information in this manual is applicable to these
models:
†
Gas Steam Electric/Other
ATB50CG DTB50EG STB50CSH STB50CSL STB50CE JCB50CE
STB50CG JTB50EG JTB50CSH JTB50CSL JTB50CE SCB50CE
DTB50CG JT50EG DTB50CSH DTB50CSL DTB50CE JC50CE
JTB50CG JC50EG JT50CSH JT50CSL JT50CE DCB50CE
50 Pound
75 Pound
120 Pound
170 Pound
JT50CG JCB50EG JCB50CSH SCB50CSH SC50CE SCB50AT
JC50CG SC50EG JC50CSH DCB50CSH
JCB50CG SCB50EG ATB50CSH
SC50CG DCB50CG
SCB50CG DCB50EG
STB50EG
STB75CG DTB75EG STB75CSH JTB75CSL STB75CE JCB75CE
DTB75CG JTB75EG JTB75CSH DTB75CSL JTB75CE SCB75CE
JTB75CG JT75EG DTB75CSH JT75CSL DTB75CE ST75CE
ATB75CG STB634 JT75CSH DCB75CSH JT75CE JC75CE
JT75CG DCB75CG ATB75CSH JCB75CSH DCB75CE SC75CE
DTB634 JCB75CG STB75CSL SCB75CSH
STB75EG SCB75CG SCB75CSL JCB75CSL
ST120FG JC120FG ST120CSH JC120CSH ST120AT
JT120FG DC120FG JT120CSH DC120CSH
DT120FG AT120FG DT120CSH AT120CSH
SC120FG SC120CSH
ST170FG SC170FG ST170CSH SC170CSH
JT170FG AT170FG JT170CSH AT170CSH
JC170FG DT170FG JC170CSH DT170CSH
DC170FG DC170CSH
DCB75CSL
SC120AT
Not Applicable
† Includes models with MT, EC, OM, CD, RM, EP, CX, CY, EX, EY, NX, NY, ZC, ZR, ZX, ZY, NC and NR
control suffixes.
Customer Service
If literature or replacement parts are required, contact
the source from whom the machine was purchased or
contact Alliance Laundry Systems at (920) 748-3950
for the name and address of the nearest authorized
parts distributor.
For technical assistance, call (920) 748-3121.
Wiring Diagram
The wiring diagram is located in the literature packet
supplied with all the non-European models. On
European models, it is located in the junction box.
The wiring diagram is inside the electrical junction
boxes located on the back of 0300D models, or under
the front control panel on 0220S, 0270S, and 0350S
models.
4
© Copyright, Alliance Laundry Systems LLC – DO NOT COPY or TRANSMIT
M414462
Page 7

Nameplate Location
When calling or writing for information about your
product, be sure to mention model and serial numbers.
Model and serial numbers are located on the
nameplate as shown. The model number may also be
found inside the door.
MODEL NO:
SERIAL NO:
V-/ HERTZ/ PHASE
AMPS, WIRES + GROUND
TOTAL kW, MOTOR kW
REQ'D CIRCUIT BREAKER: AMPS
FAN OUTPUT:
@MAX "WC STATIC PRESSURE
EQUIPPED FOR: GAS@ "WC MANIFOLD PRESS.
MIN SUPPLY
PRESSURE:
INPUT: BTU/hr @ BTU/cu.ft.
MADE IN U.S.A./FABRIQUE AU ETATS UNIS/FABRICADO EN LOS ESTADOS UNIDOS 70051001
MODEL NO:
SERIAL NO:
MAX SUPPLY
"WC. "WC.
PRESSURE:
ANS 72152
CLOTHES DRYER.
VOL II
TESTED FOR NATURAL &
LIQUID PETROLEUM GASSES
AMPLFIEDRER
Introduction
CGA 72
0220S, 0270S, 0350S
1
0300D
1
50 AND 75 POUND TUMBLERS
T448I
T453I
1
M414462
1 Nameplate
© Copyright, Alliance Laundry Systems LLC – DO NOT COPY or TRANSMIT
120 POUND TUMBLER
170 POUND TUMBLER
Figure 1
5
Page 8

Notes
6
© Copyright, Alliance Laundry Systems LLC – DO NOT COPY or TRANSMIT
M414462
Page 9
Safety Information
DANGER indicates the presence of a
hazard that will cause severe personal
injury, death, or substantial property
damage if the danger is ignored.
DANGER
WARNING indicates the presence of a
hazard that can cause severe personal
injury, death, or substantial property
damage if the warning is ignored.
WARNING
CAUTION indicates the presence of a
hazard that will or can cause minor
personal injury or property damage if the
caution is ignored.
CAUTION
Precautionary statements (“CAUTION,”
“WARNING,” and “DANGER”), followed by specific
instructions, are found in this manual and on machine
decals. These precautions are intended for the personal
safety of the operator, user, servicer, and those
maintaining the machine.
NOTE: The word “NOTE” is used to communicate
installation, operation, maintenance or servicing
information that is important but not hazard
related.
IMPORTANT: Warranty is void unless drying
tumbler is installed according to instructions in this
manual. Compliance with minimum specifications
and requirements detailed herein, and with
applicable local gas fitting regulations, municipal
building codes, water supply regulations, electrical
wiring regulations, and any other relevant
statutory regulations. Because of varied
requirements, applicable local codes should be
thoroughly understood and all pre-installation
work arranged for accordingly.
WARNING
Failure to install, maintain, and/or operate
this machine according to manufacturer’s
instructions may result in conditions which
can produce serious injury, death and/or
property damage.
W051
Additional precautionary statements (“IMPORTANT”
and “NOTE”) are followed by specific instructions.
IMPORTANT: The word “IMPORTANT” is used
to inform the reader of specific procedures where
minor machine damage will occur if the procedure
is not followed.
NOTE: The WARNING and IMPORTANT
instructions appearing in this manual are not meant
to cover all possible conditions and situations that
may occur. It must be understood that common
sense, caution and carefulness are factors which
CANNOT be built into this tumbler. These factors
MUST BE supplied by the person(s) installing,
maintaining or operating the tumbler.
Always contact your dealer, distributor, service agent
or the manufacturer on any problems or conditions you
do not understand.
M414462
© Copyright, Alliance Laundry Systems LLC – DO NOT COPY or TRANSMIT
7
Page 10

Safety Information
To reduce the risk of fire, electric shock,
serious injury or death to persons when
using your tumbler, follow these basic
precautions:
W054
WARNING
Important Safety Instructions
1. Read all instructions before using the tumbler.
2. Refer to the GROUNDING INSTRUCTIONS
for the proper grounding of the tumbler.
3. Do not dry articles that have been previously
cleaned in, washed in, soaked in, or spotted with
gasoline, dry cleaning solvents, or other
flammable or explosive substances as they give
off vapors that could ignite or explode.
4. Do not allow children to play on or in the
tumbler. Close supervision of children is
necessary when the tumbler is used near children.
This is a safety rule for all appliances.
5. Before the tumbler is removed from service or
discarded, remove the door to the drying
compartment and the door to the lint
compartment.
6. Do not reach into the tumbler if the cylinder is
revolving.
7. Do not install or store the tumbler where it will
be exposed to water and/or weather.
8. Do not tamper with the controls.
9. Do not repair or replace any part of the tumbler,
or attempt any servicing unless specifically
recommended in the User-Maintenance
instructions or in published user-repair
instructions that you understand and have the
skills to carry out.
10. Do not use fabric softeners or products to
eliminate static unless recommended by the
manufacturer of the fabric softener or product.
11. To reduce the risk of fire, DO NOT DRY plastics
or articles containing foam rubber or similarly
textured rubberlike materials.
12. Always clean the lint filter daily.
13. Keep area around the exhaust opening and
adjacent surrounding area free from the
accumulation of lint, dust, and dirt.
14. The interior of the tumbler and the exhaust duct
should be cleaned periodically by qualified
service personnel.
15. If not installed, operated and maintained in
accordance with the manufacturer’s instructions
or if there is damage to or mishandling of this
product’s components, use of this product could
expose you to substances in the fuel or from fuel
combustion which can cause death or serious
illness and which are known to the State of
California to cause cancer, birth defects or other
reproductive harm.
16. Tumbler will not operate with the loading door
open. DO NOT bypass the door safety switch to
permit the tumbler to operate with the door open.
The tumbler will stop tumbling when the door is
opened. Do not use the dryer if it does not stop
tumbling when the door is opened or starts
tumbling without pressing or turning the START
mechanism. Remove the tumbler from use and
call the service person.
17. Tumbler will not operate with lint panel open.
DO NOT bypass lint panel safety switch to
permit the tumbler to operate with the lint panel
open.
18. Do not put articles soiled with vegetable or
cooking oil in the tumbler, as these oils may not
be removed during washing. Due to the
remaining oil, the fabric may catch on fire by
itself.
19. To reduce the risk of fire, DO NOT put clothes
which have traces of any flammable substances
such as machine oil, flammable chemicals,
thinner, etc. or anything containing wax or
chemicals such as in mops and cleaning cloths, or
anything dry-cleaned at home with dry-cleaning
solvent in the tumbler.
20. Use the tumbler only for its intended purpose,
drying water-washed fabrics.
21. ALWAYS disconnect the electrical power to the
tumbler before servicing. Disconnect power by
shutting off appropriate breaker or fuse.
22. Install this tumbler according to these
INSTALLATION INSTRUCTIONS. All
connections for electrical power, grounding, and
gas supply must comply with local codes and be
made by licensed personnel when required. Do
not do it yourself unless you know how!
8
© Copyright, Alliance Laundry Systems LLC – DO NOT COPY or TRANSMIT
M414462
Page 11

Safety Information
23. Remove laundry immediately after tumbler stops.
24. Always read and follow manufacturer’s
instructions on packages of laundry and cleaning
aids. Heed all warnings or precautions. To reduce
the risk of poisoning or chemical burns, keep
them out of reach of children at all times
(preferably in a locked cabinet).
25. Do not tumble fiberglass curtains and draperies
unless the label says it can be done. If they are
dried, wipe out the cylinder with a damp cloth to
remove particles of fiberglass.
26. Always follow the fabric care instructions
supplied by the garment manufacturer.
27. Never operate the tumbler with any guards and/or
panels removed.
28. DO NOT operate the tumbler with missing or
broken parts.
29. DO NOT by-pass any safety devices.
WARNING
To reduce the risk of serious injury, install
lockable door(s) to prevent public access to
rear of tumblers.
W055
This machine is intended for commercial use.
IMPORTANT: Solvent vapors from dry-cleaning
machines create acids when drawn through the
heater of the drying unit. These acids are corrosive
to the tumbler as well as to the laundry load being
dried. Be sure make-up air is free of solvent vapors.
M414462
© Copyright, Alliance Laundry Systems LLC – DO NOT COPY or TRANSMIT
9
Page 12

Notes
10
© Copyright, Alliance Laundry Systems LLC – DO NOT COPY or TRANSMIT
M414462
Page 13
Operating Instructions
Clean lint screen and lint compartment
daily. Failure to clean the lint screen daily
will result in higher than normal
temperatures that may damage laundry.
W331
CAUTION
To reduce the risk of serious injury, open
tumbler door and allow cylinder to stop
before cleaning lint screen. Do not operate
without lint panel in place.
W077
WARNING
WARNING
To reduce the risk of fire:
• DO NOT DRY articles containing foam rubber or similarly textured rubberlike materials.
• DO NOT DRY plastics, anything containing wax or chemicals such as mops and cleaning
cloths, or anything dry-cleaned at home with a dry-cleaning solvent.
• DO NOT TUMBLE fiberglass curtains and draperies unless the label says it can be done. If
they are dried, wipe out the cylinder with a damp cloth to remove particles of fiberglass.
To reduce the risk of serious injury, open tumbler door and allow cylinder to stop before
cleaning lint screen. Do not operate without lint panel in place.
W076
W077
Step 1: Clean Lint Screen/
Compartment
Remove any accumulated lint from the lint screen and
compartment. Close panel tightly against tumbler
frame and lock panel securely.
Step 3: Determine Required
Temperature
The type of fabric being dried will determine the
setting. Consult the fabric-care label or fabric
manufacturer to determine proper temperature setting.
IMPORTANT: ALWAYS FOLLOW THE FABRIC
CARE INSTRUCTIONS SUPPLIED BY THE
GARMENT MANUFACTURER.
Step 4: Determine Control Type
Refer to the following pages and use the appropriate
instructions for the control type.
Stacked Tumblers Only: Use the correct coin slot and
control panel for the top or bottom cylinder.
Step 2: Load Laundry
Open tumbler door and load cylinder with laundry. DO
NOT OVERLOAD.
NOTE: Overloading causes slow drying and
wrinkling.
Close cylinder door. Tumbler will not operate with the
door open.
M414462
© Copyright, Alliance Laundry Systems LLC – DO NOT COPY or TRANSMIT
11
Page 14
Operating Instructions
1
0
60
50
40
10
20
HEAT
30
PUSH
TO
START
25, 30 AND 35 POUND TUMBLERS
HIGH
190
LOAD
READY
MEDIUM
160
TEMPERATURE
2
0
15
10
HIGH
HIGH
5
COOL
DOWN
LOW
COTTON
TEMPERATURE
PUSH TO START
MEDIUM
MIXED
LOW
PERM
PRESS
10
COOLING
5
DRYING
50
40
15
0
30
60
0
10
20
34
TMB47N
TMB48N
50/75 POUND TUMBLERS
LOW
130
LOW AIR
FLOW
NON
REV
REV
120 AND 170 POUND TUMBLERS
PUSH
TO
START
10
COOLING
15
0
5
DRYING
50
40
30
60
0
10
20
TMB49N
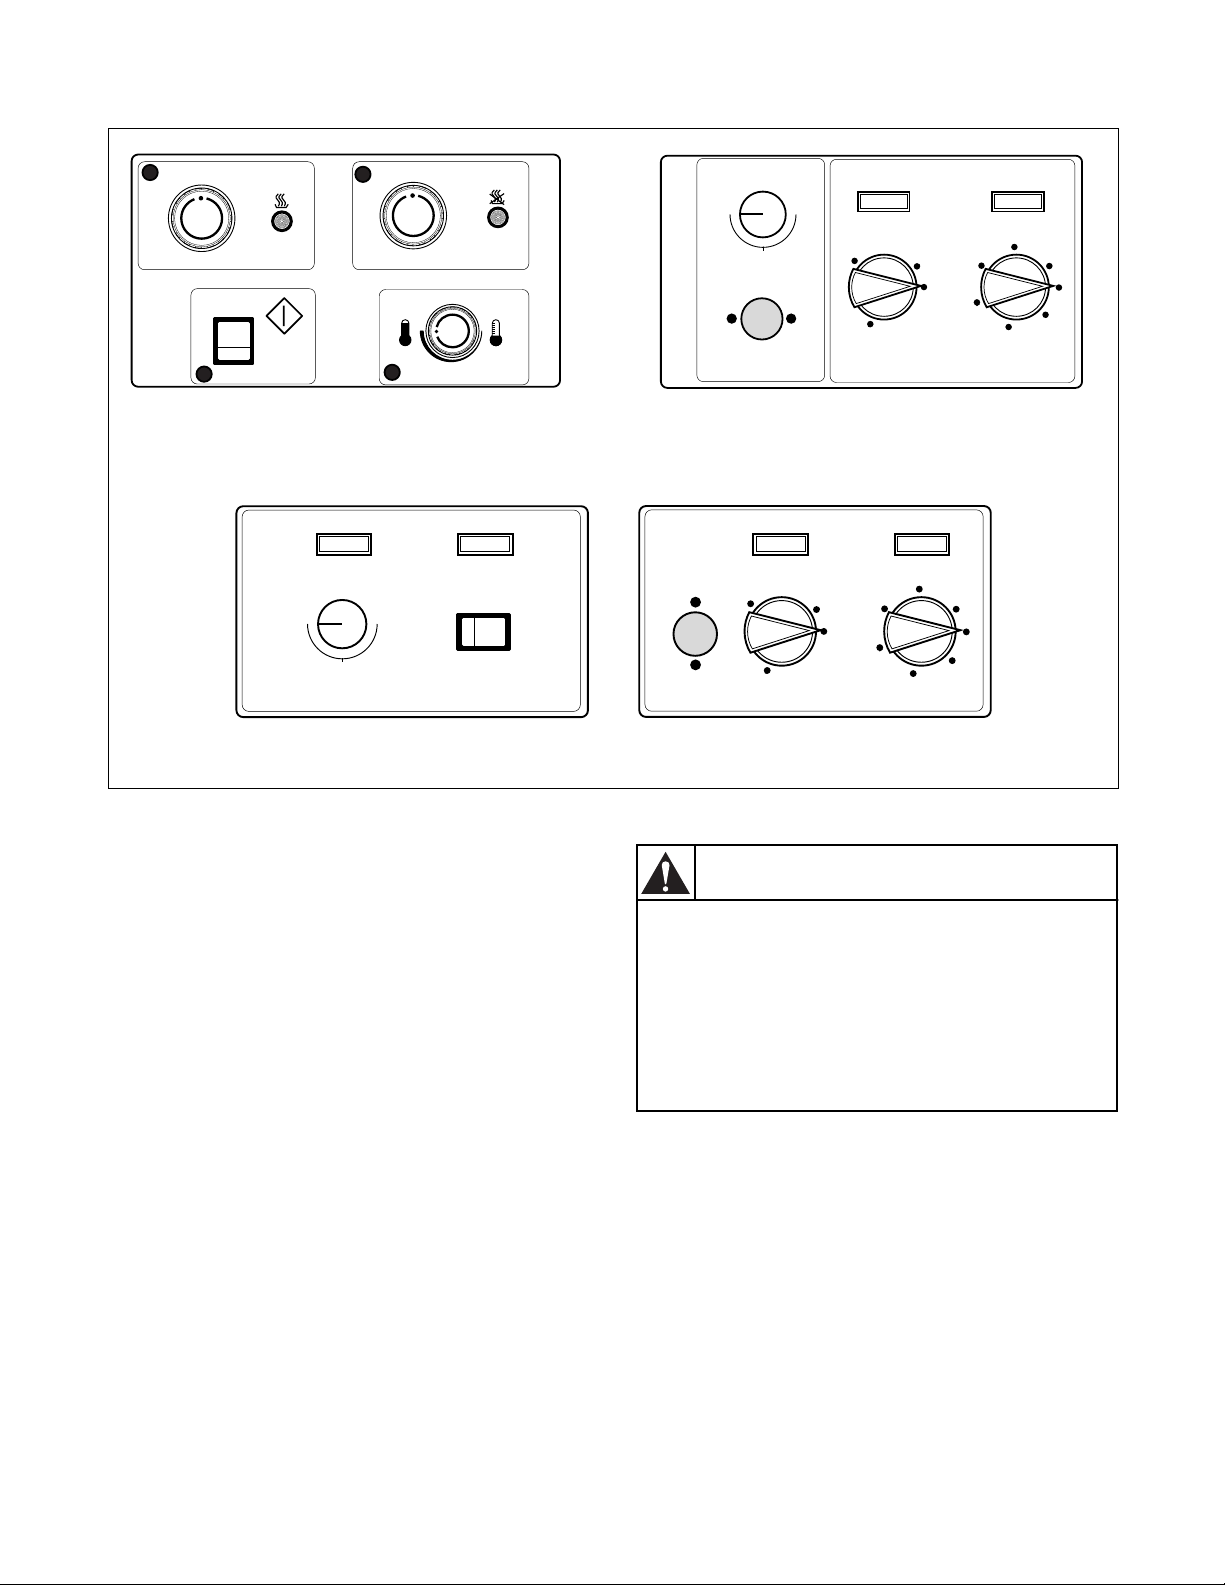
Manual Timer Tumblers
1. Set the TEMPERATURE selector at HIGH,
MEDIUM, LOW or anywhere between these
settings.
2. Set the HEAT/DRYING timer for the number of
minutes (from 0-60) desired.
3. Set the COOL DOWN/COOLING timer for the
number of minutes (from 0-15) desired.
4. Press the PUSH TO START button in and hold it
in for approximately three seconds. This starts
the tumbler cycle.
IMPORTANT: If the cylinder is opened during the
cycle, the heating system will shut off and the
motor will stop. To restart the cycle, door must be
closed and the PUSH TO START button must be
pressed in.
Figure 2
WARNING
To reduce the risk of bodily injury, the
tumbler stops tumbling when the door is
opened. Do not use the tumbler if it does
not stop tumbling when the door is opened
or starts tumbling without pressing the
START pad. Remove the tumbler from use
and call for service.
W078
5. When the cycle is complete, open door and
remove the laundry
12
© Copyright, Alliance Laundry Systems LLC – DO NOT COPY or TRANSMIT
M414462
Page 15
Operating Instructions
TEMPERATURE SELECTOR
TEMPERATURE
HIGH
PUSH
START
PUSH TO START
BUTTON
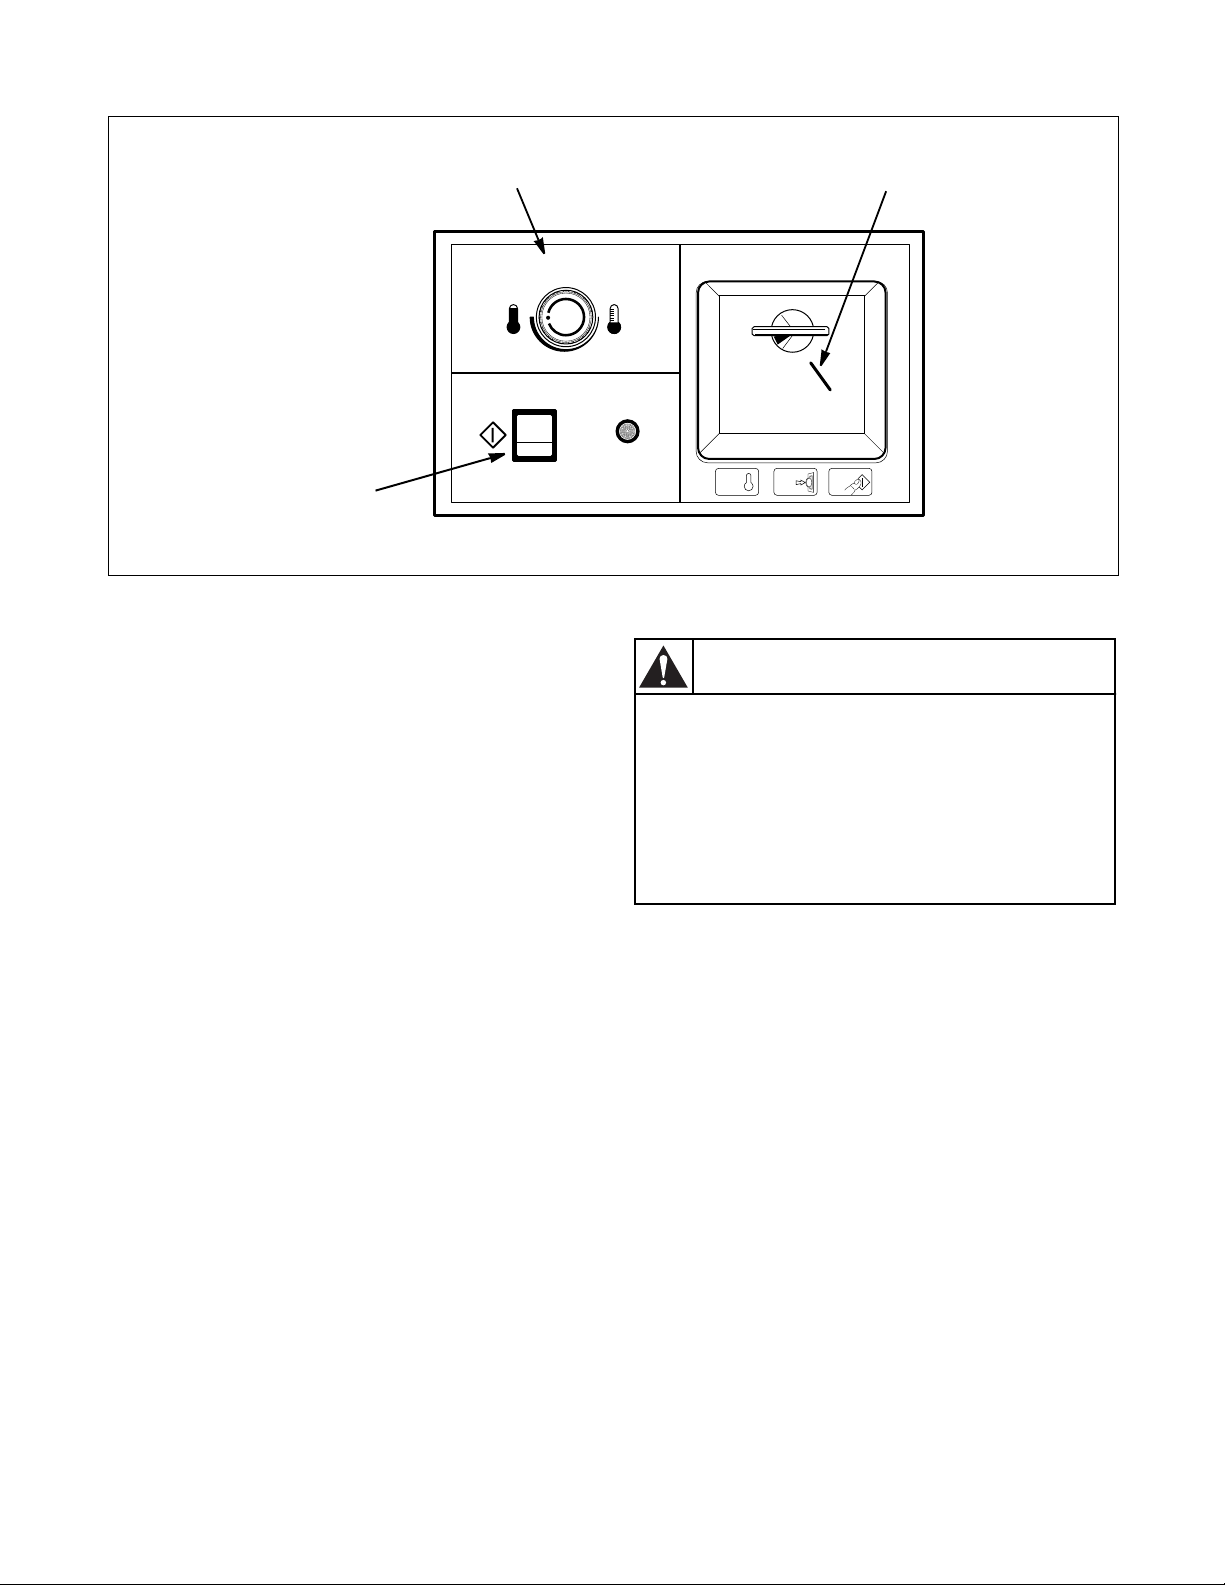
Electro-Mechanical Coin Control Tumbler
1. Set the TEMPERATURE selector at HIGH or
LOW, or anywhere between these settings.
2. Coin Drop Models: Insert the coin(s) in the coin
slot, turn the knob to the right and release it.
Coin Slide Models: Insert the required number of
coins in the coin slide. Push coin slide in
completely and then release it.
3. Press the PUSH TO START button and hold it for
approximately three (3) seconds.
IMPORTANT: If the cylinder door is opened
during the cycle, the heating system will shut off
and the motor will stop. However, the timer will
continue to run. To restart the cycle, the door must
be closed and the PUSH TO START button must be
pressed in.
LOW
TO
Figure 3
SINGLE AND DUAL COIN
METER COIN SLOT AND KNOB
INSERT QUARTER
TURN KNOB
25
Q
U
A
R
1 2 3
SELECT
TEMP
T
INSERT
COIN
R
E
T
S
A
E
R
M
PUSH
START
T366I
WARNING
To reduce the risk of bodily injury, the
tumbler stops tumbling when the door is
opened. Do not use the tumbler if it does
not stop tumbling when the door is opened
or starts tumbling without pressing the
START pad. Remove the tumbler from use
and call for service.
4. When the cycle is complete, open door and
remove the laundry.
W078
M414462
© Copyright, Alliance Laundry Systems LLC – DO NOT COPY or TRANSMIT
13
Page 16
Operating Instructions
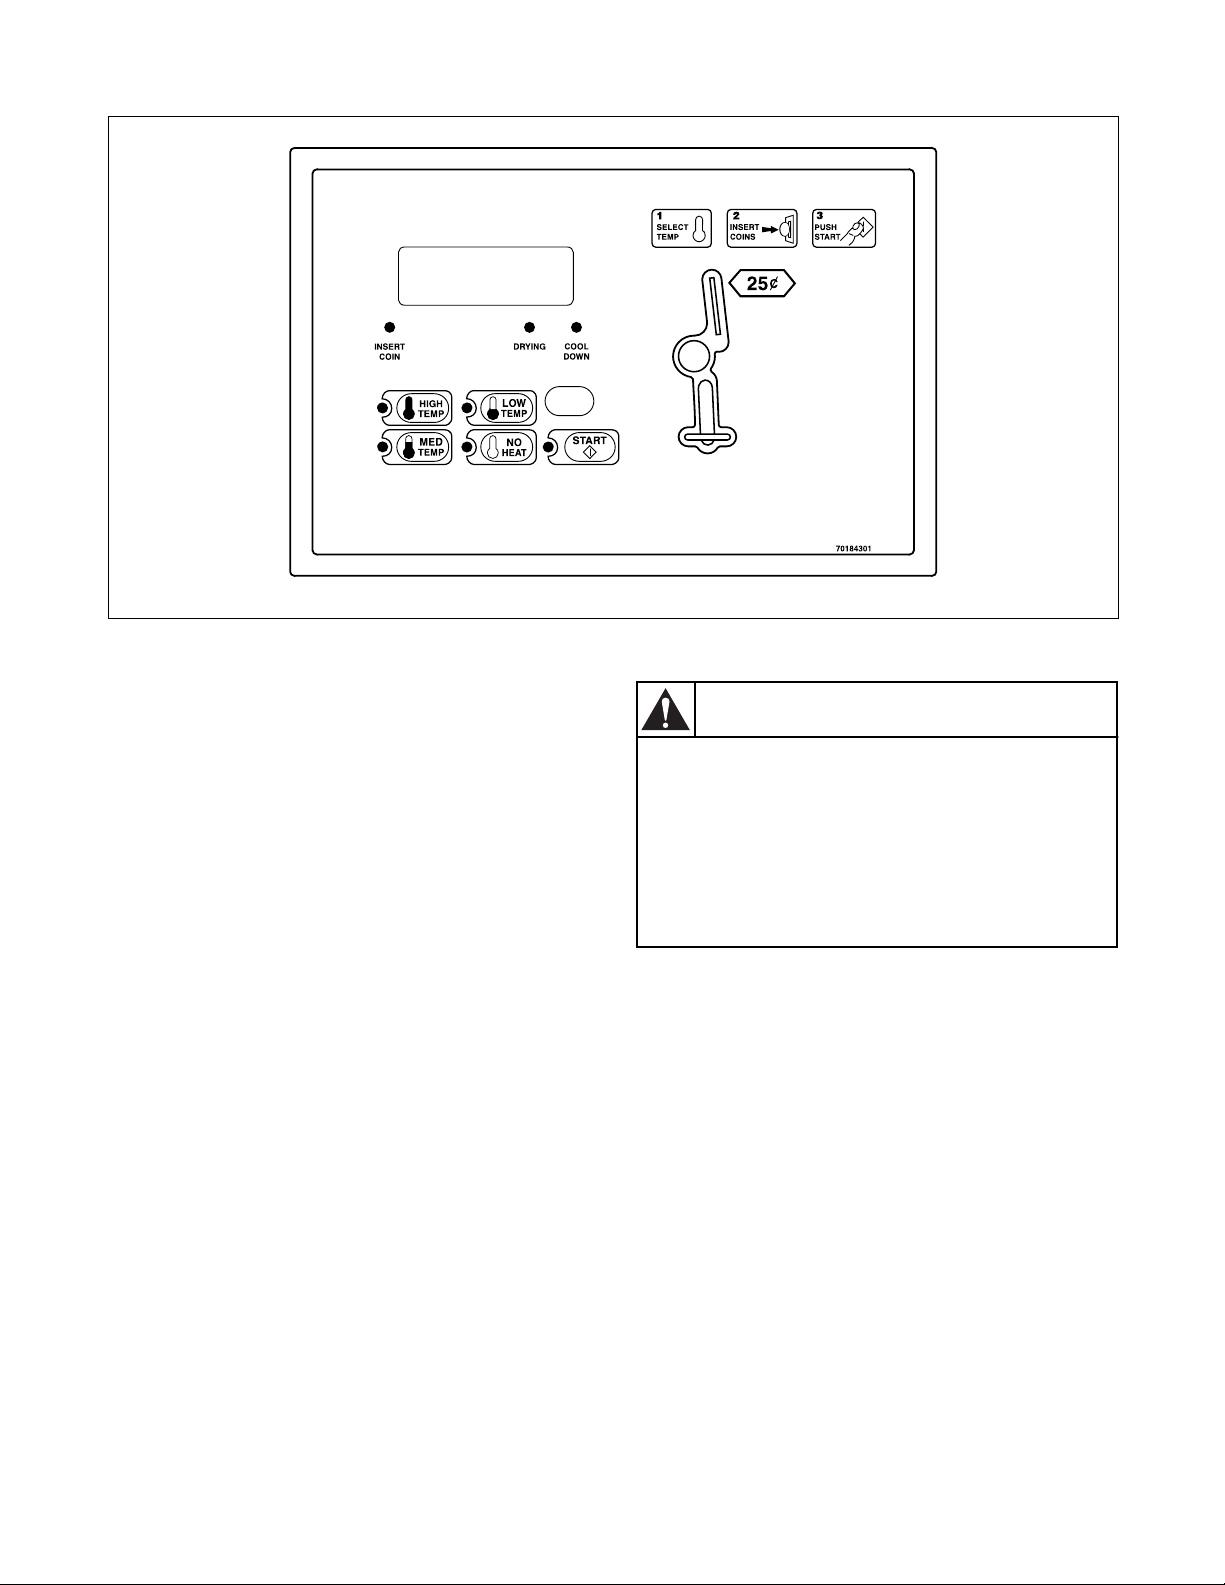
NetMaster Coin Control
1. Select HIGH TEMP, MED TEMP, LOW TEMP,
or NO HEAT by pressing the appropriate
temperature pad.
2. Insert the coin(s) in the coin slot.
3. Press START pad to start tumbler.
To stop the tumbler at any time during the cycle,
OPEN DOOR. To restart the tumbler, CLOSE
door and press START pad.
C851I
C851I
Figure 4
WARNING
To reduce the risk of bodily injury, the
tumbler stops tumbling when the door is
opened. Do not use the tumbler if it does
not stop tumbling when the door is opened
or starts tumbling without pressing the
START pad. Remove the tumbler from use
and call for service.
W078
4. When the cycle is complete, open door and
remove the laundry.
14
© Copyright, Alliance Laundry Systems LLC – DO NOT COPY or TRANSMIT
M414462
Page 17
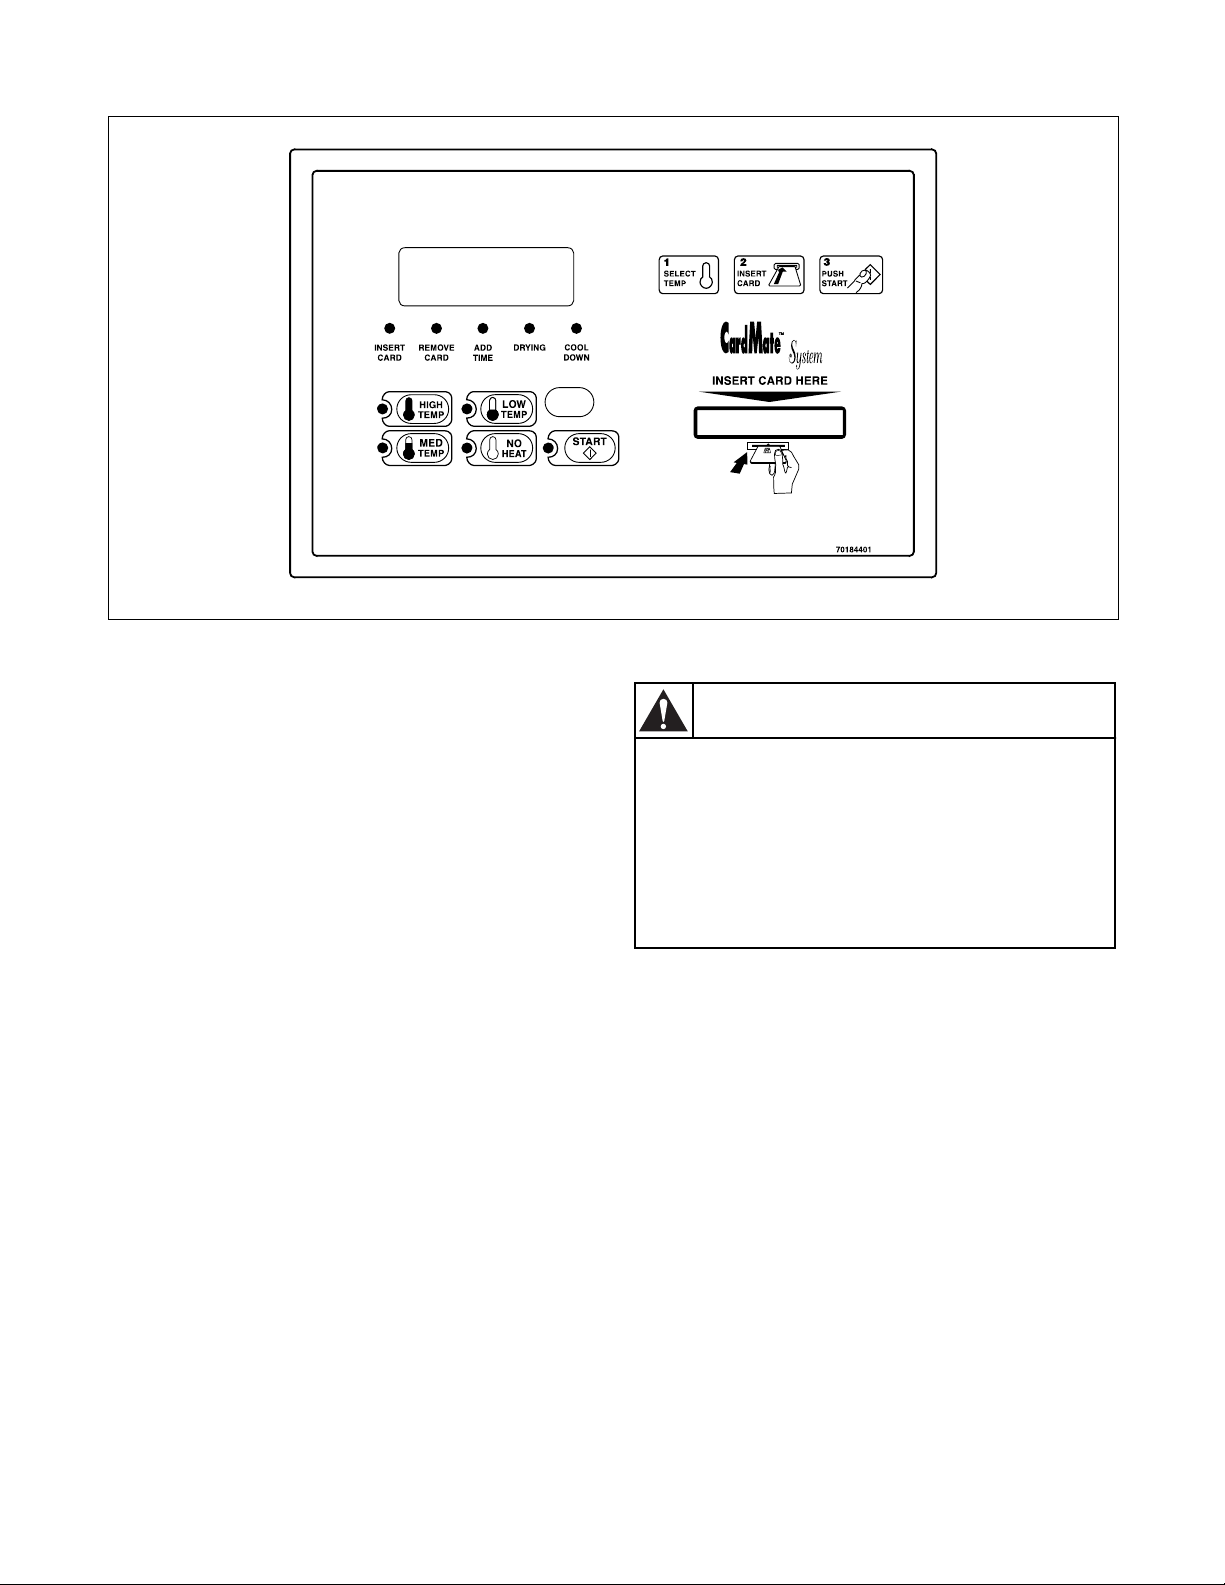
Figure 5
Operating Instructions
C852I
NetMaster Card Control
1. Select HIGH TEMP, MED TEMP, LOW TEMP,
or NO HEAT by pressing the appropriate
temperature pad.
2. Insert card into opening. DO NOT remove the
card until “REMOVE CARD” LED is lit.
3. Press START pad to start tumbler.
To stop the tumbler at any time during the cycle,
OPEN DOOR. To restart the tumbler, CLOSE
door and press START pad.
WARNING
To reduce the risk of bodily injury, the
tumbler stops tumbling when the door is
opened. Do not use the tumbler if it does
not stop tumbling when the door is opened
or starts tumbling without pressing the
START pad. Remove the tumbler from use
and call for service.
W078
4. When the cycle is complete, open door and
remove the laundry.
M414462
© Copyright, Alliance Laundry Systems LLC – DO NOT COPY or TRANSMIT
15
Page 18
Operating Instructions
ON / SELECT
HIGH
MEDIUM
MED LOW
LOW
NO HEAT
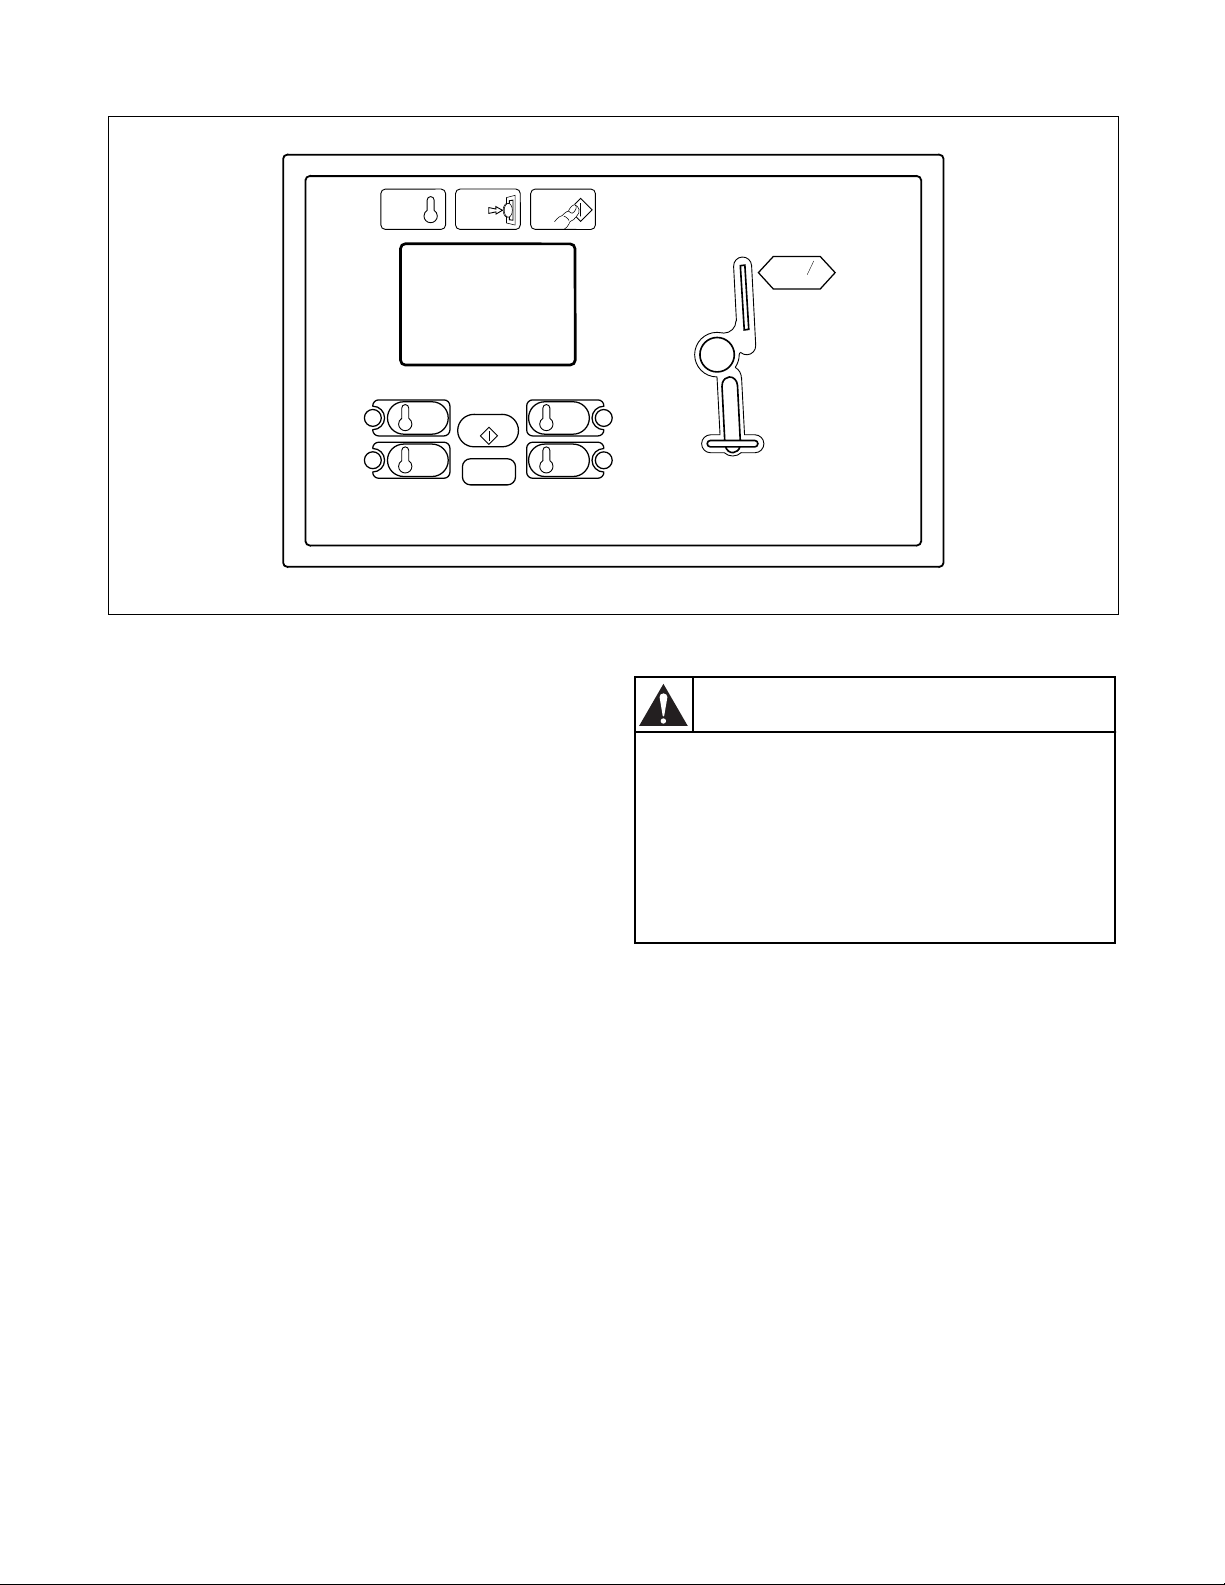
Electronic OPL Control
1. To use an Automatic Cycle, press an ON/
SELECT pad. Select HIGH, MEDIUM,
MED LOW, LOW or NO HEAT for items that
should not be dried with heat. A light to the left
of the selected pad lights up.
To use a Time Dry or Custom Cycle, refer to
section Programming the Electronic OPL
Control.
START
STOP/RESET
TEMP
DISPLAY
F/ C
SIGNAL
REVERSING
STATUS
DRYING
COOL DOWN
DOOR OPEN
CUSTOM
Figure 6
NOTE: All pads can be pressed in any sequence
without damaging control or tumbler. To stop the
tumbler at any time, open the door or press STOP/
RESET. The window display will flash. Press
STOP/RESET twice (within 3 seconds) to end the
cycle and reset the control to idle status. To restart
the tumbler, CLOSE door and press START pad.
PROGRAM
*
AUTO
AUTO
SPECIAL
CYCLE
AUTO
TEMP
MORE
TIME
SPECIAL
TIME
COOL
*
DOWN
LESS
+--
CONDITION
2. Press START pad to start tumbler.
SAVE
CUSTOM
PROG
T359I
NOTE: Do not press directly on lights or the center
of pad. For proper selection, press on pad slightly
to the right of center. Refer to Figure 7.
T306I
Figure 7
WARNING
To reduce the risk of bodily injury, the
tumbler stops tumbling when the door is
opened. Do not use the tumbler if it does
not stop tumbling when the door is opened
or starts tumbling without pressing the
START pad. Remove the tumbler from use
and call for service.
W078
3. When the cycle is complete, open door and
remove the laundry.
16
© Copyright, Alliance Laundry Systems LLC – DO NOT COPY or TRANSMIT
M414462
Page 19
Operating Instructions
1
SELECT
TEMP
HIGH
TEMP
MED
TEMP
2 3
INSERT
COIN
START
PUSH
START
Electronic Coin Control
1. Select HIGH TEMP, MED TEMP, LOW TEMP,
or NO HEAT by pressing the appropriate
temperature pad.
2. Insert the coin(s) in the coin slot.
3. Press START pad to start tumbler.
To stop the tumbler at any time during the cycle,
OPEN DOOR. To restart the tumbler, CLOSE
door and press START pad.
LOW
TEMP
NO
HEAT
Figure 8
C
25
T361I
T361I
WARNING
To reduce the risk of bodily injury, the
tumbler stops tumbling when the door is
opened. Do not use the tumbler if it does
not stop tumbling when the door is opened
or starts tumbling without pressing the
START pad. Remove the tumbler from use
and call for service.
W078
M414462
4. When the cycle is complete, open door and
remove the laundry.
© Copyright, Alliance Laundry Systems LLC – DO NOT COPY or TRANSMIT
17
Page 20

Operating Instructions
Reversing Operation
Tumblers with the reversing options are equipped with
a second motor and additional controls to reverse the
direction of the cylinder rotation. This prevents the
tangling of large pieces and minimizes wrinkling.
Reverse Control Switch
A simple “on-off” switch is placed in the control panel
area so the operator can select the reversing or nonreversing operation. The switch is wired into the
reverse control time circuit so the cylinder will always
turn clockwise (as viewed from the front of the dryer)
when the reverse control switch is actuated for “non-
reversing” operation. If the cylinder is turning in the
wrong direction when the switch is actuated, it will
continue for a few seconds and then start up in the
proper direction.
IMPORTANT: After any electrical maintenance is
done, make sure that the blower motor is turning
clockwise as viewed from the front of the 0350S, 50,
and 75 pound tumblers and counterclockwise on
the 634, 120 and 170 pound tumblers. Then set the
reverse control switch to “non-reversing” and note
that the cylinder turns constantly clockwise as
viewed from the front of the tumbler. If not,
interchange L1 and L2 power leads to the reverse
drive motor.
18
© Copyright, Alliance Laundry Systems LLC – DO NOT COPY or TRANSMIT
M414462
Page 21
Programming the Electronic OPL Control
One pre-programmed
NO HEAT cycle
Four pre-programmed
Automatic Dry heat
cycles
All of these cycles
may be used as
pre-programmed
from the factory . . .
ON / SELECT
HIGH
MEDIUM
MED LOW
LOW
NO HEAT
They may be
OR OR
modified for one
cycle without
being saved in
the memory . . .
*
PROGRAM
AUTO
AUTO
SPECIAL
CYCLE
AUTO
TEMP
MORE
START
STOP/RESET
TEMP
DISPLAY
F/ C
SIGNAL
STATUS
DRYING
COOL DOWN
DOOR OPEN
CUSTOM
+--
REVERSING
CONDITION
They may be
modified and
saved in the
memory as one of
five CUSTOM
CYCLES.
TIME
SPECIAL
TIME
COOL
*
DOWN
LESS
SAVE
CUSTOM
PROG
NOTE: Not all tumblers will have reversing option.
Drying can be done automatically or by time dry.
When drying automatically, the tumbler stops drying
when laundry reaches the factory set or programmed
dryness level and starts cool down. When time drying,
the tumbler stops drying when programmed time ends
and starts cool down.
Both automatic and time dry have factory-set cycles,
but other cycles can also be created. Frequently used
cycles can be saved in the control’s memory as Custom
cycles.
In all cycles, except No Heat, Wrinkle-Free begins
when Cool Down ends. During Wrinkle-Free, the
tumbler alternately stops for 2-1/2 minutes and then
runs without heat for 2-1/2 minutes until door is
opened or 60 minutes has elapsed.
The HIGH, MEDIUM, MED LOW, and LOW ON/
SELECT pads may be saved in one of four ways as a
custom heat cycle, refer to Table 1.
T359I
Figure 9
Custom Cycles
Automatic Dry Dries the load to one of eleven user-
selectable dryness levels for a given
fabric type, and then enters automatic
or user-variable cool down.
Time Dry Duplicates the functions of
electromechanical dual timer
controls, allowing the user to vary
temperature, drying time and cool
down time.
Special Cycle Allows the user to specify the
number of heating cycles and to
select from the full range of
temperatures for all heat cycles.
Special Time Similar to Time Dry, except that the
user may specify from 80°F (27°C)
to 180°F (82°C) for any heat cycle.
M414462
Table 1
© Copyright, Alliance Laundry Systems LLC – DO NOT COPY or TRANSMIT
19
Page 22

Programming the Electronic OPL Control
NOTE: Do not press directly on lights or the center
of pad. For proper selection, press on pad slightly
to the right of center. Refer to Figure 10.
T306I
Figure 10
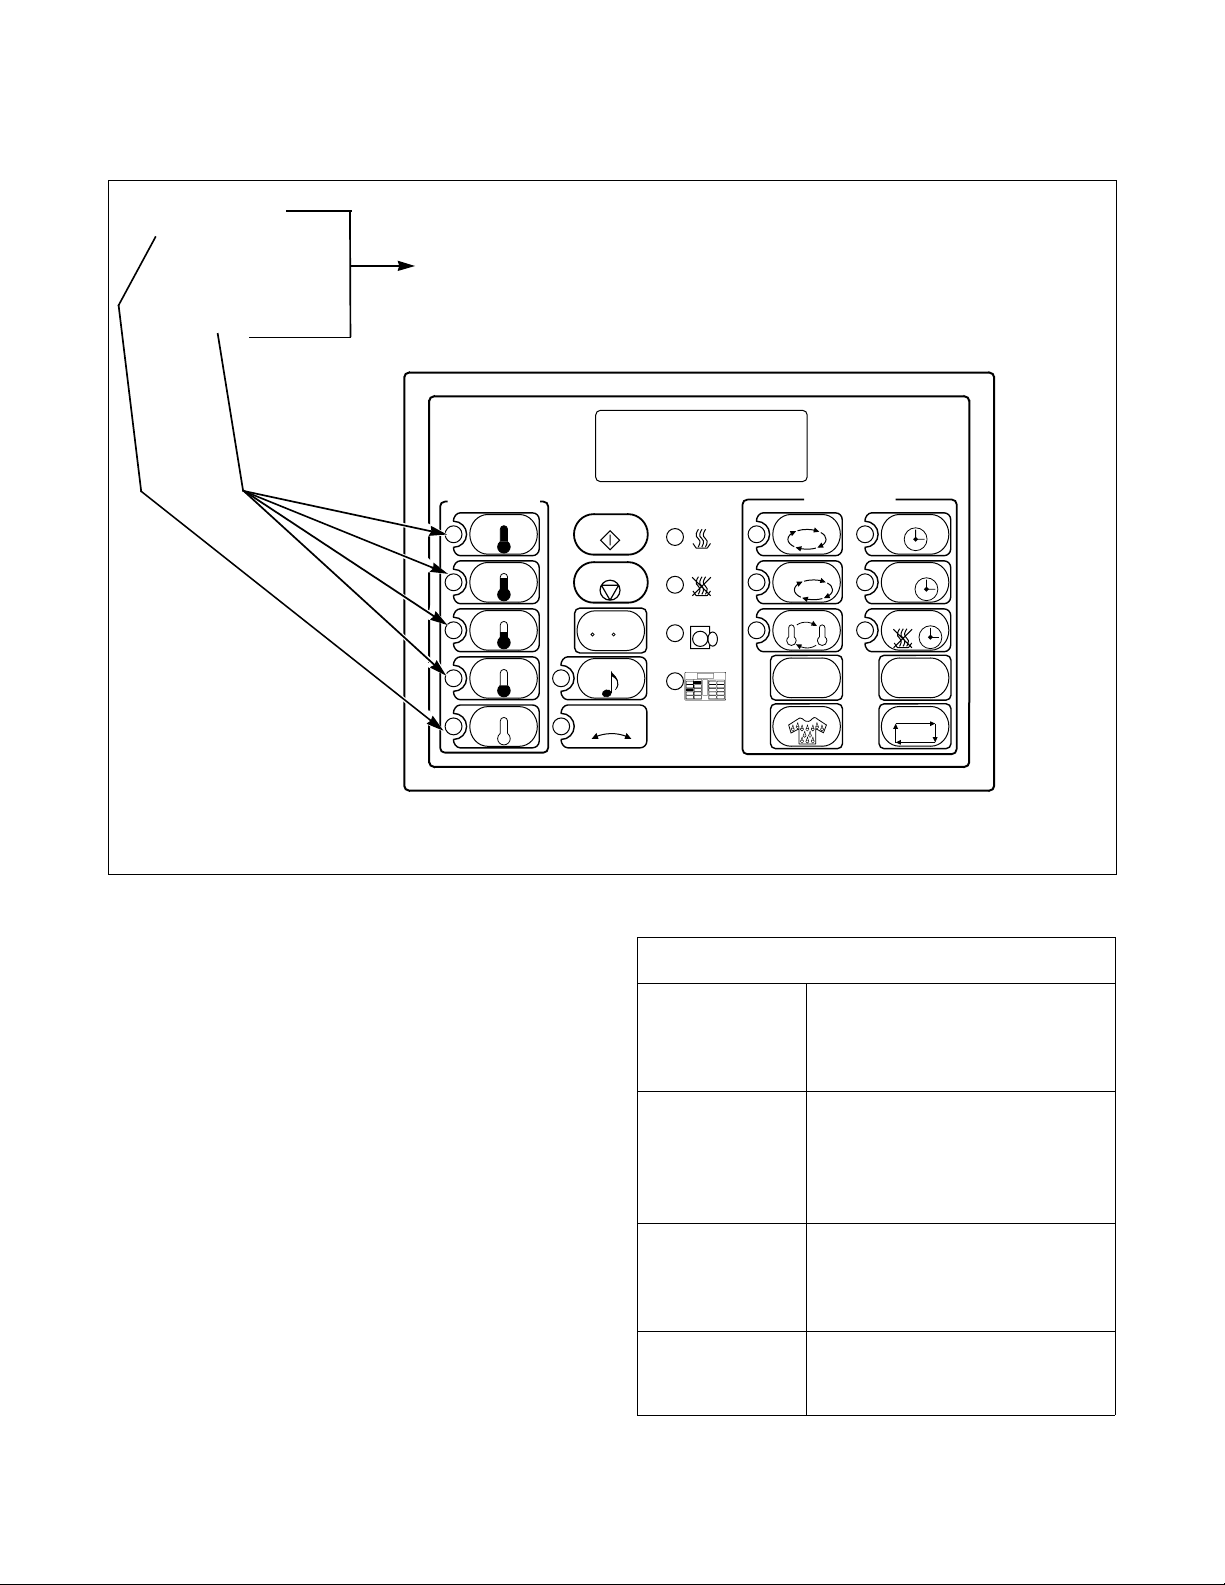
Signal
(Refer to Figure 11)
The signal has three loudness levels that can be set
anytime the control is activated. Pressing the SIGNAL
pad once produces the softest tone. Press the pad again
to increase signal volume. The fourth press turns the
tone and light off. The loudness level selected is for all
cycles until changed.
Status Lights
(Refer to Figure 11)
Lights when door is open.
DOOR OPEN
DRYING
COOL DOWN
CUSTOM
SIGNAL
REVERSING
NOTE: Display window also
flashes.
Lights when laundry is drying.
Lights when laundry is cooling.
Lights when a Custom cycle is
programmed, recalled or running.
When lit, the signal will sound when
the laundry is ready for removal.
When lit, the cylinder will rotate in
one direction for 25 seconds, pause
for 6 seconds, then rotate in opposite
direction for 25 seconds.
STATUS
DRYING
When the signal is on and any key pad is pressed, it
sounds at the selected level to confirm the pad was
properly pressed.
Reversing
(Refer to Figure 11)
NOTE: Not all tumblers will have the reversing
option.
When this is selected, the cylinder will rotate in one
direction for 25 seconds, pause for 6 seconds, then
rotate in opposite direction for 25 seconds.
This sequence will repeat until the selected cycle ends.
To turn Reversing option off, press the REVERSING
pad. (Any time reversing pad is pressed, the cylinder
will pause for 6 seconds.)
SIGNAL
REVERSING
STATUS LIGHTS
Figure 11
COOL DOWN
DOOR OPEN
CUSTOM
T398I
T398I
20
© Copyright, Alliance Laundry Systems LLC – DO NOT COPY or TRANSMIT
M414462
Page 23

Programming the Electronic OPL Control
ON/SELECT PADS
Automatic Dry and Condition Mode
When a temperature is selected, “A0:00” will appear
in the display window. Press START to start the
tumbler. “A*:**” will appear in the display window.
The first “*” is the selected dryness level (dryness
levels less than zero will appear as “-*”), and the “:**”
is the elapsed time.
The degree of dryness can be altered. Use the MORE
pad, or the LESS pad, to increase or decrease dryness
level.
NOTE: Dryness level can only be altered prior to
the end of the first heat cycle.
ON / SELECT
HIGH
MEDIUM
MED LOW
START
STOP/RESET
“AC:**” will be displayed when tumbler is in Auto
Cool Down. Typical cool down times for fabric
selections are preset as shown in Table 2. The cool
down time can only be altered before cycle is started.
To alter cool down time press the COOL DOWN pad
and then press the MORE or LESS pad (when cool
down time is altered, “TC:**” will be displayed). For 1
minute changes, press pad and release. For 5 minute
changes, press pad and hold. Cooling time can be from
1 to 39 minutes. To return to the Auto Cool Down,
press MORE or LESS pad until “AC:**” is displayed.
TEMP
MORE
LESS
+--
CONDITION
T396I
DRYNESS PADS
T396I
LOW
NO HEAT
T399I
T399I
Figure 12
When clothes reach selected dryness level, Cool Down
begins. “AC:**” will appear in the display window.
“:**” is the elapsed Cool Down time. When Cool
Down ends, tumbler automatically goes into wrinklefree and “Lr” (Load Ready) will appear in the display.
Figure 13
Use the CONDITION pad for items to be left damp for
ironing. “Cn:00” will replace “A0:00” in the display.
Automatic Cool Down ends when either a preset
temperature or a preset time is reached. Refer to
Table 2.
AUTOMATIC COOL DOWN
TEMPERATURES AND TIMES
Fabric
HIGH 100°F, 3 8°C5 Minutes
MEDIUM 90°F, 32°C8 Minutes
MED LOW 90°F, 32°C5 Minutes
LOW 90°F, 32°C5 Minutes
Preset
Temperature
Table 2
Preset Time
M414462
© Copyright, Alliance Laundry Systems LLC – DO NOT COPY or TRANSMIT
21
Page 24

Programming the Electronic OPL Control
TIME DRY PADS
Time Dry and No Heat Modes
After fabric selection, press the TIME pad. Refer to
Figure 14.
TIME
COOL
DOWN
MORE
LESS
+--
T397I
“AC:**” will be displayed when tumbler is in Auto
Cool Down. Typical cool down times for fabric
selections are preset as shown in Table 3. The cool
down time can only be altered before cycle is started.
To alter cool down time press the COOL DOWN pad
and then press the MORE or LESS pad (when cool
down time is altered, “TC:**” will be displayed). For 1
minute changes, press pad and release. For 5 minute
changes, press pad and hold. Cooling time can be from
1 to 39 minutes. To return to the Auto Cool Down,
press MORE or LESS pad until “AC:**” is displayed.
To start the cycle, press START. The total drying time
plus cool down time will display. During the cycle,
remaining time displays.
NO HEAT is a time dry cycle only. When NO HEAT is
pressed, a 20 minute preset time will display. This can
be changed from 1 minute to 60 minutes by pressing
the MORE or LESS pads before pressing START. The
COOL DOWN pad does not work in NO HEAT
cycles.
T397I
Figure 14
A preset drying time, “Td:**” will replace “A0:00” in
the display. This time can be changed by pressing the
MORE or LESS pads. For 1 minute changes, press pad
and release. For 5 minute changes, press pad and hold.
Maximum drying time allowed is 60 minutes. Refer to
Table 3 for Preset Drying Times.
Cycles Preset Time Range
HIGH 35 Min. 1 – 60 Min.
MEDIUM 20 Min. 1 – 60 Min.
MED LOW 15 Min. 1 – 60 Min.
LOW 30 Min. 1 – 60 Min.
NO HEAT 20 Min. 1 – 60 Min.
Table 3
22
© Copyright, Alliance Laundry Systems LLC – DO NOT COPY or TRANSMIT
M414462
Page 25

Programming the Electronic OPL Control
Custom
Frequently used cycles can be saved in the control’s
memory as Custom cycles. Only one cycle can be
saved for each fabric type.
Create an Automatic, Time Dry, Special, or Special
Time cycle and save them by pressing the word
CUSTOM before pressing START. To change a
Custom cycle, repeat above.
To recall and use a Custom cycle, press its
ON/SELECT pad twice. Press START.
Custom Cycle Record
Automatic Time
Select
Dryness Level Cool Down Dry Cool Down
HIGH
MED
MED LOW
During Custom cycles the display is the same as nonCustom Automatic cycles. The CUSTOM status light
will be on.
When creating or changing a Custom cycle, record it
on a Custom Cycle Record, refer to sample at bottom
of page. To modify or fine-tune a Custom cycle, its
values must be known. Custom cycle values can be
extracted from the micro-control, but it is easier and
more permanent to use a Custom Cycle Record.
Temp Load Type
LOW
NO HEAT
Select
HIGH
MED
MED LOW
LOW
NO HEAT
Special Special Time
Temp Load Type
Dryness Level Cool Down Dry Cool Down
M414462
© Copyright, Alliance Laundry Systems LLC – DO NOT COPY or TRANSMIT
23
Page 26

Programming the Electronic OPL Control
Special Cycle Mode
This allows the user to select the number of times the
tumbler will cycle from heat-on to heat-off. To enter
the Special Cycle Mode, press the SPECIAL CYCLE
pad after selecting a cycle. The display will read
“SC:**”. “**” is the number of times the tumbler will
cycle from heat-on to heat-off. This number can be
changed by pressing the MORE or LESS pads. For
increments of 1, press pad and release. For increments
of 5, press pad and hold for 3 seconds. Range is from
1 – 99.
Press the START pad and the number shown after
“SC:” is the number of cycles selected, the number
will decrease as each cycle is completed. The default
cool down cycle for the Special Cycle Mode is
Automatic Cool Down.
NOTE: Since there is only 60 minutes of cycle time,
any cycles not completed within 60 minutes will be
skipped.
NOTE: Unlike the Time Dry mode and Automatic
mode, the regulating temperature in the Special
Cycle Mode has a range of 80°F (27°C) to 180°F
(82°C) or all heat cycles.
Special Time Mode
This mode is just like the Time Dry mode, except that
the regulating temperature for each heat cycle ranges
from 80°F (27°C) to 180°F (82°C). To enter the
Special Time mode, press the SPECIAL TIME pad
after selecting a cycle. The display will read “St:**”,
where “**” is the drying time. This time can be
changed by pressing the MORE or LESS pads. For 1
minute changes, press the pad and release. For 5
minute changes, press the pad and hold. Maximum
drying time allowed is 60 minutes.
“AC:**” will be displayed when tumbler is in Auto
Cool Down. Typical cool down times for fabric
selections are preset. The cool down time can only be
altered before cycle is started. To alter cool down time
press the COOL DOWN pad and then press the
MORE or LESS pad (when cool down time is altered,
“TC:**” will be displayed). For 1 minute changes,
press pad and release. For 5 minute changes, press pad
and hold. Cooling time can be from 1 to 39 minutes.
To return to the Auto Cool Down, press MORE or
LESS pad until “AC:**” is displayed.
To start the cycle, press START. The total drying time
plus cool down time will display. During the cycle,
remaining time displays.
Security Lock-Out
The programming pads can be “locked-out” so
operators cannot change cycles on their own. When
lock-out is used, the operator can use only the factoryset Automatic cycles and the one Custom cycle
allowed per Select pad. Before using lock-out, create
all desired Custom cycles.
To lock-out, hold SIGNAL pad and press MORE in
the idle mode.
To unlock, hold SIGNAL pad and press LESS in the
idle mode.
Show Mode
This mode will show all LED’s and light up entire
display while deactivating all pads. This mode allows
loading door to be opened and closed. To enter this
mode, the control must first be in the idle mode. Hold
the START pad and press the SAVE CUSTOM pad. To
exit Show Mode, hold the START pad and press the
SAVE CUSTOM pad.
24
© Copyright, Alliance Laundry Systems LLC – DO NOT COPY or TRANSMIT
M414462
Page 27

Programming the Electronic OPL Control
Temperature Sensor
To test the temperature sensor, hold COOL DOWN
pad and press the TEMP pad in the idle mode. This
will show the temperature detected by the control.
“SH” displays and signal sounds if the temperature
sensor is shorted or sensor temperature is over 200°F
(93°C). Press the STOP/RESET pad twice within 3
seconds and allow the tumbler to cool, then press an
ON/SELECT pad. If “SH” still displays, call for
service.
“OP” displays and signal sounds 3 minutes after the
tumbler is started if the temperature sensor is faulty or
if a temperature below 24°F (-4.4°C) is detected. If
dryer temperature is above 24°F (-4.4°C), call for
service.
NOTE: To display the software revision level, hold
the AUTO pad and press the TIME pad while the
control is in idle mode.
Temperature Adjustment
Selecting a fabric type selects a preset ideal
temperature for that fabric. Lower temperatures may
be needed for small loads or when air flow through the
tumbler is less than ideal due to inadequate make-up
air or exhaust ducting.
Whenever the control is on, but not in NO HEAT,
COOL DOWN or LOAD READY, pressing the TEMP
pad displays the three digits of the set temperature.
Use the MORE or LESS pad to increase or decrease
the temperature.
Temperature Display (°F/°C)
To select between Fahrenheit and Celsius display, hold
in the TEMP display pad while pressing the TEMP
pad.
NOTE: Temperature can be set from 80°F (27°C)
to 180°F (82°C) in the SPECIAL CYCLE and
SPECIAL TIME options only.
To include an adjusted temperature in a Custom cycle,
simply adjust temperature before pressing CUSTOM.
Temperature
Selection
HIGH
MEDIUM
MED LOW
LOW
Control
Program
Temperature
Desired
Clothes
Temperature
°F (°C) °F (°C)
0220S
0270S 0350S
140 (60) 145 (63) 185 (85) 190 (88)
135 (57) 140 (60) 180 (82)
130 (54) 135 (57) 170 (77) 175 (79)
125 (52) 130 (54) 160 (71) 165 (74)
120 (49) 125 (52) 155 (68) 160 (71)
125 (52) 130 (54) 160 (71) 165 (74)
120 (49) 125 (52) 155 (68) 160 (71)
115 (46) 120 (49) 150 (66) 155 (68)
110 (43) 115 (46) 145 (63)
105 (41) 110 (43) 135 (57) 140 (60)
110 (43) 120 (49) 145 (63) 155 (68)
105 (41) 115 (46) 135 (57) 145 (63)
100 (38) 110 (43) 130 (54) 140 (60)
95 (35) 105 (41) 120 (49) 135 (57)
90 (32) 100 (38) 105 (41) 125 (52)
95 (35) 120 (49)
90 (32) 105 (41)
85 (29) 100 (38)
80 (27) 95 (35)
75 (24) 95 (35)
0220S
0270S 0350S
Cylinder Temperature Display
To see the approximate temperature at the exit of the
cylinder, press and hold the TEMP DISPLAY pad
(50-170# Models Only).
M414462
© Copyright, Alliance Laundry Systems LLC – DO NOT COPY or TRANSMIT
Table 4
25
Page 28

Notes
26
© Copyright, Alliance Laundry Systems LLC – DO NOT COPY or TRANSMIT
M414462
Page 29

Maintenance
To reduce the risk of serious injury, do not
open the lint panel while the tumbler is in
operation. Open tumbler door and allow
cylinder to completely stop before cleaning
lint screen.
W079
WARNING
WARNING
To reduce the risk of electric shock, fire, explosion, serious injury or death:
• Disconnect electric power to the tumbler before servicing.
• Close gas shut-off valve to gas tumbler before servicing.
• Close steam valve to steam tumbler before servicing.
• Never start the tumbler with any guards/panels removed.
• Whenever ground wires are removed during servicing, these ground wires must be
reconnected to ensure that the tumbler is properly grounded.
Daily
Keep tumbler area clear and free from combustible
materials, gasoline, and other flammable vapors and
liquids.
Lint Removal
W002
1. Open the lint panel or pull out lint drawer.
2. Remove all accumulated lint in the lint
compartment area. Lightly brush any lint that
may be left on the lint screen. Lint left in the lint
compartment is drawn back onto the lint screen
and will restrict proper air circulation.
3. Be sure the lint screen is not torn. If it is, replace
immediately. A torn lint screen allows lint to pass
from the tumbler to the ductwork system, thus
creating a restriction to air circulation.
4. The lint screen is designed to completely cover
the entire opening in the lint screen panel. Be
sure that it does so. Excessive gaps between the
lint screen and the lint screen panel allows lint to
pass into the ductwork system.
5. 50-170 Pound Tumblers: Wipe any accumulated
lint off of the thermostat sensing probe, cabinet
hi-limit thermostat or thermistor. Failure to do so
will allow a buildup of lint in this area to act as an
insulator, causing the tumbler to overheat.
6. Replace the lint compartment access panel on the
tumbler, ensuring a tight fit and lock.
M414462
© Copyright, Alliance Laundry Systems LLC – DO NOT COPY or TRANSMIT
1
0220S, 0270S, & 0350S MODELS
1 Lint Screen
Figure 15
0300D MODELS
Figure 16
T388I
T388I
TMB98N
27
Page 30

Maintenance
WARNING
To reduce the risk of electric shock, fire, explosion, serious injury or death:
• Disconnect electric power to the tumbler before servicing.
• Close gas shut-off valve to gas tumbler before servicing.
• Close steam valve to steam tumbler before servicing.
• Never start the tumbler with any guards/panels removed.
• Whenever ground wires are removed during servicing, these ground wires must be
reconnected to ensure that the tumbler is properly grounded.
1
WARNING
W002
50 – 170 POUND TUMBLERS
1 Thermostat Sensing Probe
2 Lint Screen
Monthly
Lubrication
Motor bearings, roller bearings and trunnion bearings
are sealed bearings and require no lubrication.
2
T046I
T046I
Figure 17
Lint Removal
Remove the exhaust duct from the exhaust thimble and
remove lint. If excessive lint is evident at the thimble,
further disassemble the duct work and remove lint.
Energy Saver Gas Models: Remove the cleanout cover
at the bottom of the vertical duct and clean out lint.
28
© Copyright, Alliance Laundry Systems LLC – DO NOT COPY or TRANSMIT
M414462
Page 31

WARNING
To reduce the risk of electric shock, fire, explosion, serious injury or death:
• Disconnect electric power to the tumbler before servicing.
• Close gas shut-off valve to gas tumbler before servicing.
• Close steam valve to steam tumbler before servicing.
• Never start the tumbler with any guards/panels removed.
• Whenever ground wires are removed during servicing, these ground wires must be
reconnected to ensure that the tumbler is properly grounded.
Maintenance
W002
Every Three Months
Lint Removal
1. Clean the lint and any other foreign materials
from the air vents located on the motors. The
motors are air cooled and if the air vents become
clogged, the motor will overheat and the internal
thermal overload protector will cycle off.
2. Steam Models: Check the steam coils and
remove any lint buildup and/or replace air filter
in the coil fin area. This can be accomplished by
using compressed air or by fabricating a comb
that can be pulled across the fins of the coil.
3. Exhaust ducts should be periodically inspected to
ensure there has been no build-up of lint which
could obstruct the air flow.
4. Inspect the dryer area to make sure nothing is
obstructing the flow of combustion and
ventilation air.
5. Remove front panel and clean any lint buildup.
Belt Tension
Every Six Months
Overall Check
Check the tumbler over thoroughly for loose nuts,
bolts and screws, and for loose gas, electrical and/or
steam connections.
GAS CONNECTIONS: (Unions, flared tube fittings)
Check for leakage that might be caused by vibration.
Use a non-corrosive leak detention fluid. DO NOT
USE A FLAME AT ANY TIME TO CHECK FOR
GAS LEAKS.
ELECTRICAL CONNECTIONS: Electrical service
and grounding connections should be examined for
proper tightness.
Check belt tension and adjust if needed.
M414462
© Copyright, Alliance Laundry Systems LLC – DO NOT COPY or TRANSMIT
29
Page 32

Maintenance
WARNING
To reduce the risk of electric shock, fire, explosion, serious injury or death:
• Disconnect electric power to the tumbler before servicing.
• Close gas shut-off valve to gas tumbler before servicing.
• Close steam valve to steam tumbler before servicing.
• Never start the tumbler with any guards/panels removed.
• Whenever ground wires are removed during servicing, these ground wires must be
reconnected to ensure that the tumbler is properly grounded.
Three Month Maintenance
Clean air vents on drive motor.
Check and clean steam coils.
Clean exhaust ducts.
Check flow of combustion air.
W002
Check flow of ventilation air.
Check belt tension.
Check chain tension.
Six Month Maintenance
Check for loose nuts.
Check for loose bolts.
Check for loose screws.
Check gas connection.
Check electrical connections.
Check steam connections.
30
© Copyright, Alliance Laundry Systems LLC – DO NOT COPY or TRANSMIT
M414462
Page 33

Before You Call for Service
IMPORTANT: All tumbler panels must be in place
for proper operation.
You may save time and money by checking the
following:
If the Tumbler:
Won’t
Start
•
•
•
•
•
•
Won’t
Heat
Clothes
Not Dry
•
•
•
•
••
Possible Reason – Do This to Correct
Insert coin(s). (Coin Drop Models Only)
Close the loading door tightly.
Press the PUSH TO START button.
Be sure power cord is plugged all the way into the electrical outlet.
Drying timer is in OFF position.
Check the main fuse and circuit breaker.
Insufficient air flow.
Gas shut-off valve in OFF position.
Are controls properly set?
Broken drive belt. Call the service person.
Tumbler is in Cool Down Mode.
M414462
••
••
© Copyright, Alliance Laundry Systems LLC – DO NOT COPY or TRANSMIT
Lint screen clogged. Clean lint screen.
Exhaust duct to outside is blocked. Clean out.
31
Page 34

Page 35

Secadoras por
agitación
Consulte la página 37 para la identificación del modelo
H
I
G
H
TE
M
P
S
T
A
R
T
L
O
W
TE
MP
M
E
D
T
E
M
P
N
O
H
E
A
T
C
2
5
1
S
E
L
2
E
C
T
T
I
E
N
M
S
E
P
3
R
T
C
O
P
I
H
U
N
IG
S
H
H
S
T
T
E
A
MP
R
T
S
T
A
R
T
LO
W
1
S
E
L
2
E
C
T
T
I
E
N
M
S
E
P
3
R
T
C
O
P
I
U
N
S
H
S
T
A
R
T
T
EM
P
M
E
D
T
E
M
P
NO
H
E
A
T
C
2
5
Funcionamiento/mantenimiento/programación
T433I
T478C
Guarde estas instrucciones para referencia en el futuro.
(Si la unidad cambia de dueño, asegúrese de que este manual vaya con la misma).
T477C
www.comlaundry.com
Pieza No. M414462R1
Marzo 2001
Page 36

Page 37

En los Estados Unidos, la instalación debe conformar la última edición del “Código de Gas Combustible
POR SU PROPIA SEGURIDAD, la
información que aparece en este manual
debe tomarse en cuenta para mantener a
un mínimo el riesgo de incendio o
explosión y para evitar daños a la
propiedad, lesiones personales o la
muerte.
W033S
• No almacene ni use gasolina u otros
vapores o líquidos inflamables cerca de
éste ni en cualquier otro aparato
electrodoméstico.
• QUÉ DEBE HACER SI DETECTA OLOR A
GAS:
– No trate de usar ningún aparato
electrodoméstico.
– No toque ningún interruptor eléctrico;
no use ningún teléfono en el edificio.
– Asegúrese de que todas las personas
salgan de la habitación, edificio o área.
– Llame de inmediato a su proveedor de
gas desde el teléfono de algún vecino.
Siga las instrucciones que le dé el
proveedor de gas.
– Si no puede ponerse en contacto con
su proveedor de gas, llame a los
bomberos.
• Un instalador calificado, una agencia de
servicio o el proveedor de gas debe
hacer la instalación y proporcionar el
servicio.
W052S
POR SU PROPIA SEGURIDAD
No almacene ni use gasolina ni vapores o
líquidos inflamables cerca de esta
secadora ni de cualquier otro aparato
electrodoméstico.
W053S
ADVERTENCIA
Nacional” Estándar Nacional Americano Z223.1 y el “Código Eléctrico Nacional” ANSI/NFPA 70.
En Canadá, la instalación debe cumplir con los estándares CAN1-B149.1 o con los códigos CAN1-B149.2
para los artefactos y equipos de quemado de gas y con CSA C22.1, última edición, Código Eléctrico
Canadiense, Parte I.
En Australia, la instalación debe cumplir con el Código de Instalación de la Asociación Australiana de gas
para artefactos y equipos de quemado de gas.
IMPORTANTE: Debe obtenerse la información de un abastecedor de gas local sobre las instrucciones que
deberán seguirse en caso de que el usuario perciba olor a gas. Estas instrucciones deben estar anunciadas en
una ubicación prominente. Las instrucciones detalladas de la información de seguridad mencionada
anteriormente deberán estar anunciadas en una ubicación prominente cerca de la secadora para uso del
cliente.
M414462 (SP)
© Copyright, Alliance Laundry Systems LLC – DO NOT COPY or TRANSMIT
35
Page 38

Contenido
Introducción ........................................................................................ 37
Identificación de modelo ...................................................................... 37
Servicio a clientes................................................................................. 38
Diagrama de cableado........................................................................... 38
Ubicación de la placa............................................................................ 39
Información de seguridad.................................................................. 41
Instrucciones importantes de seguridad................................................ 42
Instrucciones de funcionamiento....................................................... 45
Paso 1: Limpieza del compartimento/pantalla de pelusa...................... 45
Paso 2: Cargado de la ropa ................................................................... 45
Paso 3: Determinación de la temperatura requerida............................. 45
Paso 4: Determinación del tipo de control............................................ 45
Secadoras de temporizador manual ................................................. 46
Secadora electromecánica de control de monedas........................... 47
Control de monedas de NetMaster................................................... 48
Control de tarjeta NetMaster............................................................ 49
Control electrónico de OPL ............................................................. 50
Control electrónico de moneda ........................................................ 51
Función de inversión........................................................................ 52
Interrupción de control de inversión................................................ 52
Programación del control electrónico de OPL................................. 53
Señal ..................................................................................................... 54
Inversión ............................................................................................... 54
Luces de estado..................................................................................... 54
Modalidad de condición y secado automático...................................... 55
Modalidades de secado por tiempo y sin calor..................................... 56
Personalización..................................................................................... 57
Registro de ciclo de personalización................................................ 57
Modalidad de ciclo especial.................................................................. 58
Modalidad de tiempo especial.............................................................. 58
Bloqueo de seguridad ........................................................................... 58
Modalidad de muestra........................................................................... 58
Sensor de temperatura........................................................................... 59
Ajuste de temperatura........................................................................... 59
Despliegue de temperatura (°F/°C)....................................................... 59
Despliegue de temperatura de cilindro ................................................. 59
Mantenimiento .................................................................................... 61
Diariamente........................................................................................... 61
Mensualmente....................................................................................... 62
Cada tres meses..................................................................................... 63
Cada seis meses .................................................................................... 63
Si la unidad necesita servicio ............................................................. 65
© Copyright 2001, Alliance Laundry Systems LLC
Reservados todos los derechos. Ninguna sección del presente manual puede ser reproducida o transmitida en forma
alguna o a través de ningún medio sin el expreso consentimiento por escrito del editor.
36
© Copyright, Alliance Laundry Systems LLC – DO NOT COPY or TRANSMIT
M414462 (SP)
Page 39

Introducción
Identificación de modelo
La información que se encuentra en este manual es
aplicable a los siguientes modelos.
DT0220SFG DT0220SRG DT0220SSH DT0220SSL DT0220SEL DC0220SEL
JT0220SFG JT0220SRG JT0220SSH JT0220SSL JT0220SEL JC0220SEL
25 libras
(220 litros)
30 libras
apiladas
(300 litros)
30 libras
(270 litros)
35 libras
(350 litros)
ST0220SFG ST0220SRG ST0220SSH ST0220SSL ST0220SEL SC0220SEL
DC0220SFG DC0220SRG DC0220SSL JC0220SSL
JC0220SFG JC0220SRG SC0220SSL
SC0220SFG SC0220SRG
DT0300DFG DT0300DRG DT0300DSH DT0300DSL DT0300DEL DC0300DEL
JT0300DFG JT0300DRG JT0300DSH JT0300DSL JT0300DEL JC0300DEL
ST0300DFG ST0300DRG ST0300DSH ST0300DSL ST0300DEL SC0300DEL
DC0300DFG DC0300DRG DC0300DSL JC0300DSL
JC0300DFG JC0300DRG SC0300DSL
SC0300DFG SC0300DRG
NT0300DRG
DT0270SFG DT0270SRG DT0270SSH DT0270SSL DT0270SEL DC0270SEL
JT0270SFG JT0270SRG JT0270SSH ST0270SSL JT0270SEL JC0270SEL
ST0270SFG ST0270SRG ST0270SSH DC0270SSL ST0270SEL SC0270SEL
DC0270SFG DC0270SRG JC0270SSL SC0270SSL
JC0270SFG JC0270SRG JT0270SSL
SC0270SFG SC0270SRG
DT0350SFG JT0350SRG DT0350SSH JT0350SSL DT0350SEL DC0350SEL
JT0350SFG ST0350SRG JT0350SSH ST0350SSL JT0350SEL JC0350SEL
ST0350SFG DC0350SRG ST0350SSH DC0350SSL ST0350SEL SC0350SEL
DC0350SFG JC0350SRG DT0350SSL JC0350SSL
JC0350SFG SC0350SRG SC0350SSL AT0350SSL
SC0350SFG AT0350SRG
DT0350SRG
†
Gas Vapor Eléctrico/Otro
† Incluye los modelos con los sufijos de control MT, EC, OM, CD, RM, EP, CX, CY, EX, EY, NX, NY, ZC, ZR,
ZX, ZY, NC y NR.
M414462 (SP)
© Copyright, Alliance Laundry Systems LLC – DO NOT COPY or TRANSMIT
37
Page 40

Introducción
La información que se encuentra en este manual es
aplicable a los siguientes modelos.
†
Gas Vapor Eléctrico/Otro
ATB50CG DTB50EG STB50CSH STB50CSL STB50CE JCB50CE
STB50CG JTB50EG JTB50CSH JTB50CSL JTB50CE SCB50CE
DTB50CG JT50EG DTB50CSH DTB50CSL DTB50CE JC50CE
JTB50CG JC50EG JT50CSH JT50CSL JT50CE DCB50CE
50 libras
75 libras
120 libras
170 libras
JT50CG JCB50EG JCB50CSH SCB50CSH SC50CE SCB50AT
JC50CG SC50EG JC50CSH DCB50CSH
JCB50CG SCB50EG ATB50CSH
SC50CG DCB50CG
SCB50CG DCB50EG
STB50EG
STB75CG DTB75EG STB75CSH JTB75CSL STB75CE JCB75CE
DTB75CG JTB75EG JTB75CSH DTB75CSL JTB75CE SCB75CE
JTB75CG JT75EG DTB75CSH JT75CSL DTB75CE ST75CE
ATB75CG STB634 JT75CSH DCB75CSH JT75CE JC75CE
JT75CG DCB75CG ATB75CSH JCB75CSH DCB75CE SC75CE
DTB634 JCB75CG STB75CSL SCB75CSH
STB75EG SCB75CG SCB75CSL JCB75CSL
DCB75CSL
ST120FG JC120FG ST120CSH JC120CSH ST120AT
JT120FG DC120FG JT120CSH DC120CSH
DT120FG AT120FG DT120CSH AT120CSH
SC120FG SC120CSH
ST170FG SC170FG ST170CSH SC170CSH
JT170FG AT170FG JT170CSH AT170CSH
JC170FG DT170FG JC170CSH DT170CSH
DC170FG DC170CSH
SC120AT
1RFRUUHVSRQGH
† Incluye los modelos con los sufijos de control MT, EC, OM, CD, RM, EP, CX, CY, EX, EY, NX, NY, ZC, ZR,
ZX, ZY, NC y NR.
Servicio a clientes
Si necesita más información escrita o repuestos,
póngase en contacto con la fuente de donde compró la
máquina o con Alliance Laundry Systems, teléfono
(920) 748-3950, para obtener el nombre y la dirección
del distribuidor de repuestos autorizado más cercano.
Para obtener asistencia técnica, llame al siguiente
número: (920) 748-3121
38
© Copyright, Alliance Laundry Systems LLC – DO NOT COPY or TRANSMIT
Diagrama de cableado
El diagrama de cableado se encuentra dentro del
paquete de literatura que se provee con todos los
modelos no europeos. En los modelos europeos, se
encuentra en la caja de conexiones eléctricas.
El diagrama de cableado se encuentra dentro de las
cajas de conexiones eléctricas ubicadas en la parte
trasera de los modelos 0300D o debajo del panel de
control frontal de los modelos 0220S, 0270S y 0350S.
M414462 (SP)
Page 41

Ubicación de la placa
Al llamar o escribir para solicitar información acerca
de su producto, asegúrese de mencionar el modelo y
los números de serie. Ambos se encuentran en la placa,
según lo muestra la siguiente ilustración. El número de
modelo también puede encontrarse dentro de la puerta.
MODEL NO:
SERIAL NO:
V-/ HERTZ/ PHASE
AMPS, WIRES + GROUND
TOTAL kW, MOTOR kW
REQ'D CIRCUIT BREAKER: AMPS
FAN OUTPUT:
@MAX "WC STATIC PRESSURE
EQUIPPED FOR: GAS@ "WC MANIFOLD PRESS.
MIN SUPPLY
PRESSURE:
INPUT: BTU/hr @ BTU/cu.ft.
MADE IN U.S.A./FABRIQUE AU ETATS UNIS/FABRICADO EN LOS ESTADOS UNIDOS 70051001
MODEL NO:
SERIAL NO:
MAX SUPPLY
"WC. "WC.
PRESSURE:
ANS 72152
CLOTHES DRYER.
VOL II
TESTED FOR NATURAL &
LIQUID PETROLEUM GASSES
AMPLFIEDRER
Introducción
CGA 72
0220S, 0270S, 0350S
1
0300D
1
SECADORAS DE 50 Y 75 LIBRAS
T448I
T453I
1
1 Placa
M414462 (SP)
SECADORAS DE 120 LIBRAS
SECADORAS DE 170 LIBRAS
Figura 1
© Copyright, Alliance Laundry Systems LLC – DO NOT COPY or TRANSMIT
39
Page 42

Notas
40
© Copyright, Alliance Laundry Systems LLC – DO NOT COPY or TRANSMIT
M414462 (SP)
Page 43

Información de seguridad
PELIGRO indica la presencia de un riesgo
que ocasionará lesiones personales
severas, muerte o daño importante a la
propiedad en caso de ignorarse el peligro.
PELIGRO
ADVERTENCIA indica la presencia de un
riesgo que ocasionará lesiones
personales severas, muerte o daño
importante a la propiedad en caso de
ignorarse la advertencia.
ADVERTENCIA
PRECAUCIÓN indica la presencia de un
riesgo que ocasionará o que podrá
ocasionar lesiones personales menores o
daño a la propiedad en caso de ignorarse
la precaución.
PRECAUCIÓN
Las medidas de precaución (“PRECAUCIÓN”,
“ADVERTENCIA” y “PELIGRO”), seguidas por
instrucciones específicas, se encuentran en este
manual y en las calcomanías de la máquina. Estas
precauciones aparecen para proteger la seguridad
personal del operador, del usuario y de aquéllos
responsables por el mantenimiento de dicha máquina.
NOTA: La palabra “NOTA” se utiliza para
comunicar información de instalación, operación,
mantenimiento o servicio que es importante pero
que no se relaciona con un riesgo.
IMPORTANTE: La garantía quedará anulada a
menos que la secadora por agitación se instale
ateniéndose a las instrucciones que comprende este
manual. Deberán acatarse las estipulaciones y
requisitos mínimos detallados en el presente
documento, al igual que las ordenanzas locales de
válvulas de gas, los códigos municipales de
edificación, las ordenanzas de abastecimiento de
agua, las ordenanzas de tendido de cables eléctricos
y demás ordenanzas estatutarias pertinentes. A
causa de la diversidad de requisitos, tendrán que
entenderse cabalmente las correspondientes
normativas locales, habiendo de concertarse en
conformidad todo tipo de trabajo previo a la
instalación.
ADVERTENCIA
Si la instalación, mantenimiento y/o
operación de esta máquina no se ejecuta de
conformidad con las instrucciones del
fabricante, se correrá el riesgo de sufrir u
originar lesiones graves, la muerte, y/o
daños a la propiedad.
W051S
Otras medidas de precaución adicionales
(“IMPORTANTE” y “NOTA”) se encuentran seguidas
por instrucciones específicas.
IMPORTANTE: La palabra “IMPORTANTE” se
utiliza para informar al lector de los
procedimientos específicos donde ocurrirá el daño
menor a la máquina en caso de no seguirse el
procedimiento.
M414462 (SP)
© Copyright, Alliance Laundry Systems LLC – DO NOT COPY or TRANSMIT
NOTA: Las instrucciones ADVERTENCIA e
IMPORTANTE que aparecen en este manual no
intentan cubrir todas las condiciones y situaciones
posibles que pueden ocurrir. Debe entenderse que el
sentido común, la precaución y el cuidado son
factores que NO PUEDEN estar incluidos en esta
secadora. Estos factores DEBEN ser
proporcionados por la persona o personas que
instalen, mantengan u operen la misma.
Siempre póngase en contacto con su vendedor,
distribuidor, agente de servicio o fabricante sobre
cualquier problema o condición que no comprenda.
41
Page 44

Información de seguridad
Para reducir el riesgo de fuego, sacudidas
eléctricas, y lesiones graves o muerte a las
personas cuando use su secadora, siga las
siguientes precauciones básicas:
W054S
ADVERTENCIA
Instrucciones importantes de
seguridad
1. Lea las instrucciones antes de utilizar la
secadora.
2. Consulte las INSTRUCCIONES DE TOMA A
TIERRA para efectuar la toma a tierra apropiada
de la secadora.
3. No seque artículos que han sido previamente
limpiados, lavados, puestos en remojo, o
manchados con gasolina, solventes de tintorería u
otras sustancias explosivas o inflamables, ya que
éstas desprenden vapores que pueden encender o
explotar.
4. No permita que los niños jueguen en la secadora
o cerca de ella. Es necesaria la supervisión
constante de los niños cuando la secadora se
utiliza cerca de ellos. Esta es una regla de
seguridad pertinente a todos los artefactos.
5. Antes de quitar la secadora de servicio o de que
ésta sea descartada, quite la puerta del
compartimento de secado y la del compartimento
de pelusas.
6. No introduzca sus manos dentro de la secadora si
el cilindro se encuentra girando.
7. No instale ni almacene la secadora donde se
encontrará expuesta a agua y/o inclemencias del
clima.
8. No juegue con los controles.
9. No repare ni reemplace cualquier pieza de la
secadora ni intente cualquier servicio a menos
que se haya recomendado específicamente en las
instrucciones de Mantenimiento del usuario o en
las instrucciones publicadas de reparación del
usuario que pueda comprender y siempre que
tenga las habilidades necesarias para hacerlo.
10. No utilice productos suavizantes de telas ni
aquéllos que eliminan la estática, a menos que
sea recomendado por el fabricante de dichos
productos.
11. Para reducir el riesgo de incendio, NO SEQUE
plásticos ni artículos que contengan goma
espuma o materiales de tipo de goma de textura
42
similar.
© Copyright, Alliance Laundry Systems LLC – DO NOT COPY or TRANSMIT
12. Limpie siempre diariamente el filtro de pelusa.
13. Mantenga el área que se encuentra alrededor de
la abertura de salida y el área circundante
adyacente libre de acumulaciones de pelusa,
polvo y tierra.
14. El interior de la secadora y el conducto de salida
deben limpiarse periódicamente por personal de
servicio calificado.
15. Si no se ha instalado, operado y mantenido de
acuerdo con las instrucciones del fabricante o si
existe daño o mal uso de los componentes de este
producto, el uso del mismo puede exponerlo a
sustancias en el combustible o de la combustión
del mismo, que pueden ocasionar la muerte o una
enfermedad seria y que son conocidos por el
estado de California como causantes de cáncer,
defectos de nacimiento u otros daños
reproductivos.
16. La secadora no operará con la puerta de carga
abierta. NO pase por alto el interruptor de
seguridad para permitir que opere la secadora con
la puerta abierta. La secadora dejará de agitarse
cuando la puerta esté abierta. No utilice la
secadora si no deja de agitarse cuando la puerta
esté abierta o si comienza a agitarse sin oprimir o
girar el mecanismo de START (Inicio). Quite la
secadora del uso y llame a la persona del
servicio.
17. La secadora no operará con el panel de pelusa
abierto. NO pase por alto el interruptor de
seguridad del panel de pelusa para permitir que la
secadora opere con el panel de pelusa abierto.
18. No coloque en la secadora artículos manchados
con aceite de cocina o vegetal, ya que estos
aceites no se quitan durante el lavado. Debido al
aceite restante, la tela puede prenderse fuego por
sí misma.
19. Para reducir el riesgo de incendio, NO coloque
en la secadora ropa que pueda tener restos de
sustancias inflamables, como aceite de máquina,
productos químicos inflamables, diluyentes, etc.
O cualquier cosa que contenga cera o productos
químicos, tales como de escobas y trapos de
limpieza, o cualquier cosa que haya sido
limpiada en seco en el hogar con solvente de
limpiado en seco.
20. Utilice la secadora solamente para el propósito
para el cual fue fabricada: para secar telas lavadas
con agua.
21. SIEMPRE desconecte la secadora antes de que
se le efectúe el mantenimiento. Desconéctela
cerrando el fusible o disyuntor correspondiente.
M414462 (SP)
Page 45

Información de seguridad
22. Instale la secadora de acuerdo con estas
INSTRUCCIONES DE INSTALACIÓN. Todas
las conexiones para la electricidad, toma a tierra
y suministro de gas deben cumplir con los
códigos locales y ser fabricados por personal
autorizado cuando sea requerido. ¡No lo haga
usted mismo a menos que sepa cómo!
23. Quite la ropa inmediatamente después que se
detenga la secadora.
24. Lea y siga siempre las instrucciones del
fabricante en los paquetes de productos de ayuda
en la limpieza de la ropa. Ponga atención a todas
las advertencias o precauciones. Para reducir el
riesgo de envenenamiento o de quemaduras
químicas, manténgalos fuera del alcance de los
niños en todo momento (preferentemente, en un
armario cerrado con llave).
25. No seque cortinas y cortinajes de vidrio fibroso a
menos que la etiqueta diga que puede hacerse. Si
están secos, seque el cilindro con un paño
húmedo para quitar las partículas de vidrio
fibroso.
26. Siga siempre las instrucciones de cuidado de las
telas proporcionadas por el fabricante de la ropa.
27. No opere nunca la secadora si se han quitado las
guardas y/o paneles.
28. NO opere la secadora cuando falten piezas o con
piezas rotas.
29. NO pase por alto ningún mecanismo de
seguridad.
ADVERTENCIA
A fin de reducir el riesgo de lesiones
graves, instale puerta(s) con seguro, para
prevenir el acceso público a la parte
posterior de la secadora.
W055S
Esta máquina ha sido fabricada para uso
comercial.
IMPORTANTE: Los vapores de solvente de las
máquinas de limpieza en seco crean ácidos cuando
se acercan al calentador de la unidad de secado.
Estos ácidos son corrosivos para la secadora y para
el lavado que se está secando. Asegúrese que el aire
de compensación se encuentra libre de vapores de
solvente.
M414462 (SP)
© Copyright, Alliance Laundry Systems LLC – DO NOT COPY or TRANSMIT
43
Page 46

Notas
44
© Copyright, Alliance Laundry Systems LLC – DO NOT COPY or TRANSMIT
M414462 (SP)
Page 47

Instrucciones de funcionamiento
Limpie diariamente el compartimento y la
pantalla de pelusa. El no limpiar diariamente
la pantalla de pelusa, resultará en
temperaturas más altas de lo normal que
pueden dañar la ropa.
W331S
PRECAUCIÓN
Para reducir el riesgo de lesiones graves,
antes de limpiar el filtro de pelusas, abrir la
puerta de la secadora y dejar que el cilindro
se detenga. No operar el equipo sin el filtro
de pelusas en su lugar.
W077S
ADVERTENCIA
ADVERTENCIA
Para reducir el riesgo de fuego:
• NO PONER A SECAR artículos que contengan caucho o goma esponjosa, o que sean de
materiales o textura similares.
• NO PONER A SECAR artículos plásticos, ni nada que contenga cera o productos químicos,
como fregonas y paños de limpieza, ni nada que se haya limpiado en seco en el hogar con
disolvente de limpieza en seco.
• NO PONGA A SECAR EN EL TAMBOR cortinas ni tapices de fibra de vidrio, salvo que la
etiqueta diga que puede hacerse. Tras semejante uso de la secadora hay que limpiar el
cilindro con un paño húmedo, para retirar todas las partículas de fibra de vidrio.
Para reducir el riesgo de lesiones graves, antes de limpiar el filtro de pelusas, abrir la puerta
de la secadora y dejar que el cilindro se detenga. No operar el equipo sin el filtro de pelusas
en su lugar.
W076S
W077S
Paso 1: Limpieza del
compartimento/pantalla de pelusa
Quite cualquier pelusa acumulada de la pantalla y del
compartimento de pelusa. Cierre bien el panel contra
el marco de la secadora y asegúrelo.
Paso 3: Determinación de la
temperatura requerida
El tipo de tela a secarse determinará la configuración.
Consulte la etiqueta de cuidado de la tela o el
fabricante de la misma para determinar la
configuración de temperatura apropiada.
IMPORTANTE: SIGA SIEMPRE LAS
INSTRUCCIONES DE CUIDADO DE LA TELA
PROPORCIONADAS POR EL FABRICANTE DE
LA MISMA.
Paso 4: Determinación del tipo de
control
Consulte las páginas siguientes y use las instrucciones
apropiadas para el tipo de control.
Solamente para secadoras apiladas: Utilice la ranura
de moneda correcta y el panel de control para el
cilindro superior o inferior.
Paso 2: Cargado de la ropa
Abra la puerta de la secadora y cargue el cilindro con
ropa. NO SOBRECARGUE.
NOTA: La sobrecarga ocasiona un secado lento y
arrugas.
Cierre la puerta del cilindro. La secadora no operará
con la puerta abierta.
M414462 (SP)
© Copyright, Alliance Laundry Systems LLC – DO NOT COPY or TRANSMIT
45
Page 48

Instrucciones de funcionamiento
1
0
60
50
40
10
20
HEAT
30
PUSH
TO
START
2
0
15
10
HIGH
34
SECADORAS DE 25, 30 Y 35 LIBRAS
LOAD
READY
HIGH
190
TEMPERATURE
MEDIUM
160
LOW
130
HIGH
PUSH
TO
START
COTTON
5
LOW AIR
NON
REV
COOL
DOWN
FLOW
LOW
TMB47N
REV
SECADORAS DE 120 Y 170 LIBRAS
MEDIUM
MIXED
TEMPERATURE
PUSH TO START
LOW
PERM
PRESS
10
COOLING
15
0
5
SECADORAS DE 50/75 LIBRAS
10
COOLING
15
0
5
DRYING
50
40
30
60
10
20
40
30
0
DRYING
50
20
TMB49N
60
0
10
TMB48N
Secadoras de temporizador manual
1. Configure el selector de TEMPERATURE
(Temperatura) en HIGH (Alta), MEDIUM
(Mediana), LOW (Baja) o en cualquier
temperatura media entre las tres configuraciones.
2. Configure el tiempo de HEAT/DRYING (Calor/
secado) por el número de minutos deseado (entre
0 y 60).
3. Configure el tiempo de COOL DOWN/
COOLING (Enfriado/enfriamiento) por el
número de minutos deseado (entre 0 y 15).
4. Oprima el botón PUSH TO START (Oprimir
para iniciar) y manténgalo oprimido por tres
segundos aproximadamente. Esto inicia el ciclo
de secado.
IMPORTANTE: Si el cilindro se abre durante el
ciclo, se cerrará el sistema de calor y se detendrá el
motor. Para reiniciar el ciclo, la puerta debe
encontrarse cerrada y el botón PUSH TO START
(Oprimir para iniciar) debe encontrarse oprimido.
Figura 2
ADVERTENCIA
Para reducir el riesgo de lesiones
corporales, la secadora tiene que detenerse
cuando se abra la puerta. No intente usar la
secadora si ésta no se detiene cuando abra
la puerta o si el cilindro comienza la acción
centrifugadora sin haberse pulsado la tecla
de START. Desconecte la secadora y llame
al servicio de reparación.
W078S
5. Cuando se ha terminado el ciclo, abra la puerta y
quite la ropa.
46
© Copyright, Alliance Laundry Systems LLC – DO NOT COPY or TRANSMIT
M414462 (SP)
Page 49

BOTÓN PUSH TO START
(Oprimir para iniciar)
SELECTOR DE TEMPERATURA
TEMPERATURE
HIGH
PUSH
TO
START
LOW
Figura 3
Instrucciones de funcionamiento
RANURA Y PRESILLA DE MONEDA
DE MEDIDOR DE MONEDAS
SENCILLAS Y DUALES
INSERT QUARTER
TURN KNOB
25
Q
U
A
R
1 2 3
SELECT
TEMP
T
INSERT
COIN
R
E
T
S
A
E
R
M
PUSH
START
T366I
Secadora electromecánica de control de
monedas
1. Configure el selector de TEMPERATURE
(Temperatura) en HIGH (Alta), LOW (Baja) o en
cualquier temperatura media entre las
configuraciones.
2. Modelos de tirado de moneda: Inserte las
monedas en la ranura de monedas, gire la perilla
hacia la derecha y suéltela. Modelos de ranura de
moneda: Inserte el número requerido de monedas
en la ranura de monedas. Empuje completamente
el desliz de monedas y suéltelo.
3. Oprima el botón PUSH TO START (Oprimir
para iniciar) y manténgalo apretado por 3
segundos aproximadamente.
IMPORTANTE: Si el cilindro se abre durante el
ciclo, se cerrará el sistema de secado y se detendrá
el motor. Sin embargo, el tiempo continuará su
curso. Para reiniciar el ciclo, la puerta debe
encontrarse cerrada y el botón PUSH TO START
(Oprimir para iniciar) debe encontrarse oprimido.
ADVERTENCIA
Para reducir el riesgo de lesiones
corporales, la secadora tiene que detenerse
cuando se abra la puerta. No intente usar la
secadora si ésta no se detiene cuando abra
la puerta o si el cilindro comienza la acción
centrifugadora sin haberse pulsado la tecla
de START. Desconecte la secadora y llame
al servicio de reparación.
W078S
4. Cuando se ha terminado el ciclo, abra la puerta y
quite la ropa.
M414462 (SP)
© Copyright, Alliance Laundry Systems LLC – DO NOT COPY or TRANSMIT
47
Page 50

Instrucciones de funcionamiento
Control de monedas de NetMaster
1. Seleccione HIGH TEMP (Temperatura alta),
MED TEMP (Temperatura media), LOW TEMP
(Temperatura baja) o NO HEAT (Sin calor),
oprimiendo el botón de temperatura apropiado.
2. Inserte las monedas en la ranura de monedas.
3. Oprima el botón START (Iniciar) para iniciar la
secadora.
Para detener la secadora en cualquier momento
durante el ciclo, ABRA la puerta. Para reiniciar la
secadora, CIERRE la puerta y oprima el botón
START (Iniciar).
C851I
C851I
Figura 4
ADVERTENCIA
Para reducir el riesgo de lesiones
corporales, la secadora tiene que detenerse
cuando se abra la puerta. No intente usar la
secadora si ésta no se detiene cuando abra
la puerta o si el cilindro comienza la acción
centrifugadora sin haberse pulsado la tecla
de START. Desconecte la secadora y llame
al servicio de reparación.
W078S
4. Cuando se ha terminado el ciclo, abra la puerta y
quite la ropa.
48
© Copyright, Alliance Laundry Systems LLC – DO NOT COPY or TRANSMIT
M414462 (SP)
Page 51

Figura 5
Instrucciones de funcionamiento
C852I
Control de tarjeta NetMaster
1. Seleccione HIGH TEMP (Temperatura alta),
MED TEMP (Temperatura media), LOW TEMP
(Temperatura baja) o NO HEAT (Sin calor),
oprimiendo el botón de temperatura apropiado.
2. Inserte la tarjeta en el la abertura. NO saque la
tarjeta hasta que se ilumine el respectivo diodo
electroluminiscente “REMOVE CARD”
(SACAR LA TARJETA).
3. Oprima el botón START (Iniciar) para iniciar la
secadora.
Para detener la secadora en cualquier momento
durante el ciclo, ABRA la puerta. Para reiniciar la
secadora, CIERRE la puerta y oprima el botón
START (Iniciar).
ADVERTENCIA
Para reducir el riesgo de lesiones
corporales, la secadora tiene que detenerse
cuando se abra la puerta. No intente usar la
secadora si ésta no se detiene cuando abra
la puerta o si el cilindro comienza la acción
centrifugadora sin haberse pulsado la tecla
de START. Desconecte la secadora y llame
al servicio de reparación.
W078S
4. Cuando se ha terminado el ciclo, abra la puerta y
quite la ropa.
M414462 (SP)
© Copyright, Alliance Laundry Systems LLC – DO NOT COPY or TRANSMIT
49
Page 52

Instrucciones de funcionamiento
ON / SELECT
HIGH
MEDIUM
MED LOW
LOW
NO HEAT
START
STOP/RESET
TEMP
DISPLAY
F/ C
SIGNAL
REVERSING
Control electrónico de OPL
1. Para utilizar un Ciclo automático, oprima el
botón ON/SELECT (Encendido/seleccionar).
Seleccione HIGH (Alta), MEDIUM (Mediana),
MED LOW (Media baja), LOW (Baja) o NO
HEAT (Sin calor) para los artículos que no deben
secarse con calor. Se enciende una luz a la
izquierda del botón seleccionado. Para utilizar un
Ciclo de personalización o Secado por tiempo,
consulte la sección Programación del control
electrónico de OPL.
NOTA: No oprima directamente las luces o el centro
del botón. Para lograr una selección apropiada,
oprima ligeramente el botón a la derecha del centro.
Consulte la Figura 7.
STATUS
DRYING
COOL DOWN
DOOR OPEN
CUSTOM
Figura 6
NOTA: Todos los botones pueden oprimirse en
cualquier secuencia sin dañar el control o la
secadora. Para detener la secadora en cualquier
momento, abra la puerta u oprima STOP/RESET
(Detener/reiniciar). Comenzará a titilar el
despliegue de la ventana. Oprima STOP/RESET
(Detener/reiniciar) dos veces (dentro de un lapso de
3 segundos) para terminar el ciclo y reiniciar el
control en un estado de inactividad. Para reiniciar
la secadora, CIERRE la puerta y oprima el botón
START (Iniciar).
PROGRAM
*
AUTO
AUTO
SPECIAL
CYCLE
AUTO
TEMP
MORE
TIME
SPECIAL
TIME
COOL
*
DOWN
LESS
+--
CONDITION
2. Oprima el botón START (Iniciar) para iniciar la
secadora.
SAVE
CUSTOM
PROG
ADVERTENCIA
T359I
50
Para reducir el riesgo de lesiones
corporales, la secadora tiene que detenerse
cuando se abra la puerta. No intente usar la
secadora si ésta no se detiene cuando abra
la puerta o si el cilindro comienza la acción
centrifugadora sin haberse pulsado la tecla
de START. Desconecte la secadora y llame
al servicio de reparación.
3. Cuando se ha terminado el ciclo, abra la puerta y
T306I
Figura 7
© Copyright, Alliance Laundry Systems LLC – DO NOT COPY or TRANSMIT
quite la ropa.
W078S
M414462 (SP)
Page 53

Instrucciones de funcionamiento
1
SELECT
TEMP
HIGH
TEMP
MED
TEMP
2 3
INSERT
COIN
START
PUSH
START
LOW
TEMP
NO
HEAT
Control electrónico de moneda
1. Seleccione HIGH TEMP (Temperatura alta),
MED TEMP (Temperatura media), LOW TEMP
(Temperatura baja) o NO HEAT (Sin calor),
oprimiendo el botón de temperatura apropiado.
2. Inserte las monedas en la ranura de monedas.
3. Oprima el botón START (Iniciar) para iniciar la
secadora.
Para detener la secadora en cualquier momento
durante el ciclo, ABRA la puerta. Para reiniciar la
secadora, CIERRE la puerta y oprima el botón
START (Iniciar).
Figura 8
C
25
T361I
T361I
ADVERTENCIA
Para reducir el riesgo de lesiones
corporales, la secadora tiene que detenerse
cuando se abra la puerta. No intente usar la
secadora si ésta no se detiene cuando abra
la puerta o si el cilindro comienza la acción
centrifugadora sin haberse pulsado la tecla
de START. Desconecte la secadora y llame
al servicio de reparación.
4. Cuando se ha terminado el ciclo, abra la puerta y
quite la ropa.
W078S
M414462 (SP)
© Copyright, Alliance Laundry Systems LLC – DO NOT COPY or TRANSMIT
51
Page 54

Instrucciones de funcionamiento
Función de inversión
Las secadoras que cuentan con opciones de inversión
están equipadas con un segundo motor y controles
adicionales para invertir la dirección de giro del
cilindro. Esto evita el enredo de piezas grandes y
minimiza las arrugas.
Interrupción de control de inversión
Se coloca un simple interruptor de “encendido y
apagado” en el área del panel de control de manera que
el operador pueda seleccionar la función de inversión o
no inversión. El interruptor está conectado con el
circuito de tiempo de control de inversión de manera
que el cilindro siempre girará en el sentido de las
manecillas del reloj (según se ve en la parte frontal de
la secadora) cuando el interruptor de control de
inversión está activado para la función de “no
inversión”. Si el cilindro está girando en la dirección
equivocada cuando el interruptor está activado,
continuará por unos pocos segundos y luego se iniciará
en la dirección apropiada.
IMPORTANTE: Después de efectuarse cualquier
mantenimiento eléctrico, asegúrese de que el motor
soplador está girando en el sentido de las
manecillas del reloj, según se ve desde la parte
frontal de las secadoras 0350S de 50 y 75 libras y
contrario a las agujas del reloj en las secadoras de
634, 120 y 170 libras. Luego configure el
interruptor de control de inversión a “no inversión”
y note que el cilindro gira constantemente en el
sentido de las manecillas del reloj, según se ve en la
parte frontal de la secadora. De lo contrario,
intercambie los conductos de electricidad L1 y L2
en el motor de acción de inversión.
52
© Copyright, Alliance Laundry Systems LLC – DO NOT COPY or TRANSMIT
M414462 (SP)
Page 55

Programación del control
electrónico de OPL
Un ciclo previamente
programado de NO
HEAT (Sin calor)
Cuatro ciclos
previamente
Todos estos ciclos
pueden utilizarse
como previamente
programados de
fábrica . . .
O
programados de calor
seco automático
ON / SELECT
HIGH
MEDIUM
MED LOW
LOW
NO HEAT
START
STOP/RESET
DISPLAY
F/ C
SIGNAL
REVERSING
TEMP
STATUS
DRYING
COOL DOWN
DOOR OPEN
CUSTOM
NOTA: 1RWRGDVODVVHFDGRUDVFXHQWDQFRQODRSFLyQGHLQYHUVLyQ
Pueden ser
modificados para
un ciclo sin
guardarse en la
memoria . . .
PROGRAM
AUTO
AUTO
SPECIAL
CYCLE
AUTO
*
TEMP
MORE
+--
CONDITION
O
TIME
SPECIAL
TIME
COOL
*
DOWN
LESS
SAVE
CUSTOM
PROG
Pueden ser
modificados y
guardados en la
memoria como uno
de los cinco CICLOS
PERSONALIZADOS.
T359I
El secado puede efectuarse automáticamente o por
tiempo de secado. Al secar automáticamente, la
secadora deja de secar cuando la ropa alcanza el nivel
de secado programado o configurado de fábrica y
comienza a enfriar. Cuando se seca por tiempo, la
secadora deja de secar cuando termina el tiempo
programado y comienza a enfriarse.
Tanto el secado por tiempo como el automático
cuentan con ciclos configurados de fábrica, pero
pueden crearse otros ciclos. Los ciclos utilizados
frecuentemente pueden guardarse en la memoria de
control como ciclos personalizados.
En todos los ciclos, con la excepción de Sin calor, la
eliminación de arrugas comienza cuando termina el
enfriado. Durante la eliminación de arrugas, la
secadora se detiene alternadamente por 2-1/2 minutos
y después funciona sin calor por 2-1/2 minutos hasta
que se abre la puerta o transcurren 60 minutos.
Los botones de HIGH (Alta), MEDIUM (Mediana),
MED LOW (Media baja) y LOW (Baja) ENCENDER/
SELECCIONAR pueden guardarse en una de cuatro
maneras como ciclo de calor personalizado. Consulte
la Tabla 1.
Figura 9
Secado
automático
Secado por
tiempo
Ciclo especial
Tiempo
especial
Ciclos de personalización
Seca la carga en uno de once niveles de
secado que puede seleccionar el usuario
para un tipo de ropa dado y luego
introduce un enfriado automático o que
puede variar según el usuario.
Duplica las funciones de los controles del
cronómetro electromecánico dual,
permitiendo que el usuario varíe la
temperatura, el tiempo de secado y el de
enfriado.
3HUPLWHTXHHOXVXDULRHVSHFLILTXHHO
Q~PHURGHFLFORVGHFDORU\TXHVHOHFFLRQH
GHXQUDQJRFRPSOHWRGHWHPSHUDWXUDVGH
WRGRVORVFLFORVGHFDORU
Es similar al secado por tiempo, con la
excepción de que el usuario puede
especificar de 27 grados C (80 grados F) a
82 grados C (180 grados F) para cualquier
ciclo de calor.
Tabla 1
M414462 (SP)
© Copyright, Alliance Laundry Systems LLC – DO NOT COPY or TRANSMIT
53
Page 56

Programación del control electrónico de OPL
NOTA: No oprima directamente las luces o el
centro del botón. Para lograr una selección
apropiada, oprima ligeramente el botón a la
derecha del centro. Consulte la Figura 10.
T306I
Figura 10
Señal
(Consulte la Figura 11)
La señal tiene tres niveles de sonido que pueden ser
configurados en cualquier momento que esté activado
el control. Si se oprime el botón SIGNAL (Señal) una
vez, produce el tono más suave. Si se oprime
nuevamente el botón, se aumenta el volumen de señal.
Si se oprime una cuarta vez, se apagan el tono y la luz.
Los niveles de sonido seleccionados son para todos los
ciclos, a menos que esto se cambie.
Luces de estado
(Consulte la Figura 11)
Se enciende cuando se abre la
DOOR OPEN
(Puerta abierta)
DRYING
(Secado)
COOL DOWN
(Enfriado)
CUSTOM
(Personalización)
SIGNAL
(Señal)
REVERSING
(Reversión)
puerta.
NOTA: También titila la
ventana de despliegue.
Se enciende cuando se está
secando la ropa.
Se enciende cuando se está
enfriando la ropa.
Se enciende cuando se ha
programado, ejecutado o vuelto a
llamar un Ciclo de
personalización.
Cuando se enciende, sonará la
señal cuando la ropa esté lista
para quitarla de la secadora.
Cuando se enciende, el cilindro
girará en una dirección durante
25 segundos, hará una pausa de 6
segundos y luego girará en la
dirección opuesta durante otros
25 segundos.
Cuando la señal está encendida y se oprime el botón,
suena en el nivel seleccionado para confirmar que el
botón se oprimió apropiadamente.
Inversión
(Consulte la Figura 11)
NOTA: No todas las secadoras tendrán la opción de
inversión
Cuando esta función está seleccionada, el cilindro
girará en una dirección durante 25 segundos, hará una
pausa de 6 segundos y luego girará en la dirección
opuesta durante otros 25 segundos.
Esta secuencia se repetirá hasta que finalice el ciclo
seleccionado. Para apagar la opción de Inversión,
oprima el botón REVERSING (Reversión). (Cada vez
que se oprima el botón de inversión, el cilindro hará
una pausa de 6 segundos).
SIGNAL
REVERSING
LUCES DE ESTADO
Figura 11
STATUS
DRYING
COOL DOWN
DOOR OPEN
CUSTOM
T398I
T398I
54
© Copyright, Alliance Laundry Systems LLC – DO NOT COPY or TRANSMIT
M414462 (SP)
Page 57

Programación del control electrónico de OPL
BOTONES DE ENCENDER/SELECCIONAR
Modalidad de condición y secado
automático
Cuando se selecciona una temperatura, aparecerá
“A0:00” en la ventana de despliegue. Oprima START
(Iniciar) para comenzar la secadora. “A*:**” aparecerá
en la ventana de despliegue. El primer asterisco “*” es
el nivel de secado seleccionado (los niveles de secado
inferiores a cero aparecerán como “-*”) y “:**”
significa el tiempo transcurrido.
Puede alterarse el grado de secado. Utilice el botón
MORE (Más) o el botón LESS (Menos), para
aumentar o disminuir el nivel de secado.
NOTA: El nivel de secado sólo puede alterarse antes
del final del primer ciclo de calor.
ON / SELECT
HIGH
MEDIUM
START
STOP/RESET
“AC:**” se desplegará cuando la secadora se encuentre
en Enfriado automático. Los tiempos típicos de
enfriado para las selecciones de telas se encuentran
predeterminados, según se muestra en la Tabl a 2 . El
tiempo de enfriado sólo puede alterarse antes de que se
haya iniciado el ciclo. Para alterar el tiempo de
enfriado, oprima el botón COOL DOWN (Enfriado) y
luego oprima el botón MORE (Más) o LESS (Menos)
(cuando se altera el tiempo de enfriado, se desplegará
“TC:**”). Para cambios de 1 minuto, oprima y suelte
el botón. Para cambios de 5 minutos, oprima el botón y
manténgalo oprimido. El tiempo de enfriado puede
estar entre 1 y 39 minutos. Para regresar al Enfriado
automático, oprima el botón MORE (Más) o LESS
(Menos) hasta que se despliegue “AC:**”.
TEMP
MORE
LESS
+--
CONDITION
MED LOW
LOW
NO HEAT
T399I
T399I
Figura 12
Cuando la ropa alcanza el nivel de secado
seleccionado, comienza el enfriado. “AC:**” aparecerá
en la ventana de despliegue. “:**” significa el tiempo
de enfriado transcurrido. Cuando termina el enfriado,
la secadora automáticamente comienza el proceso de
eliminación de arrugas y “Lr” (Carga lista) aparece en
el despliegue.
T396I
BOTONES DE SECADO
T396I
Figura 13
Utilice el botón CONDITION (Conditión) para los
artículos que deben dejarse húmedos para el
planchado. “Cn:00” reemplazará “A0:00” en el
despliegue.
El enfriado automático finaliza cuando se alcanza una
temperatura o un tiempo predeterminados. Consulte la
Tabla 2.
TEMPERATURAS Y TIEMPOS
DE ENFRIADO AUTOMÁTICO
Tela
HIGH (Alta) 38°C, 100°F5 minutos
MEDIUM
(Mediana)
Temperatura
predeterminada
32°C, 90°F8 minutos
Tiempo
predeterminado
M414462 (SP)
© Copyright, Alliance Laundry Systems LLC – DO NOT COPY or TRANSMIT
MED LOW
(Media baja)
LOW (Baja) 32°C, 90°F5 minutos
32°C, 90°F5 minutos
Tabla 2
55
Page 58

Programación del control electrónico de OPL
BOTONES DE SECADO POR TIEMPO
Modalidades de secado por
tiempo y sin calor
Después de la selección de tela, oprima el botón TIME
(Tiempo). Consulte la Figura 14.
TIME
COOL
DOWN
MORE
LESS
+--
T397I
T397I
Figura 14
Un tiempo de secado predeterminado, “Td:**” será el
que reemplazará “A0:00” en el despliegue. Este
tiempo puede cambiarse oprimiendo los botones
MORE (Más) o LESS (Menos). Para cambios de 1
minuto, oprima y suelte el botón. Para cambios de 5
minutos, oprima el botón y manténgalo oprimido. El
tiempo de secado máximo permitido es de 60 minutos.
Consulte la Tab l a 3 para los Tiempos de secado
predeterminados.
“AC:**” se desplegará cuando la secadora se encuentre
en Enfriado automático. Los tiempos de enfriado
típicos para las selecciones de tela se encuentran
predeterminados según se muestra en la Tab l a 3 . El
tiempo de enfriado sólo puede alterarse antes de que se
haya iniciado el ciclo. Para alterar el tiempo de
enfriado, oprima el botón COOL DOWN (Enfriado) y
luego oprima el botón MORE (Más) o LESS (Menos)
(cuando se altera el tiempo de enfriado, se desplegará
“TC:**”). Para cambios de 1 minuto, oprima y suelte
el botón. Para cambios de 5 minutos, oprima el botón y
manténgalo oprimido. El tiempo de enfriado puede ser
entre 1 y 39 minutos. Para regresar al Enfriado
automático, oprima el botón MORE (Más) o LESS
(Menos) hasta que se despliegue “AC:**”.
Para iniciar el ciclo, oprima el botón START (Iniciar).
Se desplegarán el tiempo de secado total más el tiempo
de enfriado. Durante el ciclo, se despliega el tiempo
restante.
NO HEAT (Sin calor) es un ciclo de secado por tiempo
solamente. Cuando se oprime NO HEAT (Sin calor),
se desplegará un tiempo predeterminado de 20
minutos. Esto puede cambiarse de 1 a 60 minutos
oprimiendo los botones MORE (Más) o LESS
(Menos) antes de oprimir el botón START (Iniciar). El
botón COOL DOWN (Enfriado) no funciona en los
ciclos de NO HEAT (Sin calor).
Ciclos
HIGH (Alta) 35 min. 1 – 60 min.
MEDIUM
(Mediana)
MED LOW
(Media baja)
LOW (Baja) 30 min. 1 – 60 min.
NO HEAT
(Sin calor)
56
Tiempo
predeterminado
20 min. 1 – 60 min.
15 min. 1 – 60 min.
20 min. 1 – 60 min.
Tabla 3
© Copyright, Alliance Laundry Systems LLC – DO NOT COPY or TRANSMIT
Rango
M414462 (SP)
Page 59

Programación del control electrónico de OPL
Personalización
Los ciclos más frecuentemente utilizados pueden
guardarse en la memoria del control como Ciclos de
personalización. Solamente puede guardarse un ciclo
por tipo de tela.
Cree un Ciclo automático, de secado por tiempo,
especial o de tiempo especial y guárdelos oprimiendo
la palabra CUSTOM (Personalización) antes de
oprimir START (Iniciar). Para cambiar un ciclo de
personalización, repita lo anterior.
Para instalar u utilizar un ciclo de personalización,
oprima dos veces el botón ON/SELECT (Encendido/
seleccionar). Oprima START (Iniciar).
Registro de ciclo de personalización
Automático Tiempo
Seleccionar
Nivel de secado Enfriado Secado Enfriado
HIGH
(Alta)
MEDIUM
(Media)
Durante los ciclos de personalización, el despliegue es
igual al de los ciclos automáticos de no
personalización. La luz de estado de CUSTOM
(Personalización) se hallará encendida.
Cuando cree o cambie un ciclo de personalización,
inclúyalo en un registro de ciclos de personalización.
Consulte la muestra en la parte inferior de esta página.
Para modificar o mejorar un ciclo de personalización,
debe conocerse sus valores. Los valores de los ciclos
de personalización pueden extraerse del microcontrol,
pero es más fácil y más permanente utilizar un registro
de ciclos de personalización.
Temperatura
Tipo de
carga
MED LOW
(Media baja)
LOW
(Baja)
NO HEAT
(Sin calor)
Seleccionar
HIGH
(Alta)
MEDIUM
(Media)
MED LOW
(Media baja)
LOW
(Baja)
NO HEAT
(Sin calor)
Especial Tiempo especial
Nivel de secado Enfriado Secado Enfriado
Temperatura
Tipo de
carga
M414462 (SP)
© Copyright, Alliance Laundry Systems LLC – DO NOT COPY or TRANSMIT
57
Page 60

Programación del control electrónico de OPL
Modalidad de ciclo especial
Este ciclo le permite al usuario seleccionar el número
de veces que la secadora completará el ciclo de
encendido y apagado de calor. Para introducir la
modalidad de ciclo especial, oprima el botón
SPECIAL CYCLE (Ciclo especial) después de
seleccionar un ciclo. El despliegue leerá “SC:**”.
“**” es el número de veces que la secadora completará
el ciclo de encendido y apagado de calor. Este número
puede cambiarse oprimiendo los botones de MORE
(Más) o LESS (Menos). Para incrementos de 1, oprima
y suelte el botón. Para incrementos de 5, oprima el
botón y manténgalo oprimido por 3 segundos. El
rango es de 1 a 99.
Oprima el botón START (Iniciar) y el número que se
muestra después de “SC:” es el número de ciclos
seleccionado. El número disminuirá a medida que se
termine cada ciclo. El ciclo de enfriado implícito para
la modalidad de ciclo especial es el Enfriado
automático.
NOTA: Ya que hay solamente 60 minutos de tiempo
de ciclo, cualquier ciclo que no se haya completado
dentro de un lapso de 60 minutos, se pasará por alto.
NOTA: A diferencia de la modalidad de secado por
tiempo y de la de secado automático, la temperatura
de regulación en la modalidad de ciclo especial
tiene un rango de 27 grados C (80 grados F) a
82 grados C (180 grados F) o todos los ciclos de
calor.
Modalidad de tiempo especial
Esta modalidad es como la de secado por tiempo, con
la excepción que la temperatura de regulación para
cada ciclo de calor se encuentra entre 27 grados C
(80 grados F) y 82 grados C (180 grados F). Para
introducir la modalidad de tiempo especial, oprima el
botón SPECIAL TIME (Tiempo especial) después de
seleccionar un ciclo. El despliegue leerá “St:**”,
donde “**” es el tiempo de secado. Este tiempo puede
cambiarse oprimiendo los botones de MORE (Más) y
LESS (Menos). Para cambios de 1 minuto, oprima y
suelte el botón. Para cambios de 5 minutos, oprima el
botón y manténgalo oprimido. El tiempo de secado
máximo permitido es de 60 minutos.
“AC:**” se desplegará cuando la secadora se encuentre
en Enfriado automático. Los tiempos de enfriado
típicos para las selecciones de tela están
predeterminados. El tiempo de enfriado sólo puede
alterarse antes de que se haya iniciado el ciclo. Para
alterar el tiempo de enfriado, oprima el botón COOL
DOWN (Enfriado) y luego oprima el botón MORE
(Más) o LESS (Menos) (cuando se altera el tiempo de
enfriado, se desplegará “TC:**”). Para cambios de 1
minuto, oprima y suelte el botón. Para cambios de 5
minutos, oprima el botón y manténgalo oprimido. El
tiempo de enfriado puede ser entre 1 y 39 minutos.
Para regresar al Enfriado automático, oprima el botón
MORE (Más) o LESS (Menos) hasta que se
despliegue “AC:**”.
Para iniciar el ciclo, oprima el botón START (Iniciar).
Se desplegarán el tiempo de secado total más el tiempo
de enfriado. Durante el ciclo, se despliega el tiempo
restante.
Bloqueo de seguridad
Los botones de programación pueden estar
“bloqueados” de manera que los operadores no puedan
cambiar los ciclos por sí mismos. Cuando se utiliza el
bloqueo, el operador puede utilizar solamente los
ciclos automáticos configurados de fábrica y un ciclo
de personalización permitido por botón de selección.
Antes de utilizar el bloqueo cree todos los ciclos de
personalización deseados.
Para bloquear, mantenga oprimido el botón SIGNAL
(Señal) y oprima el botón MORE (Más) en la
modalidad de inactividad.
Para cancelar el bloqueo, mantenga oprimido el botón
SIGNAL (Señal) y oprima el botón LESS (Menos) en
la modalidad de inactividad.
Modalidad de muestra
Esta modalidad mostrará todos los LED e iluminará el
despliegue entero mientras se desactivan todos los
botones. Esta modalidad permite que se abra y cierre
la puerta de carga. Para introducir esta modalidad, el
control debe encontrarse primero en la modalidad de
inactividad. Mantenga oprimido el botón START
(Iniciar) y oprima el botón SAVE CUSTOM (Guardar
personalización). Para salir de la modalidad de
muestra, mantenga oprimido el botón START (Iniciar)
y oprima el botón SAVE CUSTOM (Guardar
personalización).
58
© Copyright, Alliance Laundry Systems LLC – DO NOT COPY or TRANSMIT
M414462 (SP)
Page 61

Programación del control electrónico de OPL
Sensor de temperatura
Para probar el sensor de temperatura, mantenga
oprimido el botón COOL DOWN (Enfriado) y oprima
el botón TEMP (Temperatura) en la modalidad de
inactividad. Esto mostrará la temperatura detectada
por el control.
Se despliega “SH” y sonidos de señal si el sensor de
temperatura está en corto circuito o si la temperatura
del sensor se encuentra sobre los 93 grados C (200
grados F). Oprima el botón STOP/RESET (Detener/
reiniciar) dos veces dentro de un lapso de 3 segundos y
permita que la secadora se enfríe, luego oprima un
botón ON/SELECT (Encendido/seleccionar). Si aún
se despliega “SH”, llame al servicio.
Si el sensor de temperatura está defectuoso o si se
detecta un temperatura por debajo de los -4.4 grados C
(24 grados F) se despliega “OP” y suena una señal 3
minutos después de haberse iniciado la secadora. Si la
temperatura de la secadora se encuentra por encima de
los -4.4 grados C (24 grados F), llame al servicio.
NOTA: Para desplegar el nivel de revisión del
software, mantenga el botón AUTO (Automático)
oprimido y oprima el botón TIME (Tiempo)
mientras el control se encuentra en la modalidad de
inactividad.
Despliegue de temperatura de
cilindro
Para ver la temperatura aproximada a la salida del
cilindro, oprima y mantenga oprimido el botón TEMP
DISPLAY (Despliegue de temperatura) (Modelos
números 50-170 solamente).
Temperatura
deseada de
la ropa
0220S
0270S 0350S
Selección de
temperatura
HIGH (Alta)
Temperatura
de programa
de control
°C (°F) °C (°F)
0220S
0270S 0350S
60 (140) 63 (145) 85 (185) 88 (190)
57 (135) 60 (140) 82 (180)
54 (130) 57 (135) 77 (170) 79 (175)
52 (125) 54 (130) 71 (160) 74 (165)
49 (120) 52 (125) 68 (155) 71 (160)
52 (125) 54 (130) 71 (160) 74 (165)
Ajuste de temperatura
Al seleccionar un tipo de tela se selecciona una
temperatura ideal predeterminada para esa tela. Las
temperaturas inferiores pueden necesitarse para cargas
pequeñas o cuando el flujo de aire a través de la
secadora es inferior al ideal debido al aire de
composición inadecuado o al conducto de salida.
Cada vez que el control se encuentre activado, pero no
en NO HEAT (Sin calor), COOL DOWN (Enfriado) o
LOAD READY (Carga lista), al oprimir el botón
TEMP (Temperatura) se despliegan los tres dígitos de
la temperatura configurada. Utilice los botones MORE
(Más) y LESS (Menos) para aumentar o disminuir la
temperatura.
Despliegue de temperatura (°F/°C)
Para seleccionar entre un despliegue de Fahrenheit y
uno de Centígrados, oprima el botón de despliegue de
TEMP (Temperatura) mientras oprime el botón TEMP
(Temperatura).
NOTA: La temperatura puede configurarse
entre 27 grados C (80 grados F) y 82 grados C
(180 grados F) en las opciones de SPECIAL CYCLE
(Ciclo especial) y SPECIAL TIME (Tiempo
especial) solamente.
Para incluir una temperatura ajustada en un ciclo de
personalización, simplemente ajuste la tempertura
antes de oprimir CUSTOM (Personalización).
MEDIUM
(Mediana)
MED LOW
(Media baja)
LOW (Baja)
49 (120) 52 (125) 68 (155) 71 (160)
46 (115) 49 (120) 66 (150) 68 (155)
43 (110) 46 (115) 63 (145)
41 (105) 43 (110) 57 (135) 60 (140)
43 (110) 49 (120) 63 (145) 68 (155)
41 (105) 46 (115) 57 (135) 63 (145)
38 (100) 43 (110) 54 (130) 60 (140)
35 (95) 41 (105) 49 (120) 57 (135)
32 (90) 38 (100) 41 (105) 52 (125)
35 (95) 49 (120)
32 (90) 41 (105)
29 (85) 38 (100)
27 (80) 35 (95)
24 (75) 35 (95)
Tabla 4
M414462 (SP)
© Copyright, Alliance Laundry Systems LLC – DO NOT COPY or TRANSMIT
59
Page 62

Notas
60
© Copyright, Alliance Laundry Systems LLC – DO NOT COPY or TRANSMIT
M414462 (SP)
Page 63

Mantenimiento
Para reducir el riesgo de lesiones graves,
no abrir el panel de pelusas mientras la
secadora esté en marcha. Abrir la puerta de
la secadora y dejar que el cilindro se
detenga completamente antes de proceder
a limpiar el filtro de pelusas.
W079S
ADVERTENCIA
ADVERTENCIA
Para reducir el riesgo de sacudidas eléctricas, fuego, explosión, lesiones graves o muerte:
• Desconecte la alimentación eléctrica a la secadora antes de reparaciones y/o mantenimiento.
• Cierre la válvula de cierre a la secadora de gas antes de reparaciones y/o mantenimiento.
• Cierre la válvula de vapor a la secadora de vapor antes de reparaciones y/o mantenimiento.
• Nunca arranque la secadora cuando ésta se halle desprovista de sus protectores/paneles.
• Siempre que se desconecten alambres de tierra durante reparaciones y/o mantenimiento,
asegurarse de que la secadora quede debidamente puesta a tierra.
W002S
Diariamente
Mantenga la secadora en un área despejada y libre de
materiales combustibles, gasolina y otros vapores y
líquidos inflamables.
Limpieza de pelusa
1. Abra el panel de pelusa o saque el cajón de
pelusas.
2. Quite toda la pelusa acumulada en el área del
compartimento de pelusas. Cepille ligeramente
cualquier pelusa que pueda haberse dejado en la
pantalla de pelusas. La pelusa que se haya dejado
en dicho compartimento se acerca a la pantalla de
pelusas y restringe la circulación apropiada de
aire.
3. Asegúrese de que la pantalla de pelusas no esté
rajada. Si lo está, reemplácela inmediatamente.
Una pantalla de pelusas rajada permite que la
pelusa pase de la secadora al sistema del conducto
y de esta manera crea una restricción a la
circulación de aire.
4. La pantalla de pelusa está diseñada para cubrir
completamente la abertura entera del panel de la
pantalla de pelusas. Asegúrese de que esto
suceda. Los espacios excesivos entre la pantalla
de pelusas y el panel de la pantalla de pelusas
permiten que la pelusa pase al sistema del
conducto.
5. Secadoras de 50-170 libras: Limpie cualquier
pelusa acumulada de la sonda sensible del
termostato, del termostato de alto límite del closet
o del termistor. El no hacerlo, hará que se
acumule la pelusa en este área y que ésta actúe
como aislación, haciendo que recaliente la
secadora.
M414462 (SP)
© Copyright, Alliance Laundry Systems LLC – DO NOT COPY or TRANSMIT
6. Reemplace el panel de acceso del compartimento
de pelusa de la secadora, asegurando que ajuste y
cierre apropiadamente.
1
MODELOS 0220S, 0270S Y 0350S
1 Pantalla de pelusa
Figura 15
MODELOS 0300D
Figura 16
T388I
T388I
TMB98N
61
Page 64

Mantenimiento
ADVERTENCIA
Para reducir el riesgo de sacudidas eléctricas, fuego, explosión, lesiones graves o muerte:
• Desconecte la alimentación eléctrica a la secadora antes de reparaciones y/o mantenimiento.
• Cierre la válvula de cierre a la secadora de gas antes de reparaciones y/o mantenimiento.
• Cierre la válvula de vapor a la secadora de vapor antes de reparaciones y/o mantenimiento.
• Nunca arranque la secadora cuando ésta se halle desprovista de sus protectores/paneles.
• Siempre que se desconecten alambres de tierra durante reparaciones y/o mantenimiento,
asegurarse de que la secadora quede debidamente puesta a tierra.
1
WARNING
W002S
SECADORAS DE 50 – 170 LIBRAS
1 Sonda sensible del termostato
2 Pantalla de pelusa
Figura 17
Mensualmente
Lubricación
Los cojinetes del motor, de los rodillos y muñones son
cojinetes que no requieren lubricación.
2
T046I
T046I
Eliminación de pelusa
Quite el conducto de salida de la terminal de salida y
quite la pelusa. Si es evidente que existe exceso de
pelusa en la terminal, desarme el conducto y quite la
pelusa.
Modelos de gas de ahorro de energía: Quite la cubierta
de limpieza al fondo del conducto vertical y limpie la
pelusa.
62
© Copyright, Alliance Laundry Systems LLC – DO NOT COPY or TRANSMIT
M414462 (SP)
Page 65

Mantenimiento
ADVERTENCIA
Para reducir el riesgo de sacudidas eléctricas, fuego, explosión, lesiones graves o muerte:
• Desconecte la alimentación eléctrica a la secadora antes de reparaciones y/o mantenimiento.
• Cierre la válvula de cierre a la secadora de gas antes de reparaciones y/o mantenimiento.
• Cierre la válvula de vapor a la secadora de vapor antes de reparaciones y/o mantenimiento.
• Nunca arranque la secadora cuando ésta se halle desprovista de sus protectores/paneles.
• Siempre que se desconecten alambres de tierra durante reparaciones y/o mantenimiento,
asegurarse de que la secadora quede debidamente puesta a tierra.
W002S
Cada tres meses
Eliminación de pelusa
1. Limpie la pelusa y cualquier otro material
foráneo de los conductos de aire ubicados en los
motores. Los motores se enfrían con aire y si los
conductos de aire se tapan, el motor recalentará y
el protector de sobrecarga termal interno se
apagará.
2. Modelos de vapor: Verifique las bobinas de vapor
y quite cualquier acumulación de pelusa y/o
reemplace el filtro de aire en el área de la aleta de
la bobina. Esto puede lograrse utilizando aire
comprimido o fabricando un peine que pueda
tirarse a través de las aletas de la bobina.
3. Los conductos de salida deben inspeccionarse
periódicamente para asegurar que no ha habido
acumulación de pelusa que pueda obstruir el
conducto de aire.
4. Inspeccione el área de secado para asegurarse de
que nada está obstruyendo el flujo de combustión
y el aire de ventilación.
Cada seis meses
Verificación general
Verifique la secadora detalladamente para ver si
existen tuercas, pernos y tornillos sueltos, así como
para ver si existen conexiones de gas, eléctricas y/o de
vapor sueltas.
CONEXIONES DE GAS: (Uniones, ajustes de
tuberías abocinadas). Verifique si existen pérdidas que
puedan ser ocasionadas por vibraciones. Utilice un
líquido de detención de pérdidas no corrosivo.
NO UTILICE UNA LLAMA EN NINGÚN
MOMENTO PARA VERIFICAR SI EXISTEN
PÉRDIDAS DE GAS.
CONEXIONES ELÉCTRICAS: Deben examinarse el
servicio eléctrico y las conexiones a tierra para
verificar que están ajustadas apropiadamente.
5. Quite el panel frontal y limpie cualquier
acumulación de pelusa.
Te ns ión de la correa
Verifique la tensión de la correa y ajuste de ser
necesario.
M414462 (SP)
© Copyright, Alliance Laundry Systems LLC – DO NOT COPY or TRANSMIT
63
Page 66

Mantenimiento
ADVERTENCIA
Para reducir el riesgo de sacudidas eléctricas, fuego, explosión, lesiones graves o muerte:
• Desconecte la alimentación eléctrica a la secadora antes de reparaciones y/o mantenimiento.
• Cierre la válvula de cierre a la secadora de gas antes de reparaciones y/o mantenimiento.
• Cierre la válvula de vapor a la secadora de vapor antes de reparaciones y/o mantenimiento.
• Nunca arranque la secadora cuando ésta se halle desprovista de sus protectores/paneles.
• Siempre que se desconecten alambres de tierra durante reparaciones y/o mantenimiento,
asegurarse de que la secadora quede debidamente puesta a tierra.
Mantenimiento de tres meses
Limpiar los conductos de aire en el
motor de conducción.
Verificar y limpiar las bobinas
de vapor.
Limpiar los conductos de salida.
Verificar el flujo de aire de combustión.
W002S
Verificar el flujo de aire de ventilación.
Verificar la tensión de la correa.
Verificar la tensión de la cadena.
Mantenimiento de seis meses
Verificar si existen tuercas sueltas.
Verificar si existen pernos sueltos.
Verificar si existen tornillos sueltos.
Verificar la conexión del gas.
Verificar las conexiones eléctricas.
Verificar las conexiones de vapor.
64
© Copyright, Alliance Laundry Systems LLC – DO NOT COPY or TRANSMIT
M414462 (SP)
Page 67

Si la unidad necesita servicio
IMPORTANTE: Para el adecuado funcionamiento,
todos los paneles de la secadora deben estar en su
lugar.
Puede ahorrar tiempo y dinero verificando lo
siguiente:
Si la secadora:
No se
inicia
•
•
•
•
•
•
No
calienta
•
•
•
•
Las ropas no
se secan
Razón posible - Efectúe lo siguiente para corregir el problema
Inserte las monedas (Modelos de inserción de monedas solamente).
Cierre la puerta de carga.
Oprima el botón PUSH TO START (Oprimir para iniciar).
Asegúrese de que el cable de la electricidad esté enchufado completamente
en el enchufe eléctrico.
Verifique que el cronómetro de secado se encuentre en posición de OFF
(Apagado).
Verifique el estado del fusible principal y el interruptor del circuito.
Flujo de aire insuficiente.
Verifique que la válvula de cierre de gas se encuentre en posición de OFF
(Apagado).
¿Están configurados apropiadamente los controles?
La correa impulsora está rota. Llame al servicio.
M414462 (SP)
••
••
••
© Copyright, Alliance Laundry Systems LLC – DO NOT COPY or TRANSMIT
La secadora se encuentra en la modalidad de enfriado.
La pantalla de pelusa se encuentra tapada. Límpiela.
El conducto de salida hacia fuera está bloqueado. Despéjelo.
65
Page 68

 Loading...