

MDC
FLW1R
FLW1R
Frontload Washer
Refer to Page 4 for Model Numbers
Programming
Keep These Instructions for Future Reference.
(If this machine changes ownership, this manual must accompany machine.)
www.alliancelaundry.com
Part No. 801184R7
December 2012


NOTE: The WARNING and IMPORTANT
Failure to install, maintain, and/or operate
this machine according to the
manufacturer's instructions may result in
conditions which can produce bodily injury
and/or property damage.
W030
WARNING
instructions appearing in this manual are not meant
to cover all possible conditions and situations that
may occur. It must be understood that common
sense, caution, and carefulness are factors which
cannot be built into these washers. These factors
MUST BE supplied by the person(s) installing,
maintaining, or operating the washer.
Always contact the distributor, service agent, or the
manufacturer about any problems or conditions you do
not understand.
801184
© Copyright, Alliance Laundry Systems LLC – DO NOT COPY or TRANSMIT
1

Table of
Contents
Model Identification ........................................................................... 6
Preliminary Information.................................................................... 7
About the Control ................................................................................. 7
Glossary of Terms................................................................................. 7
Power Failure Recovery ....................................................................... 7
Card Reader Communications.............................................................. 7
MDC Identification............................................................................. 8
SELECT CYCLE Keypads................................................................... 8
START Keypad .................................................................................... 8
Display Identification ......................................................................... 9
Light Emitting Diodes (LEDs) ............................................................. 9
START LED .................................................................................... 9
WASH LED ..................................................................................... 9
RINSE LED ..................................................................................... 9
SPIN LED ........................................................................................ 9
DOOR LOCKED LED .................................................................... 9
Four 7-Segment Digits..................................................................... 9
Washer Operation .............................................................................. 10
Start Up................................................................................................. 10
Ready Mode.......................................................................................... 10
Closing the Washer Door...................................................................... 10
Signals................................................................................................... 10
MDC Special Features........................................................................ 11
Programming MDC .............................................................................. 11
Collecting Audit Information ............................................................... 11
Testing Machine and MDC Functions.................................................. 11
Rapid Advance Feature......................................................................... 11
Coin Drop ............................................................................................. 11
Start Pulse Operation ............................................................................ 11
Service Door and Coin Vault Openings ............................................... 11
Opening the Service Door .................................................................. 12
Stacked Washers and Dryers, Front Control Washers and
Coin Rear Control Washers................................................................ 12
Rear Control Washers Prepped for Card Reader.................................. 12
Entering the Manual Mode................................................................ 13
How to Enter the Manual Mode ........................................................... 13
Programming MDC............................................................................ 14
What Can Be Programmed? ................................................................. 14
Programmable Options Available......................................................... 14
1. Vend Price “AtS”......................................................................... 15
2. Coin #1 Amount “dEn1”.............................................................. 16
3. Coin #2 Amount “dEn2”.............................................................. 17
4. Start Pulse Value “PLSE”............................................................ 18
5. Cycle Stages “CyCL” .................................................................. 19
6. Configuration “CnFg”.................................................................. 20
Configuration Programming ............................................................ 21
7. Default Cycle “dCyC” ................................................................. 23
Collecting Audit Information ............................................................ 24
How to Enter Audit Feature.................................................................. 24
Entering the Audit Feature by Manual Mode .................................. 24
© Copyright 2012, Alliance Laundry Systems LLC
All rights reserved. No part of the contents of this book may be reproduced or transmitted in any form or by any
means without the expressed written consent of the publisher.
2
© Copyright, Alliance Laundry Systems LLC – DO NOT COPY or TRANSMIT
801184

Entering the Audit Feature with the Coin Vault Open .................... 24
How to Read Audit Data....................................................................... 24
How to Exit Audit Feature When Using Manual Mode....................... 24
Testing Machine and MDC Functions.............................................. 25
How to Enter Testing Feature............................................................... 25
How to Start Tests ................................................................................ 25
How to Exit Testing Feature................................................................. 25
Diagnostic Test Descriptions................................................................ 25
Show Fill Time Test......................................................................... 25
Show Drain Time Test ..................................................................... 25
Production Test Cycle........................................................................... 26
To Enter Production Test Cycle....................................................... 26
To Exit Production Test Cycle......................................................... 26
Rapid Advance Feature...................................................................... 29
How to Enter Rapid Advance from Ready Mode................................. 29
How to Enter Rapid Advance During an Active Cycle........................ 29
How to Use Rapid Advance ................................................................. 29
How to Exit Rapid Advance Feature .................................................... 29
Default Washer Settings..................................................................... 30
Default Settings .................................................................................... 30
Default Cycle ........................................................................................ 30
801184
© Copyright, Alliance Laundry Systems LLC – DO NOT COPY or TRANSMIT
3

Model Identification
Information in this manual is applicable to these washer
models:
HFNBCF
HFNBCR
HFNBDF
HFNBDR
HFNBEF
HFNBER
HFNBXF
HFNBXR
HFNBYF
HFNBYR
HFNCXF
HFNCXR
HTEBCF
HTEBDF
HTEBXF
HTEBYF
HTET17
HTET77
HTEX17
HTEX77
HTEY17
HTEY77
HTEZ17
HTGBCF
HTGBDF
HTGBYF
HTGT19
HTGT79
HTGX19
HTGX79
HTGY19
HTGY79
HTGZ19
HWFR61
HWFR71
HWFT61
HWFT63
HWFT71
HWFT73
HWFX61
HWFX71
HWFY61
HWFY63
HWFY71
HWFY73
HWFZ61
HWFZ63
HWRR61
HWRR71
HWRT61
HWRT71
HWRX61
HWRX71
HWRY61
HWRY71
HWRYE1
HWRZ61
HWRRE1
HWRTE1
HWRXE1
NTEBXF
NTGX77
NTGX79
NTGBXF
SFNBCF
SFNBCR
SFNBXF
SFNBXR
SFNBYF
SFNBYR
SFNCCF
SFNCCR
SFNCXR
SFNCYF
SFNCYR
STEBCF
STEBXF
STET17
STET77
STEX17
STEX77
STEY17
STEY77
STEZ17
STGBCF
STGBXF
STGBYF
STGT19
STGT79
STGX13
STGX19
STGX73
STGX79
STGY19
STGY79
STGZ19
SWFT61
SWFT63
SWFT71
SWFT73
SWFX61
SWFX63
SWFX71
SWFX73
SWFY61
SWFY63
SWFY71
SWFY73
SWFZ61
SWFZ63
SWRT61
SWRT71
SWRT73
SWRTE1
SWRX61
SWRX71
SWRY61
SWRY71
SWRZ61
4
© Copyright, Alliance Laundry Systems LLC – DO NOT COPY or TRANSMIT 801184

Preliminary Information
About the Control
MDC on the commercial washer is a programmable
control that lets the owner control machine features by
pressing sequences of SELECT CYCLE keypads.
MDC allows the owner to program cycle steps, set
vend prices, retrieve audit information and run
diagnostic tests. Washers shipped from the factory
have a default cycle (PERM PRESS/WARM) built in.
IMPORTANT: In the event of a power failure,
MDC will not have to be reprogrammed. It is
designed with a memory system that will remember
how it was programmed (for up to six years) until
the electrical power is restored.
IMPORTANT: It is extremely important that the
washer has a positive ground and that all
mechanical and electrical connections to MDC are
made before applying power to or operating the
washer.
Glossary of Terms
The following are a few terms and abbreviations to
learn. These are referred to throughout the manual:
Power Failure Recovery
If power fails during an active cycle, the cycle status is
saved in memory. If door is locked when power is
restored, the washer will automatically resume the
cycle. If door is unlocked when power is restored, the
user must press the START keypad to resume the
cycle.
Card Reader Communications
Card Models Only
The control will communicate with a third party card
reader, available at extra cost from various card reader
manufacturers. Contact the card reader manufacturer
of your choice for availability and additional
information.
Four-Digit Display – This term refers to the window
area of the control that displays values.
LED (Light Emitting Diode) – This term refers to the
lights on the keypads and status words of the control.
801184
© Copyright, Alliance Laundry Systems LLC – DO NOT COPY or TRANSMIT
5
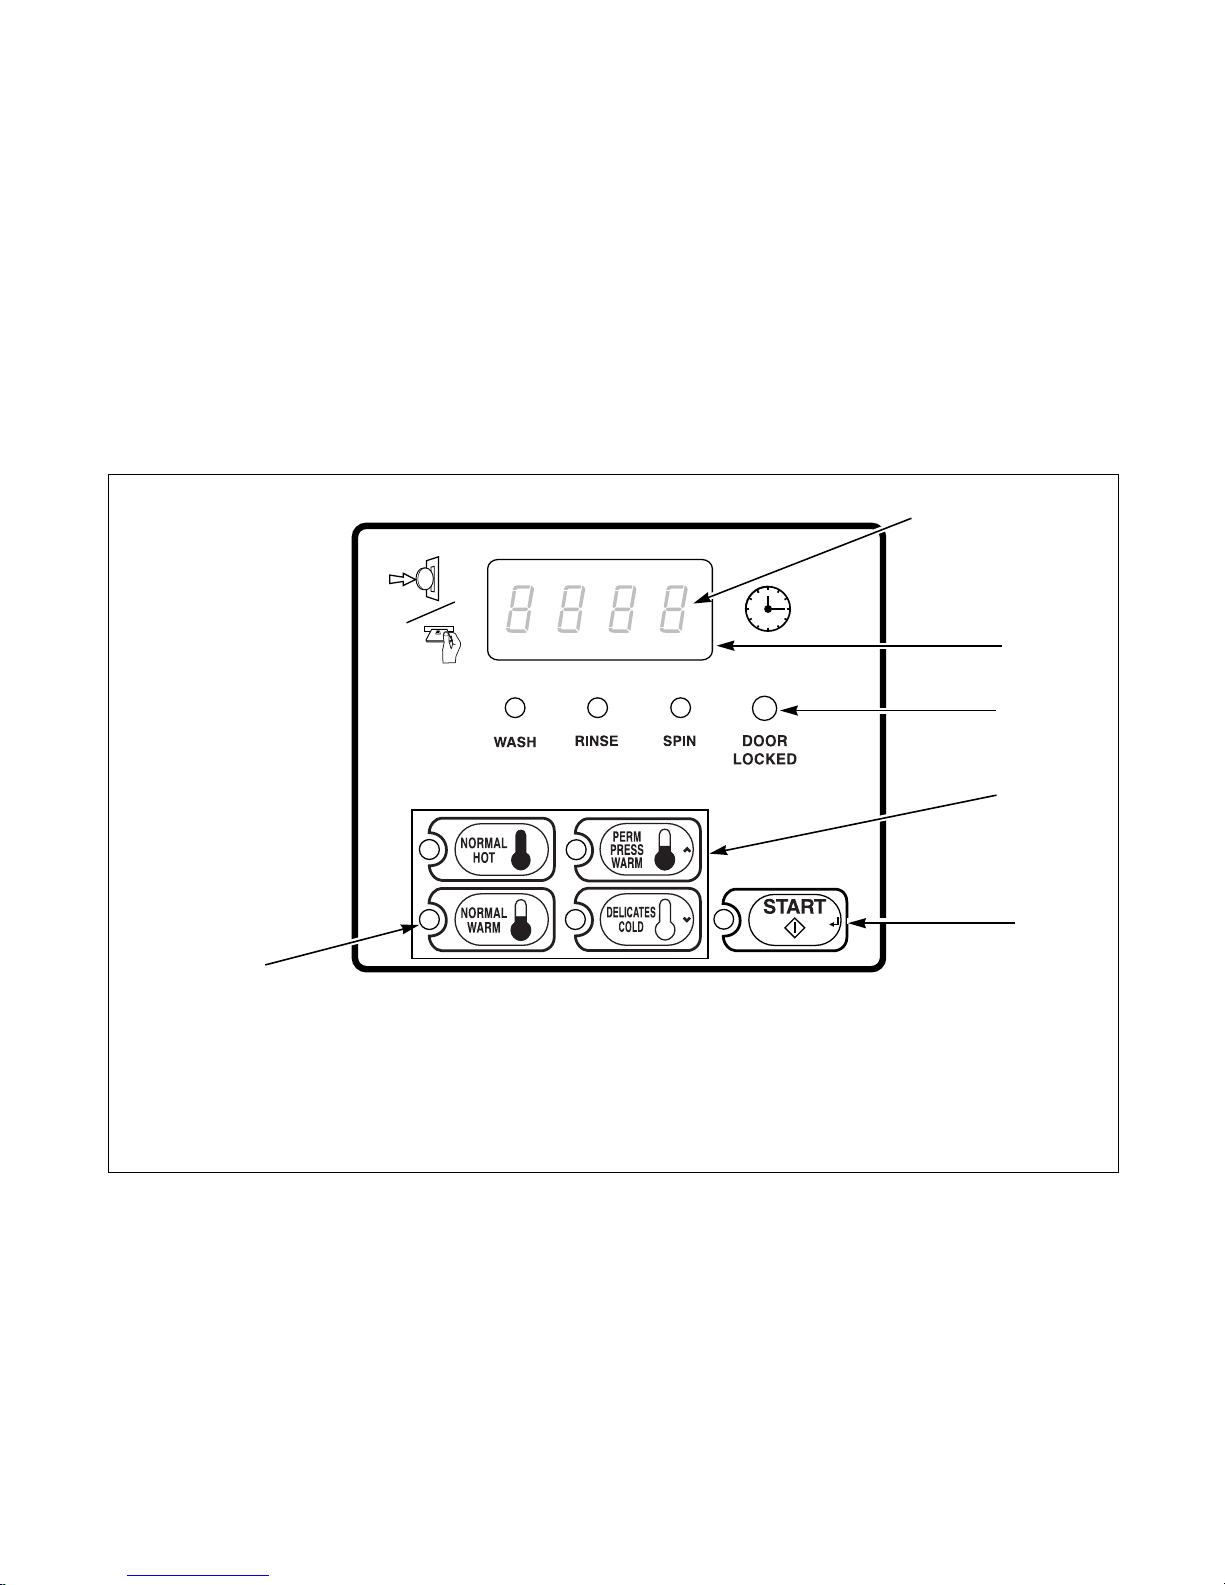
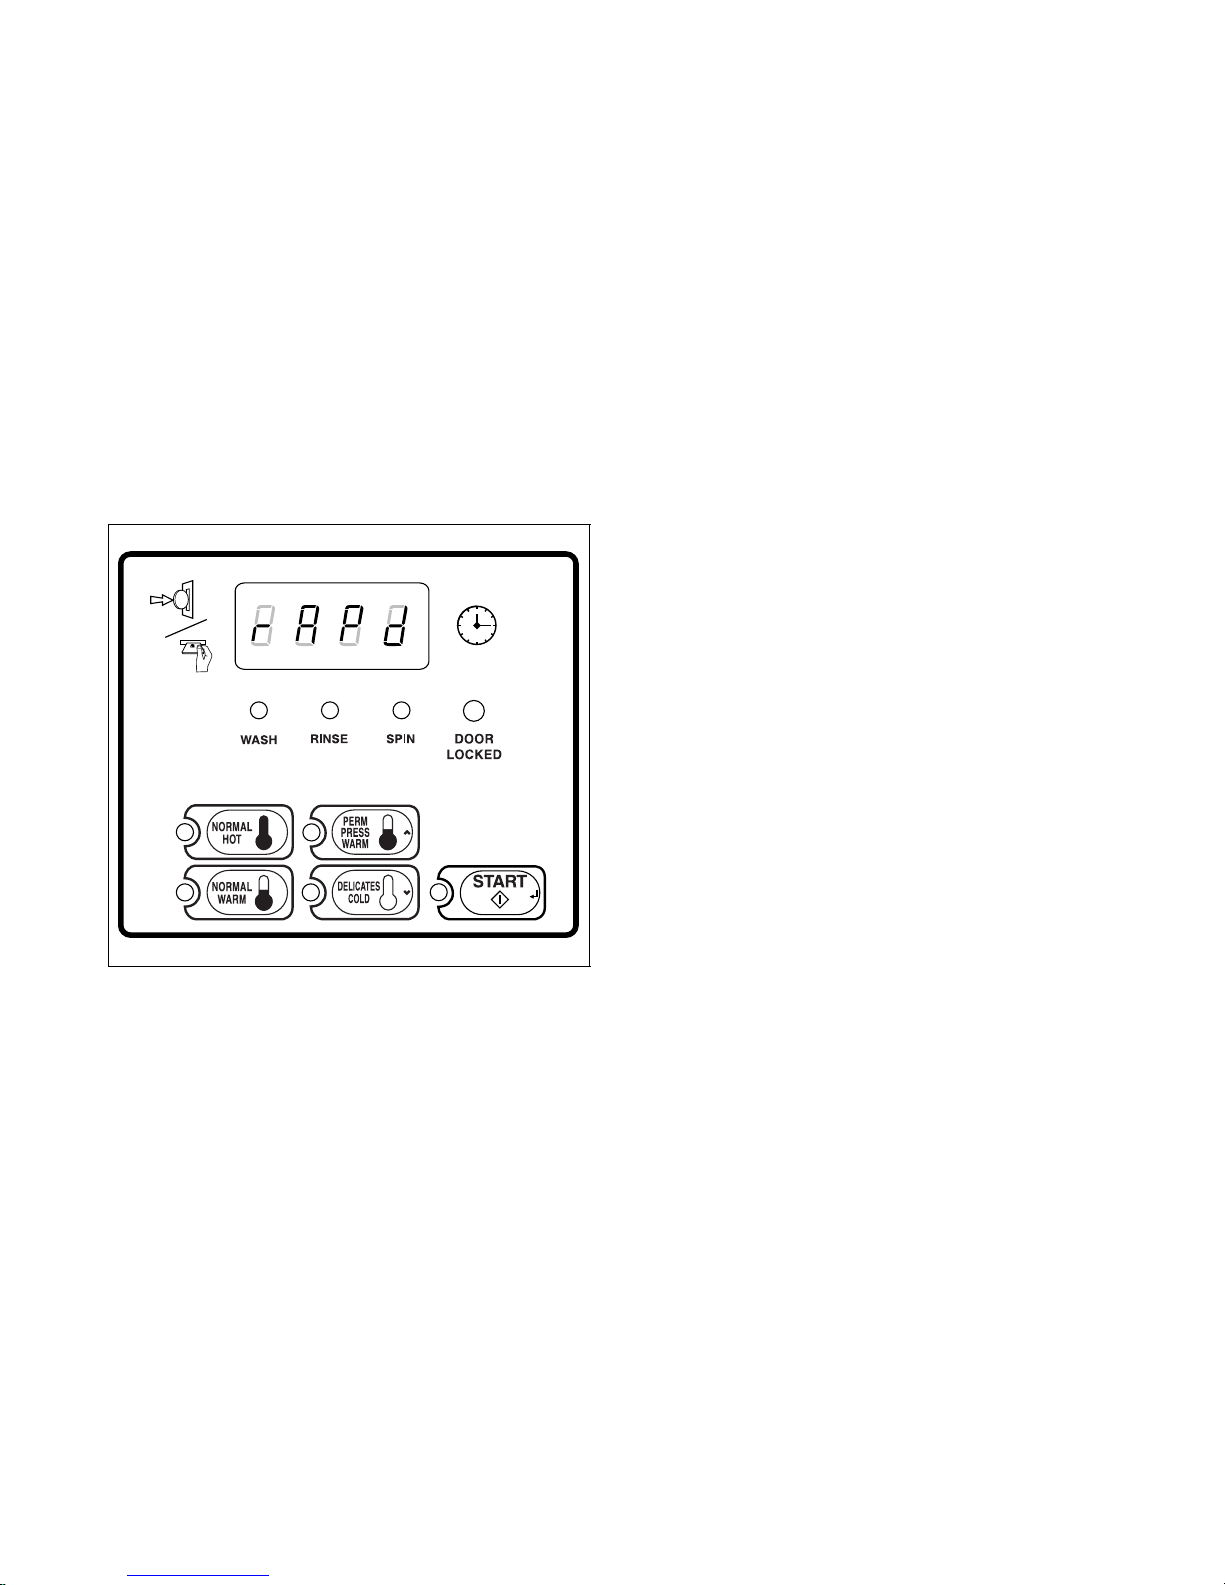
MDC Identification
6
2
3
1
5
4
SELECT CYCLE Keypads
SELECT CYCLE keypads are used to select the
specific washer cycle. These keypads include
NORMAL/HOT, NORMAL/WARM, PERM PRESS/
WARM, and DELICATES/COLD. The selection of
one of these keypads will light up the corresponding
LED. The default cycle is PERM PRESS/WARM. The
SELECT CYCLE keypads are not active after the first
fill cycle of the washer. Pressing the flashing START
keypad will confirm selection and cycle will begin
when vend is satisfied.
START Keypad
The START keypad is used to start the washer after the
full vend price has been satisfied.
Both the START keypad and the SELECT CYCLE
keypads are used in various combinations for
programming cycles, retrieving audit information,
running diagnostic tests, and other operations
described in Entering the Manual Mode.
1 Four 7-Segment Digits
2 Four-Digit Display
3 LED Status Lights
4 SELECT CYCLE Keypads
5 START Keypad
6 LED Light
6
© Copyright, Alliance Laundry Systems LLC – DO NOT COPY or TRANSMIT 801184
FLW1R
Figure 1

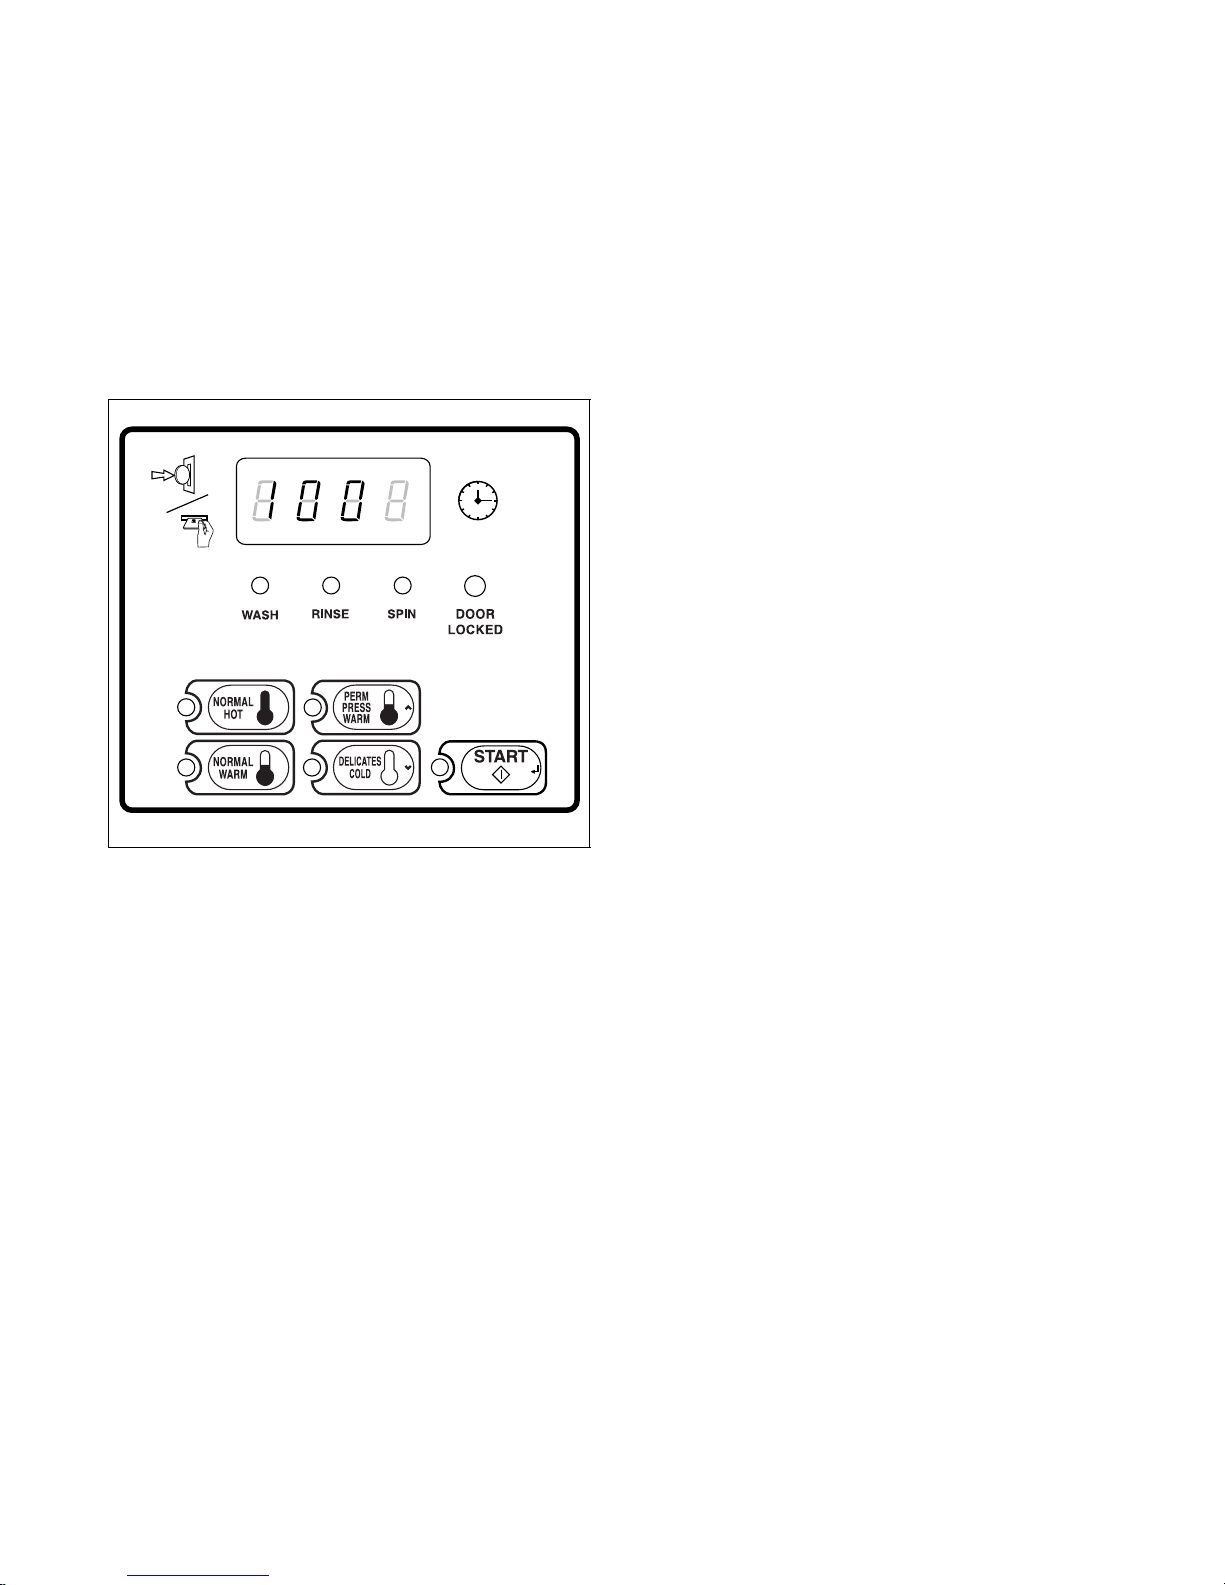
Display Identification
Light Emitting Diodes (LEDs)
LIGHT EMITTING DIODES (LEDs) are used to
indicate the chosen cycle status. Refer to LED
descriptions below.
START LED
The START keypad LED flashes whenever the washer
is not in a cycle and the full vend price has been
satisfied. When the START keypad is pressed, the
cycle will begin or resume. The START LED will shut
off when the START keypad is pressed.
WASH LED
The WASH LED is lit at the beginning of a wash cycle
and will remain lit until the wash cycle is complete.
RINSE LED
The RINSE LED is lit at the beginning of the rinse or
extra rinse cycle and will remain lit until the cycle is
complete.
SPIN LED
The SPIN LED is lit for all spin cycles.
DOOR LOCKED LED
The DOOR LOCKED LED is lit whenever the door is
locked. The door cannot be opened when the DOOR
LOCKED LED is lit.
Four 7-Segment Digits
The 7-SEGMENT DIGITS are used to display the
time remaining in a cycle, vend price, error messages
and descriptive codes. When displaying the time
remaining, the time value is displayed on the right side
of the display. When displaying the vend price, the
value is displayed on the left side of the display.
During diagnostic testing or manual programming of
the control, these digits will display descriptive codes
and values (as described in Entering the Manual
Mode).
801184
© Copyright, Alliance Laundry Systems LLC – DO NOT COPY or TRANSMIT
7
Washer Operation
Start Up
When power is applied to the washer, the control will
display its software version as “SXXX” (“XXX” is the
version number) for two seconds. If the control was
not powered down during a running cycle, it will enter
the Ready Mode.
Ready Mode
When the START keypad is pressed, the door will lock
and the washer will start. The START LED will stop
flashing and the WASH LED will be lit. The display
will change to show the remaining cycle time on the
right side of the display. The appropriate LEDs will
light while the machine passes through different cycle
steps. Any coin entered after the first fill cycle will be
added to the total coin counter, but the user will not be
able to change cycles.
When a cycle is complete, the Four-Digit Display will
show “00” until the washer door is opened, a keypad is
pressed, a coin or card is entered, or a start pulse is
received. When one of these instances occurs, the
Four-Digit Display will revert back to the Ready
Mode.
Closing the Washer Door
If the door is not closed when the vend price is
satisfied, the Four-Digit Display will show “door”
until the door is closed. Once the door is closed, the
START keypad must be pressed again to lock door and
start cycle. If the door does not lock within 15 seconds
of being closed, “E dl” will be displayed indicating a
door lock error and the machine will shut off.
FLW2R
Figure 2
In Ready Mode, the PERM PRESS/WARM (default
cycle) LED is lit, and the full vend price is displayed
as left justified. The user may select a different cycle,
if desired. (In card reader machines, if the current
cycle has a vend price which differs from the default
cycle, the display will be updated to show the new
price.) If another cycle is selected, the control will
flash the amount needed to satisfy the vend price
shown on the display. If the vend price is not satisfied
within one minute, the washer control will stop
flashing the vend price and return to the default cycle.
The display will continue to show the remaining vend
price needed to start a cycle and will credit any vend
entered by the user.
Vends may be satisfied by a coin drop, start pulses, or
by a third party card reader. If a coin drop is used, the
remaining vend price will decrease with each coin
entry. If start pulses are used, the remaining vend price
will decrease with each received pulse. Once the vend
price is satisfied, the START LED will begin to flash.
If a third party card reader is used, the START LED
will begin to flash when a valid cash card is entered
into the reader.
Signals
There are four instances when a signal may sound
during washer operation. The owner may program the
signal to be turned on or off (refer to Programming
MDC, option 6). These four instances are listed below:
1. Keypad Depression Signal
The signal will sound for.25 seconds each time a
keypad is pressed.
2. Coin Input/Start Pulse Input/Card Insertion
Signal
The signal will sound for.25 seconds each time a
coin or start pulse is received or a card is entered.
3. Machine Error Signal
The signal will sound for 15 seconds if an error
occurs.
4. Vend Satisfaction Signal
The signal will sound one second on and one
second off for 10 seconds when the vend price is
satisfied.
8
© Copyright, Alliance Laundry Systems LLC – DO NOT COPY or TRANSMIT 801184

MDC Special Features
Programming MDC
MDC allows the washer owner to program special
features with the use of the keypads. Audit, diagnostic,
cycle and vend information may be programmed and
retrieved by pressing keypad combinations.
For details on programming cycle and vend
information, refer to Programming MDC.
Collecting Audit Information
With MDC, the washer owner is able to access
valuable audit information by manual access or by a
third party card reader. Audit information recorded
and available to be displayed to the owner includes
total coins entered, total start pulses received, and total
cycles.
For detailed information on audit features, refer to
Collecting Audit Information.
Testing Machine and MDC
Functions
Special programmable diagnostic features built into
MDC allow the owner to test specific information with
the washer in the Ready Mode. By opening and
closing the service door and then pressing various
sequences of keypads, the owner may perform the
following tests:
• Show Fill Time Test
• Show Drain Time Test
• Production Test
Rapid Advance Feature
This feature allows the user to quickly advance
through an active cycle or advance into a cycle from
the Ready Mode. This feature is useful when tests
must be performed immediately on a washer in an
active cycle. In this case, the user can quickly advance
the cycle to the end, perform the required tests, and
return the washer to the active cycle.
For detailed information on using the Rapid Advance
feature, refer to Rapid Advance Feature section.
Coin Drop
The control will accept pulses from a single or dual
coin drop to satisfy vend price. Each coin drop will
have the ability to start or run a cycle.
Start Pulse Operation
The control will accept pulses from a central card
reader system (available at extra cost). The machine
can be programmed for the value of each start pulse
received. Refer to Programming MDC, option 4.
Service Door and Coin Vault
Openings
An open service door or coin vault combined with
various keypad presses allows the control to enter
manual modes of operation. These modes include
Manual Programming, Audit Collection, and
Diagnostics.
For detailed information on running diagnostic tests,
refer to Testing Machine and MDC Functions.
801184
© Copyright, Alliance Laundry Systems LLC – DO NOT COPY or TRANSMIT
9
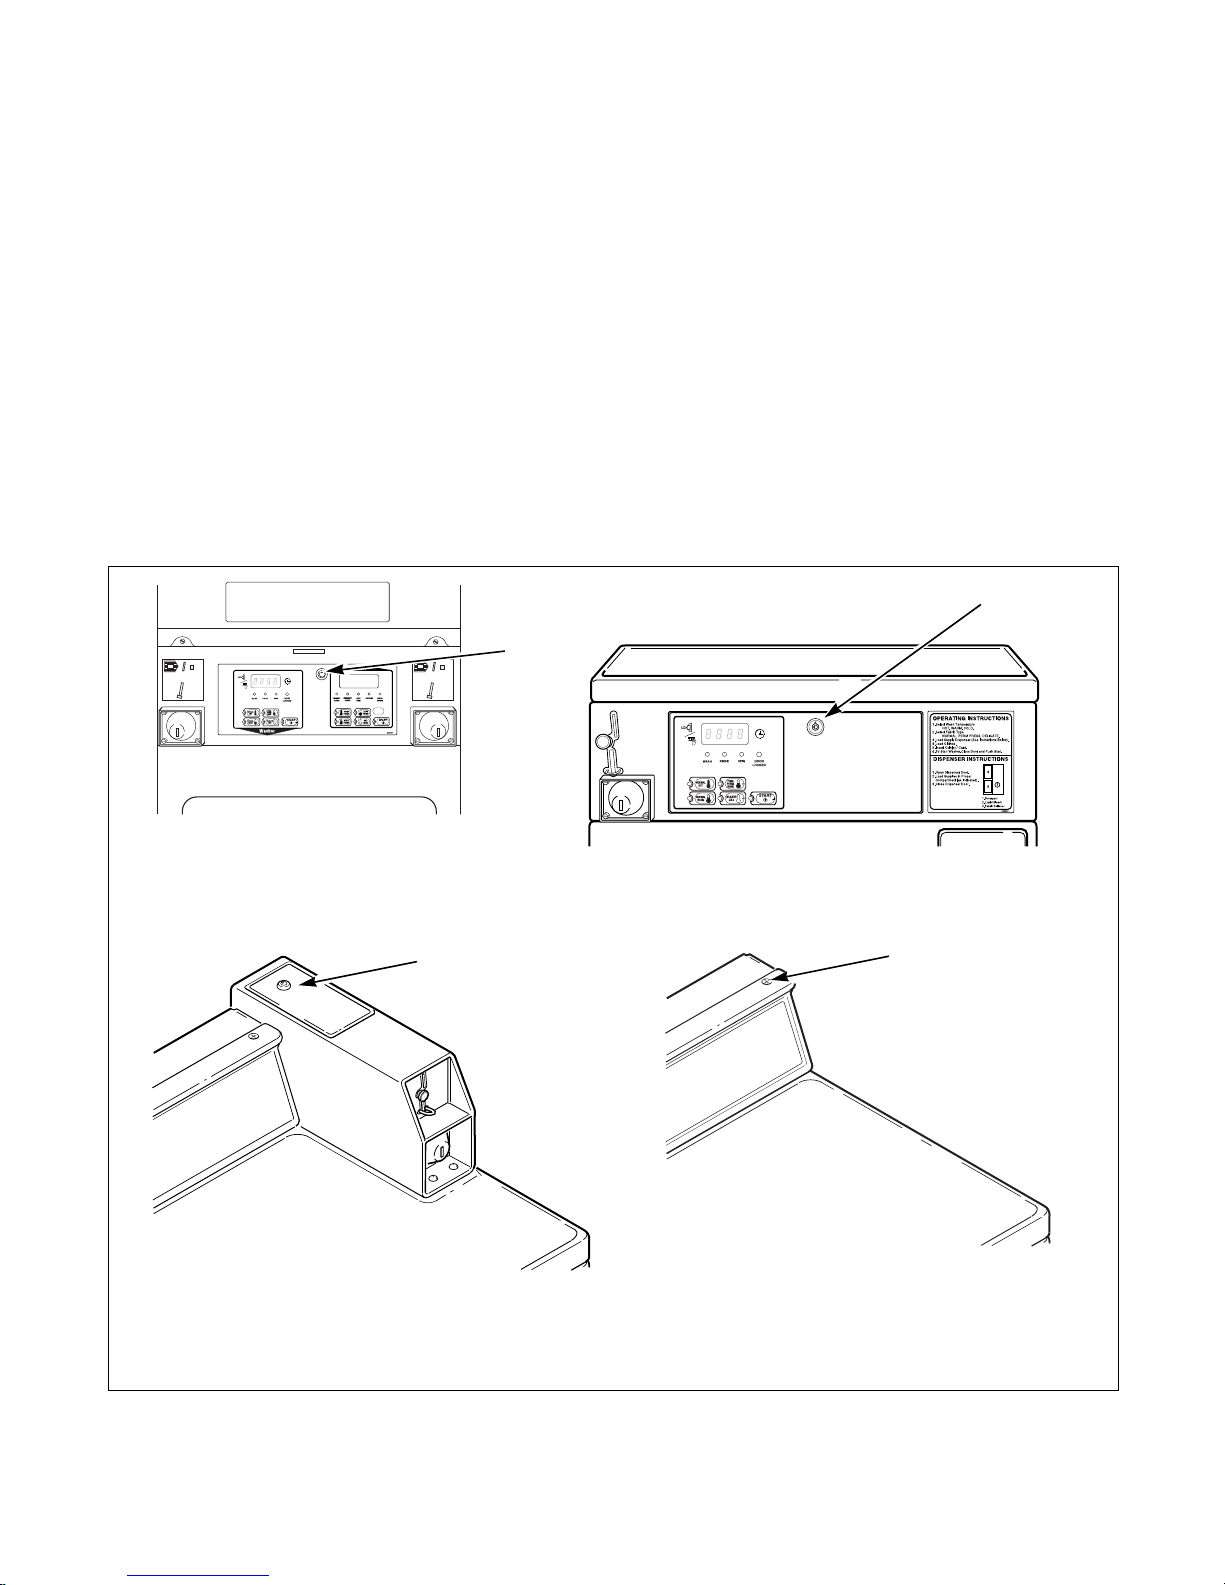
Opening the Service Door
FLW4R
FLW3R
25
25
FLW5R
FRONT CONTROL WASHERS
1
1
1
1
STACKED WASHERS AND DRYERS
FLW3R
FLW4R
FLW5R
FLW6R
REAR CONTROL CARD WASHERS
REAR CONTROL COIN WASHERS
Stacked Washers and Dryers, Front
Control Washers and Coin Rear
Control Washers
Manually programming MDC requires the user to
open and close the service door. Opening and closing
the service door trips a switch allowing access to
various programming options, diagnostics, and audit
capabilities. The coin drawer switch must be closed to
enter the Manual Mode.
The service door is located in the control panel on the
Stacked Washers and Dryers and Front Control
Washers. On Rear Control Washers, the service door is
located on the top of the meter case. Refer to Figure 3.
After opening and closing the service door, the
programmer has 4.25 minutes to begin programming.
If a SELECT CYCLE keypad has not been pressed in
that time, the control will exit the Programming Mode.
Refer to Figure 3.
Rear Control Washers Prepped for
Card Reader
Manually programming MDC requires the user to
remove the control panel and unplug the bullet
connector located between the “white/black” and “red/
blue” wires. This will allow the user to access various
programming options, diagnostics, and audit
capabilities. Refer to Figure 3.
1 Service Door
FLW6R
Figure 3
10
© Copyright, Alliance Laundry Systems LLC – DO NOT COPY or TRANSMIT 801184
Entering the Manual Mode
>
<
For programming, testing, and retrieving information
from MDC, it is often necessary to enter the Manual
Mode by following the five simple steps below.
How to Enter the Manual Mode
1. Open the service door. Refer to Opening the
Service Door. The coin vault switch must be
closed.
2. While pressing and holding the NORMAL/HOT
keypad with one hand, press the NORMAL/
WARM keypad with the other hand.
3. The Four-Digit Display will show “rAPd”.
There are four manual features available. They are as
follows:
1. Manual Rapid Advance (rAPd)
2. Manual Programming (PrOg)
3. Manual Audit (AUdT)
4. Diagnostic Tests (dIAg)
NOTE: The Audit feature can also be accessed by
removing the coin vault and pressing the START
(enter) keypad.
Once in the Manual Mode, continue on into one of the
features described in detail on the following pages.
Instructions on how to exit each feature are found at
the end of each feature description.
Figure 4
4. Press the PERM PRESS/WARM ( ) or the
DELICATES/COLD ( ) keypad to scroll through
the options until the desired option appears in the
display.
5. Press the START (enter) keypad.
801184
© Copyright, Alliance Laundry Systems LLC – DO NOT COPY or TRANSMIT
FLW7R
11

Programming MDC
What Can Be Programmed?
This feature allows the owner to program cycle
parameters, standard vend pricing, and other features
by using the keypads.
This section offers a detailed description of all seven
options available for programming.
Each description includes instructions on when and
why the option might be used and, more importantly,
how to program the option.
For more advanced users, a quick reference list of the
options available through the Programming Mode is
located on this page.
NOTE: The letters in the Option column of the
Programmable Options List are what will show in
the Four-Digit Display when that option is selected.
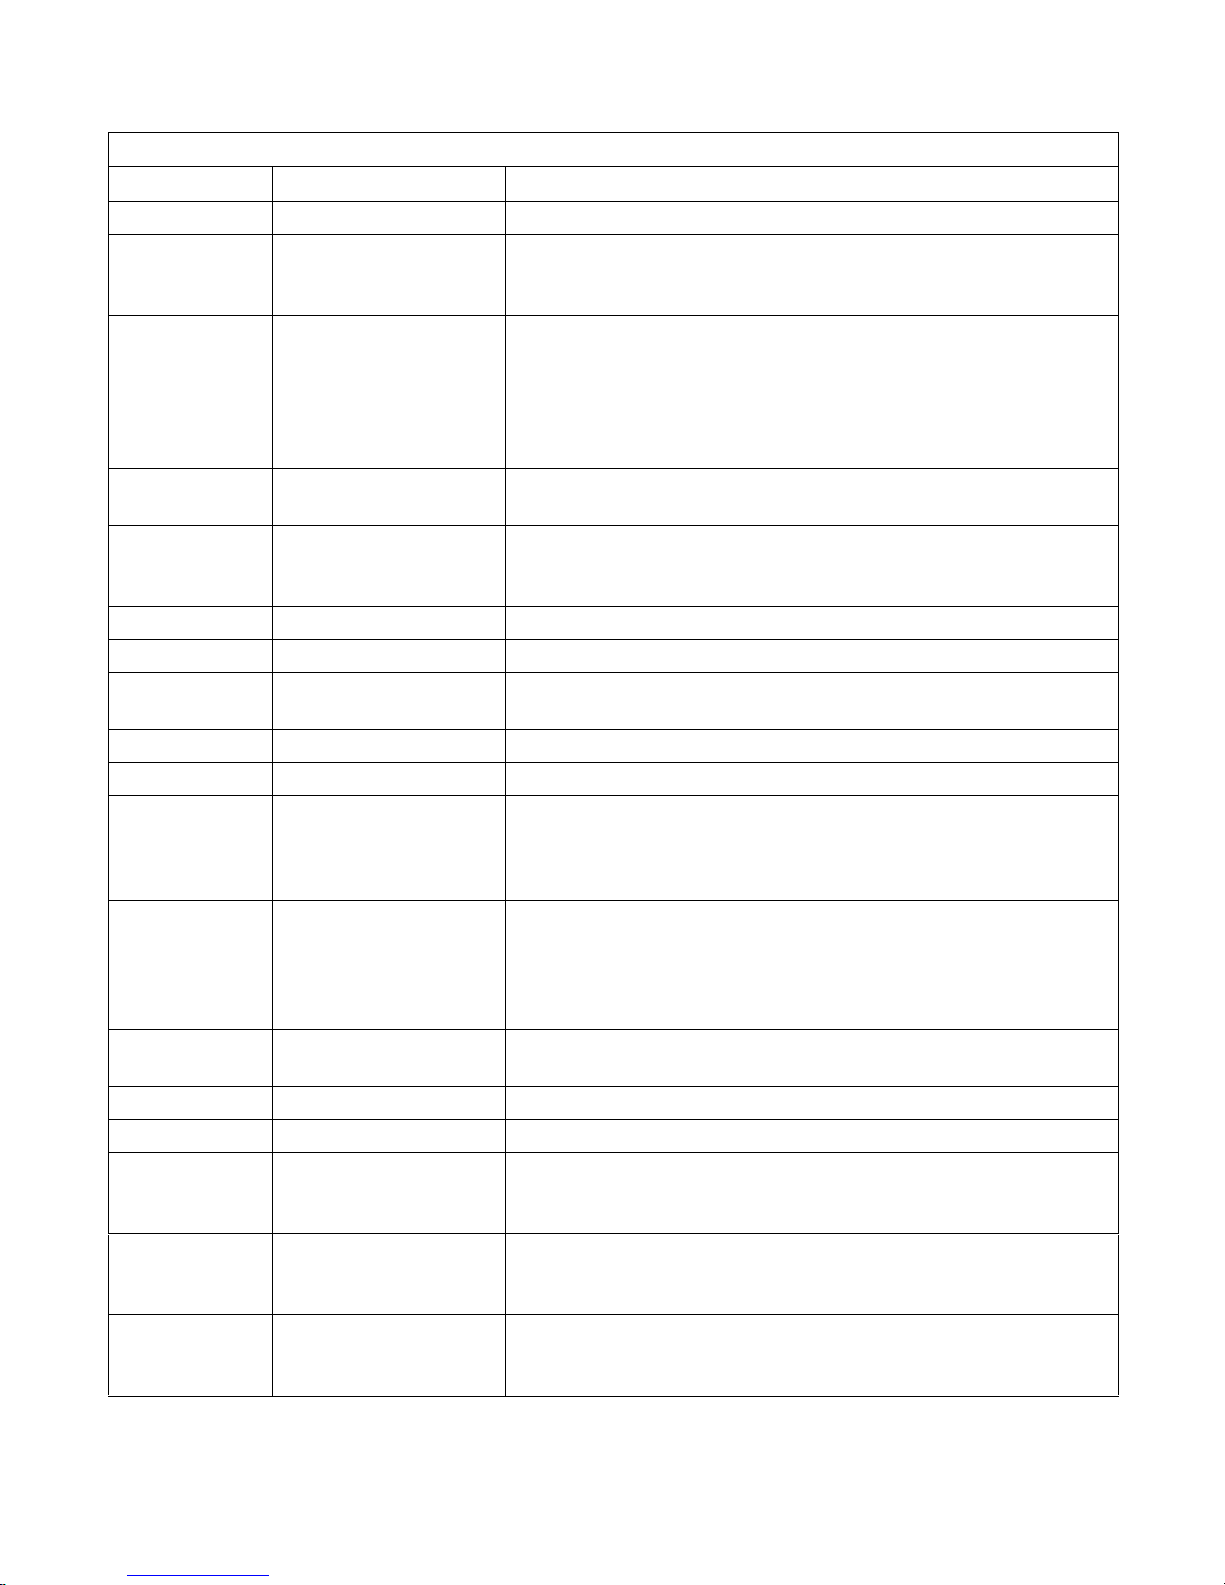
Programmable Options Available
Option Description
AtS Vend Price
dEn1 Coin # 1 Amount
dEn2 Coin #2 Amount
PLSE Start Pulse Value
CyCL Cycle Stages
CnFg Configuration Display
dCyC Default Cycle (software version “S003” or
higher only)
12
© Copyright, Alliance Laundry Systems LLC – DO NOT COPY or TRANSMIT 801184

Programming MDC
><>
<
>
<
1. Vend Price “AtS”
This option allows the owner to set the vend price. The
vend price will be displayed in the Four-Digit Display.
Program this option whenever the vend price needs to
be changed.
How to Program Vend Price
1. Control must be in Manual Mode. Refer to
Entering the Manual Mode.
2. Press the PERM PRESS/WARM ( ) or the
DELICATES/COLD ( ) keypad until “PrOg”
appears in the Four-Digit Display.
COM1R
Figure 5
3. Press the START (enter) keypad.
4. Press the PERM PRESS/WARM ( ) or the
DELICATES/COLD ( ) keypad to scroll through
the programmable options until “AtS” appears in
the Four-Digit Display.
5. When “AtS” appears in the Four-Digit Display,
press the START (enter) keypad. There are four
digits in Vend Price and the fourth digit will
become the active digit. The active digit will
flash one second on and one second off.
COM3R
Figure 7
NOTE: The vend price can be set from 0 to 9999.
6. Press the PERM PRESS/WARM ( ) or the
DELICATES/COLD ( ) keypad to increase or
decrease the value of the active digit and the
START (enter) keypad to enter the value of the
digit and advance to the next digit.
7. Repeat step 6 for each of the four digits. When
the START (enter) keypad is pressed and the last
digit is the active digit, the changes to the vend price
will be saved into the memory. The next option,
“dEn1”, will appear in the Four-Digit Display.
NOTE: To program “dEn1” (Coin #1 Amount),
refer to option 2. To program other options, refer to
the appropriate section.
Figure 6
DRY550R
How to Exit Programming Feature
1. Be sure the control shows a programmable
option, not a value.
2. While pressing and holding the NORMAL/HOT
keypad with one hand, press the NORMAL/WARM
keypad with the other hand. The control will
revert back to the previous mode of operation.
801184
© Copyright, Alliance Laundry Systems LLC – DO NOT COPY or TRANSMIT
13

Programming MDC
><>
<
>
<
2. Coin #1 Amount “dEn1”
This option allows the owner to set a specific
numerical value for a coin entered. For example, in the
United States, the coin value for one quarter would be
measured in cents (25). Therefore, the coin amount
entered for one quarter would be 0025.
If the Vend Price (option 1) is set for “75”, and the
coin #1 amount is set for “0025”, the vend price
displayed will decrease by 25 for each coin entered.
How to Program Coin #1 Amount
1. Control must be in Manual Mode. Refer to
Entering the Manual Mode.
2. Press the PERM PRESS/WARM ( ) or the
DELICATES/COLD ( ) keypad until “PrOg”
appears in the Four-Digit Display.
COM1R
Figure 8
3. Press the START (enter) keypad and “AtS” will
appear in the Four-Digit Display.
4. Press the PERM PRESS/WARM ( ) or the
DELICATES/COLD ( ) keypad to scroll through
the programmable options until “dEn1” appears
in the Four-Digit Display.
5. When “dEn1” appears in the Four-Digit Display,
press the START (enter) keypad. There are four
digits in Coin #1 Amount, and the fourth digit
will become the active digit. The active digit will
flash one second on and one second off.
COM3R
Figure 10
NOTE: The coin amount can be set from 1 to 9999.
6. Press the PERM PRESS/WARM ( ) or the
DELICATES/COLD ( ) keypad to increase or
decrease the value of the active digit and the
START (enter) keypad to enter the value of the
digit and advance to the next digit.
7. Repeat step 6 for each of the four digits. When
the START (enter) keypad is pressed and the last
digit is the active digit, the changes to the coin #1
amount will be saved into the memory. The next
option, “dEn2”, will appear in the Four-Digit
Display.
NOTE: To program “dEn2” (Coin #2 Amount),
refer to option 3. To program other options, refer to
the appropriate section.
How to Exit Programming Feature
1. Be sure the control shows a programmable
option, not a value.
Figure 9
14
© Copyright, Alliance Laundry Systems LLC – DO NOT COPY or TRANSMIT
2. While pressing and holding the NORMAL/HOT
keypad with one hand, press the NORMAL/
WARM keypad with the other hand. The control
will revert back to the previous mode of
operation.
DRY552R
801184

Programming MDC
><>
<
>
<
3. Coin #2 Amount “dEn2”
This option allows the owner to set a specific
numerical value for a coin entered when using the dual
coin drop. For example, the coin value for a dollar
coin would be measured in cents (100). Therefore, the
coin amount entered for one dollar coin would be
0100.
If the Vend Price (option 1) is set for “200”, and the
coin #2 amount is set for “0100”, the vend price
displayed wi11 decrease by 100 for each coin entered.
How to Program Coin #2 Amount
1. Control must be in Manual Mode. Refer to
Entering the Manual Mode.
2. Press the PERM PRESS/WARM ( ) or the
DELICATES/COLD ( ) keypad until “PrOg”
appears in the Four-Digit Display.
COM1R
Figure 11
3. Press the START (enter) keypad and “AtS” will
appear in the Four-Digit Display.
4. Press the PERM PRESS/WARM ( ) or the
DELICATES/COLD ( ) keypad to scroll through
the programmable options until “dEn2” appears
in the Four-Digit Display.
5. When “dEn2” appears in the Four-Digit Display,
press the START (enter) keypad. There are four
digits in Coin #2 Amount, and the fourth digit
will become the active digit. The active digit will
flash one second on and one second off.
COM3R
Figure 13
NOTE: The coin amount can be set from 1 to 9999.
6. Press the PERM PRESS/WARM ( ) or the
DELICATES/COLD ( ) keypad to increase or
decrease the value of the active digit and the
START (enter) keypad to enter the value of the
digit and advance to the next digit.
7. Repeat step 6 for each of the four digits. When
the START (enter) keypad is pressed and the last
digit is the active digit, the changes to the coin #2
amount will be saved into the memory. The next
option, “PLSE”, will appear in the Four-Digit
Display.
NOTE: To program “PLSE” (Start Pulse Value),
refer to option 4. To program other options, refer to
the appropriate section.
How to Exit Programming Feature
1. Be sure the control shows a programmable
option, not a value.
Figure 12
801184
© Copyright, Alliance Laundry Systems LLC – DO NOT COPY or TRANSMIT
2. While pressing and holding the NORMAL/HOT
keypad with one hand, press the NORMAL/
WARM keypad with the other hand. The control
will revert back to the previous mode of
operation.
DRY553R
15

Programming MDC
><>
<
>
<
4. Start Pulse Value “PLSE”
This option allows the owner to program the value of
the start pulse with an aftermarket central card reader
or pay system.
How to Program Start Pulse Value
1. Control must be in Manual Mode. Refer to
Entering the Manual Mode.
2. Press the PERM PRESS/WARM ( ) or the
DELICATES/COLD ( ) keypad until “PrOg”
appears in the Four-Digit Display.
COM1R
Figure 14
3. Press the START (enter) keypad and “AtS” will
appear in the Four-Digit Display.
4. Press the PERM PRESS/WARM ( ) or the
DELICATES/COLD ( ) keypad to scroll through
the programmable options until “PLSE” appears
in the Four-Digit Display.
5. When “PLSE” appears in the Four-Digit
Display, press the START (enter) keypad. There
are four digits in Start Pulse Value, and the fourth
digit will become the active digit. The active
digit will flash one second on and one second off.
COM3R
Figure 16
NOTE: The start pulse can be set from 1 to 9999.
6. Press the PERM PRESS/WARM ( ) or the
DELICATES/COLD ( ) keypad to increase or
decrease the value of the active digit and the
START (enter) keypad to enter the value of the
digit and advance to the next digit.
7. Repeat step 6 for each of the four digits. When
the START (enter) keypad is pressed and the last
digit is the active digit, the changes to the start
pulse value will be saved into the memory. The
next option, “CyCL”, will appear in the FourDigit Display.
NOTE: To program “CyCL” (Cycle Stages), refer
to option 5. To program other options, refer to the
appropriate section.
Figure 15
DRY554R
How to Exit Programming Feature
1. Be sure the control shows a programmable
option, not a value.
2. While pressing and holding the NORMAL/HOT
keypad with one hand, press the NORMAL/WARM
keypad with the other hand. The control will
revert back to the previous mode of operation.
16
© Copyright, Alliance Laundry Systems LLC – DO NOT COPY or TRANSMIT
801184

Programming MDC
><><>
<
5. Cycle Stages “CyCL”
This option allows the owner to set the number of
stages for a cycle.
How to Program Cycle Stages
1. Control must be in Manual Mode. Refer to
Entering the Manual Mode.
2. Press the PERM PRESS/WARM ( ) or the
DELICATES/COLD ( ) keypad until “PrOg”
appears in the Four-Digit Display.
Figure 17
3. Press the START (enter) keypad and “AtS” will
appear in the Four-Digit Display.
4. Press the PERM PRESS/WARM ( ) or the
DELICATES/COLD ( ) keypad to scroll through
the programmable options until “CyCL” appears
in the Four-Digit Display.
COM1R
5. When “CyCL” appears in the Four-Digit Display,
press the START (enter) keypad. The current
number of cycle stages will appear in the FourDigit Display. This number (found below)
corresponds to the cycle stages.
3 = One wash and two rinses
4 = One wash and three rinses
5 = One pre-wash, one wash, and three rinses
6. Press the PERM PRESS/WARM ( ) or the
DELICATES/COLD ( ) keypad to increase or
decrease the current code displayed in the FourDigit Display to the desired code.
7. Press the START (enter) keypad when the correct
code appears in the Four-Digit Display. The next
option, “CnFg” will appear in the Four-Digit
Display.
NOTE: To program “CnFg” (Configuration
Display), refer to option 6. To program other
options, refer to the appropriate section.
How to Exit Programming Feature
1. Be sure the control shows a programmable
option, not a value.
2. While pressing and holding the NORMAL/HOT
keypad with one hand, press the NORMAL/
WARM keypad with the other hand. The control
will revert back to the previous mode of
operation.
Figure 18
801184
© Copyright, Alliance Laundry Systems LLC – DO NOT COPY or TRANSMIT
DRY555R
17

Programming MDC
><><>
<
6. Configuration “CnFg”
This option allows the owner to turn ON or turn OFF
preprogrammed capabilities within MDC.
How to Program Configuration
1. Control must be in Manual Mode. Refer to
Entering the Manual Mode.
2. Press the PERM PRESS/WARM ( ) or the
DELICATES/COLD ( ) keypad until “PrOg”
appears in the Four-Digit Display.
COM1R
Figure 19
3. Press the START (enter) keypad and “AtS” will
appear in the Four-Digit Display.
4. Press the PERM PRESS/WARM ( ) or the
DELICATES/COLD ( ) keypad to scroll through
the programmable options until “CnFg” appears
in the Four-Digit Display.
5. When “CnFg” appears in the Four-Digit Display,
press the START (enter) keypad. A number will
appear in the Four-Digit Display. This number
corresponds to the current configuration value.
6. Press the PERM PRESS/WARM ( ) or the
DELICATES/COLD ( ) keypad to increase or
decrease the current number to the desired
number selected from Table 1.
7. Press the START (enter) keypad when the correct
number appears in the Four-Digit Display. The
next option will appear in the Four-Digit Display.
(On software versions less than “S003”, the first
option, “AtS”, will appear in the Four-Digit
Display. On software version “S003” and higher,
“dCyC” will appear in the Four-Digit Display.)
NOTE: To program “dCyC” (Default Cycle), refer
to option 7. To program other options, refer to the
appropriate section.
How to Exit Programming Feature
1. Be sure the control shows a programmable
option, not a value.
2. While pressing and holding the NORMAL/HOT
keypad with one hand, press the NORMAL/
WARM keypad with the other hand. The control
will revert back to the previous mode of
operation.
Figure 20
18
© Copyright, Alliance Laundry Systems LLC – DO NOT COPY or TRANSMIT
DRY563R
801184

Programming MDC
Configuration Programming
Use Tabl e 1 to turn on or turn off the preprogrammed
Card Reader Controlled Display, Pressure Switch
Type, Audio Signal, Global Errors, Coin Drop #1, and
Pump/Gravity Drain options in MDC.
This option, when enabled, prevents the control from displaying certain card operation-related
messages on the Four-Digit Display to allow a third party card reader to display messages on
Card Reader Controlled
Display
Pressure Switch Type
Audio Signal
the Four-Digit Display.
ON = Turns off control generated display messages
OFF = Turns on control generated display messages
This option selects whether a two-level or three-level pressure switch type is used. (Proper
pressure switch must be installed to match configuration or machine will not function
correctly.)
0 = Two-level pressure switch
1 = Three-level pressure switch
This option turns on or off the audio signal which, when turned on, sounds for keypad
depression, coin/start pulse input and card insertion, and open/shorted thermistor error.
ON = Turns on audio signal
OFF = Turns off audio signal
To change any or all of these configuration options,
review the following descriptions carefully and choose
the appropriate configuration value from Tab le 1.
Enter the appropriate value in step 6 on the previous
page.
Global Errors
Coin Drop #1
Pump/Gravity Drain
This option determines whether all errors are displayed.
ON = Turns on errors in Four-Digit Display
OFF = Turns off errors in Four-Digit Display
This option determines whether the control will accept pulses from the coin drop #1.
Coin Drop #1 = Turns on coin drop #1
This option determines whether the machine will use the pump or the gravity drain. (Gravity
drain must be installed to match configuration or machine will not function correctly.)
Pump = Turns pump on and turns gravity drain off
Gravity Drain = Turns gravity drain on and turns pump off
801184
© Copyright, Alliance Laundry Systems LLC – DO NOT COPY or TRANSMIT
19

Programming MDC
.
Configuration
Value
Card Reader
Display
Pressure
Switch
Audio
Signal
Errors Coin Drop #1
0 OFF 0 OFF OFF Coin Drop #1 Pump
1 OFF 0 OFF OFF Coin Drop #1 Gravity Drain
4OFF0OFFON Coin Drop #1 Pump
5OFF0OFFON Coin Drop #1 Gravity Drain
8OFF0ON OFF Coin Drop #1 Pump
9OFF0ON OFF Coin Drop #1 Gravity Drain
12 (default) OFF 0 ON ON Coin Drop #1 Pump
13 OFF 0 ON ON Coin Drop #1 Gravity Drain
16 OFF 1 OFF OFF Coin Drop #1 Pump
17 OFF 1 OFF OFF Coin Drop #1 Gravity Drain
20 OFF 1 OFF ON Coin Drop #1 Pump
21 OFF 1 OFF ON Coin Drop #1 Gravity Drain
24 OFF 1 ON OFF Coin Drop #1 Pump
25 OFF 1 ON OFF Coin Drop #1 Gravity Drain
28 OFF 1 ON ON Coin Drop #1 Pump
29 OFF 1 ON ON Coin Drop #1 Gravity Drain
32 ON 0 OFF OFF Coin Drop #1 Pump
33 ON 0 OFF OFF Coin Drop #1 Gravity Drain
36 ON 0OFFON Coin Drop #1 Pump
37 ON 0OFFON Coin Drop #1 Gravity Drain
40 ON 0 ON OFF Coin Drop #1 Pump
41 ON 0 ON OFF Coin Drop #1 Gravity Drain
44 ON 0 ON ON Coin Drop #1 Pump
45 ON 0 ON ON Coin Drop #1 Gravity Drain
48 ON 1 OFF OFF Coin Drop #1 Pump
49 ON 1 OFF OFF Coin Drop #1 Gravity Drain
52 ON 1OFFON Coin Drop #1 Pump
53 ON 1OFFON Coin Drop #1 Gravity Drain
56
ON 1 ON OFF Coin Drop #1 Pump
57 ON 1 ON OFF Coin Drop #1 Gravity Drain
60 ON 1 ON ON Coin Drop #1 Pump
61 ON 1 ON ON Coin Drop #1 Gravity Drain
Pump/
Gravity Drain
20
© Copyright, Alliance Laundry Systems LLC – DO NOT COPY or TRANSMIT
Table 1
801184

Programming MDC
><><>
<
7. Default Cycle “dCyC”
This option allows the owner to set the default cycle
type.
NOTE: This option is available on software version
“S003” or higher only.
How to Program Default Cycle
1. Control must be in Manual Mode. Refer to
Entering the Manual Mode.
2. Press the PERM PRESS/WARM ( ) or the
DELICATES/COLD ( ) keypad until “PrOg”
appears in the Four-Digit Display.
COM1R
Figure 21
3. Press the START (enter) keypad and “AtS” will
appear in the Four-Digit Display.
4. Press the PERM PRESS/WARM ( ) or the
DELICATES/COLD ( ) keypad to scroll through
the programmable options until “dCyC” appears
in the Four-Digit Display.
5. When “dCyC” appears in the Four-Digit Display,
press the START (enter) keypad. A letter code
will appear in the Four-Digit Display. This code
(found below) corresponds to the cycle type.
hEAy = NORMAL/HOT
nOrL = NORMAL/WARM
PP = PERM PRESS/WARM
dEL = DELICATES/COLD
6. Press the PERM PRESS/WARM ( ) or the
DELICATES/COLD ( ) keypad to increase or
decrease the current code displayed in the FourDigit Display to the desired code.
7. Press the START (enter) keypad when the correct
code appears in the Four-Digit Display.
NOTE: To program other options, refer to the
appropriate section.
How to Exit Programming Feature
1. Be sure the control shows a programmable
option, not a value.
2. While pressing and holding the NORMAL/HOT
keypad with one hand, press the NORMAL/
WARM keypad with the other hand. The control
will revert back to the previous mode of
operation.
Figure 22
801184
© Copyright, Alliance Laundry Systems LLC – DO NOT COPY or TRANSMIT
TLW1944N
21

Collecting Audit Information
>
<
>
<
This feature allows the owner to retrieve audit
information stored in the washer by pressing a
sequence of keypads on the control. For an
explanation of the audit options available, refer to
Tabl e 2.
How to Enter Audit Feature
There are two methods the owner can use to enter the
Audit Feature.
Entering the Audit Feature by Manual
Mode
1. Control must be in the Manual Mode to start.
Refer to Entering the Manual Mode.
2. Press the PERM PRESS/WARM ( ) or the
DELICATES/COLD ( ) keypad until “AUdT”
appears in the Four-Digit Display.
COM2R
Figure 23
3. Press the START (enter) keypad. “C1” will
appear in the Four-Digit Display.
How to Read Audit Data
1. Use the PERM PRESS/WARM ( ) or the
DELICATES/COLD ( ) keypad to scroll through
various options until the desired option is displayed
in the Four-Digit Display. Refer to Table 2 for an
explanation of the audit options available.
Audit Options List
Four-Digit
Display
C1 Total Number of Coins #1
C2 Total Number of Coins #2
CyC Total Number of Machine Cycles
SP Total Number of Start Pulses
2. Once the desired option appears in the Four-Digit
Display, press the START (enter) keypad to start
the audit count. At this point, the display will
show the four-digit number of the audit value.
3. Press the START (enter) keypad again. The
control will go to the next audit option in Tabl e 2.
4. To select other audit options, repeat steps 1-3.
Description
Table 2
How to Exit Audit Feature When
Using Manual Mode
Entering the Audit Feature with the Coin
Vault Open
1. Open coin vault.
NOTE: The service door must be closed on
machines with controls that have software version
“S003” or higher.
2. Press the START (enter) keypad.
22
© Copyright, Alliance Laundry Systems LLC – DO NOT COPY or TRANSMIT 801184
1. Be sure the control shows an audit option, not a
value.
2. While pressing and holding the NORMAL/HOT
keypad with one hand, press the NORMAL/
WARM keypad with the other hand. The control
will return to the previous mode of operation.
NOTE: To exit Audit Feature when using Coin
Vault Open method, owner must close coin vault.

Testing Machine and MDC Functions
><>
<
This feature allows the owner to run diagnostic tests
on various washer operations without servicing the
washer. The following tests are available:
• Show Fill Time Test
• Show Drain Time Test
How to Enter Testing Feature
1. Control must be in Manual Mode. Refer to
Entering the Manual Mode.
2. Press the PERM PRESS/WARM ( ) or the
DELICATES/COLD ( ) keypad until “dIAg”
appears in the Four-Digit Display.
3. Press the START (enter) keypad. Display will
change to “d001”.
4. Press the PERM PRESS/WARM ( ) or the
DELICATES/COLD ( ) keypad to scroll through
the diagnostic test options.
How to Start Tests
To start a diagnostic test, refer to Table 3 . Press the
START (enter) keypad when the desired test number is
displayed. For detailed information on each test, read
the appropriate description on this page.
How to Exit Testing Feature
Diagnostic Test Descriptions
Show Fill Time Test
This test will display the average fill time. The average
will be calculated by taking the average of the last four
fill times.
To start test, control must be in the Testing Mode.
Refer to “How to Start Tests” at the beginning of this
section.
To enter, press the START (enter) keypad. The FourDigit Display will show “FXXX”. The “XXX” will be
the average fill time in minutes and seconds for that
machine.
To exit the Show Fill Time Test, press and hold the
NORMAL/HOT keypad with one hand, then press the
PERM PRESS/WARM keypad with the other hand.
The control will return to the previous mode of
operation. Refer to Figure 2.
Show Drain Time Test
This test will display the average drain time. The
average will be calculated by taking the average of the
last four drain times.
To start test, control must be in the Testing Mode.
Refer to “How to Start Tests” at the beginning of this
section.
While pressing and holding the NORMAL/HOT
keypad with one hand, press the NORMAL/WARM
keypad with the other hand. The display will return to
the previous mode of operation.
Diagnostic (Testing) Mode –
Quick Reference Table
Test
Number
d001 Show Fill Time Test FXXX
d002 Show Drain Time
Diagnostic Mode Four-Digit Display
dXXX
Tes t
Table 3
To enter, press the START (enter) keypad. The FourDigit Display will show “dXXX”. The “XXX” will be
the average drain time in minutes and seconds for that
machine.
To exit the Show Drain Time Test, press and hold the
NORMAL/HOT keypad with one hand, then press the
PERM PRESS/WARM keypad with the other hand.
The control will return to the previous mode of
operation. Refer to Figure 2.
801184
© Copyright, Alliance Laundry Systems LLC – DO NOT COPY or TRANSMIT
23

Testing Machine and MDC Functions
Production Test Cycle
To Enter Production Test Cycle
1. Be certain control is in Ready Mode and access
panel or coin vault is open.
2. While pressing and holding the NORMAL/
WARM keypad with one hand, press the PERM
PRESS/WARM keypad with the other hand.
3. When the control enters the Production Test
Cycle, it will first display “SXXX” with the
“XXX” showing the software version of the
control.
4. The control will advance through the sequence of
test steps whenever NORMAL/WARM is
pressed, with the exception of the Keypad Test.
Refer to Table 4 for all tests in the Production
Test Cycle.
To Exit Production Test Cycle
The control must be powered down to end the test.
24
© Copyright, Alliance Laundry Systems LLC – DO NOT COPY or TRANSMIT
801184
Testing Machine and MDC Functions
Production Test Cycle Quick Reference Chart
Display Test Mode Comments
SXXX Software Version XXX is the software version number
All LEDs and
Show Entire Display Mode None
display segments
will light
PadX Keypad Test When a key is pressed, the control will display the number assigned to the
keypad (1 – NORMAL/HOT, 2 – PERM PRESS/WARM, 3 – NORMAL/
WARM, 4 – DELICATES/COLD, 5 – START). As each keypad is pressed,
its corresponding LED will be lit and remain on for the duration of the test.
When all keypads have been pressed, the control will advance to Door
Switch Test step.
drOP or drCL Door Switch Test drOP is displayed when loading door is open. drCL is displayed when
loading door is closed.
drLO or drUL Door Lock Test When step is entered, control will lock door and will then check to make
sure door is locked. drLO is displayed if door is locked. drUL is displayed
if door is unlocked.
U XX Coin Vault Test XX is the number of coin vault openings.
S XX Service Door Switch Test XX is the number of service door switch openings.
CXCX Coin Drop Test X is the number of coins entered. Coin drop #1 is shown on the left of the
display and coin drop #2 is shown on the right of the display.
CLdE Cold/Detergent Fill Cold Water Fill valve and Detergent/Bleach valve are turned on.
HoSF Hot/Softener Fill Hot Water Fill valve and Softener valve are turned on.
PSL Pressure Switch Low Both water valves are turned on. When the pressure Switch Low Level is
satisfied, the water valves are turned off. The control will not advance to
next step until Pressure Switch Low Level is satisfied and NORMAL/
WARM keypad is pressed.
PSH Pressure Switch High Both water valves are turned on. When the Pressure Switch High Level is
satisfied, the water valves are turned off. The control will not advance to
next step until Pressure Switch High Level is satisfied and NORMAL/
WARM keypad is pressed. This step is only available if a 3-level pressure
switch is enabled.
OFLo Overflow Test All water and dispenser valves are turned on. When the overflow level is
reached the water valves are turned off.
LoAg Low Agitate Machine enters low agitate.
rEAg Regular Agitate Machine enters regular agitate.
PunP or drAi Pump/Gravity Drain Test Pump is turned on or Gravity drain is opened. The control will not advance
to next step until pressure switch is closed indicating drum is empty and
NORMAL/WARM keypad is pressed.
Step Time in
Minutes*
Clothes Spin The control runs a spin step. The drum will ramp up to 650 RPM for
4 minutes then 1000 RPM for 1 minute. The control will advance to the
next step when finished.
UnLo* Unlock Door Door Lock is unpowered. The door will take approximately 1 minute to
unlock. The motor will run at Regular Agitate speed. The control will
remain in this step until the door unlocks.
801184
© Copyright, Alliance Laundry Systems LLC – DO NOT COPY or TRANSMIT
Table 4 (continued)
25
Testing Machine and MDC Functions
Table 4 (continued)
Production Test Cycle Quick Reference Chart
Display Test Mode Comments
LoAd* Load Weight The control will remain in this step until the loading door is closed and the
NORMAL/WARM keypad is pressed.
LoAd* Lock Door Door Lock is powered. Machine will remain in this step until door is
locked.
RPM speed
displayed
Spin Test Machine steps through all spin speeds for 30 seconds at each speed. Speeds
are 90, 500, 650, and 1000. After 1000 RPM step, motor will stop.
brAY Breakaway Motor runs at Regular Agitate speed until door is unlocked. When door
unlocks, control will exit test.
* These test steps are only on controls with software
versions “S005” or higher.
26
© Copyright, Alliance Laundry Systems LLC – DO NOT COPY or TRANSMIT
801184

Rapid Advance Feature
>
<
The Rapid Advance feature allows the owner to
quickly advance through active cycles or advance into
a cycle from the Ready Mode.
How to Enter Rapid Advance from
Ready Mode
1. If control is in Ready Mode, control must be put
into Manual Mode. Refer to Entering the
Manual Mode.
2. Press the PERM PRESS/WARM ( ) or the
DELICATES/COLD ( ) keypad until “rAPd”
appears in the display.
3. Press the START (enter) keypad. The Four-Digit
Display will display “PFIL” or “UFIL” and the
START (enter) keypad LED will flash.
4. Press the START (enter) keypad to start cycle.
The time remaining will show in the Four-Digit
Display.
NOTE: If the Rapid Advance feature is attempted
while door open, the Four-Digit Display will show
“door” until the door is closed.
How to Enter Rapid Advance During
an Active Cycle
1. Be certain service door is open and coin vault is
closed.
Four-Digit
Display
PFIL Pre-Wash Fill/Agitate Cycle Step
PdIS Pre-Wash Distribute Cycle Step
PSPI Pre-Wash Pulse Spin Cycle Step
UFIL Wash Fill/Agitate Cycle Step
UdIS Wash Distribute Cycle Step
USPI Wash Pulse Spin Cycle Step
rFIL Rinse Fill/Agitate Cycle Step
rdIS Rinse Distribute Cycle Step
rSPI Rinse Pulse Spin Cycle Step
EFIL Extra Rinse Fill/Agitate Cycle Step
EdIS Extra Rinse Distribute Cycle Step
ESPI Extra Rinse Pulse Spin Cycle Step
FFIL Final Fill/Agitate Cycle Step
FdIS Final Distribute Cycle Step
FSPI Final Pulse Spin Cycle Step
SPIn Final High Spin Cycle Step
brAy Breakaway Cycle Step
Continue pressing the START (enter) keypad until the
cycle is completed.
Cycle Step
Table 5
2. While pressing and holding the NORMAL/HOT
keypad with one hand, press the NORMAL/
WARM keypad with the other hand. The FourDigit Display will show “rAPd”.
3. Press the START (enter) keypad.
How to Use Rapid Advance
While in the Rapid Advance feature, pressing the
START (enter) keypad will advance the washer to the
next cycle step. The Four-Digit Display will show
which cycle step the washer is in for three seconds and
will then show the cycle time remaining. Refer to
Tabl e 5 for cycle steps.
NOTE: When the Rapid Advance feature is used to
end a cycle, the loading door will stay locked for 1
minute after the cycle has ended.
How to Exit Rapid Advance Feature
Advance through the cycles until reaching the Ready
Mode.
801184
© Copyright, Alliance Laundry Systems LLC – DO NOT COPY or TRANSMIT
27
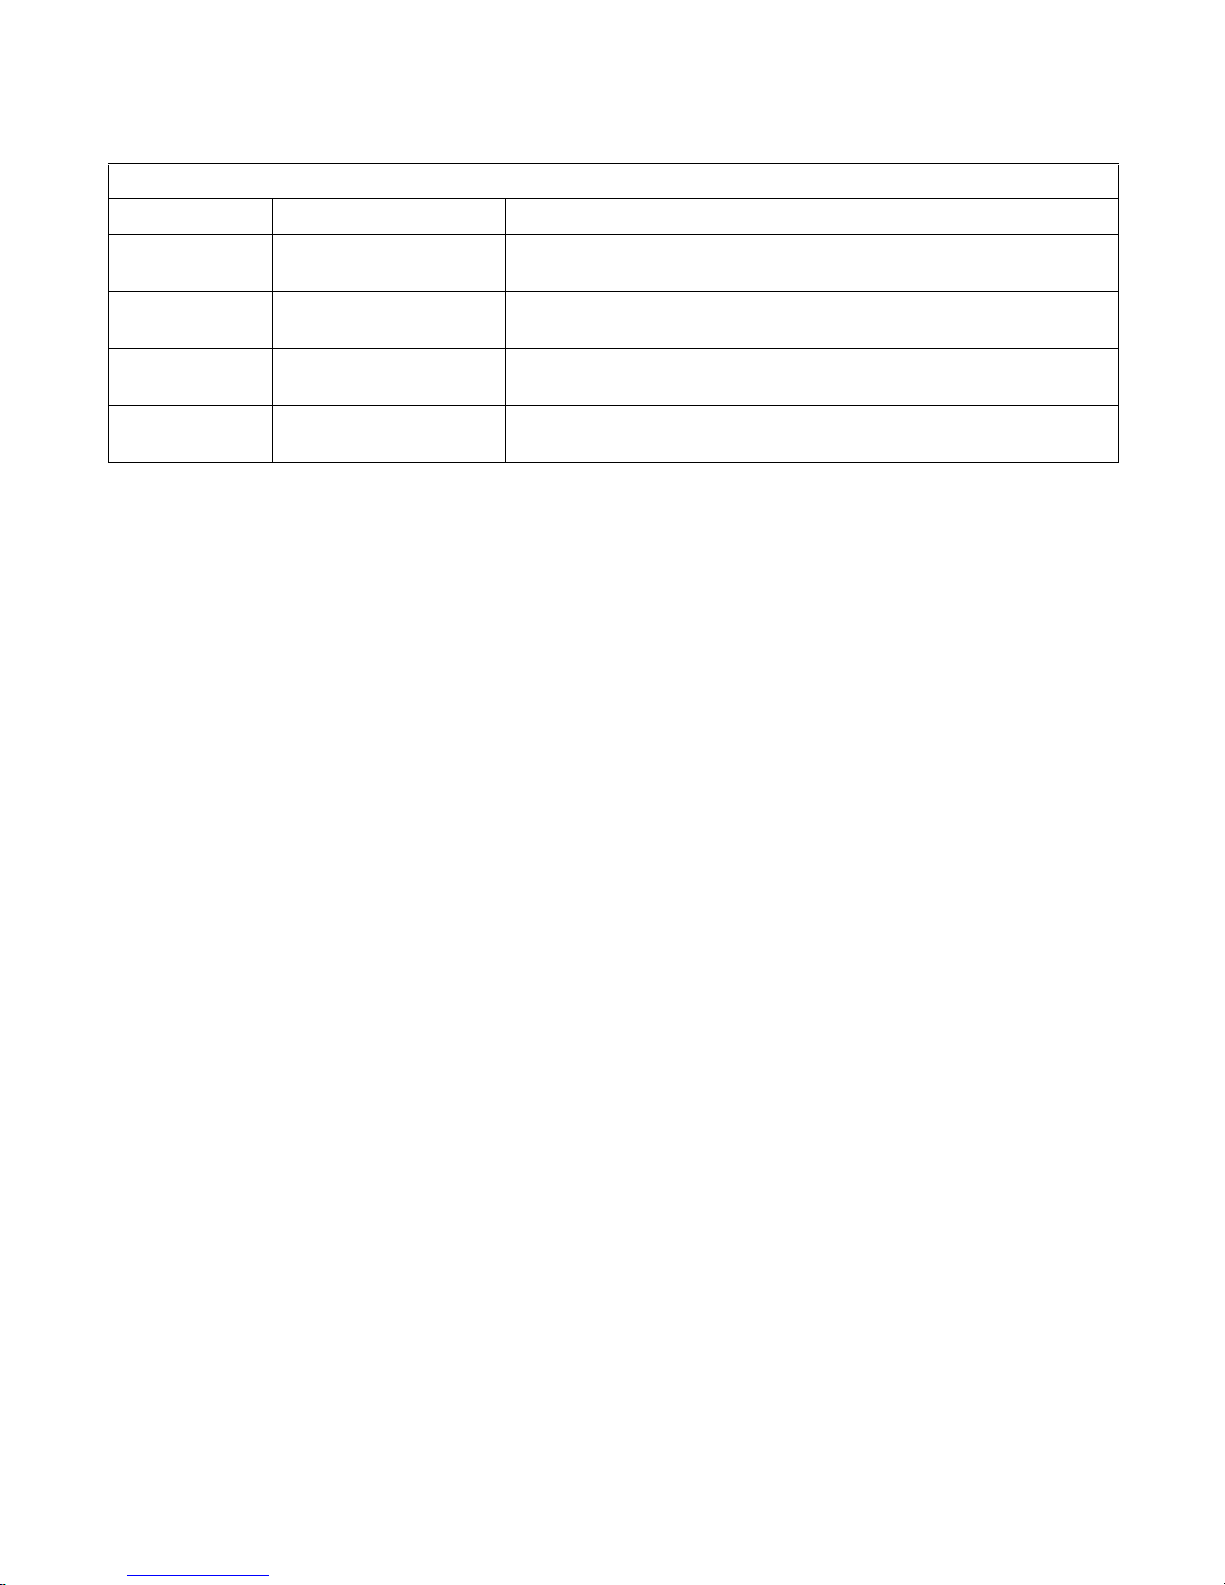
Default Washer Settings
Default Settings
Default Settings Default
Vend Price 100
Coin #1 Value 25
Coin #2 Value 100
Start Pulse Value 25
Cycle Steps One wash, two rinses
Control Configuration 12
Card Reader Display Control OFF
Pressure Switch Type 2 Level
Audio Signal ON
Error Mode ON
Coin Drop #1 Coin Drop #1
Pump/Gravity Drain Pump
Default Cycle* PERM PRESS/
WA RM
* This option available in software version “S003” or
higher.
Default Cycle
The PERM PRESS/WARM cycle is the default cycle
and is programmed in at the factory. This cycle can be
made longer or shorter by reprogramming the cycle
stages. Refer to Programming MDC, option 5, to
change these times. All other times are not
programmable.
Models with Old-Style Brush Motor (Letter
“H” in Eighth Character of Model Number)
Cycle Default
Wash Fill 6 minutes
Wash Distribute 45 seconds
Wash Spin 2 minutes and 15 seconds
Rinse Fill/Agitate 2 minutes
Rinse Distribute 45 seconds
Rinse Spin 2 minutes and 15 seconds
Final Rinse Fill/Agitate 2 minutes
Final Rinse Distribute 45 seconds
Final Rinse Spin 2 minutes and 15 seconds
Final High Spin 7 minutes
Breakaway 1 minute
Total Cycle Time 27 minutes
All Other Models
Cycle Default
Wash Fill 6 minutes
Wash Distribute 45 seconds
Wash Spin 2 minutes and 15 seconds
Rinse Fill/Agitate 2 minutes
Rinse Distribute 45 seconds
Rinse Spin 2 minutes and 15 seconds
Final Rinse Fill/Agitate 2 minutes
Final Rinse Distribute 45 seconds
Final Rinse Spin 2 minutes and 15 seconds
Final High Spin 5 minutes
Breakaway 1 minute
28
© Copyright, Alliance Laundry Systems LLC – DO NOT COPY or TRANSMIT 801184
Total Cycle Time 25 minutes


 Loading...