

Page 1
Washer-Extractor
Cabinet Freestanding
Variable-Speed
Instructions for
Operating and Programming
the V-Series Microcomputer
Model Numbers
HF18VNV SF18VNV UF18PNV
HF25VNV SF25VNV UF25PNV
Operation/Programming
NOTA: El manual en
español aparece después
del manual en inglés.
Part No. F232072R3
September 1998
Page 2

Table of C ontents
Operation/Programming
Safety
Key to Symbols . . . . . . . . . . . . . . . . . . . . . . . . 4
Safety Decal Locations. . . . . . . . . . . . . . . . . . . 5
Operator Safety . . . . . . . . . . . . . . . . . . . . . . . . 6
Safe Operating Environment . . . . . . . . . . . . . . 7
Environmental Conditions . . . . . . . . . . . . . 7
Machine Location . . . . . . . . . . . . . . . . . . . . 8
Input and Output Services . . . . . . . . . . . . . 8
AC Inverter Drive . . . . . . . . . . . . . . . . . . . . 9
Misuse . . . . . . . . . . . . . . . . . . . . . . . . . . . . . . . 9
Operation
Customer Service . . . . . . . . . . . . . . . . . . . . . . . 11
Machine Familiarization Guide . . . . . . . . . . . . 11
Theory of Operation . . . . . . . . . . . . . . . . . . . . 13
V-Computer . . . . . . . . . . . . . . . . . . . . . . . . . 13
Keypad. . . . . . . . . . . . . . . . . . . . . . . . . . . . . 14
Conditions Monitored by the Computer . . . 15
Display Indications . . . . . . . . . . . . . . . . . . . 16
Start-Up. . . . . . . . . . . . . . . . . . . . . . . . . . . . . . . 17
Opening Door . . . . . . . . . . . . . . . . . . . . . . . . . 17
Programming
Key Functions in Programming Mode . . . . . . 23
Setup Mode. . . . . . . . . . . . . . . . . . . . . . . . . 23
Degrees Displayed in Fahrenheit
or Celsius . . . . . . . . . . . . . . . . . . . . . . . . . . 24
Auxiliary Heat . . . . . . . . . . . . . . . . . . . . . . 24
Supply 5 or Auxiliary Fill. . . . . . . . . . . . . . 24
Temperature-Controlled Fill. . . . . . . . . . . . 24
Automatic Cool-Down . . . . . . . . . . . . . . . . 25
Cycle Count . . . . . . . . . . . . . . . . . . . . . . . . . . . 25
Cycle Programming. . . . . . . . . . . . . . . . . . . . . 25
Cycle Options. . . . . . . . . . . . . . . . . . . . . . . 25
Agitation Action. . . . . . . . . . . . . . . . . . . . . 25
Agitation Speed . . . . . . . . . . . . . . . . . . . . . 26
Recirculation Pump . . . . . . . . . . . . . . . . . . 26
Segment Programming. . . . . . . . . . . . . . . . 26
Test Cycle . . . . . . . . . . . . . . . . . . . . . . . . . . 28
Chemical Injection Supply System . . . . . . . . . 31
Cycle Segment Charts . . . . . . . . . . . . . . . . . . . 32
V-Computer Cycle Charts . . . . . . . . . . . . . . . . 36
Cycle Programming Worksheet. . . . . . . . . . . . 42
Loading . . . . . . . . . . . . . . . . . . . . . . . . . . . . . . 17
Supply Dispenser . . . . . . . . . . . . . . . . . . . . . . . 18
Cycle Selection . . . . . . . . . . . . . . . . . . . . . . . . . 18
Cycle Execution . . . . . . . . . . . . . . . . . . . . . . . . 18
Fill . . . . . . . . . . . . . . . . . . . . . . . . . . . . . . . . 18
Wash . . . . . . . . . . . . . . . . . . . . . . . . . . . . . . 19
Drain . . . . . . . . . . . . . . . . . . . . . . . . . . . . . . 19
Spin . . . . . . . . . . . . . . . . . . . . . . . . . . . . . . . 20
Test Cycle . . . . . . . . . . . . . . . . . . . . . . . . . . 20
Stop Routine . . . . . . . . . . . . . . . . . . . . . . . . 20
Balance Detection. . . . . . . . . . . . . . . . . . . . . . . 20
Overtravel Limit Switch . . . . . . . . . . . . . . . . . . 21
F232072
1
Page 3

© Copyright 2000, Alliance Laundry Systems LLC
All rights reserved. No part of the contents of this book may be reproduced or transmitted in any form or by any
means without the expressed written consent of the publisher.
2 F232072
Page 4
Section 1
Safety
Anyone operating or servicing this machine must
follow the safety rules in this manual. Particular
attention must be paid to the DANGER, W ARNING ,
and CAUTION blocks which appear throughout the
manual.
CAUTION
Be careful around the open door, particularly
when loading from a level below the door.
Impact with door edges can cause personal
injury.
SW025
W ARNING
Dangerous voltages are present in the
electrical control box(es) and at the motor
terminals. Only qualified personnel familiar with
electrical test procedures, test equipment, and
safety precautions should attempt ad jus tments
and troubleshooting. Disconnect power from
the machine before removing the control box
cover, and before attempting any service
procedures.
SW005
The following warnings are general examples that
apply to this machine. Warnings specific to a
particular operation will appear in the manual with
the discussion of that operation.
DANGER
Death or serious injury can result if children
become trapped in the machine. Do not allow
children to play on or around this machine. Do
not leave children unattended while the
machine door is open.
SW001
WARNING
This machine must be installed, adjusted, and
serviced by qualified electrical maintenance
personnel familiar with the construction and
operation of this type of machinery. They must
also be familiar with the potential hazards
inv o lved. Failure to observe this warning may
result in personal injury and/or equipment
damage, and may void the warranty.
SW004
F232072 3
Page 5

Safety
CAUTION
Ensure that the machine is installed on a level
floor of sufficient strength and that the
recommended clearances for inspection and
maintenance are provided. Never allow the
inspection and maintenance space to be
blocked.
Key To Symbols
The lightning flash and arrowhead within the
triangle is a warning sign indicating the presence of
dangerous voltage.
SW020
WARNING
Never touch internal or external steam pipes,
connections, or components. These surfaces
can be extremely hot and will cause severe
burns. The steam must be turned off and the
pipe, connections, and components allowed to
cool before the pipe can be touched.
This warning symbol indicates the presence of
possibly dangerous chemicals. Proper precautions
should be taken when handling corrosive or caustic
materials.
SW014
The exclamation point within the triangle is a
warning sign indicating important instructions
concerning the machine and possibly dangerous
conditions.
This warning symbol indicates the presence of
potentially dangerous drive mechanisms within the
machine. Guards should always be in place when
This warning symbol indicates the presence of hot
surfaces that could cause serious burns. Stainless
steel and steam lines can become extremely hot and
should not be touched.
This warning symbol indicates the presence of
possibly dangerous pinch-points. Moving
mechanical parts can crush and/or sever body parts.
the machine is in operation.
4 F232072
Page 6
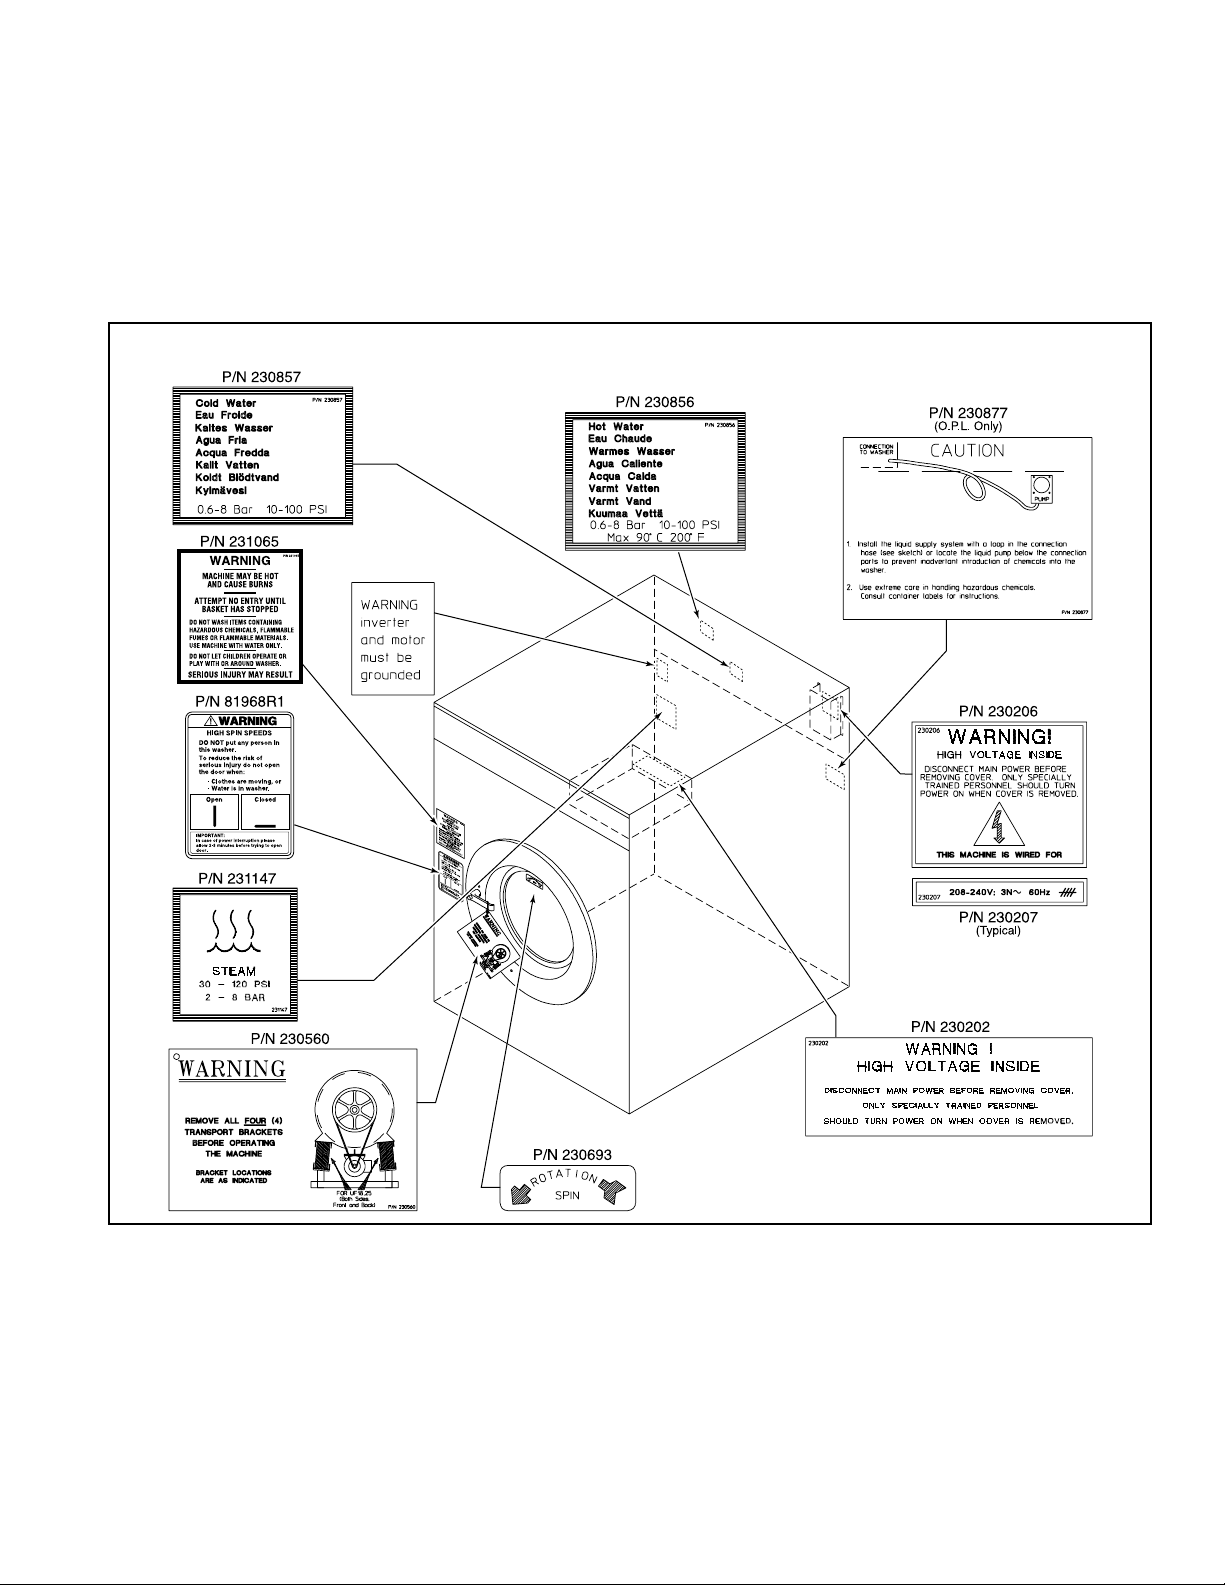
Safety
Safety decals appear at crucial locations on the
machine. Failure to maintain legible safety decals
could result in injury to the operator or service
technician.
81968R1
81968R1
R069RE3A
Figure 1
F232072 5
Page 7
Safety
To provide personal safety and keep the machine in
proper working order, follow all maintenance and
safety procedures presented in this manual. If
questions regarding safety arise, contact the factory
immediately.
Use factory-authorized spare parts to avoid safety
hazards.
Operator Safety
WARNING
NEVER insert hands or objects into basket
until it has completely stopped. Doing so could
result in serio u s in ju ry.
To ensure the safety of machine operators, the
following maintenance checks must be performed
daily:
1. Prior to operating the machine, verify that all
warning signs are present and legible. Missing
or illegible signs must be replaced immediately .
Make certain that spares are available.
SW012
3. Do not attempt to operate the machine if any of
the following conditions are present:
a. The door does not remain securely locked
during the entire cycle.
b. Excessively high water level is evident.
c. Machine is not connected to a properly
grounded circuit.
Do not bypass any safety devices in the machine.
WARNING
Nev er operate the machine with a bypassed or
disconnected out-of-balance switch. Operating
the machine with severe out-of-balance loads
could result in personal injury and serious
equipment damage.
SW010
2. Check door interlock before starting operation
of the machine:
a. Attempt to start the machine with the door
open. The machine should not start with the
door open.
b. Close the door without locking it and
attempt to start the machine. The machine
should not start with the door unlocked.
c. Close and lock the door and start a cycle.
Attempt to open the door while the cycle is
in progress. The door should not open.
If the door lock and interlock are not
functioning properly, call a service technician.
6 F232072
Page 8

Safe Operating Environment
Safe operation requires an appropriate operating
environment for both the operator and the machine.
If questions regarding safety arise, contact the
factory immediately.
Environmental Conditions
l
Ambient Temperature
will freeze at temperatures of 32°F (0°C) or
below.
T emperatures abo v e 120°F (50°C) will result in
more frequent motor overheating and, in some
cases, malfunction or premature damage to
solid state devices that are used in some
models. Special cooling devices may be
necessary.
Water pressure switches are affected by
increases and decreases in temperature. Every
25°F (10°C) change in temperature will have a
1% effect on the water level.
l
Humidity
. Relative humidity above 90% may
cause the machine’s electronics or motors to
malfunction or may trip the ground fault
interrupter. Corrosion problems may occur on
some metal components in the machine.
If the relative humidi ty is below 30%, belts and
rubber hoses may eventually develop dry rot.
This condition can result in hose leaks, which
may cause safety hazards external to the
machine in conjunction with adjacent electrical
equipment.
l
Ventilation
. The need for make-up air openings
for such laundry room accessories as dryers,
ironers, water heaters, etc., must be evaluated
periodically. Louvers, screens, or other
separating devices may reduce the available air
opening significantly.
. Water in the machine
Safety
l
Radio Frequency Emissions
available for machines in installations where
floor space is shared with equipment sensitive
to radio frequency emissions.
l
Elevation
. If the machine is to be operated at
elevations of over 3,280 feet (1,000 meters)
above sea level, pay special attention to water
levels and electronic settings (particularly
temperature) or desired results may not be
achieved.
l
Chemicals
. Keep stainless steel surfaces free of
chemical residues.
DANGER
Do not place volatile or flammable fluids in any
machine. Do not clean the machine with
volatile or flammable fluids such as acetone,
lacquer thinners, enamel reducers, carbon
tetrachloride, gasoli n e, benzene, naptha, etc.
Doing so could result in serious personal injury
and/or damage to the machine.
l
Water Damage
water . Short circuiting and seri ous damage may
result. Repair immediately all seepage due to
worn or damaged gaskets, etc.
. Do not spray the machine with
. A filter is
SW002
F232072 7
Page 9
Safety
Safe Operating Environment
(Continued)
Machine Location
l
Foundation
sufficient strength and thickness to handle the
floor loads generated by the high extract speeds
of the machine.
l
Service/Maintenance Space
space to allow comfortable performance of
service procedures and routine preventive
maintenance.
This is especially important in connection with
machines equipped with an AC inverter drive.
Consult installation instructions for specific details.
Replace all panels that are remov ed to perform
service and maintenance procedures. Do not
operate the machine with missing guards or
with broken or missing parts. Do not bypass
any safety devices.
l
Water Pressure
realized if water is provided at a pressure of
30 – 85 psi (2.0 – 5.7 bar). Although the
machine will function properly at lower
pressure, increased fill times will occur. Water
pressure higher than 100 psi (6.7 bar) may
result in damage to machine plumbing.
Component failure(s) and personal injury could
result.
. The concrete floor must be of
. Provide sufficient
CAUTION
SW019
Input and Output Services
. Best performance will be
l
Steam Heat (Optional) Pressure
. Best
performance will be realized if steam is
provided at a pressure of 30 – 80 psi (2.0 – 5.4
bar). Steam pressure higher than 125 psi (8.5
bar) may result in damage to steam components
and may cause personal injury.
For machines equipped with optional steam
heat, install piping in accordance with approved
commercial steam practices. Failure to install
the supplied steam filter may void the warranty.
l
Compressed Air
. For machines requiring
compressed air service, best performance will
be realized if air is provided at a pressure of
80 – 100 psi (5.4 – 6.7 bar). Large capacity
machines could experience door seal failure if
compressed air service is interrupted.
l
Drainage System
. Provide drain lines or
troughs large enough to accommodate the total
number of gallons that could be dumped if all
machines on the site drained at the same time
from the highest attainable level. If troughs are
used, they should be covered to support light
foot traffic.
l
Power.
For personal safety and for proper
operation, the machine must be grounded in
accordance with state and local codes. The
ground connection must be to a proven earth
ground, not to conduit or water pipes. Do not
use fuses in place of the circuit breaker. An
easy-access cutoff switch should also be
provided.
8 F232072
Page 10
WARNING
Ensure that a ground wire from a pro ven earth
ground is connected to the g r ound lug near the
input power block on this machine. Without
proper grounding, personal injury from electric
shock could occur and machine malfunctions
may be evident.
SW008
Always disconnect power and water supplies before
a service technician performs any service
procedure. Where applicable, steam and/or
compressed air supplies should also be
disconnected before service is performed.
AC Inverter Drive
Machines equipped with the AC inverter drive
require special attention with regard to the
operating environment.
Safety
l
Sufficient space to perform service procedures
and routine preventi v e maintenance is especially
important for machines equipped with the AC
inverter drive.
Misuse
Never use this machine for any purpose other than
washing fabric.
l
Never wash petroleum-soaked rags in the
machine. This could result in an explosion.
l
Never wash machine parts or automotive parts
in the machine. This could result in serious
damage to the basket.
l
Never allow children to play on or around this
machine. Death or serious injury can result if
children become trapped in the machine. Do not
leave children unattended while the machine
door is open. These cautions apply to animals
as well.
l
An especially dusty or linty environment will
require more frequent cleaning of the AC
inverter drive cooling fan filter and of the AC
inverter drive itself.
l
Power line fluctuations from sources such as
uninterruptible power supplies (UPS) can
adversely affect machines equipped with the AC
inverter drive. Proper suppression devices
should be utilized on the incoming power to the
machine to avoid problems.
l
A clean power supply free from voltage spikes
and surges is absolutely essential for machines
equipped with the AC inverter drive. Nonlinear
inconsistencies (peaks and valleys) in the power
supply can cause the AC inverter drive to
generate nuisance errors.
If voltage is above 230V for 200V installations
or above 440V for 400V installations, a
buckboost transformer is recommended. If
voltage is above 240 or 480, a buckboost
transformer is required.
F232072 9
Page 11

Safety
Notes
10 F232072
Page 12

Section 2
Operation
This manual is designed as a guide to operating and
programming the 18-pound and 25-pound capacity
cabinet freestanding washer-extractors equipped
with the V-computer and AC inverter drive. The
models covered by this manual are designed for use
in on-premises laundries.
Keep the manuals, installation instructions, and the
wiring diagra ms which acco mpany the machin e in a
safe place for ready reference. They have been
included with the machine at no charge. Additional
copies are available at a nominal charge.
Note: Read this manual thoroughly before
attempting to operate the machine or program the
microcomputer.
Note: Do not use this manual in conjunction with
earlier model computer-controlled machines. Do
not use technical literature intended for earlier
models when operating this machine.
Note: All information, illustrations, and
specifications contained in this manual are based on
the latest product information available at the time
of printing. We reserve the right to make changes at
any time without notice.
Customer Service
If literature or replacement parts are required,
contact the source from whom the machine was
purchased or contact Alliance Laundry Systems
LLC at (920) 748-3950 for the name and address of
the nearest authorized parts distributor.
For technical assistance, call any of the following
numbers:
(850) 718-1035
(850) 718-1026
Marianna, Florida
(920) 748-3121
Ripon, Wisconsin
A record of each machine is on file with the
manufacturer. Always provide the machine’s serial
number and model number when ordering parts or
when seeking technical assistance.
Machine Familia riz a ti on Guide
The machine familiarization guide in Figure 2
provides front and rear views of the washerextractor and identifies the major operational
features of the machine.
F232072 11
Page 13
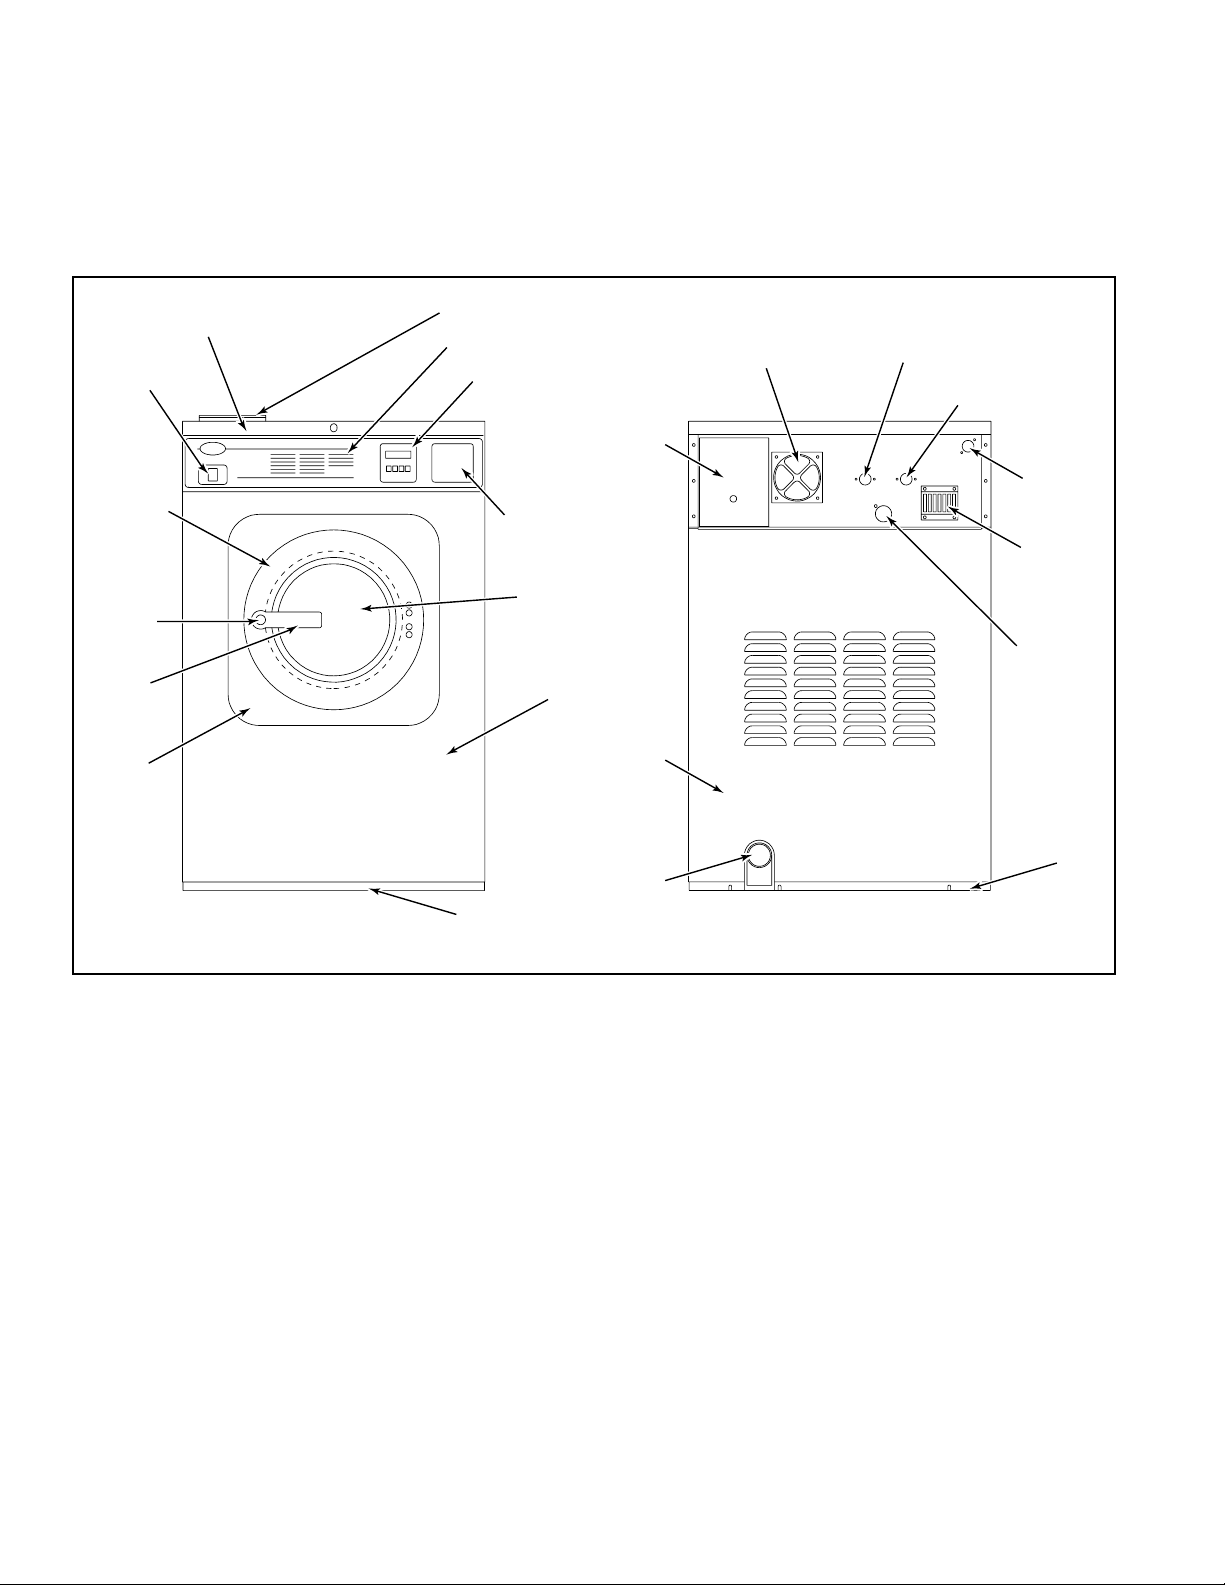
Operation
Top Cover
Door Unlock
Switch
Door
Door
Unlock
Button
Door
Handle
Inner
Front
Panel
Supply Dispenser
Control Panel
V-Computer Keypad
Emergency
Stop Button
Door Glass
Power
Connection
Outer
Front
Panel
Rear Panel
Drain Outlet
AC Drive Cooling
Fan Filter
Cold Water Inlet
Hot Water Inlet
Steam
Inlet
(Optional)
Vacuum
Breaker
Vent
Base
Frame
Front View
Base Frame
Figure 2
Rear View
B007RE3A
12 F232072
Page 14

Operation
Theory of Operation
The design of the machine emphasizes performance
reliability and long service life. The cylinder, shell,
and main body panels are fabricated of stainless
steel.
The machine uses one motor to drive the cylinder
via a V-belt drive in all speeds.
A door-lock system prevents opening of the
stainless steel door when water is in the machine. It
also prevents operation of the machine when the
door is open.
An electrically operated drain valve is used to retain
the water and wash solution in the machine during
the wash and fill steps. The drain v alv e c loses when
power is applied and opens when power is remov ed,
allowing the machine to drain in the event of a
power failure.
The cylinder is designed with lifters or ribs that lift
the garments from the wash solution when the
cylinder rotates at slow speed and allow the
garments to tumble back into the solution. The
cylinder is perforated, allowing the water to pass
through and drain from within during the wash
process and extract.
The operator can select from among 30 cycles, 16
of which are preprogrammed at the factory. On
export models, 10 cycles are preprogrammed at the
factory. A special permanent test cycle can be
selected to verify proper operation of the machine.
Electronic sensing of load balancing is utilized to
attempt to optimize load balance prior to extract.
The machine is equipped with five hose barbs on
the rear of the machine to facilitate connection to an
external chemical supply system. A terminal strip i n
the input power junction box provides control
signals for an external chemical supply system.
V- Computer
The V-computer control is a programmable solidstate control capable of storing and running up to 30
cycles. A detailed description of these cycles can be
found in the Programming section of this manual
under V-Computer Standard OPL Cycles and
V-Computer Export OPL Cycles.
If this machine’s computer has been equipped with
special preprogrammed cycles, a separate insert
listing these cycles has been included in the
resealable plastic bag which contained this manual.
Electrical controls for the machine are housed in a
separate enclosure located underneath the top cover
of the machine.
The machine uses an AC inverter drive control
which provides six motor speeds using a single
motor. The solid state output board converts motor
logic from the V-computer to the correct signals for
the AC inverter drive.
The AC inv erter dri ve uses specia l balance detection
software in conjunction with the V-computer to
prevent out-of-balance conditions. When the AC
drive detects an unbalanced load at the end of a
drain step, the computer will make up to seven
attempts to balance the load. As a f ail-safe measure,
an overtravel limit switch is installed between the
frame and the sump, stopping the AC drive when
tripped.
F232072 13
Page 15
Operation
Theory of Operation (Continued)
Note: Never turn the power off while the computer
mode switch is in the PROGRAM position. Such
action will disorder portions of the programmed
data, necessitating reprogramming of some or all of
the existing cycles. Always return the mode switch
to RUN position before turning the power off.
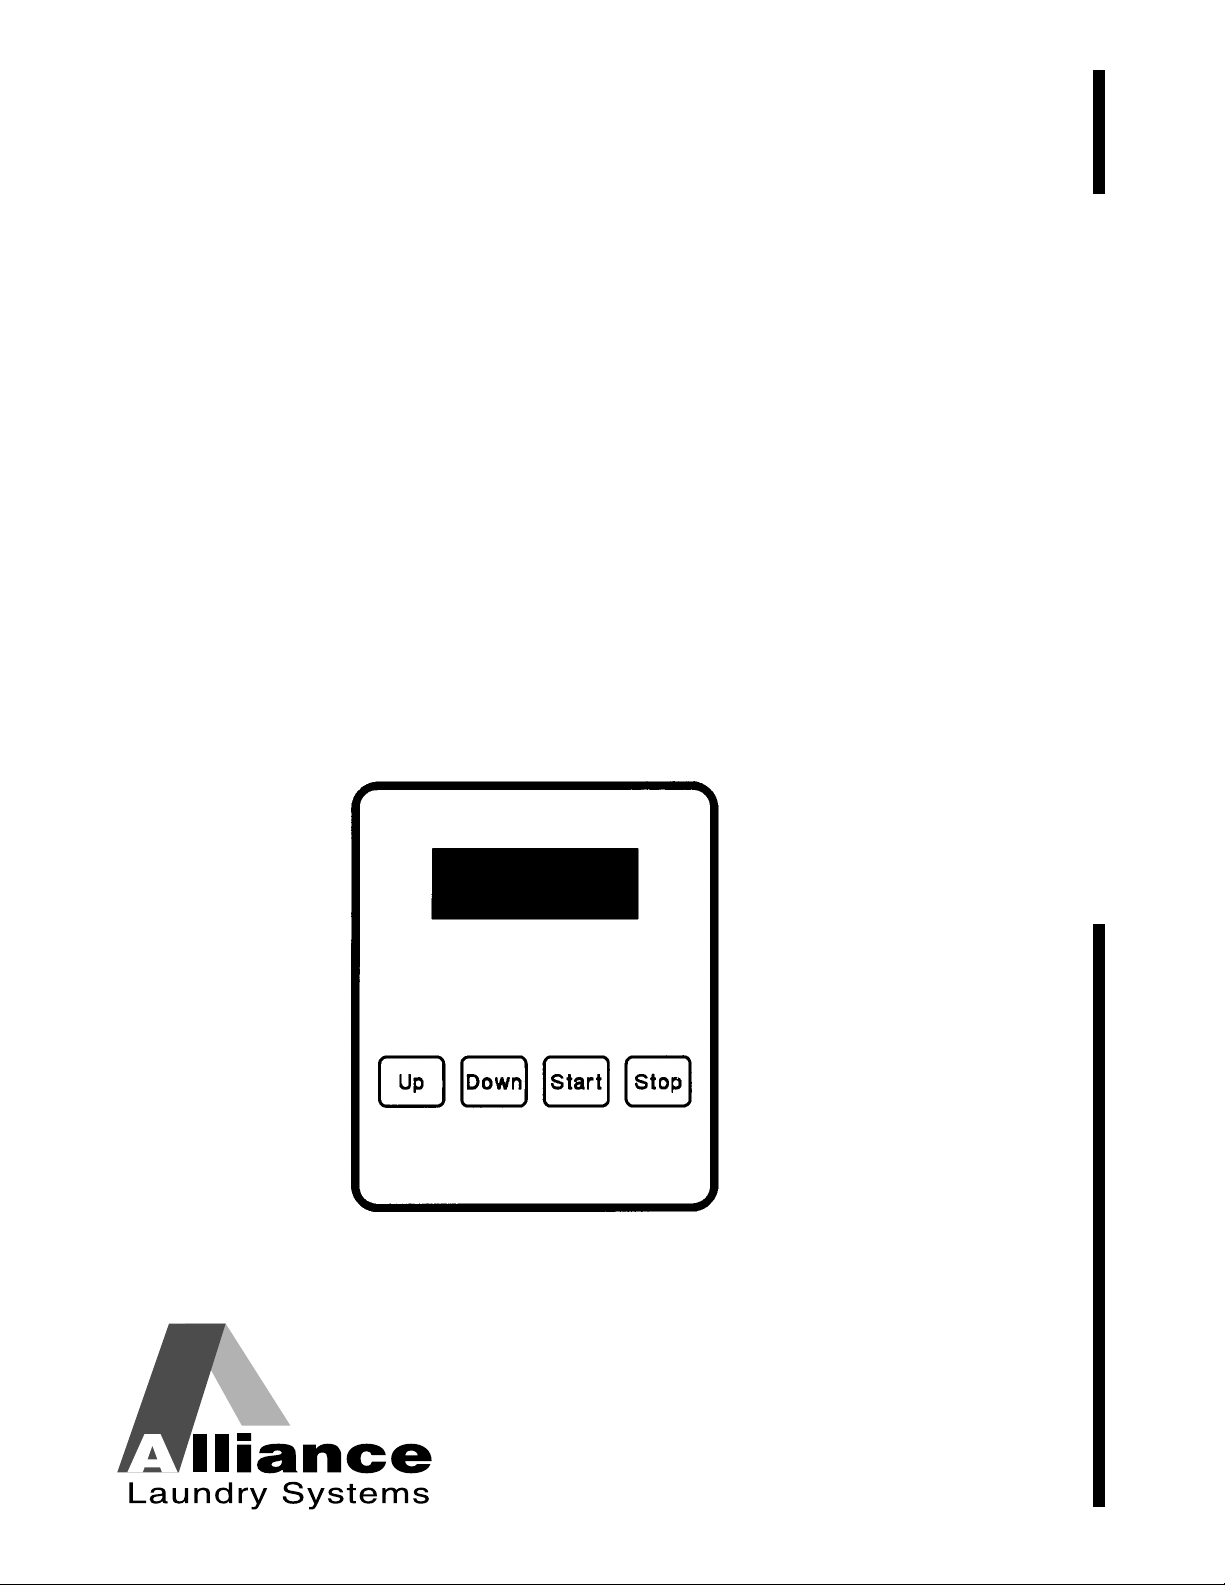
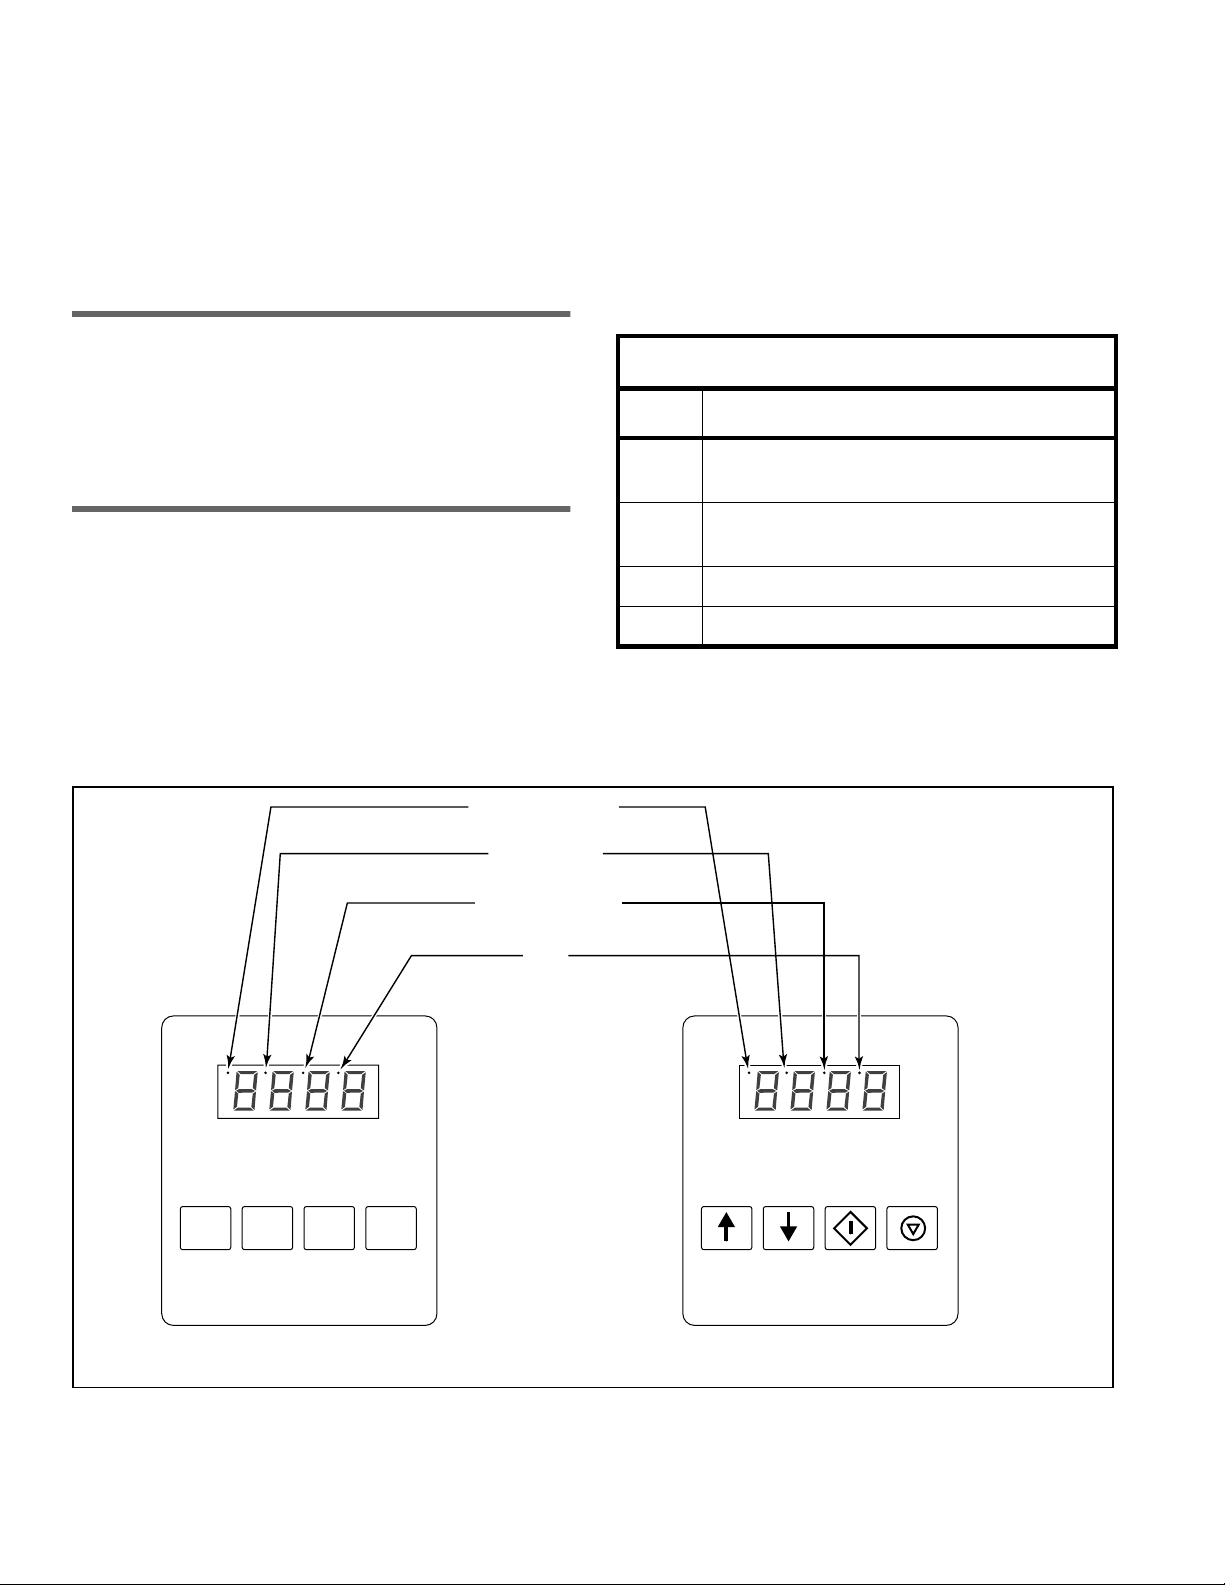
Keypad
Operation of the V-computer control is performed
with a 4-key touch ke ypad and LED display located
on the front of the machine. See Figure 3 for
domestic and international versions of the keypad.
Out-of-Balance
Condition
High Water
Level
Medium Water
Level
Low
Water
Level
The following table describes the function of the
individual keys when the machine is in RUN mode.
Keypad
Key Description
Up
Down
Start Used to start a cycle.
Stop Used to stop a cycle.
Used in cycle selection; pressing this key moves
among cycles from smaller to greater.
Used in cycle selection; pressing this key moves
among cycles from greater to smaller.
Up Down Start Stop
Domestic International
R076RE3A
Figure 3
14 F232072
Page 16

Operation
Conditions Monitored by the Computer
l
Door – The computer continuously monitors the
open/locked status of the door. If it detects that
the door is open during a wash cycle, it
immediately aborts the cycle and executes the
stop routine.
l
Power – If power is int errupted long enough for
the computer to go off, after the power is
restored, the display briefly flashes “Hold” to
indicate the interruption. The door unlock will
be disabled to keep the door from being opened
while the basket is still turning.
l
Balance – The computer monitors the balance
signal provided by the AC drive during drain
steps. It will attempt to distribute the load seven
(7) times. The dot at the top of the leftmost
display digit will light following the final
unsuccessful attempt.
l
Water level – The computer attempts to
maintain the water level programmed for the fill
preceding the agitation step. If the level falls
below the programmed level, the computer will
stop the time countdown and re-energize the fill
valves until the level is restored.
l
Temperature probe problem – If the
temperature sensor fails when prompted for
degrees Fahrenheit, the computer flashes “tSFL”
in PROGRAM mode rather than showing the
temperature. If the temperature sensor fails
when prompted for degrees Celsius, the display
will read “-17C” rather than showing the
temperature.
The following table, entitled “Display Indic ations,”
lists the various displays and what they mean. The
operator should become familiar with these
computer displays.
l
Water lev e l in a heat step – In order for the
computer to energize the heat output, there must
be at least a low water level in the machine. If
this minimum level is not detected, the heat
output will be turned off until the required level
is restored.
F232072 15
Page 17

Operation
Display Indications
Display Meaning Display Meaning
FP1 Program identification code (ROM). This is an
example only.
Hold Wait...power has just been turned on. HI High water level
CY Cycle (followed by two-digit number) SUP1 Supply 1
tESt/CYC* Test cycle selected. SUP2 Supply 2
FAr Degrees Fahrenheit SUP3 Supply 3
CEL Degrees Celsius SUP4 Supply 4
Heat Auxiliary heat enabled. SUP5 Supply 5 (SETUP option)
noHt Auxiliary heat disabled. SUP6 Supply 6 (supply 1 and 5)
tFIL Temperature-controlled fill enabled. SUP7 Supply 7 (supply 3 and 4)
ntFL Temperature-controlled fill disabled. SLo/For Gentle wash speed, forward direction
CooL Automatic cool-down enabled. SLo/rEv Gentle wash speed, reverse direction
noCL Automatic cool-down disabled. norM/For Normal wash speed, forward direction
Ag 1 Agitation 1 selected (90% agitation). norM/rEv Normal wash speed, reverse direction
Ag 2 Agitation 2 selected (33% agitation). drAI Drain enabled.
Ag 3 Agitation 3 selected (10% agitation). nodr Drain disabled.
Ag 4 Agitation 4 selected (6.7% agitation). dISt Distribution (load balancing before extract)
AgSn Agitation speed normal
AgSL Agitation speed low
PMP Pump output en abled (future use only). SPn1 Lowest of three spins
nPMP Pump output disabled (future use only). SPn2 Middle of three spins
PrE Prewash segment (1st of 11 segments) SPn3 Highest of three spins
UASH Wash segment (2nd of 11 segments) STOP Stop routine
FIL1 First fill (3rd of 11 segments) SdLY Spin coast delay
FIL2 Second fill (4th of 11 segments) donE Cycle and stop routine have ended.
FIL3 Third fill (5th of 11 segments) dFLt Drive fault detected.
FIL4 Fourth fill (6th of 11 segments) door Door not properly closed.
FIL5 Fifth fill (7th of 11 segments)
FIL6 Sixth fill (8th of 11 segments)
FIL7 Seventh fill (9th of 11 segments)
FIL8 Eighth fill (10th of 11 segments)
FIL9 Ninth fill (11 of 11 segments)
CFIL Cold fill
bFIL Warm fill (both hot and cold)
HFIL Hot fill
AFIL Auxiliary fill (SETUP option)
Lo Low water level
*Display indications separated by a slash represent a flashing display.
Med Medium water level
SPIn/tIME*
bAL/FAIL*
FILL/STOP*
FULL
rotA
tSFL
Reads “SPIn” for one second, then “tIME”
followed by time for spin.
Balancing routine failed during test cycle after
10 attempts to balance load.
Programmed water level not reached after 30
minutes.
The computer detects low water level or higher
when none should be present.
Computer detects possible rotation of motor
when there should be none.
T emperature s ensor f ailure or temp erature out of
range.
16 F232072
Page 18
Operation
Start-Up
Turn on the main power source (circuit breaker or
cut-off switch on the wall).
An identification code will appear for
approximately five seconds. Then the display will
flash “hold” briefly.
The display will then read “CY” followed by a two-
digit cycle number (01 – 30) to indicate that a cycle
can be selected. This display will be shown at all
times that power is on between cycles, indicating
that the door-unlock solenoid will function if the
door-unlock button is pressed. The machine is then
ready for loading and unloading.
Opening Door
Press and hold the door-unlock button on the left
side of the control panel. Press the round button on
the door handle and turn the door handle downward.
Loading
Partial loads are a waste of energy, water, and
chemicals, and cause greater machine wear than full
loads. Partial loads also increa se the possibi lity of a
severe out-of-balance condition.
WARNING
Never operate the machine with a bypassed or
disconnected balance system. Operating the
machine with severe out-of-balance loads could
result in personal injury and serious equipment
damage.
SW039
When loading is complete, ensure that all fabric is
inside the basket. Then close and lock the door by
rotating the door handle counterclockwise until the
door handle pushbutton pops out. The machine
should not start or run unless the door is both closed
and locked.
CAUTION
CAUTION
Be careful around the open door, particularly
when loading from a le v el belo w t he door. Impact
with door edges can cause personal injury.
Load the machine to full capacity whenever
possible, but do not exceed the rated dry-weight
capacity of the machine if the fa bric to be washe d is
quite dense, closely woven, and heavily soiled.
Overloading can result in an inferior wash. The
operator may need to experiment to determine load
size based on fabric content, soil content, and level
of cleanliness required.
SW025
Check the door safety interlock daily before the
machine is placed in operation.
Note: When washing items which may disintegrate,
SW024
such as mop heads or sponges, use laundry net bags
to prevent drain blockage.
F232072 17
Page 19

Operation
Supply Dispenser
The 18-pound and 25-pound capacity freestanding
models are equipped with a three-compartment
polypropylene supply dispenser. The supply
dispenser is mounted at the left top of the machine
as seen from the front. Both liquid and powder
supplies may be added by raising the flexible cover
of the dispenser.
Cycle Selection
Note: The computer does not count down the
remaining cycle time during fills, drains,
cool-down, or prior to first achieving the
programmed heat temperature when heating. The
computer resumes counting down cycle time once
the programmed fill level is reached, when the
machine has drained, and after a programmed heat
temperature is reached.
Note: Press ke ys at their centers jus t hard enough to
activate them.
Press the Up or Down key until the desired cycle
number is displayed. Press the Start key to start the
cycle. For a more detailed description of the
preprogrammed cycles, see the cycle charts at the
end of the Programming section.
If the computer detects that the door is not properly
closed when the Start key is pressed, the display
will read “door” until the door is closed and locked.
Press Start again to begin the desired cycle.
Cycle Execution
A cycle can be stopped at any time by pressing the
Stop key. The machine will go to the stop routine.
When the routine is complete, the door may be
unlocked.
To display the temperature of the water while a
cycle is running, press the Up key. To display the
number of the cycle in progress, press the Start key.
Each of the 30 cycles consists of 11 segments:
Prewash, Wash, and Fills 1 – 9. A description of the
various steps in a cycle segment follows:
Fill
After the Start key is pressed, the door locks, the
drain closes, and the machine begins filling to the
programmed level. Each programmed segment
begins with a fill. The display counts down the
remaining cycle time in minutes and seconds while
the cycle is running.
If a supply is programmed in a step, the supply
dispenser will flush during the fill of that segment.
If the machine is connected to an external chemical
supply system, the programmed supply will begin
10 seconds into the fill. The supply will remain on
until the programmed water level is reached, or
until 60 seconds have elapsed, whichever happens
first.
If agitation options 1 or 2 are selected for the cycle
program, the cylinder will rotate slowly during the
fill step. If agitation options 3 or 4 are selected for
the cycle program, the cylinder will not rotate
during the fill step. See the Agitation Options table
for more information.
18 F232072
Page 20
If the computer does not receive a signal that water
level has been attained within 30 minutes, it will
alternately flash “STOP” and “FILL” and sound the
on-board beeper for ten seconds. It will then initiate
the stop routine.
Operation
Note: If the water does not reach the programmed
temperature in 40 minutes, the computer progresses
to the wash step.
Wash
As soon as water level is reached (and any
programmed temperature is reached), the displayed
time begins counting down at one-second intervals.
Agitation is active during this portion of the
segment. There are four different agitation actions
available. See the following table for more
information.
Agitation Action Options
Display Description Percentage
27 seconds forward,
Ag 1
Ag 2
Ag 3
Ag 4
3 seconds pause,
27 seconds reverse,
3 seconds pause
10 seconds forward,
20 seconds pause,
10 seconds reverse,
20 seconds pause
3 seconds forward,
27 seconds pause,
3 seconds reverse,
27 seconds pause
4 seconds forward,
56 seconds pause,
4 seconds reverse,
56 seconds pause
90%
33%
10%
6.7%
Drain
If the cycle program segment calls for a drain, the
drain valve will open after the programmed segment
time has elapsed. If a spin step follows a drain step,
the cylinder will turn counterclockwise (forward) at
wash speed while in the drain step.
If the cycle program segment does not call for a
drain, the computer moves to the next segment of
the cycle program. If the segment is at the end of a
cycle program, the computer goes into the stop
routine.
If the cycle program segment does not call for a
spin, the cylinder will continue to agitate
throughout the drain step. When the drain has
completed, the computer mov es to the ne xt se gment
of the cycle program. If the segment is at the end of
a cycle program, the computer goes into the stop
routine.
Note: The machine should drain in 30 seconds. If
the machine fails to drain, contact a qualified
service technician.
If the segment contains a heat step, the machine
begins heating after the water has reached the
programmed level.
F232072 19
Page 21

Operation
Spin
After the drain sequence ends, the speed of the
cylinder increases to the extract speed if the
programmed spin time is not zero. The displayed
time resumes counting down at one-second
intervals.
After the programmed spin time has elapsed, the
computer moves on to the fill step in the next
segment of the cycle. If the spin is at the end of the
cycle, the computer begins the stop routine.
Test Cycle
Note: If the stop routine seems excessively long,
check for “FULL” or “rotA” messages. If this
occurs, contact a qualified service technician.
Balance Detection
Each model comes equipped with an inverter drive
balance detection system. Load balance is detected
by the inverter drive during any drain step that
immediately precedes a spin step. The V-series
computer will make up to seven attempts to balance
the load during a drain step.
A test cycle is provided as a means of verifying
proper machine operation. Before the test cycle is
run, it must be enabled. Refer to the Programming
section of this manual for instructions on enabling
and running the test cycle.
Stop Routine
When the computer concludes the wash cycle or
when the Stop key is pressed while a cycle is in
progress, the computer goes into the stop routine.
The stop routine consists of a brief countdown and a
brief reversing sequence, after which the computer
will display “dONE.”
W ARNING
NEVER insert hands or objects into basket until it
has completely stopped. Doing so could resul t in
serious injury.
Once “dONE” is displayed, open the door by
pressing and holding the door unlock button as
described earlier. Once the door is opened, the
computer display will show the most recent cycle
number.
SW012
The computer begins monitoring the balance signal
from the inverter drive eight seconds after the water
level drops below low level. If the balance signal
indicates that the wash load is evenly distributed,
the computer will start the spin step.
If the balance signal indicates that the wash load is
unbalanced, the computer will slow the cylinder
down to wash speed for se v en seconds in an attempt
to redistribute the load. The computer will make as
many as seven attempts, if needed.
If on the seventh attempt the load is not balanced,
the machines will light the out-of-balance LED
indicator located in the upper left corner of the
display (to the left of the first digit) until the drain
step is complete. The machine will then ignore the
programmed spin and use a safe spin speed (not to
exceed 85 G’s) for the extract step, provided
programmed spin time is not zero.
If the load cannot be properly distributed, the
computer skips the spin and moves on to the next
segment. If the segment is at the end of a cycle
program, the computer goes into the stop routine.
The out-of-balance LED indicator will remain lit
until the door is opened.
The machine is now ready to begin another wash
cycle.
20 F232072
Page 22

Overtravel Limit Switch
As a fail-safe measure, an overtravel limit switch is
installed on all machine s. The limit switc h serv es to
trigger a rapid stop. This means that if the machine
balance “passes” the inverter drive balance
detection system at the drain step but the overtravel
limit switch detects an out-of-balance load
condition at the extract step, the basket will brak e to
a rapid stop.
To reset the control, push the stop button and open
the door when the display shows “donE.”
Operation
F232072 21
Page 23

Operation
Notes
22 F232072
Page 24
Section 3
Programming
The V-computer board is inside the control module.
Near the center of the board is a small toggle
switch: this is the RUN/PROGRAM mode switch.
W ARNING
Dangerous voltages are present i n the electrical
control box(es) and at the motor terminals. Only
qualified personnel familiar with electrical test
procedures, test equipment, and safety
precautions should attempt adjustments and
troubleshooting. Dis connect power from the
machine before removing the control box cover,
and before attempting any service procedures.
SW005
The switch is normally in the down (RUN mode)
position. T o enter PR OGRAM mode, flip the switch
to the up position. The display will now show the
current temperature in the sump.
Since the keypad operates in a slightly different
fashion when in PROGRAM mode, pay careful
attention to the programming instructions provided
in this manual.
Down–The Down key is used to decrease cycle
numbers (1 through 30) and other numerical values
such as times or temperatures (when creating wash
formulas).
Start–The Start key acts as an enter key in program
mode. Use this key to enter data and move to the
next function in the cycle.
Stop–The Stop key saves all data and terminates
the programming procedure. If it is the first key
pressed in PROGRAM mode, the computer enters
SETUP mode. The Stop key can be pressed again t o
exit SETUP mode and return to PROGRAM mode.
Setup Mode
SETUP options are programmable options that are
in effect for all wash formulas. These options
include:
l
Degrees displayed in Fahrenheit or Celsius
l
Auxiliary heat enabled or disabled
l
Supply 5 or Auxiliary fill
l
Temperature-controlled fill enabled or disabled
l
Automatic cool-down enabled or disabled
Key Functions in Programming Mode
Up–The Up key is used to increase cycle numbers
(1 through 30) and other numerical values such as
times or temperatures (when creating wash
formulas).
F232072 23
Note: These options can be read or changed only in
SETUP mode.
Page 25

Programming
Setup Mode (Continued)
T o enter SETUP mode, press the Stop ke y while the
display is showing the temperature in the sump.
Once in SETUP mode, use the Up or Down key to
change the selected option. Use the Start key to
accept the selected option and move on to the next
one. Press the Stop key to exit SETUP mode.
Degrees Displayed in Fahrenheit or Celsius
Note: Do not enable the auxiliary heat SETUP
option and disable the temperature-controlled fill
option on machines not equipped with auxiliary
heat. The machine will pause for 40 minutes during
any cycle segment where the fill water temperature
does not equal or exceed the programmed value of
the heat step.
This SETUP option affects the programming and
display of all temperatures. If “FAr” is selected, all
temperatures will display in F ahrenheit. If “CEL” is
selected, all temperatures will display in Celsius.
Acceptable ranges for programmable temperatures
are 75°F – 200°F or 25°C – 93°C.
Auxiliary Heat
Heat is a dedicated output of the V-computer, which
controls an optional heat source. If “nOHt” is
selected, the heat output will never energize during
a cycle (except briefly in the test cycle to ensure that
the output functions properly), regardless of
programmed temperature settings. If “HEAt” is
selected, the output will energize during a cycle if
the three following conditions are true:
l
A nonzero heat temperatureis programmed.
l
The computer senses that the present
temperature is below the programmed target
temperature.
l
There is at least a low water level in the
machine.
Supply 5 or Auxiliary Fill
If “SUP5” is selected, the output labeled AF on the
solid state output board can be used to control a
fifth supply signal. This SETUP option must be
selected to program a “SUP5” or a “SUP6” (supply
1 and supply 5 combined) in a cycle step.
If “AFIL” is selected, the output labeled AF can be
used to control an auxiliary fill v alve. Auxiliary f ills
can be programmed to low, medium, or high water
level. It is also possible to program an overflow
(flush) in Prewash. This SETUP option must be
selected to program an “AFIL” in a cycle step.
Temperature-Controlled Fill
If “tFIL” is selected, a temperature-controlled fill
can be programmed for any segment. This SETUP
option must be selected to program a “tFIL” in a
cycle step. If “ntFL” is selected, this feature is
disabled.
24 F232072
Page 26

Automatic Cool-Down
If “CooL” is selected, the automatic cool-down
feature is enabled. If the wash solution is 140°F
(60°C) or higher when a cycle step calls for a drain,
the washing action will continue and the cold wate r
valve will begin flushing cold water into the wash
solution. Once the wash solution temperature drops
below 140°F (60°C), the drain opens and the cycle
continues as programmed. If “noCL” is selected,
this feature is disabled.
Programming
Note: Cycle option settings are unique to the cycle
for which they are programmed.
Use the Up or Down key to change the selected
option. Use the Start key to accept the selected
option and move on to the next one.
Agitation Action
Cycle Count
To display the current cycle count, press the Start
key while the display is showing the temperature in
the sump. The display will show a 2-digit number
indicating how many cycles have been run to
completion (cycles which were stopped in progress
are not counted). Press the Start key to return to
PROGRAM mode without resetting the count.
Press the Up or Down key to reset the count to zero
and return to PROGRAM mode.
Cycle Programming
T o e dit an exist ing cycl e or create a n ew c ycle, pr ess
the Up key while the display is showing the
temperature in the sump. The display will show
“CY01.” Press the Up or Down key until the
desired cycle number is displayed. Press the Start
key to begin editing the selected cycle.
Cycle Options
Cycle options are programmable options that are in
effect for the duration of the selected wash cycle.
These options include:
l
Agitation action
l
Agitation speed
There are four agitation actions from which
to choose:
Agitation Action Options
Display Description Percentage
27 seconds forward,
Ag 1
Ag 2
Ag 3
Ag 4
3 seconds pause,
27 seconds reverse,
3 seconds pause
10 seconds forward,
20 seconds pa u se,
10 seconds reverse,
20 seconds pause
3 seconds forward,
27 seconds pa u se,
3 seconds reverse,
27 seconds pause
4 seconds forward,
56 seconds pa u se,
4 seconds reverse,
56 seconds pause
90%
33%
10%
6.7%
The selected agitation applies to the entire cycle. It
is possible to progam a different agitation action for
each of the 30 cycles.
l
Recirculation pump enabled or disabled (for
possible future application)
F232072 25
Page 27
Programming
Cycle Programming (Continued)
Agitation Speed
If “AgSn” is selected, the machine uses the normal
wash speed for the duration of the cycle. If “AgSL”
is selected, the machine use s the gentle was h speed.
Gentle wash speed is approximately half the speed
of the normal wash speed.
Recirculation Pump
This cycle option setting is intended to be used with
a possible future recirculation application. Selecting
either “nPMP” or “PUMP” will have no bearing on
the wash cycle. However, the “nPMP” setting is
recommended to prevent the corresponding output
on the output board from energizing.
Press the Start key after selecting this last cycle
option setting to begin editing the cycle segments.
When modifying a cycle, a time must be entered for
each segment. To skip a segment or spin, set the
time to “00” and press the Start key. The following
table gives the time parameters for each segment
and spin, as well as the allowable temperature
range.
Time and Temperature Parameters
Function Minimum Maximum
Prewash 2 minutes 30 minutes
Wash 2 minutes 20 minutes
Fill 1 2 minutes 15 minutes
Fill 2 2 minutes 15 minutes
Fill 3 2 minutes 15 minutes
Fill 4 2 minutes 15 minutes
Fill 5 2 minutes 15 minutes
Fill 6 2 minutes 15 minutes
Segment Programming
All cycle programs (“CY1”–“CY30”) can be
customized within a preset program structure. Each
cycle program consists of eleven program segments.
See the following table.
.
Cycle Program Segments
Segment Display Segment Display
Prewash PrE Fill 5 FIL5
W ash UASH Fill 6 FIL6
Fill 1 FIL1 Fill 7 FIL7
Fill 2 FIL2 Fill 8 FIL8
Fill 3 FIL3 Fill 9 FIL9
Fill 4 FIL4
Fill 7 2 minutes 15 minutes
Fill 8 2 minutes 15 minutes
Fill 9 2 minutes 15 minutes
Intermediate 30 seconds 240 seconds
Final Spin 1 minute 10 minutes
Temperature 75°F / 25°C 200°F / 93°C
Note: Spin times in cycle segments 1–10 are
entered in seconds (30 to 240), and time for final
spin in segment 11 is entered in minutes (1 to 10).
26 F232072
Page 28

Programming
1. Press the Up key until the computer display
shows the segment to be edited. Press the Start
key .
2. Use the Up or Down key to select the desired
segment time. Set this value to zero to skip the
segment. Press the Start key.
Note: The computer does not count down the
remaining cycle time during fills, drains, cooldown, or prior to first achieving the programmed
heat temperature when heating. The computer
resumes counting down cycle time once the
programmed fill le vel is reac hed, when the machine
has drained, and after a programmed heat
temperature is reached.
3. If the temperature-controlled fill SETUP option
is enabled, the display will show “tFIL.” Press
the Start key.
4. Use the Up or Down key to select the desired
fill temperature. See the following table for fill
options.
If the temperature-controlled fill SETUP option
is enabled and a target temperature is set, the
selected fill valve(s) will energize for the first 3
seconds of the segment fill. The computer will
then begin operating the fill valves in an attempt
to reach the target temperature. Press the Start
key .
Note: If “AFIL” is selected and the temperature-
controlled fill SETUP option is set to “tFIL,” the
temperature for the segment must be set to zero.
5. Use the Up or Down key to select the desired
fill level. See the table below.
Water Level Options
Display Fill Level
LO Low Level
Med Medium Level
HI High Level
6. Press the Start key.
Fill Temperature Options
Display Fill Type
CFIL Cold fill
HFIL Hot fill
bFIL Warm fill
AFIL Auxiliary fill*
*This is available only if the “SUP5”/“AFIL” SETUP
option is set to “AFIL.”
F232072 27
Page 29

Programming
Cycle Programming (Continued)
7. Use the Up or Down key to select the desired
supply option. See the table below.
Supply Options
Display Supply
SUP0 No Supply
SUP1 Supply 1
SUP2 Supply 2
SUP3 Supply 3
SUP4 Supply 4
SUP5 Supply 5*
SUP6 Supply 1 and 5*
SUP7 Supply 3 and 4
*This is available only if the “SUP5”/“AFIL” SETUP
option is set to “SUP5.”
8. Press the Start key.
11. Final “FIL9” spin only. Use the Up or Down
key to select the desired spin speed. See the
table below.
Spin Options
Display Spin Speed
SPn1 Low Spin
SPn2 Medium Spin
SPn3 High Spin
12. Press the Start key.
13. Use the Up or Down key to select the desired
spin time. Set this value to zero to skip the spin
step. Press the Start key. The display will now
show the identifier for ne xt program segment or
cycle option.
Note: Every intermediate spin is followed by a
25-second coast-down period, which occurs during
the fill step for the following segment.
9. If the temperature-controlled fill or the
auxiliary heat SETUP option is enabled, use the
Up or Down key to select the desired segment
14. Press the Stop key at any time to complete the
cycle programming procedure.
temperature. To disable auxiliary heat and
temperature-controlled fill for this segment, set
Test Cycle
this value to zero. Press the Start key.
1.Verify that the RUN/PR OGRAM mode toggle
10. Use the Up or Down key to select the desired
switch is in the RUN position.
drain option. If “drAI” is selected, the machine
will drain after the segment time has elapsed. If
“nodr” is selected, the machine will not drain
and the spin step will be skipped entirely. Press
the Start key.
Note: The drain step in the final program segment
2. Press the Up or Down key until the display
alternately flashes “tESt” and “CYC,”
indicating that the test cycle is selected.
3. Press the Start key to begin the test cycle.
cannot be skipped.
28 F232072
Page 30

Note: Pressing the Start key while the test cycle is
in progress will immediately advance to the next
step in the test c ycle. Dra in and load balancing steps
may not be skipped.
The test cycle is as follows:
a. Once the Start key is pressed, the door
interlock is de-energized (preventing the
door from being opened), the drain valve
closes, the cylinder begins agitating at wash
speed, and both water inlet valves are
energized. The display alternately flashes
“bFIL” and “LO” (both hot and cold fill
valves on, filling to low level).
b. When the water level switch indicates that
low water level has been reached, the water
fill valves shut off and the dot above and to
the immediate left of the fourth digit of the
display lights.
c. The cold water fill valve is energized. The
display alternately flashes “CFIL” and
“Med” (cold fill valve on, filling to medium
water level).
d. When the water level switch indicates that
medium water level has been reached, the
cold water fill valve shuts off and the dot
above and to the immediate left of the third
digit of the display lights.
e. The hot water fill valve is energized. The
display alternately flashes “HFIL” and “HI”
(hot fill valv e on, f illing to high water le v el).
Programming
f. When the water level switch indicates that
high water level has been reached, the hot
water fill valve shuts off and the dot above
and to the immediate left of the second digit
of the display lights.
g. The auxiliary heat output is energized,
provided that the water le vel switch indicates
that at least low water level is present. The
cold water fill valve is energi zed. The supply
1 output is energized for five seconds. The
display alternately flashes “SUP1” and
“HEAt” (supply 1 output on, auxiliary heat
output on).
h. The supply 2 output is energized for five
seconds. The display alternately flashes
“SUP2” and “HEAt” (supply 2 output on,
auxiliary heat output on).
i. The supply 3 output is energized for five
seconds. The display alternately flashes
“SUP3” and “HEAt” (supply 3 output on,
auxiliary heat output on).
j. The auxiliary heat output is turned off. The
supply 4 output is energized for fi ve seconds.
The display shows “SUP4” (supply 4 output
on).
k. The supply 5/auxiliary fill output energizes
for five seconds. If the “SUP5”/“AFIL”
setup option is set to “SUP5,” the display
shows “SUP5” (supply 5/auxiliary f ill output
on). If the “SUP5”/“AFIL” setup option is
set to “AFIL,” the display shows “AFIL”
(supply 5/auxiliary fill output on).
F232072 29
Page 31

Programming
Test Cycle (C ontinued)
l. The cold water fill valve turns off. The
recirculation pump output is energized for
ten seconds, provided that the water level
switch indicates that at least low water level
is present. The display shows “PUnP”
(recirculation pump output on).
m.The motor rotates clockwise (in reverse) at
reduced wash speed for 60 seconds. The
display alternately flashes “SLo” and “rEv”
(normal wash speed, clockwise).
n. The motor rotates counterclockwise
(forward) at reduced wash speed for 60
seconds. The display alternately flashes
“SLo” and “For” (reduced wash speed,
counterclockwise).
o. The motor rotates clockwise (in reverse) at
normal wash speed for 60 seconds. The
display alternately flashes “norM” and “rEv”
(normal wash speed, clockwise).
p. The motor rotates counterclockwise
(forward) at normal wash speed for 60
seconds. The display alternately flashes
“norM” and “For” (reduced wash speed,
counterclockwise).
q. The display begins alternately flashing
“drAI” and “For” (drain step, cylinder
rotating at wash speed). The motor continues
to rotate counterclockwise (forward) at
normal wash speed for seven seconds.
r. The motor accelerates to distribution speed.
The display alternately flashes “drAI” and
“dISt” (drain step, cylinder rotating at
distribution speed).
s. The drain opens 15 seconds into the drain
step. The water level indicator lights on the
display will begin to go out, one by one, as
the machine drains past each water level.
t. The computer begins monitoring the balance
signal from the AC inverter drive eight
seconds after the water le vel switch indicat es
that water lev el has dropped below low lev e l.
u. If the balance signal indicates that the wash
load is unbalanced, the cylinder will slow
down to wash speed for seven seconds in an
attempt to redistribute the load. The
computer will make as man y as ten attempts,
as needed, in this cycle.
Note: If the machine utilizes the overtravel limit
switch balance detection system, the computer will
proceed through the drain step and will time steps t
and u. The computer will then proceed to step v.
v. The cylinder accelerates to low spin speed.
The display shows “SPn1” (c ylinder rotating
at low spin speed). The basket rotates at low
spin speed for 60 seconds.
w. The cylinder accelerates to medium spin
speed. The display shows “SPn2” (cylinder
rotating at medium spin speed). The basket
rotates at medium spin speed for 60 seconds.
x. The cylinder accelerates to high spin speed.
The display shows “SPn3” (c ylinder rotating
at high spin speed). The basket rotates at
high spin speed for 60 seconds.
30 F232072
Page 32

y. All outputs are turned off for roughly 20
seconds. The display shows “SdLY” (spin
coast delay).
z. The computer performs the normal stop
routine.
The door interlock is energized (allowing the
door to be opened), provided that the water
level switch indicates that water has fallen
below low level and that the AC drive
indicates that the motor has stopped.
Chemical Injection Supply System
Programming
Supply Dispenser
Compartments
2
1
1
Chemical Supply
Injection Points
3
4
3
2
The external supply connections are located on the
rear of the machine. The supply dispenser
compartments are designated 1, 2, and 3, in that
order, viewed from the front of the machine, left to
right.
The external supply hoses empty into the supply
dispenser compartments as follows: e xternal supply
1 empties into compartment 1, external supply 2
empties into compartment 2, and external supplies 3
and 4 empty into compartment 3. See Figure 4.
B009RE3B
Figure 4
Compartment 1 flushes with each f ill. Compartment
2 flushes when the program calls for supply 2
during a fill. Compartment 3 flushes when the
program calls for supply 3 during a fill.
Note: Compartment 3 does not flush when supply 4
is called for in a program.
F232072 31
Page 33

Programming
Cycle Segment Charts
Segment 1 (Prewash)
Instructions
Display
Use Up or Down key to change. Press Start key to enter or advance.
PrE
00 or 02 to 30 Select segment time: 02 to 30 minutes (00 to skip segment).
tFIL Indicates temperature fill is enabled.*
HFIL, CFIL, bFIL,
or AFIL
LO, Med, or HI Select fill level: “LO” (low), “Med” (medium), or “HI” (high) water level.
SUP0–SUP7 Select supply 0 – 7 (0 for no supply).***
00°F, 75°F–200°F
00°C, 25°C–93°C
drAI or nodr Select drain option: “drAI” (drain), “nodr” (no drain)‡
SPIn (flashed for one second)
tIME (flashed for one second)
00 or 30 to 240 Select time for spin: 30 to 240 seconds (00 for no spin)
* This is displayed only if temperature-controlled fills are enabled in the SETUP options and if the heat
temperature is set to a value other than “00.”
** “AFIL” can be selected only if the “SUP5”/“AFIL” SETUP option is set to “AFIL.”
*** “SUP5” and “SUP6” can be selected only if the “SUP5”/“AFIL” SETUP option is set to “SUP5.”
† This value is not available when temperature-controlled fill and auxiliary heat SETUP options are
disabled.
‡ If “nodr” is selected, the computer skips the spin step and goes on to the next segment.
Select “HFIL” (hot fill), “CFIL” (cold fill), “bFIL” (warm fill), or “AFIL”
(auxiliary fill).**
Select temperature: 75 to 200° F or 25 to 93° C (00 for no heat).†
32 F232072
Page 34

Programming
Segment 2 (Wash)
Instructions
Display
Use Up or Down key to change. Press Start key to enter or advance.
UASH
00 or 02 to 20 Select segment time: 02 to 20 minutes (00 to skip segment).
tFIL Indicates temperature fill is enabled.*
HFIL, CFIL, bFIL,
or AFIL
LO, Med, or HI Select fill level: “LO” (low), “Med” (medium), or “HI” (high) water level.
SUP0–SUP7 Select supply 0 – 7 (0 for no supply).***
00°F, 75°F–200°F
00°C, 25°C–93°C
drAI or nodr Select drain option: “drAI” (drain), “nodr” (no drain)‡
SPIn (flashed for one second)
tIME (flashed for one second)
00 or 30 to 240 Select time for spin: 30 to 240 seconds (00 for no spin)
* This is displayed only if temperature-controlled fills are enabled in the SETUP options and if the heat
temperature is set to a value other than “00.”
** “AFIL” can be selected only if the “SUP5”/“AFIL” SETUP option is set to “AFIL.”
*** “SUP5” and “SUP6” can be selected only if the “SUP5”/“AFIL” SETUP option is set to “SUP5.”
† This value is not available when temperature-controlled fill and auxiliary heat SETUP options are
disabled.
‡ If “nodr” is selected, the computer skips the spin step and goes on to the next segment.
Select “HFIL” (hot fill), “CFIL” (cold fill), “bFIL” (warm fill), or “AFIL”
(auxiliary fill).**
Select temperature: 75 to 200° F or 25 to 93° C (00 for no heat).†
F232072 33
Page 35

Programming
Segments 3 – 10 (Fills 1 – 8)
Instructions
Display
Use Up or Down key to change. Press Start key to enter or advance.
FIL1, FIL2, FIL3, FIL4, FIL5, FIL6, FIL7, or FIL8
00 or 02 to 15 Select segment time: 02 to 15 minutes (00 to skip segment).
tFIL Indicates temperature fill is enabled.*
HFIL, CFIL, bFIL,
or AFIL
LO, Med, or HI Select fill level: “LO” (low), “Med” (medium), or “HI” (high) water level.
SUP0–SUP7 Select supply 0 – 7 (0 for no supply).***
00°F, 75°F–200°F
00°C, 25°C–93°C
drAI or nodr Select drain option: “drAI” (drain), “nodr” (no drain)‡
SPIn (flashed for one second)
tIME (flashed for one second)
00 or 30 to 240 Select time for spin: 30 to 240 seconds (00 for no spin)
* This is displayed only if temperature-controlled fills are enabled in the SETUP options and if the heat
temperature is set to a value other than “00.”
** “AFIL” can be selected only if the “SUP5”/“AFIL” SETUP option is set to “AFIL.”
*** “SUP5” and “SUP6” can be selected only if the “SUP5”/“AFIL” SETUP option is set to “SUP5.”
† This value is not available when temperature-controlled fill and auxiliary heat SETUP options are
disabled.
‡ If “nodr” is selected, the computer skips the spin step and goes on to the next segment.
Select “HFIL” (hot fill), “CFIL” (cold fill), “bFIL” (warm fill), or “AFIL”
(auxiliary fill).**
Select temperature: 75 to 200° F or 25 to 93° C (00 for no heat).†
34 F232072
Page 36

Programming
Segment 11 (Fill 9)
Instructions
Display
Use Up or Down key to change. Press Start key to enter or advance.
FIL9
00 or 02 to 15 Select segment time: 02 to 15 minutes (00 to skip segment).
tFIL Indicates temperature fill is enabled.*
HFIL, CFIL, bFIL,
or AFIL
LO, Med, or HI Select fill level: “LO” (low), “Med” (medium), or “HI” (high) water level.
SUP0–SUP7 Select supply 0 – 7 (0 for no supply).***
00°F, 75°F–200°F
00°C, 25°C–93°C
drAI or nodr Select drain option: “drAI” (drain), “nodr” (no drain)‡
SPn1, SPn2, or SPn3 Select spin speed: “SPn1” (low), “SPn2” (medium), or “SPn5” (high).
SPIn (flashed for one second)
tIME (flashed for one second)
00 or 01 to 10 Select time for spin: 1 to 10 minutes (00 for no spin)
* This is displayed only if temperature-controlled fills are enabled in the SETUP options and if the heat
temperature is set to a value other than “00.”
** “AFIL” can be selected only if the “SUP5”/“AFIL” SETUP option is set to “AFIL.”
*** “SUP5” and “SUP6” can be selected only if the “SUP5”/“AFIL” SETUP option is set
to “SUP5.”
† This value is not available when temperature-controlled fill and auxiliary heat SETUP options
are disabled.
‡ If “nodr” is selected, the computer skips the spin step and goes on to the next segment.
Select “HFIL” (hot fill), “CFIL” (cold fill), “bFIL” (warm fill), or “AFIL”
(auxiliary fill).**
Select temperature: 75 to 200° F or 25 to 93° C (00 for no heat).†
F232072 35
Page 37

Programming
V-Computer Cycle Charts
V-Computer Standard OPL Cycles
1
Permanent
Program
Press
Light Soil
Agitation AG 1 AG 1 AG 1 AG 1 AG 1 AG 1 AG 1 AG 1
Wash Speed AGSn AGSn AGSn AGSn AGSn AGSn AGSn AGSn
Pump nPMP nPMP nPMP nPMP nPMP nPMP nPMP nPMP
Prewash
Time (Min)00222222
Water --- --- Warm Warm Warm Warm Warm Warm
Level --- --- High High High High High High
Supply --- --- 0 0 0 0 0 0
Temp (F) --- --- 0 0 0 0 0 0
Drain --- --- DrAI DrAI DrAI DrAI DrAI DrAI
Spin (Sec) --- --- 0 0 0 0 0 0
Wash
Time (Min)77776699
Water Hot Hot Hot Hot Hot Hot Hot Hot
Level Low Low Low Low Low Low Low Low
Supply11111111
Temp (F)00000000
Drain DrAI DrAI DrAI DrAI DrAI DrAI DrAI DrAI
Spin (Sec)00000000
Fill 1
Time (Min)44777747
Water Hot Hot Hot Hot Hot Hot Hot Hot
Level High High Low Low Low Low High Low
Supply00221102
Temp (F)00000000
Drain DrAI DrAI DrAI DrAI DrAI DrAI DrAI DrAI
Spin (Sec)00000000
Fill 2
Time (Min)22447724
Water Warm Warm Hot Hot Hot Hot Warm Hot
Level High High High High Low Low High High
Supply00002200
Temp (F)00000000
Drain DrAI DrAI DrAI DrAI DrAI DrAI DrAI DrAI
Spin (Sec)30600000300
Fill 3
Time (Min)40224442
Water Warm --- Warm Warm Hot Hot Warm Warm
Level Low --- High High High High Low High
Supply3---000030
Temp (F)0---000000
Drain DrAI --- DrAI DrAI DrAI DrAI DrAI DrAI
Spin (Sec) 240 --- 30 0 60 0 240 30
2
Cotton
Terrycloth
Light Soil
3
Permanent
Press
Medium Soil
4
Cotton
Terr ycloth
Medium Soil
5
Permanent
Press
Heavy Soil
6
Cotton
Terrycloth
Heavy Soil
7
Table Napery
Blends
Colors
8
Table Napery
Blends
Whites
36 F232072
Page 38

Programming
V-Computer Standard OPL Cycles (Continued)
1
Permanent
Program
Press
Light Soil
Fill 4
Time (Min)00402204
Water --- --- Warm --- Warm Warm --- Warm
Level --- --- Low --- High High --- Low
Supply --- --- 3 --- 0 0 --- 3
Temp (F) --- --- 0 --- 0 0 --- 0
Drain --- --- DrAI --- DrAI DrAI --- DrAI
Spin (Sec) --- --- 240 --- 30 30 --- 240
Fill 5
Time (Min)00004000
Water --- --- --- --- Warm --- --- --Level --- --- --- --- Low --- --- ---
Supply --- --- --- --- 3 --- --- ---
Temp (F) --- --- --- --- 0 --- --- ---
Drain --- --- --- --- DrAI --- --- ---
Spin (Sec) --- --- --- --- 240 --- --- ---
Fill 6
Time (Min)00000000
Water --- --- --- --- --- --- --- --Level --- --- --- --- --- --- --- ---
Supply --- --- --- --- --- --- --- ---
Temp (F) --- --- --- --- --- --- --- ---
Drain --- --- --- --- --- --- --- ---
Spin (Sec) --- --- --- --- --- --- --- ---
Fill 7
Time (Min)00000000
Water --- --- --- --- --- --- --- --Level --- --- --- --- --- --- --- ---
Supply --- --- --- --- --- --- --- ---
Temp (F) --- --- --- --- --- --- --- ---
Drain --- --- --- --- --- --- --- ---
Spin (Sec) --- --- --- --- --- --- --- ---
Fill 8
Time (Min)00000000
Water --- --- --- --- --- --- --- --Level --- --- --- --- --- --- --- ---
Supply --- --- --- --- --- --- --- ---
Temp (F) --- --- --- --- --- --- --- ---
Drain --- --- --- --- --- --- --- ---
Spin (Sec) --- --- --- --- --- --- --- ---
Fill 9
Time (Min)04040400
Water --- Warm --- Warm --- Warm --- --Level --- Low --- Low --- Low --- ---
Supply --- 3 --- 3 --- 3 --- ---
Temp (F) --- 0 --- 0 --- 0 --- ---
Drain --- --- --- DrAI --- DrAI --- ---
Spin --- SPn3 --- SPn3 --- SPn3 --- ---
Spin (Min) --- 5 --- 5 --- 5 --- ---
2
Cotton
Terr ycloth
Light Soil
3
Permanent
Press
Medium Soil
4
Cotton
Terr ycloth
Medium Soil
5
Permanent
Press
Heavy Soil
6
Cotton
Terrycloth
Heavy Soil
7
Table Napery
Blends
Colors
8
Table Napery
Blends
Whites
F232072 37
Page 39

Programming
V-Computer Standard OPL Cycles (Continued)
9
VISA
Program
Table Napery
Colors
Agitation AG 1 AG 1 AG 1 AG 1 AG 1 AG 1 AG 1 AG 1
Wash Speed AGSn AGSn AGSn AGSn AGSn AGSn AGSn AGSn
Pump nPMP nPMP nPMP nPMP nPMP nPMP nPMP nPMP
Prewash
Time (Min)22222200
Water Warm Warm Warm Hot Warm Warm --- --Level High High High High High High --- ---
Supply 0 0 1 1 1 0 --- ---
Temp (F) 0 0 0 0 0 0 --- ---
Drain DrAI DrAI DrAI DrAI DrAI DrAI --- ---
Spin (Sec) 0 0 0 0 0 0 --- ---
Wash
Time (Min)10101067757
Water Hot Hot Hot Hot Hot Hot Cold Warm
Level Low Low Low Low Low Low High High
Supply11112111
Temp (F)00000000
Drain DrAI DrAI DrAI DrAI DrAI DrAI DrAI DrAI
Spin (Sec)00000000
Fill 1
Time (Min)666122244
Water Hot Hot Hot Hot Warm Warm Cold Warm
Level Low Low Low Low High High High High
Supply11220000
Temp (F)00000000
Drain DrAI DrAI DrAI DrAI DrAI DrAI DrAI DrAI
Spin (Sec)00000000
Fill 2
Time (Min)44442222
Water Hot Hot Hot Hot Warm Warm Cold Warm
Level High High High High High High High High
Supply00200000
Temp (F)00000000
Drain DrAI DrAI DrAI DrAI DrAI DrAI DrAI DrAI
Spin (Sec) 0 0 0 0 30 30 30 30
Fill 3
Time (Min)22224444
WaterWarmWarmWarmWarmWarmWarm Cold Warm
Level High High High High Low Low High High
Supply00003333
Temp (F)00000000
Drain DrAI DrAI DrAI DrAI DrAI DrAI DrAI DrAI
Spin (Sec) 0 0 0 0 240 240 240 240
10
VISA
Table Napery
Whites
11
Rags
Heavy Soil
12
Reclaim
13
Personals
with
Bleach
14
Personals
no
Bleach
15
Delicates
Spreads
Cold Water
16
Delicates
Spreads
Warm Water
38 F232072
Page 40

Programming
V-Computer Standard OPL Cycles (Continued)
9
VISA
Program
Table Napery
Colors
Fill 4
Time (Min)22220000
Water Cold Cold Warm Warm --- --- --- --Level High High High High --- --- --- ---
Supply 0 0 0 0 --- --- --- ---
Temp (F) 0 0 0 0 --- --- --- ---
Drain DrAI DrAI DrAI DrAI --- --- --- ---
Spin (Sec) 30 30 60 30 --- --- --- ---
Fill 5
Time (Min)44440000
Water Cold Cold Warm Warm --- --- --- --Level Low Low High Low --- --- --- ---
Supply 3 3 0 3 --- --- --- ---
Temp (F) 0 0 0 0 --- --- --- ---
Drain DrAI DrAI DrAI DrAI --- --- --- ---
Spin (Sec) 240 240 60 240 --- --- --- ---
Fill 6
Time (Min)00000000
Water --- --- --- --- --- --- --- --Level --- --- --- --- --- --- --- ---
Supply --- --- --- --- --- --- --- ---
Temp (F) --- --- --- --- --- --- --- ---
Drain --- --- --- --- --- --- --- ---
Spin (Sec) --- --- --- --- --- --- --- ---
Fill 7
Time (Min)00000000
Water --- --- --- --- --- --- --- --Level --- --- --- --- --- --- --- ---
Supply --- --- --- --- --- --- --- ---
Temp (F) --- --- --- --- --- --- --- ---
Drain --- --- --- --- --- --- --- ---
Spin (Sec) --- --- --- --- --- --- --- ---
Fill 8
Time (Min)00000000
Water --- --- --- --- --- --- --- --Level --- --- --- --- --- --- --- ---
Supply --- --- --- --- --- --- --- ---
Temp (F) --- --- --- --- --- --- --- ---
Drain --- --- --- --- --- --- --- ---
Spin (Sec) --- --- --- --- --- --- --- ---
Fill 9
Time (Min)00400000
Water --- --- Warm --- --- --- --- --Level --- --- Low --- --- --- --- ---
Supply --- --- 3 --- --- --- --- ---
Temp (F) --- --- 0 --- --- --- --- ---
Drain --- --- DrAI --- --- --- --- ---
Spin --- --- SPn3 --- --- --- --- ---
Spin (Min) --- --- 6 --- --- --- --- ---
10
VISA
Table Napery
Whites
11
Rags
Heavy Soil
12
Reclaim
13
Personals
with
Bleach
14
Personals
no
Bleach
15
Delicates
Spreads
Cold Water
16
Delicates
Spreads
Warm Water
F232072 39
Page 41

Programming
V-Computer Export OPL Cycles
21
Program
Agitation Ag 1 Ag 1 Ag 1 Ag 1 Ag 1 Ag 1 Ag 1 Ag 1 Ag 1 Ag 2
Wash Speed AgSn AgSn AgSn AgSn AgSn AgSn AgSn AgSn AgSn AgSn
Pump nPMP nPMP nPMP nPMP nPMP nPMP nPMP nPMP nPMP nPMP
Prewash
Time (Min)8080680806
Water Cold --- Cold --- Cold Cold --- Cold --- Cold
Level High --- High --- High High --- High --- High
Supply 1 --- 1 --- 1 1 --- 1 --- 1
Temp (C) 40° --- 40° --- 40° 40° --- 40° --- 40°
Drain DrAI --- DrAI --- DrAI DrAI --- DrAI -- - DrAI
Spin (Sec) 0 --- 0 --- 0 0 --- 0 --- 0
Wash
Time (Min)10101010 8 10101010 8
Water Hot Hot Hot Hot Both Hot Hot Hot Hot Both
Level Low Low Low Low Low Low Low Low Low Low
Supply2222222222
Temp (C) 90° 90° 60° 60° 40° 90° 90° 60° 60° 40°
Drain DrAI DrAI DrAI DrAI DrAI DrAI Dr AI DrAI DrAI DrAI
Spin (Sec)0000000000
Fill 1
Time (Min)0000000000
Water --- --- --- --- --- --- --- --- --- ---
Level --- --- --- --- --- --- --- --- --- ---
Supply --- --- --- --- --- --- --- --- --- ---
Temp (C) --- --- --- --- --- --- --- --- --- ---
Drain --- --- --- --- --- --- --- --- --- ---
Spin (Sec) --- --- --- --- --- --- --- --- --- ---
Fill 2
Time (Min)0000000000
Water --- --- --- --- --- --- --- --- --- ---
Level --- --- --- --- --- --- --- --- --- ---
Supply --- --- --- --- --- --- --- --- --- ---
Temp (C) --- --- --- --- --- --- --- --- --- ---
Drain --- --- --- --- --- --- --- --- --- ---
Spin (Sec) --- --- --- --- --- --- --- --- --- ---
Fill 3
Time (Min)2222222222
Water Cold Cold Cold Cold Cold Cold Cold Cold Cold Cold
Level Medium Medium Medium Medium Medium Medium Medium Medium Medium Medium
Supply0000000000
Temp (C)0000000000
Drain DrAI DrAI DrAI DrAI DrAI DrAI DrAI DrAI DrAI DrAI
Spin (Sec)30303030303030303030
Fill 4
Time (Min)2222222222
Water Cold Cold Cold Cold Cold Cold Cold Cold Cold Cold
Level Medium Medium Medium Medium Medium Medium Medium Medium Medium Medium
Supply0000000000
Temp (C)0000000000
Drain DrAI DrAI DrAI DrAI DrAI DrAI DrAI DrAI DrAI DrAI
Spin (Sec)30303030303030303030
Normal
90°C
(Prewash)
22
Normal
90°C
23
Normal
60°C
(Prewash)
24
Normal
60°C
25
Normal
40°C
(Prewash)
26
Permanent
Press
90°C
(Prewash)
27
Permanent
Press
90°C
28
Permanent
Press
60°C
(Prewash)
29
Permanent
Press
60°C
30
Fine
40°C
40 F232072
Page 42

Programming
V-Computer Export OPL Cycles (Continued)
21
Program
Fill 5
Time (Min)2222222222
Water Cold Cold Cold Cold Cold Cold Cold Cold Cold Cold
Level Medium Medium Medium Medium Medium Medium Medium Medium Medium Medium
Supply0000000000
Temp (C)0000000000
Drain DrAI DrAI DrAI DrAI DrAI DrAI DrAI DrAI DrAI DrAI
Spin (Sec)30303030303030303030
Fill 6
Time (Min)0000000000
Water --- --- --- --- --- --- --- --- --- ---
Level --- --- --- --- --- --- --- --- --- ---
Supply --- --- --- --- --- --- --- --- --- ---
Temp (C) --- --- --- --- --- --- --- --- --- ---
Drain --- --- --- --- --- --- --- --- --- ---
Spin (Sec) --- --- --- --- --- --- --- --- --- ---
Fill 7
Time (Min)0000000000
Water --- --- --- --- --- --- --- --- --- ---
Level --- --- --- --- --- --- --- --- --- ---
Supply --- --- --- --- --- --- --- --- --- ---
Temp (C) --- --- --- --- --- --- --- --- --- ---
Drain --- --- --- --- --- --- --- --- --- ---
Spin (Sec) --- --- --- --- --- --- --- --- --- ---
Fill 8
Time (Min)0000000000
Water --- --- --- --- --- --- --- --- --- ---
Level --- --- --- --- --- --- --- --- --- ---
Supply --- --- --- --- --- --- --- --- --- ---
Temp (C) --- --- --- --- --- --- --- --- --- ---
Drain --- --- --- --- --- --- --- --- --- ---
Spin (Sec) --- --- --- --- --- --- --- --- --- ---
Fill 9
Time (Min)2222222222
Water Cold Cold Cold Cold Cold Cold Cold Cold Cold Cold
Level Medium Medium Medium Medium Medium Medium Medium Medium Medium Medium
Supply3333333333
Temp (C)0000000000
Spin SPn3 SPn3‘ SPn3 SPn3 SPn3 SPn3 SPn3 SPn3 SPn3 SPn2
Spin (Min)6666622222
Normal
90°C
(Prewash)
22
Normal
90°C
23
Normal
60°C
(Prewash)
24
Normal
60°C
25
Normal
40°C
(Prewash)
26
Permanent
Press
90°C
(Prewash)
27
Permanent
Press
90°C
28
Permanent
Press
60°C
(Prewash)
29
Permanent
Press
60°C
30
Fine
40°C
F232072 41
Page 43

Programming
Cycle Programming Worksheet
Program Prewash Wash
Title Time (Min) Time (Min)
Water Water
Level Level
Cycle Supply Supply
Agitation Temp Temp
Wash Speed Drain Drain
Pump Spin (Sec) Spin (Sec)
Fill 1
Time (Min) Time (Min) Time (Min)
Water Water Water
Level Level Level
Fill 2 Fill 3
Supply Supply Supply
Temp Temp Temp
Drain Drain Drain
Spin (Sec) Spin (Sec) Spin (Sec)
Fill 4
Time (Min) Time (Min) Time (Min)
Water Water Water
Level Level Level
Supply Supply Supply
Temp Temp Temp
Drain Drain Drain
Spin (Sec) Spin (Sec) Spin (Sec)
Fill 7
Time (Min) Time (Min) Time (Min)
Water Water Water
Level Level Level
Supply Supply Supply
Temp Temp Temp
Drain Drain Drain
Fill 5 Fill 6
Fill 8 Fill 9
Spin (Sec) Spin (Sec) Spin
Spin (Min)
42 F232072
Page 44

Lavadora extractora
Unidad independiente
Velocidad variable
Instrucciones para la
operación y programación
del microordenador serie V
Números de modelo
HF18VNV SF18VNV UF18PNV
Operación/Programación
HF25VNV SF25VNV UF25PNV
Pieza No. F232072R3
Septiembre 1998
Page 45

44 F232072(SP)
Page 46

Contenido
Operación/Programación
Seguridad
Explicación de los símbolos . . . . . . . . . . . . . . . 48
Ubicación de los adhesivos de seguridad . . . . . 49
Seguridad del operario . . . . . . . . . . . . . . . . . . . 50
Ambiente seguro para el funcionamiento. . . . . 51
Condiciones del ambiente . . . . . . . . . . . . . . 51
Ubicación de la máquina . . . . . . . . . . . . . . . 52
Servicios de entrada y salida . . . . . . . . . . . . 52
Impulsor del inversor de CA . . . . . . . . . . . . 53
Uso erróneo. . . . . . . . . . . . . . . . . . . . . . . . . . . . 53
Operación
Servicio al cliente . . . . . . . . . . . . . . . . . . . . . . . 55
Guía para familiarizarse con la máquina . . . . . 55
Teoría del funcionamiento . . . . . . . . . . . . . . . . 57
Ordenador V . . . . . . . . . . . . . . . . . . . . . . . . 57
Teclado. . . . . . . . . . . . . . . . . . . . . . . . . . . . . 58
Condiciones controladas por el
ordenador. . . . . . . . . . . . . . . . . . . . . . . . . . . 59
Indicaciones en pantalla. . . . . . . . . . . . . . . . 60
Puesta en marcha . . . . . . . . . . . . . . . . . . . . . . . 61
Abertura de la puerta. . . . . . . . . . . . . . . . . . . . . 61
Cargar . . . . . . . . . . . . . . . . . . . . . . . . . . . . . . . . 61
Distribuidor de productos de lavandería . . . . . . 62
Selección del ciclo . . . . . . . . . . . . . . . . . . . . . . 62
Ejecución del ciclo . . . . . . . . . . . . . . . . . . . . . . 62
Llenado . . . . . . . . . . . . . . . . . . . . . . . . . . . . 62
Lavado. . . . . . . . . . . . . . . . . . . . . . . . . . . . . 63
Desagüe . . . . . . . . . . . . . . . . . . . . . . . . . . . . 63
Centrifugado. . . . . . . . . . . . . . . . . . . . . . . . 63
Ciclo de prueba. . . . . . . . . . . . . . . . . . . . . . 64
Rutina de parada. . . . . . . . . . . . . . . . . . . . . 64
Detección del balance . . . . . . . . . . . . . . . . . . . 64
Interruptor de límite de sobrecarrera . . . . . . . . 65
Programación
Funciones de las teclas en el modo de
programación . . . . . . . . . . . . . . . . . . . . . . . . 67
Modo de configuración . . . . . . . . . . . . . . . . . . 67
Grados visualizados en Fahrenheit
o centígrados. . . . . . . . . . . . . . . . . . . . . . . . 68
Calor auxiliar . . . . . . . . . . . . . . . . . . . . . . . 68
Productos de lavandería 5 o calor
auxiliar . . . . . . . . . . . . . . . . . . . . . . . . . . . . 68
Llenado con control de temperatura. . . . . . 68
Enfriamiento automático . . . . . . . . . . . . . . 69
Cuenta de los ciclos . . . . . . . . . . . . . . . . . . . . . 69
Programación de los ciclos . . . . . . . . . . . . . . . 69
Opciones de los ciclos . . . . . . . . . . . . . . . . 69
Acción de agitación . . . . . . . . . . . . . . . . . . 69
Velocidad de agitación . . . . . . . . . . . . . . . . 70
Bomba de recirculación . . . . . . . . . . . . . . . 70
Programación de los segmentos . . . . . . . . . 70
Ciclo de prueba. . . . . . . . . . . . . . . . . . . . . . 72
Sistema de suministro de la
inyección química. . . . . . . . . . . . . . . . . . . . . 75
Tablas de los segmentos del ciclo . . . . . . . . . . 76
Tablas del ciclo del ordenador V . . . . . . . . . . . 80
Hoja de programación del ciclo. . . . . . . . . . . . 86
F232072(SP)
45
Page 47

© Copyright 2000, Alliance Laundry Systems LLC
Reservados t odos los derechos. Ninguna sección del prese nte man ual puede ser repr oducida o trans mitida en forma
alguna o a través de ningún medio sin el expreso consentimiento por escrito del editor.
46 F232072(SP)
Page 48

Sección 1
Seguridad
Cualquier persona que haga funcionar o revise esta
máquina debe seguir las normas de seguridad de
este manual. Se debe prestar atención en especial a
los recuadros de PELIGRO, ADVERTENCIA y
PRECAUCIÓN que aparecen en este manual.
PRECAUCIÓN
Tenga cuidado cuando la puerta esté abierta,
especialmente cuando esté cargando desde
un nivel inferior a la misma. El impacto con los
bordes de la puerta puede causar daños
personales.
SW025
ADVERTENCIA
Existen voltajes peligrosos en las cajas de
mando eléctrico y en los terminales del motor.
Solamente el personal cualificado y
familiarizado con los procedimientos eléctricos
de prueba, el equipo de prueba y las
precauciones de seguridad debe intentar
realizar ajustes o lo calizar a vería s. Desconecte
la alimentación de la máquina antes de quitar
la tapa de la caja de control, y antes de intentar
cualquier procedimiento de servicio técnico.
SW005
Las siguientes advertencias son ejemplos generales
aplicables a esta máquina. Las advertencias
específicas de un funcionamiento especial
aparecerán en el manual con el comentario de ese
funcionamiento.
PELIGRO
Si un niño quedará atrapado en la máquina,
éste podría fallecer o sufrir lesio nes gra v es. No
permita que los niños jueguen en la máquina o
cerca de ella. No los deje desatendidos
mientras la puerta de la lavadora esté abierta.
SW001
ADVERTENCIA
Esta máquina debe ser instalada, ajustada y
reparada por el personal cualificado de
mantenimiento eléctrico, que esté familiarizado
con la construcción y el funcionamiento de
este tipo de máquina. También debe estar
familiarizado con los posibles peligros
implicados. Si no se observa esta adv ertencia
se puede incurrir en lesiones personales y/o
daños al equipo que podrían anular la ga rantía.
SW004
F232072(SP) 47
Page 49

Seguridad
PRECAUCIÓN
Asegúrese de que la máquina esté instalada
en un suelo niv elado de suf iciente resist encia y
que se proporcionen los espacios libres
recomendados alrededor, para la inspección y
el mantenimiento. No permita nunca que se
bloquee el espacio para ins pección y
mantenimiento.
Explicación de los símbolos
El rayo con punta de flecha dentro del triángulo es
un signo de advertencia que indica la presencia de
voltaje peligroso.
SW020
ADVERTENCIA
No toque nunca las tubeías, conexiones o
componentes de vapor internos o externos.
Estas superficies pueden estar sumamente
calientes y causar quemaduras graves. El
vapor se debe apagar y tanto la tubería, como
las conexiones y los componentes se deben
dejar enfriar antes de que se pueda tocar la
tubería.
Este símbolo de advertencia indica la presencia de
productos químicos posiblemente peligrosos.
Deben tomarse precauciones adecuadas al manejar
materiales corrosivos o cáusticos.
SW014
El signo de admiración dentro del triángulo es un
símbolo de advertencia que indica que existen
importantes instrucciones acerca de la máquina y
condiciones potencialmente peligrosas
Este símbolo de advertencia indica que existen
superficies calientes que podrían causar graves
quemaduras. El acero inoxidable y las líneas de
vapor pueden ponerse demasiado calientes y no
deben ser tocadas.
Este símbolo de advertencia indica que hay
mecanismos de transmisión (mando)
potencialmente peligrosos dentro de la máquina.
Los protectores siempre deben estar en su lugar
Este símbolo de advertencia indica que hay puntos
de agarre potencialmente peligrosos. Las piezas
mecánicas móviles pueden aplastar y/o cortar partes
del cuerpo.
cuando la máquina esté funcionando.
48 F232072(SP)
Page 50

Seguridad
Los adhesivos de seguridad aparecen en lugares
críticos de la máquina. Si no se mantienen legibles
los adhesivos de seguridad, se pueden producir
daños al operario o al técnico de servcio.
81968R1
81968R1
R069RS3A
Figura 1
F232072(SP) 49
Page 51

Seguridad
Para proporcionar seguridad personal y mantener la
máquina funcionando debidamente, siga todos los
procedimientos de mantenimiento y seguridad que
figuran en este manual. Si surgen preguntas acerca
de la seguridad, póngase en contacto con la fábrica
inmediatamente.
Utilice piezas de repuesto autorizadas por la fábrica
para evitar peligros de seguridad.
Seguridad del operario
ADVERTENCIA
NUNCA introduzca las manos u objetos en el
tambor hasta que se haya detenido
completamente. De lo contrario, se podrían
producir lesiones graves.
Para garantizar la seguridad de los operadores de la
máquina, se deben llevar a cabo diariamente las
siguientes comprobaciones de mantenimiento:
1. Antes de poner en funcionamiento la máquina,
verifique que todos los signos de advertencia
estén presentes y sean legibles. Los signos que
falten o sean ilegibles se deben cambiar
inmediatamente. Asegúrese de que tiene
algunos de repuesto.
SW012
Si la cerradura y el enganche no funcionan
debidamente, llame al técnico de servicio.
3. No intente poner en marcha la máquina si se
presentan cualquiera de las siguientes
condiciones:
a. La puerta no permanece firmemente cerrada
durante todo el ciclo.
b. El nivel de agua parece excesivamente alto.
c. La máquina no está conectada a un circuito
de toma de tierra.
No pase por alto ningún dispositiv o de seguridad en
esta máquina.
ADVERTENCIA
No haga funcionar nunca la máquina con un
sistema de equilibrio anulado o desconec tado . Si
la máquina se hace funcionar con cargas muy
desequilibradas pueden producirse lesiones
personales y daños graves al equipo.
SW039
2. Compruebe el enclavamiento de la puerta antes
de poner en funcionamiento la máquina:
a. Intente poner en marcha la máquina con la
puerta abierta. La lavadora no debe arrancar
con la puerta abierta.
b. Cierre la puerta sin bloquearla e intente
poner en marcha la máquina. La máquina no
debe arrancar si la puerta no está bloqueada.
c. Cierre, bloquee la puerta y empiece el ciclo.
Intente abrir la puerta mientras el ciclo está
en progreso. La puerta no debería abrirse.
50 F232072(SP)
Page 52

Seguridad
Ambiente seguro para el
funcionamiento
El funcionamiento seguro requiere un ambiente
apropiado tanto para el operario como para la
máquina. Si surgen preguntas referentes a la
seguridad, póngase en contacto inmediatamente con
la fábrica.
Condiciones del ambiente
l
Temperatura ambiente.
se congela a temperaturas inferiores a 32°F.
A temperaturas superiores a 50° C (120° F) el
motor se sobrecalienta más frecuentemente y,
en algunos casos, los dispositivos de estado
sólido que se usan en algunos modelos pueden
fallar o dañarse prematuramente. Es posible que
sea necesario instalar dispositivos especiales de
enfriamiento.
Los interruptores de presión de agua pueden
resultar afectados por los aumentos y las
disminuciones en la temperatura. Cada cambio
de 10° C (25° F) en temperatura tendrá un
efecto de 1% en el nivel de agua.
l
Humedad.
La humedad relativa superior al 90%
puede ocasionar un mal funcionamiento de los
componentes electrónicos o los motores de la
máquina. También se puede disparar el
interruptor accionado por corriente de pérdida a
tierra. Pueden ocurrir problemas de corrosión
en algunos componentes de metal de la
máquina.
Si la humedad relativa es inferior al 30%, las
correas y las mangueras de goma pueden
secarse y pudrirse con el transcurso del tiempo.
Este factor puede ocasionar fugas en las
mangueras, lo que a su vez puede causar
problemas de seguridad externos a la máquina,
conjuntamente con el equipo eléctrico
adyacente.
El agua en la máquina
etc. Las persianas, telas metálicas u otros
objetos de separación podrían bloquear de
forma significativa las aberturas del aire.
l
Emisiones de frecuencia de radio.
Existe un
filtro para máquinas en aquellas instalaciones
donde se comparte la misma superficie con
otros aparatos sensibles a las emisiones de
frecuencia de radio.
l
Elevación.
Si la máquina va a funcionar a
altitudes por encima de los 1.000 metros (3.280
pies) sobre el nivel del mar, preste atención
especial a los niveles de agua y a los ajustes
electrónicos (particularmente la temperatura) o
puede que no se logren los resultados deseados.
l
Productos químicos.
Mantenga las superficies
de acero inoxidable exentas de residuos
químicos.
PELIGRO
No ponga líquidos volátiles o inflamables en
ninguna máquina. No la limpie con líquidos
volátiles o inflamables tales como acetona,
disolvente s de pintura, productos para rebajar
el barniz, tetracloruro de carbono, gasolina,
bencina, nafta, etc. De lo contrario, podrían
producirse lesiones personales graves y/o
daños a la máquina.
l
Daños debidos al agua.
No rocíe la máquina
con agua. Podría producirse un corto circuito y
daños graves. Repare inmediatamente cualquier
fuga debida a obturadores defectuosos, etc.
SW002
l
Ventilación.
Se debe evaluar periódicamente la
necesidad de aberturas para el aire en
accesorios de lavandería tales como: secadoras,
máquinas de planchar, calentadores de agua,
F232072(SP) 51
Page 53

Seguridad
Ambiente seguro para el
funcionamiento
Ubicación de la máquina
l
Base.
El suelo de cemento debe ser lo
suficientemente resistente y grueso para
soportar la carga generada por las altas
velocidades de extracción de la máquina.
l
Espacio para servicio/mantenimiento.
Proporcione suficiente espacio para que se
lleven a cabo cómodamente los procedimientos
rutinarios de servicio y mantenimiento
preventivo.
Esto es especialmente importante en el caso de
las máquinas que tienen un impulsor del
inversor de CA.
Consulte las instrucciones de instalación para ver
los detalles específicos.
(continuación)
l
Presión del calor de vapor (opcional).
Se
obtendrán mejores resultados si se suministra
vapor a una presión de 2,0 – 5,4 Barias
(30 – 80 PSI). Una presión de vapor superior a
los 8,5 Barias (125 PSI) podría dañar los
componentes de vapor y causar lesiones
personales.
Para las máquinas que están equipadas con un
calor de vapor opcional, instale las tuberías de
acuerdo con los métodos aprobados para vapor
comercial. De no instalar el filtro de vapor
suministrado se podría anular la garantía.
l
Aire comprimido.
Para las máquinas que
requieren un servicio de aire comprimido, se
obtendrá un mejor rendimiento si el aire se
suministra a una presión de 5,4 – 6,7 Barias
(80 – 100 PSI). Las máquinas de gran capacidad
podrían experimentar un fallo en el cierre de la
puerta si se interrumpe el servicio de aire
comprimido.
PRECAUCIÓN
Vuelva a colocar todos los paneles que se
hayan quitado para llevar a cabo
procedimientos de reparación y
mantenimiento. No ponga en marcha la
máquina sin las protecciones, con piezas rot as
o que falten. No pase por alto ninguno de los
dispositivos de seguridad.
Servicios de entrada y salida
l
Presión del agua.
Se obtendrán mejores
resultados si el agua se suministra a una presión
de 2,0 – 5,7 Barias (30 – 85 PSI). Aunque la
máquina funcionará debidamente a una presión
inferior, tardará más en llenarse. Si la presión
del agua es superior a los 6,7 Barias (100 PSI)
se pueden perjudicar las tuberías de la máquina,
dañarse los componentes y producirse lesiones
personales.
SW019
l
Sistema de desagüe.
Proporcione tubos para
desagüe o depósitos suficientemente grandes
como para acomodar el número total de litros
que se podrían verter si todas las máquinas del
lugar se vaciasen al mismo tiempo desde el
nivel más alto posible. Si se usan depósitos de
desagüe deberán cubrirse para soportar un
tráfico peatonal ligero.
l
Energía.
Para la seguridad personal y el
funcionamiento adecuado, la máquina debe
estar conectada a una toma de tierra según
ordenan los códigos estatales y locales. La
conexión a tierra debe efectuarse a una toma de
tierra comprobada, no a un conducto o tubería
de agua. No utilice fusibles en lugar de
cortacircuitos. Se debe suministrar un
interruptor de fácil acceso.
52 F232072(SP)
Page 54

ADVERTENCIA
Asegúrese de conectar a tierra a partir de una
conexión tierra adecuada a la orejeta terminal
de conexión a tierra cerca del bloque de
suministro de corriente de esta máquina. Si no
se conecta a tierra correctamente, se pueden
ocasionar lesiones personales debidas a
descargas eléctricas y la máquina puede fallar.
SW008
Desconecte siempre los suministros de energía y
agua antes de que el técnico de servicio lleve a cabo
cualquier procedimiento de reparación. Cuando sea
pertinente, desconecte también los suministros de
vapor y/o aire comprimido antes de realizar el
servicio.
Impulsor del inversor de CA
Las máquinas equipadas con un impulsor del
inversor de CA requieren atención especial en lo
referente al ambiente de funcionamiento.
l
Un ambiente especialmente polvoriento o con
pelusas requerirá una limpieza más frecuente
del filtro del ventilador enfriador del impulsor
del inversor de CA y del propio impulsor del
inversor de CA.
Seguridad
Si el voltaje es superior a los 230 V para
instalaciones de 200 V o superior a los 440 V
para instalaciones de 400 V, se recomienda un
transformador reductor-elevador . Si el v oltaje es
superior a 240 ó 480, se requiere un
transformador reductor-elevador.
l
Es especialmente importante tener suficiente
espacio para llevar a cabo procedimientos de
servicio y mantenimiento preventivo para las
máquinas equipadas con un impulsor del
inversor de CA.
Uso erróneo
Nunca use esta máquina con otro propósito que no
sea lavar tela.
l
No lave nunca en la máquina trapos
impregnados de petróleo, pues podría
producirse una explosión.
l
No lave nunca en la máquina piezas de máquina
o piezas automotrices, pues podrían producirse
daños serios al tambor de lavado.
l
No permita nunca que los niños jueguen sobre
la máquina o cerca de la misma. Si un niño
quedara atrapado en la misma, éste podría
fallecer o sufrir lesiones graves. No deje a los
niños desatendidos mientras la puerta de la
máquina esté abierta. Estas precauciones son
también aplicables para los animales.
l
Las fluctuaciones de corriente eléctrica en
fuentes tales como suministros de energía
ininterrumpida (UPS) pueden perjudicar a las
máquinas equipadas con un impulsor del
inv e rsor de CA. S e debe utili za r disposit ivos de
supresión adecuados en la alimentación
eléctrica dela máquina a fin de evitar
problemas.
l
Es absolutamente esencial tener un suministro
de energía exento de sacudidas y sobretensiones
para las máquinas equipadas con un impulsor
del inversor de CA. Las fluctuaciones de
corriente eléctrica (subidas y bajadas) en el
suministro de energía pueden hacer que el
impulsor del inversor de CA produzca errores
molestos.
F232072(SP) 53
Page 55

Seguridad
Notas
54 F232072(SP)
Page 56

Sección 2
Operación
Este manual está diseñado como guía para el
funcionamiento y la programación de las lavadorasextractoras de unidad independiente de 8 y 10 kg
(18 y 25 libras) de capacidad, equipadas con el
ordenador V y el impulsor del inversor de CA. Los
modelos que abarca este manual están diseñados
para usarse en lavanderías.
Mantenga los manuales, instrucciones de
instalación y diagramas de instalación eléctrica que
acompañan a la máquina en un lugar seguro para
poder usarlos como referencia. Se han incluido
gratis con la máquina. Se pueden obtener copias
adicionales a un precio simbólico.
Nota: Lea este manual completamente antes de
intentar poner en funcionamiento la máquina o
programar el microordenador.
Nota: No utilice este manual para los modelos
antiguos de máquinas controladas por ordenador.
No se base en folletos técnicos de modelos antiguos
cuando utilice esta máquina.
Nota: Toda la información, ilustraciones, y
especificaciones contenidas en este manual están
basadas en la última información del producto
disponible en el momento de imprimir. Nos
reservamos el derecho de hacer cambios sin avisar
en cualquier momento.
Servicio al cliente
Si se necesitan folletos o piezas de repuesto,
póngase en contacto con el establecimiento donde
adquirió la máquina o con Alliance Laundry
Systems LLC llamando al (920) 748-3950 para
conocer el nombre y la dirección del distribuidor de
piezas autorizado más cercano.
Para obtener asistencia técnica, llame a cualquiera
de los siguientes números:
(850) 718-1035
(850) 718-1026
Marianna, Florida
(920) 748-3121
Ripon, Wisconsin
El fabricante tiene un archivo con el número de
cada máquina. Proporcione siempre el número de
serie y de modelo de la máquina al pedir piezas o
cuando necesite asistencia técnica.
Guía para familiarizarse con la
máquina
La guía para familiarizarse con la máquina en la
figura 2 proporciona vistas delantera y posterior de
la lav adora-ex tractora e identif ic a las característic as
más importantes de funcionamiento de la máquina.
F232072(SP) 55
Page 57

Operación
Interruptor para
desbloquear
la puerta
Puerta
Botón para
desbloquear
la puerta
Manilla
de la puerta
Panel
delantero
interior
Tapa superior
Vista delantera
Distribuidor de
productos de lavandería
Panel de control
Teclado del ordenador V
Conexión de
la alimentación
Botón de parada
de emergencia
Puerta de cristal
Panel delantero
Armazón de la base
Filtro del ventilador de
enfriamiento del impulsor de
CA
exterior
Panel
posterior
Salida
de desagüe
Entrada de agua fr’a
Entrada de agua caliente
Vista posterior
Entrada de
vapor
(opcional)
Válvula
vacuorreguladora
Respiradero
Armazón de
la base
B007RS3A
Figura 2
56 F232072(SP)
Page 58

Operación
Teoría del funcionamiento
El diseño de esta máquina pone de relieve la
fiabilidad del rendimiento y la larga duración. El
cilindro, la cubierta y los paneles del cuerpo
principal están fabricados de acero inoxidable.
La máquina utiliza un motor para impulsar el
cilindro por medio de una correa en V para todas las
velocidades.
El sistema de cerradura de la puerta impide abrir la
puerta de acero inoxidable cuando hay agua en la
máquina. También impide el funcionamiento de la
máquina cuando la puerta está abierta.
Se utiliza una válvula de desagüe eléctrica para
retener el agua y la solución de lavado en la
máquina durante el lavado y el llenado. La válvula
de desagüe se cierra cuando se conecta la
alimentación eléctrica y se abre cuando se
desconecta, permitiendo que la máquina se vacíe en
caso de que haya un fallo de corriente.
El cilindro está construido con dos dispositivos de
elevación o rebordes que levantan la ropa de la
solución de jabón cuando el cilindro gira a
velocidad baja y después la vuelve a colocar en la
solución. El cilindro está perforado, permitiendo
que el agua circule y se vacíe desde dentro durante
los pasos de lavado y extracción.
Los controles eléctricos de la máquina se
encuentran en un recinto separado ubicado debajo
de la tapa superior de la máquina.
La máquina utiliza un control del impulsor del
inv ersor de CA, que proporciona seis velocidades al
motor usando un único motor. El tablero de salida
convierte la lógica del motor del ordenador V a las
señales adecuadas para el impulsor del inversor de
CA.
contra fallas, se ha instalado un interruptor de límite
de sobrecarrera entre la estructura y el sumidero
que, al dispararse, corta la corriente al mando de
CA.
El operario puede seleccionar entre 30 ciclos, 16 de
los cuales están preprogramados en la misma
fábrica. En los modelos de exportación, hay 10
ciclos preprogramados en fábrica. Se puede
seleccionar un ciclo especial de prueba permanente
para verificar el funcionamiento adecuado de la
máquina.
Se utiliza un sistema electrónico sensible al
equilibrio de la carga para intentar perfeccionar el
equilibrio de la carga antes de la extracción.
La máquina viene equipada con cinco lengüetas de
la manguera situadas en la parte posterior de la
máquina para facilitar la conexión a un sistema
externo de suministro de productos químicos. Una
tira de terminales en la caja de empalmes de
potencia de entrada proporciona señales de control
para un sistema externo de suministro de productos
químicos.
Ordenador V
El control del ordenador V es un control
programable de estado sólido capaz de almacenar y
hacer funcionar hasta 30 ciclos. Se puede encontrar
una descripción detallada de estos ciclos en la
sección de programación de este manual bajo el
apartado Ciclos OPL estándar del ordenador V y
Ciclos OPL export del ordenador V.
Si el ordenador de esta máquina está equipado con
ciclos especiales preprogramados, encontrará
incluido un encarte/suplemento con la lista de estos
ciclos, dentro de la bolsa de plástico que contenía
este manual.
El impulsor del inversor de CA utiliza un software
especial de detección de equilibrio junto con el
ordenador V para impedir que ocurra un
desequilibrio. Cuando el impulsor de CA detecta
una carga desequilibrada al final del ciclo de
desagüe, el ordenador hará hasta siete intentos para
equilibrar la carga. Como medida de seguridad
F232072(SP) 57
Page 59

Operación
Teoría del funcionamiento
(continuación)
Nota: No apague nunca el suministro eléctrico
mientras el interruptor de modalidad del ordenador
está en la posición de PROGRAM (programar). De
hacer esto se distorsionarán partes de los datos
programados, siendo necesario el volver a
programar algunos o todos los ciclos existentes.
Vuelva a poner siempre el interruptor de modalidad
en la posición RUN (funcionar) antes de apagar el
suministro eléctrico.
Teclado
El funcionamiento del control del ordenador V se
lleva a cabo con un teclado de cuatro teclas y una
pantalla de LED ubicada en la parte delantera de la
máquina. Vea en la Figura 3 las versiones nacional e
internacional del teclado.
La siguiente tabla describe la función de las teclas
individuales cuando la máquina está en la
modalidad de RUN (funcionar).
Teclado
Tecla Descripción
Se usa en la selección del ciclo;
Up (arriba)
Down (abajo)
Start (arrancar)
Stop (parar)
pulsando esta tecla se puede pasar de
un ciclo menor a otro ciclol mayor.
Se usa en la selección del ciclo; pulsando esta tecla se puede pasar de un
ciclo mayor a otro ciclo menor.
Se usa para empezar un ciclo.
Se usa para par ar un ciclo.
Up Down Start Stop
Nacional Internacional
Condición de
desequilibrio
Nivel alto
del agua
Nivel medio
del agua
Nivel bajo
del agua
R076RS3A
Figura 3
58 F232072(SP)
Page 60

Operación
Condiciones controladas por el ordenador
l
Puerta – El ordenador controla continuamente
la condición de la puerta por si está abierta o
bloqueada. Si detecta que la puerta está abierta
durante el ciclo de lavado, interrumpe el ciclo
inmediatamente y lleva a cabo la rutina de
parada.
l
Suministro eléctrico – Si se interrumpe el
suministro eléctrico el tiempo suficiente como
para que el ordenador se apague, la pantalla
mostrará brevemente y de forma intermitente
“Hold” (Espera), cuando vuelva el suministro
eléctrico, para indicar la interrupción. El
dispositivo encargado de abrir puerta se
desactivará para evitar que la misma se abra
mientras el tambor todavía está girando.
l
Equilibrio – El ordenador controla la señal de
equilibrio proporcionada por el impulsor de CA
durante las etapas de desagüe. Se intentará
distribuir la carga siete (7) veces. El punto
situado en la parte superior de la pantalla digital
del extremo izquierdo se encenderá después del
último intento sin éxito.
l
Nivel de agua en la fase de calor – A fin de
que el ordenador active la producción de calor,
tiene que haber por lo menos un nivel bajo de
agua en la máquina. Si no se detecta este nivel
mínimo, la producción de calor se apagará hasta
que se obtenga el nivel adecuado.
l
Problema con el sensor de temperatura – Si
el sensor de temperatura falla cuando se utilizan
grados Fahrenheit, destellará en la pantalla
“tSFL” en la modalidad de programación
(PROGRAM), en lugar de la temperatura. Si el
sensor de temperatura falla cuando se utilizan
grados Celsius, en la pantalla aparece “-17C”
en lugar de la temperatura.
La siguiente tabla titulada “Indicaciones en
pantalla” lista las distintas pantallas y lo que
significan. El operario deberá familiarizarse con
estas pantallas del ordenador.
l
Nivel del agua – El ordenador intenta
mantener el nivel de agua programado para el
llenado antes del procedimiento de agitación. Si
el nivel es inferior al programado, el ordenador
detendrá la cuenta atrás y volverá a activar las
válvulas de llenado hasta que se alcance el nivel
adecuado.
F232072(SP) 59
Page 61

Operación
Indicaciones en pantalla
Pantalla Significado Pantalla Significado
FP1
Hold (Espera) Espere… se acaba de conectar la corriente. HI Nivel alto de agu a
CY Ciclo (s eguido de un número de dos dígitos) SU P1 Prod. lavand. 1
tESt/CYC* Ciclo de prueba seleccionado. SUP2 Prod. lavand. 2
FAr Grados Fahrenheit SUP3 Prod. lavand. 3
CEL Grados centígrados SUP4 Prod. lavand. 4
Heat (calor) Calor auxiliar activado. SUP5 Prod. lavand. 5 (opción de CONFIGURACIÓN)
noHt Calor auxiliar desactivado. SUP6 Prod. lavand. 6 (prod. lavand. 1 y 5)
tFIL Llenado con contr ol de t em peratura activado. SUP7 Prod. lavand. 7 (prod. lavand. 3 y 4)
ntFL Llenado con control de temperatura desactivado. SLo/For Velocidad de lavado suave, dirección hacia adel ante
CooL Enfriamiento auto m át i co activado. SLo/rEv Velocidad de lavado suave, dirección hacia atrás.
noCL Enfriamiento auto m át i co desactivado. norM/For Velocidad de lavado normal, dirección hacia adelante.
Ag 1 Agitación 1 selecci onada (90% de agitac ió n) . norM/rEv Velo ci dad normal de lavado, dirección ha ci a at r ás.
Ag 2 Agitación 2 seleccionada (33% de agitación). drAI Desagüe activado.
Ag 3 Agitación 3 seleccionada (10% de agitación). nodr Desagüe desactivado.
Ag 4 Agitación 4 seleccionada (6,7% de agitación). dISt Distribución (equilibrio de carga ante s de extraer)
AgSn Velocidad normal de agitación
AgSL Velocidad lenta de agitación
PMP Salida de la bomba activada (solamente uso futuro). SPn1 El más bajo de los tres centrifugados
nPMP Sal id a de la bomba desact ivada (solam ente uso futuro). SPn2 El centri fugado medio de los tr es centrifugados
PrE
UASH
FIL1
FIL2
FIL3
FIL4
FIL5
FIL6
FIL7
FIL8
FIL9
CFIL Llenado frío
bFIL Llenado tibio (tanto agua fría como caliente)
HFIL Llenad o caliente
AFIL Llenado auxiliar (opción de CONFIGURACIÓN)
Lo Nivel bajo del agua
* Las indicaciones en pantalla separadas por una barra oblicua indican que son indicaciones intermitentes.
Código de identificación de programa (ROM). Esto es
sólo un ejemplo .
Segmento de prelavado (1
Segmento de lavado (2° de 11 segmentos)
Primer llenado (3° de 11 segmentos )
Segundo llenado (4
Tercer llenado (5° de 11 segmentos)
Cuarto llenado (6° de 11 segm entos)
Quinto llenado (7
Sexto llenado (8° de 11 segmentos)
Séptimo llenado (9° de 11 segmentos)
Octavo llenado (10
Noveno llenado (11° de 11 segme ntos)
° de 11 segmentos)
° de 11 segmentos)
° de 11 segmentos)
° de 11 segmentos)
Med N ivel medio de agua
SPIn/tIME*
SPn3 El más alto de lo s t res centrifugados
STOP Rutina de parada
SdLY Retraso en el centrifugado
donE Fin del ciclo y de la rutina de parada.
dFLt Fallo detectado en el impulsor.
door La puerta no está bien cerrada.
bAL/FAIL*
FILL/STOP*
FULL
rotA
tSFL
Se lee “SPIn” (centrifugado) durante un segundo, después
“tIME” (tiempo) seguido del t i em po del centrifuga do.
La rutina de equilibrio fal ló durante el ciclo de prueba
después de 10 intent os de equilibrar la carga.
Nivel programado de agua no alcanzado después de 30
minutos.
El ordenador detecta un nivel de agua bajo o dema si ado
alto cuando no tien e que haberlo.
El ordenador detecta un p osible giro del motor cuando no
debe haberlo.
Fallo del sensor de temperatura o temperatura fuera de
margen.
60 F232072(SP)
Page 62

Operación
Puesta en marcha
Encienda la fuente de alimentación principal
(cortacircuitos o interruptor de la pared).
Aparecerá un código de identificación durante unos
cinco segundos. A continuación la pantalla mostrará
brevemente de forma intermitente el mensaje
“hold” (espera).
Después la pantalla mostrará “CY” seguido de un
número de ciclo de dos dígitos (01 – 30) para
indicar que se ha seleccionado un ciclo. Esta
pantalla se mostrará siempre que la corriente esté
conectada entre ciclos, indicando que el solenoide
de abrir puerta funcionará si el botón de abrir puerta
está pulsado. La máquina está preparada para ser
cargada o descargada.
Abertura de la puerta
Mantenga pulsado el botón de abrir la puerta que se
halla en el lado izquierdo del panel de control. Pulse
el botón redondo que hay en la manilla de la puerta
y gírela hacia abajo.
Las cargas parciales son un gasto superfluo de
energía, agua y productos químicos y causan un
mayor desgaste a la máquina que las cargas llenas.
Además, con las cargas parciales hay más
posibilidades de que se produzca una situación de
desequilibrio.
ADVERTENCIA
No haga funcionar nunca la máquina con un
sistema de equilibrio anulado o desconect ado . Si
la máquina se hace funcionar con cargas muy
desequilibradas pueden producirse lesiones
personales y daños graves al equipo.
Cuando se ha terminado de cargar , asegúrese de que
toda la ropa esté dentro del tambor. Cierre y bloquee
la puerta girando la manilla en el sentido contrario a
las agujas del reloj hasta que el botón de la manilla
salga hacia afuera. La máquina no deber ponerse en
marcha ni funcionar a menos que la puerta esté
cerrada y bloqueada.
SW039
Cargar
PRECAUCIÓN
Tenga cuidado cuando la puerta esté abierta,
especialmente si está cargando desde un nivel
inferior a la misma. El impacto c on los bor des de
la puerta puede causar daños personales.
Cargue la máquina hasta su máxima capacidad
siempre que sea posible, pero no exceda la
capacidad estimada de la máquina para peso en
seco, si la ropa que se va a lavar es muy densa, tiene
un tejido muy apretado y está muy sucia. Si se carga
en exceso se puede incurrir en un lavado de inferior
calidad. Es posible que el operario tenga que
experimentar para determinar el tamaño de la carga
basado en el tipo de ropa, la suciedad y el nivel de
limpieza deseado.
SW025
PRECAUCIÓN
Compruebe diariamente el enclavamiento de
seguridad de la puerta antes de poner a
funcionar la máquina.
Nota: Cuando se laven artículos que se pueden
desintegrar, como fregonas o esponjas, utilice
bolsas de malla para lavandería, a fin de evitar el
atasco del desagüe.
SW024
F232072(SP) 61
Page 63

Operación
Distribuidor de productos de
lavandería
Los modelos independientes de 8 y 10 kg (18 y 25
libras) de capacidad están equipados con un
distribuidor de productos de lavandería de
polipropileno con tres compartimientos. Dicho
distribuidor está montado en la parte superior
izquierda de la máquina mirando desde la parte
delantera. Tanto los productos de lavanderías
líquidos como en polvo se pueden añadir
levantando la tapa flexible del distribuidor.
Nota: El ordenador no cuenta el tiempo que queda
de ciclo durante los llenados, desagües,
enfriamientos o antes de llegar a la temperatura del
calor programado cuando se está calentando. El
ordenador vuelve a contar el tiempo de ciclo una
vez que se ha alcanzado el nivel de llenado
programado, cuando se ha vaciado el agua de la
máquina y después de alcanzar la temperatura de
calor programado.
Selección del ciclo
Nota: Pulse las teclas en el centro y lo
suficientemente fuerte como para activarlas.
Pulse la tecla Up (arriba) o Down (abajo) hasta que
aparezca el número del ciclo deseado. Pulse la tecla
Start (arrancar) para comenzar el ciclo. Para
obtener una descripción mas detallada de los ciclos
preprogramados, consulte las tablas de ciclos al
final de la sección de Programación.
Si el ordenador detecta que la puerta no está bien
cerrada cuando se pulsa la tecla Start (arrancar), la
pantalla mostrará “door” (puerta) hasta que la
puerta se cierre y bloquee. Pulse de nuevo la tecla
Start (arrancar) para empezar el ciclo deseado.
Ejecución del ciclo
Un ciclo puede pararse en cualquier momento
pulsando la tecla Stop (parar). La máquina
ejecutará la rutina de parada. Cuando dicha rutina se
haya terminado, se podrá abrir la puerta.
Cada uno de los 30 ciclos consiste en 11 segmentos:
prelavado, lavado y llenados 1 – 9. A continuación
se ofrece una descripción de los distintos pasos en
un segmento de un ciclo:
Llenado
Después de pulsar la tecla Start (arrancar), la puerta
se cierra, el desagüe se cierra y la máquina empieza
a llenarse al nivel programado. Cada segmento
programado empieza con un llenado. La pantalla
cuenta en minutos y segundos el tiempo que queda
de ciclo mientras éste todavía se está ejecutando.
Si en una fase concreta se programa el suministro
de un detergente o producto, el distribuidor de
productos de lavandería lo introducirá en la
máquina durante el llenado de ese segmento.
Si la máquina está conectada a un sistema externo
de suministro de productos químicos, el suministro
programado empezará 10 segundos después de que
se inicie el llenado. Dicho suministro permanecerá
activo hasta que se alcance el nivel de agua
programado, o hasta que hayan transcurrido 60
segundos, dependiendo de lo que ocurra primero.
Para visualizar la temperatura del agua durante el
funcionamiento de un ciclo, pulse la tecla Up
(arriba). Para visualizar el número del ciclo que está
en progreso, pulse la tecla Start (arrancar).
62 F232072(SP)
Si se seleccionan las opciones de agitación 1 ó 2
para el programa del ciclo, el cilindro girará
lentamente durante la fase de llenado. Si se
seleccionan las opciones 3 ó 4 para el programa del
ciclo, el cilindro no girará durante la fase de
llenado. Consulte la tabla de opciones de agitación
para obtener más información.
Page 64

Operación
Si el ordenador no recibe la señal de que se ha
llegado al niv el del agua dentro de un período de 30
minutos, se visualizarán de manera intermitente las
palabras “STOP” y “FILL” y durante diez segundos
sonará un pitido. A continuación se iniciará la rutina
de parada.
Lavado
En cuanto se alcance el nivel de agua (y se llegue a
la temperatura programada), la indicación visual del
tiempo empieza la cuenta atrás a intervalos de un
segundo.
La agitación está activa durante esta porción del
segmento. Hay cuatro acciones de agitación
diferentes. Véase la siguiente tabla para obtener
más información.
Opciones de acción de agitación
Pantalla Descripción Porcentaje
27 segundos ha c ia a de la nte ,
Ag 1
Ag 2
Ag 3
Ag 4
3 segundos pausa,
27 segundos sentido inverso,
3 segundos pausa
10 segundos ha c ia a de la nte ,
20 segundos pausa,
10 segundos sentido inverso,
20 segundos pausa
3 segundos hacia adelante,
27 segundos pausa,
3 segundos sentido inverso,
27 segundos pausa
4 segundos hacia adelante,
56 segundos pausa,
4 segundos sentido inverso,
56 segundos pausa
90%
33%
10%
6,7%
Si el segmento contiene una etapa de calentamiento,
la máquina empieza a calentar después de que el
agua ha llegado al nivel programado.
Nota: Si en 40 minutos el agua no llega a la
temperatura programada, el ordenador prosigue con
la fase de lavado.
Desagüe
Si el segmento del programa del ciclo tiene un
desagüe, la válvula de desagüe se abrirá después de
que haya transcurrido el tiempo del segmento
programado. Si el centrifugado sigue al desagüe, el
cilindro girará en el sentido contrario a las agujas
del reloj (hacia adelante) a la velocidad de lavado
durante el desagüe.
Si el segmento del programa del ciclo no tiene
desagüe, el ordenador pasa al siguiente segmento
del programa del ciclo. Si el segmento es al final de
un programa del ciclo, el ordenador pasa a la rutina
de parada.
Si el segmento del programa del ciclo no incluye un
centrifugado, el cilindro continuará con la agitación
durante la fase de desagüe. Cuando el desagüe se
haya terminado, el ordenador pasa al siguiente
segmento del programa del ciclo. Si el segmento es
al final de un programa del ciclo, el ordenador
pasará a la rutina de parada.
Nota: El agua de la máquina se vaciará en 30
segundos. Si no desagua, póngase en contacto con
un técnico de reparación experto.
Centrifugado
Después de que termina la secuencia de desagüe, la
velocidad del cilindro aumenta a la velocidad de
extracción, si el tiempo de centrifugado programado
no es cero. El tiempo en pantalla reanuda la cuenta
atrás a intervalos de un segundo.
Después de que ha transcurrido el tiempo
programado de centrifugado, el ordenador pasa al
paso de llenado en el siguiente segmento del ciclo.
Si el centrifugado se encuentra al final del ciclo, el
ordenador pasa a la rutina de parada.
F232072(SP) 63
Page 65

Operación
Ciclo de prueba
El ciclo de prueba tiene como propósito verificar el
funcionamiento correcto de la máquina. Antes de
iniciar el ciclo de prueba, éste debe activarse.
Consulte la sección de programación de este
manual para ver las instrucciones referentes a la
activación y funcionamiento del ciclo de prueba.
Rutina de parada
Cuando el ordenador concluye el ciclo de lavado o
cuando se pulsa la tecla Stop (parar) mientras un
ciclo está en progreso, el ordenador pasa a la rutina
de parada. La rutina de parada consiste en una breve
cuenta atrás y una secuencia de inversión, después
de lo cual el ordenador muestra el mensaje “dONE”
(fin/terminado).
ADVERTENCIA
No inserte NUNCA las manos u objetos en el
tambor hasta que se haya parado
completamente. De lo contrario, se podrían
producir lesiones gr aves.
Cuando aparezca “dONE”, abra la puerta mientras
mantiene pulsado el botón de abertura de la puerta,
tal y como se describió anteriormente. Una vez que
la puerta esté abierta, la pantalla del ordenador
mostrará el número del ciclo más reciente.
La máquina está ahora preparada para comenzar
otro ciclo de lavado.
SW012
Detección del balance
Todos los modelos están equipados con un sistema
de detección de balance por medio del impulsor del
inv ersor . El balance de la carga se detecta por medio
del impulsor del inversor durante el paso de desagüe
inmediatamente anterior a un paso de centrifugado.
El ordenador serie V hará hasta siete intentos para
balancear la carga durante un paso de desagüe.
El ordenador comienza a detectar la señal de
balance que envía el impulsor del inversor de CA
ocho segundos después de que el nivel de agua baja
del nivel bajo de agua. Si la señal de balance indica
que la carga de lavado está distribuida de manera
uniforme, el ordenador comienza el paso de
centrifugado.
Si la señal de balance indica que la carga de lavado
está desbalanceada, el ordenador disminuye la
velocidad del cilindro (tambor) durante siete
segundos, intentando redistribuir la carga. El
ordenador realiza hasta siete intentos para balancear
la carga si es necesario.
Si durante el séptimo intento para balancear no se
ha logrado balancear la carga, se ilumina el
indicador de fuera de balance que está en la esquina
izquierda superior de la pantalla indicadora (a la
izquierda del primer dígito) hasta que termine el
paso de desagüe. La máquina entonces omite el
paso de centrifugado programado (que no excede de
85 G) y ejecuta el paso de extracción a una
velocidad de centrifugado baja y segura, siempre y
cuando el tiempo programado para el centrifugado
no sea cero.
Si la carga no puede ser distribuida uniformemente,
Nota: Si la rutina de parada parece excesivamente
larga, compruebe si aparecen los mensajes de
“FULL” y “rotA”. De ser así, póngase en contacto
con un técnico de reparación experto.
64 F232072(SP)
el ordenador omite el centrifugado y pasa el
siguiente segmento. Si el segmento está al final de
un programa de ciclos, el ordenador comienza la
rutina de parada. El LED indicador de fuera de
balance permanece encendido hasta que se abra la
compuerta.
Page 66

Interruptor de límite de sobrecarrera
Como medida de seguridad, todas las máquinas
tienen instalado un interruptor de límite de
sobrecarrera. El interruptor de límite de
sobrecarrera sirve para realizar una parada rápida.
Esto significa que si el balance de la máquina
“pasa” la prueba del sistema de detección de
balance por medio del impulsor del inversor en el
paso de desagüe, pero el interruptor de balance
detecta una situación fuera de balance durante el
paso de extracción, la canasta se detiene
rápidamente.
Para reincializar el control, pulse el botón de parada
y abra la puerta cuando aparezca en la pantalla
“donE.”
Operación
F232072(SP) 65
Page 67

Operación
Notas
66 F232072(SP)
Page 68

Sección 3
Programación
El panel del ordenador V está dentro del módulo de
control. Cerca del centro del cuadro hay un pequeño
interruptor: se trata del interruptor del modo RUN/
PROGRAM (funcionar/programar).
ADVERTENCIA
Existen voltajes peligrosos en las cajas de
mando eléctrico y en los terminales del motor.
Solamente el personal cualificado y
familiarizado con los procedimientos eléctricos
de prueba, el equipo de prueba y las
precauciones de seguridad debe intentar
realizar ajustes o lo calizar a vería s. Desconecte
la alimentación de la máquina antes de quitar
la tapa de la caja de control, y antes de intentar
cualquier procedimiento de servicio técnico.
SW005
El interruptor está normalmente en la posición hacia
abajo (modo FUNCIONAR). Para cambiar al modo
PROGRAMAR, ponga el interruptor en la posición
hacia arriba. La pantalla mostrará ahora la
temperatura actual del sumidero.
Puesto que el teclado funciona de una manera
ligeramente distinta cuando está en el modo
PROGRAMAR, preste mucha atención a las
instrucciones de programación que se proporcionan
con este manual.
Funciones de las teclas en el modo
de programación
Down (Ab ajo ) – La tecla Down (abajo) se usa para
disminuir los números del ciclo (1 a 30) y otros
valores numéricos como tiempos o temperaturas (al
crear fórmulas de lavado).
Start (Arrancar) – La tecla Start (arrancar)
funciona como una tecla “enter” en el modo
programar. Use esta tecla para introducir datos y
pasar a la siguiente función del ciclo.
Stop (Parar) – La tecla Stop (parar) guarda todos
los datos y termina el procedimiento de
programación. Si es la primera tecla que se pulsa en
el modo PROGRAMAR, el ordenador cambia al
modo de CONFIGURACIÓN. La tecla Stop (parar)
puede pulsarse de nuevo para salir del modo
CONFIGURACIÓN y volver al modo
PROGRAMAR.
Modo de configuración
Las opciones de CONFIGURACIÓN son opciones
programables aplicables en todas las fórmulas de
lavado. Estas opciones incluyen:
l
Grados mostrados en Fahrenheit o centígrados
l
Calor auxiliar activado o desactivado
l
Llenado de productos de lavandería 5 o auxiliar
l
Llenado con control de temperatura activado o
desactivado
l
Enfriamiento automático activado o
desactivado
Up (Arriba) – La tecla Up (arriba) se usa para
aumentar los números del ciclo (1 a 30) y otros
Nota: Estas opciones pueden leerse o cambiarse
solamente en el modo de CONFIGURACIÓN.
valores numéricos como tiempos o temperaturas (al
crear fórmulas de lavado).
F232072(SP) 67
Page 69

Programación
Modo de configuración (continuación)
Para pasar al modo de CONFIGURACIÓN, pulse
la tecla Stop (parar) mientras la pantalla muestra la
temperatura del sumidero. Una vez que esté en
modo CONFIGURACIÓN, use la tecla Up (arriba)
o Down (abajo) para cambiar la opción
seleccionada. Use la tecla Start (arrancar) para
aceptar la opción seleccionada y pasar a la
siguiente. Pulse la tecla Stop (parar) para salir del
modo CONFIGURACIÓN.
Nota: No active la opción de CONFIGURACIÓN
de calor auxiliar ni desactive la opción de llenado
con control de temperatura en máquinas que no
estén equipadas con calor auxiliar. La máquina
realizará una pausa de 40 minutos durante
cualquier segmento del ciclo en el que la
temperatura del agua de llenado no sea igual o
superior al valor programado del calor.
Grados visualizados en Fahrenheit
o centígrados
Esta opción de CONFIGURACIÓN afecta la
programación y visualización de todas las
temperaturas. Si se selecciona “Far”, todas las
temperaturas aparecerán en Fahrenheit. Si se
selecciona “CEL”, todas las temperaturas
aparecerán en centígrados. Los márgenes
programables aceptables para las temperaturas son
7525.
Calor auxiliar
El calor es una salida exclusiva del ordenador V,
que controla una fuente de calor opcional. Si se
selecciona “nOHt”, la salida de calor nunca se
activará durante el ciclo (excepto brevemente en el
ciclo de prueba para asegurar que la salida funciona
adecuadamente), independientemente de los ajustes
de temperatura programados. Si se selecciona
“HEAT”(calor), la salida se activará durante un
ciclo si se cumplen las tres siguientes opciones:
l
Se programa una temperatura distinta de cero.
l
El ordenador detecta que la temperatura actual
es inferior a la temperatura programada.
l
Hay por lo menos un nivel bajo de agua en la
máquina.
Productos de lavandería 5 o calor auxiliar
Si se selecciona “SUP5”, la salida con la etiqueta
AF en el panel de salida de estado sólido puede
usarse para controlar la señal del quinto producto de
lavandería. Esta opción de CONFIGURACIÓN
debe seleccionarse para programar un “SUP5” o un
“SUP6” (productos de lavandería 1 y 5
combinados) durante la fase de un ciclo.
Si se selecciona “AFIL” la salida con la etiqueta AF
puede usarse para controlar la válvula de llenado
auxiliar. Los llenados auxiliares pueden
programarse para un nivel de agua bajo, medio o
alto. También es posible programar un rebose/
sobrecarga (lavado) en Prelavado. Debe
seleccionarse esta opción de CONFIGURACIÓN
para programar un “AFIL” durante la fase de un
ciclo.
Llenado con control de temperatura
Si se selecciona “tFIL”, se puede programar un
llenado con control de temperatura para cualquier
segmento. Se debe seleccionar esta opción de
CONFIGURACIÓN para programar un “tFIL”
durante la fase de un ciclo. Si se selecciona “ntFL”,
esta opción se desactiva.
68 F232072(SP)
Page 70

Enfriamiento automático
Si se selecciona “CooL”, se activa la opción de
enfriamiento automático. Si la solución de lavado
está a una temperatura de 60°C (140°F) o más alta
cuando en un paso del ciclo se ejecuta un desagüe,
la acción de lavado continuará y la válvula de agua
fría empezará a introducir agua fría en la solución
de lavado. Una vez que la temperatura de la
solución de lavado descienda por debajo de los
60°C (140°F) se abre el desagüe y el ciclo continúa
según lo programado. Si se selecciona “noCL”, esta
opción se desactiva.
Cuenta de los ciclos
Programación
Nota: Los ajustes de la opción de un ciclo son
exclusivos del ciclo para el que están programados.
Use la tecla Up (arriba) o Down (abajo) para
cambiar la opción seleccionada. Use la tecla Start
(arrancar) para aceptar la opción seleccionada y
pasar a la siguiente.
Acción de agitación
Existen cuatro opciones de agitación a elegir:
Para visualizar la cuenta actual de los ciclos, pulse
la tecla Start (arrancar) mientras la pantalla
muestra la temperatura en el sumidero. La pantalla
mostrará un número de dos dígitos indicando
cuántos ciclos han transcurrido hasta finalizar (los
ciclos que se interrumpieron durante la mitad no
cuentan). Pulse la tecla Start (arrancar) para volver
al modo de PROGRAMAR sin reconfigurar la
cuenta. Pulse la tecla Up (arriba) o Down (abajo)
para poner el contador a cero y volver al modo
PROGRAMAR.
Programación de los ciclos
Para corregir un ciclo existente o crear uno nuevo,
pulse la tecla Up (arriba) mientras la pantalla
muestra la temperatura en el sumidero. La pantalla
mostrará “CY01”. Pulse la tecla Up (arriba) o
Down (abajo) hasta que aparezca el número del
ciclo deseado. Pulse la tecla Start (arrancar) para
empezar a corregir el ciclo seleccionado.
Opciones de acción de agitación
Pantalla Descripción Porcentaje
27 segundos hacia adelante,
Ag 1
Ag 2
Ag 3
Ag 4
3 segundos pa us a ,
27 segundos sentido inverso,
3 segundos pa us a
10 segundos hacia adelante,
20 segundos pausa,
10 segundos sentido inverso,
20 segundos pausa
3 segundos hacia adelante,
27 segundos pausa,
3 segundos se ntido inve r s o,
27 segundos pausa
4 segundos hacia adelante,
56 segundos pausa,
4 segundos se ntido inve r s o,
56 segundos pausa
90%
33%
10%
6,7%
La agitación seleccionada es aplicable a todo el
ciclo. Es posible programar una acción de agitación
diferente para cada uno de los 30 ciclos.
Opciones de los ciclos
Las opciones de los ciclos son opciones
programables que están vigentes durante el ciclo de
lavado seleccionado. Estas opciones incluyen:
l
Acción de agitación
l
Velocidad de agitación
l
Bomba de circulación activada o desactivada
(para posible aplicación futura)
F232072(SP) 69
Page 71

Programación
Programación de los ciclos
(continuación)
Velocidad de agitación
Si se selecciona “AgSn”, la máquina usa la
velocidad de lavado normal durante el ciclo. Si se
selecciona “AgSL”, la máquina usa la velocidad de
lavado suave. Esta velocidad es aproximadamente
la mitad de la velocidad de lavado normal.
Bomba de recirculación
Esta opción del ciclo está pensada para usarse con
una posible aplicación futura de recirculación. La
selección de “nPMP” o “PUMP”(bomba) no
afectará al ciclo de lavado. Sin embargo se
recomienda el ajuste “nPMP” para evitar la salida
correspondiente en el cuadro de salida debida a la
activación.
Pulse la tecla Start (arrancar) después de
seleccionar esta última opción del ciclo a fin de
empezar a corregir los segmentos del ciclo.
Programación de los segmentos
Todos los programas de los ciclos (“CY1”–
“CY30”) pueden hacerse a medida dentro de una
estructura de programas previamente fijada. Cada
programa de un ciclo consiste en once segmentos de
programa. Véase la siguiente tabla.
Segmentos del programa de un ciclo
Cuando se modifica un ciclo, se debe introducir un
tiempo para cada segmento. Para saltarse un
segmento o el centrifugado, ponga el tiempo a “00”
y pulse la tecla Start (arrancar). La siguiente tabla
proporciona los parámetros de tiempo para cada
segmento y centrifugado, así como el margen
permitido de temperatura.
Parámetros de tiempo y temperatura
Función Mínimo Máximo
Prelavado 2 minutos 30 minutos
Lavado 2 minutos 20 minutos
Llenado 1 2 minutos 15 minutos
Llenado 2 2 minutos 15 minutos
Llenado 3 2 minutos 15 minutos
Llenado 4 2 minutos 15 minutos
Llenado 5 2 minutos 15 minutos
Llenado 6 2 minutos 15 minutos
Llenado 7 2 minutos 15 minutos
Llenado 8 2 minutos 15 minutos
Llenado 9 2 minutos 15 minutos
Centrifugado intermedio 30 segundos 240 segundos
Centrifugado final 1 minuto 10 minutos
Temperatura 25°C / 75°F 93°C / 200°F
Nota: Los tiempos de centrifugado en los
segmentos de los ciclos 1 – 10 se introducen en
segundos (30 a 240) y el tiempo para el
centrifugado final en el segmento 11 se introduce en
minutos (1 a 10).
Segmento Pantalla Segmento Pantalla
Prelavado PrE Llenado 5 FIL5
Lavado UASH Llenado 6 FIL6
Llenado 1 FIL1 Llenado 7 FIL7
Llenado 2 FIL2 Llenado 8 FIL8
Llenado 3 FIL3 Llenado 9 FIL9
Llenado 4 FIL4
70 F232072(SP)
Page 72

Programación
1. Pulse la tecla Up (arriba) hasta que la pantalla
del ordenador muestre el segmento que se va a
corregir. Pulse la tecla Start (arrancar).
2. Use la tecla Up (arriba) o Down (abajo) para
seleccionar el tiempo del segmento deseado.
Ajuste este valor a cero para saltarse el
segmento. Pulse la tecla Start (arrancar).
Nota: El ordenador no cuenta el tiempo restante del
ciclo durante llenados, desagües, enfriamientos o
antes de llegar a la temperatura de calor programada
cuando se está calentando. El ordenador reanuda la
cuenta atrás del ciclo una vez que se alcanza el nivel
de llenado programado, cuando la máquina se ha
vaciado y después de que se alcance una
temperatura de calor programada.
3. Si está activada la opción de
CONFIGURACIÓN de llenado con control de
temperatura, la pantalla mostrará “tFIL”. Pulse
la tecla Start (arrancar).
4. Use la tecla Up (arriba) o Down (abajo) para
seleccionar la temperatura de llenado deseada.
Véase la siguiente tabla para las opciones de
llenado.
Si está activada la opción de
CONFIGURACIÓN de llenado con
temperatura controlada y se fija una
temperatura como objetivo, la(s) válvula(s) de
llenado se activará(n) durante los 3 primeros
segundos del llenado perteneciente a ese
segmento. El ordenador empezará a hacer
funcionar las válvulas de llenado para alcanzar
la temperatura objetivo. Pulse la tecla Start
(arrancar).
Nota: Si se selecciona “AFIL” y la opción de
CONFIGURACIÓN de llenado con control de
temperatura se ha fijado a “tFIL”, la temperatura
para ese segmento deberá ser cero.
5. Use la tecla Up (arriba) o Down (abajo) para
seleccionar el nivel de llenado deseado. Véase
la tabla que figura a continuación.
Opciones de nivel de agua
Pantalla Nivel de llenado
LO Nivel bajo
Med Nivel medio
HI Nivel alto
Opciones de temperatura de llenado
Pantalla Tipo de llenado
CFIL Llenado frío
HFIL Llenado caliente
bFIL Llenado templado
AFIL Llenado auxiliar*
*Esto es posible solamente si la opción de
CONFIGURACIÓN “SUP (arriba) 5”/“AFIL” está fijada
en “AFIL”.
F232072(SP) 71
6. Pulse la tecla Start (arrancar).
Page 73

Programación
Programación de los ciclos
(continuación)
7. Use la tecla Up (arriba) o Down (abajo) para
seleccionar la opción de productos de
lavandería deseada. Véase la tabla a
continuación.
Opciones de productos de lavandería
Pantalla Productos de lavandería
SUP0 No prod. lavand.
SUP1 Prod. lavand. 1
SUP2 Prod. lavand. 2
Nota: La fase de desagüe del segmento final del
programa no se puede saltar.
11. Solamente para el centrifugado final “FIL9”. Use
la tecla Up (arriba) o Down (abajo) para
seleccionar la velocidad de centrifugado deseada.
Véase la tabla que figura a continuación.
Opciones de centrifugado
Pantalla Velocidad de centrifugado
SPn1 Centrifugado a velocidad baja
SPn2 Centrifugado a velocidad media
SPn3 Centrifugado a velocidad alta
SUP3 Prod. lavand. 3
SUP4 Prod. lavand. 4
SUP5 Prod. lavand. 5*
SUP6 Prod. lavand. 1 y 5*
SUP7 Prod. lavand. 3 y 4
* Esto se puede obtener solamente si la opción de
CONFIGURACIÓN “SUP5”/“AFIL” se ha fijado a
“SUP5”.
8. Pulse la tecla Start (arrancar).
9. Si el llenado con control de temperatura o la
opción de CONFIGURACIÓN de calor auxiliar
está activada, use la tecla Up (arriba) o Down
(abajo) para seleccionar la temperatura deseada
del segmento. P ara desact i v ar el c alor auxiliar y
el llenado con control de temperatura para este
segmento, ponga el valor a cero. Pulse la tecla
Start (arrancar).
10. Use la tecla Up (arriba) o Down (abajo) para
seleccionar la opción de desagüe deseada. Si se
selecciona “drAI”, la máquina se vaciará
después de que haya transcurrido el tiempo del
segmento. Si se selecciona “nodr”, la máquina
no se vaciará y se saltará completamente el paso
del centrifugado. Pulse la tecla Start (arrancar).
12. Pulse la tecla Start (ar rancar).
13. Use la tecla Up (arriba) o Down (abajo) para
seleccionar el tiempo de centrifugado deseado.
Ponga este valor a cero para saltarse el
centrifugado. Pulse la tecla Start (arrancar). La
pantalla mostrará ahora el identificador para el
siguiente segmento del programa u opción del
ciclo.
Nota: Cada centrifugado intermedio va seguido de
un período de 25 segundos de v elocidad por inercia,
que ocurre durante el paso de llenado del siguiente
segmento.
14. Pulse la tecla Stop (parar) en cualquier
momento para completar el procedimiento de
programación del ciclo.
Ciclo de prueba
1. Verifique que el interruptor de palanca de
modalidad de marcha o programación (RUN/
PROGRAM) esté en la posición de marcha
(RUN).
2. Use la tecla Up (arriba) o la tecla Down (aba jo)
hasta que en la pantalla aparezca
alternativamente “tESt” y “CYC”, indicando
que el ciclo de prueba ha sido seleccionado.
3. Oprima la tecla Start (arrancar) para iniciar el
ciclo de prueba.
72 F232072(SP)
Page 74

Nota: Al oprimir la tecla Start (arrancar) mientras
se está efectuando el ciclo de prueba se avanza de
inmediato al siguiente paso en el ciclo de prueba.
No se pueden omitir los pasos de desagüe y de
balance de la carga.
El ciclo de prueba es como sigue:
a. Una vez que se ha oprimido la tecla Start
(arrancar) se elimina la corriente eléctrica
del sistema de enclavamiento de la puerta
(evitando que se abra la puerta), se cierra la
válvula de desagüe, el cilindro (tambor)
comienza a agitar a la velocidad de lavado y
se energizan ambas válvulas de entrada de
agua. En la pantalla aparece “bFIL” y “LO”
en forma alternante (tanto la válvula de agua
caliente como la válvula de agua fría están
abiertas, llenando hasta el nivel bajo).
b. C uando el interruptor de nivel de agua indica
que se ha alcanzado el nivel bajo de agua, se
cierran las válvulas de llenado y se ilumina
el punto arriba e inmediatamente a la
izquierda del cuarto dígito de los diodos
indicadores.
c. Se energiza la válvula de llenado de agua
fría. En la pantalla aparece “CFIL” y “Med”
en forma alternante (la válvula de agua fría
está abierta, llenando hasta el nivel medio).
d. C uando el interruptor de nivel de agua indica
que se ha alcanzado el nivel medio de agua,
se cierra la válvula de llenado de agua fría y
se ilumina el punto arriba e inmediatamente
a la izquierda del tercer dígito de los diodos
indicadores.
e. Se energiza la válvula de llenado de agua
caliente. En la pantalla aparece “HFIL” y
“HI” en forma alternante (la válvula de agua
caliente está abierta, llenando hasta el nivel
alto).
Programación
f. Cuando el interruptor de nivel de agua indica
que se ha alcanzado el nivel alto de agua, se
cierra la válvula de llenado de agua caliente
y se ilumina el punto arriba e
inmediatamente a la izquierda del segundo
dígito de los diodos indicadores.
g. Se energiza la señal de salida del calor
auxiliar, siempre que el interruptor de nivel
de agua indique que por lo menos está
presente un nivel bajo de agua. Se energiza
la válvula de llenado de agua fría. Se
energiza la señal de salida del suministro 1
durante cinco segundos. En la pantalla
aparece “SUP1” y “HEAt” en forma
alternante (la señal de salida del suministro 1
está activa, y la señal de salida del calor
auxiliar está activa).
h. Se energiza la señal de salida del suministro
2 durante cinco segundos. En la pantalla
aparece “SUP2” y “HEAt” en forma
alternante (la señal de salida del suministro 2
está activa, y la señal de salida del calor
auxiliar está activa).
i. Se energiza la señal de salida del suministro
3 durante cinco segundos. En la pantalla
aparece “SUP3” y “HEAt” en forma
alternante (la señal de salida del suministro 3
está activa, y la señal de salida del calor
auxiliar está activa).
j. La señal de salida de calor auxiliar está
apagada. Se energiza la señal de salida del
suministro 4 durante cinco segundos. En la
pantalla aparece “SUP4” (la señal de salida
del suministro 4 está activa).
k. Se energizan las señales de salida del
suministro 5 y del llenado auxiliar durante
cinco segundos. Si la opción de preparación
“SUP5”/“AFIL” está seleccionada para
“SUP5” en la pantalla aparece “SUP5” (las
señales de suministro 5 y de llenado auxiliar
están activas). Si la opción de preparación
“SUP5”/ “AFIL” está seleccionada para
“AFIL” en la pantalla aparece “AFIL” (las
señales de suministro 5 y de llenado auxiliar
están activas).
F232072(SP) 73
Page 75

Programación
Ciclo de prueba (continuación)
l. Se cierra la válvula de llenado de agua fría.
La señal de salida de la bomba de
recirculación se energiza durante 10
segundos, siempre que el interruptor de niv el
de agua indique que se ha establecido por lo
menos un nivel bajo de agua. En la pantalla
aparece “PUnP”(señal de salida de la bomba
de recirculación).
m.El motor gira en el sentido del reloj (en
reversa) a una velocidad disminuida de
lavado durante 60 segundos. En la pantalla
aparece “SLo” y “rEv” en forma alternante
(velocidad normal de lavado, en el sentido
del reloj).
n. El motor gira en contra del sentido del reloj
(hacia adelante) a una velocidad disminuida
de lavado durante 60 segundos. En la
pantalla aparece “SLo” y “For” en forma
alternante (velocidad reducida de lavado, en
contra del sentido del reloj).
o. El motor gira en el sentido del reloj (en
reversa) a una velocidad normal de lavado
durante 60 segundos. En la pantalla aparece
“norM” y “rEv” en forma alternante
(velocidad normal de lavado, en el sentido
del reloj).
p. El motor gira en contra del sentido del reloj
(hacia adelante) a una velocidad normal de
lavado durante 60 segundos. En la pantalla
aparece “norM” y “For” en forma alternante
(velocidad normal de lavado, en contra del
sentido del reloj).
q. En la pantalla aparece “drAI” y “For” en
forma alternante (paso de desagüe, el
cilindro gira a la velocidad de lavado). El
motor continúa girando en contra del sentido
del reloj (hacia adelante) a la velocidad
normal de lavado durante 7 segundos.
r. El motor acelera a la velocidad de
distribución. En la pantalla aparece “drAI” y
“dISt” en forma alternante (paso de desagüe,
el cilindro (tambor) gira a la velocidad de
distribución).
s. El desagüe se abre 15 segundos después de
que inicia el paso de desagüe. Los diodos
indicadores de nivel de agua en la pantalla
indicadora comienzan a apagarse, uno a la
vez, mientras la máquina desagua más allá
de cada uno de los niveles de agua.
t. La computadora comienza a monitorear la
señal de balance del mando inversor de CA 8
segundos después de que el interruptor de
nivel de agua indica que el nivel de agua ha
bajado del nivel bajo.
u. Si la señal de balance indica que la carga de
lavado no está balanceada, el cilindro
(tambor) reduce la velocidad durante 7
segundos en un intento para redistribuir la
carga. La computadora hace hasta 10
intentos, según sea necesario.
Nota: Si la máquina empl ea el sistema de detección
de balance que utiliza el interruptor de limite de
sobrecarrera, la computadora continuará con el paso
de desagüe y cronometrará los pasos t y u.
Seguidamente, la computadora procederá con el
paso v.
v. El cilindro (tambor) acelera a la velocidad
baja de centrifugado. En la pantalla aparece
“SPn1”(el cilindro gira a baja velocidad de
centrifugado). La canasta gira a velocidad
baja de centrifugado durante 60 segundos.
w. El cilindro (tambor) acelera a la velocidad
media de centrifugado. En la pantalla
aparece “SPn2”(el cilindro gira a media
velocidad de centrifugado). La canasta gira a
velocidad media de centrifugado durante 60
segundos.
x. El cilindro acelera a la velocidad alta de
centrifugado. En la pantalla aparece
“SPn3”(el cilindro gira a alta velocidad de
centrifugado). La canasta gira a velocidad
alta de centrifugado durante 60 segundos.
74 F232072(SP)
Page 76

y. Todas la s señales de salida se apagan durante
aproximadamente 20 segundos. En la
pantalla aparece “SdLY”(retraso de
disminución gradual de centrifugado).
z. La computadora realiza la rutina normal de
paro.
Programación
Compartimientos del
distribuidor de productos de
lavandería
2
1
3
Se energiza el sistema de enclavamiento de
la puerta (permitiendo abrir la puerta)
siempre que el interruptor de nivel de agua
indique que el nivel de agua ha bajado del
nivel bajo y que el mando de CA indique que
el motor se ha detenido.
Sistema de suministro de la
inyección química
Las conexiones de producto de lavandería externo
se encuentran ubicadas en la parte posterior de la
máquina. Los compartimientos del distribuidor de
productos de lavandería están numerados 1, 2 y 3,
en ese orden, vistos desde la perspectiva delantera
de la máquina, y de izquierda a derecha.
Las mangueras de producto de lavandería externo
vierten en los compartimientos del distribuidor de
productos de lavandería de la siguiente manera:
producto de lavandería externo 1 se vierte en el
compartimiento 1, producto de lav andería externo 2
se vierte en el compartimiento 2, y producto de
lavandería externo 3 y 4 se vierten en el
compartimiento 3. Véase la Figura 4.
1
2
Puntos de inyección del
suministro químico
4
3
B009RS3B
Figura 4
El agua circula por el compartimiento 1 en cada
llenado. El agua circula por el compartimiento 2
cuando el programa pide el producto de lavandería
2 durante un llenado. El agua circula por el
compartimiento 3 cuando el programa pide el
producto de lavandería 3 durante el llenado.
Nota: El agua no circula por el compartimiento 3
cuando en un programa se pide el producto de
lavandería 4.
F232072(SP) 75
Page 77

Programación
Tablas de los segmentos del ciclo
Segmento 1 (prelavado)
Instrucciones
Pantalla
PrE
00 ó 02 a 30 Seleccione el tiempo del segmento: de 02 a 30 minutos (00 para saltarse el segmento).
tFIL Indica que está activada la temperatura de llenado.*
Use la tecla Up (arriba) o Down (abajo) para cambiar. Pulse la tecla Start (arrancar) para entrar o
avanzar.
HFIL, CFIL, bFIL o
AFIL
LO, Med, o HI Seleccione nivel de llenado: nivel de agua “LO” (bajo), “Med” (medio) o “HI” (alto).
SUP0–SUP7 Seleccione prod. lavand. 0 – 7 (0 para ningún prod. lavand.).***
00°F, 75°F–200°F 00°C,
25°C–93°C
drAI o nodr Seleccione la opción de desagüe: “drAI” (desagüe) “nodr” (sin desagüe)‡
SPIn (se enciende durante 1 segundo)
tIME (se enciende durante 1 segundo)
00 ó 30 a 240 Seleccione el tiempo de centrifugado: de 30 a 240 segundos (00 sin centrifugado)
* Aparece solamente si está activado el llenado con control de temperatura en las opciones de CONFIGURACIÓN y si la
temperatura del calor está fijada a un valor que no sea “00”.
** “AFIL” puede seleccionarse solamente si la opción de CONFIGURACIÓN “SUP5”/“AFIL” está fijada a “AFIL”.
*** “SUP5” y “SUP6” pueden seleccionarse solamente si la opción de CONFIGURACIÓN “SUP5”/“AFIL” está fijada a
“SUP5”.
† Este valor no se puede obtener cuando las opciones de CONFIGURACIÓN de llenado con control de temperatura y calor
auxiliar están desactivadas.
‡ Si se ha seleccionado “nodr”, el ordenador se salta el paso de centrifugado y pasa al siguiente segmento.
Seleccione “HFIL” (llenado caliente), “CFIL” (llenado frío), “bFIL” (llenado templado) o “AFIL”
(llenado auxiliar).**
Seleccione la temperatura: 75 a 200ºF o 25 a 93ºC (00 sin calor).†
76 F232072(SP)
Page 78

Programación
Segmento 2 (lavado)
Instrucciones
Pantalla
UASH
00 ó 02 a 20 Seleccione el tiempo del segmento: de 02 a 20 minutos (00 para saltarse el segmento).
tFIL Indica que está activada la temperatura de llenado.*
Use la tecla Up (arriba) o Down (abajo) para cambiar. Pulse la tecla Start (arrancar) para entrar o
avanzar.
HFIL, CFIL, bFIL o
AFIL
LO, Med, o HI Seleccione nivel de llenado: nivel de agua “LO” (bajo), “Med” (medio) o “HI” (alto).
SUP0–SUP7 Seleccione prod. lavand. 0 – 7 (0 para ningún prod. lavand.).***
00ºF, 75ºF–200ºF
00ºC, 25ºC–93ºC
drAI o nodr Seleccione la opción de desagüe: “drAI” (desagüe) “nodr” (sin desagüe)‡
SPIn (se enciende durante 1 segundo)
tIME (se enciende durante 1 segundo)
00 ó 30 a 240 Seleccione el tiempo de centrifugado: de 30 a 240 segundos (00 sin centrifugado)
* Aparece solamente si está activado el llenado con control de temperatura en las opciones de CONFIGURACIÓN y si la
temperatura del calor está fijada a un valor que no sea “00”.
** “AFIL” puede seleccionarse solamente si la opción de CONFIGURACIÓN “SUP5”/“AFIL” está fijada a “AFIL”.
*** “SUP5” y “SUP6” pueden seleccionarse solamente si la opción de CONFIGURACIÓN “SUP5”/“AFIL” está fijada a
“SUP5”.
† Este valor no se puede obtener cuando las opciones de CONFIGURACIÓN de llenado con control de temperatura y calor
auxiliar están desactivadas.
‡ Si se ha seleccionado “nodr”, el ordenador se salta el paso de centrifugado y pasa al siguiente segmento.
Seleccione “HFIL” (llenado caliente), “CFIL” (llenado frío), “bFIL” (llenado templado) o “AFIL”
(llenado auxiliar).**
Seleccione la temperatura: 75 a 200ºF o 25 a 93ºC (00 sin calor).†
F232072(SP) 77
Page 79

Programación
Segmentos 3 – 10 (llenados 1 – 8)
Instrucciones
Pantalla
FIL1, FIL2, FIL3, FIL4, FIL5, FIL6, FIL7 o FIL8
00 ó 02 a 15 Seleccione el tiempo del segmento: de 02 a 15 minutos (00 para saltarse el segmento).
tFIL Indica que está activada la temperatura de llenado.*
Use la tecla Up (arriba) o Down (abajo) para cambiar. Pulse la tecla Start (arrancar) para entrar o
avanzar.
HFIL, CFIL, bFIL o
AFIL
LO, Med, o HI Seleccione nivel de llenado: nivel de agua “LO” (bajo), “Med” (medio) o “HI” (alto).
SUP0–SUP7 Seleccione prod. lavand. 0 – 7 (0 para ningún prod. lavand.).***
00ºF, 75ºF–200ºF
00ºC, 25ºC–93ºC
drAI o nodr Seleccione la opción de desagüe: “drAI” (desagüe) “nodr” (sin desagüe)‡
SPIn (se enciende durante 1 segundo)
tIME (se enciende durante 1 segundo)
00 ó 30 a 240 Seleccione el tiempo de centrifugado: de 30 a 240 segundos (00 sin centrifugado)
* Aparece solamente si está activado el llenado con control de temperatura en las opciones de CONFIGURACIÓN y si la
temperatura del calor está fijada a un valor que no sea “00”.
** “AFIL” puede seleccionarse solamente si la opción de CONFIGURACIÓN “SUP5”/“AFIL” está fijada a “AFIL”.
*** “SUP5” y “SUP6” pueden seleccionarse solamente si la opción de CONFIGURACIÓN “SUP5”/“AFIL” está fijada a
“SUP5”.
† Este valor no se puede obtener cuando las opciones de CONFIGURACIÓN de llenado con control de temperatura y calor
auxiliar están desactivadas.
‡ Si se ha seleccionado “nodr”, el ordenador se salta el paso de centrifugado y pasa al siguiente segmento.
Seleccione “HFIL” (llenado caliente), “CFIL” (llenado frío), “bFIL” (llenado templado) o “AFIL”
(llenado auxiliar).**
Seleccione la temperatura: 75 a 200ºF o 25 a 93ºC (00 sin calor).†
78 F232072(SP)
Page 80

Programación
Segmento 11 (llenado 9)
Instrucciones
Pantalla
FIL9
00 ó 02 a 15 Seleccione el tiempo del segmento: de 02 a 15 minutos (00 para saltarse el segmento).
tFIL Indica que está activada la temperatura de llenado.*
Use la tecla Up (arriba) o Down (abajo) para cambiar. Pulse la tecla Start (arrancar) para entrar o
avanzar.
HFIL, CFIL, bFIL o
AFIL
LO, Med, o HI Seleccione nivel de llenado: nivel de agua “LO” (bajo), “Med” (medio) o “HI” (alto).
SUP0–SUP7 Seleccione prod. lavand. 0 – 7 (0 para ningún prod. lavand.).***
00ºF, 75ºF–200ºF
00ºC, 25ºC–93ºC
drAI o nodr Seleccione la opción de desagüe: “drAI” (desagüe) “nodr” (sin desagüe)‡
SPn1, SPn2 ó SPn3 Seleccione la velocidad de centrifugado: “SPn1” (baja velocidad), “SPn2” (mediana velocidad) ó
SPIn (se enciende durante 1 segundo)
tIME (se enciende durante 1 segundo)
00 ó 01 a 10 Seleccione el tiempo de centrifugado: de 1 a 10 minutos (00 sin centrifugado)
* Aparece solamente si está activado el llenado con control de temperatura en las opciones de CONFIGURACIÓN y si la
temperatura del calor está fijada a un valor que no sea “00”.
** “AFIL” puede seleccionarse solamente si la opción de CONFIGURACIÓN “SUP5”/“AFIL” está fijada a “AFIL”.
*** “SUP5” y “SUP6” pueden seleccionarse solamente si la opción de CONFIGURACIÓN “SUP5”/“AFIL” está fijada a
“SUP5”.
† Este valor no se puede obtener cuando las opciones de CONFIGURACIÓN de llenado con control de temperatura y calor
auxiliar están desactivadas.
‡ Si se ha seleccionado “nodr”, el ordenador se salta el paso de centrifugado y pasa al siguiente segmento.
Seleccione “HFIL” (llenado caliente), “CFIL” (llenado frío), “bFIL” (llenado templado) o “AFIL”
(llenado auxiliar).**
Seleccione la temperatura: 75 a 200ºF o 25 a 93ºC (00 sin calor).†
“SPn3” (alta velocidad).
F232072(SP) 79
Page 81

Programación
Tablas del ciclo del ordenador V
Ciclos OPL estándar del ordenador V
1
Planchado
Programa
Agitación AG 1 AG 1 AG 1 AG 1 AG 1 AG 1 AG 1 AG 1
Velocidad de lavado AGSn AGSn AGSn AGSn AGSn AGSn AGSn AGSn
Bomba nPMP nPMP nPMP nPMP nPMP nPMP nPMP nPMP
Prelavado
Tiempo (min.)00222222
Agua --- --- Templado Templado Templado Templado Templado Templado
Nivel --- --- Alto Alto Alto Alto Alto Alto
Prod. lavand.------000000
Temp (F)------000000
Desagüe --- --- DrAI DrAI DrAI DrAI DrAI DrAI
Centrifugado (seg.) --- --- 000000
Lavado
Tiempo (min.)77776699
Agua Caliente Caliente Caliente Caliente Caliente Caliente Caliente Caliente
Nivel BajoBajoBajoBajoBajoBajoBajoBajo
Prod. lavand.11111111
Temp (F)00000000
Desagüe DrAI DrAI DrAI DrAI DrAI DrAI DrAI DrAI
Centrifugado (seg.) 00000000
Llenado 1
Tiempo (min.)44777747
Agua Caliente Caliente Caliente Caliente Caliente Caliente Caliente Caliente
Nivel Alto Alto Bajo Bajo Bajo Bajo Alto Bajo
Prod. lavand.00221102
Temp (F)00000000
Desagüe DrAI DrAI DrAI DrAI DrAI DrAI DrAI DrAI
Centrifugado (seg.) 00000000
Llenado 2
Tiempo (min.)22447724
Agua Templado Templado Caliente Caliente Caliente Caliente Templado Caliente
Nivel Alto Alto Alto Alto Bajo Bajo Alto Alto
Prod. lavand.00002200
Temp (F)00000000
Desagüe DrAI DrAI DrAI DrAI DrAI DrAI DrAI DrAI
Centrifugado (seg.) 30 60 0000300
Llenado 3
Tiempo (min.)40224442
Agua Templado --- Templado Templado Caliente Caliente Templado Templado
Nivel Bajo --- Alto Alto Alto Alto Bajo Alto
Prod. lavand.3---000030
Temp (F)0---000000
Desagüe DrAI --- DrAI DrAI DrAI DrAI DrAI DrAI
Centrifugado (seg.) 240 --- 30 0 60 0 240 30
permanente
Poca
suciedad
2
Algodón T ela
de rizo Poca
suciedad
3
Planchado
permanente
Suciedad
media
4
Algodón T ela
de rizo
Suciedad
media
5
Planchado
permanente
Mucha
suciedad
6
Algodón Tela
de rizo
Mucha
suciedad
7
Mantelerí as
Mezclas
Colores
8
Mantelerías
Mezclas
Blanco
80 F232072(SP)
Page 82

Programación
Ciclos OPL estándar del ordenador V (continuación)
1
Planchado
Programa
permanente
Poca
suciedad
Llenado 4
Tiempo (min.)00402204
Agua --- --- Templado --- Templado Templado --- Templado
Nivel --- --- Bajo --- Alto Alto --- Bajo
Prod. lavand. --- --- 3 --- 0 0 --- 3
Temp (F) --- --- 0 --- 0 0 --- 0
Desagüe --- --- DrAI --- DrAI DrAI --- DrAI
Centrifugado (seg.) --- --- 240 --- 30 30 --- 240
Llenado 5
Tiempo (min.)00004000
Agua --- --- --- --- Templado --- --- --Nivel --- --- --- --- Bajo --- --- ---
Prod. lavand. --- --- --- --- 3 --- --- ---
Temp (F) --- --- --- --- 0 --- --- ---
Desagüe --- --- --- --- DrAI --- --- ---
Centrifugado (seg.) --- --- --- --- 240 --- --- ---
Llenado 6
Tiempo (min.)00000000
Agua --- --- --- --- --- --- --- --Nivel --- --- --- --- --- --- --- ---
Prod. lavand. --- --- --- --- --- --- --- ---
Temp (F) --- --- --- --- --- --- --- ---
Desagüe --- --- --- --- --- --- --- ---
Centrifugado (seg.) --- --- --- --- --- --- --- ---
Llenado 7
Tiempo (min.)00000000
Agua --- --- --- --- --- --- --- --Nivel --- --- --- --- --- --- --- ---
Prod. lavand. --- --- --- --- --- --- --- ---
Temp (F) --- --- --- --- --- --- --- ---
Desagüe --- --- --- --- --- --- --- ---
Centrifugado (seg.) --- --- --- --- --- --- --- ---
Llenado 8
Tiempo (min.)00000000
Agua --- --- --- --- --- --- --- --Nivel --- --- --- --- --- --- --- ---
Prod. lavand. --- --- --- --- --- --- --- ---
Temp (F) --- --- --- --- --- --- --- ---
Desagüe --- --- --- --- --- --- --- ---
Centrifugado (seg.) --- --- --- --- --- --- --- ---
Llenado 9
Tiempo (min.)04040400
Agua --- Templado --- Templado --- Templado --- --Nivel --- Bajo --- Bajo --- Bajo --- ---
Prod. lavand. --- 3 --- 3 --- 3 --- ---
Temp (F) --- 0 --- 0 --- 0 --- ---
Desagüe --- --- --- DrAI --- DrAI --- ---
Centrifugado --- SPn3 --- SPn3 --- SPn3 --- ---
Centrifugado (seg.) --- 5 --- 5 --- 5 --- ---
2
Algodón T ela
de rizo Poca
suciedad
3
Planchado
permanente
Suciedad
media
4
Algodón T ela
de rizo
Suciedad
media
5
Planchado
permanente
Mucha
suciedad
6
Algodón Tela
de rizo
Mucha
suciedad
7
Mantelerí as
Mezclas
Colores
8
Mantelerías
Mezclas
Blanco
F232072(SP) 81
Page 83

Programación
Ciclos OPL estándar del ordenador V (continuación)
9
Mantelerías
Programa
Agitación AG 1 AG 1 AG 1 AG 1 AG 1 AG 1 AG 1 AG 1
Velocidad de lavado AGSn AGSn AGSn AGSn AGSn AGSn AGSn AGSn
Bomba nPMP nPMP nPMP nPMP nPMP nPMP nPMP nPMP
Prelavado
Tiempo (min.)22222200
Agua Templado Templado Templado Caliente Templado Templado --- --Nivel Alto Alto Alto Alto Alto Alto --- ---
Prod. lavand. 0 0 1 1 1 0 --- ---
Temp (F)000000------
Desagüe DrAI DrAI DrAI DrAI DrAI DrAI --- ---
Centrifugado (seg.) 0 0 0 0 0 0 --- ---
Lavado
Tiempo (min.)10101067757
Agua Caliente Caliente Caliente Caliente Caliente Caliente Frío Templado
Nivel Bajo Bajo Bajo Bajo Bajo Bajo Alto Alto
Prod. lavand.11112111
Temp (F)00000000
Desagüe DrAI DrAI DrAI DrAI DrAI DrAI DrAI DrAI
Centrifugado (seg.)00000000
Llenado 1
Tiempo (min.)666122244
Agua Caliente Caliente Caliente Caliente Templado Templado Frío Templado
Nivel Bajo Bajo Bajo Bajo Alto Alto Alto Alto
Prod. lavand.11220000
Temp (F)00000000
Desagüe DrAI DrAI DrAI DrAI DrAI DrAI DrAI DrAI
Centrifugado (seg.)00000000
Llenado 2
Tiempo (min.)44442222
Agua Caliente Caliente Caliente Caliente Templado Templado Frío Templado
Nivel Alto Alto Alto Alto Alto Alto Alto Alto
Prod. lavand.00200000
Temp (F)00000000
Desagüe DrAI DrAI DrAI DrAI DrAI DrAI DrAI DrAI
Centrifugado (seg.) 0 0 0 0 30 30 30 30
Llenado 3
Tiempo (min.)22224444
Agua Templado Templado Templado Templado Templado Templado Frío Templado
Nivel Alto Alto Alto Alto Bajo Bajo Alto Alto
Prod. lavand.00003333
Temp (F)00000000
Desagüe DrAI DrAI DrAI DrAI DrAI DrAI DrAI DrAI
Centrifugado (seg.) 0 0 0 0 240 2 40 240 240
VISA Color
10
Mantelerías
VISA Blanco
11
Trapos
Mucha
suciedad
12
Depurar
13
Ropa interior
con lejía
14
Ropa interior
sin lejí a
15
Ropa
delicada
Colchas
Agua fría
16
Ropa
delicada
Colchas
Agua
templada
82 F232072(SP)
Page 84

Programación
Ciclos OPL estándar del ordenador V (continuación)
9
Mantelerías
Programa
Llenado 4
Tiempo (min.)22220000
Agua Frío Frío Templado Templado --- --- --- ---
Nivel Alto Alto Alto Alto --- --- --- ---
Prod. lavand. 0 0 0 0 --- --- --- ---
Temp (F) 0 0 0 0 --- --- --- ---
Desagüe DrAI Dr AI DrAI DrAI --- --- --- ---
Centrifugado (seg.) 30 30 60 30 --- --- --- ---
Llenado 5
Tiempo (min.)44440000
Agua Frío Frío Templado Templado --- --- --- --Nivel Bajo Bajo Alto Bajo --- --- --- ---
Prod. lavand. 3 3 0 3 --- --- --- ---
Temp (F) 0 0 0 0 --- --- --- ---
Desagüe DrAI Dr AI DrAI DrAI --- --- --- ---
Centrifugado (seg.) 240 240 60 240 --- --- --- ---
Llenado 6
Tiempo (min.)00000000
Agua --- --- --- --- --- --- --- --Nivel --- --- --- --- --- --- --- ---
Prod. lavand. --- --- --- --- --- --- --- ---
Temp (F) --- --- --- --- --- --- --- ---
Desagüe --- --- --- --- --- --- --- ---
Centrifugado (seg.) --- --- --- --- --- --- --- ---
Llenado 7
Tiempo (min.)00000000
Agua --- --- --- --- --- --- --- --Nivel --- --- --- --- --- --- --- ---
Prod. lavand. --- --- --- --- --- --- --- ---
Temp (F) --- --- --- --- --- --- --- ---
Desagüe --- --- --- --- --- --- --- ---
Centrifugado (seg.) --- --- --- --- --- --- --- ---
Llenado 8
Tiempo (min.)00000000
Agua --- --- --- --- --- --- --- --Nivel --- --- --- --- --- --- --- ---
Prod. lavand. --- --- --- --- --- --- --- ---
Temp (F) --- --- --- --- --- --- --- ---
Desagüe --- --- --- --- --- --- --- ---
Centrifugado (seg.) --- --- --- --- --- --- --- ---
Llenado 9
Tiempo (min.)00400000
Agua --- --- Templado --- --- --- --- --Nivel --- --- Bajo --- --- --- --- ---
Prod. lavand. --- --- 3 --- --- --- --- ---
Temp (F) --- --- 0 --- --- --- --- ---
Desagüe --- --- DrAI --- --- --- --- ---
Centrifugado --- --- SPn3 --- --- --- --- ---
Centrifugado (seg.) --- --- 6 --- --- --- --- ---
VISA Color
10
Mantelerías
VISA Blanco
11
Trapos
Mucha
suciedad
12
Depurar
13
Ropa interior
con lejía
14
Ropa interior
sin lejí a
15
Ropa
delicada
Colchas
Agua fría
16
Ropa
delicada
Colchas
Agua
templada
F232072(SP) 83
Page 85

Programación
Ciclos OPL Export del ordenador V
21
Normal 90°C
Programa
Agitación Ag 1 Ag 1 Ag 1 Ag 1 Ag 1 Ag 1 Ag 1 Ag 1 Ag 1 Ag 2
Velocidad de
lavado
Bomba nPMP nPMP nPMP nPMP nPMP nPMP nPMP nPMP nPMP nPM P
(prelav ado)
AgSn AgSn AgSn AgSn AgSn AgSn AgSn AgSn AgSn AgSn
Prelavado
Tiempo (min.)8080680806
Agua Frío --- Frío --- Frío Frío --- Frío --- Frío
Nivel Alto --- Alto --- Alto Alto --- Alto --- Alto
Prod. lavand. 1 --- 1 --- 1 1 --- 1 --- 1
Temp (F) 40° --- 40° --- 40° 40° --- 40° --- 40°
Desagüe DrAI --- DrAI --- DrAI DrAI --- DrAI --- DrAI
Centrifugado
(seg.)
0 --- 0 --- 0 0 --- 0 --- 0
Lavado
Tiempo (min.) 10 10 10 10 8 10 10 10 10 8
Agua Caliente Caliente Caliente Caliente Ambos Caliente Caliente Caliente Caliente Ambos
Nivel Bajo Bajo Bajo Bajo Bajo Bajo Bajo Bajo Bajo Bajo
Prod. lavand.2222222222
Temp (F) 90° 90° 60° 60° 40° 90° 90° 60° 60° 40°
Desagüe DrAI DrAI DrAI DrAI DrAI DrAI DrAI DrAI DrAI DrAI
Centrifugado
(seg.)
0000000000
Llenado 1
Tiempo (min.)0000000000
Agua --- --- --- --- --- --- --- --- --- --Nivel --- --- --- --- --- --- --- --- --- ---
Prod. lavand. --- --- --- --- --- --- --- --- --- ---
Te m p ( F) --- --- --- --- --- --- --- --- --- ---
Desagüe --- --- --- --- --- --- --- --- --- ---
Centrifugado
(seg.)
--- --- --- --- --- --- --- --- --- ---
Llenado 2
Tiempo (min.)0000000000
Agua --- --- --- --- --- --- --- --- --- --Nivel --- --- --- --- --- --- --- --- --- ---
Prod. lavand. --- --- --- --- --- --- --- --- --- ---
Te m p ( F) --- --- --- --- --- --- --- --- --- ---
Desagüe --- --- --- --- --- --- --- --- --- ---
Centrifugado
(seg.)
--- --- --- --- --- --- --- --- --- ---
Llenado 3
Tiempo (min.)2222222222
Agua Frío Frío Frío Frío Frío Frío Frío Frío Frío Frío
Nivel Medio Medio Medio Medio Medio Medio Medio Medio Medio Medio
Prod. lavand.0000000000
Temp (F)0000000000
Desagüe DrAI DrAI DrAI DrAI DrAI DrAI DrAI DrAI DrAI DrAI
Centrifugado
(seg.)
30 30 30 30 30 30 30 30 30 30
22
Normal
90°C
23
Normal 60°C
(prelavado)
24
Normal
60°C
25
Normal 40°C
(prelavado)
26
Planchado
permanente
90°C
(prelavado)
27
Planchado
permanente
90°C
28
Planchado
permanente
60°C
(prelavado)
29
Planchado
permanente
60°C
30
Delicado
40°C
84 F232072(SP)
Page 86

Programación
Ciclos OPL Export del ordenador V (continuación)
21
Normal 90°C
Programa
(prelava do)
Llenado 4
Tiempo (min.)2222222222
Agua Frío Frío Frío Frío Frío Frío Frío Frío Frío Frío
Nivel Medio Medio Medio Medio Medio Medio Medio Medio Medio Medio
Prod. lavand.0000000000
Temp (F)0000000000
Desagüe DrAI DrAI DrAI DrAI DrAI DrAI DrAI DrAI DrAI DrAI
Centrifugado
(seg.)
30 30 30 30 30 30 30 30 30 30
Llenado 5
Tiempo (min.)2222222222
Agua Frío Frío Frío Frío Frío Frío Frío Frío Frío Frío
Nivel Medio Medio Medio Medio Medio Medio Medio Medio Medio Medio
Prod. lavand.0000000000
Temp (F)0000000000
Desagüe DrAI DrAI DrAI DrAI DrAI DrAI DrAI DrAI DrAI DrAI
Centrifugado
(seg.)
30 30 30 30 30 30 30 30 30 30
Llenado 6
Tiempo (min.)0000000000
Agua --- --- --- --- --- --- --- --- --- --Nivel --- --- --- --- --- --- --- --- --- ---
Prod. lavand. --- --- --- --- --- --- --- --- --- ---
Te m p ( F) --- --- --- --- --- --- --- --- --- ---
Desagüe --- --- --- --- --- --- --- --- --- ---
Centrifugado
(seg.)
--- --- --- --- --- --- --- --- --- ---
Llenado 7
Tiempo (min.)0000000000
Agua --- --- --- --- --- --- --- --- --- --Nivel --- --- --- --- --- --- --- --- --- ---
Prod. lavand. --- --- --- --- --- --- --- --- --- ---
Te m p ( F) --- --- --- --- --- --- --- --- --- ---
Desagüe --- --- --- --- --- --- --- --- --- ---
Centrifugado
(seg.)
--- --- --- --- --- --- --- --- --- ---
Llenado 8
Tiempo (min.)0000000000
Agua --- --- --- --- --- --- --- --- --- --Nivel --- --- --- --- --- --- --- --- --- ---
Prod. lavand. --- --- --- --- --- --- --- --- --- ---
Te m p ( F) --- --- --- --- --- --- --- --- --- ---
Desagüe --- --- --- --- --- --- --- --- --- ---
Centrifugado
(seg.)
--- --- --- --- --- --- --- --- --- ---
Llenado 9
Tiempo (min.)2222222222
Agua Frío Frío Frío Frío Frío Frío Frío Frío Frío Frío
Nivel Medio Medio Medio Medio Medio Medio Medio Medio Medio Medio
Prod. lavand.3333333333
Temp (F)0000000000
Desagüe SPn3 SPn3 SPn3 SPn3 SPn3 SPn3 SPn3 SPn3 SPn3 SPn2
Centrifugado
(seg.)
6666622222
22
Normal
90°C
23
Normal 60°C
(prelavado)
24
Normal
60°C
25
Normal 40°C
(prelavado)
26
Planchado
permanente
90°C
(prelavado)
27
Planchado
permanente
90°C
28
Planchado
permanente
60°C
(prelavado)
29
Planchado
permanente
60°C
30
Delicado
40°C
F232072(SP) 85
Page 87

Programación
Hoja de programación del ciclo
Programa Prelavado Lavado
Título
Ciclo Prod. lavand. Prod. lavand.
Agitación Temp Temp
Velocidad de lavado Desagüe Desagüe
Bomba Centrifugado (seg.) Centrifugado (seg.)
Tiempo (min.)
Agua Agua
Nivel Nivel
Llenado 1 Llenado 2 Llenado 3
Tiempo (min.) Tiempo (min.) Tiempo (min.)
Agua Agua Agua
Nivel Nivel Nivel
Prod. lavand. Prod. lavand. Prod. lavand.
Temp Temp Temp
Desagüe Desagüe Desagüe
Centrifugado (seg.) Centrifugado (seg.) Centrifugado (seg.)
Llenado 4 Llenado 5 Llenado 6
Tiempo (min.) Tiempo (min.) Tiempo (min.)
Agua Agua Agua
Nivel Nivel Nivel
Prod. lavand. Prod. lavand. Prod. lavand.
Temp Temp Temp
Desagüe Desagüe Desagüe
Centrifugado (seg.) Centrifugado (seg.) Centrifugado (seg.)
Llenado 7 Llenado 8 Llenado 9
Tiempo (min.) Tiempo (min.) Tiempo (min.)
Agua Agua Agua
Nivel Nivel Nivel
Prod. lavand. Prod. lavand. Prod. lavand.
Temp Temp Temp
Desagüe Desagüe Desagüe
Centrifugado (seg.) Centrifugado (seg.) Centrifugado
Tiempo (min.)
Centrifugado (min.)
86 F232072(SP)
 Loading...