

Page 1

Washer-Extractors
Cabinet Freestanding Installation and Operating Instructions
Installation/Operation Supplement
www.comlaundry.com
Part No. F232148R2EN
December 2007
Page 2

Page 3

Installation/Operation Supplement
Table of
Contents
Safety Information.............................................................................. 2
Important Safety Instructions ............................................................... 2
Installation........................................................................................... 4
General Specifications.......................................................................... 4
V-Computer ..................................................................................... 4
WE-6 Computer ............................................................................... 6
Dimensional Clearances ....................................................................... 10
V-Computer ..................................................................................... 10
WE-6 Computer ............................................................................... 10
Dimensions ........................................................................................... 11
V-Computer ..................................................................................... 11
WE-6 Computer ............................................................................... 13
Operation............................................................................................. 21
V-Computer .......................................................................................... 21
WE-6 Computer.................................................................................... 23
Loading Using Tilt Option............................................................... 24
Unloading Using Tilt Option ........................................................... 24
Disposal of Unit................................................................................... 25
© Copyright 2007, Alliance Laundry Systems LLC
All rights reserved. No part of the contents of this book may be reproduced or transmitted in any form or by any
means without the expressed written consent of the publisher.
F232148 (EN)
© Copyright, Alliance Laundry Systems LLC – DO NOT COPY or TRANSMIT
1
Page 4
Installation/Operation Supplement
Safety Information
Precautionary statements (“DANGER,” “WARNING,”
and “CAUTION”), followed by specific instructions,
are found in this manual and on machine decals. These
precautions are intended for the personal safety of the
operator, user, servicer and those maintaining the
machine.
DANGER
DANGER indicates the presence of a
hazard that will cause severe personal
injury, death, or substantial property
damage if the danger is ignored.
WARNING
WARNING indicates the presence of a
hazard that can cause severe personal
injury, death, or substantial property
damage if the warning is ignored.
CAUTION
CAUTION indicates the presence of a
hazard that will or can cause minor
personal injury or property damage if the
caution is ignored.
Additional precautionary statements (“IMPORTANT”
and “NOTE”) are followed by specific instructions.
IMPORTANT: The word “IMPORTANT” is used
to inform the reader of specific procedures where
minor machine damage will occur if the procedure
is not followed.
NOTE: The word “NOTE” is used to communicate installation, operation, maintenance or servicing information that is important but not hazard related.
Important Safety Instructions
WARNING
To reduce the risk of fire, electric shock,
serious injury or death to persons when
using your washer, follow these basic
precautions:
W023
1. Read all instructions before using the washer.
2. Refer to the GROUNDING INSTRUCTIONS in the INSTALLATION manual for the proper grounding of the washer.
3. Do not wash textiles that have been previously cleaned in, washed in, soaked in, or spotted with gasoline, dry-cleaning solvents, or other flammable or explosive substances as they give off vapors that could ignite or explode.
4. Do not add gasoline, dry-cleaning solvents, or other flammable or explosive substances to the wash water. These substances give off vapors that could ignite or explode.
5. Under certain conditions, hydrogen gas may be
produced in a hot water system that has not been
used for two weeks or more. HYDROGEN GAS
IS EXPLOSIVE. If the hot water system has not
been used for such a period, before using a
washing machine or combination washer-dryer,
turn on all hot water faucets and let the water
flow from each for several minutes. This will
release any accumulated hydrogen gas. The gas is
flammable; do not smoke or use an open flame
during this time.
6. Do not allow children to play on or in the washer. Close supervision of children is necessary when the washer is used near children. This is a safety rule for all appliances.
7. Before the washer is removed from service or discarded, remove the door to the washing compartment.
8. Do not reach into the washer if the wash drum is moving.
2
© Copyright, Alliance Laundry Systems LLC – DO NOT COPY or TRANSMIT
F232148 (EN)
Page 5

Installation/Operation Supplement
9. Do not install or store the washer where it will be exposed to water and/or weather.
10. Do not tamper with the controls.
11. Do not repair or replace any part of the washer, or attempt any servicing unless specifically recommended in the user-maintenance instructions or in published user-repair instructions that the user understands and has the skills to carry out.
12. To reduce the risk of an electric shock or fire, DO NOT use an extension cord or an adapter to connect the washer to the electrical power source.
13. Use washer only for its intended purpose, washing textiles.
14. ALWAYS disconnect the washer from electrical supply before attempting any service. Disconnect the power cord by grasping the plug, not the cord.
15. Install the washer according to the INSTALLATION INSTRUCTIONS. All connections for water, drain, electrical power and grounding must comply with local codes and be made by licensed personnel when required.
16. To reduce the risk of fire, textiles which have
traces of any flammable substances such as
vegetable oil, cooking oil, machine oil,
flammable chemicals, thinner, etc. or anything
containing wax or chemicals such as in mops and
cleaning cloths, must not be put into the washer.
These flammable substances may cause the
fabric to catch on fire by itself.
17. Do not use fabric softeners or products to eliminate static unless recommended by the manufacturer of the fabric softener or product.
19. Replace worn power cords and/or loose plugs.
20. Be sure water connections have a shut-off valve and that fill hose connections are tight. CLOSE the shut-off valves at the end of each wash day.
21. Loading door MUST BE CLOSED anytime the washer is to fill, tumble or spin. DO NOT bypass the loading door switch by permitting the washer to operate with the loading door open.
22. Always read and follow manufacturer’s
instructions on packages of laundry and cleaning
aids. Heed all warnings or precautions. To reduce
the risk of poisoning or chemical burns, keep
them out of the reach of children at all times
(preferably in a locked cabinet).
23. Always follow the fabric care instructions supplied by the textile manufacturer.
24. Never operate the washer with any guards and/or panels removed.
25. DO NOT operate the washer with missing or broken parts.
26. DO NOT bypass any safety devices.
27. Failure to install, maintain, and/or operate this washer according to the manufacturer’s instructions may result in conditions which can produce bodily injury and/or property damage.
NOTE: The WARNING and IMPORTANT
SAFETY INSTRUCTIONS appearing in this
manual are not meant to cover all possible
conditions and situations that may occur. Common
sense, caution and care must be exercised when
installing, maintaining, or operating the washer.
18. Keep washer in good condition. Bumping or dropping the washer can damage safety features. If this occurs, have washer checked by a qualified service person.
F232148 (EN)
© Copyright, Alliance Laundry Systems LLC – DO NOT COPY or TRANSMIT
Any problems or conditions not understood should be
reported to the dealer, distributor, service agent or the
manufacturer.
3
Page 6
Installation/Operation Supplement
Installation
General Specifications
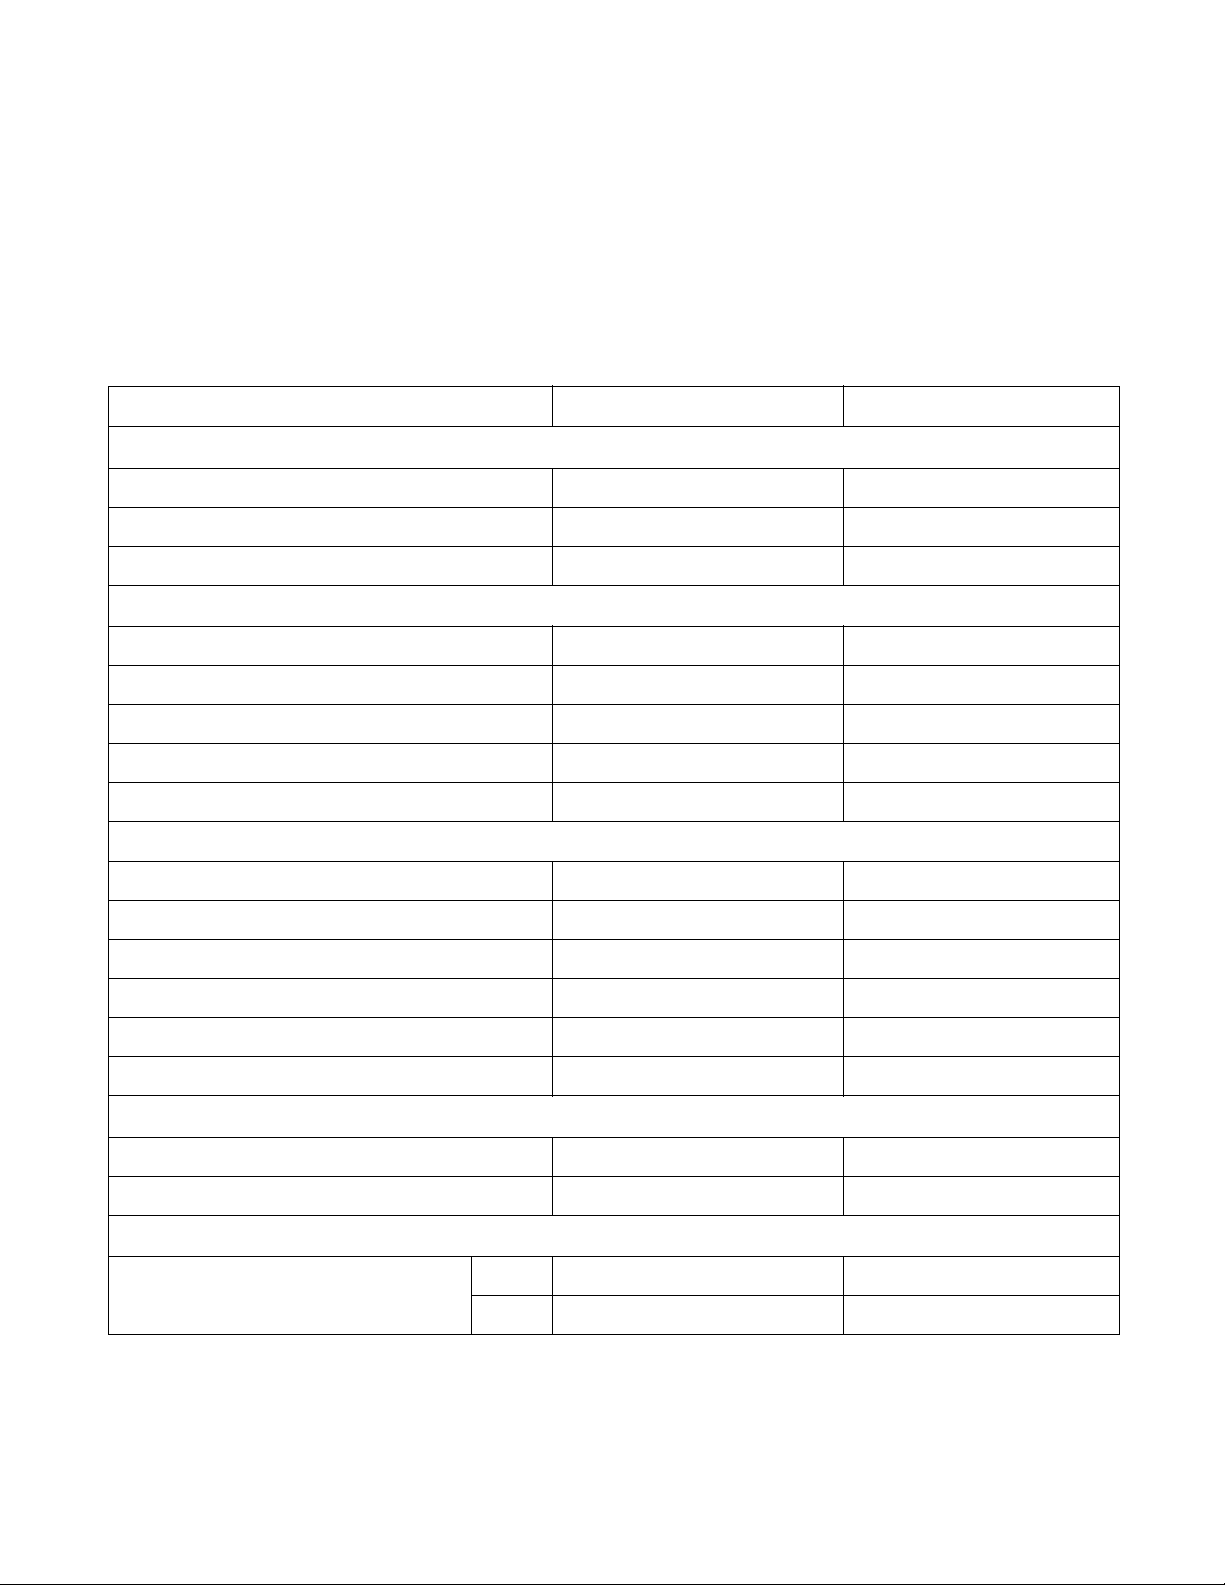
V-Computer
SF18VNV, SF25VNV, UF18VNV, and UF25VNV Models
Refer to Table 1.
18 Pound 25 Pound
Overall Dimensions
Overall width, mm (in.) 737 (29.0) 813 (32.0)
Overall height, mm (in.) 1168 (46.0) 1232 (48.5)
Overall depth, mm (in.) 833 (32.8) 940 (37.0)
Weight and Shipping Information
Net weight, kg (lbs.) 250 (550) 318 (700)
Domestic shipping weight, kg (lbs.) 250 (550) 341 (750)
Domestic shipping volume, m
Export shipping weight, kg (lbs.) 272 (600) 363 (800)
Export shipping volume, m
Cylinder diameter, mm (in.) 533 (21.0) 610 (24.0)
Cylinder depth, mm (in.) 349 (13.75) 406 (16.0)
Cylinder volume, l (ft
Perforation size, mm (in.) 4.77 (0.188) 4,77 (0.188)
Perforation open area, % 23 23
Load capacity (dry cloth weight), kg (lbs.) 8.16 (18) 11.34 (25)
Door opening size, mm (in.) 305 (12.0) 364 (14.345)
Height of door bottom above floor, mm (in.) 518 (20.4) 511 (20.1)
3
3
(ft3) 0.98 (34.6) N/A
3
(ft3) 1.17 (41.44) N/A
Wash Cylinder Information
) 78 (2.76) 119 (4.19)
Door Opening Information
Water Consumption
Average water consumption
per cycle, l (gal.)
4
HOT 87 (23) 106 (28)
COLD 42 (11) 49 (13)
Table 1 (Continued)
© Copyright, Alliance Laundry Systems LLC – DO NOT COPY or TRANSMIT
F232148 (EN)
Page 7

Installation/Operation Supplement
Table 1 (Continued)
18 Pound 25 Pound
Power Consumption
Average power used per cycle, kWh 0.2 0.3
Nominal sound emission, dBA 58 Data not available
Average HVAC load, kcal/hr (Btu/hr) 101 (400) 113 (450)
Drive Train Information
Number of motors in drive train 1 1
Drive motor power, kW (HP) 0.75 (1.0) 1.50 (2.0)
Cylinder Speeds
Low wash/reverse speed, RPM 29 27
Normal wash/reverse speed, RPM 52 49
Distribution speed, RPM 86 73
Extract l, RPM 534 500
Extract 2, RPM 685 641
Extract 3, RPM 1080 1011
Centrifugal Force Data
Low wash/reverse centrifugal force, Gs 0.25 0.80
Normal wash/reverse centrifugal force, Gs 0.80 0.80
Distribution centrifugal force, Gs 2.20 1.80
Extract 1 centrifugal force, Gs 85 85
Extract 2 centrifugal force, Gs 140 140
Extract 3 centrifugal force, Gs 348 348
Load Balancing
Balance detection system AC drive AC drive
Direct Steam Heating (Optional)
Steam inlet connection size, mm (in.) DN15 (1/2 NPT) DN15 (1/2 NPT)
Number of steam inlets 1 1
Steam required to
raise bath temperature
10 ° C, kg (10 ° F, lb.)
LOW 0.81 (1.13) 1.05 (1.46)
MED 0.90 (1.25) 1.16 (1.61)
HIGH 1.04 (1.45) 1.33 (1.85)
Average steam use per cycle, kg (bhp) 11.7 (0.75) 15 (0.96)
F232148 (EN)
© Copyright, Alliance Laundry Systems LLC – DO NOT COPY or TRANSMIT
5
Page 8
Installation/Operation Supplement
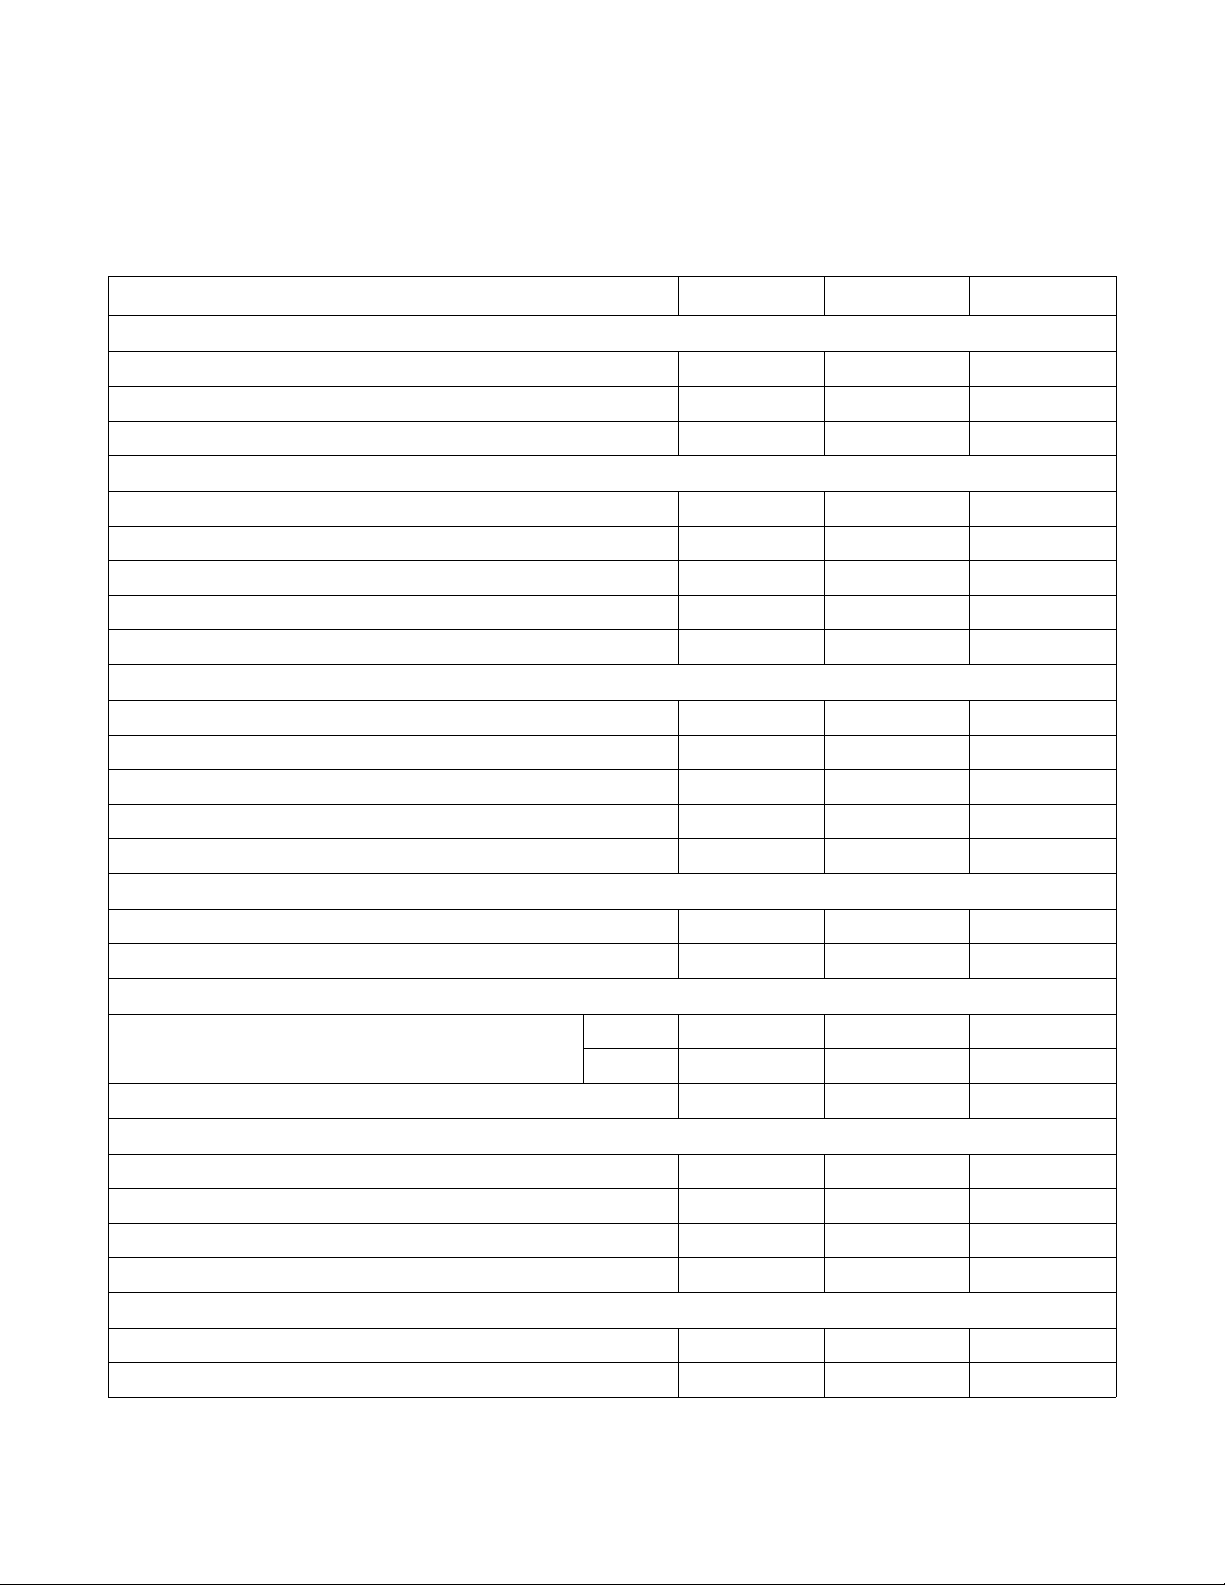
WE-6 Computer
SF35PV, SF50PV, SF85PV, UF35PV, UF50PV, and UF85PV Models
Refer to Table 2.
35 Pound 50 Pound 85 Pound
Overall Dimensions
Overall width, mm (in.) 889 (35) 990 (39) 1181 (46.5)
Overall height, mm (in.) 1407 (55.4) 1514 (59.6Z) 1781 (70.1)
Overall depth, mm (in.) 992 (39) 1049 (41.3) 1270 (50)
Weight and Shipping Information
Net weight, kg (lbs.) 550 (1212) 726 (1600) 1362 (3000)
Domestic shipping weight, kg (lbs.) 572 (1260) 749(1650) 1407 (3100)
Domestic shipping volume, m
Export shipping weight, kg (lbs.) 580 (1275) 1750 (795) 3200 (1453)
Export shipping volume, m
3
(ft3) 1.80 (63.6) 2.26 (80) 3.46 (123)
3
(ft3) 1.85 (65.3) 2.36 (83.5) 3.86 (137)
Wash Cylinder Information
Cylinder diameter, mm (in.) 668 (26.25) 762 (30) 914 (36)
Cylinder depth, mm (in.) 467 (18.375) 508 (20) 61 (240)
Cylinder volume, l (ft
3
) 164 (5.79) 232 (8.19) 400 (14.1)
Perforation size, mm (in.) 0.188 (4.77) 0.188 (4.77) 4.77 (0.188)
Perforation open area, % 23 23 23
Door Opening Information
Door opening size, mm (in.) 354 (13.9) 413 (16.25) 445 (17.5)
Height of door bottom above floor, mm (in.) 636 (25) 23 (585) 32.7 (831)
Water Consumption
Average water consumption per cycle, l (gal.) HOT 47 (178) 216 (57) 407 (108)
COLD
79 (21) 98 (26) 190 (50)
Average hot water consumed per hour, l (gal.) 276 (73) 322 (85) 579 (153)
Power Consumption
Average power used per cycle, kWh 0.4 0.6 0.9
Average HVAC load, kcal/hr (Btu/hr) 125 (500) 213 (850) 300 (1200)
Nominal sound emission, dBA 70 76 75
Background noise level, dBA 54 49 55
Drive Train Information
Number of motors in drive train 1 1 1
Drive motor power, kW (HP) 2.2 (3) 3.7 (5.0) 5.6 (7.5)
Table 2 (Continued)
6
© Copyright, Alliance Laundry Systems LLC – DO NOT COPY or TRANSMIT
F232148 (EN)
Page 9
Installation/Operation Supplement
Table 2 (Continued)
35 Pound 50 Pound 85 Pound
Cylinder Speeds
Gentle wash/reverse speed, RPM 26 26 26
Wash/reverse speed, RPM 43 40 41
Distribution/drain speed, RPM 77 73 65
Medium extract speed, RPM 325 305 280
High extract speed l, RPM 475 445 410
High extract speed 2, RPM 610 575 525
High extract speed 3, RPM 960 900 825
Centrifugal Force Data
Gentle wash/reverse centrifugal force, Gs 0.25 0.29 0.345
Wash/reverse centrifugal force, Gs 0.69 0.68 0.858
Distribution/drain centrifugal force, Gs 2.2 2.3 2.16
Medium extract centrifugal force, Gs 40 40 40
High extract 1 centrifugal force, Gs 85 84 85.8
High extract 2 centrifugal force, Gs 140 141 141
High extract 3 centrifugal force, Gs 345 345 348
Balance Detection
Vibration safety switch installed Standard Standard Standard
Direct Steam Heating (Optional)
Steam inlet connection size, mm (in.) DN15 DN15 (0.5) DN15 (0.5) DN15 (0.5)
Number of steam inlets 1 1 1
Steam required to raise bath temperature
10° C, kg (10° F, l b.)
LOW 2.22 (1.6) 2.91 (2.42) 3.8 (5.2)
MED 2.52 (1.81) 2.42 (3.46) 4.3 (5.9)
HIGH 2.84 (2.04) 2.73 (3.80) 4.9 (6.9)
Average steam use per cycle, kg (bhp) 1.47 (23) 1.95 (30.6) 54.9 (3.5)
Electric Heating (Optional)
Total electric heating capacity, kW 15.6 23.4 31.2
Number of electrical heat elements 6 9 12
Electrical heat element size, kW 2.6 2.6 2.6
Time required to raise bath temperature
10°C, min. (10°F, min.)
LOW 3.9 (2.6) 3.6 (2.4) 3.1 (4.8)
MED 4.5 (2.9) 4.2 (2.7) 3.5 (5.4)
F232148 (EN)
HIGH 5.0 (3.3) 4.7 (3.1) 6.4 (4.1)
© Copyright, Alliance Laundry Systems LLC – DO NOT COPY or TRANSMIT
7
Page 10

Installation/Operation Supplement
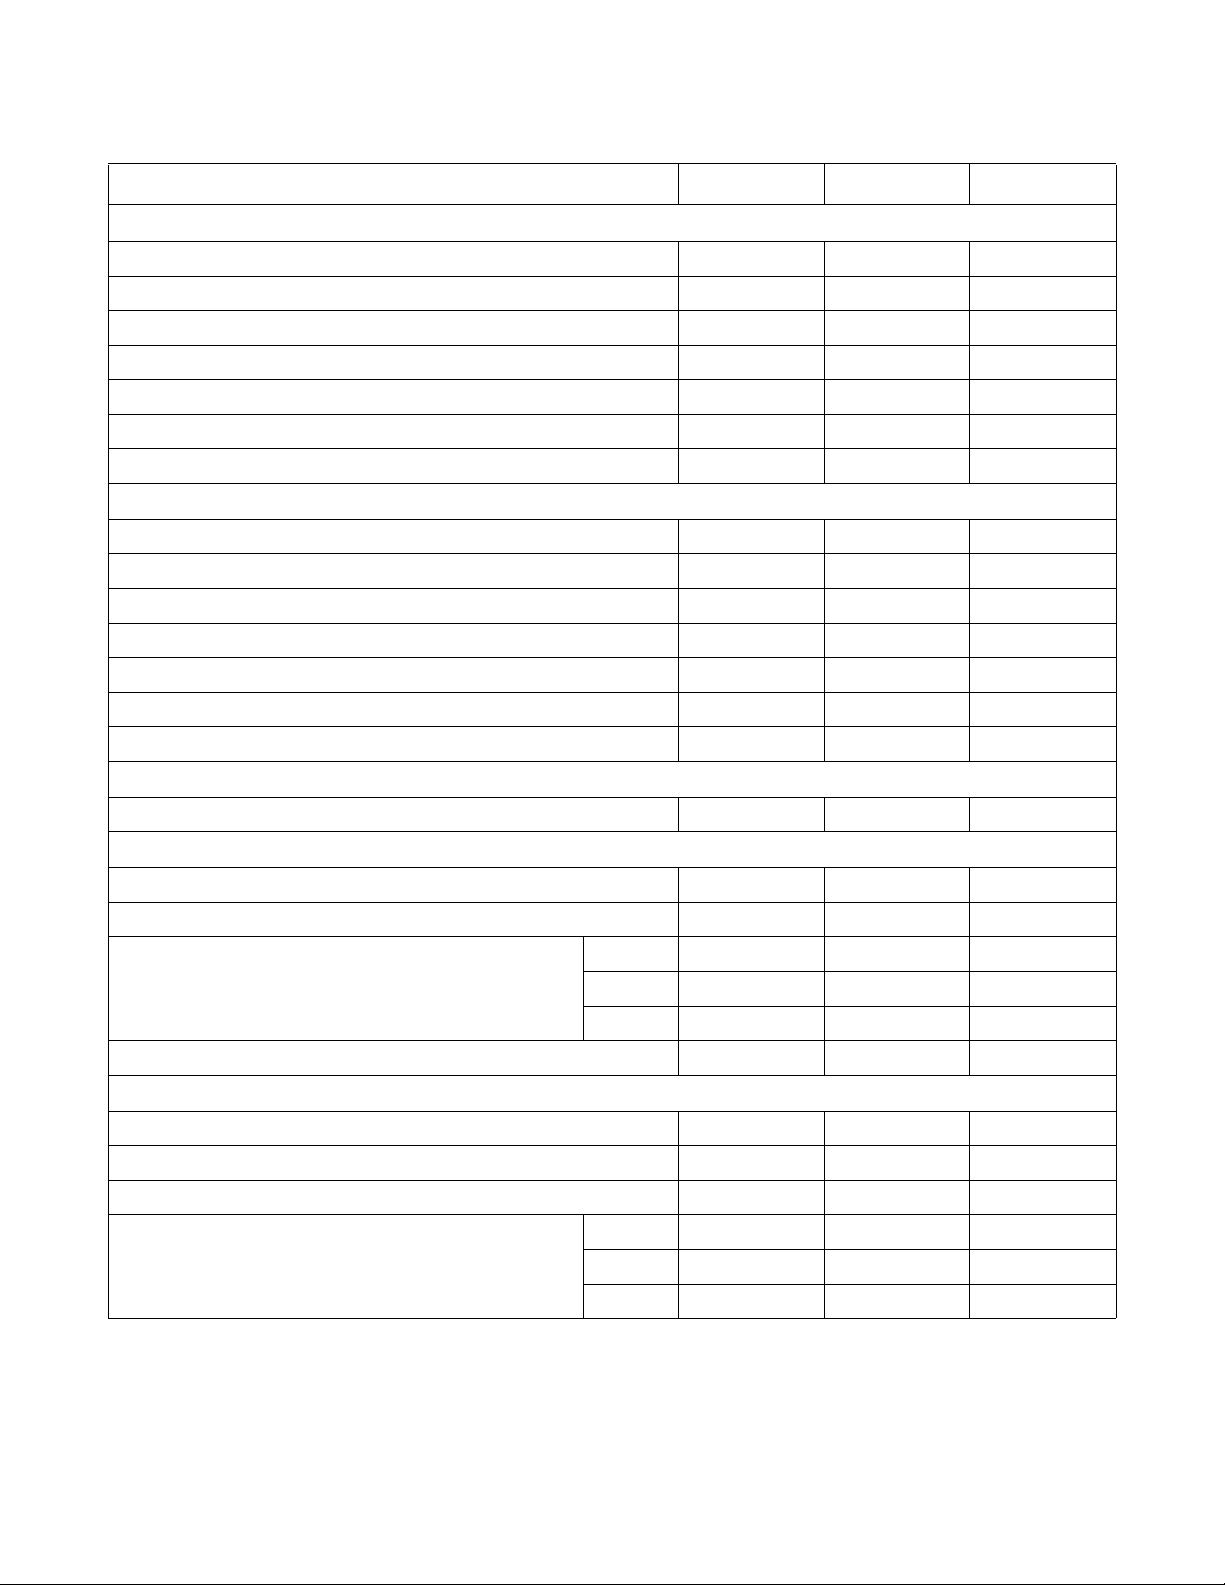
SF135PV, SF250PV, UF135PV, and UF250PV Models
Refer to Table 3.
135 Pound 250 Pound
Standard Standard
Forward Tilt
Option
Two-Way
Tilt Option
Overall Dimensions
Overall width, mm (in.) 1803 (71) 1957 (77) 2006 (79) 2006 (79)
Overall height, mm (in.) 1829 (75) 2083 (82) 2235 (88) 2235 (88)
Overall depth, mm (in.) 1537 (60.5) 2235 (88) 2243 (88.3) 2311 91()
Weight and Shipping Information
Net weight, kg (lbs.) 1818 (4000) 3661 (8070) 4000 (8800) 4355 (9600)
Domestic shipping weight, kg (lbs.) 1909 (4200) 3951 (8270) 4000 (8800) 4445 (9800)
Domestic shipping volume, m
3
(ft3) 6.35 (227) 11.5 (409) 11.5 (409) 11.5 (409)
Export shipping weight, kg (lbs.) 2045 (4500) 3860 (8500) 4227 (9300) 4581 (10,100)
Export shipping volume, m
3
(ft3) 6.39 (248) 11.5 (409) 11.5 (409) 11.5 (409)
Wash Cylinder Information
Cylinder diameter, mm (in.) 1092 (43) 1321 (52) 1321 (52) 1321 (52)
Cylinder depth, mm (in.) 635 (25) 813 (32) 813 (32) 813 (32)
Cylinder volume, l (ft
3
) 596 (21.0) 1114 (39.3) 1114 (39.3) 1114 (39.3)
Perforation size, mm (in.) 4.77 (0.188) 4.76 (0.188) 4.76 (0.188) 4.76 (0.188)
Perforation open area, % 23 20 20 20
Door Opening Information
Door opening size, mm (in.) 584 (23) 724 (28.5) 724 (28.5) 724 (28.5)
Height of door bottom above floor, mm (in.) 718 (28.25) 784 (30.9) 937 (36.9) 937 (36.9)
Water Consumption
Average water consumption per cycle, l (gal.) HOT 590 (156) 905 (239) 905 (239) 905 (239)
COLD
437 (116) 424 (112) 424 (112) 424 (112)
Average hot water consumed per hour, l (gal.) 1023 (270) 1355 (358) 1355 (358) 1355 (358)
Power Consumption
Average power used per cycle, kWh 0.9 1.5 (Est.) 1.5 (Est.) 1.5 (Est.)
Average HVAC load, kcal/hr (Btu/hr) 375 (1500) 550 (2200) 550 (2200) 550 (2200)
Nominal sound emission,
dBA
75
75 N/A N/A
Drive Train Information
Number of motors in drive train 1 1 1 1
Drive motor power, kW (HP) 7.5 (10) 18.5 (25) 18.5 (25) 18.5 (25)
Table 3 (Continued)
8
© Copyright, Alliance Laundry Systems LLC – DO NOT COPY or TRANSMIT
F232148 (EN)
Page 11

Table 3 (Continued)
135 Pound 250 Pound
Installation/Operation Supplement
Standard Standard
Forward Tilt
Option
Two-Way
Tilt Option
Cylinder Speeds
1/2 Wash/reverse speed, RPM 26 21 21 21
Wash/reverse speed, RPM 36 31 31 31
Distribution speed, RPM 62545454
Medium extract speed, RPM 170 140 140 140
High extract speed l, RPM 375 340 340 340
High extract speed 2, RPM 480 435 435 435
High extract speed 3, RPM 715 650 650 650
Centrifugal Force Data
1/2 Wash/reverse centrifugal force, Gs 0.412 0.325 0.325 0.325
Wash/reverse centrifugal force, Gs 0.790 0.708 0.708 0.708
Distribution centrifugal force, Gs 2.34 2.15 2.15 2.15
Medium extract centrifugal force, Gs 17.6 14.7 14.7 14.7
High extract 1 centrifugal force, Gs 85.8 86.9 86.9 86.9
High extract 2 centrifugal force, Gs 141 142 142 142
High extract 3 centrifugal force, Gs 312 318 318 318
Balance Detection
Vibration safety switch installed Standard Standard Standard Standard
Direct Steam Heating (Optional)
Steam inlet connection size, mm (in.) DN19 (0.75) DN25 (1.0) DN25 (1.0) DN25 (1.0)
Number of steam inlets 1 1 1 1
Steam required to raise bath temperature
10 °C, kg (10 ° F, l b.)
LOW 3.11 (6.84) 5.23 (11.5) 5.23 (11.5) 5.23 (11.5)
HIGH 4.40 (9.67) 7.91 (17.4) 17.4 (7.91) 17.4 (7.91)
Average steam use per cycle, bhp 4.78 9.0 9.0 9.0
Electric Heating (Optional)
Total electric heating capacity, kW 45 N/A N/A N/A
Number of electrical heat elements 18 N/A N/A N/A
Electrical heat element size, kW 2.5 N/A N/A N/A
Time required to raise bath temperature
10°C, min. (10°F, min.)
LOW 5.0 (3.2) N/A N/A N/A
HIGH 6.4 (4.2) N/A N/A N/A
F232148 (EN)
© Copyright, Alliance Laundry Systems LLC – DO NOT COPY or TRANSMIT
9
Page 12

Installation/Operation Supplement
Dimensional Clearances
NOTE: The dimensions shown here are for
planning purposes only. They are approximate and
subject to normal manufacturing tolerances. If
exact dimensions are required for construction
purposes, contact the distributor or manufacturer.
We reserve the right to make changes at any time
without notice.
V-Computer
SF18VNV, SF25VNV, UF18VNV, and UF25VNV Models
Both single and multiple machine installations require
specified minimum clearances on all sides of each
machine. Tables below show these clearances.
Recommended Minimum Clearances
18 Pound 25 Pound
Minimum rear clearance, mm (in.) 305 (12) 305 (12)
Minimum clearance between machine and wall, mm (in.) 50 (2) 50 (2)
Minimum clearance between machines (side), mm (in.) 25 (1) 25 (1)
Minimum front clearance, mm (in.) 406 (16) 445 (17.5)
Tab le 4
WE-6 Computer
SF35-85PV, UF35-85PV, SF135-250PV, and UF135-250PV Models
Recommended Minimum Clearances
Minimum rear clearance,
mm (in.)
Minimum clearance between
machine and wall, mm (in.)
Minimum clearance between
machines (side), mm (in.)
135
35
Pound
450 (18) 450 (18) 450 (18) 610 (24) 610 (24) 914 (36) 914 (36)
150 (6) 150 (6) 150 (6) 457 (18) 457 (18) 457 (18) 457 (18)
25.4 (1) 25.4 (1) 25.4 (1) 457 (18) 457 (18) 457 (18) 457 (18)
50
Pound
85
Pound
Pound
Standard Standard
250 Pound
Forward
Tilt
Option*
Two-Way
Tilt
Option*
Minimum front clearance,
mm (in.)
* Machines equipped with the tilt option require a minimum overhead clearance as well. Refer to
overhead clearance for the 250 pound capacity model with tilt option.
10
533 (21) 584 (23) 584 (23) 584 (23) 914 (36) 914 (36) 914 (36)
Table 5
© Copyright, Alliance Laundry Systems LLC – DO NOT COPY or TRANSMIT
Figure 7 for the minimum
F232148 (EN)
Page 13
Dimensions
V-Computer
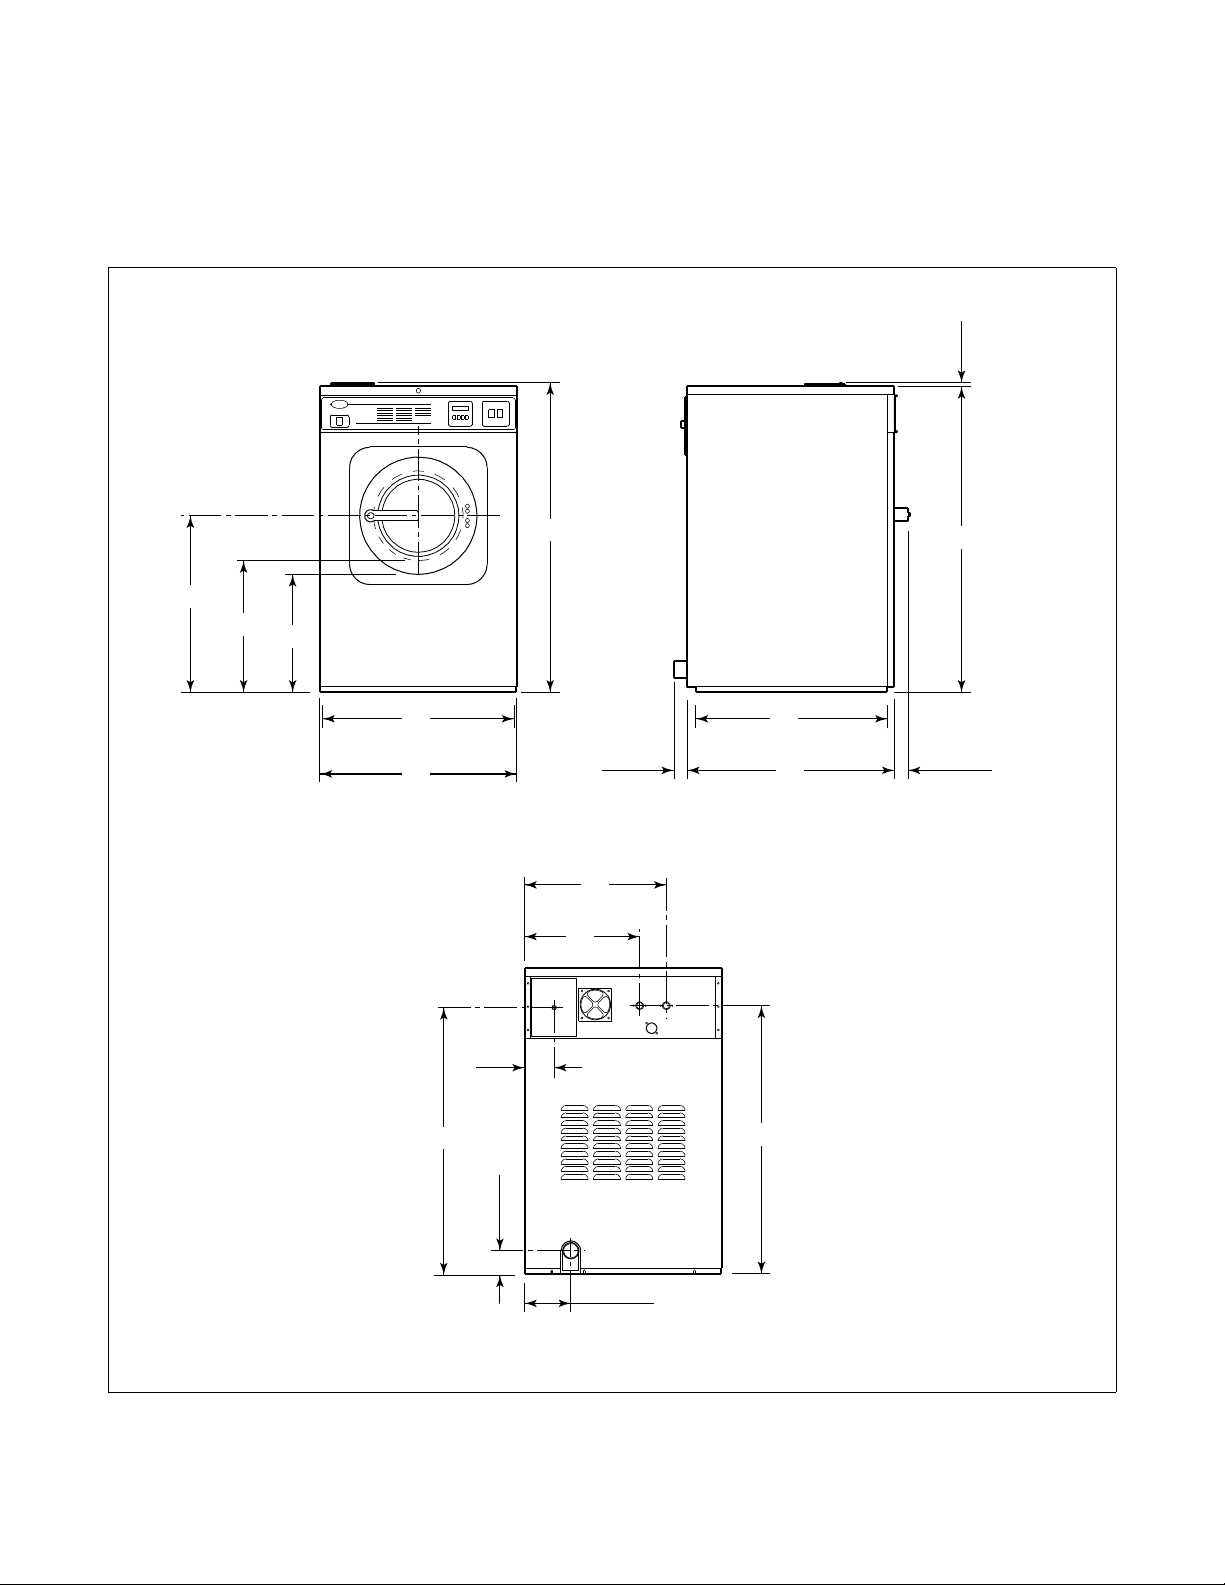
SF18VNV, UF18VNV, SF25VNV, and UF25VNV Models
Installation/Operation Supplement
G
D
A
B
C
E
F
Front
L
M
N
S
K
J
Left Side
H
I
F232148 (EN)
R
Q
P
O
Rear
Figure 1
© Copyright, Alliance Laundry Systems LLC – DO NOT COPY or TRANSMIT
CFS425N
11
Page 14

Installation/Operation Supplement
18 Pound 25 Pound
A
B
C
D
E
F
G
H
I
J
K
L
M
N
O
659 mm (26 in.) 686 mm (27 in.)
492 mm (19-13/32 in.) 508 mm (20 in.)
440 mm (17-5/16 in.) 432 mm (17 in.)
1161 mm (45-23/32 in.) 1232 mm (48-1/2 in.)
686 mm (27 in.) 762 mm (30 in.)
737 mm (29 in.) 813 mm (32 in.)
18 mm (23/32 in.) 18 mm (23/32 in.)
1143 mm (45 in.) 1214 mm (47-13/16 in.)
25 mm (1 in.) 25 mm (1 in.)
774 mm (30-1/2 in.) 876 mm (34-1/2 in.)
709 mm (27-15/16 in.) 816 mm (32-1/8 in.)
33 mm (1-5/16 in.) 38 mm (1-1/2 in.)
530 mm (20-29/32 in.) 597 mm (23-1/2 in.)
430 mm (16-29/32 in.) 495 mm (19-1/2 in.)
1074 mm (42-5/16 in.) 1074 mm (42-5/16 in.)
173 mm (6-13/16 in.) 211 mm (8-5/16 in.)
P
Q
R
S
86 mm (3-13/32 in.) 86 mm (3-13/32 in.)
1029 mm (40-1/2 in.) 1067 mm (42 in.)
114 mm (4-1/2 in.) 4-13/16 in. (122 mm)
12
© Copyright, Alliance Laundry Systems LLC – DO NOT COPY or TRANSMIT
F232148 (EN)
Page 15

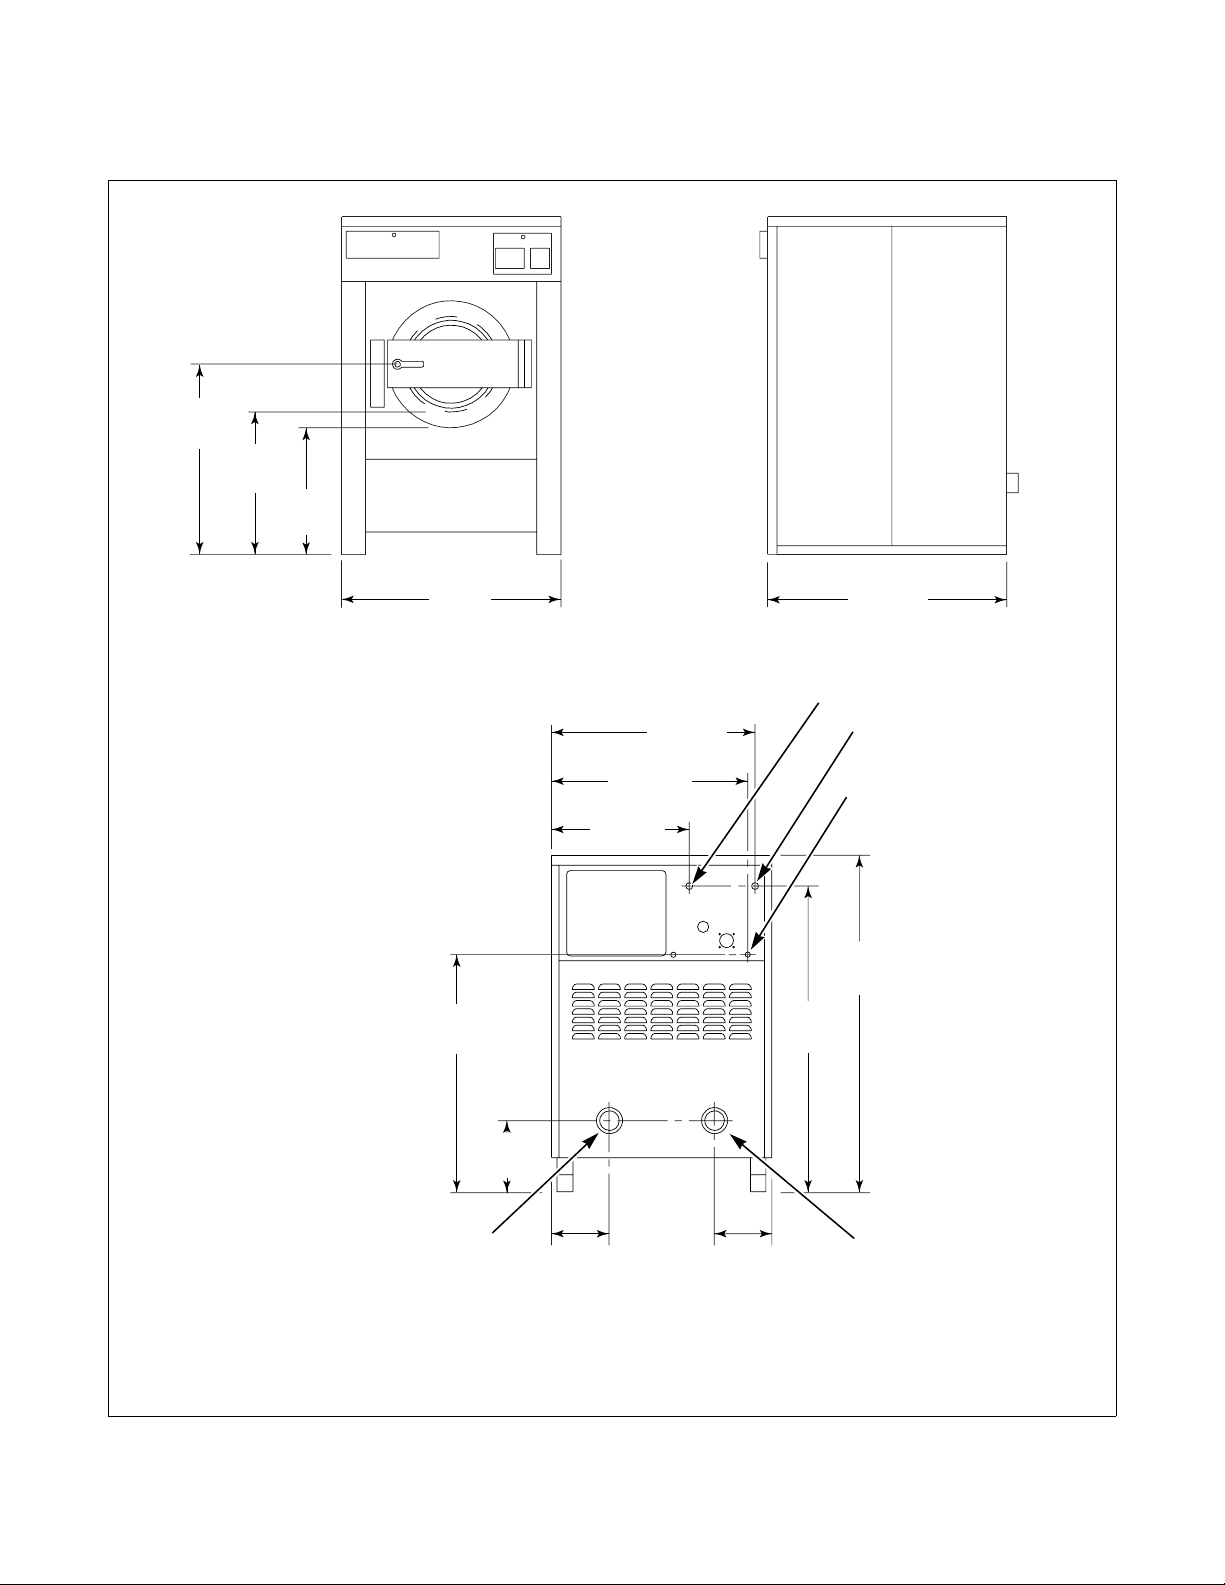
WE-6 Computer
SF35PV and UF35PV Models
814 mm
(32")
638 mm
(25 1/10")
559 mm
(22")
Installation/Operation Supplement
889 mm
(35")
Front Side
828 mm
(32 3/5")
813 mm
(32")
606 mm
(23 9/10")
1255 mm
(49 2/5")
1031 mm
(40 3/5")
300 mm
(11 4/5")
1
1323 mm
(52 1/10")
992 mm
(39")
2
3
1408 mm
(55 2/5")
209 mm
5
(8 1/5")
279 mm
(11")
Rear
1 Cold Water 4 76 mm (3 in.) Reuse Drain Outlet
2 Hot Water 5 76 mm (3 in.) Drain Outlet
3 Steam Inlet
Figure 2
F232148 (EN)
© Copyright, Alliance Laundry Systems LLC – DO NOT COPY or TRANSMIT
4
B145I
B145I
13
Page 16
Installation/Operation Supplement
SF50PV, UF50PV, SF85PV, and UF85PV Models
A
B
C
D E
Front
N
Side
1
F
G
H
M
2
3
I
J
5
1 Cold Water 4 76 mm (3 in.) Reuse Drain Outlet
2 Hot Water 5 76 mm (3 in.) Drain Outlet
3 Steam Inlet
L
Rear
K
4
Figure 3
14
© Copyright, Alliance Laundry Systems LLC – DO NOT COPY or TRANSMIT
B146I
F232148 (EN)
Page 17

50 Pound 85 Pound
872 mm (34-3/10 in.) 1054 mm (41-1/2 in.)
A
Installation/Operation Supplement
B
C
D
E
F
G
H
J
K
L
M
N
26-1/5 in. (666 mm) 831 mm (32-7/10 in.)
582 mm (22-9/10 in.) 765 mm (30-1/10 in.)
991 mm (39 in.) 1181 mm (46-1/2 in.)
1049 mm (41-3/10 in.) 1270 mm (50 in.)
930 mm (36-3/5 in.) 1107 mm (43-3/5 in.)
889 mm (35 in.) 1083 mm (42-3/5 in.)
619 mm (24-2/5 in.) 758 mm (29-9/10 in.)
1513 mm (59-3/5 in.) 1781 mm (70-1/10 in.)
I
1399 mm (55-1/10 in.) 1685 mm (66-2/5 in.)
260 mm (10-1/5 in.) 254 mm (10 in.)
260 mm (10-1/5 in.) 197 mm (7-3/4 in.)
300 mm (11-4/5 in.) 281 mm (11-1/10 in.)
1136 mm (44-7/10 in.) 1328 mm (52-3/8 in.)
F232148 (EN)
© Copyright, Alliance Laundry Systems LLC – DO NOT COPY or TRANSMIT
15
Page 18
Installation/Operation Supplement
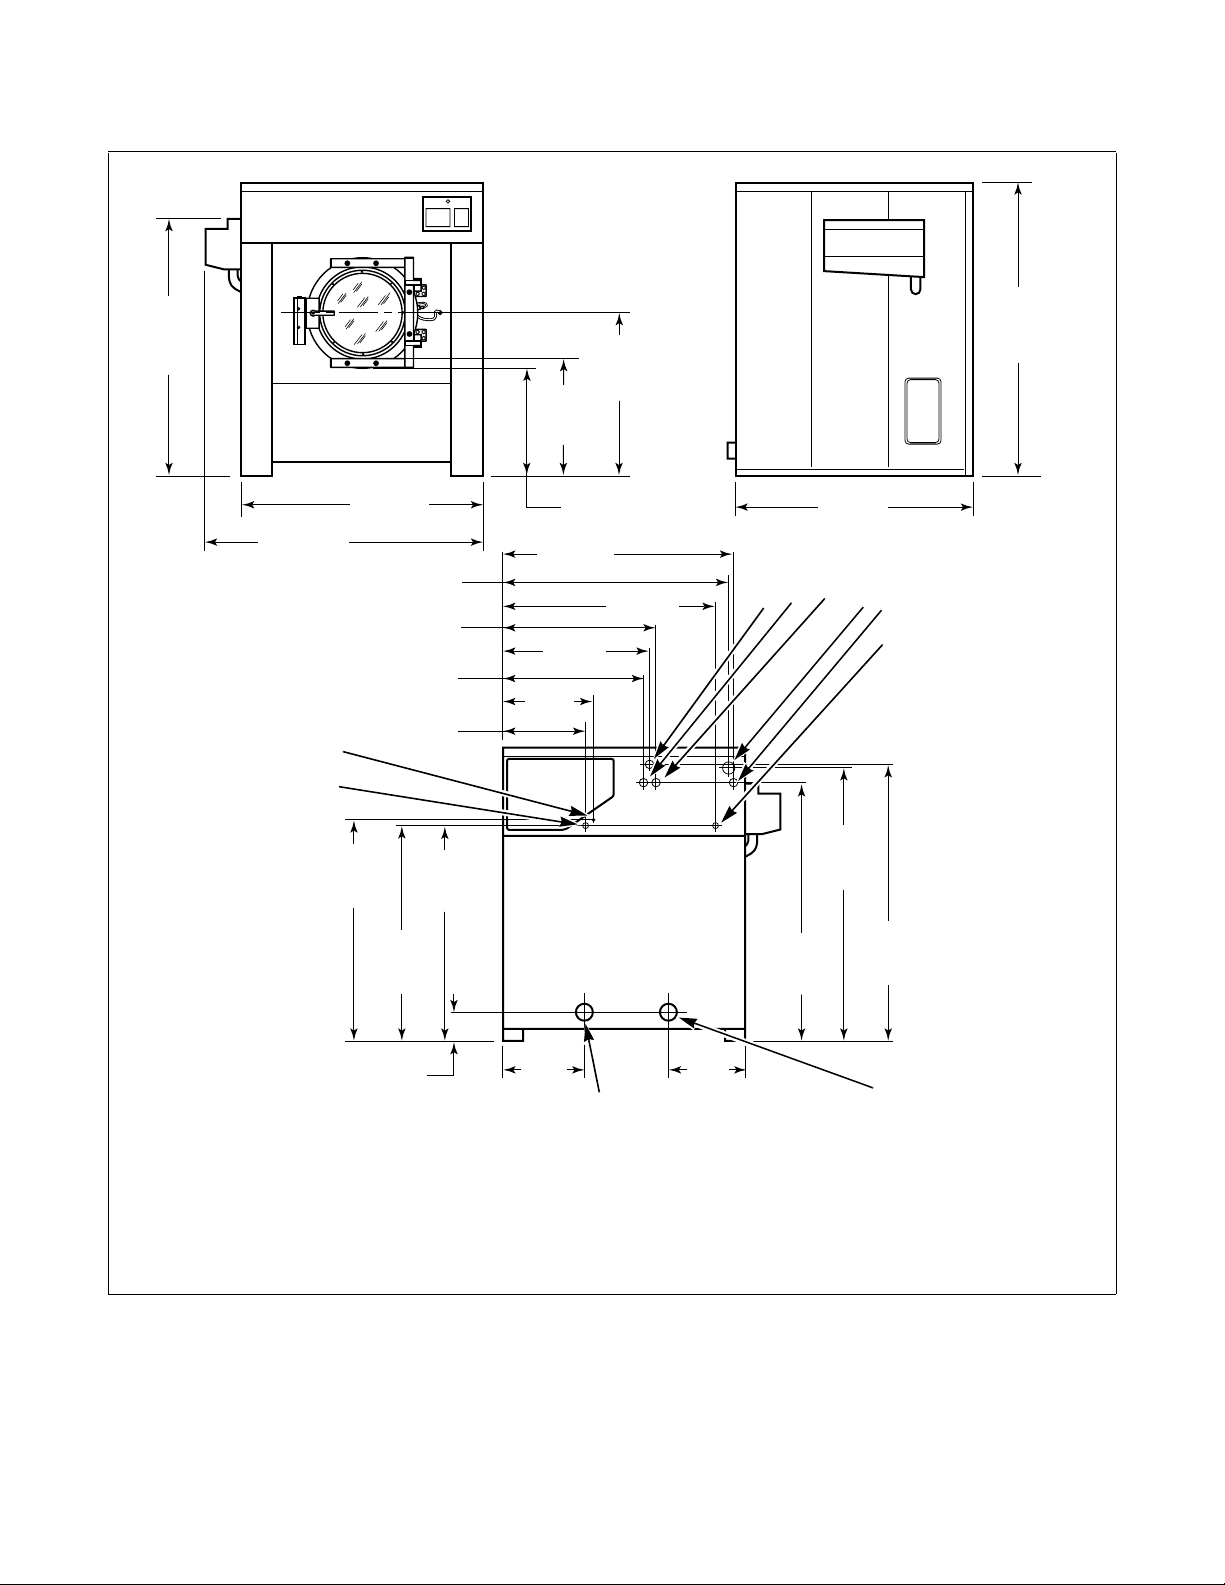
135 Pound Capacity Models
1664 mm
(65 1/2")
1060 mm
(41 3/4")
768 mm
(30 1/4")
1575 mm
(62")
1803 mm
(71")
Front Side
10
1457 mm
(57 5/16")
992 mm
(39 3/32")
913 mm
(35 29/32")
529 mm
(20 13/16")
1491 mm
(58 11/16")
952 mm
(37 1/2")
584 mm
(23")
718 mm
(28 1/4")
1376 mm
(54 3/16")
1549 mm
(61")
3
2
1
4
5
6
9
1803 mm
1468 mm
(57 13/16")
1430 mm
(56 5/16")
(71")
1905 mm
(75")
1435 mm
(56 1/2")
171 mm
(6 3/4")
521 mm
(20 1/2")
509 mm
(20 1/16")
8
Rear
1715 mm
(67 1/2")
1 Recirculation Port 6 Steam Inlet
2 Extra Fill Valve 7 Drain Outlet
3 Cold Water Inlet 8 Reuse Drain Outlet
4 Vent 9 Main Power
5 Hot Water Inlet 10 External Supply Signal
Figure 4
16
© Copyright, Alliance Laundry Systems LLC – DO NOT COPY or TRANSMIT
1829 mm
(72")
7
R012I
F232148 (EN)
Page 19

250 Pound Capacity Models
Installation/Operation Supplement
2083 mm
(82")
1740 mm
(68 1/2")
292 mm
(11 1/2")
721 mm
(28 3/8")
1207 mm
(47 1/2")
829 mm
(32 5/8")
483 mm
(19")
2037 mm
(80 3/16")
1
2
1096 mm
(43 3/16")
712 mm
(28")
784 mm
(30 7/8")
1744 mm
(68 11/16")
1615 mm
(63 5/8")
1829 mm
1957 mm
(77 1/16")
Front Side
10
(72")
1639 mm
(64 1/2")
1198 mm
(47 3/16")
912 mm
(35 29/32")
1034 mm
(40 11/16")
3
4
5
6
9
559 mm
(22")
483 mm
(19")
1997 mm
(78 5/8")
1584 mm
(62 3/8")
1530 mm
(60 1/4")
218 mm
8
(8 5/8")
572 mm
(22 1/2")
Rear
572 mm
(22 1/2")
1446 mm
(59 29/32")
1763 mm
(69 13/32")
1960 mm
(77 3/16")
1 Recirculation Port 6 Steam Inlet
2 Extra Fill Valve 7 Drain Outlet
3 Hot Water Inlet 8 Reuse Drain Outlet
4 Vent 9 External Supply Signal
5 Cold Water Inlet 10 Main Power
Figure 5
7
R070I
F232148 (EN)
© Copyright, Alliance Laundry Systems LLC – DO NOT COPY or TRANSMIT
17
Page 20

Installation/Operation Supplement
250 Pound Capacity Models with Forward Tilt or Two-Way Tilt Option
A
H
I J
B
E
C
D
Front
9
8
AA
Z
Y
X
Q
R
G
F
K
3
2
L
M
N
O
P
1
U
Side
4
5
S
T
7
W
V
Rear
1 Recirculation Port 6 Drain Outlet
2 Extra Fill Valve 7 Reuse Drain Outlet
3 Hot Water Inlet 8 External Supply Signal
4 Vent 9 Main Power
5 Cold Water Inlet
Figure 6
18
© Copyright, Alliance Laundry Systems LLC – DO NOT COPY or TRANSMIT
6
CFS456N
R074IE3A
F232148 (EN)
Page 21

Forward Tilt Two-Way Tilt
Installation/Operation Supplement
A
B
C
D
E
F
G
H
I
J
K
L
M
N
O
2235 mm (88 in.) 2235 mm (88 in.)
1736 mm (74-13/32 in.) 1736 mm (74-13/32 in.)
1930 mm (76 in.) 1930 mm (76 in.)
2057 mm (81 in.) 2006 mm (79 in.)
936 mm (36-7/8 in.) 936 mm (36-7/8 in.)
981 mm (38-19/32 in.) 981 mm (38-5/8 in.)
1359 mm (53-1/2 in.) 1359 mm (53-1/2 in.)
2037 mm (80-3/16 in.) 2037 mm (80-3/16 in.)
721 mm (28-3/8 in.) 721 mm (28-3/8 in.)
559 mm (22 in.) 559 mm (22 in.)
2254 mm (88-3/4 in.) 2311 mm (91 in.)
1174 mm (68-11/16 in.) 1174 mm (68-11/16 in.)
1639 mm (64-1/2 in.) 1639 mm (64-1/2 in.)
1615 mm (63-5/8 in.) 1615 mm (63-5/8 in.)
1198 mm (47-3/16 in.) 1198 mm (47-3/16 in.)
1096 mm (43-3/16 in.) 1096 mm (43-3/16 in.)
P
912 mm (35-29/32 in.) 912 mm (35-29/32 in.)
Q
R
S
T
U
V
W
X
Y
Z
AA
712 mm (28 in.) 712 mm (28 in.)
2121 mm (83-1/2 in.) 2121 mm (83-1/2 in.)
1930 mm (76 in.) 1930 mm (76 in.)
1613 mm (63-1/2 in.) 1613 mm (63-1/2 in.)
620 mm (24-13/32 in.) 620 mm (24-13/32 in.)
620 mm (24-13/32 in.) 620 mm (24-13/32 in.)
370 mm (14-5/8 in.) 370 mm (14-5/8 in.)
1683 mm (66-1/4 in.) 1683 mm (66-1/4 in.)
1737 mm (68-3/8 in.) 1737 mm (68-3/8 in.)
2149 mm (84-5/8 in.) 2149 mm (84-5/8 in.)
F232148 (EN)
© Copyright, Alliance Laundry Systems LLC – DO NOT COPY or TRANSMIT
19
Page 22
Installation/Operation Supplement
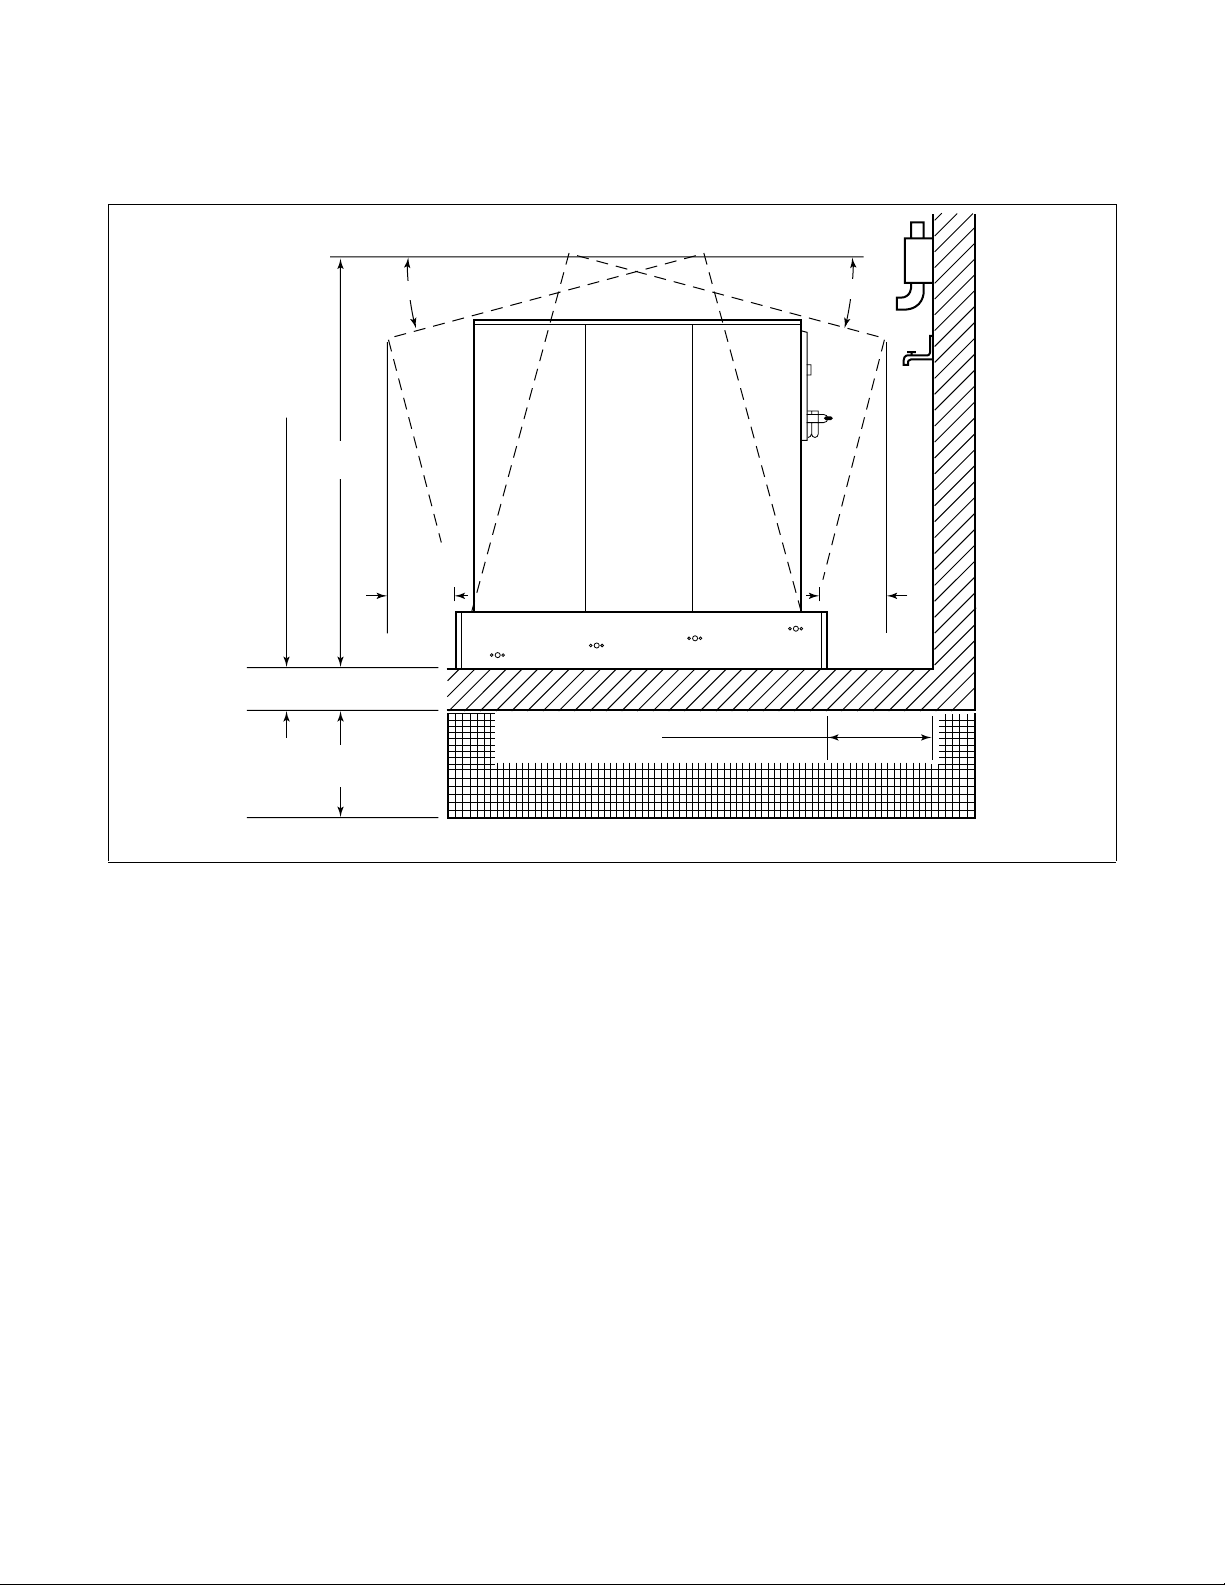
250 Pound Capacity Models with Forward and Two-Way Tilt Option
2622 mm
(103 1/4")
Floor Thickness
152 mm (6") Minimum
475 mm (18")
Compacted fill dirt
13°
330 mm
(13")
914 mm (36") Recommended
762 mm (30") Allowable
13°
330 mm
(13")
CFS219N
Figure 7
20
© Copyright, Alliance Laundry Systems LLC – DO NOT COPY or TRANSMIT
F232148 (EN)
Page 23

Operation
Installation/Operation Supplement
V-Computer
1. Turn on main power source (circuit breaker).
2. Turn on the ON/OFF switch on the front panel to the ON position. Refer to Figure 9.
3. Push button and turn handle clockwise. Refer to Figure 8.
U001IE1B
U001IE1B
Figure 8
5. Load to capacity whenever possible. DO NOT OVERLOAD. Refer to Figure 10.
U003IE1A
U003IE1A
Figure 10
6. Close door and turn handle counterclockwise until button pops out. Refer to Figure 11.
4. Press and hold the DOOR UNLOCK button on the left side of the control panel while performing the above step. Refer to Figure 8 and Figure 9.
1
1 DOOR UNLOCK Button
2 ON/OFF Switch
Figure 9
2
CFS1N
U005IE1B
U005IE1B
Figure 11
F232148 (EN)
© Copyright, Alliance Laundry Systems LLC – DO NOT COPY or TRANSMIT
21
Page 24

Installation/Operation Supplement
7. Add liquid and/or powder supplies to supply dispenser. Refer to Figure 12.
a. Add detergent to container 1.
b. Add detergent or bleach to container 2.
c. Add softener to container 3.
NOTE: Liquid supplies may be injected directly into the supply dispenser by an external chemical supply dispenser. Refer to Installation and Programming manuals.
8. Press the START key. Refer to Figure 13.
3
1
2
1
CYCLE SELECTION
B159R
1 Up
2 Down
3 Start
4 Stop
3
4
B159R
Figure 13
10. When applicable, add bleach when the display
reads “bLCH”. Refer to Figure 14.
2
1 Detergent Container
2 Detergent or Bleach Container
3 Softener Container
Figure 12
9. Press the UP and DOWN keys to select wash cycle. Press the START key. Refer to Figure 13.
B163R
CYCLE SELECTION
B160R
Figure 14
NOTE: To stop a cycle at any time, press the STOP key.
NOTE: To display the temperature of the water while a cycle is running, press the UP key. To display the number of the cycle in progress, press the START key.
22
© Copyright, Alliance Laundry Systems LLC – DO NOT COPY or TRANSMIT
F232148 (EN)
Page 25

Installation/Operation Supplement
A
U
WE-6 Computer
1. Turn on main power source (circuit breaker).
2. Use left hand to press and hold the door unlock button on top of the door box cover. Use right hand to turn door handle counterclockwise and open door. Refer to Figure 15.
U153R
Figure 15
3. Load to capacity whenever possible. DO NOT OVERLOAD. Refer to Figure 16.
U153R
NOTE: For models with tilt, refer to “Loading Using Tilt Option” at the end of this section.
4. Close door and turn handle clockwise until it locks.
5. Add powder supplies to supply dispenser.
NOTE: Liquid supplies may be injected directly into the supply dispenser by an external chemical supply dispenser. Refer to Installation and Programming manuals.
6. Select wash cycle from cycle charts located in the Programming section of the Programming Manual.
7. Enter the cycle number, 01-39, on the keypad. Refer to Figure 17.
Output Indicators
Supply 1
Supply 2
Supply 3
Supply 4
Supply 5
Cold Fill
Hot Fill
Spare
Spare
Signal
Heat
Forward
Reverse
Dist. Speed
Med. Speed
High Speed
Unlock Door
Drain Closed
Auxiliary 1
Auxiliary 2
F232148 (EN)
8. Press the START key. Refer to Figure 17.
9. When cycle is complete and the display reads “DONE”, open door by pressing and holding the door unlock button.
U003IE1
U003IE1A
Figure 16
© Copyright, Alliance Laundry Systems LLC – DO NOT COPY or TRANSMIT
10. Unload.
U152R
Figure 17
23
Page 26

Installation/Operation Supplement
Loading Using Tilt Option
Two-Way Tilt Machines
1. Open loading door and secure it to the door latch on the right side of the machine.
2. Turn the selector on the pendant switch left to the REVERSE position. Refer to Figure 18.
1
ENABLE
FORWARD
REVERSE
Forward Tilt Machines
1. Open loading door and secure it to the door latch on the right side of the machine.
2. Check that selector on the pendant switch is in the CENTER position. If machine is in the FORWARD position, turn the selector to the CENTER position. While holding down the ENABLE button, press the REVERSE button to center the machine.
3. Load the machine.
4. Unlatch and close loading door.
Unloading Using Tilt Option
Forward and Two-Way Tilt Machines
1. Open loading door and secure it to the door latch on the right side of the machine.
2. Turn the selector on the pendant switch right to the FORWARD position. Refer to Figure 18.
3. While holding down the ENABLE button, press the FORWARD button to tilt forward.
U150R3
U150R
1 Selector Dial
Figure 18
3. While holding down the ENABLE button, press the REVERSE button to tilt backward.
4. Load the machine.
5. Turn the selector back to the CENTER position to lower the machine.
6. Unlatch and close loading door.
4. Unload the machine.
5. Turn the selector back to the CENTER position to lower the machine.
6. Unlatch and close loading door.
24
© Copyright, Alliance Laundry Systems LLC – DO NOT COPY or TRANSMIT
F232148 (EN)
Page 27

Disposal of Unit
This appliance is marked according to the European
directive 2002/96/EC on Waste Electrical and
Electronic Equipment (WEEE).
This symbol on the product or on its packaging
indicates that this product shall not be treated as
household waste. Refer to Figure 19. Instead it shall be
handed over to the applicable collection point for the
recycling of electrical and electronic equipment.
Ensuring this product is disposed of correctly will help
prevent potential negative consequences for the
environment and human health which could otherwise
be caused by inappropriate waste handling of this
product. The recycling of materials will help to
conserve natural resources. For more detailed
information about recycling of this product, please
contact the local city office, household waste disposal
service, or the source from which the product was
purchased.
Installation/Operation Supplement
MIX1N
Figure 19
F232148 (EN)
© Copyright, Alliance Laundry Systems LLC – DO NOT COPY or TRANSMIT
25
Page 28

 Loading...