

Page 1
Drying Tumblers
50 Pound Capacity
Refer to Page 5 for Model Numbers
Service
www.comlaundry.com
T012C
T012c
Part No. M411429R1
July 2002
Page 2

Table of Contents
Section 1 –Safety Information
Locating An Authorized Service Person..................4
Section 2 –Introduction
Model Identification.................................................5
Customer Service.....................................................6
Serial Plate Location................................................6
Safety Warnings and Decals....................................7
Safety Precautions for Servicing Tumblers .............7
How A Tumbler Works ...........................................8
Section 3 –Troubleshooting
1. Motor Does Not Start.......................................11
2. Motor Overload Protector Cycles Repeatedly.12
3. Motor Runs But Cylinder Does Not Turn. ......12
4. Motor Does Not Stop.......................................12
5. Heating Element Does Not Heat or Burner
Does Not Ignite13
6. Pilot Does Not Ignite — Gas Models
(Standing Pilot Ignition) ..................................15
7. Pilot Goes Out — Gas Models
(Standing Pilot Ignition) ..................................15
8. Igniter Does Not Shut Off After Gas Ignition
— Gas Burner (Automatic Pilot Ignition) .......16
9. Igniter Does Not Glow (Gas Supply Sufficient)
— Gas Models (Glow-bar Ignition).................16
10. Igniter Glows, Sensor Opens But No Ignition
— Gas Models .................................................17
11. Igniter Glows, Sensor Opens But No Ignition
— Gas Models .................................................17
12. Burner Ignites and Goes Out Repeatedly
— Gas Models .................................................18
13. Heating Element or Burner Shuts-off
Prematurely......................................................18
14. Heating Element or Burner Repeatedly Cycles
Off On High Limit Thermostat........................19
15. Heating Element or Burner Does Not
Shut-off ............................................................19
16. Clothes Do Not Dry.........................................19
17. Tumbler Overheating.......................................20
18. Burners Not Burning Properly — Gas Models20
19. Cylinder Door Opens During Operation..........20
20. Tumbler Runs But No Steam To Coils
— Steam Models..............................................21
21. Water In Steam Line — Steam Models...........21
22. Tumbler Will Not Start, Time on Drying
Timer, Door Closed .........................................22
23. Motor Runs, Time on Drying Timer
But No Heat .....................................................23
24. No Spark to Pilot Burner.................................24
25. Spark to Pilot Burner — No Pilot Flame.........25
26. Spark To Pilot Burner — Pilot Lights
— No Main Burner..........................................26
27. Igniter Does Not Glow.....................................27
28. Igniter Glows Constantly.................................27
29. Igniter Glows, Cycles Off But Burner
Does Not Ignite................................................27
30. Igniter Does Not Glow.....................................28
31. Igniter Glows Constantly.................................28
32. Igniter Glows, Cycles Off But Burner
Does Not Ignite................................................28
33. Igniter Sparks — No Main Burner Ignition.....29
34. CSH OM Models: No Heat with cycle selected,
unit running and calling for heat......................30
35. OM Models: No Start with cycle selected, start
button pressed and door closed........................31
36. OM Models: No Display after selecting one of
the ON/SELECT keys......................................32
37. CE OM Models: No Heat with cycle selected,
unit running and calling for heat......................33
38. CG OM Models: No Heat with cycle selected,
unit running and calling for heat......................34
39. OM Models: No fan motor rotation with cycle
selected and start pressed.................................36
40. MM Models: Fan Motor Does Not Run with
door closed, cycle selected and start button
pressed .............................................................37
41. MM Models: Cylinder motor does not run or
reverse with door closed, cycle selected and
start button pressed in reversing mode or
nonreversing mode...........................................38
42. MM Models: No Heat with cycle selected, unit
running and calling for heat.............................39
43. MM Models: No Heat with cycle selected, unit
running and calling for heat.............................40
44. OM Reversing Models: No cylinder rotation or
reversing capabilities .......................................41
45. MM Models: No display after pressing the ON/
Select keys .......................................................42
46. MM Models: Motor Does Not Run with
door closed, cycle selected and start button
pressed .............................................................42
© Copyright 2002, Alliance Laundry Systems LLC
All rights reserved. No part of the contents of this book may be reproduced or transmitted in any form or by any means without
the expressed written consent of the publisher.
M411429 1
© Copyright, Alliance Laundry Systems LLC – DO NOT COPY or TRANSMIT
Page 3

47. MM Models: Cylinder motor does not run or
reverse with door closed, cycle selected and start
button pressed in reversing mode or
nonreversing mode...........................................43
48. MM Nonreversing Models: Motor Does Not
Run with door closed, cycle selected and start
button pressed ..................................................44
49. CD Models: No start with vend satisfied and
start button pressed in ......................................45
50. CD Models: No Heat with vend satisfied
and unit running...............................................46
51. CD Models: No Heat with vend satisfied and
unit running......................................................47
52. CD Models: No start with vend satisfied and
start button pushed...........................................48
53. CD Models: No start with vend satisfied and
start button pushed...........................................49
Section 4 –Grounding
Grounding Instructions ..........................................51
Section 5 –Service Procedures
54. Control Panel ...................................................53
55. Push-to-Start Switch........................................53
56. Cooling, Drying, or Run Light ........................53
57. Relay (Manual Timers Models).......................55
58. Resistor ............................................................55
59. Cooling or Drying Timer.................................55
60. Cooling or Drying Timer Motor......................56
61. Coin Meter.......................................................57
62. Coin Meter Timer Motor .................................58
63. Coin Meter Run or Heat Switch ......................58
64. Control Thermostat..........................................59
65. Transformer .....................................................60
66. Gas Valve Assembly........................................62
67. Electronic Package...........................................64
68. Main or Pilot Operator.....................................64
69. Gas Valve.........................................................64
70. Operator ...........................................................64
71. Reset Assembly ...............................................64
72. Gas Valve.........................................................66
73. Magnetic Operators .........................................66
74. Gas Valve.........................................................66
75. Diode Logic Board ..........................................66
76. Main Coil.........................................................67
77. Igniter and Bracket ..........................................67
78. Sensor ..............................................................67
79. Igniter...............................................................67
80. Ignition Control ...............................................67
81. Gas Valve.........................................................67
82. Main Coil.........................................................68
83. Burner Tube.....................................................68
84. Contactors and Terminal Block.......................68
85. Heater Element ................................................69
86. Stove High Limit Thermostat..........................70
87. Cabinet High Limit Thermostat.......................71
88. High Limit Thermostat....................................72
89. Steam Coils......................................................73
90. Loading Door Assembly..................................73
91. Loading Door Hinge........................................74
92. Loading Door Handle......................................74
93. Front Panel.......................................................74
94. Loading Door Switch.......................................76
95. Loading Door Switch Rod...............................76
96. Airflow Switch ................................................77
97. Wire Cover or Wire Channel Cover Plate.......78
98. Drive Guard .....................................................78
99. Drive Belt ........................................................78
100. Drive Chain......................................................79
101. Idler Housing Assembly..................................79
102. Idler Sprocket...................................................80
103. Sheave..............................................................80
104. Drive Sprocket.................................................81
105. Idler Shaft ........................................................81
106. Cylinder Sprocket............................................81
107. Cylinder Assembly ..........................................82
108. Trunnion Housing Assembly...........................83
109. Trunnion Shaft Assembly................................84
110. Motor and Fan Assembly ................................85
111. Fan And Motor Assembly ...............................86
112. Cylinder Drive Motor ......................................88
113. Reversing Control Electrical Components......90
Section 6 –Adjustments
114. Leveling Legs ..................................................93
115. Main Gas Burner Air Inlet Shutters.................94
116. Airflow Switch ................................................95
117. Loading Door Switch.......................................97
118. Cylinder Door Strike .......................................97
119. Drive Belt Tension...........................................98
120. Drive Chain Tension......................................101
121. Cylinder Clearance ........................................103
2 M411429
© Copyright, Alliance Laundry Systems LLC – DO NOT COPY or TRANSMIT
Page 4
Section 1
Safety Information
Throughout this manual and on machine decals, you
will find precautionary statements (“CAUTION”,
“WA RN I NG ”, and “DANGER”) followed by specific
instructions. These precautions are intended for the
personal safety of the operator, user, servicer, and those
maintaining the machine.
DANGER
DANGER indicates the presence of a
hazard that will cause severe personal
injury, death, or substantial property
damage if the danger is ignored.
WARNING
WARNING indicates the presence of a
hazard that can cause severe personal
injury, death, or substantial property
damage if the warning is ignored.
In the interest of safety, some general precautions
relating to the operation of this machine follow.
WARNING
• Failure to install, maintain and/or operate
this product according to the
manufacturer’s instructions may result in
conditions which can produce serious
injury, death and/or property damage.
• Do not repair or replace any part of the
product or attempt any servicing unless
specifically recommended or published in
this Service Manual and that you
understand and have the skills to carry
out.
• Whenever ground wires are removed
during servicing, these ground wires
must be reconnected to ensure that the
product is properly grounded and to
reduce the risk of fire, electric shock,
serious injury or death.
W006R1
CAUTION
CAUTION indicates the presence of a
hazard that will or can cause minor
personal injury or property damage if the
caution is ignored.
Additional precautionary statements (“IMPORTANT”
and “NOTE”) are followed by specific instructions.
IMPORTANT: The word “IMPORTANT” is used
to inform the reader of specific procedures where
minor machine damage will occur if the procedure
is not followed.
NOTE: The word “NOTE” is used to communicate
installation, operation, maintenance or servicing
information that is important but not hazard
related.
M411429 3
© Copyright, Alliance Laundry Systems LLC – DO NOT COPY or TRANSMIT
Page 5
Section 1 Safety Information
IMPORTANT INFORMATION: During the
lifetime of a tumbler, it may require service. The
information contained in this manual was written
and is intended for use by qualified service
technicians who are familiar with the safety
procedures required in the repair of a tumbler, and
who are equipped with the proper tools and testing
equipment.
WARNING
To reduce the risk of electric shock, fire,
explosion, serious injury or death:
• Disconnect electric power to the tumbler
before servicing.
• Never start the tumbler with any guards/
panels removed.
• Whenever ground wires are removed
during servicing, these ground wires
must be reconnected to ensure that the
tumbler is properly grounded.
W240
WARNING
NOTE: The WARNING and IMPORTANT
instructions appearing in this manual are not meant
to cover all possible conditions and situations that
may occur. It must be understood that common
sense, caution and carefulness are factors which
CANNOT be built into this tumbler. These factors
MUST BE supplied by the person(s) installing,
maintaining or operating the tumbler.
Always contact your dealer, distributor, service agent
or the manufacturer on any problems or conditions you
do not understand.
Locating An Authorized Service
Person
Alliance Laundry Systems is not responsible for
personal injury or property damage resulting from
improper service. Review all service information
before beginning repairs.
Warranty service must be performed by an
authorized technician, using authorized factory
parts. If service is required after the warranty
expires, Alliance Laundry Systems also
recommends contacting an authorized technician
and using authorized factory parts.
Repairs that are made to your products by
unqualified persons can result in hazards
due to improper assembly or adjustments
subjecting you, or the inexperienced
person making such repairs, to the risk of
serious injury, electrical shock or death.
W007
CAUTION
If you or an unqualified person perform
service on your product, you must assume
the responsibility for any personal injury or
property damage which may result. The
manufacturer will not be responsible for
any injury or property damage arising from
improper service and/or service
procedures.
W008
4 M411429
© Copyright, Alliance Laundry Systems LLC – DO NOT COPY or TRANSMIT
Page 6

Section 2
Introduction
Model Identification
Information in this manual is applicable to these models:
Gas Steam/Thermal Oil Electric
DCB50CG
DCB50EG
DTB50CG
DTB50EG
JC50CG
JC50EG
JCB50CG
JCB50EG
JT37CG
JT37CGI
JT37EG
JT37EGI
JT50CG
JT50CGI
JT50EG
JT50EGI
JTB50CG
JTB50EG
SC50CG
SC50EG
SCB50CG
SCB50EG
ST37CG
ST37CGI
ST37EG
ST37EGI
ST50CGI
ST50EGI
STB50CG
STB50EG
TKD50CGMT
DCB50CSH
DTB50CSH
DTB50CSL
JC50CSH
JCB50CSH
JT37CSH
JT37CSL
JT50CSH
JT50CSL
JTB50CSH
JTB50CSL
SC50CSH
SCB50CSH
ST37CSH
ST37CSL
ST50CSH
ST50CSL
STB50CSH
STB50CSL
DCB50CE
DTB50CE
JC50CE
JCB50CE
JT37CE
JT50CE
JTB50CE
SC50CE
SCB50CE
ST37CE
ST50CE
STB50CE
TKD50CEMT
M411429 5
© Copyright, Alliance Laundry Systems LLC – DO NOT COPY or TRANSMIT
Page 7
Section 2 Introduction
Customer Service
If literature or replacement parts are required, contact
the source from whom the machine was purchased or
contact Alliance Laundry Systems at (920) 748-3950
for the name and address of the nearest authorized
parts distributor.
For technical assistance, call (920) 748-3121.
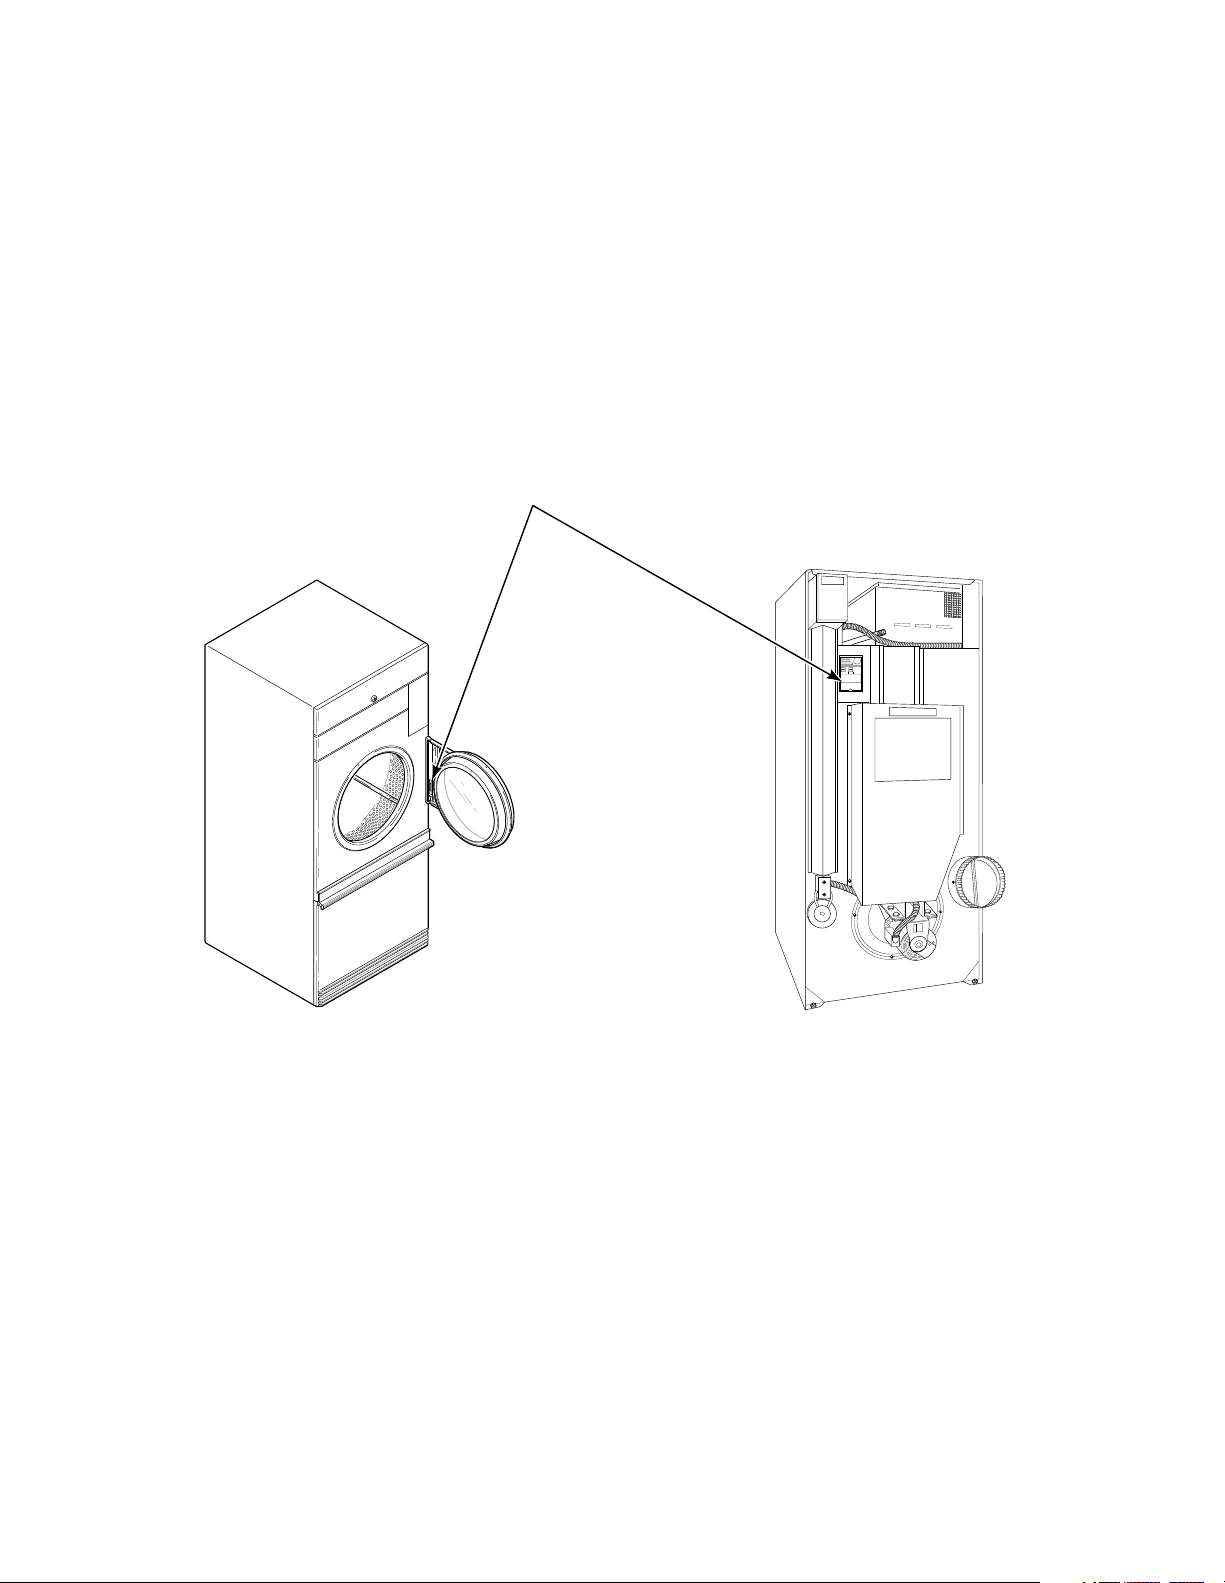
Serial Plate Location
When calling or writing about your product, be sure to
mention model and serial numbers. Model and serial
numbers are located on serial plate(s) as shown.
T419IE3B
6 M411429
© Copyright, Alliance Laundry Systems LLC – DO NOT COPY or TRANSMIT
Page 8

Safety Warnings and Decals
SAFETY WARNINGS and decals have been provided
in key locations to remind you of important precautions
for the safe operation and maintenance of your tumbler.
Please take the time to review these warnings before
proceeding with service work.
All decals have been designed and applied to withstand
washing and cleaning. Decals should be checked
periodically to be sure they have not been damaged,
removed, or painted. Refer to Parts Manual for
ordering replacement decals.
Safety Precautions for Servicing Tumblers
• Disconnect electrical service.
• Shut off supply gas valve before servicing gas
components.
• Control panel and access panel MUST be
reinstalled after inspection or servicing of
tumbler is completed.
Section 2 Introduction
• Use a non-corrosive leak detection fluid to check
all pipe connections for gas leaks. DO NOT USE
AN OPEN FLAME TO CHECK FOR GAS
LEAKS!
• Chain/drive guard MUST be reinstalled after
inspection or servicing of tumbler is completed.
• Belt guard MUST be reinstalled after inspection
or servicing of tumbler is completed.
• Contactor box cover MUST be reinstalled after
inspection or servicing of electric and/or reversing
tumbler is completed.
• Loading door switch MUST be operational before
putting tumbler into service.
• Junction box cover MUST be reinstalled after
inspection or servicing of tumbler is completed.
M411429 7
© Copyright, Alliance Laundry Systems LLC – DO NOT COPY or TRANSMIT
Page 9
Section 2 Introduction
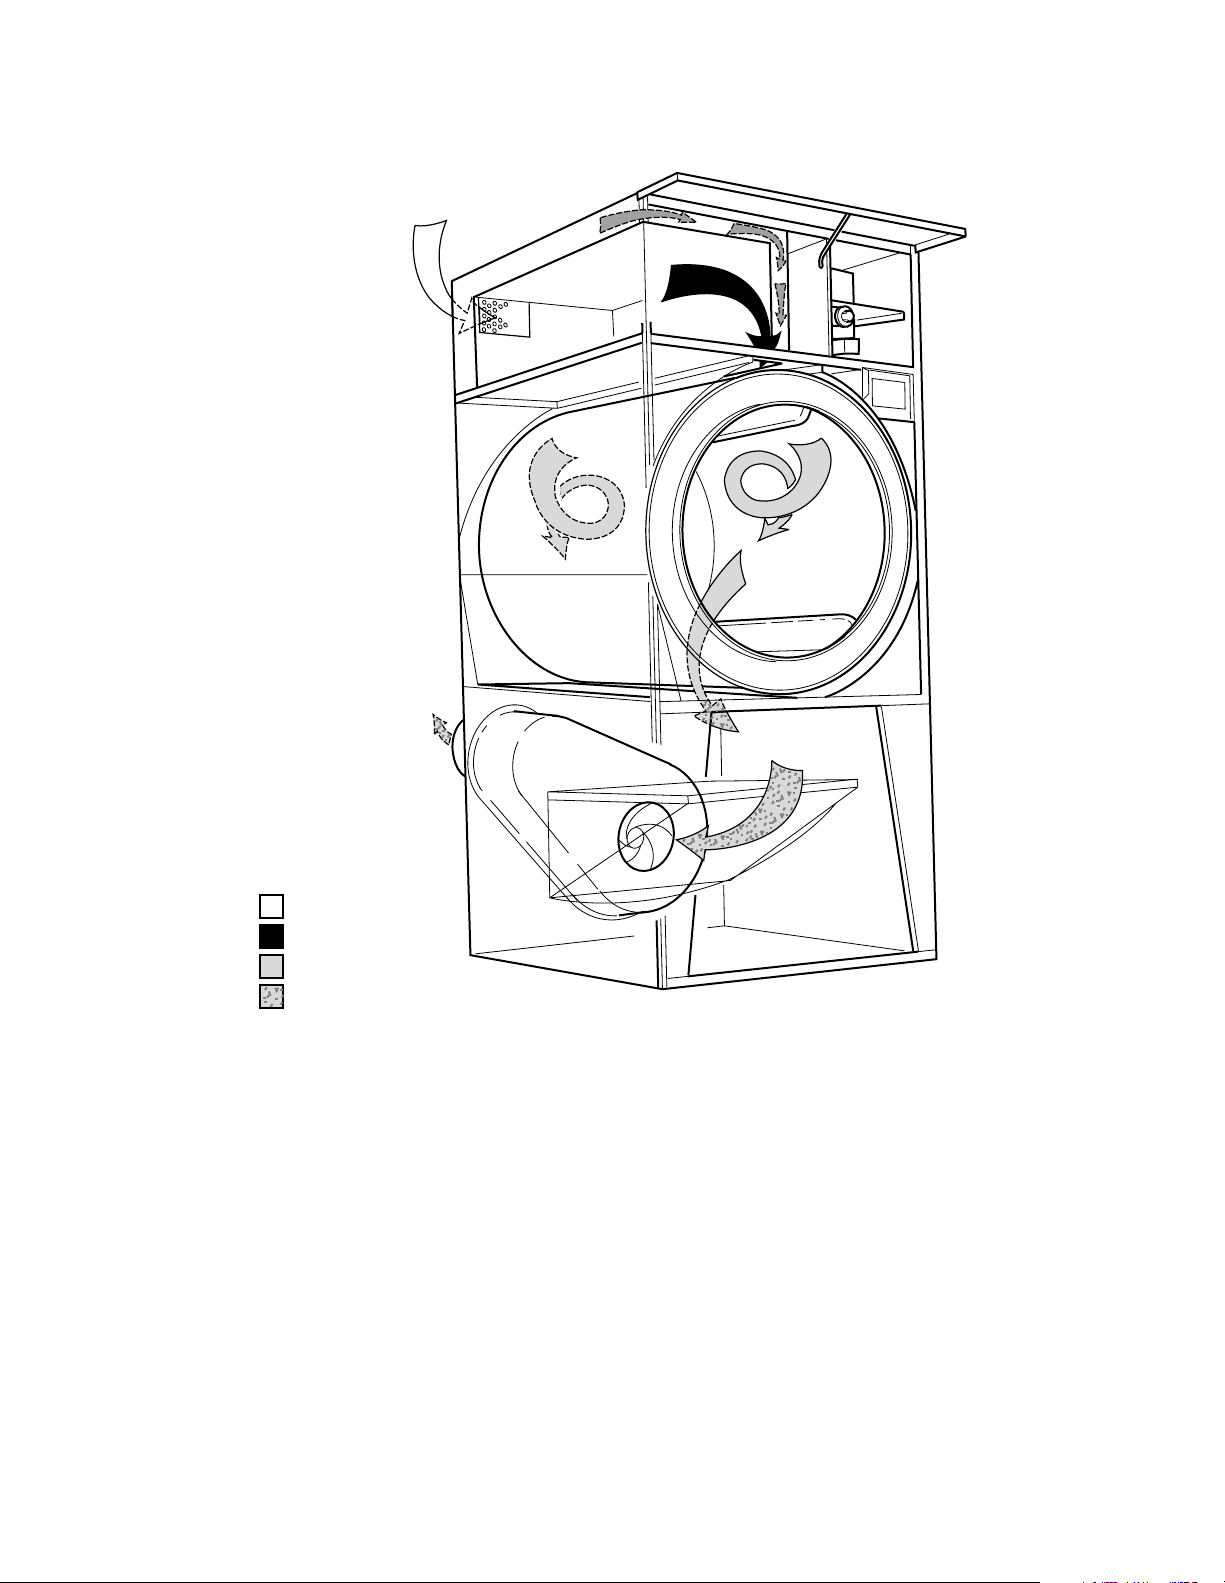
How A Tumbler Works
Fresh Air
Combustion Air
Mixed Air
T008CE1A
Exhaust Air
Standard Models
The tumbler uses heat, air and movement to dry loads of laundry.
When the motor is started, the exhaust fan pulls fresh air in through the air intake and over the heat source
(burner flame for gas, heating element for electric, and coil for steam).
The heated air moves into the cylinder, where it is circulated through the laundry by the tumbling action
of the cylinder.
The air then passes through the lint filter, exhaust fan, and is vented to the outdoors.
NOTE: In Energy Saver Models, some of the exhaust air is recirculated. Refer to page 9.
8 M411429
© Copyright, Alliance Laundry Systems LLC – DO NOT COPY or TRANSMIT
Page 10
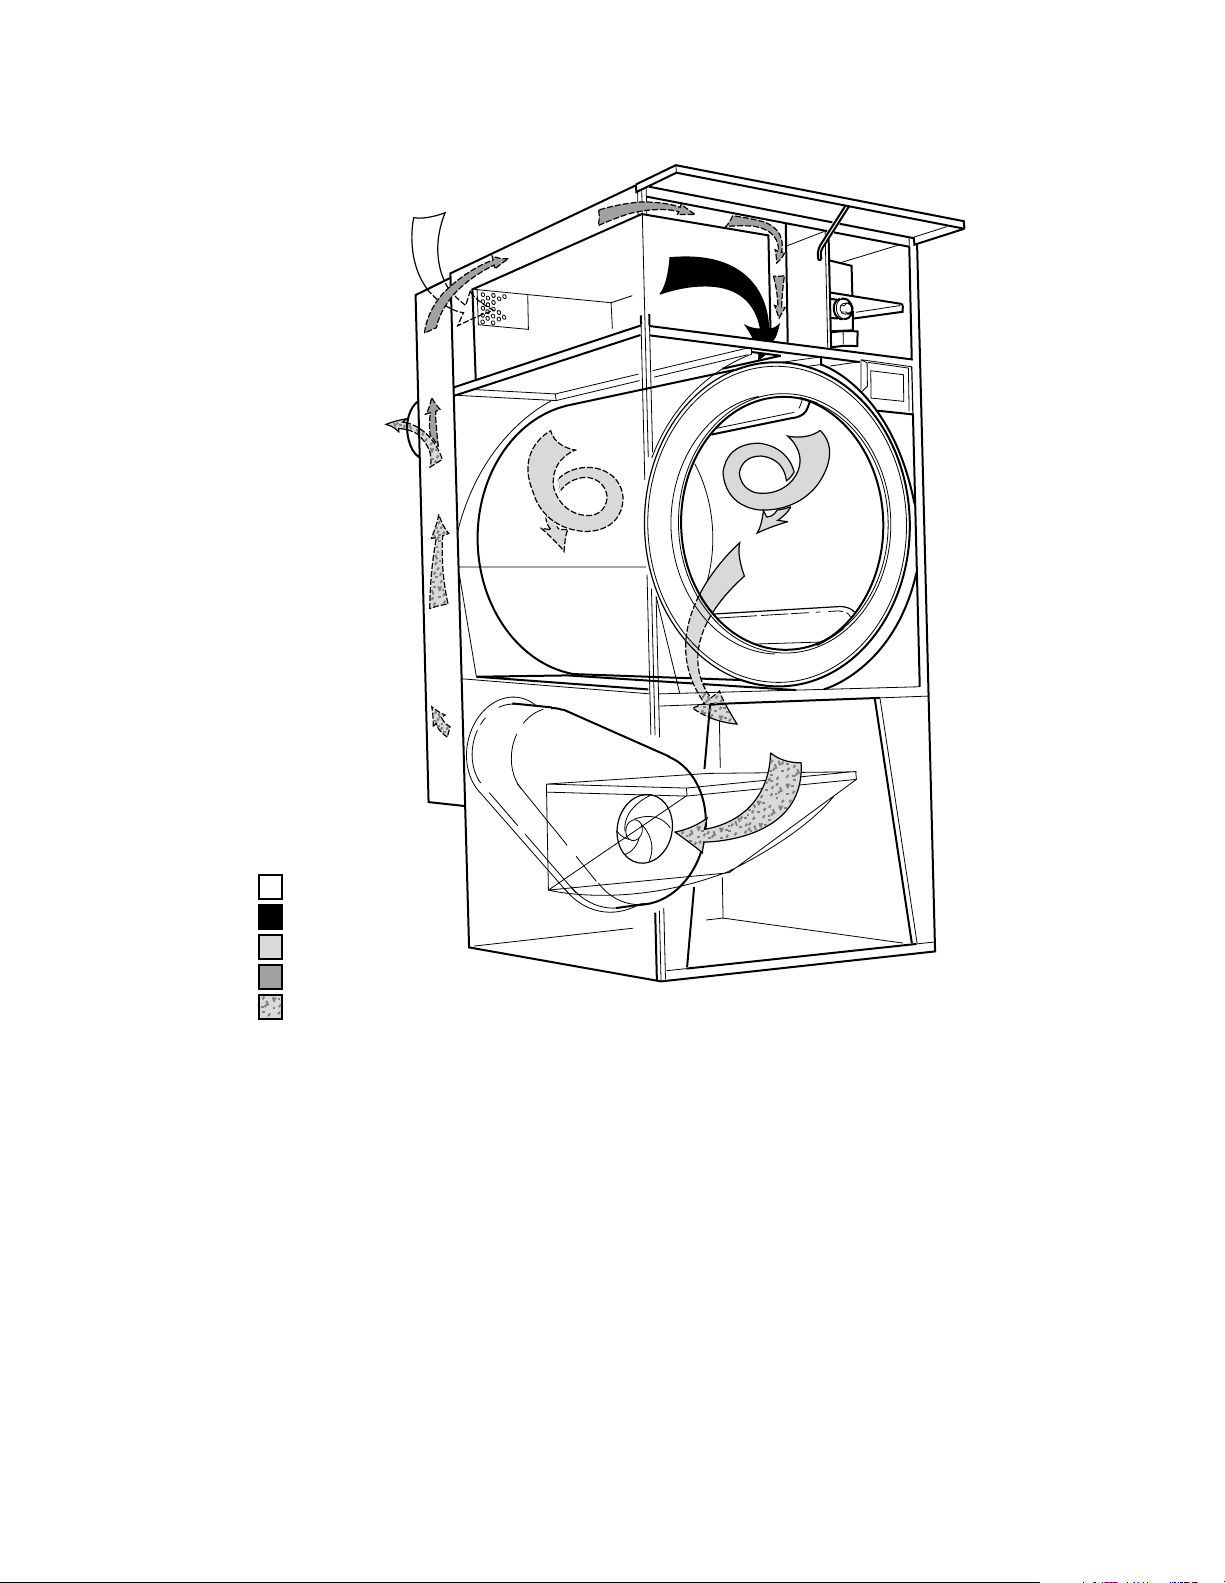
Section 2 Introduction
Fresh Air
Combustion Air
Mixed Air
Recirculating Air
Exhaust Air
T007CE1A
Energy Saver Models
M411429 9
© Copyright, Alliance Laundry Systems LLC – DO NOT COPY or TRANSMIT
Page 11
Section 3
Troubleshooting
WARNING
To reduce the risk of electric shock, fire, explosion, serious injury or death:
• Disconnect electric power to the tumbler before servicing.
• Close gas shut-off valve to gas tumbler before servicing.
• Close steam valve to steam tumbler before servicing.
• Never start the tumbler with any guards/panels removed.
• Whenever ground wires are removed during servicing, these ground wires must be
reconnected to ensure that the tumbler is properly grounded.
IMPORTANT: Refer to appropriate wiring diagram for aid in testing tumbler components.
1. MOTOR DOES NOT START
POSSIBLE CAUSE TO CORRECT
Electrical power off or fuses blown. • Check power and fuses, replace fuses if necessary
Loading door not closed or inoperative door switch. • Close door, or test switch and replace if inoperative.
Door switch improperly adjusted. • Refer to Adjustment Section in this manual for door
switch adjustment.
Trunnion shaft assembly binding in
trunnion housing bearings.
Start circuit not completed. • Press start switch, or test switch and replace if
Idler shaft binding in idler housing bearings. • Replace bearings.
Inoperative motor. • Have motor tested and replace if inoperative.
Non-Metered Models: Timer improperly set. • Turn drying timer clockwise to desired setting.
Non-Metered Models: Inoperative timer or relay. • Test timer and relay and replace if inoperative.
Metered Models: Improper coins inserted in
accumulator.
Metered Models: Accumulator knob improperly
set after coins were inserted.
Metered Models: Inoperative run switch
(accumulator).
Broken, loose, or incorrect wiring. • Refer to wiring diagram located on back of tumbler or in
• Replace trunnion housing bearings.
inoperative.
• Check that proper coins are inserted.
• Turn knob clockwise to its full limit of travel.
• Test run switch and replace if inoperative.
literature packet.
W002
M411429 11
© Copyright, Alliance Laundry Systems LLC – DO NOT COPY or TRANSMIT
Page 12
Section 3 Troubleshooting
WARNING
To reduce the risk of electric shock, fire, explosion, serious injury or death:
• Disconnect electric power to the tumbler before servicing.
• Close gas shut-off valve to gas tumbler before servicing.
• Close steam valve to steam tumbler before servicing.
• Never start the tumbler with any guards/panels removed.
• Whenever ground wires are removed during servicing, these ground wires must be
reconnected to ensure that the tumbler is properly grounded.
2. MOTOR OVERLOAD PROTECTOR CYCLES REPEATEDLY
POSSIBLE CAUSE TO CORRECT
Incorrect voltage. • Refer to the Installation Manual (supplied with tumbler)
for electrical requirements.
Clothes load too large. • Remove part of load.
Clothes cylinder is binding. • Check cylinder for binding. Refer to Adjustment Section
for cylinder adjustment.
Inadequate wiring. • Check with an electrician to ensure that wiring is
adequate.
Inadequate make-up air. • Refer to Installation Manual (supplied with tumbler) for
make-up air requirements.
Poor housekeeping. • Clean lint accumulation on and around the motor.
Broken, loose, or incorrect wiring. • Refer to wiring diagram located on back of tumbler or in
literature packet.
W002
3. MOTOR RUNS BUT CYLINDER DOES NOT TURN.
POSSIBLE CAUSE TO CORRECT
Motor drive pulley loose. • Tighten setscrews.
Sheave loose. • Tighten setscrews.
Broken or loose belt. • Replace or adjust belt.
Broken or loose drive chain or sprocket. • Replace or adjust chain or sprocket.
Cylinder is binding. • Check cylinder for binding. Refer to Adjustment Section
for proper cylinder adjustment.
4. MOTOR DOES NOT STOP
POSSIBLE CAUSE TO CORRECT
Inoperative door switch or switch is out-ofadjustment.
• Test switch and replace if inoperative. Refer to
Adjustment Section for proper switch adjustment.
Non-Metered Models: Inoperative timer or relay. • Test timer and relay and replace if inoperative.
Metered Models: Inoperative accumulator. • Test accumulator and replace if inoperative.
Incorrect wiring. • Refer to wiring diagram located on back of tumbler or in
literature packet.
12 M411429
© Copyright, Alliance Laundry Systems LLC – DO NOT COPY or TRANSMIT
Page 13
Section 3 Troubleshooting
WARNING
To reduce the risk of electric shock, fire, explosion, serious injury or death:
• Disconnect electric power to the tumbler before servicing.
• Close gas shut-off valve to gas tumbler before servicing.
• Close steam valve to steam tumbler before servicing.
• Never start the tumbler with any guards/panels removed.
• Whenever ground wires are removed during servicing, these ground wires must be
reconnected to ensure that the tumbler is properly grounded.
5. HEATING ELEMENT DOES NOT HEAT OR BURNER DOES NOT IGNITE
POSSIBLE CAUSE TO CORRECT
Improper or inadequate exhaust system. • Refer to the Installation Manual (Supplied with tumbler)
for exhaust system requirements.
Blown fuses or tripped circuit breakers. • Check fuses or circuit breakers.
Drying timer not selected or inoperative. • Set drying timer or replace if necessary.
Inoperative control relay. • Test relay and replace if inoperative.
Inoperative thermostat. • Test thermostat and replace if inoperative.
Electric Models:
• Check heat contactors and elements. Replace if necessary.
Inoperative heating elements or contactors.
Gas Models:
Insufficient gas supply.
• Open partially closed gas shut-off valve, or correct low
gas pressure. Check inlet pressure and compare to
pressure specified on serial plate. If pressure cannot be
obtained, contact gas supplier.
Gas Models:
Incorrect orifices.
• Tumbler is equipped for type of gas specified on serial
plate. If orifices are different from that specified on serial
plate, obtain and install proper orifices.
Gas Models: (Standing Pilot Ignition)
Pilot is not lit.
• Refer to Installation Manual (supplied with tumbler) or
INSTRUCTION plate on back of tumbler for LIGHTING
AND SHUTTING DOWN STANDING PILOT.
Gas Models: (Standing Pilot Ignition)
Inoperative gas valve reset assembly or
• Check and replace thermocouple or reset assembly if
necessary.
thermocouple.
Gas Models:
• Test coils and replace if inoperative.
Inoperative gas valve coils.
Gas Models: (Automatic Ignition)
• Test igniter and replace if inoperative.
Inoperative igniter.
Gas Models: (Automatic Ignition)
• Test igniter control and replace if inoperative.
Inoperative igniter control.
W002
(continued on next page)
M411429 13
© Copyright, Alliance Laundry Systems LLC – DO NOT COPY or TRANSMIT
Page 14
Section 3 Troubleshooting
WARNING
To reduce the risk of electric shock, fire, explosion, serious injury or death:
• Disconnect electric power to the tumbler before servicing.
• Close gas shut-off valve to gas tumbler before servicing.
• Close steam valve to steam tumbler before servicing.
• Never start the tumbler with any guards/panels removed.
• Whenever ground wires are removed during servicing, these ground wires must be
reconnected to ensure that the tumbler is properly grounded.
5. HEATING ELEMENT DOES NOT HEAT OR BURNER DOES NOT IGNITE (continued)
POSSIBLE CAUSE TO CORRECT
Gas Models: (Glow Bar Ignition)
• Test igniter and replace if inoperative.
Inoperative igniter
Gas Models: (Glow Bar Ignition)
• Test sensor and replace if inoperative.
Inoperative sensor.
Gas and Electric Models:
• Test thermostat and replace if inoperative.
Inoperative high limit thermostat.
Gas and Electric Models:
Inoperative airflow switch
• Clean lint compartment after every eight hour shift.
• Check back draft damper for foreign objects, lint
accumulation, or other causes that may prevent damper
from opening.
• Check ductwork for lint build-up. Refer to Installation
Manual (supplied with tumbler) to ensure that ductwork
and make-up air openings are sized properly.
• Check exhaust outlet. If a screen has been improperly
installed on the outlet, it may be clogged with lint or
frozen over in winter. NEVER install a screen over the
exhaust outlet.
Gas and Electric Models:
Airflow switch out of adjustment.
• Refer to Adjustment Section for airflow switch
adjustment.
Lint door panel not closed properly. • Open lint door panel, place lint door panel back on
tumbler (ensuring a tight fit) then latch.
Broken, loose, or incorrect wiring. • Refer to wiring diagram located on back of tumbler or in
literature packet.
W002
14 M411429
© Copyright, Alliance Laundry Systems LLC – DO NOT COPY or TRANSMIT
Page 15

Section 3 Troubleshooting
WARNING
To reduce the risk of electric shock, fire, explosion, serious injury or death:
• Disconnect electric power to the tumbler before servicing.
• Close gas shut-off valve to gas tumbler before servicing.
• Close steam valve to steam tumbler before servicing.
• Never start the tumbler with any guards/panels removed.
• Whenever ground wires are removed during servicing, these ground wires must be
reconnected to ensure that the tumbler is properly grounded.
6. PILOT DOES NOT IGNITE — GAS MODELS (STANDING PILOT IGNITION)
POSSIBLE CAUSE TO CORRECT
Gas shut-off valve to tumbler is closed. • Open valve.
Air is present in gas line. • Purge air from gas line.
Incorrect pilot orifice. • Tumbler is equipped for type of gas specified on serial
plate. If pilot orifice is different from that specified on
serial plate, obtain and install correct orifice.
Clogged pilot gas filter. • Replace reset assembly.
Clogged pilot gas tube or pilot orifice. • Clean or replace tube or orifice.
Inoperative thermocouple. • Replace thermocouple.
Inoperative pilot assembly. • Replace pilot assembly.
W002
7. PILOT GOES OUT — GAS MODELS (STANDING PILOT IGNITION)
POSSIBLE CAUSE TO CORRECT
Improper or inadequate exhaust system. • Refer to Installation Manual (supplied with tumbler) for
exhaust system requirements.
Clogged lint screen. • Remove and clean lint screen.
Improperly adjusted burner flame. • Close air shutter slightly — A harsh roaring flame will
draw pilot flame out.
Carbon accumulation on heated end of pilot
• Wipe carbon off end of thermocouple.
thermocouple.
Incorrect pilot orifice. • Tumbler is equipped for type of gas specified on serial
plate. If pilot orifice is different from that specified on
serial plate, obtain and install correct orifice.
Inoperative gas valve reset assembly or
thermocouple.
• Check and replace reset assembly or thermocouple if
necessary.
M411429 15
© Copyright, Alliance Laundry Systems LLC – DO NOT COPY or TRANSMIT
Page 16
Section 3 Troubleshooting
WARNING
To reduce the risk of electric shock, fire, explosion, serious injury or death:
• Disconnect electric power to the tumbler before servicing.
• Close gas shut-off valve to gas tumbler before servicing.
• Close steam valve to steam tumbler before servicing.
• Never start the tumbler with any guards/panels removed.
• Whenever ground wires are removed during servicing, these ground wires must be
reconnected to ensure that the tumbler is properly grounded.
8. IGNITER DOES NOT SHUT OFF AFTER GAS IGNITION — GAS BURNER (AUTOMATIC PILOT
IGNITION)
POSSIBLE CAUSE TO CORRECT
Tumbler not properly equipped for type of gas
being used.
• Tumbler is equipped for type of gas specified on serial
plate. If tumbler is equipped for gas different from that
specified on serial plate, obtain the necessary components
to correct the problem.
Insufficient gas supply. • Open partially closed gas shut-off valve, or correct low
gas pressure.
Improperly adjusted burner flame. • Refer to Adjustment Section for recommended burner
flame adjustment.
Pilot and electrode assembly incorrectly installed. • Check assembly for correct alignment.
Inoperative igniter control. • Test igniter control and replace if inoperative.
Incorrect wiring. • Refer to wiring diagram located on back of tumbler or in
literature packet.
W002
9. IGNITER DOES NOT GLOW (GAS SUPPLY SUFFICIENT) — GAS MODELS (GLOW-BAR
IGNITION)
POSSIBLE CAUSE TO CORRECT
Sensor failed with contacts open. • Replace sensor.
Igniter is broken or open. • Replace glow bar igniter.
No circuit for burner operation. • Tumbler is not calling for heat, check the heat circuit to
the ignition system.
16 M411429
© Copyright, Alliance Laundry Systems LLC – DO NOT COPY or TRANSMIT
Page 17
Section 3 Troubleshooting
WARNING
To reduce the risk of electric shock, fire, explosion, serious injury or death:
• Disconnect electric power to the tumbler before servicing.
• Close gas shut-off valve to gas tumbler before servicing.
• Close steam valve to steam tumbler before servicing.
• Never start the tumbler with any guards/panels removed.
• Whenever ground wires are removed during servicing, these ground wires must be
reconnected to ensure that the tumbler is properly grounded.
10. IGNITER GLOWS, SENSOR OPENS BUT NO IGNITION — GAS MODELS
(Johnson Controls System)
POSSIBLE CAUSE TO CORRECT
Insufficient gas supply. • Check gas supply and pressure.
Gas flow but no ignition. • Remove igniter and bracket and bend “L” shaped bracket
(located on left side of stove) up or down. Reinstall igniter
and bracket and check for 1/8 – 1/4 inch gap between
bottom of igniter and top of main burner.
No gas flow through gas valve. • Check primary valve coil and plunger. Replace coil if
inoperative, or check for 120 Volts to control relay (PR1)
coil contacts (A) and 120 Volts to control relay (PR1)
contact number 7. If no voltage replace control relay
(PR1) or check secondary valve coil and plunger
operation replace coil if inoperative.
W002
NOTE: To check the primary and secondary valve coil and plunger operation, place fingers on top of coils,
cycle the machine and restart ignition circuit, you should feel the primary valve coil plunger open first,
followed by glow bar heat up, followed by the sensor opening, and the secondary valve coil plunger opening.
If plungers do not open, electrically check the coils. Check gas pressure to tumbler. Line pressure should be
7 ± 1/2 inches (Natural Gas) or 11 inches (L.P. Gas) water column pressure. Manifold pressure should be 3.5
inches (Natural Gas) or 11 inches (L.P. Gas) water column pressure.
11. IGNITER GLOWS, SENSOR OPENS BUT NO IGNITION — GAS MODELS
(White Rodgers Glow-bar Ignition)
POSSIBLE CAUSE TO CORRECT
Insufficient gas supply. • Is manual shut-off valve in full open position? Check gas
pressure.
Gas flow but no ignition. • Gap between igniter and burner must be 1/8 to 1/4 inch.
No gas flow through gas valve. • Check for 80 – 120 Volts between red and white wire on
gas valve.
• If correct voltage is present and redundant coil does not
click open, replace complete gas valve.
• If correct voltage is not present, replace diode logic board.
• If correct voltage is present and redundant coil clicks
open, check for 40 – 60 Volts across the purple wires on
the main coil after the igniter cycles off.
• If voltage is present and main coil does not stay open,
replace main coil.
• If no voltage is present, replace diode logic board.
M411429 17
© Copyright, Alliance Laundry Systems LLC – DO NOT COPY or TRANSMIT
Page 18
Section 3 Troubleshooting
WARNING
To reduce the risk of electric shock, fire, explosion, serious injury or death:
• Disconnect electric power to the tumbler before servicing.
• Close gas shut-off valve to gas tumbler before servicing.
• Close steam valve to steam tumbler before servicing.
• Never start the tumbler with any guards/panels removed.
• Whenever ground wires are removed during servicing, these ground wires must be
reconnected to ensure that the tumbler is properly grounded.
12. BURNER IGNITES AND GOES OUT REPEATEDLY — GAS MODELS
(Glow-Bar Ignition)
POSSIBLE CAUSE TO CORRECT
Burner heat not holding sensor contacts open. • Replace sensor.
Insufficient gas pressure. • Check gas supply and pressure. A low flame will not
maintain radiation to sensor.
Burner ports plugged or dirty. • Check burner tubes for build-up.
Improper or inadequate exhaust system or make-up
air.
Cycles on high limit thermostat. • Refer to Paragraph 14.
Improper orifices. • Tumbler is equipped for type of gas specified on serial
• Refer to Installation Manual (supplied with tumbler) for
exhaust and make-up air requirements.
plate. If orifices are different from that specified on serial
plate, obtain and install proper orifices.
W002
13. HEATING ELEMENT OR BURNER SHUTS-OFF PREMATURELY
POSSIBLE CAUSE TO CORRECT
Improper or inadequate exhaust and/or make-up air
system.
Gas Models:
Insufficient gas supply.
Gas Models:
Tumbler not properly equipped for type of gas
used.
Gas Models:
• Refer to Installation Manual (supplied with tumbler) for
exhaust and make-up air requirements.
• Open partially closed gas shut-off valve, or correct low
pressure.
• Tumbler is equipped for type of gas specified on serial
plate. If orifices are different from that specified on serial
plate, obtain and install proper orifices.
• Refer to Adjustment Section for burner flame adjustment.
Improperly adjusted burner flame.
Gas Models: (Glow-Bar Ignition)
• Replace sensor.
Sensor contact closing.
Cycling off on high limit thermostat. • Refer to Paragraph 14.
Broken, loose or incorrect wiring. • Refer to wiring diagram located on back of tumbler or in
literature packet.
18 M411429
© Copyright, Alliance Laundry Systems LLC – DO NOT COPY or TRANSMIT
Page 19
Section 3 Troubleshooting
WARNING
To reduce the risk of electric shock, fire, explosion, serious injury or death:
• Disconnect electric power to the tumbler before servicing.
• Close gas shut-off valve to gas tumbler before servicing.
• Close steam valve to steam tumbler before servicing.
• Never start the tumbler with any guards/panels removed.
• Whenever ground wires are removed during servicing, these ground wires must be
reconnected to ensure that the tumbler is properly grounded.
14. HEATING ELEMENT OR BURNER REPEATEDLY CYCLES OFF ON HIGH LIMIT
THERMOSTAT
POSSIBLE CAUSE TO CORRECT
External exhaust system is longer than
recommended or inadequate make-up air.
• Refer to Installation Manual (supplied with tumbler) for
exhaust and make-up air requirements.
Clogged lint screen. • Remove screen and clean. Lint screen and compartment
should be cleaned after every eight hour shift.
Lint in tumbler ducts. • Clean tumbler ducts.
Lint in external exhaust system. • Disassemble exhaust system and clean.
High limit thermostat cycling at too low a
• Replace thermostat.
temperature.
Lint door panel not closed properly. • Open lint door panel — place lint door panel back on
tumbler (ensuring a tight fit) then latch.
W002
15. HEATING ELEMENT OR BURNER DOES NOT SHUT-OFF
POSSIBLE CAUSE TO CORRECT
Gas Models:
• Replace gas valve.
Impurities on gas valve seat, preventing valve
from closing.
Inoperative drying timer, relay or contactor. • Replace timer, relay or contactor.
Incorrect wiring. • Refer to wiring diagram located on back of tumbler or in
literature packet.
16. CLOTHES DO NOT DRY
POSSIBLE CAUSE TO CORRECT
Heat source inoperative. • Refer to Paragraph 5.
Too much water in articles being dried. • Remove excess water.
Clothes load too large. • Remove part of load.
Improper or inadequate exhaust system. • Refer to Installation Manual (supplied with tumbler) for
exhaust requirements.
Heat source shuts-off prematurely. • Refer to Paragraph 13.
Drying timer improperly set. • Set selector for higher setting.
Incorrect voltage. • Refer to Installation Manual (supplied with tumbler) for
electrical requirements.
Inadequate make-up air. • Refer to Installation Manual (supplied with tumbler) for
make-up air requirements.
M411429 19
© Copyright, Alliance Laundry Systems LLC – DO NOT COPY or TRANSMIT
Page 20
Section 3 Troubleshooting
WARNING
To reduce the risk of electric shock, fire, explosion, serious injury or death:
• Disconnect electric power to the tumbler before servicing.
• Close gas shut-off valve to gas tumbler before servicing.
• Close steam valve to steam tumbler before servicing.
• Never start the tumbler with any guards/panels removed.
• Whenever ground wires are removed during servicing, these ground wires must be
reconnected to ensure that the tumbler is properly grounded.
17. TUMBLER OVERHEATING
POSSIBLE CAUSE TO CORRECT
Gas Models:
• Replace orifices.
Incorrect main burner orifices.
Gas Models:
• Gas pressure must be as specified on serial plate.
Gas pressure too high.
Inadequate make-up air. • Refer to Installation Manual (supplied with tumbler) for
make-up air requirements.
Lint accumulation. • Remove lint.
Restricted or inadequate exhaust system. • Remove obstruction or lint build-up from exhaust
ductwork. Refer to the Installation Manual (supplied
with tumbler) for exhaust system requirements.
Inoperative thermostat. • Replace thermostat.
W002
18. BURNERS NOT BURNING PROPERLY — GAS MODELS
POSSIBLE CAUSE TO CORRECT
Burner air shutters incorrectly adjusted. • Refer to Adjustment Section for proper flame adjustment.
Dirt in burners. • Disassemble burners and blow out the dirt.
Gas pressure too high. • Check serial plate on back of the tumbler for correct gas
pressure.
Incorrect orifices. • Tumbler is equipped for type of gas specified on serial
plate. If orifices are different from that specified on serial
plate, obtain and install proper orifices.
Restricted or blocked exhaust duct. • Disassemble and clean exhaust system.
Airflow switch not functioning properly. • Check adjustment and replace airflow switch if necessary.
19. CYLINDER DOOR OPENS DURING OPERATION
POSSIBLE CAUSE TO CORRECT
Door strike improperly adjusted. • Refer to Adjustment Section for door strike adjustment.
Tumbler improperly leveled. • Refer to Adjustment Section for leveling leg adjustment.
20 M411429
© Copyright, Alliance Laundry Systems LLC – DO NOT COPY or TRANSMIT
Page 21
Section 3 Troubleshooting
WARNING
To reduce the risk of electric shock, fire, explosion, serious injury or death:
• Disconnect electric power to the tumbler before servicing.
• Close gas shut-off valve to gas tumbler before servicing.
• Close steam valve to steam tumbler before servicing.
• Never start the tumbler with any guards/panels removed.
• Whenever ground wires are removed during servicing, these ground wires must be
reconnected to ensure that the tumbler is properly grounded.
20. TUMBLER RUNS BUT NO STEAM TO COILS — STEAM MODELS
POSSIBLE CAUSE TO CORRECT
Valves closed. • Check all valves in supply and return lines, make sure
they are open.
Blocked steam trap. • Remove trap and clean. Replace if inoperative.
Inoperative solenoid valve. • Check operation of solenoid valve.
Incorrect installation of check valve. • Check for inlet and outlet markings on check valve, and
invert if necessary.
Clogged strainer. • Remove strainer and clean.
Inoperative timer or thermostat • Test timer or thermostat. Replace if inoperative.
W002
21. WATER IN STEAM LINE — STEAM MODELS
POSSIBLE CAUSE TO CORRECT
Incorrect installation of steam piping. • Refer to Installation Manual (supplied with tumbler) for
steam requirements.
Trap functioning improperly. • Check trap for size and capacity. If trap is dirty or sluggish
clean thoroughly or replace. Check return line for high
back pressure.
M411429 21
© Copyright, Alliance Laundry Systems LLC – DO NOT COPY or TRANSMIT
Page 22
Section 3 Troubleshooting
WARNING
To reduce the risk of electric shock, fire, explosion, serious injury or death:
• Disconnect electric power to the tumbler before servicing.
• Close gas shut-off valve to gas tumbler before servicing.
• Close steam valve to steam tumbler before servicing.
• Never start the tumbler with any guards/panels removed.
• Whenever ground wires are removed during servicing, these ground wires must be
reconnected to ensure that the tumbler is properly grounded.
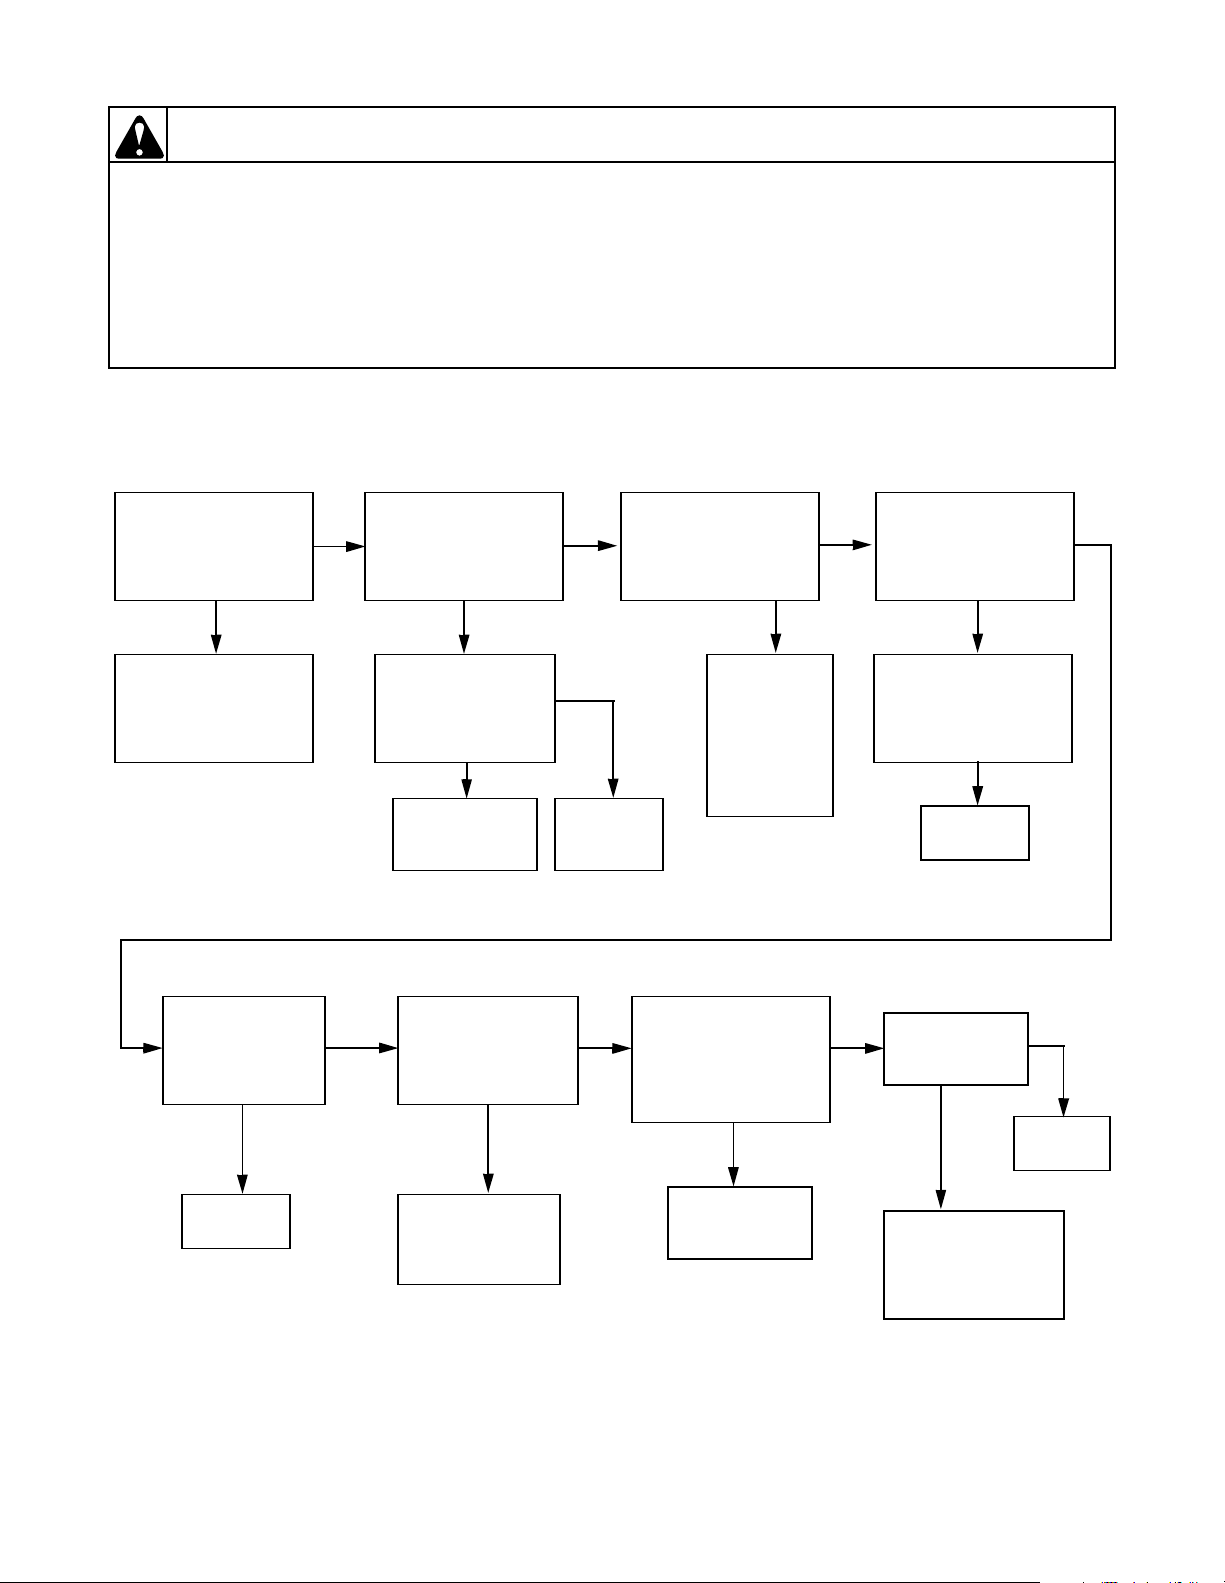
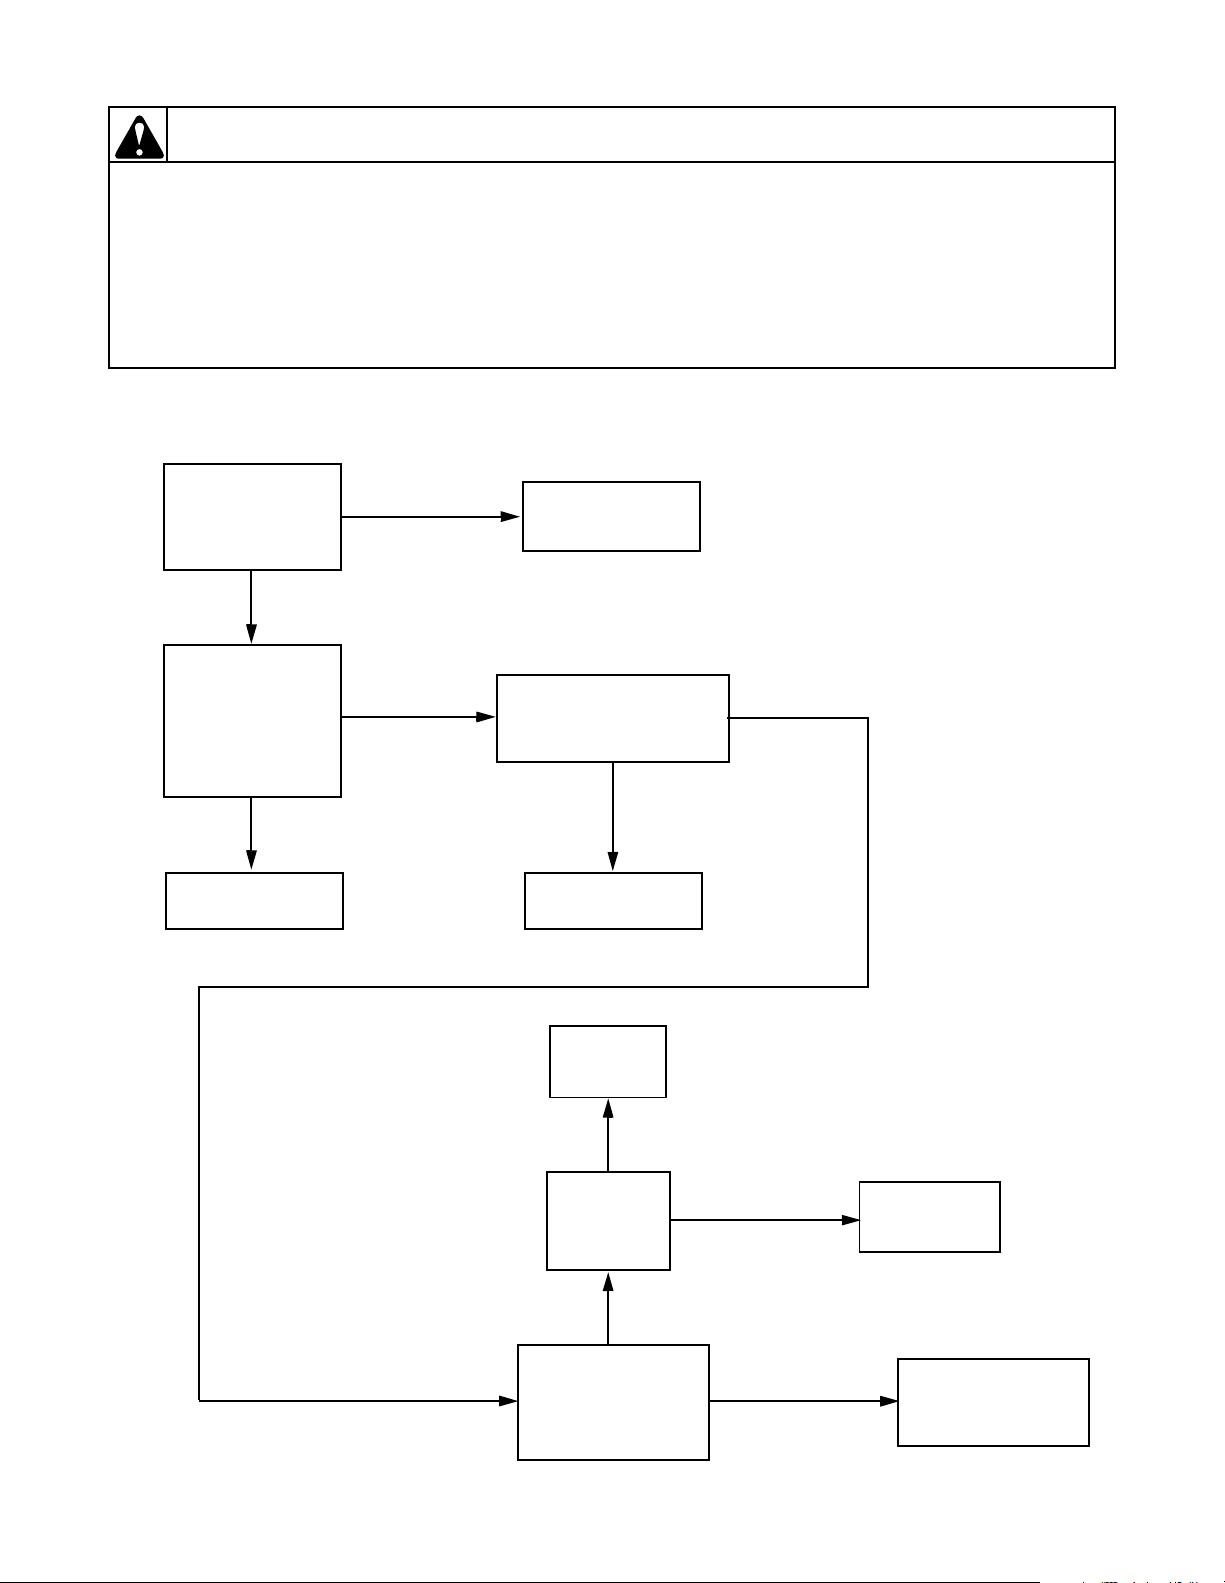
22. TUMBLER WILL NOT START, TIME ON DRYING TIMER, DOOR CLOSED
MANUAL TIMER MODELS
W002
CHECK FOR
LINE VOLTAGE
INTO DOOR SWITCH
NO
CHECK
ELECTRICAL SERVICE
TO TUMBLER
(Fuses/Circuit Breaker)
CHECK FOR
LINE VOLTAGE ON
TERMINAL 1 OF
CONTROL RELAY
NO
CHECK FOR
LINE VOLTAGE
OUT OF
DOOR SWITCH
NO NO
HAS SWITCH ROD
MECHANICALLY
ACTUATED
DOOR SWITCH?
NO
ADJUST
DOOR SWITCH
ROD
YES YES YES
CHECK FOR
LINE VOLTAGE INTO
PUSH-TO-START
SWITCH
NO NO
YES
YES
REPLACE
DOOR
SWITCH
CHECK FOR
LINE VOLTAGE AT
TERMINAL 3 OF
CONTROL RELAY
CHECK FOR
BROKEN
WIRE
OR POOR
CONNECTION
AT
HARNESS
PLUG
PRESS
PUSH-TO-START
SWITCH. CHECK FOR
LINE VOLTAGE OUT
OF PUSH-TO-START
SWITCH
YESYES
CHECK FOR
LINE VOLTAGE ACROSS
COIL TERMINALS
OF CONTROL RELAY
NO
CHECK FOR
LINE VOLTAGE ON
TERMINAL B
OF DRYING TIMER
NO
REPLACE
TIMER
CHECK FOR
LINE VOLTAGE
TO MO T O R
NO
YES
REPLACE
MOTOR
YES
REPLACE
RELAY
22 M411429
© Copyright, Alliance Laundry Systems LLC – DO NOT COPY or TRANSMIT
CHECK FOR
BROKEN WIRE
FROM CONTROL
RELAY TERMINAL 1
REPLACE
PUSH-TO-START
SWITCH
CHECK FOR
BROKEN WIRE
OR POOR
CONNECTION
AT HARNESS PLUG
Page 23
Section 3 Troubleshooting
WARNING
To reduce the risk of electric shock, fire, explosion, serious injury or death:
• Disconnect electric power to the tumbler before servicing.
• Close gas shut-off valve to gas tumbler before servicing.
• Close steam valve to steam tumbler before servicing.
• Never start the tumbler with any guards/panels removed.
• Whenever ground wires are removed during servicing, these ground wires must be
reconnected to ensure that the tumbler is properly grounded.
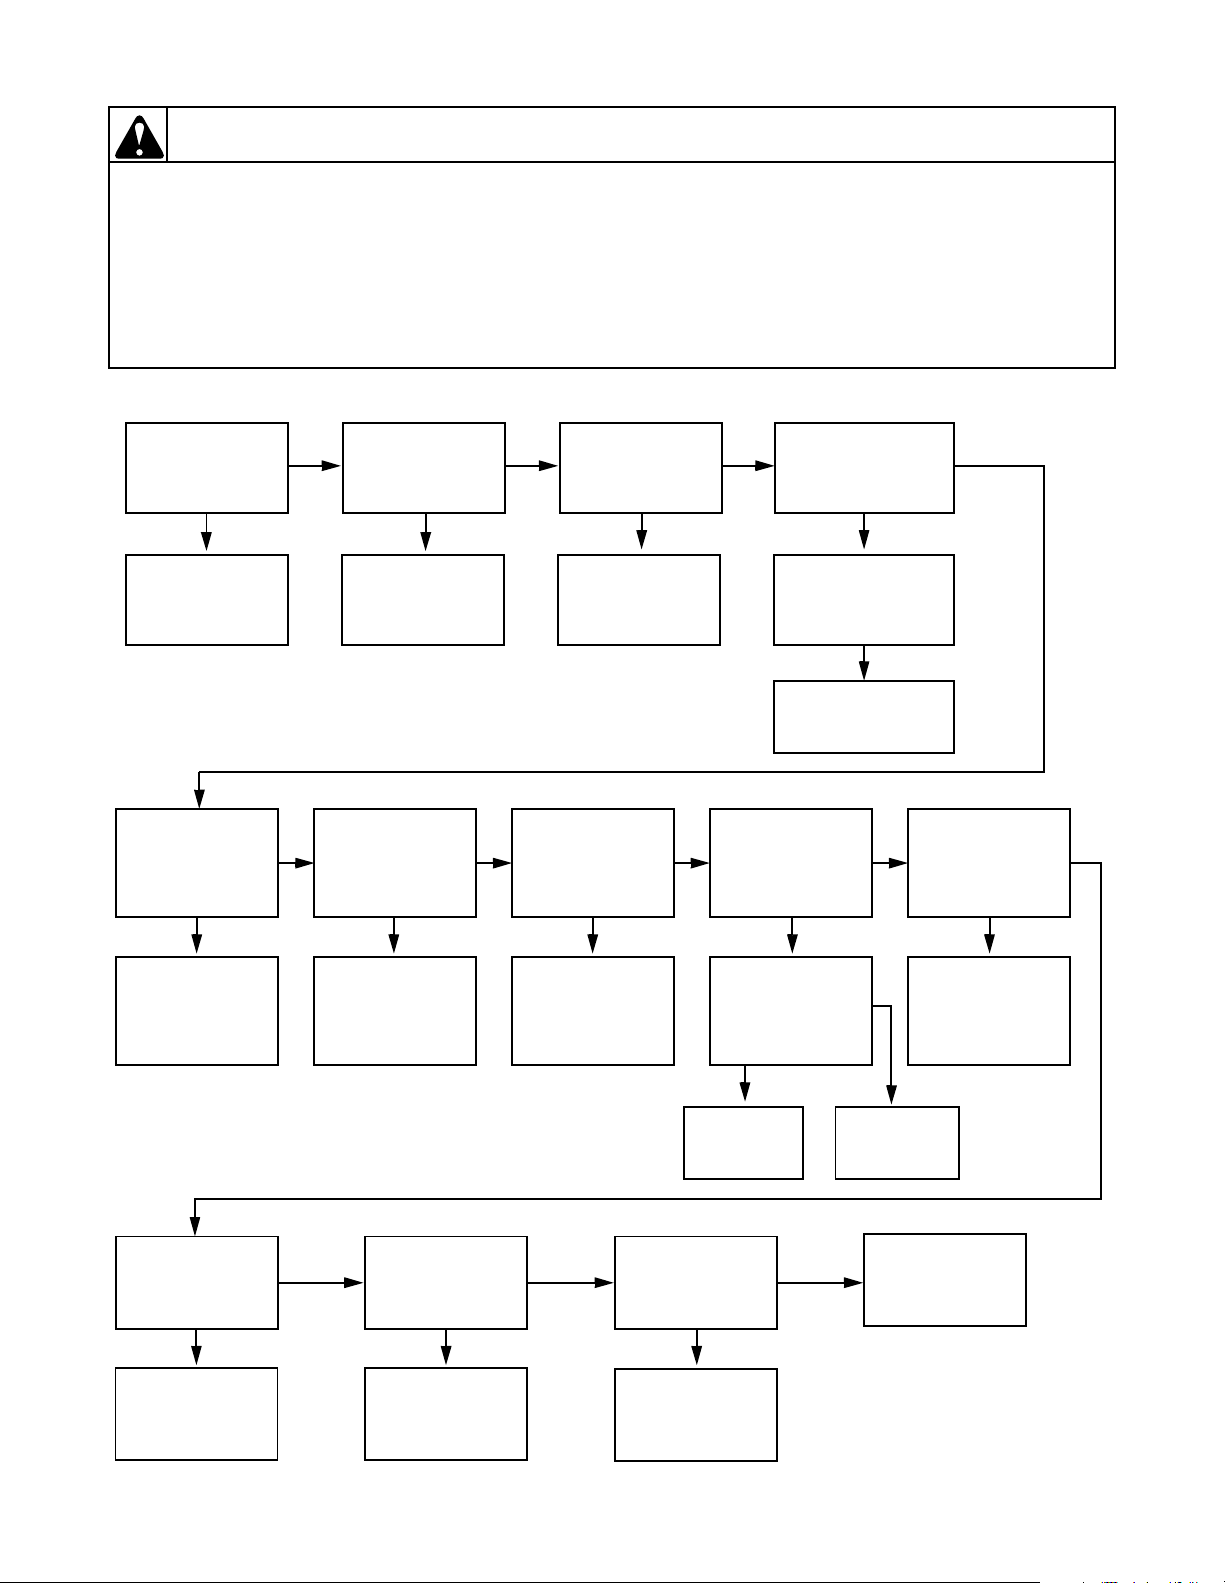
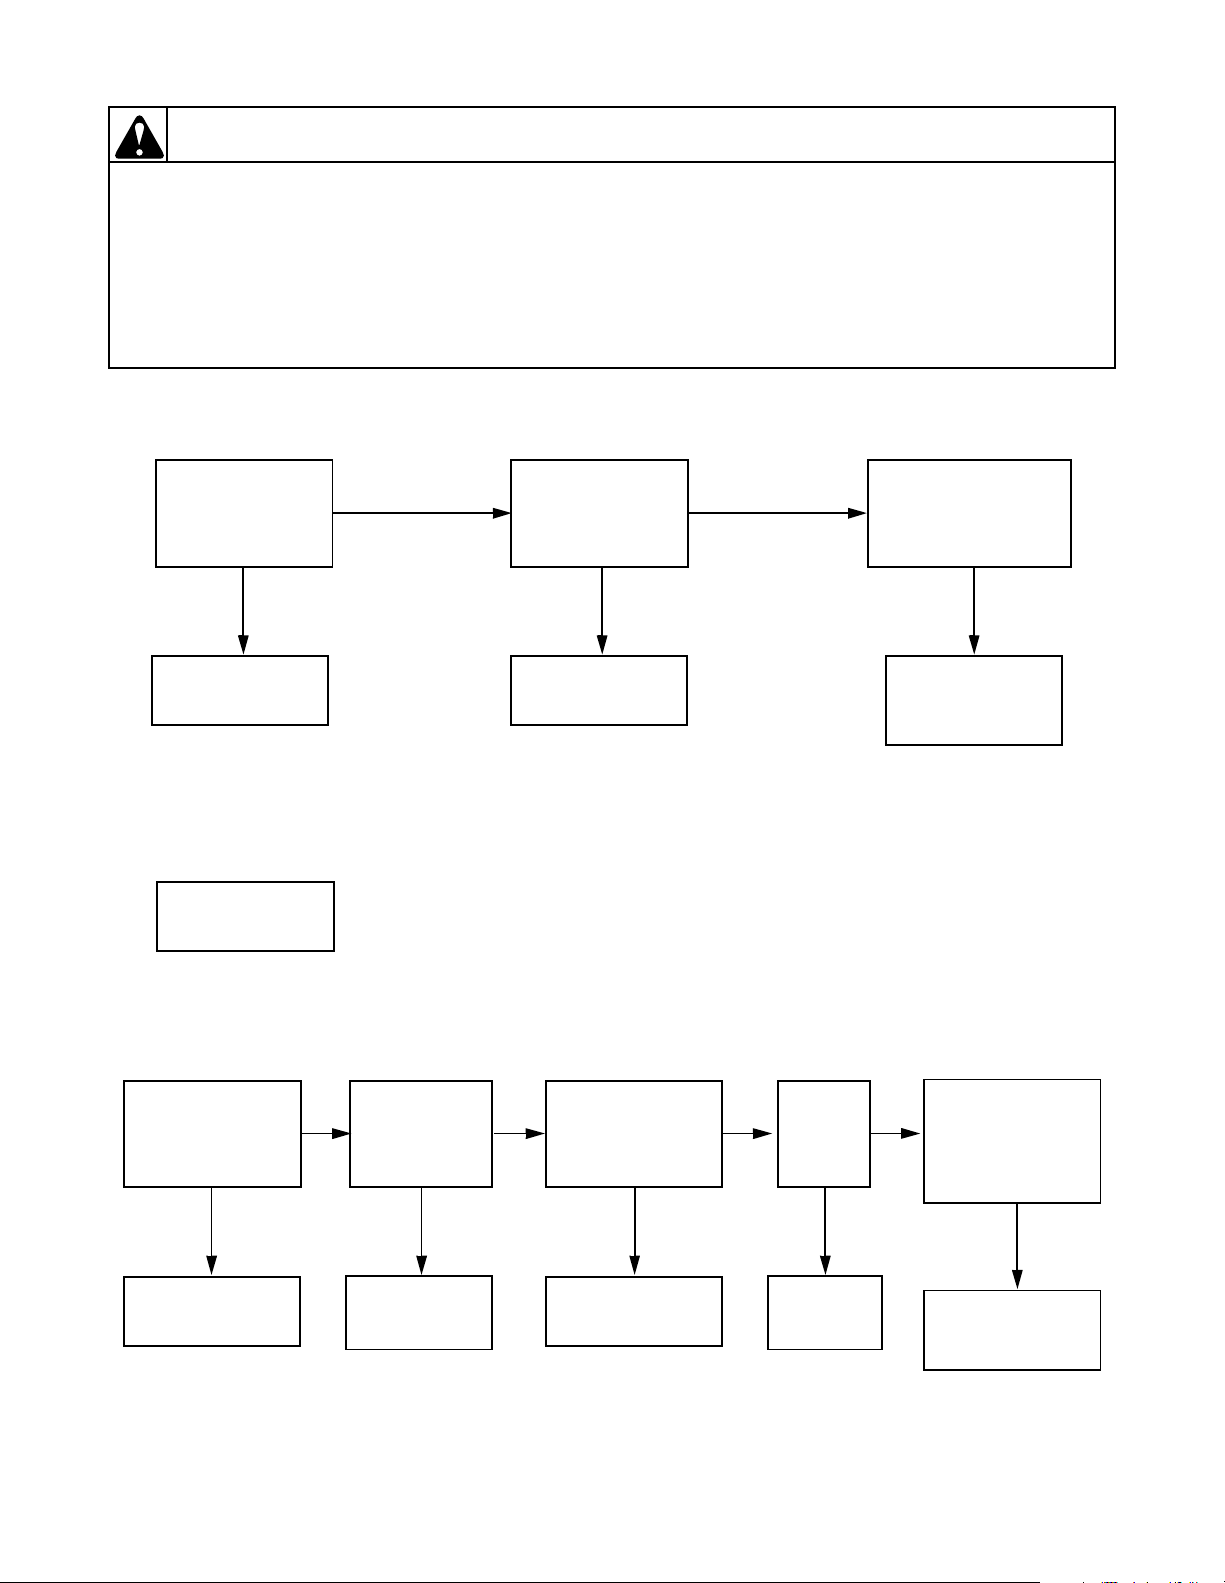
23. MOTOR RUNS, TIME ON DRYING TIMER BUT NO HEAT
W002
POWER OUT OF
MAIN CONTROL
THERMOSTAT
YES
CHECK THE
IGNITION
CIRCUIT
CHECK FOR
BROKEN OR
LOOSE WIRE AT
HARNESS PLUG
YES NO NO NO NO
REPAIR
WIRE
NO
NO YES YES YES YES
POWER INTO
MAIN CONTROL
THERMOSTAT
YES
REPLACE
MAIN CONTROL
THERMOSTAT
POWER ON
RED WIRE
FROM MOTOR
REPLACE
MOTOR
NO
BROKEN WIRE
POWER ON
TERMINAL 6 OF
CONTROL RELAY
LOOSE OR
BROKEN WIRE TO
MAIN CONTROL
THERMOSTAT
POWER INTO
AIRFLOW
SWITCH
CHECK FOR
LOOSE OR
FROM MOTOR
NO
YES YE S
POWER OUT OF
AIRFLOW
SWITCH
AIRFLOW
SWITCH
CLOSED
POWER ON
TERMINAL 4 OF
CONTROL RELAY
POWER ACROSS
COIL TERMINALS OF
CONTROL RELAY
YES
REPLACE
CONTROL RELAY
NO
POWER INTO
CABINET
HIGH LIMIT
THERMOSTAT
CHECK FOR
BROKEN WIRE
FROM
AIRFLOW SWITCH
NO
ADJUST
AIRFLOW
SWITCH
POWER OUT OF
CABINET
HIGH LIMIT
THERMOSTAT
NO NO NO
REPLACE
THERMOSTAT
M411429 23
POWER INTO
BURNER
HIGH LIMIT
THERMOSTAT
CHECK FOR
BROKEN WIRE
FROM CABINET
HIGH LIMIT
© Copyright, Alliance Laundry Systems LLC – DO NOT COPY or TRANSMIT
YES YESYES
POWER OUT OF
BURNER
HIGH LIMIT
THERMOSTAT
REPLACE
BURNER
HIGH LIMIT
THERMOSTAT
YES
REPLACE
AIRFLOW
SWITCH
CHECK FOR LOOSE
OR BURNED
CONNECTION
AT HARNESS PLUG
Page 24
Section 3 Troubleshooting
WARNING
To reduce the risk of electric shock, fire, explosion, serious injury or death:
• Disconnect electric power to the tumbler before servicing.
• Close gas shut-off valve to gas tumbler before servicing.
• Close steam valve to steam tumbler before servicing.
• Never start the tumbler with any guards/panels removed.
• Whenever ground wires are removed during servicing, these ground wires must be
reconnected to ensure that the tumbler is properly grounded.
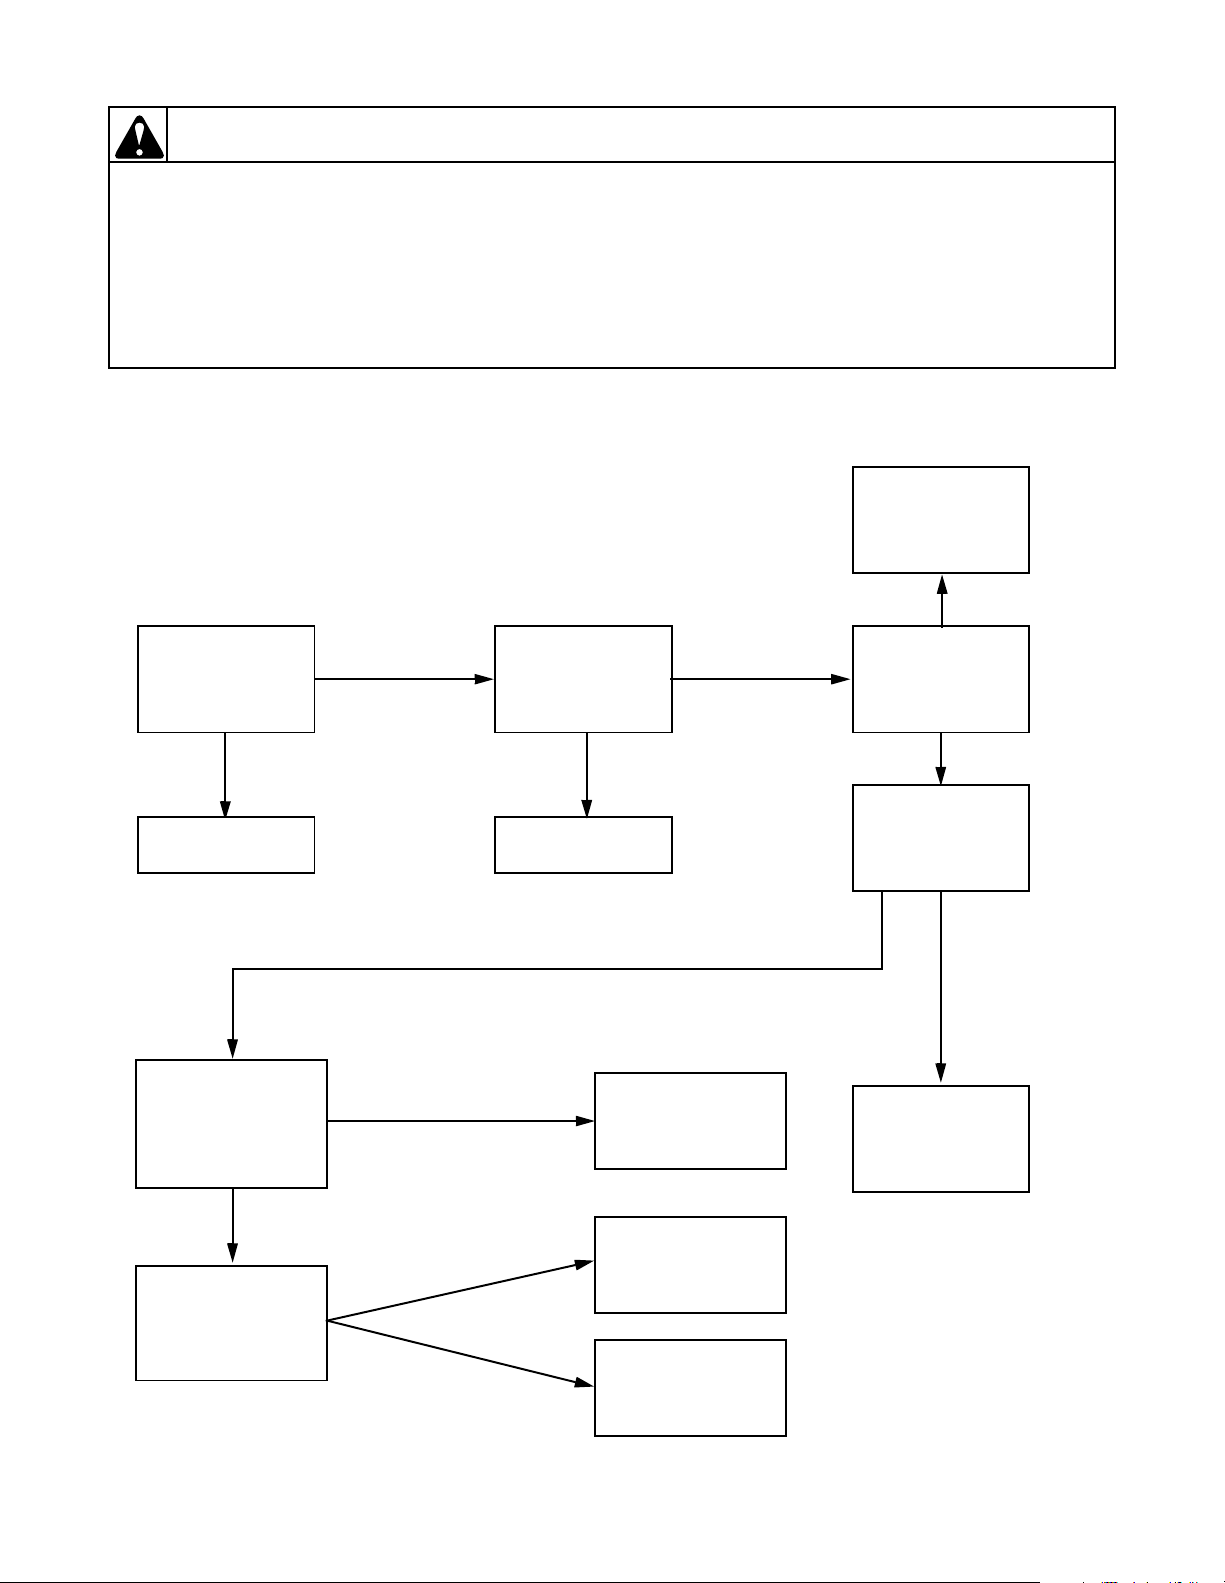
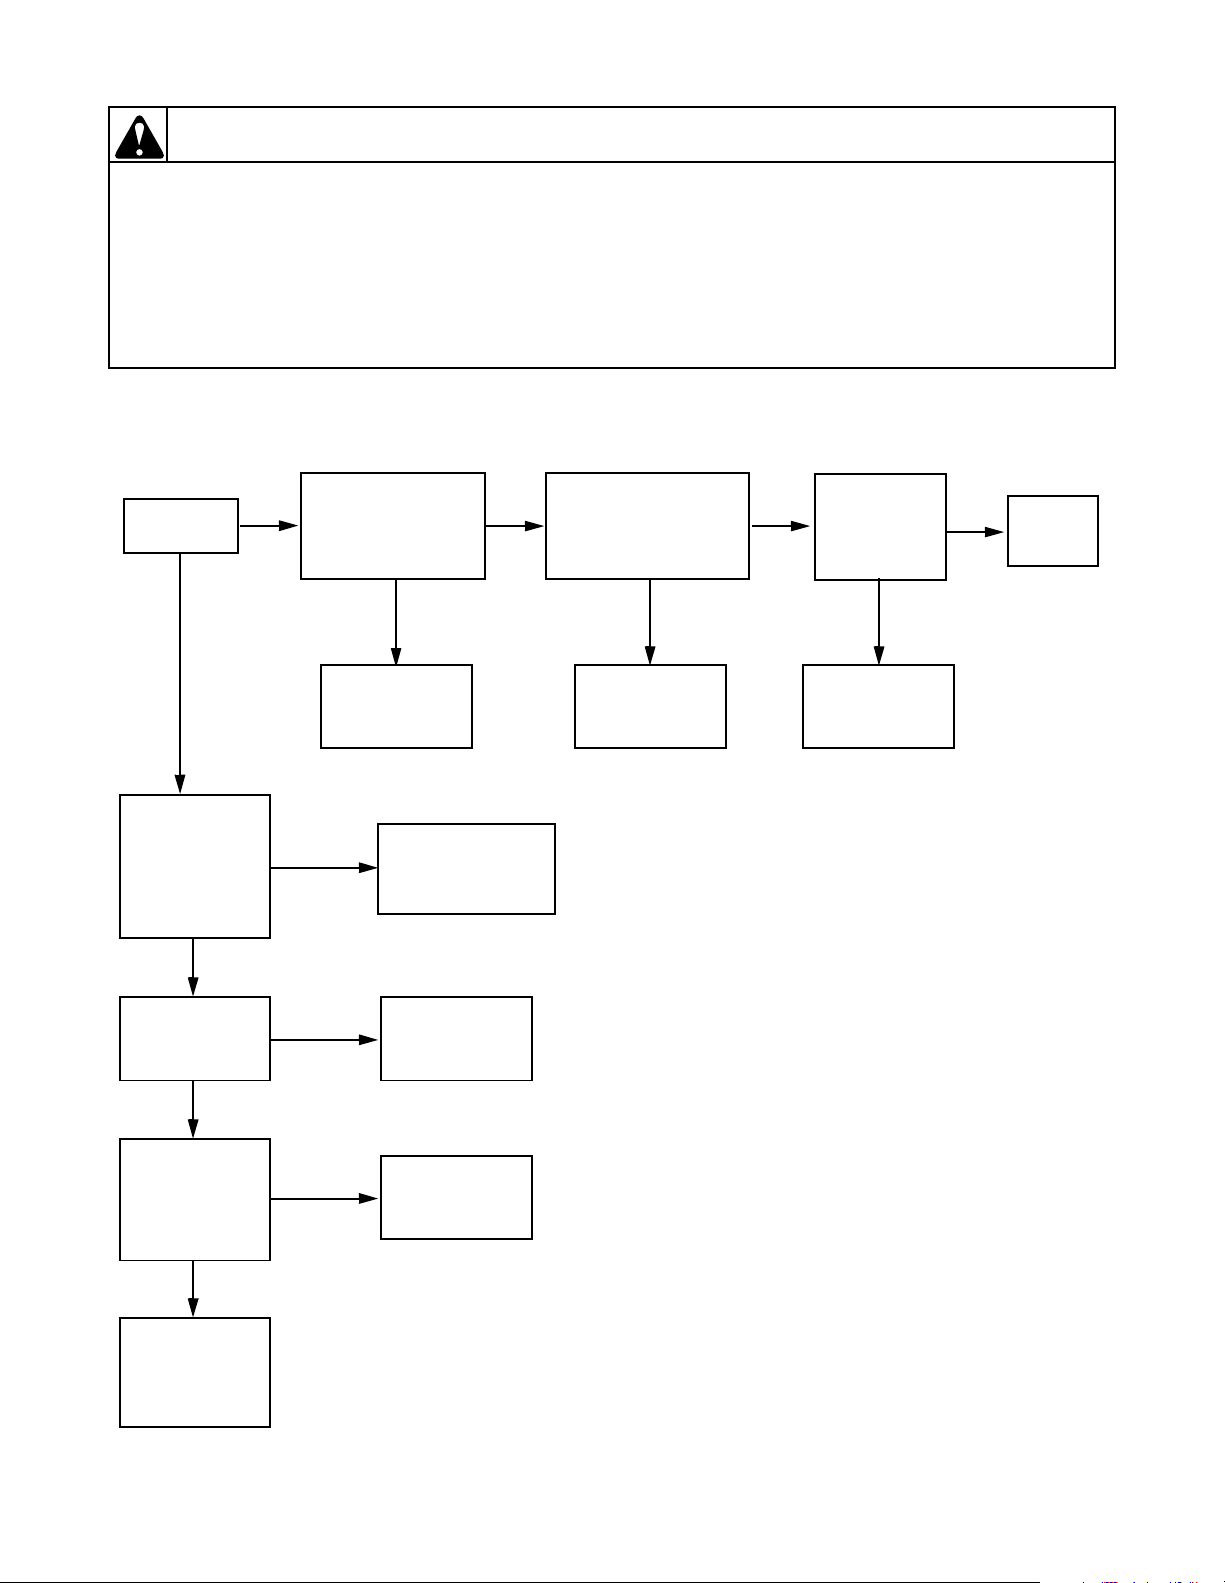
24. NO SPARK TO PILOT BURNER
(Electronic Pilot Ignition Models Only)
SHIFT LEFT
BURNER FURTHER
TO LEFT
YES
W002
24 VOLTS BETWEEN
TERMINAL 2 AND
GROUND ON
ELECTRONIC
PACKAGE
NO
CHECK TUMBLER
HEAT CIRCUIT
NO
CERAMIC INSULATOR
SECURELY BONDED
TO PILOT BURNER
ASSEMBLY
(Cannot Swivel)
YES
NO
HIGH TENSION
CABLE SECURELY
ATTACHED TO
IGNITOR POST
NO
CORRECT
REPLACE PILOT
AND ELECTRODE
ASSEMBLY
YES
ARCING TO LEFT
BURNER
NO
CRACKS IN
CERAMIC INSULATOR
ENCASING IGNITOR
PROBE
NO
YES
REPLACE
PILOT AND
ELECTRODE
ASSEMBLY
YES
S
E
7/64 INCH GAP
BETWEEN
ELECTRODE AND
LEFT DIVERTER OF
PILOT BURNER
24 M411429
© Copyright, Alliance Laundry Systems LLC – DO NOT COPY or TRANSMIT
Y
N
O
REPLACE
ELECTRONIC
PACKAGE
REPLACE PILOT
AND ELECTRODE
ASSEMBLY
Page 25
Section 3 Troubleshooting
WARNING
To reduce the risk of electric shock, fire, explosion, serious injury or death:
• Disconnect electric power to the tumbler before servicing.
• Close gas shut-off valve to gas tumbler before servicing.
• Close steam valve to steam tumbler before servicing.
• Never start the tumbler with any guards/panels removed.
• Whenever ground wires are removed during servicing, these ground wires must be
reconnected to ensure that the tumbler is properly grounded.
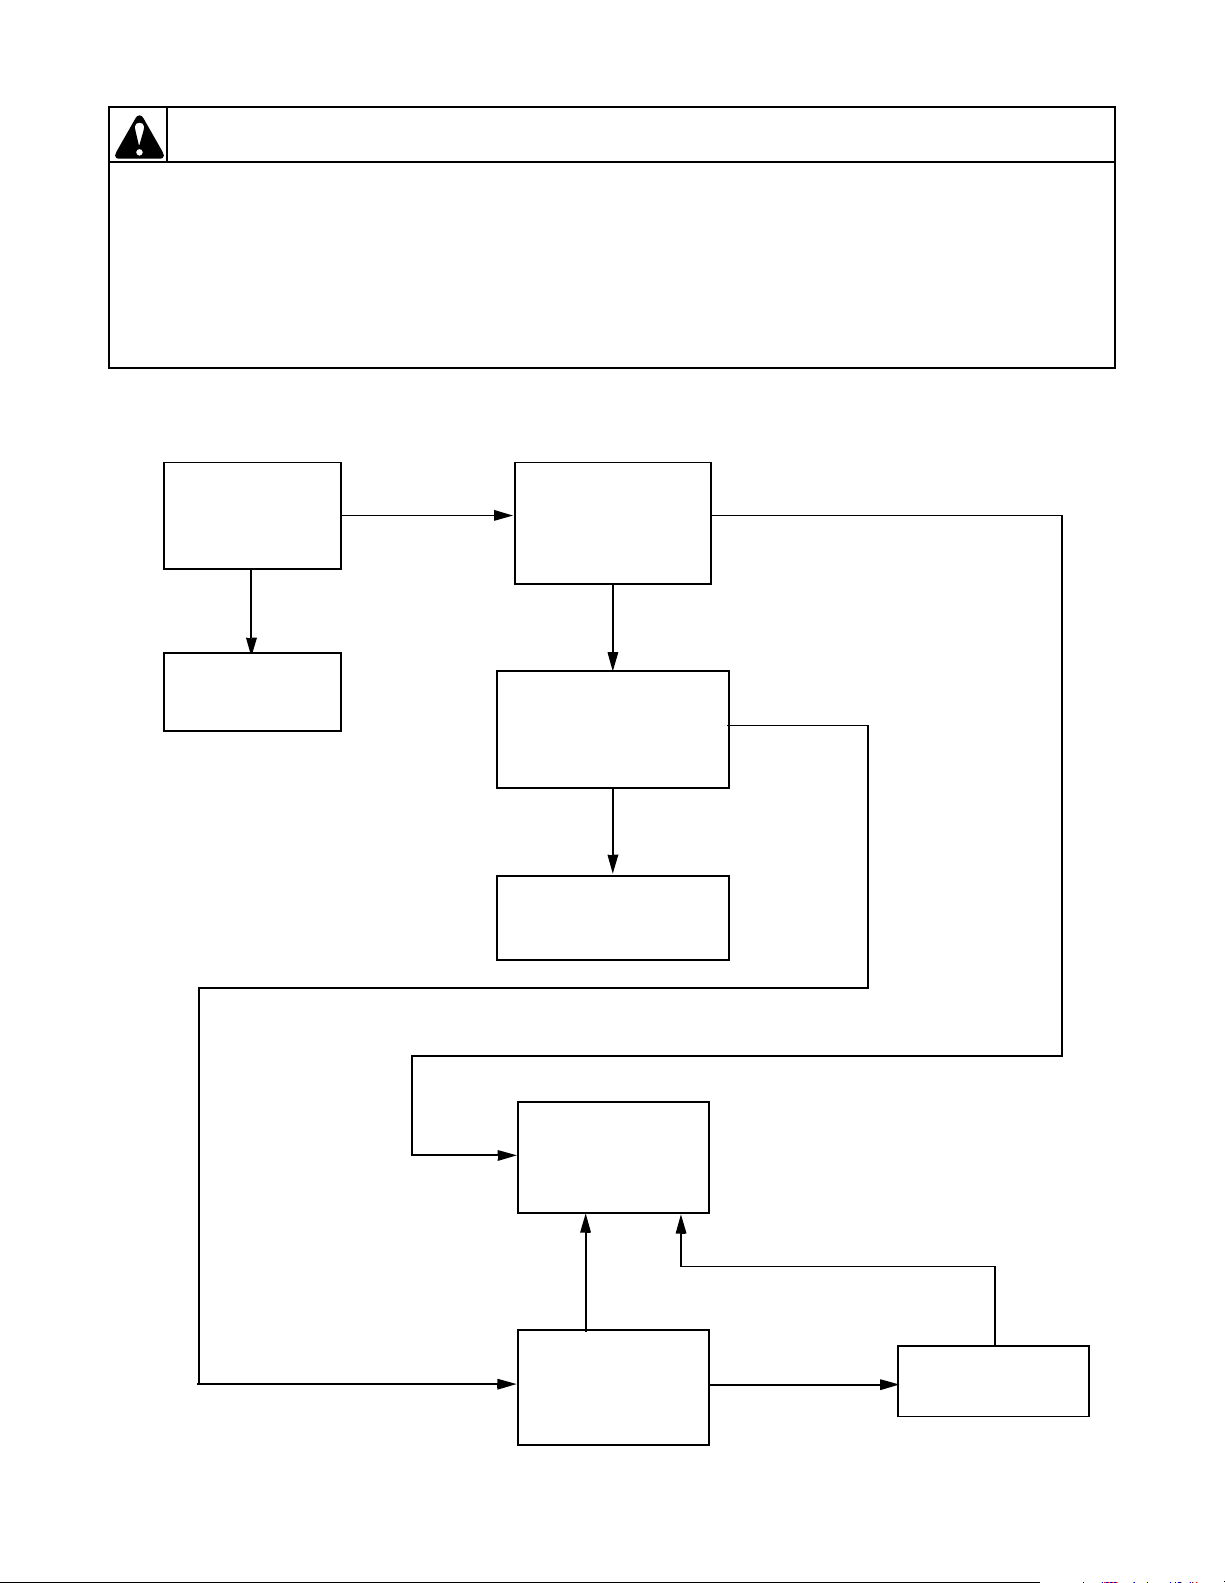
25. SPARK TO PILOT BURNER — NO PILOT FLAME
(Electronic Pilot Ignition Models Only)
W002
24 VOLTS BETWEEN
TERMINAL 1 AND
GROUND ON
ELECTRONIC
PACKAGE
NO
REPLACE
ELECTRONIC
PACKAGE
YES
YES
GAS PRESENT AT
PILOT BURNER
(Disconnect white wire
from Terminal 3 and
light manually)
NO
REMOVE BLACK WIRE
FROM TERMINAL 1.
MOMENTARILY TOUCH TO
TERMINAL 2; IS “CLICK”
HEARD?
NO
REPLACE RIGHT COIL
(PILOT OPERATOR)
YES
YES
YES
YES
M411429 25
© Copyright, Alliance Laundry Systems LLC – DO NOT COPY or TRANSMIT
REFER TO
“NO SPARK TO
PILOT BURNER”
NO
PILOT FILTER,
TUBE OR
ORIFICE
OBSTRUCTED
YES
CLEAR
OBSTRUCTION
Page 26
Section 3 Troubleshooting
WARNING
To reduce the risk of electric shock, fire, explosion, serious injury or death:
• Disconnect electric power to the tumbler before servicing.
• Close gas shut-off valve to gas tumbler before servicing.
• Close steam valve to steam tumbler before servicing.
• Never start the tumbler with any guards/panels removed.
• Whenever ground wires are removed during servicing, these ground wires must be
reconnected to ensure that the tumbler is properly grounded.
26. SPARK TO PILOT BURNER — PILOT LIGHTS — NO MAIN BURNER
(Electronic Pilot Ignition Models Only)
24 VOLTS BETWEEN
TERMINAL 3 AND
GROUND ON
ELECTRONIC
PACKAGE
NO
YES
REPLACE LEFT COIL
(Main Operator)
W002
WIRE BETWEEN
SENSOR AND
TERMINAL 4 OF
ELECTRONIC
PACKAGE
CONNECTED
SECURELY
NO
CORRECT
YES
YES
SENSOR SECURELY
SEATED IN
PILOT BURNER
NO
CORRECT
REPLACE
SENSOR
YES
CRACK IN
SENSOR
CERAMIC
INSULATOR
NO
YES
CHECK GAS
PRESSURE
NO
YES
26 M411429
© Copyright, Alliance Laundry Systems LLC – DO NOT COPY or TRANSMIT
PILOT FILTER,
TUBE OR
ORIFICE
OBSTRUCTED
YES
CLEAR PILOT ORIFICE
OR USE LARGER
PILOT ORIFICE
Page 27

Section 3 Troubleshooting
WARNING
To reduce the risk of electric shock, fire, explosion, serious injury or death:
• Disconnect electric power to the tumbler before servicing.
• Close gas shut-off valve to gas tumbler before servicing.
• Close steam valve to steam tumbler before servicing.
• Never start the tumbler with any guards/panels removed.
• Whenever ground wires are removed during servicing, these ground wires must be
reconnected to ensure that the tumbler is properly grounded.
27. IGNITER DOES NOT GLOW
(Johnson Controls Glow-Bar System)
W002
120 VOLTS PRESENT
BETWEEN BLACK
WIRE AND GROUND
ON MAIN
THERMOSTAT?
NO
CHECK
HEAT CIRCUIT
YES
120 VOLTS PRESENT
BETWEEN RED AND
WHITE WIRES OF
IGNITER BRACKET?
NO
REPLACE
IGNITER
YES
28. IGNITER GLOWS CONSTANTLY
(Johnson Controls Glow-Bar System)
REPLACE
SENSOR
29. IGNITER GLOWS, CYCLES OFF BUT BURNER DOES NOT IGNITE
(Johnson Controls Glow-Bar System)
120 VOLTS PRESENT
ACROSS THE TWO
WIRES OF THE
PRIMARY COIL?
CAN YOU FEEL OR
YES YES YES
HEAR THE PRIMARY
COIL OPEN?
120 VOLTS PRESENT
ACROSS THE TWO
WIRES TO THE
SECONDARY COIL?
120 VOLTS PRESENT
BETWEEN EACH OF THE
PURPLE WIRES OF
SENSOR AND GROUND?
NO
REPLACE
SENSOR
REPLACE
SECONDARY COIL
NO
CHECK FOR A
BROKEN WIRE
BETWEEN THE
TERMINAL BLOCK
AND PRIMARY COIL.
M411429 27
© Copyright, Alliance Laundry Systems LLC – DO NOT COPY or TRANSMIT
PRIMARY COIL.
NO
REPLACE
NO
120 VOLTS PRESENT
ON TERMINALS A
AND 7 OF IGNITION
RELAY?
NO
REPLACE
RELAY
YES
GAP BETWEEN
IGNITER AND BURNER
1/8 – 1/4 INCH?
ADJUST
IGNITER GAP TO
1/8 – 1/4 INCH
NO
Page 28
Section 3 Troubleshooting
WARNING
To reduce the risk of electric shock, fire, explosion, serious injury or death:
• Disconnect electric power to the tumbler before servicing.
• Close gas shut-off valve to gas tumbler before servicing.
• Close steam valve to steam tumbler before servicing.
• Never start the tumbler with any guards/panels removed.
• Whenever ground wires are removed during servicing, these ground wires must be
reconnected to ensure that the tumbler is properly grounded.
30. IGNITER DOES NOT GLOW
(White Rodgers Glow-Bar System)
W002
80 - 120 VOLTS
PRESENT BETWEEN
BLACK WIRE AND
GROUND ON MAIN
THERMOSTAT?
NO
CHECK
HEAT CIRCUIT
YES
80 - 120 VOLTS
PRESENT BETWEEN
RED AND WHITE
WIRES OF IGNITER
BRACKET?
YES
REPLACE
IGNITER
NO
31. IGNITER GLOWS CONSTANTLY
(White Rodgers Glow-Bar System)
REPLACE
SENSOR
32. IGNITER GLOWS, CYCLES OFF BUT BURNER DOES NOT IGNITE
(White Rodgers Glow-Bar System)
80 - 120 VOLTS
PRESENT BETWEEN
EACH OF THE PURPLE
WIRES OF SENSOR AND
GROUND?
NO
REPLACE
DIODE LOGIC
BOARD
80 - 120 VOLTS
PRESENT ACROSS
THE RED AND WHITE
WIRES OF THE
REDUNDANT COIL?
NO
REPLACE DIODE
LOGIC BOARD
YES YES YES
28 M411429
CAN YOU
HEAR THE
REDUNDANT
COIL
OPEN?
NO
REPLACE
COMPLETE
GAS VALVE
© Copyright, Alliance Laundry Systems LLC – DO NOT COPY or TRANSMIT
40 - 60 VOLTS
PRESENT ACROSS
THE PURPLE WIRES
TO THE
MAIN COIL?
NO
REPLACE DIODE
LOGIC BOARD
CAN YOU
HEAR THE
MAIN COIL
CLICK
OPEN?
NO
REPLACE
MAIN COIL
YES
GAP BETWEEN
IGNITER
AND BURNER
1/8 – 1/4 INCH?
NO
ADJUST
IGNITER GAP TO
1/8 – 1/4 INCH
Page 29
Section 3 Troubleshooting
WARNING
To reduce the risk of electric shock, fire, explosion, serious injury or death:
• Disconnect electric power to the tumbler before servicing.
• Close gas shut-off valve to gas tumbler before servicing.
• Close steam valve to steam tumbler before servicing.
• Never start the tumbler with any guards/panels removed.
• Whenever ground wires are removed during servicing, these ground wires must be
reconnected to ensure that the tumbler is properly grounded.
33. IGNITER SPARKS — NO MAIN BURNER IGNITION
(Instant Electronic Ignition)
W002
IGNITER
SPARKING
YES
GREEN WIRE
FROM
IEI CONTROL
CONNECTED TO
GROUND
TERMINAL
YES
GAS SHUT-OFF
VALVE
TURNED ON?
NO
IEI CONTROL IN
SAFETY LOCKOUT
RESET BY OPENING
AND CLOSING DOOR
OPEN AND
CLOSE DOOR
NO
NO OPEN GAS
NO
YES
CONNECT
GREEN WIRE TO
GROUND TERMINAL
SHUT-OFF VALVE
RESISTANCE OF
HIGH VOLTAGE LEAD
GREATER THAN 25,0000
OHMS OR LESS THAN
5,000 OHMS
YES YES
REPLACE
HIGH VOLTAGE
LEAD
NO
IGNITER GAP IS
NOT 5/32 INCH
(.397 CM)
OR CERAMIC
CRACKED
RE-GAP OR
REPLACE
IGNITER
NO
REPLACE
IEI
CONTROL
YES
120 VOLTS
PRESENT ON
BLACK WIRE
FROM IEI
CONTROL
YES
CHECK GAS
VALVE COILS
REPLACE
AS REQUIRED
M411429 29
NO
© Copyright, Alliance Laundry Systems LLC – DO NOT COPY or TRANSMIT
REPLACE
IEI
CONTROL
Page 30
Section 3 Troubleshooting
WARNING
To reduce the risk of electric shock, fire, explosion, serious injury or death:
• Disconnect electric power to the tumbler before servicing.
• Close gas shut-off valve to gas tumbler before servicing.
• Close steam valve to steam tumbler before servicing.
• Never start the tumbler with any guards/panels removed.
• Whenever ground wires are removed during servicing, these ground wires must be
reconnected to ensure that the tumbler is properly grounded.
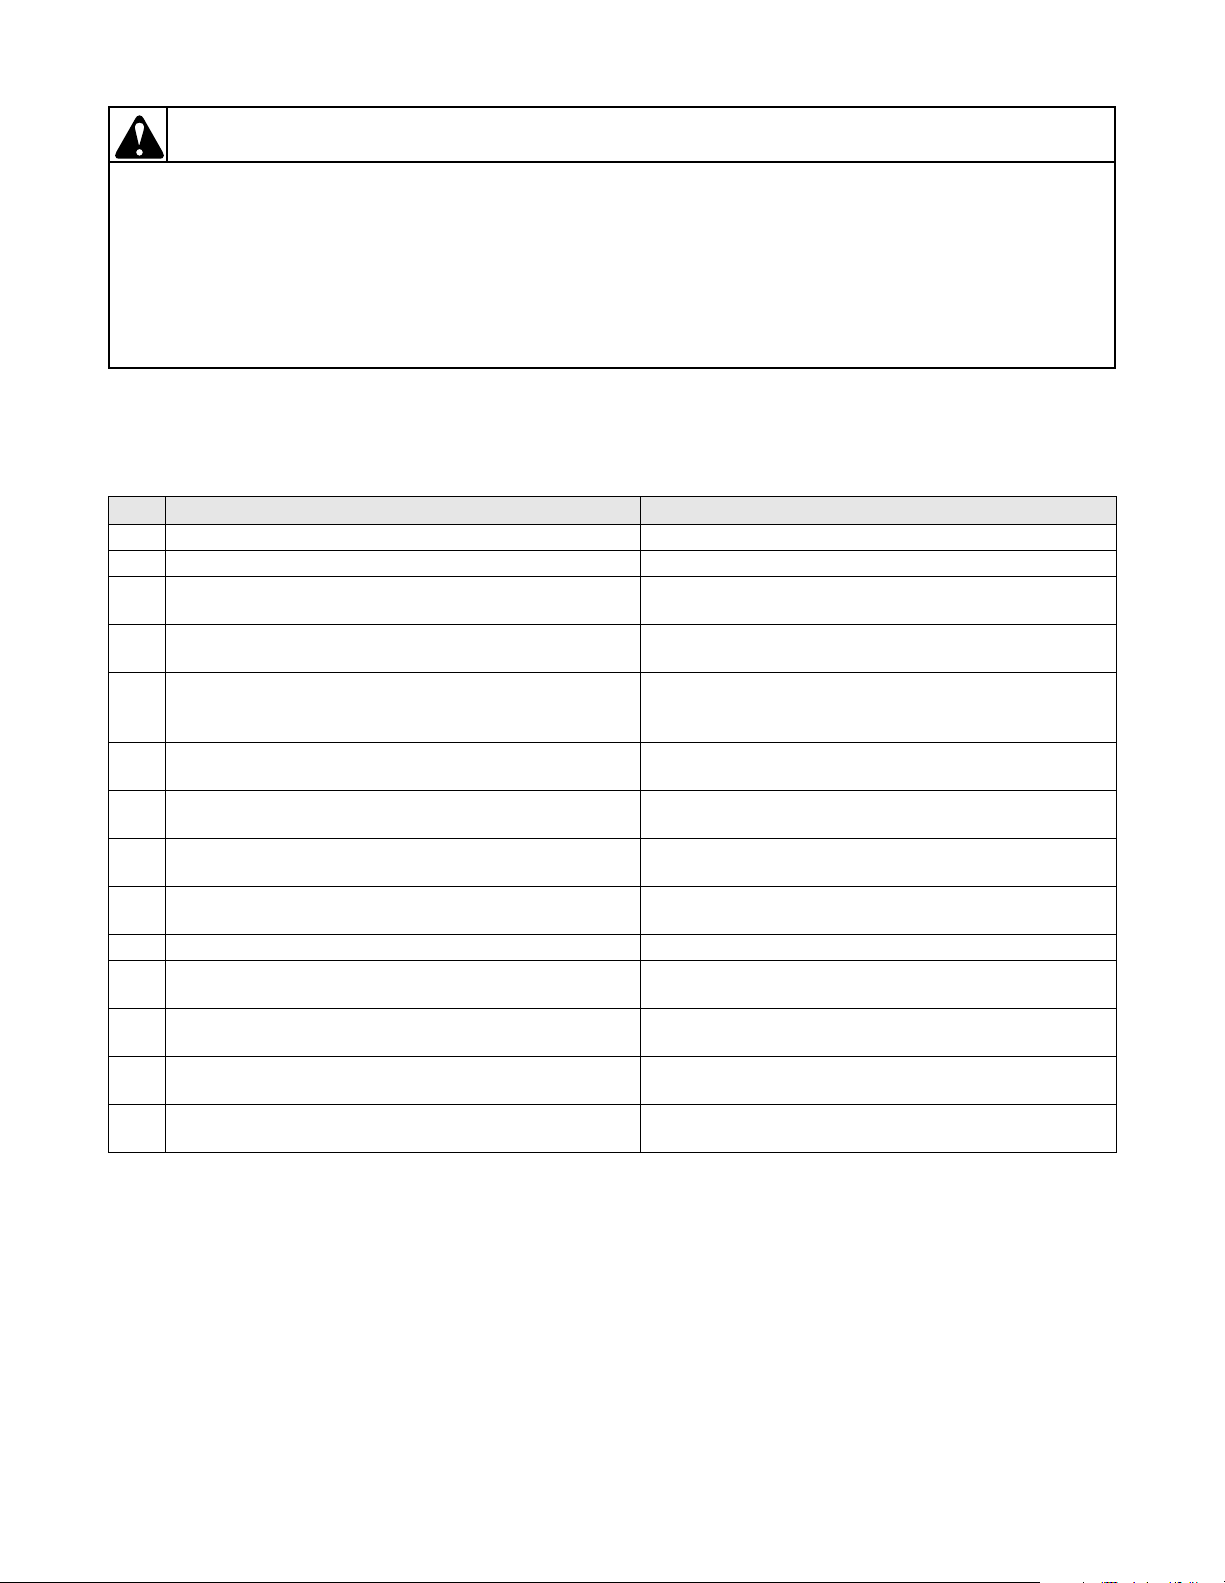
34. CSH OM MODELS: NO HEAT WITH CYCLE SELECTED, UNIT RUNNING AND CALLING FOR
HEAT
120 Volt/60 Hertz/1 Phase and 208-240 Volt/60 Hertz/1 Phase Nonreversing
460-480 Volt/60 Hertz/3 Phase and 208-240 Volt/60 Hertz/3 Phase Reversing and Nonreversing
Step Problem If No, then
1 Is there voltage at H2-13? If yes, continue to next step. Replace micro control.
2 Is there voltage at H2-6? If yes, continue to next step. Correct wiring between H2-6 and H2-13.
3 Is there voltage at H2-5? If yes, continue to next step. Check for proper thermistor operation. Replace micro
control if necessary.
4 Is there voltage to the input of the motor relay? If yes,
continue to next step.
5 Is there voltage to the output of the motor relay? If yes,
continue to next step for 1 phase units, Step 11 for 3 phase
units.
6 1 Phase Only: Is there voltage to terminal 3 of CR1? If
yes, continue to next step.
7 Is there voltage to terminal 5 of CR1? If yes, continue
with Step 13.
8 Is there voltage to terminal 3 of the motor? If yes,
continue to next step.
9 Is there voltage across the coil of CR1? If yes, continue to
next step.
10 Does CR1 operate? If yes, continue to Step 13. Replace CR1.
11 3 Phase Only: Is there voltage to the input of the motor
switch? If yes, continue to next step.
12 Is there voltage to the output of the motor switch? If yes,
continue to next step.
13 Is there voltage across the steam valve coil? If yes,
continue to next step.
14 Unit operational. If unit still doesn’t heat, check steam
supply.
Correct wiring between motor relay and micro control.
Replace motor relay.
Correct wiring between CR1 and motor relay.
Continue with Step 8.
Replace motor.
Correct wiring to CR1.
Correct wiring to motor switch.
Replace motor.
Correct wiring to steam valve coil.
W002
30 M411429
© Copyright, Alliance Laundry Systems LLC – DO NOT COPY or TRANSMIT
Page 31

Section 3 Troubleshooting
WARNING
To reduce the risk of electric shock, fire, explosion, serious injury or death:
• Disconnect electric power to the tumbler before servicing.
• Close gas shut-off valve to gas tumbler before servicing.
• Close steam valve to steam tumbler before servicing.
• Never start the tumbler with any guards/panels removed.
• Whenever ground wires are removed during servicing, these ground wires must be
reconnected to ensure that the tumbler is properly grounded.
35. OM MODELS: NO START WITH CYCLE SELECTED, START BUTTON PRESSED AND DOOR
CLOSED
120 Volt/60 Hertz/1 Phase CG & CSH Nonreversing
208-240 Volt/60 Hertz/1 or 3 Phase CSH Nonreversing
208-240 Volt/60 Hertz/3 Phase CE Nonreversing
460-480 Volt/60 Hertz/3 Phase CG, CE and CSH Nonreversing
Step Problem If No, then
1 Is there voltage to the primary of the transformer? If yes,
continue to next step.
2 Is there 24 VAC across terminals 2 & 3 of transformer
secondary? If yes, continue to next step.
3 Is there voltage to the COM terminal of the door switch?
If yes, continue to next step.
4 Is there voltage to the N.O. terminal of the door switch? If
yes, continue to next step.
5 Is there voltage to terminal H2-8 on the micro control? If
yes, continue to next step.
6 Is there voltage at terminal H2-7 on the micro control? If
yes, continue to next step.
7 Is there voltage across the coil of motor relay? If yes,
continue to next step.
8 Is there voltage to the input of the motor relay? If yes,
continue to next step.
9 Is there voltage to the output of the motor relay? If yes,
continue to next step.
10 Is there voltage across terminals 1 and 4 of the motor for
single phase units or L1, L2 and L3 of three phase units?
If yes, continue to next step.
11 Does the motor operate? If yes, continue to next step. Replace motor.
12 Unit operational.
Correct wiring to transformer primary. Check fuses.
Replace transformer.
Correct wiring between door switch and transformer.
Check fuses.
Check door switch for proper operation. Replace if
necessary.
Correct wiring between micro control and door switch.
Replace micro control.
Correct wiring between motor relay and micro control.
Correct wiring between motor relay and supply voltage.
Replace motor relay.
Correct wiring between motor and motor relay.
W002
M411429 31
© Copyright, Alliance Laundry Systems LLC – DO NOT COPY or TRANSMIT
Page 32

Section 3 Troubleshooting
WARNING
To reduce the risk of electric shock, fire, explosion, serious injury or death:
• Disconnect electric power to the tumbler before servicing.
• Close gas shut-off valve to gas tumbler before servicing.
• Close steam valve to steam tumbler before servicing.
• Never start the tumbler with any guards/panels removed.
• Whenever ground wires are removed during servicing, these ground wires must be
reconnected to ensure that the tumbler is properly grounded.
36. OM MODELS: NO DISPLAY AFTER SELECTING ONE OF THE ON/SELECT KEYS
120 Volt/60 Hertz/1 Phase CG & CSH Nonreversing
208-240 Volt/60 Hertz/1 Phase CG and CSH Nonreversing
208-240 Volt/60 Hertz/3 Phase CG and CSH Reversing/Nonreversing
208-240 Volt/60 Hertz/3 Phase CE Reversing/Nonreversing
460-480 Volt/60 Hertz/3 Phase CG, CE and CSH Reversing/Nonreversing
Step Problem If No, then
1 Is there voltage across the primary of the transformer? If
yes, continue to next step.
2 Is there 24 VAC across terminals 1 & 4 of transformers
secondary? If yes, continue to next step.
3 Is there 24 VAC across terminals H3-3 and H3-4 on the
micro control? If yes, continue to next step.
4 Is there voltage to the input of the fuse on the micro
control? If yes, continue to next step
5 Is there voltage to the opposite side of the fuse on the
micro control? If yes, continue to next step.
6 Replace micro control.
Correct wiring between transformer and supply voltage.
Check fuses.
Replace transformer
Correct wiring between H3 and transformer. Check fuses.
Replace micro control.
Check fuse making sure it is not blown. Replace if
necessary.
W002
32 M411429
© Copyright, Alliance Laundry Systems LLC – DO NOT COPY or TRANSMIT
Page 33

Section 3 Troubleshooting
WARNING
To reduce the risk of electric shock, fire, explosion, serious injury or death:
• Disconnect electric power to the tumbler before servicing.
• Close gas shut-off valve to gas tumbler before servicing.
• Close steam valve to steam tumbler before servicing.
• Never start the tumbler with any guards/panels removed.
• Whenever ground wires are removed during servicing, these ground wires must be
reconnected to ensure that the tumbler is properly grounded.
37. CE OM MODELS: NO HEAT WITH CYCLE SELECTED, UNIT RUNNING AND CALLING FOR
HEAT
460-480 Volt/60 Hertz/3 Phase and 208-240 Volt/60 Hertz/3 Phase Reversing and Nonreversing
Step Problem If No, then
1 Is there voltage at H2-13? If yes, continue to next step. Replace Micro.
2 Is there voltage at H2-6? If yes, continue to next step. Correct wiring between H2-6 and H2-13.
3 Is there voltage at H2-5? If yes, continue to next step. Check for proper thermistor operation. Replace micro if
necessary.
4 Is there voltage to terminal 14 of the motor relay? If yes,
continue to next step.
5 Is there voltage to terminal 13 of the motor relay? If yes,
continue to next step for 1 phase units, Step 22 for 3 phase
units.
6 Is there voltage to the fan motor switch? If yes, continue
to next step.
7 Is there voltage at the output of the fan motor switch.
If yes, continue to next step.
8 Is there voltage to the input of the cabinet limit? If yes,
continue to next step.
9 Is there voltage to the output of the cabinet limit? If yes,
continue to next step.
10 Is there voltage to the COM terminal of the airflow
switch? If yes, continue to next step.
11 Is there voltage to the N.O. terminal of the airflow switch?
If yes, continue to next step.
12 Is there voltage to the input of the stove limit? If yes,
continue to next step.
13 Is there voltage to the output of the stove limit? If yes,
continue to next step.
14 Is there voltage HC1? Correct wiring to HC1.
15 Is there voltage to terminals T1, T2 and T3 of HC1? If yes,
continue to next step.
16 Is there voltage to terminals L1, L2 and L3 of HC1? Replace HC1.
17 Is there voltage across the elements? If yes, then continue
to next step.
18 Do the elements produce heat? If yes, continue to Step 35.
Correct wiring between motor relay and micro.
Replace motor relay.
Correct wiring between motor switch and motor relay.
Replace fan motor.
Correct wiring between cabinet limit and fan motor.
Check for proper airflow. Replace cabinet limit.
Correct wiring between airflow switch and cabinet limit.
Check for proper airflow. Replace airflow switch.
Correct wiring between stove limit and airflow switch.
Check for proper airflow. Replace stove limit if necessary.
Correct wiring between HC1 and supply.
Correct wiring to the elements.
Check for opens or shorts in the elements.
W002
NOTE: IF elements are glowing a bright red/orange,
there is not enough airflow.
19 Unit operational.
(continued)
M411429 33
© Copyright, Alliance Laundry Systems LLC – DO NOT COPY or TRANSMIT
Page 34

Section 3 Troubleshooting
WARNING
To reduce the risk of electric shock, fire, explosion, serious injury or death:
• Disconnect electric power to the tumbler before servicing.
• Close gas shut-off valve to gas tumbler before servicing.
• Close steam valve to steam tumbler before servicing.
• Never start the tumbler with any guards/panels removed.
• Whenever ground wires are removed during servicing, these ground wires must be
reconnected to ensure that the tumbler is properly grounded.
38. CG OM MODELS: NO HEAT WITH CYCLE SELECTED, UNIT RUNNING AND CALLING FOR
HEAT
120 Volt/60 Hertz/1 Phase and 208-240 Volt/60 Hertz/1 Phase Nonreversing
460-480 Volt/60 Hertz/3 Phase and 208-240 Volt/60 Hertz/3 Phase Reversing and Nonreversing
Step Problem If No, then
1 Is there voltage at H2-13? If yes, continue to next step. Replace micro control.
2 I s t he re vo lt ag e a t H2 -6 of the mi cr o c ont ro l?
If yes, continue to next step.
3 I s t he re vo lt ag e a t H2 -5 of the mi cr o c ont ro l?
If yes, continue to next step.
4 Is there voltage to input of the motor relay? If yes,
continue to next step.
5 Is there voltage to the output of the motor relay? If yes,
continue to next step for 1 phase units, or step 11 for 3
phase units.
6 1 Phase Models: Is there voltage to terminal 3 of CR1?
If yes, continue to next step.
7 Is there voltage to terminal 5 of CR1? If yes, continue to
next step.
8 Is there voltage to terminal 3 of the motor? If yes,
continue to next step.
9 Is there voltage across the coil of CR1? If yes, continue to
next step.
10 Does CR1 operate properly? If yes, continue with Step
13.
11 3 Phase Models: Is there voltage to the input of fan motor
switch? If yes, continue to next step.
12 Is there voltage out from the fan motor switch? If yes,
continue to next step.
13 Is there voltage to the input of the cabinet limit? If yes,
continue to next step.
14 Is there voltage to the output of the cabinet limit? If yes,
continue to next step
15 Is there voltage to COM terminal of the airflow switch?
If yes, continue to next step.
16 Is there voltage to the N.O. terminal of the airflow switch?
If yes, continue to next step.
17 Is there voltage to the input of the stove limit? If yes,
continue to next step.
18 Is there voltage to the output of the stove limit? If yes,
continue to next step.
19 Is there voltage to terminal 2 of the ignition control?
If yes, continue to next step.
Correct wiring between H2-5 and H2-13 on the micro
control.
Check for proper thermistor operation. Replace micro
control if necessary.
Correct wiring between motor relay and micro.
Replace motor relay.
Correct wiring between CR1 and motor relay.
Continue with Step 8.
Replace motor.
Correct wiring between CR1 and motor.
Replace CR1.
Correct wiring to fan motor switch?
Replace fan motor.
Correct wiring between cabinet limit and CR1.
Replace cabinet limit.
Correct wiring between airflow switch and cabinet limit.
Check for proper operation and airflow. Replace airflow
switch if necessary.
Correct wiring between stove limit and airflow switch.
Check for proper airflow. Replace stove limit if necessary.
Correct wiring between ignition control and stove limit.
W002
(continued)
34 M411429
© Copyright, Alliance Laundry Systems LLC – DO NOT COPY or TRANSMIT
Page 35

Section 3 Troubleshooting
WARNING
To reduce the risk of electric shock, fire, explosion, serious injury or death:
• Disconnect electric power to the tumbler before servicing.
• Close gas shut-off valve to gas tumbler before servicing.
• Close steam valve to steam tumbler before servicing.
• Never start the tumbler with any guards/panels removed.
• Whenever ground wires are removed during servicing, these ground wires must be
reconnected to ensure that the tumbler is properly grounded.
38. CG OM MODELS: NO HEAT WITH CYCLE SELECTED, UNIT RUNNING AND CALLING FOR
HEAT
120 Volt/60 Hertz/1 Phase and 208-240 Volt/60 Hertz/1 Phase Nonreversing
460-480 Volt/60 Hertz/3 Phase and 208-240 Volt/60 Hertz/3 Phase Reversing and Nonreversing
(continued)
Step Problem If No, then
20 Does the igniter spark? If yes, continue to next step. Check for proper gap on igniter and check for proper
resistance of ignition cable. Replace if necessary.
21 Is there voltage at terminal 1 of the ignition control? If yes,
continue to next step.
21 Is there voltage across the gas valve? If yes, continue to
next step.
22 Is there a flame? If yes, continue to next step. Check for gas flow and proper gas pressure. Replace gas
24 Unit operational.
Replace ignition control.
Correct wiring to gas valve.
valve or coils of gas valve.
W002
M411429 35
© Copyright, Alliance Laundry Systems LLC – DO NOT COPY or TRANSMIT
Page 36

Section 3 Troubleshooting
WARNING
To reduce the risk of electric shock, fire, explosion, serious injury or death:
• Disconnect electric power to the tumbler before servicing.
• Close gas shut-off valve to gas tumbler before servicing.
• Close steam valve to steam tumbler before servicing.
• Never start the tumbler with any guards/panels removed.
• Whenever ground wires are removed during servicing, these ground wires must be
reconnected to ensure that the tumbler is properly grounded.
39. OM MODELS: NO FAN MOTOR ROTATION WITH CYCLE SELECTED AND START PRESSED
208-240 Volt/60 Hertz/3 Phase and 480 Volt/60 Hertz/3 Phase CE Reversing Models
208-240 Volt/60 Hertz/3 Phase and 460-480 Volt/60 Hertz/3 Phase CG Reversing and CSH Models
Step Problem If No, then
1 Is there voltage across the primary of the transformer?
If yes, continue to next step.
2 Is there 24 VAC across terminals 2 & 3 of the transformer
secondary? If yes, continue to next step.
3 Is there voltage to the COM of the door switch?
If yes, continue to next step.
4 Is there voltage to the N.O. terminal of the door switch?
If yes, continue to next step.
5 Is there voltage to H2-8 of micro control? If yes, continue
to next step.
6 Is there voltage to H2-7 of micro control? If yes, continue
to next step.
7 Is there voltage across the coil of the M contactor? If yes,
continue to next step.
8 Is there voltage to L1, L2 and L3 of the M contactor?
If yes, continue to next step.
9 Is there voltage toT1, T2 and T3 of the M contactor?
If yes, continue to next step.
10 Is there voltage across L1, L2 and L3 of the motor?
If yes, continue to next step.
11 Unit operational.
Correct wiring to transformer. Check fuses.
Replace transformer.
Correct wiring to door switch. Check fuse.
Check door switch and switch rod for proper operation.
Replace if necessary.
Correct wiring between micro control and door switch.
Replace micro control.
Correct the wiring to the M contactor.
Correct wiring between M contactor and supply voltage.
Replace M contactor.
Correct wiring between motor and M contactor.
W002
36 M411429
© Copyright, Alliance Laundry Systems LLC – DO NOT COPY or TRANSMIT
Page 37

Section 3 Troubleshooting
WARNING
To reduce the risk of electric shock, fire, explosion, serious injury or death:
• Disconnect electric power to the tumbler before servicing.
• Close gas shut-off valve to gas tumbler before servicing.
• Close steam valve to steam tumbler before servicing.
• Never start the tumbler with any guards/panels removed.
• Whenever ground wires are removed during servicing, these ground wires must be
reconnected to ensure that the tumbler is properly grounded.
40. MM MODELS: FAN MOTOR DOES NOT RUN WITH DOOR CLOSED, CYCLE SELECTED AND
START BUTTON PRESSED
208-240 Volt/60 Hertz/3 Phase Gas and Steam Reversing and Nonreversing
480 Volt/60 Hertz/3 Phase Gas Nonreversing
480 Volt/60 Hertz/3 Phase Steam Reversing
Step Problem If No, then
1 Is there voltage to the COM of the door switch?
If yes, continue to next step.
2 Is there 120 VAC to the N.O. terminal of the door switch?
If yes, continue to next step.
3 Is there 120 VAC to terminal P2 of the micro control?
If yes, continue to next step.
4 Is there 120 VAC to terminal P1 of the micro control?
If yes, continue to next step.
5 Is there 120 VAC across the coil of the motor contactor?
If yes, continue to next step.
6 Is there voltage to terminals L1, L2, and L3 of motor
contactor? If yes, continue to next step.
7 Is there voltage at terminals T1, T2 and T3 of the M
contactor? If yes, continue to next step.
8 Is there voltage to L1, L2 and L3 of motor? If yes,
continue to next step.
9 Replace motor.
Correct wiring between door switch and L1 supply for
208-240 Volt units. Check between door switch and X1 of
transformer for 480 Volt units.
Check for proper operation of door switch arm and/or
replace door switch.
Correct wiring between door switch and micro control.
Replace micro control.
Correct wiring to the coil of motor contactor.
Correct wiring between motor contactor and terminals L1,
L2, L3 and TB1.
Replace motor contactor.
Correct wiring between motor and motor contactor.
W002
NOTE: Make sure fuse on x1 of transformer is operational (240 Volt and 480 Volt/60 Hertz/3 Phase units).
M411429 37
© Copyright, Alliance Laundry Systems LLC – DO NOT COPY or TRANSMIT
Page 38

Section 3 Troubleshooting
WARNING
To reduce the risk of electric shock, fire, explosion, serious injury or death:
• Disconnect electric power to the tumbler before servicing.
• Close gas shut-off valve to gas tumbler before servicing.
• Close steam valve to steam tumbler before servicing.
• Never start the tumbler with any guards/panels removed.
• Whenever ground wires are removed during servicing, these ground wires must be
reconnected to ensure that the tumbler is properly grounded.
41. MM MODELS: CYLINDER MOTOR DOES NOT RUN OR REVERSE WITH DOOR CLOSED,
CYCLE SELECTED AND START BUTTON PRESSED IN REVERSING MODE OR
NONREVERSING MODE
480 Volt/60 Hertz/3 Phase Steam Reversing and 208-240 Volt/60 Hertz/3 Phase Gas and Steam Reversing
Models
Step Problem If No, then
1 Is there120 VAC to the COM terminal of the door switch?
If yes, continue to next step.
2 Is there 120 VAC to the N.O. terminal of the door switch?
If yes, continue to next step.
3 Is there 120 VAC to terminal P2 of the micro control? If
yes, continue to next step.
4 Is there 120 VAC to terminal P1 of the micro control? If
yes, continue to next step.
5 Is there 120 VAC across the coils of the motor contactor?
If yes, continue to next step.
6 Is there voltage to terminals L1, L2, and L3 of motor
contactor? If yes, continue to next step.
7 Is there voltage at terminals T1, T2 and T3 of the M
contactor? If yes, continue to next step.
8 Is there voltage to terminals T1, T2, T3 on the forward
contactor and voltage to terminals U, V, and W on the
reversing contactor? If yes, continue to next step.
9 Is there voltage to L1, L2, L3 on the forward contactor or
voltage to terminals X, Y, and Z on the reversing
contactor? If yes, continue to next step.
10 Is there voltage to L1, L2 and L3 at the cylinder motor? If
yes, continue to step 16.
11 Is there voltage across the coils of either the forward or
reversing contactor? If yes, replace either the forward or
reversing contactor.
12 Is there voltage at the CW or CCW terminal on the solid
state timer? If yes, correct wiring between the solid state
timer and either the forward or reversing coil.
13 Is there voltage at L1 of the solid state timer? If yes,
replace solid state timer.
14 Is there voltage to the output of the auxiliary contacts on
the motor contactor? If yes, correct wiring between motor
contactor and solid state timer.
15 Is there voltage to the input side of the auxiliary contacts
on the motor contactor? If yes, replace motor contactor
16 Unit operational.
Correct wiring between door switch and L1 supply for
208-240 units. Check transformer on 480 Volt.
Check for proper operation of door switch arm and/or
replace door switch.
Correct wiring between door switch and micro control.
Replace micro control.
Correct wiring to the coil of motor contactor.
Correct wiring between motor contactor terminals and L1,
L2, L3 of TB1.
Replace motor contactor.
Correct wiring between forward contactor and motor
contactor and /or correct wiring between reverse contactor
and motor contactor.
Continue to Step 11.
Correct wiring between cylinder motor and forward or
reversing contactor.
Continue to next step.
Continue to next step.
Continue to next step.
Continue to next step.
Correct wiring between motor contactor and TB1-L1
supply.
W002
NOTE: If the unit will not reverse when reversing is selected, check for proper operation and wiring of
reversing switch. Replace if necessary.
38 M411429
© Copyright, Alliance Laundry Systems LLC – DO NOT COPY or TRANSMIT
Page 39

Section 3 Troubleshooting
WARNING
To reduce the risk of electric shock, fire, explosion, serious injury or death:
• Disconnect electric power to the tumbler before servicing.
• Close gas shut-off valve to gas tumbler before servicing.
• Close steam valve to steam tumbler before servicing.
• Never start the tumbler with any guards/panels removed.
• Whenever ground wires are removed during servicing, these ground wires must be
reconnected to ensure that the tumbler is properly grounded.
42. MM MODELS: NO HEAT WITH CYCLE SELECTED, UNIT RUNNING AND CALLING FOR
HEAT
120 Volt/60 Hertz/1 Phase and 208-240 Volt/60 Hertz/1 Phase Gas and Steam Nonreversing
480 Volt/60 Hertz/3 Phase and 208-240 Volt/60 Hertz/3 Phase Steam Reversing and Nonreversing
Step Problem If No, then
1 Is there voltage to COM terminal of the micro control?
If yes, continue to next step.
2 Is there voltage to the N.O. terminal of the micro control?
If yes, continue to next step for gas models, to step 20 for
steam models.
3 Is there voltage to the input of the stove high limit? If yes,
continue to next step.
4 Is there voltage to the output of the stove high limit? If yes,
continue to next step.
5 Is there voltage to the N.O. terminal of the airflow switch?
If yes, continue to next step.
6 Is there voltage at COM of the airflow switch? If yes,
continue to next step.
7 Is there voltage to the input of the cabinet limit? If yes,
continue to next step.
8 Is there voltage to the output of the cabinet limit? If yes,
continue to next step.
9 Is there voltage to terminal 1 of CR2? If yes, continue to
next step.
10 Is there voltage to terminal 3 of the CR2 If yes, continue to
next step.
11 Is there voltage to L1 of I.E.I. board? If yes, continue to
next step.
12 Is there voltage across gas valve coils? If yes, continue to
next step.
13 Is the igniter sparking? If yes, continue to next step. Check resistance of High Voltage lead (5k and 20k).
14 Is there gas flow through the valve? If yes, continue to step
22.
15 Is there voltage across the coil of CR2. If yes, continue to
next step.
16 Is there 120 VAC on terminal 3 of motor? If yes, correct
wiring between CR2 and motor. Continue to step 22.
17 Is there voltage across the coil of the steam valve? If yes,
continue to next step.
18 Does the unit heat? If yes, continue to next step. Check for proper steam supply. Replace steam valve if
19 Unit operational.
Correct wiring between door switch and micro control.
Replace micro.
Correct wiring between stove high limit and micro
control.
Check for proper airflow. If airflow is good, replace
stove high limit.
Correct wiring between airflow switch and stove high
limit.
Check for proper airflow and function of airflow switch.
Replace airflow switch if necessary.
Correct wiring to between cabinet limit and airflow
switch.
Replace cabinet limit.
Correct wiring between CR2 and cabinet limit.
Continue with step 16.
Correct wiring between I.E.I. board and CR2.
Check wiring. Replace I.E.I. board if necessary.
Replace if necessary.
Check for proper gas pressure. Replace gas valve if
necessary.
Replace CR2.
Replace motor.
Correct wiring to steam valve.
necessary.
W002
M411429 39
© Copyright, Alliance Laundry Systems LLC – DO NOT COPY or TRANSMIT
Page 40

Section 3 Troubleshooting
WARNING
To reduce the risk of electric shock, fire, explosion, serious injury or death:
• Disconnect electric power to the tumbler before servicing.
• Close gas shut-off valve to gas tumbler before servicing.
• Close steam valve to steam tumbler before servicing.
• Never start the tumbler with any guards/panels removed.
• Whenever ground wires are removed during servicing, these ground wires must be
reconnected to ensure that the tumbler is properly grounded.
43. MM MODELS: NO HEAT WITH CYCLE SELECTED, UNIT RUNNING AND CALLING FOR
HEAT
208-240 Volt/60 Hertz/3 Phase Gas Reversing
Step Problem If No, then
1 Is there voltage to the COM terminal of the micro control?
If yes, continue to next step.
2 Is there voltage to the N.O. terminal of the micro control? If
yes, continue to next step.
3 Is there voltage to the COM terminal of the airflow switch?
If yes, continue to next step.
4 Is there voltage to the N.O. contact of the airflow switch?
If yes, continue to next step.
5 Is there voltage to the input of the stove limit? If yes,
continue to next step.
6 Is there voltage to the output of the stove limit? If yes,
continue to next step.
7 Is there voltage to the input of the cabinet high limit? If yes,
continue to next step.
8 Is there voltage to the output side of the cabinet high limit?
If yes, continue to next step.
9 Is there voltage to L1 of the I.E.I. board? If yes, continue to
next step.
10 Is there voltage across V1 and V2 of the I.E.I. board? If
yes, continue to next step.
11 Is there voltage across the coils of the gas valve? If yes,
continue to next step.
12 Does the unit ignite? If yes, continue to next step. Continue to next step.
13 Is there a spark? If yes, continue to next step. Check for proper igniter gap. Check for proper resistance
14 Is there a gas flow through the valve? If yes, continue to
next step.
15 Unit operational.
Correct wiring between door switch and micro control.
Replace the micro control.
Correct wiring between airflow switch and micro control.
Check for proper operation of airflow switch and airflow.
Replace airflow switch if necessary.
Correct wiring between stove limit and airflow switch.
Check for proper airflow and flame pattern. Replace
stove high limit if necessary.
Correct wiring between cabinet high limit and stove high
limit.
Check for proper airflow. Replace cabinet limit if
necessary.
Correct wiring between I.E.I. board and cabinet high
limit.
Make sure unit is not in flame lockout. Replace I.E.I.
board if necessary.
Correct wiring between gas valves and I.E.I. board.
of high voltage lead, 5 k to 25 k ohms.
Check to see if gas line is on and that the gas line was
bled of air. Also, check for proper gas pressure.
W002
(continued)
40 M411429
© Copyright, Alliance Laundry Systems LLC – DO NOT COPY or TRANSMIT
Page 41

Section 3 Troubleshooting
WARNING
To reduce the risk of electric shock, fire, explosion, serious injury or death:
• Disconnect electric power to the tumbler before servicing.
• Close gas shut-off valve to gas tumbler before servicing.
• Close steam valve to steam tumbler before servicing.
• Never start the tumbler with any guards/panels removed.
• Whenever ground wires are removed during servicing, these ground wires must be
reconnected to ensure that the tumbler is properly grounded.
44. OM REVERSING MODELS: NO CYLINDER ROTATION OR REVERSING CAPABILITIES
208-240 Volt/60 Hertz/3 Phase and 480 Volt/60 Hertz/3 Phase CE Models
208-240 Volt/60 Hertz/3 Phase and 460-480 Volt/60 Hertz/3 Phase CG and CSH Models
Step Problem If No, then
1 Is there voltage across the primary of the transformer?
If yes, continue to next step.
2 Is there voltage across terminals 2 & 3 of the transformer
secondary? If yes, continue to next step.
3 Is there voltage to the COM of the door switch?
If yes, continue to next step.
4 Is there voltage to the N.O. terminal of the door switch?
If yes, continue to next step.
5 Is there voltage to H2-8 terminal of micro control?
If yes, continue to next step for forward rotation, or step 11
for reverse rotation.
6 Forward Rotation: Is there voltage to H2-3 of micro
control? If yes, continue to next step.
7 Is there voltage across the coil of the forward relay?
If yes, continue to next step.
8 Is there voltage to terminals L1, L2 and L3 of the forward
relay? If yes, continue to next step.
9 Is there voltage to terminals T1, T2 and T3 of the forward
relay? If yes, continue to next step.
10 Is there voltage across L1, L2 and L3 of the motor?
If yes, continue step 16.
11 Reverse Rotation: Is there voltage to H2-4 of micro
control? If yes, continue to next step.
12 Is there voltage across the coil of the reverse relay?
If yes, continue to next step.
13 Is there voltage to terminals X, Y and Z of the reversing
relay? If yes, continue to next step.
14 Is there voltage to terminals U, V and W of the reversing
relay? If yes, continue to next step.
15 Is there voltage across L1, L2 and L3 of the motor?
If yes, continue to next step.
16 Does the motor turn? If yes, continue to next step. Replace motor.
17 Does the cylinder rotate? If yes, continue to next step. Check drive components between motor and cylinder.
18 Unit operational.
Correct wiring between transformer and supply voltage.
Check fuses.
Replace transformer.
Correct wiring to door switch. Check fuses.
Correct wiring and check fuses.
Correct wiring between micro control and door switch.
Make sure unit is in the forward portion of rotation.
Replace micro control.
Correct the wiring to the relay.
Correct wiring between relay and supply voltage.
Replace forward relay.
Correct wiring between motor and forward relay.
Make sure unit is in the reverse portion of rotation.
Replace micro control.
Correct the wiring to the relay.
Correct wiring between relay and supply voltage.
Replace reversing relay.
Correct wiring between motor and reversing relay.
W002
M411429 41
© Copyright, Alliance Laundry Systems LLC – DO NOT COPY or TRANSMIT
Page 42

Section 3 Troubleshooting
WARNING
To reduce the risk of electric shock, fire, explosion, serious injury or death:
• Disconnect electric power to the tumbler before servicing.
• Close gas shut-off valve to gas tumbler before servicing.
• Close steam valve to steam tumbler before servicing.
• Never start the tumbler with any guards/panels removed.
• Whenever ground wires are removed during servicing, these ground wires must be
reconnected to ensure that the tumbler is properly grounded.
45. MM MODELS: NO DISPLAY AFTER PRESSING THE ON/SELECT KEYS
120 Volt/60 Hertz/1 Phase and 208-240 Volt/60 Hertz/1 Phase Gas and Steam Nonreversing
480 Volt/60 Hertz/3 Phase and 208-240 Volt/60 Hertz/3 Phase Gas and Steam Reversing/Nonreversing
Step Problem If No, then
1 Is there 120 VAC across COM and Neutral (P3) terminals
on PC board? If yes, replace PC board.
Correct wiring between TB1-L1 and COM on PC board
or between TB1-N and P3 (Neutral) on PC board for low
voltage. Correct wiring between COM on PC board and
X1 of transformer for 480 Volt/60 Hertz/3 Phase voltage.
NOTE: Make sure fuse on X1 line of transformer is operational. Used for 480 Volt/60 Hertz/3 Phase voltage.
W002
NOTE: If unable to change settings, the key board had been manually locked out. To lock or unlock, press
and hold the START pad and press TIME.
46. MM MODELS: MOTOR DOES NOT RUN WITH DOOR CLOSED, CYCLE SELECTED AND
START BUTTON PRESSED
208-240 Volt/60 Hertz/3 Phase Gas and Steam Reversing and Nonreversing
480 Volt/60 Hertz/3 Phase Gas Nonreversing
480 Volt/60 Hertz/3 Phase Steam Reversing
Step Problem If No, then
1 Is there voltage to the COM of the door switch? If yes,
continue to next step.
2 Is there 120 VAC to the N.O. terminal of the door switch?
If yes, continue to next step.
3 Is there 120 VAC to terminal P2 of the micro control? If
yes, continue to next step.
4 Is there 120 VAC to terminal P1 of the micro control? If
yes, continue to next step.
5 Is there 120 VAC across the coil of the motor contactor? If
yes, continue to next step.
6 Is there voltage to terminals L1, L2, and L3 of motor
contactor? If yes, continue to next step.
7 Is there voltage at terminals T1, T2 and T3 of the M
contactor? If yes, continue to next step.
8 Is there voltage to L1, L2 and L3 at motor? If yes, continue
to next step.
9 Replace motor.
Correct wiring between door switch and L1 supply for
208-240 Volt units. Check between door switch and X1
of transformer for 480 Volt/3 Phase units.
Check for proper operation of door switch arm and/or
replace door switch.
Correct wiring between door switch and micro control.
Replace micro control.
Correct wiring to the coil of motor contactor.
Correct wiring between motor contactor and terminals
L1, L2, L3 and TB1.
Replace motor contactor.
Correct wiring between motor and motor contactor.
NOTE: Make sure fuse on x1 of transformer is operational (480 Volt/60 Hertz/3 Phase units).
42 M411429
© Copyright, Alliance Laundry Systems LLC – DO NOT COPY or TRANSMIT
Page 43

Section 3 Troubleshooting
WARNING
To reduce the risk of electric shock, fire, explosion, serious injury or death:
• Disconnect electric power to the tumbler before servicing.
• Close gas shut-off valve to gas tumbler before servicing.
• Close steam valve to steam tumbler before servicing.
• Never start the tumbler with any guards/panels removed.
• Whenever ground wires are removed during servicing, these ground wires must be
reconnected to ensure that the tumbler is properly grounded.
47. MM MODELS: CYLINDER MOTOR DOES NOT RUN OR REVERSE WITH DOOR CLOSED,
CYCLE SELECTED AND START BUTTON PRESSED IN REVERSING MODE OR
NONREVERSING MODE
480 Volt/60 Hertz/3 Phase Steam Reversing and 208-240 Volt/60 Hertz/3 Phase Gas and Steam Reversing
Models
Step Problem If No, then
1 Is there120 VAC to the COM terminal of the door switch?
If yes, continue to next step.
2 Is there 120 VAC to the N.O. terminal of the door switch?
If yes, continue to next step.
3 Is there 120 VAC to terminal P2 of the micro control?
If yes, continue to next step.
4 Is there 120 VAC to terminal P1 of the micro control?
If yes, continue to next step.
5 Is there 120 VAC across the coils of the motor contactor?
If yes, continue to next step.
6 Is there voltage to terminals L1, L2, and L3 of motor
contactor? If yes, continue to next step.
7 Is there voltage at terminals T1, T2 and T3 of the M
contactor? If yes, continue to next step.
8 Is there voltage to terminals T1, T2, T3 on the forward
contactor and voltage to terminals U, V, and W on the
reversing contactor? If yes, continue to next step.
9 Is there voltage to L1, L2, L3 on the forward contactor or
voltage to terminals X, Y, and Z on the reversing contactor?
If yes, continue to next step.
10 Is there voltage to L1, L2 and L3 at motor? If yes, continue
to step 16.
11 Is there voltage across the coils of either the forward or
reversing contactor? If yes, replace either the forward or
reversing contactor.
12 Is there voltage at the CW or CCW terminal on the solid
state timer? If yes, correct wiring between the solid state
timer and either the forward or reversing coil.
13 Is there voltage at L1 of the solid state timer?
If yes, replace solid state timer.
14 Is there voltage to the output of the auxiliary contacts on
the motor contactor? If yes, correct wiring between motor
contactor and solid state timer.
15 Is there voltage to the input side of the auxiliary contacts on
the motor contactor? If yes, replace motor contactor.
16 Unit operational.
Correct wiring between door switch and L1 supply for
208-240 units. Check transformer on 480 Volt machines.
Check for proper operation of door switch arm and/or
replace door switch.
Correct wiring between door switch and micro control.
Replace micro control.
Correct wiring to the coil of motor contactor.
Correct wiring between motor contactor terminals and
L1, L2, L3 of TB1.
Replace motor contactor.
Correct wiring between forward contactor and motor
contactor and /or correct wiring between reverse
contactor and motor contactor.
Continue to Step 11.
Correct wiring between cylinder motor and forward or
reversing contactor.
Continue to next step.
Continue to next step.
Continue to next step.
Continue to next step.
Correct wiring between motor contactor and TB1-L1
supply.
W002
NOTE: If the unit will not reverse when reversing is selected, check for proper operation and wiring of
reversing switch. Replace if necessary.
M411429 43
© Copyright, Alliance Laundry Systems LLC – DO NOT COPY or TRANSMIT
Page 44

Section 3 Troubleshooting
WARNING
To reduce the risk of electric shock, fire, explosion, serious injury or death:
• Disconnect electric power to the tumbler before servicing.
• Close gas shut-off valve to gas tumbler before servicing.
• Close steam valve to steam tumbler before servicing.
• Never start the tumbler with any guards/panels removed.
• Whenever ground wires are removed during servicing, these ground wires must be
reconnected to ensure that the tumbler is properly grounded.
48. MM NONREVERSING MODELS: MOTOR DOES NOT RUN WITH DOOR CLOSED, CYCLE
SELECTED AND START BUTTON PRESSED
120 Volt/60 Hertz/1 Phase Gas and Steam
208-240 Volt/60 Hertz/3 Phase Gas
480 Volt/60 Hertz/3 Phase Steam
NOTE: Voltage checks referenced to are for neutral unless stated otherwise.
Step Problem If No, then
1 Is there120 VAC to the COM of the door switch?
If yes, continue to next step.
2 Is there 120 VAC to the N.O. terminal of the door switch?
If yes, continue to next step.
3 Is there 120 VAC to terminal P2 of the micro control?
If yes, continue to next step.
4 Is there 120 VAC to terminal P1 of the micro control?
If yes, continue to next step for gas models, step 9 for steam
models.
5 Gas Models: Is there 120 VAC across the coils of the CR1?
If yes, continue to next step for gas models, step 9 for steam
models.
6 Is there 120 VAC to terminal 1 on CR1? If yes, continue to
next step.
7 Is there 120 VAC to terminal 3 on CR1? If yes, continue to
next step for 120 VAC units, or step 12 for 240 VAC units.
8 Is there 120 VAC across the terminals 1 and 4 of the motor?
If yes, replace motor.
9 STEAM: Is there 120 VAC across M coil? Correct the wiring to M coil.
10 Is there 120 VAC on terminal L1 of the motor relay for
single phase units, or across L1, L2, and L3 for three phase
units? If yes, continue to next step.
11 Is there 120 VAC on terminal T1 of the motor relay for
single phase units, or across T1, T2, and T3 for three phase
units? If yes, continue to step 8.
12 Is there 120 VAC to terminal 1 of the motor?
If yes, continue to next step.
13 Is there 240 VAC across terminals 1 and 4 of the motor?
If yes, replace motor.
14 Is there 120 VAC to terminal 8 of CR1? If yes, continue to
next step.
15 Is there 120 VAC to terminal 7 of CR1? If yes, correct
wiring between CR1-7 and terminal 4 of the motor.
Correct wiring between door switch and L1 supply for
low voltage units. Check between door switch and X1 of
transformer for high voltage units.
Check for proper operation of door switch arm and/or
replace door switch.
Correct wiring between door switch and micro control.
Replace micro control.
Correct wiring to the coil of CR1.
Correct wiring between terminal 1and door switch.
Replace CR1
Correct wiring to motor.
Correct wiring between motor and motor relay and the
terminal block.
Replace motor control relay.
Correct wiring between motor CR1.
Continue to next step.
Correct wiring between CR1-8 and L2.
Replace CR1.
W002
44 M411429
© Copyright, Alliance Laundry Systems LLC – DO NOT COPY or TRANSMIT
Page 45

Section 3 Troubleshooting
WARNING
To reduce the risk of electric shock, fire, explosion, serious injury or death:
• Disconnect electric power to the tumbler before servicing.
• Close gas shut-off valve to gas tumbler before servicing.
• Close steam valve to steam tumbler before servicing.
• Never start the tumbler with any guards/panels removed.
• Whenever ground wires are removed during servicing, these ground wires must be
reconnected to ensure that the tumbler is properly grounded.
49. CD MODELS: NO START WITH VEND SATISFIED AND START BUTTON PRESSED IN
208-240 Volt/60 Hertz/3 Phase Gas Nonreversing
NOTE: All voltage checks are referenced to neutral unless stated otherwise.
Step Problem If No, then
1 Is there voltage to COM terminal of switch A?
If yes, continue to next step.
2 Is there voltage to the NC terminal of switch A?
If yes, continue to next step.
3 Is there voltage to the common terminal of the door switch?
If yes, continue to next step.
4 With the door closed, is there voltage to the N.O. terminal
of the door switch? If yes, continue to next step.
5 Is there voltage to the input side of the Push-To-Start
button? If yes, continue to next step.
6 Is there voltage to the input side of the auxiliary contacts on
the motor contactor? If yes, continue to next step.
7 Is there voltage across the coil of the motor control
contactor?
8 If the start button is released, does the motor contactor stay
in the made position? If yes, continue to next step.
9 Is there voltage to L1, L2, and L3 of the motor contactor?
If yes, continue to next step.
10 Is there voltage to T1, T2, and T3 of the motor contactor?
If yes, continue to next step.
11 Is there voltage to L1, L2, and L3 of the motor?
If yes, continue to next step.
12 Is the internal wiring of the motor correct for the supply
voltage?
13 Thermal overload cycled, allow motor to cool and recheck. Replace motor.
14 Unit operational.
Correct wiring between L1 and switch A.
Check for proper operation of switch A. Replace switch
A if necessary.
Correct wiring between door switch and switch A.
Check door switch for proper operation, replace if
necessary.
Correct wiring between start switch and door switch.
Correct wiring between motor contactor and door switch.
Correct wiring between motor contactor and Push-ToStart button.
Check for proper operation of motor contactor, replace if
necessary.
Correct wiring between motor contactor and L1, L2 and
L3 supply.
Check for proper operation. Replace motor contactor if
necessary.
Correct wiring between motor contactor and motor.
Change the wiring accordingly.
W002
M411429 45
© Copyright, Alliance Laundry Systems LLC – DO NOT COPY or TRANSMIT
Page 46

Section 3 Troubleshooting
WARNING
To reduce the risk of electric shock, fire, explosion, serious injury or death:
• Disconnect electric power to the tumbler before servicing.
• Close gas shut-off valve to gas tumbler before servicing.
• Close steam valve to steam tumbler before servicing.
• Never start the tumbler with any guards/panels removed.
• Whenever ground wires are removed during servicing, these ground wires must be
reconnected to ensure that the tumbler is properly grounded.
50. CD MODELS: NO HEAT WITH VEND SATISFIED AND UNIT RUNNING
208-240 Volt/60 Hertz/3 Phase Gas Nonreversing
NOTE: All voltage checks are referenced to neutral unless stated otherwise.
Step Problem If No, then
1 Is there voltage to the input of the motor switch?
If yes, continue to next step.
2 Is there voltage to the output of the motor switch?
If yes, continue to next step.
3 Is there voltage to the input of the cabinet limit?
If yes, continue to next step.
4 Is there voltage to the output of the cabinet limit?
If yes, continue to next step.
5 Is there voltage to the COM terminal of the airflow switch?
If yes, continue to next step.
6 Is there voltage to the N.O. terminal of the airflow switch?
If yes, continue to next step.
7 Is there voltage to the input of the stove limit?
If yes, continue to next step.
8 Is there voltage to the output of the stove limit?
If yes, continue to next step.
9 Is there voltage to the N.C. terminal of switch B?
If yes, continue to next step.
10 Is there voltage to the COM terminal of switch B?
If yes, continue to next step.
11 Is there voltage to the input of the adjustable bulb
thermostat? If yes, continue to next step.
12 Is there voltage to the output of the adjustable bulb
thermostat? If yes, continue to next step.
13 Is there voltage to the ignition control board?
If yes, continue to next step.
14 Does the igniter spark? If yes, continue to next step. Check for proper igniter gaps and resistance for high
15 Is there voltage across V1 and V2 of the IEI board?
If yes, continue to next step.
16 Is there voltage across the coils of the gas valve?
If yes, continue to next step.
17 Is there a flame? If yes, unit is operational. Continue to next step.
18 Is there gas pressure on the output side of the gas valve?
If yes, continue to next step.
19 Check for proper gas pressure. 3.5 water column inches for
Natural Gas, 10.5 W.C.I. for L.P. Gas.
† Proper gaps for igniter: 5/16 above burner and 5/32 between electrode and grounding tab. The proper resistance of the high
voltage lead is between 5,000 Ohms and 25,000 Ohms.
Correct wiring to the input of motor switch.
Replace motor.
Correct wiring between cabinet limit and motor switch.
Check for proper operation, replace if necessary.
Correct wiring between airflow switch and cabinet limit.
Check for proper airflow and function of the airflow
switch. Replace airflow switch if necessary.
Correct wiring between stove limit and airflow switch.
Check for blockage and proper airflow. Replace stove
limit if necessary.
Correct wiring between switch B and stove limit.
Check for proper operation, replace switch B if
necessary.
Correct wiring between thermostat and switch B.
Replace adjustable bulb thermostat.
Correct wiring between IEI board and thermostat.
voltage lead.
Replace IEI board.
Correct wiring between gas valve and IEI board.
Replace gas valve.
W002
46 M411429
© Copyright, Alliance Laundry Systems LLC – DO NOT COPY or TRANSMIT
Page 47

Section 3 Troubleshooting
WARNING
To reduce the risk of electric shock, fire, explosion, serious injury or death:
• Disconnect electric power to the tumbler before servicing.
• Close gas shut-off valve to gas tumbler before servicing.
• Close steam valve to steam tumbler before servicing.
• Never start the tumbler with any guards/panels removed.
• Whenever ground wires are removed during servicing, these ground wires must be
reconnected to ensure that the tumbler is properly grounded.
51. CD MODELS: NO HEAT WITH VEND SATISFIED AND UNIT RUNNING
120 Volt/60 Hertz/1 Phase and 240 Volt/60 Hertz/1 Phase Gas Nonreversing Models
Step Problem If No, then
1 Is there voltage on red wire of the motor?
If yes, continue to next step.
2 Is there voltage to the input of the cabinet high limit?
If yes, continue to next step.
3 Is there voltage to the output of the cabinet high limit?
If yes, continue to next step.
4 Is there voltage to the COM terminal of the airflow switch?
If yes, continue to next step.
5 Is there voltage to the N.O. terminal of the airflow switch?
If yes, continue to next step.
6 Is there voltage to the input side of the stove high limit
thermostat? If yes, continue to next step.
7 Is there voltage to the output side of the stove high limit
thermostat? If yes, continue to next step.
8 Is there voltage to the N.C. terminal of switch B on the coin
drop? If yes, continue to next step.
9 Is there voltage to the COM terminal of switch B?
If yes, continue to next step.
10 Is there voltage to the input side of the adjustable
thermostat? If yes, continue to next step.
11 Is there voltage to the output side of the adjustable
thermostat? If yes, continue to next step.
12 Is there voltage to L1 of the ignition control board (IEI
board)? If yes, continue to next step.
13 Does the igniter spark? If yes, continue to next step. Check for proper gap on igniter and check for proper
14 Is there voltage across V1 and V2 of the IEI board?
If yes, continue to next step.
15 Is there voltage across the coils of the gas valve?
If yes, continue to next step.
16 Is there a flame? If yes, unit is operational. Continue to next step.
17 Is there gas pressure on the output side of the gas valve?
If yes, continue to next step.
18 Check for proper gas pressure. 3.5 water column inches for
Natural Gas, 10.5 W.C.I. for L.P. Gas.
† Proper gaps for igniter: 5/16 above burner and 5/32 between electrode and grounding tab. The proper resistance of the high
voltage lead is between 5,000 Ohms and 25,000 Ohms.
Replace motor.
Correct wiring between cabinet high limit and motor.
Check for proper operation. Replace if necessary.
Correct wiring between airflow switch and cabinet high
limit.
Check for proper operation and airflow. Replace switch
if necessary.
Correct wiring between stove limit and airflow switch.
Check for proper operation and airflow. Replace stove
high limit if necessary.
Correct wiring between switch B and stove high limit.
Check for proper operation of coin drop. Replace switch
B if necessary.
Correct wiring between switch B and thermostat.
Replace thermostat.
Correct wiring between ignition control board and
thermostat.
resistance of high voltage lead.† Replace lead if
necessary.
Replace IEI board.
Correct wiring between gas valve and IEI board.
Replace gas valve.
W002
M411429 47
© Copyright, Alliance Laundry Systems LLC – DO NOT COPY or TRANSMIT
Page 48

Section 3 Troubleshooting
WARNING
To reduce the risk of electric shock, fire, explosion, serious injury or death:
• Disconnect electric power to the tumbler before servicing.
• Close gas shut-off valve to gas tumbler before servicing.
• Close steam valve to steam tumbler before servicing.
• Never start the tumbler with any guards/panels removed.
• Whenever ground wires are removed during servicing, these ground wires must be
reconnected to ensure that the tumbler is properly grounded.
52. CD MODELS: NO START WITH VEND SATISFIED AND START BUTTON PUSHED
240 Volt/60 Hertz/1 Phase Gas Nonreversing
NOTE: All voltage checks are referenced to neutral unless stated otherwise.
Step Problem If No, then
1 Is there voltage to the NC terminal of switch A?
If yes, continue to next step.
2 Is there voltage to COM terminal of switch A?
If yes, continue to next step.
3 Is there voltage to COM terminal of the door switch?
If yes, continue to next step.
4 With the door closed, is there voltage to the N.O. terminal
of the door switch? If yes, continue to next step.
5 Is there voltage across the coil of the control relay (CR)?
If yes, continue to next step.
6 Is there voltage to terminal 5 of the motor? If yes, continue
to next step.
7 Is there voltage to the input side of the start switch?
If yes, continue to next step.
8 With the start button pressed in, is there voltage to the
output side of the start button? If yes, continue to next step.
9 Is there voltage to terminal 1 of the control relay?
If yes, continue to next step.
10 Is there voltage to terminal 3 of the control relay? If yes,
continue to next step.
11 Is there voltage to terminal 1 of the motor? If yes, continue
to next step.
12 Does the motor run? If yes, continue to next step. Replace the motor.
13 Unit operational.
Correct wiring between L1 on TBI and switch A.
Check for proper operation of switch A. Replace switch
A if necessary.
Correct wiring between door switch and switch A of the
rotary coin drop.
Check door switch for proper operation, replace if
necessary.
Correct wiring to the control relay.
Correct wiring between motor and door switch.
Correct wiring between start switch and door switch.
Replace start switch.
Correct wiring to terminal 1 of the control relay.
Check for proper operation. Replace control relay if
necessary.
Correct wiring between motor and start switch.
W002
NOTE: If the motor only runs with the start switch pressed in, that means the centrifugal switch in the motor
is bad. Replace the motor.
48 M411429
© Copyright, Alliance Laundry Systems LLC – DO NOT COPY or TRANSMIT
Page 49

Section 3 Troubleshooting
WARNING
To reduce the risk of electric shock, fire, explosion, serious injury or death:
• Disconnect electric power to the tumbler before servicing.
• Close gas shut-off valve to gas tumbler before servicing.
• Close steam valve to steam tumbler before servicing.
• Never start the tumbler with any guards/panels removed.
• Whenever ground wires are removed during servicing, these ground wires must be
reconnected to ensure that the tumbler is properly grounded.
53. CD MODELS: NO START WITH VEND SATISFIED AND START BUTTON PUSHED
120 Volt/60 Hertz/1 Phase Gas Nonreversing
NOTE: All voltage checks are referenced to neutral unless stated otherwise.
Step Problem If No, then
1 Is there voltage to the NC terminal of switch A?
If yes, continue to next step.
2 Is there voltage to COM terminal of switch A?
If yes, continue to next step.
3 Is there voltage to COM terminal of the door switch?
If yes, continue to next step.
4 With the door closed, is there voltage to the N.O. terminal
of the door switch? If yes, continue to next step.
5 Is there voltage to terminal 5 of the motor? If yes, continue
to next step.
6 Is there voltage to the input side of the start switch?
If yes, continue to next step.
7 With the start button pressed in, is there voltage to the
output side of the start button? If yes, continue to next step.
8 Is there voltage to terminal 1 of the motor? If yes, continue
to next step.
9 Does the motor run? If yes, continue to next step. Replace the motor.
10 Unit operational.
Correct wiring between L1 on TBI and switch A.
Check for proper operation of switch A. Replace switch
A if necessary.
Correct wiring between door switch and switch A of the
rotary coin drop.
Check door switch for proper operation, replace if
necessary.
Correct wiring between motor and door switch.
Correct wiring between start switch and door switch.
Replace start switch.
Correct wiring between motor and start switch.
W002
NOTE: If the motor only runs with the start switch pressed in, that means the centrifugal switch in the motor
is bad. Replace the motor.
M411429 49
© Copyright, Alliance Laundry Systems LLC – DO NOT COPY or TRANSMIT
Page 50

Section 4
Grounding
WARNING
To reduce the risk of electric shock, fire, explosion, serious injury or death:
• Disconnect electric power to the tumbler before servicing.
• Close gas shut-off valve to gas tumbler before servicing.
• Close steam valve to steam tumbler before servicing.
• Never start the tumbler with any guards/panels removed.
• Whenever ground wires are removed during servicing, these ground wires must be
reconnected to ensure that the tumbler is properly grounded.
WARNING
To reduce the risk of fire and electric shock, check with a qualified serviceperson for proper
grounding procedures. Improper connection of the equipment grounding conductor may result
in a risk of electric shock.
W002
W068R1
WARNING
To reduce the risk of fire and electric shock, if electrical supply is coming from a three phase
service, DO NOT connect a “High Leg” or “Stinger Leg” to a single phase machine. On a three
phase machine, if there is a “High Leg” or “Stinger Leg” it should be connected to L3.
Grounding Instructions
Tumbler must be grounded. In the event of malfunction
or breakdown, grounding will reduce the risk of electric
shock by providing the path of least resistance for
electric current. Tumbler must be connected to a
grounded metal, permanent wiring system; or an
equipment grounding conductor must be run with the
circuit conductors and connected to the appropriate
ground location.
NOTE: To ensure protection against shock, this
tumbler MUST be electrically grounded in
accordance with local codes, or in the absence of
local codes, with the latest edition of the National
Electrical Code ANSI/NFPA No. 70. In Canada the
electrical connections are to be made in accordance
with CSA C22.1 or the latest edition of the
Canadian Electrical Code, Part I and/or local codes.
Electrical work should be done by a qualified
electrician.
WARNING
All electrical connections should be made
by a qualified electrician.
To reduce the risk of electrical shock, deenergize the electrical circuit being
connected to the tumbler before making any
electrical connections. Never attempt to
connect a live circuit.
W070
W069
M411429 51
© Copyright, Alliance Laundry Systems LLC – DO NOT COPY or TRANSMIT
Page 51

Section 5
Service Procedures
WARNING
To reduce the risk of electric shock, fire, explosion, serious injury or death:
• Disconnect electric power to the tumbler before servicing.
• Close gas shut-off valve to gas tumbler before servicing.
• Close steam valve to steam tumbler before servicing.
• Never start the tumbler with any guards/panels removed.
• Whenever ground wires are removed during servicing, these ground wires must be
reconnected to ensure that the tumbler is properly grounded.
W002
IMPORTANT: References made to the left or right
hand direction are taken from the operator’s
position facing the front of the tumbler.
54. CONTROL PANEL
Refer to Figure 1.
a. Unlock and open access panel. To hold panel
open, swing support rod under panel.
b. Manual Timer and Coin Meter Models
(1) Remove two screws holding control panel
to cabinet.
(2) Lift control panel off top edge of front
panel and pull panel forward just far
enough to disconnect wire harness at the
plug.
55. PUSH-TO-START SWITCH
a. Remove control panel.
b. Remove two screws holding switch, and
mounting bracket (if applicable), to control
panel. Refer to Figure 1.
c. Disconnect wires from switch terminals and
remove switch.
NOTE: Refer to wiring diagram when rewiring
switch.
56. COOLING, DRYING, OR RUN LIGHT
a. Remove control panel.
b. Disconnect light wire leads.
NOTE: On Coin Meter Models, the run light white
lead must be joined to the wire harness white lead
using a double spade connector. Remove the single
spade lug from the replacement run light white
wire.
c. Compress locking tabs on sides of light and
push light out through front of control panel.
Refer to Figure 2 for Coin Drop Models or
Figure 3 for Manual Timer Models.
NOTE: Refer to wiring diagram when rewiring
light.
M411429 53
© Copyright, Alliance Laundry Systems LLC – DO NOT COPY or TRANSMIT
Page 52

Section 5 Service Procedures
ACCESS
PANEL
ATTACHING SCREWS
SUPPORT
ROD
CONTROL PANEL
PUSH-TO-START
SWITCH
TERMINAL
BOARD
SCREWS
T056SE3D
WIRE HARNESS
PLUG
T057SE3A
CONTROL PANEL
BRACKETS
PUSH-TO-START
SWITCH ASSEMBLY
CONTROL
PANEL BRACKET
Figure 1
54 M411429
© Copyright, Alliance Laundry Systems LLC – DO NOT COPY or TRANSMIT
Page 53

Section 5 Service Procedures
WARNING
To reduce the risk of electric shock, fire, explosion, serious injury or death:
• Disconnect electric power to the tumbler before servicing.
• Close gas shut-off valve to gas tumbler before servicing.
• Close steam valve to steam tumbler before servicing.
• Never start the tumbler with any guards/panels removed.
• Whenever ground wires are removed during servicing, these ground wires must be
reconnected to ensure that the tumbler is properly grounded.
57. RELAY (MANUAL TIMERS MODELS)
a. Remove control panel.
COIN
DROP
MODELS
TAB
TAB
b. Remove two screws holding relay to bracket.
Refer to Figure 3.
c. Disconnect wires from relay.
NOTE: Refer to wiring diagram when rewiring
relay.
58. RESISTOR
(Models with 208-240Volt/60Hertz Control
Circuit)
a. Remove control panel.
b. Disconnect resistor leads. Refer to Figure 3.
W002
RUN LIGHT
LOCKING
TAB
CONTROL
Figure 2
PANEL
T005SE1D
NOTE: Refer to wiring diagram when rewiring
resistor.
59. COOLING OR DRYING TIMER
(New Style)
a. Remove control panel.
b. Pull timer knob off timer shaft. Refer to
Figure 3.
c. Remove three screws holding timer to control
panel or mounting bracket.
d. Remove wires from timer terminal board, and
timer motor lead from terminal block.
IMPORTANT: Be sure barrier is installed in proper
position when reinstalling drying timer. If either
timer is a Robert Shaw timer a barrier must be
used. If both timers are Mallory or Greenwald
timers, barrier may be discarded.
NOTE: Refer to wiring diagram when rewiring
timer.
M411429 55
© Copyright, Alliance Laundry Systems LLC – DO NOT COPY or TRANSMIT
Page 54

Section 5 Service Procedures
WARNING
To reduce the risk of electric shock, fire, explosion, serious injury or death:
• Disconnect electric power to the tumbler before servicing.
• Close gas shut-off valve to gas tumbler before servicing.
• Close steam valve to steam tumbler before servicing.
• Never start the tumbler with any guards/panels removed.
• Whenever ground wires are removed during servicing, these ground wires must be
reconnected to ensure that the tumbler is properly grounded.
MANUAL TIMER
MODELS
TIMER
DRYING
LIGHT
W002
LOCKING
TA BS
COOLING
LIGHT
TIMER
KNOB
60. COOLING OR DRYING TIMER MOTOR
(Old Style Timers)
NOTE: Cooling and drying timers used prior to
January 1985 were supplied by Greenwald and
have serviceable timer motors. After January 1985,
Robert Shaw or Mallory timers are used, which do
not have serviceable timer motors. These later
timers must be replaced as complete assemblies if
the timer motor fails.
a. Remove control panel.
b. Disconnect motor leads.
RESISTORS
RELAY
BRACKET
T341S
Figure 3
c. Remove screws holding timer motor to
mounting bracket. Refer to Figure 4.
NOTE: Refer to wiring diagram when rewiring
timer motor.
d. Replacing Greenwald timer assembly with
Mallory timer assembly:
(1) Remove Greenwald timer assembly.
(2) Connect timer terminal wire 3 to terminal
board terminal B.
(3) Connect timer terminal 5 wire to terminal
board terminal C.
56 M411429
© Copyright, Alliance Laundry Systems LLC – DO NOT COPY or TRANSMIT
Page 55

Section 5 Service Procedures
WARNING
To reduce the risk of electric shock, fire, explosion, serious injury or death:
• Disconnect electric power to the tumbler before servicing.
• Close gas shut-off valve to gas tumbler before servicing.
• Close steam valve to steam tumbler before servicing.
• Never start the tumbler with any guards/panels removed.
• Whenever ground wires are removed during servicing, these ground wires must be
reconnected to ensure that the tumbler is properly grounded.
HEAT
SWITCH
SCREW
TIMER
MOTOR
W002
RUN
SWITCH
TIMER
ASSEMBLY
TU001-SV
Figure 4
61. COIN METER
Refer to Figure 5.
a. Remove control panel.
b. Disconnect wires from heat and run switches.
c. Cut remaining motor wire and joining white
wire at wire nut.
d. Remove four speed nuts holding coin meter to
coin meter frame.
NOTE: Refer to wiring diagram when rewiring coin
meter. Connect wires cut in step “c” above with
new wire nut.
TIMER
MOTOR
Figure 5
SPEED
NUT
COIN
METER
TU060-SV
M411429 57
© Copyright, Alliance Laundry Systems LLC – DO NOT COPY or TRANSMIT
Page 56

Section 5 Service Procedures
WARNING
To reduce the risk of electric shock, fire, explosion, serious injury or death:
• Disconnect electric power to the tumbler before servicing.
• Close gas shut-off valve to gas tumbler before servicing.
• Close steam valve to steam tumbler before servicing.
• Never start the tumbler with any guards/panels removed.
• Whenever ground wires are removed during servicing, these ground wires must be
reconnected to ensure that the tumbler is properly grounded.
W002
62. COIN METER TIMER MOTOR
a. Remove control panel.
b. Remove two screws holding motor to mounting
bracket. Refer to Figure 6.
c. Hold cam and drive fork against inside face of
motor mounting bracket and pull motor free of
cam and drive fork.
d. Disconnect motor leads.
e. Slide cam and drive fork out from under motor
mounting bracket.
NOTE: Refer to wiring diagram when rewiring
timer motor.
MOTOR
MOUNTING
BRACKET
SCREW
remove the switches and actuating bracket
parts.
d. Assemble the two switches and the two parts
making up the switch actuating bracket.
e. Actuate the switches a number of times by
manually pressing the actuating plate against
the switch lever and plunger to ensure that the
actuating parts do not bind. If binding occurs,
reposition the actuating plate slightly until the
binding stops.
NOTE: Refer to wiring diagram when rewiring
switches.
TIMER
SWITCH
ACTUATOR
BRACKET
CAM AND
DRIVE FORK
T007SE1B
TIMER
MOTOR
Figure 6
RUN
63. COIN METER RUN OR HEAT SWITCH
Refer to Figure 7.
a. Remove control panel.
b. Disconnect wires from switches on timer.
SWITCH
HEAT
SWITCH
Figure 7
T008SE1B
c. Hold switches and actuating bracket under
switches tightly together with one hand while
removing two screws holding switches to
timing motor mounting bracket. Carefully
58 M411429
© Copyright, Alliance Laundry Systems LLC – DO NOT COPY or TRANSMIT
Page 57

Section 5 Service Procedures
WARNING
To reduce the risk of electric shock, fire, explosion, serious injury or death:
• Disconnect electric power to the tumbler before servicing.
• Close gas shut-off valve to gas tumbler before servicing.
• Close steam valve to steam tumbler before servicing.
• Never start the tumbler with any guards/panels removed.
• Whenever ground wires are removed during servicing, these ground wires must be
reconnected to ensure that the tumbler is properly grounded.
W002
64. CONTROL THERMOSTAT
a. Remove control panel.
b. Pull knob off thermostat. Refer to Figure 8.
c. Disconnect wires from thermostat.
d. Remove two screws holding thermostat to
bracket.
e. Remove wire-way attaching screws. Refer to
Figure 9.
f. Remove screws, wire clips and/or retaining
straps securing thermostat sensing tube in wireway.
g. Later Models: Remove junction box cover
attaching screws. Refer to Figure 9.
IMPORTANT: When reinstalling thermostat, be
sure to install all screws and wire clips and replace
all retaining straps removed in steps “f” and “g”.
h. Unlock and remove lint panel.
i. Spread locking tabs on sensing probe bracket
and disengage probe from bracket. Refer to
Figure 10.
IMPORTANT: When reinstalling thermostat, be
sure to secure sensing probe with locking tabs on
bracket. Refer to Figure 10.
j. Carefully remove thermostat, tube and probe.
IMPORTANT: Do not kink sensing tube when
installing thermostat.
NOTE: Refer to wiring diagram when rewiring
thermostat.
JUNCTION
BOX
WIRE
TIES
WIRE
WAY
THERMOSTAT
THERMOSTAT
KNOB
SCREWS
SENSING
TUBE
BRACKET
T012SE1B
TU013-SV
THERMOSTAT
SENSING TUBE
Figure 9
Figure 8
M411429 59
© Copyright, Alliance Laundry Systems LLC – DO NOT COPY or TRANSMIT
Page 58

Section 5 Service Procedures
WARNING
To reduce the risk of electric shock, fire, explosion, serious injury or death:
• Disconnect electric power to the tumbler before servicing.
• Close gas shut-off valve to gas tumbler before servicing.
• Close steam valve to steam tumbler before servicing.
• Never start the tumbler with any guards/panels removed.
• Whenever ground wires are removed during servicing, these ground wires must be
reconnected to ensure that the tumbler is properly grounded.
65. TRANSFORMER
(Automatic Pilot Ignition Models)
Refer to Figure 11.
a. Remove control panel.
b. Disconnect transformer wires at electronic
package.
c. Disconnect remaining wires from transformer
at connectors.
NOTE: Refer to wiring diagram when rewiring
transformer.
W002
d. Remove nut holding transformer to cabinet.
SENSING
PROBE
LOCKING
TABS
THERMOSTAT
SENSING PROBE
LINT
SCREEN
THERMOSTAT
SENSING TUBE
WARNING
T014SE3A
Figure 10
60 M411429
© Copyright, Alliance Laundry Systems LLC – DO NOT COPY or TRANSMIT
Page 59

TRANSFORMER
WIRES
NUT
TRANSFORMER
Section 5 Service Procedures
CONNECTORS
ELECTRONIC
PACKAGE
TU015-SV
Figure 11
M411429 61
© Copyright, Alliance Laundry Systems LLC – DO NOT COPY or TRANSMIT
Page 60

Section 5 Service Procedures
WARNING
To reduce the risk of electric shock, fire, explosion, serious injury or death:
• Disconnect electric power to the tumbler before servicing.
• Close gas shut-off valve to gas tumbler before servicing.
• Close steam valve to steam tumbler before servicing.
• Never start the tumbler with any guards/panels removed.
• Whenever ground wires are removed during servicing, these ground wires must be
reconnected to ensure that the tumbler is properly grounded.
66. GAS VALVE ASSEMBLY
(Automatic Pilot Ignition Models)
Refer to Figure 12 and Figure 14.
a. Remove control panel.
b. Close gas shut-off valve.
c. Disconnect all wires from gas valve terminals
and disconnect gas valve union nuts.
d. Disconnect igniter wire and sensor wire from
electronic package.
e. Disconnect pilot tube from gas valve.
IMPORTANT: Purge air in the gas service line by
operating the tumbler in drying mode. Use pipe
compound resistant to action of L.P. Gas on all pipe
threads.
To reduce risk of fire or explosion, check
pipe connections for gas leaks with a noncorrosive leak detection fluid. Do not use an
open flame to check for gas leaks!
f. Remove screws holding gas valve and bracket
to stove assembly.
g. Remove spudholder and nipple from left side of
valve and plug from right side of valve.
NOTE: Refer to wiring diagram when rewiring gas
valve.
WARNING
W002
W310
COMPRESSION
NUT
FRAME
PLUG
PILOT AND
ELECTRODE
ASSEMBLY
PILOT
TUBE
SCREW
SPUD HOLDER
AND
NIPPLE
Figure 12
SENSOR
WIRE
ELECTRONIC
PACKAGE
ATTACHING
SCREWS
UNION
NUT
ELECTRONIC
PAC KA GE
IGNITER
WIRE
TU020-SV
62 M411429
© Copyright, Alliance Laundry Systems LLC – DO NOT COPY or TRANSMIT
Page 61

Section 5 Service Procedures
OPERATOR
GAS
VALV E
BODY
Standing Pilot
RESET
ASSEMBLY
MAIN
OPERATOR
GAS VALVE
BODY
Automatic Pilot System
MAGNETIC
OPERATORS
PILOT
OPERATOR
GAS VALVE
BODY
Johnson Controls Glow-Bar
MAIN
COIL
REDUNDANT
COIL
White Rodgers Glow-Bar
MAIN
COIL
GAS
VALV E
BODY
GAS
VALV E
BODY
REDUNDANT
COIL
White Rodgers
Instant Electronic Ignition System (IEI)
T002SE3A
Figure 13
M411429 63
© Copyright, Alliance Laundry Systems LLC – DO NOT COPY or TRANSMIT
Page 62

Section 5 Service Procedures
WARNING
To reduce the risk of electric shock, fire, explosion, serious injury or death:
• Disconnect electric power to the tumbler before servicing.
• Close gas shut-off valve to gas tumbler before servicing.
• Close steam valve to steam tumbler before servicing.
• Never start the tumbler with any guards/panels removed.
• Whenever ground wires are removed during servicing, these ground wires must be
reconnected to ensure that the tumbler is properly grounded.
W002
67. ELECTRONIC PACKAGE
(Automatic Pilot Ignition Models)
a. Remove control panel.
b. Close gas shut-off valve. Refer to Figure 14.
c. Disconnect igniter wire and sensor wire from
electronic package.
d. Remove two screws holding electronic package
to gas valve. Refer to Figure 12.
e. Disconnect two operator wires from electronic
package terminals.
NOTE: Refer to wiring diagram when rewiring
electronic package.
68. MAIN OR PILOT OPERATOR
(Automatic Pilot Ignition Models)
a. Remove electronic package.
b. Remove screws holding main or pilot operator
to gas valve body. Refer to Figure 13.
69. GAS VALVE
(Standing Pilot Models)
Refer to Figure 14.
a. Remove control panel.
b. Close gas shut-off valve.
c. Disconnect all wires from gas valve terminals
and disconnect gas valve pipe unions.
d. Disconnect thermocouple and pilot tube from
gas valve.
e. Remove screws holding gas valve and bracket
to stove assembly.
f. Remove spudholder from left side of valve and
plug from right side of valve.
70. OPERATOR
(Standing Pilot Models)
a. Remove control panel.
b. Close gas shut-off valve. Refer to Figure 14.
c. Disconnect wires from operator terminals
d. Remove screws holding operator to gas valve
body. Refer to Figure 13.
NOTE: Refer to wiring diagram when rewiring gas
valve operator.
71. RESET ASSEMBLY
(Standing Pilot Models)
a. Remove control panel.
b. Close gas shut-off valve. Refer to Figure 14.
c. Disconnect pilot tube and thermocouple from
reset assembly.
d. Remove screws holding reset assembly to gas
valve. Refer to Figure 13.
IMPORTANT: Purge air in the gas service line by
operating the tumbler in drying mode. Use pipe
compound resistant to action of L.P. Gas on all pipe
threads.
WARNING
To reduce risk of fire or explosion, check
pipe connections for gas leaks with a noncorrosive leak detection fluid. Do not use an
open flame to check for gas leaks!
64 M411429
© Copyright, Alliance Laundry Systems LLC – DO NOT COPY or TRANSMIT
W310
Page 63

Section 5 Service Procedures
PILOT
BURNER
GAS
VALV E
PILOT
TUBE
THERMOCOUPLE
Standing Pilot Burner
GLOW BAR
IGNITER
UNION
NUTS
UNION
NUTS
SHUT-OFF
GAS VALVE
(Shown in the
ON position)
T016SE1A
GAS SHUT-OFF
VALV E
(Shown in the
ON position)
SENSING
PROBE
PILOT
TUBE
SENSOR
SENSOR
WIRE
UNION
NUTS
IGNITER
WIRE
Automatic Pilot Ignition Burner
MOUNTING
PINS
GLOWBAR
IGNITER
GAS
SHUT-OFF
VALV E
UNION
NUTS
GAS SHUT-OFF
VALV E
(Shown in the
ON position)
GAS
VALV E
T017SE1A
DIODE
LOGIC
BOARD
SENSOR
PLUG
Johnson Controls Glow-Bar Ignition Burner
MANIFOLD
UNION
NUT
NIPPLE
GAS
VALV E
SHUT-OFF
T021SE1A
GAS
ON
Instant Electronic Ignition Burner
VALV E
T018SE1A
GAS
OFF
GAS
VALV E
GAS
IGNITER
BRACKET
SPUD HOLDER
NIPPLE
White Rodgers Glow-Bar Ignition Burner
IGNITER
BRACKET
SPARK
IGNITER
HIGH
VOLTAGE
LEAD
INSTANT ELECTRONIC
IGNITION HARNESS
PLUG
T019SE3B
GAS
VALV E
INSTANT
ELECTRONIC
IGNITION
CONTROL
Figure 14
M411429 65
© Copyright, Alliance Laundry Systems LLC – DO NOT COPY or TRANSMIT
Page 64

Section 5 Service Procedures
WARNING
To reduce the risk of electric shock, fire, explosion, serious injury or death:
• Disconnect electric power to the tumbler before servicing.
• Close gas shut-off valve to gas tumbler before servicing.
• Close steam valve to steam tumbler before servicing.
• Never start the tumbler with any guards/panels removed.
• Whenever ground wires are removed during servicing, these ground wires must be
reconnected to ensure that the tumbler is properly grounded.
W002
72. GAS VALVE
(Johnson Controls Glow-Bar Models)
Refer to Figure 14.
a. Remove control panel.
b. Close gas shut-off valve.
c. Disconnect all wires from gas valve terminals
and disconnect gas valve union nuts.
d. Remove screws holding gas valve and bracket
to stove assembly.
e. Remove spudholder from left side of valve and
plug from right side of valve.
NOTE: Refer to wiring diagram when rewiring gas
valve.
IMPORTANT: Purge air in the gas service line by
operating the tumbler in drying mode. Use pipe
compound resistant to action of L.P. Gas on all pipe
threads.
WARNING
To reduce risk of fire or explosion, check
pipe connections for gas leaks with a noncorrosive leak detection fluid. Do not use an
open flame to check for gas leaks!
W310
73. MAGNETIC OPERATORS
(Johnson Controls Glow-Bar Models)
a. Remove control panel.
b. Close gas shut-off valve. Refer to Figure 14.
c. Disconnect wires from magnetic operator
terminals.
d. Remove screws holding magnetic operators to
gas valve body. Refer to Figure 13.
74. GAS VALVE
(White Rodgers Glow-Bar Models)
Refer to Figure 14.
a. Remove control panel.
b. Close gas shut-off valve.
c. Disconnect all wires from gas valve terminals
and disconnect gas valve union nuts.
d. Remove screws holding gas valve and bracket
to stove assembly.
e. Remove gas valve from mounting bracket.
f. Remove spudholder and nipple from left side of
valve and plug from right side of valve.
IMPORTANT: Purge air in the gas service line by
operating the tumbler in drying mode. Use pipe
compound resistant to action of L.P. Gas on all pipe
threads.
NOTE: Refer to wiring diagram when rewiring gas
valve.
75. DIODE LOGIC BOARD
(White Rodgers Glow-Bar Models)
Refer to Figure 14.
a. Remove control panel.
b. Disconnect wires from diode logic board
terminals.
c. Compress tabs on back ends of diode logic
board standoffs and push pins through holes in
cabinet wall to free diode logic board.
NOTE: Refer to wiring diagram when rewiring
diode logic board.
NOTE: Refer to wiring diagram when rewiring
magnetic operators.
66 M411429
© Copyright, Alliance Laundry Systems LLC – DO NOT COPY or TRANSMIT
Page 65

Section 5 Service Procedures
WARNING
To reduce the risk of electric shock, fire, explosion, serious injury or death:
• Disconnect electric power to the tumbler before servicing.
• Close gas shut-off valve to gas tumbler before servicing.
• Close steam valve to steam tumbler before servicing.
• Never start the tumbler with any guards/panels removed.
• Whenever ground wires are removed during servicing, these ground wires must be
reconnected to ensure that the tumbler is properly grounded.
W002
76. MAIN COIL
(White Rodgers Glow-Bar Models)
NOTE: The redundant coil cannot be purchased
separately. Replace the complete gas valve.
a. Remove control panel.
b. Close gas shut-off valve. Refer to Figure 14.
c. Disconnect wires from main coil terminals.
d. Remove screws holding main coil to gas valve.
Refer to Figure 13.
NOTE: Refer to wiring diagram when rewiring gas
valve main coils.
77. IGNITER AND BRACKET
(Glow-Bar Models)
Refer to Figure 14.
a. Remove control panel.
b. Insert tips of 90 degree Tru-Arc pliers into
holes in each igniter mounting clip and spread
clips just far enough for igniter removal.
IMPORTANT: Use extreme care when handling the
igniter as it is very fragile. Handle igniter by
grasping the white ceramic portion only. Do not
handle the silicon of the igniter with hands or allow
any oil, grease, or other foreign material to
contaminate it. Hairline cracks, oil, grease, or other
impurities will cause igniter to burn out.
c. Remove screw holding igniter bracket to stove
assembly.
d. Disconnect igniter wires from diode logic
board (White Rodgers) or relay (Johnson
Controls).
78. SENSOR
(Glow-bar Models)
a. Remove control panel.
b. Disconnect wires from sensor. Refer to
Figure 14.
c. Remove screw holding sensor to side of stove
assembly.
NOTE: Refer to wiring diagram when rewiring
sensor.
79. IGNITER
(Instant Electronic Ignition Models)
a. Remove control panel.
b. Disconnect high voltage lead from igniter.
c. Remove two screws attaching igniter bracket to
stove assembly.
80. IGNITION CONTROL
(Instant Electronic Ignition Models)
a. Remove control panel.
b. Disconnect wire harness.
c. Remove high voltage lead.
IMPORTANT: Remove circuit board and plastic
back as a unit. Handle ignition control unit by sides
of board only. Do not contact circuit boards with
hands or metal objects. Place unit in clean, dry area
away from work area to avoid damage. Do not
attempt field repair of the ignition control unit.
Attempted repair or tampering with the ignition
control unit will void its warranty.
d. Remove two screws attaching ignition control
unit to cabinet frame.
e. Remove ignition control unit.
81. GAS VALVE
(Instant Electronic Ignition Models)
a. Remove control panel.
b. Close gas shut-off valve. Refer to Figure 14.
c. Disconnect all wires from gas valve terminals
and disconnect gas valve pipe unions.
d. Remove screw holding gas valve bracket to
stove.
e. Remove spudholder and manifold from left
side of valve and plug from right side of valve.
f. Remove gas valve from mounting bracket.
IMPORTANT: Purge air in the gas service line by
operating the tumbler in drying mode. Use pipe
compound resistant to action of L.P. Gas on all pipe
threads.
M411429 67
© Copyright, Alliance Laundry Systems LLC – DO NOT COPY or TRANSMIT
Page 66

Section 5 Service Procedures
WARNING
To reduce the risk of electric shock, fire, explosion, serious injury or death:
• Disconnect electric power to the tumbler before servicing.
• Close gas shut-off valve to gas tumbler before servicing.
• Close steam valve to steam tumbler before servicing.
• Never start the tumbler with any guards/panels removed.
• Whenever ground wires are removed during servicing, these ground wires must be
reconnected to ensure that the tumbler is properly grounded.
W002
WARNING
To reduce risk of fire or explosion, check
pipe connections for gas leaks with a noncorrosive leak detection fluid. Do not use an
open flame to check for gas leaks!
W310
82. MAIN COIL
(Instant Electronic Ignition Models)
NOTE: The redundant coil cannot be purchased
separately. Replace complete gas valve.
a. Remove control panel.
b. Close gas shut-off valve. Refer to Figure 14.
c. Disconnect wires from main coil terminals.
d. Remove screws holding main coil to gas valve.
Refer to Figure 13.
83. BURNER TUBE
Refer to Figure 14.
a. Remove control panel.
b. Close gas shut-off valve.
c. Disconnect union nut attaching nipple to
spudholder and remove spudholder.
d. Remove screws holding gas valve bracket to
stove assembly.
e. Remove screws holding burner tubes to stove
frame and remove burner tubes.
WARNING
To reduce risk of fire or explosion, check
pipe connections for gas leaks with a noncorrosive leak detection fluid. Do not use an
open flame to check for gas leaks!
W310
IMPORTANT: Make sure that spudholder and
orifices are positioned such that gas will be injected
directly down the center of the burner.
CONTACTOR
TERMINAL
BLOCK
ATTACHING
SCREWS
Figure 15
CONTACTOR
T022SE1A
84. CONTACTORS AND TERMINAL BLOCK
(Electric Models)
NOTE: Contactors and terminal blocks are located
in contactor box at the rear of the tumbler.
a. Remove screw holding cover to contactor box
and remove cover.
b. Remove wires from contactor terminals and
terminal blocks.
NOTE: Refer to wiring diagram when rewiring
contactors or terminal blocks.
c. Remove screws holding contactor to box.
d. Remove two screws holding terminal block to
box. Refer to Figure 15.
NOTE: OLDER MODELS - Terminal block
consists of two terminal section (one phase) or three
terminal sections (three phase) and an end piece
snapped together.
NEWER MODELS - Use a 3 pole terminal block.
68 M411429
© Copyright, Alliance Laundry Systems LLC – DO NOT COPY or TRANSMIT
Page 67

Section 5 Service Procedures
WARNING
To reduce the risk of electric shock, fire, explosion, serious injury or death:
• Disconnect electric power to the tumbler before servicing.
• Close gas shut-off valve to gas tumbler before servicing.
• Close steam valve to steam tumbler before servicing.
• Never start the tumbler with any guards/panels removed.
• Whenever ground wires are removed during servicing, these ground wires must be
reconnected to ensure that the tumbler is properly grounded.
W002
85. HEATER ELEMENT
(Electric Models)
Refer to Figure 16.
NOTE: Remove heater element from the rear of the
tumbler.
a. Remove two screws and lift hood assembly off
heater housing.
b. Remove nuts, disconnect wires and buss bars
from element terminals.
ELECTRIC HEATER
NOTE: Refer to wiring diagram when rewiring
element terminals.
c. Remove screws attaching element to rear of
heater housing.
d. Slide element toward front of tumbler and
carefully lift element up and out of heater
housing.
NOTE: Each tumbler is equipped with three
elements. Remove each element individually.
WIRES TO
CONTACTOR
BOX
NUT
BUSS
BAR
HEATER
ELEMENTS
(3)
SCREW
TU198-PT
Figure 16
M411429 69
© Copyright, Alliance Laundry Systems LLC – DO NOT COPY or TRANSMIT
Page 68

Section 5 Service Procedures
WARNING
To reduce the risk of electric shock, fire, explosion, serious injury or death:
• Disconnect electric power to the tumbler before servicing.
• Close gas shut-off valve to gas tumbler before servicing.
• Close steam valve to steam tumbler before servicing.
• Never start the tumbler with any guards/panels removed.
• Whenever ground wires are removed during servicing, these ground wires must be
reconnected to ensure that the tumbler is properly grounded.
W002
86. STOVE HIGH LIMIT THERMOSTAT
(Gas Models)
NOTE: Steps “a” through “d”, and “f” apply only
to energy saver models. The stove high limit
thermostat is more readily accessible on non-energy
saver models.
a. Remove control panel.
b. Remove screw holding cover plate to wire-way
(older models); or, remove screw holding cover
to junction box or airflow switch box (older
models). Remove cover. Refer to Figure 17.
c. Disconnect stove high limit thermostat wires in
wire-way or in junction box.
d. Remove conduit nut from BX cable on inside of
wire-way or junction box. Refer to Figure 17.
AIRFLOW
SWITCH
CONDUIT
NUT
SCREWS
STOVE
HIGH LIMIT
THERMOSTAT
e. Remove two screws holding thermostat and
bracket to rear side of burner. Refer to
Figure 17.
NOTE: This will allow the conduit to follow through
between burner and cabinet when thermostat and
bracket assembly are slid toward front of tumbler
(energy saver models only).
f. Carefully slide assembly, with conduit, toward
front of tumbler far enough to permit removal
of complete assembly from burner.
g. Remove two screws holding cover to mounting
bracket. Refer to Figure 18
h. Disconnect wires from thermostat.
i. Remove two screws holding thermostat to
mounting bracket. Refer to Figure 18.
JUNCTION
BOX
CONDUIT
NUT
SCREWS
STOVE
HIGH LIMIT
THERMOSTAT
T025SE1A
NEWER MODELS
OLDER MODELS
CABINET
HIGH LIMIT
THERMOSTAT
T024SE1A
Figure 17
70 M411429
© Copyright, Alliance Laundry Systems LLC – DO NOT COPY or TRANSMIT
Page 69

Section 5 Service Procedures
WARNING
To reduce the risk of electric shock, fire, explosion, serious injury or death:
• Disconnect electric power to the tumbler before servicing.
• Close gas shut-off valve to gas tumbler before servicing.
• Close steam valve to steam tumbler before servicing.
• Never start the tumbler with any guards/panels removed.
• Whenever ground wires are removed during servicing, these ground wires must be
reconnected to ensure that the tumbler is properly grounded.
W002
87. CABINET HIGH LIMIT THERMOSTAT
(Energy Saver Gas Models)
a. Disconnect electrical service to tumbler.
b. Remove chain guard.
c. Disconnect wires from thermostat.
d. Remove two screws holding thermostat to
vertical duct.
(Non-Energy Saver Gas Models)
Refer to Figure 19.
a. Disconnect electrical service to tumbler.
b. Remove lint compartment door.
c. Remove two screws holding thermostat
mounting bracket to cylinder shroud.
d. Remove two screws holding cover to mounting
bracket.
SCREWS
e. Disconnect two wires from thermostat.
f. Remove two screws holding thermostat to
mounting bracket.
g. To remove thermostat wire assembly.
(1) Repeat steps “d” through “l”, above.
(2) Pull wires through bushing in thermostat
mounting bracket and then push wire out
through hole in back of lint compartment.
(3) Remove wire cover and junction box cover
from rear of tumbler.
(4) Disconnect wires from inside of junction
box, and pull wires from junction box and
wire way.
NOTE: Refer to wiring diagram when reconnecting
thermostat wires.
COVER
STOVE
HIGH LIMIT
THERMOSTAT
MOUNTING
BRACKET
Figure 18
M411429 71
© Copyright, Alliance Laundry Systems LLC – DO NOT COPY or TRANSMIT
SCREWS
TU026-SV
Page 70

Section 5 Service Procedures
WARNING
To reduce the risk of electric shock, fire, explosion, serious injury or death:
• Disconnect electric power to the tumbler before servicing.
• Close gas shut-off valve to gas tumbler before servicing.
• Close steam valve to steam tumbler before servicing.
• Never start the tumbler with any guards/panels removed.
• Whenever ground wires are removed during servicing, these ground wires must be
reconnected to ensure that the tumbler is properly grounded.
THERMOSTAT
W002
88. HIGH LIMIT THERMOSTAT
(Electric Models)
a. Unlock and open access door. Remove cover.
b. Disconnect wires from thermostat.
c. Remove two screws holding thermostat to front
of heater housing and remove thermostat. Refer
to Figure 20.
NOTE: Refer to wiring diagram when rewiring
thermostat.
MOUNTING
BRACKET
Figure 19
COVER
CLIPS
HIGH LIMIT
THERMOSTAT
SCREW
THERMOSTAT
HOUSING
COVER
TU076-SV
HEATER BOX
ASSEMBLY
GRILL
COVER
T027SE1A
Figure 20
72 M411429
© Copyright, Alliance Laundry Systems LLC – DO NOT COPY or TRANSMIT
Page 71

Section 5 Service Procedures
WARNING
To reduce the risk of electric shock, fire, explosion, serious injury or death:
• Disconnect electric power to the tumbler before servicing.
• Close gas shut-off valve to gas tumbler before servicing.
• Close steam valve to steam tumbler before servicing.
• Never start the tumbler with any guards/panels removed.
• Whenever ground wires are removed during servicing, these ground wires must be
reconnected to ensure that the tumbler is properly grounded.
W002
89. STEAM COILS
WARNING
Allow steam coils and valve to cool down
before attempting any service procedures.
a. Shut off inlet and outlet valves and disconnect
flex hoses from steam coils
b. Remove screws holding cover to top of steam
heating unit and remove cover.
c. Remove screws holding steam coils to coil
frame.
W249
d. Remove steam coils by lifting straight up and
out of tumbler.
IMPORTANT: When removing or replacing steam
coils, be careful not to damage fins on steam coils.
90. LOADING DOOR ASSEMBLY
Refer to Figure 21 and Figure 22.
a. Open loading door.
b. While supporting door, remove upper hinge
bolt holding door to hinge bracket.
c. Remove door from hinge bracket.
NOTE: Nylon washer must be in place on lower pin
when reinstalling loading door.
ALTERNATE STYLEREGULAR STYLE
BAR
ATTACHING
SCREW
SCREW
LOADING
DOOR
DOOR
HANDLE
BAR
ATTACHING
SCREW
TU030-SV TU031-SV
LOADING
DOOR
DOOR
BAR
Figure 21
M411429 73
© Copyright, Alliance Laundry Systems LLC – DO NOT COPY or TRANSMIT
Page 72

Section 5 Service Procedures
WARNING
To reduce the risk of electric shock, fire, explosion, serious injury or death:
• Disconnect electric power to the tumbler before servicing.
• Close gas shut-off valve to gas tumbler before servicing.
• Close steam valve to steam tumbler before servicing.
• Never start the tumbler with any guards/panels removed.
• Whenever ground wires are removed during servicing, these ground wires must be
reconnected to ensure that the tumbler is properly grounded.
91. LOADING DOOR HINGE
a. Open loading door.
b. While supporting door, remove upper hinge
bolt holding door to hinge bracket.
c. Remove door from hinge bracket.
d. Remove nuts and screws holding hinge to door
frame. Refer to Figure 23.
92. LOADING DOOR HANDLE
Refer to Figure 21.
a. Open loading door.
b. Remove screws holding door handle to door
frame.
93. FRONT PANEL
a. Remove control panel.
b. Unlock, open and remove lint panel. Set aside
to prevent damage.
c. Open loading door, support door and remove
upper hinge bolt holding door to hinge bracket.
Refer to Figure 22.
HINGE
BRACKET
HINGE
BOLT
Figure 22
W002
LOADING
DOOR
ASSEMBLY
T028SE1A
NOTE: Nylon washer must be in place on lower
hinge pin when reinstalling door.
d. Remove door from bracket.
LOADING
DOOR
HINGE
e. Support front panel and remove screws (and
three speed nuts — newer models only) holding
front panel to tumbler cabinet. Refer to
Figure 24.
HINGE
ATTACHING
SCREWS
NOTE: When removing front panel, lower panel
slightly to make sure door switch rod clears hole in
cabinet.
T029SE1A
Figure 23
74 M411429
© Copyright, Alliance Laundry Systems LLC – DO NOT COPY or TRANSMIT
Page 73

Section 5 Service Procedures
FRONT PANEL
ATTACHING
SCREWS
(13)
FRONT PANEL
ATTACHING
SCREWS
SPEED
NUTS
NEWER MODELS OLDER MODELS
FRONT PANEL
ATTACHING
SCREWS
T032SE3A
Figure 24
M411429 75
© Copyright, Alliance Laundry Systems LLC – DO NOT COPY or TRANSMIT
Page 74

Section 5 Service Procedures
WARNING
To reduce the risk of electric shock, fire, explosion, serious injury or death:
• Disconnect electric power to the tumbler before servicing.
• Close gas shut-off valve to gas tumbler before servicing.
• Close steam valve to steam tumbler before servicing.
• Never start the tumbler with any guards/panels removed.
• Whenever ground wires are removed during servicing, these ground wires must be
reconnected to ensure that the tumbler is properly grounded.
W002
94. LOADING DOOR SWITCH
a. Remove control panel.
b. Disconnect wires from door switch.
c. Remove two switch attaching screws and
remove switch. Refer to Figure 25.
NOTE: Refer to wiring diagram when rewiring
door switch.
DOOR
SWITCH
SCREWS
95. LOADING DOOR SWITCH ROD
Refer to Figure 26.
a. Remove front panel.
b. Remove nut, washers and spring clip holding
switch rod to backside of front panel.
c. Apply upward pressure on the welded clip to
allow switch rod to snap free. Refer to
Figure 26.
SWITCH
ROD
T034SE1B
SPRING
CLIP
Figure 25
T034SE1A
Figure 26
76 M411429
© Copyright, Alliance Laundry Systems LLC – DO NOT COPY or TRANSMIT
Page 75

Section 5 Service Procedures
WARNING
To reduce the risk of electric shock, fire, explosion, serious injury or death:
• Disconnect electric power to the tumbler before servicing.
• Close gas shut-off valve to gas tumbler before servicing.
• Close steam valve to steam tumbler before servicing.
• Never start the tumbler with any guards/panels removed.
• Whenever ground wires are removed during servicing, these ground wires must be
reconnected to ensure that the tumbler is properly grounded.
96. AIRFLOW SWITCH
NOTE: Depending on the model, the airflow switch
will be found either on the rear of the stove
assembly, directly below the wire-way or within the
wire way on the rear of the tumbler.
a. Remove wire-way cover plate (older models),
or airflow switch box cover (newer models).
b. Disconnect wires from switch. Refer to
Figure 28.
NOTE: Refer to wiring diagram when rewiring
airflow switch.
WIRE-WAY
COVER
W002
c. Remove screw(s) holding switch and mounting
bracket to rear of tumbler (older models); or to
switch box (newer models). Refer to Figure 28.
d. Remove two screws holding switch to
mounting bracket.
NOTE: After reinstalling airflow switch and
mounting bracket into switch box, adjust switch.
Refer to Adjustments Section.
DRIVE
GUARD
DRIVE
GUARD
ATTACHING
SCREW
AIRFLOW
SWITCH
Figure 27
SWITCH
BOX
COVER
TU072-SV
M411429 77
© Copyright, Alliance Laundry Systems LLC – DO NOT COPY or TRANSMIT
Page 76

Section 5 Service Procedures
WARNING
To reduce the risk of electric shock, fire, explosion, serious injury or death:
• Disconnect electric power to the tumbler before servicing.
• Close gas shut-off valve to gas tumbler before servicing.
• Close steam valve to steam tumbler before servicing.
• Never start the tumbler with any guards/panels removed.
• Whenever ground wires are removed during servicing, these ground wires must be
reconnected to ensure that the tumbler is properly grounded.
W002
97. WIRE COVER or WIRE CHANNEL
COVER PLATE
Refer to Figure 27.
a. Remove single screw holding wire channel
cover plate to wire channel (older models); or
remove six screws holding wire cover to rear of
tumbler (new models).
b. Remove wire cover or wire channel cover plate.
IMPORTANT: When reinstalling cover, make sure
the wires and thermostat sensing tube (if equipped)
are not pinched between rear of cabinet and wire
cover or between cover plate and channel.
98. DRIVE GUARD
a. Support drive guard and remove screws
holding guard to rear of tumbler. Refer to
Figure 27.
b. Reinstall drive guard.
MOUNTING
BRACKET
SWITCH
BOX
SWITCH
LEVER
AIRFLOW
SWITCH
MOUNTING
SCREWS
99. DRIVE BELT
Nonreversing Tumblers
a. Remove drive guard. Remove four clips (older
models) or two screws (newer models) holding
belt guard assembly to motor bracket. Refer to
Figure 29. Remove belt guard.
b. Remove chain.
c. Loosen nut on idler housing attaching bolt.
Refer to Figure 30. Drop idler housing to
bottom of slots.
d. Remove lower bolt and nut from guide rail.
Refer to Figure 30. Hinge guide rail out and slip
belt out from under guide rails.
e. Slip new belt under guide rail and onto sheave
and motor pulley. Refer to Figure 31.
NOTE: After reinstalling belt and chain, adjust
belt, then adjust chain.
Reversing Tumblers
a. Support drive guard and remove the screws
holding it to the back panel of the tumbler.
Leave the belt guard attached to the top of the
drive guard.
b. Loosen four capscrews holding motor
mounting bracket to side brackets. Lower
motor and mounting bracket until holding
capscrews bottom in the mounting slots.
c. Slip drive belt off of the motor pulley.
d. Disconnect the wires from motor.
e. Slip drive belt off of sheave, and remove drive
belt by working it over the top of the guide rails.
f. Slip the new belt onto the sheave and the motor
pulley. Adjust belt tension.
NEWER MODELS
Figure 28
78 M411429
© Copyright, Alliance Laundry Systems LLC – DO NOT COPY or TRANSMIT
T037SE1A
Page 77

Section 5 Service Procedures
WARNING
To reduce the risk of electric shock, fire, explosion, serious injury or death:
• Disconnect electric power to the tumbler before servicing.
• Close gas shut-off valve to gas tumbler before servicing.
• Close steam valve to steam tumbler before servicing.
• Never start the tumbler with any guards/panels removed.
• Whenever ground wires are removed during servicing, these ground wires must be
reconnected to ensure that the tumbler is properly grounded.
c. Adjust chain following installation. Refer to
Adjustments section.
101. IDLER HOUSING ASSEMBLY
Reversing Tumblers
a. Support drive guard and remove the screws
holding it to the back panel of the tumbler.
Leave the belt guard attached to the top of the
drive guard.
b. Loosen four capscrews holding motor
mounting bracket to side brackets. Lower
motor and mounting bracket until holding
capscrews bottom in the mounting slots.
c. Slip drive belt off of the motor pulley.
d. Loosen nut on idler housing attaching bolt and
slide idler housing to top of slotted mounting
holes in guide rails. Refer to Figure 31. This
will provide slack in drive chain for removal
from sprockets.
e. Remove top bolt from guide rail and remove
SCREWS
(Newer Models)
CLIPS
(Older Models)
BELT
GUARD
TU039-SV
Figure 29
guilde rail, idler housing and sheave assembly.
f. After repairing or replacing idler housing
assembly, reinstall chain, belt, chain guard and
belt guard.
W002
100. DRIVE CHAIN
Nonreversing Tumblers
a. Remove drive guard.
b. Loosen jamnut on idler sprocket locking bolt
and move sprocket to the right to relieve chain
tension. Refer to Figure 30.
c. Run chain off drive sprocket and lift chain off
cylinder sprocket.
d. Reinstall chain and drive guard.
Reversing Tumblers
a. Repeat steps “a” and “b” of procedure for non-
reversing tumblers, above.
b. Loosen nut on idler housing attaching bolt and
slide idler housing to top of slotted mounting
holes in guide rails. Refer to Figure 31. This
will provide slack in drive chain for removal
from sprockets.
M411429 79
© Copyright, Alliance Laundry Systems LLC – DO NOT COPY or TRANSMIT
Page 78

Section 5 Service Procedures
WARNING
To reduce the risk of electric shock, fire, explosion, serious injury or death:
• Disconnect electric power to the tumbler before servicing.
• Close gas shut-off valve to gas tumbler before servicing.
• Close steam valve to steam tumbler before servicing.
• Never start the tumbler with any guards/panels removed.
• Whenever ground wires are removed during servicing, these ground wires must be
reconnected to ensure that the tumbler is properly grounded.
W002
BELT
BELT/CHAIN NONREVERSING
SHEAVE
LOWER GUIDE
RAIL BOLT
Figure 30
CHAIN
CYLINDER
SPROCKET
IDLER
SPROCKET
JAMNUT
DRIVE
SPROCKET
IDLER
HOUSING
ATTACH ING
BOLT AND
NUT
IDLER
RAILS
TU202-PT
102. IDLER SPROCKET
Nonreversing Tumblers
a. Remove drive guard.
b. Remove drive chain from idler sprocket.
c. Remove jam nut and sprocket from bolt. Refer
to Figure 31.
NOTE: After installing chain and sprocket, adjust
chain. Refer to Adjustments Section.
d. Reinstall chain and drive guard.
103. SHEAVE
a. Remove drive guard.
b. Loosen jam nut on chain idler sprocket and
move idler sprocket to the right. Refer to
Figure 31. (Nonreversing tumblers only.)
c. Run chain off drive sprocket.
d. Remove belt tension by loosening idler
capscrews or bolt.
e. While supporting idler housing, remove the
upper and lower bolts, nuts, and lockwashers
holding guide rails to trunnion housing and
motor bracket. Refer to Figure 31.
f. Remove the sheave, guide rails and idler
housing as an assembly from the rear of the
tumbler.
g. Remove snap ring from idler shaft. (Non-
reversing models only).
h. Loosen two setscrews holding sheave to idler
shaft and pull sheave off idler shaft.
i. Remove key from shaft keyway.
IMPORTANT: Reassemble sheave to idler shaft.
On nonreversing tumblers, run sheave out until it
butts against snap ring. Make sure that shaft key is
correctly positioned under setscrew. Tighten
setscrew above key first, then tighten other setscrew.
IMPORTANT: Nonreversing Tumblers — Realign
motor pulley directly under sheave by loosening
drive motor mounting screws and repositioning
motor on mounting bracket.
80 M411429
© Copyright, Alliance Laundry Systems LLC – DO NOT COPY or TRANSMIT
Page 79

Section 5 Service Procedures
WARNING
To reduce the risk of electric shock, fire, explosion, serious injury or death:
• Disconnect electric power to the tumbler before servicing.
• Close gas shut-off valve to gas tumbler before servicing.
• Close steam valve to steam tumbler before servicing.
• Never start the tumbler with any guards/panels removed.
• Whenever ground wires are removed during servicing, these ground wires must be
reconnected to ensure that the tumbler is properly grounded.
W002
IMPORTANT: Reversing Tumblers — Realign
motor pulley directly over sheave by loosening drive
motor mounting screws and repositioning motor on
mounting bracket.
104. DRIVE SPROCKET
Reversing Tumblers
a. Remove drive guard.
b. Loosen nut on idler housing attaching bolt and
slide idler housing to top of slotted mounting
holes in guide rails. This will provide slack in
drive chain for removal from sprockets. Refer
to Figure 31.
c. Remove chain.
d. Loosen setscrews holding drive sprocket to
idler shaft and pull sprocket free.
e. Remove key from shaft keyway.
f. Reinstall chain and drive guard.
IMPORTANT: Reassemble sprocket to idler shaft.
Align sprocket with cylinder sprocket. Make sure
shaft key is positioned under one of the sprocket
setscrews. Tighten setscrew over key first, then
tighten the other setscrew.
105. IDLER SHAFT
Refer to Figure 32.
a. Remove idler housing assembly.
b. Remove sheave and drive sprocket.
c. Remove bolt holding idler housing to guide
rails.
d. Support idler housing assembly and carefully
drive idler shaft from housing using a hammer
and a hardwood dowel.
e. Support idler housing assembly and remove
drive bearings from housing using a hammer
and a hardwood dowel.
f. Reinstall shaft and bearings.
IMPORTANT: When installing new bearings, apply
a film of oil to the bearing cavity surfaces of the
housing and the outside diameter of the bearings.
IMPORTANT: If a press is not available to install
bearings, tap bearings into housing using a prylin
hammer.
g. Reinstall chain guard.
NOTE: After installing sheave, adjust belt and then
adjust chain.
106. CYLINDER SPROCKET
Nonreversing Tumblers
Refer to Figure 30.
a. Remove drive guard.
b. Loosen jam nut on idler sprocket and move
sprocket to the right to relieve chain tension.
c. Run chain off idler sprocket and drive sprocket.
d. Lift chain off cylinder sprocket.
NOTE: After installing chain on drive and idler
sprockets, adjust chain.
e. Remove pal nut, jam nut, and sprocket from
cylinder shaft.
Reversing Tumblers
Refer to Figure 31.
a. Remove drive chain from sprocket.
b. Remove three attaching bolts from sprocket
hub.
c. Turn these three bolts into the threaded holes in
the sprocket hub, and “jack” the hub and
sprocket apart.
d. Remove hub, sprocket, key and spacer.
NOTE: After installing chain on drive and idler
sprockets, adjust chain.
M411429 81
© Copyright, Alliance Laundry Systems LLC – DO NOT COPY or TRANSMIT
Page 80

Section 5 Service Procedures
WARNING
To reduce the risk of electric shock, fire, explosion, serious injury or death:
• Disconnect electric power to the tumbler before servicing.
• Close gas shut-off valve to gas tumbler before servicing.
• Close steam valve to steam tumbler before servicing.
• Never start the tumbler with any guards/panels removed.
• Whenever ground wires are removed during servicing, these ground wires must be
reconnected to ensure that the tumbler is properly grounded.
W002
107. CYLINDER ASSEMBLY
a. Remove control panel.
b. Open loading door.
c. While supporting door, remove upper hinge
bolt holding door to hinge bracket.
d. Remove door from hinge bracket.
e. Unlock, open and remove lint panel. Set aside
to prevent damage.
f. Support front panel and remove screws (and
three speed nuts — newer models only) holding
front panel to tumbler cabinet. Refer to
Figure 24.
g. Remove drive chain or belt.
h. Remove cylinder sprocket and key.
i. Pull cylinder out through front of cabinet.
NOTE: When removing cylinder out through front
of cabinet, spread cabinet slightly so cylinder will
clear cabinet sides.
NOTE: After reinstalling chain on cylinder, drive
and idler sprockets, adjust chain.
NOTE: After installing cylinder and shaft, adjust
cylinder.
j. Reinstall chain guard on tumbler.
MOTOR
BRACKET
MOUNTING
BOLTS
BELT
TRUNNION
HOUSING
ASSEMBLY
CHAIN
MOTOR
PULLEY
CYLINDER
MOTOR
MOTOR
MOUNTING
BOLTS
BUSHING
CYLINDER
SPROCKET
SHEAVE
DRIVE
SPROCKET
T201PE1A
Figure 31
82 M411429
© Copyright, Alliance Laundry Systems LLC – DO NOT COPY or TRANSMIT
Page 81

Section 5 Service Procedures
WARNING
To reduce the risk of electric shock, fire, explosion, serious injury or death:
• Disconnect electric power to the tumbler before servicing.
• Close gas shut-off valve to gas tumbler before servicing.
• Close steam valve to steam tumbler before servicing.
• Never start the tumbler with any guards/panels removed.
• Whenever ground wires are removed during servicing, these ground wires must be
reconnected to ensure that the tumbler is properly grounded.
W002
BOLT
IDLER
HOUSING
(Includes
M400039
SNAP RING
CARRIAGE
BOLT
BEARING
LOCKWASHER
108. TRUNNION HOUSING ASSEMBLY
a. Remove cylinder assembly.
b. Remove upper guide rail bolt and nut. Refer to
Figure 32.
c. Remove four cap screws holding trunnion
housing assembly to rear of cabinet. Refer to
Figure 31.
d. Remove four bearing retainer screws holding
the small bearing in housing. Refer to
Figure 33.
e. Use a hammer and hardwood dowel to remove
bearings.
WASHER
NUT
KEY
TU039-SV
Figure 32
IDLER
SPROCKET
SLEEVE
IDLER
HOUSING
CONNECTING LINK
(Included with
M401425 CHAIN)
NUT
LOCKWASHER
DRIVE
SPROCKET
DRIVE
CHAIN
BEARING
IDLER
SHAFT
LARGE
BEARING
WASHER
IMPORTANT: When installing new bearings, apply
a film of oil to the bearing cavity surfaces in the
housing and to the outside diameter of the bearings.
IMPORTANT: If a press is not available to install
TRUNNION
HOUSING
SMALL
BEARING
BEARING
RETAINER
SCREW
TU192-PT
bearings, tap bearings into housing.
f. Reinstall chain guard on tumbler. Refer to
Figure 33
Figure 27.
M411429 83
© Copyright, Alliance Laundry Systems LLC – DO NOT COPY or TRANSMIT
Page 82

Section 5 Service Procedures
WARNING
To reduce the risk of electric shock, fire, explosion, serious injury or death:
• Disconnect electric power to the tumbler before servicing.
• Close gas shut-off valve to gas tumbler before servicing.
• Close steam valve to steam tumbler before servicing.
• Never start the tumbler with any guards/panels removed.
• Whenever ground wires are removed during servicing, these ground wires must be
reconnected to ensure that the tumbler is properly grounded.
W002
109. TRUNNION SHAFT ASSEMBLY
Refer to Figure 34.
a. Remove control panel.
b. Open loading door.
c. While supporting door, remove upper hinge
bolt holding door to hinge bracket.
d. Remove door from hinge bracket.
e. Unlock, open and remove lint panel. Set aside
to prevent damage.
f. Support front panel and remove screws (and
three speed nuts — newer models only) holding
front panel to tumbler cabinet. Refer to
Figure 24.
g. Remove drive chain.
h. Remove cylinder sprocket and key.
i. Pull cylinder out through front of cabinet.
NOTE: When removing cylinder out through front
of cabinet, spread cabinet slightly so cylinder will
clear cabinet sides.
TAPE
MEASURE
j. Remove the four washers and nuts holding
trunnion shaft assembly to rear of cylinder.
IMPORTANT: When installing trunnion assembly
on cylinder, the cylinder and shaft must be aligned.
Refer to Figure 34 for an example of how to check
for proper alignment of the shaft and cylinder.
Measure the distance between the center of the
trunnion shaft and the outer rim of the cylinder at
the four points shown. If any measurement is lower
than the highest point, place shim or shims
(M401402) between trunnion channel and cylinder
back until the measurement is equal to the highest
point.
NOTE: After installing cylinder and shaft, adjust
cylinder.
k. Reinstall chain guard on tumbler. Refer to
Figure 27.
TRUNNION
ASSEMBLY
MEASURE AT
FOUR POINTS
CYLINDER
T089SE3C
Figure 34
84 M411429
© Copyright, Alliance Laundry Systems LLC – DO NOT COPY or TRANSMIT
Page 83

Section 5 Service Procedures
WARNING
To reduce the risk of electric shock, fire, explosion, serious injury or death:
• Disconnect electric power to the tumbler before servicing.
• Close gas shut-off valve to gas tumbler before servicing.
• Close steam valve to steam tumbler before servicing.
• Never start the tumbler with any guards/panels removed.
• Whenever ground wires are removed during servicing, these ground wires must be
reconnected to ensure that the tumbler is properly grounded.
W002
110. MOTOR AND FAN ASSEMBLY
(Nonreversing)
a. Disconnect wires from motor as follows:
Older models (No quick-disconnect wire
harness)
(1) Remove cover plate from motor junction
box and disconnect wires from motor
wires. Refer to Figure 35.
(2) Remove conduit nut from inside of motor
junction box. Pull wires from junction box.
Newer models (Quick-disconnect wire harness)
(1) Remove cover plate from rear of motor.
(2) Mark four wires and disconnect them from
motor terminals.
(3) Loosen clamp screws in box connector.
(4) While holding box, turn box connector out
of motor.
NOTE: Refer to wiring diagram when rewiring
motor.
b. Remove chain or upper belt.
c. Loosen nut on upper guide rail bolt. Refer to
Figure 30.
d. Loosen nut on idler housing attaching bolt and
lower idler housing to bottom of slots. This is to
put slack in drive belt, so it can be slipped off
the motor pulley without risk of damage.
e. Remove four clips or two screws holding belt
guard to motor bracket and remove belt guard.
Refer to Figure 29.
f. Remove nut and washer from lower guide rail
bolt. Refer to Figure 30.
NOTE: After removing belt, replace the lower guide
rail bolt. Refer to Figure 36.
g. Slip drive belt off motor pulley.
h. Remove the seven fan housing attaching
screws. Refer to Figure 35.
MOTOR
ATTACHING
BOLT
(Both sides)
FAN HOUSING
ATTACHING
SCREWS
(7)
NUT
AND
WASHER
CAP
SCREWS
MOTOR
JUNCTION
BOX
PLATE
NUT
AND
WASHER
MOTOR
ATTACHING
BOLT
(Both sides)
TU044-SV
Figure 35
i. Remove the two capscrews and two sets of nuts
and washers holding motor bracket to rear of
tumbler cabinet. Refer to Figure 35.
j. Using the guide rails as supports, swing motor
and fan assembly out and away from rear of
tumbler. Refer to Figure 36.
k. While supporting motor and fan assembly,
remove the lower guide rail bolt. Refer to
Figure 30.
l. Remove four sets of nuts, washers and bolts
holding mounting bracket to motor. Refer to
Figure 35.
M411429 85
© Copyright, Alliance Laundry Systems LLC – DO NOT COPY or TRANSMIT
Page 84

Section 5 Service Procedures
WARNING
To reduce the risk of electric shock, fire, explosion, serious injury or death:
• Disconnect electric power to the tumbler before servicing.
• Close gas shut-off valve to gas tumbler before servicing.
• Close steam valve to steam tumbler before servicing.
• Never start the tumbler with any guards/panels removed.
• Whenever ground wires are removed during servicing, these ground wires must be
reconnected to ensure that the tumbler is properly grounded.
NOTE: After installing motor and fan assembly,
adjust belt, then adjust chain (Nonreversing models
only.)
111. FAN AND MOTOR ASSEMBLY
(Reversing Tumblers)
a. Disconnect wires from motor as follows:
Older models (No quick-disconnect wire
harness)
LOWER
GUIDE RAIL
BOLT
(1) Remove cover plate from motor junction
box and disconnect wires from motor
wires. Refer to Figure 35.
(2) Remove conduit nut from inside of motor
junction box. Pull wires from junction box.
W002
MOTOR
AND FAN
ASSEMBLY
T045SE3A
Figure 36
m. Remove locknut and jam nut holding fan on
motor shaft. Refer to Figure 37. Pull fan off
motor shaft.
NOTE: Fan is keyed to motor shaft and may have to
be removed using a puller. Look for a spacer washer
at the bottom of the fan keyway. Take care to avoid
losing or damaging the spacer washer.
n. Remove spacer washer from motor shaft. Refer
to Figure 37.
o. Loosen two setscrews holding motor pulley to
motor shaft. Refer to Figure 37. Remove motor
pulley.
NOTE: A puller may be required to remove pulley
from motor shaft.
Newer models (Quick-disconnect wire harness)
(1) Remove cover plate from rear of motor.
(2) Mark four wires and disconnect them from
motor terminals.
(3) Loosen clamp screws in box connector.
(4) While holding box, turn box connector out
of motor.
NOTE: Refer to wiring diagram when rewiring
motor.
b. Remove nut and washer from lower guide rail
bolt. Refer to Figure 30.
c. Remove the seven fan housing attaching
screws. Refer to Figure 35.
d. Remove the two capscrews and two sets of nuts
and washers holding motor bracket to rear of
tumbler cabinet. Refer to Figure 35.
e. Using the guide rails as supports, swing motor
and fan assembly out and away from rear of
tumbler. Refer to Figure 36.
f. While supporting motor and fan assembly,
remove the lower guide rail bolt. Refer to
Figure 30.
g. Remove four sets of nuts, washers and bolts
holding mounting bracket to motor. Refer to
Figure 35.
86 M411429
© Copyright, Alliance Laundry Systems LLC – DO NOT COPY or TRANSMIT
Page 85

Section 5 Service Procedures
WARNING
To reduce the risk of electric shock, fire, explosion, serious injury or death:
• Disconnect electric power to the tumbler before servicing.
• Close gas shut-off valve to gas tumbler before servicing.
• Close steam valve to steam tumbler before servicing.
• Never start the tumbler with any guards/panels removed.
• Whenever ground wires are removed during servicing, these ground wires must be
reconnected to ensure that the tumbler is properly grounded.
h. Remove locknut and jam nut holding fan on
motor shaft. Refer to Figure 37. Pull fan off
motor shaft.
NOTE: Fan is keyed to motor shaft and may have to
be removed using a puller. Look for a spacer washer
at the bottom of the fan keyway. Take care to avoid
losing or damaging the spacer washer.
i. Remove spacer washer from motor shaft. Refer
to Figure 37.
W002
JAM NUT
SPACER
WASHER
LOCKNUT
FAN HOUSING
COVER
FAN
FAN
KEY
MOTOR
PULLEY
KEY
MOTOR
PULLEY
T046SE3A
Figure 37
M411429 87
© Copyright, Alliance Laundry Systems LLC – DO NOT COPY or TRANSMIT
Page 86

Section 5 Service Procedures
WARNING
To reduce the risk of electric shock, fire, explosion, serious injury or death:
• Disconnect electric power to the tumbler before servicing.
• Close gas shut-off valve to gas tumbler before servicing.
• Close steam valve to steam tumbler before servicing.
• Never start the tumbler with any guards/panels removed.
• Whenever ground wires are removed during servicing, these ground wires must be
reconnected to ensure that the tumbler is properly grounded.
W002
112. CYLINDER DRIVE MOTOR
(Reversing Tumblers)
Refer to Figure 38.
a. Support chain guard and remove the screws
holding it to the back panel of the tumbler.
Leave the belt guard attached to the top of the
chain guard.
b. Older Models: Loosen four capscrews holding
motor mounting bracket to side brackets.
Lower motor and mounting bracket until
holding capscrews bottom in the mounting
slots. Refer to Figure 38.
Newer Models: Loosen locking bolt and back
adjusting screw out to loosen belt. Refer to
Figure 46.
c. Slip drive belt off of the motor pulley.
d. Disconnect the wire harness from motor.
e. Remove the four capscrews, nuts, lockwashers
and flat washers holding the motor to the
mounting bracket.
f. Loosen the setscrews in the motor pulley and
remove pulley by using a suitable puller.
NOTE: Refer to wiring diagram when rewiring the
motor.
g. After installing motor, adjust drive belt tension,
and adjust motor position on mounting bracket.
88 M411429
© Copyright, Alliance Laundry Systems LLC – DO NOT COPY or TRANSMIT
Page 87

Section 5 Service Procedures
SIDE
BRACKET
CYLINDER
MOTOR
MOTOR
PULLEY
BELT
GUARD
MOUNTING
BRACKET
SIDE
BRACKET
TU142-PT
Figure 38
M411429 89
© Copyright, Alliance Laundry Systems LLC – DO NOT COPY or TRANSMIT
Page 88

Section 5 Service Procedures
WARNING
To reduce the risk of electric shock, fire, explosion, serious injury or death:
• Disconnect electric power to the tumbler before servicing.
• Close gas shut-off valve to gas tumbler before servicing.
• Close steam valve to steam tumbler before servicing.
• Never start the tumbler with any guards/panels removed.
• Whenever ground wires are removed during servicing, these ground wires must be
reconnected to ensure that the tumbler is properly grounded.
W002
113. REVERSING CONTROL ELECTRICAL
COMPONENTS
Refer to Figure 39.
NOTE: All electrical components except the
reversing/nonreversing switch are located in the
reversing control box on the rear of the tumbler.
The reversing/nonreversing switch is mounted on
the upper right hand corner of the control panel.
a. Reversing/Nonreversing switch:
(1) Remove control panel.
(2) Disconnect wires from switch terminals.
NOTE: Refer to wiring diagram when rewiring
switch.
(3) Manual Timer Models: Remove knurled
nut holding switch to front of control panel.
MM Models: Compress tabs on switch
from rear side of control panel. Slide
switch forward out of control panel.
(4) Remove and save hex nut from switch
shaft. Knurled nut is furnished with the
switch.
b. Reversing timer assembly:
(1) Remove two attaching screws and cover
from control box.
(2) Disconnect wires from timer motor and
switches, or from solid state reversing
timer.
NOTE: Refer to wiring diagram when rewiring
timer motor and switches.
(3) Remove two screws holding timer to back
wall of control box.
(4) Models not having solid state reverser:
Remove timer motor and/or switches as
necessary for replacement. If timer itself is
faulty, replace the complete assembly,
including timer motor and switches.
c. Reversing contactor:
(1) Remove two attaching screws and cover
from control box.
(2) Disconnect wires from contactor coil
terminals.
NOTE: Refer to wiring diagram when rewiring
reversing contactor.
(3) Remove screws holding contactor to back
wall of control box.
(4) To remove coils for replacement, remove
single screw holding each coil to contactor
frame.
(5) If contactor problem is something other
than a defective coil, replace complete
contactor assembly.
d. Fan motor contactor:
(1) Remove two attaching screws and cover
from reversing control box (earlier
versions); or remove junction box cover
(later versions).
(2) Disconnect wires from contactor terminals.
NOTE: Refer to wiring diagram when rewiring fan
motor contactor.
(3) Remove two screws holding fan motor
contactor to back wall of reversing control
box, or junction box.
e. Transformers (480 volt electrical system
only):
(1) Remove two attaching screws and cover
from reversing control box.
(2) Disconnect leads from transformer
terminals.
NOTE: Refer to wiring diagram when rewiring
transformer.
(3) Remove four screws holding transformer
to back wall of reversing control box.
90 M411429
© Copyright, Alliance Laundry Systems LLC – DO NOT COPY or TRANSMIT
Page 89

Section 5 Service Procedures
SOLID STATE
REVERSING TIMER
TIMER
MOTOR
REVERSING
TIMER
ASSEMBLY
CONTROL
COVER
SWITCH
GROUND
SCREW
SCREW
BOX
TRANSFORMER
(3 Phase Only)
GROUND
LUG
FAN
CONTACTOR
REVERSING
CONTACTOR
ASSEMBLY
REVERSING CONTROL ASSEMBLY
COIL
(240 Volt)
SCREW
TMB1747S
Figure 39
M411429 91
© Copyright, Alliance Laundry Systems LLC – DO NOT COPY or TRANSMIT
Page 90

Section 6
Adjustments
WARNING
To reduce the risk of electric shock, fire, explosion, serious injury or death:
• Disconnect electric power to the tumbler before servicing.
• Close gas shut-off valve to gas tumbler before servicing.
• Close steam valve to steam tumbler before servicing.
• Never start the tumbler with any guards/panels removed.
• Whenever ground wires are removed during servicing, these ground wires must be
reconnected to ensure that the tumbler is properly grounded.
114. LEVELING LEGS
NOTE: It is recommended that the front of the
tumbler be kept slightly higher than the rear
(approximately 1/8 inch, 3.0 mm). This will prevent
the clothes, while tumbling, from wearing on the
door glass gasket.
a. Check the front to rear level by rotating the
clothes cylinder until one of the cylinder ribs is
at the bottom. Place a level on the rib.
b. Check the side to side level by placing a level
on the front and rear of top panel.
c. Front leg adjustment fittings are accessed by
removing lint panel door. Rear adjustment
fittings are located on rear corner braces.
Adjust legs as needed.
T451I
W002
NOTE: Keep the tumbler as close to the floor as
possible. All four legs must rest firmly on the floor
so weight of tumbler is evenly distributed. Tumbler
must not rock.
d. Replace lint panel.
Figure 40
M411429 93
© Copyright, Alliance Laundry Systems LLC – DO NOT COPY or TRANSMIT
Page 91

Section 6 Adjustments
WARNING
To reduce the risk of electric shock, fire, explosion, serious injury or death:
• Disconnect electric power to the tumbler before servicing.
• Close gas shut-off valve to gas tumbler before servicing.
• Close steam valve to steam tumbler before servicing.
• Never start the tumbler with any guards/panels removed.
• Whenever ground wires are removed during servicing, these ground wires must be
reconnected to ensure that the tumbler is properly grounded.
W002
115. MAIN GAS BURNER AIR INLET
SHUTTERS
(All Gas Models)
Refer to Figure 41.
CAUTION
The air inlet shutters on the burner must be
adjusted so sufficient primary air is metered
into the system for proper combustion and
maximum efficiency. Before adjusting the
inlet shutter be sure that all lint is removed
from lint compartment and lint screen.
Air inlet shutter adjustments will vary from
location to location and will depend on the vent
system, number of units installed, make-up air and
line gas pressure. Opening the shutter increases
the amount of air supplied to the burner while
closing the shutter decreases the air supply. Adjust
air shutter as follows:
W281
a. Unlock and open the access door.
b. Start the tumbler and check the flame pattern.
Correct air and gas mixture is indicated if the
flame pattern is primarily blue, with small
yellow tips, and bends to the right of the heater
section. Too little air is indicated if the flame is
yellow, lazy and smoky.
c. To adjust the air inlet shutter, loosen adjusting
screws. The control panel may have to be
removed temporarily to loosen adjusting screw.
d. Turn shutter to the right or left (or in or out on
new models) as necessary to obtain desired
flame intensity.
e. After shutter is adjusted, tighten locking screw
securely.
f. If the shutter is correctly adjusted, but the flame
pattern is straight up, insufficient air is flowing
through the tumbler and airflow switch is
improperly set. A flame pattern that flares to the
right and left, indicates that no air is flowing
through the tumbler.
PROPER
AIRFLOW
T048SE3A
AIR SHUTTER
ADJUSTING SCREWS
94 M411429
© Copyright, Alliance Laundry Systems LLC – DO NOT COPY or TRANSMIT
INSUFFICIENT
AIRFLOW
AIR SHUTTER
ADJUSTING SCREWS
Figure 41
T047SE3A
NO AIRFLOW
T049SE3A
AIR SHUTTER
ADJUSTING SCREWS
Page 92

Section 6 Adjustments
WARNING
To reduce the risk of electric shock, fire, explosion, serious injury or death:
• Disconnect electric power to the tumbler before servicing.
• Close gas shut-off valve to gas tumbler before servicing.
• Close steam valve to steam tumbler before servicing.
• Never start the tumbler with any guards/panels removed.
• Whenever ground wires are removed during servicing, these ground wires must be
reconnected to ensure that the tumbler is properly grounded.
W002
116. AIRFLOW SWITCH
Refer to Figure 42.
IMPORTANT: Airflow switch disc must remain
closed during operation. If it opens during the
drying cycle, insufficient airflow through the
tumbler is indicated. If switch remains open, or
pops open and closed during the cycle, the heating
system will shut off. The cylinder and fan will
continue to operate even though the airflow switch
is malfunctioning.
WARNING
Airflow switch operation may be affected by
a clogged lint screen, lack of make-up air, or
by obstructions in the vertical recirculation
stack, or in the customer installed main or
collector ducts. These conditions MUST be
checked and necessary corrections made
before adjusting airflow switch. Always
check airflow at installation. Under no
circumstances is the airflow switch to be
blocked closed or bypassed.
W277
The airflow switch is set at the factory for proper
operation. However, at installation, and following
repairs, the airflow switch operation should be
checked. The airflow switch operation is
controlled by the counterweight position on the
shaft. Moving the counterweight changes airflow
switch sensitivity. The counterweight should be
adjusted so the airflow will force the disc away
from the cabinet when the lint panel is opened 11/2 inches (38 mm). Adjust the airflow switch as
follows:
a. Load the tumbler with a 50 pound dry cotton
load.
NOTE: Airflow adjustment is much faster with one
person opening lint panel in front and another
adjusting the counterweight in the rear of tumbler.
b. Start the tumbler. Open the lint panel 1-1/2
inches (38 mm). The airflow disc should move
away from the cabinet, opening the switch
contacts and shutting off the heat system. This
indicates proper operation and proper
adjustment.
c. If switch is not opening as described in step “b”,
it should be adjusted so it is MORE sensitive.
Depress the spring clip and move
counterweight a small amount toward disc.
Retest by opening lint panel and continue
moving counterweight toward disc until switch
operates as described in step “b”.
d. If switch opens BEFORE lint panel is opened
the proper distance, in step “b”, it should be
adjusted so it is LESS sensitive. Depress the
spring clip and move counterweight a small
amount away from the disc. Retest by opening
lint panel and continue moving counterweight
away from disc until switch operates as
described in step “b”.
M411429 95
© Copyright, Alliance Laundry Systems LLC – DO NOT COPY or TRANSMIT
Page 93

Section 6 Adjustments
AIRFLOW
SWITCH
REAR PANEL
OF TUMBLER
SWITCH
ADJUSTING
SCREWS
SCREW
AIRFLOW
SWITCH
MOUNTING
BRACKET
SWITCH
LEVER
VANE
LEVER
ARM
DISC
COUNTER
WEIGHT
Figure 42
SPRING
CLIP
SWITCH
LEVER
SPRING
CLIP
COUNTER
WEIGHT
DISC
TU050-SV
96 M411429
© Copyright, Alliance Laundry Systems LLC – DO NOT COPY or TRANSMIT
Page 94

Section 6 Adjustments
WARNING
To reduce the risk of electric shock, fire, explosion, serious injury or death:
• Disconnect electric power to the tumbler before servicing.
• Close gas shut-off valve to gas tumbler before servicing.
• Close steam valve to steam tumbler before servicing.
• Never start the tumbler with any guards/panels removed.
• Whenever ground wires are removed during servicing, these ground wires must be
reconnected to ensure that the tumbler is properly grounded.
W002
117. LOADING DOOR SWITCH
Refer to Figure 43.
The door switch should be adjusted so the cylinder
stops when door is opened two inches (51 mm),
plus or minus 1/4 inch (6 mm). This switch is a
normally open switch and is closed when the door
is closed.
a. Close door and start tumbler, then slowly open
loading door. Cylinder and heat system should
shut off when door is open two inches (51 mm)
plus or minus 1/4 inch (6 mm).
b. Slowly close loading door. When door is two
inches (51 mm) from being fully closed, the tab
on the door should contact the switch rod and
depress it enough to close the switch with an
audible “click”.
c. If tab does not depress the switch rod enough to
operate the switch, bend tab outward and repeat
steps “a” and “b”.
SWITCH
ARM
ADJUSTING
SCREWS
DOOR
SAFETY
SWITCH
118. CYLINDER DOOR STRIKE
Refer to Figure 44.
The door strike must be adjusted so it has
sufficient tension to hold loading door closed
against the force of a tumbling load. The door
strike is properly adjusted when 8-15 lbs. (17.6-33
kg) of pull is required to open door.
To adjust, open door, loosen acorn nut and turn
door strike screw in or out as required. Retighten
acorn nut.
DOOR
STRIKE
ACORN
NUT
DOOR
LATCH
T048IE1A
SWITCH
BRACKET
INTERLOCK
ROD
TAB
T249IE1A
Figure 44
Figure 43
M411429 97
© Copyright, Alliance Laundry Systems LLC – DO NOT COPY or TRANSMIT
Page 95

Section 6 Adjustments
WARNING
To reduce the risk of electric shock, fire, explosion, serious injury or death:
• Disconnect electric power to the tumbler before servicing.
• Close gas shut-off valve to gas tumbler before servicing.
• Close steam valve to steam tumbler before servicing.
• Never start the tumbler with any guards/panels removed.
• Whenever ground wires are removed during servicing, these ground wires must be
reconnected to ensure that the tumbler is properly grounded.
W002
119. DRIVE BELT TENSION
Refer to Figure 46.
Proper tension is when drive belt can be depressed 1/2
inch (12.7 mm) by applying light thumb pressure
(approximately 5 pounds) at a point midway between
sheave and motor pulley.
Reversing Belt Drive Models: Proper tension is when
each cylinder belt can be depressed approximately 3/16
inch (4.77 mm) by applying light thumb pressure
(approximately 5 pounds) at a point midway between
the sheave and the idler.
CAUTION
Adjusting the drive belt tension WILL
AFFECT drive chain tension. You MUST
check and readjust the chain tension after
adjusting belt tension.
W282
Nonreversing Tumblers (Belt and Chain Drive
Models):
a. Remove guard from rear of tumbler.
b. Loosen idler housing bolts holding idler
housing to the housing support.
c. Position housing assembly by turning adjusting
bolt until proper belt tension is reached, then
retighten idler housing bolts.
d. Replace guard on rear of tumbler.
Reversing Tumblers:
a. Remove guard from rear of tumbler.
b. To adjust cylinder belt tension, loosen idler
housing bolts holding idler housing assembly to
the housing support.
c. Position housing assembly by turning adjusting
bolt until proper belt tension is reached, then
retighten idler housing bolts.
NOTE: Adjust cylinder belt tension first, then
adjust motor to idler belt tension. Refer to Figure 38
for older models. Refer to Figure 46 for newer
models.
d. Loosen the locking bolt.
e. Loosen the adjusting nut and use the adjusting
screw to move the motor up or down.
f. Once proper belt tension is reached, retighten
the adjusting nut and locking bolt.
g. Replace the guard on rear of tumbler.
98 M411429
© Copyright, Alliance Laundry Systems LLC – DO NOT COPY or TRANSMIT
Page 96

NONREVERSING
BELT DRIVE
POLY
V-BELT
(Self-adjusting)
Section 6 Adjustments
IDLER
HOUSING
BOLTS
(2)
ADJUSTING
BOLT
DRIVE
V-BELT
GUIDE
RAILS
IDLER
HOUSING
ASSEMBLY
T234IE3B
Figure 45
M411429 99
© Copyright, Alliance Laundry Systems LLC – DO NOT COPY or TRANSMIT
Page 97

Section 6 Adjustments
BELT/BELT REVERSING
DRIVE
BELT
LOCKING
BOLT
ADJUSTING
BOLT
(Not Shown)
IDLER
HOUSING
BOLTS
(2)
ADJUSTING
NUT
ADJUSTING
SCREW
CYLINDER
BELTS
IDLER
HOUSING
ASSEMBLY
T322IE3A
Figure 46
100 M411429
© Copyright, Alliance Laundry Systems LLC – DO NOT COPY or TRANSMIT
Page 98

Section 6 Adjustments
WARNING
To reduce the risk of electric shock, fire, explosion, serious injury or death:
• Disconnect electric power to the tumbler before servicing.
• Close gas shut-off valve to gas tumbler before servicing.
• Close steam valve to steam tumbler before servicing.
• Never start the tumbler with any guards/panels removed.
• Whenever ground wires are removed during servicing, these ground wires must be
reconnected to ensure that the tumbler is properly grounded.
W002
120. DRIVE CHAIN TENSION
Refer to Figure 47.
WARNING
To avoid bodily injury, disconnect power to
tumbler before performing this operation. To
find the proper tension, apply light thumb
pressure midway between the cylinder
sprocket and the idler sprocket, and adjust
until the chain can be depressed
approximately 1/2 inch (13 mm).
W279
IMPORTANT: After a tumbler has been in
operation over an extended period of time, a “HIGH
POINT” will develop on the cylinder drive sprocket
from use and wear. Turn the sprocket manually with
drive chain in place until this “high point” is at the
top center. The “high point” can be found by
noticing increased chain tension while slowly
rotating the cylinder sprocket manually. The chain
must be at the “high point” when making the
adjustment. Refer to Figure 47.
Nonreversing Tumblers
a. Remove drive guard, Paragraph 98.
b. To adjust chain tension, loosen jam nut holding
idler sprocket to housing.
c. Move idler sprocket left or right until proper
chain tension is reached, then retighten the jam
nut.
d. Check chain tension.
Reversing Tumblers
a. Remove drive guard, Paragraph 98.
b. To adjust chain tension, loosen nut on idler
housing attaching bolt. Refer to Figure 31.
Move entire idler housing assembly up or down
in the guide rails to change tension.
c. When chain tension is correct, tighten idler
housing attaching bolt. Hold idler housing
firmly in position while tightening nut on
attaching bolt.
d. Check chain tension after tightening nut on
idler housing attaching bolt. Refer to Figure 47.
M411429 101
© Copyright, Alliance Laundry Systems LLC – DO NOT COPY or TRANSMIT
Page 99

Section 6 Adjustments
BELT/CHAIN
REVERSING
POLY
V-BELT
1/2 INCH (13 mm)
DEFLECTION
MOTOR
PULLEY
CYLINDER
MOTOR
LOCKNUT
ADJUSTING
BOLT
CYLINDER
SPROCKET
SHEAVE
GUIDE
RAILS
IDLER HOUSING
ATTACHING
BOLT AND NUT
Figure 47
CYLINDER
DRIVE CHAIN
1/2 INCH (13 mm)
DEFLECTION
GUIDE
RAIL
IDLER
HOUSING
T201PE3A
102 M411429
© Copyright, Alliance Laundry Systems LLC – DO NOT COPY or TRANSMIT
Page 100

Section 6 Adjustments
WARNING
To reduce the risk of electric shock, fire, explosion, serious injury or death:
• Disconnect electric power to the tumbler before servicing.
• Close gas shut-off valve to gas tumbler before servicing.
• Close steam valve to steam tumbler before servicing.
• Never start the tumbler with any guards/panels removed.
• Whenever ground wires are removed during servicing, these ground wires must be
reconnected to ensure that the tumbler is properly grounded.
W002
121. CYLINDER CLEARANCE
The clearance between the cylinder rim and front
panel must be adjusted so the cylinder is centered
within the front panel opening when the cylinder
is fully loaded and is turning. However, the
adjustment should be made when the cylinder is
empty.
NOTE: If the cylinder is not properly adjusted, the
cylinder rim will rub against the front panel.
a. Open loading door and check the gap between
the center of the front panel top flange and the
cylinder rim. Proper adjustment is when the gap
is 7/16 inch (11 mm). Refer to Figure 48.
b. Remove chain guard.
c. Loosen the four trunnion housing bolts. Refer
to Figure 49.
d. Loosen the locknuts on the trunnion housing
adjusting bolts. Refer to Figure 49.
e. Turn the adjusting bolts in or out as necessary
to obtain proper clearance between cylinder rim
and front panel.
NOTE: Turning the adjusting bolts clockwise will
raise the cylinder and turning them counterclockwise will lower the cylinder. Turn both bolts
evenly to adjust top and bottom clearance. Turn
one or the other adjusting bolt in or out to adjust
side clearance.
f. After the cylinder is properly adjusted, tighten
the adjusting bolt locknuts and the four
trunnion housing bolts.
g. Install the chain guard removed in step “b”.
NOTE: If adjusting the trunnion housing fails to
correct the clearance, the problem is probably due
to a worn trunnion shaft or defective bearings.
CYLINDER
RIM
7/16 INCH
(11.113 mm)
GAP
FRONT
PANEL
Figure 48
M411429 103
© Copyright, Alliance Laundry Systems LLC – DO NOT COPY or TRANSMIT
FRONT PANEL
TOP FLANGE
T057PE3B
 Loading...