

ALLIANCE EA3820, EA3821, EA3920, EA3921, EC2921 Programming Manual
...
Electronic
Control
Topload Washer
See Page 2 for Model Numbers
WASH
RINSE SOAK
PRICE TIME REMAINING
INSERT COINS UNBALANCE
SPIN
Programming
FABRICS AND TEMPERATURES
NORMAL
HOT
Use this manual with all electronic topload washers.
PERM
PRESS
WARM
DELICATES
COLD
C540i
Part No. 36198R8
August 2000


WARNING
Failure to install, maintain, and/or operate this machine according to the manufacturer’s
instructions may result in conditions which can produce bodily injury and/or property
damage.
NOTE: The WARNING and IMPORTANT INSTRUCTIONS appearing in this manual are not meant to
cover all possible conditions and situations that may occur. It must be understood that common sense,
caution, and carefulness are factors which cannot be built into these washers. These factors MUST BE
supplied by the person(s) installing, maintaining, or operating the washer.
Always contact the distributor, service agent, or the manufacturer about any problems or conditions you do
not understand.
36198 1

Model Identification
Information in this manual is applicable to these washer models:
EAJ920 XA2820 SWT420
EAJ921 XA2821 SWT421
EA2820 ZAJ920 SWT520
EA2821 ZAJ921 SWT521
EA2920 ZA2920 SWT620
EA2921 ZA2921 SWT621
EA3820 ZA3821 SWT720
EA3821 ZC2921 SWT721
EA3920 HWT521 NWT721
EA3921 HWT621
EC2921 HWT721
2 36198

Table of Contents
Section I
Preliminary Information
About the Control................................................................ 5
Glossary of Terms ...............................................................5
Power Failure Recovery ...................................................... 5
Infra-red Communications (Optional)................................. 5
Section II
Electronic Control Identification
Select Cycle Pads ................................................................7
Select Wash Temp Pads....................................................... 7
Section III
VFD Display Identification
Status Words........................................................................ 9
Section IV
Washer Operation
Start Up ............................................................................. 11
Cycle Sequence ................................................................. 11
Opening the Washer Lid.................................................... 11
Signals ............................................................................... 12
Section V
Electronic Control Special Features
Programming the Electronic Control ................................13
Collecting Audit Information............................................13
Testing Machine and Electronic Control Functions.......... 13
Sales Floor Feature............................................................13
Rapid Advance Feature.....................................................13
Clearing the Electronic Control Vend Feature ..................13
Section VI
Opening the Service Door .........................................15
Section VII
Entering the Special Mode
How to Enter the Special Mode ........................................ 17
Section VIII
Programming the Electronic Control
What Can Be Programmed?..............................................19
Programmable Options Available......................................19
1. Audio Signal “SIg” ...................................................... 20
2. Hot Wash Number of Coins “HnC”............................. 23
3. Warm Wash Number of Coins “AnC”......................... 24
4. Cold Wash Number of Coins “dnC”............................ 25
5. Special Vend A Days ON “SPA” ................................ 26
6. Special Vend A Start Time “SAS” .............................. 30
7. Special Vend A End Time “SAE” ............................... 31
8. Special Vend A Hot Wash Number of Coins “SHC” .. 32
9. Special Vend A Warm Wash Number of Coins “rnC” 33
10.Special Vend A Cold Wash Number of Coins “CnC”. 34
11.Normal Wash Agitation Time “nSE”........................... 35
12.Normal Rinse Agitation Time “ngE”...........................36
13.Normal Final Spin Time “nFS” ...................................37
14.Permanent Press Wash Agitation Time “PSE”............ 38
15.Permanent Press Rinse Agitation Time “PgE”.............39
16.Permanent Press Final Spin Time “PFS” .....................40
17.Delicates Wash Agitation Time “dSE” ........................41
18.Delicates Rinse Agitation Time “dgE” ........................42
19.Delicates Final Spin Time “dFS” .................................43
20.Coin Value “COI” ........................................................44
21.Default Cycle Select “dCS” .........................................45
22.Reset After a Power Failure “rPF” ...............................47
23.Extra Rinse “Ern”.........................................................49
24.Warm Rinse “rrn”.........................................................50
25.Control Configuration “CFg”.......................................51
26.Set Real Time Clock Minutes “CIn”............................54
27.Set Real Time Clock Hours “CHr” ..............................55
28.Set Real Time Clock Days “CdA” ...............................56
29.Set Real Time Clock Date “CdE” ................................57
30.Set Real Time Clock Month “COn”.............................58
31.Set Real Time Clock Year “CYr” ................................59
Section IX
Collecting Audit Information
How to Enter Audit Feature...............................................61
How to Read Audit Data....................................................61
How to Exit Audit Feature.................................................62
Section X
Testing Machine and Electronic Control Functions
How to Enter Testing Feature............................................63
How to Start Tests..............................................................63
How to Exit Testing Feature..............................................63
Diagnostic Test Descriptions.............................................64
Section XI
Sales Floor Feature
How to Enter Sales Floor Feature......................................67
How to Exit Sales Floor Feature........................................67
Section XII
Rapid Advance Feature
How to Enter Rapid Advance Feature ...............................69
How to Exit Rapid Advance Feature .................................69
Section XIII
Clear Vend Feature
How to Clear Vend.............................................................71
Section XIV
Default Washer Settings
Default Settings .................................................................73
Default Cycle.....................................................................73
36198 3

Notes
4 36198
Section I
ON
Preliminary Information
About the Control
The Electronic Control on the commercial washer is
an advanced, programmable computer that lets you
control most machine features by pressing a sequence
of SELECT CYCLE and SELECT WASH TEMP
pads. See Figure 1.
The Electronic Control allows the user to program
custom cycles, set vend prices, retrieve audit
information, program and run diagnostic cycles, and
program special vend features. Washers shipped from
the factory have a default cycle and wash temperature
setting of PERM PRESS, WARM built in. However,
the user can change the default cycle, or any cycle, as
needs permit.
IMPORTANT: In the event of a power failure, the
Electronic Control will not have to be
reprogrammed. It is designed with a memory
system that will remember how it was programmed
(for a minimum of six years) until the electrical
power is restored.
IMPORTANT: It is extremely important that the
washer has a positive ground and that all
mechanical and electrical connections to the
Electronic Control are made before applying power
to or operating the washer.
Glossary of Terms
Power Failure Recovery
If a cycle is in progress and the power fails, the cycle
status is saved in memory for a minimum of six years
without power. When the power recovers, the washer
will resume into the previously active cycle if so
programmed by the owner.
The owner may program a special feature called
POWER FAIL RESET which sets a maximum power
failure duration. To program this feature, see Section
VIII, option 22.
If the length of the power failure is greater than the
POWER FAIL RESET time, the washer will return to
the default mode when power is restored.
NOTE: The washer will first spin if the pressure
switch was open at the time of the power failure
before returning to the default mode.
If the length of the power failure is less than the
POWER FAIL RESET time, the washer will resume at
the point it was interrupted when power is restored.
Infra-red Communications
(Optional)
The Electronic Control may be programmed manually
or by an optional hand-held infra-red computer called
the Micro-Wand III
TM
E
.
The following are a few terms and abbreviations to
learn. These are referred to throughout the
instructions:
VFD - Vacuum Fluorescent Display
This term refers to the window area of the
control that displays words and values.
LED - Light Emitting Diode
O
N
A
B
C
H
7
D
I
8
J
O
E
4
9
K
P
F
5
Q
V
L
1
G
6
R
W
M
2
X
S
.
S
N
H
3
IF
Y
0
Z
-
L
IG
T
H
T
T
B
K
B
S
P
K
U
E
N
T
E
R
S
P
S
P
A
C
E
C
L
E
A
F
M
IC
R
1
R
O
-W
F
2
A
N
D
IIIE
T
M
F
3
F
4
M
O
D
E
This term refers to the lights on the six
keypads of the control.
Micro-Wand III
C100IE1A
TM
E
The Micro-Wand allows the owner to program and
retrieve information from the Electronic Control
without touching the keypad. The Micro-Wand greatly
expands the programming options available to the
owner. However, the Micro-Wand is not required to
program and operate the washer. The operation of the
Micro-Wand and the advanced features available are
covered separately in the Micro-Wand III
TM
E
instruction manual.
36198 5

Notes
6 36198
Section II
Electronic Control Identification
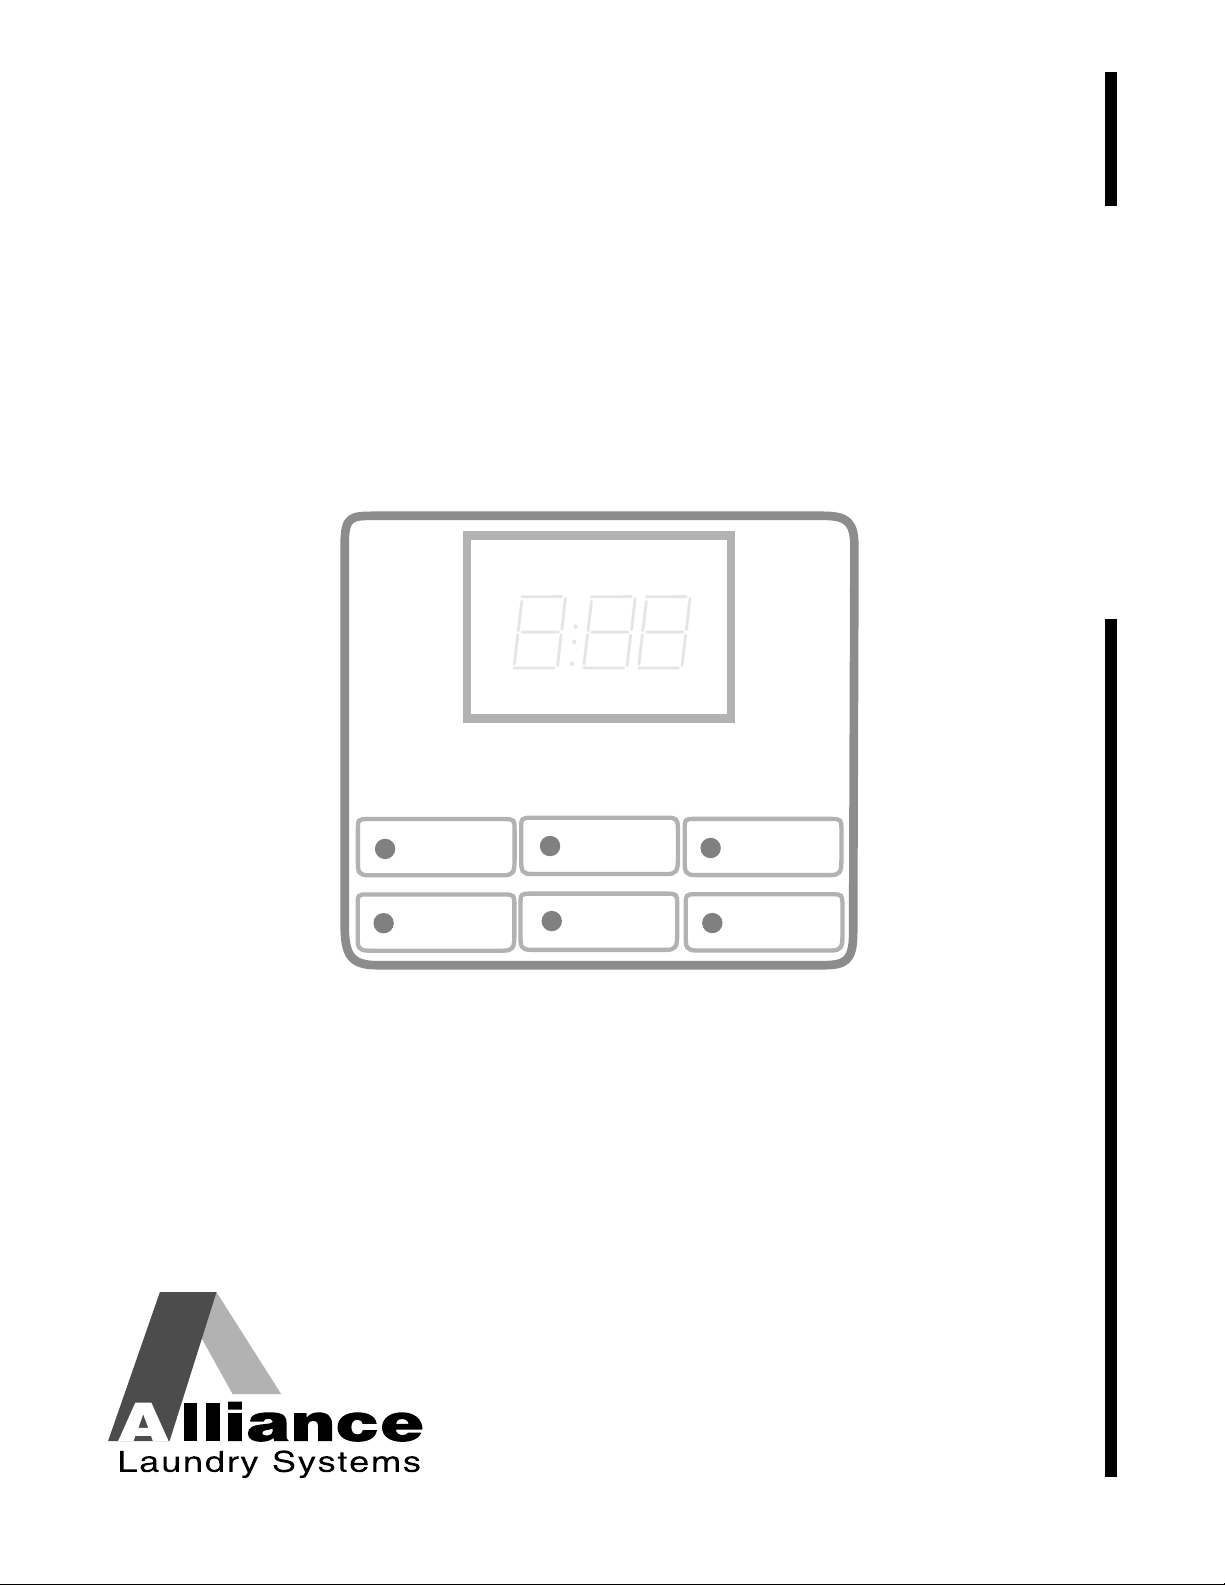
Select Cycle Pads
(Figure 1)
SELECT CYCLE pads are used to select the specific
washer cycle. These pads include NORMAL, PERM
PRESS, and DELICATES. These pads allow the user
to select a cycle other than the default cycle (PERM
PRESS). The SELECT CYCLE key pads are active
only during the first fill cycle of the washer. The
selected cycle is indicated by the light (LED) on the
pad.
WASH
RINSE SOAK
PRICE TIME REMAINING
Select Wash Temp Pads
(Figure 1)
SELECT WASH TEMP pads are used to select the
temperature of the water used for the wash fill. These
pads include HOT, WARM, and COLD. These pads
allow the user to select a water temperature other than
the default setting (WARM). The SELECT WASH
TEMP pads are active only during the first fill cycle of
the washer. The selected temperature is indicated by
the light (LED) on the pad.
Both the WASH TEMP pads and the SELECT
CYCLE pads are used in various combinations for
programming cycles, retrieving audit information,
running diagnostic tests, and other hidden operations.
These instructions cover the manual programming and
data retrieval options.
SPIN
Status Words
LED Light
INSERT COINS UNBALANCE
FABRICS AND TEMPERATURES
NORMAL
HOT
PERM
PRESS
WARM
DELICATES
COLD
Figure 1
Three 7-Segment Digits
VFD Display
SELECT CYCLE pads
(top row)
SELECT WASH TEMP pads
(bottom row)
C101IE3A
36198 7

Notes
8 36198

Section III
VFD Display Identification
Status Words
(See Figure 1)
WASH
WASH is lit at the beginning of a Wash cycle and will
remain lit until the wash cycle is complete.
RINSE
RINSE is lit at the beginning of the Rinse or Extra
Rinse cycle and will remain lit until the cycle is
complete.
SOAK
SOAK is lit at the beginning of all Pause cycles. During
a Wash Pause cycle, the display will light WASH
SOAK and during a Rinse or Extra Rinse Pause cycle,
the display will light RINSE SOAK.
SPIN
SPIN is lit for all Spin cycles. During a Wash Spin
cycle, the display will light WASH SPIN and during an
Extra Rinse Spin cycle, the display will light RINSE
SPIN. At the beginning of Final Spin, the display will
light SPIN.
PRICE
PRICE is lit to indicate that the value displayed by the
VFD is the vend price remaining to be satisfied. Once
the vend price is satisfied, the word PRICE will go off.
INSERT COINS
INSERT COINS is lit to prompt the user for coins to
satisfy the vend price. When INSERT COINS is lit, the
three digits and decimal point show the vend price
remaining to be satisfied. The vend price displayed
will decrease with each coin inserted. If a new wash
temp is selected during the first fill of the wash cycle
and it requires more coins, the INSERT COINS light
will flash, and the display will show the vend price
remaining to be satisfied.
UNBALANCE
UNBALANCE is lit and will flash when the washer is
in a Spin mode and the washer goes out of balance or
the lid is opened. Also, all washer functions including
the timer will stop. If the lid is opened during the last
three (3) minutes of the final spin cycle, the display
will go blank and the word UNBALANCE will light
but not flash, and the timer will continue to run. If the
lid is opened during any non-spin cycle, the display
will freeze and the timer will stop.
Three 7-Segment Digits
The 7-SEGMENT DIGITS are used to display the
time remaining in a cycle or the vend price. When
displaying the time remaining the colon will flash, and
when displaying the vend price the decimal point may
be lit. During diagnostic testing or manual
programming of the control, these digits will display
descriptive codes and values (as described in Section
VII).
TIME REMAINING
TIME REMAINING is lit to indicate that the number
displayed by two digits and the colon is the time
remaining in the current cycle. It will light at the start
of the cycle and remain lit until the cycle is completed.
The colon flashes one (1) second on and one (1)
second off while the time is counting down.
36198 9
Light Emitting Diodes (LEDS)
LIGHT EMITTING DIODES (LEDS) are used to
indicate the chosen cycle and wash temperature. The
cycle LED will remain lit the entire cycle. The wash
temp LED will change to a rinse fill temperature or
remain on until the end of the cycle if programmed to
do so.

Notes
10 36198

Section IV
WASH
RINSE SOAK
SPIN
PRICE TIME REMAINING
INSERT COINS UNBALANCE
NORMAL
HOT
DELICATES
COLD
FABRICS AND TEMPERATURES
PERM
PRESS
WARM
C102IE1A
Washer Operation
Start Up
When power is applied to the washer, the control will
display PRICE, INSERT COINS, the decimal point,
and the vend price. The PRICE and INSERT COINS
light will remain lit until the vend price has been
satisfied. The default cycle setting is PERM PRESS,
the wash water fill temperature is WARM, and the
rinse water temperature is COLD. The LED’s will be
lit on PERM PRESS and WARM at the start of the
cycle. See Figure 2. These default settings are owner
programmable. Refer to Section VIII.
“Ready” Mode
Cycle Sequence
Upon the start of a cycle, the Electronic Control will
display TIME REMAINING and the total cycle time.
The appropriate status words will light while the
machine passes through different cycle steps. Any coin
entered after the first fill cycle, and before the final
three (3) minutes of the final spin cycle will be added
to the total coin counter. If coins are added during the
final three (3) minutes of the final spin cycle, the
control will return to the “Ready” mode and ask the
user to satisfy the vend price if needed.
Opening the Washer Lid
Any time the washer lid is opened while a cycle is in
progress, the control will deactivate all motor and
water relays. If the lid is opened during a non-spin
cycle, the control display will freeze and the timer will
stop. Once the lid is reclosed, the cycle will restart
from the point of interruption. If the lid is open during
a spin cycle, the status word UNBALANCE will flash,
the display will appear blank, and the timer will stop
any time other than the final three minutes of the final
spin cycle. If the lid is opened in the final three
minutes of the final spin cycle, the timer will continue
to count down to the end of the cycle. When the timer
reaches 0 minutes, the control will return to the
“Ready” mode. See Figure 2.
Figure 2
The user will be able to select a different cycle or wash
water temperature by pressing a cycle pad when the
machine is in the “Ready” mode or in the first fill
cycle. If not enough coins are entered to satisfy the
vend price, the control will display the remaining vend
price needed to start the cycle. If the first fill was
interrupted to change the temperature (which requires
more money), and the vend price is not satisfied within
one minute, the washer control will go back to the first
selection and the cycle will restart from the point it
was stopped. After the first fill, all key presses will be
ignored, allowing the washer to go through the
complete cycle.
When a cycle is complete, the control will display
TIME REMAINING, “00” until the washer lid is
opened, a key is pressed, or a coin is entered. When
one of these three options occur, the display will revert
back to the “Ready” mode. See Figure 2.
36198 11

Signals
There are four options when a signal can be used
during the washer operation. The owner may program
when the signal will sound and at what volume level.
These four options are listed below:
1. End of Cycle Signal
By default, this signal is turned off. If turned on, the
signal sounds for three seconds at the end of a
cycle, at one of the three programmable volume
levels.
2. Signal On Keypad Depression
By default, this signal is set at the lowest volume
level, and sounds for .25 seconds each time a
keypad is pressed. This signal can be programmed
at one of three volume levels.
3. Signal On Coin Drop
By default, this signal is turned off. If turned on,
this signal will sound for .25 seconds each time a
coin is entered at one of the three programmable
volume levels.
4. Signal On Unbalance
By default, this signal is turned off. If turned on,
this signal will sound on for three seconds and off
for two seconds for a total of one minute when the
machine is in the Spin cycle and becomes
unbalanced. The signal will sound until the
unbalance condition is over. The signal can be
programmed at one of the three volume levels.
If the machine becomes unbalanced during the
final three minutes of the final spin cycle, the signal
will not sound.
NOTE: Refer to “Programming the Electronic
Control,” Section VIII, to program signal options.
12 36198

Section V
Electronic Control Special Features
Programming the Electronic Control
The Electronic Control allows the washer owner to
program the control with the use of the keypad. Audit,
diagnostic, cycle and vend information may be
programmed and retrieved by pressing combinations
of the Select Cycle and Select Wash Temp pads.
For details on programming cycle and vend
information, refer to “Programming the Electronic
Control,” Section VIII.
Collecting Audit Information
The control will store audit information in its memory
that can be retrieved by pressing various combinations
of Select Cycle and Select Wash Temp pads. The
Electronic Control will record coin vault openings,
coins entered, service door openings, total wash
cycles, special vend options, power failures and more.
For more information on the audit features, refer to
“Collecting Audit Information,” Section IX.
Testing Machine and Electronic
Control Functions
Special programmable diagnostic features built into
the Electronic Control allow the owner to test specific
information with the washer in and out of an active
cycle. By opening and closing the service door and
then pressing various sequences of Select Cycle and
Select Wash Temp pads, the owner may perform the
following tests:
• Diagnostic Test
Sales Floor Feature
The Electronic Control washer has a built-in sales
floor routine used to display all LED lights, status
words, and the three digits with the colon and decimal
point. This function is designed to show potential
customers the high-tech features of the Electronic
Control.
For detailed information on using the Sales Floor
feature, refer to Section XI.
Rapid Advance Feature
This feature allows the user to quickly advance
through active cycles or advance into a cycle from the
“Ready” mode. This feature is useful when tests must
be performed immediately on a washer currently in an
active cycle. In this case, the user can quickly advance
through the cycles to the “Ready” mode. At this point,
the user can perform the required tests and then return
the washer to the point it was interrupted.
For detailed information on using the Rapid Advance
feature, refer to Section XII.
Clearing the Electronic Control
Vend Feature
This feature allows the user to return the Electronic
Control back to the “Ready” mode if coins have been
entered but the full vend price has not yet been
satisfied. See Figure 2.
For more information on using the Clear Vend feature,
refer to Section XIII.
• Pressure Switch Opening Test
• Coin Vault Opening Test
• Service Door Opening Test
• Coin Drop Input Test
• Lid Opening Test
• Show Fill Test
For detailed information on running diagnostic tests,
refer to “Testing Machine and Electronic Control
Functions,” Section X.
36198 13

Notes
14 36198
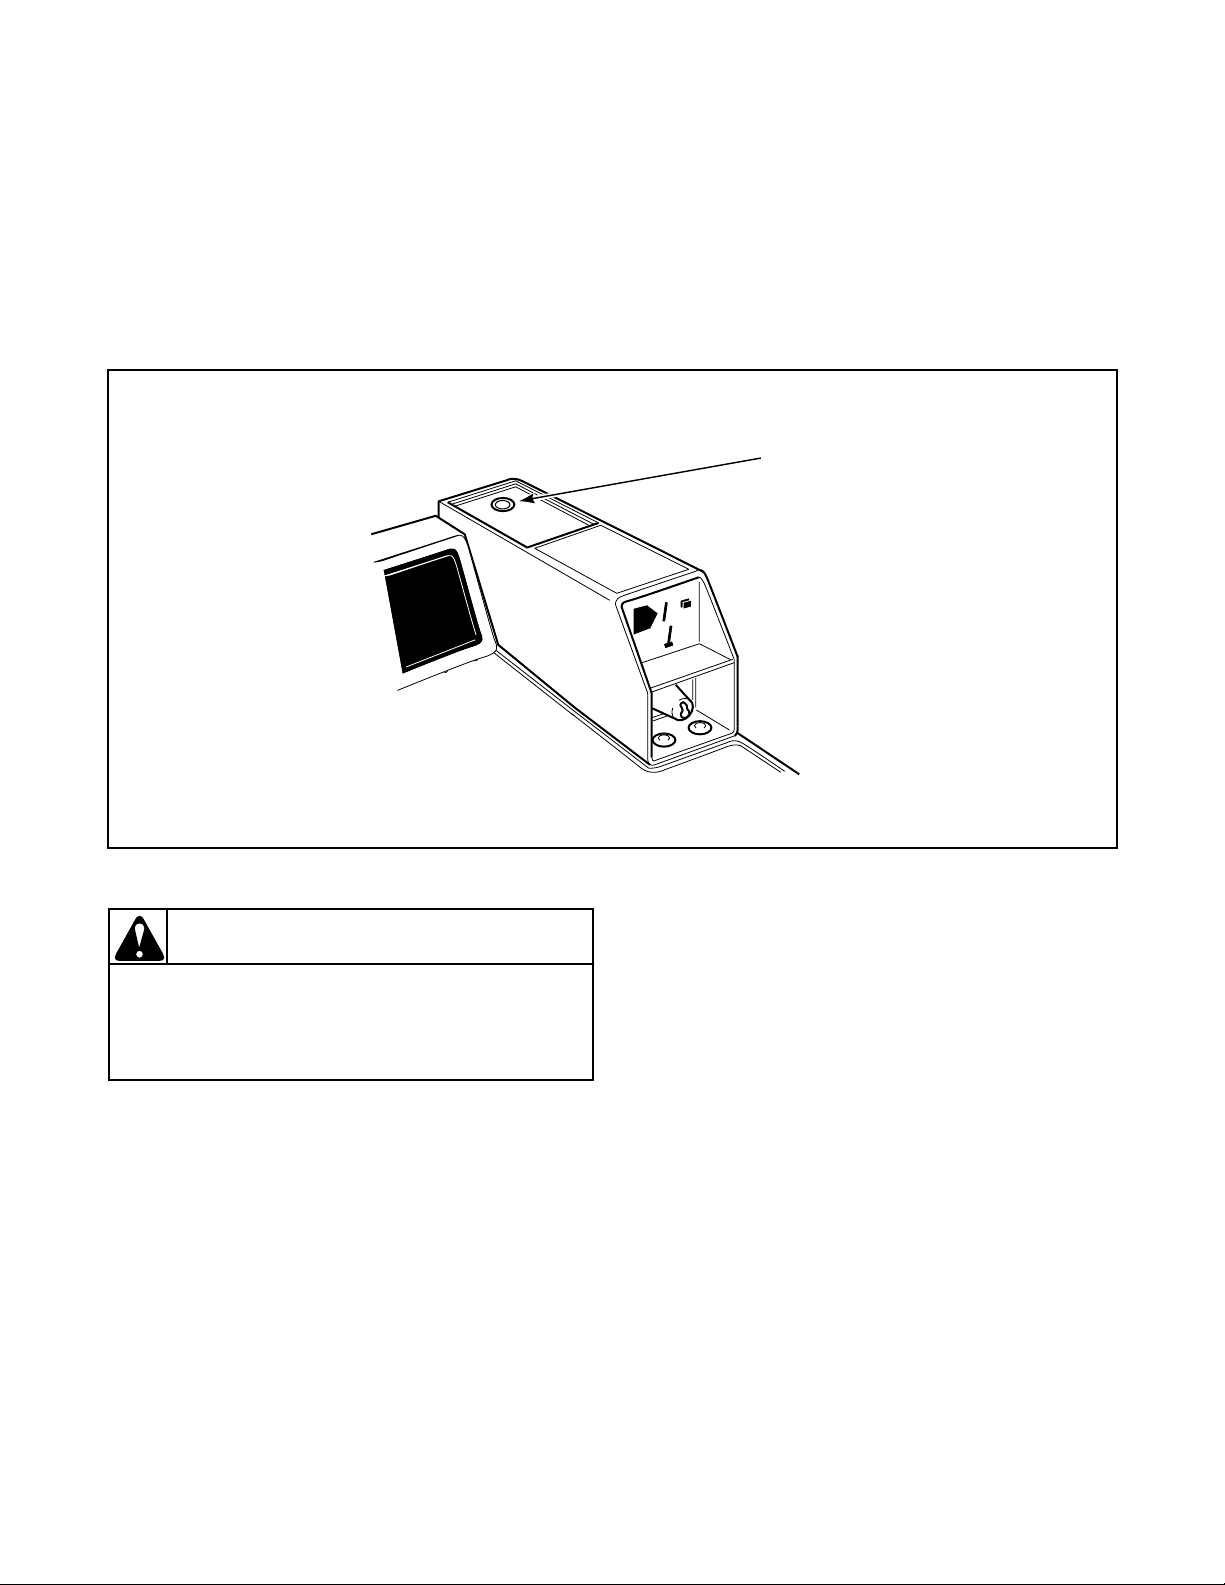
Section VI
25
Any disassembly requiring the use of tools
must be performed by a suitably qualified
service person.
W299
WARNING
Opening the Service Door
Manually programming the Electronic Control often
requires the user to open and close the service door.
Opening and closing the service door trips a switch
allowing access to various programming options,
diagnostics and audit capabilities.
The service door is located on the top of the meter
case. See Figure 3.
After opening and closing the service door, the
programmer has 4.25 minutes to begin programming.
If a SELECT CYCLE pad has not been pressed in that
time, the control will revert back to the “Ready” mode.
See Figure 2.
SERVICE
DOOR
Figure 3
C103IE3A
36198 15

Notes
16 36198
Section VII
NORMAL
HOT
DELICATES
COLD
FABRICS AND TEMPERATURES
PERM
PRESS
WARM
C104IE1A
WASH
RINSE SOAK
SPIN
PRICE TIME REMAINING
INSERT COINS UNBALANCE
Entering the Special Mode
For programming, testing, and retrieving information
from the Electronic Control, it is often necessary to
enter the Special Mode by following the four simple
steps below.
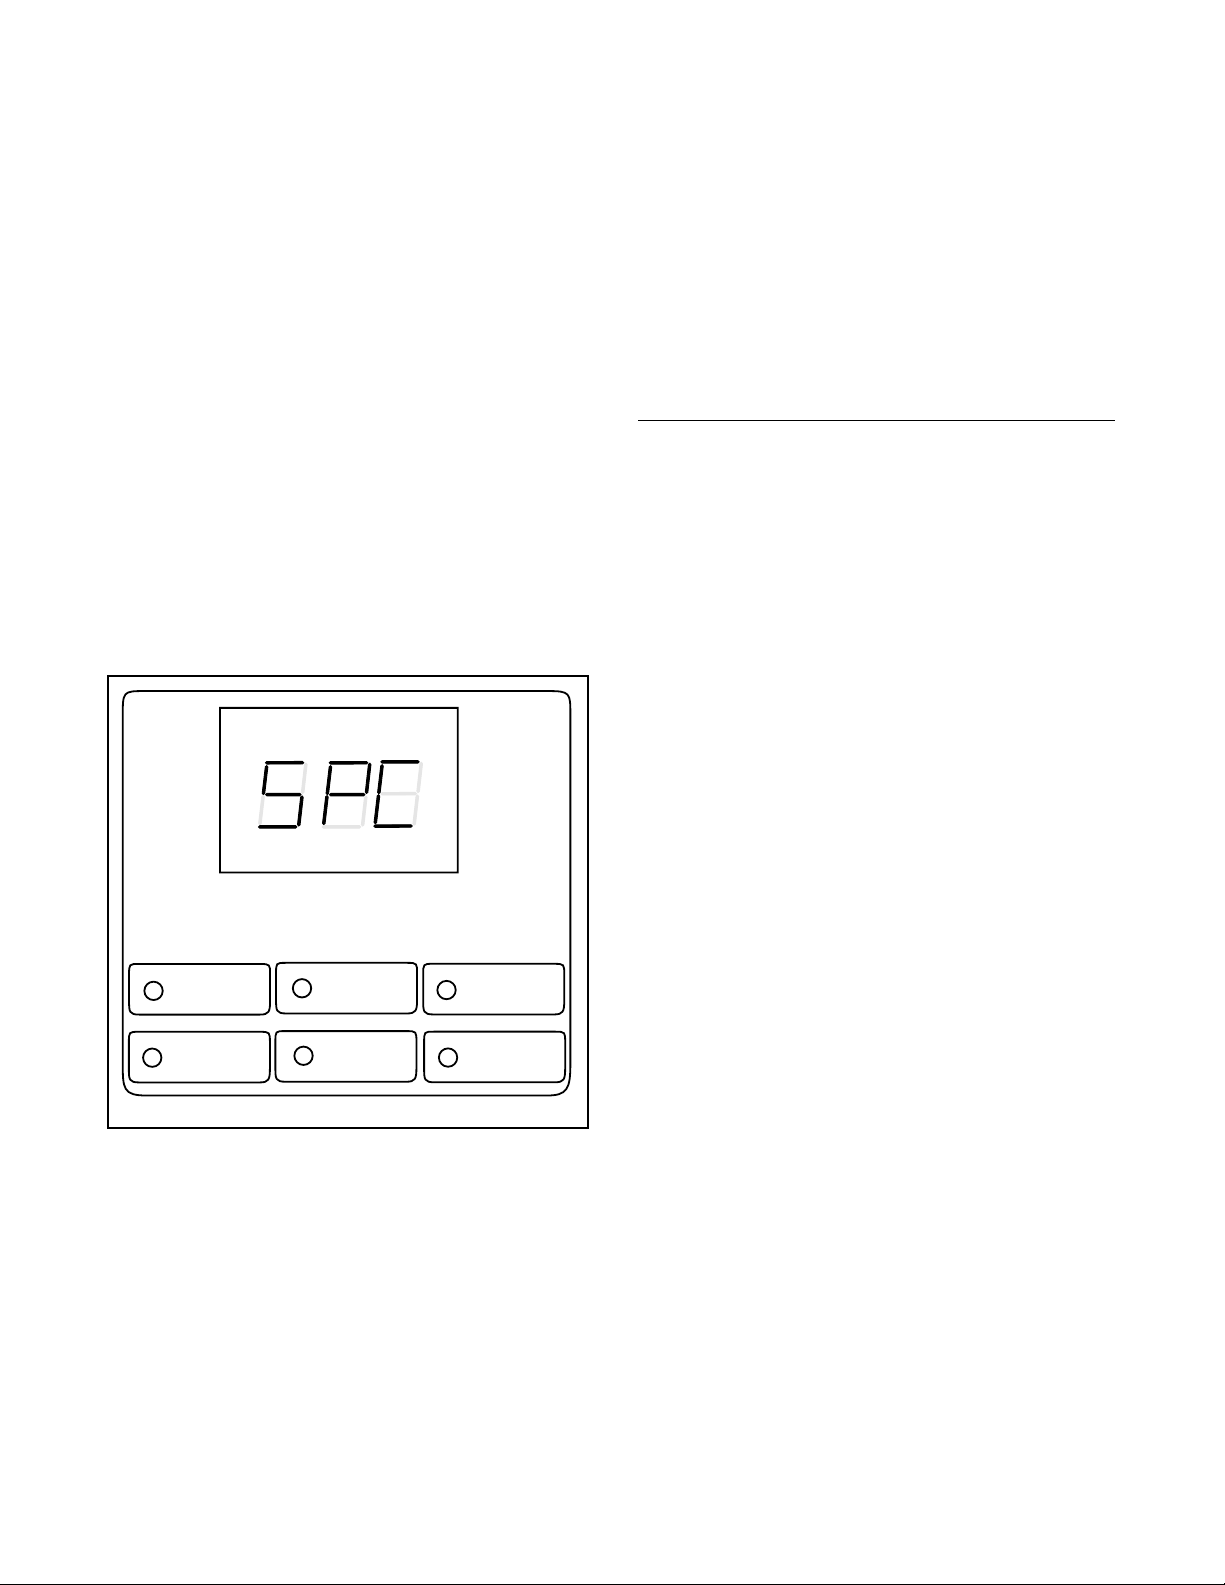
How to Enter the Special Mode
1. Be sure the washer is in the “Ready” mode before
continuing to step 2. See Figure 2. If the washer is
in an active cycle, rapid advance through the cycle.
See the Rapid Advance feature (Section XII). If
coins have been entered, see the Clear Vend feature
(Section XIII).
2. Open the service door located on the top of the
meter case. See Figure 3.
3. While pressing and holding the NORMAL keypad
with one hand, press the HOT keypad with the
other hand.
4. The VFD display will show SPC.” See Figure 4.
The rest of this section describes the six special
features that the control can enter. It is necessary to
enter the Special Mode when programming special
features 1 - 4 in the list below.
1. Programming the Electronic Control
2. Collecting Audit Information
3. Testing Machine and Electronic Control Functions
4. Sales Floor Feature
5. Rapid Advance Feature
6. Clear Vend Feature
Once in the Special Mode, continue on into one of the
features described in detail on the following pages.
Instructions on how to exit each feature are found at
the end of each feature description.
Figure 4
36198 17

Notes
18 36198
Section VIII
Programming the Electronic Control
What Can Be Programmed?
This feature allows the owner to program cycle
information, standard vend pricing, special vends and
others. Refer to this section when programming the
Electronic Control.
This section offers a detailed description of all 31
options available to program.
Each description includes instructions on when and
why the option might be used and, more importantly,
how to program the option.
For more advanced users, a quick reference list of the
options available through the programming mode is
located on this page.
NOTE: The 3 letters in the Option column of the
Programmable Options List is what will show in the
VFD display when that option is selected.
*Options marked with an asterisk are for basic start-up
programming.
Programmable Options Available
# OPTION DESCRIPTION
*1 “Slg” Audio Signal
*2 “HnC” Hot Wash # of Coins
*3 “AnC” Wa rm Wash # of Coins
*4 “dnC” Cold Wash # of Coins
5 “SPA” Special Vend A Days enable
6 “SAS” Special Vend A Start Time
7 “SAE” Special Vend A End Time
8 “SHC” Special Vend A Hot Wash # of Coins
9 “rnC” Special Vend A Warm Wash # of Coins
10 “CnC” Special Vend A Cold Wash # of Coins
*11 “nSE” Normal Wash Time
*12 “ngE” Normal Rinse Agitation Time
*13 “nFS” Normal Final Spin Time
*14 “PSE” Permanent Press Wash Time
*15 “PgE” Permanent Press Rinse Agitation Time
*16 “PFS” Permanent Press Final Spin Time
*17 “dSE” Delicates Wash Time
*18 “dgE” Delicates Rinse Agitation Time
*19 “dFS” Delicates Final Spin Time
20 “COI” Coin Value (set at 025 value)
21 “dCS” Default Cycle Select
22 “rPF” Reset After a Power Failure
23 “Ern” Extra Rinse (0 = Off, 128 = On)
24 “rrn” Warm Rinse (0 = Off, 128 = On)
25 “CFg” Configuration Byte
26 “Cln” Set Real-Time Clock (minutes)
27 “CHr” Set Real-Time Clock (hours)
28 “CdA” Set Real-Time Clock Day
29 “CdE” Set Real-Time Clock Date
30 “COn” Set Real-Time Clock Month
31 “CYr” Set Real-Time Clock Year
36198 19
1. Audio Signal “SIg”
This option allows the user to program when the
signals will sound and at what volume level.
There are four occasions where a signal may sound
during the washer operation. These four occasions are
listed below:
1. End of Cycle Signal
By default, the signal is turned off. If turned on, the
signal will sound for three seconds at the end of a
cycle at one of three programmable volume levels.
2. Keypad Depression Signal
By default, this signal is set at the lowest volume
level and will sound for .25 seconds. This signal
will sound each time a keypad is pressed at one of
the three programmable volume levels.
3. Coin Drop Signal
By default, this signal is off. If turned on, the signal
will sound for .25 seconds each time a coin is
entered at one of three programmable volume
levels.
4. Unbalance Signal
By default, this signal is off. If turned on, the signal
will sound on for three seconds and off for two
seconds for a total of one minute when the machine
is in the Spin cycle and becomes unbalanced. The
signal can be programmed at one of three
programmable volume levels.
How to Program the Audio Signal
1. Control must be in Special Mode. Refer to Section
VII.
2. While pressing and holding the PERM PRESS
keypad with one hand, press the COLD keypad
with the other hand. Programmable option number
one, “SIg”, will appear in the VFD. See Figure 5.
4. Locate the desired three digit number in the first
column of Chart 1 on the following page.
5. Press the DELICATES (+) or the COLD (-) keypad
to increase or decrease the current three digit
number until correct. See Figure 6.
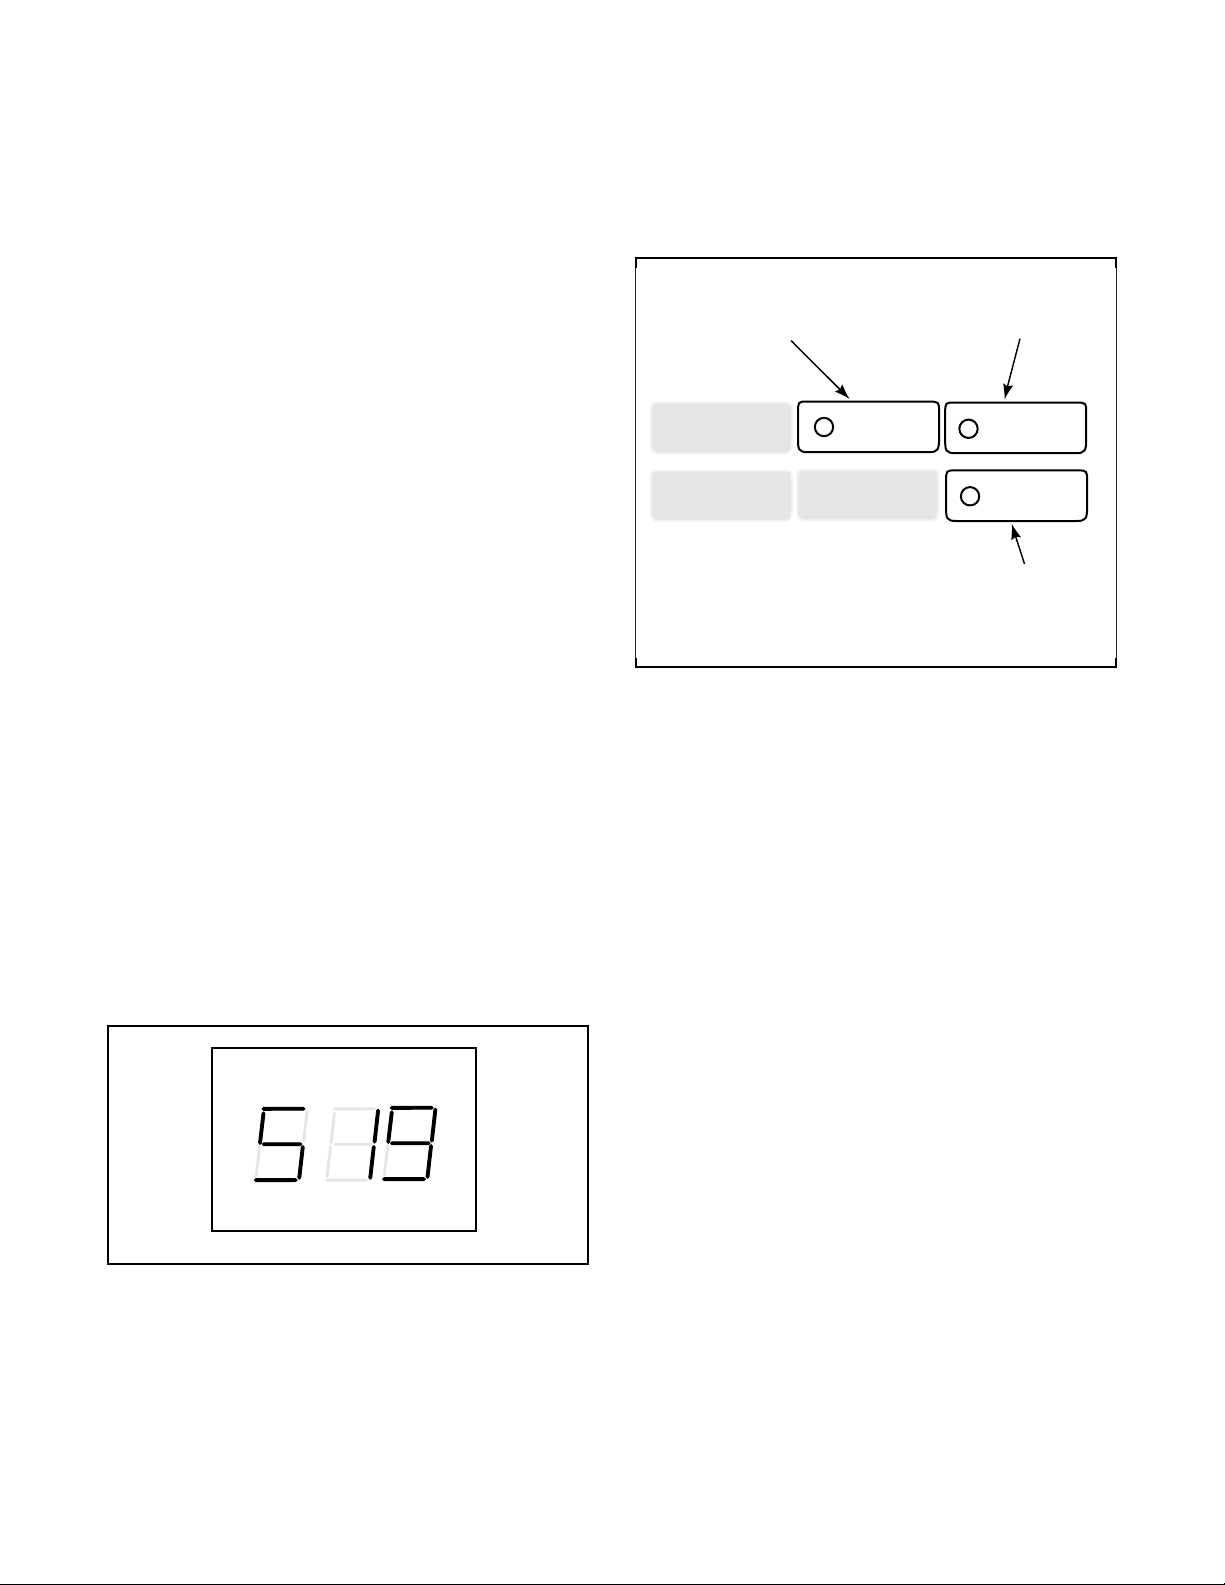
Press this pad (enter)
to choose a selected
value or option
NORMAL
HOT
PERM
PRESS
WARM
Press this pad (+)
to scroll forward or
increase a value
DELICATES
COLD
Press this pad (-)
to scroll back or
decrease a value
C106IE1A
Figure 6
For Example: A user might wish to have the signal
sound only when a keypad is pressed and at the lowest
level. Entering the three digit number 035 in step four
would turn off all the options except LOW VOLUME
and KEYPAD. In this instance, the signal would sound
at the lowest volume only when a keypad is pressed.
6. Press the PERM PRESS (enter) keypad when the
correct three digit number appears in the VFD. The
next option, “HnC”, will appear in the VFD.
NOTE: To program “HnC” (Hot Wash Number of
Coins), see option 2. To program other options,
refer to the appropriate section.
WASH
RINSE SOAK
PRICE TIME REMAINING
SPIN
How to Exit Programming Feature
1. Be sure service door has been opened and closed.
Refer to Section VI.
2. Be sure the control shows a programmable option,
INSERT COINS UNBALANCE
C105IE1A
not a value.
3. While pressing and holding the PERM PRESS
keypad with one hand; press the COLD keypad
Figure 5
with the other hand. The control will revert back to
the “Ready” mode. See Figure 2.
3. When “SIg” appears in the VFD, press the PERM
PRESS (enter) keypad. A three digit number will
appear in the VFD.
NOTE: The number appearing in the VFD is the
current number that was selected from Chart 1
located on the following page.
20 36198
How to read Chart 1
To determine the correct three digit number required in
step four on the previous page, review the chart below.
Read Chart 1 from left to right. Each row begins with a
three digit number required in step four.
Each three digit number in the first column is followed
by the words ON or OFF in the following columns.
The word ON or OFF indicates if the option at the top
of that column is turned on or turned off when that
number is entered.
Chart 1: “Slg”
Signal
Valu e
000 OFF OFF OFF OFF OFF OFF OFF
035 OFF OFF ON OFF OFF OFF ON
037 OFF OFF ON OFF OFF ON OFF
039 OFF OFF ON OFF OFF ON ON
041 OFF OFF ON OFF ON OFF OFF
043 OFF OFF ON OFF ON OFF ON
045 OFF OFF ON OFF ON ON OFF
047 OFF OFF ON OFF ON ON ON
049 OFF OFF ON ON OFF OFF OFF
051 OFF OFF ON ON OFF OFF ON
053 OFF OFF ON ON OFF ON OFF
055 OFF OFF ON ON OFF ON ON
057 OFF ON ON ON ON OFF OFF
059 OFF ON ON ON ON OFF ON
061 OFF ON ON ON ON ON OFF
063 OFF ON ON ON ON ON ON
065 OFF ON OFF OFF OFF OFF OFF
067 OFF ON OFF OFF OFF OFF ON
069 OFF ON OFF OFF OFF ON OFF
071 OFF ON OFF OFF OFF ON ON
073 OFF ON OFF OFF ON OFF OFF
075 OFF ON OFF OFF ON OFF ON
077 OFF ON OFF OFF ON ON OFF
079 OFF ON OFF OFF ON ON ON
081 OFF ON OFF ON OFF OFF OFF
083 OFF ON OFF ON OFF OFF ON
085 OFF ON OFF ON OFF ON OFF
087 OFF ON OFF ON OFF ON ON
089 OFF ON OFF ON ON OFF OFF
091 OFF ON OFF ON ON OFF ON
093 OFF ON OFF ON ON ON OFF
095 OFF ON OFF ON ON ON ON
129 ON OFF OFF OFF OFF OFF OFF
131 ON OFF OFF OFF OFF OFF ON
133 ON OFF OFF OFF OFF ON OFF
135 ON OFF OFF OFF OFF ON ON
137 ON OFF OFF OFF ON OFF OFF
High
Vo lu me
Medium
Vo lu me
Low
Vo lu me
Unbalanced
Coin
Input
Cycle
End
Chart 1: (Page 1 of 2)
Key
Pad
36198 21
 Loading...