

Page 1
FLW1510C
Commercial
Front Control
Washers
Refer to Page 6 for Model Numbers
Service
www.comlaundry.com
Part No. 800168R4
January 2010
Page 2

Page 3

Table of Contents
Section 1 –Safety Information
Locating an Authorized Servicer .............................4
Section 2 –Introduction
Customer Service.....................................................5
Nameplate Location.................................................5
Model Identification.................................................6
How Your Washer Works........................................7
Section 3 –Troubleshooting
1. Troubleshooting Coin Drop...............................9
2. No Spin Condition – Models through Serial No.
9811005968......................................................13
3. Troubleshooting Knocking Noise....................13
4. No motor rotation, or drive failure code “E:DF”
on electronic display units ...............................15
EDC Models
5. EDC Error Code Listing..................................19
6. Cannot Perform Infrared Communication.......20
7. Coins Ignored When Entered...........................21
8. Electronic Control Has No Visible Display –
Washer .............................................................22
9. Washer Will Not Start (Door and Door Lock
Switch) – No Door Lock Only.........................24
10. Washer Will Not Start
(EDC Control Analysis)...................................26
11. Washer Will Not Fill .......................................28
12. Washer Overflows ...........................................30
13. Washer Will Not Pump....................................32
14. “E:SP” Error Analysis .....................................34
15. Door Locked, Motor Does Not Run (E:df on
display).............................................................36
16. Start Up Sequence............................................38
17. Shut Down Sequence.......................................40
MDC Models
18. MDC Error Code Listing.................................43
19. Coins Ignored When Entered...........................44
20. No Visible Display on Control ........................46
21. Washer Will Not Start – No Door Lock ..........48
22. Washer Will Not Start – Control Analysis......50
23. Washer Will Not Fill .......................................52
24. Washer Overflows ...........................................54
25. Pump Does Not Operate..................................56
26. Door Locked, Motor Does Not Run (E:df on
display).............................................................58
NetMaster Models
27. Microwand Does Not Communicate With
Control .............................................................62
28. Coins Ignored When Entered...........................63
29. No Visible Display on Control ........................64
30. Washer Will Not Start – No Door Lock..........66
31. Washer Will Not Start – Control Analysis......68
32. Washer Will Not Fill .......................................70
33. Washer Overflows ...........................................72
34. Pump Does Not Operate..................................74
35. Door Locked, Motor Does Not Run (E:df on
display).............................................................76
Section 4 –Grounding
36. Wall Receptacle Polarity Check......................79
37. Machine Ground Connections .........................80
Section 5 –Service Procedures
38. Control Panel...................................................83
39. Indicator Light.................................................84
40. Electronic Control............................................85
41. Control Panel Overlay .....................................85
42. Cabinet Top .....................................................86
43. Coin Drop ........................................................88
44. Card Reader .....................................................90
45. Motor Control Board .......................................92
46. Pressure Switch................................................93
47. Control Cabinet Front......................................93
48. Control Cabinet Wrapper.................................95
49. Lower Access Panel.........................................95
50. Electric Drain Pump ........................................96
51. Belt...................................................................97
52. Mixing Valve...................................................98
53. Front Panel.....................................................100
54. Loading Door.................................................103
55. Door Seal and Hose Assembly......................104
56. Door Switch...................................................104
57. Door Latch Switch.........................................106
58. Motor .............................................................107
59. Outer Tub Front Panel...................................108
60. Inner Basket Pulley........................................110
61. Inner Basket Assembly..................................112
© Copyright 2010, Alliance Laundry Systems LLC
All rights reserved. No part of the contents of this book may be reproduced or transmitted in any form or by any means without
the expressed written consent of the publisher.
800168 1
© Copyright, Alliance Laundry Systems LLC – DO NOT COPY or TRANSMIT
Page 4

62. Bearing Housing............................................116
Section 6 –Adjustments
63. Cabinet Leveling Legs...................................119
64. Loading Door.................................................120
65. Motor Belt Tension........................................121
66. Door Catch.....................................................122
67. Cleaning Non-Electronic Coin Drop .............123
68. Cleaning Electronic Coin Drop .....................125
2 800168
© Copyright, Alliance Laundry Systems LLC – DO NOT COPY or TRANSMIT
Page 5

Section 1
• Failure to install, maintain and/or operate this product according to the manufacturer’s
instructions may result in conditions which can produce serious injury, death and/or property
damage.
• Do not repair or replace any part of the product or attempt any servicing unless specifically
recommended or published in this Service Manual and unless you understand and have the
skills to carry out the servicing.
• Whenever ground wires are removed during servicing, these ground wires must be
reconnected to ensure that the product is properly grounded and to reduce the risk of fire,
electric shock, serious injury or death.
W006R2
WARNING
Safety Information
Throughout this manual and on machine decals, you will find precautionary statements (“CAUTION,”
“WARNING,” and “DANGER”) followed by specific instructions. These precautions are intended for the personal
safety of the operator, user, servicer and those maintaining the machine.
a DANGER
Danger indicates the presence of a hazard that will cause severe personal injury, death or substantial property
damage if the danger is ignored.
WARNING
Warning indicates the presence of a hazard that can cause severe personal injury, death or substantial property
damage if the warning is ignored.
CAUTION
Caution indicates the presence of a hazard that will or can cause minor personal injury or property damage if the
caution is ignored.
Additional precautionary statements (“IMPORTANT” and “NOTE”) are followed by specific instructions.
IMPORTANT
The word “IMPORTANT” is used to inform the reader of specific procedures where minor machine damage will
occur if the procedure is not followed.
NOTE
The word “NOTE” is used to communicate installation, operation, maintenance or servicing information that is
important but not hazard related.
In the interest of safety, some general precautions relating to the operation of this machine follow.
800168 3
© Copyright, Alliance Laundry Systems LLC – DO NOT COPY or TRANSMIT
(continued)
Page 6
Section 1 Safety Information
To reduce the risk of electric shock, fire, explosion, serious injury or death:
• Disconnect electric power to the washer before servicing.
• Never start the washer with any guards/panels removed.
• Whenever ground wires are removed during servicing, these ground wires must be
reconnected to ensure that the washer is properly grounded.
W003
WARNING
Repairs that are made to your products by unqualified persons can result in hazards due to
improper assembly or adjustments subjecting you or the inexperienced person making such
repairs to the risk of serious injury, electrical shock or death.
W007
WARNING
If you or an unqualified person perform service on your product, you must assume the
responsibility for any personal injury or property damage which may result. The manufacturer
will not be responsible for any injury or property damage arising from improper service and/or
service procedures.
W008
WARNING
NOTE: The WARNINGS and IMPORTANT INSTRUCTIONS appearing in this manual are not meant to
cover all possible conditions and situations that may occur. Common sense, caution and care must be
exercised when installing, maintaining or operating the washer.
Always contact your dealer, distributor, service agent or the manufacturer about any problems or conditions you do
not understand.
Locating an Authorized Servicer
Alliance Laundry Systems is not responsible for personal injury or property damage resulting from improper
service. Review all service information before beginning repairs.
Warranty service must be performed by an authorized technician, using authorized factory parts. If service is
required after the warranty expires, Alliance Laundry Systems also recommends contacting an authorized
technician and using authorized factory parts.
4 800168
© Copyright, Alliance Laundry Systems LLC – DO NOT COPY or TRANSMIT
Page 7
Section 2
H129P
NAMEPLATE
LOCATION
Introduction
Customer Service
If literature or replacement parts are required, contact
the source from whom the machine was purchased or
contact Alliance Laundry Systems at (920) 748-3950
for the name and address of the nearest authorized
parts distributor.
For technical assistance, call (920) 748-3121.
Nameplate Location
When calling or writing about your product, be sure to
mention model and serial numbers. Model and serial
numbers are located on nameplate(s) as shown.
800168 5
© Copyright, Alliance Laundry Systems LLC – DO NOT COPY or TRANSMIT
Page 8

Section 2 Introduction
Model Identification
Information in this manual is applicable to these washers.
MODEL
NUMBER
HWF561*E1102 X
HWF561*H1102 X
HWF761*E1102 X
HWFB61*J1102 X
HWFF61*J1102 X
HWFT61*H X
HWFT61*H1102 X
HWFX61*H1102 X
HWFY61*H1102 X
HWFZ61*H X
HWFZ61*H1102 X
SWF561*E X
SWF561*H X
SWF661*E X
SWF661*H X
SWF761*E X
SWF761*H X
SWFA61*H X
SWFA61*J X
SWFB61*H X
SWFB61*J X
SWFC61*H X
SWFC61*J X
SWFD61*H X
SWFF61*J X
SWFH61*J X
SWFJ61*J X
SWFT61*H X
SWFX61*H X
SWFY61*H X
SWFZ61*H X
* Add Letter To Designate Color. L – Almond W – White Q – Bisque
COIN
DROP
INSTALLED
COIN
DROP
READY
CARD
READER
INSTALLED
CARD
READER
READY
6 800168
© Copyright, Alliance Laundry Systems LLC – DO NOT COPY or TRANSMIT
Page 9
How Your Washer Works
FLW1651S
3
2
1
COIN
DROP
MOTOR
CONTROL BOARD
(Located inside
control cabinet)
PRESSURE SWITCH
(Located inside
control cabinet)
MIXING
VALVE
INNER
BASKET
OUTER
TUB
MOTOR
ELECTRIC
DRAIN
PUMP
ELECTRONIC CONTROL
(Mounted to backside
of control panel)
Section 2 Introduction
800168 7
© Copyright, Alliance Laundry Systems LLC – DO NOT COPY or TRANSMIT
Page 10

Section 2 Introduction
General
This frontload washer provides some of the same
principles of operation as the typical topload washer. It
senses water level, dispenses the desired laundry
detergent, agitates the clothes for good cleaning
action, pumps the water out of the washer and spins
the clothing in preparation for the dryer.
The difference in operation is primarily the rotational
washing agitation created for the horizontal basket and
drum. This agitation tumbles the clothes in a
clockwise, pause, and counter-clockwise direction.
This reversing tumbling action provides an efficient
washing process and requires less laundry detergent
and less water.
The cycle begins by locking the loading door after the
vend is satisfied. The type of cycle and water
temperature are determined by the appropriate pads on
the electronic control.
The inner basket starts agitating during the wash water
fill. A column of air is trapped in a pressure bulb and
hose. The air pressure continues to increase as the
inner basket fills with water until it is great enough to
activate the pressure switch which then causes the
wash fill to stop.
The agitate cycle tumbles the clothing in a clockwise
direction for a period of 20 seconds, pauses for 9
seconds and then tumbles the clothing in a
counterclockwise direction for 10 seconds. This
agitation continues until the wash soak cycle. The
machine stops agitating and turns on the pump which
removes the wash water.
Upon completion of the wash cycle, the machine goes
into a rinse cycle. Fresh cold water is brought into the
inner basket via the mixing valve until the pressure
switch shuts off the water while agitating. The rinse
cycle consists of agitation for a predetermined amount
of time and then a spin mode with the pump running
where the machine goes into a series of 4 short 500
RPM spins. Two of these rinse cycles will normally
take place. A third extra rinse cycle is optional.
After all the rinse cycles have been completed, the
washer goes into a final high spin cycle to extract as
much water as possible from the clothing to prepare
them for the dryer. The spin speeds and duration of
this final high spin cycle are determined by the type of
wash cycle selected (refer to table).
NOTE: Washer may not reach 1000 RPM because
of an out-of-balance condition. Control may limit
speed to 850, 650 or 500 RPM depending on severity
of out-of-balance condition.
Regular Perm Press Delicate
650
RPM
1000
RPM
5-1/2
minutes
1-1/2
minutes
6
minutes
1
minute
4
minutes
0
minutes
Technical
The basic operational system of this washer consists of
the electronic front-end control, the motor control,
pressure switch, water valves, electric pump, D.C.
motor and transformer.
The front end control performs all control and timing
functions like the timer in a topload washer. The front
end control sends simple speed and output commands
to the motor control via serial communication. The
front end control powers the door lock, pump and the
motor control.
The motor control powers the D.C. motor and
performs all motor control functions. The motor
control also powers the water and dispenser valves and
passes the pressure switch status to the front end
control. The motor control is powered through the
door switch, door lock switch and front end control.
An auto transformer provides 240 VAC for the motor
which the motor control converts to D.C. The motor
control also alerts the front end control to any errors in
the motor.
The motor control uses a speed sensor on the motor to
measure the drum RPM. Before entering any spin step
the motor control measures the RPM of the drum to
sense out-of-balance. The motor control will try to
redistribute the clothes if an out-of-balance condition
exists. The motor control will limit the spin speed to
several speeds depending on the severity of the out-ofbalance condition. If the out-of-balance condition is
severe enough, the motor control will limit speed to 90
RPM and will not spin.
NOTE: An additional out-of-balance switch is used
to detect any out-of-balance condition during spins.
If this switch opens during a spin step the motor
control immediately stops and restarts the spin step.
8 800168
© Copyright, Alliance Laundry Systems LLC – DO NOT COPY or TRANSMIT
Page 11
To reduce the risk of electric shock, fire, explosion, serious injury or death:
• Disconnect electric power to the washer before servicing.
• Never start the washer with any guards/panels removed.
• Whenever ground wires are removed during servicing, these ground wires must be
reconnected to ensure that the washer is properly grounded.
W003
WARNING
Section 3
Additional coins
following path to
sensor
Coin Drop
Sensor
Coin in
Coin Slot
Troubleshooting
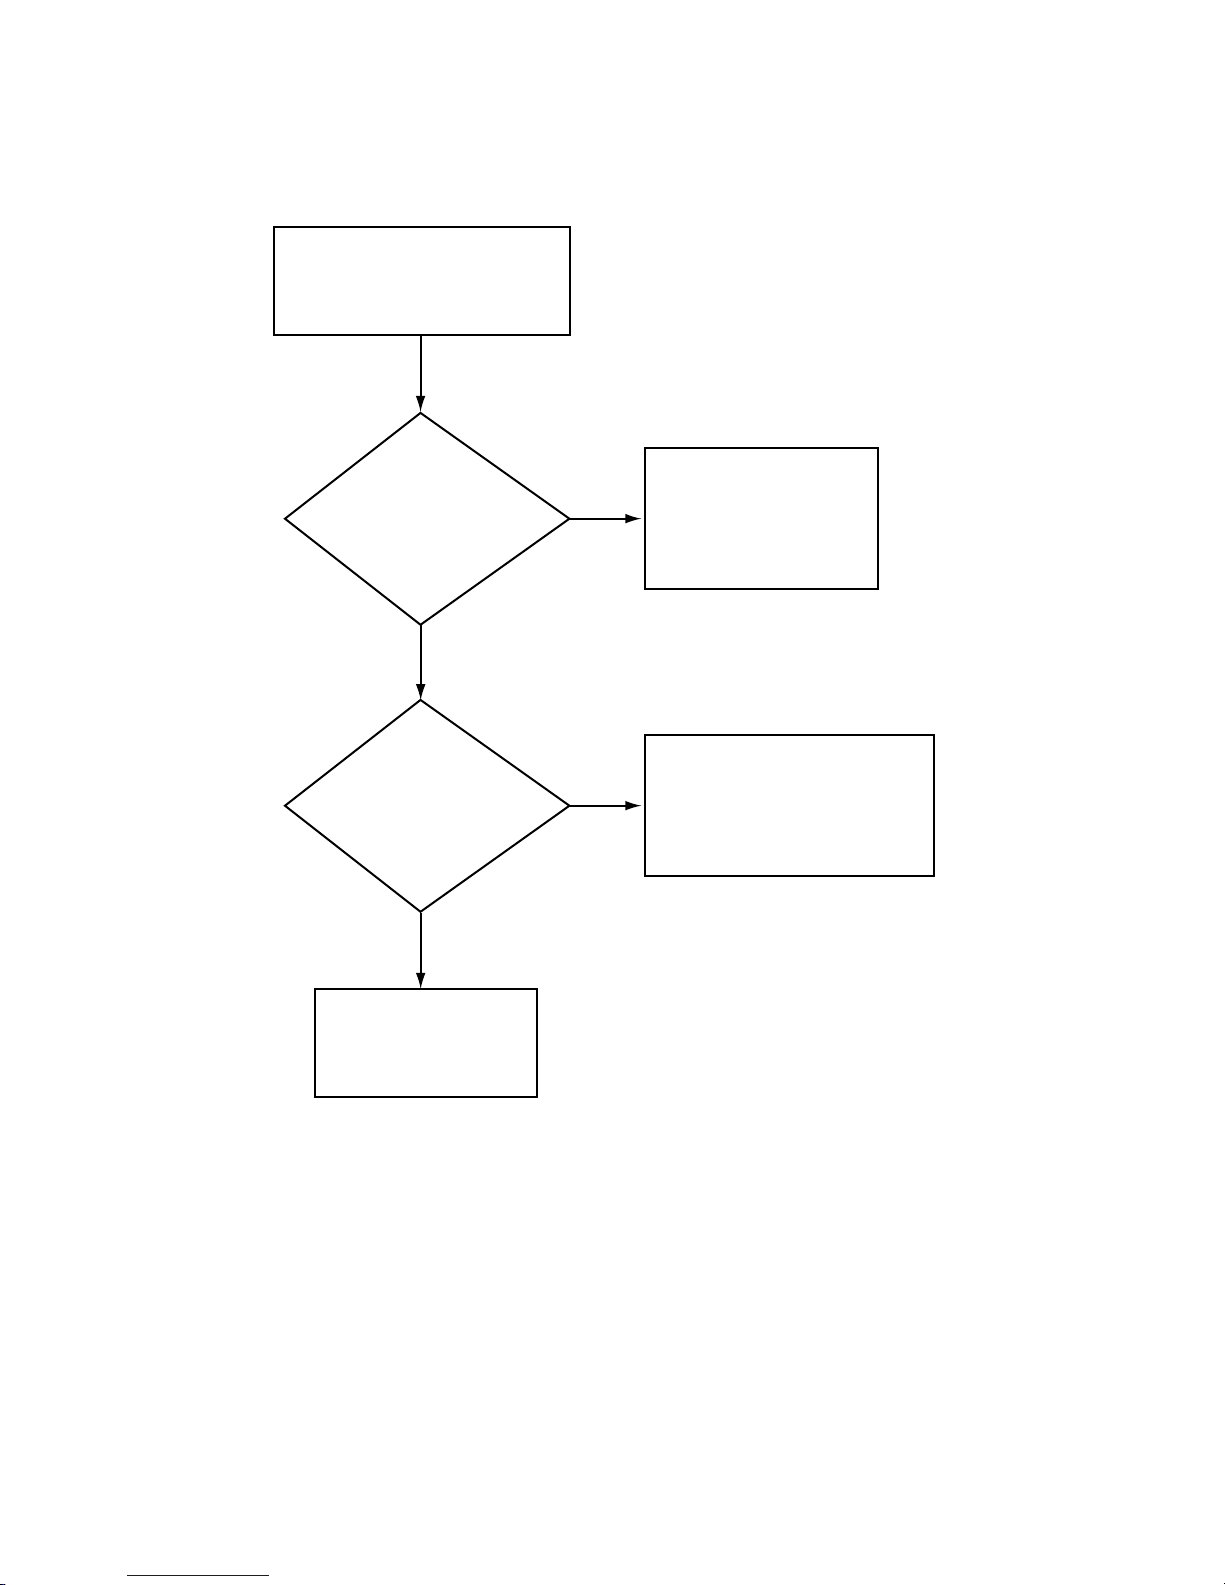
1. TROUBLESHOOTING COIN DROP
a. Non-Electronic Coin Drops:
When coin is placed into coin slot, the coin
should roll down drop and be heard dropping into
coin vault. If coin does not fall into coin vault or
if coin drop sensor does not register that coin has
been entered, follow troubleshooting instructions
on following page. Refer to Figure 1 for path that
coin follows when working properly.
IMPORTANT: Never use oil to correct coin drop
problems. Oil residue will prevent coins from
rolling properly.
IMPORTANT: Do not bend or damage mechanical
parts within coin drop.
Figure 1
DRY2B
800168 9
© Copyright, Alliance Laundry Systems LLC – DO NOT COPY or TRANSMIT
Page 12
Section 3 Troubleshooting
1. TROUBLESHOOTING COIN DROP (continued)
Is proper
electrical power
supplied to coin drop?
(Incorrect electrical connection
may prevent coins from
registering in
coin drop.)
Yes
Is
machine level?
(Machines that aren't
level may prevent coins from
following through required
check stages
of drop.)
No
No
Refer to wiring
diagram for
proper connections.
Refer to
Installation Instructions
for instructions
on leveling machine.
Yes
Is coin drop
clean? (Residue or
lint build-up may prevent
coins from following through
required check stages
of drop.)
Yes
Do coins
fall freely
through drop?
Yes
Replace
coin drop sensor.
No
Adjustments section
for instructions on cleaning
No
Replace
coin drop.
Refer to
drop.
SWD1714S
10 800168
© Copyright, Alliance Laundry Systems LLC – DO NOT COPY or TRANSMIT
Page 13
Section 3 Troubleshooting
To reduce the risk of electric shock, fire, explosion, serious injury or death:
• Disconnect electric power to the washer before servicing.
• Never start the washer with any guards/panels removed.
• Whenever ground wires are removed during servicing, these ground wires must be
reconnected to ensure that the washer is properly grounded.
W003
WARNING
MIX7B
Coin Drop
Cover
Coin Return
Button
MIX6B
Coin Drop
Cover
Cover Catch
Small Flathead
Screwdriver
Right Side of
Tension Spring
Left Tab
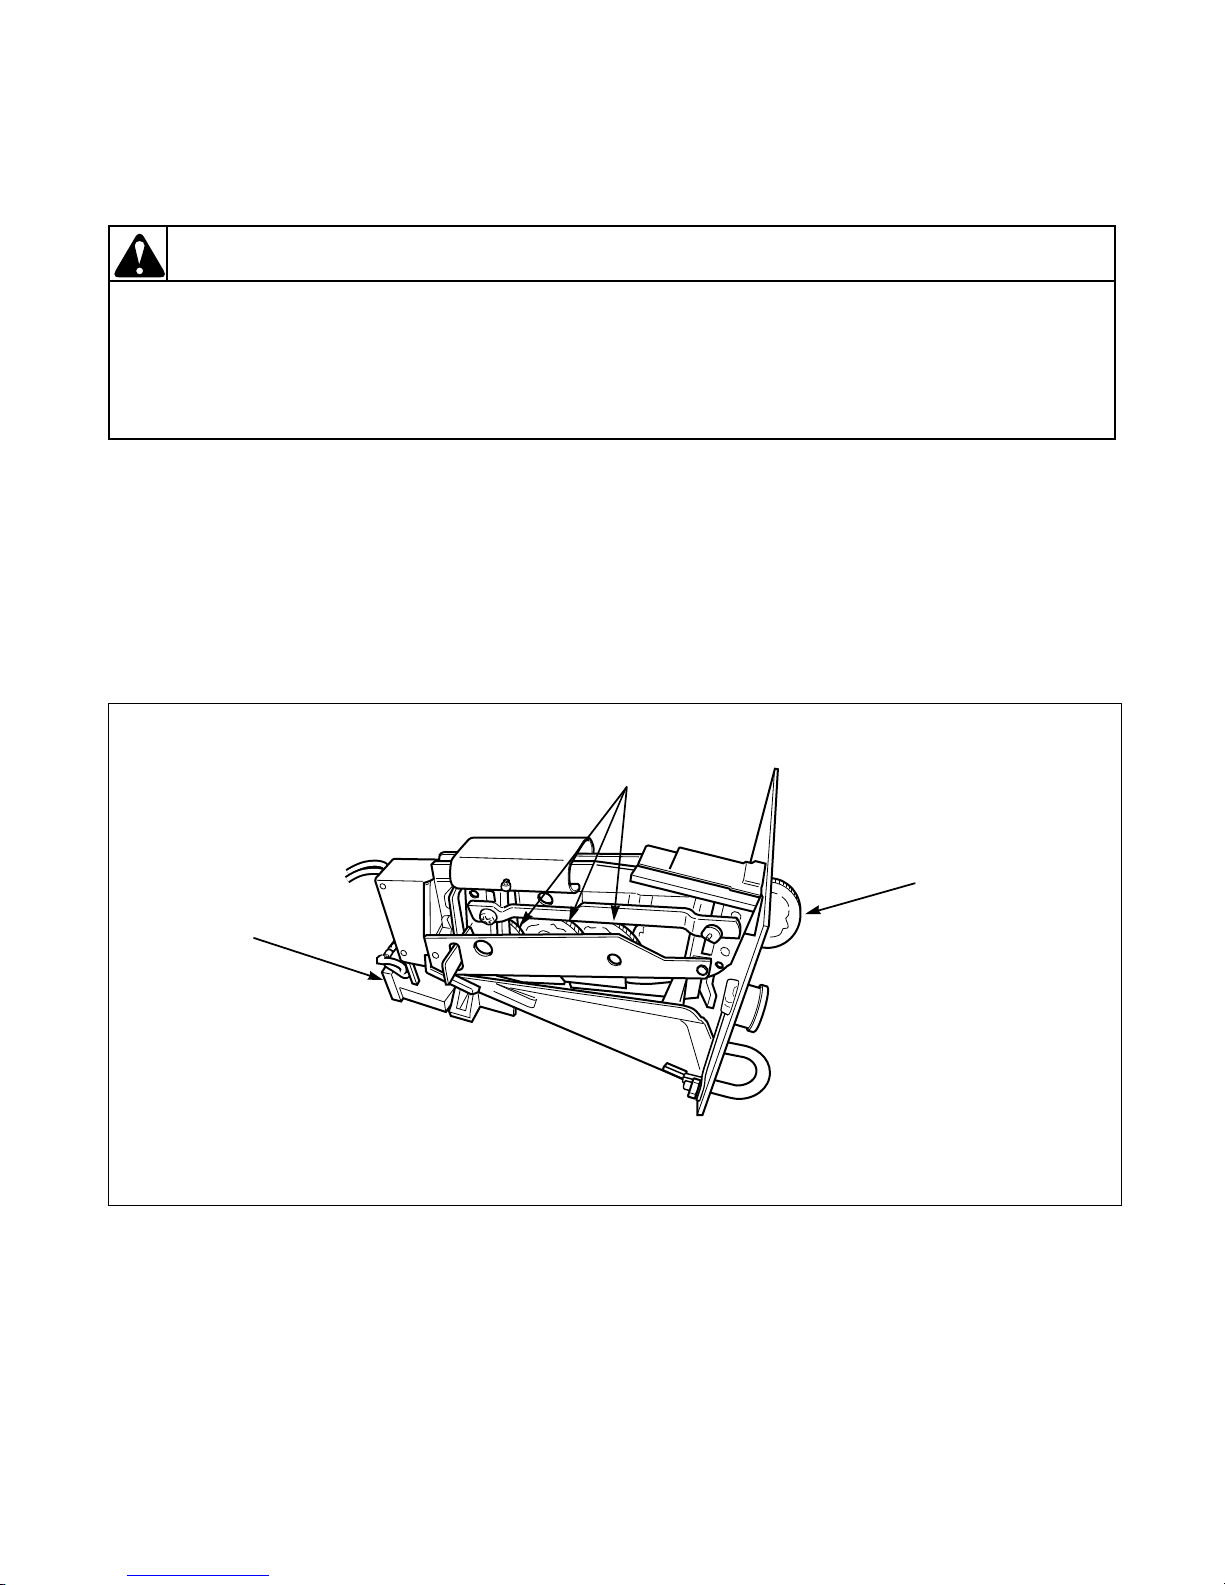
b. Electronic Coin Drops:
If coin drop is not accepting coins, perform the
following:
(1) Clean coin drop. Refer to Paragraph 68.
(2) Test and replace tension spring using the
following instructions.
REMOVE COIN DROP FROM MACHINE
(1) Disconnect electrical power to machine and
drop.
(2) Remove coin drop from machine.
TEST TENSION SPRING
(1) Push coin return button to open and close
coin drop cover to clear possible coin jams.
Refer to Figure 2.
(3) If coin drop now operates properly, replace
tension spring using instructions on
following pages.
REPLACE TENSION SPRING
(1) Move tension spring downward until cover
catch is free. Refer to Figure 4.
DRY2088N
Figure 4
(2) Open cover for coin drop.
(3) Place a small flathead screwdriver under
right side of tension spring and lift up.
Refer to Figure 5.
Figure 2
(2) Manually hold down coin drop cover and
insert coin. Refer to Figure 3.
Figure 5
(4) Use screwdriver to move spring
Figure 3
800168 11
© Copyright, Alliance Laundry Systems LLC – DO NOT COPY or TRANSMIT
approximately 3 mm to left.
MIX2B
Page 14
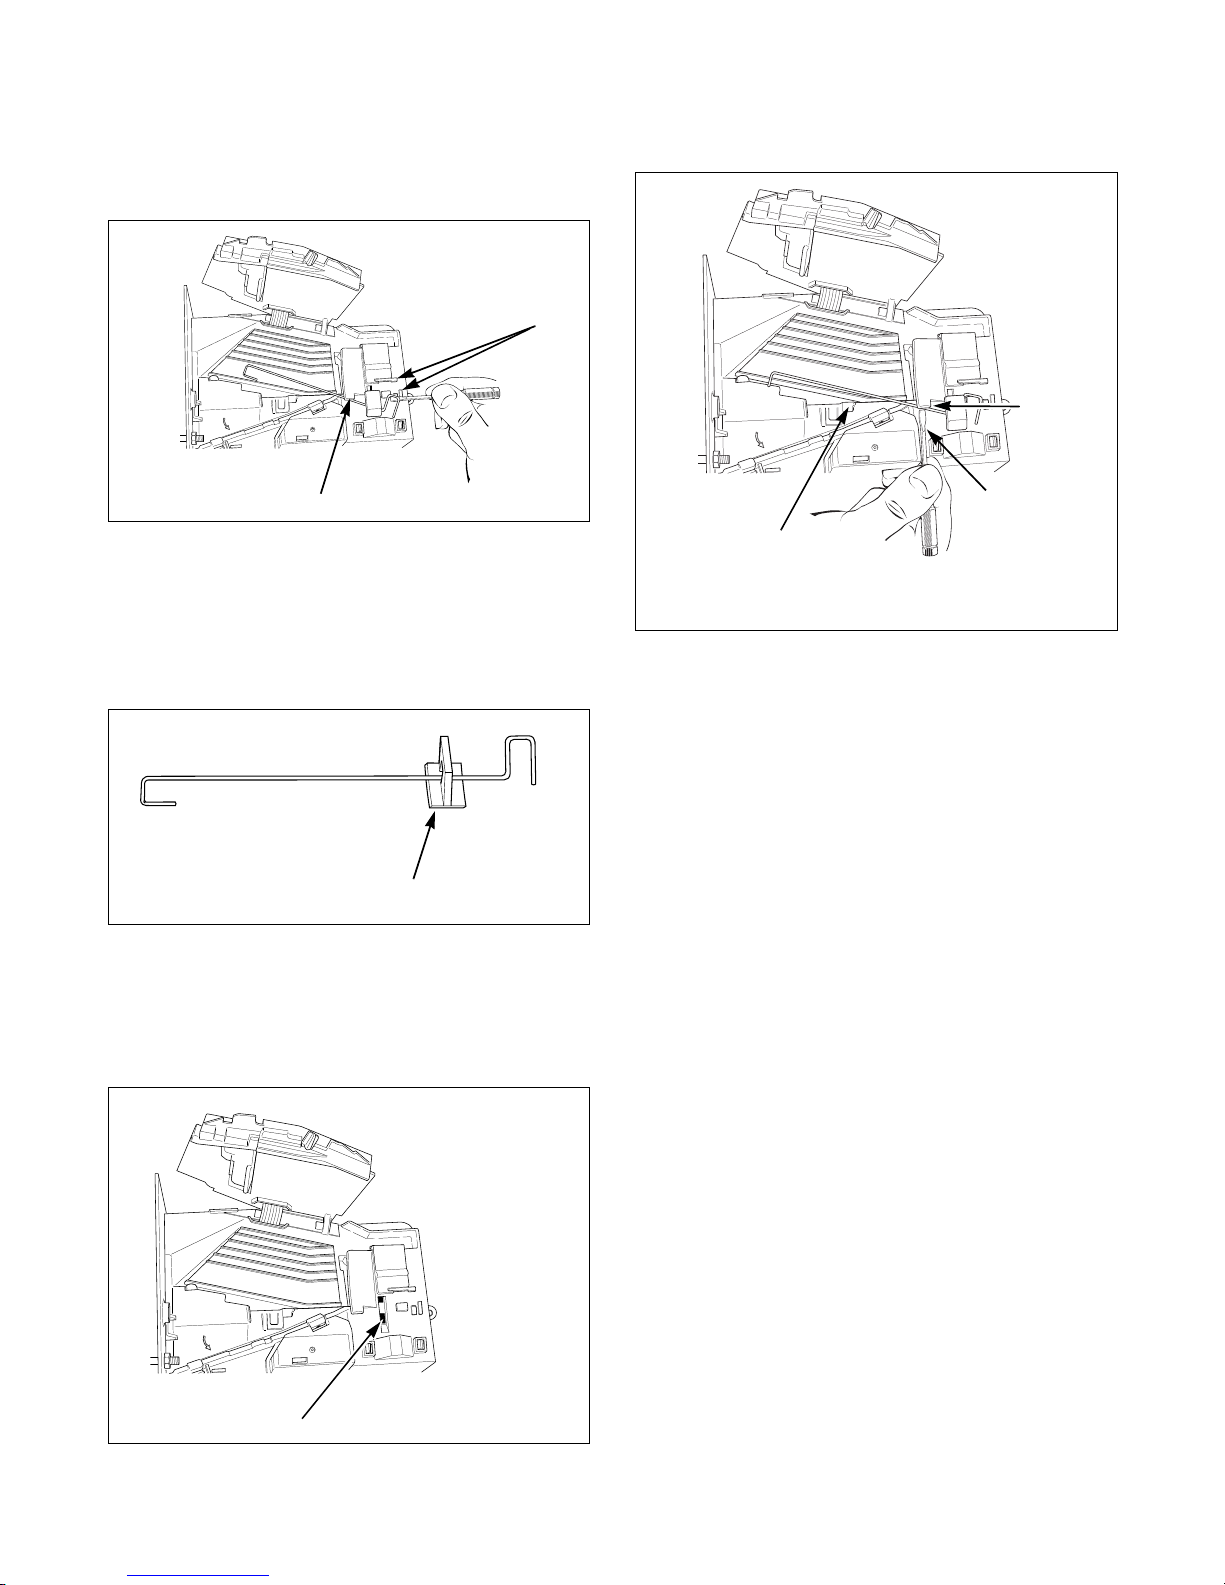
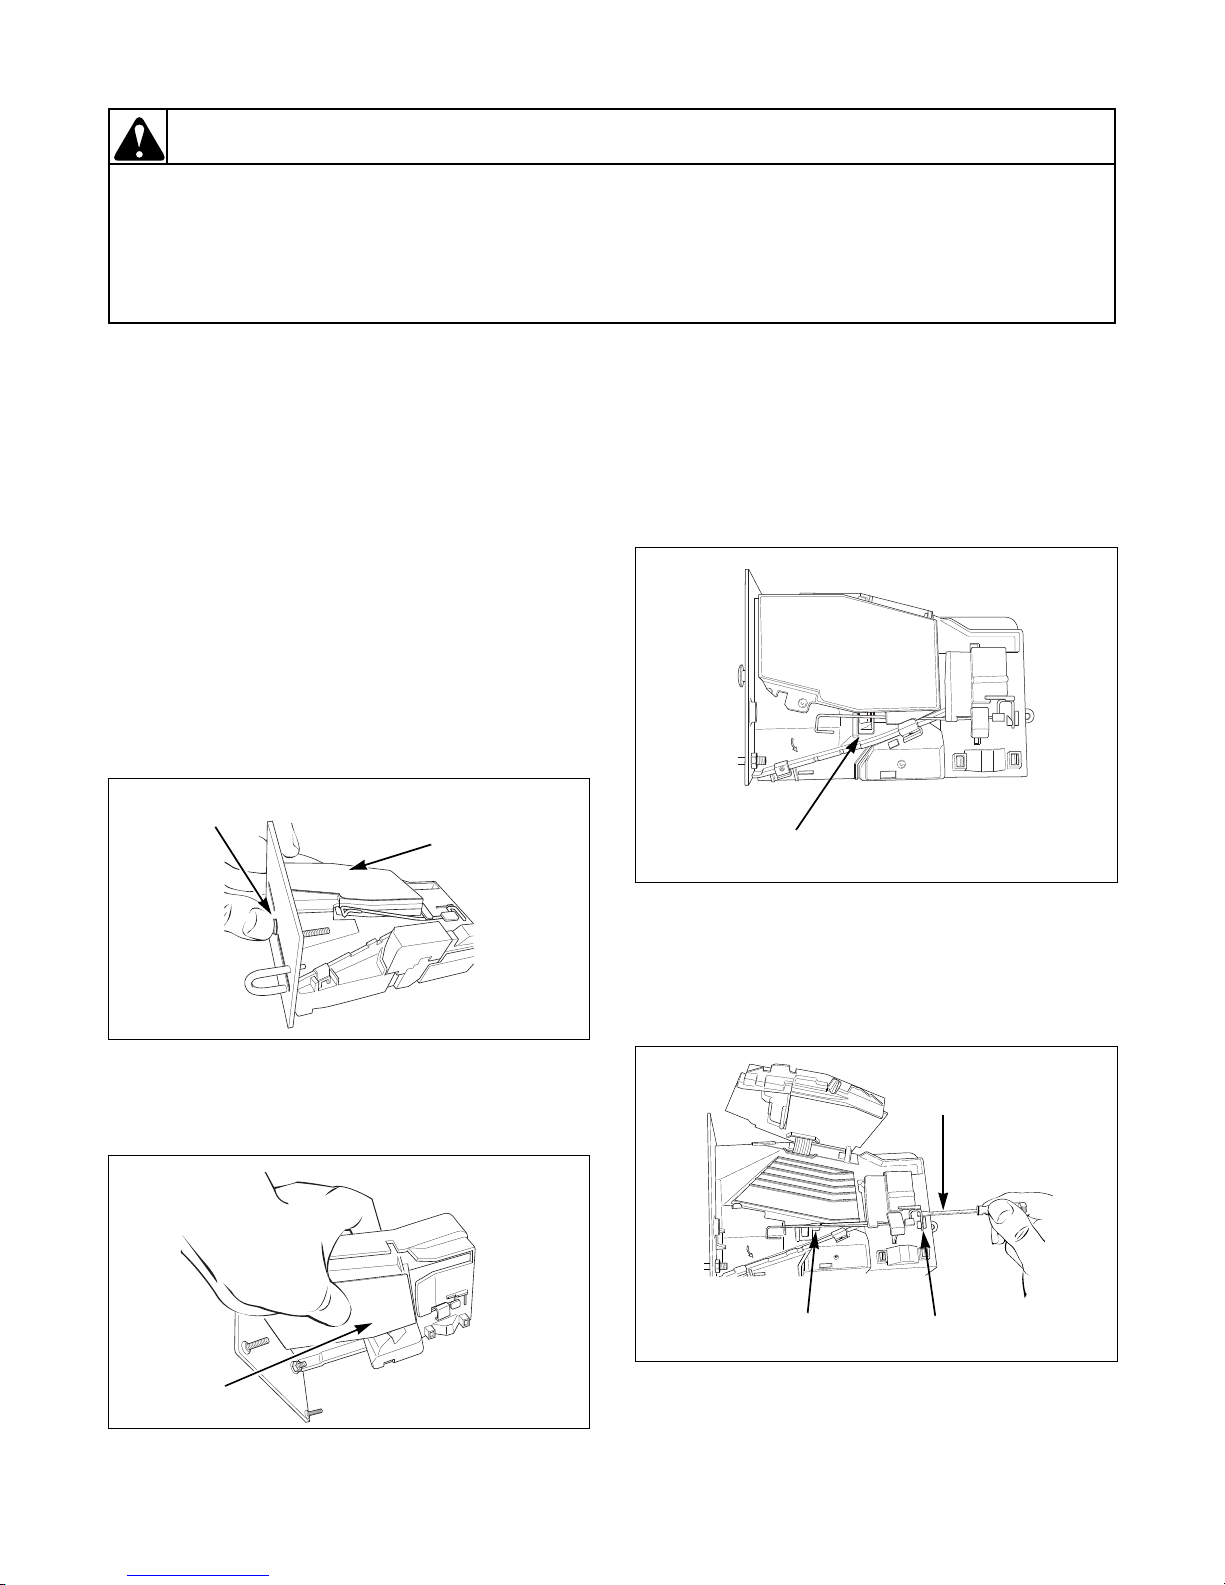
Section 3 Troubleshooting
MIX3B
Tabs
Center Tab
MIX4B
Clip
MIX8B
Slot
MIX5B
Small Flat
Screwdriver
Center
Tab
Left Tab
(5) Lift spring over left tab. Refer to Figure 5.
(6) Rotate spring clockwise, 40 to 60 degrees,
until it is free from right tabs. Refer to
Figure 6.
Figure 6
(7) Use screwdriver to remove spring from
center tab. Refer to Figure 6.
(8) Lift spring, with attached clip, off drop.
(9) Remove clip from spring. Refer to
Figure 7.
(12) Use a small flathead screwdriver to push
spring under center tab. Refer to Figure 9.
Figure 9
(13) Lift spring gently to place in position under
left tab.
(14) Push spring to right until it snaps into
position. Refer to Figure 5.
(15) Close coin drop cover.
(16) Move tension spring over cover catch.
Refer to Figure 4.
REINSTALL COIN DROP INTO MACHINE
(1) Reinstall coin drop into machine.
Figure 7
(10) Attach clip to new tension spring, Part No.
209/00598/02.
(11) Place clip, installed on spring, in slot on
(2) Reconnect electrical power to machine and
drop.
(3) Add a coin to drop to verify that coin drop
is operating properly and that electrical
connection is working properly.
coin drop. Refer to Figure 8.
Figure 8
12 800168
© Copyright, Alliance Laundry Systems LLC – DO NOT COPY or TRANSMIT
Page 15

Section 3 Troubleshooting
To reduce the risk of electric shock, fire, explosion, serious injury or death:
• Disconnect electric power to the washer before servicing.
• Never start the washer with any guards/panels removed.
• Whenever ground wires are removed during servicing, these ground wires must be
reconnected to ensure that the washer is properly grounded.
W003
WARNING
2. NO SPIN CONDITION – MODELS THROUGH SERIAL NO. 9811005968
A “no spin” condition could be the result of an open circuit in the wire harness or out-of-balance switch.
a. Check that the harness is still connected to the out-of-balance switch. The wiring diagram may show the out-
of-balance switch as a normally open switch which is incorrect. The switch is a normally closed switch.
b. To test the electrical circuit, disconnect electrical power to the washer.
c. Remove the “H3” connector from the motor control board.
d. Use an Ohm meter and check the black/white to violet/white wires. Circuit should read closed, an open
reading indicates a bad switch or wire harness problem.
e. Flex the harness at the plastic retainer and test the switch and if okay, the base wire harness has an open
circuit and MUST be replaced.
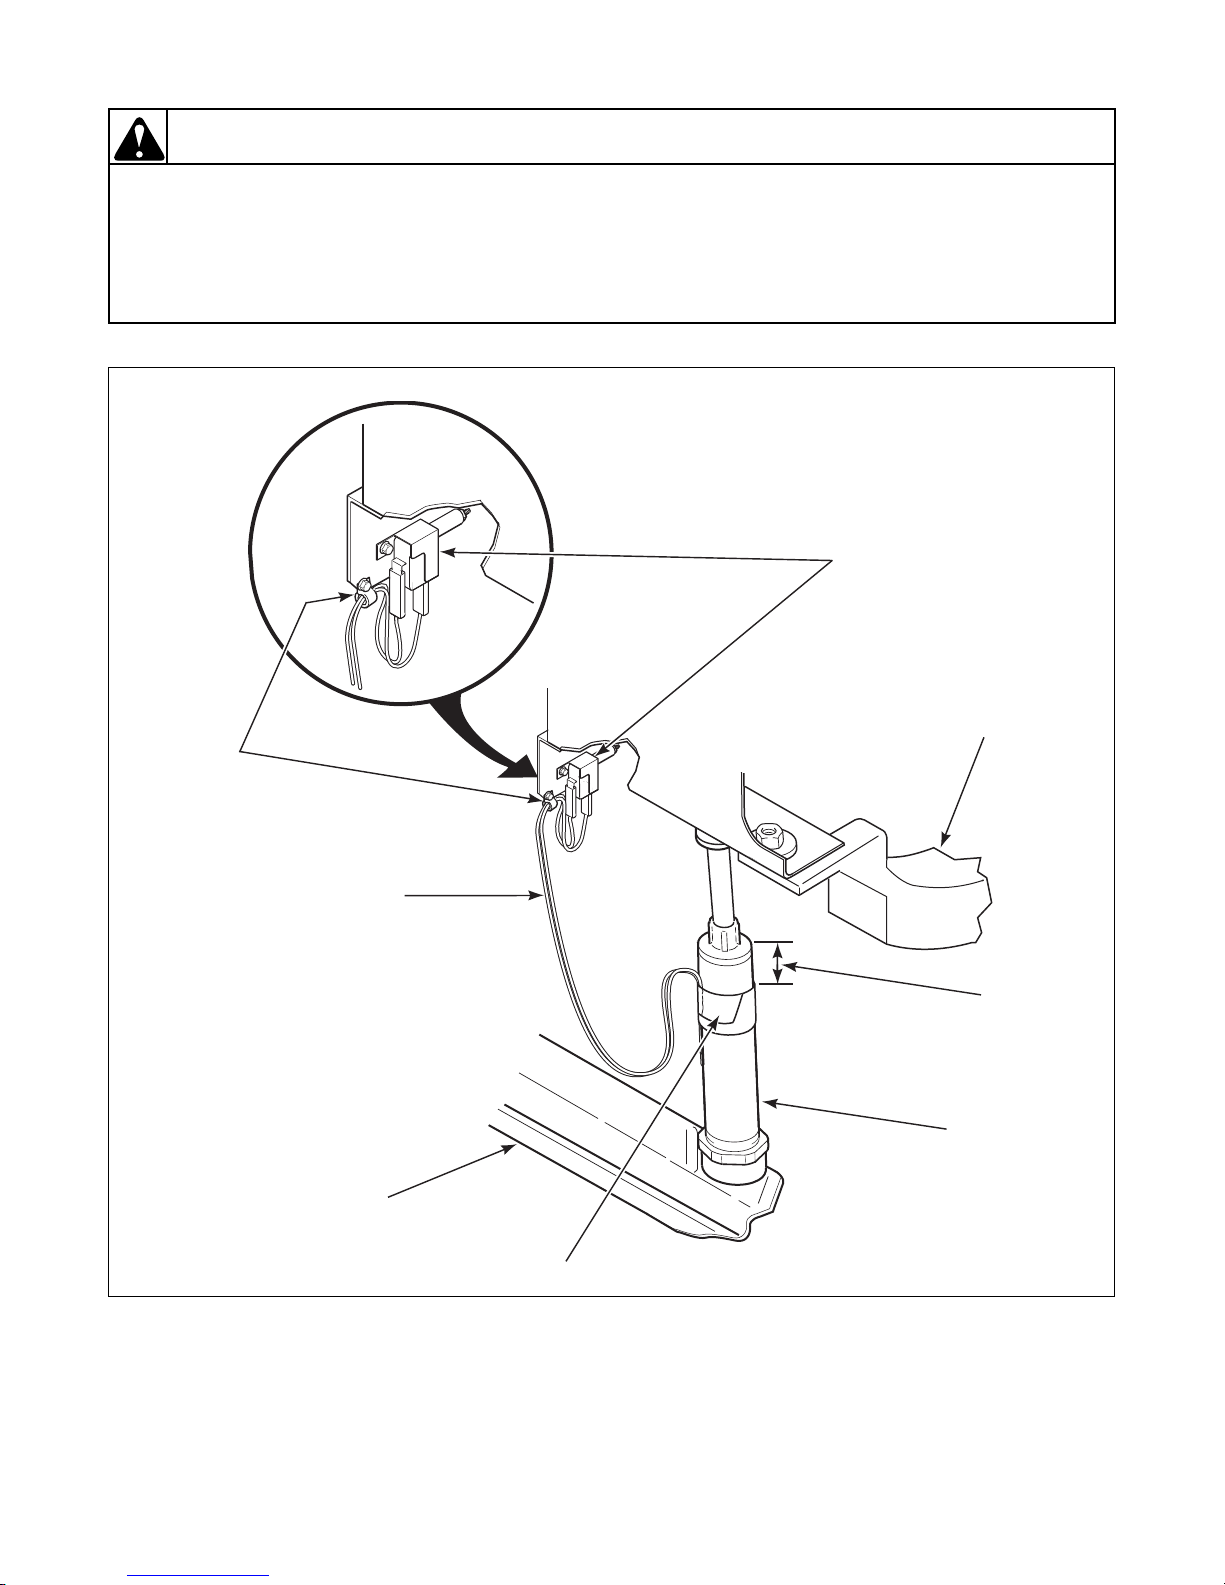
f. After replacing the wire harness, tape the harness wires to the left front shock 1 ½ inches from top of shock.
Refer to Figure 10.
IMPORTANT: Leave a minimum of 8 inches of slack between tape on shock and the plastic wire retainer on
the out-of-balance switch mounting bracket. Refer to Figure 10.
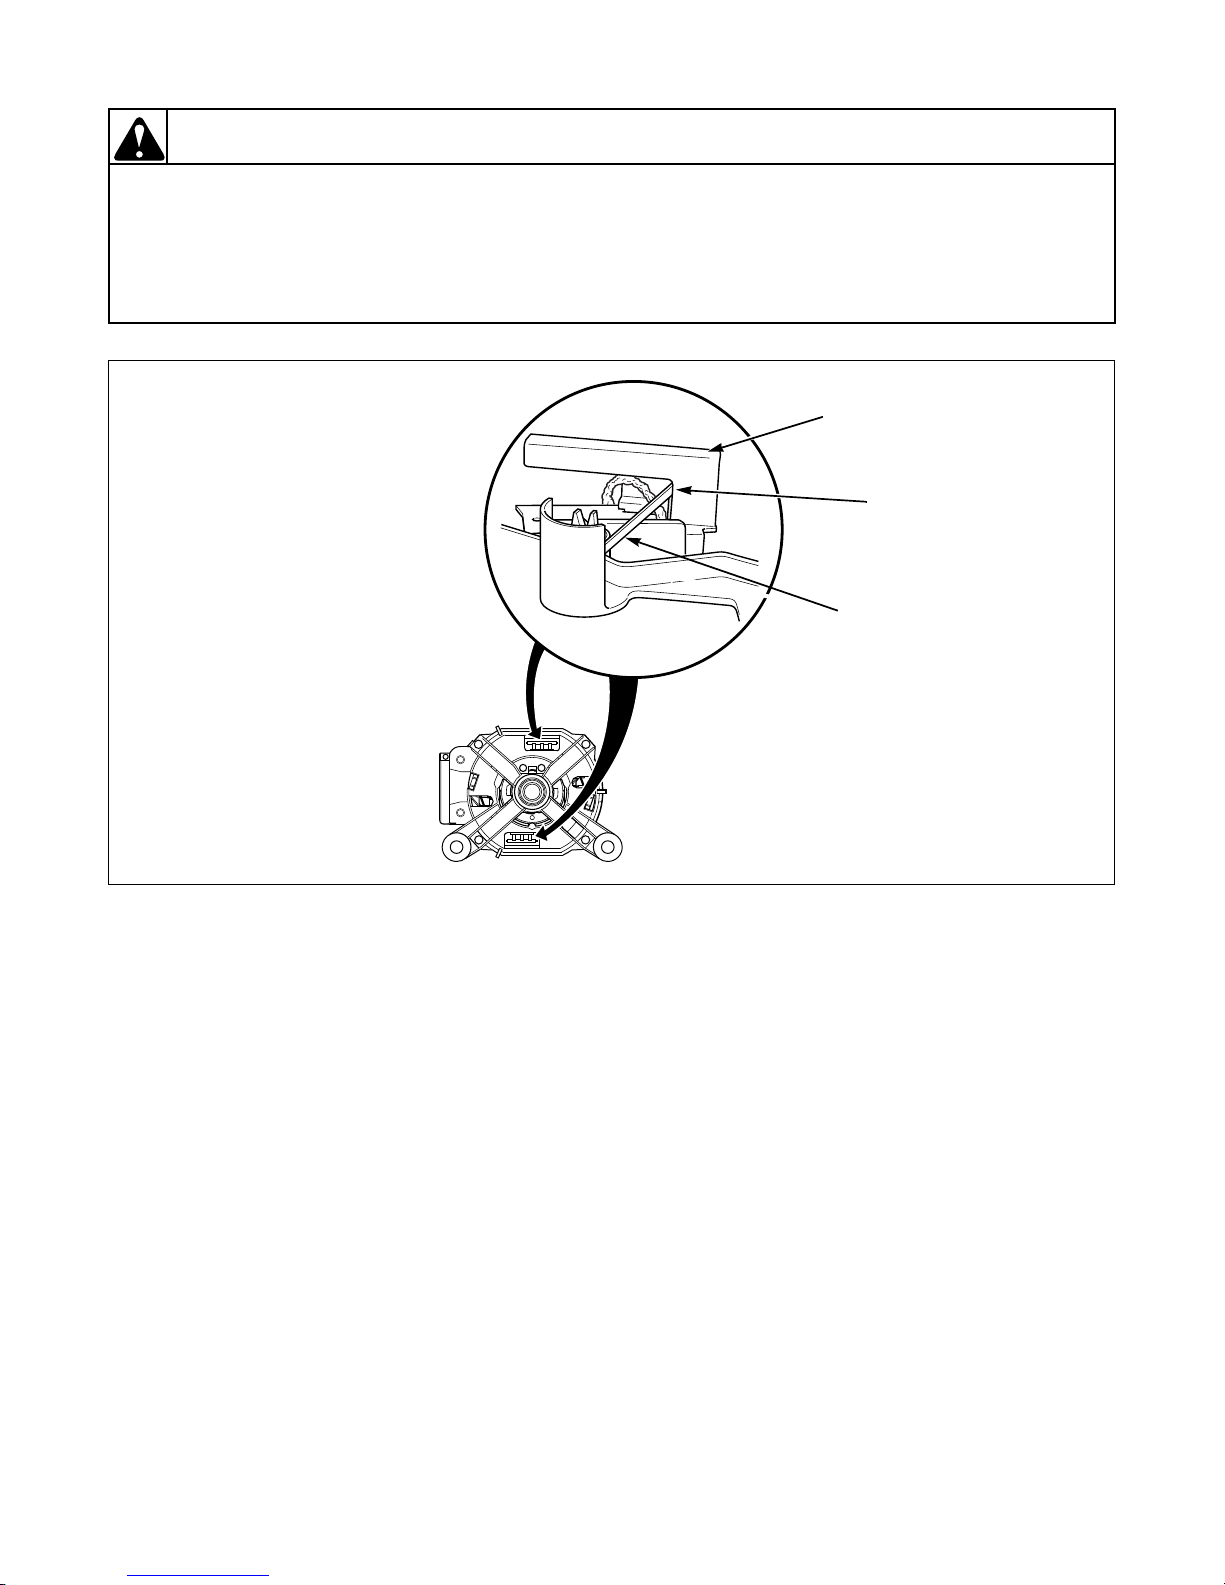
3. TROUBLESHOOTING KNOCKING NOISE
If a frontload washer produces a noise similar to a knock on a door, it might be due to a flat spot on the belt.
The knocking sound is made when the flat spot hits the pulley. The knocking may occur during a pulse spin
and fade after reaching a higher RPM.
To correct this condition, replace the washer belt. Refer to Paragraph 51.
800168 13
© Copyright, Alliance Laundry Systems LLC – DO NOT COPY or TRANSMIT
Page 16
Section 3 Troubleshooting
To reduce the risk of electric shock, fire, explosion, serious injury or death:
• Disconnect electric power to the washer before servicing.
• Never start the washer with any guards/panels removed.
• Whenever ground wires are removed during servicing, these ground wires must be
reconnected to ensure that the washer is properly grounded.
W003
WARNING
H006BE3A
Out-Of-Balance
Switch
Ballast
Weight
1-1/2
Inches
Left
Front
Shock
Tape
Washer
Base
Wire
Harness
(8 inch slack)
Plastic
Wire
Retainer
Figure 10
14 800168
© Copyright, Alliance Laundry Systems LLC – DO NOT COPY or TRANSMIT
Page 17
Section 3 Troubleshooting
To reduce the risk of electric shock, fire, explosion, serious injury or death:
• Disconnect electric power to the washer before servicing.
• Never start the washer with any guards/panels removed.
• Whenever ground wires are removed during servicing, these ground wires must be
reconnected to ensure that the washer is properly grounded.
W003
WARNING
4. NO MOTOR ROTATION, OR DRIVE FAILURE CODE “E:DF” ON ELECTRONIC DISPLAY
UNITS
NOTE: Verify that motor is receiving proper voltage. Disconnect electrical power to washer.
TEST PROCEDURE
a. At the rear of the washer, remove the lower access panel.
b. Reach in through the access panel opening and disconnect motor wire harness from motor.
c. Using an Ohmmeter, measure resistance at the terminals on the motor. Refer to Ta bl e 1.
Motor Resistance Values
TACH INPUT Terminals 6-7 Approximately 15 Ohms
BRUSHES Terminals 4-5 Less than 70 Ohms
WINDING Terminals 1-3 Approximately 1.1 Ohms
WINDING Terminals 1-2 Approximately 2.0-2.4 Ohms
WINDING Terminals 2-3 Approximately 3.4 Ohms
NOTE: Resistance values may vary depending on type of Ohmmeter used.
Tab le 1
d. Replace motor if there is an open circuit on tach input (terminals 6-7) or winding circuits (terminals 1, 2 and
3), or if there is continuity between any terminal and the motor housing.
e. An open circuit between terminals 4 and 5 indicates a stuck or worn brush. Refer to appropriate service
procedure below.
SERVICE PROCEDURE: STUCK BRUSHES
a. Remove motor from washer. Refer to Paragraph 58.
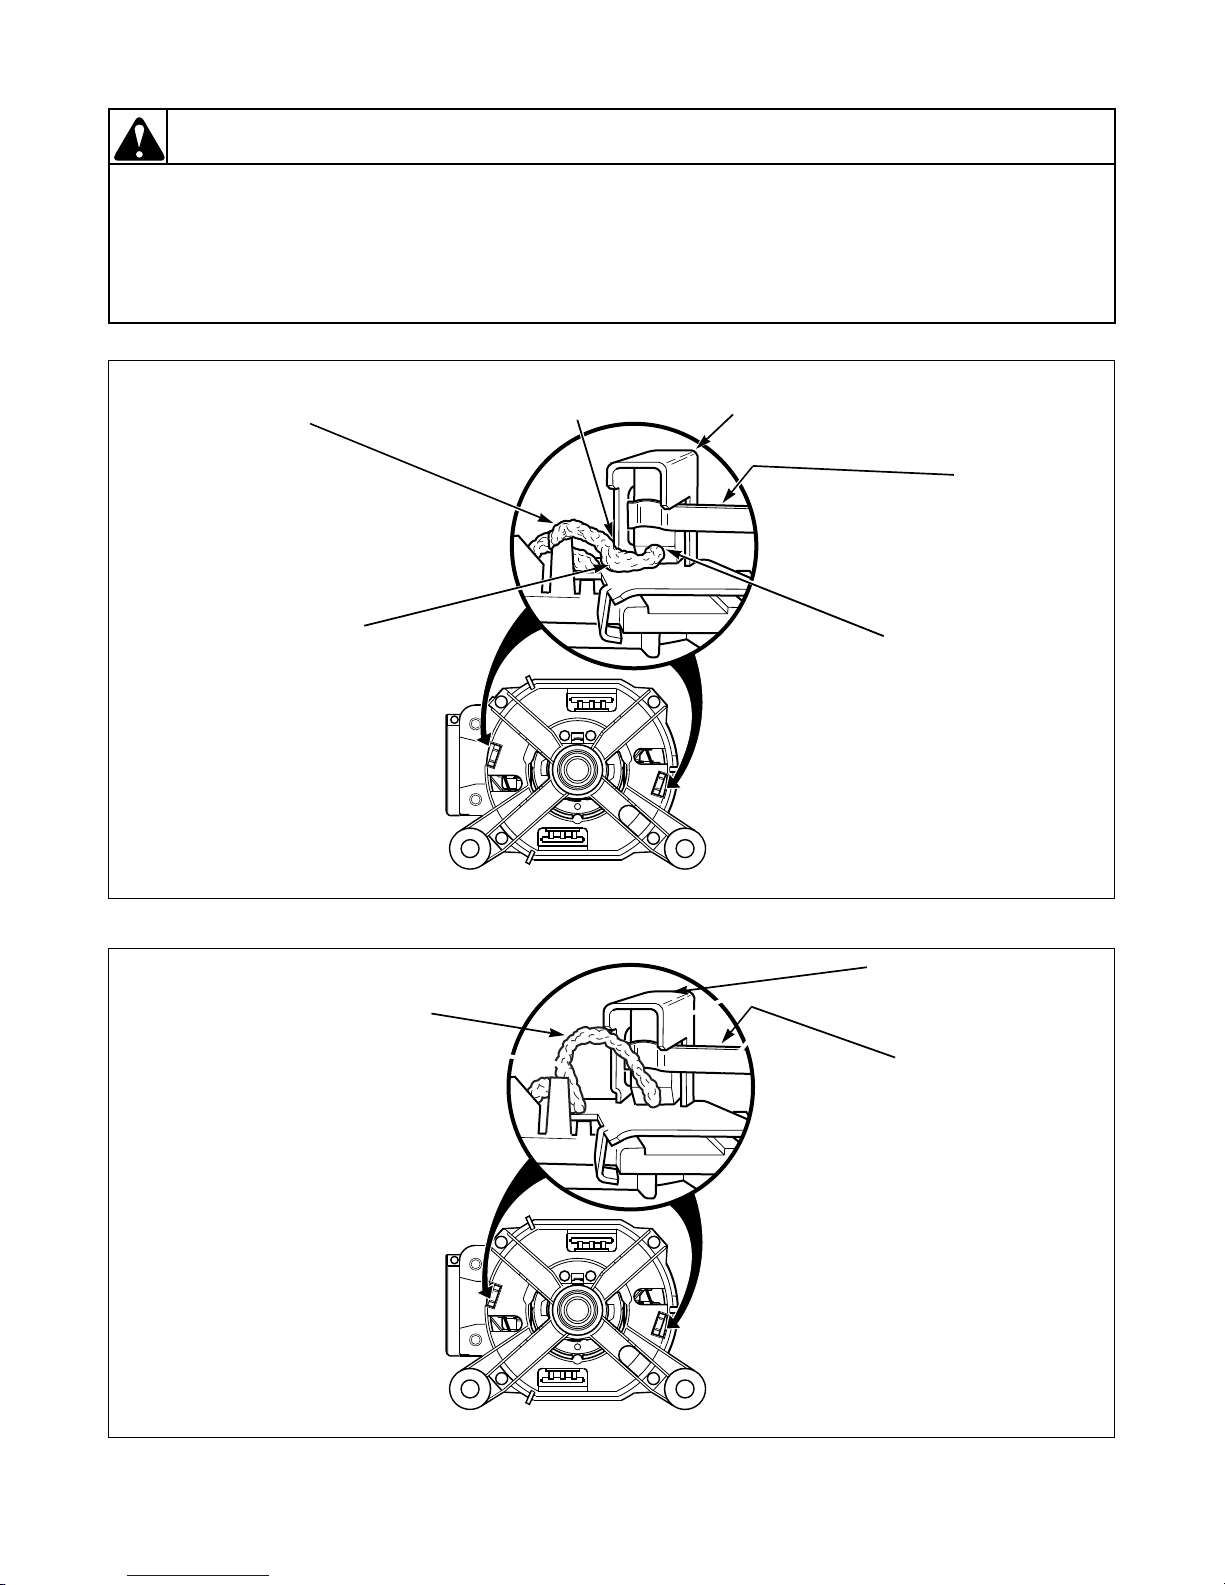
b. Using a flashlight, view brushes through holes in motor end shield. Refer to Figure 11.
c. Inspect both brushes to determine if either brush braided wire is binding the brush movement. The braided
wire might be snagged on the seam in the corner of the metal brush holder. Refer to Figure 11.
NOTE: The copper braided wire should be located in the center of the brush assembly. If the braided wire
has fallen to the bottom of the brush, it will cause binding.
d. After determining which brush assembly is binding, carefully use the tip of a small screwdriver to unsnag
and reposition the braided wire. Refer to Figure 12. Make sure spring is making unobstructed contact with
the end of the brush. Rotate armature by hand to assure that brushes are seated.
e. Recheck resistance between motor terminals 4 and 5 to verify the brush position has been corrected.
f. Reinstall motor in washer.
g. Run washer through cycle to verify proper operation.
15 800168
© Copyright, Alliance Laundry Systems LLC – DO NOT COPY or TRANSMIT
Page 18
Section 3 Troubleshooting
To reduce the risk of electric shock, fire, explosion, serious injury or death:
• Disconnect electric power to the washer before servicing.
• Never start the washer with any guards/panels removed.
• Whenever ground wires are removed during servicing, these ground wires must be
reconnected to ensure that the washer is properly grounded.
W003
WARNING
FLW971S
Braided wire hangs
up on brush holder
BRAIDED COPPER
WIRE – Must be positioned
away from this brush
holder. Braided wire should
“loop” up and away from
bottom of brush holder.
Refer to
Figure 2
.
Braided Copper
Wire
Spring Loaded
Brush
Brush
Holder
Brush
Spring
FLW970S
BRAIDED WIRE – Should
“loop” up and away from
bottom of brush holder.
Brush
Holder
Brush
Spring
Figure 11
Figure 12
16 800168
© Copyright, Alliance Laundry Systems LLC – DO NOT COPY or TRANSMIT
Page 19
Section 3 Troubleshooting
To reduce the risk of electric shock, fire, explosion, serious injury or death:
• Disconnect electric power to the washer before servicing.
• Never start the washer with any guards/panels removed.
• Whenever ground wires are removed during servicing, these ground wires must be
reconnected to ensure that the washer is properly grounded.
W003
WARNING
FLW1648S
Brush
Spring
GOOD BRUSH
– Has visible amount of
brush material remaining.
Brush
Holder
Brush
FLW1648S
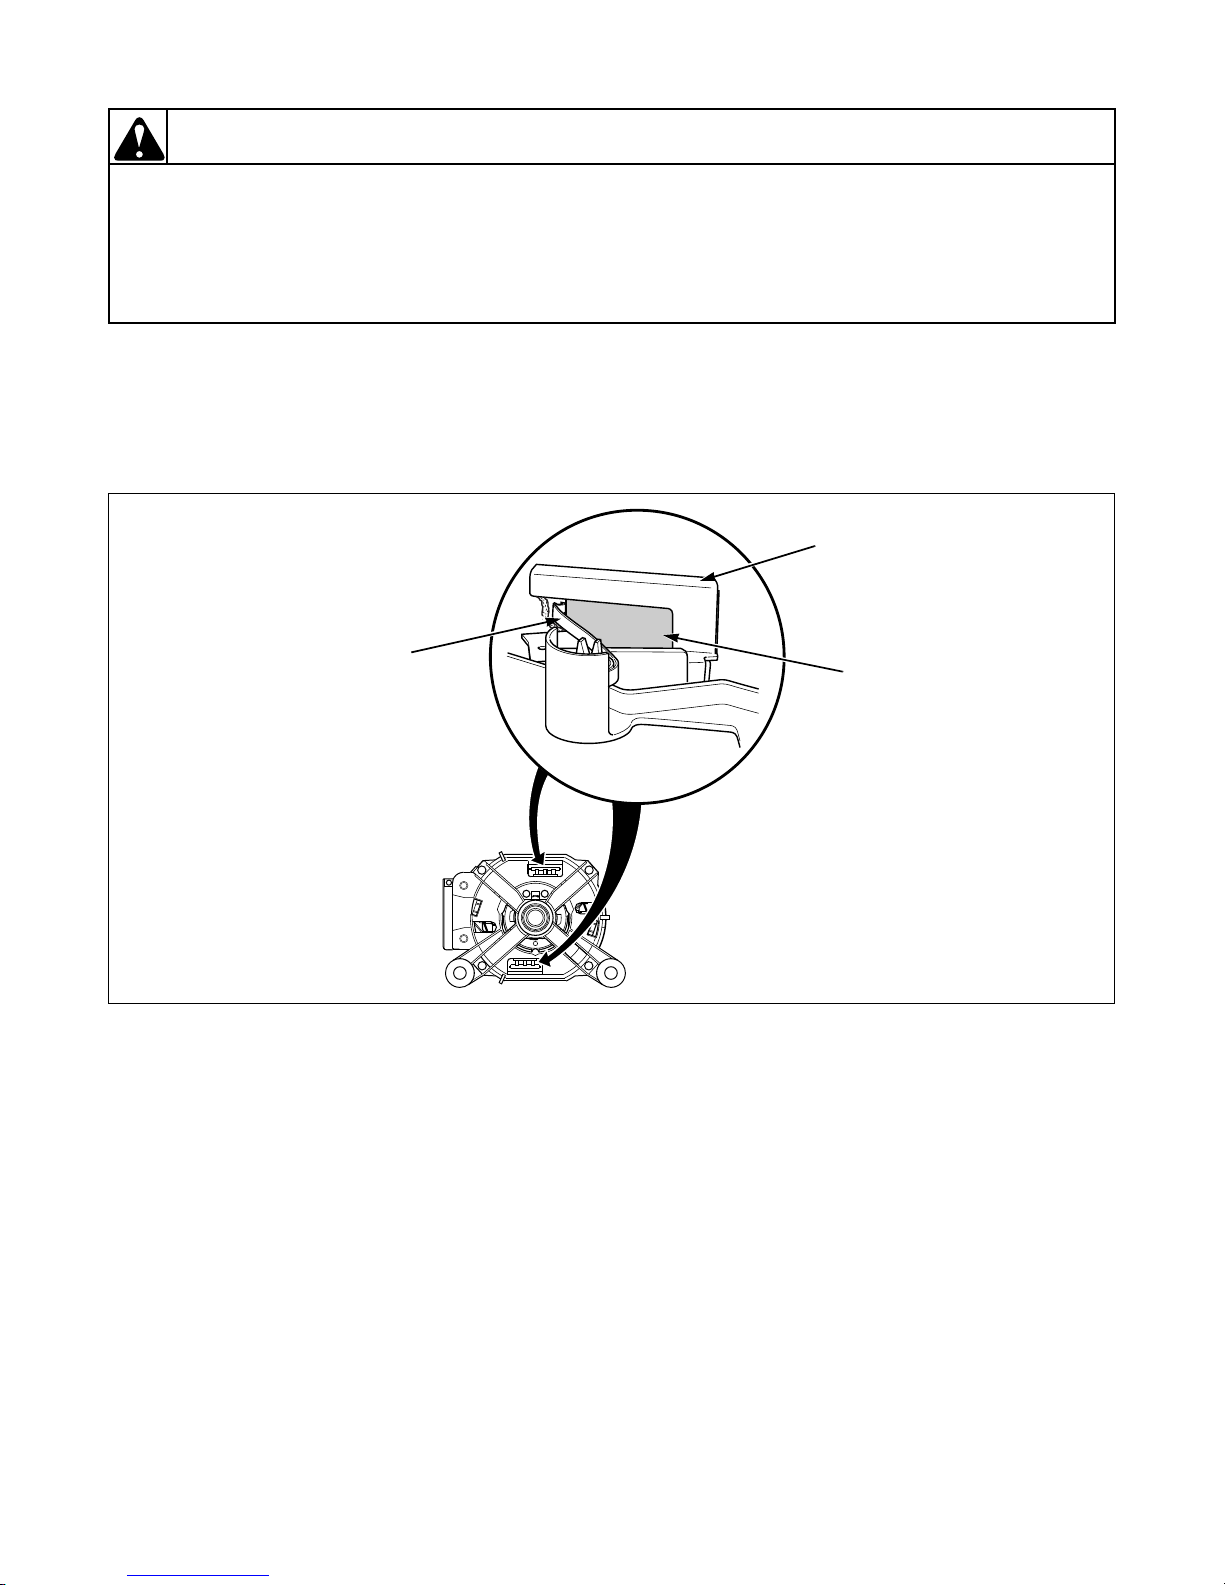
SERVICE PROCEDURE: WORN BRUSHES
a. Remove motor from washer. Refer to Paragraph 58.
b. Using a flashlight, view brushes through holes in motor end shield. Refer to Figure 13.
c. Inspect both brushes to determine if either brush is worn. Refer to Figures 13 and 14.
Figure 13
d. Replace worn brushes with 738P3 Motor Brush Kit. Follow instructions provided in kit.
17 800168
© Copyright, Alliance Laundry Systems LLC – DO NOT COPY or TRANSMIT
Page 20
Section 3 Troubleshooting
To reduce the risk of electric shock, fire, explosion, serious injury or death:
• Disconnect electric power to the washer before servicing.
• Never start the washer with any guards/panels removed.
• Whenever ground wires are removed during servicing, these ground wires must be
reconnected to ensure that the washer is properly grounded.
W003
WARNING
FLW1649S
Brush
Spring
WORN BRUSH
– Has no visible brush
material remaining.
Brush
Holder
FLW1649S
Brush spring
resting against
brush holder.
Figure 14
SERVICE PROCEDURE: CLOGGED BRUSHES
a. Remove motor from washer. Refer to Paragraph 58.
b. Using a flashlight, view brushes through holes in motor end shield. Refer to Figure 13.
c. Inspect both brushes to determine if they are clogged due to a build-up of carbon dust.
d. If there is a visible amount of brush left, use a screwdriver or similar device to push brush back and forth to
loosen and remove dust. Refer to Figure 13.
18 800168
© Copyright, Alliance Laundry Systems LLC – DO NOT COPY or TRANSMIT
Page 21
To reduce the risk of electric shock, fire, explosion, serious injury or death:
• Disconnect electric power to the washer before servicing.
• Never start the washer with any guards/panels removed.
• Whenever ground wires are removed during servicing, these ground wires must be
reconnected to ensure that the washer is properly grounded.
W003
WARNING
EDC Models
5. EDC ERROR CODE LISTING
E:df Drive failure. This error code is generated by the motor control and
transmitted to the master control. Several conditions can cause
this code; motor unplugged, motor failure (refer to Paragraph
4), tachometer circuit open, inner basket locked up. This is a
fatal error. Machine must be unpowered to reset.
E:SP Serial communication error. This error code occurs when the master control cannot
communicate with the motor control. The master control will try
to reset the motor control by powering it down. It will try
resetting three times before setting the error code. Common
causes: transformer unplugged or defective, wiring to motor
control incorrect. This is a fatal error.
E:FL Fill error. This error code occurs if the pressure switch fails to open in 30
minutes in any fill/agitate cycle. This is a fatal error.
dor Door Open Indicator. This error code occurs when the door is not closed at the start of
an active cycle. If the door is closed, check for wiring or door
switches.
E:do Door open error. This error code occurs if the control detects the door open and
door locked inputs high at the same time. You can get this error
if you jerk on the door when it is locked or as it is about to lock.
This is a fatal error.
E:dL Door lock error. This error code occurs if the door does not lock in 15 seconds or
unlock in 3 minutes at the end of the cycle. This is a non-fatal
error. If the door locks or unlocks while E:dL is displayed it will
clear the error condition. Also if the door is opened after failing
to lock it will clear the display.
NOTE: If replacing an inoperative electronic control due to burnt pin(s) on the 6-pin wire harness connector
block, it may be due to damaged terminals in the harness connector. Damaged terminals in the harness
connector will appear burnt or show signs of heat discoloration on the connector block. Replace the control
wire harness with the control to avoid repeated damage.
800168 19
© Copyright, Alliance Laundry Systems LLC – DO NOT COPY or TRANSMIT
Page 22
Section 3 Troubleshooting (EDC Models)
Attempt to communicate with
electronic control from
Micro-wand.
Aim Micro-wand
closer and try
again.
Yes
Yes
No No
Is there any
acknowledgement
of any kind from
electronic control?
Communication sequence
checks out.
Check the following:
- Low battery on Micro-wand.
- Is (IR) on control covered
or blocked?
- Is (IR) cap properly attached
to Micro-wand?
- If needed, replace electronic
control board.
Check the following:
- (IR) disabled by manual
program.
- Is (IR) on control covered
or blocked?
- If needed, change electronic
control board.
Does electronic
control display
"E:OF" or "-C-"?
Is there any control
response?
"-C-"
"E:OF"
H130S
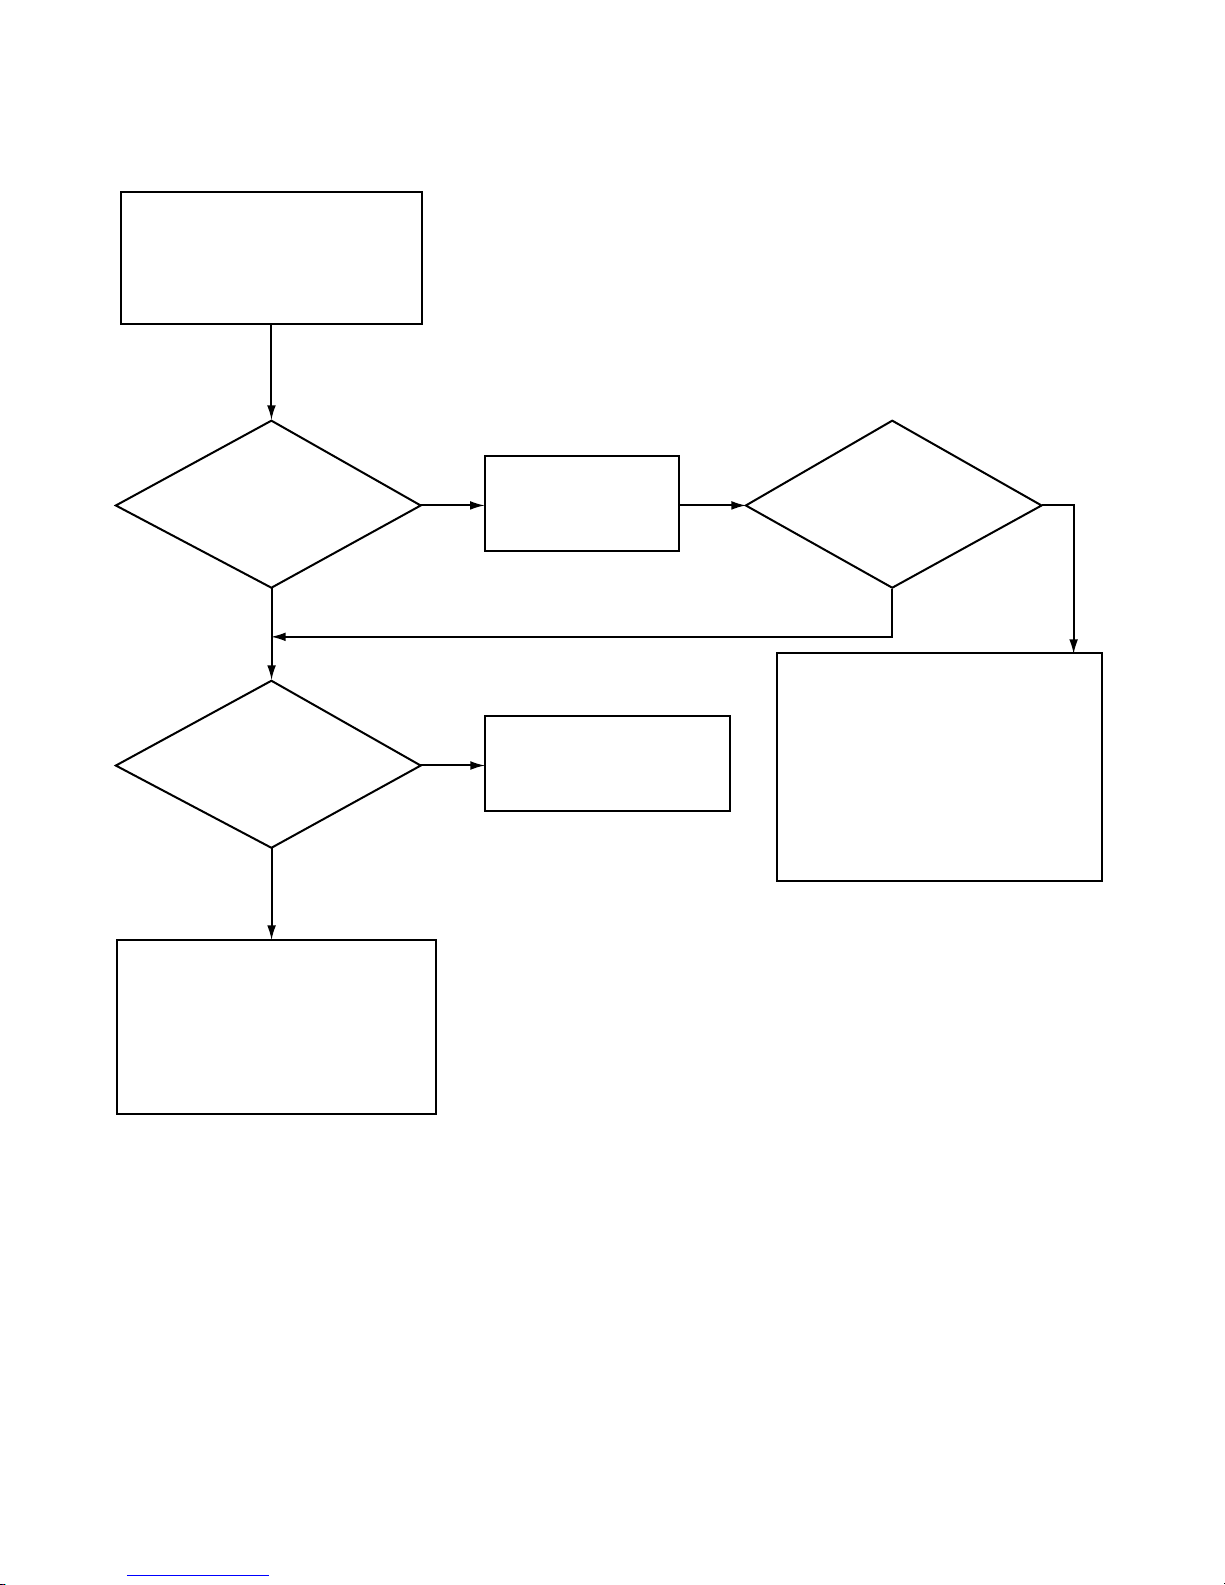
6. CANNOT PERFORM INFRARED COMMUNICATION
20 800168
© Copyright, Alliance Laundry Systems LLC – DO NOT COPY or TRANSMIT
Page 23
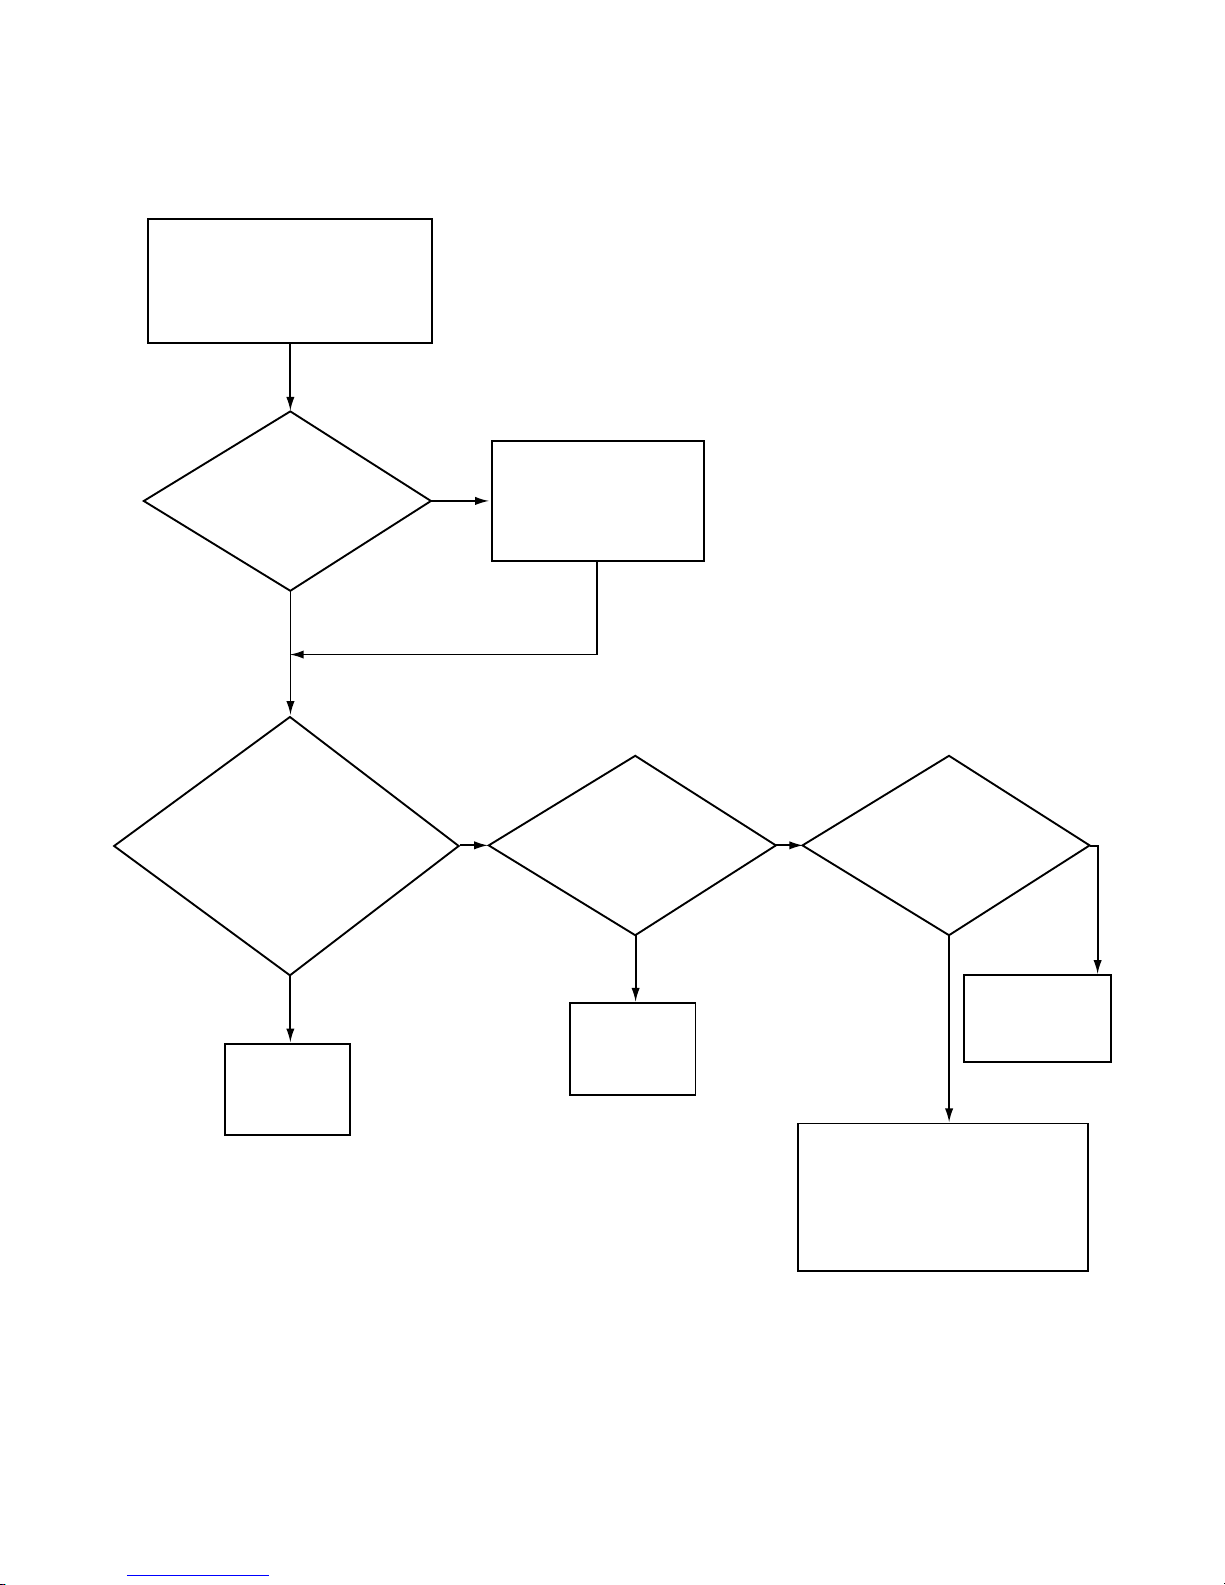
7. COINS IGNORED WHEN ENTERED
Start Coin drop Diagnostic test.
Enter
several
coins
Open
control panel
Check coin drop
Make sure control is
reset properly and
prompting for a vend.
No
Yes
Yes
No
Yes Yes
Does the display
coin counter
increment properly?
Is
connection at
"H2" (models with the
letter "E" in the 8th character
of the model number) or "H7"
(models with the letter "H" in the
8th character of the model
number) firmly seated
in its receptacle
on control?
Is 3-pin
connector plug
firmly seated in its
receptacle on
coin drop?
Are wires
exiting coin drop
optical sensor
cracked or broken?
Reconnect
and test
again.
No
No
Reconnect
and test
again.
Replace coin
drop.
Retest again, if not successful the
following is the problem:
- Replace coin drop.
If problem still exists:
- Replace electronic control.
H131SE3B
Section 3 Troubleshooting (EDC Models)
800168 21
© Copyright, Alliance Laundry Systems LLC – DO NOT COPY or TRANSMIT
Page 24
Section 3 Troubleshooting (EDC Models)
Electronic control has no
LED or VFD functioning on
control board.
Plug electronic control
washer into
electrical outlet.
Disconnect power and
check for a broken, loose or
incorrect wiring from
electrical outlet to
electronic control.
Yes
Yes
(1) "AC"
No
Is power cord
plugged in?
No
Is there voltage at
terminal "FS-1" to "FS-2"
on EDC
Control?
Replace EDC control.
H132SE3A
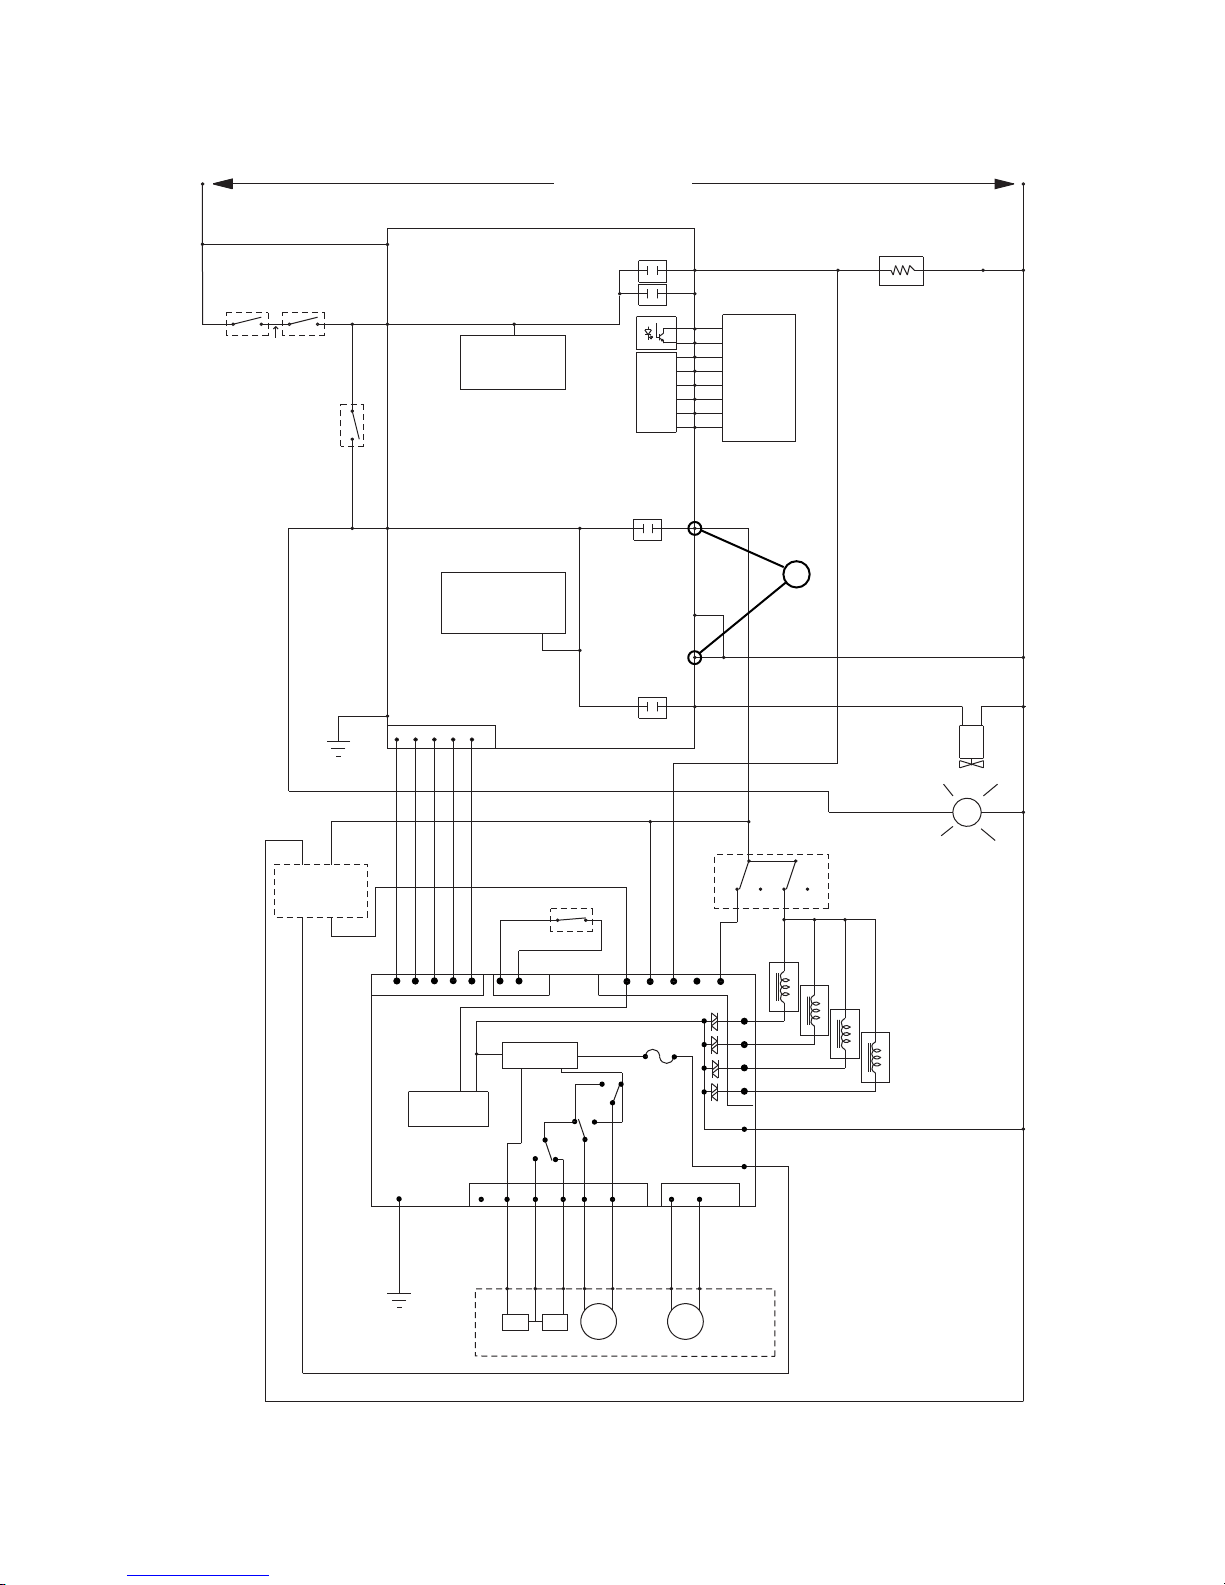
8. ELECTRONIC CONTROL HAS NO VISIBLE DISPLAY – WASHER
22 800168
© Copyright, Alliance Laundry Systems LLC – DO NOT COPY or TRANSMIT
Page 25
BRN
BLU
PNK
ORG/BLU
TAN/WHT
GRY/BLK
RED
WHT
ORG
GRY
TAN/WHT
YEL/BLK
BLK/YEL
BLK
GRY/BLK
WHT
WHT
WHT
WHT
BRN/YEL
YEL
GRN/YEL
RED
WHT/BLK
BLK/YEL
RED/BLK
PNK/BLK
WHT/RED
WHT/BLU
RED/YEL
BRN/WHT
VLT
WHT/GRY
ORG/BLK
VLT/WHT
BLK/WHT
BLU/BLK
FS1
FS2
--
+
H3-1
H5-2
H5-1
H5-4
H3-5
H3-3
H4
H2-1
H2-2
H2-3
H2-4
H2-5
H2-6
H6-2
H6-1
TO COIN
DROP OR
OTHER
VENDING
DEVICE
H5-3
K1
K3
K2
240 VAC
20 VAC
FUS1
250 V
7 AMP
EDC FRONT LOAD WASHER MODEL
N
L1
DELAY TO UNLOCK WHEN
DE-ENERGIZED)
(MECHANICAL THERMAL
DOOR LOCK
ACTUATOR
PUMP
HOTH
COLD
H3
H1
FS2
H2
FIELD
TAC H
ROTOR
C
SV
PRESSURE
SWITCH
1
3
5
4
D1
D2
D3
6
2
A2
A1
DV
3
1
2
45
7
6
SOFTENER
Control Logic
Circuit
Low Voltage
MOTOR DC
POWER SUPPLY
DETERGENT\BLEACH
MOTOR
CONTROL
ASSEMBLY
H4
SOMI
SOMI
CLK
CLK
SIMO
SIMO
ELECTRONIC
CONTROL
EDC
GND
VCC
GND
VCC
TOP1
FS1
FULL
PSTH2
IOP
L1
MA
FS3
12
H5
122
8
3
89
10 6
7124
9
6
5
3
PTC
13
4
OVER
"DOOR LOCKED" LIGHT
DOOR SWITCH
SECONDARY
DOOR SWITCH
(ON LOCK ASSY.)
120 VAC 60 Hz
TRANSFORMER
UNBALANCE SWITCH
456
K2
K1
K6
K4
AUDIT
CONTROL
CIRCUIT
21
SWITCH
DOOR LOCK
(ON LOCK ASSY.)
CIRCUIT ALLOWS CONTROL
DOOR CLOSED SENSING
TO TURN ON DOOR LOCK
CONTROL TO TURN ON MOTOR
DOOR LOCK SENSING CIRCUIT ALLOWS
ONLY WHEN DOOR IS LOCKED
RELAYS K4 AND K6
SERIAL PORT INTERFACE
230 VDC
MOTOR
WHT
GRN/YEL
1
H186SE3A
EDCSERV.SCH DVN 6/24/98
Section 3 Troubleshooting (EDC Models)
© Copyright, Alliance Laundry Systems LLC – DO NOT COPY or TRANSMIT
800168 23
Page 26
Section 3 Troubleshooting (EDC Models)
Washer will not start
(coin inserted)
Replace Door
Lock Assembly.
Replace Door
Lock Assembly.
Replace Door
Lock Assembly.
Note:
No
(1) "AC"
(2) "AC"
(3) "AC"
Yes
No
No
Yes
Yes
Yes
Is there voltage at
"H5-2" to "FS-2" on
EDC control
board?
Is there voltage at
blu/blk input
wire to door
switch on lock
assembly?
No
(4) "AC"
(5) "AC"
Is there voltage at
"H5-1" to "FS-2" on
EDC control
board?
Is there voltage at
"H3-1" to "FS-2" on
EDC control
board?
Yes
No
Is there voltage at
input blk wire
coming into
secondary door
switch?
Correct wiring between L1
and secondary door
switch.
Replace
Secondary Door
Switch Assembly.
Replace EDC
control board.
Assume proper start key
has been pressed and check
to see whether door lock
light is energized.
Note:
When checking blu/blk wire make
sure secondary door switch
(plunger switch) is pushed in the closed
position.
H134SE3A
9. WASHER WILL NOT START (DOOR AND DOOR LOCK SWITCH) – NO DOOR LOCK ONLY
24 800168
© Copyright, Alliance Laundry Systems LLC – DO NOT COPY or TRANSMIT
Page 27
BRN
BLU
PNK
ORG/BLU
TAN/WHT
GRY/BLK
RED
WHT
ORG
GRY
TAN/WHT
YEL/BLK
BLK/YEL
BLK
GRY/BLK
WHT
WHT
WHT
WHT
BRN/YEL
YEL
GRN/YEL
RED
WHT/BLK
BLK/YEL
RED/BLK
PNK/BLK
WHT/RED
WHT/BLU
RED/YEL
BRN/WHT
VLT
WHT/GRY
ORG/BLK
VLT/WHT
BLK/WHT
BLU/BLK
FS1
FS2
-
+
H3-1
H5-2
H5-1
H5-4
H3-5
H3-3
H4
H2-1
H2-2
H2-3
H2-4
H2-5
H2-6
H6-2
H6-1
TO COIN
DROP OR
OTHER
VENDING
DEVICE
H5-3
K1
K3
K2
240 VAC
20 VAC
FUS1
250 V
7 AMP
EDC FRONT LOAD WASHER MODEL
N
L1
DELAY TO UNLOCK WHEN
DE-ENERGIZED)
(MECHANICAL THERMAL
DOOR LOCK
ACTUATOR
PUMP
HOTH
COLD
H3
H1
FS2
H2
FIELD
TAC H
ROTOR
C
SV
PRESSURE
SWITCH
1
3
5
4
D1
D2
D3
6
2
A2
A1
DV
3
1
2
45
7
6
SOFTENER
Control Logic
Circuit
Low Voltage
MOTOR DC
POWER SUPPLY
DETERGENT\BLEACH
MOTOR
CONTROL
ASSEMBLY
H4
SOMI
SOMI
CLK
CLK
SIMO
SIMO
ELECTRONIC
CONTROL
EDC
GND
VCC
GND
VCC
TOP1
FS1
FULL
PSTH2
IOP
L1
MA
FS3
12
H5
122
8
3
89
10 6
7124
9
6
5
3
PTC
13
4
OVER
"DOOR LOCKED" LIGHT
DOOR SWITCH
SECONDARY
DOOR SWITCH
(ON LOCK ASSY.)
120 VAC 60 Hz
TRANSFORMER
UNBALANCE SWITCH
456
K2
K1
K6
K4
AUDIT
CONTROL
CIRCUIT
21
SWITCH
DOOR LOCK
(ON LOCK ASSY.)
CIRCUIT ALLOWS CONTROL
DOOR CLOSED SENSING
TO TURN ON DOOR LOCK
CONTROL TO TURN ON MOTOR
DOOR LOCK SENSING CIRCUIT ALLOWS
ONLY WHEN DOOR IS LOCKED
RELAYS K4 AND K6
SERIAL PORT INTERFACE
230 VDC
MOTOR
WHT
GRN/YEL
H187SE3A
K2
2
1
3
5
4
EDCSERV.SCH DVN 6/24/98
Section 3 Troubleshooting (EDC Models)
© Copyright, Alliance Laundry Systems LLC – DO NOT COPY or TRANSMIT
800168 25
Page 28
Section 3 Troubleshooting (EDC Models)
Washer will not start
Door is locked
Refer to "Washer will
not fill".
No
Yes
(1) "AC"
Is there voltage at
"H3-5" to "FS-2" on
EDC control
board?
Change EDC
control board.
H136SE3A
10. WASHER WILL NOT START (EDC CONTROL ANALYSIS)
26 800168
© Copyright, Alliance Laundry Systems LLC – DO NOT COPY or TRANSMIT
Page 29
BRN
BLU
PNK
ORG/BLU
TAN/WHT
GRY/BLK
RED
WHT
ORG
GRY
TAN/WHT
YEL/BLK
BLK/YEL
BLK
GRY/BLK
WHT
WHT
WHT
WHT
BRN/YEL
YEL
GRN/YEL
RED
WHT/BLK
BLK/YEL
RED/BLK
PNK/BLK
WHT/RED
WHT/BLU
RED/YEL
BRN/WHT
VLT
WHT/GRY
ORG/BLK
VLT/WHT
BLK/WHT
BLU/BLK
FS1
FS2
-
+
H3-1
H5-2
H5-1
H5-4
H3-5
H3-3
H4
H2-1
H2-2
H2-3
H2-4
H2-5
H2-6
H6-2
H6-1
TO COIN
DROP OR
OTHER
VENDING
DEVICE
H5-3
K1
K3
K2
240 VAC
20 VAC
FUS1
250 V
7 AMP
EDC FRONT LOAD WASHER MODEL
N
L1
DELAY TO UNLOCK WHEN
DE-ENERGIZED)
(MECHANICAL THERMAL
DOOR LOCK
ACTUATOR
PUMP
HOTH
COLD
H3
H1
FS2
H2
FIELD
TAC H
ROTOR
C
SV
PRESSURE
SWITCH
1
3
5
4
D1
D2
D3
6
2
A2
A1
DV
3
1
2
45
7
6
SOFTENER
Control Logic
Circuit
Low Voltage
MOTOR DC
POWER SUPPLY
DETERGENT\BLEACH
MOTOR
CONTROL
ASSEMBLY
H4
SOMI
SOMI
CLK
CLK
SIMO
SIMO
ELECTRONIC
CONTROL
EDC
GND
VCC
GND
VCC
TOP1
FS1
FULL
PSTH2
IOP
L1
MA
FS3
12
H5
122
8
3
89
10 6
7124
9
6
5
3
PTC
13
4
OVER
"DOOR LOCKED" LIGHT
DOOR SWITCH
SECONDARY
DOOR SWITCH
(ON LOCK ASSY.)
120 VAC 60 Hz
TRANSFORMER
UNBALANCE SWITCH
456
K2
K1
K6
K4
AUDIT
CONTROL
CIRCUIT
21
SWITCH
DOOR LOCK
(ON LOCK ASSY.)
CIRCUIT ALLOWS CONTROL
DOOR CLOSED SENSING
TO TURN ON DOOR LOCK
CONTROL TO TURN ON MOTOR
DOOR LOCK SENSING CIRCUIT ALLOWS
ONLY WHEN DOOR IS LOCKED
RELAYS K4 AND K6
SERIAL PORT INTERFACE
230 VDC
MOTOR
WHT
GRN/YEL
H188SE3A
K2
1
EDCSERV.SCH DVN 6/24/98
Section 3 Troubleshooting (EDC Models)
© Copyright, Alliance Laundry Systems LLC – DO NOT COPY or TRANSMIT
800168 27
Page 30
Section 3 Troubleshooting (EDC Models)
Washer will not fill
Change inoperative
pressure switch.
Yes
(1) "AC"
(2) "AC"
(3) "AC"
No
Still no voltage.
Yes
No
Is there voltage at
input side of
pressure switch to
"FS-2" on motor
control?
Correct wiring at
pressure switch.
Correct wiring
between EDC
control and
pressure switch.
Is there voltage at
input wires on
mixing valve to
"FS-2" on motor
control?
Yes
No
Is there voltage at
input side of
pressure switch to
"H1-3" and/or "H1-9"
on motor control?
Change motor
control.
Change mixing
valve.
H138SE3C
11. WASHER WILL NOT FILL
28 800168
© Copyright, Alliance Laundry Systems LLC – DO NOT COPY or TRANSMIT
Page 31

BRN
BLU
PNK
ORG/BLU
TAN/WHT
GRY/BLK
RED
WHT
ORG
GRY
TAN/WHT
YEL/BLK
BLK/YEL
BLK
GRY/BLK
WHT
WHT
WHT
WHT
BRN/YEL
YEL
GRN/YEL
RED
WHT/BLK
BLK/YEL
RED/BLK
PNK/BLK
WHT/RED
WHT/BLU
RED/YEL
BRN/WHT
VLT
WHT/GRY
ORG/BLK
VLT/WHT
BLK/WHT
BLU/BLK
FS1
FS2
-
+
H3-1
H5-2
H5-1
H5-4
H3-5
H3-3
H4
H2-1
H2-2
H2-3
H2-4
H2-5
H2-6
H6-2
H6-1
TO COIN
DROP OR
OTHER
VENDING
DEVICE
H5-3
K1
K3
K2
240 VAC
20 VAC
FUS1
250 V
7 AMP
EDCSERV.SCH DVN 6/24/98
EDC FRONT LOAD WASHER MODEL
N
L1
DELAY TO UNLOCK WHEN
DE-ENERGIZED)
(MECHANICAL THERMAL
DOOR LOCK
ACTUATOR
PUMP
HOTH
COLD
H3
H1
FS2
H2
FIELD
TAC H
ROTOR
C
SV
PRESSURE
SWITCH
1
3
5
4
D1
D2
D3
6
2
A2
A1
DV
3
1
2
45
7
6
SOFTENER
Control Logic
Circuit
Low Voltage
MOTOR DC
POWER SUPPLY
DETERGENT\BLEACH
MOTOR
CONTROL
ASSEMBLY
H4
SOMI
SOMI
CLK
CLK
SIMO
SIMO
ELECTRONIC
CONTROL
EDC
GND
VCC
GND
VCC
TOP1
FS1
FULL
PSTH2
IOP
L1
MA
FS3
12
H5
122
8
3
89
10 6
7124
9
6
5
3
PTC
13
4
OVER
"DOOR LOCKED" LIGHT
DOOR SWITCH
SECONDARY
DOOR SWITCH
(ON LOCK ASSY.)
120 VAC 60 Hz
TRANSFORMER
UNBALANCE SWITCH
456
K2
K1
K6
K4
AUDIT
CONTROL
CIRCUIT
21
SWITCH
DOOR LOCK
(ON LOCK ASSY.)
CIRCUIT ALLOWS CONTROL
DOOR CLOSED SENSING
TO TURN ON DOOR LOCK
CONTROL TO TURN ON MOTOR
DOOR LOCK SENSING CIRCUIT ALLOWS
ONLY WHEN DOOR IS LOCKED
RELAYS K4 AND K6
SERIAL PORT INTERFACE
230 VDC
MOTOR
WHT
GRN/YEL
H189SE3A
K2
2
1
3
Section 3 Troubleshooting (EDC Models)
© Copyright, Alliance Laundry Systems LLC – DO NOT COPY or TRANSMIT
800168 29
Page 32

Section 3 Troubleshooting (EDC Models)
Washer overflows
Correct wiring between
pressure switch and
mixing valve.
Disconnect power to
washer.
Change inoperative
pressure switch.
Note:
Go through the following tests if water is
at least half way up the door glass.
Yes
Yes
(1) "AC"
(2) "AC"
Yes
No
Washer still fills.
No
Is there voltage on
terminal 24 on
pressure switch to
"FS-2" on motor
control?
Properly attach
pressure hose or
replace hose if cut.
No
Is there voltage at
mixing valve to
"FS-2" on motor
control?
Change inoperative
mixing valve.
Is Pressure Bulb Hose
properly attached and
free of cuts?
H140SE3B
12. WASHER OVERFLOWS
30 800168
© Copyright, Alliance Laundry Systems LLC – DO NOT COPY or TRANSMIT
Page 33

BRN
BLU
PNK
ORG/BLU
TAN/WHT
GRY/BLK
RED
WHT
ORG
GRY
TAN/WHT
YEL/BLK
BLK/YEL
BLK
GRY/BLK
WHT
WHT
WHT
WHT
BRN/YEL
YEL
GRN/YEL
RED
WHT/BLK
BLK/YEL
RED/BLK
PNK/BLK
WHT/RED
WHT/BLU
RED/YEL
BRN/WHT
VLT
WHT/GRY
ORG/BLK
VLT/WHT
BLK/WHT
BLU/BLK
FS1
FS2
-
+
H3-1
H5-2
H5-1
H5-4
H3-5
H3-3
H4
H2-1
H2-2
H2-3
H2-4
H2-5
H2-6
H6-2
H6-1
TO COIN
DROP OR
OTHER
VENDING
DEVICE
H5-3
K1
K3
K2
240 VAC
20 VAC
FUS1
250 V
7 AMP
EDCSERV.SCH DVN 6/24/98
EDC FRONT LOAD WASHER MODEL
N
L1
DELAY TO UNLOCK WHEN
DE-ENERGIZED)
(MECHANICAL THERMAL
DOOR LOCK
ACTUATOR
PUMP
HOTH
COLD
H3
H1
FS2
H2
FIELD
TAC H
ROTOR
C
SV
PRESSURE
SWITCH
1
3
5
4
D1
D2
D3
6
2
A2
A1
DV
3
1
2
45
7
6
SOFTENER
Control Logic
Circuit
Low Voltage
MOTOR DC
POWER SUPPLY
DETERGENT\BLEACH
MOTOR
CONTROL
ASSEMBLY
H4
SOMI
SOMI
CLK
CLK
SIMO
SIMO
ELECTRONIC
CONTROL
EDC
GND
VCC
GND
VCC
TOP1
FS1
FULL
PSTH2
IOP
L1
MA
FS3
12
H5
122
8
3
89
10 6
7124
9
6
5
3
PTC
13
4
OVER
"DOOR LOCKED" LIGHT
DOOR SWITCH
SECONDARY
DOOR SWITCH
(ON LOCK ASSY.)
120 VAC 60 Hz
TRANSFORMER
UNBALANCE SWITCH
456
K2
K1
K6
K4
AUDIT
CONTROL
CIRCUIT
21
SWITCH
DOOR LOCK
(ON LOCK ASSY.)
CIRCUIT ALLOWS CONTROL
DOOR CLOSED SENSING
TO TURN ON DOOR LOCK
CONTROL TO TURN ON MOTOR
DOOR LOCK SENSING CIRCUIT ALLOWS
ONLY WHEN DOOR IS LOCKED
RELAYS K4 AND K6
SERIAL PORT INTERFACE
230 VDC
MOTOR
WHT
GRN/YEL
H190SE3A
K2
1
2
Section 3 Troubleshooting (EDC Models)
800168 31
© Copyright, Alliance Laundry Systems LLC – DO NOT COPY or TRANSMIT
Page 34

Section 3 Troubleshooting (EDC Models)
Washer will not pump
Correct wiring between
pump and EDC control
board.
Check for a kink or blockage
in drain hose.
Change inoperative EDC
control board.
Note:
Make sure washer cycle is in
drain/spin.
Yes
(1) "AC"
(2) "AC"
No
Yes
Still will not pump.
No
Is there voltage at
"H5-3" to "FS-2" on
EDC control
board?
Is there voltage across
wires going to
pump?
Check for blockage in
pump's button trap.
Still will not pump.
Change inoperative pump.
H142SE3B
13. WASHER WILL NOT PUMP
32 800168
© Copyright, Alliance Laundry Systems LLC – DO NOT COPY or TRANSMIT
Page 35

BRN
BLU
PNK
ORG/BLU
TAN/WHT
GRY/BLK
RED
WHT
ORG
GRY
TAN/WHT
YEL/BLK
BLK/YEL
BLK
GRY/BLK
WHT
WHT
WHT
WHT
BRN/YEL
YEL
GRN/YEL
RED
WHT/BLK
BLK/YEL
RED/BLK
PNK/BLK
WHT/RED
WHT/BLU
RED/YEL
BRN/WHT
VLT
WHT/GRY
ORG/BLK
VLT/WHT
BLK/WHT
BLU/BLK
FS1
FS2
-
+
H3-1
H5-2
H5-1
H5-4
H3-5
H3-3
H4
H2-1
H2-2
H2-3
H2-4
H2-5
H2-6
H6-2
H6-1
TO COIN
DROP OR
OTHER
VENDING
DEVICE
H5-3
K1
K3
K2
240 VAC
20 VAC
FUS1
250 V
7 AMP
EDCSERV.SCH DVN 6/24/98
EDC FRONT LOAD WASHER MODEL
N
L1
DELAY TO UNLOCK WHEN
DE-ENERGIZED)
(MECHANICAL THERMAL
DOOR LOCK
ACTUATOR
PUMP
HOTH
COLD
H3
H1
FS2
H2
FIELD
TAC H
ROTOR
C
SV
PRESSURE
SWITCH
1
3
5
4
D1
D2
D3
6
2
A2
A1
DV
3
1
2
45
7
6
SOFTENER
Control Logic
Circuit
Low Voltage
MOTOR DC
POWER SUPPLY
DETERGENT\BLEACH
MOTOR
CONTROL
ASSEMBLY
H4
SOMI
SOMI
CLK
CLK
SIMO
SIMO
ELECTRONIC
CONTROL
EDC
GND
VCC
GND
VCC
TOP1
FS1
FULL
PSTH2
IOP
L1
MA
FS3
12
H5
122
8
3
89
10 6
7124
9
6
5
3
PTC
13
4
OVER
"DOOR LOCKED" LIGHT
DOOR SWITCH
SECONDARY
DOOR SWITCH
(ON LOCK ASSY.)
120 VAC 60 Hz
TRANSFORMER
UNBALANCE SWITCH
456
K2
K1
K6
K4
AUDIT
CONTROL
CIRCUIT
21
SWITCH
DOOR LOCK
(ON LOCK ASSY.)
CIRCUIT ALLOWS CONTROL
DOOR CLOSED SENSING
TO TURN ON DOOR LOCK
CONTROL TO TURN ON MOTOR
DOOR LOCK SENSING CIRCUIT ALLOWS
ONLY WHEN DOOR IS LOCKED
RELAYS K4 AND K6
SERIAL PORT INTERFACE
230 VDC
MOTOR
WHT
GRN/YEL
H191SE3A
K2
1
2
Section 3 Troubleshooting (EDC Models)
© Copyright, Alliance Laundry Systems LLC – DO NOT COPY or TRANSMIT
800168 33
Page 36

Section 3 Troubleshooting (EDC Models)
Change control
transformer.
Change wire harness(s)
between EDC and motor
control boards.
Connect loose harness(s)
and retry washer cycle.
Yes
(1) "AC"
Lower than 20 volts "DC"
20 volts "DC"
"E:SP" still continues
No
Are all the control
wiring harnesses
connected between
the two controls?
"E:SP" is displayed on
EDC control.
What is the
measured voltage
at "H1-7" to "FS-2"
on the motor control
board?
Change either motor or
EDC control.
H144SE3A
14. “E:SP” ERROR ANALYSIS
34 800168
© Copyright, Alliance Laundry Systems LLC – DO NOT COPY or TRANSMIT
Page 37

BRN
BLU
PNK
ORG/BLU
TAN/WHT
GRY/BLK
RED
WHT
ORG
GRY
TAN/WHT
YEL/BLK
BLK/YEL
BLK
GRY/BLK
WHT
WHT
WHT
WHT
BRN/YEL
YEL
GRN/YEL
RED
WHT/BLK
BLK/YEL
RED/BLK
PNK/BLK
WHT/RED
WHT/BLU
RED/YEL
BRN/WHT
VLT
WHT/GRY
ORG/BLK
VLT/WHT
BLK/WHT
BLU/BLK
FS1
FS2
-
+
H3-1
H5-2
H5-1
H5-4
H3-5
H3-3
H4
H2-1
H2-2
H2-3
H2-4
H2-5
H2-6
H6-2
H6-1
TO COIN
DROP OR
OTHER
VENDING
DEVICE
H5-3
K1
K3
K2
240 VAC
20 VAC
FUS1
250 V
7 AMP
EDCSERV.SCH DVN 6/24/98
EDC FRONT LOAD WASHER MODEL
N
L1
DELAY TO UNLOCK WHEN
DE-ENERGIZED)
(MECHANICAL THERMAL
DOOR LOCK
ACTUATOR
PUMP
HOTH
COLD
H3
H1
FS2
H2
FIELD
TAC H
ROTOR
C
SV
PRESSURE
SWITCH
1
3
5
4
D1
D2
D3
6
2
A2
A1
DV
3
1
2
45
7
6
SOFTENER
Control Logic
Circuit
Low Voltage
MOTOR DC
POWER SUPPLY
DETERGENT\BLEACH
MOTOR
CONTROL
ASSEMBLY
H4
SOMI
SOMI
CLK
CLK
SIMO
SIMO
ELECTRONIC
CONTROL
EDC
GND
VCC
GND
VCC
TOP1
FS1
FULL
PSTH2
IOP
L1
MA
FS3
12
H5
122
8
3
89
10 6
7124
9
6
5
3
PTC
13
4
OVER
"DOOR LOCKED" LIGHT
DOOR SWITCH
SECONDARY
DOOR SWITCH
(ON LOCK ASSY.)
120 VAC 60 Hz
TRANSFORMER
UNBALANCE SWITCH
456
K2
K1
K6
K4
AUDIT
CONTROL
CIRCUIT
21
SWITCH
DOOR LOCK
(ON LOCK ASSY.)
CIRCUIT ALLOWS CONTROL
DOOR CLOSED SENSING
TO TURN ON DOOR LOCK
CONTROL TO TURN ON MOTOR
DOOR LOCK SENSING CIRCUIT ALLOWS
ONLY WHEN DOOR IS LOCKED
RELAYS K4 AND K6
SERIAL PORT INTERFACE
230 VDC
MOTOR
WHT
GRN/YEL
H192SE3A
K2
1
Section 3 Troubleshooting (EDC Models)
© Copyright, Alliance Laundry Systems LLC – DO NOT COPY or TRANSMIT
800168 35
Page 38

Section 3 Troubleshooting (EDC Models)
Replace
motor.
Is
120 Volt AC
present at terminals
1-3 on transformer?
Is
240 Volt
present on the
motor control at terminals
FS3 to FS2?
Is
20 Volt AC
present on the motor
control at terminals
H1-7 to FS2?
Is
120 Volt AC
present at terminals
H3-5 to FS2 on the
electronic display?
Replace
electronic
control.
(1)
YES
YES
YES
NO
NO
NO
NO
Using an Ohmmeter,
check white wire and brown/
yellow wire coming into
transformer for broken/poor
connection.
YES
Using an Ohmmeter, check
red wire from transformer
to FS3 on motor control
board for broken wire/poor
connection. If none found,
replace transformer.
Using an Ohmmeter,
check red/black wire
from transformer to H1-7
on motor control board
for broken wire/poor
connection. If none
found, replace
transformer.
(2)
Is there
continuity?
Check continuity at terminal strip on motor:
TACH INPUT Terminals 6-7 Approximately 15 Ohms
BRUSHES Terminals 4-5 Less than 70 Ohms
Winding Terminals 1-3 Approximately 1.1 Ohms
Winding Terminals 1-2 Approximately 2.0-2.4 Ohms
Winding Terminals 2-3 Approximately 3.4 Ohms
*Resistance values may vary
depending on type of meter used.
NO
Replace
motor.
YES
MOTOR
Using an
Ohmmeter, check
for continuity between each
terminal and the motor
housing.
NO
Is there
continuity?
YES
(3)
(4)
Is
there continuity
through the motor harness
from plug H-2 and H-5 on the motor
control, to the plug at the
motor?
NO
Replace
harness.
YES
Is the
fuse blown on the
motor control
board?
YES
Replace
fuse.
NO
Does
the machine
run now?
Replace motor
control board.
NO
Replace motor
control board.
TRANSFORMER
15. DOOR LOCKED, MOTOR DOES NOT RUN (E:DF ON DISPLAY)
36 800168
© Copyright, Alliance Laundry Systems LLC – DO NOT COPY or TRANSMIT
Page 39

BRN
BLU
PNK
ORG/BLU
TAN/WHT
GRY/BLK
RED
WHT
ORG
GRY
TAN / WH T
YEL/BLK
BLK/YEL
BLK
GRY/BLK
WHT
WHT
WHT
WHT
BRN/YEL
YEL
GRN/YEL
RED
WHT/BLK
BLK/YEL
RED/BLK
PNK/BLK
WHT/RED
WHT/BLU
RED/YEL
BRN/WHT
VLT
WHT/GRY
ORG/BLK
VLT/WHT
BLK/WHT
BLU/BLK
FS1
FS2
-
+
H3-1
H5-2
H5-1
H5-4
H3-5
H3-3
H4
H2-1
H2-2
H2-3
H2-4
H2-5
H2-6
H6-2
H6-1
TO COIN
DROP OR
OTHER
VENDING
DEVICE
H5-3
K1
K3
K2
240 VAC
20 VAC
FUS1
250 V
7 AMP
EDCSERV.SCH DVN 6/24/98
EDC FRONT LOAD WASHER MODEL
N
L1
DELAY TO UNLOCK WHEN
DE-ENERGIZED)
(MECHANICAL THERMAL
DOOR LOCK
ACTUATOR
PUMP
HOTH
COLD
H3
H1
FS2
H2
FIELD
TAC H
ROTOR
C
SV
PRESSURE
SWITCH
1
3
5
4
D1
D2
D3
6
2
A2
A1
DV
3
1
2
45
7
6
SOFTENER
Control Logic
Circuit
Low Voltage
MOTOR DC
POWER SUPPLY
DETERGENT\BLEACH
MOTOR
CONTROL
ASSEMBLY
H4
SOMI
SOMI
CLK
CLK
SIMO
SIMO
ELECTRONIC
CONTROL
EDC
GND
VCC
GND
VCC
TOP1
FS1
FULL
PSTH2
IOP
L1
MA
FS3
12
H5
122
8
3
8 9
10 6
7124
9
6
5
3
PTC
13
4
OVER
"DOOR LOCKED" LIGHT
DOOR SWITCH
SECONDARY
DOOR SWITCH
(ON LOCK ASSY.)
120 VAC 60 Hz
TRANSFORMER
UNBALANCE SWITCH
456
K2
K1
K6
K4
AUDIT
CONTROL
CIRCUIT
21
SWITCH
DOOR LOCK
(ON LOCK ASSY.)
CIRCUIT ALLOWS CONTROL
DOOR CLOSED SENSING
TO TURN ON DOOR LOCK
CONTROL TO TURN ON MOTOR
DOOR LOCK SENSING CIRCUIT ALLOWS
ONLY WHEN DOOR IS LOCKED
RELAYS K4 AND K6
SERIAL PORT INTERFACE
230 VDC
MOTOR
WHT
GRN/YEL
H192SE3B
K2
2
4
3
1
DOOR LOCKED, MOTOR DOES NOT RUN (E:DF ON DISPLAY)
Section 3 Troubleshooting (EDC Models)
© Copyright, Alliance Laundry Systems LLC – DO NOT COPY or TRANSMIT
800168 37
Page 40

Section 3 Troubleshooting (EDC Models)
16. START UP SEQUENCE
a. Insert money and/or card and push the button next to the flashing light.
b. Both door closed switches need to be in the closed position, after vend price has been satisfied.
c. The door lock actuator is energized from “H5-1” terminal on EDC control board.
d. The door lock switch is closed.
e. The “K4” relay is closed on EDC control board.
f. The control transformer is energized.
g. Communications begin between EDC and motor control boards through the SPI lines to the optoisolators on
EDC control.
h. The mixing valve is energized and washer begins to fill.
i. The main drive motor is powered to start inner basket rotating.
38 800168
© Copyright, Alliance Laundry Systems LLC – DO NOT COPY or TRANSMIT
Page 41

BRN
BLU
PNK
ORG/BLU
TAN/WHT
GRY/BLK
RED
WHT
ORG
GRY
TAN/WHT
YEL/BLK
BLK/YEL
BLK
GRY/BLK
WHT
WHT
WHT
WHT
BRN/YEL
YEL
GRN/YEL
RED
WHT/BLK
BLK/YEL
RED/BLK
PNK/BLK
WHT/RED
WHT/BLU
RED/YEL
BRN/WHT
VLT
WHT/GRY
ORG/BLK
VLT/WHT
BLK/WHT
BLU/BLK
FS1
FS2
-
+
H3-1
H5-2
H5-1
H5-4
H3-5
H3-3
H4
H2-1
H2-2
H2-3
H2-4
H2-5
H2-6
H6-2
H6-1
TO COIN
DROP OR
OTHER
VENDING
DEVICE
H5-3
K1
K3
K2
240 VAC
20 VAC
FUS1
250 V
7 AMP
EDCSERV.SCH DVN 6/24/98
EDC FRONT LOAD WASHER MODEL
N
L1
DELAY TO UNLOCK WHEN
DE-ENERGIZED)
(MECHANICAL THERMAL
DOOR LOCK
ACTUATOR
PUMP
HOTH
COLD
H3
H1
FS2
H2
FIELD
TAC H
ROTOR
C
SV
PRESSURE
SWITCH
1
3
5
4
D1
D2
D3
6
2
A2
A1
DV
3
1
2
45
7
6
SOFTENER
Control Logic
Circuit
Low Voltage
MOTOR DC
POWER SUPPLY
DETERGENT\BLEACH
MOTOR
CONTROL
ASSEMBLY
H4
SOMI
SOMI
CLK
CLK
SIMO
SIMO
ELECTRONIC
CONTROL
EDC
GND
VCC
GND
VCC
TOP1
FS1
FULL
PSTH2
IOP
L1
MA
FS3
12
H5
122
8
3
89
10 6
7124
9
6
5
3
PTC
13
4
OVER
"DOOR LOCKED" LIGHT
DOOR SWITCH
SECONDARY
DOOR SWITCH
(ON LOCK ASSY.)
120 VAC 60 Hz
TRANSFORMER
UNBALANCE SWITCH
456
K2
K1
K6
K4
AUDIT
CONTROL
CIRCUIT
21
SWITCH
DOOR LOCK
(ON LOCK ASSY.)
CIRCUIT ALLOWS CONTROL
DOOR CLOSED SENSING
TO TURN ON DOOR LOCK
CONTROL TO TURN ON MOTOR
DOOR LOCK SENSING CIRCUIT ALLOWS
ONLY WHEN DOOR IS LOCKED
RELAYS K4 AND K6
SERIAL PORT INTERFACE
230 VDC
MOTOR
WHT
GRN/YEL
H193SE3A
b
K2
c
d
e
g
f
h
i
Section 3 Troubleshooting (EDC Models)
800168 39
© Copyright, Alliance Laundry Systems LLC – DO NOT COPY or TRANSMIT
Page 42

Section 3 Troubleshooting (EDC Models)
17. SHUT DOWN SEQUENCE
a. Towards end of cycle, “:01” is on display. The door lock actuator is powered down and “K2” relay on EDC
control is opened.
b. The door lock switch is opened after a one-minute delay. The display will show “:00”.
c. The door switches will open when loading door opens.
40 800168
© Copyright, Alliance Laundry Systems LLC – DO NOT COPY or TRANSMIT
Page 43

BRN
BLU
PNK
ORG/BLU
TAN/WHT
GRY/BLK
RED
WHT
ORG
GRY
TAN/WHT
YEL/BLK
BLK/YEL
BLK
GRY/BLK
WHT
WHT
WHT
WHT
BRN/YEL
YEL
GRN/YEL
RED
WHT/BLK
BLK/YEL
RED/BLK
PNK/BLK
WHT/RED
WHT/BLU
RED/YEL
BRN/WHT
VLT
WHT/GRY
ORG/BLK
VLT/WHT
BLK/WHT
BLU/BLK
FS1
FS2
-
+
H3-1
H5-2
H5-1
H5-4
H3-5
H3-3
H4
H2-1
H2-2
H2-3
H2-4
H2-5
H2-6
H6-2
H6-1
TO COIN
DROP OR
OTHER
VENDING
DEVICE
H5-3
K1
K3
K2
240 VAC
20 VAC
FUS1
250 V
7 AMP
EDCSERV.SCH DVN 6/24/98
EDC FRONT LOAD WASHER MODEL
N
L1
DELAY TO UNLOCK WHEN
DE-ENERGIZED)
(MECHANICAL THERMAL
DOOR LOCK
ACTUATOR
PUMP
HOTH
COLD
H3
H1
FS2
H2
FIELD
TAC H
ROTOR
C
SV
PRESSURE
SWITCH
1
3
5
4
D1
D2
D3
6
2
A2
A1
DV
3
1
2
45
7
6
SOFTENER
Control Logic
Circuit
Low Voltage
MOTOR DC
POWER SUPPLY
DETERGENT\BLEACH
MOTOR
CONTROL
ASSEMBLY
H4
SOMI
SOMI
CLK
CLK
SIMO
SIMO
ELECTRONIC
CONTROL
EDC
GND
VCC
GND
VCC
TOP1
FS1
FULL
PSTH2
IOP
L1
MA
FS3
12
H5
122
8
3
89
10 6
7124
9
6
5
3
PTC
13
4
OVER
"DOOR LOCKED" LIGHT
DOOR SWITCH
SECONDARY
DOOR SWITCH
(ON LOCK ASSY.)
120 VAC 60 Hz
TRANSFORMER
UNBALANCE SWITCH
456
K2
K1
K6
K4
AUDIT
CONTROL
CIRCUIT
21
SWITCH
DOOR LOCK
(ON LOCK ASSY.)
CIRCUIT ALLOWS CONTROL
DOOR CLOSED SENSING
TO TURN ON DOOR LOCK
CONTROL TO TURN ON MOTOR
DOOR LOCK SENSING CIRCUIT ALLOWS
ONLY WHEN DOOR IS LOCKED
RELAYS K4 AND K6
SERIAL PORT INTERFACE
230 VDC
MOTOR
WHT
GRN/YEL
H194SE3A
c
K2
a
b
Section 3 Troubleshooting (EDC Models)
800168 41
© Copyright, Alliance Laundry Systems LLC – DO NOT COPY or TRANSMIT
Page 44

Section 3 Troubleshooting (EDC Models)
42 800168
© Copyright, Alliance Laundry Systems LLC – DO NOT COPY or TRANSMIT
Page 45

To reduce the risk of electric shock, fire, explosion, serious injury or death:
• Disconnect electric power to the washer before servicing.
• Never start the washer with any guards/panels removed.
• Whenever ground wires are removed during servicing, these ground wires must be
reconnected to ensure that the washer is properly grounded.
W003
WARNING
MDC Models
18. MDC ERROR CODE LISTING
E:df Drive failure. This error code is generated by the motor control and
transmitted to the master control. Several conditions can cause
this code; motor unplugged, motor failure (refer to Paragraph
4), tachometer circuit open, inner basket locked up. This is a
fatal error. Machine must be unpowered to reset.
E:SP Serial communication error. This error code occurs when the master control cannot
communicate with the motor control. The master control will try
to reset the motor control by powering it down. It will try
resetting three times before setting the error code. Common
causes include defective or unplugged transformer, and incorrect
wiring to motor control. This is a fatal error.
E:FL Fill error. This error code occurs if the pressure switch fails to open in 30
minutes in any fill/agitate cycle. This is a fatal error.
dor Door Open Indicator. This error code occurs when the door is not closed at the start of
an active cycle. If the door is closed, check for wiring or door
switches.
E:do Door open error. This error code occurs if the control detects the door open and
door locked inputs high at the same time. You can get this error
if you jerk on the door when it is locked or as it is about to lock.
This is a fatal error.
E:dL Door lock error. This error code occurs if the door does not lock in 15 seconds or
unlock in 3 minutes at the end of the cycle. This is a non-fatal
error. If the door locks or unlocks while E:dL is displayed it will
clear the error condition. Also, if the door is opened after failing
to lock it will clear the display.
800168 43
© Copyright, Alliance Laundry Systems LLC – DO NOT COPY or TRANSMIT
Page 46

Section 3 Troubleshooting (MDC Models)
Coins Ignored When Entered.
Start Coin Drop Diagnostic Test. Refer
to programming manual.
Reset control to
ready mode.
Yes
No
Is "H7" connector
properly seated on the
control board?
No
Properly reseat
connection and
conduct diagnostic
test again.
Yes
From the coin drop, is
the 3-pin connector
properly plugged in?
Yes
No
Properly reseat
connection and
conduct diagnostic
test again.
Are the wires exiting the
coin drop optical sensor
cracked or broken?
Replace electronic
control.
Replace the
coin drop.
Yes
No
Does the count on
the display increment
properly after entering
coins?
FLW297S
Start Production Test Cycle.
19. COINS IGNORED WHEN ENTERED
44 800168
© Copyright, Alliance Laundry Systems LLC – DO NOT COPY or TRANSMIT
Page 47

Section 3 Troubleshooting (MDC Models)
800168 45
© Copyright, Alliance Laundry Systems LLC – DO NOT COPY or TRANSMIT
Page 48

Section 3 Troubleshooting (MDC Models)
Control Has No Visible Display
The electronic control has no
LED or VFD functioning on
the control board.
Is the power cord
plugged in?
Plug unit into an
outlet and check
for proper supply
voltage.
No
Yes
(1)
No
Is there 24 Volt
AC at the output side of
the transformer?
Is there
120 AC to the
primary of the
transformer?
No No
(2) (3)
Check wiring to
the primary of the
transformer.
Yes Yes
Correct wiring
between
transformer and
control board.
Replace
transformer.
Make sure "H1"
connector is
seated properly.
Replace control.
Yes
Is there 24 Volt AC
across terminals "H1-1"
and "H1-3" control
board?
FLW298S
20. NO VISIBLE DISPLAY ON CONTROL
46 800168
© Copyright, Alliance Laundry Systems LLC – DO NOT COPY or TRANSMIT
Page 49

Section 3 Troubleshooting (MDC Models)
801182
1
2
3
NO VISIBLE DISPLAY ON CONTROL
800168 47
© Copyright, Alliance Laundry Systems LLC – DO NOT COPY or TRANSMIT
Page 50

Section 3 Troubleshooting (MDC Models)
21. WASHER WILL NOT START – NO DOOR LOCK
Washer Will Not Start. No Door Lock.
Washer will not
start. Vend
satisfied.
(1)
Is there 120 Volt
AC across "H4-5" and
"H6-5" on the control
board?
No
(2)
Is there voltage
to the blu/blk input wire
to the door switch on the
lock assembly?
No
(3)
Is there voltage
at the input blk wire coming
into the secondary
door switch?
Yes
Yes
Yes
Replace the Door
Lock Assembly.
Yes
(4)
Is there 120 Volt
AC across "H4-4" to "H6-5" on
the control board?
Replace the Door
Lock Assembly.
Replace the
secondary door
switch assembly.
No
No
(5)
Is there 120 Volt
AC across "H6-1" and "H6-5"
on the control board?
Yes
Replace the
Control Board.
No
Correct wiring to
the secondary
door switch.
48 800168
© Copyright, Alliance Laundry Systems LLC – DO NOT COPY or TRANSMIT
FLW300S
Page 51

Section 3 Troubleshooting (MDC Models)
801182
5
2
3
1
4
WASHER WILL NOT START – NO DOOR LOCK
800168 49
© Copyright, Alliance Laundry Systems LLC – DO NOT COPY or TRANSMIT
Page 52

Section 3 Troubleshooting (MDC Models)
Washer Will Not Start. Control Analysis.
Is there 120 Volt
AC across "H6-6" to "H6-5" on
the control board?
(1)
Yes
No
Refer to the
Washer Will Not Fill
section.
Replace the
control board.
FLW302S
22. WASHER WILL NOT START – CONTROL ANALYSIS
50 800168
© Copyright, Alliance Laundry Systems LLC – DO NOT COPY or TRANSMIT
Page 53

Section 3 Troubleshooting (MDC Models)
801182
1
WASHER WILL NOT START – CONTROL ANALYSIS
800168 51
© Copyright, Alliance Laundry Systems LLC – DO NOT COPY or TRANSMIT
Page 54

Section 3 Troubleshooting (MDC Models)
Washer Will Not Fill.
Is there 120 Volt
AC across the input side of
the pressure switch to "FS2" on
the motor control board?
Correct wiring
between pressure
switch and control
board.
No
Is there 120 Volt
AC from the input side of the
mixing valves to "FS2" on the
motor control board?
Yes
(1)
(2)
(3)
Yes
Check for cracked
or broken wiring
at the pressure
switch. Change
inoperative
pressure switch.
Is there 120 Volt
AC from the input side of
the mixing valve to "H1-9" or "H1-3"
of the motor control board?
Yes
No
No
Change the motor
control board.
Change the mixing
valve.
FLW304S
23. WASHER WILL NOT FILL
52 800168
© Copyright, Alliance Laundry Systems LLC – DO NOT COPY or TRANSMIT
Page 55

WASHER WILL NOT FILL
801182
1
3
2
Section 3 Troubleshooting (MDC Models)
800168 53
© Copyright, Alliance Laundry Systems LLC – DO NOT COPY or TRANSMIT
Page 56

Section 3 Troubleshooting (MDC Models)
Washer Overflows
Is there voltage
to the over level
terminal on pressure
switch to "FS2"?
Yes
No
Replace
inoperative
pressure switch.
Is there voltage
across the coil of
either the hot or cold
water solenoid?
Yes
No
Check for
improper wiring
and replace
inoperative
pressure switch
if necessary.
Replace
inoperative water
valve.
(1)
(2)
FLW306S
24. WASHER OVERFLOWS
54 800168
© Copyright, Alliance Laundry Systems LLC – DO NOT COPY or TRANSMIT
Page 57

WASHER OVERFLOWS
801182
1
2
Section 3 Troubleshooting (MDC Models)
800168 55
© Copyright, Alliance Laundry Systems LLC – DO NOT COPY or TRANSMIT
Page 58

Section 3 Troubleshooting (MDC Models)
Pump Does Not Operate
Is there voltage
across the wht/blk and
the white wire going to
the motor?
Is there voltage
across terminals
"H6-2" and "H6-5?"
NOTE: Check at
beginning of spin/drain
portion of cycle.
If the pump does
not operate check
for blockage.
Replace if
necessary.
Correct wiring
between control
and pump.
Replace control
assembly.
(1)
(2)
No
Yes
No
Yes
FLW308S
25. PUMP DOES NOT OPERATE
56 800168
© Copyright, Alliance Laundry Systems LLC – DO NOT COPY or TRANSMIT
Page 59

PUMP DOES NOT OPERATE
801182
2
1
Section 3 Troubleshooting (MDC Models)
800168 57
© Copyright, Alliance Laundry Systems LLC – DO NOT COPY or TRANSMIT
Page 60

Section 3 Troubleshooting (MDC Models)
Replace
motor.
Is
120 Volt AC
present at terminals
1-3 on transformer?
Is
240 Volt
present on the
motor control at terminals
FS3 to FS2?
Is
20 Volt AC
present on the motor
control at terminals
H1-7 to FS2?
Is
120 Volt AC
present at terminals
H6-6 to H6-5 on the
electronic display?
Replace
electronic
control.
(1)
YES
YES
YES
NO
NO
NO
NO
Using an Ohmmeter,
check white wire and brown/
yellow wire coming into
transformer for broken/poor
connection.
YES
Using an Ohmmeter, check
red wire from transformer
to FS3 on motor control
board for broken wire/poor
connection. If none found,
replace transformer.
Using an Ohmmeter,
check red/black wire
from transformer to H1-7
on motor control board
for broken wire/poor
connection. If none
found, replace
transformer.
TRANSFORMER
(2)
Is there
continuity?
Check continuity at terminal strip on motor:
TACH INPUT Terminals 6-7 Approximately 15 Ohms
BRUSHES Terminals 4-5 Less than 70 Ohms
Winding Terminals 1-3 Approximately 1.1 Ohms
Winding Terminals 1-2 Approximately 2.0-2.4 Ohms
Winding Terminals 2-3 Approximately 3.4 Ohms
*Resistance values may vary
depending on type of meter used.
NO
Replace
motor.
YES
MOTOR
Using an
Ohmmeter, check
for continuity between each
terminal and the motor
housing.
NO
Is there
continuity?
YES
(3)
(4)
Is
there continuity
through the motor harness
from plug H-2 and H-5 on the motor
control, to the plug at the
motor?
NO
Replace
harness.
YES
Is the
fuse blown on the
motor control
board?
YES
Replace
fuse.
NO
Does
the machine
run now?
Replace motor
control board.
NO
Replace motor
control board.
TRANSFORMER
26. DOOR LOCKED, MOTOR DOES NOT RUN (E:DF ON DISPLAY)
58 800168
© Copyright, Alliance Laundry Systems LLC – DO NOT COPY or TRANSMIT
Page 61

Section 3 Troubleshooting (MDC Models)
801182
2
1
4
3
DOOR LOCKED, MOTOR DOES NOT RUN (E:DF ON DISPLAY)
800168 59
© Copyright, Alliance Laundry Systems LLC – DO NOT COPY or TRANSMIT
Page 62

Section 3 Troubleshooting (MDC Models)
60 800168
© Copyright, Alliance Laundry Systems LLC – DO NOT COPY or TRANSMIT
Page 63

To reduce the risk of electric shock, fire, explosion, serious injury or death:
• Disconnect electric power to the washer before servicing.
• Never start the washer with any guards/panels removed.
• Whenever ground wires are removed during servicing, these ground wires must be
reconnected to ensure that the washer is properly grounded.
W003
WARNING
NetMaster Models
800168 61
© Copyright, Alliance Laundry Systems LLC – DO NOT COPY or TRANSMIT
Page 64

Section 3 Troubleshooting (NetMaster Models)
Attempt to communicate with the
electronic control from the Microwand.
Is there
acknowledgement of
any kind from the
control?
Aim the
Microwand closer
and try again.
No
Yes
Does the Microwand
prompt: Control
Mismatch error ?
Is there any control
response?
Yes
Check the following:
- Microwand battery voltage
- Blockage of IR window on control
- Attachment of IR cup to
Microwand.
No
Make sure
Microwand
selection was for
the proper
machine type and
control generation
type.
Yes
No
Does the electronic
control display "E:OF"
or "-C-"?
-C-
Communication
sequence checks
out properly.
Change electronic
control and repeat
procedure.
Has IR communication
been turned off?
E:OF
No
Yes
Turn IR
communication on
(refer to
programming
manual).
FLW296S
27. MICROWAND DOES NOT COMMUNICATE WITH CONTROL
62 800168
© Copyright, Alliance Laundry Systems LLC – DO NOT COPY or TRANSMIT
Page 65

28. COINS IGNORED WHEN ENTERED
Coins Ignored When Entered.
Start Coin Drop Diagnostic Test. Refer
to programming manual.
Reset control to
ready mode.
Yes
No
Is "H7" connector
properly seated on the
control board?
No
Properly reseat
connection and
conduct diagnostic
test again.
Yes
From the coin drop, is
the 3-pin connector
properly plugged in?
Yes
No
Properly reseat
connection and
conduct diagnostic
test again.
Are the wires exiting the
coin drop optical sensor
cracked or broken?
Replace electronic
control.
Replace the
coin drop.
Yes
No
Does the count on
the display increment
properly after entering
coins?
FLW297S
Start Production Test Cycle.
Section 3 Troubleshooting (NetMaster Models)
800168 63
© Copyright, Alliance Laundry Systems LLC – DO NOT COPY or TRANSMIT
Page 66

Section 3 Troubleshooting (NetMaster Models)
Control Has No Visible Display
The electronic control has no
LED or VFD functioning on
the control board.
Is the power cord
plugged in?
Plug unit into an
outlet and check
for proper supply
voltage.
No
Yes
(1)
No
Is there 24 Volt
AC at the output side of
the transformer?
Is there
120 AC to the
primary of the
transformer?
No No
(2) (3)
Check wiring to
the primary of the
transformer.
Yes Yes
Correct wiring
between
transformer and
control board.
Replace
transformer.
Make sure "H1"
connector is
seated properly.
Replace control.
Yes
Is there 24 Volt AC
across terminals "H1-1"
and "H1-3" control
board?
FLW298S
29. NO VISIBLE DISPLAY ON CONTROL
64 800168
© Copyright, Alliance Laundry Systems LLC – DO NOT COPY or TRANSMIT
Page 67

FIELD
25436 12
31245
DOOR LOCK
ACTUATOR
(MECHANICAL THERMAL
DELAY TO UNLOCK WHEN
DE-ENERGIZED)
(ON LOCK ASSY.)
1096 12
781
2
MOTOR DC
POWER SUPPLY
LOW VOLTAGE
CONTROL LOGIC
CIRCUIT
K2
K3
K1
FS1
ROTOR
TACH
76
H1
9
3
6
5
FS2
FS3
DV
SV
C
H
HOT
COLD
SOFTENER
DETERGENT/BLEACH
L1
PTC
PRESSURE
SWITCH
FULL
OVER
D1
D3 D2
A2
A1
PUMP
TG
FUS1
7 AMP
250 VOLT
MOTOR ASSY
4
83
H4 H3
H2 H5
MOTOR
CONTROL
ASSEMBLY
3
2
1
4
AUTO
TRANSFORMER
MOTOR
14 256
DOOR LOCK SENSING
CIRCUIT ALLOWS CONTROL
TO TURN ON RELAYS
K4 AND K6 ONLY
WHEN DOOR IS LOCKED
DOOR CLOSED SENSING
CIRCUIT ALLOWS CONTROL
TO TURN ON DOOR LOCK
MA
PS
20VAC
L1
N
UNBALANCE SWITCH
ALL SPI
LINES TO
OPTOISOLATORS
240VAC
3
4
2
1
3
2
1
5
4
6
8
7
9
10
11
12
5
4
3
6
7
12
13
10
14
11
2
1
8
9
COMM
SD SW
CV SW
CD1 SVDC
CD1
CD1 COMM
CD2 SVDC
CD2
CD2 COMM
PE
COMM
COMM
SVDC
24VDC
CRP
NBP
SVDC
COMM
COMM
NRFA
NAG
VUR
RXD
TXD
24VDC
SVDC
1
3
5
8
4
1
7
3
6
9
2
K1
K2
H2
VCC
SOMI
CLK
SIMO
GND
3
VUR
NETMASTER CONTROL
ASSEMBLY
1
4
5
2
6
3
CONTROL TRANSFORMER
(SEE CONNECTION DIAGRAM DETAIL
FOR OPTIONAL CARD READY AND COIN
READY TRANSFORMER WIRING.)
H5
100 OHM
1/4 WATT
100 OHM
1/4 WATT
H1
H4
H6
H7
BLK
WHT
WHT/BLU
RED/BLU
BLU/BLK
YEL
RED
YEL
WHT/RED
PNK/
BLK
WHT
BLK
WHT
GRY/BLK
WHT
WHTWHT/BLK
GRN/
YEL
BRN/YEL
RED/BLK
BLK/WHT
VLT/
WHT
RED/YEL
BRN/WHT
VLT
WHT/GRY
ORG/BLK
WHT
ORG
GRY
TAN/WHT
YEL/BLK
WHT
RED
BRN
BLU
PINK
BLK/YEL
TAN/WHT
ORG/BLU
GRY/BLK
WHT/RED
BLK/
YEL
WHT/
BLU
GRN/YEL
H3
K6
K4
1
H1
4
2
4N25
4N25
24 VAC
CONTROL
POWER
SUPPLY
24 VAC RETURN
24 VAC
2
4
START PULSE INPUT
INPUT LED ENERGIZED = START PULSE ACTIVE
I in = 9-30 ma TIME = 45 msec min.
AVAILABLE OUTPUT
OPTO OFF WHEN MACHINE RUNNING
Vmax = 28VDC Imax = 5ma
SECONDARY
DOOR
SWITCH
DOOR
SWITCH
(ON LOCK ASSY.)
DOOR
SWITCH
(ON LOCK ASSY.)
SEE
VEND
APPLICATION
DETAILS
(FOR
NETWORKED
APPLICATIONS
SEE
SUPPLIMENTAL
NETWORK
DIAGRAM)
FLW299S
3
2
1
800168 65
© Copyright, Alliance Laundry Systems LLC – DO NOT COPY or TRANSMIT
Section 3 Troubleshooting (NetMaster Models)
NO VISIBLE DISPLAY ON CONTROL
Page 68

Section 3 Troubleshooting (NetMaster Models)
30. WASHER WILL NOT START – NO DOOR LOCK
Washer Will Not Start. No Door Lock.
Washer will not
start. Vend
satisfied.
(1)
Is there 120 Volt
AC across "H4-5" and
"H6-5" on the control
board?
No
(2)
Is there voltage
to the blu/blk input wire
to the door switch on the
lock assembly?
No
(3)
Is there voltage
at the input blk wire coming
into the secondary
door switch?
Yes
Yes
Yes
Replace the Door
Lock Assembly.
Yes
(4)
Is there 120 Volt
AC across "H4-4" to "H6-5" on
the control board?
Replace the Door
Lock Assembly.
Replace the
secondary door
switch assembly.
No
No
(5)
Is there 120 Volt
AC across "H6-1" and "H6-5"
on the control board?
Yes
Replace the
Control Board.
No
Correct wiring to
the secondary
door switch.
66 800168
© Copyright, Alliance Laundry Systems LLC – DO NOT COPY or TRANSMIT
FLW300S
Page 69

WASHER WILL NOT START – NO DOOR LOCK
FIELD
25436 12
31245
DOOR LOCK
ACTUATOR
(MECHANICAL THERMAL
DELAY TO UNLOCK WHEN
DE-ENERGIZED)
(ON LOCK ASSY.)
1096 12
781
2
MOTOR DC
POWER SUPPLY
LOW VOLTAGE
CONTROL LOGIC
CIRCUIT
K2
K3
K1
FS1
ROTOR
TACH
76
H1
9
3
6
5
FS2
FS3
DV
SV
C
H
HOT
COLD
SOFTENER
DETERGENT/BLEACH
L1
PTC
PRESSURE
SWITCH
FULL
OVER
D1
D3 D2
A2
A1
PUMP
TG
FUS1
7 AMP
250 VOLT
MOTOR ASSY
4
83
H4 H3
H2 H5
MOTOR
CONTROL
ASSEMBLY
3
2
1
4
AUTO
TRANSFORMER
MOTOR
14 256
DOOR LOCK SENSING
CIRCUIT ALLOWS CONTROL
TO TURN ON RELAYS
K4 AND K6 ONLY
WHEN DOOR IS LOCKED
DOOR CLOSED SENSING
CIRCUIT ALLOWS CONTROL
TO TURN ON DOOR LOCK
MA
PS
20VAC
L1
N
UNBALANCE SWITCH
ALL SPI
LINES TO
OPTOISOLATORS
240VAC
3
4
2
1
3
2
1
5
4
6
8
7
9
10
11
12
5
4
3
6
7
12
13
10
14
11
2
1
8
9
COMM
SD SW
CV SW
CD1 SVDC
CD1
CD1 COMM
CD2 SVDC
CD2
CD2 COMM
PE
COMM
COMM
SVDC
24VDC
CRP
NBP
SVDC
COMM
COMM
NRFA
NAG
VUR
RXD
TXD
24VDC
SVDC
1
3
5
8
4
1
7
3
6
9
2
K1
K2
H2
VCC
SOMI
CLK
SIMO
GND
3
VUR
NETMASTER CONTROL
ASSEMBLY
1
4
5
2
6
3
CONTROL TRANSFORMER
(SEE CONNECTION DIAGRAM DETAIL
FOR OPTIONAL CARD READY AND COIN
READY TRANSFORMER WIRING.)
H5
100 OHM
1/4 WATT
100 OHM
1/4 WATT
H1
H4
H6
H7
BLK
WHT
WHT/BLU
RED/BLU
BLU/BLK
YEL
RED
YEL
WHT/RED
PNK/
BLK
WHT
BLK
WHT
GRY/BLK
WHT
WHTWHT/BLK
GRN/
YEL
BRN/YEL
RED/BLK
BLK/WHT
VLT/
WHT
RED/YEL
BRN/WHT
VLT
WHT/GRY
ORG/BLK
WHT
ORG
GRY
TAN/WHT
YEL/BLK
WHT
RED
BRN
BLU
PINK
BLK/YEL
TAN/WHT
ORG/BLU
GRY/BLK
WHT/RED
BLK/
YEL
WHT/
BLU
GRN/YEL
H3
K6
K4
1
H1
4
2
4N25
4N25
24 VAC
CONTROL
POWER
SUPPLY
24 VAC RETURN
24 VAC
2
4
START PULSE INPUT
INPUT LED ENERGIZED = START PULSE ACTIVE
I in = 9-30 ma TIME = 45 msec min.
AVAILABLE OUTPUT
OPTO OFF WHEN MACHINE RUNNING
Vmax = 28VDC Imax = 5ma
SECONDARY
DOOR
SWITCH
DOOR
SWITCH
(ON LOCK ASSY.)
DOOR
SWITCH
(ON LOCK ASSY.)
SEE
VEND
APPLICATION
DETAILS
(FOR
NETWORKED
APPLICATIONS
SEE
SUPPLIMENTAL
NETWORK
DIAGRAM)
FLW301S
1
5
4
2
3
800168 67
© Copyright, Alliance Laundry Systems LLC – DO NOT COPY or TRANSMIT
Section 3 Troubleshooting (NetMaster Models)
Page 70

Section 3 Troubleshooting (NetMaster Models)
Washer Will Not Start. Control Analysis.
Is there 120 Volt
AC across "H6-6" to "H6-5" on
the control board?
(1)
Yes
No
Refer to the
Washer Will Not Fill
section.
Replace the
control board.
FLW302S
31. WASHER WILL NOT START – CONTROL ANALYSIS
68 800168
© Copyright, Alliance Laundry Systems LLC – DO NOT COPY or TRANSMIT
Page 71

Section 3 Troubleshooting (NetMaster Models)
WASHER WILL NOT START – CONTROL ANALYSIS
800168 69
© Copyright, Alliance Laundry Systems LLC – DO NOT COPY or TRANSMIT
Page 72

Section 3 Troubleshooting (NetMaster Models)
Washer Will Not Fill.
Is there 120 Volt
AC across the input side of
the pressure switch to "FS2" on
the motor control board?
Correct wiring
between pressure
switch and control
board.
No
Is there 120 Volt
AC from the input side of the
mixing valves to "FS2" on the
motor control board?
Yes
(1)
(2)
(3)
Yes
Check for cracked
or broken wiring
at the pressure
switch. Change
inoperative
pressure switch.
Is there 120 Volt
AC from the input side of
the mixing valve to "H1-9" or "H1-3"
of the motor control board?
Yes
No
No
Change the motor
control board.
Change the mixing
valve.
FLW304S
32. WASHER WILL NOT FILL
70 800168
© Copyright, Alliance Laundry Systems LLC – DO NOT COPY or TRANSMIT
Page 73

Section 3 Troubleshooting (NetMaster Models)
FIELD
25436 12
31245
DOOR LOCK
ACTUATOR
(MECHANICAL THERMAL
DELAY TO UNLOCK WHEN
DE-ENERGIZED)
(ON LOCK ASSY.)
1096 12
781
2
MOTOR DC
POWER SUPPLY
LOW VOLTAGE
CONTROL LOGIC
CIRCUIT
K2
K3
K1
FS1
ROTOR
TACH
76
H1
9
3
6
5
FS2
FS3
DV
SV
C
H
HOT
COLD
SOFTENER
DETERGENT/BLEACH
L1
PTC
PRESSURE
SWITCH
FULL
OVER
D1
D3 D2
A2
A1
PUMP
TG
FUS1
7 AMP
250 VOLT
MOTOR ASSY
4
83
H4 H3
H2 H5
MOTOR
CONTROL
ASSEMBLY
3
2
1
4
AUTO
TRANSFORMER
MOTOR
14 256
DOOR LOCK SENSING
CIRCUIT ALLOWS CONTROL
TO TURN ON RELAYS
K4 AND K6 ONLY
WHEN DOOR IS LOCKED
DOOR CLOSED SENSING
CIRCUIT ALLOWS CONTROL
TO TURN ON DOOR LOCK
MA
PS
20VAC
L1
N
UNBALANCE SWITCH
ALL SPI
LINES TO
OPTOISOLATORS
240VAC
3
4
2
1
3
2
1
5
4
6
8
7
9
10
11
12
5
4
3
6
7
12
13
10
14
11
2
1
8
9
COMM
SD SW
CV SW
CD1 SVDC
CD1
CD1 COMM
CD2 SVDC
CD2
CD2 COMM
PE
COMM
COMM
SVDC
24VDC
CRP
NBP
SVDC
COMM
COMM
NRFA
NAG
VUR
RXD
TXD
24VDC
SVDC
1
3
5
8
4
1
7
3
6
9
2
K1
K2
H2
VCC
SOMI
CLK
SIMO
GND
3
VUR
NETMASTER CONTROL
ASSEMBLY
1
4
5
2
6
3
CONTROL TRANSFORMER
(SEE CONNECTION DIAGRAM DETAIL
FOR OPTIONAL CARD READY AND COIN
READY TRANSFORMER WIRING.)
H5
100 OHM
1/4 WATT
100 OHM
1/4 WATT
H1
H4
H6
H7
BLK
WHT
WHT/BLU
RED/BLU
BLU/BLK
YEL
RED
YEL
WHT/RED
PNK/
BLK
WHT
BLK
WHT
GRY/BLK
WHT
WHTWHT/BLK
GRN/
YEL
BRN/YEL
RED/BLK
BLK/WHT
VLT/
WHT
RED/YEL
BRN/WHT
VLT
WHT/GRY
ORG/BLK
WHT
ORG
GRY
TAN/WHT
YEL/BLK
WHT
RED
BRN
BLU
PINK
BLK/YEL
TAN/WHT
ORG/BLU
GRY/BLK
WHT/RED
BLK/
YEL
WHT/
BLU
GRN/YEL
H3
K6
K4
1
H1
4
2
4N25
4N25
24 VAC
CONTROL
POWER
SUPPLY
24 VAC RETURN
24 VAC
2
4
START PULSE INPUT
INPUT LED ENERGIZED = START PULSE ACTIVE
I in = 9-30 ma TIME = 45 msec min.
AVAILABLE OUTPUT
OPTO OFF WHEN MACHINE RUNNING
Vmax = 28VDC Imax = 5ma
SECONDARY
DOOR
SWITCH
DOOR
SWITCH
(ON LOCK ASSY.)
DOOR
SWITCH
(ON LOCK ASSY.)
SEE
VEND
APPLICATION
DETAILS
(FOR
NETWORKED
APPLICATIONS
SEE
SUPPLIMENTAL
NETWORK
DIAGRAM)
FLW305S
1
2
3
WASHER WILL NOT FILL
800168 71
© Copyright, Alliance Laundry Systems LLC – DO NOT COPY or TRANSMIT
Page 74

Section 3 Troubleshooting (NetMaster Models)
Washer Overflows
Is there voltage
to the over level
terminal on pressure
switch to "FS2"?
Yes
No
Replace
inoperative
pressure switch.
Is there voltage
across the coil of
either the hot or cold
water solenoid?
Yes
No
Check for
improper wiring
and replace
inoperative
pressure switch
if necessary.
Replace
inoperative water
valve.
(1)
(2)
FLW306S
33. WASHER OVERFLOWS
72 800168
© Copyright, Alliance Laundry Systems LLC – DO NOT COPY or TRANSMIT
Page 75

Section 3 Troubleshooting (NetMaster Models)
FIELD
25436 12
31245
DOOR LOCK
ACTUATOR
(MECHANICAL THERMAL
DELAY TO UNLOCK WHEN
DE-ENERGIZED)
(ON LOCK ASSY.)
1096 12
781
2
MOTOR DC
POWER SUPPLY
LOW VOLTAGE
CONTROL LOGIC
CIRCUIT
K2
K3
K1
FS1
ROTOR
TACH
76
H1
9
3
6
5
FS2
FS3
DV
SV
C
H
HOT
COLD
SOFTENER
DETERGENT/BLEACH
L1
PTC
PRESSURE
SWITCH
FULL
OVER
D1
D3 D2
A2
A1
PUMP
TG
FUS1
7 AMP
250 VOLT
MOTOR ASSY
4
83
H4 H3
H2 H5
MOTOR
CONTROL
ASSEMBLY
3
2
1
4
AUTO
TRANSFORMER
MOTOR
14 256
DOOR LOCK SENSING
CIRCUIT ALLOWS CONTROL
TO TURN ON RELAYS
K4 AND K6 ONLY
WHEN DOOR IS LOCKED
DOOR CLOSED SENSING
CIRCUIT ALLOWS CONTROL
TO TURN ON DOOR LOCK
MA
PS
20VAC
L1
N
UNBALANCE SWITCH
ALL SPI
LINES TO
OPTOISOLATORS
240VAC
3
4
2
1
3
2
1
5
4
6
8
7
9
10
11
12
5
4
3
6
7
12
13
10
14
11
2
1
8
9
COMM
SD SW
CV SW
CD1 SVDC
CD1
CD1 COMM
CD2 SVDC
CD2
CD2 COMM
PE
COMM
COMM
SVDC
24VDC
CRP
NBP
SVDC
COMM
COMM
NRFA
NAG
VUR
RXD
TXD
24VDC
SVDC
1
3
5
8
4
1
7
3
6
9
2
K1
K2
H2
VCC
SOMI
CLK
SIMO
GND
3
VUR
NETMASTER CONTROL
ASSEMBLY
1
4
5
2
6
3
CONTROL TRANSFORMER
(SEE CONNECTION DIAGRAM DETAIL
FOR OPTIONAL CARD READY AND COIN
READY TRANSFORMER WIRING.)
H5
100 OHM
1/4 WATT
100 OHM
1/4 WATT
H1
H4
H6
H7
BLK
WHT
WHT/BLU
RED/BLU
BLU/BLK
YEL
RED
YEL
WHT/RED
PNK/
BLK
WHT
BLK
WHT
GRY/BLK
WHT
WHTWHT/BLK
GRN/
YEL
BRN/YEL
RED/BLK
BLK/WHT
VLT/
WHT
RED/YEL
BRN/WHT
VLT
WHT/GRY
ORG/BLK
WHT
ORG
GRY
TAN/WHT
YEL/BLK
WHT
RED
BRN
BLU
PINK
BLK/YEL
TAN/WHT
ORG/BLU
GRY/BLK
WHT/RED
BLK/
YEL
WHT/
BLU
GRN/YEL
H3
K6
K4
1
H1
4
2
4N25
4N25
24 VAC
CONTROL
POWER
SUPPLY
24 VAC RETURN
24 VAC
2
4
START PULSE INPUT
INPUT LED ENERGIZED = START PULSE ACTIVE
I in = 9-30 ma TIME = 45 msec min.
AVAILABLE OUTPUT
OPTO OFF WHEN MACHINE RUNNING
Vmax = 28VDC Imax = 5ma
SECONDARY
DOOR
SWITCH
DOOR
SWITCH
(ON LOCK ASSY.)
DOOR
SWITCH
(ON LOCK ASSY.)
SEE
VEND
APPLICATION
DETAILS
(FOR
NETWORKED
APPLICATIONS
SEE
SUPPLIMENTAL
NETWORK
DIAGRAM)
FLW307S
2 1
WASHER OVERFLOWS
800168 73
© Copyright, Alliance Laundry Systems LLC – DO NOT COPY or TRANSMIT
Page 76

Section 3 Troubleshooting (NetMaster Models)
Pump Does Not Operate
Is there voltage
across the wht/blk and
the white wire going to
the motor?
Is there voltage
across terminals
"H6-2" and "H6-5?"
NOTE: Check at
beginning of spin/drain
portion of cycle.
If the pump does
not operate check
for blockage.
Replace if
necessary.
Correct wiring
between control
and pump.
Replace control
assembly.
(1)
(2)
No
Yes
No
Yes
FLW308S
34. PUMP DOES NOT OPERATE
74 800168
© Copyright, Alliance Laundry Systems LLC – DO NOT COPY or TRANSMIT
Page 77

Section 3 Troubleshooting (NetMaster Models)
FIELD
25436 12
31245
DOOR LOCK
ACTUATOR
(MECHANICAL THERMAL
DELAY TO UNLOCK WHEN
DE-ENERGIZED)
(ON LOCK ASSY.)
1096 12
781
2
MOTOR DC
POWER SUPPLY
LOW VOLTAGE
CONTROL LOGIC
CIRCUIT
K2
K3
K1
FS1
ROTOR
TACH
76
H1
9
3
6
5
FS2
FS3
DV
SV
C
H
HOT
COLD
SOFTENER
DETERGENT/BLEACH
L1
PTC
PRESSURE
SWITCH
FULL
OVER
D1
D3 D2
A2
A1
PUMP
TG
FUS1
7 AMP
250 VOLT
MOTOR ASSY
4
83
H4 H3
H2 H5
MOTOR
CONTROL
ASSEMBLY
3
2
1
4
AUTO
TRANSFORMER
MOTOR
14 256
DOOR LOCK SENSING
CIRCUIT ALLOWS CONTROL
TO TURN ON RELAYS
K4 AND K6 ONLY
WHEN DOOR IS LOCKED
DOOR CLOSED SENSING
CIRCUIT ALLOWS CONTROL
TO TURN ON DOOR LOCK
MA
PS
20VAC
L1
N
UNBALANCE SWITCH
ALL SPI
LINES TO
OPTOISOLATORS
240VAC
3
4
2
1
3
2
1
5
4
6
8
7
9
10
11
12
5
4
3
6
7
12
13
10
14
11
2
1
8
9
COMM
SD SW
CV SW
CD1 SVDC
CD1
CD1 COMM
CD2 SVDC
CD2
CD2 COMM
PE
COMM
COMM
SVDC
24VDC
CRP
NBP
SVDC
COMM
COMM
NRFA
NAG
VUR
RXD
TXD
24VDC
SVDC
1
3
5
8
4
1
7
3
6
9
2
K1
K2
H2
VCC
SOMI
CLK
SIMO
GND
3
VUR
NETMASTER CONTROL
ASSEMBLY
1
4
5
2
6
3
CONTROL TRANSFORMER
(SEE CONNECTION DIAGRAM DETAIL
FOR OPTIONAL CARD READY AND COIN
READY TRANSFORMER WIRING.)
H5
100 OHM
1/4 WATT
100 OHM
1/4 WATT
H1
H4
H6
H7
BLK
WHT
WHT/BLU
RED/BLU
BLU/BLK
YEL
RED
YEL
WHT/RED
PNK/
BLK
WHT
BLK
WHT
GRY/BLK
WHT
WHTWHT/BLK
GRN/
YEL
BRN/YEL
RED/BLK
BLK/WHT
VLT/
WHT
RED/YEL
BRN/WHT
VLT
WHT/GRY
ORG/BLK
WHT
ORG
GRY
TAN/WHT
YEL/BLK
WHT
RED
BRN
BLU
PINK
BLK/YEL
TAN/WHT
ORG/BLU
GRY/BLK
WHT/RED
BLK/
YEL
WHT/
BLU
GRN/YEL
H3
K6
K4
1
H1
4
2
4N25
4N25
24 VAC
CONTROL
POWER
SUPPLY
24 VAC RETURN
24 VAC
2
4
START PULSE INPUT
INPUT LED ENERGIZED = START PULSE ACTIVE
I in = 9-30 ma TIME = 45 msec min.
AVAILABLE OUTPUT
OPTO OFF WHEN MACHINE RUNNING
Vmax = 28VDC Imax = 5ma
SECONDARY
DOOR
SWITCH
DOOR
SWITCH
(ON LOCK ASSY.)
DOOR
SWITCH
(ON LOCK ASSY.)
SEE
VEND
APPLICATION
DETAILS
(FOR
NETWORKED
APPLICATIONS
SEE
SUPPLIMENTAL
NETWORK
DIAGRAM)
FLW309S
2
1
PUMP DOES NOT OPERATE
800168 75
© Copyright, Alliance Laundry Systems LLC – DO NOT COPY or TRANSMIT
Page 78

Section 3 Troubleshooting (NetMaster Models)
Replace
motor.
Is
120 Volt AC
present at terminals
1-3 on transformer?
Is
240 Volt
present on the
motor control at terminals
FS3 to FS2?
Is
20 Volt AC
present on the motor
control at terminals
H1-7 to FS2?
Is
120 Volt AC
present at terminals
H6-6 to H6-5 on the
electronic display?
Replace
electronic
control.
(1)
YES
YES
YES
NO
NO
NO
NO
Using an Ohmmeter,
check white wire and brown/
yellow wire coming into
transformer for broken/poor
connection.
YES
Using an Ohmmeter, check
red wire from transformer
to FS3 on motor control
board for broken wire/poor
connection. If none found,
replace transformer.
Using an Ohmmeter,
check red/black wire
from transformer to H1-7
on motor control board
for broken wire/poor
connection. If none
found, replace
transformer.
(2)
Is there
continuity?
Check continuity at terminal strip on motor:
TACH INPUT Terminals 6-7 Approximately 15 Ohms
BRUSHES Terminals 4-5 Less than 70 Ohms
Winding Terminals 1-3 Approximately 1.1 Ohms
Winding Terminals 1-2 Approximately 2.0-2.4 Ohms
Winding Terminals 2-3 Approximately 3.4 Ohms
*Resistance values may vary
depending on type of meter used.
NO
Replace
motor.
YES
MOTOR
Using an
Ohmmeter, check
for continuity between each
terminal and the motor
housing.
NO
Is there
continuity?
YES
(3)
(4)
Is
there continuity
through the motor harness
from plug H-2 and H-5 on the motor
control, to the plug at the
motor?
NO
Replace
harness.
YES
Is the
fuse blown on the
motor control
board?
YES
Replace
fuse.
NO
Does
the machine
run now?
Replace motor
control board.
NO
Replace motor
control board.
TRANSFORMER
35. DOOR LOCKED, MOTOR DOES NOT RUN (E:DF ON DISPLAY)
76 800168
© Copyright, Alliance Laundry Systems LLC – DO NOT COPY or TRANSMIT
Page 79

Section 3 Troubleshooting (NetMaster Models)
2
1
4
3
DOOR LOCKED, MOTOR DOES NOT RUN (E:DF ON DISPLAY)
BLK
L1
H5
3
4
2
1
100 OHM
1/4 WATT
H7
COMM
3
SD SW
2
CV SW
SEE
VEND
APPLICATION
DETAILS
(FOR
NETWORKED
APPLICATIONS
SEE
SUPPLIMENTAL
NETWORK
DIAGRAM)
3
AUTO
1
2
4
20VAC
240VAC
MOTOR
TRANSFORMER
WHT
1
CD1 SVDC
5
CD1
4
CD1 COMM
6
CD2 SVDC
8
CD2
7
CD2 COMM
9
PE
10
COMM
11
COMM
12
H1
2
4
H3
TXD
5
RXD
4
VUR
3
NAG
6
NRFA
7
COMM
12
COMM
13
SVDC
10
NBP
14
CRP
11
24VDC
1
SVDC
2
24VDC
8
SVDC
9
VCC
SOMI
14 256
H2
RED/YEL
BRN/WHT
83
ALL SPI
LINES TO
OPTOISOLATORS
MOTOR
CONTROL
ASSEMBLY
GRN/YEL
4N25
100 OHM
1/4 WATT
4N25
CIRCUIT ALLOWS CONTROL
NETMASTER CONTROL
CLK
VLT
LOW VOLTAGE
CONTROL LOGIC
FS1
VUR
SIMO
GND
3
WHT/GRY
ORG/BLK
H4 H3
109 612
CIRCUIT
SECONDARY
DOOR
SWITCH
AVAILABLE OUTPUT
OPTO OFF WHEN MACHINE RUNNING
Vmax = 28VDC Imax = 5ma
START PULSE INPUT
INPUT LED ENERGIZED = START PULSE ACTIVE
I in = 9-30 ma TIME = 45 msec min.
DOOR CLOSED SENSING
CIRCUIT ALLOWS CONTROL
TO TURN ON DOOR LOCK
DOOR LOCK SENSING
TO TURN ON RELAYS
K4 AND K6 ONLY
WHEN DOOR IS LOCKED
24 VAC RETURN
24 VAC
ASSEMBLY
RED/BLK
BRN/YEL
BLK/WHT
UNBALANCE SWITCH
VLT/
WHT
MOTOR DC
POWER SUPPLY
K3
K1
25436 12
1
BLU
BRN
PINK
31245
D3 D2
D1
FIELD
BLU/BLK
CONTROL
POWER
SUPPLY
K2
BLK/YEL
A2
ROTOR
MOTOR ASSY
K1
K2
K6
K4
ORG/BLU
A1
DOOR
SWITCH
(ON LOCK ASSY.)
H1
4
2
3
1
5
8
4
1
H4
7
3
BLK
6
9
WHT
2
1
4
5
H6
2
6
3
L1
MA
PTC
781
FUS1
7 AMP
250 VOLT
H2 H5
2
TAN/WHT
76
TG
TACH
GRY/BLK
WHT/BLU
RED/BLU
GRY/BLK
GRN/
YEL
PS
4
24 VAC
YEL
YEL
WHT/RED
RED
DOOR
SWITCH
(ON LOCK ASSY.)
PRESSURE
FULL
WHT/
BLU
H1
9
ORG
HOT
H
3
GRY
C
6
TAN/WHT
SV
5
FS2
FS3
YEL/BLK
DV
RED
OVER
COLD
SOFTENER
WHT
SWITCH
BLK/
DETERGENT/BLEACH
YEL
WHT
CONTROL TRANSFORMER
(SEE CONNECTION DIAGRAM DETAIL
FOR OPTIONAL CARD READY AND COIN
READY TRANSFORMER WIRING.)
DOOR LOCK
ACTUATOR
(MECHANICAL THERMAL
DELAY TO UNLOCK WHEN
DE-ENERGIZED)
(ON LOCK ASSY.)
PNK/
BLK
WHT
WHT/RED
N
WHT
WHTWHT/BLK
PUMP
800168 77
© Copyright, Alliance Laundry Systems LLC – DO NOT COPY or TRANSMIT
FLW309S
Page 80

Section 3 Troubleshooting (NetMaster Models)
78 800168
© Copyright, Alliance Laundry Systems LLC – DO NOT COPY or TRANSMIT
Page 81

To reduce the risk of electric shock, fire, explosion, serious injury or death:
• Disconnect electric power to the washer before servicing.
• Never start the washer with any guards/panels removed.
• Whenever ground wires are removed during servicing, these ground wires must be
reconnected to ensure that the washer is properly grounded.
W003
WARNING
Section 4
NOTE: Have a qualified
electrician check polarity of
wall receptacle. If a voltage
reading is measured other
than that illustrated, the
qualified electrician should
correct the problem.
Grounding
36. WALL RECEPTACLE POLARITY CHECK.
(Figure 15).
Neutral
Side
Round
Grounding
Prong
L1
115±12
V.A.C.
Figure 15
Ground
115±12
V.A.C.
Neutral
0
V.A.C.
W011GE3A
800168 79
© Copyright, Alliance Laundry Systems LLC – DO NOT COPY or TRANSMIT
Page 82

Section 4 Grounding
To reduce the risk of electric shock, fire, explosion, serious injury or death:
• Disconnect electric power to the washer before servicing.
• Never start the washer with any guards/panels removed.
• Whenever ground wires are removed during servicing, these ground wires must be
reconnected to ensure that the washer is properly grounded.
W003
WARNING
1234567
89101112
37. MACHINE GROUND CONNECTIONS
(Figure 16)
Ground to Electronic Control
Ground to Control Panel Assembly
Ground to Control Cabinet
Ground to Motor Control Board
Ground to Control Shield
Ground Power Cord to Control Cabinet Wrapper
Grounding Hardware to Control Cabinet Wrapper
Ground to Motor
Ground to Electric Drain Pump
Ground to Motor Bracket
Ground to Outer Tub
Ground to Outer Tub Front
80 800168
© Copyright, Alliance Laundry Systems LLC – DO NOT COPY or TRANSMIT
Page 83

Section 4 Grounding
FLW1162G
1
2
3
4
5
6
7
8
9
10
11
12
800168 81
© Copyright, Alliance Laundry Systems LLC – DO NOT COPY or TRANSMIT
Figure 16
Page 84

Section 4 Grounding
82 800168
© Copyright, Alliance Laundry Systems LLC – DO NOT COPY or TRANSMIT
Page 85

To reduce the risk of electric shock, fire, explosion, serious injury or death:
• Disconnect electric power to the washer before servicing.
• Never start the washer with any guards/panels removed.
• Whenever ground wires are removed during servicing, these ground wires must be
reconnected to ensure that the washer is properly grounded.
W003
WARNING
Section 5
Service Procedures
IMPORTANT: When reference is made to
directions (right or left) in this manual, it is from
operator’s position facing front of washer.
38. CONTROL PANEL
IMPORTANT: Due to the sensitivity of the
electronic control, careful handling is required. As a
precautionary measure, we recommend using a
ground wrist strap when handling the electronic
control. Wrist strap, cord and alligator clip are
designed to carry away any electrostatic charge
from your body and to direct charge to an available
ground. By using this static protection device,
potential electrostatic discharge problems
associated with handling of electronic control will
be minimized. Always handle electronic control by
its metal edges. If a wrist strap is not available,
touch washer while it is plugged in before handling
control to dissipate any charge.
STEP 1
Unlock control panel.
.
Move top of control panel away
from control cabinet and lift up.
STEP 2
a. Unlock control panel. Refer to Figure 17, Step
1.
b. Pull top of control panel away from control
cabinet far enough to allow lifting control panel
up and off the rail support of the control
cabinet. Refer to Figure 17, Step 2.
c. Remove control panel away from control
cabinet as far as wires permit. Refer to
Figure 17, Step 3.
d. While supporting control panel, disconnect all
wires and harness connectors from electronic
control and indicator light.
NOTE: DO NOT pull on wires. Instead, hold board
near appropriate disconnect block and unplug by
pulling on disconnect block.
e. Remove ground clip holding ground wire to
control panel.
NOTE: Refer to wiring diagram when reconnecting
wires.
.
Remove control panel
out of control cabinet.
STEP 3.
Figure 17
800168 83
© Copyright, Alliance Laundry Systems LLC – DO NOT COPY or TRANSMIT
H099SE3A
Page 86

Section 5 Service Procedures
To reduce the risk of electric shock, fire, explosion, serious injury or death:
• Disconnect electric power to the washer before servicing.
• Never start the washer with any guards/panels removed.
• Whenever ground wires are removed during servicing, these ground wires must be
reconnected to ensure that the washer is properly grounded.
W003
WARNING
LOCK
ASSEMBLY
SCREW
CONTROL
PANEL
OVERLAY
CONTROL PANEL
ASSEMBLY
INDICATOR
LIGHT
ELECTRONIC
CONTROL
CAM
39. INDICATOR LIGHT
(Door Locked)
a. Unlock control panel. Refer to Figure 17, Step
1.
b. Pull top of control panel away from control
cabinet far enough to allow lifting control panel
up and off the rail support of the control
cabinet. Refer to Figure 17, Step 2.
c. Remove control panel away from control
cabinet as far as wires permit. Refer to
Figure 17, Step 3.
d. While supporting control panel, disconnect
wires from indicator light.
NOTE: Refer to wiring diagram when rewiring
light.
e. Squeeze locking tabs together and pull light out
rear of control panel. Refer to Figure 18.
3
1
2
Figure 18
84 800168
© Copyright, Alliance Laundry Systems LLC – DO NOT COPY or TRANSMIT
FLW1652S
Page 87

Section 5 Service Procedures
To reduce the risk of electric shock, fire, explosion, serious injury or death:
• Disconnect electric power to the washer before servicing.
• Never start the washer with any guards/panels removed.
• Whenever ground wires are removed during servicing, these ground wires must be
reconnected to ensure that the washer is properly grounded.
W003
WARNING
40. ELECTRONIC CONTROL
g. While holding new control by its metal edges,
place control in opening of control panel and
IMPORTANT: Due to the sensitivity of the
electronic control, careful handling is required. As a
fasten control down with four screws removed
in step “e”. Refer to Figure 18.
precautionary measure, we recommend using a
ground wrist strap when handling the electronic
control. Wrist strap, cord and alligator clip are
designed to carry away any electrostatic charge
NOTE: For proper control alignment, tighten the
top two screws first then tighten the bottom screws.
Refer to Figure 18.
from your body and to direct charge to an available
ground. By using this static protection device,
potential electrostatic discharge problems
associated with handling of electronic control will
be minimized. Always handle electronic control by
its metal edges. If a wrist strap is not available,
touch washer while it is plugged in before handling
control to dissipate any charge.
NOTE: New control is supplied in a special anti-
h. Follow wiring diagram and reconnect wires to
new control.
IMPORTANT: It is important to take care when
handling the original control. It must be carefully
placed in the anti-static wrapping and anti-static
foam which was removed from new control. If
control is not wrapped properly, warranty credit
will not be issued.
static wrapping, and protected by anti-static foam.
While holding control by its metal edges, remove
control from foam and wrapping.
a. Unlock control panel. Refer to Figure 17, Step
1.
b. Pull top of control panel away from control
cabinet far enough to allow lifting control panel
up and off the rail support of the control
cabinet. Refer to Figure 17, Step 2.
c. Remove control panel away from control
cabinet as far as wires permit. Refer to
Figure 17, Step 3.
d. While supporting control panel, press in on
locking tabs and unplug harness disconnect
blocks from backside of electronic control.
NOTE: DO NOT pull on wires. Instead, hold board
near appropriate disconnect block and unplug by
pulling on disconnect block.
e. Remove four screws holding electronic control
assembly to backside of control panel. Refer to
Figure 18.
f. Place the old control in the anti-static wrapping
that the new control was supplied in.
41. CONTROL PANEL OVERLAY
IMPORTANT: Due to the sensitivity of the
electronic control, careful handling is required. As a
precautionary measure, we recommend using a
ground wrist strap when handling the electronic
control. Wrist strap, cord and alligator clip are
designed to carry away any electrostatic charge
from your body and to direct charge to an available
ground. By using this static protection device,
potential electrostatic discharge problems
associated with handling of electronic control will
be minimized. Always handle electronic control by
its metal edges. If a wrist strap is not available,
touch washer while it is plugged in before handling
control to dissipate any charge.
a. Removal:
(1) Unlock control panel. Refer to Figure 17,
Step 1.
(2) Pull top of control panel away from control
cabinet far enough to allow lifting control
panel up and off the rail support of the
control cabinet. Refer to Figure 17, Step 2.
(3) Remove control panel away from control
cabinet as far as wires permit. Refer to
Figure 17, Step 3.
800168 85
© Copyright, Alliance Laundry Systems LLC – DO NOT COPY or TRANSMIT
Page 88

Section 5 Service Procedures
To reduce the risk of electric shock, fire, explosion, serious injury or death:
• Disconnect electric power to the washer before servicing.
• Never start the washer with any guards/panels removed.
• Whenever ground wires are removed during servicing, these ground wires must be
reconnected to ensure that the washer is properly grounded.
W003
WARNING
3
2
1
FLW1653S
SPEED
NUTS
SCREWS
WITH
LOCKWASHER
(4) Support control panel, press in on locking
tabs and unplug harness disconnect blocks
from backside of electronic control.
NOTE: DO NOT pull on wires. Instead, hold board
near appropriate disconnect block and unplug by
pulling on disconnect block.
(5) Remove four screws holding electronic
control assembly to backside of control
panel. Refer to Figure 18.
(6) Remove lock assembly from control panel.
Refer to Figure 18. Remove control panel
overlay by peeling it from the control panel
assembly.
NOTE: Control panel overlay has an adhesive
backing.
b. Installation:
NOTE: Before removing protective backing from
new overlay, check fit of overlay to control panel
assembly. Refer to Figure 18. Use the lock hole in
the control panel as the locating guide.
(1) Once panel overlay is fitted to the front of
control panel frame, carefully peel
protective backing from the left end of
panel overlay and press into place.
(2) Remove rest of protective backing from
panel overlay and press overlay into place
on control panel assembly.
(3) While holding control by its metal edges,
place control in opening of control panel
and fasten control down with four screws.
Refer to Figure 18.
(4) Follow wiring diagram and reconnect
wires to control.
42. CABINET TOP
a. Unlock control panel. Refer to Figure 17, Step
1.
b. Pull top of control panel away from control
cabinet far enough to allow lifting control panel
up and off the rail support of the control
cabinet. Refer to Figure 17, Step 2.
c. Remove control panel away from control
cabinet as far as wires permit. Refer to
Figure 17, Step 3.
d. Remove two screws holding front of cabinet
top to top front edge of control cabinet front.
Refer to Figure 19.
e. If area or space permits, lift cabinet top to a
vertical position by hinging it on the rear
hinges.
NOTE: To avoid damage to hinges, be sure to
support cabinet top with a small chain or something
similar. Refer to Figure 21.
f. Remove cabinet top from washer by removing
nuts and carriage bolts holding cabinet top and
hinges to control cabinet. Refer to Figure 20.
g. Carefully lift cabinet top off washer and set out
of the way to prevent damage.
IMPORTANT: It is important to use care when
handling the control.
(5) Reinstall control panel in control cabinet
and lock control panel.
86 800168
© Copyright, Alliance Laundry Systems LLC – DO NOT COPY or TRANSMIT
Figure 19
Page 89

H044PE3A
NUT
SCREW
SCREW
NUT
CONTROL
CABINET
SECURITY
TOP PANEL
SPEED
NUT
CARRIAGE
BOLT
CARRIAGE
BOLT
CABINET
TOP
Section 5 Service Procedures
800168 87
© Copyright, Alliance Laundry Systems LLC – DO NOT COPY or TRANSMIT
Figure 20
Page 90

Section 5 Service Procedures
To reduce the risk of electric shock, fire, explosion, serious injury or death:
• Disconnect electric power to the washer before servicing.
• Never start the washer with any guards/panels removed.
• Whenever ground wires are removed during servicing, these ground wires must be
reconnected to ensure that the washer is properly grounded.
W003
WARNING
3
2
1
FLW1654S
SECURITY
PANEL
CABINET
TOP
WIRE, ROPE
OR CHAIN
SCREWS
CARRIAGE
BOLT
NUT
43. COIN DROP
a. Removal:
(1) Unlock control panel. Refer to Figure 17,
Step 1.
(2) Pull top of control panel away from control
cabinet far enough to allow lifting control
panel up and off the rail support of the
control cabinet front. Refer to Figure 17,
Step 2.
(3) Remove control panel away from control
cabinet as far as wires permit. Refer to
Figure 17, Step 3.
(4) Remove 2 screws holding front of cabinet
top to top front edge of control cabinet
front. Refer to Figure 19.
(5) If area or space permits, lift cabinet top to
a vertical position by hinging it on the rear
hinges.
NOTE: To avoid damage to hinges, be sure to
support cabinet top with a small chain or something
similar. Refer to Figure 21.
(6) If equipped with security top panel,
remove screws and carriage bolt holding
panel to control cabinet front. Refer to
Figure 21. Slide security top panel back
just far enough to disengage tabs on panel
from control cabinet front and remove
security panel. Refer to Figure 21.
(7) Disconnect coin drop harness at disconnect
block.
(8) Use a 3/8 inch square drive socket, with
number 310P4–quarter inch Ratchet
Extension Tool, to remove 2 locknuts
holding coin drop to front of control
cabinet.
NOTE: A 3/8 inch square drive socket, size 7/16
inch, fits over end of the 310P4 Extension Tool. A
1/4 inch ratchet fits in the other end. Refer to
Figure 22.
Figure 21
(9) Lift back end of coin drop and pull drop
straight back until front edge of the drop’s
front face plate clears the 2 guide wires.
(10) Carefully slide drop straight back until
drop clears inside wall of control cabinet.
Carefully remove drop out through top of
control cabinet.
88 800168
© Copyright, Alliance Laundry Systems LLC – DO NOT COPY or TRANSMIT
Page 91

Section 5 Service Procedures
H111SE3A
Guide
Wires
Coin
Drop
Locknut
Coin
Drawer
Housing
Control
Cabinet
Front
Disconnect
Block
3/8 Inch
Square Drive
7/16 Inch
Socket
No. 310P4
1/4 Inch
Ratchet
Extension
Tool
1/4 Inch
Ratchet
Figure 22
800168 89
© Copyright, Alliance Laundry Systems LLC – DO NOT COPY or TRANSMIT
Page 92

Section 5 Service Procedures
To reduce the risk of electric shock, fire, explosion, serious injury or death:
• Disconnect electric power to the washer before servicing.
• Never start the washer with any guards/panels removed.
• Whenever ground wires are removed during servicing, these ground wires must be
reconnected to ensure that the washer is properly grounded.
W003
WARNING
b. Installation:
(1) Lift coin drop up on coin drawer housing.
(2) Line up holes in the front face plate of coin
drop with the 2 guide wires. Slide coin
drop forward, making sure guide wires are
through holes in front face plate of coin
drop.
(3) Slide coin drop forward all the way until
front face plate of coin drop is up against
the control cabinet front, with the coin
return stop completely through slot.
(4) Using a 3/8 inch square drive 7/16 inch
socket with number 310P4 1/4 inch
Ratchet extension Tool, reinstall both
locknuts and tighten locknuts firmly.
(5) Reconnect coin drop wire harness.
(6) Reinstall security top panel and secure
using screws and carriage bolt previously
removed.
(7) Lower cabinet top into position and
reinstall 2 screws (previously removed)
holding cabinet top to top front edge of
NOTE: To avoid damage to hinges, be sure to
support cabinet top with a small chain or something
similar. Refer to Figure 21.
(6) Remove screws and carriage bolt holding
security top panel to control cabinet front.
Refer to Figure 21. Slide security top panel
back just far enough to disengage tabs on
panel from control cabinet front and
remove security panel. Refer to Figure 21.
(7) Disconnect card reader harness at
disconnect block.
(8) Use a 3/8 inch square drive socket, with
number 310P4 1/4 inch Ratchet Extension
Tool, to remove screws or nuts holding
card reader to control cabinet front and
carefully remove card reader out through
top of control cabinet. Refer to Figure 23.
NOTE: A 3/8 inch square drive socket, size 7/16
inch, fits over end of the 310P4 Extension Tool. A
1/4 inch ratchet fits in the other end. Refer to
Figure 23.
control cabinet front. Refer to Figure 19.
(8) Reinstall control panel in control cabinet
and lock control panel.
b. Installation:
(1) Carefully place card reader into opening in
control cabinet front.
44. CARD READER
a. Removal:
(1) Unlock control panel. Refer to Figure 17,
Step 1.
(2) Pull top of control panel away from control
cabinet far enough to allow lifting control
panel up and off the rail support of the
control cabinet front. Refer to Figure 17,
Step 2.
(3) Remove control panel away from control
cabinet as far as wires permit. Refer to
Figure 17, Step 3.
(4) Remove 2 screws holding front of cabinet
top to top front edge of control cabinet
front. Refer to Figure 19.
(5) If area or space permits, lift cabinet top to
a vertical position by hinging it on the rear
(2) Using a 3/8 inch square drive 7/16 inch
socket with number 310P4 1/4 inch
Ratchet Extension Tool, secure card reader
to control cabinet front with screws or nuts
previously removed. Refer to Figure 23.
Then tighten screws or nuts firmly.
(3) Reconnect card reader harness.
(4) Reinstall security top panel and secure
using screws and carriage bolt previously
removed.
(5) Lower cabinet top into position nd reinstall
2 screws (previously removed) holding
cabinet top to top front edge of control
cabinet front. Refer to Figure 19.
(6) Reinstall control panel in control cabinet
and lock control panel.
hinges.
90 800168
© Copyright, Alliance Laundry Systems LLC – DO NOT COPY or TRANSMIT
Page 93

H048P
C
ardM
a
te
System
INSERT
CARD HERE
FLW1025S
MODELS EQUIPPED
WITH 39685
CARD READER
MODELS EQUIPPED
WITH 510068
CARD READER
CARD
READER
CARD
READER
ATTACHING
SCREW
CONTROL
CABINET
WRAPPER
CONTROL
CABINET
FRONT
H048P
CARD
READER
CARD
READER
ATTACHI NG
NUT
CONTROL
CABINET
WRAPPER
CONTROL
CABINET
FRONT
FLW1025S
Section 5 Service Procedures
800168 91
© Copyright, Alliance Laundry Systems LLC – DO NOT COPY or TRANSMIT
Figure 23
Page 94

Section 5 Service Procedures
To reduce the risk of electric shock, fire, explosion, serious injury or death:
• Disconnect electric power to the washer before servicing.
• Never start the washer with any guards/panels removed.
• Whenever ground wires are removed during servicing, these ground wires must be
reconnected to ensure that the washer is properly grounded.
W003
WARNING
3
2
1
H108SE1A
MOTOR
CONTROL
BOARD
PRESSURE
SWITCH
45. MOTOR CONTROL BOARD
a. Unlock control panel. Refer to Figure 17, Step
1.
b. Pull top of control panel away from control
cabinet far enough to allow lifting control panel
up and off the rail support of the control
cabinet. Refer to Figure 17, Step 2.
c. Remove control panel away from control
cabinet as far as wires permit. Refer to
Figure 17, Step 3.
d. Remove two screws holding front of cabinet
top to top front edge of control cabinet front.
Refer to Figure 19.
e. If area or space permits, lift cabinet top to a
vertical position by hinging it on the rear
hinges. Refer to Figure 21.
NOTE: To avoid damage to hinges, be sure to
support cabinet top with a small chain or something
similar. Refer to Figure 21.
IMPORTANT: Due to the sensitivity of the motor
control board, careful handling is required. As a
precautionary measure, we recommend using a
ground wrist strap when handling the motor control
board. Wrist strap, cord and alligator clip are
designed to carry away any electrostatic charge
from your body and to direct charge to an available
ground. By using this static protection device,
potential electrostatic discharge problems
associated with handling of motor control board
will be minimized. Always handle motor control
board by its metal edges. If a wrist strap is not
available, touch washer while it is plugged in before
handling control to dissipate any charge.
NOTE: DO NOT pull on wires, instead, hold board
near appropriate disconnect block and unplug by
pulling on disconnect block.
g. Remove four screws holding motor control
board to back of control cabinet wrapper. Refer
to Figure 24.
h. Place old control board in the anti-static
wrapping that new control board was supplied
in.
i. Position the new motor control board on back
of control cabinet wrapper as shown in
Figure 24. Reinstall screws (removed in Step
“g”) and tighten firmly.
j. Follow the wiring diagram and reconnect wires
and harness disconnect blocks to new motor
control board.
IMPORTANT: It is important to take care when
handling the original motor control board. It must
be carefully placed in the anti-static wrapping and
anti-static foam which was removing from new
motor control board. If motor control board is not
wrapped properly, warranty credit will not be
issued.
NOTE: New control is supplied in a special antistatic wrapping, and protected by anti-static foam.
While holding control by its metal edges, remove
control from foam and wrapping.
f. Press in on locking tabs and unplug harness
disconnect blocks and all wires from motor
control board.
92 800168
© Copyright, Alliance Laundry Systems LLC – DO NOT COPY or TRANSMIT
Figure 24
Page 95

Section 5 Service Procedures
To reduce the risk of electric shock, fire, explosion, serious injury or death:
• Disconnect electric power to the washer before servicing.
• Never start the washer with any guards/panels removed.
• Whenever ground wires are removed during servicing, these ground wires must be
reconnected to ensure that the washer is properly grounded.
W003
WARNING
46. PRESSURE SWITCH
a. Unlock control panel. Refer to Figure 17, Step
1.
b. Pull top of control panel away from control
cabinet far enough to allow lifting control panel
up and off the rail support of the control
cabinet. Refer to Figure 17, Step 2.
c. Remove control panel away from control
cabinet as far as wires permit. Refer to
Figure 17, Step 3.
d. Remove two screws holding front of cabinet
top to top front edge of control cabinet front.
Refer to Figure 19.
e. If area or space permits, lift cabinet top to a
vertical position by hinging it on the rear
hinges.
NOTE: To avoid damage to hinges, be sure to
support cabinet top with a small chain or something
similar. Refer to Figure 21.
f. Disconnect wires from pressure switch at
disconnect block.
g. Disconnect pressure hose from pressure switch.
IMPORTANT: When installing pressure switch,
blow air into hose before connecting hose to switch
to remove any moisture that may have accumulated
in hose.
h. Squeeze in locking tabs on pressure switch and
push switch out toward rear of control shield.
Refer to Figure 24.
47. CONTROL CABINET FRONT
a. Unlock control panel. Refer to Figure 17, Step
1.
b. Pull top of control panel away from control
cabinet far enough to allow lifting control panel
up and off the rail support of the control
cabinet. Refer to Figure 17, Step 2.
c. Remove control panel away from control
cabinet as far as wires permit. Refer to
Figure 17, Step 3.
d. Remove two screws holding front of cabinet
top to top front edge of control cabinet front.
Refer to Figure 19.
e. If area or space permits, lift cabinet top to a
vertical position by hinging it on the rear
hinges.
NOTE: To avoid damage to hinges, be sure to
support cabinet top with a small chain or something
similar. Refer to Figure 21.
f. Remove screws holding security top panel to
control cabinet front. Refer to Figure 25. Slide
security top panel back just far enough to
disengage tabs on panel from control cabinet
front. Refer to Figure 25.
g. Remove two screws holding bottom front
flange of control cabinet front to top flange of
washer front panel. Refer to Figure 25.
h. Remove three screws (per side) holding control
cabinet front to front flange of control cabinet
wrapper. Refer to Figure 25.
i. Remove two screws holding control cabinet
wrapper tabs to control cabinet front tabs. Refer
to Figure 25.
j. Carefully pull control cabinet front straight out
and away from control cabinet wrapper. Refer
to Figure 25.
800168 93
© Copyright, Alliance Laundry Systems LLC – DO NOT COPY or TRANSMIT
Page 96

Section 5 Service Procedures
FLW1655S
PANEL
LOCATOR
SCREW
CARRIAGE
BOLT
SECURITY
TOP PANEL
SCREW
COIN
DROP
NUT
CONTROL
CABINET
FRONT
OVERLAY
SCREW
INSTRUCTION
LABEL
NUT
SCREW
SCREW
SCREW
CONTROL
CABINET
WRAPPER
CONTROL
SHIELD
94 800168
© Copyright, Alliance Laundry Systems LLC – DO NOT COPY or TRANSMIT
Figure 25
Page 97

Section 5 Service Procedures
To reduce the risk of electric shock, fire, explosion, serious injury or death:
• Disconnect electric power to the washer before servicing.
• Never start the washer with any guards/panels removed.
• Whenever ground wires are removed during servicing, these ground wires must be
reconnected to ensure that the washer is properly grounded.
W003
WARNING
H202SE1A
Screws
Lower
Access Panel
Panel
Locators
48. CONTROL CABINET WRAPPER
a. Unlock control panel. Refer to Figure 17, Step
1.
b. Pull top of control panel away from control
cabinet far enough to allow lifting control panel
up and off the rail support of the control
cabinet. Refer to Figure 17, Step 2.
c. Remove control panel away from control
cabinet as far as wires permit. Refer to
Figure 17, Step 3.
d. Remove two screws holding front of cabinet
top to top front edge of control cabinet front.
Refer to Figure 19.
e. If area or space permits, lift cabinet top to a
vertical position by hinging it on the rear
hinges.
NOTE: To avoid damage to hinges, be sure to
support cabinet top with a small chain or something
similar. Refer to Figure 21.
f. Remove cabinet top from washer by removing
nuts and carriage bolts holding cabinet top and
hinges to control cabinet. Refer to Figure 20.
g. Carefully lift cabinet top off washer and set out
of the way to prevent damage.
h. Remove screws holding security top panel to
control cabinet front. Refer to Figure 21. Slide
security top panel back just far enough to
disengage tabs on panel from control cabinet
front and remove panel.
i. Remove screws holding control shield (with
controls attached) to bottom rear flange of
control cabinet wrapper.
j. Remove screws holding motor control board to
rear of control cabinet wrapper. Refer to
Figure 24.
k. Remove screws holding control cabinet
wrapper to top flange of side panels. Refer to
Figure 25.
l. Carefully lift control cabinet assembly off
washer and set out of the way.
49. LOWER ACCESS PANEL
a. While supporting the lower access panel,
remove two screws from bottom edge of lower
access panel. Refer to Figure 26.
b. Gently lower the access panel to disengage
panel locators from bottom edge of front panel.
Figure 26
800168 95
© Copyright, Alliance Laundry Systems LLC – DO NOT COPY or TRANSMIT
Page 98

Section 5 Service Procedures
To reduce the risk of electric shock, fire, explosion, serious injury or death:
• Disconnect electric power to the washer before servicing.
• Never start the washer with any guards/panels removed.
• Whenever ground wires are removed during servicing, these ground wires must be
reconnected to ensure that the washer is properly grounded.
W003
WARNING
50. ELECTRIC DRAIN PUMP
a. While supporting the lower access panel,
remove two screws from bottom edge of lower
access panel. Refer to Figure 26.
b. Gently lower the access panel to disengage
panel locators from bottom edge of front panel.
IMPORTANT: There will always be some water
that will remain in the pump and hoses. Therefore,
before removing hoses from pump, hoses must be
drained to prevent water spillage.
c. Loosen hose clamps and remove three hoses
connected to electric drain pump (outer tub-topump hose, vent hose and drain hose). Refer to
Figure 27.
d. Disconnect wires from drain pump.
Outer
Tub-to-Pump
Hose
Mounting
Screws
Vent
Hose
Backflow
Preventer
Drain
Hose
Mounting
Screw
Electric
Drain Pump
NOTE: Refer to wring diagram when rewiring
drain pump.
e. Remove 3 mounting screws holding pump to
base and remove pump out through front of
washer. Refer to Figure 27.
H210S31A
Figure 27
96 800168
© Copyright, Alliance Laundry Systems LLC – DO NOT COPY or TRANSMIT
Page 99

To reduce the risk of electric shock, fire, explosion, serious injury or death:
• Disconnect electric power to the washer before servicing.
• Never start the washer with any guards/panels removed.
• Whenever ground wires are removed during servicing, these ground wires must be
reconnected to ensure that the washer is properly grounded.
W003
WARNING
51. BELT
3
2
1
H113SE1B
BELT
ACCESS
FROM
ABOVE
BELT
ACCESS
FROM
BELOW
CYLINDER
PULLEY
REAR
ACCESS
PANEL
MOTOR
a. Unlock control panel. Refer to Figure 17, Step
1.
b. Pull top of control panel away from control
cabinet far enough to allow lifting control panel
up and off the rail support of the control
cabinet. Refer to Figure 17, Step 2.
c. Remove control panel away from control
cabinet as far as wires permit. Refer to
Figure 17, Step 3.
d. Remove two screws holding front of cabinet
top to top front edge of control cabinet front.
Refer to Figure 19.
e. If area or space permits, lift cabinet top to a
vertical position by hinging it on the rear
hinges.
Section 5 Service Procedures
NOTE: To avoid damage to hinges, be sure to
support cabinet top with a small chain or something
similar. Refer to Figure 21.
f. Run belt off cylinder pulley while slowly
turning pulley. Refer to Figure 28.
g. Remove belt from motor shaft.
NOTE: When installing belt, adjust belt tension per
Paragraph 65.
Figure 28
800168 97
© Copyright, Alliance Laundry Systems LLC – DO NOT COPY or TRANSMIT
Page 100

Section 5 Service Procedures
To reduce the risk of electric shock, fire, explosion, serious injury or death:
• Disconnect electric power to the washer before servicing.
• Never start the washer with any guards/panels removed.
• Whenever ground wires are removed during servicing, these ground wires must be
reconnected to ensure that the washer is properly grounded.
W003
WARNING
52. MIXING VALVE
a. Unlock control panel. Refer to Figure 17, Step
1.
b. Pull top of control panel away from control
cabinet far enough to allow lifting control panel
up and off the rail support of the control
cabinet. Refer to Figure 17, Step 2.
c. Remove control panel away from control
cabinet as far as wires permit. Refer to
Figure 17, Step 3.
d. Remove two screws holding front of cabinet
top to top front edge of control cabinet front.
Refer to Figure 19.
e. If area or space permits, lift cabinet top to a
vertical position by hinging it on the rear
hinges.
NOTE: To avoid damage to hinges, be sure to
support cabinet top with a small chain or something
similar. Refer to Figure 21.
f. Mixing valve is located on upper back right
corner of rear panel. Refer to Figure 29.
g. Shut off external hot and cold water supply and
remove two inlet hoses.
h. Loosen hose clamp and remove mixing valve-
to-dispenser hose at the mixing valve. Refer to
Figure 29.
i. Remove wire harness disconnect blocks from
mixing valve solenoid terminals. Refer to
Figure 29.
NOTE: Refer to wiring diagram when rewiring
solenoids.
j. Go to rear of washer and remove screw holding
mixing valve and plate to rear panel, then
remove valve and plate out through opening in
rear panel. Refer to Figure 29.
k. Remove screws holding valve to mixing valve
plate. Refer to Figure 29.
98 800168
© Copyright, Alliance Laundry Systems LLC – DO NOT COPY or TRANSMIT
 Loading...