

Page 1

ALLEN&HEATH
User Guide
Publication AP4975
Page 2

XONE:V6 User Guide AP4975 Issue 2
Copyright © 2003 Allen & Heath Limited. All rights reserved
Whilst we believe the information in this guide to be reliable we do not assume responsibility for inaccuracies.
We also reserve the right to make changes in the interest of further product development.
This product complies with the European Electromagnetic Compatibility directives
89/336/EEC & 92/31/EEC and the European Low Voltage Directives 73/23/EEC &
93/68/EEC.
This product has been tested to EN55103 Parts 1 & 2 1996 for use in Environments E1, E2, E3, and E4 to
demonstrate compliance with the protection requirements in the European EMC directive 89/336/EEC. During
some tests the specified performance figures of the product were affected. This is considered permissible and
the product has been passed as acceptable for its intended use.
Allen & Heath has a strict policy of ensuring all products are tested to the latest safety and EMC standards.
Customers requiring more information about EMC and safety issues can contact Allen & Heath.
NOTE: Any changes or modifications to the console not approved by Allen & Heath could void the
compliance of the console and therefore the users authority to operate it.
ALLEN&HEATH
Manufactured in the United Kingdom
Allen & Heath Limited
Kernick Industrial Estate, Penryn, Cornwall, TR10 9LU, UK
http://www.allen-heath.com
2 XONE:V6 User Guide
Page 3

Important Safety Instructions – Read First
Read instructions: Read and retain these instructions for future reference. Read the instructions on the Safety Sheet
provided separately. Adhere to all warnings printed here and on the console and its power unit.
Covers: Do not remove the power unit cover. Operate the console with its cover correctly fitted. Disconnect
mains power by unplugging the power cord if you need to remove the console cover to set option
jumpers. Refer servicing work to competent technical personnel only.
Mains power: Connect the console power unit to a mains power supply only of the type described in this user guide
and marked on the unit. The power source must provide a good ground connection. Do not remove
or tamper with the ground connection in the power cord. Use the power cord with sealed mains plug
appropriate for your local mains supply as provided with the console. Route the power cord so that it
is not likely to be walked on, stretched or pinched by items placed upon or against it.
Installation: Install the console and its power unit in accordance with the instructions printed in this user guide.
Do not connect the output of power amplifiers directly to the console. Use audio connectors and
plugs only for their intended purpose.
Ventilation: Ensure adequate ventilation around the console and its power unit. Do not obstruct the ventilation
slots or position the unit where the air flow required for ventilation is impeded.
Moisture: To reduce the risk of fire or electric shock do not expose the equipment to rain or moisture or use it in
damp or wet conditions. Do not place containers of liquids on it which might spill into any openings.
Environment: Locate the units away from direct sunlight and any equipment which produces heat such as power
supplies, amplifiers and heaters. Protect from excessive dirt, dust, heat and vibration when operating
and storing. Avoid tobacco ash, drinks spillage, and smoke, especially that associated with smoke
machines. Do not mount the power supply on any surface subject to resonance or vibration.
Handling: To prevent damage to the controls and cosmetics avoid placing heavy objects on the console
surfaces, scratching the surface with sharp objects, or rough handling and vibration. Protect the
controls from damage during transit. Use adequate packing if you need to ship the unit.
XONE:V6 User Guide 3
Page 4

Important Note on Mains Voltage Setting
The power unit has two mains voltage settings. Check that your unit is correctly set to work
with your local mains voltage. This is marked on the power unit rear panel. The setting cannot
be changed by the user. Refer this work to your service agent.
115V to 230V AC auto-sensing (most of the world)
100V AC fixed (Japan)
Important Mains Plug Wiring Instructions
The console is supplied with a moulded mains plug fitted to the AC mains power lead. Follow
the instructions below if the mains plug has to be replaced.
The wire which is coloured Green/Yellow or Green must be connected to the terminal in the
plug which is marked with the letter E or with the Earth symbol.
This appliance must be earthed.
The wire which is coloured Blue or White must be connected to the terminal in the plug which
is marked with the letter N.
The wire which is coloured Brown or Black must be connected to the terminal in the plug which
is marked with the letter L.
Ensure that these colour codes are followed carefully in the event of the plug being changed.
4 XONE:V6 User Guide
Page 5

Contents
Important Safety Instructions .....................................................3
Front and Rear Panel Drawings .................................................6
Welcome to the XONE:V6..........................................................7
Front Panel Controls ..................................................................8
Rear Connectors ......................................................................14
Installing the Power Supply...................................................... 21
Installing the Console...............................................................23
Grounding ................................................................................24
Wiring the Cables .....................................................................26
Connector Types......................................................................27
Switching the Console On........................................................28
Operating Level and Meters.....................................................29
Internal Option Jumpers...........................................................30
Replacing the VU Meter Bulb ................................................... 34
Block Diagram..........................................................................35
Technical Specification ............................................................36
Performance Curves.................................................................39
User Notes (blank page) ..........................................................42
XONE:V6 User Guide 5
Page 6

Rotary Faders
INPUT 1 INPUT 3
LINE
PHONO
0
3
3
6
6
10
18
10
INPUT 2
LINE
PHONO PHONO
0
3
3
6
6
10
18
10
LEVEL
60
40
4
3
2
1
CHANNEL 1
30Hz
OFF
ON
CUE
0
200
100
400
500
600Hz
5
6
3
7
2
8
10
200
100
60
40
30Hz
OFF
ON
400
500
600Hz
CUE
5
4
6
7
8
99
00
10
CHANNEL 2
10
18
60
40
4
3
2
11
CHANNEL 3
6
LEVELLEVEL
30Hz
OFF
ON
CUE
LINE
PHONO
INPUT 4
LINE
INPUT 5
LINE B LINE B
LINE A
LINE A
INPUT 6
LEFT MIX LEVEL
RIGHT MIX LEVEL
0
3
3
6
10
200
100
400
500
600Hz
5
6
7
8
10
10
18
60
40
4
3
2
CHANNEL 4
0
3
6
LEVEL
100
30Hz
OFF
ON
CUE
5
0
0
3
6
10
3
3
6
6
10
18
10
LEVEL
200
400
500
600Hz
HI-PASSHI-PASSHI-PASSHI-PASS
200
100
60
40
OFF
ON
400
500
600Hz30Hz
CUE
5
6
10
4
0
10
CHANNEL 5
6
7
8
3
7
2
8
11
99
18
40
4
3
2
1
CHANNEL 6
6
10
LEVEL
60
30Hz
OFF
ON
CUE
0
0
3
3
6
10
200
100
400
500
600Hz
HI-PASSHI-PASS
5
6
7
8
99
10
10kHz
+6-6
-6
+6
MASTER EQ
5
6
4
3
7
2
9
1
0
10
MASTER
2.5kHz
+15
-15
10kHz
-6 +6
100Hz80Hz 120Hz
-6
8
4
3
2
1
0
BOOTH
+6
5
6
7
8
9
10
11
+15
-15
5
6
4
3
7
2
9
1
0
10
MIC
8
OFF
ON
LF
CUE
5
4
3
2
1
0
PHONES
TONE
HF
CUE/MIX
MIX
6
7
11
8
9
10
1
GND
-OUT - IN
XLR
+OUT2+IN
LINE IN/OUT
INSERT
TIP
2
TIP +
1
RING
RING -
GND
MIC INPUT
TIP SEND
RING RETURN
MASTER
INSERT
L
R
A
LINE
L
R
A
LINE
L
R
A
PHONO/
LINE
L
R
A
PHONO/
LINE
L
R
A
PHONO/
LINE
L
R
A
PHONO/
LINE
EXT CUE INPUT
RECORD
-10dBV
L
MIC INSERT
R
MASTER OUT
-2dBu
L
CUE DC LINK
L
R
PHONES 2
MIC TO BOOTH
+4dBuBOOTH
DC POWER
ONLY USE CORRECT
ALLEN&HEATH PSU
MASTER OUT
INPUT
WARNING!
FOR BALANCED CONNECTION ONLY.
DO NOT SHORT PIN 2 OR PIN 3 TO GROUND.
FOR UNBALANCED OPERATION USE JACK OUTPUTS
R
AVIS: RISQUE DE CHOC ELECTRIQUE - NE PAS OUVRIR
TO REDUCE THE RISK OF FIRE OR ELECTRIC SHOCK DO NOT EXPOSE THIS APPARATUS TO RAIN OR MOISTURE.
L
WARNING - THIS APPARATUS MUST BE EARTHED. REFER TO USER GUIDE BEFORE CONNECTING SUPPLY.
NO USER SERVICEABLE PARTS INSIDE. REFER SERVICING TO QUALIFIED SERVICE PERSONNEL.
R
SND
SND
RTNRTN
MADE IN ENGLAND BY ALLEN & HEATH LIMITED
SND SND
RTN RTN RTNRTN
&ALLEN HEATH
SND SND
6 XONE:V6 User Guide
Page 7

Welcome to the
The XONE:V6 is an audiophile rotary club mixer that sets a new
quality benchmark. It is an echo of the earliest days of pro audio
when pioneering individuals hand crafted outstanding products
free from the constraints of cost and time. We revisited the basics
of audio circuit design restoring the simple purity of a minimum
signal path meticulously constructed from the finest discrete
components. The result is a console that gives great recordings
the space and freedom to express their true warmth and clarity.
The main circuits use carefully selected transistors instead of ICs
to ensure the shortest signal path and high voltage rail operation
for massive headroom. The lower open loop stage gain means
minimum negative feedback resulting in reduced intermodulation
distortion of the complex waveforms typical of music. The all
important RIAA input stage uses paralleled audio grade JFETS
and a composite passive equalisation network which maintains
low noise and very high input impedance constant with frequency.
Similar care has been taken with the input preamps using JFETS
in a classic long tailed pair configuration and a Class A mosfet
output stage which replaces the busy integrated op-amp typically
found in modern preamps. Two of the channels feature valve
inputs producing the distinctive second harmonic distortion which
helps warm up clinical sounding sources such as CD. As much
time has been spent carrying out ‘golden ear’ listening tests as
performance logging in the laboratory. The result is the simple
assurance that you will hear every nuance of the music you mix.
The same attention to quality detail is applied to the construction.
The face plate is machined from 6mm thick bead blasted
aluminium. The main VU meters are a very rugged and accurate
original 1950’s British telecom design. The vintage durability is
also reflected in the choice of the knobs and switches.
The XONE:V6 also features the best in modern technology and
engineering excellence. The top of the range, oil damped rotary
faders are made by Penny & Giles, a British company renowned
for its fader expertise. Not only are the controls guaranteed to
give you the finest mix precision, they will also give you the
longest term service. The power unit also benefits from the finest
in linear design for a rock solid bottom end and utmost clarity.
The 6 input channels each have two selectable stereo inputs.
CH1-4 include selectable RIAA and line inputs. CH5 and 6 feature
stereo line valve preamps. Rear panel inserts are provided for
patching in external processing. The channel hi-pass filters use
large rotary controls for performance mixing. The microphone
channel has a balanced XLR input with selectable phantom
power, vocal optimised EQ, insert point, on/off switch, and the
ability to route to the booth if required.
Balanced XLR master and booth stereo outputs are provided. The
master output is also available on unbalanced TRS jack, and
includes an insert point. The recording output is taken from the
booth mix. Two band EQ is available on both the master and
booth outputs. The cue system feeds both front and rear
headphones sockets. The channel cue switches auto-cancel for
fast action, and the cue/mix rotary fader lets you audition how a
source will sound when added to the mix. The tone control helps
you lift the sounds you want to check in your headphones.
Various internal jumpers are provided so you can set preferred
source selection and operating levels.
We hope you enjoy using the XONE:V6 as much as we have
enjoyed designing it.
Andy Rigby-Jones, the designer
XONE:V6 User Guide 7
Page 8
PHONO
10
18
LEVEL
60
INPUT 4
LINE
0
3
3
6
100
6
200
Channel Controls
6 Input channels are provided. Each has switchable inputs for two stereo
sources. CH1-4 provide line and phono (RIAA) inputs. CH5 and 6 feature
valve preamps and have two switchable line sources each. All channels
provide insert points for patching in additional equipment. Internal jumper
10
400
options let you change the gain settings and switch out the RIAA equalisation.
Phono / Line select CH1-4 This toggle switch selects the PHONO input
in its left position, or the LINE input in its right position.
Line A / Line B select CH5,6 This toggle switch selects the LINE A
input in its left position, or the LINE B input in its right position.
40
500
RIAA The PHONO input passes through an RIAA equaliser. This
compensates for the response of the turntable pickup cartridge and results in
30Hz
OFF
ON
600Hz
HI-PASS
the desired flat frequency response. Note that the RIAA equaliser can be
bypassed using internal option jumpers if you want to use the inputs for
additional line sources instead.
Valve preamps The CH5 and CH6 preamps provide the warm, musical
CUE
5
4
3
2
1
0
CHANNEL 4
8 XONE:V6 User Guide
6
7
8
9
10
sound associated with the characteristically strong second harmonic distortion
associated with the valve circuit.
Meter This has 8 LEDs which display the level from -18dB to +10dB relative
to the normal 0dB operating level. It is peak responding so that it can
accurately display fast music peaks. The stereo L and R signals are summed
to feed the meter display. Turn back the LEVEL control if the red ‘+10’ LED
lights. Although there is still plenty of headroom above this level, it is important
to prevent very high channel levels which could overload the mix if several
sources are being mixed together.
Page 9

INPUT 5
LINE A
10
18
LEVEL
LINE B
Level Adjusts the input sensitivity from fully off to its maximum +10dB gain.
Correct use of this control makes it impossible to overload the input preamp.
Adjust it so that the meter averages around ‘0’ with loudest peaks up to ‘+6’.
Note that there are internal option jumpers to reduce the maximum gain
0
3
3
6
6
10
available to +6 or 0dB.
Hi-Pass filter A variable frequency 12dB per octave filter can be switched
in or out of the channel signal path using the ON/OFF switch. The cut off
frequency can be swept from 30Hz to 600Hz. The large rotary provides fine
control during performance.
60
40
OFF
ON
4
3
2
1
0
CHANNEL 5
100
CUE
5
200
400
500
600Hz30Hz
HI-PASS
6
7
8
9
10
Cue Press this button to route the channel signal to the headphones. The
integral blue LED lights when it is active. An ‘intelligent’ cue system is provided
for quick and easy channel monitoring during performance. The cue switches
are cleared when the console is powered on. The following is possible:
Latching action - Press once to turn it on, press again to turn it off.
Momentary action - Press and hold for longer than 2 seconds. Cue
turns off when you release your finger.
Interlocking action - Press one to turn the previous selection off. This
way you can quickly switch from one to another channel.
Adding action - Press two or more at the same time.
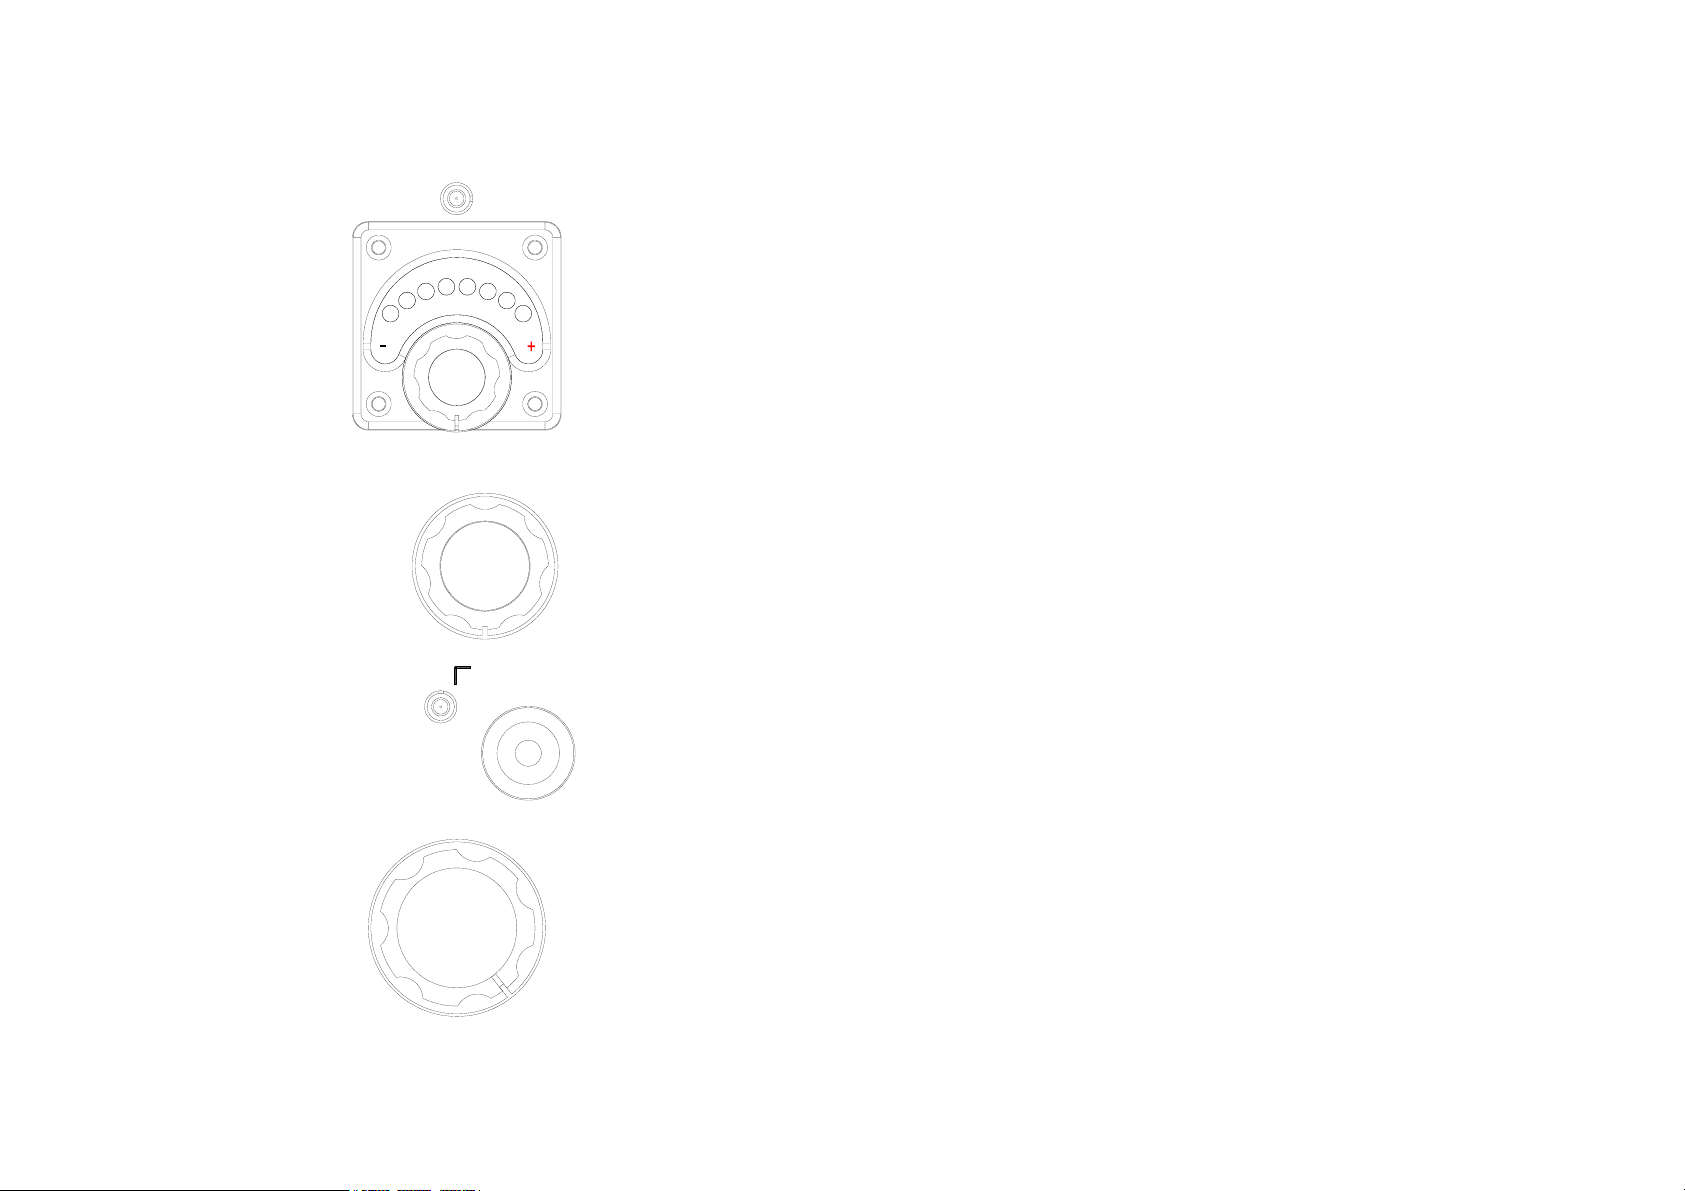
Rotary Fader Each channel has a large rotary fader for precision control
of its level when mixing. This type of control provides far greater accuracy than
the typical linear fader found in most DJ mixers. It uses the renowned Penny &
Giles oil-damped potentiometer for smooth movement, accurate control and
long life. The rotary ranges from fully off when anti-clockwise to fully on at unity
gain (0dB) when clockwise. For best performance operate these controls near
to their fully clockwise position for normal music level.
XONE:V6 User Guide 9
Page 10

-15
2.5kHz
+15
Microphone Controls
A DJ microphone can be plugged in. A professional quality balanced dynamic
vocal type is recommended. Phantom power can be internally enabled if a
condenser type is preferred. The mic can be switched into the master mix,
booth mix, and routes to the cue monitor. An insert is available for patching in
processors such as a limiter or compressor.
Mic on/off Switch the microphone into the master mix using the ON/OFF
toggle switch. Depending on the position of the rear panel MIC TO BOOTH
switch, the signal may also appear in the booth mix. When the mic is switched
off, its post fade signal is automatically sent to the cue mix for monitoring.
2
OFF
ON
3
1
-15
4
0
5
MIC
120Hz
+15
6
7
8
9
10
Mic level Controls the level of the microphone from fully off to a maximum
+60dB gain. Typical operation with a dynamic vocal mic is around the 2 to 3
o’clock position.
Hi-pass filter A hi-pass filter is built in to help remove handling noise and
the popping associated with the close mic proximity effect.
Mic EQ Two controls adjust the frequency response of the mic channel.
2.5kHz is a shelving HF control, 120Hz is a shelving LF control. Both provide
up to 15dB cut or boost. The response is flat at the centre positions. Where
possible use only small amounts of EQ, and cut rather than boost.
A small amount of HF boost can improve the intelligibility of vocals over the
mix, adding brightness. Use HF cut to remove harshness. A little LF boost can
add punch to the male voice. Use LF cut to reduce boominess and LF noise.
Phantom power An internal option jumper is provided to enable +30V
phantom power to the mic input XLR. Only use this if it is required, for example
with certain condenser mics. Do not use it with unbalanced connections.
10 XONE:V6 User Guide
Page 11

LEFT MIX LEVEL
Master Controls
The Master is the main output that feeds the house sound system. An overall
level control together with 2-band equaliser is provided. External processing
equipment such as a limiter or house EQ can be inserted into the master mix
signal path.
Main meter Two lamp-illuminated moving coil VU meters display the left
and right signals. The needle movement accurately follows the VU (volume
unit) standard. It displays the average signal level. The meter is post master
EQ and pre MASTER level control so that you can keep a check on the console
mix level regardless of house volume. Refer to the notes on Operating Level
and meters later in this guide.
10kHz
+6-6
80Hz
-6
+6
MASTER EQ
5
4
3
2
1
0
6
7
8
9
10
MASTER
Master EQ Two controls adjust the frequency response of the overall mix.
10kHz is a shelving HF control, 80Hz is a shelving LF control. Both provide up
to 6dB cut or boost. The response is flat at the centre positions. Where
possible use only small amounts of EQ, or none at all. The LF control is tuned
very low to boost frequencies well below the 80Hz turning point. This lets you
bring out thumping lows from big system subs without wooliness.
These controls should be used for performance rather than room or equipment
compensation. If the system has been properly specified and installed then it
should reproduce the music with an accurate flat response. Rear panel insert
points are provided for patching in processing equipment such as equalisers
needed for room compensation.
Master level Controls the overall level of the house mix. It ranges from
fully off to 0dB unity gain. For normal operation it should be used near to or at
its fully clockwise position. The XLR delivers +4dBu output level when the
MASTER level is fully clockwise and the VU meters read ‘0’. This should match
most systems. Internal option jumpers are available for 0dBu operation if
preferred.
XONE:V6 User Guide 11
Page 12

-6
10kHz
+6
100Hz
Booth Controls
The DJ’s local loudspeakers are fed from the console BOOTH output. The
booth mix is sourced from the master mix. It is derived post insert so that the
DJ hears exactly what is being fed to the house system. The DJ microphone
signal can be included or removed from the booth mix. The same mix feeds
the recording outputs.
Mic To Booth switch This rear panel switch is
recessed to protect it from accidental operation once
set. Use a pen or similar pointed object to change its
setting. Set the switch out (flush with panel) to
include the microphone signal in the booth and
recording mix. Set the switch in (pressed) for a
music only mix.
MIC INSERT
MIC TO BOOTH
-6
4
3
2
1
0
BOOTH
+6
5
6
7
8
9
10
11
Booth EQ Two controls adjust the frequency response of the overall mix.
10kHz is a shelving HF control, 100Hz is a shelving LF control. Both provide
up to 6dB cut or boost. The response is flat at the centre positions. Where
possible use only small amounts of EQ, or none at all. The LF control is tuned
slightly higher than the master EQ to better match the performance of the
speakers typically used. The booth EQ only affect the booth output. It does
not affect the headphones or recording feeds.
Booth level Controls the overall level of the booth mix. It ranges from fully
off to 0dB unity gain. For normal operation it should be used near to or at its
fully clockwise position.
12 XONE:V6 User Guide
Page 13

Headphones Controls
The DJ headphones is sourced from the booth mix and switched cue system.
Headphone sockets are provided on both the front and rear panels.
LF
CUE
5
4
3
2
1
6
0
PHONES
TONE
HF
CUE/MIX
MIX
7
8
9
10
11
Tone control This combines the LF and HF equaliser into one, easy to use
control. At centre position the frequency response is flat. Turning clockwise
boosts the high frequencies while cutting the lows. Turning anti-clockwise
boosts the lows while cutting the highs. Use this to check the frequency makeup of the music you are cueing in the headphones.
Cue / Mix This control balances the level of cue signal and booth (music)
signal in the headphones. Fully anti-clockwise, only cue signal is routed. Fully
clockwise, only booth mix is routed. At centre position, equal cue and booth
signal is mixed together. Use the control when auditioning new tracks and
experimenting with how they may sound when added to the mix.
Phones level Controls the overall level of the headphones. It ranges from
fully off to maximum volume.
Headphones are available with different impedance specification, typically
between 8 and 600 ohms. The XONE:V6 is designed to operate with
headphones in the range 30 to 600 ohms. For best performance we
recommend the high quality 70 or 100 ohm type popular with top DJs.
Important Note about Hearing: To avoid damage to your
hearing do not operate any sound system at excessively high volume. This
also applies to any close-to-ear monitoring such as headphones. Continued
exposure to high volume sound can cause frequency selective or wide range
hearing loss. Make sure that your system complies with any venue sound level
and noise regulations which may apply.
XONE:V6 User Guide 13
Page 14

Channel Connectors
Each channel has two stereo inputs. CH1-4 provide line and RIAA inputs. CH5
and 6 provide two line inputs.
L
A
R
LINE
SND
L
A
R
PHONO/
LINE
L and R inputs RCA phono sockets. The PHONO input provides gain
and RIAA equalisation for turntable cartridges. Note that CH1-4 have internal
option jumpers to disable RIAA if you want to use the inputs for additional line
sources. The LINE inputs have a maximum gain of +10dB to accept signals as
low as -10dBu. Note that there are internal option jumpers to reduce this gain
to +6 or 0dB if preferred. Connect the ground wires of the turntables to the
chassis ground terminals provided.
Insert A pair of RCA phono sockets for each side of the stereo signal lets
you insert external processing such as an effects unit, equaliser or other
channel signal processing device. This is done by breaking the signal path
after the hi-pass filter and before the rotary fader. The insert operates at 0dBu.
RTN
With nothing inserted, the jumper plugs must be plugged in as shown so that
the send signals are passed on to the return inputs. These plugs are provided
with the console. To insert external equipment, first unplug the jumpers. Keep
them in a safe place to use again in the future if needed. Use RCA phono
cables to connect the insert send (SND) to the equipment input, and to
connect the equipment output back to the insert return (RTN). Make sure the
equipment is set to operate around 0dBu and has 0dB (unity) gain from its
SND
input to output.
Important ! Make sure the jumper plugs are pressed fully in.
RTN
A note about cables To ensure the fine standard of sonic performance
for which the XONE:V6 has been designed, use only the highest grade
professional cables. Avoid the use of domestic grade cables.
14 XONE:V6 User Guide
Page 15

MIC INPUT
MIC INSERT
MIC TO BOOTH
Microphone Connectors
The microphone input is used for the DJ microphone. A hi-pass filter is built in
to reduce low frequency handling noise, popping and proximity effect. An
insert point is provided for patching in processors such as a compressor.
Mic input Balanced XLR, pin 2 hot. Maximum gain available is +60dB. We
recommend you use a rugged, professional grade, dynamic microphone
specifically designed for the vocal application. This should be low impedance
(less than 600 ohms), balanced and have a cardioid (directional) response to
avoid feedback problems.
Phantom power An internal option jumper is provided to select +30V to
the XLR pins for use with microphones which require phantom power. Check
the mic manufacturer’s specification regarding these power requirements.
WARNING Do not connect unbalanced sources or cables to the
XLR input when phantom power is applied. To avoid loud clicks always
turn the mic level down before plugging or unplugging phantom powered
microphones.
Insert Unbalanced TRS (stereo) jack wired tip = send,
ring = return, sleeve = common ground. With nothing
plugged in the signal is passed through internal switch
contacts within the socket. The insert operates at 0dBu.
Adjust the external equipment to operate around 0dBu
and with 0dB (unity) gain from its input to output.
XONE:V6 User Guide 15
Page 16

MASTER
INSERT
Master Connectors
The master mix to feed the house system is available on two pairs of sockets,
XLR and TRS. A pre-EQ insert point is provided for patching in processors
such as house equaliser and protection limiter.
R
MASTER OUT
-2dBu
L
R
MASTER OUT
L
R
WARNING!
FOR BALANCED CONNECTION ONLY.
DO NOT SHORT PIN 2 OR PIN 3 TO GROUND.
FOR UNBALANCED OPERATION USE JACK OUTPUTS
Insert Unbalanced TRS (stereo) jack wired tip = send, ring = return, sleeve
= common ground. With nothing plugged in the signal is passed through
internal switch contacts within the socket. The insert operates at -2dBu. Adjust
the external equipment to operate around -2dBu and with 0dB (unity) gain from
its input to output.
XLR output Electronically balanced, wired pin 2 hot. Output level is
+4dBu when the MASTER level control is fully clockwise and the VU meters
read ‘0’. Note that this can be changed to 0dBu by resetting internal option
jumpers. The XLR output is designed to operate with balanced equipment
such as speaker processors and amplifiers.
Only use the XLR output with balanced equipment. Do not short the
pin 2 or pin 3 signals to ground as this will degrade the performance. For
unbalanced connection use the TRS jack output.
TRS output Impedance balanced, wired tip hot. Output level is -2dBu
when the MASTER level is fully clockwise and the VU meters read ‘0’. The TRS
output can work with balanced or unbalanced equipment. It can be the main
house feed, or it can provide an additional zone or auxiliary feed when the XLR
output is used.
16 XONE:V6 User Guide
Page 17

L
RECORD
-10dBV
BOOTH
Booth and Record Connectors
The XLR booth output feeds the DJ’s booth amplifier / loudspeaker system.
The record output can be used to make a stereo recording of the performance.
L
Booth output Balanced XLR wired pin 2 hot. Output level is +10dBu
when the BOOTH level control is fully clockwise and the VU meters read ‘0’.
The booth output is not affected by the MASTER EQ or level control. Connect
to the amplifier input or speaker processor if one is used.
Although the booth output is designed for connection to balanced equipment,
it can be used with unbalanced equipment by shorting the pin 3 (cold)
connection to ground. Note that this does not apply to the master MIX OUT
XLR connections which should not be unbalanced.
R
Record output RCA phono connectors. These operate at the lower line
level of 316mV, -10dBV (same as -8dBu) which is suitable for connection to
most 2-track recorders. The output is sourced from the booth mix but is not
affected by the booth EQ or level control.
The booth and recording mix includes the DJ microphone signal only if it has
been routed using the rear panel MIC TO BOOTH switch.
XONE:V6 User Guide 17
Page 18

Cue, Ground and Headphones Connectors
EXT CUE INPUT
CUE DC LINK
External cue input TRS jack break point for overriding the cue system
with an external audio signal. The input is unbalanced with tip = left, ring =
right and sleeve = common ground.
Cue DC link 9-pin D connector for linking the console cue logic system
with external Allen & Heath accessories.
Chassis ground Two heavy duty binding posts are provided for ground
wire connection. Use these to bond the turntables and other equipment
chassis to the console chassis ground.
For safety it is important that all equipment grounds are connected
to mains ground so that exposed metal parts are prevented from carrying
high voltage which can injure or even kill the operator. It is recommended
that the system engineer check the continuity of the safety ground from all
points in the system including microphone bodies, turntable chassis,
equipment cases, and so on.
PHONES 2
Headphones Two headphones sockets are provided, one on the front
panel, the other on the rear. This provides the choice as to where to plug in the
DJ headphones.
18 XONE:V6 User Guide
Page 19

DC POWER
INPUT
ONLY USE CORRECT
ALLEN&HEATH PSU
Power Supply Connector
DC power input A heavy duty multi-pin socket for connection to the
external power unit using the DC cable provided. This carries the audio and
logic regulated DC power rails required for console operation. Align the
orientation lug and press the plug in. Rotate the locking ring to secure the
cable in place.
Only connect to the correct Allen & Heath
power unit specified for the console. Do not
attempt to modify the cable or power unit in any
way. Failure to observe this may result in damage
to the console.
DC POWER CABLE
The power unit has the following status LED indicators
on its front panel:
+30V and -30V Light when the audio circuit DC
voltage rails are available.
+6.3V Lights when the logic DC voltage rail is
available.
POWER UNIT
DC POWER OUT
POWER RAIL MONITORS
+30V -30V PROTECT
XONE:V6 User Guide 19
+6.3V
PROTECT Lights when the power unit is held in
safe mode. This protects the console during the
power up sequence, and if excessive current is drawn
or a voltage fault detected.
Page 20

Check mains voltage setting
MAINS INPUT
47-63 Hz ~120W MAX
V.AC
FUSE
T
MADE IN ENGLAND BY ALLEN & HEATH LIMITEDS/No
250VT2A
air flow
This way up
mounting screws
6x
CAUTION: FOR CONTINUED PROTECTION AGA INST RISK OF FIRE REPLACE FUSE
CAUTION
AVIS: RISQUE DE CHOC ELECTRIQUE - NE PAS OUVRIR.
WARNING: TO REDUCE THE RISK OF ELECTRIC SHOCK
DO NOT EXPOSE THIS APPARATUS TO RAI N OR MOISTURE.
ALLEN&
WITH SAME TYPE AND RATI NG. DISCONNECT SUPPL Y BEFORE CHANGING FU SE.
ATTENTION: REMPLACER LE FUSIBLE AVEC UN DES MEMES CARACTERISTIQUES.
COUPER L'ALIMENTATION AVANT DE CHANGER LE FUSIBLE.
DO NOT OBSTRUCT VENTILATION OPENINGS.
DO NOT OPEN. NO USER SE RVICEABLE PARTS INSIDE.
THIS APPARATUS MUST BE EARTHED BY THE POWER CORD.
HEATH
HYBRID LINEAR PSU
DC POWER
PIN 1. +6.3V 2A
PIN 2. +30V 1A
PIN 3. A GND
PIN 4. A GND
PIN 5. D GND
DC lead
Mains lead
100mm (4")
Minimum
20 XONE:V6 User Guide
Page 21

Installing the Power Supply Unit
79mm (3 1/8")
79mm (3 1/8")
To avoid damage to the power supply unit
internal assemblies do not mount it on to any
surface subject to resonance or vibration.
256mm (10")
202mm (8")
A separate high performance mains power unit is provided. This
converts the mains voltage into the various DC power rails
required by the console. Suitable mains and DC power leads are
supplied.
For permanent fixing, screw or bolt the power unit to a vertical
surface using 6x fixings as shown. This ensures optimum cooling
and performance. The fixing holes are 5mm diameter.
Check that the mains power switch is in its off (O) position. Plug
in the IEC mains lead. Plug in the console DC power lead
supplied. Ensure it is correctly orientated in the socket. Lock it in
place by tightening the locking ring being careful to avoid cross
threading it. Allow at least 100mm (4”) clearance for the
connector and cable beneath the unit.
Make sure you have read the Safety Instructions
printed in this guide and on the power unit case. Check that
the unit mains voltage setting is correct.
dia 5mm (3/16")
the DC power lead while the power unit is turned on.
To avoid damage to the console circuits do not plug in
69mm (2 11/16")
Check that there is adequate free air flow around the
unit. Make sure that the ventilation slots are not obstructed in
271mm (10 5/8")
XONE:V6 User Guide 21
any way and that no items can fall into them. To avoid
radiated interference do not install the power unit closer than
200mm (8”) to the console.
Page 22

483mm (19")
101.6mm (4")
4x M6 rack bolts
76mm (3")
4U
178mm (7")
181mm (7 1/8")
441mm (17 3/8")
256mm (10")
Allow 75mm (3") min clearance for connectors
22 XONE:V6 User Guide
Page 23

Installing the Console
172mm (6 3/4")
4x M6 bolt clearance (dia 7mm)
4x shallow screw relief (dia 8mm)
38mm (1 1/2")
441mm (17 3/8")
Template for plinth cutout
Rack mount The console fits into a standard 19” rack system
taking up 4U height. Use 4x M6 bolts with plastic protective cups.
These are usually supplied by the rack manufacturer.
Plinth mount The console can be mounted in a custom built
plinth or other furniture. Use the cutting template detail shown
here. The dimensions allow for the console cover fixing screws.
Secure with 4x suitably long M6 bolts and nuts. Use protective
cups to protect the console surface. Shallow reliefs may be
required to allow for the face plate to cover screws.
Due to the class A topology, lamps and valves used the
console can run slightly warm. Do not obstruct the ventilation
slots above and below the console. Ensure that there is
adequate air flow around the unit.
To avoid radiated interference do not install the power
unit closer than 200mm (8”) to the console.
175mm (6 7/8")
To avoid damage to the console circuits do not plug in
the DC power lead while the power unit is turned on.
51mm (2")
233mm (9 3/16")
XONE:V6 User Guide 23
445mm (17 1/2")
Do not operate the console with its cover removed.
Do not drill any fixing holes through the console cover.
Page 24

Grounding
The connection to ground (earth) in an audio system is important for two reasons:
• SAFETY - To protect the operator from high voltage electric shock, and
• AUDIO PERFORMANCE - To minimise the effect of ground loops which result in
audible hum and buzz, and to shield the audio signals from interference pickup.
For safety it is important that all equipment grounds are connected to mains
ground so that exposed metal parts are prevented from carrying high voltage which can
injure or even kill the operator. It is recommended that the system engineer check the
continuity of the safety ground from all points in the system including microphone
bodies, turntable chassis, equipment cases, and so on.
The same ground is also used to shield audio cables from external interference such as the
hum fields associated with power transformers, lighting dimmer buzz, and computer radiation.
Problems arise when the signal sees more than one path to mains ground. A ‘ground loop’
results, causing current to flow between the different ground paths. This condition is usually
detected as a mains frequency audible hum or buzz.
24 XONE:V6 User Guide
Page 25

To ensure safe and trouble-free operation we recommend the following:
• Have your mains system checked by a qualified electrician If the supply grounding is solid to start
with you are less likely to experience problems.
• Do not remove the ground connection from the power unit mains plug The console chassis is
connected to mains ground through the power cable to ensure your safety. Audio 0V is connected to
the console chassis internally.
• Make sure that turntables are correctly grounded Chassis ground terminals are provided on the
console rear panel to connect to turntable earth straps.
• Deal with ground loops Should you experience hum or buzz caused by ground loops, check first
that each piece of equipment has its own separate path to ground. If so, operate ground lift switches
on connected equipment in accordance with the instruction manuals. Alternatively disconnect the
cable screen at one end, usually the destination end. This breaks the offending loop while still
maintaining the signal shielding down the length of the cable.
• Use low impedance microphones and line level equipment rated at 200 ohms or less to reduce
susceptibility to interference. The console outputs are designed to operate at very low impedance to
minimise interference problems.
• Use balanced connections for the microphone and main outputs as these provide further immunity
by cancelling out interference that may be picked up on long cable runs.
• Route cables to avoid interference To avoid interference pickup keep audio cables away from
mains power units and cables, thyristor dimmer units and computer equipment. Where this cannot be
avoided, cross the cables at right angles to minimise interference.
• Use good quality cables and connectors and check for correct wiring and reliable solder joints. Use
professional grade short cables to connect your turntables to the console RIAA inputs. Allow sufficient
cable loop to prevent damage through stretching.
XONE:V6 User Guide 25
Page 26

Wiring the Cables
26 XONE:V6 User Guide
Page 27

Connector Types
The XONE:V6 uses professional grade 3 pin XLR, 1/4" TRS jack
and RCA PHONO sockets.
The XLR connection should be used with balanced equipment
such as microphones and feeds to balanced signal processors
and amplifiers. This has 3 connector pins: Pin 1 = ground
(screen), Pin 2 = signal hot (+), Pin 3 = signal cold (-). The male
XLR is used for signal output, female for input.
The INPUT and OUTPUT JACK connections can be used with
balanced or unbalanced line level equipment. These are wired to
work with either balanced 3-pole TRS or unbalanced 2-pole TS
type plugs.
The INSERT JACK requires a single 3-pole TRS jack plug
carrying both the send and return audio signals. Tip = send, ring
= return, sleeve = common ground. The signals are unbalanced.
Switching contacts automatically pass the signal through the
insert socket when nothing is plugged in. A typical cable is shown
in the diagram opposite.
The RCA phono connection is used to connect to equipment such
as CD players, turntables and recording devices. It is
unbalanced. A separate grounding wire may also be provided
with turntables. The RCA phono is also used for the channel
inserts. Insulated jumper plugs are provided so that the signal
can pass through the sockets when the insert is not used.
Removing the jumper interrupts the channel signal path.
To ensure best performance, we recommend that you use high
quality shielded audio cables and connectors, and take time to
check for reliable and accurate cable wiring and assembly.
XONE:V6 User Guide 27
Page 28

S/No
DC POWER OUT
MAINS INPUT
MAINS INPUT
V.AC
FUSE
T
250V
MADE IN ENGLAND BY ALLEN & HEATH LIMITED
T2A
Switching the Console On
The XONE:V6 power unit has two mains voltage settings, 115230V and 100V AC. First check that the setting is correct for your
local mains voltage. This is marked on the power unit rear panel.
The 115-230V setting senses the mains voltage level within the
115 to 230V range and automatically configures the power circuit
mains transformer using relays.
To avoid audible switch-on thumps, turn connected
power amplifiers down or off before switching the console on
or off. Ensure that the IEC mains plug is pressed fully into the
rear panel socket and the DC cable locking rings are screwed
in place before switching on.
POWER RAIL MONITORS
+30V -30V PROTECT
+6.3V
switch to its ‘I’ position. There is a delay of a few seconds as the
unit configures itself and the voltage rails stabilise. During this
time you should hear its relays click. After this time the +30, -30
and +6.3V indicators light to show that the power rails are ready.
To switch the console off set the power unit POWER ON
To switch the console on set the power unit POWER ON
switch to its ‘0’ position. The PROTECT indicator lights for a few
seconds while the power rails turn off.
The PROTECT indicator lights when the power unit shuts
down in safe mode. This happens during switch off, and also if a
power rail fault such as short circuit or over-current is detected.
Switch the console off then on again to restore normal operation.
If the fault does not clear then contact your Allen & Heath service
agent for advice.
28 XONE:V6 User Guide
Page 29

Operating Levels and Meters
It is most important that the system level settings are correctly set. The best
performance can only be achieved if the system levels are set within the normal
operating range and not allowed to peak. Peaking simply results in signal
distortion, not more volume. It is the specification of the amplifier and speaker
system that sets the maximum volume that can be achieved. The human ear
too can fool the operator into believing that more volume is needed. Be careful
as this is in fact a warning that hearing damage will result if high listening levels
are maintained. Remember that it is the QUALITY of the sound that pleases the
ear, not the VOLUME.
The meters The channel meters are peak responding. The LEDs have a
very fast attack and slower decay to display the music peaks. The main meters
0
3
3
6
10
18
6
10
are the moving coil VU type with damped mechanical action displaying the
average music level. It is typical for the VU meters to read lower than the LED
type. Music averaging around ‘0’ on the main meters may be peaking around
‘+6’ or so on the channel meters. If the music is heavily compressed this
difference may be much less. Reduce the level if the channel meter red ‘+10’
LED lights or the VU meter needle is hitting ‘+3’ on its scale.
Normal operating levels. For normal music the channel meters should
range between –6 and +6 with main meters averaging around 0dB. This
allows enough headroom for the loudest peaks before the signal hits its
maximum clipping voltage and distorts. It also achieves the best signal-to-
noise-ratio by keeping the signal well above the residual noise floor (system
hiss). The dynamic range is the maximum signal swing available between the
residual noise floor and clipping. The XONE:V6 provides a massive 116dB
dynamic range.
A final note … The human ear is a remarkable organ with the ability to
compress or ‘shut down’ when sound levels become too high. Do not interpret
this natural response as a reason to turn the system volume up further !
XONE:V6 User Guide 29
Page 30

Internal Option Jumpers
The XONE:V6 provides several user accessible internal jumper options. These are for
specialist application or user preference and should not normally be needed. The factory
default settings should satisfy most applications. The jumpers are plug-on and can be
reconfigured quickly. However, it is necessary to remove the console cover to access the
internal circuit assemblies. This requires that the console be unplugged and removed from its
installation furniture. All the jumpers are accessible without removal of any internal assemblies.
Before starting Unplug the power unit. Unplug all the cables. Remove the console from
its rack or furniture. Ensure you have a suitably sized, clean work space with adequate
lighting. Ensure you have a T10 Torx screwdriver to remove the cover screws.
Precautions Take care not to damage the panels or internal assemblies during the
process. Ensure the jumpers are pressed fully into position and log your new settings before
refitting the cover.
Access to the option jumpers
Removing the cover Use a T10 Torx
screwdriver to remove the 4x front plate to cover
fixing screws (M3x6mm). Also remove the 4x
side, 3x top and 3x underside screws
(M3x4mm). Carefully slide the cover back over
the rear connector panel to reveal the circuit
assemblies.
30 XONE:V6 User Guide
Page 31

Input Channel Option Jumpers
+10, +6, 0dB GAIN RIAA / LINE
JP3
JP5
JP6
JP9
JP10
INPUT PCB
JP1
JP2
JP8
JP7
JP4
Plug on jumpers set the options required. Plug across the two pins to
set. Plug on to just one pin to remove. This keeps the jumper
available to be re-used later in the future if needed.
RIAA disable CH1-4. For RIAA gain and equalisation JP2, JP3,
JP4 and JP8 are fitted. This is the factory default setting. To disable
RIAA and use these inputs with line sources, remove those jumpers
and fit JP1 and JP7 instead.
Gain setting CH1-6. The maximum preamp gain avaiable is set
using these jumpers. For +10dB gain all four jumpers JP5, JP6, JP9
and JP10 are fitted. This is the factory default setting. To change this
to +6dB gain fit JP5 and JP9 only. For 0dB gain remove all four
jumpers.
RIAA
JP3
JP1
JP2
JP8
JP7
JP4
LINE
JP3
JP1
JP2
JP8
JP7
JP4
GAIN
JP5
JP6
+10dB
JP9
JP10
JP5
JP6
+6dB
JP9
JP10
JP5
JP6
JP9
JP10
XONE:V6 User Guide 31
0dB
Page 32

MIC PCB
Microphone Option Jumper
A plug on jumper sets the option required. Plug across the two
JP1JP2
pins to set. Plug on to just one pin to remove. This keeps the
jumper available to be re-used later in the future if needed.
Phantom power 30V phantom power is disabled when JP1
is fitted. This is the factory default setting. Plug the jumper on to
JP2 instead if you wish to turn phantom power on.
WARNING Do not connect unbalanced sources or
cables to the XLR input when phantom power is applied. To
avoid loud clicks always turn the mic level down before
plugging or unplugging phantom powered microphones.
PHANTOM POWER
JP1
JP2
OFF
JP1JP2
ON
32 XONE:V6 User Guide
Page 33

Master Option Jumpers
Plug on jumpers set the options required. Plug across the two pins to
set. Plug on to just one pin to remove. This keeps the jumper
available to be re-used later in the future if needed.
Master output level The output level with MASTER control at
maximum position and VU meters reading ‘0’ is +4dBu with JP1 and
JP2 fitted. This is the factory default setting. To change this to 0dBu
remove JP1 and JP2. Access these jumpers from below the console.
LEVEL
JP1
JP2
MASTER PCB
+4dBu
JP2JP1
JP2JP1
0dBu
XONE:V6 User Guide 33
Page 34

VU Meter Bulb Replacement
VU METER BULBS
Each VU meter is illuminated using a filament bulb mounted in a
clip behind the meter. The bulb is a long life type. If it needs to
be replaced procede as follows:
Unplug the cables and remove the console cover as described
previously. Carefully unclip the old bulb. Press in the correct type
replacement bulb. Refit the cover.
It is best to replace both bulbs at the same time. This ensures that
they both maintain similar life.
Bulb type 12V 1.2watt 24mm festoon type
Allen & Heath part number AD5198
34 XONE:V6 User Guide
Page 35

System Block Diagram
CHANNEL 1-4
LINKS SHOWN FITTED FOR RIAA
PHONO
L
R
L
LINE
R
CHANNEL 5-6
L
LINE
R
L
LINE
R
RIAA
SELECT
PHANTOM POWER
SELECT
+6dB
PRE-AMP GAIN SELECT
REMOVE BOTH LI NKS FOR 0dB
VALVE
+6dB
PRE-AMP GAIN SELECT
REMOVE BOTH LI NKS FOR 0dB
48V
LEVEL
LEVEL
BLOCK DIAGRAM
HI PASS
FILTER
30Hz 600
+10dB
HI PASS
FILTER
30Hz 600
+10dB
ON/OFF
ON/OFF
INSERT
INSERT
MIC ON
CUE
ROTARY FADER
CUE
ROTARY FADER
MIX L
MIX R
CUE L
CUE R
CUE SENSE
CUE DC
BOOTH L
BOOTH R
REMOVE LINKS FOR 0dBu OUT
L
MASTER OUT
R
L
R
L
BOOTH OUT
R
PHONES 1
PHONES 2
MASTER MIX
BOOTH MIX
CUE MIX
L INSERT
L
R INSERT
R
L
R
L
CUE/MIX
R
MASTER EQ
RECORD OUT
BOOTH EQ
TONE
LF
10kHz
80Hz
10kHz
100Hz
HF
MASTER LEVEL
L
R
BOOTH LEVEL
PHONES LEVEL
MIC INPUT
INSERT
HI PASS FILTER
MIC EQ
2.5kHz
120Hz
GAIN/LEVEL
MIC TO BOOTH
CUE CONTROL
EXTERNAL CUE INPUT
CUE DC LINK
XONE:V6 User Guide 35
Page 36

Technical Specification
CH1-6 Line Inputs
RCA L and R connectors
Level variable from off to +10dB gain (+6, 0dB options)
Impedance >10k ohm
CH1-4 RIAA Inputs
RCA phono L and R connectors
RIAA equalisation (line input option)
Nominal level 7-100mV
Impedance 47k ohms / 330pF
Channel Inserts
RCA phono connectors (jumper plugs provided)
Operating level 0dBu
Impedance Send <75 ohms, Return >10k ohm
Microphone Input
Balanced XLR Pin2 hot
Level variable from off to +60dB max gain
Impedance 2k ohm
CMRR -70dB 100Hz to 10kHz
+30V phantom power enable option
Microphone Insert
TRS jack Tip = send, Ring = return
Operating level 0dBu
Impedance send <75 ohms, Return >10k ohm
Master Output
Balanced XLR (for balanced connection only)
TRS jack (for unbalanced connection)
XLR operating level +4dBu (0dBu option)
TRS operating level -2dBu
Impedance <110 ohm
Master Insert
TRS jack Tip = send, Ring = return
Operating level -2dBu
Impedance Send <110 ohms, Return >5k ohm
Booth Output
Balanced XLR (for balanced or unbalanced connection)
Operating level +4dBu
Impedance <75 ohm
Record Output
RCA phono L and R connectors
Operating level -10dBV (-8dBu)
Impedance <500 ohm
Cue Input
TRS jack Tip = L, Ring = R
Operating level 0dBu
Impedance >10k ohm
36 XONE:V6 User Guide
Page 37

Headphones Output
TRS jack Tip = L, Ring = R
30 to 600 ohms headphones, 70 ohms recommended
Power 480mW into 70 ohms, 150mW into 600 ohms
Channel Hi-Pass Filter
12dB per octave
Variable frequency 30Hz to 600Hz
On/off toggle switch
Microphone EQ
Vocal optimised LF and HF shelves
HF +/-15dB 2.5kHz shelf
LF +/-15dB 120Hz shelf
Booth EQ
Music optimised LF and HF shelves
HF +/-6dB 10kHz
LF +/-6dB 100Hz
Master EQ
Music optimised LF and HF shelves
HF +/-6dB 10kHz
LF +/-6dB 80Hz
Cue EQ
LF/HF cut/lift tone control
+ = HF lift / LF cut
- = LF lift / HF cut
Frequency response
Line in to Master out +0/-0.5dB 10Hz to 30kHz
+0/-1dB 8Hz to 40kHz
Maximum Output Level
Master output +28dBu into >10k ohm
+22dBu into >2k ohm
TRS output +20dBu into >2k ohm
Booth output +27dBu into >2k ohm
Record output +14dBu into >5k ohm
Headroom
Channels +26dB
Mix +24dB
Distortion THD+N
Master output <0.01% @ 0dBu
<0.03% @ +10dBu
nd
Valve CH5, 6 <0.1% @ 0dBu (2
<0.4% @ +10dBu (“)
harmonic)
Crosstalk Measured 100Hz to 10kHz
Rotary fader shutoff <-90dB
Inter-channel <-90dB
LR separation <-64dB
Headphones to mix <-90dB
XONE:V6 User Guide 37
Page 38

Noise Measured 22Hz to 22kHz
Master XLR output <-100dBu residual
<-90dBu @ unity gain
Master TRS output <-105dBu residual
<-97dBu @ unity gain
Booth output <-96dBu residual
<-86dBu @ unity gain
Record output <-99dBu residual
<-98dBu @ unity gain
Line in to Master out <-89dBu 200 ohm source
Phono in to Master <-85dBu 200 ohm source
Mic EIN <-127dB 50dB gain, 150 ohm
Meters
Channels Peak reading 8 LED bar
-18, -10, -6, -3, 0, +3, +6, +10
Main L,R Moving coil VU, lamp illuminated
Parts
Rotary faders Precision Penny & Giles
Conductive plastic, oil damped
Rotary controls Sealed, metal bodied Alps
Valves ECC82 (12AU7)
Meters Sifam classic design
Power Supply
External unit with detachable DC cable
Vertical mount with fixing brackets
Hybrid linear design
Switched mode for mains voltage sensing
Linear design for voltage rails
+/-30V DC audio circuit rails
Mains input IEC 3-pin
Wired for 115 to 230V or 100V AC
47 to 63 Hz operation
Country dependent mains lead supplied
120W max power consumption
Mains fuse T2.5AL 20mm 250V
Dimensions
Console Width 483mm (19”)
Height 178mm (7”) 4U
Depth 181mm (7 1/8”) from rear of face
Power unit Width 271mm (10 5/8”)
Height 202mm (8”)
Depth 69mm (2 11/16”)
Weight
Console 7.5kg (16lbs)
Power unit 2kg (4.5lbs)
38 XONE:V6 User Guide
Page 39

Channel Hi-Pass filter This graph shows the
response of the filter at its minimum (30Hz) and maximum
(600Hz) settings. The curve can be swept between these
positions.
Microphone EQ This graph shows the response of
the equaliser at maximum LF and HF boost and cut. The
shelves are tuned for vocal equalisation at 120Hz (LF) and
2.5kHz (HF). Maximum cut/boost is 15dB.
Channel High-Pass filter Min/Max
20.00 Hz 100.00 1000.00 10000.00 20000.00
Mic EQ
dBr
10.00
0.00
-10.00
-20.00
-30.00
-40.00
20.00 Hz 100.00 1000.00 10000.00 20000.00
20.00
15.00
10.00
5.00
0.00
-5.00
-10.00
-15.00
-20.00
dBr
XONE:V6 User Guide 39
Page 40

RIAA This graph shows the equalisation curve of the
channel RIAA input. This compensates for the response of
the pickup cartridge to result in a flat music response.
Valve channel distortion This graph shows the
harmonic distortion associated with the valve preamp. The
1kHz test tone is shown, together with a strong second
harmonic distortion. This accounts for the ‘musical warmth’
associated with valve circuits.
RIAA Response
20.00 Hz 100.00 1000.00 10000.00 20000.00
dBr
20.00
15.00
10.00
5.00
0.00
-5.00
-10.00
-15.00
-20.00
FFT of Valve Input
dBu
-0.00
-20.00
-40.00
-60.00
-80.00
-100.00
-120.00
-140.00
20.00 Hz 100.00 1000.00 10000.00 20000. 00
40 XONE:V6 User Guide
Page 41

Master and Booth EQ This graph shows the
response of the master equaliser at maximum cut and
boost. It has 80Hz (LF) and 10kHz (HF) shelves with up to
6dB boost and cut. The Booth EQ is similar but has a
100Hz LF response due to the lesser response of typical
booth loudspeakers.
Headphones EQ This graph shows the response of
the equaliser at maximum TONE control positions. Fully
anti-clockwise LF is boosted by 6dB and HF cut by 12dB.
Fully clockwise HF is boosted and LF cut. The response is
flat at mid position.
Master EQ
20.00 Hz 100.00 1000.00 10000. 00 20000.00
Phones Active Tone Control
dBr
15.00
10.00
5.00
0.00
-5.00
-10.00
-15.00
20.00 Hz 100.00 1000.00 10000.00 20000.00
15.00
10.00
5.00
0.00
-5.00
-10.00
-15.00
dBr
XONE:V6 User Guide 41
Page 42

User Notes:
42 XONE:V6 User Guide
 Loading...