

Page 1
User Manual
Original Instructions
TLSZ Guardmaster Guard Locking Switch
Catalog Numbers 440G-TZS21UPRH, 440G-TZS21UPLH, 440G-TZS21UTRH, 440G-TZS21UTLH
Page 2
Important User Information
Read this document and the documents listed in the additional resources section about installation, configuration, and
operation of this equipment before you install, configure, operate, or maintain this product. Users are required to
familiarize themselves with installation and wiring instructions in addition to requirements of all applicable codes, laws,
and standards.
Activities including installation, adjustments, putting into service, use, assembly, disassembly, and maintenance are
required to be carried out by suitably trained personnel in accordance with applicable code of practice.
If this equipment is used in a manner not specified by the manufacturer, the protection provided by the equipment may
be impaired.
In no event will Rockwell Automation, Inc. be responsible or liable for indirect or consequential damages resulting from
the use or application of this equipment.
The examples and diagrams in this manual are included solely for illustrative purposes. Because of the many variables and
requirements associated with any particular installation, Rockwell Automation, Inc. cannot assume responsibility or
liability for actual use based on the examples and diagrams.
No patent liability is assumed by Rockwell Automation, Inc. with respect to use of information, circuits, equipment, or
software described in this manual.
Reproduction of the contents of this manual, in whole or in part, without written permission of Rockwell Automation,
Inc., is prohibited
Throughout this manual, when necessary, we use notes to make you aware of safety considerations.
WARNING: Identifies information about practices or circumstances that can cause an explosion in a hazardous
environment, which may lead to personal injury or death, property damage, or economic loss.
ATTENTION: Identifies information about practices or circumstances that can lead to personal injury or death, property
damage, or economic loss. Attentions help you identify a hazard, avoid a hazard, and recognize the consequence.
IMPORTANT Identifies information that is critical for successful application and understanding of the product.
Labels may also be on or inside the equipment to provide specific precautions.
SHOCK HAZARD: Labels may be on or inside the equipment, for example, a drive or motor, to alert people that dangerous
voltage may be present.
BURN HAZARD: Labels may be on or inside the equipment, for example, a drive or motor, to alert people that surfaces may
reach dangerous temperatures.
ARC FLASH HAZARD: Labels may be on or inside the equipment, for example, a motor control center, to alert people to
potential Arc Flash. Arc Flash will cause severe injury or death. Wear proper Personal Protective Equipment (PPE). Follow ALL
Regulatory requirements for safe work practices and for Personal Protective Equipment (PPE).
Page 3

Table of Contents
Preface
Who Should Use This Manual . . . . . . . . . . . . . . . . . . . . . . . . . . . . . . . . . . 5
Purpose of This Manual . . . . . . . . . . . . . . . . . . . . . . . . . . . . . . . . . . . . . . . . 5
Conventions Used in This Manual . . . . . . . . . . . . . . . . . . . . . . . . . . . . . . 5
Additional Resources . . . . . . . . . . . . . . . . . . . . . . . . . . . . . . . . . . . . . . . . . . . 5
Terminology. . . . . . . . . . . . . . . . . . . . . . . . . . . . . . . . . . . . . . . . . . . . . . . . . . . 6
Chapter 1
General Description Guardmaster TLSZ Overview . . . . . . . . . . . . . . . . . . . . . . . . . . . . . . . . . . . 7
Catalog Numbers . . . . . . . . . . . . . . . . . . . . . . . . . . . . . . . . . . . . . . . . . . . . . . 8
Packaging Contents . . . . . . . . . . . . . . . . . . . . . . . . . . . . . . . . . . . . . . . . . . . . 9
Chapter 2
Installation General Considerations. . . . . . . . . . . . . . . . . . . . . . . . . . . . . . . . . . . . . . . . 11
Actuator/Target Mounting . . . . . . . . . . . . . . . . . . . . . . . . . . . . . . . . . . . . 11
Allowable Approach Directions . . . . . . . . . . . . . . . . . . . . . . . . . . . . . . . . 12
Minimum Operating Radius . . . . . . . . . . . . . . . . . . . . . . . . . . . . . . . . . . . 12
Manual Release . . . . . . . . . . . . . . . . . . . . . . . . . . . . . . . . . . . . . . . . . . . . . . . 13
Manual Override Cover . . . . . . . . . . . . . . . . . . . . . . . . . . . . . . . . . . . . . . . 13
Pair Proximity . . . . . . . . . . . . . . . . . . . . . . . . . . . . . . . . . . . . . . . . . . . . . . . . 14
Guide Repositioning . . . . . . . . . . . . . . . . . . . . . . . . . . . . . . . . . . . . . . . . . . 14
Steel Locking Bolts . . . . . . . . . . . . . . . . . . . . . . . . . . . . . . . . . . . . . . . . . . . . 15
Actuator Clearance. . . . . . . . . . . . . . . . . . . . . . . . . . . . . . . . . . . . . . . . . . . . 15
Dimensions. . . . . . . . . . . . . . . . . . . . . . . . . . . . . . . . . . . . . . . . . . . . . . . . . . . 17
Chapter 3
Wiring Connections. . . . . . . . . . . . . . . . . . . . . . . . . . . . . . . . . . . . . . . . . . . . . . . . . . 19
OSSD Inputs . . . . . . . . . . . . . . . . . . . . . . . . . . . . . . . . . . . . . . . . . . . . . . . . . 19
OSSD Outputs . . . . . . . . . . . . . . . . . . . . . . . . . . . . . . . . . . . . . . . . . . . . . . . 19
Auxiliary Output. . . . . . . . . . . . . . . . . . . . . . . . . . . . . . . . . . . . . . . . . . . . . . 20
Lock Command. . . . . . . . . . . . . . . . . . . . . . . . . . . . . . . . . . . . . . . . . . . . . . . 20
Chapter 4
Commissioning Preparation . . . . . . . . . . . . . . . . . . . . . . . . . . . . . . . . . . . . . . . . . . . . . . . . . . . 21
First Time Power-up . . . . . . . . . . . . . . . . . . . . . . . . . . . . . . . . . . . . . . . . . . 22
Learn First Target . . . . . . . . . . . . . . . . . . . . . . . . . . . . . . . . . . . . . . . . . . . . . 22
Learning Additional Targets . . . . . . . . . . . . . . . . . . . . . . . . . . . . . . . . . . . 22
Commissioning Errors. . . . . . . . . . . . . . . . . . . . . . . . . . . . . . . . . . . . . . . . . 23
Power-up Self-check. . . . . . . . . . . . . . . . . . . . . . . . . . . . . . . . . . . . . . . . . . . 23
Chapter 5
Functional Testing Testing Procedure. . . . . . . . . . . . . . . . . . . . . . . . . . . . . . . . . . . . . . . . . . . . . 25
Rockwell Automation Publication 440G-UM002A-EN-P - March 2019 3
Page 4

Table of Contents
Chapter 6
Application and Wiring
Examples
Diagnostics and
Troubleshooting
Wiring to GLP Relay . . . . . . . . . . . . . . . . . . . . . . . . . . . . . . . . . . . . . . . . . . 27
Wiring to GLT Relay. . . . . . . . . . . . . . . . . . . . . . . . . . . . . . . . . . . . . . . . . . 28
Wiring to DI and EMD Relay . . . . . . . . . . . . . . . . . . . . . . . . . . . . . . . . . . 30
Wiring to DG Relay . . . . . . . . . . . . . . . . . . . . . . . . . . . . . . . . . . . . . . . . . . . 32
Wiring to CR30 Relay. . . . . . . . . . . . . . . . . . . . . . . . . . . . . . . . . . . . . . . . . 33
Wiring to 1734 POINT Guard I/O . . . . . . . . . . . . . . . . . . . . . . . . . . . . 34
Wiring to 1732 ArmorBlock . . . . . . . . . . . . . . . . . . . . . . . . . . . . . . . . . . . 39
Chapter 7
Tools Needed. . . . . . . . . . . . . . . . . . . . . . . . . . . . . . . . . . . . . . . . . . . . . . . . . 43
Required Tools. . . . . . . . . . . . . . . . . . . . . . . . . . . . . . . . . . . . . . . . . . . . 43
Optional Tools. . . . . . . . . . . . . . . . . . . . . . . . . . . . . . . . . . . . . . . . . . . . 43
Flowchart . . . . . . . . . . . . . . . . . . . . . . . . . . . . . . . . . . . . . . . . . . . . . . . . . . . . 44
Step 1 — Status
Indicator OFF . . . . . . . . . . . . . . . . . . . . . . . . . . . . . . . . . . . . . . . . . . . . . . . . 44
Step 2 — Status Indicator Flashing Red at 4 Hz. . . . . . . . . . . . . . . . . . 45
Wrong Target. . . . . . . . . . . . . . . . . . . . . . . . . . . . . . . . . . . . . . . . . . . . . 45
Missing Target . . . . . . . . . . . . . . . . . . . . . . . . . . . . . . . . . . . . . . . . . . . . 46
Target Not Mounted Correctly. . . . . . . . . . . . . . . . . . . . . . . . . . . . . 46
Pair Proximity. . . . . . . . . . . . . . . . . . . . . . . . . . . . . . . . . . . . . . . . . . . . . 47
Mechanical Pressure on Safety Gate . . . . . . . . . . . . . . . . . . . . . . . . . 47
Long Wiring . . . . . . . . . . . . . . . . . . . . . . . . . . . . . . . . . . . . . . . . . . . . . . 48
Voltage Supply Dips . . . . . . . . . . . . . . . . . . . . . . . . . . . . . . . . . . . . . . . 49
Rapid Locking . . . . . . . . . . . . . . . . . . . . . . . . . . . . . . . . . . . . . . . . . . . . 49
Step 3 - Status Indicator Flashes Red at 1 Hz . . . . . . . . . . . . . . . . . . . . 50
Capacitive Loading . . . . . . . . . . . . . . . . . . . . . . . . . . . . . . . . . . . . . . . . 50
Step 4 — Status Indicator Flashes Green at 1 Hz. . . . . . . . . . . . . . . . . 51
Step 5 — Flashing Red and Green . . . . . . . . . . . . . . . . . . . . . . . . . . . . . . 51
Step 6 — Indicator Solid Red . . . . . . . . . . . . . . . . . . . . . . . . . . . . . . . . . . 52
Step 7 — Other Considerations . . . . . . . . . . . . . . . . . . . . . . . . . . . . . . . . 52
Distribution Block . . . . . . . . . . . . . . . . . . . . . . . . . . . . . . . . . . . . . . . . 52
GSR Relays on Power-up. . . . . . . . . . . . . . . . . . . . . . . . . . . . . . . . . . . 53
Appendix A
Specifications and Safety
Ratings
4 Rockwell Automation Publication 440G-UM002A-EN-P - March 2019
Specifications . . . . . . . . . . . . . . . . . . . . . . . . . . . . . . . . . . . . . . . . . . . . . . . . . 55
Safety Ratings. . . . . . . . . . . . . . . . . . . . . . . . . . . . . . . . . . . . . . . . . . . . . . . . . 56
Index
. . . . . . . . . . . . . . . . . . . . . . . . . . . . . . . . . . . . . . . . . . . . . . . . . . . . . . . . 57
Page 5
Preface
Read this preface to familiarize yourself with the rest of the manual. It provides
information concerning:
•Who would use this manual
•The purpose of this manual
• Related documentation
• Conventions used in this manual
Who Should Use This Manual
Purpose of This Manual
Conventions Used in This Manual
Use this manual to design, install, program, or troubleshoot systems that use
the TLSZ Guardmaster® guard locking safety switches.
You are required to have a basic understanding of electrical circuitry and
familiarity with safety-related control systems. If you do not, obtain the proper
training before using this product.
This manual is a reference guide for the Guardmaster TLSZ guard locking
switch. It describes the procedures you use to install, wire, and troubleshoot
your switch. This manual:
• Explains how to install and wire your TLSZ switch,
• Provides an overview of the Guardmaster TLSZ guard locking switch.
The following conventions are used throughout this manual:
• Bulleted lists such as this one provide information, not procedural steps.
• Numbered lists provide sequential steps or hierarchical information.
Additional Resources
The following documents offers additional information about related
Rockwell Automation products.
Resource Description
Guardmaster 440C-CR30 Configurable Safety Relay
Wiring Diagrams, publication 440C-WD001
Industrial Automation Wiring and Grounding Guidelines,
publication 1770-4.1
Product Certifications website, rok.auto/certifications
Functional Safety Data Sheet, publication SAFETY-SR001
Industrial Automation Glossary, publication AG-7. 1
You can view and download publications at rok.auto/literature
Rockwell Automation Publication 440G-UM002A-EN-P - March 2019 5
Provides example wiring diagrams for the CR30 software
configuration safety relay.
Provides general guidelines for installation of a
RockwellAutomation® industrial system.
Provides declarations of conformity, certificates for the
TLSZ guard locking switch.
Provides functional safety data and details for
RockwellAutomation products.
Glossary of industrial automation terms and
abbreviations
.
Page 6

Preface
Terminology
The Industrial Automation Glossary contains terms and abbreviations used by
Rockwell Automation to describe industrial automation systems. Below is a list
of specific terms and abbreviations used in this manual.
NC No connection
N.C. (Normally
Closed)
N.O. (Normally
Open)
PLC A programmable logic controller or a programmable
PTL (Power to
Lock)
PTL (Power to
Release)
Reaction Time Describes the time between the true state of the input to
An electrical contact whose normal state (for example,
no pressure or electrical potential applied) is in the
closed position.
An electrical contact whose normal state (i.e., no
pressure or electrical potential applied) is in the open
position.
automation controller.
Apply 24V to the lock command to lock the switch.
This command applies to the TLSZL switch.
Apply 24V to the lock command to unlock the switch.
This command applies to the TLSZR switch.
the ON state of the output.
Response Time Describes the time between the trigger of the input to
the OFF state of the output. Throughout this manual,
the safety outputs may be described as turning off
immediately. This means that the safety outputs will
turn off within the response time.
RFID Radio frequency identification.
OSSD (Output
Signal Switching
Device)
Standard coding Same as Low coding as defined in ENISO14119:2013
TLSZL TLSZ power-to-lock guard locking switch
TLSZR TLSZ power-to-release guard locking switch
Unique coding Same as High coding as defined in ENISO14119:2013
Typically a pair of solid-state signals pulled up to the
DC source supply. The signals are usually tested for
short circuits to the DC power supply, short circuits to
the DC common, and short circuits between the two
signals.
6 Rockwell Automation Publication 440G-UM002A-EN-P - March 2019
Page 7

General Description
Chapter 1
Guardmaster TLSZ Overview
This Guardmaster® TLSZ guard locking switch functions by locking it
actuator, which prohibits the opening of a guard.
The TLSZ uses radio frequency identification, RFID, coding to detect the
appropriate target.
This version of the Guardmaster TLSZ guard locking switch features OSSD
outputs. These outputs are enabled only when the actuator is locked and the
RF target is sensed.
This device is intended to be part of the safety-related control system of a
machine. Perform a risk assessment before installation to determine whether
the specifications of this device are suitable for all operational and
environmental characteristics of the machine. See Specifications on page 55
certification information and ratings.
Use nonremovable screws, bolts, or nuts to mount the switch and actuators. Do
not over torque the mounting hardware.
TLSZ guard locking switches are classified according to ISO 14119 as Type 4
switching devices. The RFID targets are classified as having a high level of
coding.
for
Measures are to be taken to minimize the need to defeat and to manage the use
and availability of spare RFID targets.
Rockwell Automation Publication 440G-UM002A-EN-P - March 2019 7
Page 8
Chapter 1 General Description
Catalog Numbers
The schema for the TLSZ catalog number is shown in Ta b l e 1 . The parts of the
schema are shown in Ta b l e 2
Table 1 - TLSZ Catalog Number Setup
440 G T Z S21 U P R H
1 234 5 6789
Table 2 - TLSZ Catalog Number Detail
Parameter Value Description
1 440 Safeguards the Product
2 G Guard locking switch
3 T Titan Locking Switch
4 Z PLe rated, cascadable safety signals
5 S21 Solid-state outputs, 2 safety (OSSD), 1 aux
6 U Unique coded RFID target
7PTAux signal shows lock status
8RLPower to Rele ase
9 H 8-pin M12 QD connector
.
Aux signal shows door status
Power to Lock
ATT EN TI ON : Guard lock switches that use the Power to Lock principle can
only be used after a risk assessment has shown that the Power to Release
principle is inappropriate for the application. If a power supply loss occurs
with Power to Lock switches, the switches immediately become unlocked
and the user may have access to the hazards.
8 Rockwell Automation Publication 440G-UM002A-EN-P - March 2019
Page 9
General Description Chapter 1
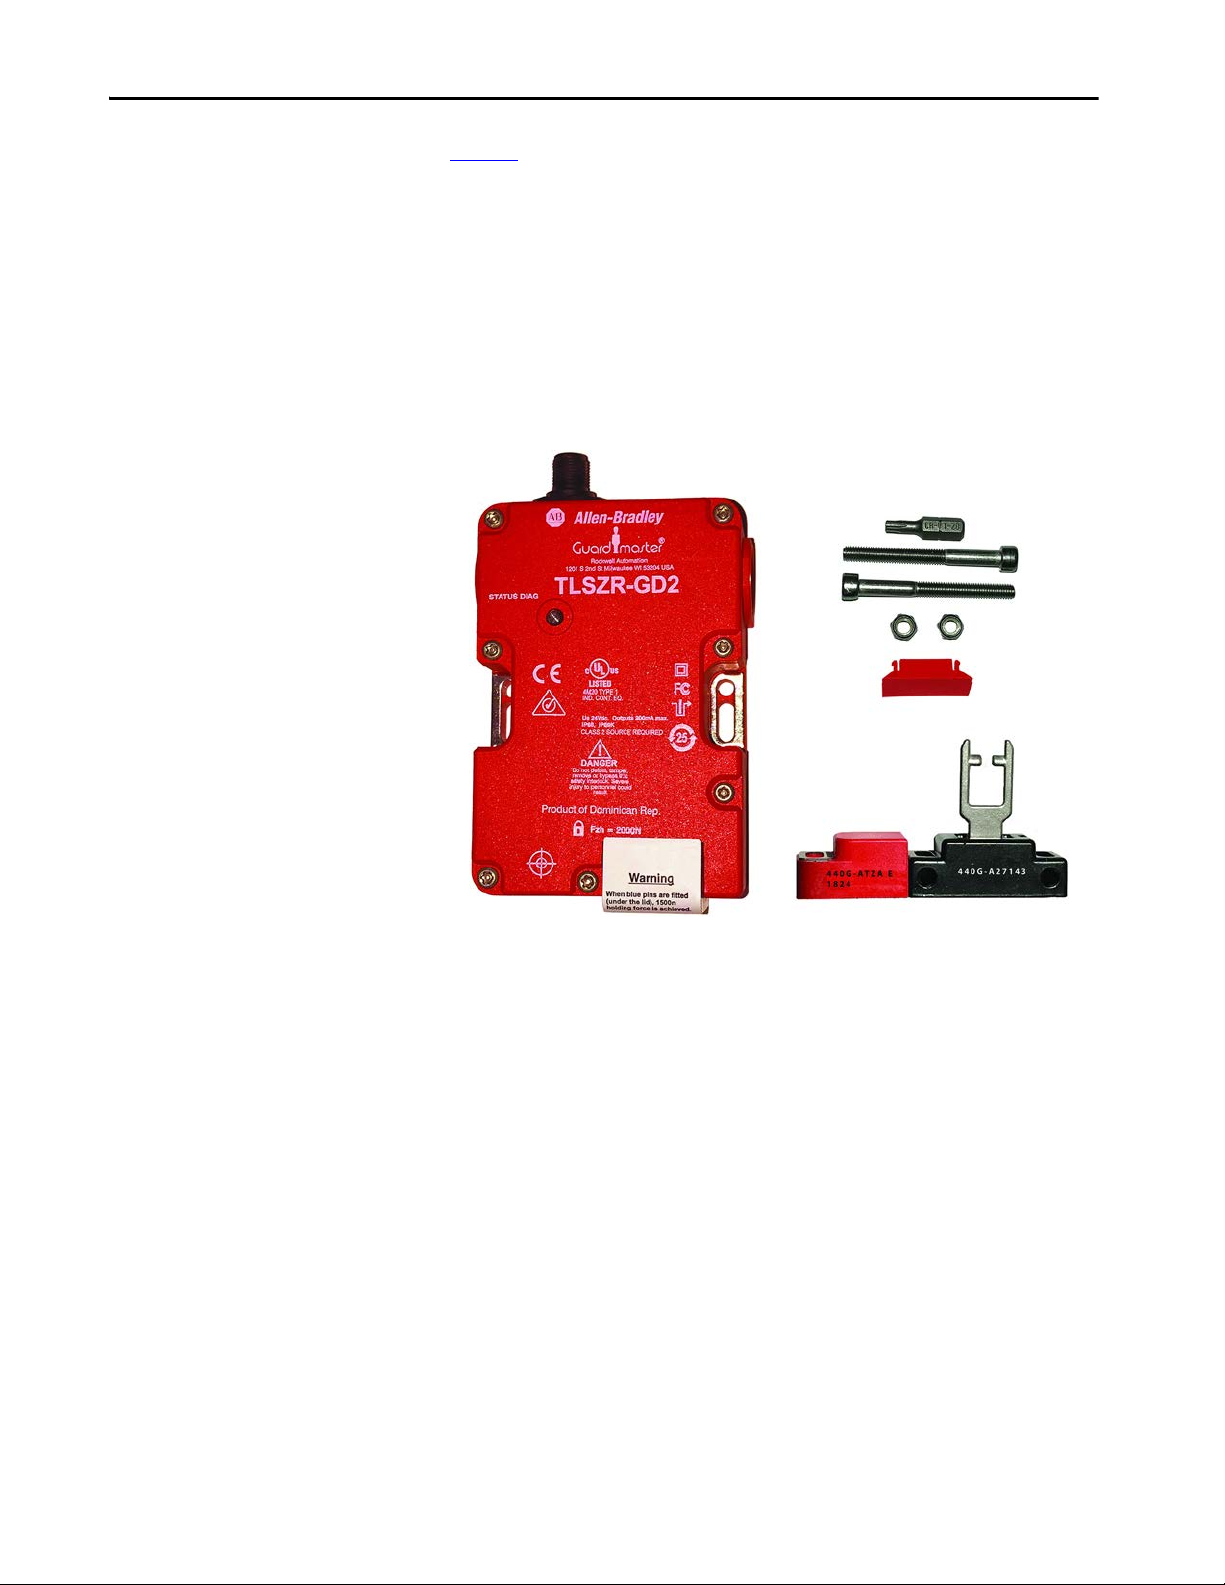
Packaging Contents
Figure 1 shows the contents in the shipping package. The contents include:
•Switch
•Actuator
•RFID target
• T20 security Torx bit
• Two steel bolts and nuts
•Plug
• Installation instructions (not shown)
Figure 1 - Package Contents
Rockwell Automation Publication 440G-UM002A-EN-P - March 2019 9
Page 10

Chapter 1 General Description
Notes:
10 Rockwell Automation Publication 440G-UM002A-EN-P - March 2019
Page 11
Installation
Chapter 2
General Considerations
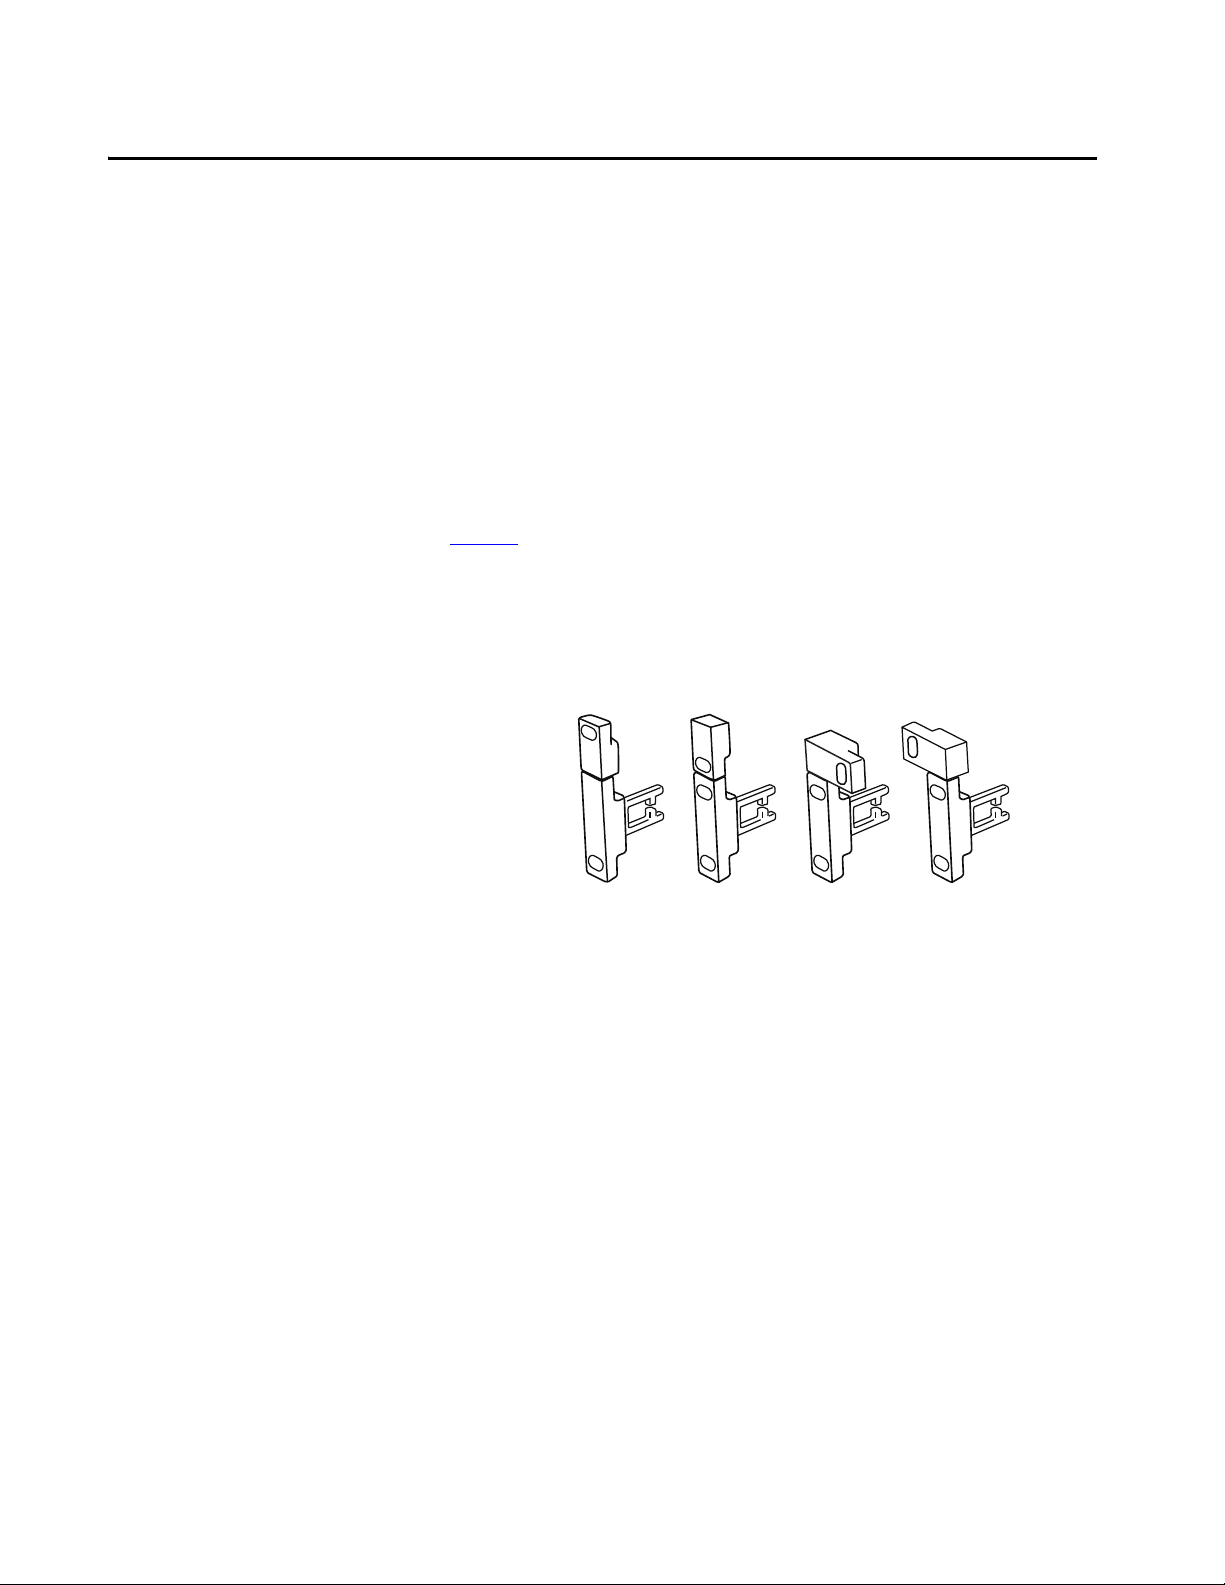
Actuator/Target Mounting
The TLSZ guard locking switch is designed for use on guards that are
engineered to be rigid and without sag. The TLSZ uses radio frequency
identification, RFID, coding to detect the appropriate target.
Figure 2 shows the correct and incorrect ways to mount the target with the
actuator.
The TLSZ must only be used with the fully flexible actuator. The replacement
part number for the actuator is catalog number 440G-A27143.
Figure 2 - Target/Actuator Mounting
Tar ge t
Actuator
Rockwell Automation Publication 440G-UM002A-EN-P - March 2019 11
Page 12
Chapter 2 Installation
This approach requires
guide repositioning, see
page 14.
80 (3.19)
80 (3.19)80 (3.19)
80 (3.19)
1.5 mm (0.06 in.)
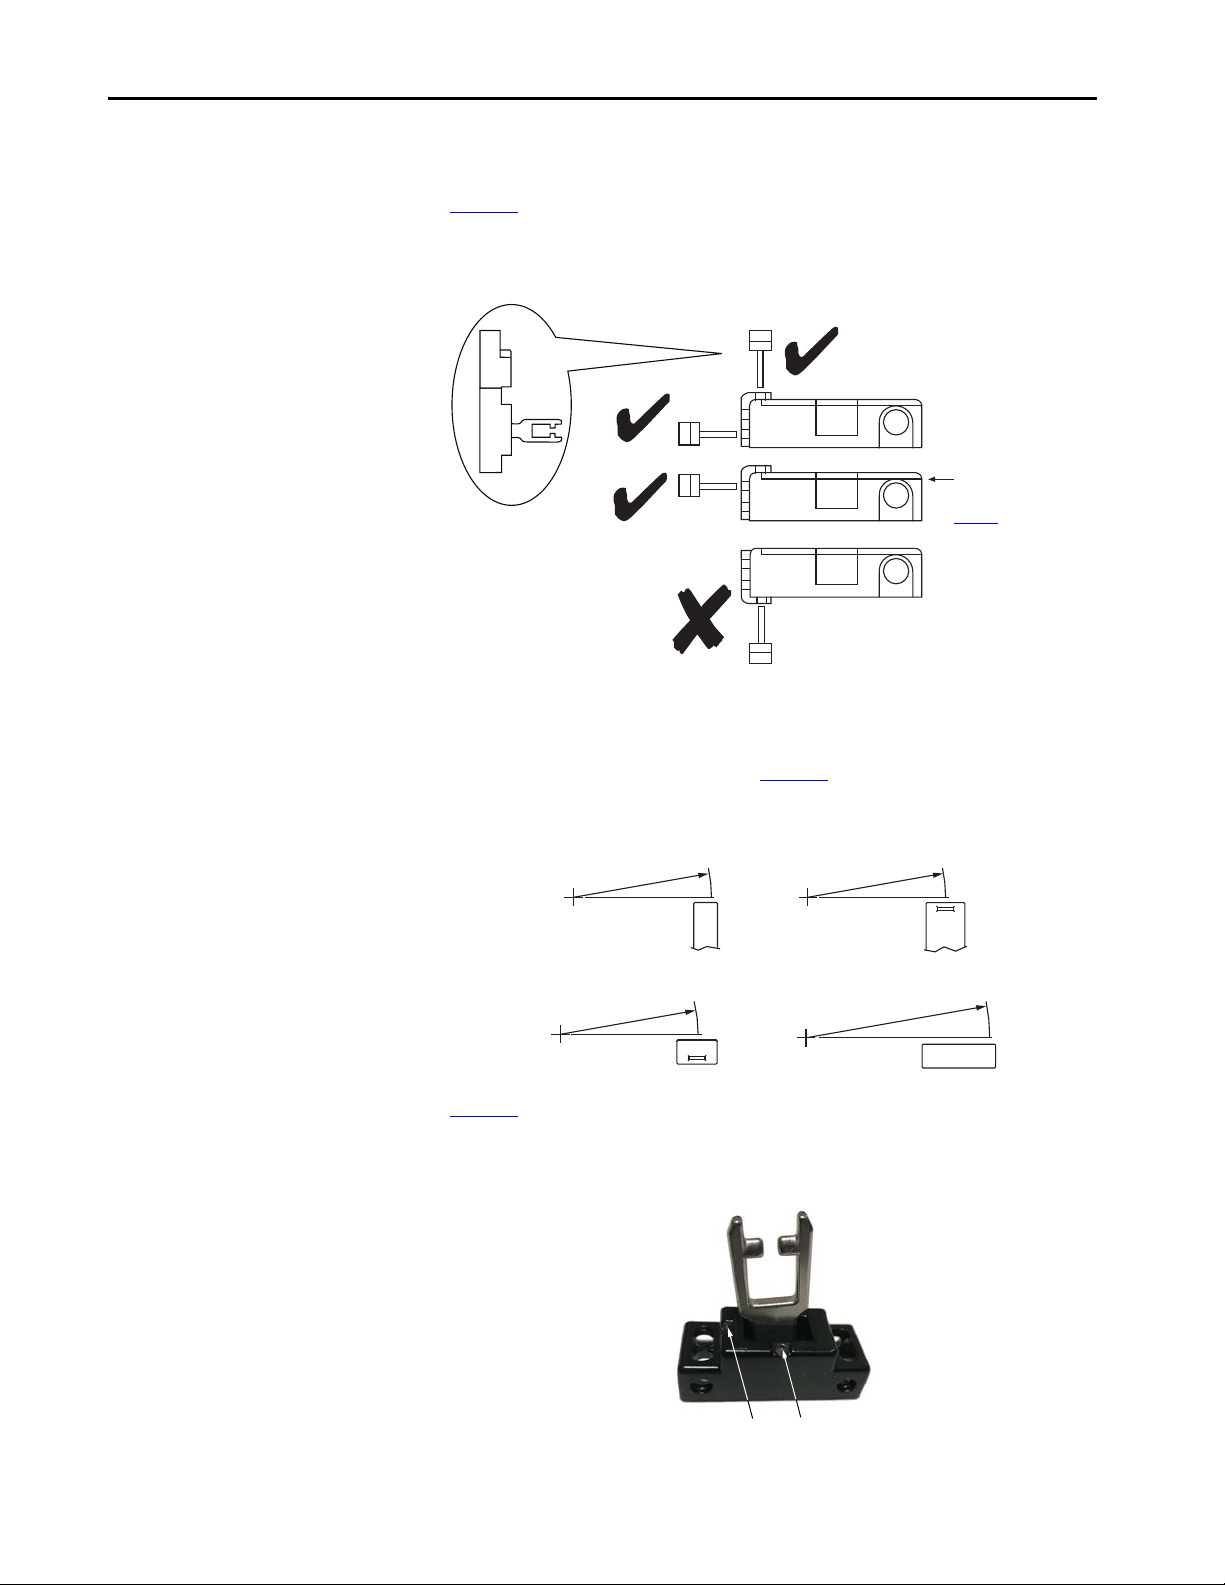
Allowable Approach Directions
The actuator and target must be always mounted as “close coupled” and can
approach the switch in any of the three entry slot positions that are shown in
Figure 3
. Approach from the underside is not allowed, as the distance from the
target to the internal RF sensor is too far for reliable operation.
Figure 3 - Allowable Approach Direction
Minimum Operating Radius
When applied to hinged doors, the minimum operating distances along the
length and perpendicular is shown in Figure 4
Figure 4 - Minimum Operating Distance [mm (in.)]
.
Figure 5 shows the location of the two 1.5 mm (0.06 in.) set screws that can be
adjusted to preset the actuator to an optimal angle, if needed.
Figure 5 - Actuator Set Screw
12 Rockwell Automation Publication 440G-UM002A-EN-P - March 2019
Page 13
Installation Chapter 2
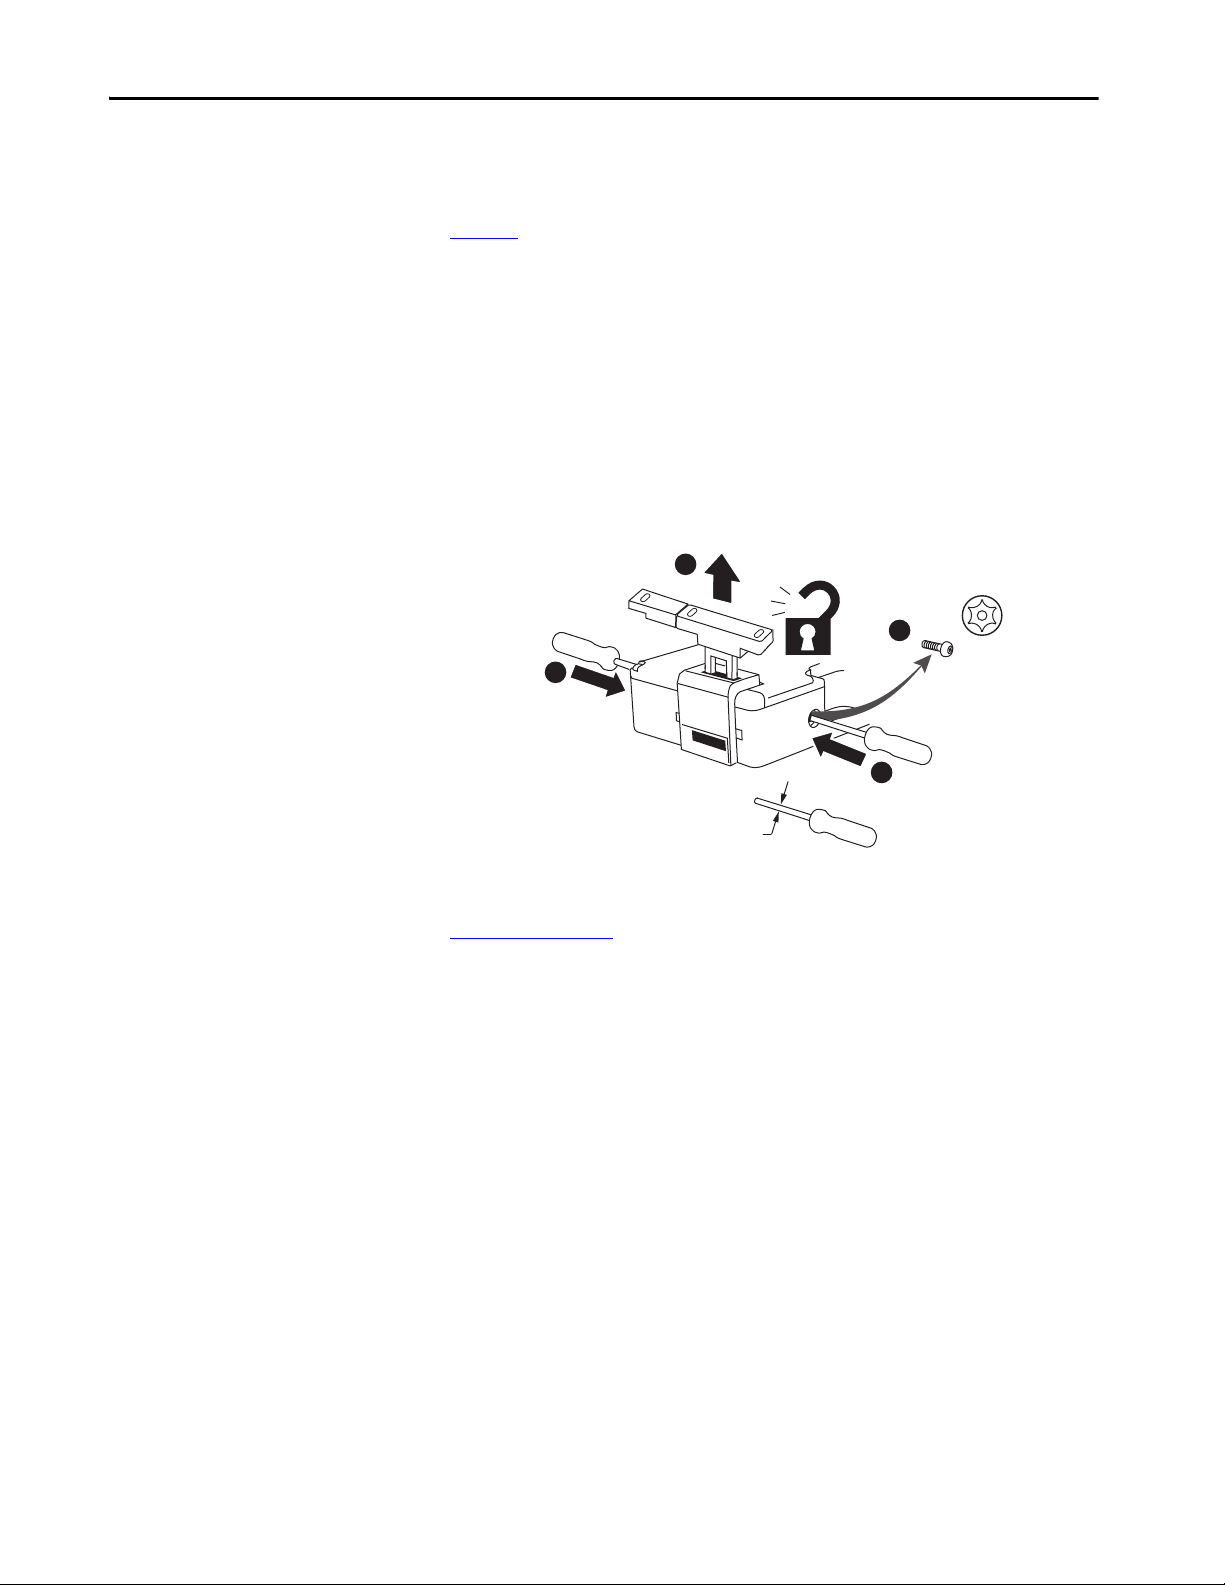
Manual Release
The manual release feature only applies to TLSZR (Power to Release) switch.
In some cases, you must manually release the locked actuator.
Figure 6
shows the two locations from which the actuator can be manually
released.
1. Remove the T20 Torx screw.
2. To release the actuator, insert a small screwdriver or rod in the hole.
If power is applied to the switch when the actuator is released, the OSSD safety
outputs turn OFF and the switch goes to a faulted state with the status
indicator flashing red at 4 Hz. Power then has to be cycled to the switch to
return it to an operational state.
Figure 6 - Manual Release
3
1
2
T20
Manual Override Cover
2
≤ 2.5 (0.10) Ø
Figure 7 on page 14 shows an optional cover that is available only for the
TLSZR (Power to Release) switch. This cover has a lever that allows you to
manually unlock the actuator at any time. Rotate the lever 90° to unlock the
actuator.
If power is applied to the switch when the actuator is released, the OSSD safety
outputs turn OFF, and the switch goes to a faulted state with the status
indicator flashing red at 4 Hz. Power is then cycled to the switch to return it to
an operational state.
Rockwell Automation Publication 440G-UM002A-EN-P - March 2019 13
Page 14
Chapter 2 Installation
1
1.2 N•m (10.62 lb•in)
2
90°
90°
Figure 7 - Manual Override Cover
Pair Proximity
Guide Repositioning
If a pair of TLSZ switches are mounted too close to each other, the two RF
fields could interact causing crosstalk. Cross talk results in nuisance faults.
An absolute minimum of 200 mm (8 in.) must be used to help achieve correct
operation.
The restriction also applies if a TLSZ switch is mounted close to the 440G-LZ
guard locking and the 440N-Z SensaGuard™ switches.
The actuator guide can be repositioned to facilitate alignment of the actuator.
In steps 8…11 (Figure 8
), rotate the metal guide to allow the switch body to be
fastened flush to the mounting surface.
Figure 8 - Guide Repositioning
2
3
1
5
6
4
7
8
14 Rockwell Automation Publication 440G-UM002A-EN-P - March 2019
180°
10
9
11
Page 15
Installation Chapter 2
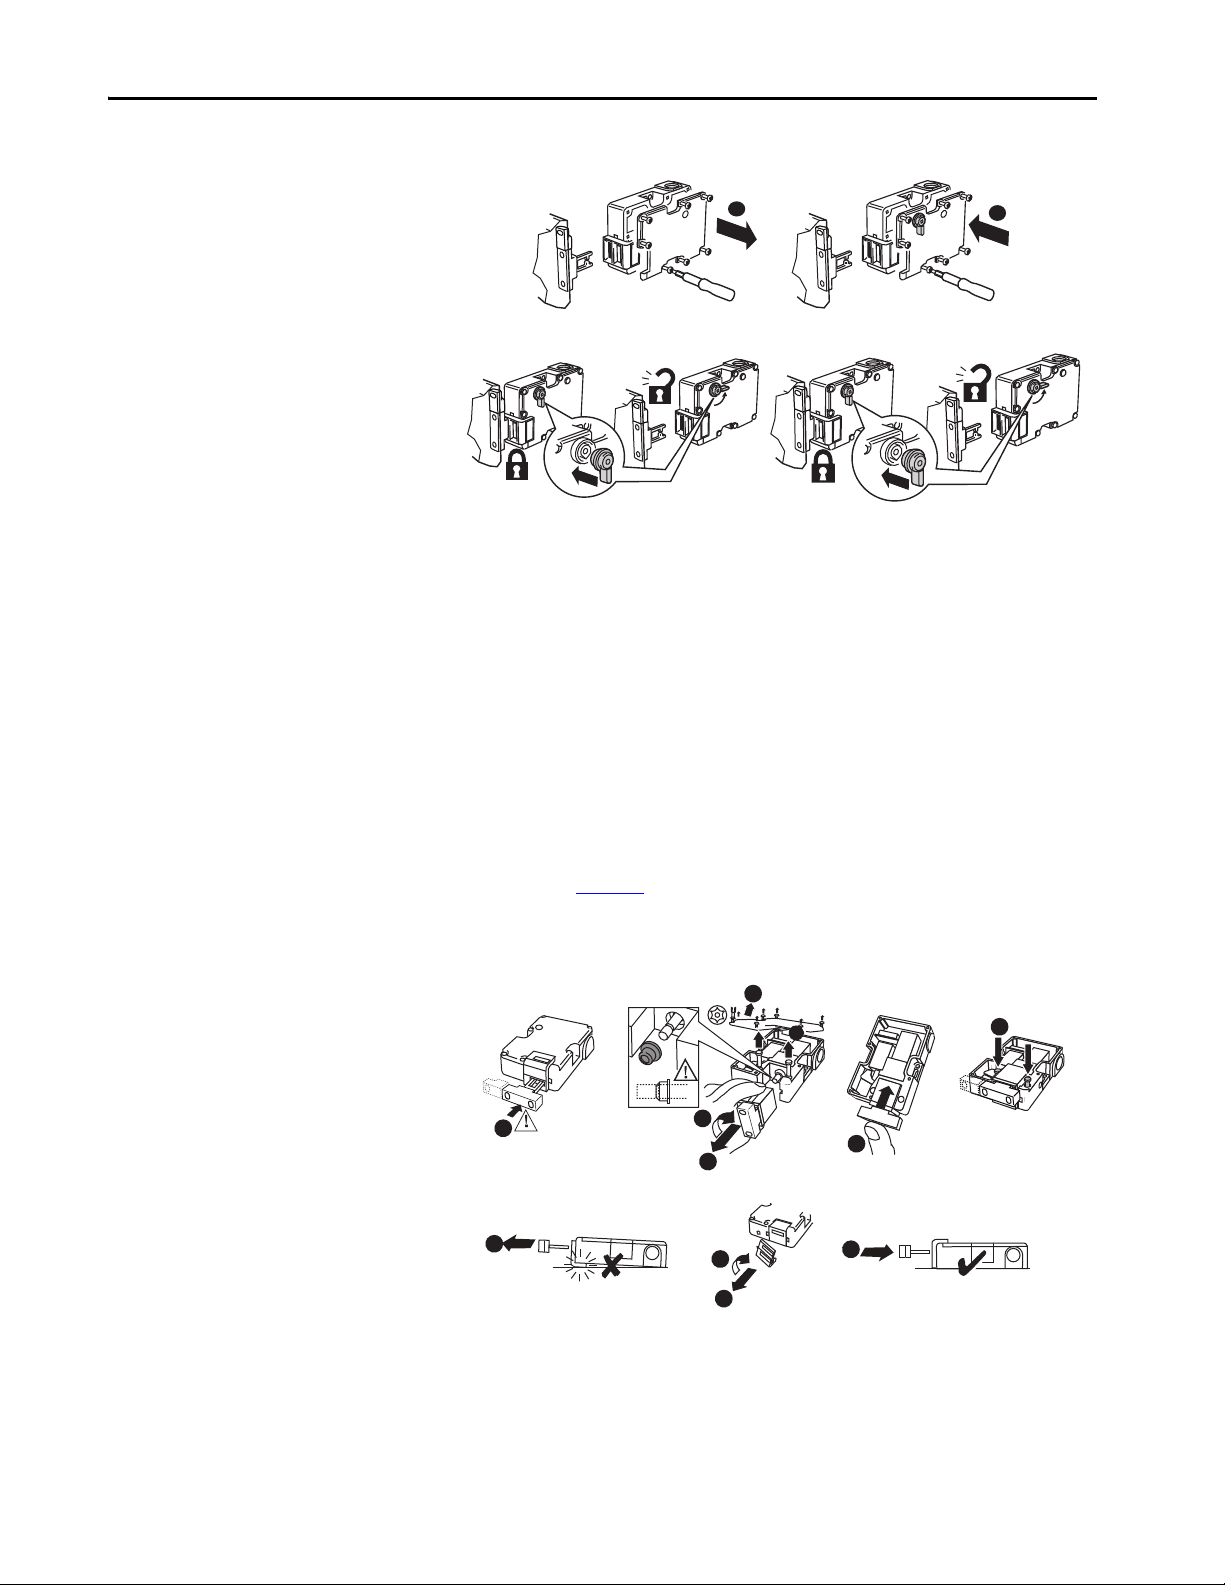
Steel Locking Bolts
The TLSZ is assembled in the factory with plastic pins that secure the actuator
guide. The plastic pins are rated for a holding force of 1500 N (337 lb). The
plastic pins must be replaced with the steel bolts to achieve a holding force of
2000 N (585 lb). Figure 9
shows how to remove the cover to replace the blue
plastic pins with steel bolts.
Figure 9 - Steel Bolt Installation
1.2 N•m (10.62 lb•in.)
5 (0.20)
dia.
Steel bolts
2 x M5
1.4 N•m
(12.39 lb•in.)
1.2 N•m (10.62 lb•in.)
2 x M5
1.4 N•m (12.39 lb•in.)
Plastic pins
15 (0.59)
Actuator Clearance
Fzh = 1500 N (337 lb)
Fzh = 2000 N (450 lb)
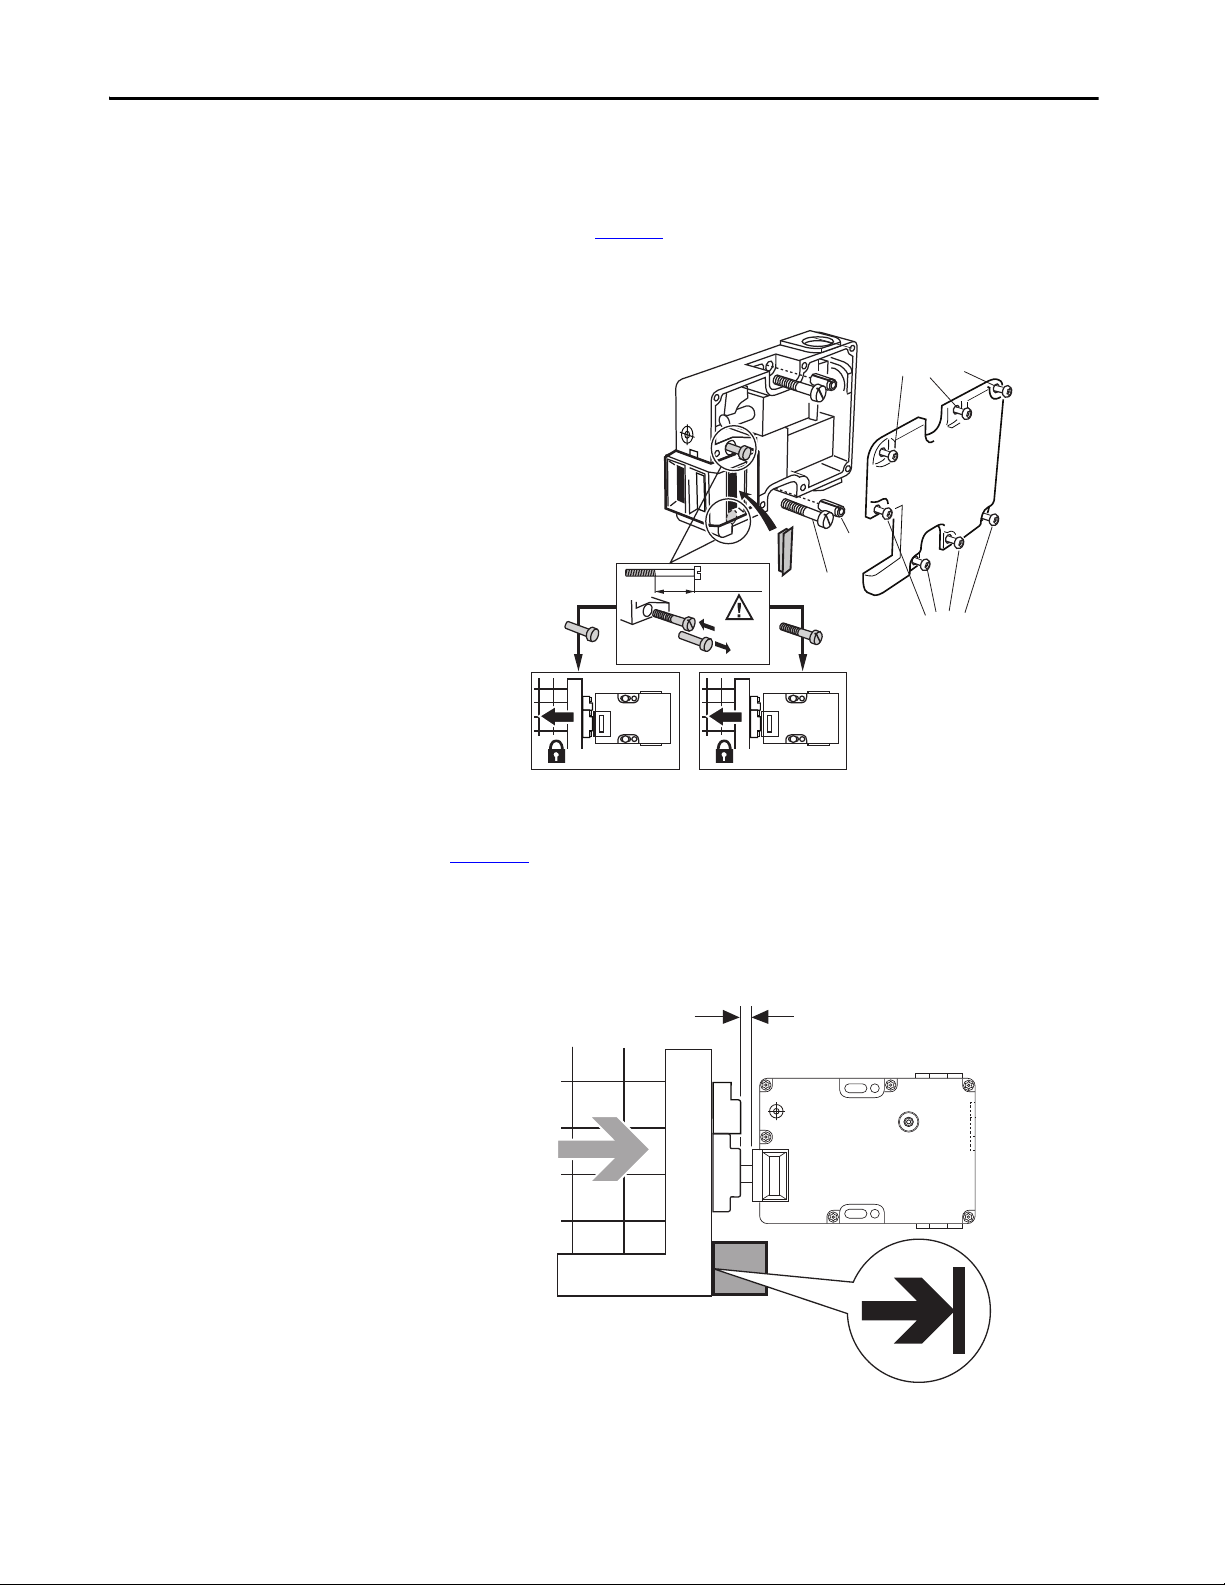
Figure 10 shows the clearance requirements for the TLSZ. The switch must
not be used as a guard stop. You must provide a mechanical stop at least 1mm
(0.04 in.) away from the actuator guide. The actuator must be inserted within
4mm (0.16 in.) or less from the actuator guide to be sure it locks.
Figure 10 - Clearance and Insertion Distance
1…4 (0.04…0.16)
Rockwell Automation Publication 440G-UM002A-EN-P - March 2019 15
Page 16
Chapter 2 Installation
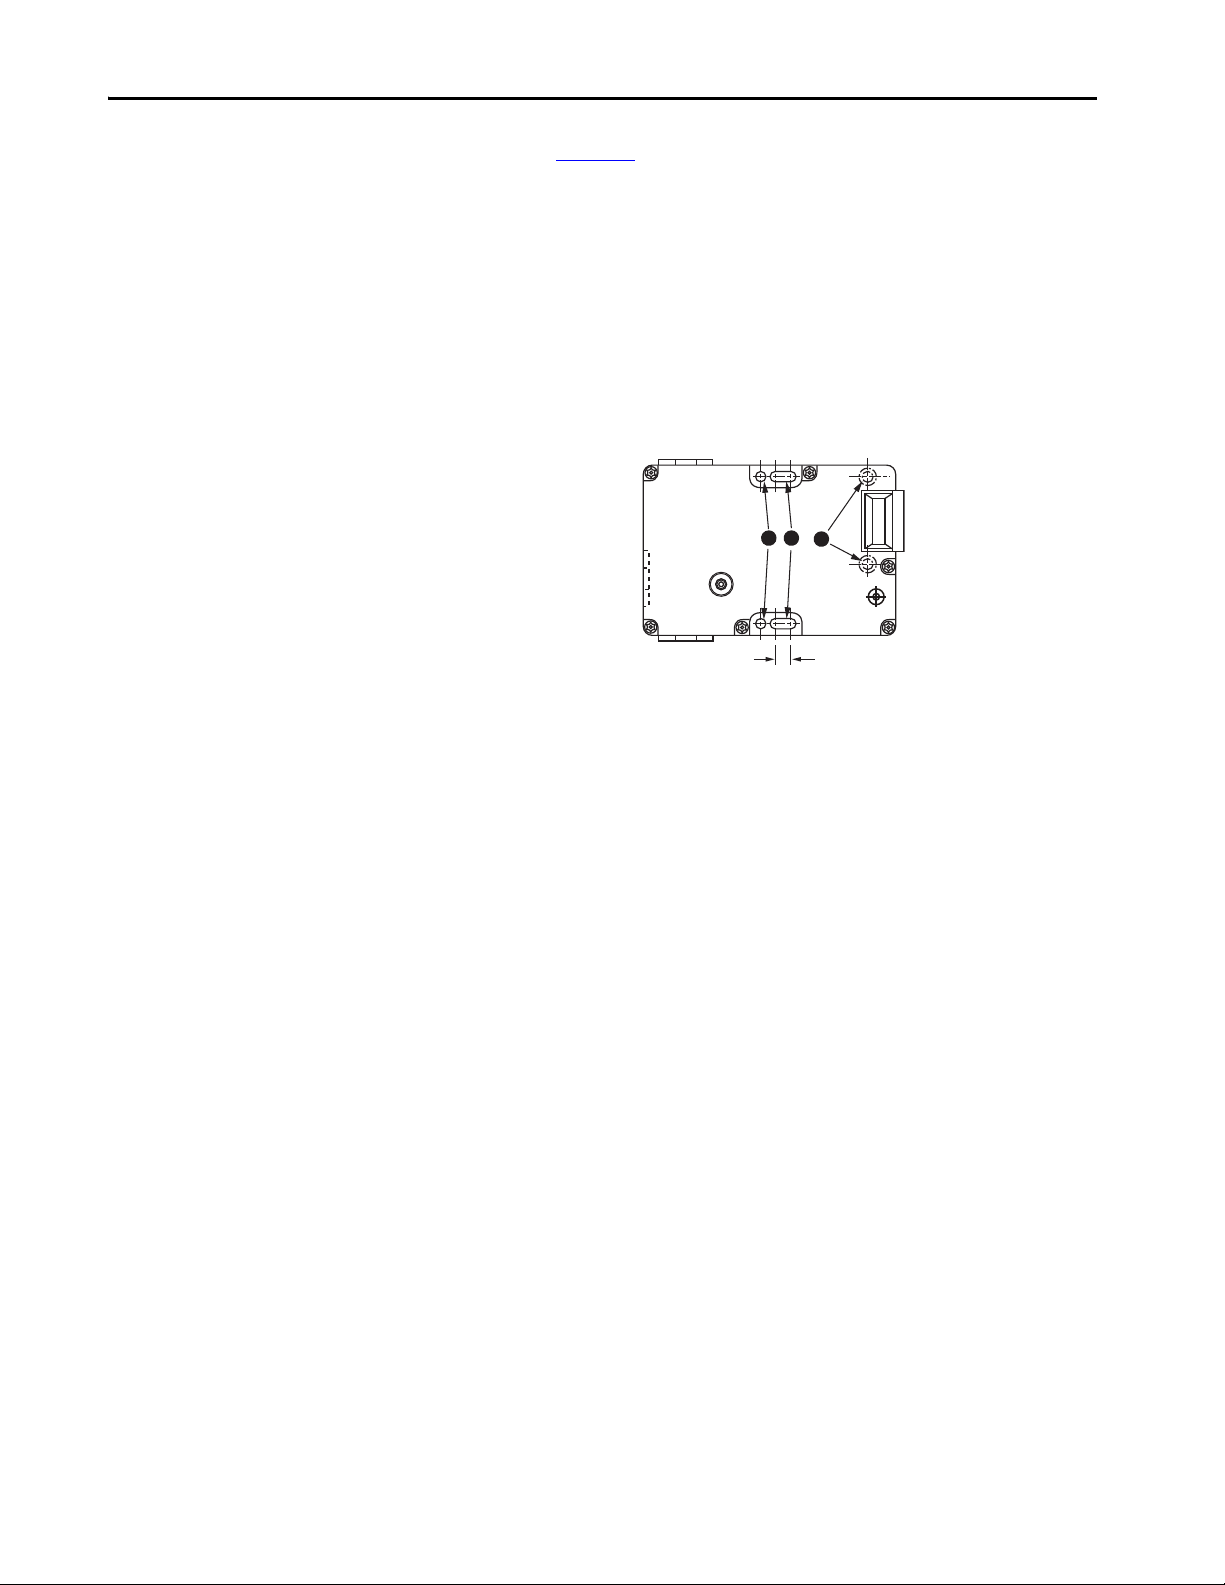
As shown in Figure 11, the TLSZ has two slotted holes to facilitate
installation. The slots allow up to 8 mm (0.31 in.) of movement of the switch
body to achieve the proper clearance with the actuator.
1. Use the slotted holes for initial installation.
2. After alignment with the actuator, secure the switch body in place by
adding mounting hardware in the circular holes.
3. To attain the maximum holding force, replace the plastic pins with steel
screws inside the cover.
Figure 11 - Mounting Slots for Alignment [mm (in.)]
M5
12
3
Status/
Diagnostic
8 (0.31)
16 Rockwell Automation Publication 440G-UM002A-EN-P - March 2019
Page 17
Installation Chapter 2
86 (3.39)
57 (2.24)
3 (0.12)
3 (0.12)
6.5 (0.26)
17
(0.67)
21 (0.83)
14.5
(0.57)
52.5 (2.07)
31.5 (1.24)
60.5 (2.38)
67.5 (2.66)
6.5 (0.26)
5 (0.2)
M5 x 4
126 (4.96)
105 (4.13)
14 (0.55)
22 (0.87)
27 (1.06)
39 (1.54)
9 (0.35)
14 (0.55)
33 (1.3)
6.5 (0.26)
25.5 (1)
20.5 (0.81)
5 (0.2)
5.5 (0.22)
21
(0.83)
17 (0.67)
43 (1.69)
6 (0.24)
5 (0.2)
73 (2.87)
4 (0.16)
Status/
Diagnostic
LED
Target Alignment Mark
14
(0.55)
2.2 (0.09)
24
(0.94)
4.2 (0.17)
19.2 (0.76)
M12
18
(0.71)
20
(0.79)
8
(0.31)
40 (1.57)
31 (4.22)
6.8
(0.27)
4 x 5.5 (0.22)
2 x M3
19
(0.75)
13
(0.51)
51
(2.0)
52 (2.05)
Actuator
Use with exible actuator only:
23.2 (0.91)
11.9
(0.47)
19
(0.75)
440G-ATZAE-xxxx
29.3 (1.15)
7
(0.28)
20
(0.79)
M5
5.5
(0.22)
Tar ge t
Connector location and
dimensions
Do not use cable gland knockouts, two places
Dimensions
Figure 12 shows the dimensions for the switch, target, and actuator.
Figure 12 - Dimensions [mm (in.)]
Rockwell Automation Publication 440G-UM002A-EN-P - March 2019 17
Page 18
Chapter 2 Installation
3 x M5
5.5 (0.22)
6 (0.24)
20
(0.79)
86.5
(3.4)
35
(1.38)
40
(1.57)
13 (0.51)
19
(0.75)
6 (0.24)
7 (0.28)
Tar ge t
Actuator
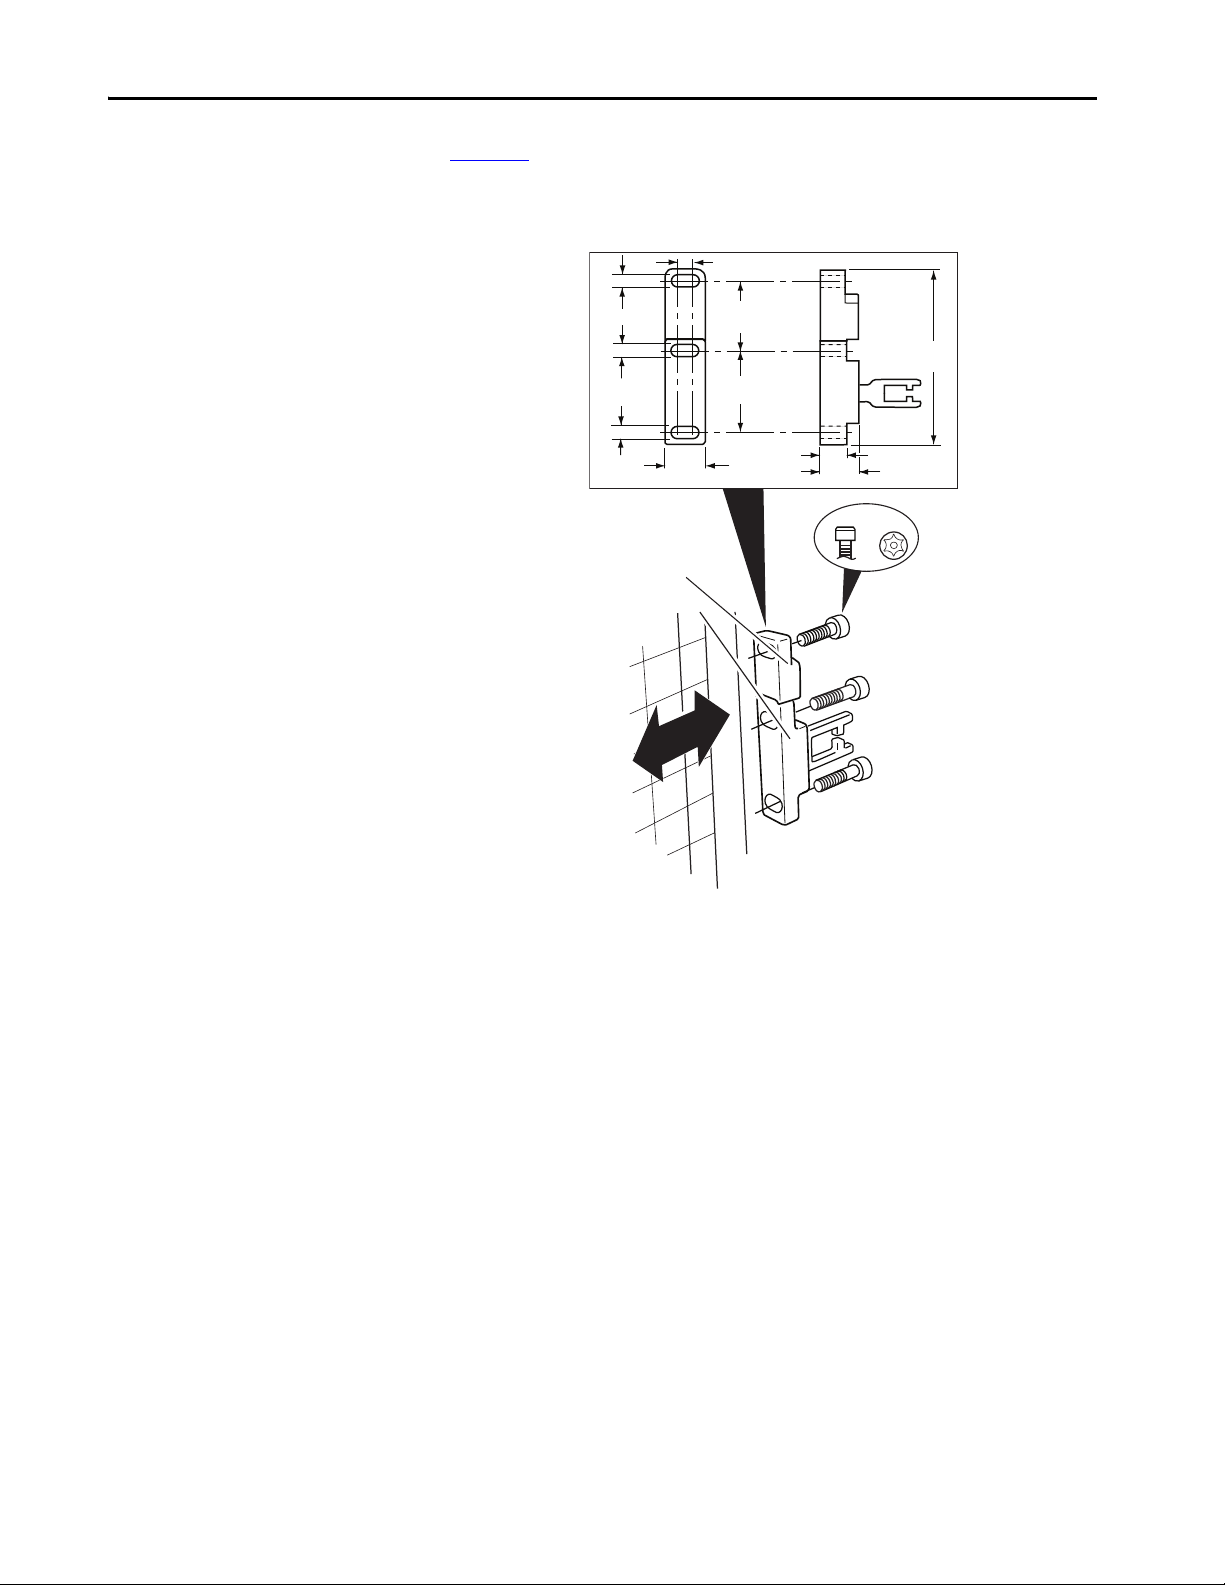
Figure 13 shows the dimensions for mounting the target that is next to the
actuator.
Figure 13 - Actuator/Target Mounting Dimensions [mm (in.)]
18 Rockwell Automation Publication 440G-UM002A-EN-P - March 2019
Page 19

Wiring
2 24V DC+
1 Aux
7 0V
6 Safety B Output
3 Lock Command
8 Safety A+ Input
4 Safety B+ Input
5 Safety A Output
Chapter 3
Connections
The TLSZ is only available with an 8-pin DC Micro M12 quick-disconnect
connector. Figure 14
and Ta b l e 3 show the pin assignments and their functions
and typical mating cordsets. Other cordsets are available at DC Micro Cordsets
and Patchcords.
Figure 14 - 8-pin Micro Quick Disconnect Cables
Table 3 - TLSZ Quick Disconnect Pin Assignments
Typical Mating Cordsets Color Function Pin
889D-F8NB-x
(Red, PVC)
889D-F8AB-x
(Black, PVC)
(1)Replace symbol with 2 [2 m (6.56 ft)], 5 [5 m (16.4 ft)], 10 [1 0 m (32.8 ft)], 15 [15 m (49.2 ft)] 20 [20 m [65.62 ft)] or 30 [30 m
(98.4ft)] for standard cable lengths. The TLSZ has been tested to operate with up to 120 m (393.7 ft) of the mating cables.
(1)
(1)
White Aux 1
Brown 24V DC Supply 2
Green Lock Command 3
Yel low Sa fe ty B + In pu t 4
Gray Safety A Output (OSSD A) 5
Pink Safety B Output (OSSD B) 6
Blue Ground (0V) 7
Red Safety A+ Input 8
OSSD Inputs
OSSD Outputs
The OSSD inputs are Safety A+ and Safety B+. These inputs can be pure
24VDC, or they can contain test pulses. The OSSD inputs allow the TLSZ
switches to be connected in-series while maintaining a high level of safety
performance.
The OSSD outputs are Safety A and Safety B. These outputs are 24V signals
that contain test pulses. The test pulses are used to detect short circuits to 24V,
to 0V and cross faults (from Safety A to Safety B). This description of the test
pulses is provided for informational purposes; you cannot modify them.
Rockwell Automation Publication 440G-UM002A-EN-P - March 2019 19
Page 20

Chapter 3 Wirin g
Figure 15 shows the safety output test pulses when connected to a 1K resistive
load for hardware (HW) revisions A and B, and for firmware (FW) revisions A
through C. The pulses are 25 μs wide and repeat every 20 ms. The exact shape
of the pulses depends on the nature of the load. The capacitive and resistive
effects of the load are determined with the combination of cabling, cable
routing, and connected devices.
Figure 15 - Output Test Pulses
Safety B (Pink)
Safety A (Grey)
5V/Div
Auxiliary Output
Lock Command
25μs/Div
Ta b l e 4 shows the auxiliary output functions. The auxiliary output is a 24V
DC logic signal, whose function is dependent on the catalog number selected.
The auxiliary signal responds independently of the OSSD safety outputs. The
auxiliary output is not a safety-rated signal and must only be used to indicate
the status of the switch.
Table 4 - Auxiliary Output Function
Catalog Number Function Value
440G-TZS21UPRH
440G-TZS21UPLH
440G-TZS21UTRH
440G-TZS21UTLH
Lock Status 24V when actuator is unlocked
0V when actuator is unlocked
Actuator Status 24V when actuator inserted (gate closed)
0V when actuator removed (gate open)
Ta b l e 5 shows the lock command function. The lock command is a 24V logic
signal, with a current of less than 5 mA. The function of the logic signal is
dependent on the catalog number. The 24V power supply connection provides
the power to operate the locking solenoid.
Table 5 - Lock Command Function
Catalog Number Switch Type Function
440G-TZS21UPRH
440G-TZS21UTRH
440G-TZS21UPLH
440G-TZS21UTLH
20 Rockwell Automation Publication 440G-UM002A-EN-P - March 2019
Power to Release 24V unlocks the actuator
0V locks the actuator
Power to Lock 24V locks the actuator
0V unlocks the actuator
Page 21

Chapter 4
Commissioning
Before use, the switch must first “learn” a new RFID target. This step is not
done at the factory.
The switch can learn up to eight targets consecutively. Use this process if there
is a potential for the target to become damaged, inoperable, or lost. When a
new target is learned, the switch no longer recognizes the older target.
Preparation
Wire up the switch with at least the functionality shown in Figure 16.
• Power — connect brown wire to +24V.
• Gnd — connect blue wire to 0V.
• Lock — Leave the green wire ‘open’ when learning the first target.
Connect the green wire to 24V to teach a TLSZR switch subsequent
targets. The TLSZL switch ignores the Lock command during learning.
• Safety A+ and Safety B+ — connect red and yellow wires to 24V during
commissioning. If 24V is not applied to the A+ and B+ inputs, then the
indicator flashes green after commissioning if the switch is locked.
• Safety A and Safety B — optional, no connection required for
commissioning.
• Aux — optional, no connection required for commissioning.
Figure 16 - Commissioning Wiring
+24V DC
TLSZ-GD2
Status Diag
889D-F8NB-x
or
889D-F8AB-x
Brown (+24)
Red (Safety A+)
Yellow (Safety B+)
Green (Lock)
Gray (Safety A)
Pink (Safety B)
White (Aux)
Blue (Gnd)
24V DC Com
Lock
NC
NC
NC
Rockwell Automation Publication 440G-UM002A-EN-P - March 2019 21
Page 22

Chapter 4 Commissioning
First Time Power-up
Learn First Target
Turn on the 24V DC power without the actuator and target.
The Status/Diagnostic indicator blinks green 3 times, pauses 2 seconds, and
then blinks green 8 times. Eight is the number of times a new target can be
learned. The switch continuously repeats the two-second pause followed by the
eight blink sequence.
Ta b l e 6 shows the events that take place when the first target is learned. The
lock command is ignored until after the switch learns its first target, therefore,
the lock command can be 24V or 0V during the first-time learning sequence.
Table 6 - First Target Learning Events
Step Event Indicator Color Blink Rate Duration
1 Apply power to switch Red Solid —
2 Present actuator/target Red Solid —
3 Detect target Red Solid 2…25 s
4 Verifying target Green/Red 1 Hz 15 s
5 Report commissioning error
(see Tab le 8
6 Programming switch Green/Red 4 Hz 15 s
7 Finalizing Red Solid 2 s
8 Number of learns remaining Green # of learns 15 s
9 Learn completed
PTR Green Solid Continuous
PTL Red
) or continue
———
Learning Additional Targets
Ta b l e 7 shows the steps that take place when teaching the switch to recognize
an additional target. For PTR switches, the lock command must connect to
+24V to learn additional targets. The PTL switch ignores the lock command
during learning.
Table 7 - Additional Target Learning Steps
Step Event Indicator
1 Apply power to switch Red Solid —
PTR: Apply 24V to lock command
PTL: Ignores lock command
2 Present new actuator/target Red Sold —
4 Detect target Red Solid 3…25 s
5 PTR: Solenoid automatically locks Red Solid 05.s
PTL: No action
6 Verifying target Green/Red 1 Hz 15 s
7 Report commissioning error (see Table 8) or continue — — —
8 Programming switch Green/Red 4 Hz 15 s
9 Finalizing Red Solid 2 s
22 Rockwell Automation Publication 440G-UM002A-EN-P - March 2019
Color
Blink Rate Duration
Page 23

Commissioning Chapter 4
Table 7 - Additional Target Learning Steps (continued)
Step Event Indicator
Color
10 Number of learns remaining Green # of learns 15 s
11 PTR: Solenoid unlocks then locks ——0.5 s
PTL: no action
12 Learn completed
PTR Red 4 Hz Continuous
PTL Red Solid
13 PTR: Cycle power — — —
PTL: Ready for use
Blink Rate Duration
Commissioning Errors
Power-up Self-check
During commissioning, the switch performs certain checks. If an error is
detected, the Status/Diagnostic indicator reports the error. Ta b l e 8
lists the
commissioning error codes. The error code is generated after the switch verifies
the target. If an error code is generated, the switch must be power cycled before
further learning is started.
Table 8 - Commissioning Error Codes
Indicator Flashes (4 Hz) Code
Red-Red-Red-Green-Green Target already learned
Red-Red-Red-Green-Green-Green Bad RFID
Target that is removed while programming PTL
Red-Red-Red-Green-Green-Green-Green Exceeded learning eight targets
Upon power-up, the TLSZ performs an internal self-check, which takes
approximately three seconds. Whether the actuator/target is inserted and the
lock command is present; the indicator remains red or turns green after the
self-check. Ta b l e 9
shows the indicator sequence during self-check with the
actuator/target inserted. The self-check sequence occurs only once.
Table 9 - Self-check Indicator Sequence
Model Lock Signal Indicator Sequence OSSD Outputs
TLSZR OFF Green-Green-Green-Red-Green ON
ON Green-Green-Green-Red OFF
TLSZL OFF Green-Green-Green-Red OFF
ON Green-Green-Green-Red-Green ON
Rockwell Automation Publication 440G-UM002A-EN-P - March 2019 23
Page 24

Chapter 4 Commissioning
Notes:
24 Rockwell Automation Publication 440G-UM002A-EN-P - March 2019
Page 25

Functional Testing
A manual functional electric test must be made:
•After installation
• After any maintenance or change of component
• If the guard is used infrequently
–Less than once per month for SIL 3/PLe
– Less than once per year for SIL 2/PLd
Chapter 5
Testing Procedure
ATT EN TI ON : During the functional test, confirm that there are no persons in
the danger area and that the machine startup causes no hazard.
1. Confirm that the guard door is open.
2. Connect the 24V DC power to pin 2 and ground (0V) to pin 7. The
switch conducts a self-testing routine at the end of which the diagnostic
indicator shows solid red.
3. Test to confirm that the machine cannot start.
4. Confirm the lock command at pin 3 is set to 0V for PTR and 24V for
PTL types.
5. Test again to confirm that the machine cannot start.
6. Close the guard door and then confirm that the guard is mechanically
locked and the diagnostic indicator shows solid green.
7. Test to confirm that the machine can now start.
8. Change the lock command at pin 3. Set it to 24V for PTR and 0V for
PTL types.
9. Confirm the machine stops, the guard door is mechanically unlocked,
and the machine cannot restart.
Rockwell Automation Publication 440G-UM002A-EN-P - March 2019 25
Page 26

Chapter 5 Functio nal Testing
Notes:
26 Rockwell Automation Publication 440G-UM002A-EN-P - March 2019
Page 27

Chapter 6
+24V DC
Proximity Sensors
871TM-DH10NP30-D4
889D-F4AC-2
Red (OSSD A+)
Pink (OSSD B)
Green (Lock)
White (Aux)
Blue (Gnd)
Grey (OSSD A)
Yellow (OSSD B+)
Brown (+24)
24V DC Com
Safety
Gate
M
Gate
Unlock
Request
Reset &
Gate Lock
Request
TLSZR-GD2
889D-F8NB-2
GLP
440R-GL2S2P
A2S12 S22 L11
L12
L61
51
P12 P22
A1X14 X24 S44S54
AP
Y32
LOGIC
0
1
2
3
4
56
7
8
9
SLS2/TIME
0
1
2
3
4
56
7
8
9
SLS1
0
1
2
3
4
56
7
8
9
L1 L2 L3
Gate control
power supply
Gate control
circuit
S1
S2
1 Stop
PowerFlex
525
2 Start
5 Preset Freq 1
4 Gnd
RTS
UWV
11 +24V DC
Status Diag
Application and Wiring Examples
The following application and wiring examples are intended to show how the
TLSZ products can be applied. If you are the user or the designer, you may
require variations to these examples in order to meet their specific
requirements.
Wiring to GLP Relay
The GLP safety relay is designed to operate with PTR switches. To use a PTL
switch, you must use an interposing relay on the lock command at GLP
terminal 51. In the example shown in Figure 17
, the GLP allows the gate to be
unlocked when the motor is running at a Safely-limited Speed.
Figure 17 - GLP and TLSZR Schematic
Rockwell Automation Publication 440G-UM002A-EN-P - March 2019 27
Page 28

Chapter 6 Application and Wiring Examples
Circuit Status as Shown
The gate is open and unlocked. The motor is off. The GLP is ready for reset.
The GLP has a Logic setting of 3: (Safely-limited Speed with Logic IN OFF), a
Safely-limited Speed (SLS1) setting of 5 (5 Hz) and a maximum (SLS2) speed
setting of 8 (2000 Hz). The safety outputs (X14 & X24), the single wire safety
output (L11), and the auxiliary output (Y32) are OFF.
IMPORTANT Start the GLP logic configuration from “0” to configure X14 and X24 for use
as safety outputs.
Starting
Close the gate and press Reset to lock the gate and turn on the GLP safety
outputs. Press Start to turn the motor ON.
Safely-limited Speed
Wiring to GLT Relay
A normal production stop is performed by pressing Stop. Access through the
safety gate is initiated by pressing Gate Unlock Request. The Y32 output of the
GLP turns ON and commands the PowerFlex® drive to bring the motor to a
safe slow speed (Preset Freq 1). When the proximity sensors detect the speed
has dropped below the Safely-limited Speed (5 Hz), the gate becomes
unlocked. The operator can enter the machine cell, as the motor continues to
run at the safe slow speed. After you leave the cell and close the gate, press Reset
to lock the gate and return the machine to production speeds.
The circuit meets the safety requirements up to Category 3, Performance
Leveld in accordance with ISO 13849-1 and SIL CL 2 in accordance with
IEC 62061.
The GLT safety relay is designed to operate with PTR switches. To use a PTL
switch, you must use an interposing relay on the lock command at terminal 51
of the GLP.
In this example shown in Figure 18 on page 29
command to the drive to turn OFF. After eight seconds, the GLT turns off its
safety outputs and unlocks the gate. The risk assessment must determine
adequate time delay for the machine to achieve a safe state before unlocking the
gate.
, the GLT sends an immediate
28 Rockwell Automation Publication 440G-UM002A-EN-P - March 2019
Page 29

Figure 18 - GLT and TLSZR Schematic
+24V DC
Red (OSSD A+)
Pink (OSSD B)
Green (Lock)
White (Aux)
Blue (Gnd)
Gray (OSSD A)
Yellow (OSSD B+)
Brown (+24)
24V DC Com
Safety
Gate
M
Gate
Unlock
Request
Reset &
Gate Lock
Request
TLSZR-GD2 440G-TZS21xxRH
889D-F8NB-2
GLT
440R-GL2S2T
A2S12 S22 24
B2
L61
51
L12 14
A1S11 S12 S44S54
L11
Y32
LOGIC
0
1
2
3
4
56
7
8
9
TIME
0
1
2
3
4
56
7
8
9
RANGE
0
1
2
3
4
56
7
8
9
L1 L2 L3
Gate control
power supply
Gate control
circuit
S1
S2
1 Stop
PowerFlex
525
2 Start
4 Gnd
RTS
UWV
11 +24V DC
Status Diag
Application and Wiring Examples Chapter 6
Circuit status as shown: The gate is open and unlocked. The motor is off. The
GLT is ready for reset. The GLT has a Logic setting of 3: (Category 1 Stop), a
Range setting of 4 (10 seconds) and a Time setting of 8 (80%). The Y32 output
turns OFF immediately; 8 seconds later, the safety outputs turn OFF.
The safety outputs (14 and 24) and the single wire safety output (L11) are
OFF and the auxiliary output (Y32) is ON.
IMPORTANT Start the GLT logic configuration from “0” to configure 14 and 24 for use with
Starting
Close the gate. Press Reset and Gate Lock Request to lock the gate and turn on
the GLT safety outputs. Press Start to turn the motor ON.
pulse testing; the PF525 can operate with pulse tested inputs to S1 and S2.
Rockwell Automation Publication 440G-UM002A-EN-P - March 2019 29
Page 30

Chapter 6 Application and Wiring Examples
Stopping
Normal production stops are performed by pressing Stop. Access through the
safety gate is initiated by pressing the Gate Unlock Request. The Y32 output of
the GLP turns OFF, which commands the PowerFlex drive to bring the motor
to a stop. After the configured time delay (eight seconds) expires, the GLT
safety outputs turn off, and the gate becomes unlocked. After you leave the cell
and close the gate, press Reset to lock the gate and return the machine to a
production state.
The circuit meets the safety requirements up to Category 3, Performance
Leveld in accordance with ISO 13849-1 and SIL CL 2 in accordance with
IEC 62061.
Wiring to DI and EMD Relay
The TLZ can be connected to the DI and EMD safety relays. The DI monitors
the safety outputs of the TLZR and the EMD enables the gate to be unlocked
after a configured delay time expires.
B1 is connected to B2 to allow for retriggering. If you open and close the
E-stop and press Reset before the delay expires, the EMD timer resets.
Upon initial power-up, the TLSZ must be cycled for the DI to recognize the
TLSZ OSSD signals.
In the example shown in Figure 19 on page 31
shutdown. After an eight-second delay, the TLZR is allowed to be unlocked
and the hazards that remain are turned OFF. A selector switch is required to
maintain the gate in an unlock state. The risk assessment must determine
adequate time delay for the machine to achieve a safe state before unlocking the
gate.
, an E-stop initiates the machine
30 Rockwell Automation Publication 440G-UM002A-EN-P - March 2019
Page 31

Figure 19 - DI with EMD and TLSZR Schematic
+24V DC
Red (OSSD A+)
Pink (OSSD B)
Green (Lock)
White (Aux)
Blue (Gnd)
Grey (OSSD A)
Yellow (OSSD B+)
Brown (+24)
Unlock
24V DC Com
Safety
Gate
TLSZR-GD2 440G-TZS21xxRH
889D-F8NB-2
Status Diag
A1
L12
X32
X32
B1 B2
L11 38
17 27 37 47
4818 28A2
EMD
440R-EM4R2D
1
2
3
4
5
67
8
9
10
TIME
0
1
2
3
4
56
7
8
9
RANGE
A1
S11 S21 S12S22
S32 L11 Y32L12
13 23
14S42 24
S34
A2
DI
440R-D22R2
0
1
2
3
4
5
6
7
8
LOGIC
K3 K4K1 K2
Reset
Application and Wiring Examples Chapter 6
Circuit Status as Shown
The E-stop is released. The gate is open and unlocked. K1, K2, K3, and K4 are
OFF. The DI is configured for two inputs with monitored manual reset. The
EMD is configured for 8-second off-delay; Range setting of 2 is 10 s, Time
setting of 8 is 80% of the range. The X32 terminal is ON because the EMD
safety outputs are OFF.
Starting
With the Unlock switch open, close the gate. Press Reset to lock the gate and
turn on the K1…K4 safety contactors.
Stopping
Stopping is initiated by pressing the E-stop. K1 and K2 contactors turn off
immediately. The single wire safety signal from the DI (L11) to the EMD
(L12) also turns off immediately, and the EMD starts the off-delay timer. After
8 seconds, contactors K3 and K4 turn OFF and X32 goes to 24V. The unlock
switch is enabled, and the gate can be unlocked. While the gate is unlocked, the
Rockwell Automation Publication 440G-UM002A-EN-P - March 2019 31
Page 32

Chapter 6 Application and Wiring Examples
L1
L2 L3
M
K1
K2
K1
K2
Status
Control
Control
+24V DC
TLSZR
TLSZR
Machine
Control
System
+24V Com
A1
S32 X3
X2
X4
14S42
13 23
24
S11
S12 S21S22
X1
A2
DG
440R-DG2R2T
INPUTINPUT
INPUTINPUT
+
440R-ENETR
A
B
C
Status
0
.
2
.
4
.
6
.
8
.
1
0
.
1
2
.
1
4
.
TIME
TLSZR
TLSZR
DI cannot turn the safety outputs back ON. After you leave the cell and close
the gate, open the unlock switch to lock the gate, and release the E-stop.
The circuit can meet the safety requirements up to Category 4, Performance
Level e in accordance with ISO 13849-1 and SIL CL 3 in accordance with
IEC62061.
Wiring to DG Relay
The TLSZR can be used in GuardLink® applications; the TLSZL cannot be
used in GuardLink applications. The GuardLink system uses taps to connect a
series of devices to one relay. The GuardLink system provides control and
status information between the machine control system and the safety system.
Figure 20
shows four TLSZR switches that are connected on two GuardLink
circuits from one DG relay. The DG relay can accommodate up to 32 devices
on each input. The devices can be a mix of many different safety devices. When
guard locking devices are included in the GuardLink system, the lock/unlock
command must come from the machine control system through the
440R-ENETR module.
See publication 440R-UM015
Figure 20 - DG with TLSZR Schematic
for further details.
32 Rockwell Automation Publication 440G-UM002A-EN-P - March 2019
Page 33

Application and Wiring Examples Chapter 6
05
CR30
020100 03 04
A1 15 20 2116
06
18A2
071908 10 11
12 13 14
09
17
+24V DC
24V DC Com
Reset
NC
440C-CR30-22BBB
Unlock
Motor Not Running
Lock
Gate control
power supply
Gate control
circuit
M
4 Gnd
S1
S2
1 Stop
11 +24V DC
L1 L2 L3
PowerFlex
525
2 Start
R5
t081=2
RTS
UWV
Red (OSSD A+)
Pink (OSSD B)
Green (Lock)
White (Aux)
Blue (Gnd)
Gray (OSSD A)
Yellow (OSSD B+)
Brown (+24)
Safety
Gate
TLSZR-GD2
440G-TZS21UTRH
889D-F8NB-2
Status Diag
R6
Wiring to CR30 Relay
The CR30 is a software configurable relay that can easily interface with the
TLSZ guard locking switch. Version 10 and later of Connected Components
Workbench™ software has a locking function that is useful for guard locking
applications.
Figure 21
shows an example schematic. The CR30 monitors the motor
running signal from the PowerFlex® 525. When the motor is not running, the
safety gate can be unlocked, and the PowerFlex 525 goes to a Safe Torque Off
state.
Figure 21 - CR30 Schematic
Figure 22 on page 34 shows an example CR30 configuration that works with
the schematic in Figure 21.
The TLSZR OSSD outputs drive the Safe Torque Off (STO) signals of the
PF525. The STO is enabled after the gate is locked and the Reset is pressed.
The PF525 STO inputs can tolerate the pulse test that is generated by the
CR30 outputs.
The Lock_Ctrl_1 block controls the unlock command to the TLSZR. The
unlock Stop Time delay is set to five seconds, and the ULR Latch (Unlock
Request) is set to ON. When an unlock request is made, the command is issued
five seconds after the motor stops running, and the unlock request is latched
ON.
Rockwell Automation Publication 440G-UM002A-EN-P - March 2019 33
Page 34

Chapter 6 Application and Wiring Examples
Figure 22 - CR30 Configuration in CCW
Wiring to 1734 POINT Guard I/O
The TLSZ can be connected to a 1734 POINT Guard I/O™. The catalog
number 889D-F8NB cordset has 24-AWG wires; which allows three wires that
are connected to one terminal. This wiring example shows a Power to Lock
switch with a Door Status auxiliary signal. The PLC logic checks to see if the
door is closed before issuing a lock command. The schematic for this example is
shown in Figure 23 on page 35
.
34 Rockwell Automation Publication 440G-UM002A-EN-P - March 2019
Page 35

Figure 23 - 1734 and TLSZL Schematic
1734-IB8S1734-AENT 1734-OB8S
24V DC Com
I0
I1
I2
T0
I3
T1M
COM COM
I4
I5
I6
T2
I7
T3M
COM COM
0
1
2
6
3
7
45
O0
O1
O2 O3
COM COM
O4
O5
O6 O7
COM COM
COM COM COM COM
+24V DC
K1
K2
Ethernet I/P
to GuardLogix
PLC and HMI
Red (OSSD A+)
Pink (OSSD B)
Green (Lock)
White (Aux)
Blue (0V)
Gray (OSSD A)
Yellow (OSSD B+)
Brown (+24V)
Safety
Gate
TLSZL-GD2
889D-F8NB-10
Status Diag
K1
K2
440G-TZS21STLH
Power to Lock
Aux = Gate Statu s
Application and Wiring Examples Chapter 6
Figure 24 shows the General Tab of the 1734-IB8S Module Properties. The
Input Status must be set to “Combined Status – Muting” as this setting is used
by the Dual Channel Input Stop logic block to verify that 1734-IB8S is
operational. The Output Data must be set to “Test,” as the test outputs are used
to generate test pulses for the output contactors.
Figure 24 - 1734-IB8S Module Properties – General
Figure 25 on page 36 shows the Input Configuration tab of the 1734-IB8S
Module Properties. In this example, Points 0 and 1 monitor the OSSD outputs
of the TLSZL. The Type is set to Single (to allow the Logix program to detect
Rockwell Automation Publication 440G-UM002A-EN-P - March 2019 35
Page 36

Chapter 6 Application and Wiring Examples
potential faults) and Mode must be set to Safety. Points 2 and 3 monitor the
status of the output contactors K1 and K2. Set the Type to Single (to allow the
program to detect potential faults). Safety pulse testing detects potential faults
in the monitoring circuit. The TLSZ can operate with the Input Delay Time
set to zero.
Figure 25 - 1734-IB8S Module Properties – Input Configuration
Figure 26 shows the Test Output tab of the 1734-IB8S Module Properties. In
this example, Points 0 and 1 are set to pulse test as these points help check the
integrity of contactors K1 and K2. Points 2 and 3 are set to “Standard.” Point 2
is the lock command, and Point 3 applies power to the TLSZL and supplies
power to the OSSD inputs. By setting it to standard, you can programmatically
turn Points 2 and 3 off and on.
Figure 26 - 1734-IB8S Module Properties –Test Output
36 Rockwell Automation Publication 440G-UM002A-EN-P - March 2019
Page 37

Application and Wiring Examples Chapter 6
Figure 27 shows the General Tab of the 1734-OB8S Module Properties. The
Output Data must be set to “Safety,” as it is controlling the output safety
contactors.
Figure 27 - 1734-OB8S Module Properties – General
Figure 28 shows the Output Configuration tab of the 1734-OB8S Module
Properties. Points 0 and 1 drive the output contactors K1 and K2. The point
Types are set to Dual, and the Modes are set to Safety.
Figure 28 - 1734-OB8S Module Properties – Output Configuration
Figure 29 on page 38 shows an example logic program. A Dual Channel Input
Stop function block monitors the TLSZL and a Configurable Redundant
Output function block controls two contactors. This example can be used as a
starting point for implementation; you must incorporate additional logic that
is based on the risk assessment for the machine.
Rockwell Automation Publication 440G-UM002A-EN-P - March 2019 37
Page 38

Chapter 6 Application and Wiring Examples
Figure 29 - Studio 5000® Example Logic Program
38 Rockwell Automation Publication 440G-UM002A-EN-P - March 2019
Page 39

Application and Wiring Examples Chapter 6
Power
AE
BF
DH
CG
EtherNet
4
3
2
1
1
2
3
4
1 T1
2 I1
3 C
4 I0
5 T0
1 T1
2 I1
3 C
4 I0
5 T0
1 T1
2 I1
3 C
4 I0
5 T0
1 T1
2 I1
3 C
4 I0
5 T0
1 T1
2 I1
3 C
4 I0
5 T0
1 T1
2 I1
3 C
4 I0
5 T0
X100 X1X10
2 O1
1+24
3 C
4 O0
5 C
2 O1
1+24
3 C
4 O0
5 C
354
21
354
21
+24V DC
24V Com
871A-TS5-DM1 5 pin
Field Attachable Connector
1732ES-IB12XOB4
Red (OSSD A+)
Pink (OSSD B)
Green (Lock)
White (Aux)
Blue (Gnd)
Gray (OSSD A)
Yellow (OSSD B+)
Brown (+24)
Safety
Gate
TLSZR-GD2
889D-F8NB-5
Status Diag
N/C
K1
Brown (1) White (2)
Black (4)
Gray (5)
K2
889D-E5NC-10
100S or 700S or 700-HPS
Contactors and Relays
K2
889D-E5NC-10
White (2) A1 A2 Blue (3)
Black (4) A1 A2 Gray (5)
K1
Wiring to 1732 ArmorBlock
The TLSZ can be connected to a 1732ES or 1732DS ArmorBlock® module by
using an 871A-TS5-DM1 field attachable connector. The 889D-F8NB
cordset has 24-AWG wires that connect to one pin. An example schematic is
shown in Figure 30
.
As an alternative, you can use an 871A-TS8-D1 field attachable connector at
the TLSZ and a 5-wire cordset (889D-M5NC-x).
Figure 30 - ArmorBlock Schematic
Figure 31 on page 40 shows the General Tab of the ArmorBlock Module
Properties. The Input Status must be set to “Combined Status — Muting” and
the Output Data must be set to “Combined.”
Rockwell Automation Publication 440G-UM002A-EN-P - March 2019 39
Page 40

Chapter 6 Application and Wiring Examples
Figure 31 - Module Properties - General
Figure 32 shows the Input Configuration tab of the ArmorBlock Module
Properties. In this example, Points 0 and 1 monitor the OSSD outputs of the
TLSZR. The Type is set to Single (to allow the Logix program to detect
potential faults), and Mode must be set to Safety. Points 4 and 5 monitor the
status of the output contactors K1 and K2. Set the Type to Single to allow the
Logix program to detect potential faults. The safety pulse test is used to detect
potential faults in the monitoring circuit.
Figure 32 - Module Properties – Input Configuration
Figure 33 on page 41 shows the Test Output tab of the ArmorBlock Module
Properties. In this example, Points 0 and 1 are set to Standard. The Standard
setting allows these two points to be controlled by the program. Point 0 applies
power to the TLSZR. By setting it to Standard, you can programmatically turn
40 Rockwell Automation Publication 440G-UM002A-EN-P - March 2019
Page 41

Application and Wiring Examples Chapter 6
this point off and on if the TLSZ switch has a fault condition. Point 1 is the
lock/unlock command. In this example, the TLSZ is a PTR type, so 24V
unlocks the switch. Use Points 4 and 5 to monitor the contactor outputs and
are set to pulse test.
Figure 33 - Module Properties – Test Output
Figure 34 shows the Output Configuration tab of the ArmorBlock Module
Properties. Points 0 and 1 drive the output contactors K1 and K2. The point
Types are set to Dual, and the Modes are set to Safety.
Figure 34 - Module Properties – Output Configuration
Rockwell Automation Publication 440G-UM002A-EN-P - March 2019 41
Page 42

Chapter 6 Application and Wiring Examples
Figure 35 shows an example program. A Dual Channel Input Stop function
block monitors the TLSZR and a Configurable Redundant Output function
block controls two contactors. This example can be used as a starting point for
implementation; based on the risk assessment for the machine, you can
incorporate additional logic.
Figure 35 - Example Studio 5000 Program
42 Rockwell Automation Publication 440G-UM002A-EN-P - March 2019
Page 43

Chapter 7
Diagnostics and Troubleshooting
Most importantly, persons who are trained in the safety of machine systems
must conduct troubleshooting procedures. This training includes knowledge
of all sources of energy (for example electrical, pneumatic, safety, thermal,
others).
The best approach to troubleshooting the TLSZ guard locking switches is to
observe the status indicator on the switch and follow the flow diagram that is
shown in Figure 36 on page 44
.
Tools Needed
Required Tools
• T20 security-Torx screwdriver bit. Notice that the security Torx has a
hollowed center. You need this bit to remove the cover of the TLSZ.
• Medium-sized flat screwdriver for terminal screws, to remove terminal
blocks, and to configure the switches on the front face of the relays.
• Digital Multimeter (DMM) to measure signal levels and resistance.
Optional Tools
• Oscilloscope — dual or four channel storage scope to view input and
output signals and to capture signals and noise transients.
• Metal paper clips — to insert into the terminals and allow connection of
scope probes to terminals.
Rockwell Automation Publication 440G-UM002A-EN-P - March 2019 43
Page 44

Chapter 7 Diagnostics and Troubleshooting
Flowchart
Figure 36 shows a flow diagram to help diagnose the condition of the TLSZ
switch.
Figure 36 - Troubleshooting Flow Diagram
Look at the Status Indicator
Yes
Is it OFF?
No
Is it Flashing Red
at 4Hz?
No
Is it Flashing Red
at 1Hz?
No
Is it Flashing Green
at 1Hz?
No
Is it Flashing
Red and Green?
No
Go to Step 1
Yes
Go to Step 2
Yes
Go to Step 3
Yes
Go to Step 4
Yes
Go to Step 5
Step 1 — Status Indicator OFF
Yes
Is it Solid Red?
No
Is it Solid Green?
No
Contact Product Support
Go to Step 6
Yes
Go to Step 7
When the status indicator is OFF, the TLSZ is not connected properly to
either the 24V power supply or ground.
1. Use the Torx screwdriver to remove the TLSZ cover.
2. Use a digital multi-meter (DMM) to measure the voltage at the power
supply terminals (blue wire is 0V and brown wire is plus), as shown in
Figure 37 on page 45
.
The voltage must measure between 20.4V and 26.4V DC.
44 Rockwell Automation Publication 440G-UM002A-EN-P - March 2019
Page 45

Diagnostics and Troubleshooting Chapter 7
Figure 37 - Measure the Voltage at the Power Supply Terminals
Step 2 — Status Indicator Flashing Red at 4 Hz
Acceptable Range
20.4V DC to 26.4V DC
DMM
24
Volts
Terminal Color: QD pin - Function
Green: 3 - Lock/Unlock
White: 1 - Aux
Red/Yellow: 4 - Safety B+
Red/White: 6 - Safety B
Red: 8 - Safety A+
Red/Black: 5 - Safety A
No Connection
Brown: 2 - +24V DC
Blue: 7 - 0V
If 24V is present at the wiring terminals, then check that the wires are stripped
and the terminal screws are tight. If the wires are okay, then replace the switch.
If 24V is not present at the terminals, then check the power supply and the
wiring up to the TLSZ switch.
The status indicator flashes red at a 4-Hz rate when an inconsistency is
detected with the RFID sensor. A number of scenarios can cause this fault
indication.
Wrong Target
The TLSZ is configured to detect a specific target. If a non-configured target is
presented to the TLSZ, the TLSZ goes into fault mode and its status indicator
flashes red at 4 Hz.
To correct this condition:
1. Replace the incorrect target with a correct target.
2. Cycle the power to clear the fault.
When received from the factory, the TLSZ is not configured to detect any
target. You must configure the TLSZ to detect a target. The configuration can
be a one-time event, or the TLSZ can be configured to be able to learn up to
eight different targets. The TLSZ can only recognize one target. If the target
gets damaged, the TLSZ can be configured to learn another target, if initial
configuration is set to multi-time learning, see Commissioning Errors on
page 23.
Rockwell Automation Publication 440G-UM002A-EN-P - March 2019 45
Page 46

Chapter 7 Diagnostics and Troubleshooting
Tar ge t
Actuator
Missing Target
If the actuator is inserted into the TLSZR without the target present, the status
indicator flashes red at 4 Hz.
To correct this condition:
1. Remove the actuator from the switch.
2. Cycle power to the TLSZR
3. Mount the target next to the actuator as shown in Figure 38
.
Insert the actuator/target into the switch.
Target Not Mounted Correctly
If the actuator is mounted incorrectly, the TLSZ can operate correctly, but
with reduced tolerance to misalignment of the target. The status indicator
intermittently goes to a fault state with the status indicator flashing red at 4 Hz.
To correct this condition:
1. Remove the actuator/target from the switch.
2. Cycle power to the TLSZ to clear the fault.
3. Mount the target next to the actuator as shown in Figure 38
4. Insert the actuator/target into the switch.
Figure 38 - Mounting of Target and Actuator
.
46 Rockwell Automation Publication 440G-UM002A-EN-P - March 2019
Page 47

Diagnostics and Troubleshooting Chapter 7
Pair Proximity
The RF field from a neighboring switch can cause intermittent faults. Switches
with similar RF technology include the TLSZ, the SensaGuard™ switches, and
the 440G-LZ guard locking switches.
To correct this condition:
1. Make sure that the neighboring switches are mounted at least 200 mm
(8 in.) from any edge of the TLSZ.
2. Cycle power to the TLSZ switch to clear the fault.
Mechanical Pressure on Safety Gate
If a mechanical load (pressure) is applied to the gate during unlocking, the
TLSZR goes to a fault mode. The status indicator flashes green three times and
then red once. It repeats this process for 10 seconds, and then the status
indicator flashes red at 4 Hz. Firmware 1.003 and earlier have a 10-second
limit. Firmware 1.004 attempts to lock for 10 minutes.
1. Check the allowable spacing between the TLS and mechanical gate stop.
2. Adjust the spacing to be between 1 mm (0.04 in.) and 4 mm (0.16 in.)
between the actuator and the metal guide as shown in Figure 39
.
3. Cycle power to the TLSZ switch to clear the fault.
The safety gate needs a little freedom to move when locked.
Figure 39 - Clearance in Closed Position [mm (in.)]
1…4 (0.04…0.16)
Rockwell Automation Publication 440G-UM002A-EN-P - March 2019 47
Page 48

Chapter 7 Diagnostics and Troubleshooting
Long Wiring
Long input wiring adds resistance and decreases the supply voltage to the
switch and reduces the safety OSSD outputs. The size of the wire also makes a
difference; smaller wires have higher resistance.
Figure 40
shows the typical TLSZ test pulses when connected to a resistive
load with short [2 m (6.56 ft) wiring. The test pulses are about 25 ms wide.
IMPORTANT The OSSD outputs are about 23V and the test pulses go to zero volts.
Figure 40 - TLSZ Test Pulses Into a 1K Resistive Load
In Figure 41 on page 49, a TLSZR and GSR-SI operate successfully with long
wiring. The OSSD outputs drop to approximately 21V and the test pulses only
drop to approximately 8V (not 0V).
48 Rockwell Automation Publication 440G-UM002A-EN-P - March 2019
Page 49

Diagnostics and Troubleshooting Chapter 7
Figure 41 - Effect of 300 ohms of Wire Resistance Going Into a GSR-SI Safety Relay
Voltage Supply Dips
When you energize the TLSZ solenoid, it causes a 350 mA in-rush current on
the power supply wire. If multiple TLSZ switches are energized
simultaneously, the voltage supply can dip below the 20.4V voltage
specification and cause the switch to go to fault mode.
Vol ta ge d ro p i s b y:
1. The number of switches being energized simultaneously,
2. The power supply wire size, and
3. The wire length.
IMPORTANT The lock/unlock command on the TLSZ is not like the older TLS1, TLS2, and
on the TLSZ (both Power to Lock and Power to Release) is a logic level signal;
about 3…5 mA. The power to energize the solenoid is provided by the
‘brown’ power supply wire.
To avoid the power supply dip, it is recommended that you stagger the lock/
unlock command to successive switches by at least 170 ms.
Rapid Locking
The TLSZL Power to Lock switches cannot withstand rapid locking and
unlocking. This action results in the indicator flashing red at 4 Hz. Although
the TLSZR Power to Release switches are more tolerant to rapid unlocking/
locking, they can also go to a fault state with the indicator flashing red at 4 Hz.
Rockwell Automation Publication 440G-UM002A-EN-P - March 2019 49
Page 50

Chapter 7 Diagnostics and Troubleshooting
It is recommended you check that the locking operation frequency is no faster
than 1 Hz with 50% duty cycle (500 ms lock, 500 ms unlock).
Step 3 - Status Indicator Flashes Red at 1 Hz
This status indicates that an undetermined fault has occurred.
Cycle the power. If the switch does not recover, cycle it again. If the switch does
not recover, then run a separate cable directly from the power supply to the
switch. This cable can run on the floor away from any extraneous signals. You
can also provide a temporary selector switch to execute the lock/unlock
command.
• Case 1: Switch Operates OK. Check the routing of the cable from the
power supply to the switch. Be sure of adequate separation of switch
cabling to sources of electromagnetic noise, such as drives and motion
systems.
• Case 2: Switch Faults. If the switch fails with the cabling on the floor
(clear of all electromechanical noise), then replace the switch.
Capacitive Loading
The OSSD outputs of the TLSZ uses pulse testing to detect faults. The pulse
testing is subjected to the capacitive loading of the cabling (longer cabling
creates additional capacitance) and capacitance from the device to which it is
connected.
Cable capacitive loading is not an intermittent issue. Once resolved, the
capacitance can remain unchanged until conditions, such as cabling changes,
occur.
Use an oscilloscope to measure the pulse tests. Figure 42 on page 51
typical effect; curved leading edge indicates capacitive loading.
The TLSZR can withstand a capacitive load up to 375 nF. Higher capacitance
causes the OSSD outputs to turn OFF and the indicator flashes red at 1 Hz.
Higher levels of capacitance can be tolerated by adding a 10K resistor from the
OSSD signal to ground.
shows the
50 Rockwell Automation Publication 440G-UM002A-EN-P - March 2019
Page 51

Figure 42 - Typical Capacitive Effect on Pulse Tests
Diagnostics and Troubleshooting Chapter 7
Step 4 — Status Indicator Flashes Green at 1 Hz
Step 5 — Flashing Red and Green
When the status indicator is flashing green at 1 Hz, the switch is indicating that
it is waiting for 24V to be applied to the OSSD A+ and OSSD B+ input
signals.
Upon power-up, the TLSZ performs internal checks. During this time, the
status indicator flashes green three times, shows solid red for about two
seconds. If the OSSD A+ and OSSD B+ inputs are not connected to 24V, the
status indicator then flashes green at 1 Hz.
Corrective Action:
1. If you have multiple switches that are connected in series, check the
OSSD outputs of the prior switch.
a. If the prior switch is flashing green, go to then next prior switch to
determine why its OSSD outputs are OFF.
b. If the TLS is the only switch or the first switch in a series connection
of switches, check the power supply connections of OSSD A+ (red
wire) and OSSD B+ (yellow wire).
The TLSZ switch was initially configured for multi-time use. The flashing red
and green indicator indicates the number of configurations that can be
completed, see Commissioning on page 21
.
Rockwell Automation Publication 440G-UM002A-EN-P - March 2019 51
Page 52

Chapter 7 Diagnostics and Troubleshooting
Step 6 — Indicator Solid Red
Step 7 — Other Considerations
The solid red indicator occurs when specific faults have not been detected.
1. Try to cycle power.
2. Remove the cable and reconnect the switch to a separate cable and use
the existing power supply.
• If the switch recovers, check the existing cable routing to be sure that
the switch cable is not along motor or other high–noise wiring. Also
check the grounding scheme, the 0V of the switch must be very close
to the safety logic device to which it interfaces.
• If the switch does not recover, proceed to step 3
3. Remove the switch from the installation and apply a bench test circuit.
• If the switch still exhibits solid red indicator, replace the switch.
• If the switch recovers, then re-examine the cable routing and the
grounding scheme.
.
Distribution Block
The TLZ can be connected the 898D distribution block. The block is available
with either four or eight ports. An example with eight ports is shown in
Figure 43 on page 53
considerations:
. This application requires a couple of special
1. The cable length in this example, are all 30 m (98.4 ft) long. The cable
length causes a 1.5V drop in power at the switch.
2. If the power supply is set to 24V, the voltage at the terminals inside each
switch is 22.5V.
Common Lock Signal
The lock/unlock command is simultaneously applied to all eight switches.
Each switch has a 300 mA nominal (350 mA max) inrush current that lasts
about 110 ms (see Figure 44 on page 53
unlocked at the same, the inrush current is 2.4 A. The power supply must be
able to accommodate this inrush.
). With all eight switches locked/
52 Rockwell Automation Publication 440G-UM002A-EN-P - March 2019
Page 53

Figure 43 - TLSZ with 898D Distribution Block
Diagnostics and Troubleshooting Chapter 7
Figure 44 - In-rush Current on the Power Supply at the Switch
GSR Relays on Power-up
Upon power-up, the Guardmaster safety relays (GSR) input does not recognize
the status of the TLSZ outputs; the IN1 indicator remains OFF. The TLSZR
must be unlocked and then locked. Then the GSR relay recognizes the OSSD
outputs of the TLS. This sequence only occurs on power-up and is a function
of the GSR (not the TLSZ).
Rockwell Automation Publication 440G-UM002A-EN-P - March 2019 53
Page 54

Chapter 7 Diagnostics and Troubleshooting
Notes:
54 Rockwell Automation Publication 440G-UM002A-EN-P - March 2019
Page 55

Specifications and Safety Ratings
Appendix A
Specifications
Attribute 440G-TZS21UPRH, 440G-TZS21UPLH,
440G-TZS21UTRH, 440G-TZS21UTLH
Operating Characteristics
TLSZR-GD2 Power to Release
TLSZL-GD2 Power to Lock
Assured Locking Distance 13 mm (0.51 in.) Maximum target distance
Torque for M5 Mounting 1.4 N•m (12.39 lb•in)
Torque for Cover Mounting 1.2 N•m (10.62 lb•in)
Locking Force Fmax Plastic pins: 1950 N (488 lb)
Locking Force Fzh per EN/ISO 14119 Plastic pins: 1500 N (337 lb)
Maximum Output Current (all outputs) 200 mA
Current Consumpt ion
solenoid not energized, no output load
solenoid energized, no output load
Inrush Current
Solenoid Duty Cycle 100%
Off-State Current < 0.5 mA DC
Maximum number of switches connected in series Unlimited
Operating Voltage Ue 24V DC +10% / -15%, Class 2 Source Required
Frequency of Solenoid Operating Cycle 1 Hz, max
Actuation Speed 160 mm/s (6.29 in/s), max
Response Time (turn Off) 75 ms first switch, 25 ms additional for each switch
Utilization Category per IEC 60947-5-2 DC-13, 24V 200 mA
Impulse Withstand Voltage Uimp 250V
Protection Class 2
Mechanical Life 1,000,000 cycles
Environmental
Operating Temperature [C (F)] -10 …+60 °C (14…140 °F)
Operating Humidity [% relative] 5…95
Risk Time, Max [ms]
If the RFID door target moves outside of the operating distance,
the safety outputs are deactivated
Rated Insulation Voltage Ui [V] 500
Enclosure Ingress Rating NEMA 3, 4X, 12, 13, IP66, IP67, IP69K
Shock per IEC 68-2-27 [g, ms] 30, 11
4 mm (0.16 in.) Maximum clearance between actuator base
and switch in the door closed position
Steel bolts: 2600 N (585 lb)
Steel bolts: 2000 N (450 lb)
75 mA
120 mA
350 mA
100 mm/min (3.94 in/min), min
60
Rockwell Automation Publication 440G-UM002A-EN-P - March 2019 55
Page 56

Appendix A Specifications and Safety Ratings
Safety Ratings
Attribute 440G-TZS21UPRH, 440G-TZS21UPLH,
440G-TZS21UTRH, 440G-TZS21UTLH
Vibration IEC 68-2-6 [Hz, mm] 10…55, 0.35
Radio frequency IEC 61000 -4-3
Poll ution Degre e 3
Altitude, Max [m(ft)] 2000 (6562)
General
Housing Material UL Approved glass-filled PBT
Actuator Material Stainless steel
Target Material UL Approved glass-filled PBT
Connection M12 8-pin connector
Protection
Short Circuit Protection Incorporated
IEC 61000-4-6
Attribute 440G-TZS21UPRH, 440G-TZS21UPLH,
440G-TZS21UTRH, 440G-TZS21UTLH
Standards IEC 60947-5-3, IEC 60947-5-1, IEC 62061, IEC 61508,
Category per ISO 13849-1 4
Performance Level per ISO 13849-1 PLe, includes guard door position and lock monitoring
SIL Claim Limit per IEC 62061 3
PFHd [1/h] 1.70E-09
Proof test Interval [years ] 20
Certifications CE Marked for all applicable EU directives, c-UL-us (UL 508), and
ISO138491, ISO 14119
TÜV
56 Rockwell Automation Publication 440G-UM002A-EN-P - March 2019
Page 57

Index
Numerics
1732 ArmorBlock
39
wiring
1734 POINT Guard I/O
34
wiring
A
actuator
15
clearance
mount
11
additional resources
additional target
22
learn
allowable approach direction 12
application
example
approach direction
allowable
audience
auxiliary
28
output
5
20
5
27
12
C
catalog number 8
clearance
15
actuator
close coupled
commission
connection
consideration
content
conventions used 5
cover
CR30 relay
12
21
23
error
preparation
wiring 21
21
19
installation
packaging
manual override
wiring
11
9
33
13
D
DG relay
32
wiring
DI relay
30
wiring
diagnostics
dimensions
direction
43
17
allowable approach
12
E
EMD relay
30
wiring
error
commission
example
application
wiring 27
23
27
F
first target
22
learn
first time
power-up
flowchart
troubleshooting
functional test
22
44
25
G
GLP relay
27
wiring
GLT relay
28
wiring
guide
reposition
14
H
holding force 15, 16
I
input
19
OSSD
installation
11
consideration
11
L
learn
additional target
first target
lock command 20
locking bolt
15
steel
22
22
M
manual override cover 13
manual release
mount
actuator/target
13
11
Rockwell Automation Publication 440G-UM002A-EN-P - March 2019 57
Page 58

Index
O
operating radius
12
minimum
OSSD
19
input
output
auxiliary
OSSD
19
7
19
20
output
overview
P
packaging content 9
pair proximity
power-up
first time
self-check
preparation
commission
purpose 5
14
22
23
21
R
radius
12
operating
rating
56
safety
release
13
manual
reposition
14
guide
W
wiring 19
commission
example
27
to 1732 ArmorBlock
to 1734 POINT Guard I/O
to CR30 relay
to DG relay
to DI and EMD relay 30
to GLP relay
to GLT relay
21
39
34
33
32
27
28
S
safety rating 56
self-check
23
power-up
specifications 55
steel locking bolt
T
target
learn additional
learn first
22
mount 11
terminology
test
troubleshooting 43
functional
procedure
flowchart
6
25
25
44
15
22
58 Rockwell Automation Publication 440G-UM002A-EN-P - March 2019
Page 59

Page 60

Rockwell Automation Support
Use the following resources to access support information.
Documentation Feedback
Your comments will help us serve your documentation needs better. If you have any suggestions on how to improve this
document, complete the How Are We Doing? form at http://literature.rockwellautomation.com/idc/groups/literature/
documents/du/ra-du002_-en-e.pdf.
Technical Support Center Knowledgebase Articles, How-to Videos, FAQs, Chat,
User Forums, and Product Notification Updates.
www.rockwellautomation.com/knowledgebase
Local Technical Support Phone Numbers Locate the phone number for your country. w ww.rockwellautomation.com/global/support/get-support-
now.page
Direct Dial Codes Find the Direct Dial Code for your product. Use the
code to route your c all directly to a techni cal support
engineer.
www.rockwellautomation.com/global/suppor t/directdial.page
Literature Library Installation Instructions, Manuals, Brochures, and
Technical Data.
www.rockwellautomation.com/literature
Product Compatibility and Download Center
(PCDC)
Get help determining how products interact, check
features and capabilities, and find associated
firmware.
www.rockwellautomation.com/global/support/pcdc.page
Waste Electrical and Electronic Equipment (WEEE)
At the end of life, this equipment should be collected separately
from any unsorted municipal waste.
Rockwell Automation maintains current product environmental information on its webs ite at http://www.rockwellautomation.com/rockwellautomation/about-us/sustainability-ethics/product-environmental-compliance.page.
Allen-Bradley, ArmorBlock, Connected Components Workbench, GuardLink, Guardmaster, POINT Guard I/O, PowerFlex, Rockwell Automation, Rockwell Software, SensaGuard, and Studio 5000 are trademarks
of Rockwell Automation, Inc.
Trademarks not belonging to Rockwell Automation are property of their respec tive companies.
Publication 440G-UM002A-EN-P - March 2019
Supersedes Publication 440R-UM015C-EN-P – April 2018 Copyright © 2019 Rockwell Auto mation, Inc. All rights reserved. Pr inted in the U.S.A.
 Loading...