

Page 1

Getting Results
RSLinx Classic Getting Results Guide
Page 2
Important user information
Read this document and the documents listed in the additional resources section about installation, configuration, and operation of this equipment
before you install, configure, operate, or maintain this product. Users are required to familiarize themselves with installation and wiring instructions
in addition to requirements of all applicable codes, laws, and standards.
Activities including installation, adjustments, putting into service, use, assembly, disassembly, and maintenance are required to be carried out by
suitably trained personnel in accordance with applicable code of practice. If this equipment is used in a manner not specified by the manufacturer,
the protection provided by the equipment may be impaired.
In no event will Rockwell Automation, Inc. be responsible or liable for indirect or consequential damages resulting from the use or application of this
equipment.
The examples and diagrams in this manual are included solely for illustrative purposes. Because of the many variables and requirements associated
with any particular installation, Rockwell Automation, Inc. cannot assume responsibility or liability for actual use based on the examples and
diagrams.
No patent liability is assumed by Rockwell Automation, Inc. with respect to use of information, circuits, equipment, or software described in this
manual.
Reproduction of the contents of this manual, in whole or in part, without written permission of Rockwell Automation, Inc., is prohibited.
Throughout this manual, when necessary, we use notes to make you aware of safety considerations.
WARNING: Identifies information about practices or circumstances that can cause an explosion in a hazardous environment, which may lead to
personal injury or death, property damage, or economic loss.
ATTENTION: Identifies information about practices or circumstances that can lead to personal injury or death, property damage, or economic
loss. Attentions help you identify a hazard, avoid a hazard, and recognize the consequence
Important:
Labels may also be on or inside the equipment to provide specific precautions.
Identifies information that is critical for successful application and understanding of the product.
SHOCK HAZARD: Labels may be on or inside the equipment, for example, a drive or motor, to alert people that dangerous voltage may be
present.
BURN HAZARD: Labels may be on or inside the equipment, for example, a drive or motor, to alert people that surfaces may reach dangerous
temperatures.
ARC FLASH HAZARD: Labels may be on or inside the equipment, for example, a motor control center, to alert people to potential Arc Flash. Arc
Flash will cause severe injury or death. Wear proper Personal Protective Equipment (PPE). Follow ALL Regulatory requirements for safe work
practices and for Personal Protective Equipment (PPE).
Allen-Bradley, Rockwell Software, Rockwell Automation, and TechConnect are trademarks of Rockwell A utomation, Inc.
Trademarks not belonging to Rockwell Automation are property of their respective companies.
Page 3

Table of contents
Preface
Welcome to RSLinx Classic
Purpose of the document ..................................................................................................... 7
Intended audience ................................................................................................................. 7
Document conventions ........................................................................................................ 7
Feedback .................................................................................................................................. 7
Legal notices ........................................................................................................................... 7
Chapter 1
What is RSLinx Classic? ................................................................................................... 11
Differences between RSLinx Classic types .................................................................... 11
RSLinx Classic Lite .................................................................................................... 11
RSLinx Classic Single Node ..................................................................................... 12
RSLinx Classic OEM ................................................................................................. 12
RSLinx Classic Gateway ........................................................................................... 13
Quick start ........................................................................................................................... 13
Step 1 Configure a driver .......................................................................................... 13
Step 2 Configure a topic ........................................................................................... 14
Step 3 Copy a link to the clipboard ........................................................................ 15
Step 4 Paste a link from the clipboard .................................................................... 16
Explore RSLinx Classic ..................................................................................................... 16
Title bar ........................................................................................................................ 16
Menu bar ...................................................................................................................... 16
Toolbar ......................................................................................................................... 17
Application workspace .............................................................................................. 18
RSWho ......................................................................................................................... 18
Status bar ...................................................................................................................... 18
Chapter 2
Install and start RSLinx
Classic
Rockwell Automation Publication LINX-GR001S-EN-E - February 2018 3
Before you begin ................................................................................................................. 19
System requirements .......................................................................................................... 19
Hardware requirements ............................................................................................ 19
Software requirements............................................................................................... 20
Install RSLinx Classic software ....................................................................................... 21
Update an existing installation ........................................................................................ 23
Updating the FactoryTalk Services Platform software ............................................... 23
Start RSLinx Classic software .......................................................................................... 24
RSLinx Classic running as a service vs. running as an application ........................... 24
Troubleshooting installation ........................................................................................... 24
Page 4

Table of contents
Chapter 3
RSWho
OPC and DDE Connectivity
Register EDS files of devices
Use RSWho ......................................................................................................................... 27
Control bar .......................................................................................................................... 28
Tree control ......................................................................................................................... 28
List control .......................................................................................................................... 29
Chapter 4
OPC ...................................................................................................................................... 31
DDE ...................................................................................................................................... 31
DDE/OPC client connectivity ....................................................................................... 32
Chapter 5
Manually upload and register EDS files in the RSWho ............................................. 33
Automatically upload and register EDS files in the RSWho ..................................... 34
Manually register EDS files in the EDS Hardware Installation Tool ...................... 35
View existing EDS files of devices on the computer .................................................... 36
Unregister EDS files in EDS Hardware Installation Tool ......................................... 37
Uninstall EDS Hardware Installation Tool and all EDS files ................................... 38
Compact harmony files
Find the information you
need
Activation
Chapter 6
Compact harmony files in RSLinx Classic .................................................................... 39
Chapter 7
Use the help ......................................................................................................................... 41
Help contents .............................................................................................................. 41
Access help for a control or field ............................................................................. 42
Find step-by-step procedures ................................................................................... 42
Find definitions .......................................................................................................... 43
Access guides ....................................................................................................................... 44
Training ................................................................................................................................ 44
Technical support .............................................................................................................. 45
When you call ............................................................................................................. 45
Appendix A
Grace period ........................................................................................................................ 47
Activate RSLinx Classic with FactoryTalk Activation Manager .............................. 47
How to activate RSLinx Classic .............................................................................. 47
Find more information about FactoryTalk Activation ...................................... 48
4 Rockwell Automation Publication LINX-GR001S-EN-E - February 2018
Page 5

Table of contents
Appendix B
Secure RSLinx Classic with
FactoryTalk Security
Install RSLinx Classic with
command line syntax
How do I set up security in RSLinx Classic? ................................................................ 49
If you have not used FactoryTalk Security or RSSecurity before ..................... 49
If you have used RSSecurity but not FactoryTalk Security ................................ 52
If you have used FactoryTalk Security before ....................................................... 54
What can I secure in RSLinx Classic? ............................................................................ 56
Using FactoryTalk Security .............................................................................................. 57
Network/Local Directory ......................................................................................... 57
Reset Network Tree ................................................................................................... 57
Miscellaneous .............................................................................................................. 57
Appendix C
Comparing different installation methods ................................................................... 59
Use unattended installation ............................................................................................. 60
Perform unattended installation ............................................................................. 60
Parameters .................................................................................................................... 60
Use silent installation for RSLinx Classic .msi file ...................................................... 63
Before you begin ......................................................................................................... 63
RSLinx Classic x64 driver package .......................................................................... 64
Install certificates ........................................................................................................ 64
Perform silent installation ........................................................................................ 65
Using RSLinx Classic with
ControlFlash
Glossary
Index
Appendix D
Select an RSLinx Edition in ControlFlash .................................................................... 67
RSWho ................................................................................................................................. 67
Configure drivers in RSLinx Classic .............................................................................. 67
Uninstall RSLinx Classic .................................................................................................. 68
Rockwell Automation Publication LINX-GR001S-EN-E - February 2018 5
Page 6

Page 7

k
Preface
Purpose of the document
Intended audience
The Getting Results Guide provides you with information on how to install and
navigate the RSLinx Classic software. It explains how to effectively use the RSLinx
Classic software and how to find and access additional information.
This guide can be considered the entry point into Rockwell Software
documentation set for this product. The documentation set contains pertinent,
easily accessible product information and ships with the software product. This set
is designed to free you from tedious paper shuffling and reduce information
overload.
Other components of the documentation set include electronic release notes and
help.
We assume that you are familiar with:
IBM-compliant personal computers
Microsoft® Windows® operating systems
OPC (OLE for Process Control®) communication
DDE (Microsoft dynamic data exchange) messaging
Allen-Bradley PLC™ (programmable logic controllers)
Document conventions
Feedbac
Legal notices
Rockwell Software PLC programming tools
The conventions used throughout this document for the user interface comply
with those recommended by Microsoft. If you are not familiar with the Microsoft
Windows user interface, read the documentation supplied with the operating
system you are using before attempting to use this software.
Use the feedback form packaged with your software to report errors, or let us
know what information you want to see added in future editions of this
document. You can also send an email message to info@software.rockwell.com
with any comments about Rockwell products and services.
Copyright Notice
Copyright © 2018 Rockwell Automation Technologies, Inc. All Rights Reserved.
Printed in USA.
This document and any accompanying Rockwell Software products are
copyrighted by Rockwell Automation Technologies, Inc. Any reproduction
and/or distribution without prior written consent from Rockwell Automation
Technologies, Inc. is strictly prohibited. Please refer to the license agreement for
details.
Rockwell Automation Publication LINX-GR001S-EN-E - February 2018 7
Page 8

Preface
End User License Agreement (EULA)
You can view the Rockwell Automation End-User License Agreement ("EULA")
by opening the License.rtf file located in your product's install folder on your hard
drive.
Trademark Notices
Allen-Bradley, ControlLogix, Data Highway Plus, DH+, FactoryTalk,
FactoryTalk Activation, FactoryTalk Administration Console, FactoryTalk
Automation Platform, FactoryTalk Batch, FactoryTalk Diagnostics, FactoryTalk
Directory, FactoryTalk Gateway, FactoryTalk Linx, FactoryTalk Linx Gateway,
FactoryTalk Live Data, FactoryTalk Security, FactoryTalk Services Platform,
FactoryTalk Transaction Manager, FactoryTalk View, FactoryTalk View Studio,
Logix 5000, Logix5550, MicroLogix, PanelView, PLC-2, PLC-3, PLC-5,
Rockwell, Rockwell Automation, Rockwell Software, RSAssetSecurity,
RSBizWare, RSLinx, RSLinx Classic, RSLinx Enterprise, RSLogix, RSNetWorx,
RSOPC Gateway, RSSql, RSView, SLC, SoftLogix, and Studio 5000 are
trademarks of Rockwell Automation, Inc.
Any Rockwell Automation software or hardware not mentioned here is also a
trademark, registered or otherwise, of Rockwell Automation, Inc.
Other Trademarks
Microsoft, Access, SQL Server, Visual Basic, Visual C++, Windows, and
Windows Server are registered trademarks of Microsoft Corporation in the
United States and other countries.
Adobe, Acrobat, and Reader are registered trademarks of Adobe Systems
Incorporated in the United States and other countries.
Intel and Intel Core are registered trademarks of the Intel Corporation in United
States and other countries.
OPC (OLE for Process Control) is a registered trademark of the OPC
Foundation.
ControlNet is a trademark of ControlNet International.
DeviceNet is a trademark of the Open DeviceNet Vendor Association, Inc.
(ODVA).
Ethernet is a registered trademark of Digital Equipment Corporation, Intel, and
Xerox Corporation.
Oracle is a registered trademark of Oracle Corporation.
8 Rockwell Automation Publication LINX-GR001S-EN-E - February 2018
Page 9

Preface
All other trademarks are the property of their respective holders and are hereby
acknowledged.
Warranty
This product is warranted in accordance with the product license. The product’s
performance may be affected by system configuration, the application being
performed, operator control, maintenance, and other related factors. Rockwell
Automation is not responsible for these intervening factors. The instructions in
this document do not cover all the details or variations in the equipment,
procedure, or process described, nor do they provide directions for meeting every
possible contingency during installation, operation, or maintenance. This
product’s implementation may vary among users.
This document is current as of the time of release of the product; however, the
accompanying software may have changed since the release. Rockwell Automation,
Inc. reserves the right to change any information contained in this document or
the software at any time without prior notice. It is your responsibility to obtain the
most current information available from Rockwell when installing or using this
product.
Environmental compliance
Rockwell Automation maintains current product environmental information on
its website at
http://www.rockwellautomation.com/rockwellautomation/about-us/sustainabili
ty-ethics/product-environmental-compliance.page
Contact Rockwell Automation
Customer Support Telephone — 1.440.646.3434
Online Support — http://www.rockwellautomation.com/support/
Rockwell Automation Publication LINX-GR001S-EN-E - February 2018 9
Page 10

Preface
10 Rockwell Automation Publication LINX-GR001S-EN-E - February 2018
Page 11

Chapter 1
Welcome to RSLinx Classic
This chapter includes the following information:
What is RSLinx Classic?
Differences between RSLinx Classic types
Quick start
Explore RSLinx Classic
What is RSLinx Classic?
Differences between RSLinx Classic types
RSLinx Classic for Rockwell Automation Networks and Devices is a
comprehensive factory communication solution, providing Allen-Bradley
programmable controller access to a wide variety of Rockwell Software and
Allen-Bradley applications. These range from device programming and
configuration applications such as RSLogix and RSNetWorx, to HMI
(Human-Machine Interface) applications such as RSView32, FactoryTalk View
SE (Site Edition), and FactoryTalk View ME (Machine Edition), to your own data
acquisition applications using Microsoft Office, web pages, or Visual Basic®.
RSLinx Classic also incorporates advanced data optimization techniques and
contains a set of diagnostics. The API (Application Programming Interface)
supports custom applications developed with the RSLinx Classic SDK. RSLinx
Classic is an OPC Data Access Compliant Server and a DDE server.
RSLinx Classic is available in four versions to meet the demand for a variety of
cost and functionality requirements. Depending on the version you are running,
some functionality may or may not be operational. Refer to the following sections
for specific version functionality.
The RSLinx Classic version you are running appears in the title bar at the top of
the main window. If a version of RSLinx Classic is started without the proper
activation files, it runs as RSLinx Classic Lite.
RSLinx Classic Lite
Rockwell Automation Publication LINX-GR001S-EN-E - February 2018 11
RSLinx Classic Lite provides the minimum functionality required to support
RSLogix and RSNetWorx. This version is not commercially available, but is
bundled with products that require only direct access to the RSLinx Classic
network drivers. This version does not support OPC, DDE, or the published
RSLinx Classic C API (Application Programming Interface).
RSLinx Classic Lite is used for the following:
Page 12

Chapter 1
Welcome to RSLinx Classic
Ladder logic programming using RSLogix products.
Network and device configuration and diagnostics using RSNetWorx.
Configuring Ethernet modules and devices (for example, 1756-ENET,
1756-DHRIO, and so on).
Upgrading firmware using ControlFlash.
Browsing networks and getting device information such as firmware
revision.
RSLinx Classic Single Node
RSLinx Classic Single Node includes the required functionality to supply
communication services for all Rockwell Software products. OPC and DDE
interfaces are supported, but to only one device. It does not support applications
developed for the RSLinx Classic C API, or direct drivers in HMI applications.
RSLinx Classic OEM or higher is required for these application types.
RSLinx Classic Single Node is used for the following:
Data acquisition using OPC or DDE to only one device. This includes
clients such as RSView32, FactoryTalk View SE, FactoryTalk View ME
Station, Microsoft Office, Visual Basic, and web pages. Note that this is
limited to 32bit client only.
Ladder logic programming using RSLogix products.
Network and device configuration and diagnostics using RSNetWorx.
Configuring Ethernet modules and devices (for example, 1756-ENET,
1756-DHRIO, and so on).
Upgrading firmware using ControlFlash.
Browsing networks and getting device information such as firmware
revision.
RSLinx Classic OEM
RSLinx Classic OEM includes the required functionality to supply
communication services for all Rockwell Software products. OPC and DDE
clients are supported for any number of devices. It also supports applications
developed for the RSLinx Classic C API. But note that this is limited to 32bit
client only.
RSLinx OEM version 2.2 and previous versions only supported AdvanceDDE.
RSLinx Version 2.3 and subsequent versions support all DDE types except
FastDDE.
RSLinx Classic OEM is used for the following:
Data acquisition using OPC or DDE to any number of devices. This
includes clients such as RSView32, FactoryTalk View SE, FactoryTalk View
ME Station, Microsoft Office, Visual Basic, and web pages.
12 Rockwell Automation Publication LINX-GR001S-EN-E - February 2018
Page 13

Welcome to RSLinx Classic
Q
Chapter 1
Ladder logic programming using RSLogix products.
Network and device configuration and diagnostics using RSNetWorx.
Configuring Ethernet modules and devices (for example, 1756-ENET,
1756-DHRIO, and so on).
Upgrading firmware using ControlFlash.
Browsing networks and getting device information such as firmware
revision.
RSLinx Classic Gateway
RSLinx Classic Gateway extends RSLinx Classic-based communication
throughout the enterprise by connecting clients over TCP/IP networks.
Programming and configuration products such as RSLogix and RSNetWorx use a
local RSLinx Classic Lite or better with a Remote Devices via Linx Gateway driver
configured to communicate to the RSLinx Classic Gateway. Remote HMIs and
VB/VBA applications including Microsoft Office can use remote OPC to
communicate to RSLinx Classic Gateway for data collection. This allows you to
have multiple distributed computers performing data collection without having
RSLinx Classic installed on each machine!
In addition to the capabilities provided in the RSLinx Classic Professional version,
RSLinx Classic Gateway offers remote connectivity to:
Multiple RSView32, FactoryTalk View SE, and FactoryTalk View ME
Station clients accessing data through one RSLinx Classic Gateway (remote
OPC).
Remote computer running RSLogix connecting to a plant network over a
modem for online program changes.
Remote Microsoft Office applications showing plant floor data such as
Excel.
A web page showing plant floor data when the web server and RSLinx
Classic are on separate computers.
uick start
Step 1 Configure a driver
Rockwell Automation Publication LINX-GR001S-EN-E - February 2018 13
This section outlines the main tasks you need to perform to use the RSLinx
Classic software. The quick start information included in this section is intended
to be a high-level, conceptual overview. When you are ready to use RSLinx Classic
software, follow the detailed procedures found in the Quick Start, which is located
in the RSLinx Classic help. To access the Quick Start, click Help > Quick Start
from within RSLinx Classic. For information about specific controls on RSLinx
Classic windows and dialog boxes, right-click any control.
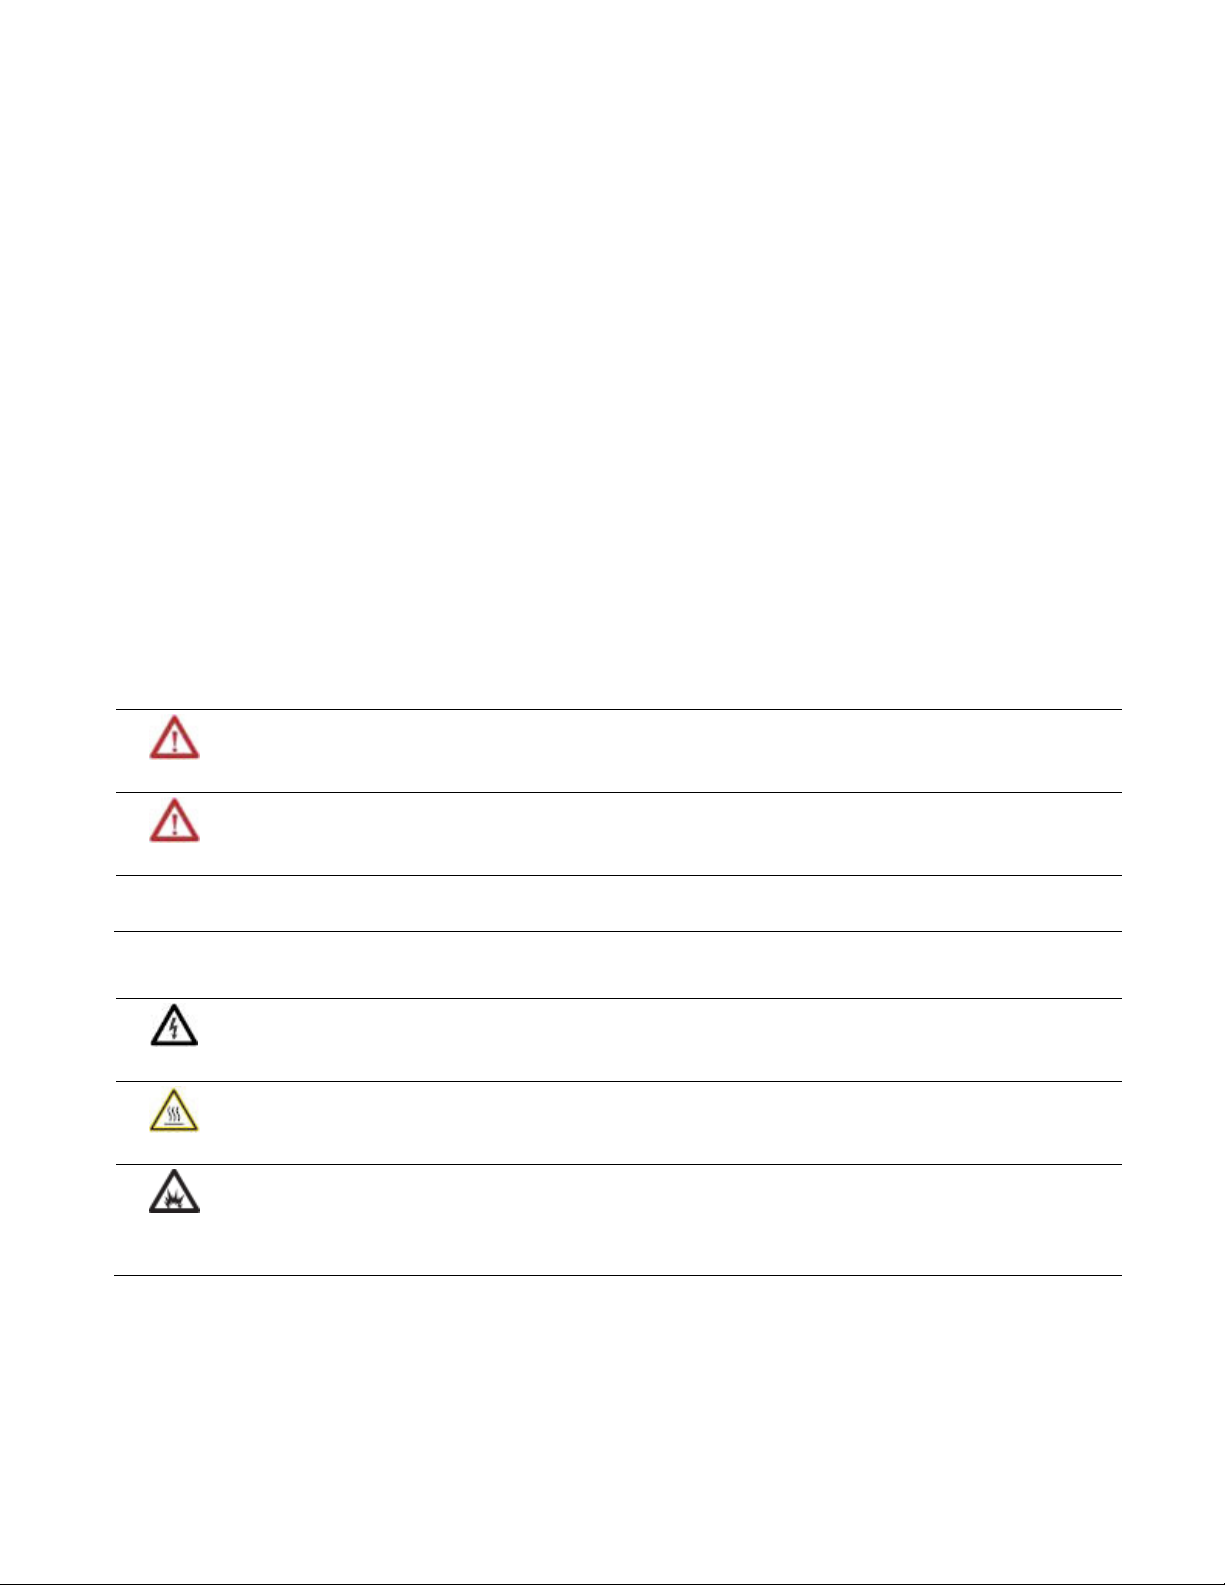
A driver is the software interface to the hardware device that will be used to
communicate between RSLinx Classic and your processor. To configure a driver
in RSLinx Classic, click Communications > Configure Drivers. The Configure
Drivers dialog box appears, which is used for adding, editing, or deleting drivers.
Click a driver to configure from the Available Driver Types list, click Add New,
Page 14
Chapter 1
Welcome to RSLinx Classic
and complete the information required in the driver configuration dialog box that
shows. The driver configuration dialog box varies depending on which driver you
select.
After you complete the driver configuration, the driver name will appear in the
Configured Drivers list.
Step 2 Configure a topic
In RSLinx Classic, a project is a storage container for one or more topics, and a
topic represents a specific path to a processor. By grouping topics together in a
project, you can make multiple topics available at the same time. To create or edit
a project in RSLinx Classic, select File > Open Project (opens the Open Project
window). To create or edit a topic, select DDE/OPC > Topic Configuration
(opens the DDE/OPC Topic Configuration window). If you attempt to create a
topic without creating a project, RSLinx Classic creates default project for you.
14 Rockwell Automation Publication LINX-GR001S-EN-E - February 2018
Page 15
Welcome to RSLinx Classic
Chapter 1
If you selected Configure New DDE/OPC Topic by right-clicking a station in
RSWho, the Topic Name field is pre-filled for you. RSLinx Classic starts with the
name of the program running in the processor, and if this topic exists, it adds a
number to the end until it finds one that does not exist. If there are any spaces, it
converts them to underscores (_). You can change the topic name RSLinx Classic
selected for you.
From the Data Source tab, click the device, with which you wish to set up
communication. To add a new topic to a project that already has at least one topic
configured, click New. To edit an existing topic, click the topic from the list. Use
the Data Collection tab to include more detailed information about specific
topics.
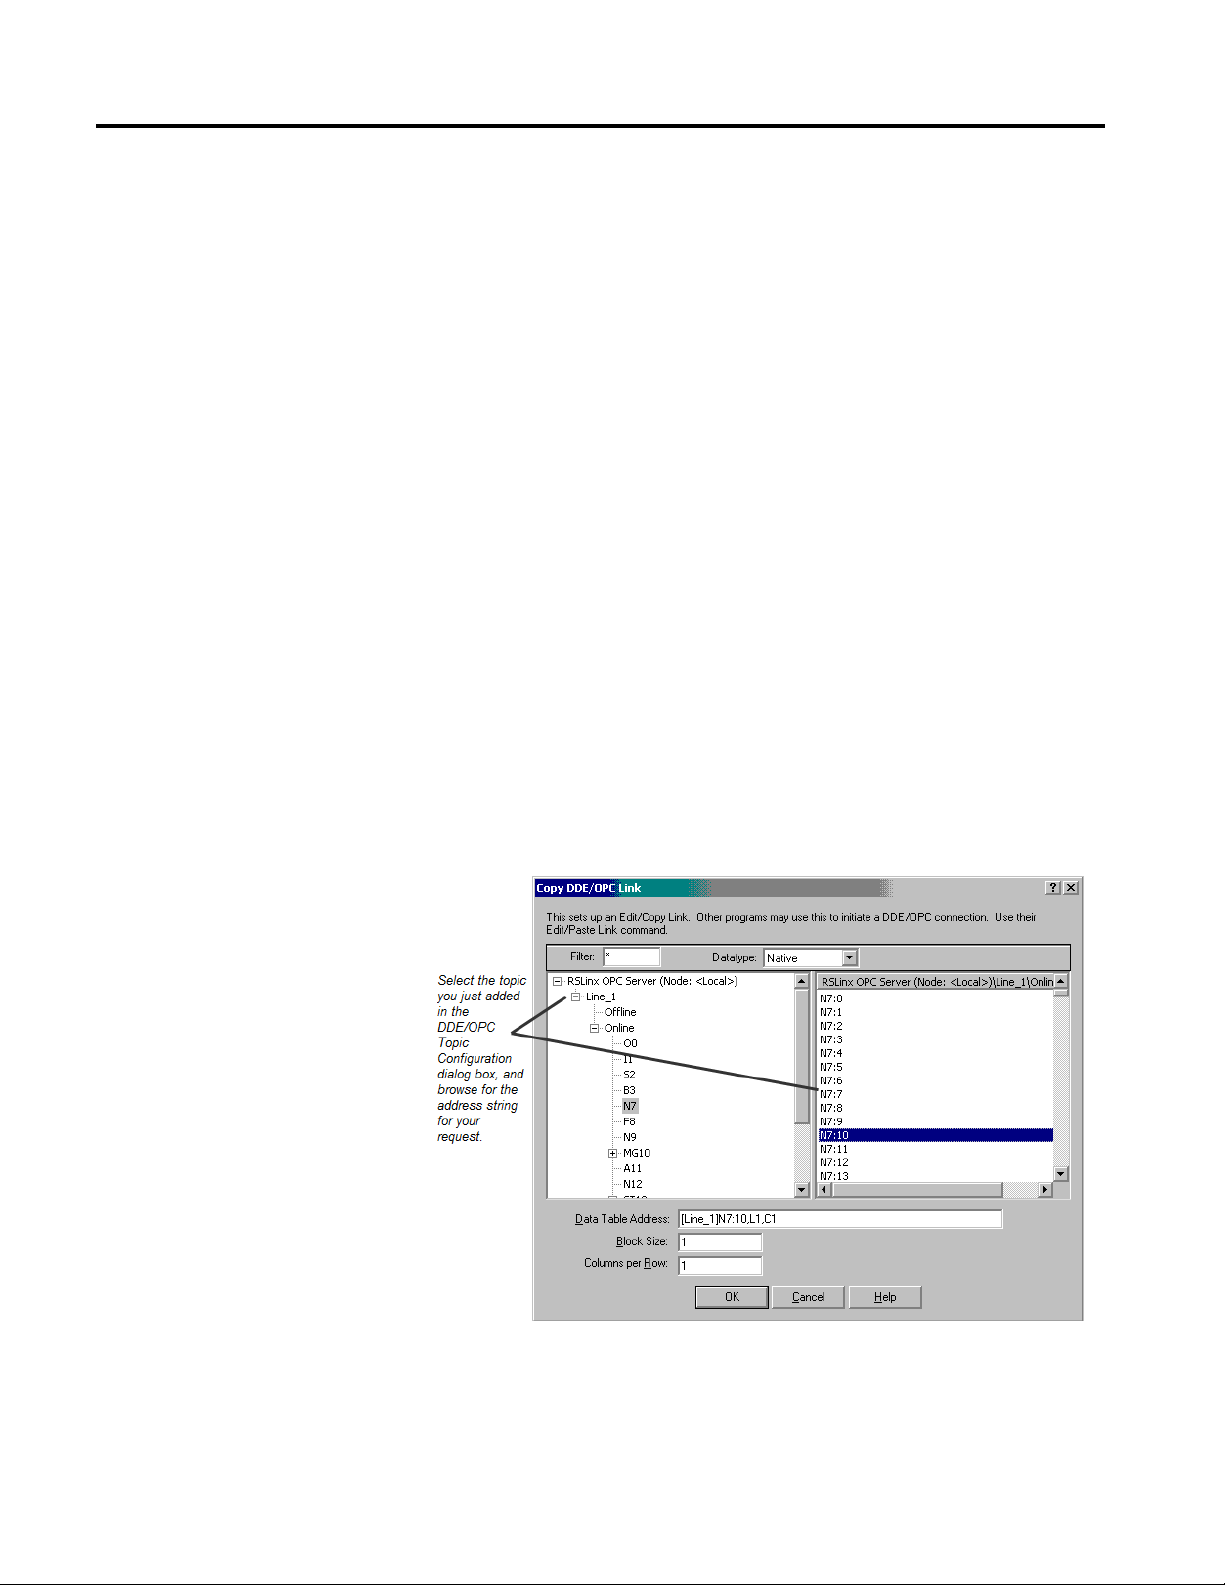
Step 3 Copy a link to the clipboard
RSLinx Classic provides a mechanism for easily establishing a link from RSLinx
Classic to a compatible program. To use the Copy to Clipboard function, choose
an RSLinx Classic project that contains topics. Select Edit > Copy DDE/OPC
Link, select the topic, and then click OK.
The Copy function takes the information needed to create a link and places it on
the Windows clipboard. Some packages support the ability to paste links from the
clipboard. The Copy to Clipboard function can be used with these applications
only.
Select the topic you just added in the DDE/OPC Topic Configuration dialog box,
and browse for the address string for your request.
The Copy to Clipboard function only establishes hot links from RSLinx Classic,
the DDE server, to a Windows DDE client application. The Data Table Address,
Block Size, Columns per Row, and selected topic are maintained from the last
Rockwell Automation Publication LINX-GR001S-EN-E - February 2018 15
Page 16
Chapter 1
Welcome to RSLinx Classic
time that you used this function. Changing these values has no effect on the last
established link.
Step 4 Paste a link from the clipboard
Explore RSLinx Classic
Title bar
Most Windows applications support a Paste Link operation, and this feature is
generally located in the Edit menu.
Go to your application program that supports the Paste Link function. For
example, in Microsoft Excel, click an open cell in a spreadsheet where you would
like to place the data, click Edit > Paste Special, click Paste Link, and click OK.
The hot link is pasted into the spreadsheet at the location you selected and begins
to update. If you click Paste, instead of Paste Link, the item string will get copied.
When you start RSLinx Classic, the Rockwell Software RSLinx Classic
application window appears. The application window contains a title bar, a menu
bar, a tool bar, the application workspace where opened child windows (RSWho,
diagnostics, and so on), and a status bar.
The title bar shows the RSLinx Classic icon, the name of the software product (for
example, Rockwell Software RSLinx Classic Gateway), the RSWho instance
number (RSWho - 1 opens by default when you open RSLinx Classic), and the
Minimize, Maximize, and Close button.
To view the Control Menu, click the RSLinx Classic icon on the title bar. The
following items appear on the Control Menu.
Item Description
Restore Restores the window to its former size after you enlarged it by using the Maximize command or
shrunk it by using the Minimize command.
Move Allows you to reposition the window on the desktop using the arrow keys on the keyboard.
Size Allows you to resize the window by using the arrow keys on the keyboard.
Minimize Shrinks the window to an icon, which is located on the task bar. This performs the same function
as if you clicked the Minimize button on the title bar.
Maximize Enlarges the window to occupy the entire screen. This performs the same function as if you clicked
the Maximize button on the title bar.
Close
Exits the RSLinx Classic application. This performs the same function as if you clicked the Close
button on the title bar.
Menu bar
The RSLinx Classic menu bar contains the following menus:
Each menu contains options for performing the following tasks:
16 Rockwell Automation Publication LINX-GR001S-EN-E - February 2018
Page 17
Welcome to RSLinx Classic
Chapter 1
Menu Description
File Create and open RSLinx Classic projects.
Edit Copy DDE and OPC links to the clipboard.
View Set and change RSLinx Classic interface shows, open the Event Viewer, and click the
RSWho view.
Communications Configure drivers, topics, and other RSLinx Classic options, and view driver, DDE, other
client application diagnostics.
Station Perform actions on diagnostic counters and view the Data Monitor.
DDE/OPC Configure DDE/OPC topics and view event and diagnostic information.
Security Set security user and access rights.
Window Arrange RSLinx Classic windows.
Help View help options for RSLinx Classic and other Rockwell Software products and services.
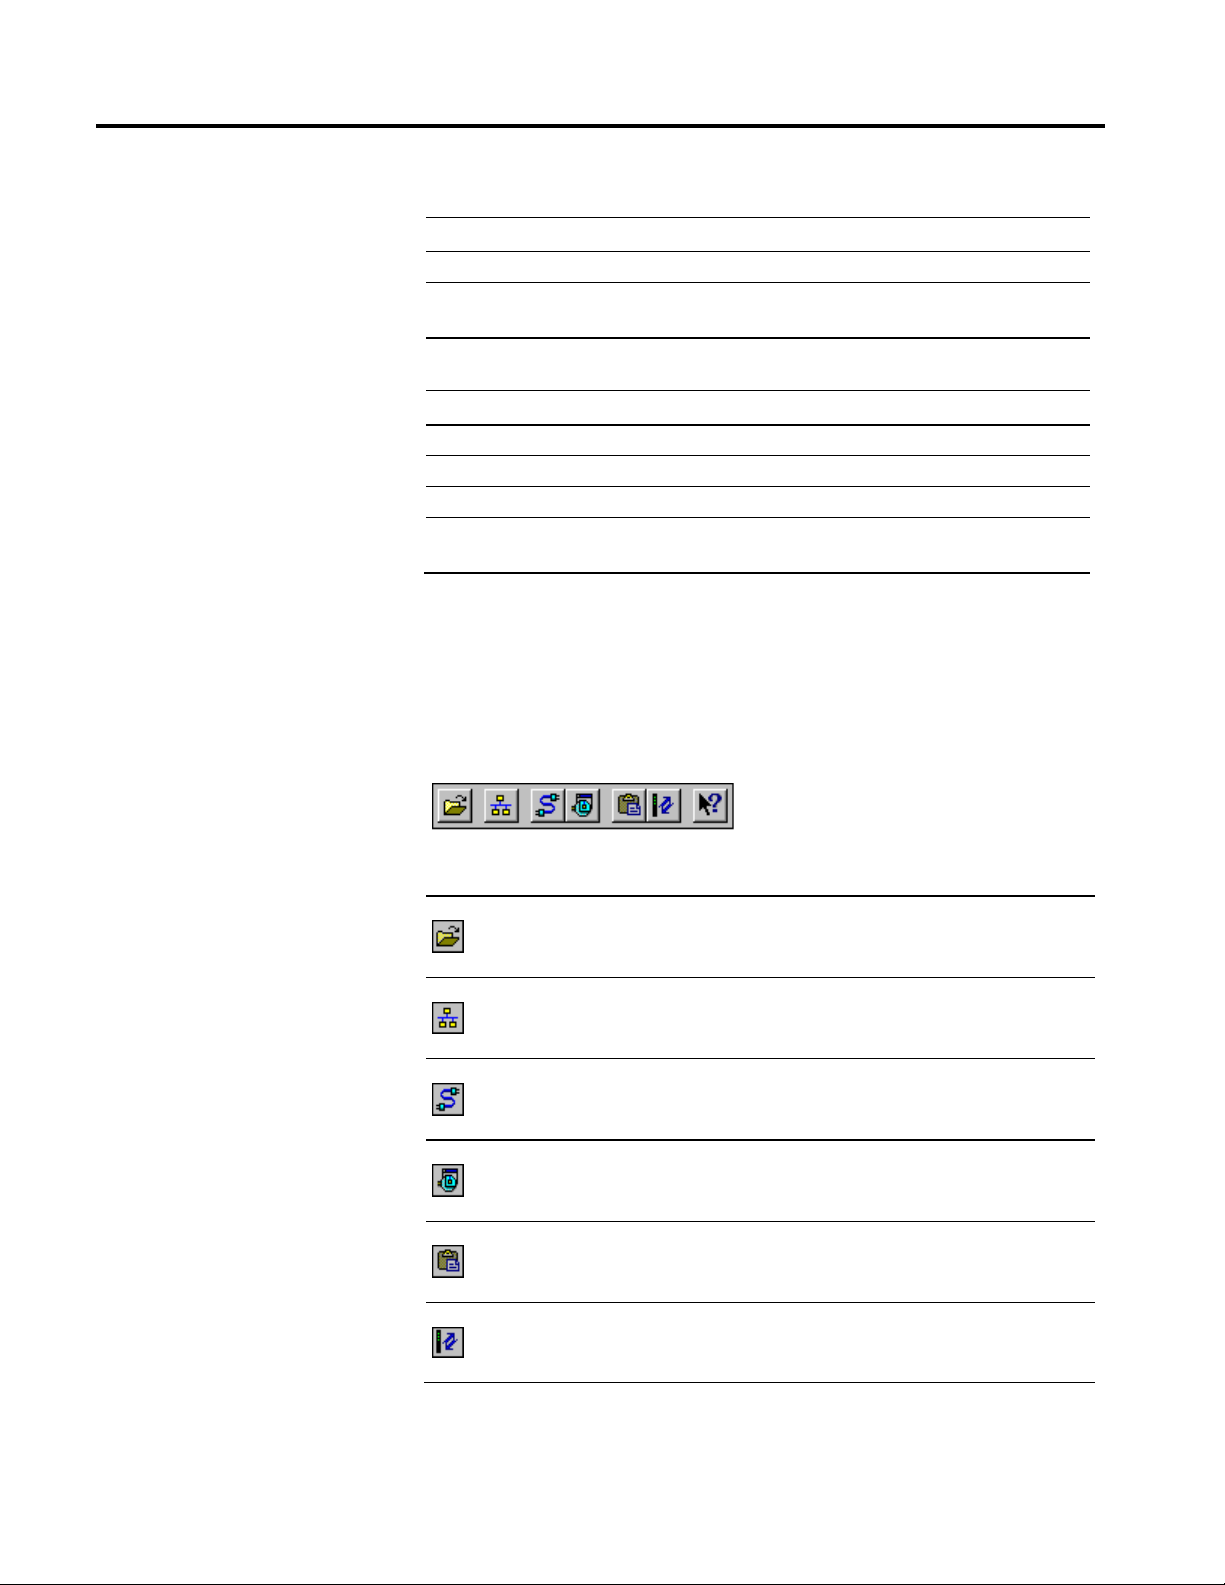
Toolbar
The toolbar contains shortcuts to several commonly used RSLinx Classic
functions. Each toolbar button is a graphical representation of a command that is
also available from the RSLinx Classic menu bar. The following items appear on
the RSLinx Classic toolbar.
Icon Menu Selection Description
File > Open Project
Communications > RSWho
Communications > Configure
Drivers
Communications > Driver
Diagnostics
Edit > Copy DDE/OPC Link
Shows the currently defined projects and allows you to open a
DDE/OPC project.
Opens an additional instance of RSWho (one instance is opened by
default each time you open RSLinx Classic).
Shows the currently configured RSLinx Classic software drivers and
allows you to add additional drivers for use with your hardware
devices.
Shows a list of currently configured drivers and provides the option to
view diagnostic information for each driver.
Provides the ability to create a DDE/OPC link between RSLinx Classic
and a client application such as Microsoft Excel.
DDE/OPC > Topic
Configuration
Rockwell Automation Publication LINX-GR001S-EN-E - February 2018 17
Allows you to create and modify a DDE/OPC topic, which is a specific
path to a processor.
Page 18
Chapter 1
Welcome to RSLinx Classic
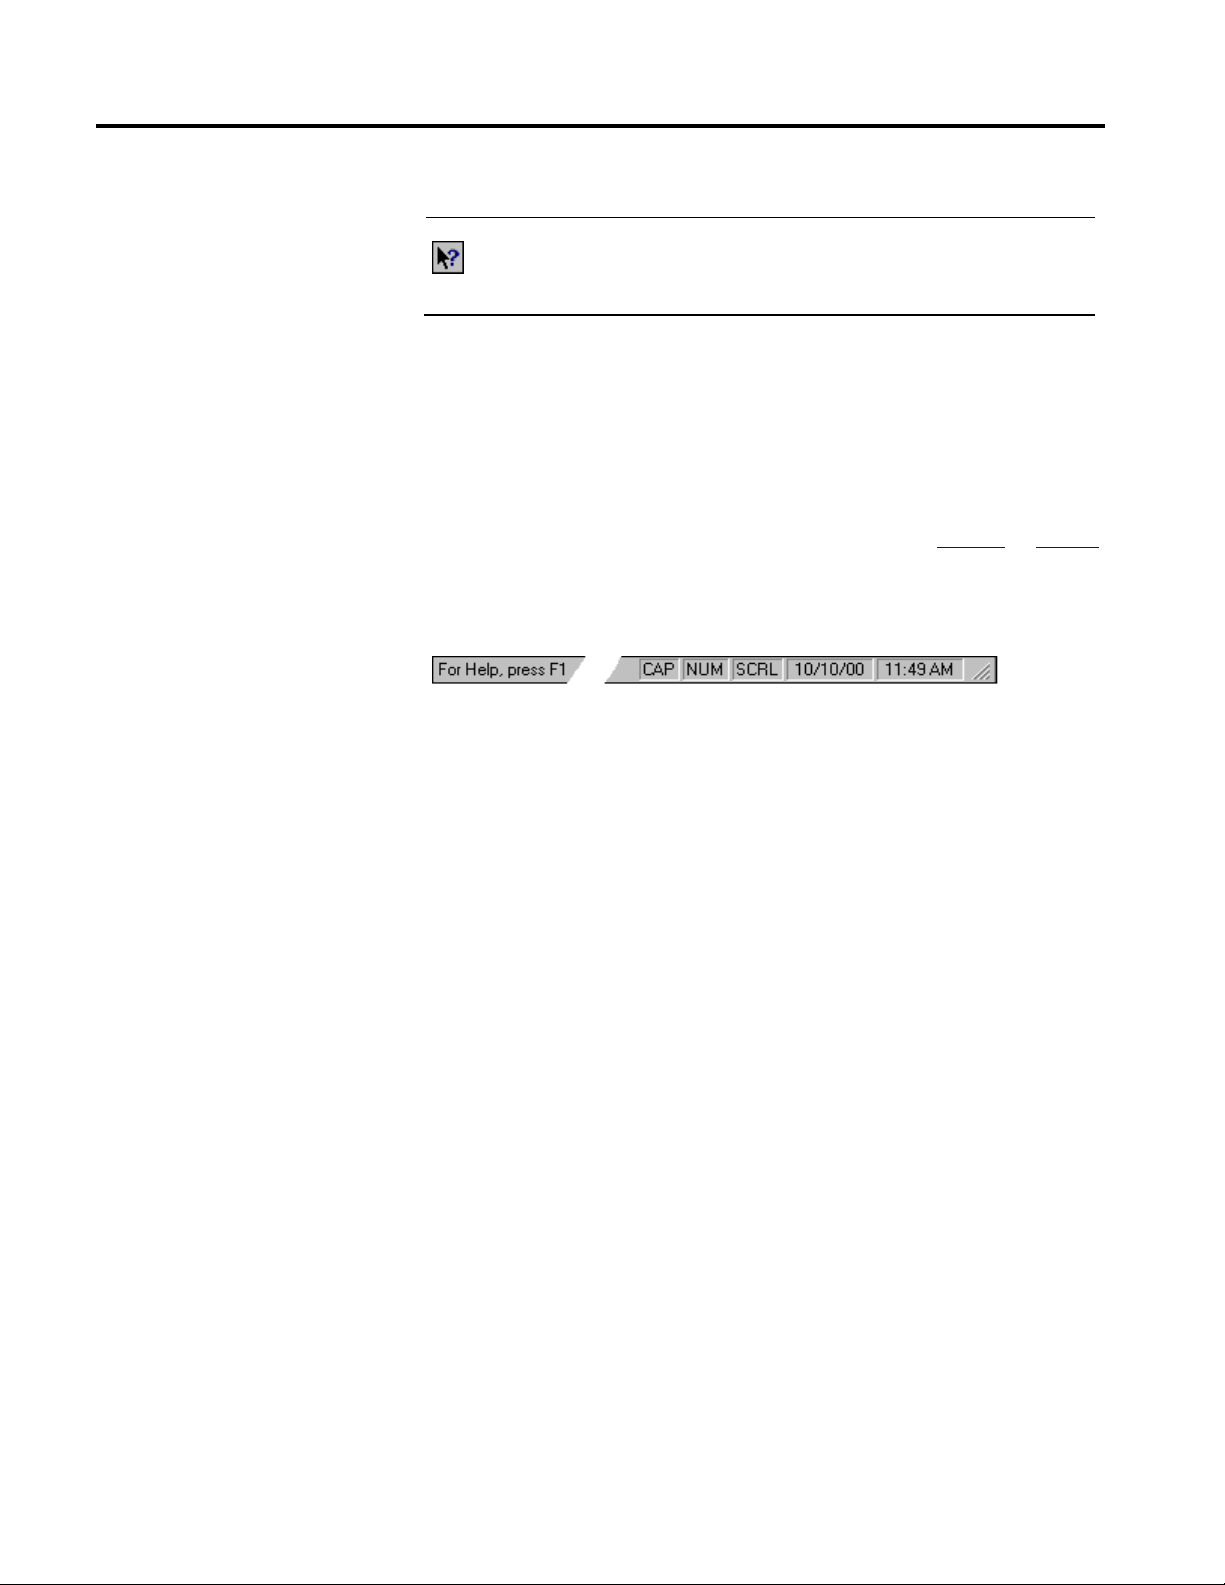
Icon Menu Selection Description
Help > Whats This?
Changes the cursor to an arrow and a question mark to indicate you
are in What's This? help mode. Click any screen item to show help text
for that item and to exit What's This? help mode.
Application workspace
RSWho
Status bar
The application workspace shows open child windows, such as the RSWho and
RSLinx Classic dialog boxes.
RSWho is RSLinx Classic's main window that shows networks and devices in a
style similar to Windows Explorer. It allows you to view all network connections
from a single screen. For more details about RSWho, refer to RSWho on page 27.
The status bar at the bottom of the RSLinx Classic screen provides information
about the current status of your system.
The left area of the status bar is used to pass messages to the user. For example,
when you scroll through the items on the menus, a brief description of the
function of that menu item appears in this area of the status bar.
The right area of the status bar shows:
CAP if the Caps Lock key on your keyboard is toggled for all caps.
NUM if the Num Lock key on your keyboard is set to enable the numeric
keypad on your keyboard.
SCRL if the Scroll Lock key on your keyboard is set.
The current date from your computer system clock and calendar.
The current time from your computer system clock and calendar.
18 Rockwell Automation Publication LINX-GR001S-EN-E - February 2018
Page 19

Chapter 2
Install and start RSLinx Classic
RSLinx Classic supports two installation methods: Setup wizard installation and
automated installation with command line syntax. This chapter uses the Setup
wizard installation method to illustrate the steps.
This chapter includes information on the following:
System requirements
Installation procedure
Update an existing installation
Before you begin
System requirements
Hardware requirements
Start procedure
Troubleshooting installation
The automated installation with command line syntax reduces user interaction
and provides command line parameters to install RSLinx Classic. See Install
RSLinx Classic with command line syntax on page 59.
Rockwell Software uses a software key to implement copy protection for
Windows-based software products. Every software product has a unique key.
Although, you can install the software on any number of computers, you are only
licensed to run the software on one computer at a time. After you install the
RSLinx Classic software, the Setup program will prompt you to activate your
software. For more information about moving software keys, copy protection, and
software activation, refer to Appendix A in this guide.
To effectively use RSLinx Classic, your personal computer must meet the
following minimum hardware and software requirements:
To install RSLinx Classic software, you will need the following hardware:
Intel Core 2 Duo, 2.8 Ghz processor; 2 GB of memory.
At least 2.2GB of available hard drive space; more hard disk space may be
required for specific application features.
A 16-color, SVGA display with 800 by 600 or greater resolution.
A mouse or other Windows-compatible pointing device.
An Ethernet card, and Allen-Bradley communication device or cable.
Rockwell Automation Publication LINX-GR001S-EN-E - February 2018 19
Page 20

Chapter 2
Install and start RSLinx Classic
This version of RSLinx Classic will not run on Alpha, MIPS, or Power
computer processors.
Software requirements
To run RSLinx Classic v4.00.00 (CPR 9 SR 10), one of the following operating
systems is required:
Supported operating systems
RSLinx Classic is tested on operating systems installed from original Microsoft
media only. RSLinx Classic runs on either the 32-bit or 64-bit versions of the
following Microsoft Windows operating systems:
Windows 7 Enterprise with Service Pack 1
Windows Embedded Standard 7 with Service Pack 1
Windows 7 Home Premium with Service Pack 1
Windows 7 Ultimate with Service Pack 1
Windows 7 Professional with Service Pack 1
Windows 8
Windows 8 Enterprise
Windows 8 Professional
Windows 8.1
Windows 8.1 Enterprise
Windows 8.1 Professional
Windows 10 Enterprise*
Windows 10 Professional*
Windows 10 IoT Enterprise 2016 Long Term Servicing Branch (LTSB)
Embedded**
Windows Server 2008 R2 Enterprise Edition with Service Pack 1
Windows Server 2008 R2 Standard Edition with Service Pack 1
Windows Server 2012 Standard
Windows Server 2012 Datacenter
Windows Server 2012 R2 Standard
Windows Server 2012 R2 Datacenter
Windows Server 2016 Standard*
Windows Server 2016 Datacenter*
20 Rockwell Automation Publication LINX-GR001S-EN-E - February 2018
Page 21

Install and start RSLinx Classic
Chapter 2
*See Operating systems section of Anomalies in the RSLinx Classic Release Notes
for notes regarding Windows 10 and Windows Server 2016 support.
**Supported with the Allen-Bradley 61xx family of Industrial Computers or
CompactLogix™ 5480 family of controllers.
RSLinx Classic is a 32-bit application. While it will function on 64-bit edition of
Windows, the RSLinx Classic Single Node and OEM activations may not operate
with a Windows 64-bit application running on the same computer. Windows
64-bit forces 32-bit and 64-bit applications to run in different processes which
causes RSLinx Classic Single Node and OEM to see the 64-bit application as
running remote and thus prevents it from using the OPC interface. In this case the
system should upgrade to RSLinx Gateway to work with 64bit applications.
For the latest information regarding software platform support, refer to
http://www.rockwellautomation.com/compatibility/#/scenarios.
Install RSLinx Classic software
You can install one or more Rockwell Software products to a single personal
computer.
Important:
This procedure could shut down your process applications. Depending on which applications you
are installing or upgrading, it is possible that your factory automation system will become
inoperable, shutting down your processes. Be certain you have prepared for this downtime and all
of your company's systems are prepared for these applications to be terminated.
To install RSLinx Classic, you must log onto your computer as an Administrator.
To install RSLinx Classic software:
1. Start your Windows operating system.
2. Insert the RSLinx Classic DVD into the DVD-ROM drive.
Click Start, and then click Run. The Run dialog box appears.
In the Open control, type x:\setup, where x is the letter of the drive
containing the RSLinx Classic DVD-ROM, and then click OK.
3. If Microsoft .NET Framework 4.0 or later is not installed on your
computer, the Microsoft .NET Framework Setup dialog box shows. Click
Install.
4. On the RSLinx Classic Setup dialog box, choose one of the following:
Rockwell Automation Publication LINX-GR001S-EN-E - February 2018 21
Page 22

Chapter 2
Install and start RSLinx Classic
Click Install Now to start the software installation process with the
default installation directory, that is, C:\Program Files\Rockwell
Software (for 32-bit operating systems) or C:\Program
Files(x86)\Rockwell Software (for 64-bit operating systems).
Click Customize to start the software installation process with a
different drive where you want to install the RSLinx Classic software,
and then click Install.
5. (Optional) If you select Customize in Step 3, and RSSecurity Emulator was
previously installed on the computer, the RSLinx Classic Security
Configuration Selection dialog box shows. Select Enable Security if you
want to use security, and click Install.
6. On the End-User License Agreements dialog box, read the agreements
and click Accept all to continue the installation, or click Decline to return
to the previous page.
7. The We'll take it from here dialog box shows with the installation progress
bar. Wait while the wizard installs the required components.
8. (Optional) When prompted to restart your computer, click Restart now to
restart your computer and continue the installation, or Restart later to
suspend and exit the installation.
9. On the Almost there dialog box, select one of the following, and click Next.
Select Activate your software to activate the software now. For more
information, refer to Appendix A Activation on page 47.
Select Skip activation to activate the software later. Some features may
not by available until you complete the software activation.
10. After the RSLinx Classic software finishes installing, the That's it! dialog
box shows.
22 Rockwell Automation Publication LINX-GR001S-EN-E - February 2018
Page 23

Install and start RSLinx Classic
Chapter 2
Click Installation Summary to see the installation details.
Click Register for updates to learn how to receive email updates about
product patches.
Click Download it free to install Adobe Acrobat Reader. Adobe
Acrobat Reader is required to open the RSLinx Classic Getting Results
Guide and other documents.
Click Restart now to restart your computer and continue the
installation, or Restart later to exit the installation. You must restart
your computer before using RSLinx Classic.
11. When you finish installing the software, remove the RSLinx Classic DVD
from the DVD-ROM drive, and store it in a safe place.
After installing the software, you are recommended to read the release notes
located in the help. The release notes may contain more up-to-date information
than was available when this document was published. To view the release notes,
start RSLinx Classic, and then choose Help > Release Notes from the main menu.
Update an existing installation
Updating the FactoryTalk Services Platform software
Perform the following steps to update an existing RSLinx Classic installation to
RSLinx Classic version 4.00.00 (CPR 9 SR 10):
1. Close your current version of RSLinx Classic.
2. Insert the RSLinx Classic DVD into the DVD-ROM drive. Refer to Install
RSLinx Classic software on page 21 and perform the installation steps. The
old version of RSLinx Classic that exists on your computer is automatically
uninstalled when you install a newer version of RSLinx Classic.
Tip:
3. When the upgrade completes, restart your computer.
For RSLinx Classic version 2.57.00 and later, a compatible version of FactoryTalk
Services Platform must be installed along with RSLinx Classic. In the Installation
Setup Wizard of RSLinx Classic version 3.70.00 and later, a compatible version of
FactoryTalk Services Platform is automatically installed (or upgraded) along with
the RSLinx Classic installation (or upgrade).
The Installation Setup Wizard automatically backs up the driver configuration that exists in the old
version of RSLinx Classic, and restore the configuration automatically into RSLinx Classic v3.90.01
(CPR 9 SR 9). You can find the backup file BackupFromSystemInstall.rsx in
C:\Users\<username>\AppData\Local\Temp.
For more details about upgrading FactoryTalk Services Platform, refer to
Upgrading the FactoryTalk Services Platform software in FactoryTalk Services
Platform Online Help.
Rockwell Automation Publication LINX-GR001S-EN-E - February 2018 23
Page 24

Chapter 2
Install and start RSLinx Classic
Start RSLinx Classic software
To start RSLinx Classic software, select Start > Programs > Rockwell Software >
RSLinx > RSLinx Classic.
RSLinx Classic running as a service vs. running as an application
Note:
We assume that you used the default names for the directory and program group. If you did not use the
default names, substitute the actual names that you specified for the default names shown.
RSLinx Classic can run as a service or as an application. When you start RSLinx
Classic, it automatically runs as a service by default.
Tip:
Starting with RSLinx Classic v3.74.00, when RSLinx Classic is running as a service, if
you select Start > Programs > Rockwell Software > RSLinx > RSLinx
Classic, the following warning message shows, and you can choose to Stop
Service or Cancel.
"RSLinx Classic is currently running as a service. To view or change the RSLinx
configuration, the service must be stopped and RSLinx started as an application.
Stopping the service will stop all communications and may impact other client
software."
To switch RSLinx Classic to run as an application, follow the steps below:
1. Click Start > Programs > Rockwell Software > RSLinx > RSLinx Classic
Launch Control Panel.
2. In the RSLinx Classic Launch Control Panel dialog box, click Stop.
Troubleshooting installation
3. Once RSLinx Classic service stops running, clear the Always Run As
Service check box.
4. Click Start to start RSLinx Classic as an application.
RSLinx Classic now runs as an application, and the RSLinx Classic main window
shows on the screen. When RSLinx Classic is running as an application, the
RSLinx Classic icon appears in the lower right corner of the Windows task bar.
You can also click this icon to show RSLinx Classic main window.
Note:
To modify RSLinx Classic configuration, you must run it as an application.
If RSLinx Classic does not start or run properly, consider the following:
Does your computer have enough memory? Running RSLinx Classic
requires a minimum of 512MB of RAM.
Does your computer have enough disk space? Running RSLinx Classic
requires a minimum of 2.2GB of available hard disk space.
24 Rockwell Automation Publication LINX-GR001S-EN-E - February 2018
Page 25

Install and start RSLinx Classic
Chapter 2
Do you have the correct activation for RSLinx Classic installed? If your
RSLinx Classic installation shows as RSLinx Classic Lite, RSLinx Classic
Single Node, or RSLinx Classic OEM, the proper activation files were not
installed. See Activate RSLinx Classic with FactoryTalk Activation
Manager on page 47 for information about activation files.
Have you reinstalled an earlier Service Pack or removed a component, such
as DCOM, that RSLinx Classic requires?
Rockwell Automation Publication LINX-GR001S-EN-E - February 2018 25
Page 26

Page 27

Chapter 3
RSWho
This chapter describes the features of the RSWho network browser interface.
RSWho allows you to view all the active network connections from a single screen.
Use RSWho
RSWho is RSLinx Classic main window that shows networks and devices in a
style similar to Windows Explorer. A variety of integrated configuration and
monitoring tools are accessible from the right mouse button in the RSWho. Some
of the available tools are the ControlLogix Gateway Configuration Tool for
Controlnet, DeviceNet, Ethernet, 1756-DHRIO, and 1756-DH485 modules, and
a Data Monitor for monitoring live data out of any ControlLogix, PLC-5, SLC, or
MicroLogix family controllers.
The following figure shows the main areas of the RSLinx Classic RSWho.
Item Name
Rockwell Automation Publication LINX-GR001S-EN-E - February 2018 27
Control bar
Tree control (left pane)
List control (right pane)
Page 28

Chapter 3
RSWho
Control bar
The control bar of the RSWho contains the following items:
Item Description
The Autobrowse check box is selected by default.
If you select the check box, RSWho continually queries the selected device or network to
discover items to display in the browser (regardless if the selected item is expanded or
collapsed). Additionally, the Refresh button is disabled.
If you clear the check box, the Refresh button is enabled, and RSWho stops the discovery
process. To refresh the browser you must then click the Refresh button.
The Refresh button is available if you clear the Autobrowse check box. Clicking the Refresh
button instructs RSWho to perform one discovery cycle of the selected device or network. Since
clicking the button only performs one discovery cycle, you may need to click multiple times to
discover everything on the network.
Status The status of device and network browsing.
The EDS file auto-upload button indicates whether the EDS files automatic upload and
registration function is enabled. If you turn on the EDS file auto-upload button, RSLinx Classic
automatically uploads and registers EDS files of unrecognized online devices when detected
during a browse discovery operation. By default, the button is turned off, and the automatic
upload and registration function is disabled.
The Show large icons button indicates how devices and networks show in the list control
(right pane) in the RSWho. If you click the Show large icons button, devices and networks
show as large icons. By default, the button is turned on, and devices and networks show as
large icons.
If you click the Show details button, devices and networks in the list control (right pane) show
in a list. You can view device details such as Address, Device Type, Online Name, and Status.
Tip: Be patient when browsing some networks, such as through a 1785-KA, as it may appear
that no devices exist, but the update is only being delayed as RSWho checks all possible station
addresses.
Tree control
The left pane of the RSWho is the tree control, which shows networks and
devices.
The RSWho icon
indicates a network. If the icon is animated, the network is
being browsed. Click a network or device to start browsing. The RSWho only
browses one network at a time.
A network is browsed when you click the "+" sign to expand it, or select it or a
device under the network node. When the network or device is collapsed
(indicated by the "+" sign), click "+" or double-click the network or device icon
next to the "+" sign to expand the view and begin browsing. When the network or
device is expanded (indicated by the "-" sign), click "-" or double-click the network
or device icon next to the "-" sign to collapse the view.
28 Rockwell Automation Publication LINX-GR001S-EN-E - February 2018
Page 29

RSWho
Chapter 3
Right-click a supported device to select Station Diagnostics, Configure DDE
Topic, or other supported services for that device.
Note: A device that appears with a red X indicates that RSWho previously recognized this device, but now it
cannot. The red X indicates a communication status error, such as unplugging a recognized device. These
devices can be removed from the RSWho display by right-clicking the device and selecting Remove.
List control
The right pane of the RSWho is the list control, which shows all members of a
collection. A collection is a network, or a device that is a bridge. Right click in the
list control and choose a view option of large icons or details. You can also right
click a supported device to select Station Diagnostics, Configure DDE Topic, or
other supported services for that device.
Rockwell Automation Publication LINX-GR001S-EN-E - February 2018 29
Page 30

Chapter 3
RSWho
30 Rockwell Automation Publication LINX-GR001S-EN-E - February 2018
Page 31

Chapter 4
OPC and DDE Connectivity
This chapter describes the features of:
OPC (OLE for Process Control)
DDE (Dynamic Data Exchange)
OPC
OPC (OLE for Process Control) is a communication standard based on OLE
technology provided by Microsoft, and developed and maintained by the OPC
Foundation, a coalition of industrial manufacturing companies, of which
Rockwell Automation is a member. The charter of this group is to provide an
industrial standard exchange mechanism between plant floor devices and client
applications. RSLinx Classic is an OPC-compliant server exposing the required
interfaces for an OPC client application to access data consistent with other
OPC-compliant servers. The added benefit provided from RSLinx Classic is its
ability to provide several DDE formats in addition to OPC.
OPC is designed to allow client applications access to plant floor data in a
consistent manner. OPC provides many benefits:
Hardware manufacturers only have to make one set of software components
for customers to use in their applications.
Software developers do not have to rewrite drivers because of feature
changes or additions in a new hardware release.
Customers have more choices with which to develop world class integrated
manufacturing systems.
With OPC, system integration in a heterogeneous computing environment is
simple. Leveraging the OLE/COM environment is possible.
RSLinx Classic is an OPC-compliant server. For more information about OPC,
visit the OPC Foundation web site at http://www.opcfoundation.org. For more
information on using OPC with Rockwell Software products, visit our web site at
http://support.rockwellautomation.com.
DDE
Rockwell Automation Publication LINX-GR001S-EN-E - February 2018 31
DDE (Dynamic Data Exchange) is a standard inter-application communication
protocol, which is built into Microsoft Windows operating systems and supported
Page 32

Chapter 4
OPC and DDE Connectivity
by many applications that run under Windows. DDE takes data from one
application and gives it to another application. It allows Windows programs that
support DDE to exchange data between themselves.
A DDE server is a program that has access to data and can provide that data
to other Windows programs.
A DDE client is a program that can obtain data from a server.
By specifying an application, topic, and item, a client application can exchange
data with a server application. DDE works like a conversation between two
people. The people represent the different applications running under Windows,
and the data they share is what they are talking about. RSLinx Classic does not
know the type of data it is receiving, it only knows that a DDE link is providing
the data.
For example, if you have a DDE link from RSLinx Classic to an Excel spreadsheet,
Excel does not know that you are sending a counter value into a spreadsheet. All
Excel sees is data.
DDE/OPC client connectivity
For example, RSLinx Classic is the application name, PLC5TOPIC1 is an
example topic name, and C5:0.ACC is an example item, in this case a counter
accumulator in an Allen-Bradley PLC-5.
Note:
Not all applications that run under Microsoft Windows support DDE. Check with the applications
manufacturer before purchasing an application for use with RSLinx Classic.
For more information about DDE, refer to the DDE topic in the RSLinx Classic
help.
RSLinx Classic provides connectivity for client applications using OPC or
multiple DDE data formats. The OPC and AdvanceDDE interfaces provide
optimized read operations by packing multiple requests from multiple clients in a
single transaction. In configuring a DDE Topic, you can specify whether or not
you want DDE poke operations optimized. Optimized pokes only work with
PLC-5 and SLC processors.
The benefit of optimizing DDE poke operations is packing multiple updates in a
single write operation, thus reducing the overall number of packets required.
Operations such as downloading a recipe can take advantage of this feature.
Other DDE formats supported include FastDDE (for Wonderware clients),
XL_Table and CF_Text to support Microsoft Office products, and other generic
DDE client applications.
32 Rockwell Automation Publication LINX-GR001S-EN-E - February 2018
Page 33

Chapter 5
Register EDS files of devices
Electronic Data Sheet (EDS) files (*.eds) are text files that contains configuration
data for specific device types. The EDS file of a device is provided by the device
vendor and is required for compliance with Open DeviceNet Vendor Association,
Inc. (ODVA) standards.
This chapter introduces the possible ways to register EDS files of devices in
RSLinx Classic, the folder path of all the existing EDS files, and how to remove
EDS files from your computer.
Manually upload and register EDS files in the RSWho
Manually upload and register EDS files in the RSWho
Automatically upload and register EDS files in the RSWho
Manually register EDS files in the EDS Hardware Installation Tool
View existing EDS files of devices on the computer
Unregister EDS files in EDS Hardware Installation Tool
Uninstall EDS Hardware Installation Tool and all EDS files
For an online device whose EDS file is not registered, RSLinx Classic detects
whether the device contains an EDS file within its firmware. If there is an EDS file
found, you can manually upload and register the device's EDS file in the RSWho.
To manually upload and register EDS file from device in the RSWho, perform the
following steps:
1. Connect the device to the computer.
2. Open RSLinx Classic, and browse for the device in the RSWho.
3. Once you find the device, right-click it, and select Upload EDS file from
device from the context menu.
Tip:
You can manually upload and register one EDS file of a device at a time. If you
want to upload and register multiple EDS files at a time, refer to Automatically
Rockwell Automation Publication LINX-GR001S-EN-E - February 2018 33
If you right click an unregistered online device, and the context menu does not contain the
Upload EDS file from device option, it means the device does not support this function.
Page 34

Chapter 5
f
Register EDS files o
devices
upload and register EDS files in the RSWho and Manually register EDS files in the
EDS Hardware Installation Tool.
Automatically upload and register EDS files in the RSWho
For an online device which supports manually upload and registration in the
RSWho, RSLinx Classic can automatically upload and register it, if you enable the
EDS files automatic upload and registration function. With this function enabled,
you can upload and register the EDS file(s) of one or more devices at a time.
To upload and register EDS files automatically, perform the following steps:
1. Turn on the EDS file auto-upload button
on the control bar of the
RSWho window.
Tip:
This enables the automatic upload and registration function. By default, the function is
disabled.
2. In the communication tree in the Explorer of the RSWho, double click (or
click the "+" sign beside) a node or a bus under a certain network to expand
and view devices under the selected node or bus.
Tip:
To trigger the automatic upload and registration, you must double click (or click the "+"
sign beside) a sub-node under a certain network. Double clicking (or clicking the "+" sign
beside) a root node of a network (for example, Ethernet) does not trigger the automatic
upload and registration.
The software performs a browse discovery query for a selected node or bus. If an
unregistered online device is found with its EDS file upon browsing, the EDS file
is uploaded and registered automatically. A progress bar shows beside the
unregistered device in the communication tree.
34 Rockwell Automation Publication LINX-GR001S-EN-E - February 2018
Page 35

Register EDS files of devices
Note:
Chapter 5
If you turn off the EDS file auto-upload button
uploaded, the EDS file upload process is aborted. While an EDS file is being registered, the EDS file
auto-upload button
If an EDS file is invalid, or an error occurs during the upload and registration, the EDS file cannot be
registered, and a diagnostics message is logged into FactoryTalk Diagnostics Viewer. To view the
diagnostics messages:
From the Windows Start menu: Start > All Programs > Rockwell Software >
FactoryTalk Tools > Diagnostics Viewer, or
From the FactoryTalk Administration Console: From the Tools menu, click FactoryTalk
Diagnostics > Viewer.
If there are multiple RSWho instances:
To allow automatic upload and registration, you need to turn on the EDS file auto-upload
button
enable this function, double clicking (or clicking the "+" sign beside) a node or a bus in
this RSWho instance triggers the network browsing, but not the automatic upload and
registration process.
If a device is automatically uploaded and registered in one RSWho instance, the device
information of this specific device is synchronized in the rest of RSWho instances
(including the RSWho instances which disable the automatic upload and registration
function). Note that no progress bar shows for the synchronization in the other RSWho
instances.
RSWho may respond slowly if there are many EDS files being registered.
cannot be turned off.
in each RSWho instance respectively. If a RSWho instance does not
when an EDS file is in the process of being
Manually register EDS files in the EDS Hardware Installation Tool
You can manually register EDS files of devices by launching the EDS Hardware
Installation Tool. The EDS Hardware Installation Tool is installed on your
computer when you install RSLinx Classic.
Important:
You must have a valid and complete EDS file of the device which you want to register. To
search and download the EDS file of a specific device, visit Rockwell Automation Network
Resources at http://www.rockwellautomation.com/support/networks/overview.page.
If an icon file (*.ico) exists for the device, save it with the same name as the EDS file in
the same directory. You can save one or more EDS files (and the related icon files) in one
directory.
To manually register EDS files of devices in the EDS Hardware Installation Tool,
perform the following steps:
1. Launch the EDS Hardware Installation Tool from Start > All Programs >
Rockwell Software > RSLinx > Tools > EDS Hardware Installation
Tool.
2. On the Rockwell Automation - Hardware Installation Tool dialog box,
click Add. The Rockwell Automation's EDS Wizard dialog box opens.
3. On the Registration screen, do one of the following, and then click Next:
Rockwell Automation Publication LINX-GR001S-EN-E - February 2018 35
Page 36

Chapter 5
f
Register EDS files o
devices
Select Register a single file to register one EDS file at a time, and click
Browse to select the EDS file
Select Register a directory of EDS files to register two or more EDS
files at a time, and click Browse to select the directory of the EDS files
4. On the EDS File Installation Test Results screen, review the hardware
device list, and click Next.
5. On the Change Graphic Image screen, review the icon(s) of the hardware
device(s), and click Next.
View existing EDS files of devices on the computer
Note:
The Rockwell Automation's EDS Wizard assigns a default icon to each hardware device.
You can specify another icon for the hardware device(s) by selecting the hardware device
and clicking the Change icon button.
6. On the Final Task Summary screen, review the hardware device list and
click Next.
7. When the registration is complete, click Finish to return to the Rockwell
Automation - Hardware Installation Tool dialog box.
8. Click Exit.
All the existing EDS files (and related icons) are stored in a default folder on your
computer. These existing EDS files include:
EDS files that are installed from the RSLinx Classic installation media
EDS files that are uploaded and registered in the RSWho, either manually
or automatically
EDS files that are manually registered via the EDS Hardware Installation
Tool
To view existing EDS files on your computer, refer to the default folder path
below.
For RSLinx Classic v3.80.00 or earlier
C:\Program Files\Rockwell Software\RSCommon\EDS (for 32-bit
operating systems)
C:\Program Files (x86)\Rockwell Software\RSCommon\EDS (for
64-bit operating systems)
For RSLinx Classic v3.81.00 or later
C:\Users\Public\Documents\Rockwell\EDS *
36 Rockwell Automation Publication LINX-GR001S-EN-E - February 2018
Page 37

Register EDS files of devices
Chapter 5
*RSLinx Classic v3.81.00 relocates the default EDS file folder. For RSLinx Classic
v3.81.00 or later, you can register or remove EDS files in the EDS Hardware
Installation Tool without having to login as Windows administrator on the
computer.
Unregister EDS files in EDS Hardware Installation Tool
Important:
If you want to remove one or more EDS files from your computer, do not delete EDS files (or
related icons) in this folder. Follow the steps in Unregister EDS files in EDS Hardware Installation
Tool and Uninstall EDS Hardware Installation Tool and all EDS files.
To unregister one or more EDS files from your computer, perform the following
steps:
1. Select Start > All Programs > Rockwell Software > RSLinx > Tools >
EDS Hardware Installation Tool to launch the tool.
2. On the Rockwell Automation - Hardware Installation Tool dialog box,
click Remove. Wait while the tool prepares and generates a full list of the
existing EDS files on your computer. A progress bar shows and indicates the
status. This may take a few seconds.
Tip:
The full list of the existing EDS files on your computer includes:
EDS files that are installed from the RSLinx Classic installation media
EDS files that are uploaded and registered in the RSWho, either manually or automatically
EDS files that are manually registered via the EDS Hardware Installation Tool
3. On the Rockwell Automation's EDS Wizard dialog box, select the check
boxes before the EDS files which you want to unregister from the computer.
For devices with multiple firmware revisions, select the check boxes before
the specific revisions to be unregistered. Click Next.
Tip:
Click Select All to select all the EDS files in the list, or click Clear All to clear your selections.
Click Find Device and enter a keyword of a device’s name to quickly locate the device’s EDS
file in the list.
The full list of the existing EDS files shows in alphabetical order by default. You can select the
Display by Catalog Name check box to view the devices by catalog name.
4. Review the Final Task Summary, and click Next.
5. Click Finish.
6. On the Rockwell Automation - Hardware Installation Tool dialog box,
click Exit.
Rockwell Automation Publication LINX-GR001S-EN-E - February 2018 37
Page 38

Chapter 5
f
Register EDS files o
devices
Important:
The following products share the EDS files on your computer. If any of the products listed
below are installed on your computer, you are not recommended to unregister the EDS files:
RSNetworx
RSLinx Classic
FactoryTalk Linx
RSLogix 5000 or Studio 5000 Logix Designer
Logix Designer (RSLogix 5000) Module Profiles
FactoryTalk Services Platform
Uninstall EDS Hardware Installation Tool and all EDS files
To uninstall EDS Hardware Installation Tool and all EDS files, perform the
following steps:
1. Select Start > All Programs > Rockwell Software > RSLinx > Tools >
Uninstall EDS Hardware Installation Tool and all EDS files to launch
the uninstall EDS subsystem process.
2. Read the Uninstall EDS Subsystem warning message, and click Yes.
Wait while the system uninstalls the tool and unregisters devices from your
computer. This may take a few minutes. A confirmation message shows
when this is complete.
3. Click OK on the confirmation message.
Important:
The following products share the EDS subsystem on your computer. If any of the products
listed below are installed on your computer, you are not recommended to uninstall the
EDS subsystem:
RSNetworx
RSLinx Classic
FactoryTalk Linx
RSLogix 5000 or Studio 5000 Logix Designer
Logix Designer (RSLogix 5000) Module Profiles
FactoryTalk Services Platform
38 Rockwell Automation Publication LINX-GR001S-EN-E - February 2018
Page 39

Chapter 6
Compact harmony files
RSLinx Classic v3.90.00 (CPR 9 SR 9) and later allows you to compact existing
harmony topologies through the RSLinx Classic user interface, instead of
manually locating and deleting the harmony files from your computer's hard drive.
This reduces the waiting time to open RSLinx Classic, or to expand the driver
nodes in the RSWho.
Compact harmony files in RSLinx Classic
Important:
This operation deletes the browsed topologies and configured
DDE/OPC topics in RSLinx Classic. If you are using RSLinx Classic
for OPC communications, RSLinx Classic will not be able to serve
data for the defined topics after the operation is completed.
To re-establish communications after you have compact
harmony files, you must re-open the application which uses
RSLinx Classic, edit the topic in RSLinx Classic, re-browse and
select a target device for each topic within RSLinx Classic's Topic
Configuration.
To compact harmony files:
1. In RSLinx Classic menu bar, click File > Compact Harmony, or
In RSLinx Classic Launch Control Panel, click Tools > Compact
Harmony.
2. The following warning message shows. Read the message and click Yes to
continue, or click No to cancel the compact harmony operation.
"This operation will delete all of the RSLinx Classic stored topology
information. If you are using RSLinx Classic for OPC communications,
after the Compact Harmony Database operation is completed, RSLinx
Classic will not be able to serve data for defined topics. To re-establish
communications, you must manually browse and select a target device for
each topic within RSLinx Classic's Topic Configuration. Do you want to
continue?"
3. If RSLinx Classic or the Harmony service is running, the following warning
message shows. Read the message and click Yes to continue, or click No to
cancel the compact harmony operation.
Rockwell Automation Publication LINX-GR001S-EN-E - February 2018 39
Page 40

Chapter 6
Compact harmony files
"RSLinx Classic and Harmony service need to be shut down in order to
perform this operation. Shut down RSLinx Classic and Harmony services?"
Tip: (Optional) Clear the Restart RSLinx Classic when finished check box if
you do not want to restart RSLinx Classic after the compact harmony
process. This option is selected by default.
4. If the system detects RSLinx Classic is in use by any other applications, the
following warning message shows. Read the message and click Yes to
continue, or click No to cancel the compact harmony operation.
"RSLinx Classic is currently in use by one or more applications. If RSLinx
Classic is shut down now, these applications will experience timeouts
and/or loss of data. Shut down RSLinx Classic anyway?"
5. Depending on your Windows User Account Control (UAC) level, an
UAC warning message may show to confirm whether to make changes to
your computer or not. Click Yes to start the compact harmony process.
6. The progress begins and the Compact Harmony Progress dialog box
shows with progress bar. Click Detail to show or hide progress details.
Tip: During the compact harmony process, the OK button is disabled. The button
is enabled once the compact harmony progress is completed or failed.
7. When the compact harmony process is completed, click OK.
40 Rockwell Automation Publication LINX-GR001S-EN-E - February 2018
Page 41

Chapter 7
Find the information you need
Use this chapter to review the sources of additional information about RSLinx
Classic software. This chapter helps you find what you need efficiently by
describing how to:
Use the help
Access guides
Participate in Rockwell Software training courses
Contact Technical Support
Use the help
Help contents
RSLinx Classic help provides general overview information, comprehensive
step-by-step procedures, and context-sensitive, dialog box control definitions for
working with all of the features in the software. To view online help while running
RSLinx Classic:
Choose RSLinx Classic Help from the Help menu on the RSLinx Classic
main window,
Click Help on any RSLinx Classic dialog box or property page,
Position the cursor over a control, with which you want help and
right-click, or
Press F1.
The help contents include overview, procedural, screen, and reference information
for the product. The help contains these basic components:
overview topics
quick start topics
step-by-step procedures
screen element descriptions (for example, text boxes, drop-down lists, and
option buttons)
All of the help is context-sensitive with the application, and provides you with
immediate access to application tasks and screen element descriptions. For a more
detailed description of the help, see Find the information you need on page 41.
Rockwell Automation Publication LINX-GR001S-EN-E - February 2018 41
Page 42

Chapter 7
Find the information you need
Note:
This getting results guide, as well as any reference guides, are included in a PDF (portable document
format) on your RSLinx Classic DVD. These files must be viewed using the Adobe Acrobat Reader software,
which you can download for free from the Adobe website: http://www.adobe.com.
Access help for a control or field
To show a definition for a control or a field, click the Whats This?
icon in
the upper right corner of the dialog box, drag the cursor to the selected area, and
then click to show the definition. In this example, the Property control was
selected.
Find step-by-step procedures
To view a list of tasks related to the current topic, move to the See also section at
the bottom of the help window and select one of the listed tasks. The current
topic is replaced with a step-by-step procedure for completing the task.
For example, from the What is a driver? help topic, if you select Add a driver
under the See also section, the procedure that describes how to add RSLinx Classic
drivers shows.
42 Rockwell Automation Publication LINX-GR001S-EN-E - February 2018
Page 43

Find the information you need
Chapter 7
Find definitions
Rockwell Automation Publication LINX-GR001S-EN-E - February 2018 43
Page 44

Chapter 7
Find the information you need
Within the RSLinx Classic help, blue text highlighted with an underline indicates
a link to a pop-up definition or a link to a related topic. For example, in the
Dynamic Data Exchange help topic, application, topic, and item are pop-up
definitions, and DDE link is a link to a related topic.
Access guides
Training
You can gain immediate access to product documentation through the guides
included with RSLinx Classic. The guides include this Getting Results Guide, as
well as any reference guides, in an electronic book format. The guides are included
in a PDF (portable document format) on your RSLinx Classic DVD. These files
must be viewed using the Adobe Acrobat Reader software, which you can
download for free from the Adobe website at http://www.adobe.com.
One of the best ways to increase your proficiency at using Rockwell Software
products is to attend a Rockwell Software training program. Our training
programs can help you master the basics and show you how to unleash the full
potential of our software.
Rockwell offers a wide range of training programs, from regularly scheduled classes
conducted at Rockwell Software facilities, to custom-tailored classes conducted at
your enterprise. The size of each class is kept small intentionally to maximize
student engagement.
If you would like more information about Rockwell training programs, visit the
Rockwell Software site or contact the Rockwell Software Training Coordinator.
Our World Wide Web address and telephone numbers appear on the inside front
cover of this document.
44 Rockwell Automation Publication LINX-GR001S-EN-E - February 2018
Page 45

Find the information you need
Technical support
Chapter 7
If you cannot find answers to your questions in the Getting Results with RSLinx
Classic guide, the help, or the guides, you can call Rockwell Software Technical
Support at the numbers listed on the inside front cover of this guide. The
technical support staff is available Monday through Friday from 8:00 A.M. to 5:00
P.M. Eastern Time, except holidays. You can also access the Rockwell Software
Online Support Library from the web site listed on the inside front cover of this
guide.
When you call
When you call, you should be at your computer and prepared to give the following
information:
Product serial numbers
Product version number
The product serial numbers and version number can be found in the
software by clicking Help > About RSLinx Classic.
Version of Windows and any service packs that you are using
Hardware you are using
Exact wording of any errors or messages that appeared on your screen
Description of what happened and what you were doing when the problem
occurred
Description of how you attempted to solve the problem
Rockwell Automation Publication LINX-GR001S-EN-E - February 2018 45
Page 46

Chapter 7
Find the information you need
46 Rockwell Automation Publication LINX-GR001S-EN-E - February 2018
Page 47

Appendix A
Activation
RSLinx Classic v2.58.00 (CPR 9 Service Release 4) and later only supports
activation using FactoryTalk Activation.
Grace period
Note:
RSLinx Classic shows a message indicates the activation status when you place the
cursor over the tray icon in the notification area. If the activation status changes
during runtime, the message shows the new status after you restart RSLinx Classic.
RSLinx Classic v2.52.00 (CPR 9) and later supports a seven-day activation grace
period when a valid activation is not found. During the grace period:
EvRSI activation is replaced by FactoryTalk Activation. If you are a current user using EvRSI activation and want
to upgrade to RSLinx Classic v2.58.00 or later, contact your local Rockwell Automation Sales office or Rockwell
Automation Technical Support for information on migrating your activations to FactoryTalk Activation
Manager. For Rockwell Automation Technical Support in the U.S. call 1 (440) 646-3434. Outside the U.S. see
http://www.rockwellautomation.com/locations/.
When the software is started, a message is logged to the FactoryTalk
Diagnostic log every four hours until a valid activation is found.
RSLinx Classic can be started an unlimited number of times. If the grace
period ends, and a valid activation has not been found, RSLinx Classic Lite
is started.
Note:
If RSLinx Classic is unable to successfully obtain valid activations (for example, a network failure
occurs), the software will attempt to run in grace period for up to seven days.
Activate RSLinx Classic with FactoryTalk Activation Manager
How to activate RSLinx Classic
Rockwell Automation Publication LINX-GR001S-EN-E - February 2018 47
RSLinx Classic v3.70.00 and later support software activation during the software
installation. The Installation Setup Wizard contains an Activate products using
FactoryTalk Activation check box. This no longer requires you to open
FactoryTalk Activation Manager to activate the software.
To activate RSLinx Classic in the RSLinx Classic Installation Setup wizard,
perform the following steps:
1. Perform the steps in Install RSLinx Classic software on page 17 on page 21
to install RSLinx Classic software.
2. On the Almost there dialog box in the Installation Setup wizard, select the
Activate your software check box and click Next.
Page 48

Appendix A
Activation
3. On the Software Activation dialog box, enter the serial number and
product key from your Activation Certificate.
4. Select a version from the Earliest version drop down list.
5. Select Activate locally to activate RSLinx Classic on a single computer, or
select Activate using a dongle to activate RSLinx Classic on any computer
by using a dongle.
Note: The Activate using a dongle option requires that you have a dongle to lock the
activation.
6. Click Continue.
You can still activate RSLinx Classic via FactoryTalk Activation Manager by
clicking the Explore other options link in the Software Activation dialog box.
The link provides direct access to the FactoryTalk Activation Manager software.
To activate your copy of RSLinx Classic in the FactoryTalk Activation Manager,
click Get New Activations and follow the instructions in the FactoryTalk
Activation Manager.
Find more information about FactoryTalk Activation
For more information on using the FactoryTalk Activation Tool, click More or
Help in the FactoryTalk Activation Manager window.
For help with FactoryTalk Activation Manager at any point, you can click:
Help on the FactoryTalk Activation Manager window
Help on the Rockwell Software Activation website:
https://licensing.software.rockwell.com
If you cannot connect to the Internet, call Technical Support for help creating an
activation file from an e-mail or a fax.
Phone: 440-646-3434 in North America. Outside of North America, call your
local support organization.
48 Rockwell Automation Publication LINX-GR001S-EN-E - February 2018
Page 49

Appendix B
Secure RSLinx Classic with FactoryTalk Security
FactoryTalk Security™ is intended to improve the security of your automation
system by limiting access to those with a legitimate need. FactoryTalk Security
authenticates user identities and authorizes user requests to access a
FactoryTalk-enabled system. These security services are fully integrated into the
FactoryTalk Directory and are included as part of the FactoryTalk Services
Platform that installs with many products.
For more information on how to use security services, refer to FactoryTalk
Security help.
How do I set up security in RSLinx Classic?
If you have not used FactoryTalk Security or RSSecurity before
RSLinx Classic, along with supporting RSSecurity, also supports FactoryTalk
Security. FactoryTalk Security is intended to improve the security of your
automation system by limiting access to those with a legitimate need. FactoryTalk
Security authenticates the identities of users and authorizes user requests to access
a FactoryTalk-enabled system against a set of defined user accounts and access
privileges held in the FactoryTalk Directory. For more information on
FactoryTalk Security, read the About FactoryTalk Security topic located in
RSLinx Classic Help. The following sections explain the steps you would need to
perform to implement one of the two security mechanisms (FactoryTalk Security
and RSSecurity) supported by RSLinx Classic.
Follow the steps in the sections below to set up security in RSLinx Classic v3.70.00
(CPR 9 SR 7) and later versions. The steps below take RSLinx Classic v3.81.00
(CPR 9 SR 8.1) as an example.
Note:
If you have not used FactoryTalk Security before, and have never configured
security using RSSecurity, follow the steps below to set up security in RSLinx
Classic.
When you install or upgrade the RSLinx Classic software, make sure to install or upgrade a
compatible version of FactoryTalk Services Platform. For the compatibility information,
refer to http://www.rockwellautomation.com/compatibility/#/scenarios.
1. Install FactoryTalk Services Platform v2.81.00 and RSLinx Classic v3.81.00
using RSLinx Classic Setup Wizard.
2. Install RSSecurity Emulator from Start > All Programs > Rockwell
Software > FactoryTalk Tools > RSSecurity Emulator Install.
Rockwell Automation Publication LINX-GR001S-EN-E - February 2018 49
Page 50

Appendix B
Secure RSLinx Classic with FactoryTalk Security
Note:
During the RSSecurity Emulator installation, the FactoryTalk Directory screen appears (see
the following figure) where you will be prompted to select the FactoryTalk Directory
(Network or Local) that RSSecurity Emulator should use. At this step, be sure to make a
note of the directory you choose — you will require this information when adding security
policies to FactoryTalk Directory in Step 4.
Open the Windows Control Panel. Select Add or Remove Programs or
Programs and Features in the Control Panel. In the list of installed programs,
right click RSLinx Classic 3.81.00 CPR 9 SR 8.1, and then select Change. The
RSLinx Classic Setup Wizard opens. While running the RSLinx Classic Setup
Wizard, select Modify in the Program Maintenance page.
50 Rockwell Automation Publication LINX-GR001S-EN-E - February 2018
Page 51

Secure RSLinx Classic with FactoryTalk Security
Note:
Appendix B
In the RSLinx Classic Security Configuration Selection page, select Enable Security. Click
Next and follow the instructions until you finish the modification.
1. Open FactoryTalk Administration Console from Start > All Programs >
Rockwell Software > FactoryTalk Administration Console to add user
accounts and set security settings to secure RSLinx Classic.
Note:
For more information on how to add user accounts, read the Add a user account topic in
FactoryTalk Administration Console help, located at Manage FactoryTalk-enabled
systems > Log on and configure security > Configure security > How To >
Work with user accounts > Add a user account.
For more information on how to secure RSLinx Classic features, read the Secure Product
Features topic in FactoryTalk Security help, located at Configure Security > How to
> Set up product policies > Secure product features.
For more information on what you can secure in RSLinx Classic, read the What can I
secure in RSLinx Classic topic in RSLinx Classic Online help, located at How to > Secure
RSLinx Classic with FactoryTalk > What can I secure in RSLinx Classic.
2. Open RSLinx Classic from Start > All Programs > Rockwell Software >
RSLinx > RSLinx Classic, and click Security > Set Security User from the
main menu. In the New User dialog box, enter the username and password
of the user you created in FactoryTalk Administration Console in step 4,
and click OK.
Note:
Because the access to features in RSLinx Classic is governed by the permissions you set for a
user in FactoryTalk Administration Console, some features out of the 13 securable features
in RSLinx Classic may be inaccessible (for example, if the user you entered in Step 5 does
not have the appropriate permission).
This completes the security setup for RSLinx Classic.
Rockwell Automation Publication LINX-GR001S-EN-E - February 2018 51
Page 52

Appendix B
Secure RSLinx Classic with FactoryTalk Security
If you have used RSSecurity but not FactoryTalk Security
If you have not used FactoryTalk Security before, and want to import an existing
RSSecurity Configuration into the FactoryTalk Directory, follow the steps below
to configure security in RSLinx Classic. The steps below take RSLinx Classic
v3.81.00 (CPR 9 SR 8.1) as an example.
1. Install FactoryTalk Services Platform v2.81.00 and RSLinx Classic v3.81.00
using RSLinx Classic Setup Wizard.
2. Launch the Security Config Explorer by selecting Start > All Programs >
Rockwell Software > Security Server Network Edition > Security Config
Explorer.
3. Locate the RSSecurity Configuration (*.bak) file, and select File > Export
to back up the *.bak file.
4. Close the Security Config Explorer.
5. Uninstall RSSecurity Server/Client (whichever is installed on this machine)
from Windows Control Panel.
6. Install RSSecurity Emulator from Start > All Programs > Rockwell
Software > FactoryTalk Tools > RSSecurity Emulator Install.
Note: During the RSSecurity Emulator installation, the FactoryTalk Directory page appears.
Select the FactoryTalk Directory (Network or Local) which RSSecurity Emulator uses. At this
step, be sure to make a note of the directory you choose this directory information is
needed when adding security policies to FactoryTalk Directory in Step 8 below.
―
7. Open the Windows Control Panel. Select Add or Remove Programs or
Programs and Features in the Control Panel. In the list of installed
programs, right click RSLinx Classic 3.81.00 CPR 9 SR 8.1, and then
52 Rockwell Automation Publication LINX-GR001S-EN-E - February 2018
Page 53

Secure RSLinx Classic with FactoryTalk Security
Appendix B
select Change. The RSLinx Classic Setup Wizard opens. While running the
RSLinx Classic Setup Wizard, select Modify in the Program Maintenance
page.
Note: In the RSLinx Classic Security Configuration Selection page, select Enable Security.
Click Next and follow the instructions until you finish the modification.
8. Import RSSecurity Server database by selecting Start > All Programs >
Rockwell Software > FactoryTalk Tools > Import RSSecurity
Configuration.
Rockwell Automation Publication LINX-GR001S-EN-E - February 2018 53
Page 54

Appendix B
Secure RSLinx Classic with FactoryTalk Security
Note: While running the Import RSSecurity Configuration utility, the FactoryTalk Security
Import dialog box appears. In the Destination directory of the FactoryTalk Security Import
dialog box, be sure to import the .bak file to the directory where you installed the Emulator
(Local or Network).
9. Open RSLinx Classic, and select Security > Set Security User from the
main menu. In the New User dialog box, enter the username (domain
name\username) and password of the RSSecurity user.
If you have used FactoryTalk Security before
Note:
If you do not remember the usernames of the users that existed in your old RSSecurity
setup, perform the following steps:
a. Run FactoryTalk Administration Console by selecting Start > Programs >
Rockwell Software > FactoryTalk Administration Console.
b. In the Explorer pane, expand the FactoryTalk Local or Network Directory tree, and
then expand the Systems folder until the Users folder is visible.
c. In the Users folder, the users who have domain associated with their usernames (for
example, na\Bob) are your RSSecurity users.
Because access to features in RSLinx Classic is governed by the permissions you set in
the security server, some features out of the 13 securable features in RSLinx Classic may
be inaccessible (for example, if the user you entered in Step 9 does not have the
appropriate permission)
This completes the security setup for RSLinx Classic.
If you used FactoryTalk Security before, and want to continue to use FactoryTalk
Security when upgrading RSLinx Classic to v3.81.00 or later, follow the steps
below to set up security in RSLinx Classic. The steps below take RSLinx Classic
v3.81.00 (CPR 9 SR 8.1) as an example.
1. Install FactoryTalk Services Platform v2.81.00 and RSLinx Classic v3.81.00
using RSLinx Classic Setup Wizard.
54 Rockwell Automation Publication LINX-GR001S-EN-E - February 2018
Page 55

Secure RSLinx Classic with FactoryTalk Security
Appendix B
Note: While running the RSLinx Classic Setup Wizard, the RSLinx Classic Security
Configuration Selection page appears. Select Enable Security. Click Next and follow
the instructions until you finish the installation.
2. Open FactoryTalk Administration Console from Start > All Programs >
Rockwell Software > FactoryTalk Administration Console to add user
accounts and set security settings to secure RSLinx Classic.
Note:
For more information on how to add user accounts, read the Add a user account topic in
FactoryTalk Administration Console help, located at Manage FactoryTalk-enabled
systems > Log on and configure security > Configure security > How To > Work with
user accounts > Add a user account.
For more information on how to secure RSLinx Classic features, read the Secure Product
Features topic in FactoryTalk Security help, located at Configure Security > How to >
Set up product policies > Secure product features.
For more information on what you can secure in RSLinx Classic, read the What can I
secure in RSLinx Classic topic in RSLinx Classic Online help, located at How to > Secure
RSLinx Classic with FactoryTalk > What can I secure in RSLinx Classic.
3. Open RSLinx Classic from Start > All Programs > Rockwell Software >
RSLinx > RSLinx Classic, and click Security > Set Security User from the
main menu. In the New User dialog box, enter the username and password
of the user you created in FactoryTalk Administration Console in Step 2,
and click OK.
Rockwell Automation Publication LINX-GR001S-EN-E - February 2018 55
Page 56

Appendix B
Secure RSLinx Classic with FactoryTalk Security
Note:
This completes the security setup for RSLinx Classic.
Because the access to features in RSLinx Classic is governed by the permissions you set
for a user in FactoryTalk Administration Console, some features out of the 13 securable
features in RSLinx Classic may be inaccessible (for example, if the user you entered in
Step 3 does not have the appropriate permission).
When RSLinx Classic is reinstalled, all security settings that were previously configured
for networks and devices are lost. You must redefine these security settings in the
Networks and Devices tree, or in RSWho. For more information, see Considerations
when using RSLinx Classic with FactoryTalk Security.
What can I secure in RSLinx Classic?
The following table explains the features you can restrict access to in RSLinx
Classic. For example, you might restrict the ability to shut down the RSLinx
Classic service to a small group of users, to prevent parts of your automation
system from going down at runtime.
Important:
If you selected Network Directory during the RSLinx Classic security setup procedure, you must use
FactoryTalk Security to secure the following list of features. For more information, contact your local
Rockwell Automation distributor.
Securable feature Description
Clear DDE/OPC Event Log Shows information on any DDE/OPC error messages logged while running RSLinx
Classic with DDE/OPC compliant programs.
Configure CIP Options Administers how PCCC requests that use the CIP protocol are sent over networks.
Configure Client Applications Maps configured and running RSLinx Classic drivers to legacy INTERCHANGE C API,
as well as shows the link identifier of the virtual network maintained by RSLinx
Classic for the use of Client Applications in the virtual link unsolicited messaging
model.
Configure ControlLogix Gateway Provides you with information about the modules in your ControlLogix Gateway.
Configure DDE/OPC Topic Configures DDE/OPC topic.
Configure Drivers and Shortcuts Configures (add, edit, or delete) drivers and shortcuts that allow RSLinx Classic to
communicate with your PLC, and provide quick access to specific networks.
Configure Gateway Allows you to enable the RSLinx Classic Gateway.
Configure Network Properties Allows you to configure network properties.
Edit DDE/OPC Project Allows you to edit your DDE/OPC project.
Edit Options
Reset Station Diagnostic Counters Clears the counters in the station diagnostic screens.
Shutdown Shuts down RSLinx Classic.
56 Rockwell Automation Publication LINX-GR001S-EN-E - February 2018
Shows the options dialog box, which contains the General and DDE tabs.
Page 57

Secure RSLinx Classic with FactoryTalk Security
Appendix B
Securable feature Description
View NT Event Log Records important system occurrences such as RSLinx Classic drivers successfully
starting and stopping.
Using FactoryTalk Security
Network/Local Directory
Keep the following in mind when using RSLinx Classic with FactoryTalk
Security:
The FactoryTalk Services Platform can install two completely separate and
independent FactoryTalk Directories: Local Directory and Network Directory.
User accounts, passwords, and security permissions to securable features are
completely separate and cannot be shared between the Network Directory and the
Local Directory. Configuring any of these items on one directory does not
configure them on the other. Similarly, changing the password to a user account in
one directory does not change the password in the other directory, even if the
account has the same name in both directories.
When configuring RSLinx Classic to work in one of the two directories, keep the
following in mind:
RSLinx Classic security policies and RSSecurity Emulator must be installed
in the same directory (either Local or Network).
If you configured RSLinx Classic to work in the Network Directory, you
must use FactoryTalk Security to administer centralized security across the
network.
If you configured RSLinx Classic to work in Local Directory and want to
use FactoryTalk Security, you can administer security only on a single
computer.
Reset Network Tree
Miscellaneous
Rockwell Automation Publication LINX-GR001S-EN-E - February 2018 57
When RSLinx Classic is reinstalled, all security settings that were previously
configured for networks and devices are lost. You must redefine these security
settings in the Networks and Devices tree, or in RSWho. For more information,
read the Network and Devices are not shown correctly topic in FactoryTalk
Security help, located at Configure security > Troubleshooting security >
Network and Devices are not displayed correctly.
Keep the following additional FactoryTalk Security considerations in mind:
If you did not select the Enable Security check box during the RSLinx
Classic installation, but want to enable security now, you need to uninstall
and then reinstall RSLinx Classic.
Every time you are in RSLinx Classic, be sure to verify that the Username
shown in the Current Security User text box of the Set Security dialog box
Page 58

Appendix B
Secure RSLinx Classic with FactoryTalk Security
(Security > Set Security User) is correct. If it is incorrect, enter the new
Username and Password, and click OK.
58 Rockwell Automation Publication LINX-GR001S-EN-E - February 2018
Page 59

Appendix C
Install RSLinx Classic with command line syntax
Besides the Setup Wizard installation, RSLinx Classic supports automated
installation using command line syntaxes. You can typically use this automated
installation method during large-scale rollouts, when it might be too slow and
costly to have administrators or technicians interactively install the software on
individual computers.
This automated installation method requires you enter a command line at the
beginning of the installation. During the installation process, instead of prompting
you for installation and configuration information interactively, the process
follows the specific command line, without user intervention.
Comparing different installation methods
RSLinx Classic supports the following automated installation:
Unattended installation (recommended)
Silent installation for RSLinx Classic .msi file
RSLinx Classic supports setup wizard installation, and installation with command
line syntax (that is, unattended installation and silent installation). The following
table illustrates the differences among each installation method.
Installation
method
Setup wizard
installation
Unattended
installation
Silent installation for
RSLinx Classic .msi file
Description References
The standard method to install RSLinx Classic. It installs all the necessary
prerequisites software and required components. The installation
processes are visible, easy to use, and provides full installation details
such as installation summary and how to register for products updates.
An automated installation method in CPR 9 SR 9 and later. It installs all
the necessary prerequisites software and required components with
little (or no) user intervention, and provides multiple parameters that
allow customized installations. It is recommended for large-scale
rollouts.
Tip: Depending on the customized parameters, you can silently install
RSLinx Classic, prerequisite software, and required components using
this method. See Example 1 on page 62.
An automated installation method in CPR 9 SR 6 and later. It installs the
RSLinx Classic .msi file with little (or no) user intervention. You need to
manually install the prerequisite software and required components
before silent installation.
Install RSLinx Classic
software on page 21
Use unattended
installation on page
60
Use silent
installation for
RSLinx Classsic .msi
file on page 63
Rockwell Automation Publication LINX-GR001S-EN-E - February 2018 59
Page 60

Appendix C
Install RSLinx Classic with command line syntax
Use unattended installation
Perform unattended installation
Starting with CPR 9 SR 9, RSLinx Classic support unattended installation. In the
unattended installation, you enter a specified command line syntax with multiple
parameters. You can customize the parameters to meet your needs.
To perform RSLinx Classic unattended installation, follow the steps below. The
steps may vary slightly. Follow the on-screen instructions that apply to your
operating system.
1. Close all open Windows programs.
2. Open the Command Prompt window as administrator.
3. In the Command Prompt window, navigate to D:, where D: is the drive
containing the RSLinx Classic installation DVD or installation package,
and press Enter.
Tip: The User Account Control dialog box may show after you press Enter, click Yes
to continue.
4. Type a command line with the following syntax:
Setup.exe {/Q | /QS}
Parameters
/IAcceptAllLicenseTerms
[/AutoRestart]
[/SetupLanguage=language]
[/InstallDrive=drive]
[/SerialNumber=serial_number]
[/ProductKey=product_key]
[/Version=product_version]
5. Press Enter. The installation process starts with the parameters you
specified.
6. For detailed description about each parameter, see Parameters. You can also
type Setup /? in the Command Prompt window, and press Enter to view
the help information of all parameters and examples.
The parameters and values are not case sensitive. If the value includes spaces, you
need to enclose it in quotation marks (" ").
/Q
Required if /QS is not specified.
Installs the product in the silent mode without any user interface.
60 Rockwell Automation Publication LINX-GR001S-EN-E - February 2018
Page 61

Install RSLinx Classic with command line syntax
Appendix C
/QS
Required if /Q is not specified.
Installs the product in the unattended mode without user interaction
during installation, and shows the progress, errors, or complete messages on
the user interface.
/IAcceptAllLicenseTerms
Required. Specifies that you read and acknowledge all license agreements,
and agree to continue the installation.
/AutoRestart
Optional. If specified, the computer will be restarted automatically after the
installation, if a restart is required to complete the installation.
The parameter is ignored if a restart is not required.
/SetupLanguage=value
Optional. Specifies which language will be displayed during the installation
process. The value must be the one of ENU, CHS, DEU, ESP, FRA, ITA,
JPN, KOR, or PTB.
If omitted, the default language is the user or system user interface language.
/Record
Optional.Records the installation options chosen to a recording file.
/Playback
Optional. Plays back a recording file to specify the installation options.
/Uninstall
Optional. Use to uninstall the software.
/InstallDrive=value
Optional. Specifies the installation drive.
If omitted, the default drive and location are:
C:\Program Files (x86)\Rockwell Software (64-bit) or
C:\Program Files\Rockwell Software (32-bit).
Rockwell Automation Publication LINX-GR001S-EN-E - February 2018 61
Page 62

Appendix C
Install RSLinx Classic with command line syntax
/SerialNumber="value"
Optional. Specifies the serial number that is required if you want to get an
activation key during installation.
/ProductKey="value"
Optional. Specifies the product key which is required if you want to get an
activation key during installation.
/Version="value"
Optional. Specifies the version corresponds to the product version that the
SerialNumber and ProductKey are able to activate if you want to get an
activation key during installation. If omitted, the installer uses a default
version which is the most recent product version available when retrieving
the activation.
The following examples show how to use the commands during the unattended
installation.
Example 1
Setup.exe /Q /IAcceptAllLicenseTerms
means:
The RSLinx Classic unattended installation uses the default settings during
the installation process, with no user interface.
Example 2
Setup.exe /QS /IAcceptAllLicenseTerms /AutoRestart
/SetupLanguage=CHS /InstallDrive=D:
/SerialNumber=0123456789 /ProductKey=ABCDE-FGHIJ
/Version=3.90.01
means:
During the installation, the progress, error, or complete messages show on
user interfaces. The displayed language is Chinese.
RSLinx Classic version v3.90.01 will be installed to D:\Program Files
(x86)\Rockwell Software if you are using a 64-bit operating system, or
D:\Program Files\Rockwell Software if you are using a 32-bit operating
system.
The setup will get activation keys during installation if the serial number
0123456789 and product key ABCDE-FGHIJ are valid.
62 Rockwell Automation Publication LINX-GR001S-EN-E - February 2018
Page 63

Install RSLinx Classic with command line syntax
Appendix C
After the installation, if a restart is required, the computer will be restarted
automatically.
Use silent installation for RSLinx Classic .msi file
Before you begin
Starting with RSLinx Classic v3.60.00 (CPR 9 SR 6), RSLinx Classic supports
silent installation for RSLinx Classic .msi file. In the silent installation, RSLinx
Classic is installed with default settings, with no (or little) dialog boxes, messages,
or user intervention.
Before installing the .msi file of RSLinx Classic using the silent installation, you
must manually install the following prerequisite software and required
components, in the following sequences:
Microsoft .NET Framework 4.6
To manually install it, run it from RSLinx Classic installation directory
\Redist\DotNETFX_4.6.
For detailed instructions about how to install it, refer to
http://msdn.microsoft.com/en-us/library/hh506443.aspx.
Microsoft SQL Server Compact 4.0
To manually install it, run it from RSLinx Classic installation directory
\Redist\SQLServerCE_4.0.
OPC .NET API 4.5
To manually install it, run it from RSLinx Classic installation directory
\Redist\OPCNETAPIRedist_2.01.10600\x86.
FactoryTalk Diagnostics v2.90.00
To manually install it, run it from RSLinx Classic installation directory
\Redist\FTDiagnostics_2.90.00.
Windows Firewall Configuration Utility 1.00.08
To manually install it, run it from RSLinx Classic installation directory
\Redist\WFCU_1.00.08.
Certificates installation
For detailed instructions about how to install it, refer to Install certificates
on page 64.
USB CIP driver package (for 32-bit operating systems)
This driver is used for Rockwell Automation USB devices and is
represented by the Virtual Backplane (SoftLogix58xx, USB driver) type
on the Configure Drivers dialog box.
Rockwell Automation Publication LINX-GR001S-EN-E - February 2018 63
Page 64

Appendix C
Install RSLinx Classic with command line syntax
To manually install it, run it from RSLinx Classic installation directory
\Redist\USBCIP_3.18.06.
x64 driver package (for 64-bit operating systems)
To manually install it, run it from RSLinx Classic installation directory
\Redist\KN64Bit_2.01.01.
FactoryTalk Services Platform
To manually install it, run it from RSLinx Classic installation directory
\Common\2.90.00-FTSP.
RSLinx Classic x64 driver package
RSLinx Classic version 3.90.01 (CPR 9 SR 9) x64 driver package includes the
following:
1747-UIC (DH485)
1752-SmartGuard USB
1784-PCIC(S) (ControlNet)
1784-PKTCS (ControlNet)
1784-PKTX (DH485/DH+/RIO)
1784-U2DHP (DH+)
Micro800 Remote LCD (208-REMLCD / 820 Remote LCD)
Micro810
Virtual Backplane
USB CIP
In addition, this release of x64 driver package includes a number of enhancements,
including USB CIP driver improvements and new driver installation folder
C:\Program Files\Rockwell Automation.
Install certificates
64 Rockwell Automation Publication LINX-GR001S-EN-E - February 2018
The following certificates are available in the installation directory \Redist\Cert:
Page 65

Install RSLinx Classic with command line syntax
Appendix C
2016-Rockwell-Driver-SHA1.cer
2016-Rockwell-SHA256.cer
DriverCodeSigning2012-1.cer
Drivers-12-06-2016.cer
Logix-11-04-2016.cer
Rockwell_2013.cer
Rockwell_2014.cer
Rockwell_2015.cer
rockwellcert2010.cer
rockwellcert2013.cer
VeriSign Class 3 Public Primary Certification Authority - G5 2036.cer
To manually install a certificate, perform the following steps. The steps below take
the VeriSign Class 3 Public Primary Certification Authority - G5 2036.cer
certificate as an example.
Perform silent installation
1. Locate the certificate file at RSLinx Classic installation directory
\Redist\Cert\VeriSign Class 3 Public Primary Certification Authority
-G5 2036.cer, and double click it.
2. On the General tab of the Certificate dialog box, click Install Certificate.
3. In the Certificate Import Wizard dialog box, click Next.
4. Select Place all certificates in the following store, and click Browse.
5. In the Select Certificate Store dialog box, select the Trusted Root
Certificate Authorities folder, and click OK.
6. In the Certificate Import Wizard dialog box, click Next.
7. Click Finish.
For more information on certificate installation, see Deploying Certificates to the
Trusted Publishers Store at
http://technet.microsoft.com/en-us/library/cc730989(v=ws.10).aspx.
To install RSLinx Classic in silent mode with default parameter:
1. Close all open
2. Open the Command
Rockwell Automation Publication LINX-GR001S-EN-E - February 2018 65
Windows programs.
Prompt window as administrator.
Page 66

Appendix C
Install RSLinx Classic with command line syntax
3. In the Command Prompt window, navigate to
D:\4.00.00-RSLinxClassic\ENU, where D: is the drive containing the
RSLinx Classic installation DVD or installation package, and press Enter.
Tip:
For RSLinx Classic Lite, the directory is D:/4.00.00-RSLinxClassic-Lite\ENU; for
RSLinx Classic SDK, the directory is D:/4.00.00-RSLinxClassic-SDK\ENU.
The User Account Control dialog box may show after you press Enter, click
Yes to continue.
4. Type the following command line syntax, and press Enter.
Msiexec /I "RSLinx.msi" /qn /L*v+ "%Temp%\Rockwell - RSLinx
Classic Install.log"
Tip:
The command line install has two options:
/qb: basic UI (user interface) - simple progress and error handling
/qn: no UI - completely silent installation
The installation process starts silently. For the installation log file, type the
following command line syntax in the Command Prompt window:
%Temp%\Rockwell - RSLinx Classic Install.Log
During the installation, you may see one or two Windows Security messages:
If the message shows "Windows can't verify the publisher of this driver
software", click Install this driver software anyway to continue the
installation.
If the message shows "Would you like to install this device software", select
the Always trust software from Rockwell Automation check box and
click Install. Selecting the check box prevents this dialog box from
appearing again.
66 Rockwell Automation Publication LINX-GR001S-EN-E - February 2018
Page 67

Appendix D
Using RSLinx Classic with ControlFlash
Select an RSLinx Edition in ControlFlash
When working with ControlFlash, you can use either RSLinx Classic or
FactoryTalk Linx (or RSLinx Enterprise v5.90.00) as your communications
software. The default choice is RSLinx Classic.
To select or change an RSLinx edition in ControlFlash:
1. Launch ControlFlash on your computer.
2. On the Welcome page, click Change RSLinx Edition. The button is
enabled only if RSLinx Classic and FactoryTalk Linx (or RSLinx Enterprise
v5.90.00) are installed.
The default choice is RSLinx Classic to communicate over Data
Highway Plus, DF1, DH485, ControlNet, DeviceNet, Ethernet, and
USB networks.
The other choice is FactoryTalk Linx (or RSLinx Enterprise v5.90.00)
to communicate over USB and Ethernet networks.
The following table shows the RSLinx edition that ControlFlash uses.
ControlFlash uses... If...
RSLinx Classic RSLinx Classic is installed, and FactoryTalk Linx (or RSLinx
Enterprise v5.90.00) is not installed.
FactoryTalk Linx (or RSLinx
Enterprise v5.90.00)
Your preferred RSLinx edition RSLinx Classic and FactoryTalk Linx (or RSLinx Enterprise
FactoryTalk Linx (or RSLinx Enterprise v5.90.00) is
installed, and RSLinx Classic is not installed.
v5.90.00) are installed.
RSWho
Configure drivers in RSLinx Classic
Rockwell Automation Publication LINX-GR001S-EN-E - February 2018 67
RSWho is RSLinx Classic's main window that shows networks and devices in a
style similar to Windows Explorer. It allows you to view all network connections
from a single screen. For more details about RSWho, refer to RSWho on page 27.
To add a driver in RSLinx Classic:
1. From the RSLinx Classic main menu, select Communications >
Configure Drivers.
Page 68

Appendix D
Using RSLinx Classic with ControlFlash
2. From the Configure Drivers dialog box, select the desired driver from the
Available Driver Types list.
3. Click Add New. The Add New RSLinx Classic Driver dialog box opens.
4. Enter a name for the selected driver (15 characters at maximum), and click
OK. The Configuration dialog box for that driver shows.
5. In the Configuration dialog box, enter the appropriate parameters for the
desired driver.
6. Click OK to close the Configuration dialog box. The new driver now
appears in the Configured Drivers list.
To edit a driver in RSLinx Classic:
1. From the RSLinx Classic main menu, select Communications > Configure
Drivers.
Uninstall RSLinx Classic
2. From the Configure Drivers dialog box, select the desired driver from the
Configured Drivers list.
3. Click Configure. The Configuration dialog box for that driver shows.
4. Make the necessary modifications to the driver, and click OK to return to
the Configure Drivers dialog box.
To uninstall RSLinx Classic software, do any of the following:
Open Programs and Features in Windows Control Panel, right-click
RSLinx Classic version 4.00.00 and then click Uninstall.
Open Setup.exe, and then click modify or uninstall.
Open the Command Prompt window and type a command with the
following syntax:
Setup.exe [/Q | /QS] /Uninstall
Note:
Components, such as FactoryTalk Activation Manager, that are shared with other products
will not be uninstalled.
For more information about command-line parameter, see Parameters on page 60.
68 Rockwell Automation Publication LINX-GR001S-EN-E - February 2018
Page 69

Glossary
Activation file - A hidden, read-only, system file that activates a Rockwell
Software product. The software will run only if your system can find the correct
activation file.
Activation key - Activation files contain a database of activation keys. Each key is
particular to a certain product and must be accessible on a local or remote drive for
that product to run.
Driver - The software interface to the hardware device that will be used to
communicate between RSLinx Classic and your processor.
DDE (Dynamic Data Exchange) - A form of inter-process communication.
When two or more programs that support DDE are running simultaneously, they
can exchange information and commands.
License - Authorization to use a specified number of instances of software. A
products activation key contains a license for each copy of the software you have
purchased.
Links - The data path established for one or more channels between two or more
stations. DDE links can be hot, warm, or cold.
OPC - Provides an industry-standard mechanism to communicate and exchange
data between clients and servers using OLE technology.
Packet - The transmission unit exchanged at the network layer.
Poke - DDE version of a write.
Read - To acquire data from somewhere (memory, an output, another station).
Topic - Represents a specific path to a processor.
Write - To load data into somewhere (memory, an output, another station).
Rockwell Automation Publication LINX-GR001S-EN-E - February 2018 69
Page 70

Glossary
70 Rockwell Automation Publication LINX-GR001S-EN-E - February 2018
Page 71

A
x
activation 47
activate 47
application workspace 18
Inde
H
hard drive space 19
hardware 19
C
classes 44
close 16
communications device 19
configure a driver 13
configure a topic 14
context-sensitive help 17, 41
control definitions 41
Control menu 16
copy a link 15
Customer Information 21
D
diagnostics 17
document conventions 7
document set 41
driver configuration 13
Dyamnic Data Exchange 29
E
electronic book format 7, 44
Electronic Data Sheet (EDS) 31
Enable Security 21
ethernet card 19
I
Install 21
FactoryTalk Services Platform 49
RSLinx Classic 19
RSSecurity Emulator 49
intended audience 7
L
license 19
License Agreement 21
Lite version 11
Local Directory 57
M
maximize 16
memory 24
menu bar 16
minimize 16
mouse 19
move 16, 56
N
Network Directory 56
F
FactoryTalk Activation 47
FactoryTalk Administration Console 49
FactoryTalk Security user 49
feedback 7
G
Gateway version 13
grace period 47
Rockwell Automation Publication LINX-GR001S-EN-E - February 2018 71
O
OEM version 12
OLE for Process Control 29
online guides 44
online help 41
P
paste a link 15
pointing device 19
pop-up definition 43
Page 72

Index
Process Terminating 21
product
serial numbers 45
version number 45
Q
Quick start 13
R
RAM 19, 24
related topic 43
release notes 19
requirements
hardware 19
software 20
restore 16, 49, 56
RSLinx Classic icon 16
RSLinx Classic types 11
RSSecurity Emulator 49
RSSecurity user 49
support 45
support library 45
SVGA graphics adapter 19
system requirements 19
T
tasks 42
technical support 45
title bar 16
toolbar 17
topic configuration 14
training 44
troubleshooting
installation 24
types of RSLinx Classic 11
U
updating an existing installation 22
V
S
version numbers 45
security 49
Add user accounts 49
considerations 57
enable security option 58
FactoryTalk Administration Console 49
FactoryTalk Security user 49
FactoryTalk Services Platform 49
Local Directory 57
Network Directory 56, 57
Network Tree 58
RSSecurity Emulator 49, 57
RSSecurity user 49
securable features 56
Set Security dialog box 58
set up security 49
serial numbers 45
Single Node version 12
size 16, 56
software 20
starting RSNetWorx for DeviceNet 19, 23
status bar 18
step-by-step procedures 41, 42
72 Rockwell Automation Publication LINX-GR001S-EN-E - February 2018
W
What’s This? help 42
Page 73

Rockwell Automation support
Rockwell Automation provides technical information on the web to assist you in using its products. At
http://www.rockwellautomation.com/support you can find technical and application notes, sample code, and links to software service packs. You
can also visit our Support Center at https://rockwellautomation.custhelp.com for software updates, support chats and forums, technical
information, FAQs, and to sign up for product notification updates.
In addition, we offer multiple support programs for installation, configuration, and troubleshooting. For more information, contact your local
distributor or Rockwell Automation representative, or visit http://www.rockwellautomation.com/services/online-phone .
Installation assistance
If you experience a problem within the first 24 hours of installation, review the information that is contained in this manual. You can contact
Customer Support for initial help in getting your product up and running.
United States or Canada 1.440.646.3434
Outside United States or Canada Use the Worldwide Locator available at http://www.rockwellautomation.com/locations , or contact your local Rockwell
Automation representative.
New product satisfaction return
Rockwell Automation tests all of its products to ensure that they are fully operational when shipped from the manufacturing facility. However, if
your product is not functioning and needs to be returned, follow these procedures.
United States Contact your distributor. You must provide a Customer Support case number (call the phone number above to obtain one) to
your distributor to complete the return process.
Outside United States Please contact your local Rockwell Automation representative for the return procedure.
Documentation feedback
Your comments will help us serve your documentation needs better. If you have any suggestions on how to improve this document, complete the
feedback form, publication RA-DU002
Rockwell Automation Publication LINX-GR001S-EN-E - February 2018
Supersedes Publication LINX-GR001R-EN-E
Copyright © 2018 Rockwell Automation Technologies, Inc. All Rights Reserved. Printed in the U.S.A.
 Loading...