

Allen-Bradley 2094-AL25S, 2094-BL50S, 2094-AL50S, 2094-BL25S, 2094-BL75S Installation Instructions Manual
...Page 1
Installation Instructions
Line Interface Module
Catalog Numbers 2094-AL15S, 2094-AL25S, 2094-AL50S, 2094-AL75S, 2094-BL10S, 2094-BL25S, 2094-BL50S,
2094-BL75S, 2094-XL75S-C1, 2094-XL75S-C2, 2094-AL09, 2094-BL02
Top ic Pag e
About the Line Interface Module 1
Important User Information 2
Catalog Number Explanation 3
Before You Begin 3
Connector D ata 9
Understanding Signal Specifications 17
Install the Line Interface Module 27
Wiring Diagrams 43
Block Diagrams 45
Post -inst allati on 50
Status Indicators 51
Specifications 52
Additional Resources 56
About the Line Interface Module
The Bulletin 2094 line interface module is designed to replace many of the
common-input power devices required for your servo drive system. Use these
instructions when mounting your module to the panel or wiring your module
into the system.
For installation information regarding equipment and accessories excluded here,
see Additional Resources
on page 56 or the information available for those
products.
Page 2
2 Line Interface Module
IMPORTANT
Important User Information
Solid state equipment has operational characteristics differing from those of electromechanical equipment.
Safety Guidelines for the Application, Installation and Maintenance of Solid State Controls (publication
available from your local Rockwell Automation sales office or online at
SGI-1.1
http://www.rockwellautomation.com/literature
equipment and hard-wired electromechanical devices. Because of this difference, and also because of the
wide variety of uses for solid state equipment, all persons responsible for applying this equipment must
satisfy themselves that each intended application of this equipment is acceptable.
In no event will Rockwell Automation, Inc. be responsible or liable for indirect or consequential damages
resulting from the use or application of this equipment.
The examples and diagrams in this manual are included solely for illustrative purposes. Because of the many
variables and requirements associated with any particular installation, Rockwell Automation, Inc. cannot
assume responsibility or liability for actual use based on the examples and diagrams.
No patent liability is assumed by Rockwell Automation, Inc. with respect to use of information, circuits,
equipment, or software described in this manual.
Reproduction of the contents of this manual, in whole or in part, without written permission of Rockwell
Automation, Inc., is prohibited.
Throughout this manual, when necessary, we use notes to make you aware of safety considerations.
ATTENTION: Identifies information about practices or circumstances that can
cause an explosion in a hazardous environment, which may lead to personal
injury or death, property damage, or economic loss.
Identifies information that is critical for successful application and understanding
of the product.
ATTENTION: Identifies information about practices or circumstances that can
lead to personal injury or death, propert y damage, or economic loss. Attentions
help you to identify a hazard, avoid a hazard, and recognize the consequences.
) describes some important differences between solid state
SHOCK HAZARD: Labels may be on or inside the equipment, for example, a
drive or motor, to alert people that dangerous voltage may be present.
BURN HAZARD: Labels may be on or inside the equipment, for example, a
drive or motor, to alert people that surfaces may reach dangerous
temperatures.
Rockwell Automation Publication 2094-IN005H-EN-P - October 2012
Page 3
Line Interface Module 3
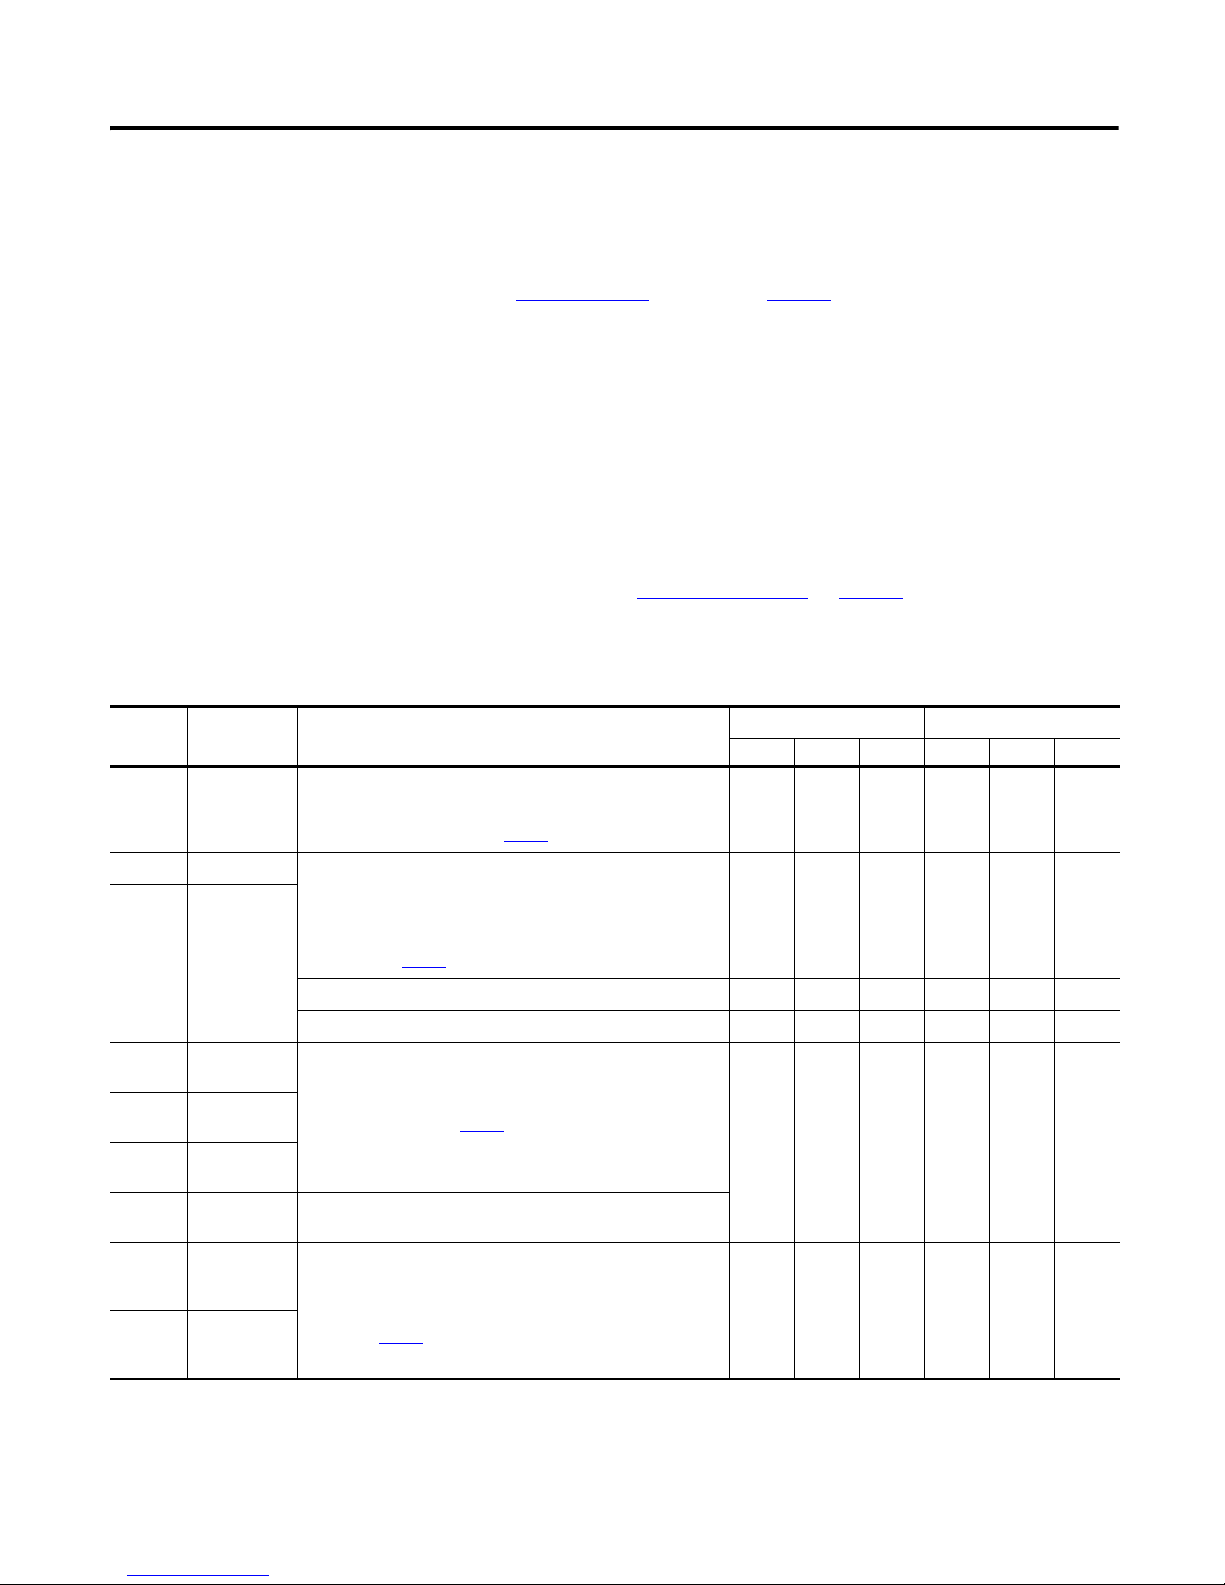
Catalog Number Explanation
Cat. No.
2094-AL15S
2094-AL25S 25 A
2094-AL50S 50 A
2094-AL75S 75 A
2094-BL10S
2094-BL25S 25 A
2094-BL50S 50 A
2094-BL75S 75 A
2094-XL75S-C1 230/460V 75 A 110V AC auxiliary power input.
2094-XL75S-C2 230/460V 75 A 230V AC auxiliary power input.
2094-AL09 230V 20 A • 24V DC power output with 8 A current capacity.
2094-BL02 460V 30 A
Input
Volt age
230V
460V
Before You Begin
Catalog numbers and descriptions for the line interface module are listed in the
table below.
Current
Rating
15 A
10 A
Description
• 230V AC auxiliary power output.
• Customer-configurable branch-circuit
protection. This feature provides the
option for connecting CB2 and CB3 before
or after the main (CB1) disconnect.
See Configure Branch-circuit Protection
page 40 for more information.
• Internal 3-phase line filter.
• Internal 230V AC control line filter.
• 24V DC power output with 20 A current capacity.
• Branch circuit protection and disconnect when used with the
variable-depth rotary mechanism (catalog number
on
140U-H-RM12B).
• Power to multiple Bulletin 2093 or 2094 power rails.
• Internal 24V DC I/O line filter.
• Internal 230V AC control line filter.
• External (customer supplied) 3-phase line filter.
Before you begin mounting your line interface module, make sure you:
• unpack your line interface module.
• understand the mounting requirements.
• establish noise zones.
Unpack Your Line Interface Module
Remove all packing material, wedges, and braces from within and around the
components. After unpacking, check the item nameplate catalog number against
the purchase order.
Line interface modules ship with the following items:
• Connector set for 2094-ALxxS, 2094-BLxxS, and 2094-XL75S-Cx line
interface modules includes I/O (IOL), VAC line (IPL), VAC load (OPL),
control power (CPL), 24V brake/IO power (P1L), auxiliary 230V Output
(P2L), and auxiliary 230V input (APL) connectors.
• Connector set for 2094-AL09 and 2094-BL02 line interface modules
includes VAC line (IPL), VAC load (OPL), control power (CPL), and
24V brake I/O power (PSL) connectors.
The I/O (26-pin) connector for 2094-AL09 and 2094-BL02 line interface
modules is not provided. See Accessories
number and a complete description of the connector sets.
• These installation instructions, publication 2094-IN005.
Rockwell Automation Publication 2094-IN005H-EN-P - October 2012
on page 51 for the catalog
Page 4
4 Line Interface Module
IMPORTANT
Mounting Requirements
The following requirements apply when preparing to mount your line interface
module:
ATTENTION: Plan the installation of your system so that you can perform all cutting,
drilling, tapping, and welding with the system removed from the enclosure. Because
the system is of the open type construction, be careful to keep any metal debris from
falling into it. Metal debris or other foreign matter can become lodged in the circuitry,
which can result in damage to components.
• The line interface module must be enclosed in a grounded conductive
enclosure offering protection as defined in standard EN 60529 (IEC 529)
to IP55 such that they are not accessible to an operator or unskilled person,
to comply with UL
these requirements providing protection to IP66.
• The panel you install inside the enclosure for mounting your system
components must be on a flat, rigid, vertical surface that won’t be subjected
to shock, vibration, moisture, oil mist, dust, or corrosive vapors.
• Observe the Environmental Specifications
• Maintain minimum clearances for proper airflow, easy module access, and
proper cable bend radius as shown in the figures on page 5
and CE requirements. A NEMA 4X enclosure exceeds
on page 55.
.
Mount the line interface module in an upright position as shown. Do not mount the
module on its side.
Rockwell Automation Publication 2094-IN005H-EN-P - October 2012
Page 5
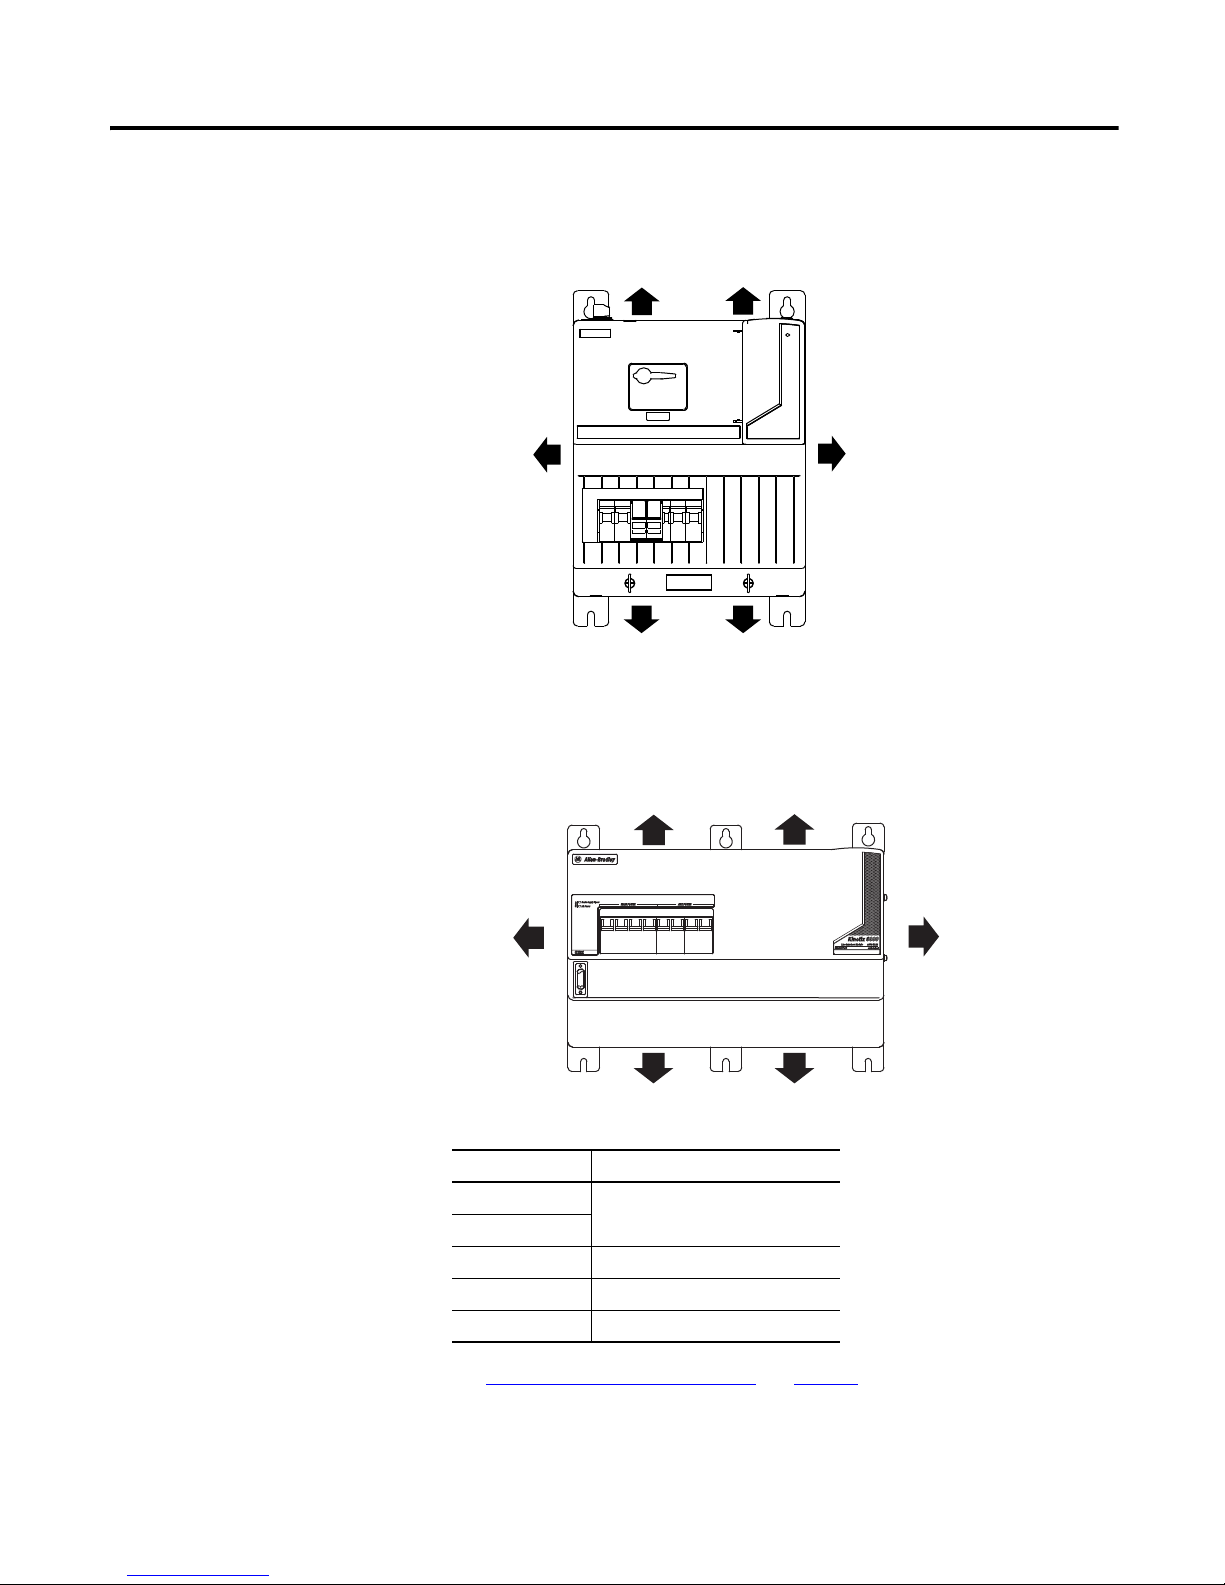
Figure 1 - Minimum Clearance Requirements
MAIN VAC
Clearance for Airflow and Installation
50.8 mm (2.0 in.) min
Line Interface Module
(catalog number 2094-ALxxS is shown)
Clearance right of module
is not required.
Clearance left of
module is not required.
Clearance for Airflow and Installation
50.8 mm (2.0 in.) min
Clearance for Airflow and Installation
50.8 mm (2.0 in.) min
Line Interface Module
(catalog number 2094-BL02 is shown)
Clearance for Airflow and Installation
50.8 mm (2.0 in.) min
Clearance for Airflow
and Installation
50.8 mm (2.0 in.) min
Clearance for Airflow
and Installation
50.8 mm (2.0 in.) min
(catalog numbers 2094-ALxxS, 2094-BLxxS, and 2094-XL75S-Cx)
Line Interface Module 5
Figure 2 - Minimum Clearance Requirements
(catalog numbers 2094-AL09 and 2094-BL02)
Cat. No. Cabinet Depth Clearance, min
2094-ALxxS
2094-XL75S
2094-BLxxS 250 mm (9.8 in.)
2094-AL09 200 mm (7.9 in.)
2094-BL02 300 mm (11.8 in.)
For Power Dissipation Specifications, see page 54.
200 mm (7.9 in.)
Rockwell Automation Publication 2094-IN005H-EN-P - October 2012
Page 6
6 Line Interface Module
C
D
VD
D
D
D
D
D
D
VD
D
MAIN VAC
Line Interface Module
(catalog n umber
2094-ALxxS is shown)
Drive/
System Module
(3)
Dirty Wireway
Clean Wireway
I/O
(1)
and
Feedback Cables
No sensitive
equipment within 150
mm (6.0 in.)
(2)
Motor Power Cables
Very dirty Filter/Drive connections
segregated (not in wireway)
Route 24V DC I/O
Shielded Cable
Route Encoder/Analog/Registration
Shielded Cables
VAC LOAD
VAC L INE
AC Line Filte r
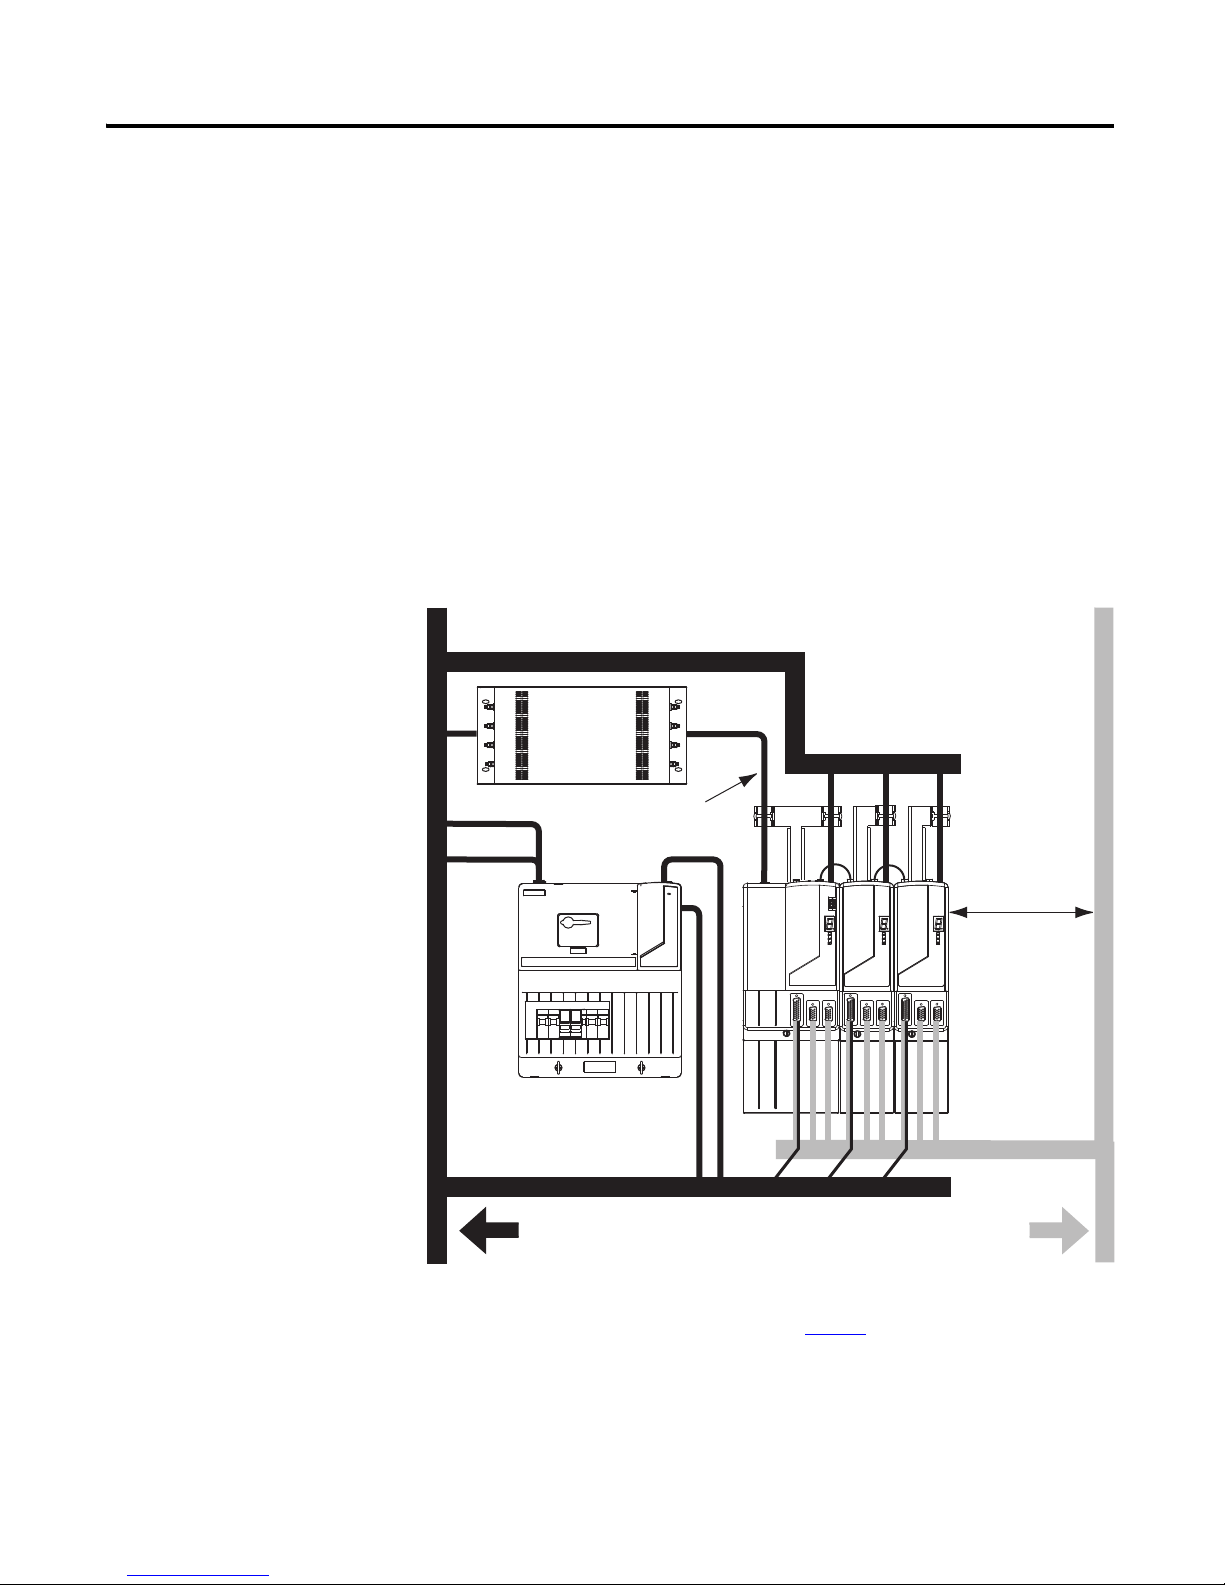
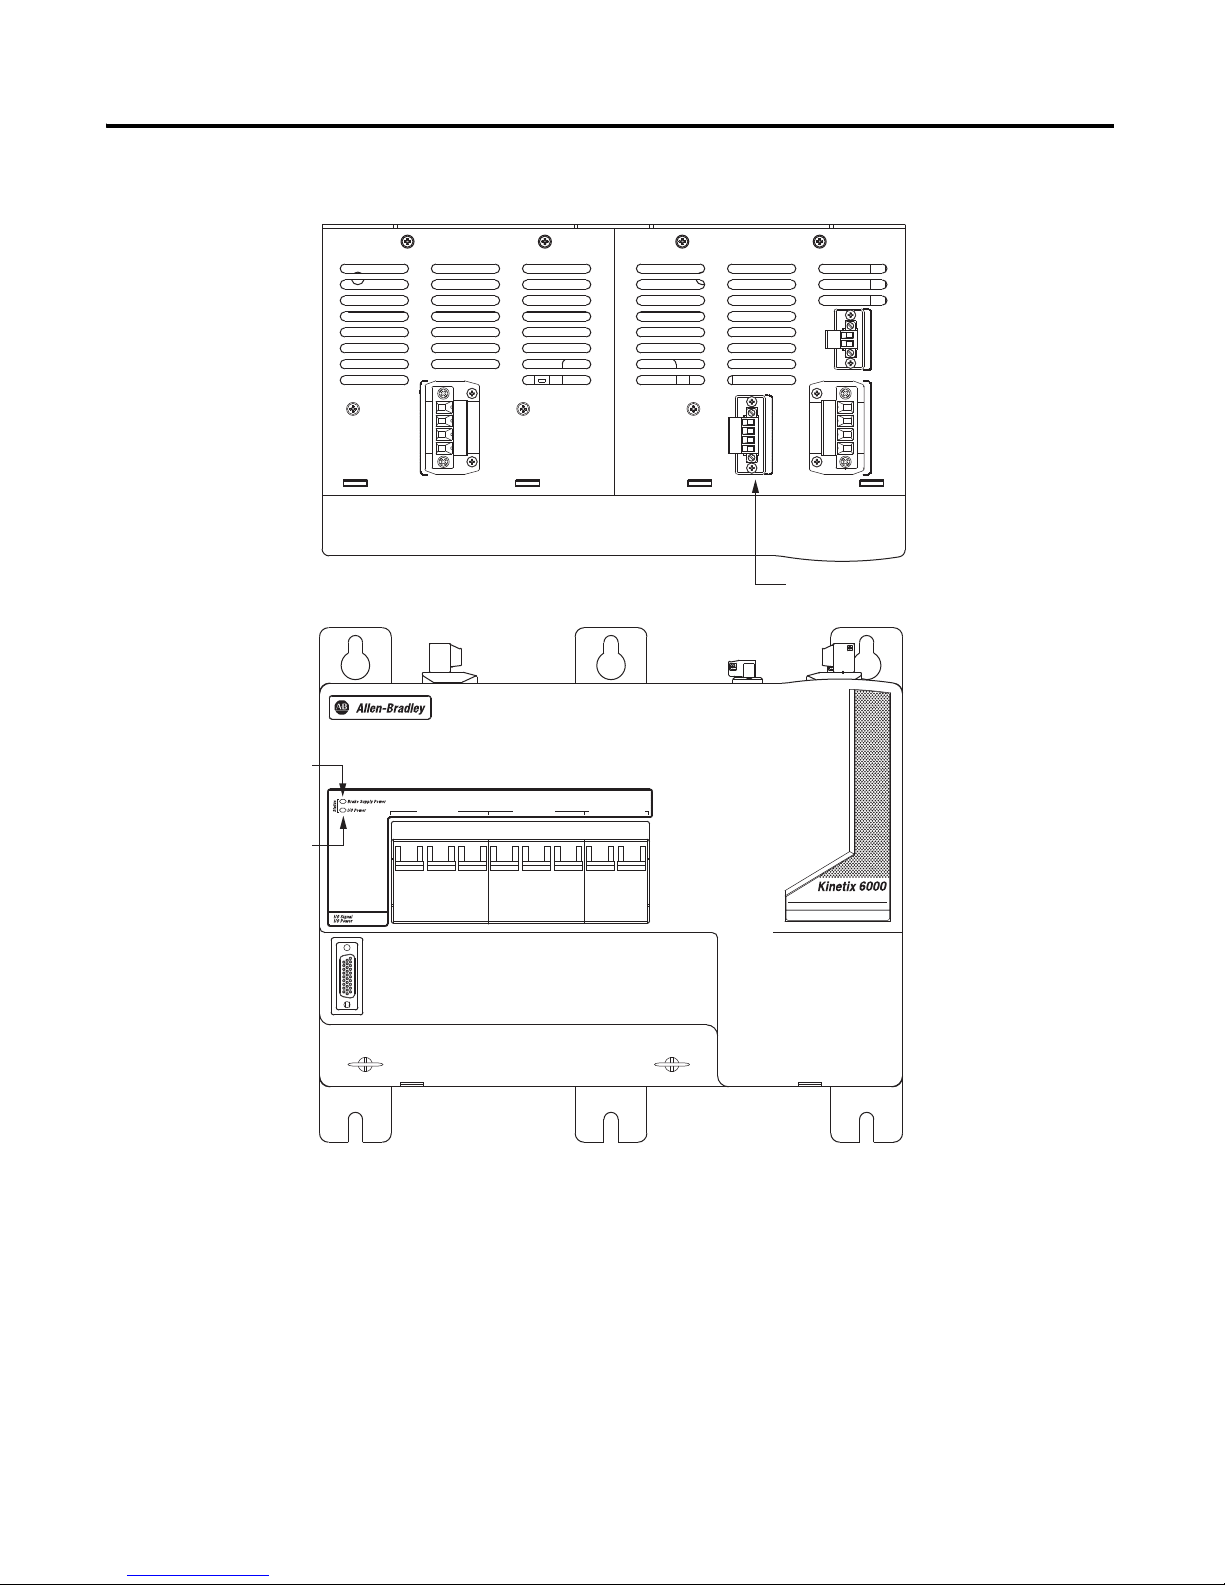
Establishing Noise Zones
Observe these guidelines when a 2094-ALxxS, 2094-BLxxS, or 2094-XL75S-Cx
line interface module is used in the system and mounted left of the drive with the
AC (EMC) line filter mounted above the module:
• The clean zone (C) is to the right and beneath the drive system (gray
wireway).
• The dirty zone (D) is to the left and above the drive system, and above and
below the line interface module (black wireway).
• The very dirty zone (VD) is from the filter output to drive. Shielded cable
is required on the EMC filter (LOAD side) and the braided shield
attached to the clamp (when provided).
• The sercos fiber-optic cables are immune to electrical noise.
Figure 3 - Establishing Noise Zones (EMC filter above the line interface module)
(1) If drive system I/O cable contains (dirty) relay wires, route cable with module I/O cable in dir ty wireway.
(2) When space does not permit the 150 mm (6.0 in.) segregation, use a grounded steel shield instead. For examples, see the System
Design for Control of Electrical Noise Reference Manual, publication GMC-RM001
(3) The Kinetix® 6000 drive is shown as an example of any drive or other device in configuration with the line interface module;
however, noise zones of other products will vary.
.
Rockwell Automation Publication 2094-IN005H-EN-P - October 2012
Page 7

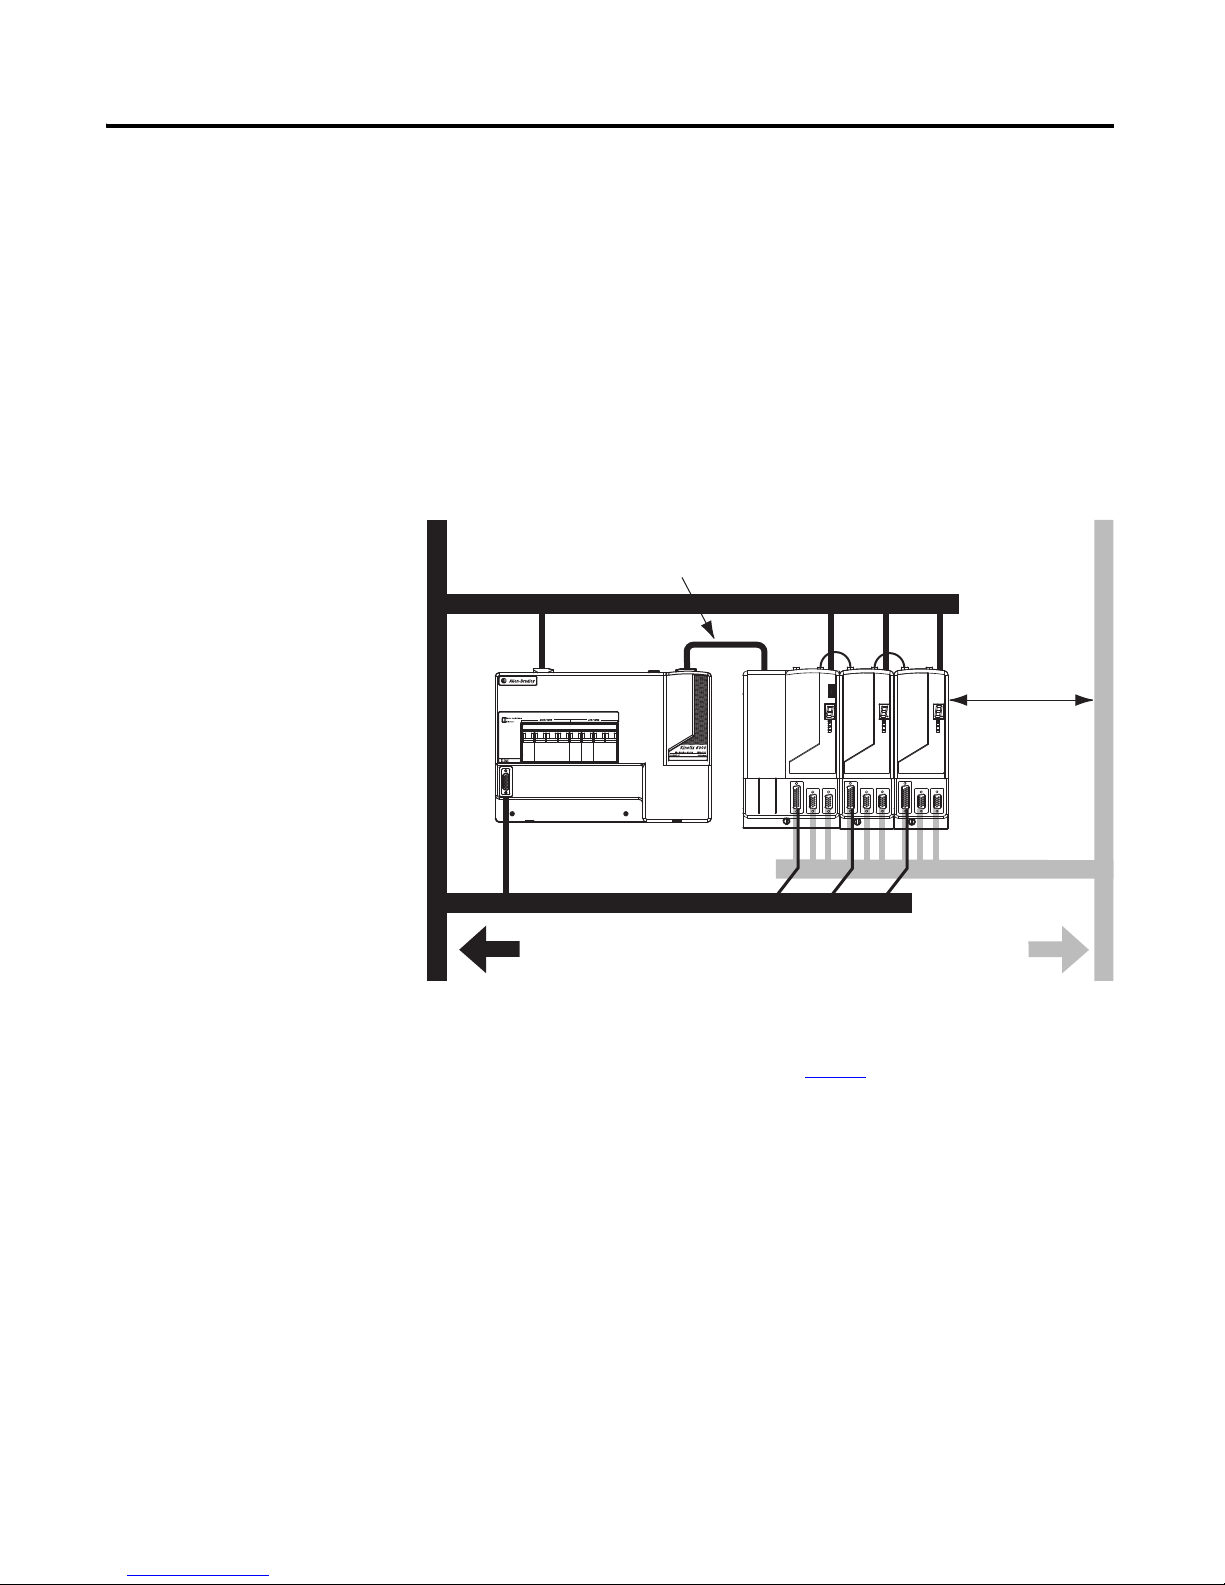
Line Interface Module 7
I/O
(1)
and Feedback Cables
No sensitive
equipment within 150
mm (6.0 in.)
(2)
Line Interface Module
(catalog number
2094-ALxxS is shown)
Drive/System Module
(3)
Clean Wireway
Dirty Wireway
Motor Power Cables
Very dirty Filter/Drive connections
segregated (not in wireway)
Route 24V DC I/O
Shielded Cable
Route Encoder/Analog/Registration
Shielded Cables
2094 Mounting
Brackets
(4)
x2
VAC LO AD
VAC L INE
AC (EMC)
Line Filter
Control VAC
Auxiliary VAC
24V DC Brake
LIM
I/O
Observe these guidelines when a 2094-ALxxS, 2094-BLxxS, or 2094-XL75S-Cx
line interface module is used in the system and mounted right of the drive with
the AC (EMC) line filter mounted behind the line interface module:
• The clean zone (C) is to the left and beneath the drive system (gray
wireway).
• The dirty zone (D) is to the right and above the drive, and above and
below the line interface module (black wireway).
• The very dirty zone (VD) is from the filter output to drive. Shielded cable
is required on the EMC filter (LOAD side) and the braided shield
attached to the clamp (when provided).
• The sercos fiber-optic cables are immune to electrical noise.
Figure 4 - Establishing Noise Zones (EMC filter behind the line interface module)
D
D
D
D
C
VD
MAIN VAC
VD
PR
D
PR
C
D
(1) If the drive system I/O cable contains (dirty) relay wires, route cable with the module I/O cable in dirty wireway.
(2) When space does not permit the 150 mm (6.0 in.) segregation, use a grounded steel shield instead. For examples, see the System
Design for Control of Electrical Noise Reference Manual, publication GMC-RM001
(3) The Kinetix 6000 drive is shown as an example of any drive or other device in configuration with the line interface module; however,
noise zones of other products will vary.
(4) Only the 2094-ALxxS and 2094-XL75S-Cx line interface modules are compatible with 2094 mounting brackets. The 2094-BLxxS,
2094-AL09, and 2094-BL02 line interface modules are not compatible.
.
Rockwell Automation Publication 2094-IN005H-EN-P - October 2012
Page 8
8 Line Interface Module
Line Interface Module
(catalog number
2094-AL09 is shown)
Dirty Wireway
Clean Wireway
I/O
(1)
and Feedback Cables
No sensitive
equipment within 150
mm (6.0 in.)
(2)
Motor Power Cables
Very dirty LIM/Drive connections
segregated (not in wireway)
Route 24V DC I/O
Shielded Cable
Route Encoder/Analog/Registration
Shielded Cables
Drive/
System Module
(3)
Observe these guidelines when a 2094-AL09 or 2094-BL02 line interface
module is used in the drive system:
• The clean zone (C) is to the right and beneath the drive system (gray
wireway).
• The dirty zone (D) is to the left and above the drive, and above and below
the line interface module (black wireway).
• The very dirty zone (VD) is limited to where the line interface module
VAC output jumpers over to the drive. Shielded cable is required only if
the very dirty cables enter a wireway.
• The sercos fiber-optic cables are immune to electrical noise.
Figure 5 - Establishing Noise Zones (catalog numbers 2094-AL09 or 2094-BL02)
D
D
D
(1) If drive system I/O cable contains (dirty) relay wires, route cable with module I/O cable in dir ty wireway.
(2) When space does not permit the 150 mm (6.0 in.) segregation, use a grounded steel shield instead. For examples, see the System
Design for Control of Electrical Noise Reference Manual, publication GMC-RM001
(3) The Kinetix 6000 drive is shown as an example of any drive or other device in configuration with the line interface module; however,
noise zones of other products will vary.
VD
C
D
D
C
.
Rockwell Automation Publication 2094-IN005H-EN-P - October 2012
Page 9
Line Interface Module 9
Line Interface Module, Top View
(catalog number 2094-XL75S-Cx is shown)
Line Interface Module, Front View
(catalog number 2094-XL75S-Cx is shown)
Control/ AUX
VAC
Fuse
Block
VAC Load
(OPL) Connec tor
VAC L ine
(IPL) Connector
I/O (IOL) Connector
(staggered)
Control Power Output (CPL) Connector
24V Power
Status Indicator
Main VAC
Auxiliary Power Output (P2L) Connector
24V DC Brake Power Output (P1L) Connector
IOL Connector
(as viewed from side)
Brake-I/O
VAC
CB2
CB3
FB1
I/O (IOL) Connector
Access Door
Auxiliary Power Input
(APL) Connector
(1)
I/O (IOL) Connector
(straight)
IOL Connector
(as viewed from side)
Connector Data
Use the figures below to locate the line interface module connectors and
indicators.
Figure 6 - Connectors and Indicators
(catalog numbers 2094-ALxxS, 2094-BL7xxS, and 2094-XL75S-Cx)
1 2
L2/N
L1
1 2 3 4
L3
L2
L1
195-265 VAC LINE, 50/60 Hz
1 2 3 4
L3'
L2'
L1'
195-265 VAC LOAD, 50/60 Hz
AUX2
AUX2
AUX1
AUX1
CTRL2
CTRL1
I/O_COM
I/O_PWR
I/O_COM
I/O_PWR
I/O_COM
I/O_PWR
CONTROL VAC
1 2
230 VAC SUPPLY
1 2 3 4
24 VDC SUPPLY
1 2 3 4 5 6
CB1
ON
MAIN VAC
(1) Auxiliary Power Input (APL) connector is present only on the 2094-XL75S-Cx line interface module.
OFF
Rockwell Automation Publication 2094-IN005H-EN-P - October 2012
Page 10
10 Line Interface Module
MAIN VAC
AUX VAC BRAKE - I/O VAC
195-264 VAC LINE
50/60 Hz
PE
L3
L2
L1
195-264 VAC LOAD
50/60 Hz
PE
L3
L2
L1
1
1
1
1
MBRK PWR
MBRK COM
MBRK PWR
MBRK COM
230 VAC LOAD
L1
L2/N
24 VDC BRAKE SUPPLY
Line Interface Module 2094-AL09
200/230V AC
20A Output
1 2 3 4
4 3 2 1
1 2 3 4
1 2
VAC L oad
(OPL) Connec tor
VAC Line
(IPL) Connector
24V DC Brake Power Output (PSL) Connector
Control Power Outp ut
(CPL) Connec tor
Brake Power
Status Indicator
I/O Power
Status Indicator
I/O (IOL) Connector
Main
VAC
Control/AU X
VAC
Brake-I/O
VAC
CB3
CB1
CB2
Line Interface Module, Top View
(catalog number 2094-AL09
is shown)
Line Interface Module, Front View
(catalog number 2094-AL09
is shown)
Figure 7 - Connectors and Indicators (catalog numbers 2094-AL09 and 2094-BL02)
Rockwell Automation Publication 2094-IN005H-EN-P - October 2012
Page 11
Line Interface Module 11
Line Interface Module Connectors
Table 1 - Connectors (catalog numbers 2094-ALxxS, 2094-BLxxS, and 2094-XL75S-Cx)
Designator Description Connector
IOL Status I/O 21-pin (plugable) terminal block
IPL VAC LINE input power 4-position plug/header
OPL VAC LOAD output power 4-position plug/header
P1L Brake and I/O power output (24V DC) 6-position plug/header
P2L Auxiliar y power output (230V AC) 4-position plug/header
CPL Control power output 2-position plug/header
(1)
APL
(1) Auxiliary power input (APL) connector is present only on the 2094-XL75S-Cx module.
Table 2 - Connectors (catalog numbers 2094-AL09 and 2094-BL02)
Designator Description Connector
IOL Status I/O 26-pin high-density D-shell
IPL VAC LINE input power 4-position terminals
OPL VAC LOAD output power 4-position terminals
PSL Brake and I/O power output (24V DC) 4-position plug/header
CPL Control power output 2-position plug/header
Auxiliary power input 2-position plug/header
I/O Connector
These tables provide signal descriptions and pinouts for the
I/O (IOL) connector.
Table 3 - IOL (21-pin) Connector Pinouts
(catalog numbers 2094-ALxxS, 2094-BLxxS, and 2094-XL75S-Cx)
IOL Pin Description Signal IOL Pin Description Signal
1 IO 24V supply IO_PWR1 12 Alarm common (CB1) ALRM_COM
2 IO 24V common IO_COM1 13 Contactor auxiliary contact (NC) #1 IN CONSTAT_11
3 IO 24V supply IO_PWR1 14 Contactor auxiliary contact (NC) #1 OUT CONSTAT_12
4 IO 24V common IO_COM1 15 Contactor auxiliary contact (NC) #2 IN CONSTAT_21
5 IO 24V supply IO_PWR1 16 Contactor auxiliary contact (NC) #2 OUT CONSTAT_22
6 IO 24V common IO_COM1 17 Contactor auxiliary contact (NC) #3 IN CONSTAT_31
7 24V contactor coil positive COIL_E1 18 Contactor auxiliary contact (NC) #3 OUT CONSTAT_32
8 24V contactor coil negative COIL_E2 19 Contactor auxiliary contact (NO) #5 IN CONSTAT_53
9 Alarm make contact (CB1) ALRM_M 20 Contactor auxiliary contact (NO) #5 OUT CONSTAT_54
10 SHIELD SHIELD 21 SHIELD SHIELD
11 Alarm break contact (CB1) ALRM_B
Rockwell Automation Publication 2094-IN005H-EN-P - October 2012
Page 12
12 Line Interface Module
Pin 1
Pin 20
Pin 2
Pin 21
IO_PWR1
IO_COM1
IO_PWR1
IO_COM1
IO_PWR1
IO_COM1
COIL_E1
COIL_E2
ALRM_M
SHIELD
ALRM_B
ALRM_COM
CONSTAT_11
CONSTAT_12
CONSTAT_21
CONSTAT_22
CONSTAT_31
CONSTAT_32
CONSTAT_53
CONSTAT_54
SHIELD
1
3
5
7
9
11
13
15
17
19
21
2
4
6
8
10
12
14
16
18
20
IOL
IO_PWR1
IO_COM1
IO_PWR1
IO_COM1
IO_PWR1
IO_COM1
COIL_E1
COIL_E2
ALRM_M
SHIELD
ALRM_B
ALRM_COM
CONSTAT_11
CONSTAT_12
CONSTAT_21
CONSTAT_22
CONSTAT_31
CONSTAT_32
CONSTAT_53
CONSTAT_54
SHIELD
1
3
5
7
9
11
13
15
17
19
21
2
4
6
8
10
12
14
16
18
20
IOL
21-pin I/O
Staggered
(IOL) Connector
Line Interface Module
(catalog number 2094-ALxxS
is shown)
I/O (IOL) Connector
Access Door
(door open)
Pin 1
Pin 20
Pin 2
Pin 21
IO_PWR1
IO_COM1
IO_PWR1
IO_COM1
IO_PWR1
IO_COM1
COIL_E1
COIL_E2
ALRM_M
SHIELD
ALRM_B
ALRM_COM
CONSTAT_11
CONSTAT_12
CONSTAT_21
CONSTAT_22
CONSTAT_31
CONSTAT_32
CONSTAT_53
CONSTAT_54
SHIELD
1
3
5
7
9
11
13
15
17
19
21
2
4
6
8
10
12
14
16
18
20
IOL
IO_PWR1
IO_COM1
IO_PWR1
IO_COM1
IO_PWR1
IO_COM1
COIL_E1
COIL_E2
ALRM_M
SHIELD
ALRM_B
ALRM_COM
CONSTAT_11
CONSTAT_12
CONSTAT_21
CONSTAT_22
CONSTAT_31
CONSTAT_32
CONSTAT_53
CONSTAT_54
SHIELD
1
3
5
7
9
11
13
15
17
19
21
2
4
6
8
10
12
14
16
18
20
IOL
1
2
3
4
5
6
7
8
9
10
11
12
13
14
15
16
17
18
19
20
21
21-pin I/O
Straight
(IOL) Connector
Line Interface Module
(catalog number 2094-ALxxS
is shown)
I/O (IOL) Connector
Access Door
(door open)
Your IOL connector terminals may be staggered, as in Figure 8, or straight, as in
Figure 9
Figure 8 - Pin Orientation for the IOL (21-pin) Connector, Staggered
.
Figure 9 - Pin Orientation for the IOL (21-pin) Connector, Straight
Rockwell Automation Publication 2094-IN005H-EN-P - October 2012
Page 13
Line Interface Module 13
Pin 18
Pin 26
Pin 1
Pin 9
Pin 10
Pin 19
26-pin
I/O Connector
Figure 10 - IOL (26-pin) Connector Pinouts (catalog numbers 2094-AL09 and 2094-BL02)
IOL Pin Description Signal IOL Pin Description Signal
1 Reserved – 14 Reser ved –
2 Reserved – 15 Contactor auxiliary contact (NC) #1 IN CONSTAT_11
3 Reserved – 16 Contactor auxiliary contact (NC) #2 IN CONSTAT_21
4 24V contactor coil negative COIL_A2 17 Contactor auxiliary contact (NC) #3 IN CONSTAT_31
5 Reserved – 18 Contactor auxiliary contact (NC) #4 IN CONSTAT_41
6 Contactor auxiliary contact (NC) #1 OUT CONSTAT_12 19 Reserved –
7 Contactor auxiliary contact (NC) #2 OUT CONSTAT_22 20 IO 24V common IO_COM
8 Contactor auxiliary contact (NC) #3 OUT CONSTAT_32 21 IO 24V common IO_COM
9 Contactor auxiliary contact (NC) #4 OUT CONSTAT_42 22 IO 24V common IO_COM
10 Reserved – 23 Reserved –
11 Reserved – 24 IO 24V supply IO_PWR
12 Reserved – 25 IO 24V supply IO_PWR
13 24V contactor coil positive COIL_A1 26 IO 24V supply IO_PWR
Figure 11 - Pin Orientation for the IOL (26-pin) Connector
Auxiliary Power Input Connector
This table provides the signal descriptions and pinouts for the auxiliary power
input (2-pin) APL connector. This connector applies only to 2094-XL75S-C1
and 2094-XL75S-C2 line interface modules.
APL Pin Description Signal
1
2L1
Auxiliary power input
L2/N
Rockwell Automation Publication 2094-IN005H-EN-P - October 2012
Page 14
14 Line Interface Module
Control Power Output Connector
These tables provide signal descriptions and pinouts for the control power
(2-pin) CPL connector.
Table 4 - CPL (2-pin) Connector Pinouts
(catalog numbers 2094-ALxxS, 2094-BLxxS, and 2094-XL75S-Cx)
CPL Pin Description Signal
2
1CTRL 1
Control power out put
Table 5 - CPL (2-pin) Connector Pinouts
(catalog numbers 2094-AL09 and 2094-BL02)
CPL Pin Description Signal
2
1L2/N
Control power LOAD output
CTRL 2
L1
24V DC Brake Supply Connector
These tables provide signal descriptions and pinouts for the 24V brake supply
connector, intended for use with mechanical motor brake or Bulletin 2090
resistive-brake module (RBM) applications.
Table 6 - P1L (6-pin) Connector Pinouts
(catalog numbers 2094-ALxxS, 2094-BLxxS, and 2094-XL75S-Cx
P1L Pin Description Signal
1 +24V DC supply IO_PWR2
2 +24V DC common IO_COM2
3 +24V DC supply IO_PWR2
4 +24V DC common IO_COM2
5 +24V DC supply IO_PWR2
6 +24V DC common IO_COM2
Table 7 - PSL (4-pin) Connector Pinouts
(catalog numbers 2094-AL09 and 2094-BL02)
PSL Pin Description Signal
1 +24V DC supply MBRK PWR
2 +24V DC common MBRK COM
3 +24V DC supply MBRK PWR
4 +24V DC common MBRK COM
)
Rockwell Automation Publication 2094-IN005H-EN-P - October 2012
Page 15
Line Interface Module 15
IMPORTANT
VAC LINE Connector
These tables provide signal descriptions and pinouts for the 3-phase input power
(4-pin) IPL connector.
Table 8 - IPL (4-pin) Connector Pinouts
(catalog numbers 2094-ALxxS, 2094-BLxxS, and 2094-XL75S-Cx)
IPL Pin Description Signal
1 Chassis ground
2
3L2
4L1
3-phase input power
L3
Table 9 - IPL (4-pin) Connector Pinouts
(catalog numbers 2094-AL09 and 2094-BL02)
IPL Pin
2094-AL09 2094-BL02
14Chassis ground
23
32 L2
41 L1
Description Signal
PE
L3
3-phase input power
ATTENTION: Make the chassis (earth) ground connection from a grounded
configuration only.
Rockwell Automation Publication 2094-IN005H-EN-P - October 2012
Page 16
16 Line Interface Module
VAC LOAD Connector
These tables provide signal descriptions and pinouts for the 3-phase output
power (4-pin) OPL connector.
Table 10 - OPL (4-pin) Connector Pinouts
(catalog numbers 2094-ALxxS, 2094-BLxxS, and 2094-XL75S-Cx)
OPL Pin Description Signal
1 Chassis ground
2
3L2’
4L1’
3-phase output power
L3’
Table 11 - OPL (4-pin) Connector Pinouts
(catalog numbers 2094-AL09 and 2094-BL02)
OPL Pin
2094-AL09 2094-BL02
4 1 Chassis ground
32
23 L2’
14 L1’
Description Signal
PE’
L3’
3-phase output power
Auxiliary Power Connector
This table provides signal descriptions and pinouts for the auxiliary power output
(4-pin) P2L connector.
Table 12 - P2L (4-pin) Connector Pinouts
(catalog numbers 2094-ALxxS, 2094-BLxxS, and 2094-XL75S-Cx)
Cat. No. P2L Pin Description Signal
1 230V AC power supply. Can be used with the
2094-ALxxS,
2094-BLxxS, and
2094-XL75S-C2
2094-XL75S-C1
Rockwell Automation Publication 2094-IN005H-EN-P - October 2012
2AUX1_L2
3 230V AC power supply. Can be used with the
4AUX2_L2
1
2AUX1_L2
3
4AUX2_L2
Bulletin 2090-XB120 resistive-brake module
(RBM) or other as needed.
Bulletin 2090-XB120 resistive-brake module
(RBM) or other as needed.
110V AC power supply. For use as needed.
110V AC power supply. For use as needed.
AUX1_L1
AUX2_L1
AUX1_L1
AUX2_L1
Page 17
Line Interface Module 17
Understanding Signal
Specifications
A description of the I/O (IOL), brake power (P1L/PSL), control power (CPL),
and auxiliary power (P2L) signals and circuit specifications is provided on the
following pages.
See the Block Diagrams
beginning on page 45 for your line interface modules
schematic.
I/O Signals
The 2094-ALxxS, 2094-BLxxS, and 2094-XL75S-Cx line interface module I/O
(IOL) signals include the contactor coil, alarm contacts, status contacts, and I/O
power supply.
This table provides a description and electrical specifications for the IOL
connector signals. See Power Specifications
specifications.
Table 13 - IOL (21-pin) Signal Specifications
(catalog numbers 2094-ALxxS, 2094-BLxxS, and 2094-XL75S-Cx)
IOL Pin Signal Description
IOL-8
IOL-7
IOL-12 ALRM_COM Non-voltage contact (ALRM_M) to indicate that CB1 is closed (make) when
IOL-9
IOL-11
IOL-14
IOL-13
IOL-16
IOL-15
IOL-18
IOL-17
IOL-20
IOL-19
IOL-2
IOL-4
IOL-6
IOL-1
IOL-3
IOL-5
COIL_E2
COIL_E1
ALRM_M
ALRM_B
CONSTAT_12
CONSTAT_11
CONSTAT_22
CONSTAT_21
CONSTAT_32
CONSTAT_31
CONSTAT_54
CONSTAT_53
IO_COM1
IO_PWR1
Line contactor coil connections with an auxiliary contact from the control
power circuit breaker wired in series with the contactor coil. The line
contactor is a safety contactor that includes three main contacts with three
auxiliary contacts (see the figure on page 19).
CB1 is tripped. (DC)
Non-voltage contact (ALRM_B) to indicate that CB1 is closed (make) when
CB1 is not tripped.
See the figure on page 18. (DC)
[AC] — — 250 — — 5
[AC] — — 600 — — 2
Three safety-rated auxiliary contacts that are normally-closed on the line
contactor (see the figure on page 20
One auxiliary contact (normally-open) that is not safety rated and should
not be used in a safety string.
Power supply capable of supplying 24V @ 20 A for I/O functions and
switches. Each set of pins is capable of 8 A. To use the full rating of the
supply, all pins must be used to provide the appropriate current rating (see
the figure on page 21
).
).
on page 52 for auxiliary contactor
Voltage (Volts) Current (Amps)
Min Nom Max Min Nom Max
18 24 30 0.005 0.011 0.017
— — 125 — — 1
—24 ———10
21.6 24 26.4 — — 8
Rockwell Automation Publication 2094-IN005H-EN-P - October 2012
Page 18
18 Line Interface Module
B
M
1c
AL
B
M
1c
B
M
1c
OFF ON
TRIP
For more information regarding the Bulletin 100S-C85x-14 contactor, see the
Safety Products Catalog, website http://www.ab.com
.
The 2094-AL09 and 2094-BL02 line interface module I/O (IOL) signals
include the contactor coil, status contacts, and I/O power supply.
Table 14 - IOL (26-pin) Signal Specifications
(catalog numbers 2094-AL09 and 2094-BL02)
IOL Pin Signal Description
IOL-4
IOL-13
IOL-6
IOL-15
IOL-7
IOL-16
IOL-8
IOL-17
IOL-9
IOL-18
IOL-20
IOL-21
IOL-22
IOL-24
IOL-25
IOL-26
COIL_A2
COIL_A1
CONSTAT_12
CONSTAT_11
CONSTAT_22
CONSTAT_21
CONSTAT_32
CONSTAT_31
CONSTAT_42
CONSTAT_41
IO_COM
IO_PWR
Line contactor coil connections with an auxiliary contac t from the control power circuit
breaker wired in series with the contactor coil. The line contactor is a safety contactor that
includes three main contacts with four auxiliary contacts (see figure on page 19).
Four pairs of auxiliary contacts that are normally-closed on the line contactor (see figure
on page 21).
Power supply capable of supplying 24V @ 6 A for I/O functions and switches. Each set of
pins is capable of 2 A. To use the full rating of the supply, all pins must be used to provide
the appropriate current rating (see figure on page 23
).
See Power Specifications beginning on page 52 for auxiliary contactor
specifications.
CB1 Alarm Operation
The CB1 alarm circuitry (ALRM_M contact) in the 2094-ALxxS, 2094-BLxxS,
and 2094-XL75S-Cx line interface modules is closed only when CB1 trips
(meaning input current exceeds instantaneous current trip setting) and not
dependant on the ON/OFF switch. The ALRM_B contact is closed when CB1
is manually set to the ON or OFF position, and open when CB1 is tripped.
Figure 12 - CB1 Alarm Operation
(catalog numbers 2094-ALxxS, 2094-BLxxS, and 2094-XL75S-Cx)
Rockwell Automation Publication 2094-IN005H-EN-P - October 2012
Page 19

Line Interface Module 19
IMPORTANT
1
3
2
4
FB1
CB2_AUX
1
2
A1
A2
COIL_E1
IOL-7
CR1
Line Interface Module
DC Interface Module
E2
E1
A1
CB2
2
4
1
3
COIL_E2
IOL-8
Contactor Coil
For safety reasons, the internal wiring is arranged so that if the control power
(CPL) circuit breaker (CB2) trips, the opening contact will interrupt the coil
voltage and remove main input power to the drive.
The 2094-ALxxS, 2094-BLxxS, and 2094-XL75S-Cx line interface modules use
an AC coil and a DC interface module allows the contactor coil to be controlled
by the 24V DC output of the drive. Additional surge suppression is not required
for these contactors.
ATTENTION: Do not apply AC voltage to COIL_E1 and COIL_E2.
Figure 13 - IOL Contactor Coil
(catalog numbers 2094-ALxxS, 2094-BLxxS, and 2094-XL75S-Cx)
COIL_A1
IOL-13
The contactors in the 2094-AL09 and 2094-BL02 line interface modules use a
DC coil. The contactor coil voltage is 24V DC with a suitably-rated surge
suppressor fitted inside the line interface module.
Figure 14 - IOL Contactor Coil
(catalog numbers 2094-AL09 and 2094-BL02)
CR1
D1
Line Interface Module
A2
IOL-4
CB2_AUX
3
CB2
5
Rockwell Automation Publication 2094-IN005H-EN-P - October 2012
21
4
6
A1
COIL_A2
Page 20

20 Line Interface Module
IMPORTANT
Safety Contactor
The safety contactor includes three main contacts (normally-open) that close
when coil power is applied.
The three auxiliary (safety) contacts (used in 2094-ALxxS, 2094-BLxxS, and
2094-XL75S-Cx line interface modules) are volt-free, positively-guided, and
mechanically-latched.
A fourth volt-free normally-open contact is also available, but is not safety rated and
should not be used in a safety string.
Figure 15 - IOL Contactor Status
(catalog numbers 2094-ALxxS, 2094-BLxxS, and 2094-XL75S-Cx)
CONSTAT_11
CONSTAT_21
CONSTAT_31
CONSTAT_53
CR1
IOL-13
IOL-15
IOL-17
IOL-19
Line Interface Module
5
3
1
A1
6
4
2
IOL-14
IOL-16
IOL-18
IOL-20
A2
CONSTAT_12
CONSTAT_22
CONSTAT_32
CONSTAT_54
See Power Specifications on page 52 for auxiliary contactor specifications.
Rockwell Automation Publication 2094-IN005H-EN-P - October 2012
Page 21

Line Interface Module 21
A1
A2
CR1
1
2
3
4
5
6
CONSTAT_11
IOL-15
IOL-6
CONSTAT_21
IOL-16
IOL-7
CONSTAT_31
IOL-17
IOL-8
CONSTAT_41
IOL-18
IOL-9
CONSTAT_12
CONSTAT_22
CONSTAT_32
CONSTAT_42
Line Interface Module
IMPORTANT
The four auxiliary (safety) contacts (used in 2094-AL09 and 2094-BL02 line
interface modules) are volt-free, positively-guided, and mechanically-latched.
Figure 16 - IOL Contactor Status
(catalog numbers 2094-AL09 and 2094-BL02)
See Power Specifications beginning on page 52 for auxiliary contactor
specifications.
24V Power Supply
(catalog numbers 2094-ALxxS, 2094-BLxxS, and 2094-XL75S-Cx)
The 24V DC power supply on 2094-ALxxS, 2094-BLxxS, and 2094-XL75S-C2
line interface modules is capable of supplying +24V @ 20 A for PLC I/O
functions (IOL connector), mechanical motor brakes, and the Bulletin 2090
resistive-brake module (RBM) I/O (P1L connector). An AC line filter is placed
on the input to the supply to provide conditioning. The supply is protected by
circuit breaker CB3.
PLC I/O power is available to the user via the IOL (21-pin) terminal block
connector (as shown in the figure on page 22
Motor brakes and the resistive-brake module I/O power is available to the user
via the P1L (6-pin) connector. Each P1L output contains an LC circuit to
prevent electrical noise contamination of the 24V supply and an MOV to prevent
current surges from the motor brake.
Use the P1L +24V DC supply with devices that can potentially generate flyback
currents (for example, brake coils and relays).
).
Rockwell Automation Publication 2094-IN005H-EN-P - October 2012
Page 22

22 Line Interface Module
L1
480 W, 20 A
Power Supply
PS1
24V+
PE 24V-
L2
CB3
IOL-5
IOL-3
IOL-1
IOL-6
IOL-4
IOL-2
IO_PWR1
IO_COM1
Line Interface Module
AC Line Filter
2
4
1
3
IO_PWR2
P1L-1
P1L-3
P1L-5
IO_COM2
P1L-2
P1L-4
P1L-6
Interface PCB
IMPORTANT
Figure 17 - IOL Power Supply
(catalog numbers 2094-ALxxS, 2094-BLxxS, and 2094-XL75S-Cx)
Rockwell Automation Publication 2094-IN005H-EN-P - October 2012
Each set of pins (IO_PWR1 and IO_PWR2) is rated at 8 A (not to exceed 20 A for
combined IOL and P1L use).
Page 23

Line Interface Module 23
4
150 W, 6 A
Power Supply
PS2
1
32
5
CB3
IOL-24
IOL-25
IOL-26
IOL-22
IOL-21
IOL-20
IO_PWR
IO_COM
Line Interface Module
AC Line Filter
2
4
1
3
I/O Power Supply (catalog numbers 2094-AL09 and 2094-BL02)
The I/O power supply on 2094-AL09 and 2094-BL02 line interface modules is
capable of supplying 24V @ 5.7 A for PLC I/O functions and switches. It is
available to the user via the IOL (26-pin) D-sub connector. A single-phase filter is
placed on the input to the supply to provide conditioning. The supply is
protected by circuit breaker CB1.
ATTENTION: When current draw exceeds 2 A (IOL-24, IOL-25, or IOL-26), multiple pins
must be used to provide appropriate current rating and avoid connector damage.
Figure 18 - IOL Power Supply
(catalog numbers 2094-AL09 and 2094-BL02)
Rockwell Automation Publication 2094-IN005H-EN-P - October 2012
Page 24

24 Line Interface Module
IMPORTANT
4
50 W, 2 A
24V DC Power Supply
PS1
1
32
5
CB3
MBRK PWR
PSL-1
PSL-3
MBRK COM
Line Interface Module
PSL-2
PSL-4
AC Line Filter
2
4
1
3
Brake Power Supply
(catalog numbers 2094-AL09 and 2094-BL02)
A +24V DC supply is provided on the PSL connector of the 2094-AL09 and
2094-BL02 line interface modules for mechanical motor brakes and the Bulletin
2090 resistive-brake module I/O. The supply has over-current protection and is
isolated from all other supplies. A single-phase filter placed on the input to the
supply provides conditioning. The supply is protected by circuit breaker CB3.
The PSL brake power supply is rated at 2 A. If more current is required, consider
using the IOL power supply.
Use the PSL +24V DC supply with devices that can potentially generate flyback
currents (for example, brake coils and relays). This supply requires external flyback
protection with either a diode or MOV.
Figure 19 - PSL Power Supply
(catalog numbers 2094-AL09 and 2094-BL02)
Rockwell Automation Publication 2094-IN005H-EN-P - October 2012
Page 25

Line Interface Module 25
CTRL 2
CPL-2
CB2
CB2_AUX
CTRL 1
CPL-1
Line Interface Module
Single-phase
AC Line Filter
2
4
1
3
1
3
2
4
FB1
Control Power Supply
The control power supply on 2094-ALxxS, 2094-BLxxS, and 2094-XL75S-C2
line interface modules is protected by FB1 and one 2-pole circuit breaker (CB2).
The control power supply on 2094-AL09 and 2094-BL02 line interface modules
is protected by one 3-pole circuit breaker (CB2).
They all have a single-phase filter placed in the control VAC supply to provide
protection/conditioning. For safety reasons, the internal wiring is arranged so
that, if the control power (CPL) circuit breaker (CB2) trips, the opening contact
will interrupt the coil voltage. Circuit breaker CB2 and fuse block FB1 are
field-replaceable.
For FB1 replacement fuse part numbers, see the table on page 50
.
Figure 20 - Control Power Output Source
Cat. No. Input Voltage Control Power Source
2094-ALxxS
2094-AL09
2094-XL75S-C1
2094-XL75S-C2 Auxiliary 230V AC input (APL) connector.
2094-BLxxS
2094-BL02
230V AC
230/460V AC
460V AC Internal step down transformer.
Two phases of incoming power.
(internal connection)
Auxiliary 110V AC input (APL) connector.
See Power Specifications beginning on page 52 for control power output (CPL)
specifications.
Figure 21 - CPL Power Supply (catalog numbers 2094-ALxxS, 2094-BLxxS, and 2094-XL75S-Cx)
Figure 22 - CPL Power Supply (catalog numbers 2094-AL09 and 2094-BL02)
Line Interface Module
COIL_A1 (CR1)
3
Single-phase
AC Line Filter
Rockwell Automation Publication 2094-IN005H-EN-P - October 2012
CB2
5
21
CPL-2
4
CPL-1
6
COIL_A1 (IOL-13)
L1
L2/N
Page 26

26 Line Interface Module
IMPORTANT
CB2
P2L-1
P2L-2
Line Interface Module
P2L-3
P2L-4
AUX1_L1
AUX1_L2
AUX2_L1
AUX2_L2
2
4
1
3
1
3
2
4
FB1
Auxiliary Power Output
An auxiliary 230V AC output is provided for use with the Bulletin 2090
resistive-brake module (RBM) or other customer requirement as needed on the
P2L connector. This supply is present with 2094-ALxxS, 2094-BLxxS, and
2094-XL75S-C2 line interface modules. The supply is protected by circuit
breaker CB2.
Auxiliary power output (P2L) is 110V AC with catalog number 2094-XL75S-C1.
Figure 23 - P2L 230V Power (catalog numbers 2094-ALxxS, 2094-BLxxS, and 2094-XL75S-C2)
See Power Specifications beginning on page 52 for Auxiliary Power Output
(P2L) specifications.
Auxiliary Power Input
The auxiliary power input (APL) connector is available only with the
2094-XL75S-C1 and 2094-XL75S-C2 line interface modules. This connector
allows the customer to provide a separate auxiliary power source, independent
from the mains supply, for control power and other uses.
The APL connector will accept either 110V (2094-XL75S-C1) or 230V AC
(2094-XL75S-C2) input voltage. As a result, the auxiliary power output (P2L)
and control power output (CPL) voltage is 110V or 230V AC, respectively. The
24V power supply is designed to operate on either 110V or 230V AC and will
auto-detect the input voltage.
See Power Specifications
and auxiliary power output (P2L) specifications.
See page 47
for the 2094-XL75S-Cx line interface module block-diagram.
beginning on page 52 for auxiliary power input (APL)
Rockwell Automation Publication 2094-IN005H-EN-P - October 2012
Page 27

Line Interface Module 27
IMPORTANT
IMPORTANT
Install the Line Interface
Module
This procedure assumes that you have prepared your panel and understand how
to bond your system.
See the System Design for Control of Electrical Noise Reference Manual,
publication GMC-RM001
, for information on high-frequency bonding and
reducing electrical noise.
ATTENTION: To avoid hazard of electrical shock, mount your line interface module to
the panel before applying power. Once power is applied, connector terminals may have
voltage present even when not in use.
If you are using the 2094 mounting brackets and plan to mount your line interface
module over the AC line filter, you must install the line filter and brackets first. See the
2094 Mounting Brackets Installation Instructions, publication 2094-IN008
information.
Only the 2094-ALxxS and 2094-XL75S-Cx line interface modules are compatible with
the 2094 mounting brackets. The 2094-BLxxS, 2094-AL09, and 2094-BL02 line
interface modules are not compatible.
, for that
Mount the Line Interface Module
Follow these steps to mount your line interface module to the panel.
1. Layout the position for your module in the enclosure.
See Establishing Noise Zones
recommendations. See Product Dimensions
To improve EMC performance, mount the line interface module on the same
panel as the drive and as close to the drive as possible.
beginning on page 6 for panel layout
beginning on page 28.
2. Attach the line interface module to the cabinet.
The recommended mounting hardware is M6 metric (1/4 in.) bolts. Make
sure all fasteners are properly bonded to the subpanel.
3. Tighten all mounting fasteners.
Rockwell Automation Publication 2094-IN005H-EN-P - October 2012
Page 28

28 Line Interface Module
259.8
(10.23)
195-265 VAC LINE, 50/60 Hz
L3
L2
L1
230 VAC SUPPLY
CTRL2
CTRL1
195-265 VAC LOAD, 50/60 Hz
L3'
L2'
L1'
CONTROL VAC
AUX2
AUX2
AUX1
AUX1
I/O_COM
I/O_PWR
I/O_COM
I/O_PWR
I/O_COM
I/O_PWR
24 VDC SUPPLY
MAIN VAC
375.9
(14.80)
2x 33 (1.30)
4x 40.6 (1.60)
2x 12.69 (0.50)
10.8 (0.425)
2x 352.4
(13.87)
220
(8.66)
2x 33 (1.30)
309.9
(12.20)
26.7
(1.05)
A
309.9
(12.20)
Dimensions are in millimeters (inches)
(catalog number 2094-XL75S-Cx is shown)
Connectors not shown for clarity.
Mounting features sized for
M6 (1/4 ”) hardware.
Product Dimensions
Figure 24 - Mounting Dimensions
(catalog numbers 2094-ALxxS, 2094-BLxxS, and 2094-XL75S-Cx)
Cat. No.
2094-ALxxS
2094-XL75S-Cx
2094-BLxxS 248.0 (9.76)
Dimension A
mm (in.)
198.3 (7.81)
Rockwell Automation Publication 2094-IN005H-EN-P - October 2012
Page 29

Figure 25 - Mounting Dimensions (catalog number 2094-AL09)
Dimensions are in millimeters (inches)
Flying-lead I/O Cable
with 2090-K6CK-D26M
Low-profile Connector Kit
IMPORTANT
325
(12.8)
Line Interface Module 29
286.8
(11.29)
30.9
(1.22)
184.7
(7.27)
3x Ø 16
(0.63)
3x 28.7 (1.13)
225
(8.86)
20
(0.79)
6x Ø 7.9
(0.31)
142.5
(5.61)
285
(11.22)
187.7
(7.39)
253.1
(9.97)
12.7
(0.5)
12.7
(0.5)
(0.87)
22
(0.35)
197
(7.75)
187.7
(7.39)
8.9
28
(1.1)
Additional clearance below the low-profile I/O connector is necessary to provide the
recommended cable-bend radius.
Rockwell Automation Publication 2094-IN005H-EN-P - October 2012
Page 30

30 Line Interface Module
Flying-lead I/O Cable
with 2090-K6CK-D26M
Low-profile Connector Kit
Dimensions are in millimeters (inches)
IMPORTANT
100
(3.9)
277
(10.9)
Figure 26 - Mounting Dimensions (catalog number 2094-BL02)
400
(15.75)
2x 206
(8.11)
280
(11.02)
2x 28.5 (1.2)
312
(12.28)
3x Ø 16
(0.63)
3x 28.7 (1.13)
197
(7.8)
250
(9.84)
1.22 (31)
20
(0.79)
6x Ø 7.9
(0.31)
180
(7.09)
280
(11.02)
360
(14.17)
2x 40.4
(1.59)
27.6
(1.09)
12.7
(0.50)
8.9
252.2
(9.93)
(0.35)
278.4
(10.96)
12.7
(0.50)
289
(11.37)
2.5
(0.1)
Additional clearance below the low-profile I/O connector is necessary to provide the
recommended cable-bend radius.
Rockwell Automation Publication 2094-IN005H-EN-P - October 2012
Page 31

Line Interface Module 31
IMPORTANT
L3
L2
L1
L3’
L2’
L1’
Wire the Line Interface Module
This section provides wiring requirements for each connector on the line
interface module.
The National Electrical Code and local electrical codes take precedence over the values
and methods provided.
Wire should be copper with 75 °C (167 °F) minimum rating. Phasing of main
AC power is arbitrary and earth-ground connection is required for safe and
proper operation.
Use these tables to determine the recommended wire size, strip length, and
torque value for wiring your line interface module.
Figure 27 - Wiring Requirements
(catalog numbers 2094-ALxxS, 2094-BLxxS, and 2094-XL75S-C2)
Description
VAC L INE
VAC LOA D
Auxiliary power input
Control power output
Auxiliary power output
Brake and I/O power output
Status I/O
(21-pin terminal block)
(1)
Connects to Terminals Recommended
Pin Signal
IPL-1
IPL-2
IPL-3
IPL-4
OPL-1
OPL-2
OPL-3
OPL-4
APL-1 L2/N
APL-2 L1
CPL-1 CTRL 1
CPL-2 CTRL 2
P2L-1
P2L-2
P2L-3
P2L-4
P1L-1
P1L-2
P1L-3
P1L-4
P1L-5
P1L-6
IO L-1… IO L-21
AUX1_L1
AUX1_L2
AUX2_L1
AUX2_L2
IO_PWR2
IO_COM2
IO_PWR2
IO_COM2
IO_PWR2
IO_COM2
Wire Size
2
mm
(AWG)
2.5…25
(14…4)
0.2…4.0
(24…10)
0.2…4.0
(24…10)
0.2…4.0
(24…10)
0.08…1.5
(28…16)
0.5…1.5
(22…14)
Strip Length
mm (in.)
16.0
(0.63)
7.0
(0.28)
7.0
(0.28)
7.0
(0.28)
7.0
(0.28)
6.0
(0.25)
Tor que V alue
N•m (lb•in)
2.7
(24)
0.5…0.6
(4.4…5.3)
0.5…0.6
(4.4…5.3)
0.5…0.6
(4.4…5.3)
0.22…0.25
(1.9…2.2)
1.13
(10)
(1) The auxiliary power input (APL) connector is present only on the 2094-XL75S-Cx line interface modules.
Rockwell Automation Publication 2094-IN005H-EN-P - October 2012
Page 32

32 Line Interface Module
L3
L2
L1
L3’
L2’
L1’
L3
L2
L1
L3’
L2’
L1’
Figure 28 - Wiring Requirements
(catalog numbers 2094-AL09 and 2094-BL02)
Cat. No. Description
VAC L INE
2094-AL09
(230V)
VAC LO AD
VAC L INE
2094-BL02
(460V)
VAC LO AD
Control power out put
Common
(230V or 460V)
Brake and I/O power
output
Connects to Terminals Recommended
Pin Signal
IPL-1
IPL-2
IPL-3
IPL-4
OPL-4
OPL-3
OPL-2
OPL-1
IPL-4
IPL-3
IPL-2
IPL-1
OPL-1
OPL-2
OPL-3
OPL-4
CPL-2
CPL-1
PSL-1
PSL-2
PSL-3
PSL-4
L1
L2/N
MBRK PWR
MBRK COM
MBRK PWR
MBRK COM
Wire Size
2
mm
(AWG)
2.5
(14)
4.0
(12)
2.5
(14)
Strip Length
mm (in.)
10.0
(0.38)
10.0
(0.38)
10.0
(0.38)
Tor que V alue
N•m (lb•in)
0.5…0.6
(4.4…5.3)
1.5…1.8
(13.2…15.9)
0.5…0.6
(4.4…5.3)
ATTENTION: To avoid hazard of electrical shock, complete the wiring of your module
before applying power. Once power is applied, connector terminals may have voltage
present even when not in use.
ATTENTION: The input power for Bulletin 2094 line interface modules must come from
a grounded configuration. When an ungrounded power configuration is used, phases
L1, L2, and L3 (without a reference to earth ground) can drift and stress the line-filter
components internal to the line interface module.
ATTENTION: Your Bulletin 2093, 2094, and 2099 servo drive user manual includes
examples of grounded and ungrounded power configurations. See Additional
Resources on page 56 for publication numbers.
Rockwell Automation Publication 2094-IN005H-EN-P - October 2012
Page 33

Line Interface Module 33
IMPORTANT
IMPORTANT
IMPORTANT
Wiring Guidelines
Use these guidelines as a reference when wiring the connectors on your line
interface module.
See Connector Data on page 9 for the connector locations of your line interface
module.
When tightening screws to secure the wires, see the tables beginning on page 31
torque values.
When removing insulation from wires, see the tables beginning on page 31
lengths.
To ensure system performance, run wires and cables in wireways as shown in
Establishing Noise Zones
on page 6.
for strip
for
See Wiring Diagrams
beginning on page 43 for interconnect diagrams including
the line interface module.
Follow these steps when wiring the connectors on your line interface module.
1. Prepare the wires for attachment to each connector plug by removing
insulation equal to the recommended strip length.
Use caution not to nick, cut, or otherwise damage strands as you remove the
insulation.
2. Route the cable/wires to your line interface module.
3. Insert wires into connector plugs.
See connector pinout tables beginning on page 11
.
4. Tighten the connector screws.
5. Gently pull on each wire to make sure it does not come out of its terminal.
If any wires are loose, then repeat steps 3 and 4.
6. Insert the connector plug into the appropriate connector.
Rockwell Automation Publication 2094-IN005H-EN-P - October 2012
Page 34

34 Line Interface Module
L2/N
L1
1 2
Line Interface Module, Top View
(catalog number 2094-XL75S-Cx
is shown)
Wiring the Auxiliary-input Power (APL) Connector
The auxiliary-input power (APL) connector is present only on the
2094-XL75S-Cx line interface modules.
Figure 29 - Line Interface Module (APL connector)
Table 15 - Auxiliary Input Power (APL) Connector
Single-phase Supply APL Pin Signal
L1 1 L1
L2 2 L2/N
Recommended
Wire Size
2
(AWG)
mm
0.2…4.0
(24…10)
Strip Length
mm (in.)
7.0
(0.28)
Tor que V alue
N•m (lb•in)
0.5…0.6
(4.4…5.3)
Rockwell Automation Publication 2094-IN005H-EN-P - October 2012
Page 35

Wiring the VAC LINE (IPL) Connector
L3
L2
L1
1 2 3 4
Line Interface Module, Top View
(catalog number 2094-XL75S-Cx
is shown)
Figure 30 - Line Interface Module (IPL connector)
ATTENTION: The input power for Bulletin 2094 line interface modules must come from
a grounded configuration. When an ungrounded power configuration is used, phases
L1, L2, and L3 (without a reference to earth ground) can drift and stress the line filter
components internal to the line interface module.
ATTENTION: Your Bulletin 2093, 2094, and 2099 servo-drive user manual includes
examples of grounded and ungrounded power configurations. See Additional
Resources on page 56 for publication numbers.
Line Interface Module 35
Table 16 - VAC LINE (IPL) Connector
(catalog numbers 2094-AL09, 2094-ALxxS, 2094-BLxxS, and 2094-XL75S-Cx)
3-phase Supply IPL Pin Signal
L1 4 L1
L2 3 L2
L3 2 L3
1
Table 17 - VAC LINE (IPL) Connector
(2094-BL02 module)
3-phase Supply IPL Pin Signal
L1 1 L1
L2 2 L2
L3 3 L3
4
Recommended
Wire Size
2
(AWG)
mm
2.5…25
(14…4)
Recommended
Wire Size
2
(AWG)
mm
4.0
(12)
Strip Length
mm (in.)
16.0
(0.63)
Strip Length
mm (in.)
10.0
(0.38)
Tor que V alue
N•m (lb•in)
2.7
(24)
Tor que V alue
N•m (lb•in)
1.5…1.8
(13.2…15.9)
Rockwell Automation Publication 2094-IN005H-EN-P - October 2012
Page 36

36 Line Interface Module
L3
L2
L1
1 2 3 4
Line Interface Module, Top View
(catalog number 2094-XL75S-Cx
is shown)
IMPORTANT
Wiring the VAC LOAD (OPL) Connector
Figure 31 - Line Interface Module (OPL connector)
The 2094-ALxxS, 2094-BLxxS, and 2094-XL75S-Cx line interface modules are capable
of connecting to multiple drives, providing each drive has its own line filter and the
maximum current specification is not exceeded.
For example diagrams, see the user manual for your drive. See Additiona l Resources
for publications.
page 56
on
Table 18 - VAC LOAD (OPL) Connector
(catalog numbers 2094-ALxxS, 2094-BLxxS, or 2094-XL75S-Cx)
3-phase Supply OPL Pin S ignal
L1 4 L1’
L2 3 L2’
L3 2 L3’
1
Table 19 - VAC LOAD (OPL) Connector (catalog number 2094-AL09)
3-phase Supply OPL Pin S ignal
L1 1 L1’
L2 2 L2’
L3 3 L3’
4
Table 20 - VAC LOAD (OPL) Connector (catalog number 2094-BL02)
3-phase Supply OPL Pin S ignal
L1 4 L1’
L2 3 L2’
L3 2 L3’
1
Recommended Wire Size
2
(AWG)
mm
2.5…25
(14…4)
Recommended Wire Size
2
(AWG)
mm
2.5…25
(14…4)
Recommended Wire Size
2
mm
(AWG)
4.0
(12)
Strip Length
mm (in.)
16.0
(0.63)
Strip Length
mm (in.)
16.0
(0.63)
Strip Length
mm (in.)
10.0
(0.38)
Tor que V alue
N•m (lb•in)
2.7
(24)
Tor que V alue
N•m (lb•in)
2.7
(24)
Tor que V alue
N•m (lb•in)
1.5…1.8
(13.2…15.9)
Rockwell Automation Publication 2094-IN005H-EN-P - October 2012
Page 37

Wiring the Control Power Output (CPL) Connector
CTRL 2
CTRL 1
1 2
Line Interface Module, Top View
(catalog number 2094-XL75S-Cx is shown)
Figure 32 - Line Interface Module (CPL connector)
Table 21 - Control Power Output (CPL) Connector
(catalog numbers 2094-ALxxS, 2094-BLxxS, and 2094-XL75S-Cx)
Line Interface Module 37
Recommended
CPL Pin Signal
1CTRL 1
2CTRL 2
Wire Size
2
(AWG)
mm
0.2…4.0
(24…10)
Table 22 - Control Power Output (CPL) Connector
(catalog numbers 2094-AL09 and 2094-BL02)
Recommended
CPL Pin Signal
2L1
1L2/N
Wire Size
2
(AWG)
mm
2.5
(14)
Strip Length
mm (in.)
7.0
(0.28)
Strip Length
mm (in.)
10.0
(0.38)
Tor que V alue
N•m (lb•in)
0.5…0.6
(4.4…5.3)
Tor que V alue
N•m (lb•in)
0.5…0.6
(4.4…5.3)
Rockwell Automation Publication 2094-IN005H-EN-P - October 2012
Page 38

38 Line Interface Module
AUX2_L2
AUX2_L1
AUX1_L2
AUX1_L1
1 2 3 4
Line Interface Module, Top View
(catalog number 2094-XL75S-Cx is shown)
Wiring the Auxiliary Power Output (P2L) Connector
Figure 33 - Line Interface Module (P2L connector)
Table 23 - Auxiliary Power Output (P2L) Connector
(catalog numbers 2094-ALxxS, 2094-BLxxS, and 2094-XL75S-Cx)
Recommended
P2L Pin Signal
1AUX1_L1
2AUX1_L2
3AUX2_L1
4AUX2_L2
Wire Size
2
mm
(AWG)
0.2…4.0
(24…10)
Strip Length
mm (in.)
7.0
(0.28)
Tor que V alue
N•m (lb•in)
0.5…0.6
(4.4…5.3)
Rockwell Automation Publication 2094-IN005H-EN-P - October 2012
Page 39

Wiring the Brake Power Output (24V DC) Connector
Line Interface Module, Top View
(catalog number 2094-XL75S-Cx is shown)
Figure 34 - Line Interface Module (24V connector)
Table 24 - Brake Power Output (24V DC) Connector
(catalog numbers 2094-ALxxS, 2094-BLxxS, and 2094-XL75S-Cx)
Line Interface Module 39
IO_PWR2
IO_COM2
IO_PWR2
IO_COM2
IO_PWR2
IO_COM2
1 2 3 4 5 6
Recommended
P1L Pin Signal
1IO_PWR2
2IO_COM2
3IO_PWR2
4IO_COM2
5IO_PWR2
6IO_COM2
Wire Size
2
(AWG)
mm
0.08…1.5
(28…16)
Table 25 - Brake Power Output (24V DC) Connector
(catalog numbers 2094-AL09 and 2094-BL02)
Recommended
PSL Pin Signal
1MBRK PWR
2MBRK COM
3MBRK PWR
4MBRK COM
Wire Size
2
(AWG)
mm
2.5
(14)
Strip Length
mm (in.)
7.0
(0.28)
Strip Length
mm (in.)
10.0
(0.38)
Tor que V alue
N•m (lb•in)
0.22…0.25
(1.9…2.2)
Tor que V alue
N•m (lb•in)
0.5…0.6
(4.4…5.3)
Rockwell Automation Publication 2094-IN005H-EN-P - October 2012
Page 40

40 Line Interface Module
P4 J4
J4_B
Default Connection
(before CB1)
Circuit Breaker
(CB3)
Circuit Breaker
(CB1)
Circuit Breaker
(CB2)
Fuse Bl ock
Disconnect
(140U-H-RM12B)
Safety Contactor
3-phase
Input (OPL)
Aux Power
Output (P1L)
24V DC
Aux Power
Output (P2L)
230V AC
I/O Power
Output (IOL)
24V DC
Control Po wer
Output (CPL)
230V AC
3-phase Power
Output (OPL)
to Drive
Tra ns fo rm er
(460V only)
Line Interface
Module
Optional Connection
(after CB1)
IMPORTANT
Configure Branch-circuit Protection
Branch-circuit protection for the line interface module is customer configurable.
By moving the CB2/CB3 wiring harness (P4) from one side of CB1 to the other,
you can change the module operation. To understand this option, see the
simplified block diagram and table below.
Figure 35 - Simplified Block Diagram (catalog numbers 2094-ALxxS and 2094-BLxxS)
Figure 36 - Branch-circuit Operation (catalog numbers 2094-ALxxS and 2094-BLxxS)
Cat. No. Branch-circuit Protection Configurations Module Operation
• 2094-AL15S, 2094-AL25S, 2094-AL50S,
2094-AL75S
(1)
(230V) line interface modules
• 2094-BL10S, 2094-BL25S, 2094-BL50S,
2094-BL75S
(1)
(460V) line interface modules
(1) Applies to 2094-ALxxS and 2094-BLxxS (series B) line interface modules only.
Input VAC to CB2 and CB3 before CB1
(default configuration)
Input VAC to CB2 and CB3 after CB1
(optional configuration)
Closing CB1 removes 3-phase power to the device (servo
drive), however 24V DC (CB2) and 230V AC (CB3) auxiliary
circuit s remain energi zed.
Closing CB1 removes all power to the line interface module.
For the input VAC to CB2/CB3 before CB1 (default) configuration, no action is required.
Follow these steps to move the CB2/CB3 wiring harness to the optional
configuration.
1. Remove all input power from the line interface module.
ATTENTION: To avoid shock hazard or personal injury, verify that all power has
been removed before proceeding. This system may have multiple sources of
power. Multiple disconnect switches may be required to de-energize the
system.
Rockwell Automation Publication 2094-IN005H-EN-P - October 2012
Page 41

Line Interface Module 41
IO_PWR1
IO_COM1
IO_PWR1
IO_COM1
IO_PWR1
IO_COM1
COIL_E1
COIL_E2
ALRM_M
SHIELD
ALRM_B
ALRM_COM
CONSTAT_11
CONSTAT_12
CONSTAT_21
CONSTAT_22
CONSTAT_31
CONSTAT_32
CONSTAT_53
CONSTAT_54
SHIELD
1
3
5
7
9
11
13
15
17
19
21
2
4
6
8
10
12
14
16
18
20
IOL
21-pin I/O Connector Plug
Line Interface Module
(catalog number 2094-ALxxS
is shown)
I/O (IOL) Connector
Access Door
(door open)
Connector Screw
Connector Screw
Bail
Fasteners
Closed
Open
IMPORTANT
2. Allow five minutes for the 24V power supplies to completely discharge
before proceeding.
ATTENTION: This product contains stored energy devices. To avoid hazard of
electrical shock, verify that all voltage on capacitors has been discharged
before attempting to service, repair, or remove this unit. You should attempt
the procedures in this document only if you are qualified to do so and are
familiar with solid-state control equipment and the safety procedures in
publication NFPA 70E.
3. Open the I/O (IOL) connector access door.
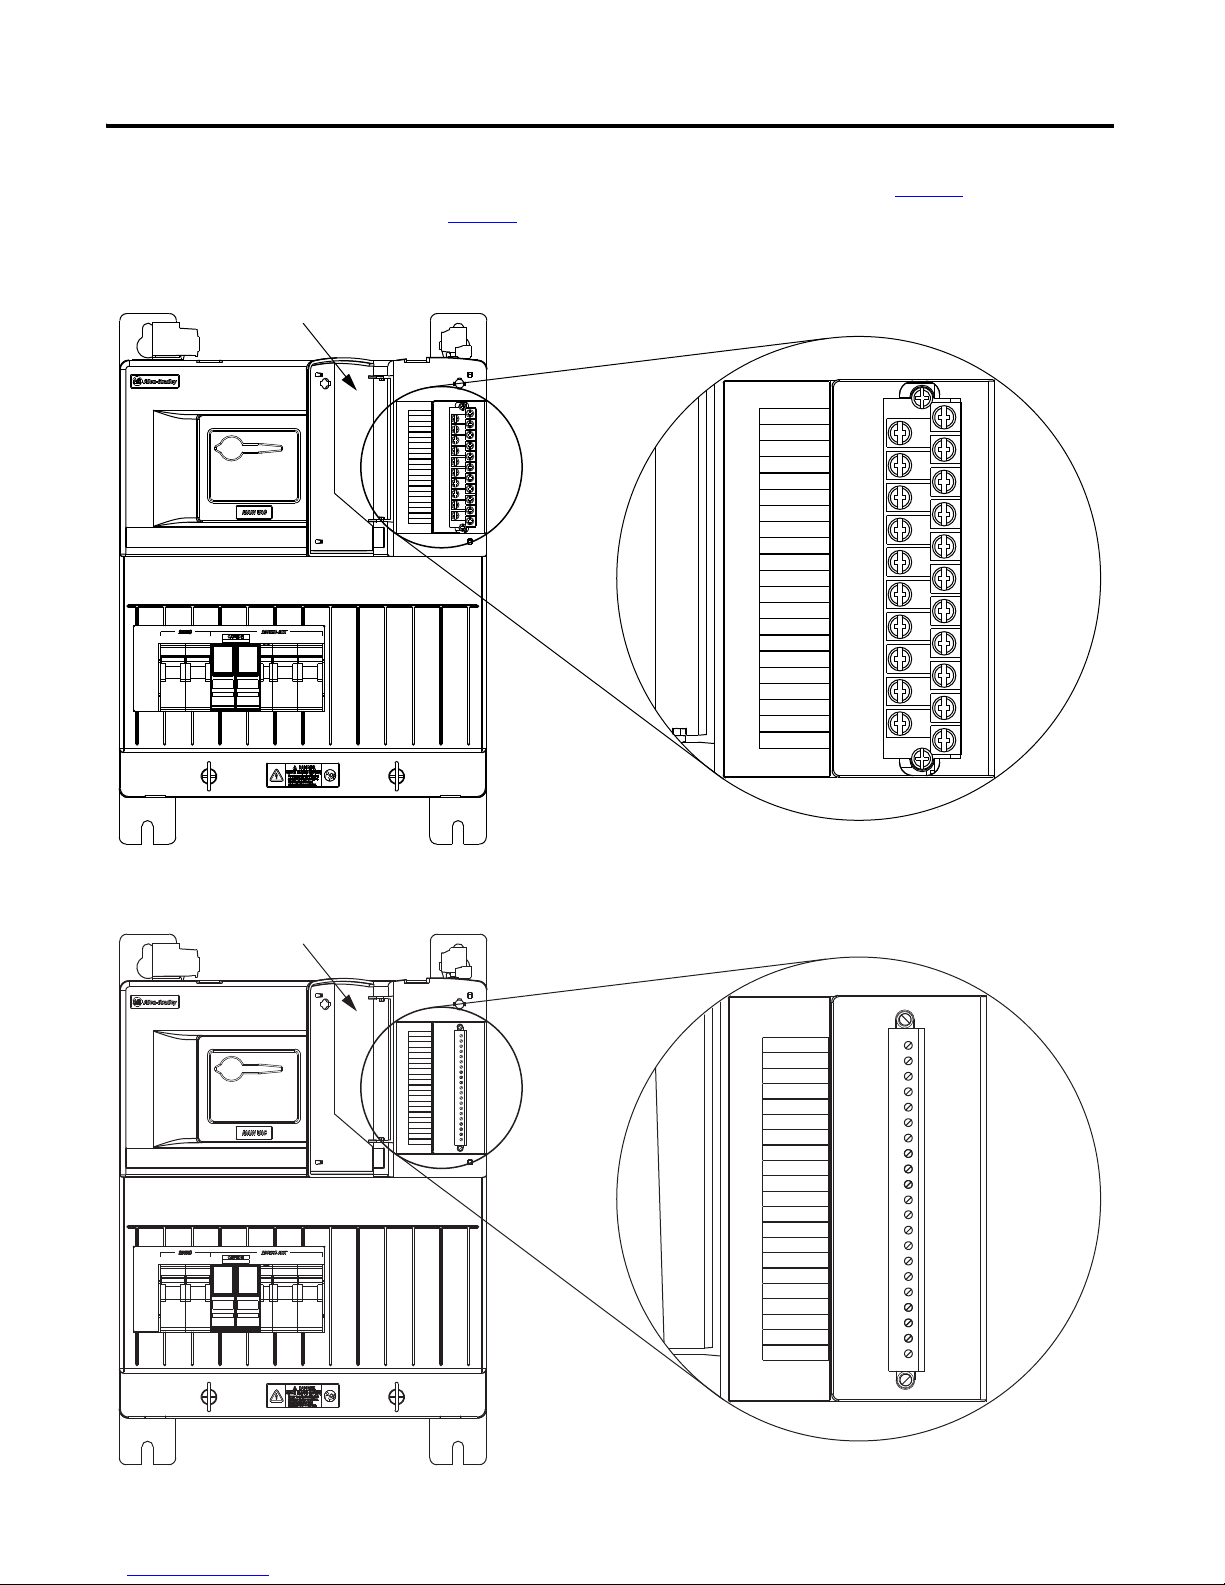
4. Loosen the two (captive) connector screws.
5. Remove the I/O connector plug by pulling it straight out from the mating
connector inside the line interface module.
6. Locate the two bail fasteners (lower front cover) and rotate them
one-quarter turn counterclockwise.
It is not necessary to remove any of the wires attached to the I/O connector.
7. Starting at the bottom, pull the front cover away from the line interface
module, then up and over the module to completely remove the cover.
The cover pivots from two latches at the top of the module.
8. Unplug the CB2/CB3 wiring harness (P4) from the J4 (default)
connection.
Rockwell Automation Publication 2094-IN005H-EN-P - October 2012
Page 42

42 Line Interface Module
P4
J4
P4
J4_B
Line Interface Module
(catalog number 2094-ALxxS
is shown)
CB2/CB3 Wiring Harness
in Default (before CB1) Configuration
CB2/CB3 Wiring Harness
in Optional (after CB1) Configuration
9. Move the CB2/CB3 wiring harness (P4) to the J4_B (optional)
connection.
10. Fully insert the P4 connector into the J4_B housing until latched.
11. Replace the cover and I/O connector by following steps 3…7
in reverse
order.
Rockwell Automation Publication 2094-IN005H-EN-P - October 2012
Page 43

Line Interface Module 43
Control Po wer
Connections
* INDICATES USER SUPPLIED COMPONENT
Contactor Enable
Connections
24V for motor brake or
other as needed
24V for motor brake or
other as needed
24V for motor brake or
other as needed
Bonded Cabinet
Ground Bus *
VAC L INE
3-phase (IPL) Input
195-264V AC RMS
or 324-528V AC RMS
Ground Stud
VAC LOA D
3-phase (OPL) Output
195-264V AC RMS
or 324-528V AC RMS
STOP *
I/O (IOL)
Connector
2094-ALxxS, 2094-BLxxS, or
2094-XL75S-Cx
Line Interface Module
Ground and
3-phase
Input Connections
Control Po wer
Single-phase (CPL) Output
195-264V AC RMS
3-phase
AC Line Filter *
Auxiliary Power
Single-phase (APL) Input
93-121V AC RMS
or 196-253V AC RMS
(This connector is present
only on the 2094-XL75S-Cx)
Drive Module *
Auxiliary
Power Ou tput
(P2L) Connector
Auxiliary power for use
as needed
Auxiliary power for use
as needed
Brake and I/O Output
(P1L) Connector
Wiring Diagrams
1
2
L3
3
L2
4
L1
1
L2/N
2
L1
In this example configuration, the servo drive has input power, brake power, and
the start/stop string wired from 2094-ALxxS, 2094-BLxxS, or 2094-XL75S-Cx
line interface modules. These modules do not contain an AC line filter, so an
external filter is added between the module and the drive.
Figure 37 - Power-interconnect Diagram (line interface module with drive)
1
CTRL 2
2
CTRL 1
1
2
L3'
3
L2'
4
L1'
IO_PWR2
IO_COM2
IO_PWR2
IO_COM2
IO_PWR2
IO_COM2
AUX2_L1
AUX2_L2
AUX1_L1
AUX1_L2
IO_PWR1
COIL_E1
IO_COM1
COIL_E2
1
2
3
4
5
6
1
2
3
4
1, 3, 5
7
2, 4, 6
8
L3
L2
L1
Rockwell Automation Publication 2094-IN005H-EN-P - October 2012
Page 44

44 Line Interface Module
Control Po wer
Connections
* INDICATES USER SUPPLIED COMPONENT
Contactor Enable
Connections
Brake and I/O Output
(PSL) Connector
Drive Module *
Bonded Cabinet
Ground Bus*
VAC LINE 3-phase (IPL) Input
195-264V AC RMS
or 324-528V AC RMS
Ground Stud
Ground
VAC LOA D 3- phas e (OP L) O utpu t
195-264V AC RMS
or 324-528V AC RMS
STOP *
I/O (IOL)
Connector
2094-AL09 or 2094-BL02
Line Interface Module
Ground and
3-phase
Input (IPD)
Connections
Single-phase (CPL) Output
195-264V AC RMS
24V for motor brakes
or other as needed
24V for motor brakes
or other as needed
In the example configuration below, the servo drive has input power, brake
power, and the start/stop string wired from a 2094-AL09 or 2094-BL02 line
interface module. These modules contain an AC line filter, so an external filter is
not required.
Figure 38 - Power-interconnect Diagram (line interface module with drive)
1
L2
2
L1
L3
L2
L1
L3'
L2'
L1'
MBRK_PWR
MBRK_COM
MBRK_PWR
MBRK_COM
IO_PWR
COIL_A1
IO_COM
COIL_A2
L3
L2
L1
1
2
3
4
24-26
13
20-22
4
Rockwell Automation Publication 2094-IN005H-EN-P - October 2012
Page 45

Line Interface Module 45
CB 2
11
14
12
1
3
2
4
1
3
2
4
CB 3
FB1
1
3
2
4
5
6
3
4
1
2
11
12
21
22
31
32
41
42
A1
A2
53
54
N/C
N/C
LF 2
IOL
LF 1
100-JE
E2
E1
A1
IPL
Pin 1
Pin 2
Pin 3
Pin 4
PEL3L2
L1
IPL: VAC LINE
OPL
OPL: VAC LOAD
Pin 1
Pin 2
Pin 3
Pin 4
PE
L3'
L2'
L1'
123
4
123
4
IPL
OPL
Interface PCB
L3
L2
L1
ALRM_COM
1
3
2
4
6
AL
1c
B
M
5
L3'
L2'
L1'
CR1
CONSTAT_12
CONSTAT_22
CONSTAT_32
CONSTAT_54
COIL_A2
CONSTAT_53
CONSTAT_31
CONSTAT_21
CONSTAT_11
CONSTAT_54
CONSTAT_32
CONSTAT_22
CONSTAT_12
ALRM_COM
ALRM_B
COIL_E1
CONSTAT_53
CONSTAT_31
CONSTAT_21
CONSTAT_11
ALRM_M
COIL_E2
Pin 14
Pin 13
Pin 12
Pin 11
Pin 1
Pin 2
Pin 3
Pin 4
Pin 6
Pin 7
Pin 17
Pin 8
Pin 18
Pin 10
Pin 20
Pin 19
Pin 15
Pin 16
Pin 5
Pin 9
Pin 21
IO_PWR1
IO_COM1
IO_PWR1
IO_COM1
IO_PWR1
IO_COM1
COIL_E1
COIL_E2
ALRM_M
SHIELD
ALRM_B
ALRM_COM
CONST AT_11
CONST AT_12
CONST AT_21
CONST AT_22
CONST AT_31
CONST AT_32
CONST AT_53
CONST AT_54
SHIELD
IOL: STATUS I/O
123456789
1011121314151617181920
21
1
2
21
20
IOL
24V Status
Indicator
ALRM_B
ALRM_M
ALRM_M
ALRM_COM
ALRM_B
L1
L2
PE
L1'
L2'
678
9
10
L3
N
123
4
L3'
N'
Three-phase, 1-Stage
Line Filter (460V AC)
IO_PWR1
IO_COM1
IO_PWR2
IO_COM2
L1
L2
PE
24+
24+
20 A Power Supply
PS1
24-
24-
COIL_A2
L1
L2
PE
L1'
L2'
1
2
3
4
Single-phase, 1-Stage
Line Filter (230V AC)
5
Pin 6
Pin 5
Pin 4
Pin 3
Pin 2
Pin 1
P2L
P2L: AUXILIARY PWR OUTPUT
AUX1_L2
AUX1_L1
AUX2_L2
AUX2_L1
Pin 1
CPL: CONTROL PWR OUTPUT
CPL
CTRL 2
CTRL 1
Pin 1
P1L: BRAKE AND I/O OUTPUT
P1L
Pin 2
Pin 4
Pin 3
Pin 2
6
5
4
3
2
1
2
1
4
3
2
1
IO_PWR2
IO_COM2
IO_PWR2
IO_COM2
IO_PWR2
IO_COM2
432
1
2
1
65432
1
CTRL1
CTRL2
AUX1_L2 and AUX2_L2
AUX1_L1 and AUX2_L1
Interface PCB
P2L
CPL
P1L
COIL_E2
COIL_E1
L1L1L2
L2
123
4
123
4
J4 P4
J4_B
12345
(P4)
CB1 (Bulletin 140U)
(1)
(1)
1
21
IOL
(2)
(2)
(1) Alarm contacts (ALRM_B and ALRM_M) only change state when CB1 tri ps, not when manually operated. See CB1 Alarm Operation on page 18 for more information.
(2) The IOL (21-pin) terminal block may have staggered terminals or stra ight terminals.
Block Diagrams
These are block diagrams for the Bulletin 2094 line interface modules.
Figure 39 - Block Diagram (catalog number 2094-ALxxS)
Rockwell Automation Publication 2094-IN005H-EN-P - October 2012
Page 46

46 Line Interface Module
CB 2
11
14
12
1
3
2
4
1
3
2
4
CB 3
FB1
1
3
2
4
5
6
3
4
1
2
11
12
21
22
31
32
41
42
A1
A2
53
54
N/C
N/C
LF 2
IOL
LF 1
100-JE
E2
E1
A1
IPL
Pin 1
Pin 2
Pin 3
Pin 4
PEL3L2
L1
IPL: VAC LINE
OPL
OPL: VAC LOAD
Pin 1
Pin 2
Pin 3
Pin 4
PE
L3'
L2'
L1'
123
4
123
4
IPL
OPL
Interface PCB
L3
L2
L1
ALRM_COM
1
3
2
4
6
AL
1c
B
M
5
CB1 (Bulletin 140U)
L3'
L2'
L1'
CR1
CONSTAT_12
CONSTAT_22
CONSTAT_32
CONSTAT_54
COIL_A2
CONSTAT_53
CONSTAT_31
CONSTAT_21
CONSTAT_11
CONSTAT_54
CONSTAT_32
CONSTAT_22
CONSTAT_12
ALRM_COM
ALRM_B
COIL_E1
CONSTAT_53
CONSTAT_31
CONSTAT_21
CONSTAT_11
ALRM_M
COIL_E2
123456789
1011121314151617181920
21
1
2
21
20
IOL
ALRM_B
ALRM_M
ALRM_M
ALRM_COM
ALRM_B
65
L1
L2
PE
L1'
L2'
678
9
10
L3
N
123
4
L3'
N'
Three-phase, 1-Stage
Line Filter (460V AC)
IO_PWR1
IO_COM1
IO_PWR2
IO_COM2
L1
L2
PE
24+
24+
20 A Power Supply
PS1
24-
24-
COIL_A2
L1
L2
PE
L1'
L2'
1
2
3
4
Single-phase, 1-Stage
Line Filter (230V AC)
5
Pin 6
Pin 5
Pin 4
Pin 3
Pin 2
Pin 1
P2L
P2L: AUXILIARY PWR OUTPUT
AUX1_L2
AUX1_L1
AUX2_L2
AUX2_L1
Pin 1
CPL: CONTROL PWR OUTPUT
CPL
CTRL 2
CTRL 1
Pin 1
P1L: BRAKE AND I/O OUTPUT
P1L
Pin 2
Pin 4
Pin 3
Pin 2
6
5
4
3
2
1
2
1
4
3
2
1
IO_PWR2
IO_COM2
IO_PWR2
IO_COM2
IO_PWR2
IO_COM2
432
1
2
1
65432
1
CTRL1
CTRL2
Interface PCB
P2L
CPL
P1L
COIL_E2
COIL_E1
L3
TX1
460V :: 230V
750VA
L3L1L1L2L2
AUX1_L2 and AUX2_L2
AUX1_L1 and AUX2_L1
123
4
123
4
J4 P4
J4_B
12345
(P4)
(1)
(1)
Pin 14
Pin 13
Pin 12
Pin 11
Pin 1
Pin 2
Pin 3
Pin 4
Pin 6
Pin 7
Pin 17
Pin 8
Pin 18
Pin 10
Pin 20
Pin 19
Pin 15
Pin 16
Pin 5
Pin 9
Pin 21
IO_PWR1
IO_COM1
IO_PWR1
IO_COM1
IO_PWR1
IO_COM1
COIL_E1
COIL_E2
ALRM_M
SHIELD
ALRM_B
ALRM_COM
CONST AT_11
CONST AT_12
CONST AT_21
CONST AT_22
CONST AT_31
CONST AT_32
CONST AT_53
CONST AT_54
SHIELD
IOL: STATUS I/O
24V Status
Indicator
1
21
IOL
(2)
(2)
(1) Alarm contacts (ALRM_B and ALRM_M) only change state when CB1 trips, not when manually operated. See CB1 Alarm Operation on page 18 for more information.
(2) The IOL (21-pin) terminal block may have staggered terminals or straight terminals.
Figure 40 - Block Diagram (catalog number 2094-BLxxS)
Rockwell Automation Publication 2094-IN005H-EN-P - October 2012
Page 47

Figure 41 - Block Diagram (catalog number 2094-XL75S-Cx)
CB 2
11
14
12
1
3
2
4
1
3
2
4
CB 3
FB1
1
3
2
4
5
6
3
4
1
2
11
12
21
22
31
32
41
42
A1
A2
53
54
N/C
N/C
LF 2
IOL
LF 1
100-JE
E2
E1
A1
IPL
Pin 1
Pin 2
Pin 3
Pin 4
PEL3L2
L1
IPL: VAC LINE
OPL
OPL: VAC LOAD
Pin 1
Pin 2
Pin 3
Pin 4
PE
L3'
L2'
L1'
1
234
123
4
IPL
APL: AUXILIARY PWR INPUT
APL
L2/N
L1
Pin 2
Pin 1
1
2
APL
OPL
Interface PCB
L3
L2
L1
ALRM_COM
1
3
2
4
6
AL
1c
B
M
5
L3'
L2'
L1'
CR1
CONSTAT_12
CONSTAT_22
CONSTAT_32
CONSTAT_54
COIL_A2
CONSTAT_53
CONSTAT_31
CONSTAT_21
CONSTAT_11
CONSTAT_54
CONSTAT_32
CONSTAT_22
CONSTAT_12
ALRM_COM
ALRM_B
COIL_E1
CONSTAT_53
CONSTAT_31
CONSTAT_21
CONSTAT_11
ALRM_M
COIL_E2
123456789
1011121314151617181920
21
1
2
21
20
IOL
ALRM_B
ALRM_M
ALRM_M
ALRM_COM
ALRM_B
65
L1
L2
PE
L1'
L2'
678
9
10
L3
N
123
4
L3'
N'
Three-phase, 1-Stage
Line Filter (460V AC)
IO_PWR1
IO_COM1
IO_PWR2
IO_COM2
L1
L2
PE
24+
24+
20 A Power Supply
PS1
24-
24-
COIL_A2
L1
L2
PE
L1'
L2'
1
2
3
4
Single-phase, 1-Stage
Line Filter (230V AC)
5
Pin 6
Pin 5
Pin 4
Pin 3
Pin 2
Pin 1
P2L
P2L: AUXILIARY PWR OUTPUT
AUX1_L2
AUX1_L1
AUX2_L2
AUX2_L1
Pin 1
CPL: CONTROL PWR OUTPUT
CPL
CTRL 2
CTRL 1
Pin 1
P1L: BRAKE AND I/O OUTPUT
P1L
Pin 2
Pin 4
Pin 3
Pin 2
6
5
4
321
2
1
4
3
2
1
IO_PWR2
IO_COM2
IO_PWR2
IO_COM2
IO_PWR2
IO_COM2
432
1
2
1
65432
1
CTRL1
CTRL2
Interface PCB
P2L
CPL
P1L
COIL_E2
COIL_E1
L1L1L2/N
L2/N
AUX1_L2 and AUX2_L2
AUX1_L1 and AUX2_L1
123
4
123
4
1
2
J4 P4
CB1 (Bulletin 140U)
(1)
(1)
Pin 14
Pin 13
Pin 12
Pin 11
Pin 1
Pin 2
Pin 3
Pin 4
Pin 6
Pin 7
Pin 17
Pin 8
Pin 18
Pin 10
Pin 20
Pin 19
Pin 15
Pin 16
Pin 5
Pin 9
Pin 21
IO_PWR1
IO_COM1
IO_PWR1
IO_COM1
IO_PWR1
IO_COM1
COIL_E1
COIL_E2
ALRM_M
SHIELD
ALRM_B
ALRM_COM
CONST AT_11
CONST AT_12
CONST AT_21
CONST AT_22
CONST AT_31
CONST AT_32
CONST AT_53
CONST AT_54
SHIELD
IOL: STATUS I/O
24V Status
Indicator
1
21
IOL
(2)
(2)
(1) Alarm contacts (ALRM_B and ALRM_M) only change state when CB1 trips, not when manually operated. See CB1 Alarm Operation on page 18 for more information.
(2) The IOL (21-pin) terminal block may have staggered terminals or straight terminals.
Line Interface Module 47
Rockwell Automation Publication 2094-IN005H-EN-P - October 2012
Page 48

48 Line Interface Module
CB2_AUX
1
3
2
4
CB3
LF2
CB2
3
5
4
6
L1
L2
PE
L1'
L2'
L3
L3'
Three-phase, 1-Stage
Line Filter (460V AC)
L1
L2
PE
L1'
L2'
Single-phase, 1-Stage
Line Filter (230V AC)
L1
L2
PE
24+
2 A Power Supply
PS1
24-
IOL: STATUS I/O
Pin 1
Pin 2
Pin 3
Pin 4
CPL: CONTROL POWER
CPL
L2/N
L1
Pin 2
PSL: I/O 24V DC OUTPUT
PSL
Pin 1
1
2
3
4
MBRK_PWR
MBRK_COM
MBRK_PWR
MBRK_COM
24V Status LEDs
IOL
9
1
10
19
18
26
Pin 14
Pin 13
Pin 12
Pin 11
Pin 1
Pin 2
Pin 3
Pin 4
Pin 6
Pin 7
Pin 17
Pin 8
Pin 18
Pin 10
Pin 20
Pin 19
Pin 15
Pin 16
Pin 5
Pin 9
Pin 21
Pin 22
Pin 23
Pin 24
Pin 25
Pin 26
N/C
N/C
N/C
COIL_A2
N/C
CONSTAT_12
CONSTAT_22
CONSTAT_32
CONSTAT_42
N/C
N/C
N/C
COIL_A1
N/C
CONSTAT_11
CONSTAT_21
CONSTAT_31
CONSTAT_41
N/C
IO_COM
IO_COM
IO_COM
N/C
IO_PWR
IO_PWR
IO_PWR
12
2
1
L1
L2/N
L3_OUT
L2_OUT
L1_OUT
IPL
Pin 1
Pin 2
Pin 3
Pin 4
PEL3L2
L1
IPL: VAC LINE INPUT
OPL: VAC LOAD OUTPUT
432
1
432
1
Pin 4
Pin 3
Pin 2
Pin 1
PE
L3'
L2'
L1'
L3_IN
L2_IN
L1_IN
CR1
11
12
21
22
31
32
A1
A2
41
42
5
3
1
6
4
2
1
3
2
4
6
5
CONSTAT_12
CONSTAT_22
CONSTAT_32
CONSTAT_42
COIL_A2
CONSTAT_41
CONSTAT_31
CONSTAT_21
CONSTAT_11
CONSTAT_42
CONSTAT_41
CONSTAT_32
CONSTAT_31
CONSTAT_22
CONSTAT_21
CONSTAT_12
CONSTAT_11
COIL_A2
COIL_A1
IO_PWR
IO_COM
IO_PWR
IO_COM
L1
L2
PE
24+
6 A Power Supply
PS2
24-
CB1
LF1
MBRK_PWR
MBRK_COM
D1
COIL_A1
Figure 42 - Block Diagram (catalog number 2094-AL09)
Rockwell Automation Publication 2094-IN005H-EN-P - October 2012
Page 49

LF2
L1
L2
PE
L1'
L2'
L3
L3'
Three-phase, 1-Stage
Line Filter (460VAC)
L1
L2
PE
L1'
L2'
Single-phase, 1-Stage
Line Filter (230VAC)
L1
L2
PE
24+
2 A Power Supply
PS1
24-
IOL: STATUS I/O
Pin 1
Pin 2
Pin 3
Pin 4
CPL: CONTROL POWER
CPL
L2/N
L1
Pin 2
PSL: I/O 24V DC OUTPUT
PSL
Pin 1
2
1
1
2
3
4
MBRK_PWR
MBRK_COM
MBRK_PWR
MBRK_COM
24V Status LEDs
IOL
9
1
10
19
18
26
Pin 14
Pin 13
Pin 12
Pin 11
Pin 1
Pin 2
Pin 3
Pin 4
Pin 6
Pin 7
Pin 17
Pin 8
Pin 18
Pin 10
Pin 20
Pin 19
Pin 15
Pin 16
Pin 5
Pin 9
Pin 21
Pin 22
Pin 23
Pin 24
Pin 25
Pin 26
N/C
N/C
N/C
COIL_A2
N/C
CONSTAT_12
CONSTAT_22
CONSTAT_32
CONSTAT_42
N/C
N/C
N/C
COIL_A1
N/C
CONSTAT_11
CONSTAT_21
CONSTAT_31
CONSTAT_41
N/C
IO_COM
IO_COM
IO_COM
N/C
IO_PWR
IO_PWR
IO_PWR
TX1
460V to 230V
750VA XFMR
1
3
2
4
CB3
CB2
3
5
4
6
12
Cooling Fan
FAN_1
FAN_2
L1
L2/N
L3_OUT
L2_OUT
L1_OUT
IPL
Pin 4
Pin 3
Pin 2
Pin 1
PEL3L2
L1
IPL: VAC LINE INPUT
OPL: VAC LOAD OUTPUT
123
4
123
4
Pin 1
Pin 2
Pin 3
Pin 4
PE
L3'
L2'
L1'
L3_IN
L2_IN
L1_IN
CR1
100S-C85
11
12
21
22
31
32
A1
A2
41
42
5
3
1
6
4
2
1
3
2
4
6
5
CONSTAT_12
CONSTAT_22
CONSTAT_32
CONSTAT_42
COIL_A2
CONSTAT_41
CONSTAT_31
CONSTAT_21
CONSTAT_11
CONSTAT_42
CONSTAT_41
CONSTAT_32
CONSTAT_31
CONSTAT_22
CONSTAT_21
CONSTAT_12
CONSTAT_11
COIL_A2
COIL_A1
IO_PWR
IO_COM
IO_PWR
IO_COM
L1
L2
PE
24+
6 A Power Supply
PS2
24-
CB1
LF1
MBRK_PWR
MBRK_COM
D1
COIL_A1
CB2_AUX
Line Interface Module 49
Figure 43 - Block Diagram (catalog number 2094-BL02)
Rockwell Automation Publication 2094-IN005H-EN-P - October 2012
Page 50

50 Line Interface Module
Post-installation
Cat. No. Quantity
2094-ALxxS
2094-BLxxS
2094-XL75S-C1
2094-XL75S-C2
Common module
components
This section provides descriptions and catalog numbers for accessory items and
field-replaceable components internal to the line interface module. For
component removal and replacement information, see Removing and Replacing
line interface Module Internal Components Installation Instructions, publication
2094-IN009
Table 26 - Field-Replaceable Components
(catalog numbers 2094-ALxxS, 2094-BLxxS, and 2094-XL75S-Cx)
Reference
Designator
1 CB2 Circuit breaker, 2-pole, 20 A 1492-SP2D200 –
1 CB3 Circuit breaker, 2-pole, 16 A 1492-SP2C160 –
2FB1
1 CB2 Circuit breaker, 2-pole, 4 A 1492-SP2D040 –
1 CB3 Circuit breaker, 3-pole, 6 A 1492-SP3C060 –
2FB1
1 CB2 Circuit breaker, 2-pole, 20 A 1492-SP2D200 –
1 CB3 Circuit breaker, 2-pole, 16 A 1492-SP2C160 –
2FB1
1 CB2 Circuit breaker, 2-pole, 20 A 1492-SP2D200 –
1 CB3 Circuit breaker, 2-pole, 16 A 1492-SP2C160 –
2FB1
1 FB1 Fuse block 1492-FB2C30-L –
1 CB2A Auxiliary contact 1492-ASPH3 –
(1)
(1)
(1)
(1)
.
Description
Fuse, 10 A, Class CC – FNQ-R-10
Fuse, 3.5 A, Class CC – FNQ-R-3.5
Fuse, 15 A, Class CC – FNQ-R-15
Fuse, 10 A, Class CC – FNQ-R-10
Allen-Bradley
Part Number
Bussmann
Part Number
(1) Fuses for FB1 are accessible from the front of each module. See page 9 for the location of FB1.
Table 27 - Field-Replaceable Components (catalog numbers 2094-AL09 and 2094-BL02)
Cat. No. Quantity Description
2094-AL09 1 Circuit breaker, 3-phase, 25 A, 480V 1492-SP3D250 –
1 Circuit breaker, 3-phase, 32 A, 480V 1492-SP3D320 –
2094-BL02
Common module
components
1 Finger guard, fan, wire, 80 mm – 8172 (Qual-Tek)
1 Fan, 80 mm (3.15 in.), 230V –
1 Circuit breaker, 2-phase, 3 A, 480V 1492-SP2D030 –
1 Circuit breaker, 3-phase, 3 A, 480V 1492-SP3D030 –
Allen-Bradley
Part Number
Vendor Part Number
UF80B23-BTH
(Mechatronics)
Rockwell Automation Publication 2094-IN005H-EN-P - October 2012
Page 51

Line Interface Module 51
Table 28 - Accessories
Cat. No. Description Accessory Cat. No.
Connector Set. Includes I/O (IOL), VAC LINE (IPL), VAC LOAD (OPL), control power (CPL),
2094-ALxxS, 2094-BLxxS,
and 2094-XL75S-Cx
2094-AL09 and 2094-BL02
230V auxiliary output (P2L), 24V brake power (P1L), and 230V auxiliary input (APL)
replacement connectors for these catalog numbers.
Mounting bracket for use when panel configuration calls for mounting the AC line filter
behind the line inter face module.
Variable-depth rotary mechanism. Provides disconnect from outside the cabinet when
used with 140U device (CB1).
Low-profile connector kit for I/O (26-pin high density D-shell). 2090-K6CK-D26M
Connector Set. Includes VAC LINE (IPL), VAC LOAD (OPL), control power (CPL), and 24V
brake power (PSL) replacement connectors for these catalog numbers.
2094-XNLIM-2
2094-XNBRKT-1
140U-H-RM12B
2094-XNLIM-1
Status Indicators
The line interface module status indicators monitor the 24V output supply.
Table 29 - Troubleshooting Status Indicators
Status Indicator Status Description
Steady Green Normal, 24V power enabled
• CB3 is open. Reset CB3.
• If CB3 continues to trip, call your Rockwell
• 24V power status indicator
• Brake power status indicator
• I/O power status indicator
(1) Applies to 2094-ALxxS, 2094-BLxxS, and 2094-XL75S-Cx line inter face modules.
(2) Applies to 2094-AL09 and 2094-BL02 line interface module s.
(1)
(2)
(2)
Off
(24V power disabled)
Automation representative to return module
for repair.
• Check 24V polarity. Correct polarity if
reversed.
• If polarity is correct and indicator is not
steady green, call your Rockwell Automation
representative to return module for repair.
Rockwell Automation Publication 2094-IN005H-EN-P - October 2012
Page 52

52 Line Interface Module
Specifications
Designators Attribute
VAC L INE
(IPL) connector
VAC LO AD
(OPL) connector
Control power outp ut (CPL)
connector
and
Auxiliary power output
(P2L) connector
Brake power output (P1L)
connector
and
I/O (IOL) connector
Contac tor (CR1)
AC inp ut voltag e
AC input frequency 47…63 Hz 47…63 Hz
Main AC output current (rms) 15 A 25 A 50 A 75 A 10 A 25 A 50 A 75 A
AC output current (rms) 3 A
AC out put voltage
24V DC power supply 20 A
Contactor control voltage
Contactor control current
Contactor pickup current
Contactor hold-in current
Contactor voltage N/A (Internal) N/A (Internal)
Contactor pickup time 18.5 ms (min) 30.0 ms (max) 18.5 ms (min) 30.0 ms (max)
Contactor dropout time 10.0 ms (min) 60.0 ms (max) 10.0 ms (min) 60.0 ms (max)
This section provides power, fuse, weight, and environmental specifications for
the line interface modules.
Power Specifications
Table 30 - Power Specifications (catalog numbers 2094-ALxxS and 2094-BLxxS)
2094-ALxxS (230V) 2094-BLxxS (460V)
AL15S AL25S AL50S AL75S BL10S BL25S BL50S BL75S
195…265V rms 3-phase
(230V nom)
(3)
195…265V rms single-phase
(230V nom)
(4)
(1)
(1)
(2)
(2)
21.6…26.4V DC 21.6…26.4V DC
12…9 mA 12…9 mA
N/A (Internal) N/A (Internal)
N/A (Internal) N/A (Internal)
380…520V rms 3-phase
(460V nom)
(3)
3 A
190…260V rms single-phase
(230V nom)
(4)
20 A
(1) Power specifications for DC-interface module (100 JE) COIL_E1 and COIL_E2 input.
(2) Current provided by auxiliary VAC input.
(3) Sum of CPL and P2L current must not exceed 3 A.
(4) Sum of P1L and IOL current must not exceed 20 A.
Rockwell Automation Publication 2094-IN005H-EN-P - October 2012
Page 53

Line Interface Module 53
Table 31 - Power Specifications (catalog numbers 2094-XL75S-Cx)
Designators Attribute 2094-XL75S-C1 (230/460V) 2094-XL75S-C2 (230/460V)
VAC L INE
(IPL) Connector
VAC LO AD
(OPL) connector
Auxiliary power input
(APL) connec tor
Control power outp ut (CPL)
connector
and
Auxiliary power output
(P2L) connector
Brake power output (P1L)
connector
and
I/O (IOL) connector
Contac tor (CR1)
(1) Power specifications for DC-interface module (100 JE) COIL_E1 and COIL_E2 input.
(2) Current provided by auxiliary VAC input.
AC input voltage 195…520V rms 3-phase (230…460V nom)
AC input frequency 47…63 Hz
Main AC output current (rms) 75 A
Auxiliary AC input voltage 93…121V rms single-phase (110V nom) 196…253V rms single-phase (230V nom)
Auxiliary AC input current (rms) 20 A 11 A
AC output current (rms) 12 A 5 A
AC output voltage 93…121V rms single-phase (110V nom) 196…253V rms single-phase (230V nom)
24V DC power supply 20 A
Contactor control voltage
Contactor control current
Contactor pickup current
Contactor hold-in current
(1)
(1)
(2)
(2)
21.6…26.4V DC
12…9 mA
1.75 A 0.87 A
0.14 A 0.07 A
Contactor voltage 93…121V rms single-phase (110V nom) 196…253V rms single-phase (230V nom)
Contactor pickup time 18.5 ms (min) 30.0 ms (max)
Contactor dropout Time 10.0 ms (min) 60.0 ms (max)
Designator Attribute
VAC L INE
(IPL) connector
VAC LO AD
(OPL) connector
Control power outp ut (CPL)
connector
Brake power output (PSL)
connector
AC input voltage 195-265V rms 3-phase (230V nom) 380-520V rms 3-phase (460V nom)
AC input frequency 47…63 Hz
Main AC output current 20 A rms 30 A rms
AC output current 3 A
AC output voltage 195-265V rms 3-phase (230V nom) 190-260V rms 3-phase (230V nom)
Brake power 24V DC 2.0 A
I/O brake power 24V DC 5.7 A
Contactor pickup current 383 mA
Contactor hold-in current 383 mA
Contac tor (CR1)
Contactor voltage 24V DC
Contactor pickup time 50 ms (min) 80 ms (max)
Contactor dropout time 80 ms (min) 125 ms (max)
Table 32 - Power Specifications (catalog numbers 2094-AL09 and 2094-BL02)
Value
2094-AL09 (230V) 2094-BL02 (460V)
Rockwell Automation Publication 2094-IN005H-EN-P - October 2012
Page 54

54 Line Interface Module
IMPORTANT
Table 33 - Power Dissipation Specifications
Cat. No.
2094-AL09 72
2094-ALxxS52.5
2094-BL02 90
2094-BLxxS42.9
2094-XL75S-Cx 52.5
Dissipation at 100% of Rated Power Output
(watts)
Fuse Specifications
Use Class CC, J, L, or R fuses with current rating as indicated in the table below.
The table below lists fuse examples recommended for use with 2094-AL09 and
2094-BL02 line interface modules.
The 2094-ALxxS, 2094-BLxxS, and 2094-XL75S-Cx line interface modules provide
branch-circuit protection. Follow all applicable NEC and local codes.
Table 34 - Fuse Specifications
Cat. No. VAC Input Power Fuse
(2)
2094-AL09
2094-BL02
(1) The maximum short circuit current available from the source must
(2) Part numbers shown are examples of Bussmann fuses.
(1)
(2)
be limited to 5000 A.
KTK-R-25 (25 A)
KTK-R-30 (30 A)
ATTENTION: Bulletin 1492 and 140M circuit breakers should not be used on the output
of an AC drive as an isolating disconnect switch or motor overload device. These devices
are designed to operate on sine-wave voltage and the drive’s PWM waveform does not
allow it to operate properly. As a result, damage to the device will occur.
Rockwell Automation Publication 2094-IN005H-EN-P - October 2012
Page 55

General Specifications
Table 35 - Environmental Specifications
Attribute Value (operational range) Value (storage range)
Temperature 0…50 °C (32…122 °F) -40…70 °C (-40…158 °F)
Humidity 5…95% noncondensing 5…95% noncondensing
1000 m (3281 ft) 3000 m (9843 ft) during transport
Altitude
Vibration (max)
Shock
The line interface module can operate at elevations up to 1000 m (3300 ft) without derating; however, the continuous current rating
must be de-rated by 3% for each additional 300 m (1000 ft) up to 3000 m (10,000 ft). Consult your local Rockwell Automation
representative before operating at over 3000 m (10,000 ft)
0.152 mm (0.006 in.) peak-to-peak displacement, 1.0 g peak
acceleration @ 5…2000 Hz
15 g, 11 ms half-sine pulse (3 pulses in each direction of 3
mutually perpendicular directions)
0.381 mm (0.015 in.) peak-to-peak displacement,
2.5 g peak acceleration @ 5…2000 Hz
30 g, 11 ms half-sine pulse (3 pulses in each direction of 3
mutually perpendicular directions)
Table 36 - Weight Specifications
Line Interface Module 55
Cat. No.
2094-AL09 11.33 (25.0)
2094-ALxxS 10.70 (23.6)
2094-BL02 18.14 (40.0)
2094-BLxxS 17.15 (37.8)
2094-XL75S-Cx 10.70 (23.6)
Weight, Ap prox.
kg (lb)
Table 37 - Certifications
Certification
(when product is marked)
c-UL-us UL Listed to U.S. and Canadian safety standards (UL 508 C File E59272).
CE
(1) See http://www.ab.com for Declarations of Conformity Certificates.
(1)
Description
European Union 2004/108/EC EMC Directive compliant with EN 61800-3:2004: Adjustable Speed
Electrical Power Drive Systems - Part 3; EMC Product Standard including specific test methods.
European Union 2006/95/EC Low Voltage Directive compliant with:
• EN 61800-5-1:2003 - Safety of Machinery - Electrical Equipment of Machines.
• EN 50178:1997 - Electronic Equipment for use in Power Installations.
Rockwell Automation Publication 2094-IN005H-EN-P - October 2012
Page 56

56 Line Interface Module
Additional Resources
These documents contain additional information concerning related Rockwell
Automation products.
Resource Description
Kinetix 2000 Multi-axis Ser vo Drives User Manual, publication 2093-UM001
Kinetix 6000 Multi-axis Ser vo Drives User Manual, publication 2094-UM001
Kinetix 6200 and Kinetix 6500 Modular Multi-axis Servo Drives
User Manual, publication 2094-UM002
Kinetix 7000 High Power Servo Drives User Manual, publication 2099-UM001
Line Interface Module Installation Instructions, publication 2094-IN009
2094 Mounting Brackets Installation Instructions, publication 2094-IN008
Kinetix Motion Control Selection Guide, publication GMC-SG001
Kinetix Motion Accessories Specifications, publication GMC-TD004
Download Motion Analyzer software from:
http://www.ab.rockwellautomation.com/motion-control/motion-anal yzer-software
Resistive-brake Module Installation Instructions, publication 2090-IN009
System Design for Control of Electrical Noise Reference Manual,
publication GMC-RM001
EMC Noise Management DVD, publication GMC-SP004
Understanding the Machinery Directive, publication SHB-900-RM001
Rockwell Automation Product Certification website, http://www.ab.com For declarations of conformity (DoC) currently available from Rockwell Automation.
National Electrical Code, published by the National Fire Protection Association of
Boston, MA
Allen-Bradley® Industrial Automation Glossary, publication AG- 7.1
Detailed mounting, wiring, setup with RSLogix™ 5000 software, applying power, and
troubleshooting information with appendices to support firmware upgrades and common
bus applications.
Removal and replacement procedures for field-replaceable line interface module internal
components.
Information on installing 2094 mounting brackets for use with the 2094 power rail or line
interface modules.
Overview of Kinetix ser vo drives, motors, actuators, and motion accessories designed to help
make initial decisions for the motion control products best suited for your system
requirem ents.
Product specifications for Bulletin 2090 motor and interface cables, low-profile connector
kits, drive power components, and other servo drive accessory items.
Comprehensive motion application sizing tool used for analysis, optimization, selection, and
validation of your Kinetix Motion Control system.
Information on the installation and wiring of the Bulletin 2090 resistive-brake module
(RBM).
Information, examples, and techniques designed to minimize system failures caused by
electrical noise.
A road map to CE marking and safety-related control product applications.
An article on wire sizes and types fo r grounding electrical equipment.
A glossary of industrial automation terms and abbreviations.
You can view or download publications at
http://www.rockwellautomation.com/literature
. To order paper copies of
technical documentation, contact your local Rockwell Automation® distributor
or sales representative.
Rockwell Automation Publication 2094-IN005H-EN-P - October 2012
Page 57

Notes:
Line Interface Module 57
Rockwell Automation Publication 2094-IN005H-EN-P - October 2012
Page 58

58 Line Interface Module
Notes:
Rockwell Automation Publication 2094-IN005H-EN-P - October 2012
Page 59

Notes:
Line Interface Module 59
Rockwell Automation Publication 2094-IN005H-EN-P - October 2012
Page 60

Rockwell Automation Support
Rockwell Automation provides technical information on the Web to assist you in using its products.
At http://www.rockwellautomation.com/support
code and links to software service packs, and a MySupport feature that you can customize to make the best use of these
tools. You can also visit our Knowledgebase at http://www.rockwellautomation.com/knowledgebase
information, support chat and forums, software updates, and to sign up for product notification updates.
For an additional level of technical phone support for installation, configuration, and troubleshooting, we offer
Te c h C o n n e c t
sm
support programs. For more information, contact your local distributor or Rockwell Automation
representative, or visit http://www.rockwellautomation.com/support/
Installation Assistance
If you experience a problem within the first 24 hours of installation, review the information that is contained in this
manual. You can contact Customer Support for initial help in getting your product up and running.
United States or Canada 1.440.646.3434
Outside United States or Canada
Use the Wo rldw ide L ocat or
Automation representative.
, you can find technical manuals, technical and application notes, sample
for FAQs, technical
.
at http://www.rockwellautomation.com/support/americas/phone_en.html, or contact your local Rockwell
New Product Satisfaction Return
Rockwell Automation tests all of its products to ensure that they are fully operational when shipped from the
manufacturing facility. However, if your product is not functioning and needs to be returned, follow these procedures.
United States
Outside United States Please contact your local Rockwell Automation representative for the return procedure.
Contact your distributor. You must provide a Customer Support case number (call the phone number above to obtain one) to your
distributor to complete the return process.
Documentation Feedback
Your comments will help us serve your documentation needs better. If you have any suggestions on how to improve this
document, complete this form, publication RA-DU002
Allen-Bradley, Kinetix, RSLogix, Rockwell Software, Rockwell Automation, and TechConnect are trademarks of Rockwell Automation, Inc.
Trademarks not belonging to Rockwell Automation are property of their respective companies.
Rockwell Otomasyon Ticaret A.Ş., Kar Plaza İş Merkezi E Blok Kat:6 34752 İçerenköy, İstanbul, Tel: +90 (216) 5698400
, available at http://www.rockwellautomation.com/literature/.
Publication 2094-IN005H-EN-P - October 2012 PN-160340
Supersedes Publication 2094-IN005G-EN-P - April 2010 Copyright © 2012 Rockwell Automation, Inc . All rights reserved. Printed in the U.S.A.
 Loading...