

Allen-Bradley 747-L532, 1747-L524, 1747-L541, 1747-L542, 1747-L543 Installation And Operation Manual
...Page 1

MANUFACTURER DATA SHEET
PLC-CPU
Manufacturer:
Allen-Bradley/Rockwell
Model Number:
SLC500
See www.geomartin.com for additional PDF datasheets
Martin Part Numbe r:
E-014624-00
VendorPartNumber:
1747-L524
PDF File: Doc_000074_Cover.pdf
Page 2

This page is intentio n allyleft blank
Page 3

Allen-Bradley
SLC 500t Modular
Hardware Style
Installation
(Cat. Nos. 1747-L511, 1747-L514,
1747-L524, 1747-L531, 1747-L532,
1747-L541, 1747-L542, 1747-L543,
1747-L551, 1747-L552, and
1747-L553)
and
Operation
Manual
Page 4

Important User
Information
Because of the variety of uses for the products described in this
publication, those responsible for the application and use of this
control equipment must satisfy themselves that all necessary steps
have been taken to assure that each application and use meets all
performance and safety requirements, including any applicable laws,
regulations, codes and standards.
The illustrations, charts, sample programs and layout examples
shown in this guide are intended solely for purposes of example.
Since there are many variables and requirements associated with any
particular installation, Allen-Bradley does not assume responsibility
or liability (to include intellectual property liability) for actual use
based upon the examples shown in this publication.
Allen-Bradley publication SGI-1.1, Safety Guidelines for the
Application, Installation, and Maintenance of Solid-State Control
(available from your local Allen-Bradley office), describes some
important differences between solid-state equipment and
electromechanical devices that should be taken into consideration
when applying products such as those described in this publication.
Reproduction of the contents of this copyrighted publication, in
whole or in part, without written permission of Allen-Bradley
Company, Inc., is prohibited.
Throughout this manual we use notes to make you aware of safety
considerations:
ATTENTION: Identifies information about practices
or circumstances that can lead to personal injury or
!
death, property damage or economic loss.
Attention statements help you to:
• identify a hazard
• avoid the hazard
• recognize the consequences
Important: Identifies information that is critical for successful
application and understanding of the product.
PLC, PLC–2, PLC–3, and PLC–5 are registered trademarks of Rockwell Automation. SLC, SLC 500, SLC 5/01, SLC 5/02, SLC 5/03, SLC 5/04, SLC
5/05, PanelView, PanelView 550, PanelView 900, RediPANEL, ControlView, PBASE, DH+, DTAM, DeviceNet, and Dataliner are trademarks of
Rockwell Automation. RSLogix 500 and RSLinx are trademarks of Rockwell Software, Inc. Ethernet is a registered trademark of Digital Equipment
Corporation, Intel, and Xerox Corporation. IBM is a registered trademark of International Business Machines, Incorporated. Multimodem is a
trademark of Multi–Tech Systems, Inc. Procomm is a registered trademark of Datastorm Technologies, Inc. Tandy is a trademark of the Tandy
Corporation. Gateway 2000 is a trademark of Gateway 2000, Inc. Toshiba is a trademark of Toshiba America, Inc. Compaq is a registered trademark
of Compaq Computer Corporation. Deskpro is a trademark of Compaq Computer Corporation. Intel is a trademark of Intel Corporation.
Page 5
6–8
Installing Your Hardware Components
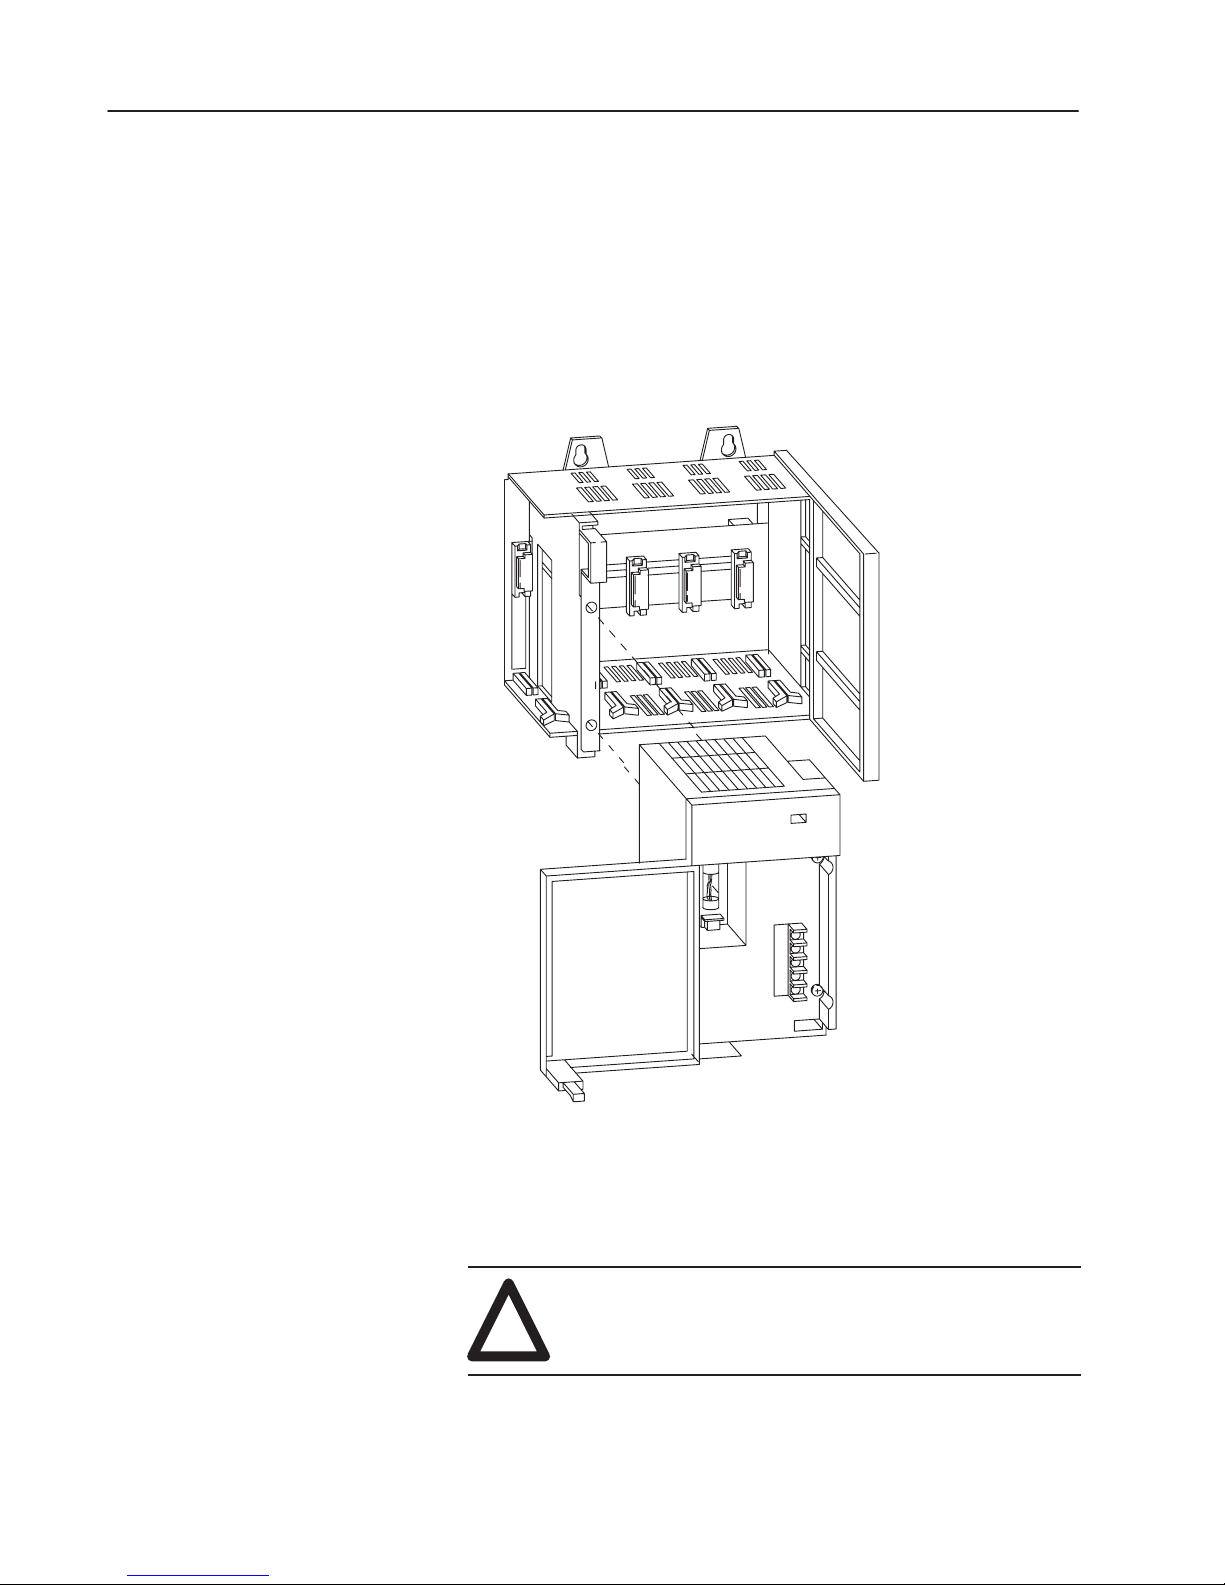
Installing Your Power
Supply
If you have multiple chassis configurations, install the chassis
interconnect cable before installing the power supply.
(See page 6–10.) Also, the power supply terminals accept two #14
AWG wires and are marked as shown in the figure on page 6–8. To
install the power supply, do the following:
1. Align the circuit board with the card guide on the left side of the
chassis. Slide the power supply in until flush with the chassis.
Publication
1747-6.2
19524
2. Fasten the power supply to the chassis with the two Phillips head
screws.
3. Place the jumper to match the input voltage. (This does not apply
to 1746-P3 or 1746-P5, which do not have a jumper.)
ATTENTION: Make jumper selection before
applying power. Hazardous voltage is present on
!
exposed pins when power is applied.
Page 6
Installing Your Hardware Components
6–9
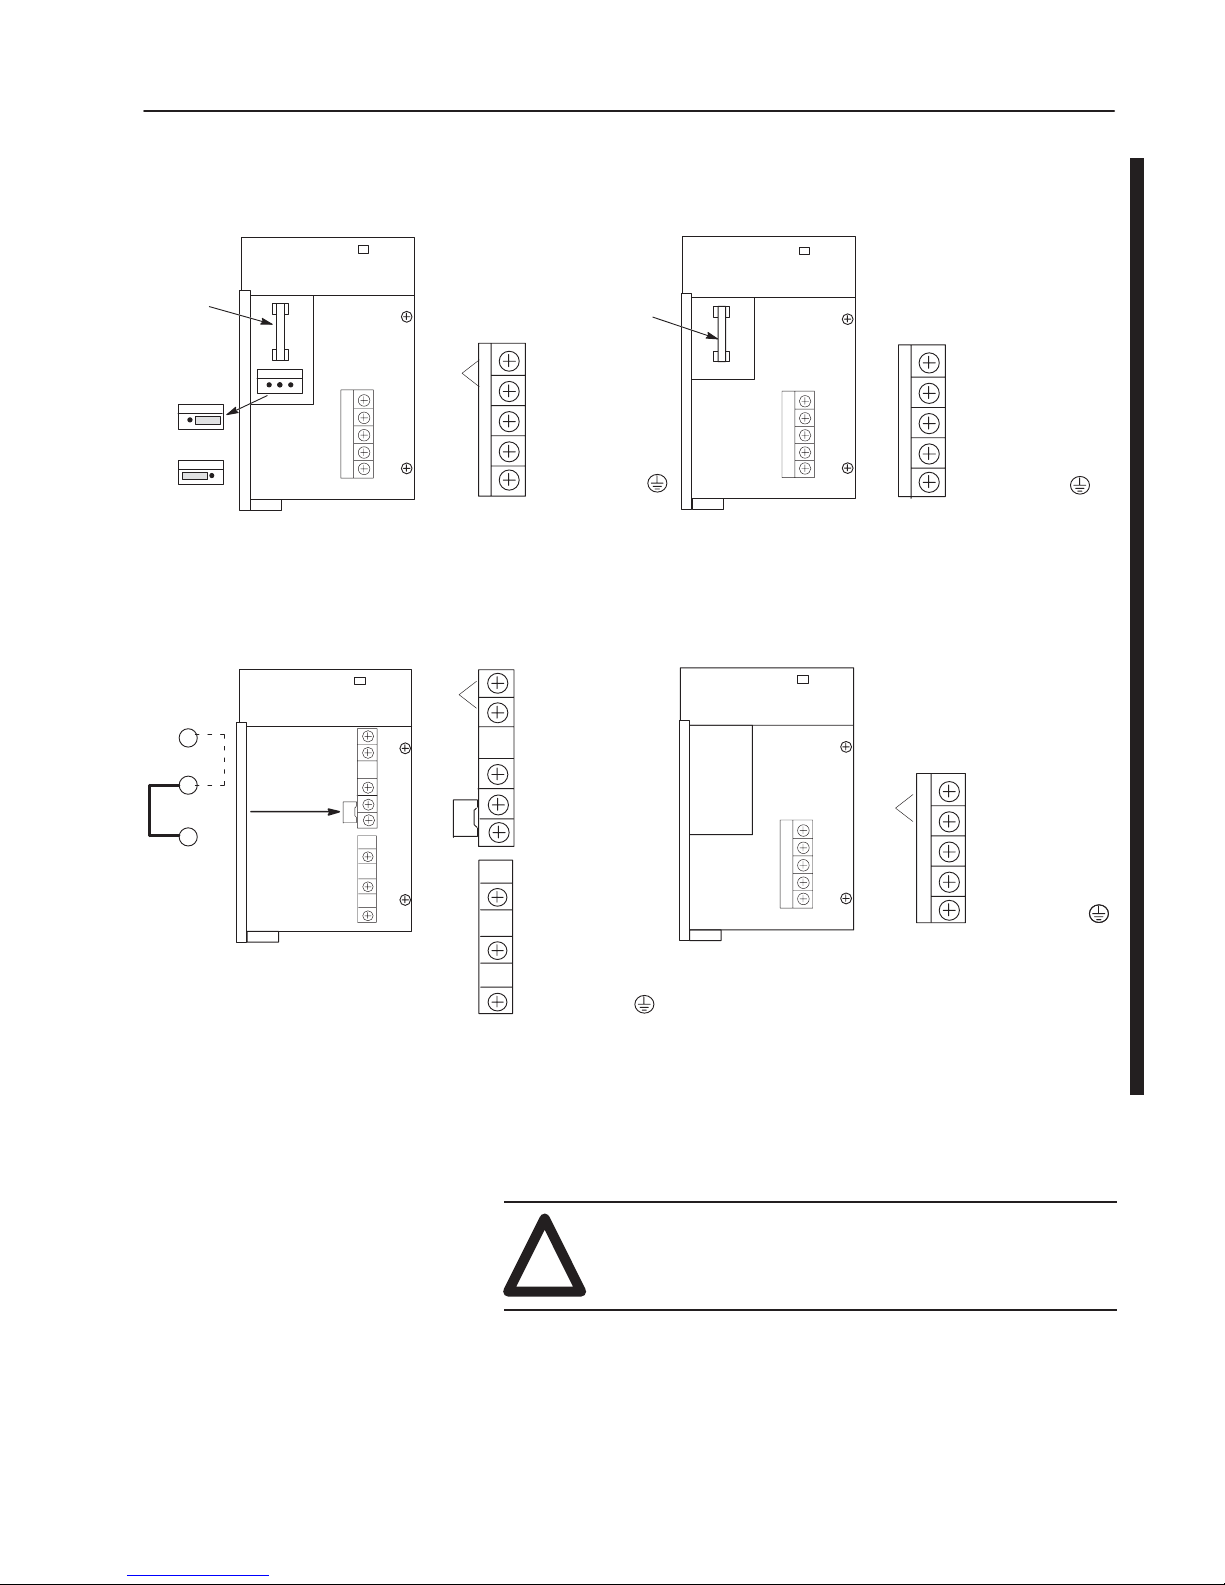
Fuse
Jumper
Selection
100/120 Volts
200/240 V
Jumper
Selection
85–132V ac
170–265V ac
olts
1746-P1 and -P2
POWER
POWER
User
Power
User
Power
PWR OUT +24V dc
PWR OUT COM
120/240V ac
V ac NEUT
CHASSIS GROUND
PWR OUT +24V dc
PWR OUT COMMON
85–132V ac
JUMPER
170–265V ac
L185–132/170–265
Fuse
1746-P3
POWER
POWER
User
Power
NOT USED
NOT USED
+ 24V dc
dc NEUT
CHASSIS GROUND
PWR OUT +24V dc
PWR OUT COM
+125V dc
dc NEUT
CHASSIS GROUNDCHASSIS GROUND
L2
NEUTRAL
1746-P4 1746-P5
CHASSIS GROUND
4. Remove the warning label from the top of the power supply.
5. Connect line power to the power supply.
ATTENTION: If you have a 1746-P3, see page 3–5
for special grounding considerations.
!
On the 1746-P1 and -P2 power supply, use the PWR OUT + 24 VDC
and PWR OUT COM terminals to power sensors. The terminals
provide an isolated, nonfused, 200 mA, 24V dc power supply.
Publication
1747-6.2
Page 7
6–10
Installing Your Hardware Components
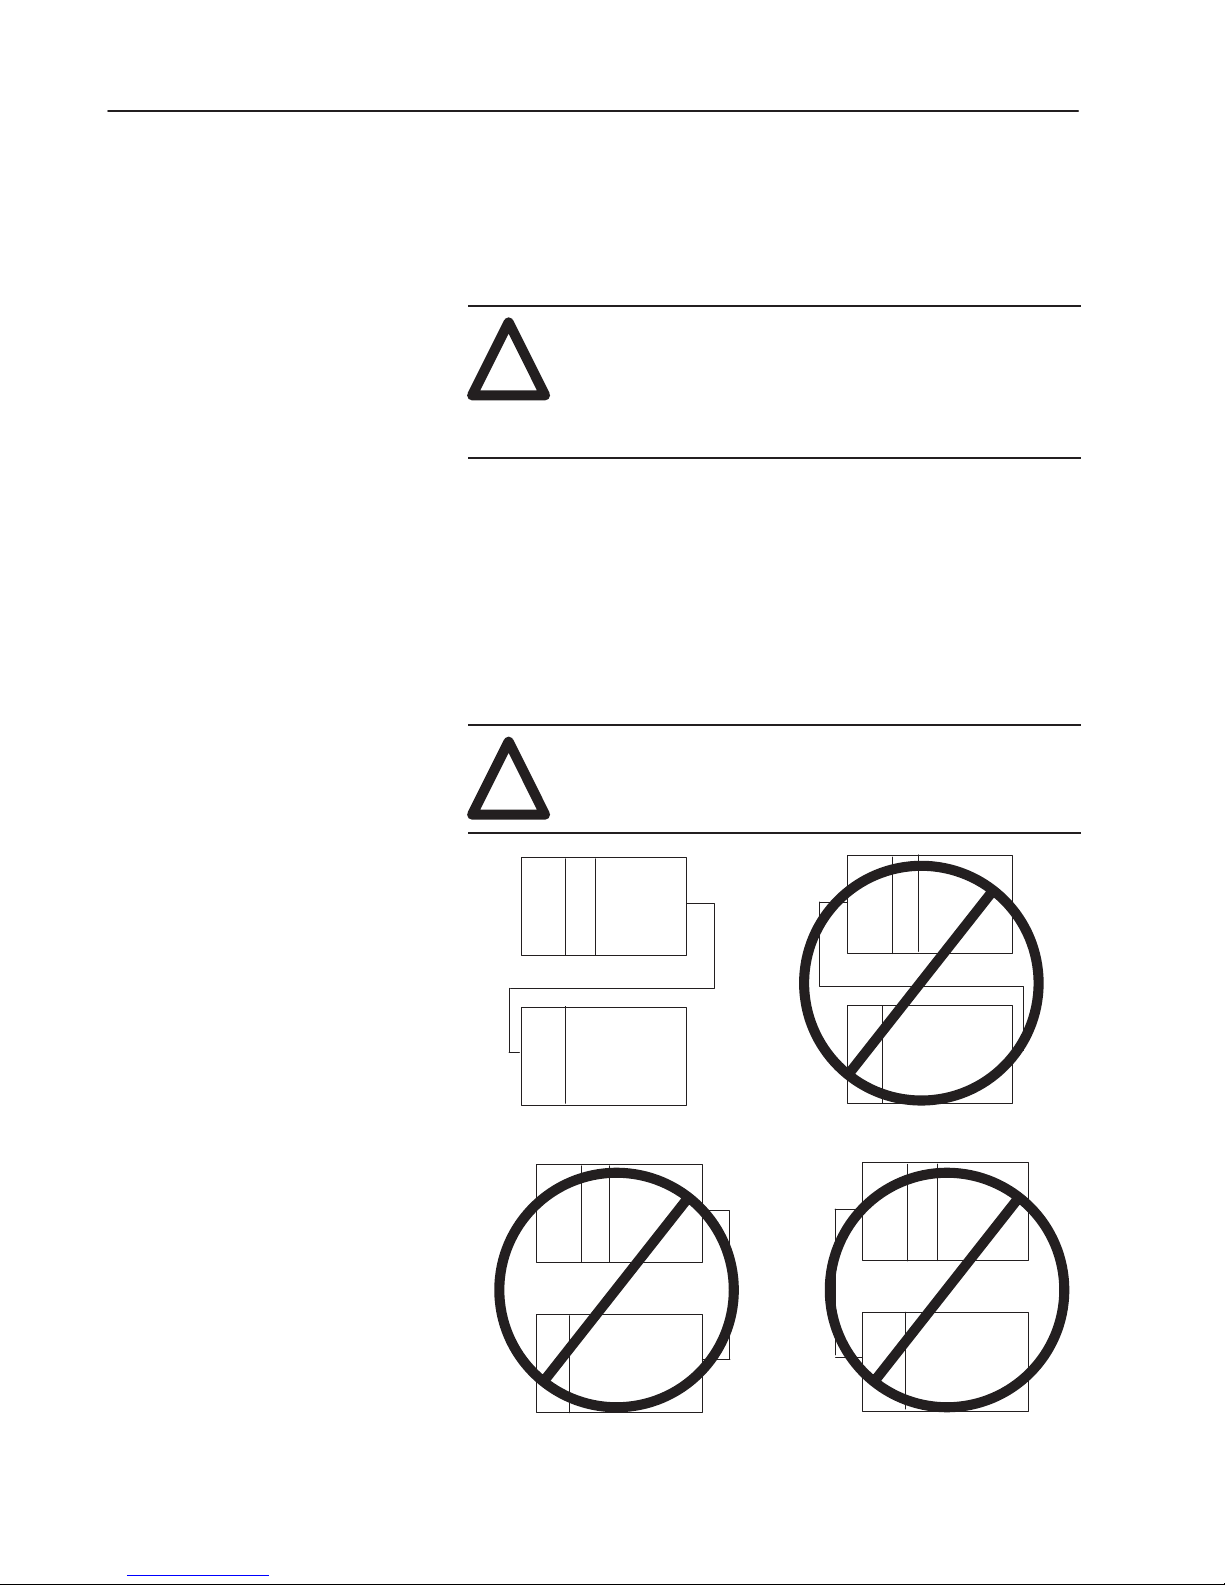
Installing Your Chassis
Interconnect Cable
Two cables are available to link modular hardware chassis. Catalog
Number 1746-C7 cable is 152.4 mm (6 in.) in length and used when
connecting chassis side-by-side. Catalog Number 1746-C9 is
914.4 mm (36 in.) in length and used to link one chassis below the
other.
ATTENTION: Do not use any other cables than those
provided. Longer cables could affect the integrity of
!
data communications between the chassis, possibly
causing unsafe operation. Also, make sure the cable is
properly secured to protect against the effects of shock
and vibration.
Install the chassis interconnect cable before installing the power
supply in multiple chassis configurations.
The cables are “keyed” for proper installation. The end of the cable
that plugs into the right socket in the chassis has the “key” on the top
of the connector. The opposite end of the cable has the “key” on the
inside of the connector for insertion into the expansion chassis.
To remove the cable, move the tabs on the socket outward and the
connector pops out.
ATTENTION: The expansion cable must always exit
the right end of the chassis with the processor. Refer to
!
the following figures.
C
P
P
S
U
Chassis 1
P
S
Chassis 2
CORRECT INSTALLATION
C
P
P
S
U
Chassis 1
P
S
Chassis 2
INCORRECT INSTALLATION
C
P
P
S
U
Chassis 1
P
S
Chassis 2
INCORRECT INSTALLATION
C
P
P
S
U
Chassis 1
P
S
Chassis 2
INCORRECT INSTALLATION
Publication
1747-6.2
Page 8

Chapter 7
Wiring Your I/O Modules
This chapter describes how to wire your I/O modules. It covers the
following:
• defining sinking and sourcing
• preparing your wiring layout
• features of an I/O module
• recommendations for wiring I/O devices
• wiring your I/O modules
• octal label kit installation
• using removable terminal blocks
Defining Sinking and
Sourcing
Sinking and sourcing are terms used to describe a current signal flow
relationship between field input and output devices in a control
system and their power supply.
• Field devices connected to the positive side (+V) of the field
power supply are sourcing field devices.
• Field devices connected to the negative side (DC Common) of the
field power supply are called sinking field devices.
To maintain electrical compatibility between field devices and the
programmable controller system, this definition is extended to the
input/output circuits on the discrete I/O modules.
• Sourcing I/O circuits supply (source) current to sinking field
devices.
• Sinking I/O circuits receive (sink) current from sourcing field
devices.
Europe: DC sinking input and sourcing output module circuits are
the commonly used options.
Publication
1747-6.2
Page 9

Chapter 10
Troubleshooting
In this chapter, you will learn about:
• calling Allen-Bradley for assistance
• tips for troubleshooting your control system
• troubleshooting the SLC 5/01 and SLC 5/02 processors
• troubleshooting the SLC 5/03, SLC 5/04, and SLC 5/05
processors
• troubleshooting your input modules
• troubleshooting your output modules
Calling Allen-Bradley for
Assistance
If you need to contact Allen-Bradley or local distributor for
assistance, it is helpful to obtain the following (prior to calling):
• processor type, series letter, operating system (OS) number
(obtained from the status file), firmware (FRN) number (see label
on side of processor module)
• processor LED status
• processor error codes (found in S:6 of status file)
• hardware types in system (I/O modules, chassis)
• revision of programming device (on the main menu of the
Hand-Held Terminal or programming software)
Publication
1747-6.2
Page 10

10–2
Troubleshooting
Tips for Troubleshooting
Your Control System
When troubleshooting, pay careful attention to these general
warnings:
ATTENTION: Have all personnel remain clear of the
controller and equipment when power is applied. The
!
If installation and start-up procedures detailed in chapters 6, 7, and 8
were followed closely, your SLC controller will give you reliable
service. If a problem should occur, the first step in the
troubleshooting procedure is to identify the problem and its source.
problem may be intermittent and sudden unexpected
machine motion could result in injury. Have someone
ready to operate an emergency-stop switch in case it
becomes necessary to shut off power to the controller
equipment. Also, see NFPA 70E Part II for additional
guidelines for safety related work practices.
Never reach into a machine to actuate a switch since
unexpected machine motion can occur and cause
injury.
Remove all electrical power at the main power
disconnect switches before checking electrical
connections or inputs/outputs causing machine motion.
The SLC 500 controller has been designed to simplify
troubleshooting procedures. By observing the diagnostic indicators
on the front of the power supply, processor unit and I/O modules, the
majority of faults can be located and corrected. These indicators,
along with error codes identified in the programming device user
manual and programmer’s monitor, help trace the source of the fault
to the user’s input/output devices, wiring, or the controller.
Removing Power
Before working on a SLC 500 modular system, always remove the
power supply input power at the main power disconnect switch.
The power LED on the power supply indicates that DC power is
being supplied to the chassis. The LED could be off when incoming
power is present.
Publication
1747-6.2
Page 11

Troubleshooting
10–3
Replacing Fuses
When replacing a fuse, be sure to remove all power from the system.
Program Alteration
There are several causes of alteration to the user program, including
extreme environmental conditions, Electromagnetic Interference
(EMI), improper grounding, improper wiring connections, and
unauthorized tampering. If you suspect the memory has been
altered, check the program against a previously saved program on an
EEPROM, UVPROM or Flash EPROM module.
Troubleshooting the SLC
5/01 and SLC 5/02
Processors
To receive the maximum benefit of this troubleshooting section, we
recommend you follow these steps:
1. Identify the status of your processor LEDs. See chapter 5 for a
description of LEDs and their different states.
2. Using the tables on the following pages, match your processor
and power supply LEDs with the status LEDs located in the first
column.
3. Once the status LEDs are matched to the appropriate table,
simply move across the table identifying error description and
probable causes.
4. Follow the recommended action steps for each probable cause
until the error is corrected.
5. If recommended actions do not correct the error, contact your
local Allen-Bradley sales office or distributor.
Publication
1747-6.2
Page 12

10–4
Troubleshooting
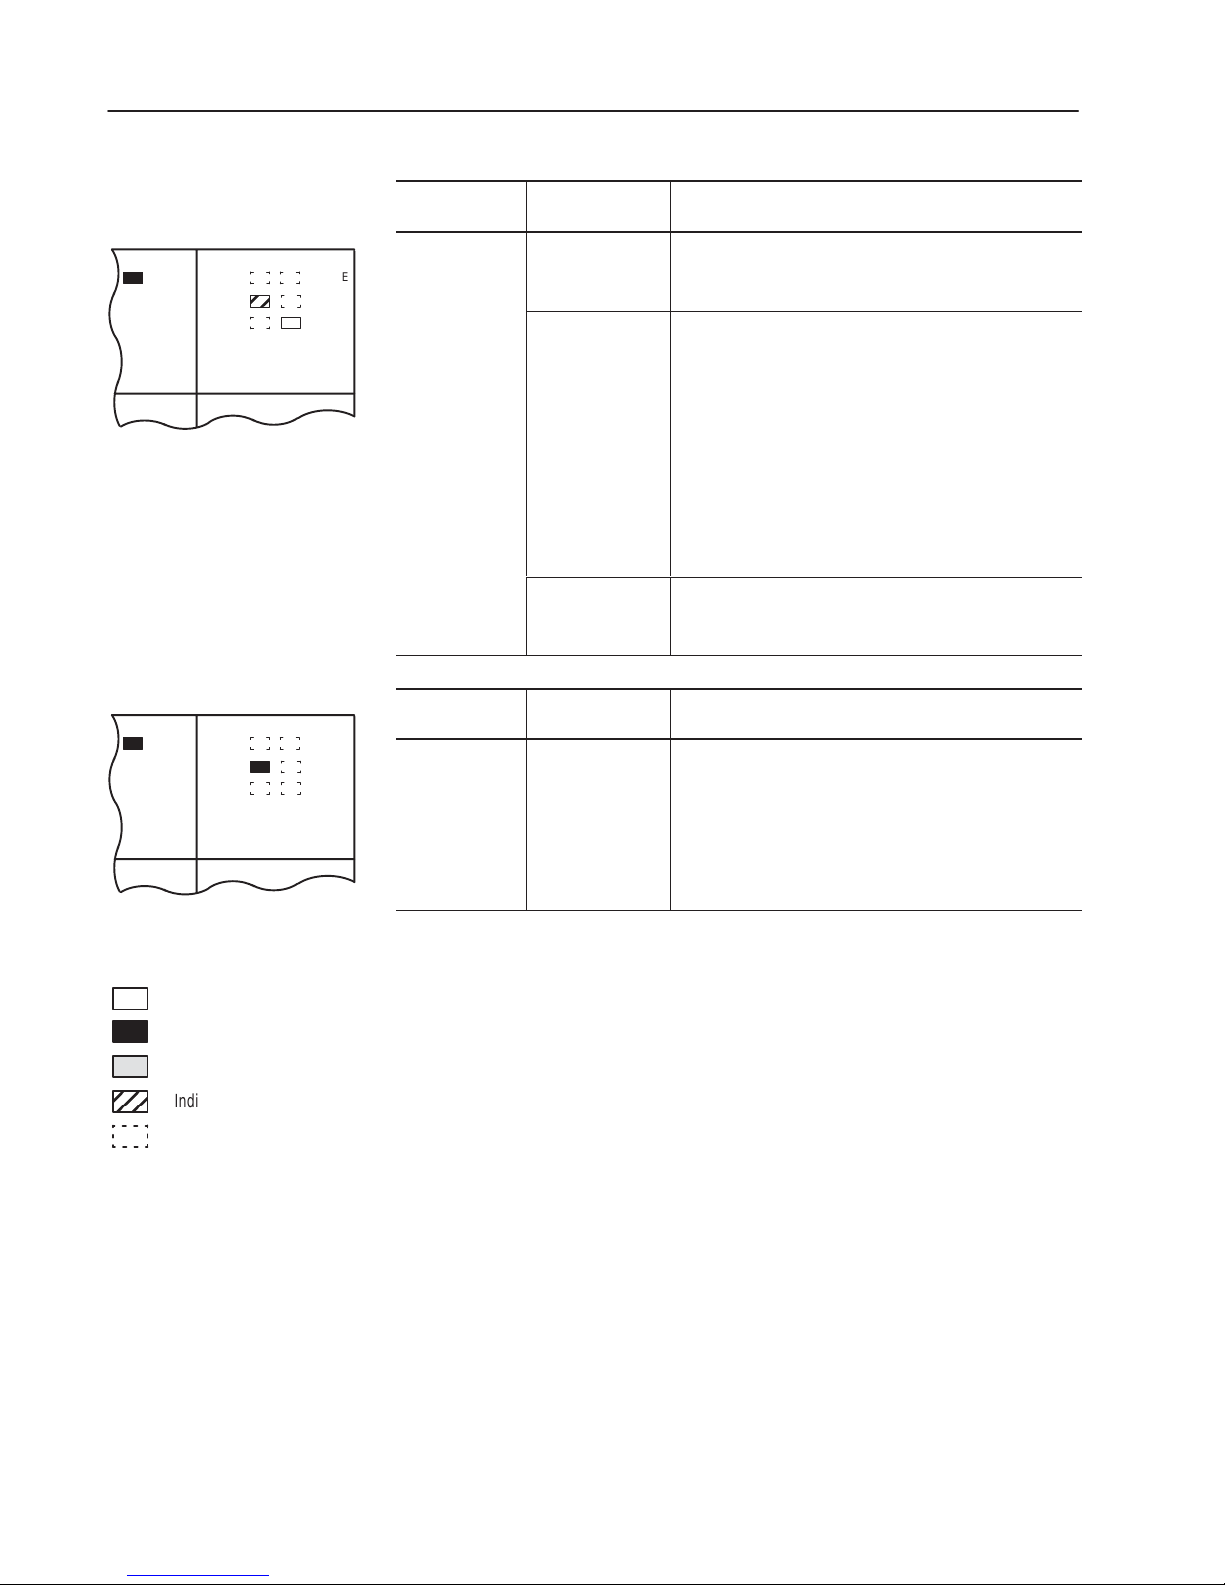
Identifying SLC 5/01 and SLC 5/02 Processor Errors
The following LEDs and tables provide you with information
regarding error messages, possible cause(s) for the error, and
recommended action to take to resolve the error.
If the LEDs indicate:
POWER
RUN
CPU FAULT
FORCED I/O
BATTERY LOW
➀
COMM
The Following
Error Exists
Inadequate
System Power
Probable Cause Recommended Action
1. Verify proper line voltage and connections on the
No Line Power
power terminals.
2. Verify proper 120/240V power supply jumper
selection. See page 6–8.
1. Check the incoming power fuse, check for proper
Power Supply
Fuse Blown
incoming power connections. Replace fuse.
2. If fuse blows again, replace the power supply. See
page 9–8 on fuse replacement.
1. Remove line power to power supply. Remove
several output modules from the chassis. Wait five
minutes. Reapply power.
Power Supply
Overloaded
2. If condition reoccurs, re-calculate module
configuration power required and verify proper power
supply selection. See page 2–11.
This problem can occur intermittently if power supply is
slightly overloaded when output loading and
temperature varies.
1. Recheck other probable causes.
Defective Power
Supply
2. Monitor the line power to chassis power supply for
possible transient or shorting.
3. Replace the power supply.
If the LEDs indicate:
POWER
RUN
CPU FAULT
FORCED I/O
BATTERY LOW
➀
COMM
Inadequate
System Power
Refer to the following key to determine the status of
the LED indicators:
Indicates the LED is OFF.
Indicates the LED is ON.
Indicates the LED is FLASHING.
Status of LED does not matter.
➀
The RUN LED on the SLC 5/01 processor is actually
labeled “PC RUN.” Also, the SLC 5/01 processor does
not have a COMM LED.
Publication
1747-6.2
The Following
Error Exists
Probable Cause Recommended Action
Improper Line
Power Voltage
Selection
Verify proper 120/240V power supply jumper selection.
See page 6–8.
Page 13

Troubleshooting
10–5
If the LEDs indicate:
POWER
RUN
CPU FAULT
FORCED I/O
BATTERY LOW
➀
COMM
The Following
Error Exists
Processor Not in
Run Mode
Probable Cause Recommended Action
1. Verify selected processor mode.
Either Improper
Mode Selected or
User Program
Logic Error
2. If in program/test modes attempt Run mode entry.
3. If in suspend mode, check user program logic for
suspend instructions.
Refer to either the Hand-Held Terminal User Manual
(Catalog Number 1747-NP002) or your programming
software user manual.
1. Check proper 120/240V power supply jumper
Line Power Out of
Operating Range
selection and incoming power connections.
2. Monitor for proper line voltage at the incoming
power connections.
See page 6–8 for power supply installation.
1. Remove power and inspect the power supply
Improper Seating
of Power Supply,
and/or Processor
in the Chassis
chassis connections and the processor chassis
connections.
2. Re-install the devices and re-apply power.
Important: The processor only operates in slot 0 of
chassis #1.
1. Attempt Run mode selection of Processor in
existing chassis.
2. Place processor in another chassis not in the
Defective
Processor, Power
Supply or Chassis
existing system. Apply power, reconfigure and attempt
Run mode selection. If unsuccessful, replace
processor.
3. Try existing power supply in test chassis. If
unsuccessful, replace power supply. If entry into the
Run mode is allowed, replace the existing chassis.
Refer to the following key to determine the status of
the LED indicators:
Indicates the LED is OFF.
Indicates the LED is ON.
Indicates the LED is FLASHING.
Status of LED does not matter.
➀
The RUN LED on the SLC 5/01 processor is
actually labeled “PC RUN.” Also, the
SLC 5/01 processor does not have a COMM
LED.
Publication
1747-6.2
Page 14

10–6
ault
ault
Troubleshooting
If the LEDs indicate:
POWER
RUN
CPU FAULT
FORCED I/O
BATTERY LOW
If the LEDs indicate:
POWER
RUN
CPU FAULT
FORCED I/O
BATTERY LOW
➀
➀
COMM
COMM
The Following
Error Exists
System
Inoperable,
No Major CPU
F
sDetected
The Following
Error Exists
Probable Cause Recommended Action
1. Monitor logic in Run mode and verify desired I/O
status.
User Program
Logic Error
2. Check for minor CPU faults.
Refer to either the Hand-Held Terminal User Manual
(Catalog Number 1747-NP002) or your programming
software user manual
Defective I/O
Devices or I/O
Wiring
Test inputs and outputs according to I/O troubleshooting
procedures starting on page 10–26.
Probable Cause Recommended Action
CPU Memory
Error
Cycle power.
1. Remove power and then remove the memory module
from the processor.
2. Re-install the processor and re-apply power to the
Faulty Memory
Module
power supply
If steady CPU FAULT LED changes to flashing, replace the
existing memory module with a replacement module.
Refer to the following key to determine the status of
the LED indicators:
Indicates the LED is OFF.
Indicates the LED is ON.
Indicates the LED is FLASHING.
Status of LED does not matter.
➀
The RUN LED on the SLC 5/01 processor is
actually labeled “PC RUN.” Also, the
SLC 5/01 processor does not have a COMM
LED.
CPUF
Faulty CPU/Power
Supply
Processor
Firmware Installed
Incorrectly
Refer to chapter 6 for removing and installing memory
modules.
1. Place the processor in another chassis not in the
existing system and cycle power.
If steady CPU FAULT LED reappears, replace the
processor.
2. If CPU FAULT LED clears, monitor the line power
going to the power supply in existing system.
3. Replace existing system power supply if line power
checks OK.
If upgrading the processor to a different firmware level,
verify firmware chip orientation matches the upgrade kit
directions.
Publication
1747-6.2
Page 15

Troubleshooting
10–7
If the LEDs indicate:
POWER
RUN
CPU FAULT
FORCED I/O
BATTERY LOW
If the LEDs indicate:
POWER
RUN
CPU FAULT
FORCED I/O
BATTERY LOW
➀
➀
COMM
COMM
The Following
Error Exists
CPU Major
Fault
The Following
Error Exists
System does
not operate per
ladder logic.
Probable Cause Recommended Action
Initial CPU Factory
Power-up
Condition
1. Refer to chapter 8 and follow the start-up procedures.
2. Clear processor memory to get rid of the flashing CPU
FAULT LED.
1. Monitor Status File Word S:6 for major error code.
Hardware/Software
Major Fault
Detected
2. Refer to either the Hand-Held Terminal User Manual
(Catalog Number 1747-NP002) or the Instruction Set
Reference Manual for error codes and additional
troubleshooting information.
Erratic repetitive
power cycling can
cause a processor
major hardware
fault.
3. Remove hardware/software condition causing fault.
4. Clear Status File S:1/13 major error bits, if set.
5. Clear Status File S:5 minor error bits, if set.
6. Clear Status File S:6 major error code (optional).
7. Attempt a processor Run mode entry.
If unsuccessful, repeat recommended action steps above.
Probable Cause Recommended Action
1. Monitor program file online and identify forced I/O.
User Forced I/O
Disabling
Operation
2. Disable appropriate forces and test system conditions
again.
Refer to either the Hand-Held Terminal User Manual
(Catalog Number 1747-NP002) or your programming
software user manual.
Refer to the following key to determine the status of
the LED indicators:
Indicates the LED is OFF.
Indicates the LED is ON.
Indicates the LED is FLASHING.
Status of LED does not matter.
➀
The RUN LED on the SLC 5/01 processor is
actually labeled “PC RUN.” Also, the
SLC 5/01 processor does not have a COMM
LED.
Publication
1747-6.2
Page 16

10–8
Troubleshooting
If the LEDs indicate:
POWER
RUN
CPU FAULT
FORCED I/O
BATTERY LOW
If the LEDs indicate:
POWER
RUN
CPU FAULT
FORCED I/O
BATTERY LOW
➀
➀
COMM
COMM
The Following
Error Exists
System does
not operate per
programmed
forces.
The Following
Error Exists
CPU Major
Error with Low
or No Battery
Back-up
Probable Cause Recommended Action
1. Monitor program file online and identify programmed
forces.
User Programmed
Forces are Not
Enabled
2. Enable appropriate forces and test system conditions
again. Once forces are enabled, the FORCED I/O LED
goes on steady.
Refer to either the Hand-Held Terminal User Manual
(Catalog Number 1747-NP002) or your programming
software user manual.
Probable Cause Recommended Action
1. Verify battery is connected. See pages 6–1 and 9–4.
2. Replace the battery if you want RAM battery backup.
See page 9–4. If you want to back up RAM with the
Loss of RAM
during Power
Down Period
capacitor in a SLC 5/01 (1747-L511), add or replace the
BATTERY LOW LED jumper.
3. Refer to processor major fault recommended action
steps.
Refer to either the Hand-Held Terminal User Manual
(Catalog Number 1747-NP002) or your programming
software user manual.
Refer to the following key to determine the status of
the LED indicators:
Indicates the LED is OFF.
Indicates the LED is ON.
Indicates the LED is FLASHING.
Status of LED does not matter.
➀
The RUN LED on the SLC 5/01 processor is
actually labeled “PC RUN.” Also, the
SLC 5/01 processor does not have a COMM
LED.
Publication
1747-6.2
Page 17

Troubleshooting
ceivingdata.
ata.
Identifying SLC 5/02 Processor Communication Errors
10–9
If the LEDs indicate:
➀
The Following
Error Exists
POWER
RUN
CPU FAULT
FORCED I/O
BATTERY LOW
COMM
The SLC 5/02
processor is not
receivingd
re
No
communication
to the
programmer.
Refer to the following key to determine the status of
the LED indicators:
Indicates the LED is OFF.
Indicates the LED is ON.
Probable Cause Recommended Action
1. Check communication parameters of programmer.
Programmer and processor baud rate must match.
DH-485
communication
parameters are
improperly set up.
Programmer and processor node addresses must be
different.
2. Try different combinations of:
a. baud rate (Processor default is 19200.)
b. node address (Processor default is 1.)
3. Try to increase the maximum node address. (Default
is 31.)
1. Check cable continuity.
Bad Connection of
Communication
Device
2. Check cable connections between programmer and
processor.
3. Check communication device (for example, the
1747-PIC). Replace if necessary.
1. Verify proper power supply selection and backplane
Low or No Power
to Communication
Device
loading. (1747-PIC and 1747-AIC draw power off the
backplane.)
2. Verify proper 120/240V power supply jumper selection.
See page 6–8.
Indicates the LED is FLASHING.
Indicates the LED is FLASHING or OFF.
Status of LED does not matter.
➀
The RUN LED on the SLC 5/01 processor is
actually labeled “PC RUN.” Also, the
SLC 5/01 processor does not have a COMM
LED.
Publication
1747-6.2
Page 18

10–10
Troubleshooting
If the LEDs indicate:
➀
The Following
Error Exists
POWER
RUN
CPU FAULT
FORCED I/O
BATTERY LOW
COMM
The SLC 5/02
processor is
receiving data,
but is not
communicating
with the
programmer.
If the LEDs indicate:
➀
The Following
Error Exists
POWER
RUN
CPU FAULT
FORCED I/O
BATTERY LOW
COMM
A fatal error has
occurred.
Refer to the following key to determine the status of
the LED indicators:
Indicates the LED is OFF.
Indicates the LED is ON.
Probable Cause Recommended Action
1. Check communication parameters of programmer.
Programmer and processor baud rate must match.
DH-485
communication
parameters are
improperly set up.
Programmer and processor node addresses must be
different.
2. Try different combinations of:
a. baud rate (Processor default is 19200.)
b. node address (Processor default is 1.)
3. Try to increase the maximum node address. (Default
is 31.)
Probable Cause Recommended Action
1. Cycle power to obtain flashing CPU FAULT LED and
default program.
Excessive noise or
a faulty SLC 5/02
processor.
2. Examine the error code following the power cycle.
Take appropriate action.
3. Reload your program.
4. Contact your local Allen-Bradley representative if the
error persists.
Indicates the LED is FLASHING.
Indicates the LED is FLASHING or OFF.
Status of LED does not matter.
➀
The RUN LED on the SLC 5/01 processor is
actually labeled “PC RUN.” Also, the
SLC 5/01 processor does not have a COMM
LED.
Publication
1747-6.2
Page 19

10–1
1Troubleshooting
Troubleshooting the
SLC 5/03, SLC 5/04, and
SLC 5/05 Processors
Between the time you apply power to an SLC 5/03, SLC 5/04, or
SLC 5/05 processor and the communications are established via a
connected programming device, the only form of communication
between you and the processor is through the LED display.
When power is applied, all of the LEDs flash on and then off while
the processor conducts hardware tests. This is part of the normal
powerup sequence. Following the selftest by the processor, all the
LEDs again flash on momentarily. If a user program is in a running
state, the RUN LED will be on. If a fault exists within the processor,
the FLT LED is on.
To receive the maximum benefit of this troubleshooting section, we
recommend you follow these steps:
1. Identify the status of your processor LEDs. See chapter 5 for
description of LEDs and their different states.
2. Using the tables on the following pages, match your processor
and power supply LEDs with the status LEDs located in the first
column.
3. Once the status LEDs are matched to the appropriate table,
simply move across the table identifying error description and
probable causes.
4. Then follow the recommended action steps for each probable
cause until the cause is identified.
5. If recommended actions do not identify the trouble cause, contact
your local Allen-Bradley sales office or distributor.
Clearing SLC 5/03, SLC 5/04, and SLC 5/05 Processor Faults
Using the Keyswitch
Toggle the keyswitch from RUN to PROG and then back to RUN;
this clears the fault. If the keyswitch is left in the RUN position, the
processor mode cannot be changed from a programmer/operator
interface device. If you return the keyswitch to the REM position,
you can then use a programmer/operator interface device to change
the processor mode.
ATTENTION: If you clear a processor fault using the
keyswitch, the processor immediately enters the Run
!
mode.
Publication
1747-6.2
Page 20

10–12
Troubleshooting
Identifying SLC 5/03, SLC 5/04, and SLC 5/05 Processor Errors
The following LEDs and tables provide you with information
regarding error messages, possible cause(s) for the error, and
recommended action to take to resolve the error.
If the LEDs indicate:
POWER
RUN
FLT
BATT
➀
FORCE
DH485
RS232
The Following
Error Exists
Inadequate
System Power
Probable Cause Recommended Action
1. Verify proper line voltage and connections on the
No Line Power
power terminals.
2. Verify proper 120/240V power supply jumper
selection. See page 6–8.
1. Check the incoming power fuse, check for proper
Power Supply
Fuse Blown
incoming power connections. Replace fuse.
2. If fuse blows again, replace the power supply. See
page 9–8 on fuse replacement.
1. Remove line power to power supply. Remove
several output modules from the chassis. Wait five
minutes. Reapply power.
Power Supply
Overloaded
2. If condition reoccurs, re-calculate module
configuration power required and verify proper power
supply selection. See page 2–11.
This problem can occur intermittently if power supply is
overloaded when output loading and temperature
varies.
1. Recheck other probable causes.
Defective Power
Supply
2. Monitor the line power to chassis power supply for
possible transient or shorting.
3. Replace the power supply.
If the LEDs indicate:
POWER
RUN
FLT
BATT
➀
FORCE
DH485
RS232
Inadequate
System Power
Refer to the following key to determine the status of
the LED indicators:
Indicates the LED is OFF.
Indicates the LED is ON.
Indicates the LED is FLASHING.
Status of LED does not matter.
➀
The DH485 LED on the SLC 5/03 processor is labeled DH+ on
the SLC 5/04 processor, and ENET on the SLC 5/05 processor.
Publication
1747-6.2
The Following
Error Exists
Probable Cause Recommended Action
Improper Line
Power Voltage
Selection
Verify proper 120/240V power supply jumper selection.
See page 6–8.
Page 21

Troubleshooting
10–13
If the LEDs indicate:
POWER
RUN
FLT
BATT
➀
FORCE
DH485
RS232
The Following
Error Exists
Processor Not in
Run Mode
Probable Cause Recommended Action
1. Verify selected processor mode.
2. If the processor is in the Program/Test modes,
attempt Run mode entry:
Either Improper
Mode Selected or
User Program
Logic
• If keyswitch is in the REM position and
there is no key, use the programmer.
• If keyswitch is in REM or PROG position,
and you have the key,
toggle to the RUN
position.
3. If in the suspend mode, check user program logic
for suspend instructions.
Refer to your programming software user manual.
1. Check proper 120/240V power supply jumper
Line Power Out of
Operating Range
selection and incoming power connections.
2. Monitor for proper line voltage at the incoming
power connections.
See page 6–8 for power supply installation.
1. Remove power and inspect the power supply
Improper Seating
of Power Supply,
and/or Processor
in the Chassis
chassis connections and the processor chassis
connections.
2. Re-install the devices and re-apply power.
Important: The processor only operates in slot 0 of
chassis #1.
Refer to the following key to determine the status of
the LED indicators:
Indicates the LED is OFF.
Indicates the LED is ON.
Indicates the LED is FLASHING.
Status of LED does not matter.
➀
The DH485 LED on the SLC 5/03 processor is labeled DH+ on
the SLC 5/04 processor, and ENET on the SLC 5/05 processor.
Defective
Processor, Power
Supply, or Chassis
1. Attempt Run mode selection of Processor in
existing chassis:
• If keyswitch is in the REM position and there is
no key, use the programmer.
• If keyswitch is in REM or PROG position, and you
have the key, toggle to the RUN position.
2. Place processor in another chassis not in the
existing system. Apply power, reconfigure and attempt
Run mode selection. If unsuccessful, replace
processor.
3. Try existing power supply in test chassis. If
unsuccessful, replace power supply. If entry into the
Run mode is allowed, replace the existing chassis.
Publication
1747-6.2
Page 22

10–14
NoMajorCPU
ault
Troubleshooting
If the LEDs indicate:
POWER
RUN
FLT
BATT
If the LEDs indicate:
POWER
RUN
FLT
BATT
➀
FORCE
DH485
RS232
➀
FORCE
DH485
RS232
The Following
Error Exists
System
Inoperable,
Faults Detected
The Following
Error Exists
CPU Fault
CPUF
Probable Cause Recommended Action
1. Monitor logic in Run mode and verify desired I/O
User Program
Logic Error
status.
2. Check for minor CPU faults.
Refer to your programming software user manual.
Defective I/O
Devices or I/O
Wiring
Test inputs and outputs according to I/O troubleshooting
procedures starting on page 10–26.
Probable Cause Recommended Action
CPU Memory
Error
Cycle power.
1. Remove power and then remove the memory module
from the processor.
2. Re-install the processor and re-apply power to the
Faulty Memory
Module
power supply.
If steady FLT LED changes to flashing, replace the existing
memory module with a replacement module.
Refer to chapter 6 for removing and installing memory
modules.
1. Place the processor in another chassis not in the
existing system and cycle power. If steady FLT LED
Faulty CPU/Power
Supply
reappears, replace the processor.
2. If FLT LED clears, monitor the line power going to the
power supply in existing system.
3. Replace existing system power supply if line power
checks OK.
Refer to the following key to determine the status of
the LED indicators:
Indicates the LED is OFF.
Indicates the LED is ON.
Indicates the LED is FLASHING.
Status of LED does not matter.
➀
The DH485 LED on the SLC 5/03 processor is labeled DH+ on
the SLC 5/04 processor, and ENET on the SLC 5/05 processor.
Publication
1747-6.2
Processor
Firmware Installed
Incorrectly
If upgrading the processor to a different firmware level,
verify firmware chip orientation matches the upgrade kit
directions.
Page 23

Troubleshooting
10–15
If the LEDs indicate:
POWER
RUN
FLT
BATT
If the LEDs indicate:
POWER
RUN
FLT
BATT
➀
FORCE
DH485
RS232
➀
FORCE
DH485
RS232
The Following
Error Exists
CPU Major
Fault
The Following
Error Exists
System does
not operate per
ladder logic.
Probable Cause Recommended Action
Initial CPU Factory
Power-up
Condition in Effect
1. Refer to chapter 8 and follow the start-up procedures.
2. Clear processor memory to get rid of the flashing FLT
LED.
1. Use programmer to monitor and clear the fault (or if
keyswitch in REM):
a. Monitor Status File Word S:6 for major error code.
Hardware/
Software Major
Fault Detected
b. Refer to your programming software user manual for
error codes and additional troubleshooting information.
c. Remove hardware/software condition causing fault.
d. Clear Status File S:1/13 major error bits, if set.
Erratic repetitive
power cycling can
cause a CPU
major hardware
fault.
e. Clear Status File S:5 minor error bits, if set.
f. Clear Status File S:6 major error code (optional).
g. Attempt a processor Run mode entry.
If unsuccessful, repeat recommended action steps above.
2. Use the keyswitch to clear the fault. Toggle the
keyswitch to PROG and back to RUN. (See page 10–11.)
If FAULT occurs again, use programmer to get error code
and determine the source of problem.
Probable Cause Recommended Action
User Forced I/O
Disabling
Operation
1. Monitor program file online and identify forced I/O.
2. Disable appropriate forces and test system conditions
again.
Refer to your programming software user manual.
Refer to the following key to determine the status of
the LED indicators:
Indicates the LED is OFF.
Indicates the LED is ON.
Indicates the LED is FLASHING.
Status of LED does not matter.
➀
The DH485 LED on the SLC 5/03 processor is labeled DH+ on
the SLC 5/04 processor, and ENET on the SLC 5/05 processor.
Publication
1747-6.2
Page 24

10–16
Troubleshooting
If the LEDs indicate:
➀
The Following
Error Exists
POWER
RUN
FLT
BATT
FORCE
DH485
RS232
System does
not operate per
programmed
forces.
If the LEDs indicate:
➀
The Following
Error Exists
POWER
RUN
FLT
BATT
FORCE
DH485
RS232
CPU Major
Error with Low
or No Battery
Back-up
Refer to the following key to determine the status of
the LED indicators:
Indicates the LED is OFF.
Indicates the LED is ON.
Probable Cause Recommended Action
1. Monitor program file online and identify programmed
User programmed
forces are not
enabled.
forces.
2. Enable appropriate forces and test system conditions
again. Once forces are enabled, the FORCE LED goes on
steady.
Refer to your programming software user manual.
Probable Cause Recommended Action
1. Verify battery is connected. See pages 6–1 and 9–5.
Loss of RAM
during Power
Down Period
2. Replace the battery if you want RAM battery backup.
See page 9–5.
3. Refer to processor major fault recommended action
steps.
Refer to your programming software user manual.
Indicates the LED is FLASHING.
Status of LED does not matter.
➀
The DH485 LED on the SLC 5/03 processor is labeled DH+ on
the SLC 5/04 processor, and ENET on the SLC 5/05 processor.
Publication
1747-6.2
Page 25

Troubleshooting
Identifying SLC 5/03, SLC 5/04, and SLC 5/05 Processor
Communication Errors
10–17
If the LEDs indicate:
➀
The Following
Error Exists
POWER
RUN
FLT
BATT
FORCE
DH485
RS232
Fatal Error and
No
Communication
Refer to the following key to determine the status of
the LED indicators:
Indicates the LED is OFF.
Indicates the LED is ON.
Indicates the LED is FLASHING.
Indicates the LED is FLASHING or OFF.
Status of LED does not matter.
➀
The DH485 LED on the SLC 5/03 processor is labeled DH+ on
the SLC 5/04 processor, and ENET on the SLC 5/05 processor.
Probable Cause Recommended Action
1. Check line power.
Inadequate
System Power
2. Check 120/240V power supply jumper selection. See
page 6–8. Also, see the recommended actions for
inadequate system power on page 10–12.
Communication
channel is “shut
down.”
Check communication channel configuration with your
programming software. Also, see “Returning the SLC 5/03,
SLC 5/04, and SLC 5/05 Processors to ‘Initial Factory
Conditions’” on page 10–25.
Communication
channel is
Replace processor.
damaged.
Publication
1747-6.2
Page 26

10–18
4.)
4.)
Troubleshooting
If the LEDs indicate:
POWER
RUN
FLT
BATT
➀
FORCE
DH485
RS232
The Following
Error Exists
The SLC 5/03
and SLC 5/04
processors are
trying to
establish
communication,
but cannot find
other active
nodes. (The
LED is flashing
green on the
SLC 5/03 and
SLC 5/0
SLC
5/0
Probable Cause Recommended Action
1. Check communication parameters of programmer.
Programmer and processor baud rate must match.
Programmer and processor node addresses must be
different.
DH-485 or DH+
communication
parameters are
improperly set up.
2. Try different combinations of:
a. baud rate (Processor default is 19.2K for DH-485 on
the SLC 5/03, and 57.6K for DH+ on the SLC 5/04.)
b. node address (Processor default is 1.)
3. Try to increase the maximum node address. (Default
is 31 for the SLC 5/03 processor only.)
See your programming software user manual for channel
configuration information.
1. Check cable continuity.
Bad Connection of
Communication
Device
2. Check cable connections between programmer and
processor.
3. Check communication device (for example, the
1747-PIC). Replace if necessary.
1. Verify proper power supply selection and backplane
Low or No Power
to Communication
Device
loading. (The 1747-PIC and 1747-AIC draw power off the
backplane.)
2. Verify proper 120/240V power supply jumper selection.
See page 6–8.
Duplicate drop
is detected.
(The LED is
flashing red on
the SLC 5/04.)
An ENET fault is
being reported
via a code.
(The LED is
flashing red on
the SLC 5/05.)
Refer to the following key to determine the status of
the LED indicators:
Indicates the LED is OFF.
Indicates the LED is ON.
Indicates the LED is FLASHING.
Indicates the LED is FLASHING or OFF.
Status of LED does not matter.
➀
The DH485 LED on the SLC 5/03 processor is labeled DH+ on
the SLC 5/04 processor, and ENET on the SLC 5/05 processor.
Another DH+
device is already
on the DH+
network at the
node address of
this same device.
A hardware or
software fault has
occured.
1. Remove this device from the DH+ network.
2. Cycle power.
3. Reset the node address to an unused node before
reconnecting device to the DH+ network. (Can perform
reset if on-line via channel 0 RS-232 port without
disconnecting from DH+.)
Contact Allen-Bradley Global Technical Services for
assistance.
Publication
1747-6.2
Page 27

Troubleshooting
unication
no
.
no
.
10–19
If the RS232 Channel
is in DH485 Mode
and the LEDs
➀
indicate:
POWER
RUN
FLT
BATT
If the RS232 Channel
is in DH485 Mode
and the LEDs
➀
indicate:
POWER
RUN
FLT
BATT
FORCE
DH485
RS232
FORCE
DH485
RS232
The Following
Error Exists
Fatal Error and
No
Comm
The Following
Error Exists
The SLC 5/03,
SLC 5/04, or
SLC 5/05
processor is
trying to
establish
communication,
but cannot find
other active
des
des
Probable Cause Recommended Action
1. Check line power.
Inadequate
System Power
2. Check 120/240V power supply jumper selection. See
page 6–8. Also, see the recommended action for
Inadequate System Power on page 10–12.
Communication
channel is “shut
down.”
Check communication channel configuration with your
programming software. Also, see “Returning the SLC 5/03,
SLC 5/04, and SLC 5/05 Processors to ‘Initial Factory
Conditions’” on page 10–25.
Communication
channel is
Replace processor.
damaged.
Channel
configured for
DF1.
See your programming software user manual for channel
configuration information.
Probable Cause Recommended Action
1. Check communication parameters of programmer.
Programmer and processor baud rate must match.
Programmer and processor node addresses must be
DH-485
communication
parameters are
improperly set up.
different.
2. Try different combinations of:
a. baud rate (Processor default is 19200.)
b. node address (Processor default is 1.)
3. Try to increase the maximum node address. (Default
is 31.)
See your programming software user manual for channel
configuration information.
1. Check cable continuity.
Bad Connection
2. Check cable connections between programmer and
processor.
1. Verify proper power supply selection and backplane
Low or No Power
to Communication
Device
loading. (The 1747-PIC and 1747-AIC draw power off the
backplane.)
2. Verify proper 120/240V power supply jumper selection.
See page 6–8.
Refer to the following key to determine the status of
the LED indicators:
Indicates the LED is OFF.
Indicates the LED is ON.
Indicates the LED is FLASHING.
Indicates the LED is FLASHING or OFF.
Status of LED does not matter.
➀
The DH485 LED on the SLC 5/03 processor is labeled DH+ on
the SLC 5/04 processor, and ENET on the SLC 5/05 processor.
Publication
1747-6.2
Page 28
10–20
aramet
c.
ckin
Troubleshooting
If the RS232 Channel
is in DH485 Mode
and the LEDs
➀
indicate:
POWER
RUN
FLT
BATT
If the LEDs indicate:
POWER
RUN
FLT
BATT
FORCE
DH485
RS232
➀
FORCE
DH485
RS232
The Following
Error Exists
Probable Cause Recommended Action
Channel is
configured for
DH485 mode.
The SLC 5/03,
SLC 5/04, or RS232/DF1
SLC 5/05
processor is not
p
ers
improperly set up.
transmitting.
Hardware Problem
The Following
Error Exists
Probable Cause Recommended Action
Excessive noise or
A fatal error has
occurred.
a faulty SLC 5/03,
SLC 5/04, or
SLC 5/05
processor.
Check communication parameters of channel
configuration. Also, see your programming software user
manual.
Check communication parameters of programmer and
channel configuration:
a. baud rate
b. DF1 node addresses (Processor default is 1 for DF1
half-duplex, and 9 for DF1 full-duplex.)
error che
g
d. number of data bits
Programmer and processor baud rate must match.
Programmer and processor addresses must be different.
See your programming software user manual.
1. Check cable connections.
2. Check cable pinouts. Also, see appendix B for
RS-232 pinouts.
1. Cycle power to obtain flashing FLT LED and default
program.
2. Examine the error code following the power cycle.
Take appropriate action.
3. Reload your program.
4. Contact your local Allen-Bradley representative if the
error persists.
Refer to the following key to determine the status of
the LED indicators:
Indicates the LED is OFF.
Indicates the LED is ON.
Indicates the LED is FLASHING.
Indicates the LED is FLASHING or OFF.
Status of LED does not matter.
➀
The DH485 LED on the SLC 5/03 processor is labeled DH+ on
the SLC 5/04 processor, and ENET on the SLC 5/05 processor.
Publication
1747-6.2
 Loading...