

Page 1

ADDENDUM – AP3876
V2
Software Update V2.01 September 1999
These notes are an addendum to User Guide AP3299 issue 2.
Allen & Heath are committed to ongoing product development. The icon now benefits from
new features and improvements with the release of V2.01 operating software which can
downloaded free of charge from the Internet. Instructions for loading this software into the
mixer are provided on our web site.
(ð:ðicon http://www.allen-heath.com
< IMPORTANT NOTE : The user settings and memories are lost when new operating
software is loaded. We recommend that you save these first using a MIDI or PC archiver so
that they can be loaded back into the mixer after the update. A Windows® compatible
archiving utility may be downloaded from the Allen & Heath web site.
MAJOR NEW FEATURES AND ENHANCEMENTS
• COPY, PASTE, RESET and UNDO functions improve memory handling.
• RECALL now available from SONG and VENUE screens as well as HOME.
• SONG or VENUE memory being stored to becomes current for quicker programming.
• Screen does not return to HOME after storing a song or venue memory.
• Sets can be recalled from the SET screen as well as HOME.
• ‘SET OFF’ display changed to ‘NO SET’ for clarity.
• Auto increment of song number for quicker programming of sets.
• Last action UNDO extended to more functions. Button now lights when available.
• Confirm screens added for better display of current action.
• Rotary control and cursor key acceleration added for quicker access.
• Gate and compressor views added to channel EQ buttons for full parameter editing.
• Gain reduction meter added to compressor and gate for dynamic display of function.
• Compressor RESPONSE parameter split for independent ATTACK and RELEASE control.
• Simultaneous IN/OUT display for channel EQ, compressor and gate.
• SAFE function extended for isolating selected channel parameters from the automation.
• USERMODE utility provides three operating modes for selectable control lockout.
• FX name and parameter screens combined for better viewing of differences between effects.
• More FX1 presets added.
• FX2 reverbs improved. Better parameter control of combined delay+reverb effects.
• FX1/2 footpedal function extended to control any effects parameter or any channel volume.
• MIDI control extended for remote access to all performance parameters.
• USERNAME is displayed on power up and the standby screen for unit identification.
icon SERIES AP3876 – Addendum to User Guide – Software Update V2.01 1
Page 2
DESCRIPTION
Features have been added to make the icon even easier to use and more versatile in its
application. Many minor updates improve operating speed, information display and ease of
use. Existing users should have no difficulty adapting to the new software as the operating
principles remain unchanged. They shall, however, benefit from the new features added which
further extend the sound processing and automation control. These are described below. If
further information is required on these or any other features of the product please contact your
Allen & Heath agent or email technical support direct at support@allen-heath.com
SONG AND VENUE MEMORIES
STORE TO Press ENTER to store the current mixer
settings to the displayed memory number. Use the τυ
keys or soft strip control 10 (song) or 9 (venue) to
select a different memory number if required. Note
that this number becomes current after pressing
ENTER. Unlike the previous version the display does
not return to the HOME screen after store is complete.
This is better for continued editing of the memory
name or lock function.
RECALL Previously only available in the HOME
screen, the memories can now be recalled within the
SONG or VENUE screens. Use the τυ keys or soft strip
control 10 (song) or 9 (venue) to select a different
memory number if required. To recall the same
number press υ once first.
COPY Press COPY while in the STORE or
RECALL screen. This copies the current song or
venue settings to the copy buffer. The PASTE key
lights to show that valid data is available in the
buffer.
PASTE The PASTE key lights only if valid copy
data is available. The key flashes if the copy data is
different to the current mixer settings. The key lights
but does not flash if the data is the same as current. If
copy data is not available the key does not light.
Press PASTE to overwrite the mixer settings with the
contents of the copy buffer. It is not possible to paste
data direct to the memories. This should be done by
first pasting data to the mixer then using the store
function.
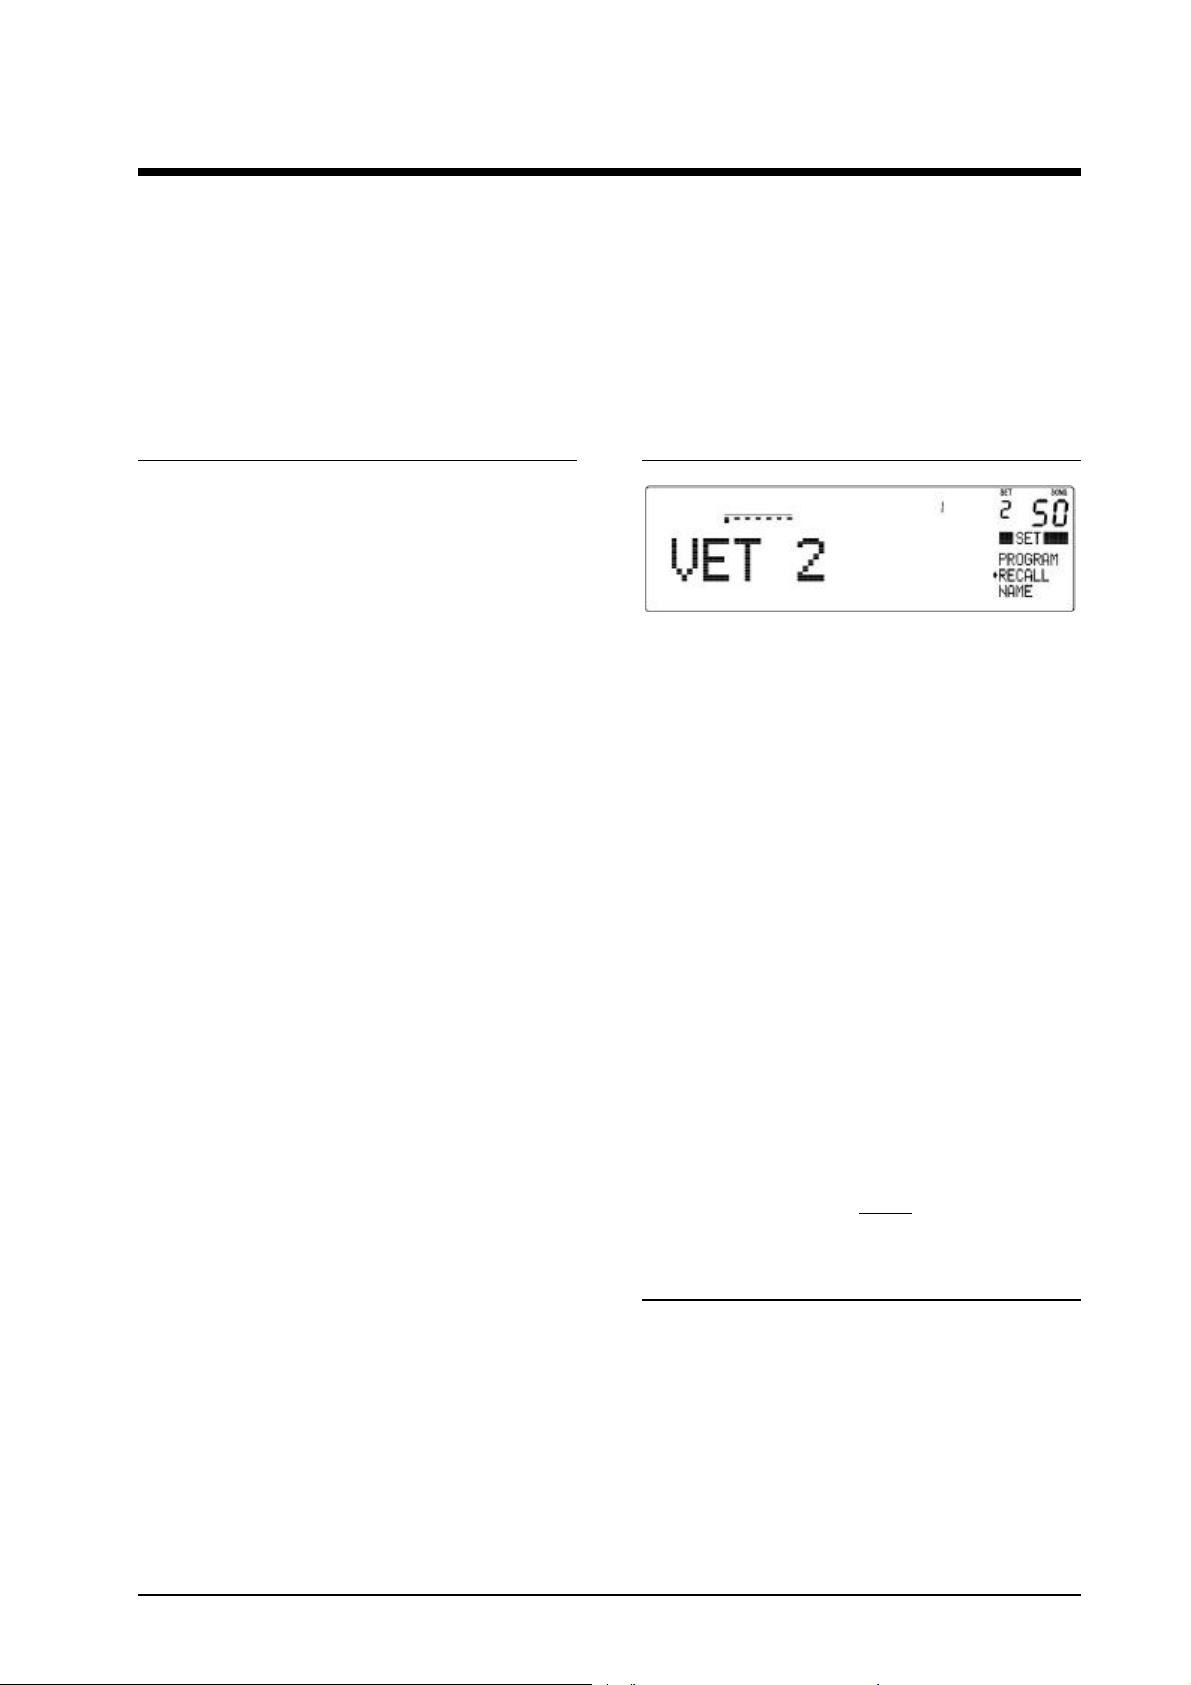
SET PROGRAMMING
RECALL Previously only available in the HOME
screen, sets can now be recalled in the SET screen.
Use the τυ keys or soft control 8 to select the required
set number 1 to 9, auto or no set. Note that this
number becomes current after pressing ENTER.
NO SET The display ‘SET OFF’ has been changed
to ‘NO SET’ to avoid confusion. The factory default
is no set active. Use the new recall function in the
SET screen to select a set for programming or play.
PROGRAM AUTO INCREMENT Programming a
set has been made easier with less button pressing
required. Each time a song memory is entered at the
end of the set the cursor automatically advances to
the next position and the song number increments by
one. A set of incremental songs can be quickly
programmed simply by repeating ENTER. The usual
song selection and editing functions are still
available.
SET PLAY Further information is provided in the
HOME screen to display when the set has been
interrupted by recalling a song not part of the active
set, for example, playing an audience request. The
SETNAME is struck out ( SET 2 ) until PAUSE or
NEXT is pressed to continue the set sequence.
RESET Press RESET while in the STORE or
RECALL screen. This resets all associated
parameters to their default settings so providing a
useful starting point for a new mix.
UNDO Press UNDO to reverse the last action carried
out. Confirm screens and the undo function prevent
the memories or mixer settings from being
inadvertently overwritten and lost. Note that undo is
only available immediately after the unwanted action
has been carried out. The UNDO key lights when this
function is available.
UNDO
This facility has been extended to more functions
including memory store and recall, set programming
and the new safes map feature. The UNDO key lights
when available. Confirm screens display briefly the
action being undone. Note that UNDO is also
available in the HOME screen to undo a memory recall
using the NEXT key, footswitch or cursor keys.
2 AP3876 – Addendum to User Guide – Software Update V2.01 icon SERIES
Page 3
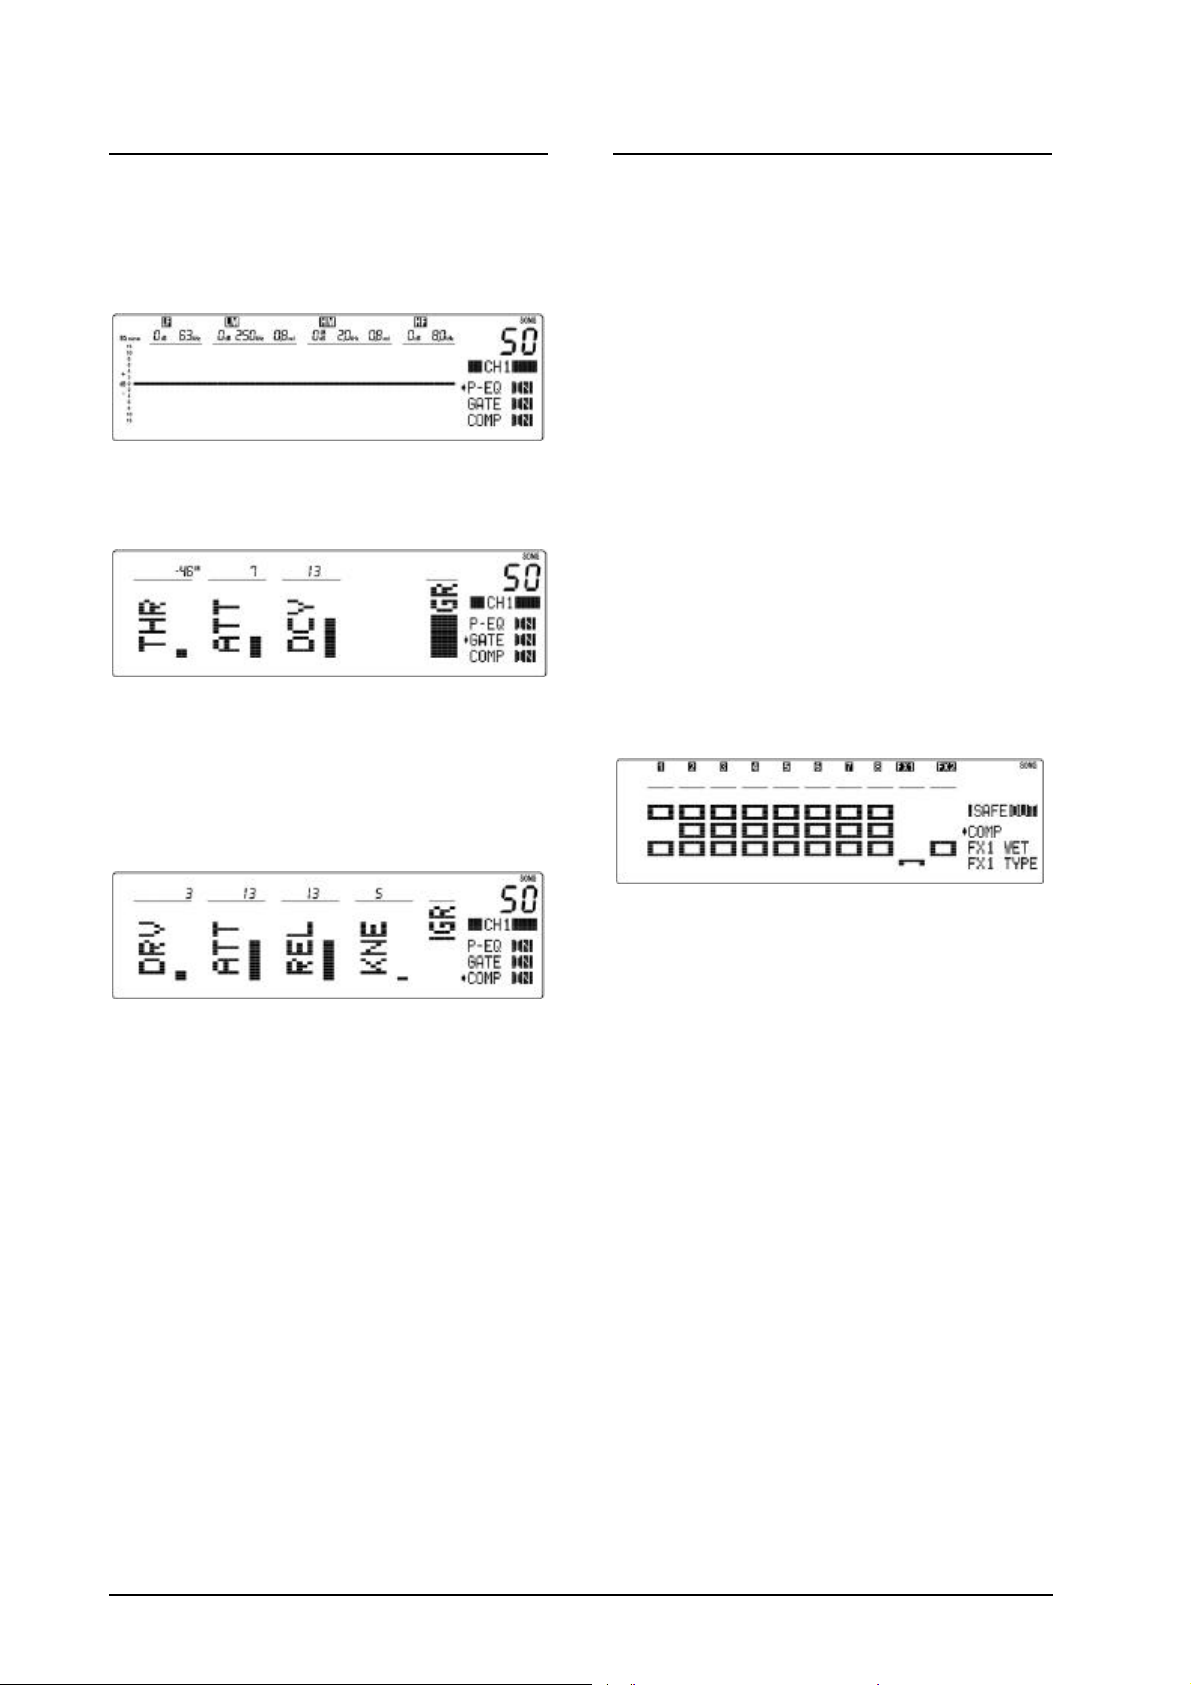
CHANNEL GATE AND COMPRESSOR VIEWS
AUTOMATION SAFES SYSTEM
In addition to the all channel GATE and COMP screens,
the gate and compressor settings can now be edited
independently for each channel. This presents all
channel parameters for interactive editing. For
example, press EQ1 to select channel 1:
The EQ screen is displayed and parameters adjusted
in the normal way. Press EQ1 again or press θ to
display the GATE screen:
Use soft controls 4, 5 and 6 to adjust the threshold,
attack and decay parameters. The new gain reduction
(GR) meter indicates when the gate is on, signal
muted (bar on) or off, signal routed (bar off).
The ‘Channel Safes’ function to isolate channels
from the automation works as before, very useful
during pre-programmed live performance when
changing channel allocation ‘on the fly’, for example
using a ‘spare guitar’ channel for a last minute guest
vocal.
In addition to this a powerful new ‘Parameter Safes’
function is added. Selected parameters on selected
channels can be made safe from MIDI and song
memory recall. This lets you decide how you want
the automation to work.
For example, a musician may simply want to recall
effects, compressor and gate settings to change the
music ‘style’ between songs. Other parameters such
as monitor levels, EQ and mutes would be manually
controlled and not affected by the automation. On the
other hand, a conference application may require that
the memories simply change channel levels and
mutes without affecting the EQ or dynamics settings.
MAKING PARAMETERS SAFE Press the
CHANNEL SAFE key. It flashes to warn that the
console is in safes edit mode:
Press EQ1 again or press θ to display the
COMPRESSOR screen:
Use soft controls 4, 5, 6 and 7 to adjust the drive
(how much compression), attack, release and
hard/soft knee parameters. The GR gain reduction
meter indicates how much compression is active.
This shows you how hard the compressor is working.
ATTACK AND RELEASE The original
RESPONSE parameter has now been split into
independent ATTACK and RELEASE parameters for
improved compressor control.
IN/OUT The OUT key works in each screen
providing independent switching for the EQ, gate and
compressor. In/out status is displayed for all three on
the right of the display. The OUT key displays status
for the active screen as usual.
The display shows a ‘map’ of the channels and
associated parameters. Columns show channels,
rows show parameters. Use the πθτυ cursor keys to
navigate to the required channel parameter. Press
ENTER to make the selected parameter safe from the
associated channel. A filled box displays a parameter
made safe, hollow displays a parameter affected by
the automation. Default is no parameters safe. If a
channel has been made ‘channel safe’ using its MUTE
key then small boxes are displayed for all its
parameters.
SAFE IN/OUT Press the OUT key to toggle the
safes map active or disabled. Status is displayed on
any screen where it can be active. This includes song
memory recall, console paste and reset. These
functions do not affect ‘song safe’ parameters with
SAFE IN displayed, or channels which have been
made ‘performance safe’. Switching safes OUT is
useful when wishing to paste or reset all console
settings regardless of how the automation is set up.
COPY The copy/paste function is now available in
each screen. EQ, gate or compressor settings may be
copied between channels or memories. The PASTE
key lights if valid data is available. It flashes if the
copy data is different to the current settings.
Note that channels made ‘channel safe’ using the
MUTE keys are not affected by ‘parameter safes’
in/out status. Note also that the PAUSE patch is not
affected by any safes settings.
icon SERIES AP3876 – Addendum to User Guide – Software Update V2.01 3
Page 4

USERMODE UTILITY
A new utility feature is added to provide three modes
of console operation. These are known as ‘user
modes’ and provide different levels of control access
for the day to day operator.
Press UTIL repeatedly until the USERMODE menu
item is displayed. Use the τυ cursor keys to scroll
through the three mode options. Enter the mode
required. The mode may be changed at any time.
NORMAL MODE = Full control.
This is the default mode. All controls and automation
are available. Normal mode is ideal for live
performers using the performance memories.
EFFECTS FX1 AND FX2
The original name and parameter screens have been
combined into one. The effects type is displayed as
the second menu item and can be changed using soft
control 10 or the τυ cursor keys. The associated
parameters are displayed and can be edited using soft
controls 4, 5, 6 and 7 as before. You can now quickly
view and hear the differences between parameters by
scrolling through the effects names.
LIVE MODE = Manual console operation +
optional recall of memories using Set.
All controls are available except for the automation.
Song, set and venue memories are locked and cannot
be overwritten. If a set is active before entering this
mode then the memories programmed into that set
can be selected using the τυ cursor keys and recalled
by pressing ENTER. If ‘NO SET’ is selected before
entering this mode then memory recall is completely
disabled. This lets you choose whether the operator
has limited access to a chosen selection of the
memories. Live mode is ideal for manual live mixing
where accidental overwriting of the console settings
is prevented.
BASIC MODE = Setup controls locked + optional
recall of memories using Set.
Only channel gain, faders, mutes and headphones
monitoring are available to the operator. All other
controls are locked to prevent preset parameters being
overwritten. If a set is active before entering this
mode then the memories programmed into that set
can be selected using the τυ cursor keys and recalled
by pressing ENTER. If ‘NO SET’ is selected before
entering this mode then memory recall is completely
disabled. This lets you choose whether the operator
can recall a selection of the memories. Basic mode is
ideal for installed sound where the installer presets
the parameters for different mixing situations and the
day to day operator has limited access to basic
controls only.
USERMODE SYMBOL If live or basic mode is
active a symbol is displayed on the left of the HOME
screen. This identifies that the console is not in its
default normal mode. Live mode = u 1
Basic mode = u 2
If any locked key is pressed both the padlock and
usermode symbols are briefly displayed.
MORE FX1 PRESETS More effects have been
added. These are based on existing effects types but
provide additional presets to store your different
parameter preferences:
• StECHO 5, 6
• BOUNCE 3, 4
• CHORUS 3
• DOUBLER 3
• M FLNGE 2
• StFLNGE 2
• PHUNNEL 3
• AUTOPAN 3
IMPROVED REVERBS The sound of the reverbs
have been enhanced to better simulate natural
acoustics. The original echo+reverb effects have
been replaced with sixteen delay+reverb types which
provide greater parameter control to set the balance
between the delay (echo) and reverb.
GREATER FOOTPEDAL CONTROL The
function of the foot pedals or switches can now be
assigned to control any effects parameter or any
channel volume. The third menu item displays the
assigned function. Select this item and scroll through
the options using soft stripcontrol 10 or the τυ cursor
keys.
• FX VOLUME = FX1, FX2
• OUTPUT VOLUME = Aux, FB, LR
• INPUT VOLUME = CH1-8
• EFFECTS PARAMETER
• BYPASS
• OFF = Footswitch disabled
Note that this greater flexibility makes the foot
controllers well suited to be used with remote wall
plate volume controls in installed systems.
4 AP3876 – Addendum to User Guide – Software Update V2.01 icon SERIES
Page 5

EXTENDED MIDI CONTROL
PARAMETER CONTROL Every console parameter is now mapped for independent MIDI
control. This is based on the NRPN system with the MSB selecting the channel number, and
the LSB selecting the parameter number in that channel (channel type specific).
Channel selection message: 0xBm, 0x63, <Channel>
Where <Channel> is 0x00 = CH1 to 0x07 = CH8, 0x08 = FX1, 0x09 = FX2, and
0x40 = GEQA, 0x41 = GEQB.
Parameter selection message: 0xBm, 0x62, <Param ID>
Where <Param ID> is shown below:
Parameter values are set using Data Entry MSB: 0xBm, 0x06, <Value>
All parameter values are ‘normalised’ from 0x00-0x7F
Device Parameter Parameter ID
LF Gain 0x01
LF Frequency 0x02
LMF Gain 0x03
LMF Frequency 0x04
PEQ
LMF Q 0x05
HMF Gain 0x06
HMF Frequency 0x07
HMF Q 0x08
HF Gain 0x09
HF Frequency 0x0A
In/Out 0x0B
Drive 0x0C
Attack 0x0D
Compressor
Foldback Send Level 0x16
Pan/Balance Pan/Balance 0x18
Fader Level Level (transmit only, no recieve) 0x1B
Release 0x0E
Knee 0x0F
In/Out 0x10
Level 0x11
Attack 0x12
Gate
Decay 0x13
In/Out 0x14
Aux Send Level 0x15
Trim Level 0x17
FX1 Send Level 0x19
FX2 Send Level 0x1A
Band Gain 0x00 Lowest Band 31Hz
GEQ
In/Out 0x20
Linking 0x21
(Controller 99)
(Controller 98)
0x09 Highest Band 16kHz
When linked, both GEQA&B messages (for
band gain & in/out) are generated by the I-CON
icon SERIES AP3876 – Addendum to User Guide – Software Update V2.01 5
Page 6

AUTOMATION
MIDI control is now extended to the VENUE memory recalls as well as SONG. These use the
same program change messages as before but different banks. Refer also to the icon User
Guide which details the original MIDI functions including MUTE note on/off messages and
system exclusive data archive.
SONG RECALL Program change in Bank 1
0xBm, 0x00, 0x00, 0xCm, pp
Where m is MIDI channel number
pp is 0x00 = SONG 1
0x7E = SONG 127
0x7F = PAUSE
VENUE RECALL Program change in Bank 2
0xBm, 0x00, 0x01, 0xCm, pp
Where m is MIDI channel number
pp is 0x00 = VENUE 1
0x12 = VENUE 19
GLOBAL FUNCTIONS
The following global functions are controlled using MIDI system exclusive messages.
Where MV is major version number 0… 127
Mv is minor version number 0… 127
m is MIDI channel number
AMP MODE Changes mix source to amplifier channels A and B:
0xF0,0x00,0x00,0x1A,0x50,0x07,MV,Mv,0x0m,0x03,Mode,0xF7
Where Mode is 0x00 for L R
0x01 for FB M
0x02 for Aux FB
AUX PRE/POST Switches all channel aux sends either pre or post fader:
0xF0,0x00,0x00,0x1A,0x50,0x07,MV,Mv,0x0m, 0x05, Pre/Post,0xF7
Where Pre is 0x00
Post is 0x7F
TRIM ON/OFF Enables or disables the channel level trim parameter:
0xF0,0x00,0x00,0x1A,0x50,0x07,MV,Mv,0x0m, 0x04, Off/On,0xF7
Where Off is 0x00
On is 0x7F
6 AP3876 – Addendum to User Guide – Software Update V2.01 icon SERIES
Page 7

FX PARAMETERS Param1 FX1 0xBn, 0x5B, <Value> FX2 0xBn,0x46, <Value>
Param2 0xBn, 0x5C, <Value> 0xBn,0x47, <Value>
Param3 0xBn, 0x5D, <Value> 0xBn,0x48, <Value>
Param4 0xBn, 0x5E, <Value> 0xBn,0x49, <Value>
Type 0xBn, 0x5F, <Name> 0xBn, 0x4A, <Name>
Where <Name> is:
FX1 NAME FX2 NAME
"M ECHO 1" 0x00 "STAGE 1 " 0x00
"M ECHO 2" 0x01 "STAGE 2 " 0x01
"M ECHO 3" 0x02 "WOODRM 1" 0x02
"M ECHO 4" 0x03 "WOODRM 2" 0x03
"M ECHO 5" 0x04 "ROOM 1 " 0x04
"M ECHO 6" 0x05 "ROOM 2 " 0x05
"M ECHO 7" 0x06 "ROOM 3 " 0x06
"M ECHO 8" 0x07 "ROOM 4 " 0x07
"StECHO 1" 0x08 "HALL 1 " 0x08
"StECHO 2" 0x09 "HALL 2 " 0x09
"StECHO 3" 0x0A "HALL 3 " 0x0A
"StECHO 4" 0x0B "HALL 4 " 0x0B
"BOUNCE 1" 0x0C "CHAMBER1" 0x0C
"BOUNCE 2" 0x0D "CHAMBER2" 0x0D
"CHORUS 1" 0x0E "CHURCH 1" 0x0E
"CHORUS 2" 0x0F "CHURCH 2" 0x0F
"DOUBLER1" 0x10 "ARENA 1 " 0x10
"DOUBLER2" 0x11 "ARENA 2 " 0x11
"M FLNGE1" 0x12 "PLATE 1 " 0x12
"StFLNGE1" 0x13 "PLATE 2 " 0x13
"PHUNNEL1" 0x14 "VxPLATE1" 0x14
"PHUNNEL2" 0x15 "VxPLATE2" 0x15
"VIBRATO1" 0x16 "SPRING 1" 0x16
"VIBRATO2" 0x17 "SPRING 2" 0x17
"StVIBE 1" 0x18 "DLYSTGE1" 0x18
"StVIBE 2" 0x19 "DLYSTGE2" 0x19
"TREMOLO1" 0x1A "DLYROOM1" 0x1A
"TREMOLO2" 0x1B "DLYROOM2" 0x1B
"AUTOPAN1" 0x1C "DLYROOM3" 0x1C
"AUTOPAN2" 0x1D "DLYROOM4" 0x1D
"FOOT VOL" 0x1E "DLYHALL1" 0x1E
"StECHO 5" 0x1F "DLYHALL2" 0x1F
"StECHO 6" 0x20 "DLYHALL3" 0x20
"BOUNCE 3" 0x21 "DLYHALL4" 0x21
"BOUNCE 4" 0x22 "DLYCHRC1" 0x22
"CHORUS 3" 0x23 "DLYCHRC2" 0x23
"DOUBLER3" 0x24 "DLYPLTE1" 0x24
"M FLNGE2" 0x25 "DLYPLTE2" 0x25
"StFLNGE2" 0x26 "DLYSPRG1" 0x26
"PHUNNEL3" 0x27 "DLYSPRG2" 0x27
"AUTOPAN3" 0x28
icon SERIES AP3876 – Addendum to User Guide – Software Update V2.01 7
Page 8

icon THE ANALOGUE EQUIVALENT
It may be helpful to understand the full capability of icon by comparing it to its analogue
equivalent. The following drawing shows the controls arranged in conventional format. Each
function has its own control. However, a long channel strip results because of the amount of
processing control available. Although it makes the full capability more obvious it is not
necessarily easier to operate. In fact, just the opposite… The fewer controls presented on icon
together with logical arrangement according to function and the informative graphical display
make it easier and less daunting to operate than this analogue equivalent in a live situation.
This demonstrates the advantage of the assignable control surface made possible using digital
technology.
8 AP3876 – Addendum to User Guide – Software Update V2.01 icon SERIES
 Loading...