

Allegri 030620010FR001 User Manual

r:o
ructions f
ton Ins
mbly & Installati
esAs
e AssemblyFixtur
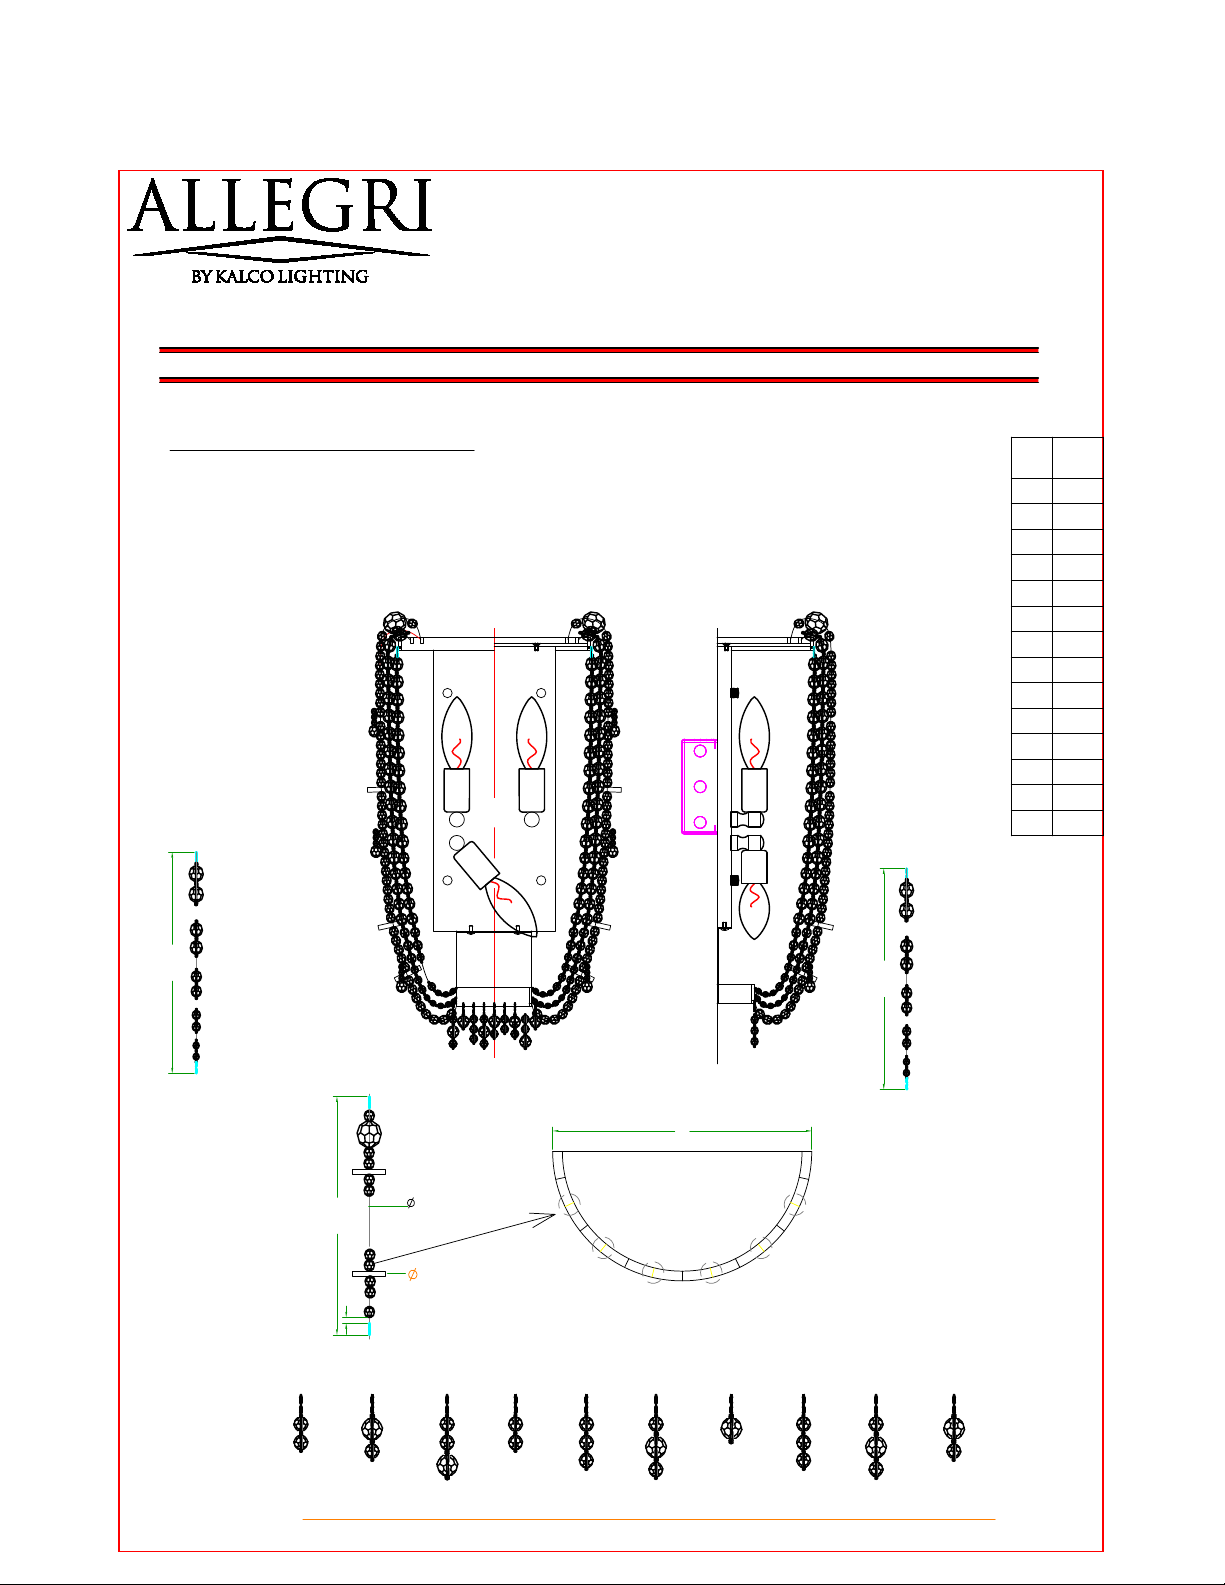
030620-010-FR001 3-Light Wall lamp
Customer Service :(702)361-4345,(800)525-2655,customer.service@kalco.com
WARMING - TO REDUCE THE RISK OF FIRE OR INJURY:
1.lf you are unfamiliar with electricalwiring, call a qualified electrician to install this unit .More than
one person may be necessary to install fixture ,make sure you have enough qualified help.
2.Turn off the power to the fixture's circuit at the service panel. Use a coltage detector to verify that
the power is off.
3.DO NOT install bulb which exxeeds the maximum wattge specified on the socket label.
Step 1. Place mount mounting and wiring steps before
crystal installation step
Lnstall candelabra bulbs bulb,do not use
bulbs that exceeds 60W
Step 3.
Step 2. Assemble glass tray to the lamp body
as shown,Align holes in glass tray with holes in
fixture and secure glass tray to fixture using
headless screw
C20-16-06-01
C10-10-04-00
C10-10-04-00
C20-16-06-01
C20-16-06-01
C10-10-04-00
C10-10-04-00
C20-16-06-01
main body
40W bulb
flat screw
r:o
ructions f
ton Ins
mbly & Installati
esAs
Customer Service :(702)361-4345,(800)525-2655,customer.service@kalco.com
Fixture Assembly
ATTENTION
1. Take all crystal or glass parts carefully
from carton, then put them on a clean
cloth.
2. Start hanging crystals from bottom center
to top of fixture in an alphabetical order
as shown in diagram
030620-010-FR001 3-Light Wall lamp
C20-16-06-01
C10-10-04-00
C10-10-04-00
C20-16-06-01
A
B
K9/1502 #8 3pcs
K9/1502 #10 3pcs
K9/1502 #12 5pcs
K9/1502 #14 10pcs
K9/1502 #6 1pcs
390±5
K9/1502 #8 5pcs
K9/1502 #10 5pcs
K9/1502 #12 4pcs
K9/1502 #14 11pcs
K9/1502 #6 1pcs
460±5
520±5
K9/1502 #10 45pcs;
K9/1502 #24 1pc
0.6
C
5
80
D
C a string of beads,
Simple sketch map
30*T5 glass,
5pcs
Code
Quant
ity
A 21
B 20
C 6
D1 2
D2 2
D3
2
D4 1
D5
1
D6
1
D7 1
D8
1
D9
1
D10
1
D1 D2 D3
D4 D5
D6
D7
D8 D9 D10
K9/1502
#8 2pc
K9/1502
#12 1pc
#8 1pc
K9/1502
#12 1pc
#8 2pc
K9/1502
#8 2pc
K9/1502
#8 3pc
K9/1502
#12 1pc
#8 2pc
K9/1502
#12 1pc
K9/1502
#8 3pc
K9/1502
#12 1pc
#8 2pc
K9/1502
#12 1pc
#8 1pc
<D1 in turn D10>
 Loading...