

Page 1
54 54
11/88
40
Blending innovative design, cutting-edge technology and the grace and elegance of traditional crystal, ALLEGRI® proudly brings you a new approach
to lighting. ALLEGRI® fixtures are made from the finest raw materials and are brought to life through a combination of traditional manufacturing, such
as sand casting, hand-forging and technology driven techniques including laser cutting.
Enclosed are detailed instructions on how to properly install your fixture. Please read all instructions carefully. If you need further assistance, please
contact the dealer from which you purchased this product or call 866-820-2665 to speak with an ALLEGRI® customer service representative. We
hope you enjoy your fixture!
ASSEMBLY AND DRESSING INSTRUCTI ONS
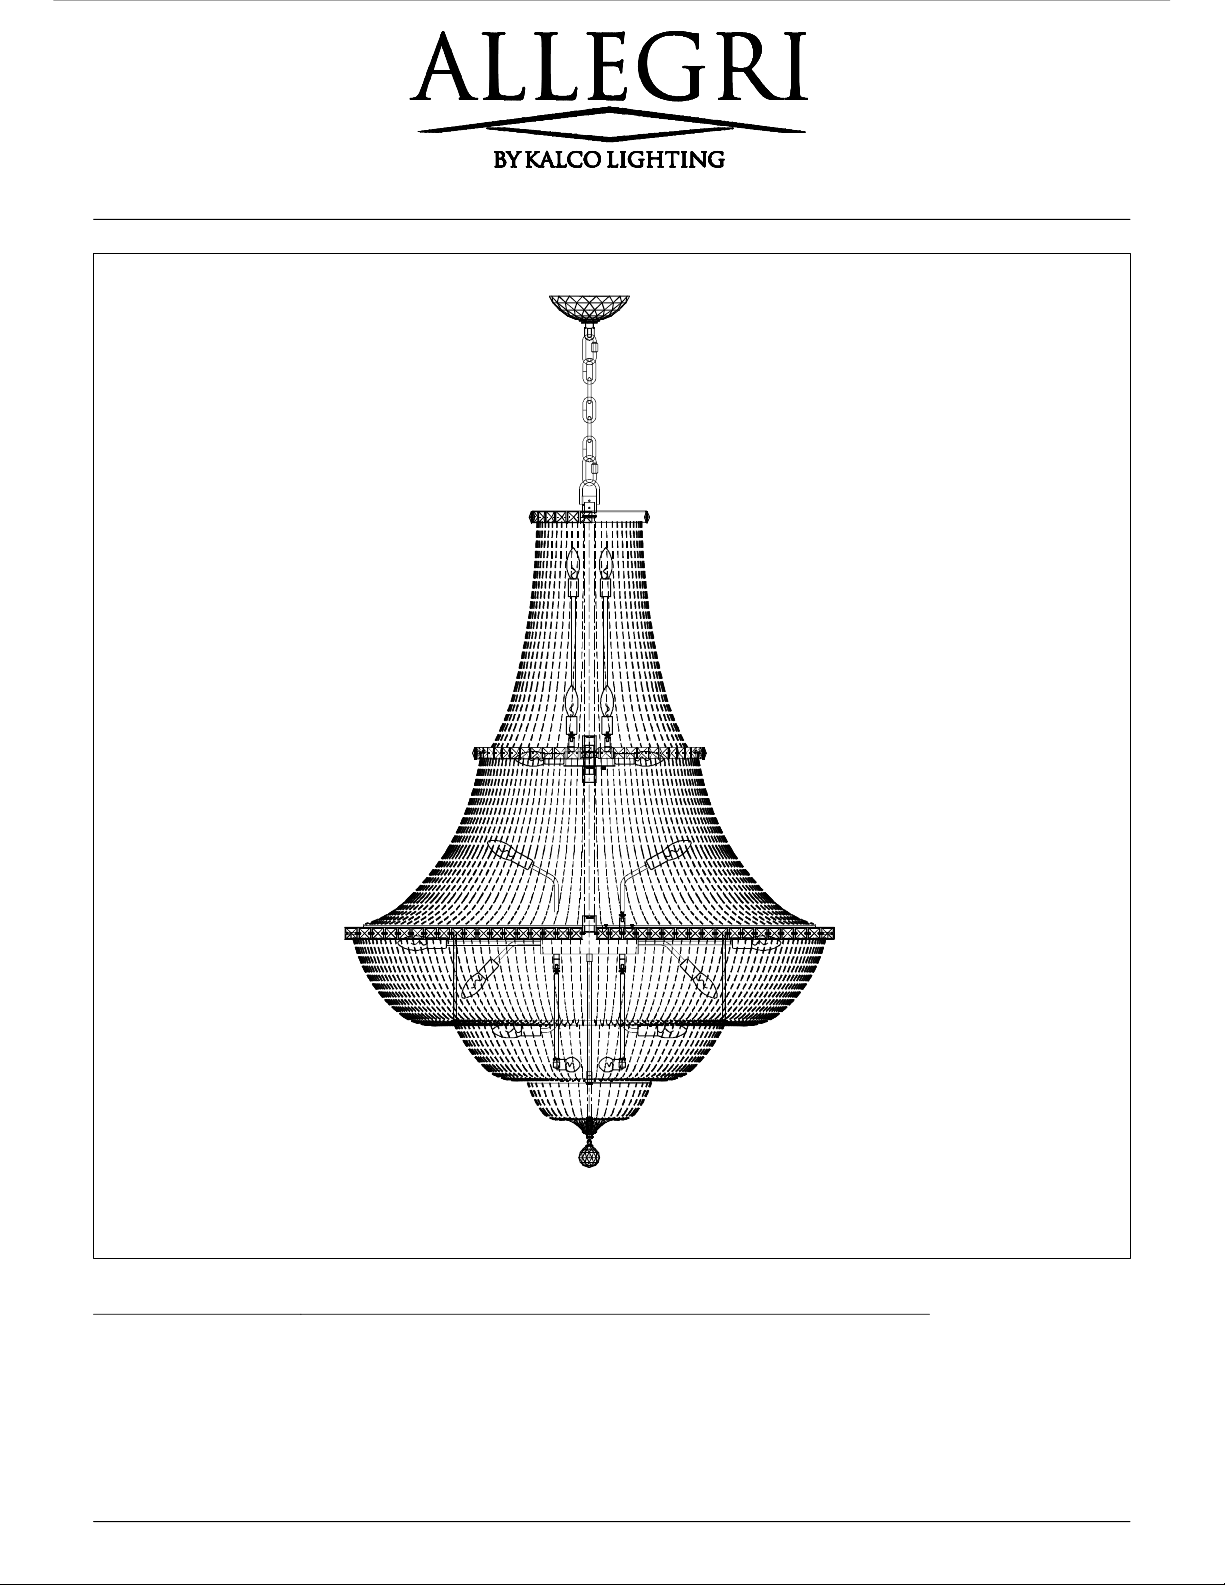
MODEL 020272
P1
WWW.ALLEGRICRYSTAL.COM
866.820.2665
Page 2
This product must be installed in accordance with the National Electric Code (NEC), and appropriate local electrical code(s), by a
person familiar with the construction and operation of the product and the hazard involved.*
For your safety and proper operation of fixture, read and understand all instructions completely before commencing installation.
This fixture is suited for dry locations. Never install fixture on damp ceiling; room should be dry and well ventilated.
Extreme care should be taken to avoid damage to the surface of lighting fixture and wires. Wearing gloves is recommended for installation.
Connect ribbed wire of lighting fixture to live wire, while smooth wire of lighting to neutral. Connect bare copper or silver color ground wire of
fixture to the double colored or green wire of outlet box.
Use UL LISTED wire nuts for the wiring connections in this fixture. Wrap wire nut connections with UL LISTED electrical tape.
Keep lighting away from acid, alkali and other corrosive chemical or gas; clean the fixture with a clean cloth only.
Fixture must be firmly secured when installing ceiling tube, chain pipe and other connecting parts.
Never cover the lighting fixture when power is connected.
Disconnect the power before installing, cleaning and/or replacing light bulb.
Extreme care should be taken when installing and cleaning of Glass and/or Crystal Components.
This product is rated 110-130V/60HZ bulb 40W Maximum.
Save these instructions for future reference.
T
he electricity must be turned off at the main fuse box or circuit breaker before installing this fixture. Turning the power off using the light switch may
not be sufficient to prevent electrical shock.
*ALLEGRI will not be liable for injury or damage caused by improper installation, lamping or use of this fixture.
P2
WWW.ALLEGRICRYSTAL.COM
866.820.2665
Page 3
WARNING
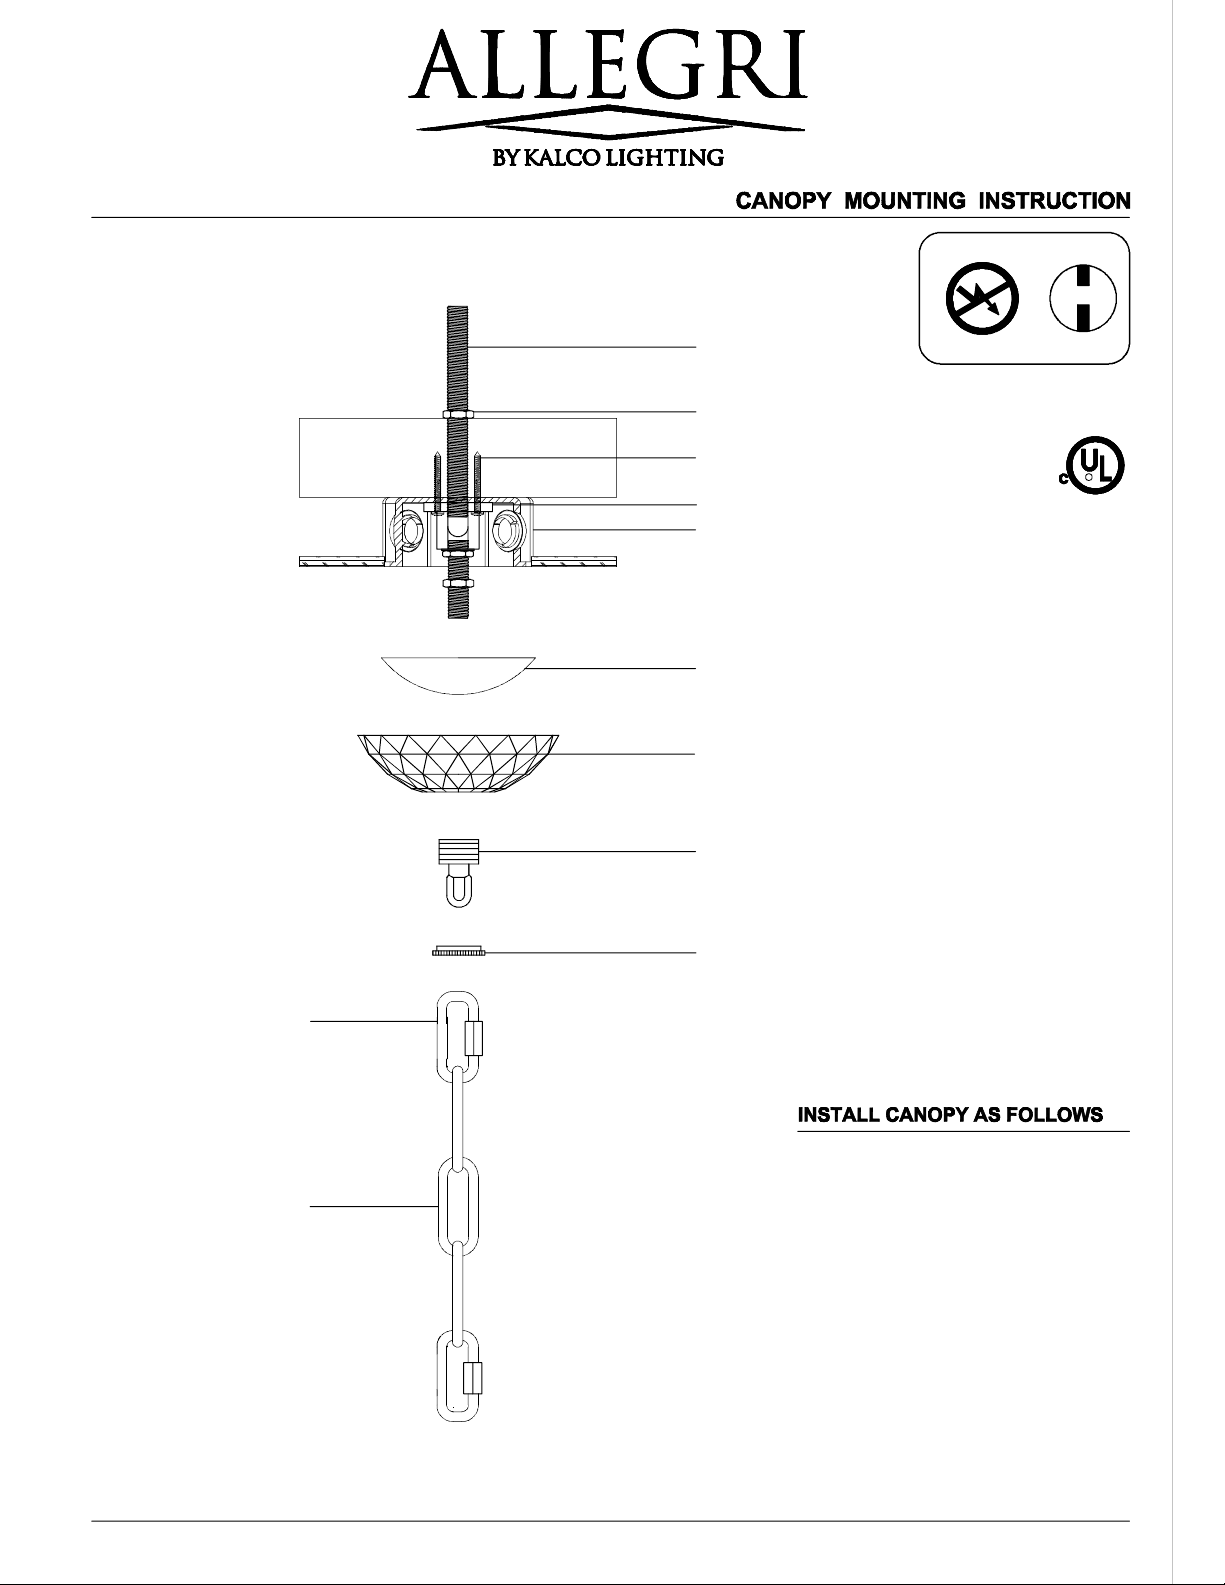
Solid Nipple
Hex nut and washer
Screws
Plate Hickey
Outlet box (by others)
Canopy
Crystal tray
Collar loop
Electrical Danger
All electrical components must be
installed by a licensed electrician in
accordance with the National
Electric code and the appropriate
local electrical codes.
Turn Power Off
R
Easy link (2pcs)
Chain
P3
Collar loop ring
CAUTION: Be sure power is off at the main
breaker box prior to installation.
1.
Drill a hole on main ceiling beam and pass
Solid Nipple through.
2.
Place Washer and Hex Nut on top of Solid
Nipple to hold.
3. Take Outlet Box through Solid Nipple and
screw Plate Hickey, then screw Plate Hickey to
main ceiling beam with 4 screws.
4.
Secure the Washer and Hex Nut to Solid
Nipple from top side of main ceiling beam.
5. Screw Collar Loop to Nipple as shown, raise
Canopy flat to ceiling and secure it with Collar
Loop Ring.
6. Hang Chain to Collar Loop with the Easy Link,
Proceed to fixture frame assembly Step 1.
WWW.ALLEGRICRYSTAL.COM
866.820.2665
Page 4
MODEL 020272
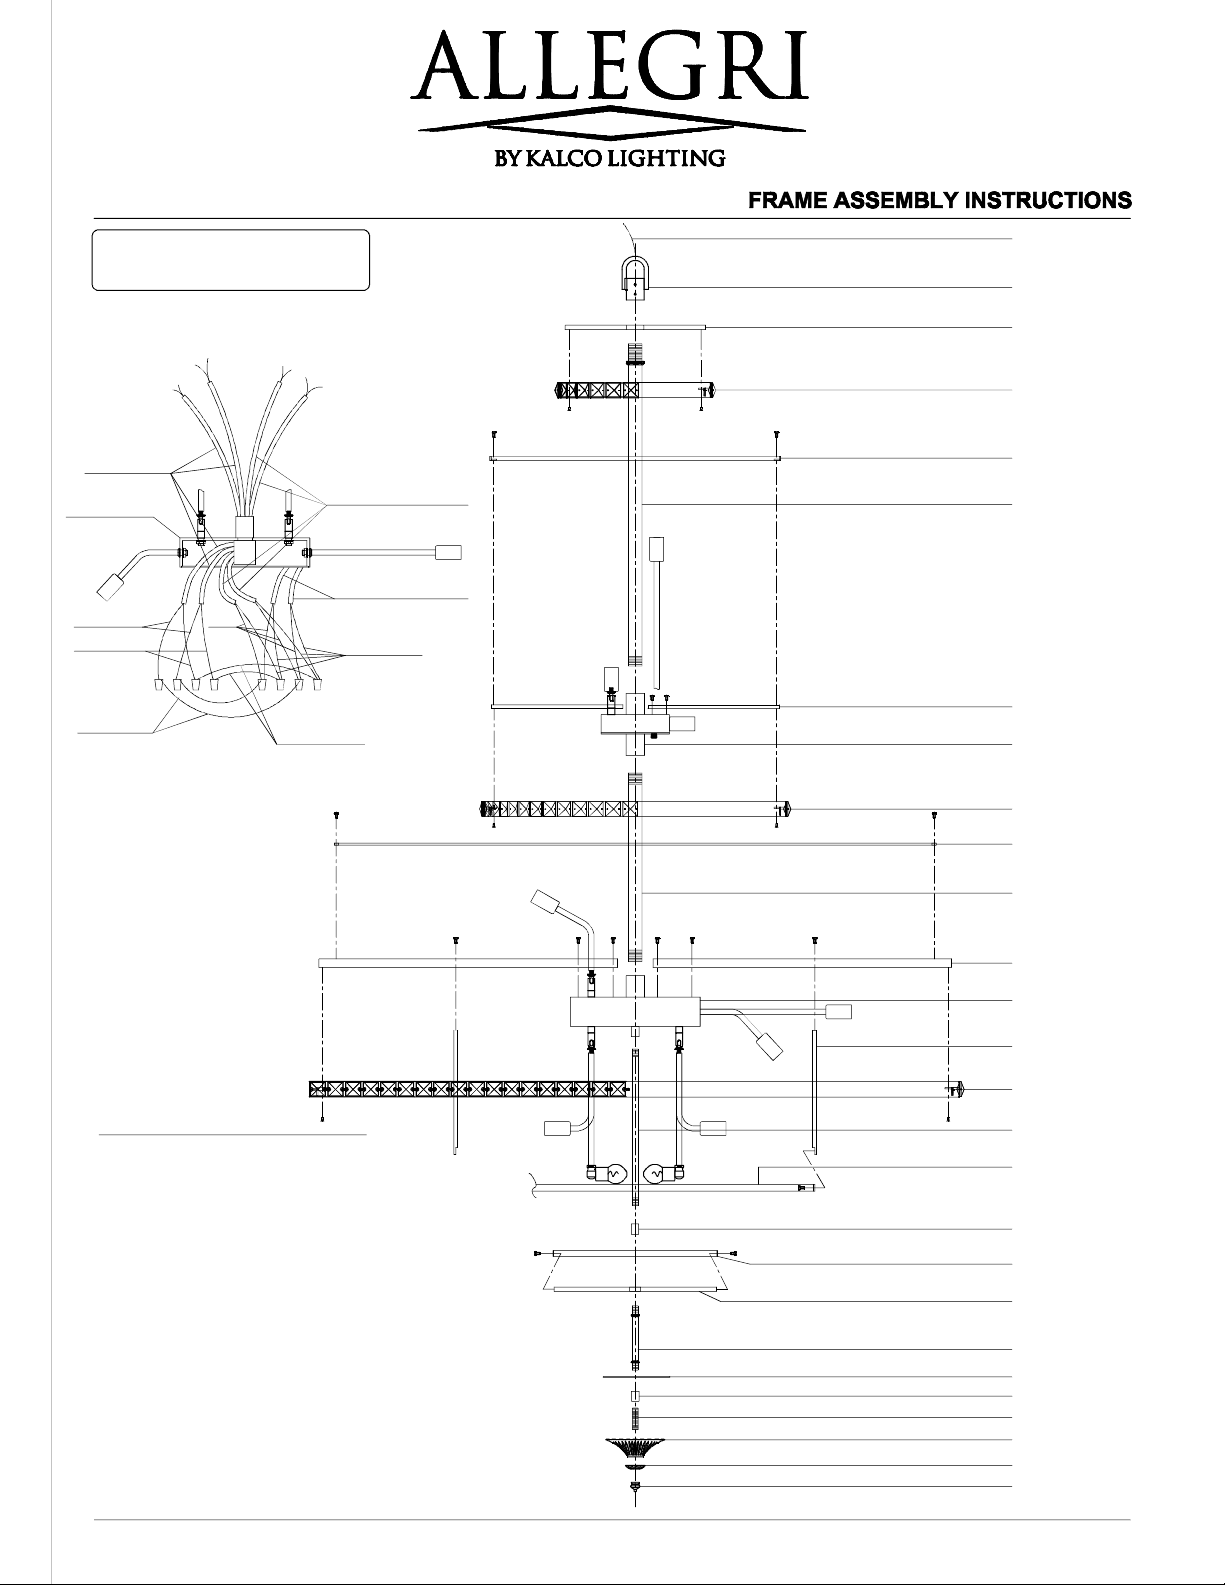
Steel wire
C20-34 -05-0 0
1-Mounting ring
2-Three ways
metal bracket
3-Metal ring A
Power cord
2nd layer
distribution
Power cord of 1st
layer distribution
power cord of 2nd
Live wire
Null wire
Live
wire
Live wire
Two power cord from distribution connected separate
layer distribution
Null wire
Null wire
4-Metal ring B
5-Nipple A
6-Square tube A
7-Main body A
54
8-Metal ring C
9-Metal ring D
10-Nipple B
11-Square tube B
12-Main body B
INSTALLATION
a. Turn off electricity, take all parts from part box.
b. Connect the main wire with the power supply circuit. See
wire connection diagram.
c. Fix part #3 to part #2 by using screw.
d. Fix part #6 to part #7 by using screw.
e. Fix part #8 to part #6 by using screw.
f. Fix part #11 to part #12 by using screw.
g. Fix part #9,#13,#14 to part #11 by using screw.
h. Fix part #16 to part #13 by using screw.
i. Fix part #18 to part #19 by usinj screw.
j. Screw part #10 to part #7,#12.
k. Screw part #15 to part #12,#17.
l. Put
part #20 through part #19,#21 then screw to part #17,#22.
m. Put part #23 through part #24,#25 then screw to part #22,#26.
part #5 through part #2 then screw to part #1,#7.
n. Put
o. Check the installation and attach bulb into lamp holder.
P4
13-Square tube C
14-Metal ring E
15-Nipple C
16-Metal ring F
17-Connector A
18-Metal ring G
19-Four ways
metal bracket
20-Nipple D
21-Acrylic sheet
22-Connector B
23-Nipple E
24-Glass tray
25-Rolling plate
26-Cone nut
WWW.ALLEGRICRYSTAL.COM
866.820.2665
Page 5
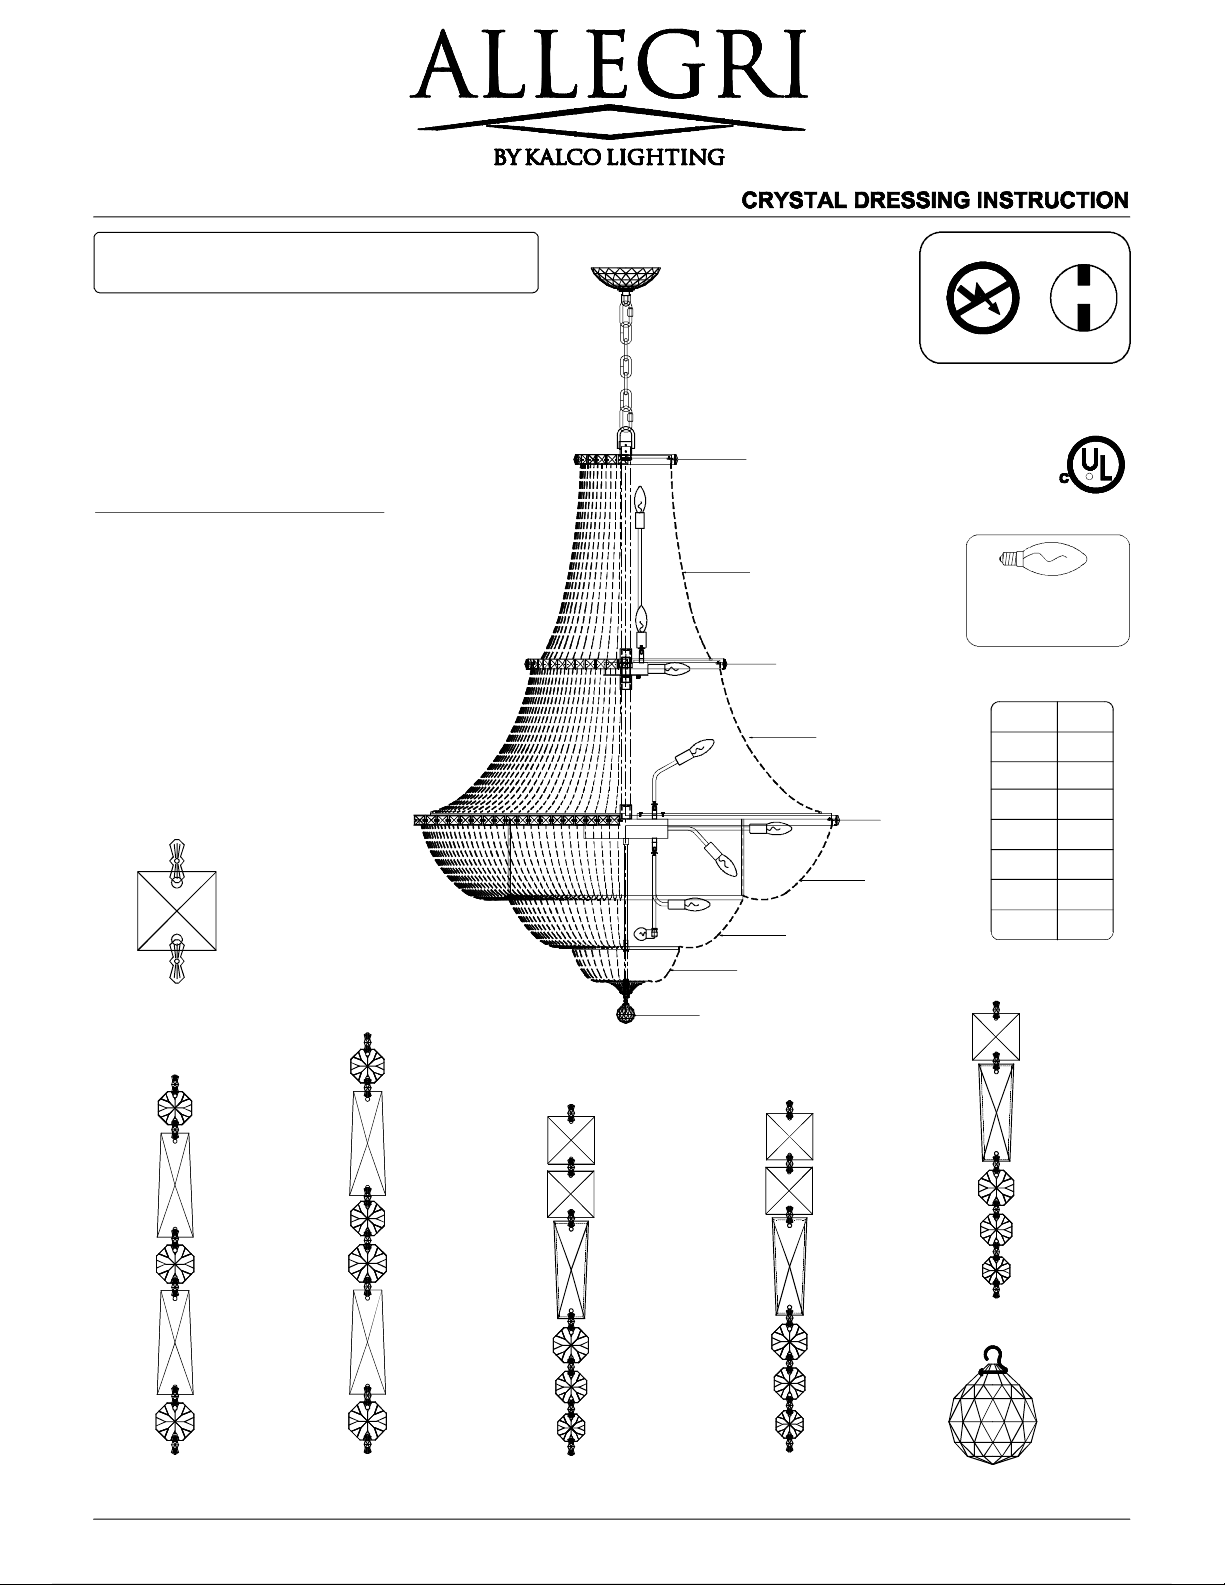
MODEL 020272-010-FR00 1
WARNING
ATTENTION
1. Take all crystal or glass parts carefully
from carton, then put them on a clean
cloth.
2.
Installing all crystal clusters per above
illustration from top to bottom.
28*28mm
1 pc
A
14mm 7PCS
Electrical Danger
All electrical components must be
installed by a licensed electrician in
accordance with the National
Electric code and the appropriate
C20-34-05-00
27位
A
B
local electrical codes.
You will need 56 - Cand.Buld
40 Watts Recommended
40 Watts Max
Bulb not included
Turn Power Off
R
A
C
Code
23.3/160
13.2/160
24/88
11/88
E
A
D
Qty
A
197
B
54
C
120
160
D
88
E
F
40
G
1
F
G
22*22mm 1PC
L590MM
14mm 8PCS
50*18mm 1PC
20mm 5 PCS
58*26mm 1PC
26mm 6PCS
B
50*18mm 1PC
50*18mm 1PC
22*22mm 2PCS
18mm 3PCS
L540M M
20mm 4PCS
58*26mm 1PC
L365MM
50*18mm 1PC
L245MM
18mm 4PCS
16mm 4PCS
26mm 4PCS
C
14mm 4PCS
D
P5
22*22mm 2PCS
50*18m m 1PC
16mm 2PCS
14mm 4PCS
12mm 1PC
E
L142MM
16mm 1PC
14mm 1PC
12mm 1PC
F
50mm
1 pc
G
WWW.ALLEGRICRYSTAL.COM
866.820.2665
Page 6

Every ALLEGRI® fixture is of heirloom quality and will last for generations. To ensure it retains its brilliance and
splendor for years to come, proper care and regular cleaning are necessary.
It is recommended that ALLEGRI® fixture, and particularly their crystal trim, be lightly dusted with a feather or lambs wool
completed every six months.
duster, or soft brush every two months, or whenever it appears dull or dusty. A thorough cleaning should be
Before cleaning an ALLEGRI® fixture, first locate the fixture's trim diagram. This will assist in replacing the crystal trim in
its proper location after cleaning. Should a replacement trim diagram be required, please call
866-820-2665 to speak with an ALLEGRI® customer service representative, who can provide a new diagram.
ALLEGRI® recommends several different cleaning methods, depending on the type of fixture. Some fixtures can be
cleaned with limited removal of crystal, while others must be completely untrimmed.
Place a soft towel or blanket directly beneath the fixture to limit the damage to both the crystal and the surface below the
fixture, should a piece of crystal be dislodged during the cleaning process. Extreme care must be taken around any
electrical fixture. For personal safety and the safety of the fixture, be sure that the fixture has been turned off. Never rotate or
spin the fixture as this can cause the fixture to lose support and fall. Instead, move around the fixture while cleaning.
White Glove Method
Prepare a cleaning solution of one part isopropyl alcohol to three parts distilled water and place in a clean spray bottle.
Do not use packaged cleaning fluids, as many of these contain ammonia, which may degrade the finish of the fixture and
the quality of the crystal.
Wearing white cotton gloves, spray one glove with the solution and keep one dry. Gently polish each crystal with the damp
connectors to chip or crack the crystal, or dislodge it from the fixture.
glove and immediately wipe it with the dry glove. Do not tug or pull on the crystal, as this may cause the
Warning: To reduce the risk of personal injury due to fire and/or electric shock, never spray solution at or near the fixture.
Crystal Removal Method
Gently remove trim and hand-wash the crystal in lukewarm water using a mild detergent. Rinse in clean water and dry with a
soft clean cloth. Do not soak finished crystal such as SWAROVSKI ELEMENTS Colors: Teak, Golden Shadow or
Silver Shade, for extended periods, as this may degrade the crystal's finish.
With the fixture untrimmed and turned off, wipe the frame, including the light bulbs once they are completely cool, with a soft
cloth.
Wearing white gloves, finger-cots or using a soft clean cloth, gently replace the trim as directed in the trim diagram.
P6
WWW.ALLEGRICRYSTAL.COM
866.820.2665
 Loading...