

Allegion SD9 Illustrated Fitting Instructions
SD9
for sliding screen doors
Austral 宏ock
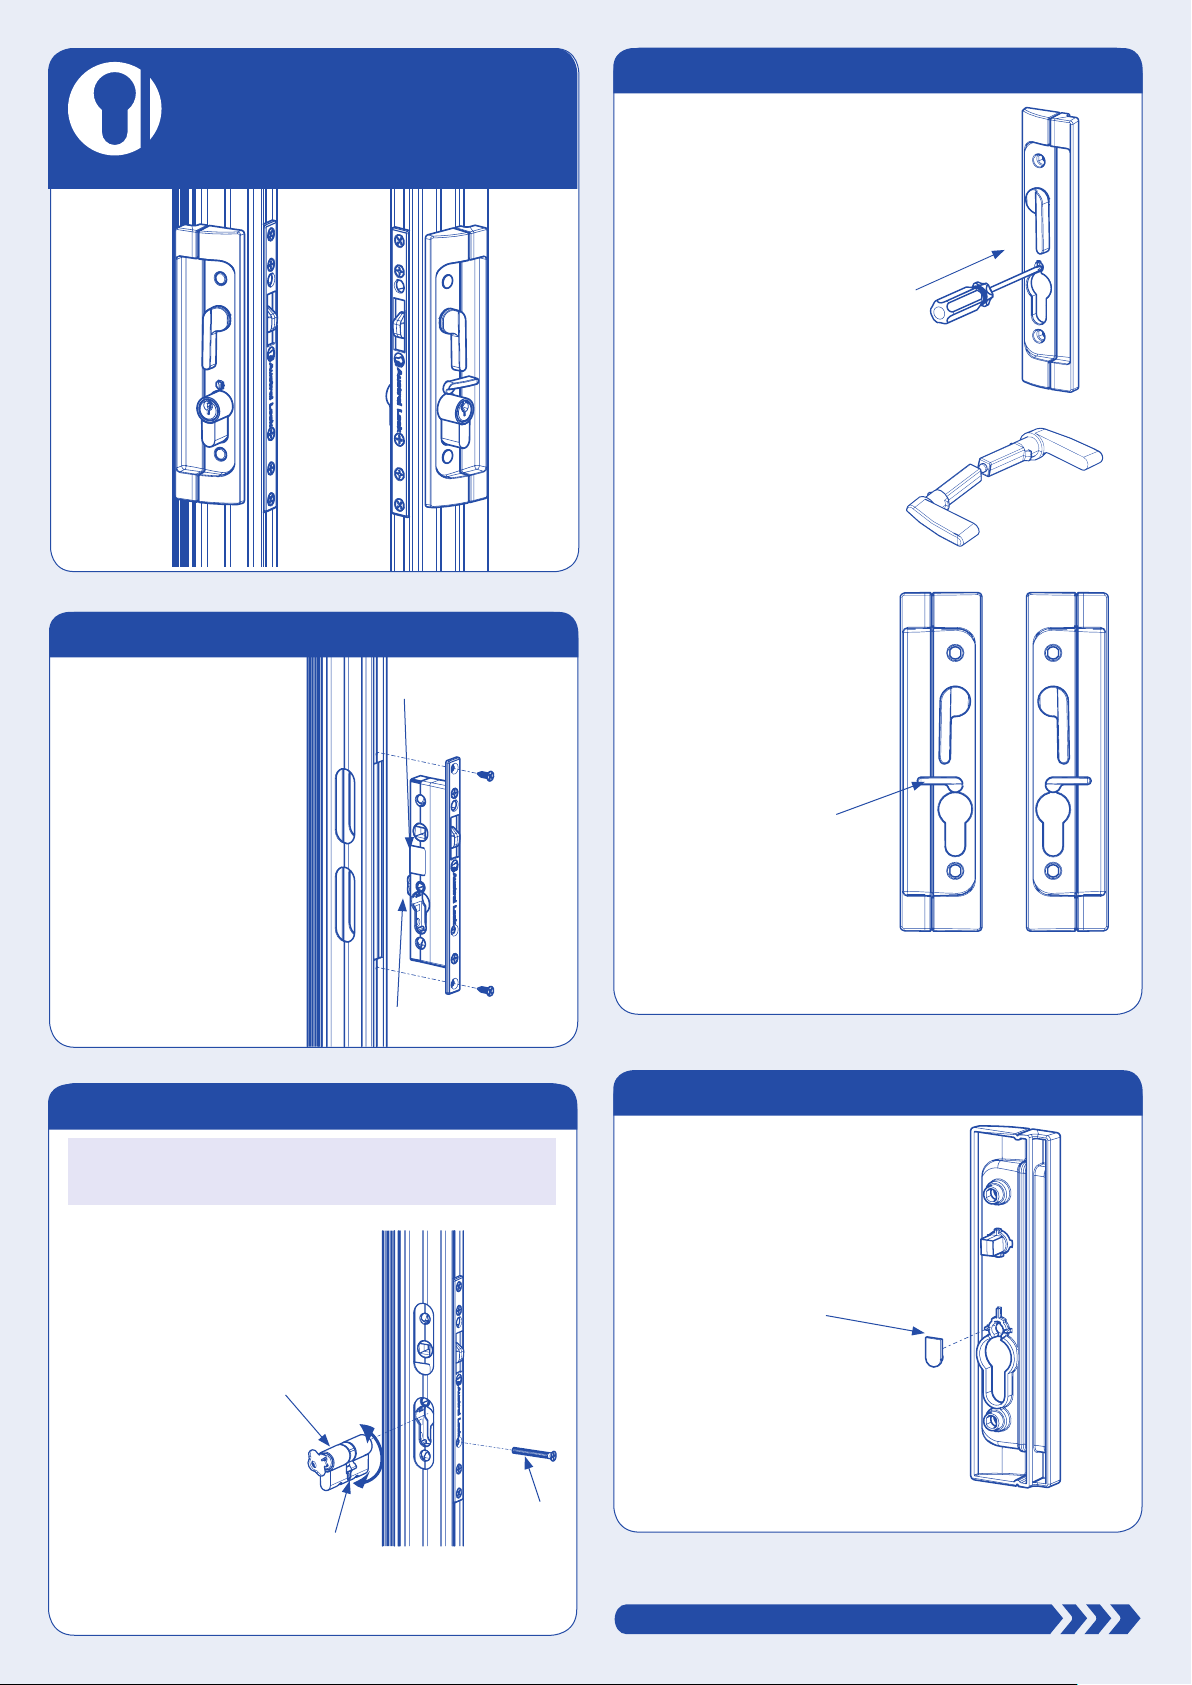
1. LOCKBODY INSTALLATION
ILLUSTRATED FITTING INSTRUCTIONS
● Lockbody screv
3. INTERIOR FURNITURE
● Select the Interior Handle
to suit your door, then
punch out the Snib Hole
Cover.
◦ (Place the punch on the
Austral Logo and punch
from the front.)
● Break the Snib Lever pair
in two.
● Install the correct Snib and
Lever as shown.
● The Sticker on the rear of
the Lockbody is to assist
in easy installation. - Do
not remove.
● If the Sticker has been
broken or removed,
ensure that the Rear
Slide is pushed
completely down
before assembling the
Lockbody into the door
cutout.
● Insert the Lockbody into
the door cutout
● Secure the Lockbody
with the two #8x13mm
Lockbody screws.
Sticker
Rear Slide
2. CYLINDER INSTALLATION
IMPORTANT : If installing with a multipoint accessory kit, be
sure to follow the cylinder installation procedure within the
multipoint kit instructions.
● Assemble the Cylinder
through the lock so the
Cylinder protrudes
equally from both sides.
NOTE : the Cylinder
Cam must rotate as
shown below. (cam turns
towards front of door)
● Insert the Key and turn
to locked position.
● Insert #10 x 38mm
Cylinder Screw &
tighten.
NOTE : test, Main Bolt
should not depress.
● Turn Key to unlocked
position and remove
Key.
Cylinder
Cylinder
Cylinder
Cam
Screw
◦ Hold the Snib vertical
and and insert it into the
Escutcheon. Secure by
rotating the Snib 90 ° to
the position shown.
LH escutcheon
set up for Interior.
● Lockbody screws.vv
4. EXTERIOR FURNITURE
● Select the Exterior Handle
assembly.
● Fit the Snib Plug in behind
the Austral logo of the
Exterior Escutcheon.
LH escutcheon set
up for exterior.
RH escutcheon
set up for Interior.
PLEASE TURN OVER
asd9doc01

L
E
A
S
E
C
L
E
T
H
K
A
G
I
N
G
● Lockbody screws.
5. INSTALL THE FURNITURE
● Lockbody screws.
7. CARE & MAINTENANCE
● Fit the External
Escutchon to the
door ensuring the
Lever engages the
Lockset.
● Insert the 2 Spiggots
into the External
Escutcheon.
● Fit the Internal
Escutcheon to the
door ensuring the
Lever and Snib
engage the Lockset.
● Secure the Internal
Escutcheon using
the 2 #8 x 22
Assembly screws.
● Conceal the Screws
using the Screw
Caps.
Spiggot
● Lockbody screws.
6. STRIKE PLATE INSTALLATION
● Pencil mark the Door Jamb at
the same height as the Main
Bolt.(refer to indicator lines)
● Centre the Strike Plate’s
square cutout over the pencil
marks on the Door Jamb.
● Pencil mark the Door Jamb
through the screw holes and
the square cutout.
● Pilot drill the screw holes if
necessary.
● Remove any material to a
depth of 16mm to ensure there
is adequate clearance around
all sides of the main bolt.
● Secure the strike plate to the
door jamb with two #8x25mm
screws.
● Test the lock.
Screw Caps
Screw
Installation
The product must be installed according to the instructions included
in the product packaging and the door should be apertured
according to the door “cut-out” dimensions and tolerances shown.
Prior to tting ensure that:
● Doors stored on site are stored in a clean dry area free from
cement, lime, paint, acid etc.
During tting of the lock ensure that :
● No metal swarf or other contaminants enter the lock body.
● The xing screws do not damage the product nish.
After installation of the door ensure that:
● The door is correctly adjusted with the correct clearances.
● The lock engages the strike plate correctly.
● The door is protected from building fall-out such as wet plaster,
mortar, paint and welding splatter.
If the door becomes contaminated:
● Do not paint the lock body or faceplate.
● Remove wet plaster, cement, mortar and other droppings
immediately, using ample clean water and a sponge or rag, to
avoid permanent staining or scratching of the product nish. If
removal is delayed and scraping becomes necessary the surface
nish may suer.
Maintenance
● Annually inspect the door to conrm that the door operates with
the correct clearances, closes and opens without obstruction and
conrm that the lock tongue slides easily up the strike plate wing
to freely enter the strike plate aperture when the door is closed adjust the door if necessary.
● Annually check that when the door is closed, the lock can be
locked by key and by the snib lever.
● Quarterly wipe the strike plates with a soapy rag to remove built
up debris and to lubricate the strike plate (To prevent bouncing of
the door).
● NB : The lock assembly has been lubricated for life, and should
not be disassembled by the user.
Cleaning Powder Coatings
● Every six months, powder coated surfaces should be cleaned to
protect the nish. However, in areas where pollutants are more
prevalent, especially in coastal or industrial regions, cleaning
should be carried out every two to three months.
● To clean the powder coated surface:
◦ Carefully remove any loose deposits with a wet sponge.
◦ Use a soft brush (non abrasive) or cloth and a mild household
detergent solution to remove dust, salt and other deposits.
Do not use steel wool, scrapers, scouring liquids or powders
to remove deposits as these permanently scratch the coating
surface.
◦ Rinse o with clean fresh water.
MAINTENANCE LOG
In order to protect your warranty, record all maintenance activity in the following log:
Address of building:
Name of door:
Date Activity Signed
Allegion (Australia) Pty Ltd
Freephone: 1800 098 094
Email: auinfo@allegion.com
www.ausloc.com.
Allegion (New Zealand) Limited
Freephone: 0800 477 869
Email: nzinfo@allegion.com
www.allegion.co.nz
I
S
Y
P
C
A
E
R
P
C
asd9doc01
 Loading...