

PRODUCT LABEL
JBE109 or JFE109
ONLY
Programming Guide
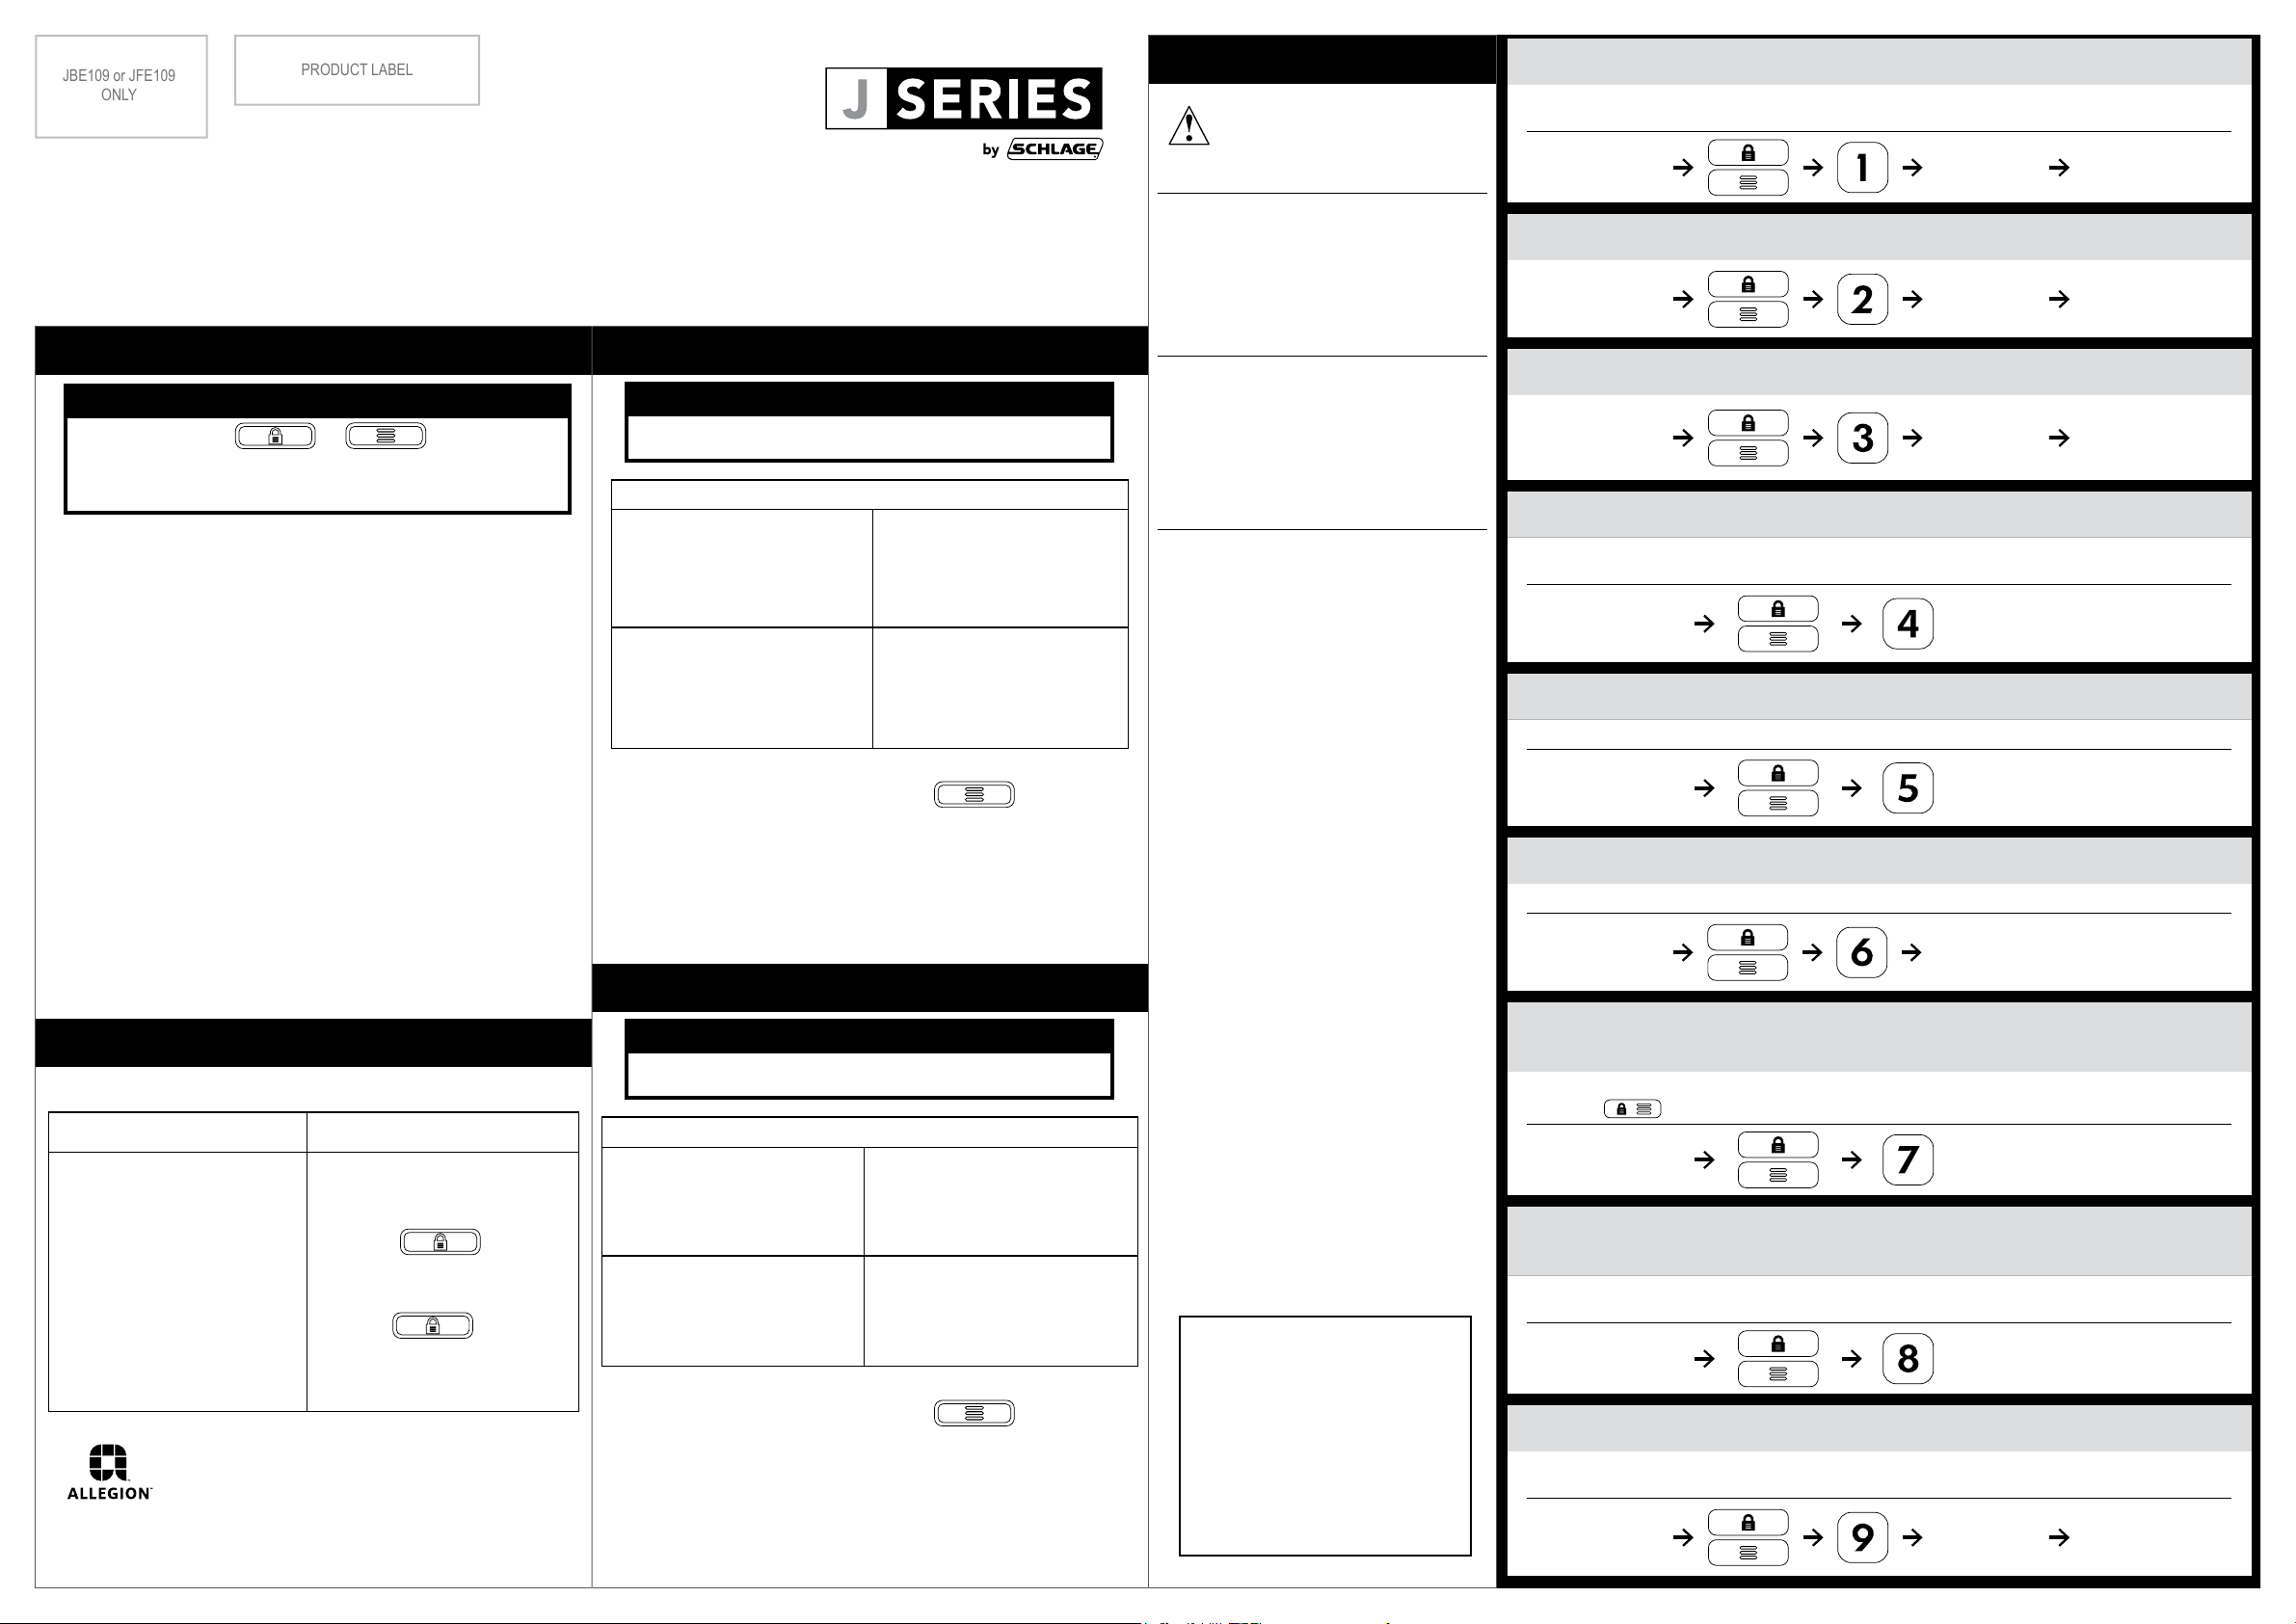
ADD USER CODE
User Guide
JBE105 Deadbolt, JFE105 Lever
JBE109 Connected Deadbolt, JFE109 Connected Lever
User Guide
NOTE
You must press or after entering
a user code. Your lock will not recognize a
user code until you press the button.
Proper Use
• Use four new AA alkaline batteries for the best performance.
• Do not attempt to disassemble any internal components of
the lockset. Doing so will void the limited warranty.
• Do not drop or hit the lockset. Impact may result in
permanent damage.
• Do not use pins or sharp objects to press the keypad.
Care and Maintenance
• Remove locks, or do not install locks, prior to painting your
door.
• Periodically clean with mild cleaner and a soft cloth only.
Do not use any abrasives or chemical products containing
alcohol, benzene, acids, and avoid using sharp or abrasive
objects to clean this lockset.
• Do not allow any water or liquids into the lockset.
• JBE109: You must enter a valid user code after battery
replacement. Lock will enter auto-handing routine, locking
and unlocking several times. Auto-handing is complete when
lock movement stops.
JFE105 Lever
NOTE
By default JFE105 Lever is in Auto-Lock mode.
JFE105 Modes
Auto-Lock
Auto-Lock mode will
automatically lock the door
after 5 seconds.
Passage
Passage mode allows
for free passage (lever is
unlocked).
Turn the inside thumbturn
to a horizontal position
(pointing left or right) to set
to Auto-Lock mode.
Turn the inside thumbturn
to a vertical position
(straight up and down) to
set to Passage mode.
How to unlock door in Auto-Lock mode
• Enter valid user code then press
• To manually unlock, insert and rotate key to vertical
position. With key installed, turn lever. Lever will remain
unlocked until key is removed.
How to unlock door in Passage mode
• Door is always unlocked.
JFE109 Connected Lever
Read instructions below
before programming your
lock!
PROGRAMMING INDICATORS
Success:
1 long green blink, 1 long beep
Fail:
2 red blinks, 2 beeps
DEFAULT CODE LOCATIONS
Default Programming Code and user
codes are located on label on the
back of the inside assembly and on
the front of the English language user
guide.
NOTES
L JBE105 Deadbolt and JFE105
Lever can hold up to 10 user
codes.
L JBE109 Connected Deadbolt and
JFE109 Connected Lever can
hold up to 30 user codes.
L All user codes must be the same
length. JBE105/JFE105: Changing
user code length will delete all
codes not of the chosen length.
User codes can be 4 - 8 digits long. Default user code length is 4 digits. If longer user code
length is desired, see CHANGE USER CODE LENGTH below, then add codes.
Programming Code
(6 digits)
New User Code
(4 - 8 digits)
New User Code again
(4 - 8 digits)
DELETE USER CODE
Programming Code
(6 digits)
User Code to
delete
(4 - 8 digits)
User Code to delete
again
(4 - 8 digits)
CHANGE PROGRAMMING CODE
Current
Programming Code
(6 digits)
New
Programming
Code
(6 digits)
New Programming
Code again
(6 digits)
ENABLE OR DISABLE VACATION MODE
ENABLED: Vacation mode disables ALL user codes.
DISABLED: User codes will unlock the lock.
Programming Code
(6 digits)
When Vacation Mode is enabled,
entering the programming code
will disable vacation mode.
ENABLE OR DISABLE SOUND
Turns sound on and o.
Programming Code
(6 digits)
DELETE ALL USER CODES
Deletes all programmed user codes. Locate default user codes before deleting all codes.
Programming Code
(6 digits)
Programming
Code
(6 digits)
JBE105 Deadbolt and JBE109 Connected Deadbolt
How to Lock/Unlock
FROM INSIDE FROM OUTSIDE
Lock
• Turn thumbturn toward
the door edge.
Unlock
• Turn thumbturn away
from door edge.
© Allegion 2020
J Series UG Rev. 10/20-f1
G59-KPL0012_01
Lock
• Insert key and turn until
deadbolt engages.
• Press
Unlock
• Enter valid user code, then
press
• To manually unlock, insert
key and turn until deadbolt
disengages.
NOTE
By default JFE109 Lever is in Auto-Lock mode.
JFE109 Modes
Auto-Lock
Auto-Lock mode will
automatically lock the door
after 5 seconds.
Passage
Passage mode allows
for free passage (lever is
unlocked).
How to unlock door in Auto-Lock mode
• Enter valid user code then press
• To manually unlock, insert and rotate key to vertical
position. With key inserted, turn lever. Lever will remain
unlocked until key is removed.
How to unlock door in Passage mode
• Door is always unlocked.
Press white button above
inside lever. LED will blink red.
Press and hold white button
above inside lever for 2
seconds until LED blinks
green twice.
Contact Customer
Support
888-805-9837
Warranty and FCC/IC
Statement
alle.co/jseries
ENABLE OR DISABLE ONE-TOUCH LOCKING
Deadbolt models only (JBE105, JBE109)
ENABLED by default. One-touch locking allows for the deadbolt to be locked from the outside by
pressing . When DISABLED, user code followed by lock button must be entered to lock.
Programming Code
(6 digits)
ENABLE OR DISABLE AUTO LOCK
Deadbolt models only (JBE105, JBE109)
Auto lock is DISABLED by default. When enabled, deadbolt will automatically lock after a 30
second delay.
Programming Code
(6 digits)
CHANGE USER CODE LENGTH
User codes can be 4-8 digits. JBE105/JFE105: Changing the user code length will delete all
existing user codes!
Programming Code
(6 digits)
New User Code
length
(4, 5, 6, 7, or 8)
New User Code length
again
(4, 5, 6, 7, or 8)
Press and hold SET button while inserting the
battery back. Hold the set button until long beep
over.
Appuyez et maintenez le bouton SET tout en
insérant la pile enlevée. Maintenez le bouton SET
Remove one battery
Retirez une pile
AA
AA
AA
AA
AA
AA
AA
AA
AA
AAA
AAA
AAA
AAA
AA
AA
AA
AA
AAA
AAA
AAA
AAA
AA
AA
AA
AA
AAA
AAA
AAA
AAA
AAA
AAA
AAA
AAA
AA
AA
AA
AA
AAA
AAA
AAA
AAA
Z-Wave™ Functions
ONLY FOR
JBE109 Connected Deadbolt
JFE109 Connected Lever
About Z-Wave™
This lock is a Security Enabled Z-Wave Product.
• This product can be operated in any Z-Wave network with
other Z-Wave certied devices from other manufacturers.
All mains operated nodes within the network will act as
repeaters regardless of vendor to increase reliability of the
network.
• S2 security enabled controller is required to operate the
product. The lock will have limited functionality if included
with a non-secure controller.
• Refer to your home automation system’s documentation
for more information.
Add or Remove lock from Z-Wave network
1. Place your Z-Wave Controller into the “Add” (Inclusion
Mode) or “Remove” (Exclusion Mode). Refer to the
respective documentation for your home automation
system for details.
2. Remove the battery cover.
3. Press and hold enrollment button under battery cover for
0.5 to 3 seconds as shown. Solid amber LED will be ON.
AAAAAA
AA
Z-Wave Plus™
For enrollment in some Z-Wave Plus networks, an additional
5 digit code may be required to be entered into the home
automation system or panel during Step 4. Enter the 5
digit code shown on the label located on lock or on the
cover of the included installation instructions. Refer to your
home automation system’s documentation or app for more
information.
JBE109 Deadbolt and JFE109 Lever can be added into a
Z-Wave network by scanning the Z-Wave QR Code at the
start of this user guide with a controller providing
SmartStart inclusion.
No further action is required and the SmartStart product will
be added automatically within 10 minutes of being switched
on in the network range.
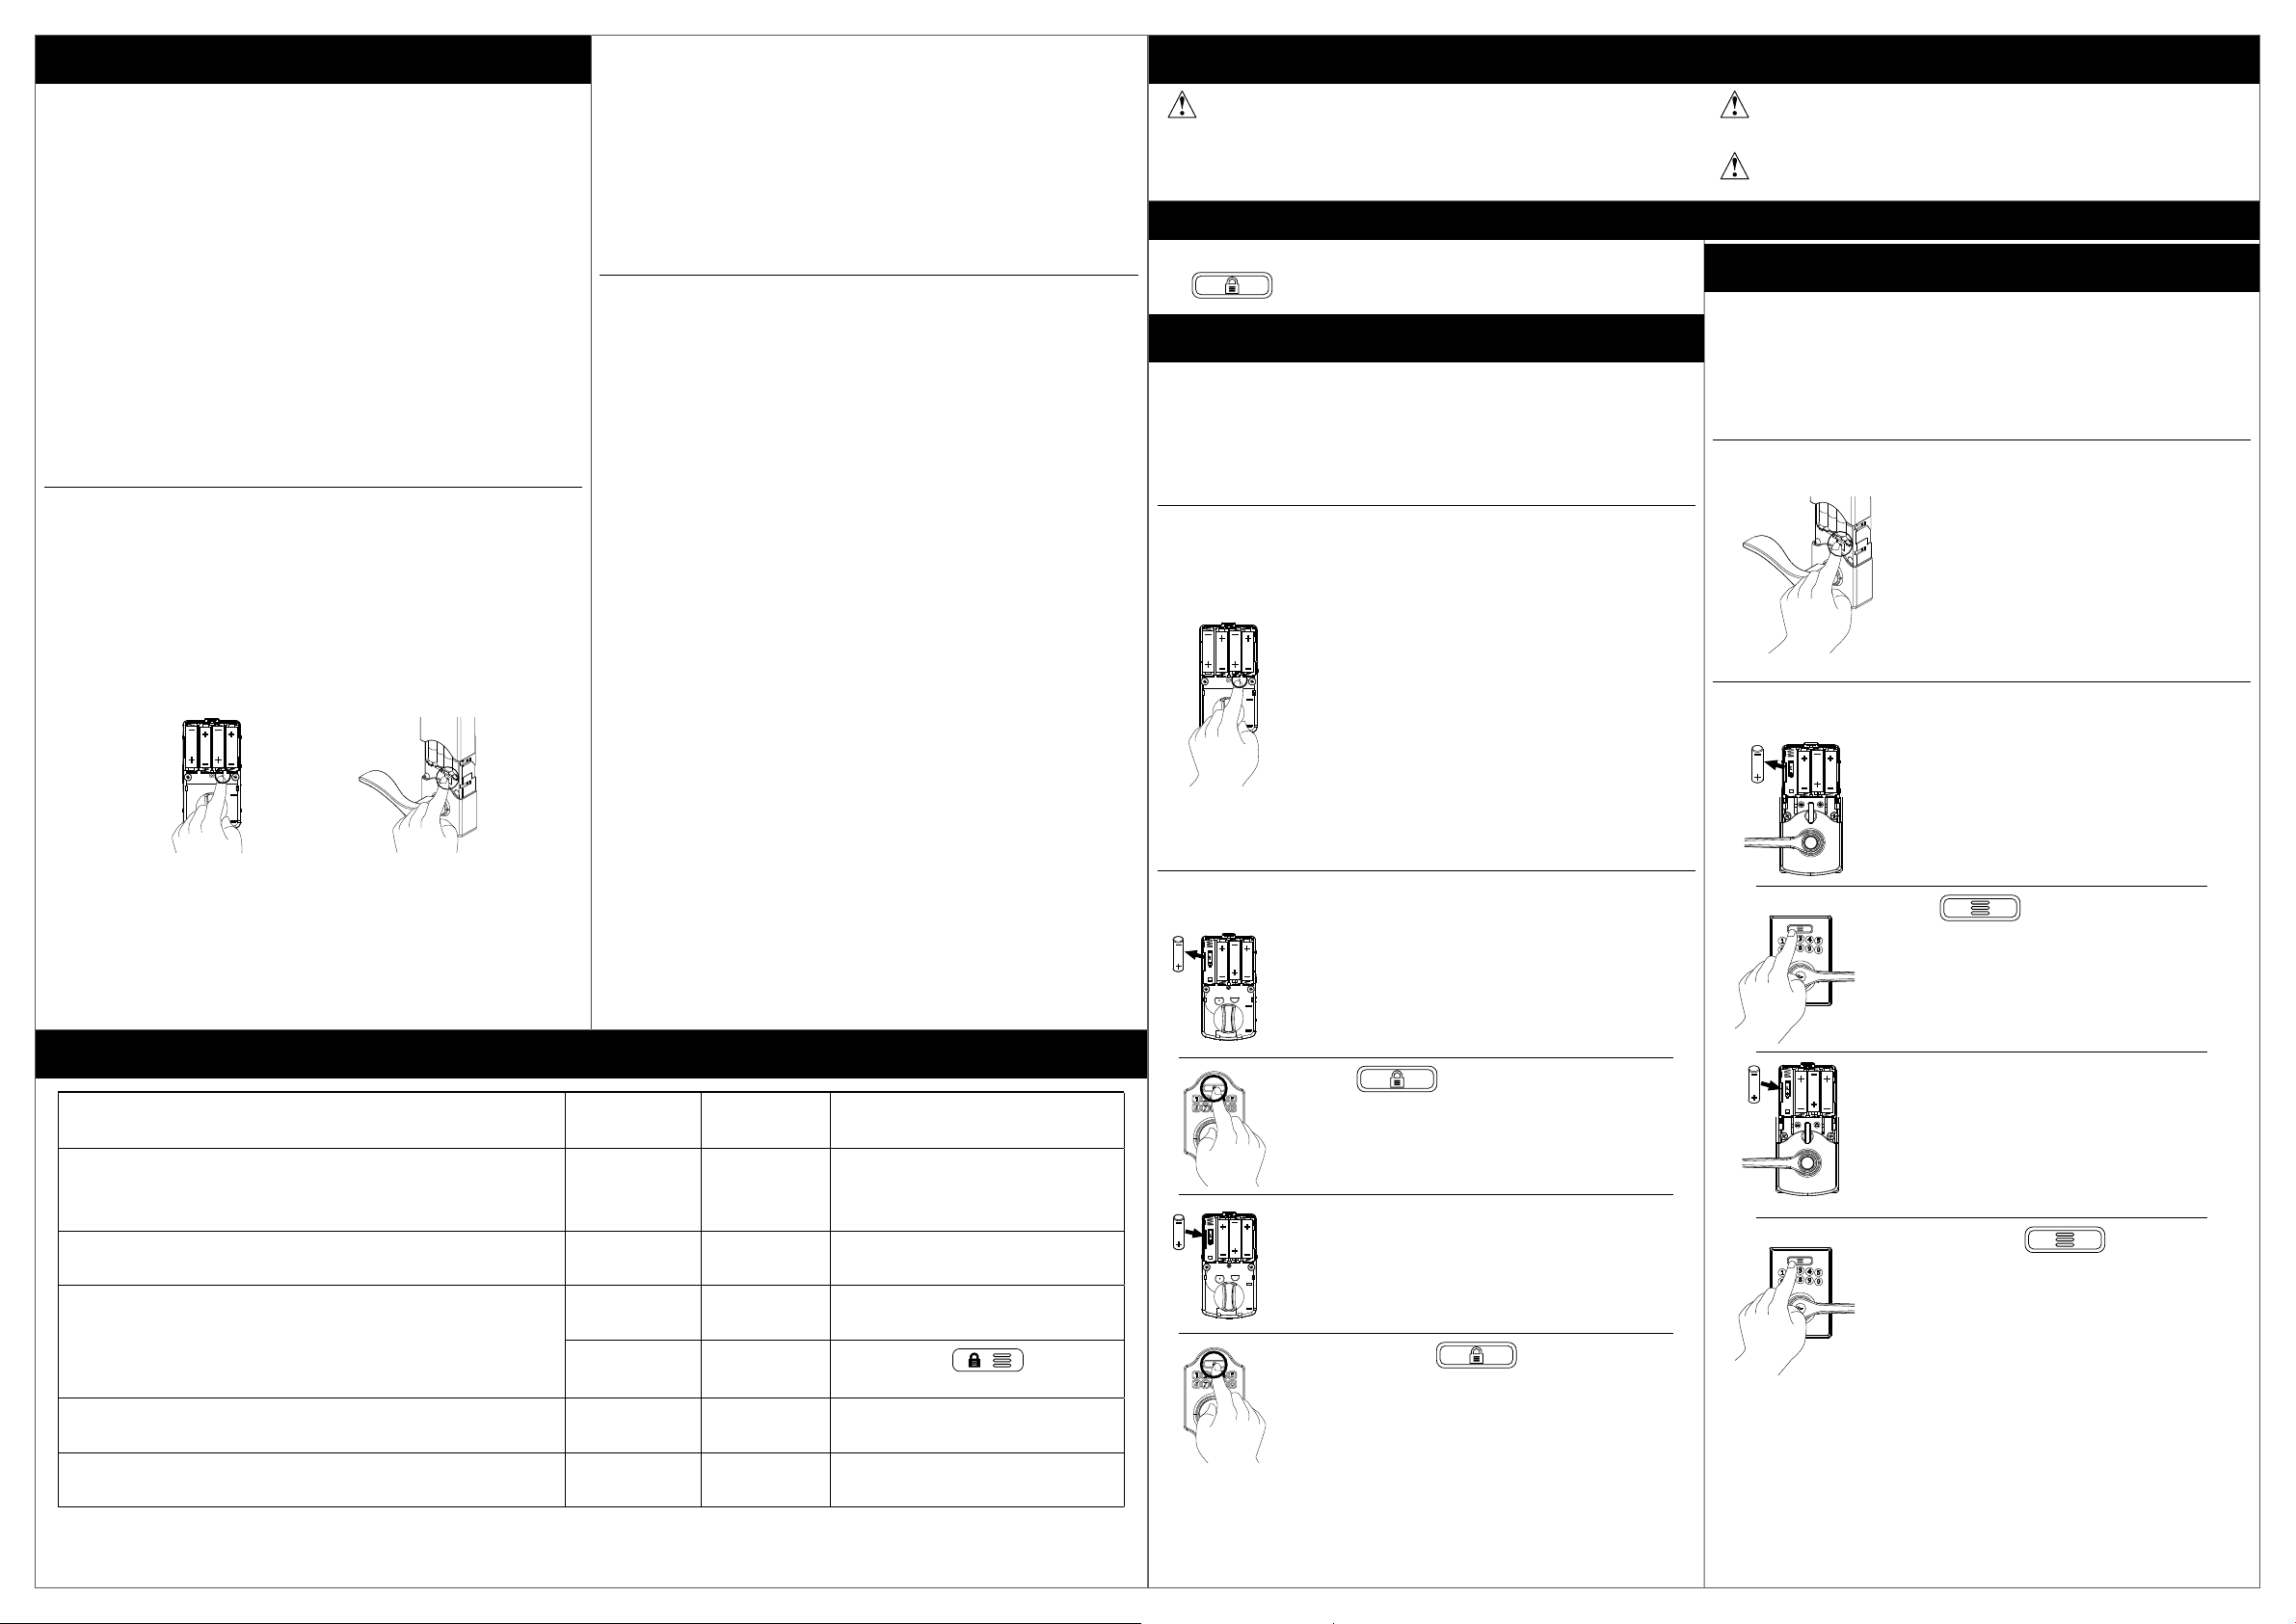
Factory Default Reset (FDR)
Locate default code sticker on lock before attempting
factory default reset (FDR) procedure. Deleted codes
CANNOT be recovered! This will erase all stored information!
DEADBOLT MODELS (JBE105, JBE109)
L You must re-enter a default access code followed by
to set up the lock after restoring to factory default!
1 Determine which deadbolt you have.
Remove battery cover. If there is a small button under the
batteries, you have a JBE109 Connected Deadbolt. Follow
labeled steps below. If there is no small button under the
batteries, you have a JBE105 Deadbolt. Follow labeled steps
below.
JBE109 Connected Deadbolt
1. Press and hold the enrollment button.
The led will light solid amber.
AAAAAA
AA
2. After about 8 seconds of holding the
button, the amber light will turn o.
Release the button. Successful FDR is
indicated by 3 long green blinks and 3
long beeps.
3. You must enter a valid user code.
Lock will enter auto-handing routine,
locking and unlocking several times.
Auto-handing is complete when lock
movement stops.
Please use this procedure only when the network primary
controller is missing or otherwise inoperable.
Read the full FDR procedure before beginning.
LEVER MODELS (JFE105, JFE109)
1 Determine which lever you have.
Remove battery cover. If there is a small button under the
batteries, you have a JFE109 Connected Lever. Follow
labeled steps below. If there is no small button under the
batteries, you have a JFE105 Lever. Follow labeled steps
below.
JFE109 Connected Lever
1. Press and hold the enrollment
button. The led will light solid amber.
2. After about 8 seconds of holding the
button, the amber light will turn o.
Release the button. Successful FDR
is indicated by 3 long green blinks
and 3 long beeps.
JFE105 Lever
AA
AA
1. Remove one battery.
AA
AA
4. Release the enrollment button. An LED will ash amber
indicating the “Add” or “Remove” process is in progress.
5. Success is indicated by a green LED blink and a beep.
L If a red LED turns on, try repeating steps 1-3.
Problem Sound Lights Solution
After entering a user code to unlock the lock, the yellow
light is ashing and there is a delay before it unlocks.
10 red ashing lights when outside lock button is
pressed.
Valid user code will not unlock. 2 beeps 2 green and
Cannot add user code. 3 beeps 3 red
Deadbolt tries to extend twice but doesn’t extend. 2 beeps 2 red
Troubleshooting
4 beeps 4 yellow
---- 10 red
---- ----
ashes
ashes
red ashes
ashes
ashes
The battery is low and should
be replaced.
Battery is critical and must be
replaced.
Vacation Mode is enabled.
Disable Vacation Mode.
Must press
after
entering user code.
Exceeded the user code limit.
Deadbolt jammed, Adjust bolt/
frame alignment.
JBE105 Deadbolt
1. Remove one battery.
AA
AA
AA
AA
2. Press
3. Replace the battery then wait until power
AA
AA
AA
AA
up is complete, indicated by 1 long green
blink and 1 long beep. You must complete
the next step within 10 seconds.
4. Press and hold for 3 seconds.
Successful FDR is indicated by 3 long
green blinks and 3 long beeps.
5. Enter default access code followed by lock button to set
up lock!
2. Press
AA
AA
3. Replace the battery then wait until
AA
AA
power up is complete, indicated by
1 long green blink and 1 long beep.
You must complete the next step
within 10 seconds.
4. Press and hold for
3 seconds. Successful FDR is
indicated by 3 long green blinks and
3 long beeps.

42.000
7.425
FRONT
FRONT
29.700
FLAT SHEET (A3) FINAL FOLDED SIZE
MAY VARY
10.500
Additional Notes: Revision History Revision Description:
A B C D E F
4/14 4/15 6/15 6/17 8/21
Material
White Paper
Notes
1. Metric measurements (cm)
2. printed two sides
3. printed black
4. tolerance ± .13
5. printed in country may vary
6. drawings not to scale
F1 > Additional Z-Wave text changes
Edited By Approved By EC Number Release
R. Byun D. Toppins N/A 08/21/2020
Title
Creation Date
04/07/2020
Created By
R. Byun
Software:
InDesign CC 2020
J-Series UG
Number
N/A
Activity
3899 Hancock Expwy
Security, CO 80911
Date
Revision
F1
© Allegion 2020
 Loading...