

ALL-CLAD WD824D51 Owner’s Guide
4 Slice Digital Gourmet Wae Maker -
Gaufrier gourmet 4 gaufres (avec touches numériques)
Owner’s Guide - Model No. WD824D51
Guide d’utilisation - Modèle No. WD824D51
Read and save these instructions - Lisez et conservez ces instructions
www.all-clad.com
EN
FR

TABLE OF CONTENTS
IMPORTANT SAFEGUARDS .......................................................................................................................... p. 3
DISPOSING OF YOUR APPLIANCE ............................................................................................................ p. 5
CONGRATULATIONS ON YOUR PURCHASE ......................................................................................... p. 5
DESCRIPTION ..................................................................................................................................................... p. 6
BEFORE USE ........................................................................................................................................................ p. 9
ASSEMBLY/DISASSEMBLY ............................................................................................................................. p. 9
USING YOUR WAFFLE MAKER .................................................................................................................... p. 10
COOKING FEATURES DESCRIPTION ....................................................................................................... p. 13
TROUBLESHOOTING ...................................................................................................................................... p. 20
CLEANING & MAINTENANCE .................................................................................................................... p. 21
TIPS FOR BETTER COOKING RESULTS ................................................................................................... p. 22
LIMITED TWO YEAR WARRANTY ............................................................................................................. p. 23
2

IMPORTANT SAFEGUARDS
When using electrical appliances, basic safety precautions should always be followed including the following:
1. Read all instructions.
2. Do not touch hot surfaces. Use handles or knobs. Always use oven mitts.
3. To protect against electrical shock do not immerse cord, plugs, or this appliance in water or any other liquid.
4. Close supervision is necessary when any appliance is used by or near children.
5. Unplug from outlet when not in use and before cleaning. Allow to cool before adding or removing parts, and
before cleaning the appliance.
6. Do not operate any appliance with a damaged cord or plug or after the appliance malfunctions, or has been
damaged in any other manner. Call 1-800-ALL-CLAD (255-2523) for repair or return information.
7. e use of accessory attachments not recommended by the appliance manufacturer may cause injuries.
8. Do not use outdoors.
9. Do not let the cord hang over the edge of tables, counters, or touch hot surfaces.
10. Do not place on or near a hot gas or electric burner, or in a heated oven.
11. Extreme caution must be used when moving an appliance containing hot oil or other liquids.
12. To disconnect, turn the control to “OFF” position, then remove plug from wall outlet.
13. Do not use appliance for other than intended use.
FOR HOUSEHOLD USE ONLY
EN
SAVE THESE INSTRUCTIONS
3

is appliance is for HOUSEHOLD USE ONLY.
ere are no user-serviceable parts inside. If servicing becomes necessary, within the warranty period, return your
wae maker to All-Clad. See warranty information for details; do not attempt to repair it yourself.
WARNING: To prevent personal injury or property damage caused by re, always unplug this and other appliances
when not in use.
CAUTION: To ensure continued protection against risk of electrical shock, connect to properly grounded outlets only.
Always follow recommended cooking times when using this electric wae maker.
NOTE: During the initial use of this appliance, some slight smoke and/or odor may be detected. is is normal
and will stop after a few uses.
ELECTRICAL REQUIREMENTS
e appliance employs a 3-conductor power supply cord with grounding conduct and a grounding type attachment
plug, which is intended to be grounded during use .
If the plug does not t, contact a qualied electrician. Do not attempt to modify the plug in any way.
• A short power-supply cord has been provided to reduce the risk entanglement in or tripping over a long cord.
• Extension cords are available and should be used with caution.
• If a longer detachable power-supply cord or extension cord is used,
- the marked electrical rating of the cord set or the extension cord should be at least as great as the electrical
rating of the appliance, and
- the cord should be arranged so that it will not drape over the countertop or tabletop where it can be pulled on
by children or tripped over unintentionally,
- the extension cord should be a grounding type 3 wire cord.
4

DISPOSING OF YOUR APPLIANCE
Your appliance contains many materials which can be recycled.
Consult your local waste collection agency for information on how to properly dispose of your
appliance.
CONGRATULATIONS ON YOUR PURCHASE
All-Clad Metalcrafters created the original collection of professional cookware made with a patented metal bonding
process, which eliminates uneven heating, an accomplishment that lead to All-Clad becoming the product chosen
for the kitchens of more four-star restaurants than any other. Still the only complete line of cookware made by an
American company with materials produced in its own mill, All-Clad has revolutionized the art of cooking since its
introduction.
All-Clad’s professional cookware collections feature a variety of bonded metals and nishes from high grade
aluminum and stainless steel to copper. All-Clad combines professional design with high performance for all tastes
and cooking styles.
e All-Clad cooking experience now extends to a focused selection of small electrical appliances, each designed
without compromise to make a noticeable dierence in both use and performance. Cooking connoisseurs now have
a wonderful opportunity to complete their kitchen with electrics by All-Clad, the undisputed original.
EN
All-Clad Metalcrafters has an ongoing policy of research and development and may modify its products without
prior notice.
5
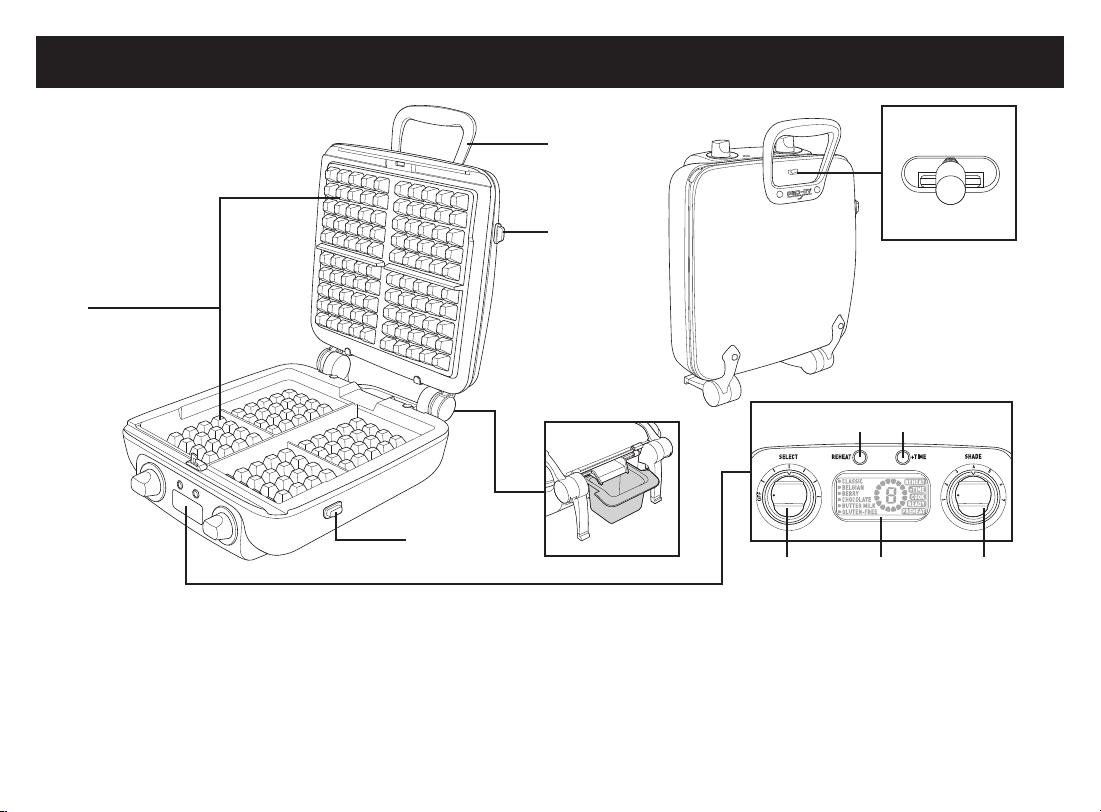
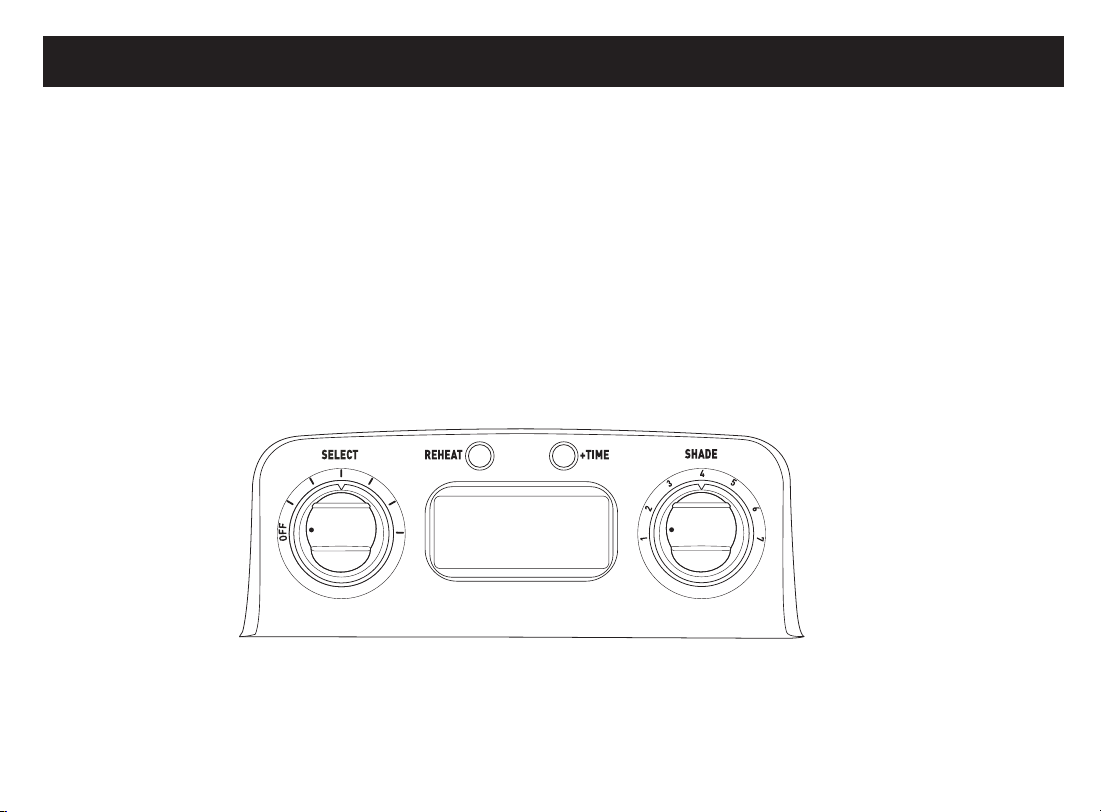
DESCRIPTION
A
C
A Cool-touch handle
B Release plates buttons
C Removable wae plates
D 6-Custom Recipes Selector
E Reheat button
F LCD Display
6
B
J*
GE
B
G +Time button
H Shade Selector
I Batter tray
J Storage lock*
(is knob is for storage ONLY)
I
D
HF
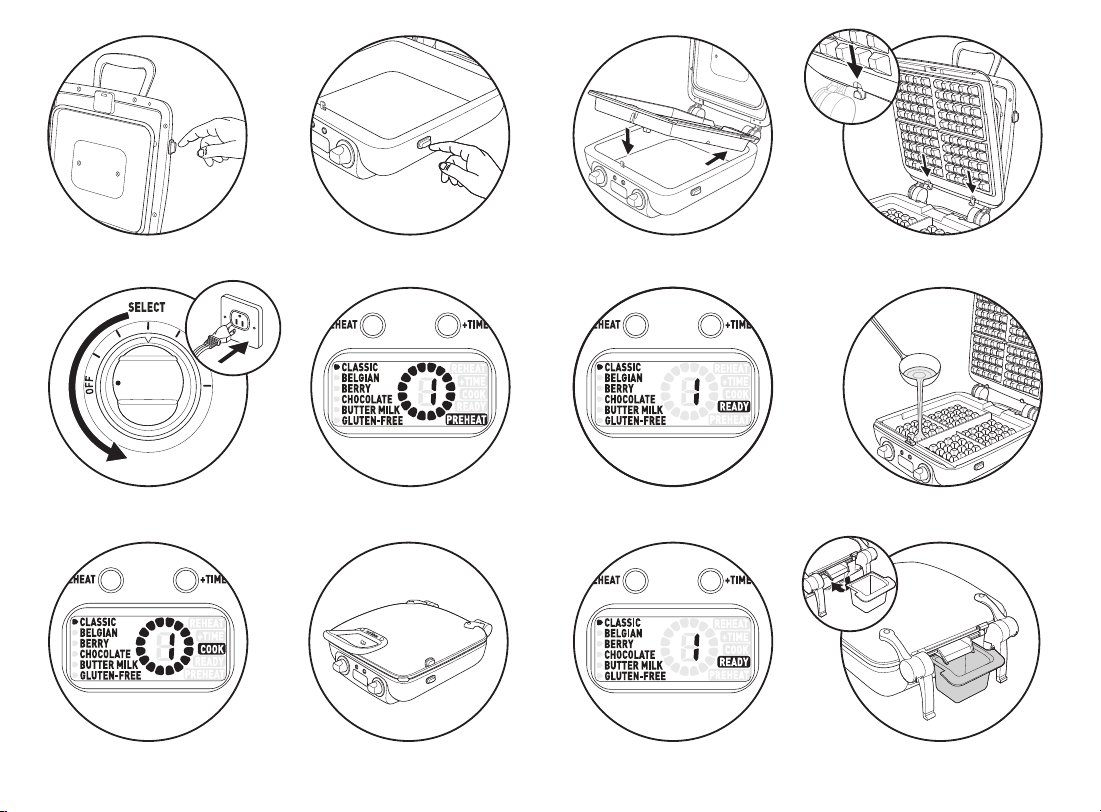
Fig. 1 Fig. 2 Fig. 3
Fig. 4
Fig. 5
Fig. 9
7
Fig. 6 Fig. 7
Fig. 8
Fig. 10 Fig. 11 Fig. 12
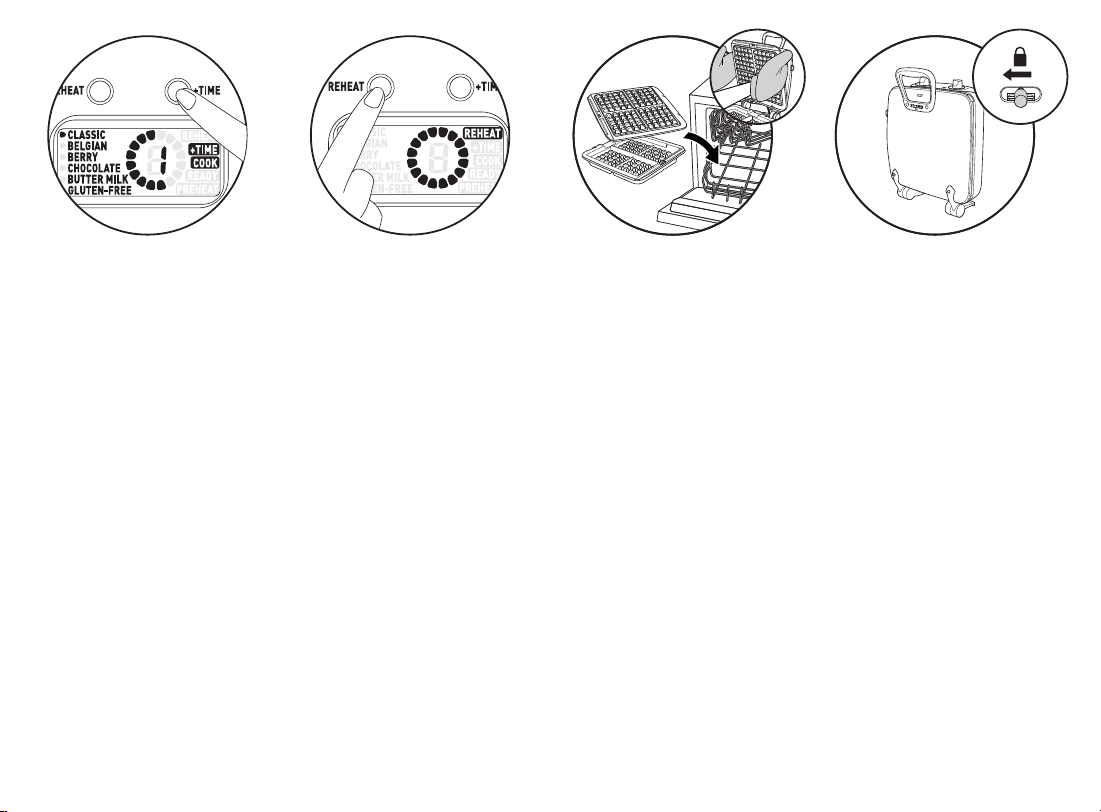
Fig. 13 Fig. 14 Fig. 15
8
Fig. 16

BEFORE USE
• Remove all packaging and stickers from your wae maker and wipe the housing and plates with a damp cloth
to remove any dust or residue remaining from manufacturing.
• We recommend seasoning the non-stick plates with cooking spray or oil before use. For best results it is suggested
to repeat this process at the start of each use
ASSEMBLY/DISASSEMBLY
1. Open the lid of the wae maker.
2. To remove wae plates
a. Be sure plates are completely cool.
b. Press the upper plate release button (located on the right side of the lid) with one hand, while removing the
plate with the other hand. (Fig. 1,2)
c. Repeat the process with the lower plates (release button located on the right bottom housing).
3. To replace wae plates a. Insert the wae plate tabs into the unit and press down. You will hear the plates click
into place. (Fig. 3,4)
EN
9
USING YOUR WAFFLE MAKER
CAUTION: Do not immerse the appliance, cord or plug in water or any other liquid.
• Do not run the wae maker under water or any other liquid.
• Before using, remove all packaging, stickers or accessories both inside and outside of the appliance.
• Take out the batter tray from the styrofoam packaging.
• Always use the wae maker on a at, dry, heat resistant surface.
• Ensure that your hands are dry when using this appliance.
• Do not place the appliance on or near slippery or hot surfaces, or allow the cord to dangle above a heat source.
1. Make sure the plates are in place and RECIPES SELECTOR is turned to the OFF position.
Plugin the wae maker (Fig. 3, 4, 5)
• While the LEFT KNOB is turned to the OFF setting, the unit will remain o and there will be no response
while pressing the buttons & or turning the RIGHT KNOB.
• e LCD display will not show while the unit is turned to the OFF position.
10
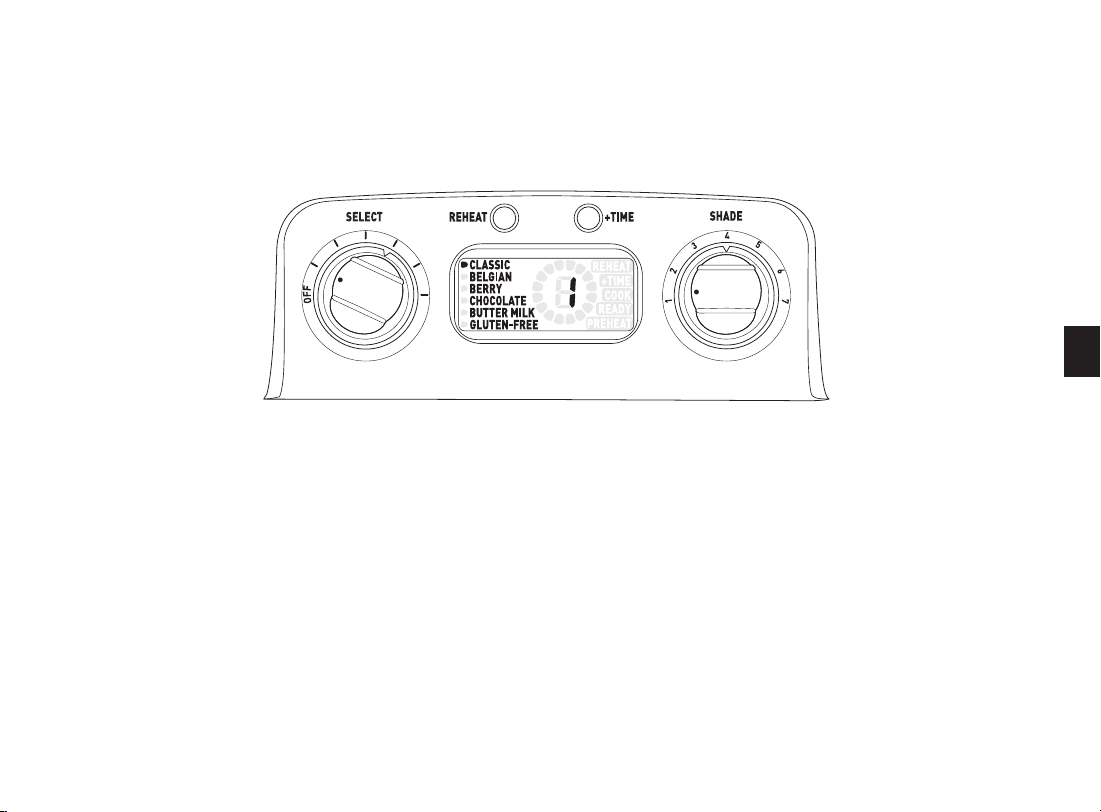
2. Turn on the unit by RECIPES SELECTOR to desired recipe with desired SHADE level selected by turning
SHADE SELECTOR (Setting 1 will results in the lightest wae; setting 7 the darkest). Pre-heat the wae
maker will start automatically once settings are conrmed (Fig. 6)
NOTE: e Removable Plates have a non-stick cooking surface that may emit a slight odor during rst use. is
is normal and commonly occurs with non-stick coatings.
• Turn LEFT KNOB to select, CLASSIC; BELGIAN; BERRY; CHOCOLATE; BUTTER MILK;
GLUTEN-FREE.
• An ARROW will turn ON next to the related recipe name to show it is selected currently.
• ARROW & DIGI will ash THREE times to conrm the selection if no more changes. No preheating will
start before conrmation, turn the LEFT KNOB again and it will move the ARROW and RECIPE name ash
again to conrm your selection.
• Turn the RIGHT KNOB to change the SHADE LEVEL, the related shade level will be shown at the middle
of the LCD, it will ash THREE times to conrm the selection.
While no more changes on RECIPE & SHADE LEVEL, preheating starts.
• During PREHEAT & COOK, turn either LEFT or RIGHT KNOB to adjust, the related indicator will ash
THREE times to conrm.
EN
11

3. Baking time is determined by recipe and browning level. We recommend using Setting 3 for golden brown
waes. When preheating to the suitable temperature and is ready to bake, the READY indicator will light up
accompanied by a beep. (Fig. 7)
a. Lift the lid and add batter. (Fig. 8) en close the lid again to cook. (Fig. 9) Do not lock the safety catches on
the sides of the wae maker when cooking. (Fig. 10)
NOTE: ere will be some steam during cooking. is is normal and expected.
4. When your waes are ready, the READY indicator will light up accompanied by a beep again. (Fig. 11)
a. Carefully remove your wae and enjoy.
b. If making more than one wae, once your rst wae is removed – repeat the baking process by adding more
batter (step 3a).
5. At the back of the wae maker there is a batter tray. (Fig. 12) is tray catches any excess batter.
We recommend emptying this tray when the wae maker is cold. Use oven mitts if the tray must be emptied
while the appliance is hot and in use
6. To turn o your wae maker at any time, turn the selector knob to the OFF position.
7. Close the lid. e wae maker will adjust the cooking time based on your selected recipe and shade level. e “COOK”
will be displayed on the LCD, and the PROGRESS INDICATOR will automatically start count down. (Fig.13)
NOTE: e lock should only be used when the wae maker is being stored away, DO NOT use the locking
mechanism during the cooking process.
NOTE: Do not use metal utensils as they can scratch the non-stick surface.
8. To turn o your wae maker at any time, turn the selector knob to the OFF position.
+ TIME
If your wae color is too light, one press of this button adds a little extra cooking time. e “+TIME” will be
displayed on the LCD, keep ashing during cooking. (Fig.13)
12

REH EAT
If you would like to reheat your wae, press the reheat button to begin the process. e “REHEAT” will be
displayed on the LCD, and the PROGRESS INDICATOR will automatically start count down. When your
waes are ready, the “READY” will be displayed on the LCD accompanied by a beep sound. (Fig.14)
NOTE: REHEAT function limited to use 5 times consecutively.
COOKING FEATURES DESCRIPTION
All cooking functions with its default settings & limitations are listed on table below.
Recipes Selection LCD display Shade Level Selection Knob
OFF (Left knob) ALL OFF Deactivated
1 (Left knob) CLASSIC 1 to 7
2 (Left knob) BELGIAN 1 to 7
3 (Left knob) BERRY 1 to 7
4 (Left knob) CHOCOLATE 1 to 7
5 (Left knob) BUTTER MILK 1 to 7
6 (Left knob) GLUTEN-FREE 1 to 7
REHEAT (Button) REHEAT Ignored
+TIME (Button) +TIME Ignored
EN
13

Two Knobs & Two Buttons:
• LEFT KNOB (Select functions, OFF mode; CLASSIC; BELGIAN; BERRY; CHOCOLATE; BUTTER
MILK; GLUTEN-FREE)
• RIGHT KNOB (Select SHADE Level from 1 to 7)
• REHEAT BUTTON (override all functions at anytime, cook with xed period of heating time)
• +TIME BUTTON (Plus additional time on top of for any shade level or provide a xed period of time after
cooking to improve performance)
14
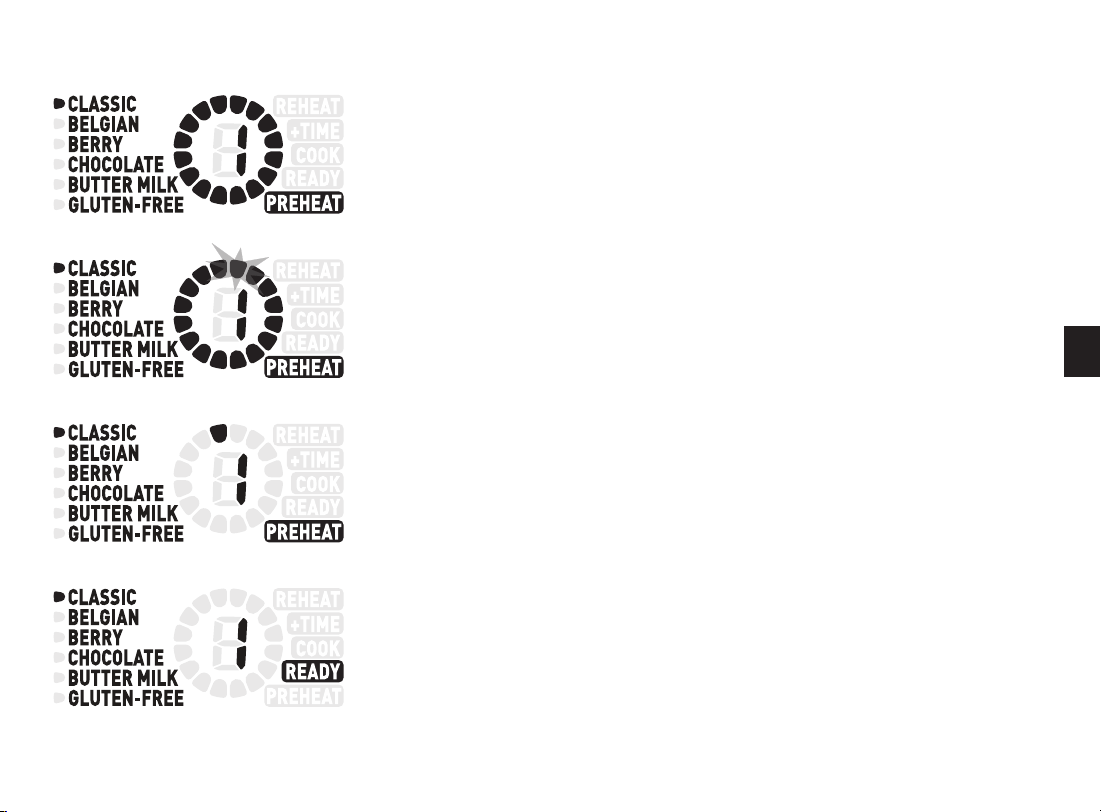
FUNCTION EXCUTION PROCESSES
While starting the preheating, the PREHEAT and FULL COUNTDOWN
RING will appear and start to count down.
As the whole ring represent the whole preheating time, it will disappear the
segment one by one in clockwise direction, the segment will rstly ash and
then disappear nally one by one.
e ring will count down until all segments disappeared.
When nished the countdown for PREHEAT, the system will go into
READY status and beep THREE times, waiting for user to pour in the
batter for cooking.
EN
15
 Loading...