

Page 1
Page 2

Contents
Contents . . . . . . . . . . . . . . . . . . . . . . . . . . . . . . . . . . . . . . . . . . . . . . . . . . 1
CoPilot Overview . . . . . . . . . . . . . . . . . . . . . . . . . . . . . . . . . . . . . . . . . . 1
A Safety Warning . . . . . . . . . . . . . . . . . . . . . . . . . . . . . . . . . . . . . . . . . . 1
Using Your Mobile Device for Guidance . . . . . . . . . . . . . . . . . . . . . . . . 2
Address Entry . . . . . . . . . . . . . . . . . . . . . . . . . . . . . . . . . . . . . . . . . . . . . . . . . . 3
Start Driving! . . . . . . . . . . . . . . . . . . . . . . . . . . . . . . . . . . . . . . . . . . . . . . . . . . . 5
Entering a Home Address . . . . . . . . . . . . . . . . . . . . . . . . . . . . . . . . . . . . . . . . . 6
Entering a Work Address . . . . . . . . . . . . . . . . . . . . . . . . . . . . . . . . . . . . . . . . . 6
Favourites. . . . . . . . . . . . . . . . . . . . . . . . . . . . . . . . . . . . . . . . . . . . . . . . . . . . . . 7
Finding Points of Interest. . . . . . . . . . . . . . . . . . . . . . . . . . . . . . . . . . . . . . . . . . 8
Intersection . . . . . . . . . . . . . . . . . . . . . . . . . . . . . . . . . . . . . . . . . . . . . . . . . . . 10
Contact Integration . . . . . . . . . . . . . . . . . . . . . . . . . . . . . . . . . . . . . . . . . . . . . 11
Latitude/Longitude . . . . . . . . . . . . . . . . . . . . . . . . . . . . . . . . . . . . . . . . . . . . . . 12
Saved Trip . . . . . . . . . . . . . . . . . . . . . . . . . . . . . . . . . . . . . . . . . . . . . . . . . . . . 13
Closing CoPilot . . . . . . . . . . . . . . . . . . . . . . . . . . . . . . . . . . . . . . . . . . . . . . . . 13
Driver Safety Screen . . . . . . . . . . . . . . . . . . . . . . . . . . . . . . . . . . . . . . . . . . . . 14
Map Screen. . . . . . . . . . . . . . . . . . . . . . . . . . . . . . . . . . . . . . . . . . . . . . . . . . . . 14
Itinerary Screen . . . . . . . . . . . . . . . . . . . . . . . . . . . . . . . . . . . . . . . . . . . . . . . . 15
Navigating Through CoPilot Screens . . . . . . . . . . . . . . . . . . . . . . . . . . . . . . . 16
Customizing the Guidance Screens. . . . . . . . . . . . . . . . . . . . . . . . . . . . . . . . . 16
Map Modes. . . . . . . . . . . . . . . . . . . . . . . . . . . . . . . . . . . . . . . . . . . . . . . . . . . . 17
Trip Editing and Waypoints . . . . . . . . . . . . . . . . . . . . . . . . . . . . . . . . . . . . . . . 18
Picking Stops From the Map . . . . . . . . . . . . . . . . . . . . . . . . . . . . . . . . . . . . . . 19
Getting ETA’s and Distances . . . . . . . . . . . . . . . . . . . . . . . . . . . . . . . . . . . . . . 20
Optimizing Stops . . . . . . . . . . . . . . . . . . . . . . . . . . . . . . . . . . . . . . . . . . . . . . . 20
Detour Feature . . . . . . . . . . . . . . . . . . . . . . . . . . . . . . . . . . . . . . . . . . . . . . . . 21
Selective Routing . . . . . . . . . . . . . . . . . . . . . . . . . . . . . . . . . . . . . . . . . . . . . . . 22
Menu Options . . . . . . . . . . . . . . . . . . . . . . . . . . . . . . . . . . . . . . . . . . . . . . . . . 23
Routing. . . . . . . . . . . . . . . . . . . . . . . . . . . . . . . . . . . . . . . . . . . . . . . . . . . . . 23
Guidance . . . . . . . . . . . . . . . . . . . . . . . . . . . . . . . . . . . . . . . . . . . . . . . . . . . 24
Map. . . . . . . . . . . . . . . . . . . . . . . . . . . . . . . . . . . . . . . . . . . . . . . . . . . . . . . . 24
Favourites. . . . . . . . . . . . . . . . . . . . . . . . . . . . . . . . . . . . . . . . . . . . . . . . . . . 25
POI Alerts . . . . . . . . . . . . . . . . . . . . . . . . . . . . . . . . . . . . . . . . . . . . . . . . . . 25
Power. . . . . . . . . . . . . . . . . . . . . . . . . . . . . . . . . . . . . . . . . . . . . . . . . . . . . . 25
The GPS Menu . . . . . . . . . . . . . . . . . . . . . . . . . . . . . . . . . . . . . . . . . . . . . . . . . 26
Save Current Location. . . . . . . . . . . . . . . . . . . . . . . . . . . . . . . . . . . . . . . . . . . 26
Modes Menu. . . . . . . . . . . . . . . . . . . . . . . . . . . . . . . . . . . . . . . . . . . . . . . . . . . 27
Reference: Guidance Mode Screens & Toolbars on Your Mobile Device . . . 28
Trip Planning on Your Mobile Device. . . . . . . . . . . . . . . . . . . . . . . . . . 33
Saving and Loading Trip Itineraries . . . . . . . . . . . . . . . . . . . . . . . . . . . . . . . . . 34
Installing CoPilot to Your Desktop . . . . . . . . . . . . . . . . . . . . . . . . . . . . 35
Adding a Data Region . . . . . . . . . . . . . . . . . . . . . . . . . . . . . . . . . . . . . . . . . . . 36
Licence Update . . . . . . . . . . . . . . . . . . . . . . . . . . . . . . . . . . . . . . . . . . . . . . . . 37
Region Selection. . . . . . . . . . . . . . . . . . . . . . . . . . . . . . . . . . . . . . . . . . . . . . . . 37
Map Download to Your Mobile Device . . . . . . . . . . . . . . . . . . . . . . . . . . . . . 38
Data Selection Options . . . . . . . . . . . . . . . . . . . . . . . . . . . . . . . . . . . . . . . . . . 40
Download Options . . . . . . . . . . . . . . . . . . . . . . . . . . . . . . . . . . . . . . . . . . . . . 46
POI Download Options. . . . . . . . . . . . . . . . . . . . . . . . . . . . . . . . . . . . . . . . . . 48
Trip Transfer . . . . . . . . . . . . . . . . . . . . . . . . . . . . . . . . . . . . . . . . . . . . . . . . . . 49
Importing Custom Places. . . . . . . . . . . . . . . . . . . . . . . . . . . . . . . . . . . . . . . . . 50
Trip Planning on Your Desktop . . . . . . . . . . . . . . . . . . . . . . . . . . . . . . 54
Reference: CoPilot on Your Desktop. . . . . . . . . . . . . . . . . . . . . . . . . . . . . . . 63
CoPilot Live Communications . . . . . . . . . . . . . . . . . . . . . . . . . . . . . . . 68
CoPilot Live Web Page . . . . . . . . . . . . . . . . . . . . . . . . . . . . . . . . . . . . . . . . . . 68
Live Mode - Overview . . . . . . . . . . . . . . . . . . . . . . . . . . . . . . . . . . . . . . . . . . . 69
Live Mode - Automatic Vehicle Location (AVL) . . . . . . . . . . . . . . . . . . . . . . . 70
Live Mode - Send/Receive Messages . . . . . . . . . . . . . . . . . . . . . . . . . . . . . . . . 70
Live Mode - Send Trip Itinerary Updates . . . . . . . . . . . . . . . . . . . . . . . . . . . . 72
Driving with Live - Mobile Device Setup. . . . . . . . . . . . . . . . . . . . . . . . . . . . . 73
Driving with Live - Receive/Respond To Messages . . . . . . . . . . . . . . . . . . . . 76
Driving with Live - Receive Trip Itinerary Updates . . . . . . . . . . . . . . . . . . . . 77
About GPS Technology . . . . . . . . . . . . . . . . . . . . . . . . . . . . . . . . . . . . . 78
Software Registration . . . . . . . . . . . . . . . . . . . . . . . . . . . . . . . . . . . . . . 79
Technical Support . . . . . . . . . . . . . . . . . . . . . . . . . . . . . . . . . . . . . . . . . 79
CoPilot® End-User Licence Agreement . . . . . . . . . . . . . . . . . . . . . . . 80
Page 3

CoPilot Overview
Welcome to CoPilot Live! CoPilot will provide you with accurate, turn-by-turn spoken
directions and street-level maps that guide you to any destination you specify. If you take a
wrong turn, CoPilot instantly re-calculates your route. Let CoPilot guide you — and never
get lost again!
CoPilot comes fully installed and ready to use for route guidance on your mobile device.
However, you will want to install CoPilot to your desktop if 1) you’d like to use the extensive
trip planning features available with a desktop installation, or 2) you’re adding a data region or
more maps. See Installing CoPilot to Your Desktop, p. 36 for details.
In-vehicle Hardware Setup:
CoPilot uses GPS satellites to calculate your exact position on the map. In order to “acquire”
a GPS fix you must first make sure your A780 has an unobstructed line of sight to the sky.
Please note it may take up to 5 minutes to acquire a fix initially. WAR NING : Never leave your
mobile device in a closed vehicle that exceeds 140
First turn on your mobile device. Before using CoPilot, ensure that your phone’s antenna is
turned “On”.
After turning your engine on, attach the cable to the mobile device and insert it into your
vehicle’s cigarette lighter socket. Make sure it is firmly seated.
o
F.
A Safety Warning
Always keep your hands on the steering wheel and eyes on the road when driving!
Do not use this product in any way that interferes with safe and attentive operation of a
vehicle. When used in a vehicle, do not place your mobile device or power supply where it
may strike the driver or passengers if the vehicle turns sharply or stops abruptly. This product
is designed, manufactured, and intended as an aid to planning and navigating routes.
The accuracy of the map data, driving directions, and GPS tracking system is insufficient for
this product to be used for automated navigation or in any situation in which the failure of
the product could lead directly to death, personal injury, or physical or environmental damage.
The driver must remain alert at all times to actual road conditions and obey all posted signs
and traffic regulations. ALK Technologies assumes no responsibility for any damage or injury
resulting from the use of this product.
Using Your Mobile Device for Guidance
CoPilot Live is pre-installed and ready to use for route guidance on your mobile device.
In CoPilot's Guidance Mode you will receive turn-by-turn route navigation information and
spoken directions as you travel.
For IN-VEHICLE HARDWARE SETUP: See CoPilot Overview, p.1.
1. To launch CoPilot, tap the application launcher, then tap the
CoPilot application.
2. The Wel come screen gives you several choices:
• Going To to enter a destination and receive guidance
• Help topics about basics such as trip entry,
hardware setup, and route options
• Options to change CoPilot routing, guidance,
and map options
• Live Setup for live communications
3. Ta p Going To. The Going To screen will list your stops. From
here you can add a stop, start a new trip (deleting the old one),
or tap Start Driving to begin receiving guidance to your
destination(s).
4. Ta p Add Stop to enter one or more destinations in the
Select Stop screen and begin driving.
- 1 -
- 2 -
Page 4
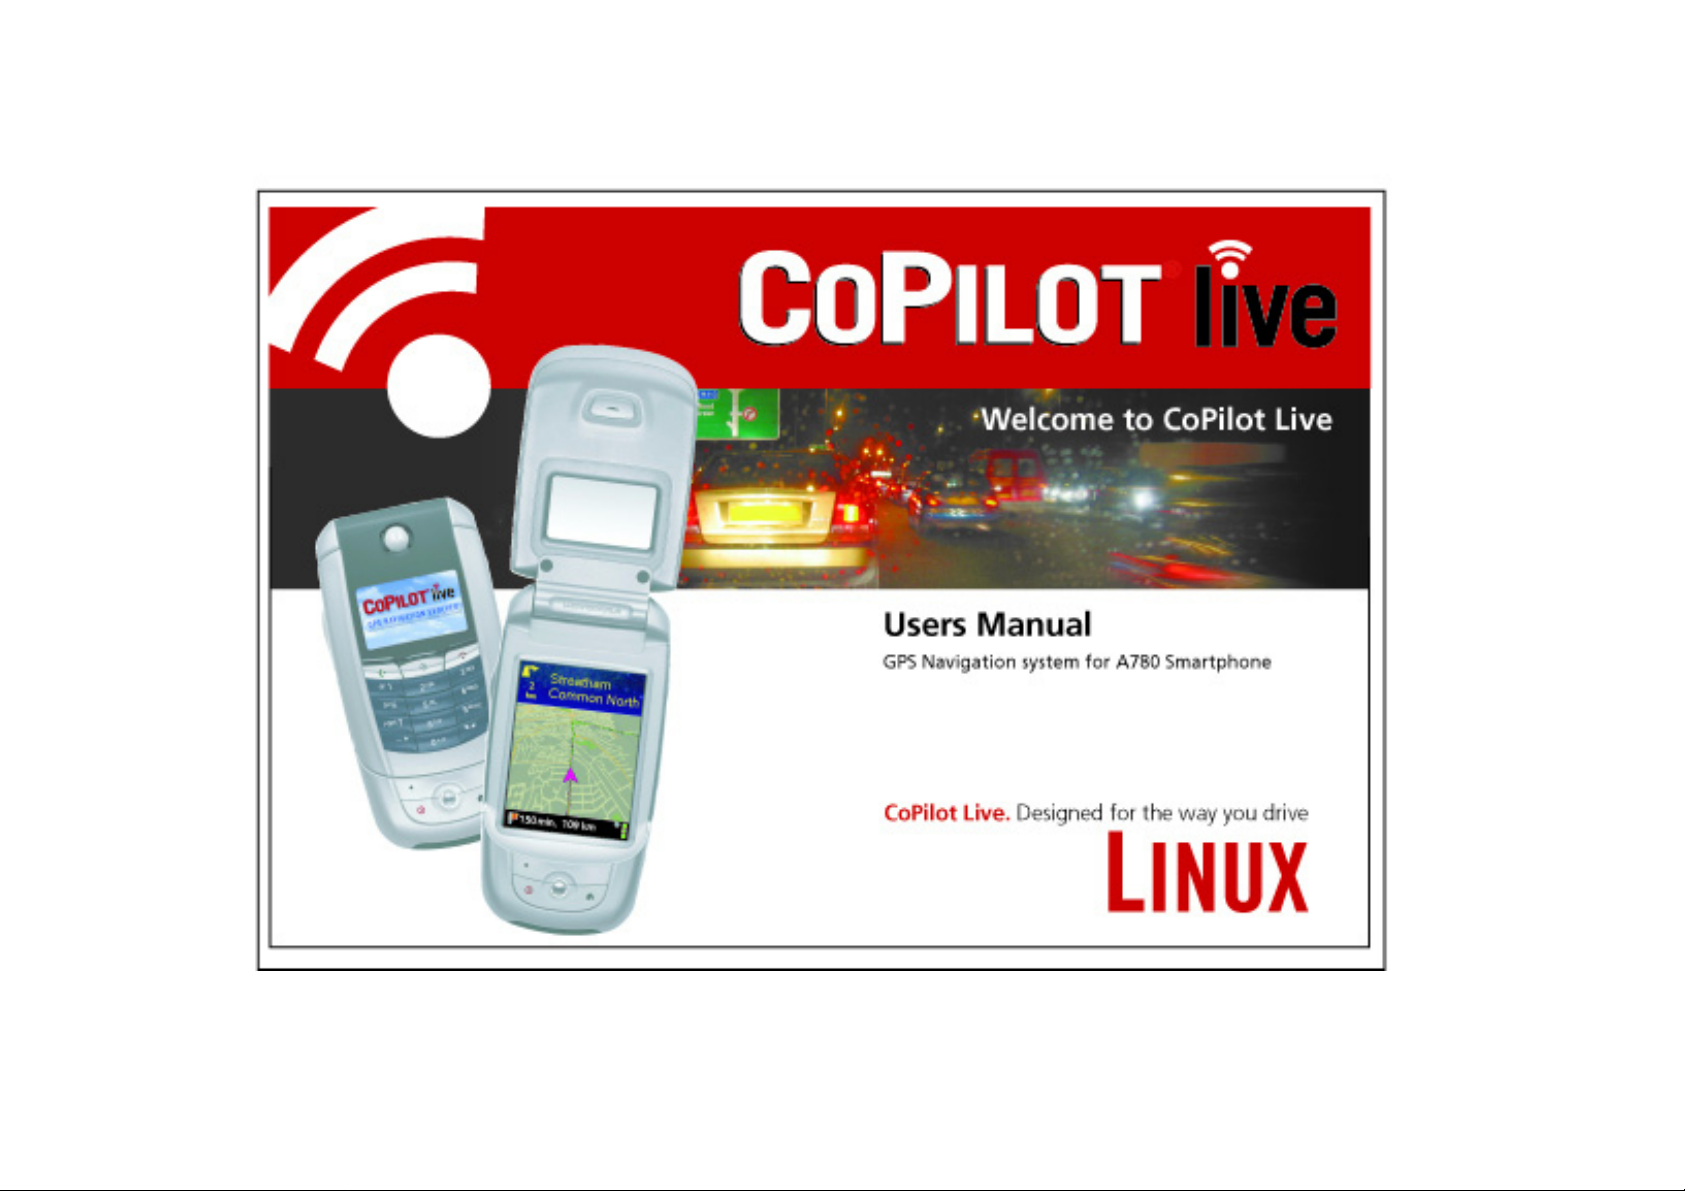
5. The Select Stop screen provides you with several different
ways to enter a destination. You can:
• Enter a new Address
• Program or enter your Home address
• Program or enter your Wor k address
• Select from your Favourite list
• Search for a Point of Interest (POI)
• Enter an Intersection
• Enter a Contact from your contancts list
• Enter a Latitude/Longitude point
• Enter a previously Saved Trip
Options are described on the following pages.
Address Entry
NOTE: There is no need to enter a starting point. CoPilot uses GPS positioning to determine
your location automatically.
Address entry is a step-by-step process in which you enter the country or postal code, city,
and house number/street name in separate screens. As you type each entry, matches in the
database appear on a pick list below. Tapping an item on the list enters it, then you tap Next
to confirm and move to the next screen.
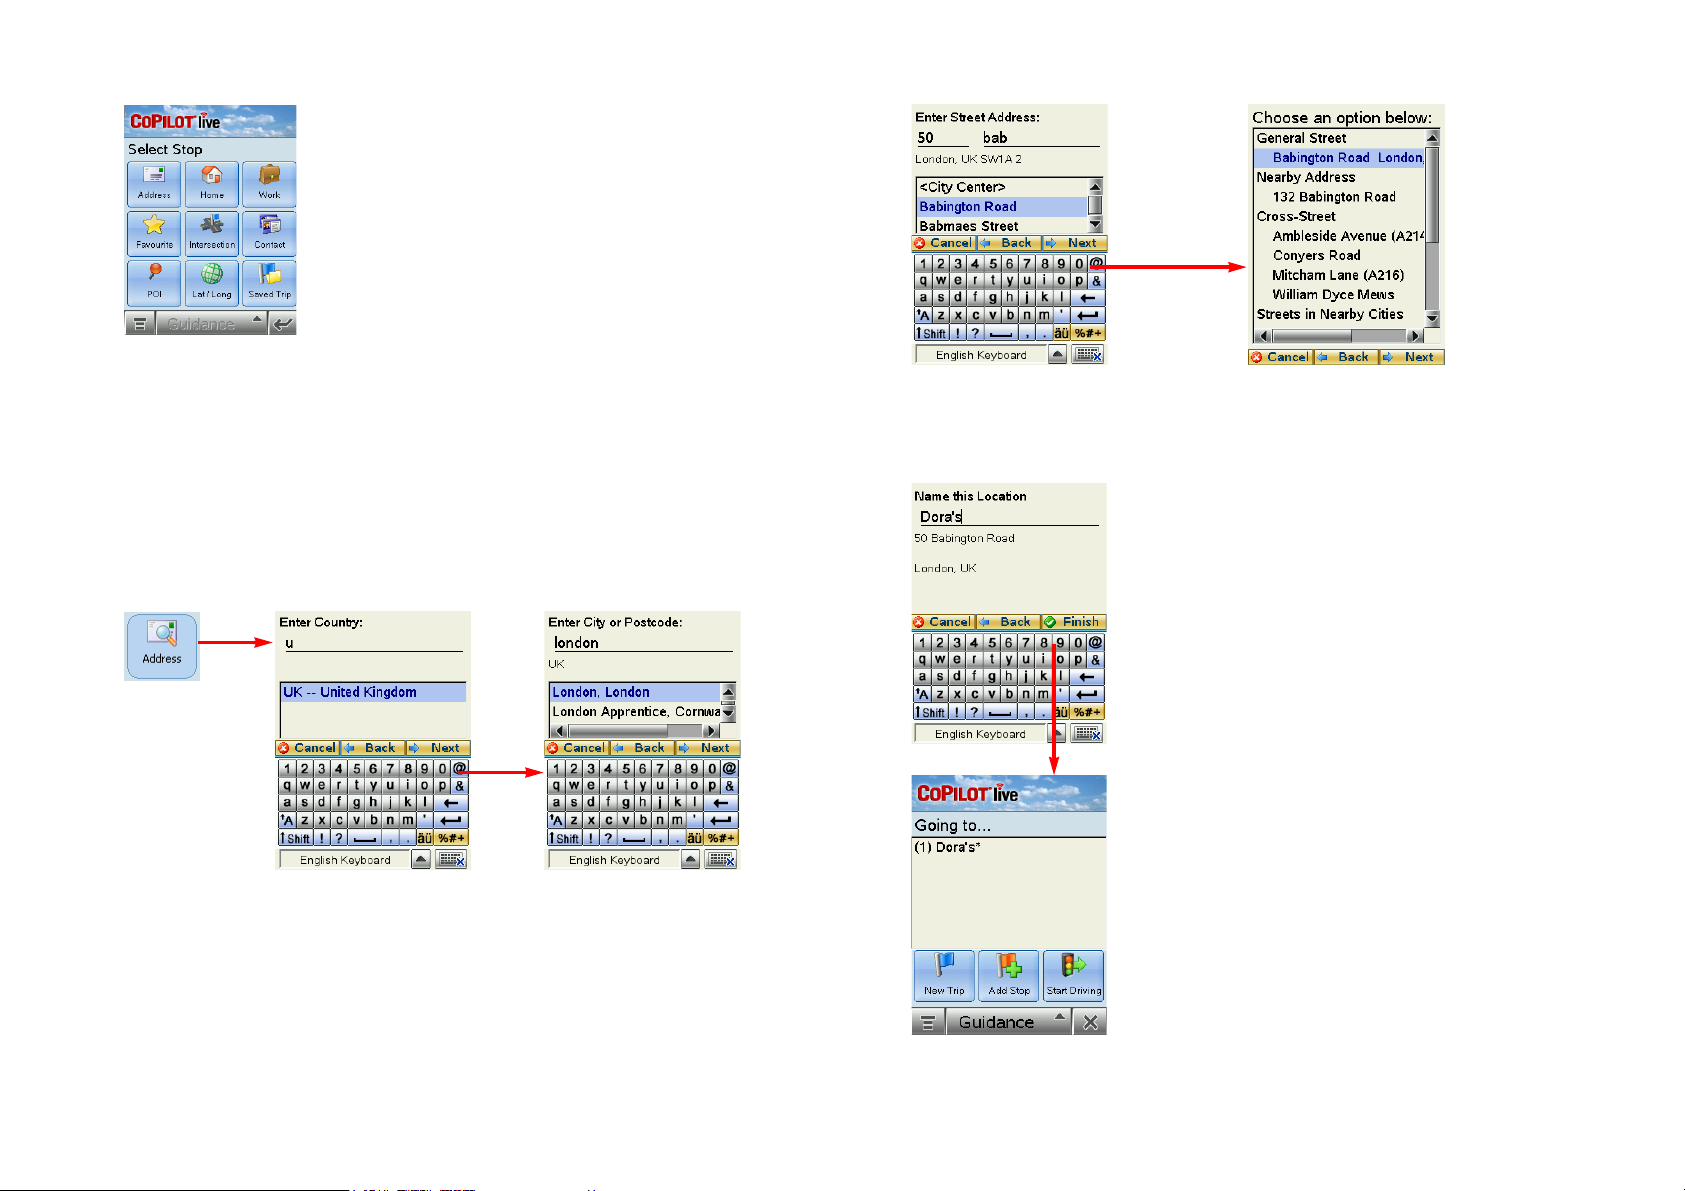
In the Select Stop
screen, tap the
Address button.
3. Enter a house number if desired
(it’s optional), then start typing a Street
name. When a match appears on the
list below, tap it, then tap Next
4. If an exact database match is not found,
you’ll be shown the available address options.
CoPilot will give you at least one of these
options: the General Street you entered,
a Nearby Address, a Cross Street on the
street you entered, or one of several
Streets in Nearby Cities. Tap your choice,
then tap Next.
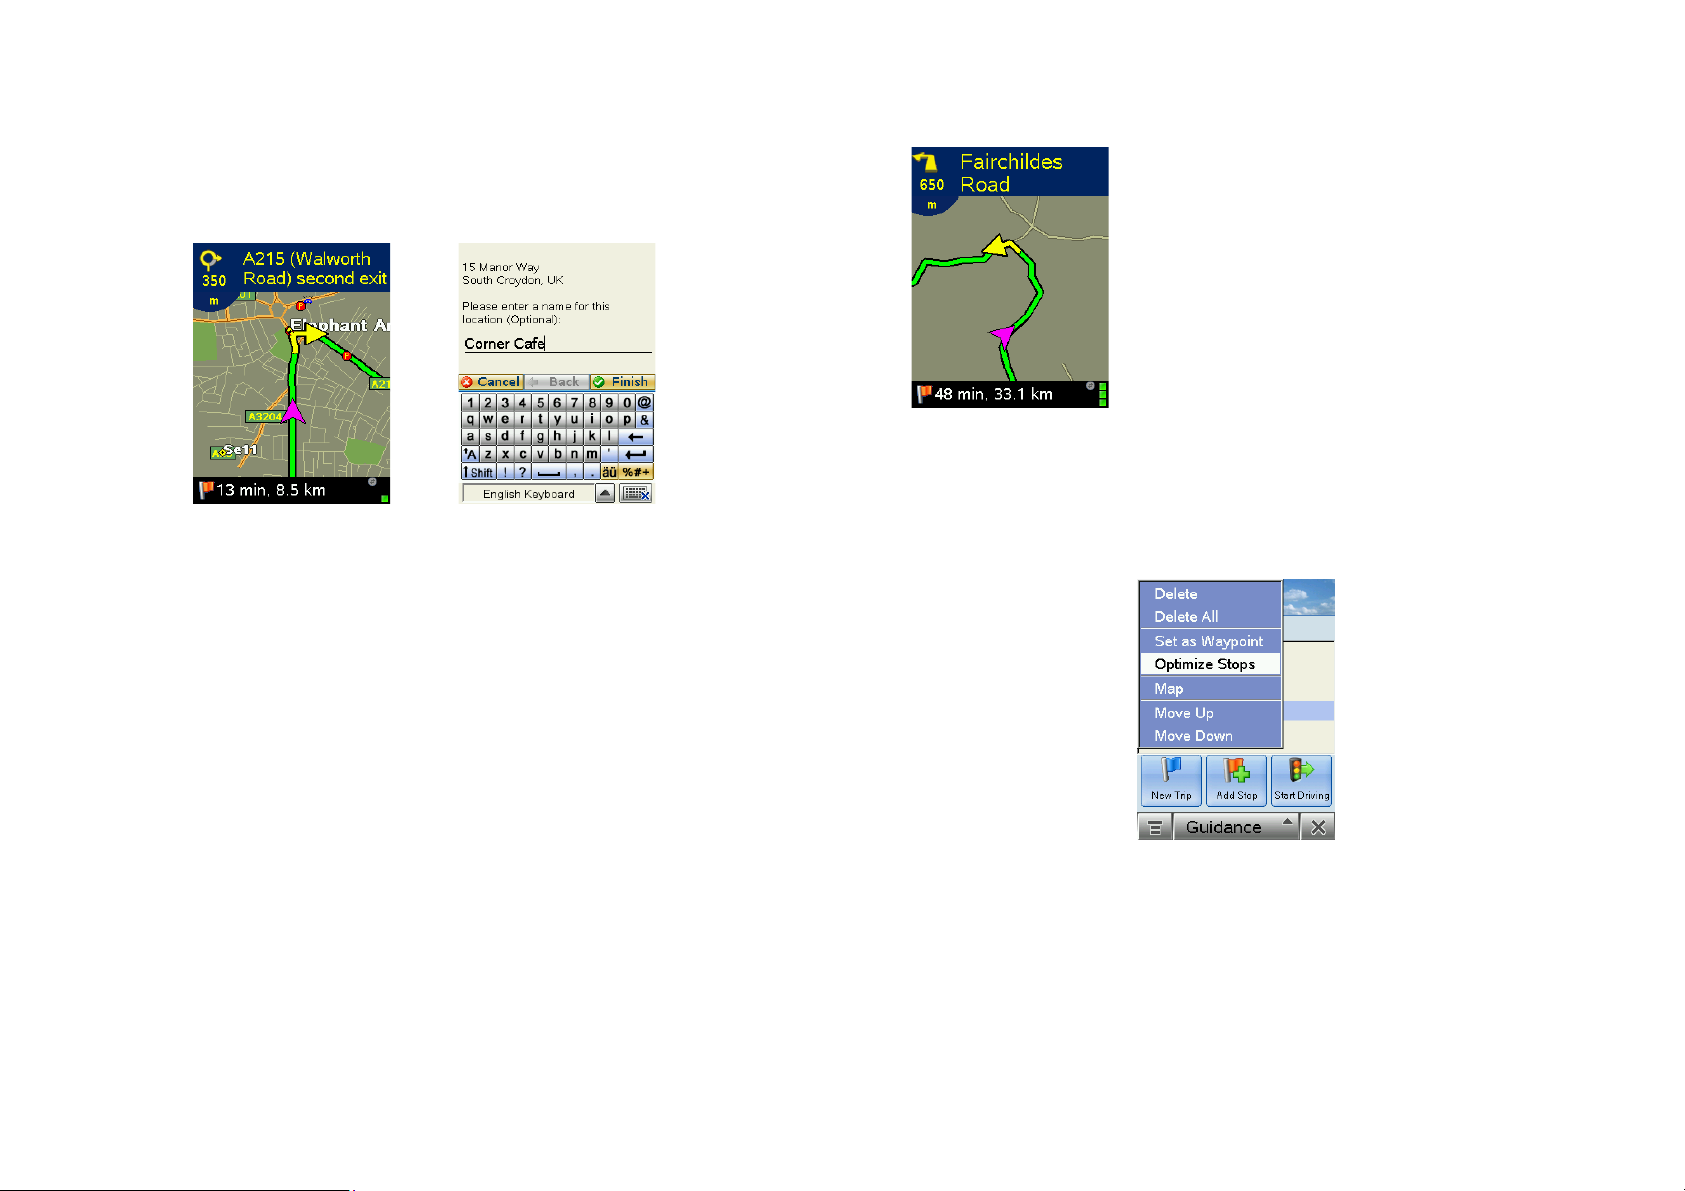
5. (Optional) Type a name for this place the
list enters it, then you tap Next to confirm
and move to the next screen. if you like, then
tap Finish.
6. After entering a destination, you will be
taken to the Going To screen. You will see the
destination you just entered listed as the first
stop on your trip.
At this point you can tap Add Stop to enter
additional stops, New Trip to delete all
stops on this trip and begin a new one,
or Start Driving to begin receiving
guidance to the destination(s) you entered.
1. Using the keyboard, enter a postal code and
tap Next, or type the name of a country — as
you type, the scroll list will move to that country.
Tap it on the list, then tap Next.
NOTE: United Kingdom postal codes are
entered in the City screen (Step 2). The country
entry screen won’t appear if map data for only
one country is downloaded.
- 3 -
2. (If you entered a postal code,
skip to step 3.) Start typing a
City name. When a match
appears on the list below, tap it
and then tap Next to continue.
7. To begin your trip, simply tap the
Start Driving button and start driving!
Once your position has been determined
(this can take a few seconds), CoPilot will
speak directions out loud to you, and your
position and next turn information will be
displayed on the screen as you drive.
- 4 -
Page 5

Start Driving!
After entering one or more destinations, start driving and enjoy CoPilot’s spoken instructions,
continuously updated maps and ETA’s, and automatic route recalculation capabilities.
The Driver Safety Screen displays a text-only screen and is the recommended view for safe
driving. When you’re within about 1 kilometre of a turn or driving less than 16 k.p.h., CoPilot
automatically switches to the map display.
Next Turn
Instruction
Distance to Next Turn
and Directional Arrow
Live Network
Current Road
(customizable, see p. 16)
ETA and Distance
to Next Stop
To return to the Going To screen to edit your trip at any time, first tap at the TOP of
the guidance screen to bring up the toolbar. Then tap the Going To button.
Message Queue
(see p. 79)
Connection
GPS Status:
Green = 3D Fix
Yellow = 2D Fix
Red = No Fix
Entering a Home Address
In the Select Stop
screen, tap the
Home button in
the Select Stop
screen. The first
time you use this
button, you will
be prompted to
enter your home
address.
Enter your home address the
same way you enter a new
address (described on p. 3-4).
Entering a Work Address
The next time you tap Home,
your work address will be
entered as a destination. To
change your home address,
choose Menu > Options
and tap Favourites (see p. 7).
- 5 -
Going To
button
In the Select Stop
screen, tap the
Work button in
the Select Stop
screen. The first
time you use this
button, you will
be prompted to
enter your work
address.
Enter your work address the
same way you enter a new
address (described on p. 3-4).
The next time you tap Wor k,
your work address will be
entered as a destination. To
change your work address,
choose Menu > Options and
tap Favourites (see p. 7).
- 6 -
Page 6
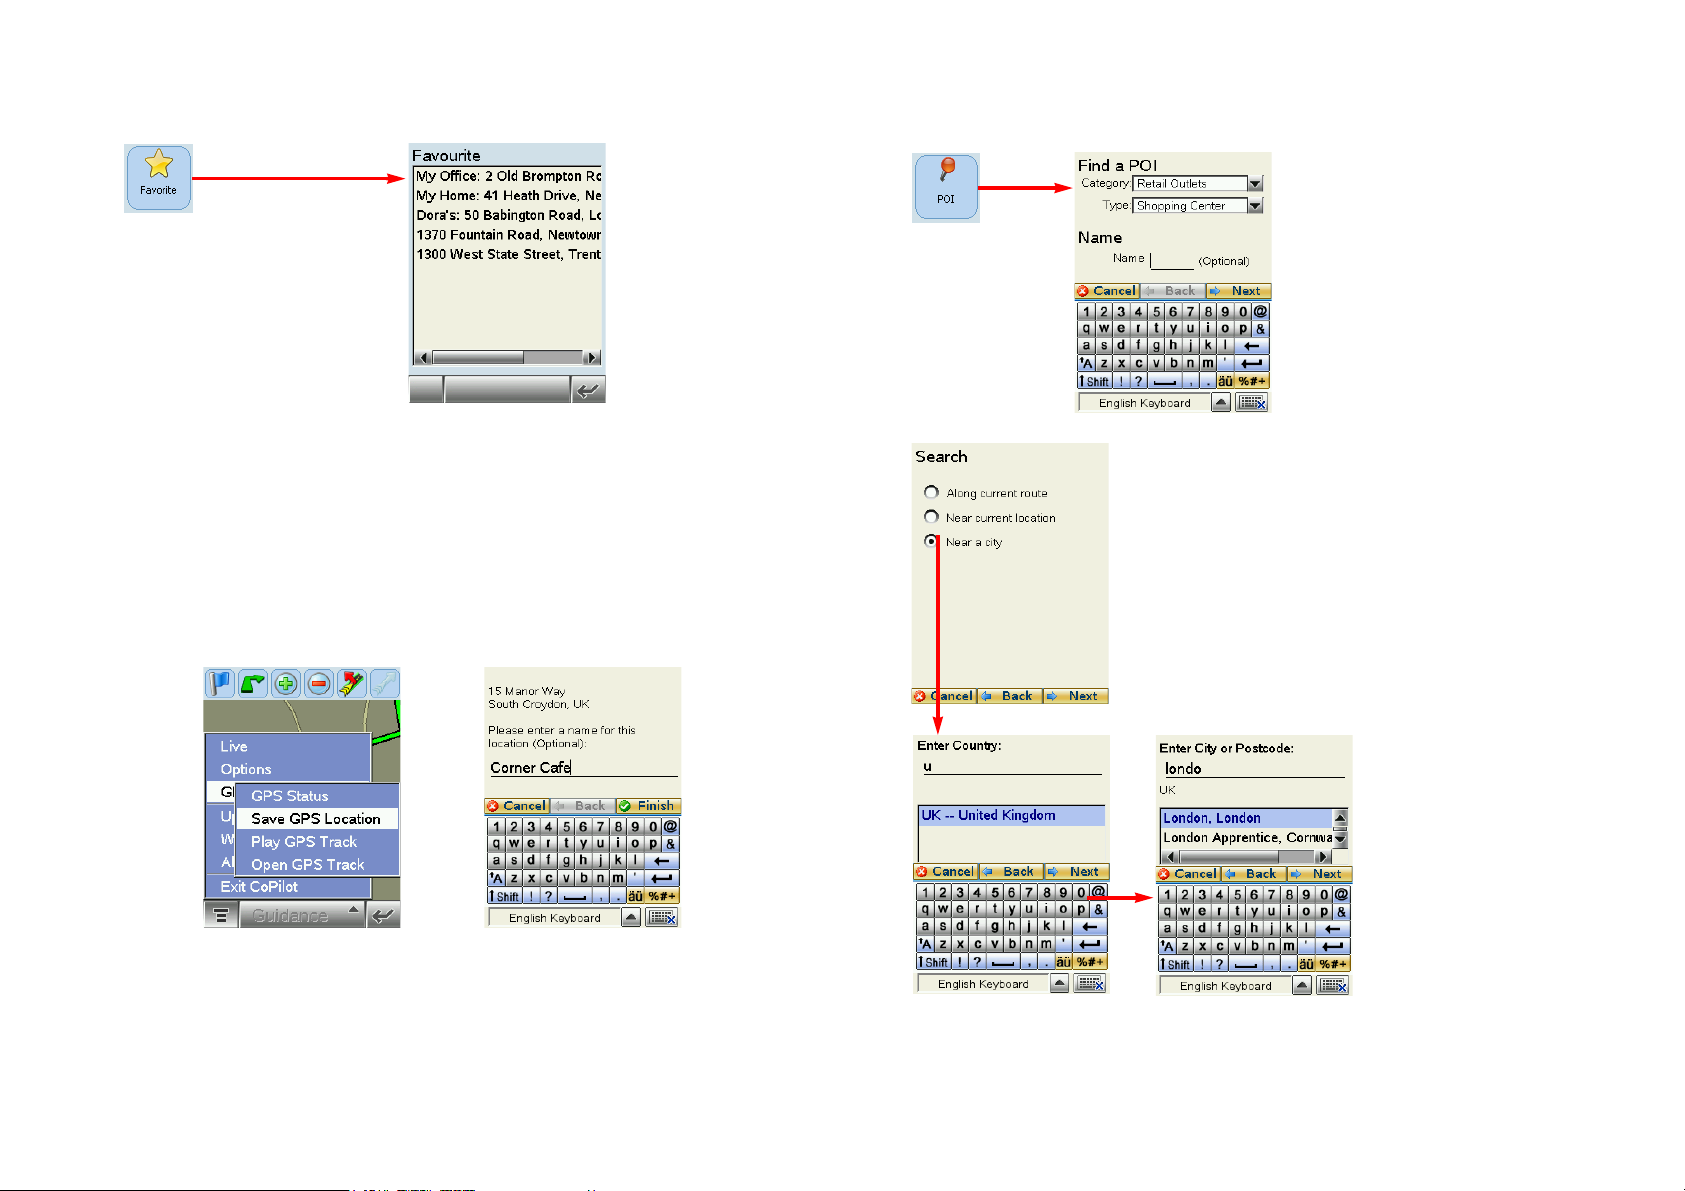
Favourites
In the Select Stop screen, tap the
Favourite button. A scrollable list
will appear, providing quick access
to the last 50 destinations that were
entered.
Finding Points of Interest
In the Select Stop
screen, tap the
POI button to
search for and/or
enter a point of
interest as a
destination.
1. In the first POI screen you
have the option to choose a
Category and Ty p e of POI
from the drop-down pick lists.
To narrow your search and cut
down on the time it takes, you
can also type the first few letters
of a place you have in mind. Tap
Next to continue.
Tap a Favourite on the list to enter it as a destination. To change which Favourite is assigned to
the Home or Work buttons, choose Menu > Options and tap Favourites (see Menu
Options, p. 23).
NOTE: When your Favourites list is filled (50), each new address will replace the
address that has been inactive for the longest period of time.
To Save Your Current Location As a Favourite:
You must have a GPS fix to save your current location as a favourite.
1. Ta p Menu > GPS,
then select Save GPS
Location.
2. A prompt will ask you to assign a
location name to your current location.
After you enter a name, your current
location will be saved in the Favourites
list.
2. In the next screen, you can tell CoPilot to search Near
current location or Along current route if a GPS fix is
present.
Or choose Near a city, then enter a country and city or
postal code in the next two screens. (European postal codes
are entered in the country entry screen, except United
Kingdom codes which are entered in the city entry screen.)
Ta p Next to execute the search.
- 7 -
- 8 -
Page 7
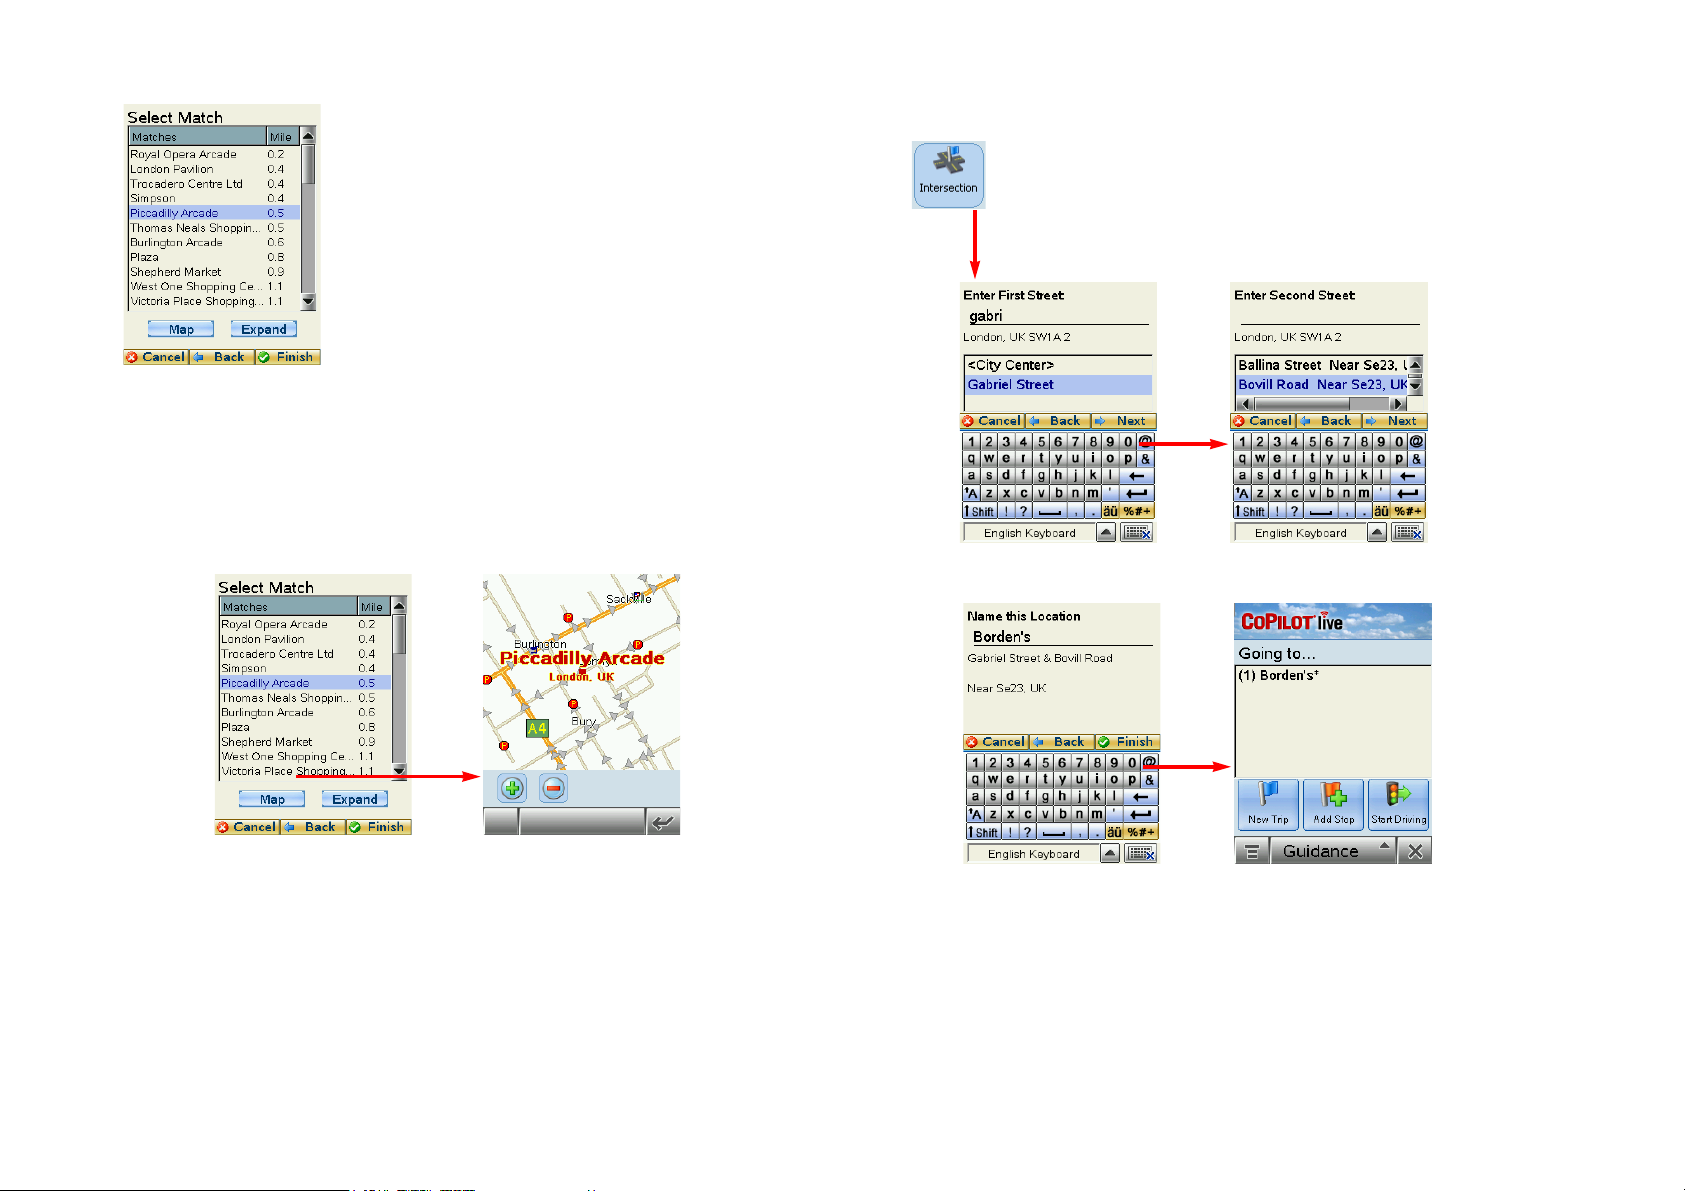
3. When the search process is complete, a scrollable list of
matches will appear. In this screen you have several choices,
you can:
• Highlight a POI and tap Map to preview it on the map
(see below)
• Ta p Expand to expand the area of the search
(this can be done twice)
• Highlight a POI and tap Finish to enter it as a
destination.
Map Preview of a POI:
To preview a POI on the map before you decide to enter it as a destination, highlight it on the
match list and tap Map. In the map screen, buttons let you zoom the view in and out. Click
Back to return to the match list. In the Matches screen, click Finished to enter the
highlighted POI as a destination and return to the Going To screen, or Expand to run another
search within a larger area.
Intersection
To enter the intersection of two roads, tap the Intersection button in the
Select Stop screen. Intersections are entered just like addresses, except that
instead of a house number you enter a “First Street” and “Second Street”.
You can name this location if you like.
- 9 -
- 10 -
Page 8
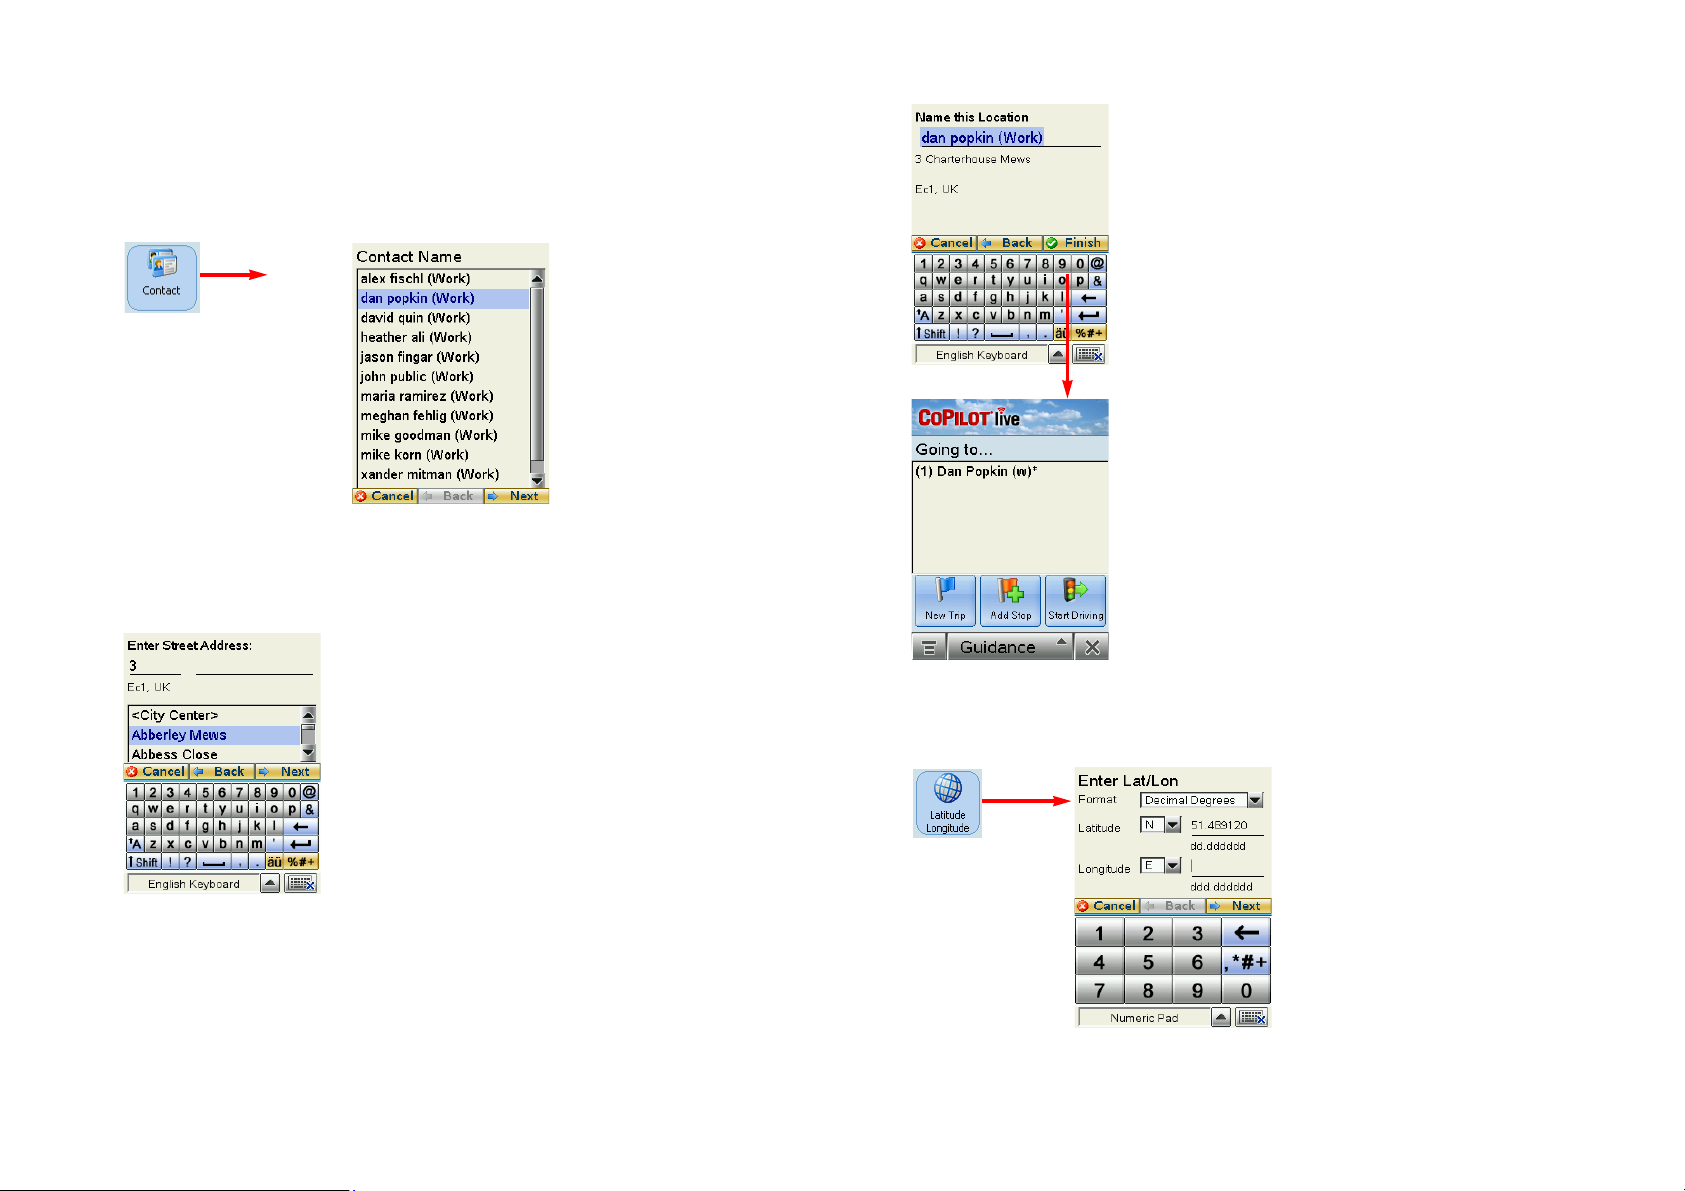
Contact Integration
CoPilot allows you to link directly to your Contacts to retrieve address information. With just
a few of quick taps of the stylus, you can enter a contact’s home and/or work address as your
destination.
1. Ta p t he
Contact button
in the Select Stop
screen.
2. Select a name from the Contact lists, and with your
selection highlighted, choose an address type (Home,
Work , or Other). The address you select will be displayed
below. Tap Next when ready.
3. If necessary, CoPilot will prompt you to correct any part
of the address in your Contact database that does not result
in a perfect match — you might be prompted to edit the city,
country, street, or house number so CoPilot can find it.
Next to continue.
In the example to the left, no match was found for the street
name, so the street address is being added manually.
NOTE: If CoPilot finds an exact match, it automatically goes
to a screen that lets you name the address you entered (see
step 4).
Ta p
4. Once the address has been matched, you have the option
of assigning a name to the address. CoPilot will pre-fill the
name from your Contact record, but that name can be
edited here.
Ta p Finish to continue.
5. The Contact address will be added to your trip itinerary
as a stop.
Latitude/Longitude
Ta p Latitude/
Longitude in the
Select Stop screen
to enter a lat/long
point.
1. Choose a format from
the first drop-down pick list.
Lat/longs can be entered in
Decimal Degrees, Decimal
Minutes, or degrees/minutes/
seconds (DMS).
- 11 -
- 12 -
Page 9
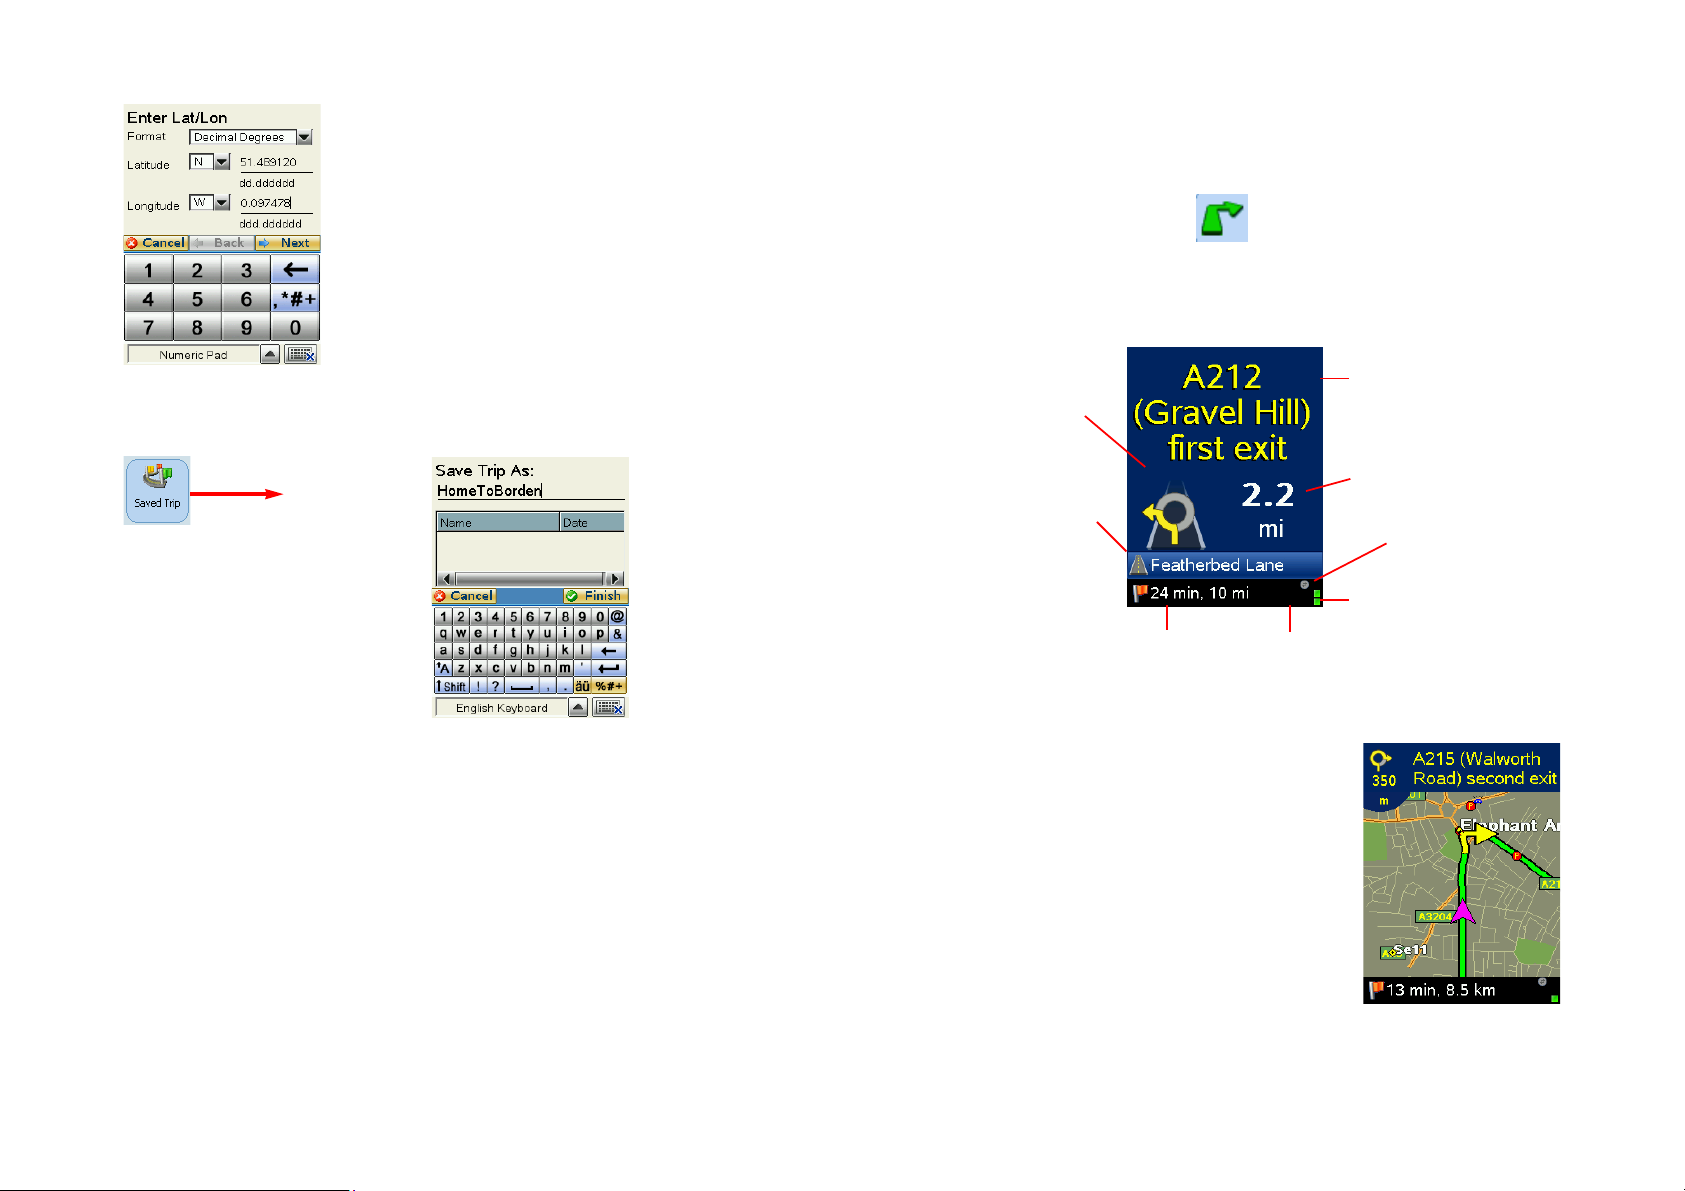
2. Enter a latitude and longitude in the appropriate format,
A
using the drop-down pick lists for N or S, and E or W.
3. Once the lat/long has been matched, you have the option
of assigning a name to the point. Tap Next to add the lat/
long you entered as a stop on your trip itinerary.
Saved Trip
1. Ta p Saved Trip in the Select Stop
screen to enter a trip that you saved
previously on your mobile device or
was built on your desktop and
transferred to your mobile device.
(See Trip Tra n s fer, p. 50 for more
about saved trips.)
2. Highlight a trip (.trp file) in the list of saved trips, then tap Next.
ll destinations included in the trip will be entered, preserving the stop
order of the original saved trip. The trip itinerary will also be included.
Closing CoPilot
To exit the CoPilot application on your mobile device, select Menu > Exit CoPilot at the
bottom of the screen. (If the menu isn’t visible, tap the top of the screen.)
Driver Safety/Map/Itinerary Screens
NOTE: It is not safe to attempt to alter settings on your mobile device while you are driving.
Either have a passenger make changes, or pull over to a safe area.
Driver Safety Screen
The Driver Safety Screen displays a text-only screen and is the recommended view for safe
driving. When you’re within about 1 kilometer of a turn or driving less than 16 k.p.h., CoPilot
automatically switches to the map display.
Next Turn
Next Turn
Directional Arrow
Current Road
(customizable, see p. 16)
ETA and Distance
to Next Stop
Message
Queue
Instruction
Distance to Next Turn
and Directional Arrow
Live Network
Connection
(see p. 79)
GPS Status:
Green = 3D Fix
Yellow = 2D Fix
Red = No Fix
Map Screen
The Map Screen displays when you are traveling at less than
16 k.p.h. and about 1 kilometer before each turn. It
combines a large map display and concise text instructions.
At the top of the screen, next turn directions are shown (a
directional arrow and distance to the next turn).
At the bottom of the Map Screen are the estimated time of
arrival (ETA) at your next destination and distance to that
destination.
- 13 -
- 14 -
Page 10
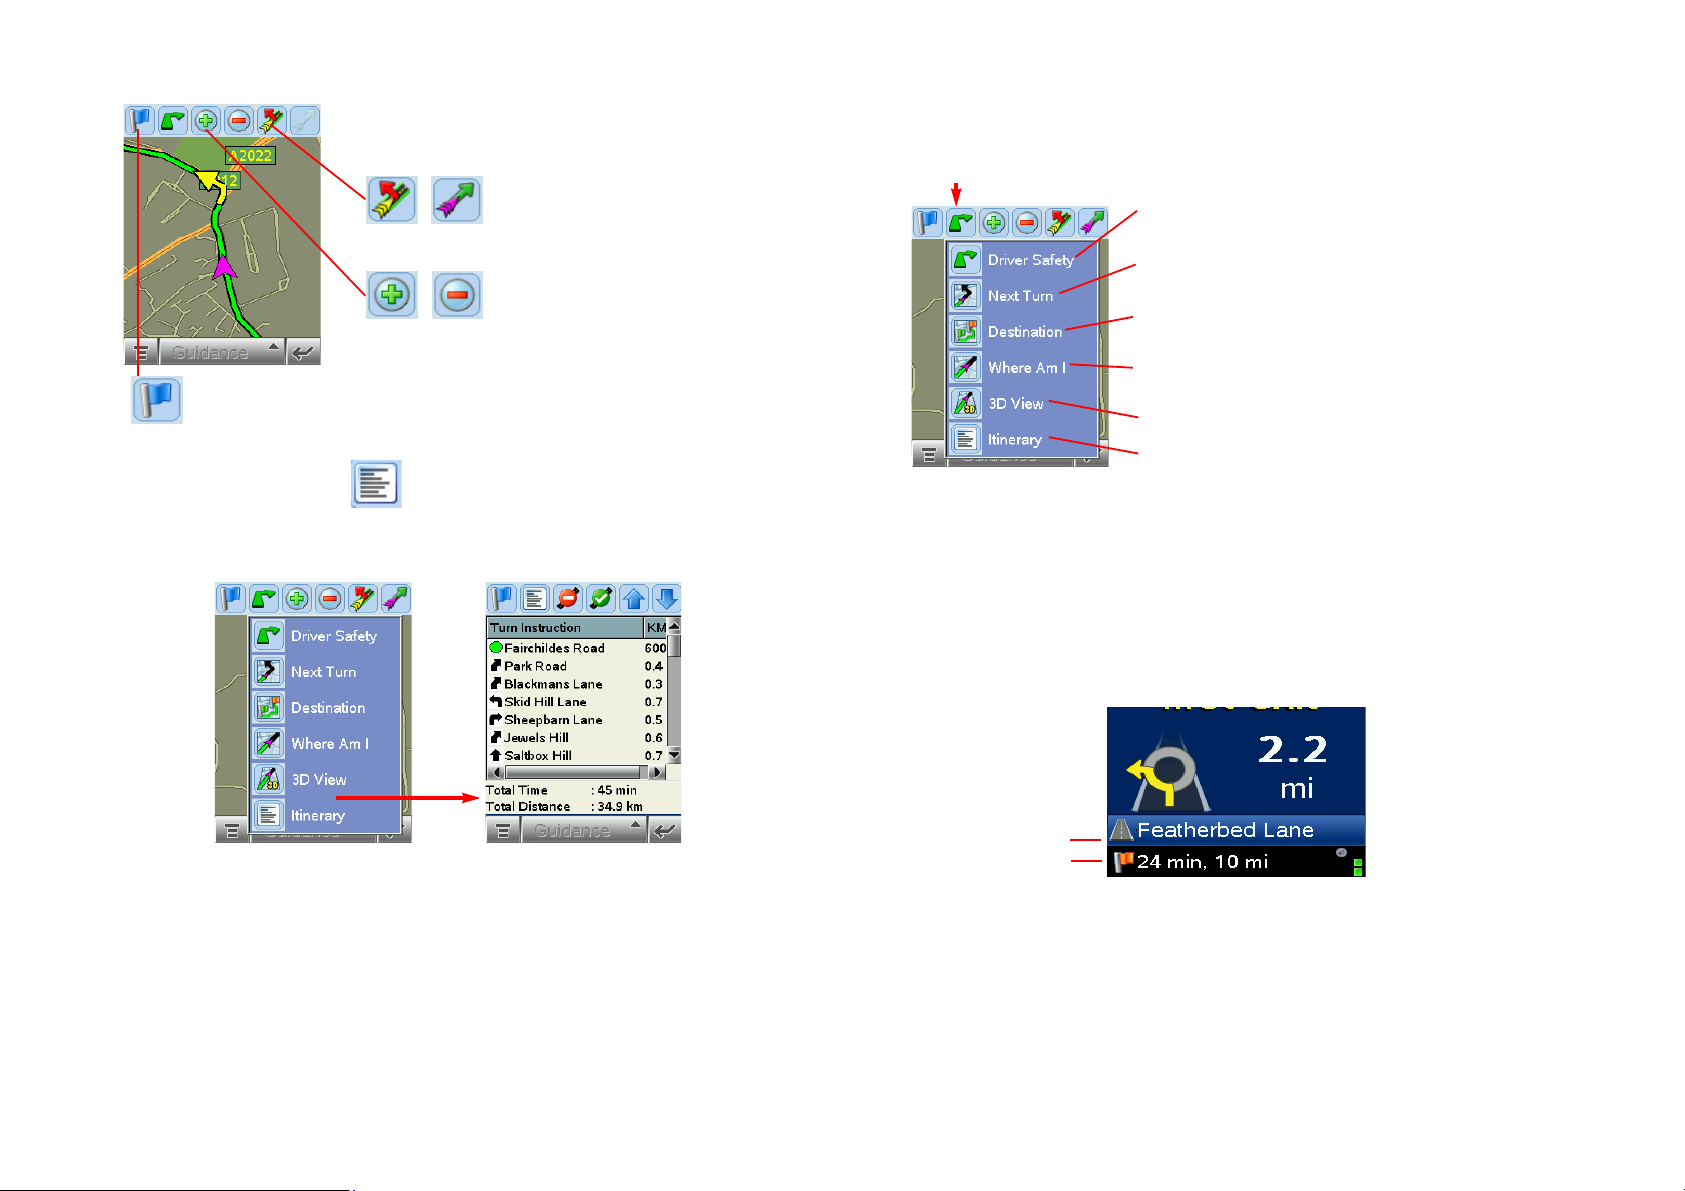
Tap at the top of the Map Screen to invoke
a toolbar and menu bar.
Use the Detour buttons when
you want to take an alternate
route to avoid heavy traffic,
construction, etc. up ahead.
Use the Zoom In and Zoom
Out buttons to change your view
of the map.
The Going To button takes you back to the Going To
screen where you can edit your trip (see p. 18).
Itinerary Screen
To see your trip Itinerary, tap the View button (second from left on the toolbar) then tap the
Itinerary button in the nested toolbar.
Navigating Through CoPilot Screens
View
button
Ta p t h e View button (second from left on the toolbar — its appearance will
reflect the current view) and choose a view from the drop-down menu.
Driver Safety Screen - Text only, switches to the map
below 16 k.p.h.
Next Turn - Map screen, frames your current position to
the next turn.
Destination - Map screen, frames the view from your
current position to your final destination.
Where Am I - Map screen, frames a close-up view of your
current position.
3D View - Map screen in 3D.
Trip Itinerary Screen - Basic text overview of all your
upcoming screens.
Customizing the Guidance Screens
The line above the ETA the Driver Safety screen can be customized. (In the Driver Safety
screen there are two lines, in the Map Screen there is one.) Tap the top of the screen, then tap
Menu > Options > Guidance. Use the Custom Display pick lists to set this line to show
your current road, nearest crossroad, nearest major road, nearest town, ETA, or speed.
Several map features can also be customized. See Menu Options, p. 23-26 for all the available
options.
The Trip Itinerary is a scrollable set of driving directions for the current trip. Roads on your
route can be avoided using this screen (see p. 22).
- 15 -
Line 1
Line 2
Hint: You may also tap on the centre bottom of the screen to change the customisable line 1.
- 16 -
Page 11
Map Modes
CoPilot gives you a choice of several different display modes for the Map Screen:
3D Perspective
CoPilot’s two-dimensional default
display mode can be changed to a threedimensional perspective based off an
isometric camera angle.
To change to 3D, tap the screen to
invoke the menu bar, then tap the
View button and select 3D View.
Night Mode
Night Mode is available in 2D or 3D
(3D perspective is shown to the right).
It dims the display and a darker map
display is used to reduce glare and eye
strain while driving with CoPilot at
night. CoPilot automatically switches to
Night Mode based on your location and
current time.
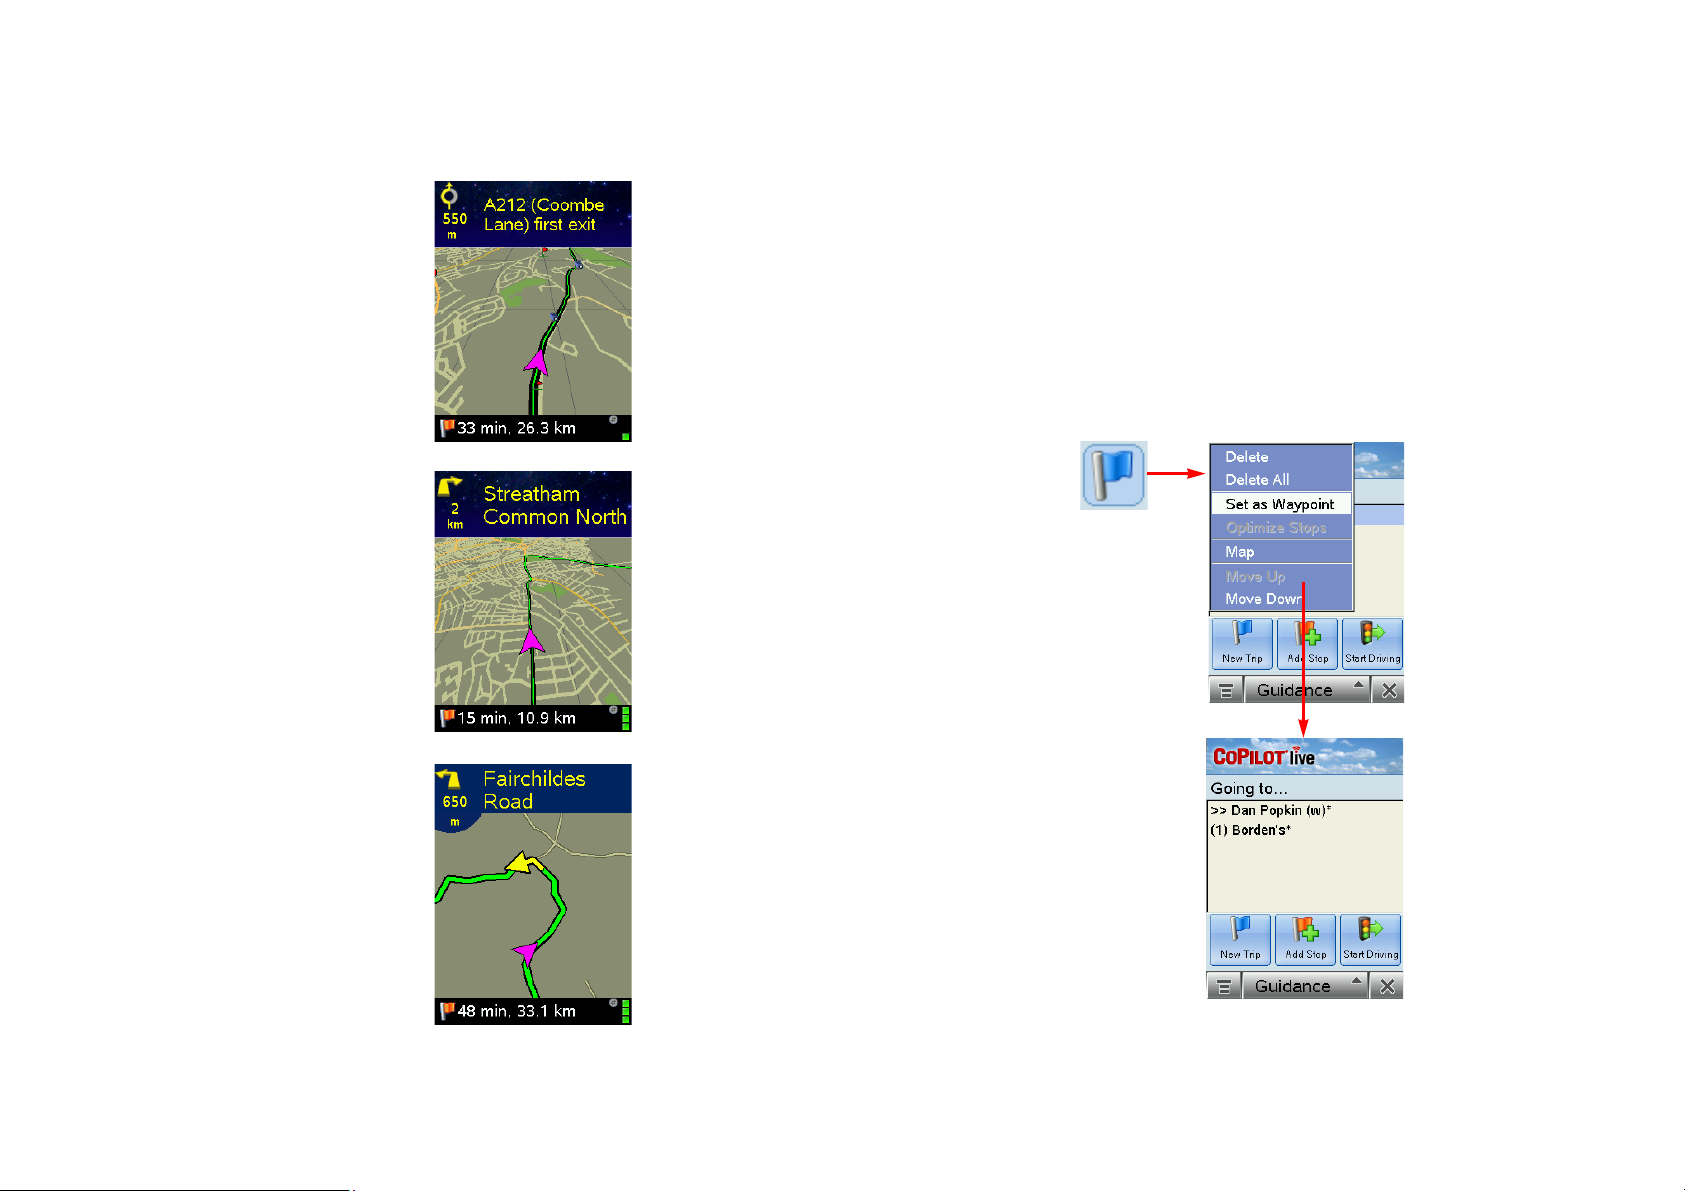
Trip Editing and Waypoints
To get to the Going To screen from the guidance screens at any time, tap the top of the screen
to open the toolbar, then tap the Going To button. From here you can edit the current trip,
add additional stops, or start a new trip.
Tap any stop on your itinerary to activate a pop-up menu that lets you delete the stop, zoom
to it on the map, or move it up or down to change the stop order. This menu also lets you
designate a stop as a “waypoint” (tap Set as Waypoint). Waypoints are not considered as
stops in the Itinerary, their purpose is to guide CoPilot’s route calculations along roads that
you choose. To change a waypoint back to a stop, choose Set as Stop from the menu.
Waypoints appear with “>>” instead of a stop number on the list of destinations.
CoPilot ignores waypoints when calculating the ETA and distance to the next stop, so settings
waypoints can be used to get the ETA and distance to a stop that is not your next stop
(see Getting ETA’s and Distances below).
Going To
button.
CoPilot’s default map mode (shown at
right) displays your route in green,
outlined in black for optimal visibility.
- 17 -
- 18 -
Page 12
Picking Stops From the Map
CoPilot enables you to pick a stop off the map when you don’t know the exact address of
your destination. In any mode, tap and hold on your target location on the map, then add it
as a stop.
1. In any mode, tap and hod on
your target location on the map.
2. Enter a name for the place
you picked and tap Finish. The
new place will be added to your
trip itinerary.
Getting ETA’s and Distances
The estimated time of arrival (ETA) and distance to your
next stop will always be shown in the lower left corner of
the Map and Driver Safety screens. After entering a
destination, tap Start Driving to see the ETA/distance.
If your trip has multiple stops and you want to know the ETA
for a destination that is not the next stop, designate the
stops between your current location and the target stop as
waypoints (tap each one and choose Set as Waypoint in
the menu that pops up)
p. 18.
— see Trip Editing and Waypoints,
Optimizing Stops
To rearrange the stops on your trip in the most efficient order, tap one of the stops in the
Going To screen. Select Optimize Stops from the menu that pops. You must have at least
three stops to optimize — the destination always remains the same.
- 19 -
- 20 -
Page 13
Detour Feature
CoPilot’s Detour Feature allows you to preview an alternate route before deciding whether
or not to take it. Perfect for situations in which traffic has suddenly slowed ahead of you,
the Detour Feature will generate an alternate route. You can then make an informed decision
about whether you’re better off driving through the delay or taking the new route.
1. To see an alternate route,
tap the top of the screen
to invoke the toolbar.
2. Tap on the Detour
button to request a new
route.
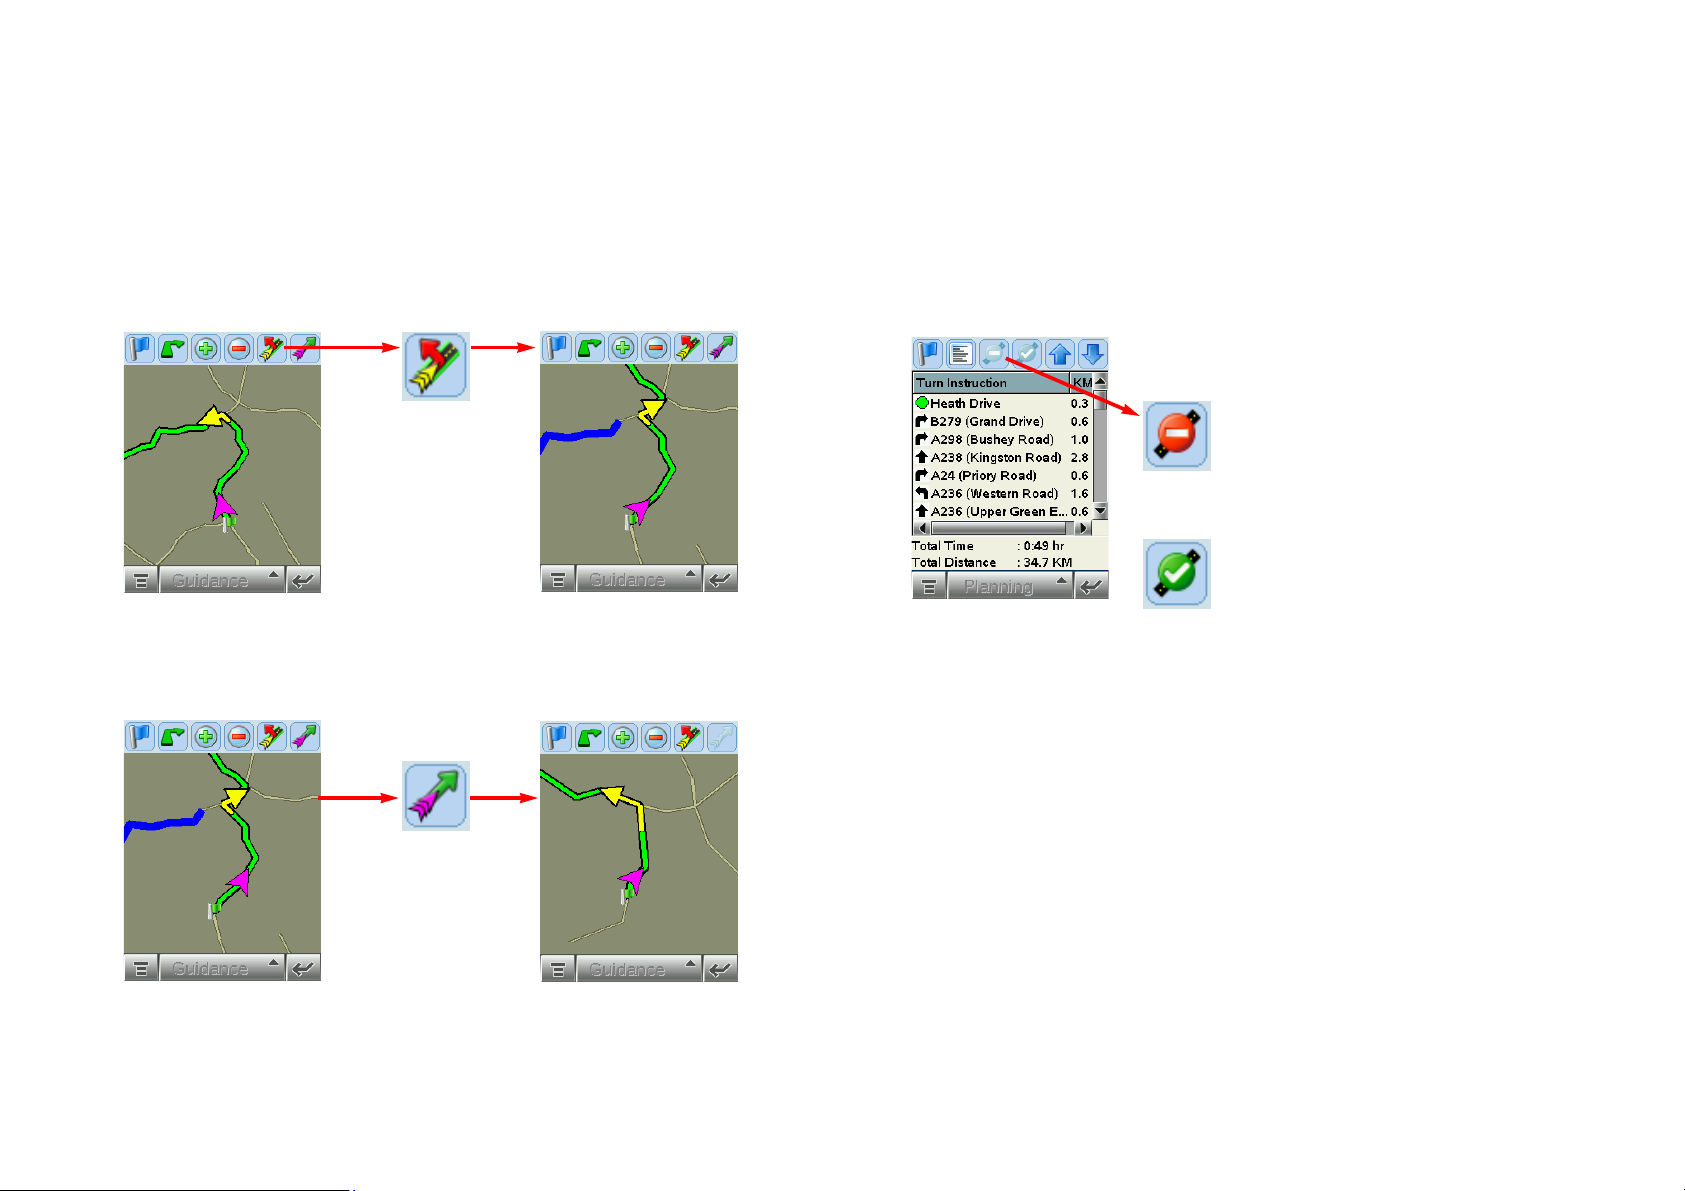
Selective Routing
CoPilot allows you to be selective about the roads you take on your trip. There are two ways
to do this: 1) you can customize your Trip Itinerary in Guidance Mode so that CoPilot will
avoid certain roads; or 2) you can guide CoPilot’s route by entering stops as “waypoints”.
Avoiding a Road in the Trip Itinerary
1. Ta p t he View button (second from the left on the guidance screen toolbar) then tap the
Itinerary option. The Itinerary lists all roads you will be traveling on if you have entered at
least one destination.
2. Highlight the road you want to avoid by
tapping it once.
3. Tap t h e Avoid button, and CoPilot will
calculate a new route that avoids that road.
This can be repeated. If there is no other
possible road or the alternate route is too
impractical, a new route won’t be generated.
4. To Return to the Original Route: Yo u
can return to the original route that CoPilot
gave you at any time by tapping the Cancel
button.
3. If you decide to use
the new route, just keep
driving.
- 21 -
4. If you decide not to
use the new route, tap the
top of the screen to open the
toolbar, then tap the Cancel
Detour button.
5. CoPilot will then return
you to your original route.
Tailoring Your Route Using Waypoints
CoPilot lets you customize a route by designating some stops as “waypoints”. Waypoints
appear on the Itinerary but they’re not treated like stops in Guidance Mode and or in routing
instructions. You can enter a waypoint along a road you want CoPilot to use, and CoPilot will
guide you through the waypoint toward your destination.
To designate a place as a waypoint, enter it as a stop in the Going To screen. Tap and hold the
location on the Going To list until a menu pops up, then choose Set as Waypoint. Waypoints
appear on the Going To list preceded by “>>” instead of a stop number. To turn the location
into a stop again, repeat and choose Set as Stop. You can set as many waypoints as you like
on a trip; however, CoPilot will always recognize the last address in the Going To list as a stop.
- 22 -
Page 14
Menu Options
Tap the top of either the Map Screen or the Driver Safety
Screen to access the menu bar. Then tap Menu and select
Options.
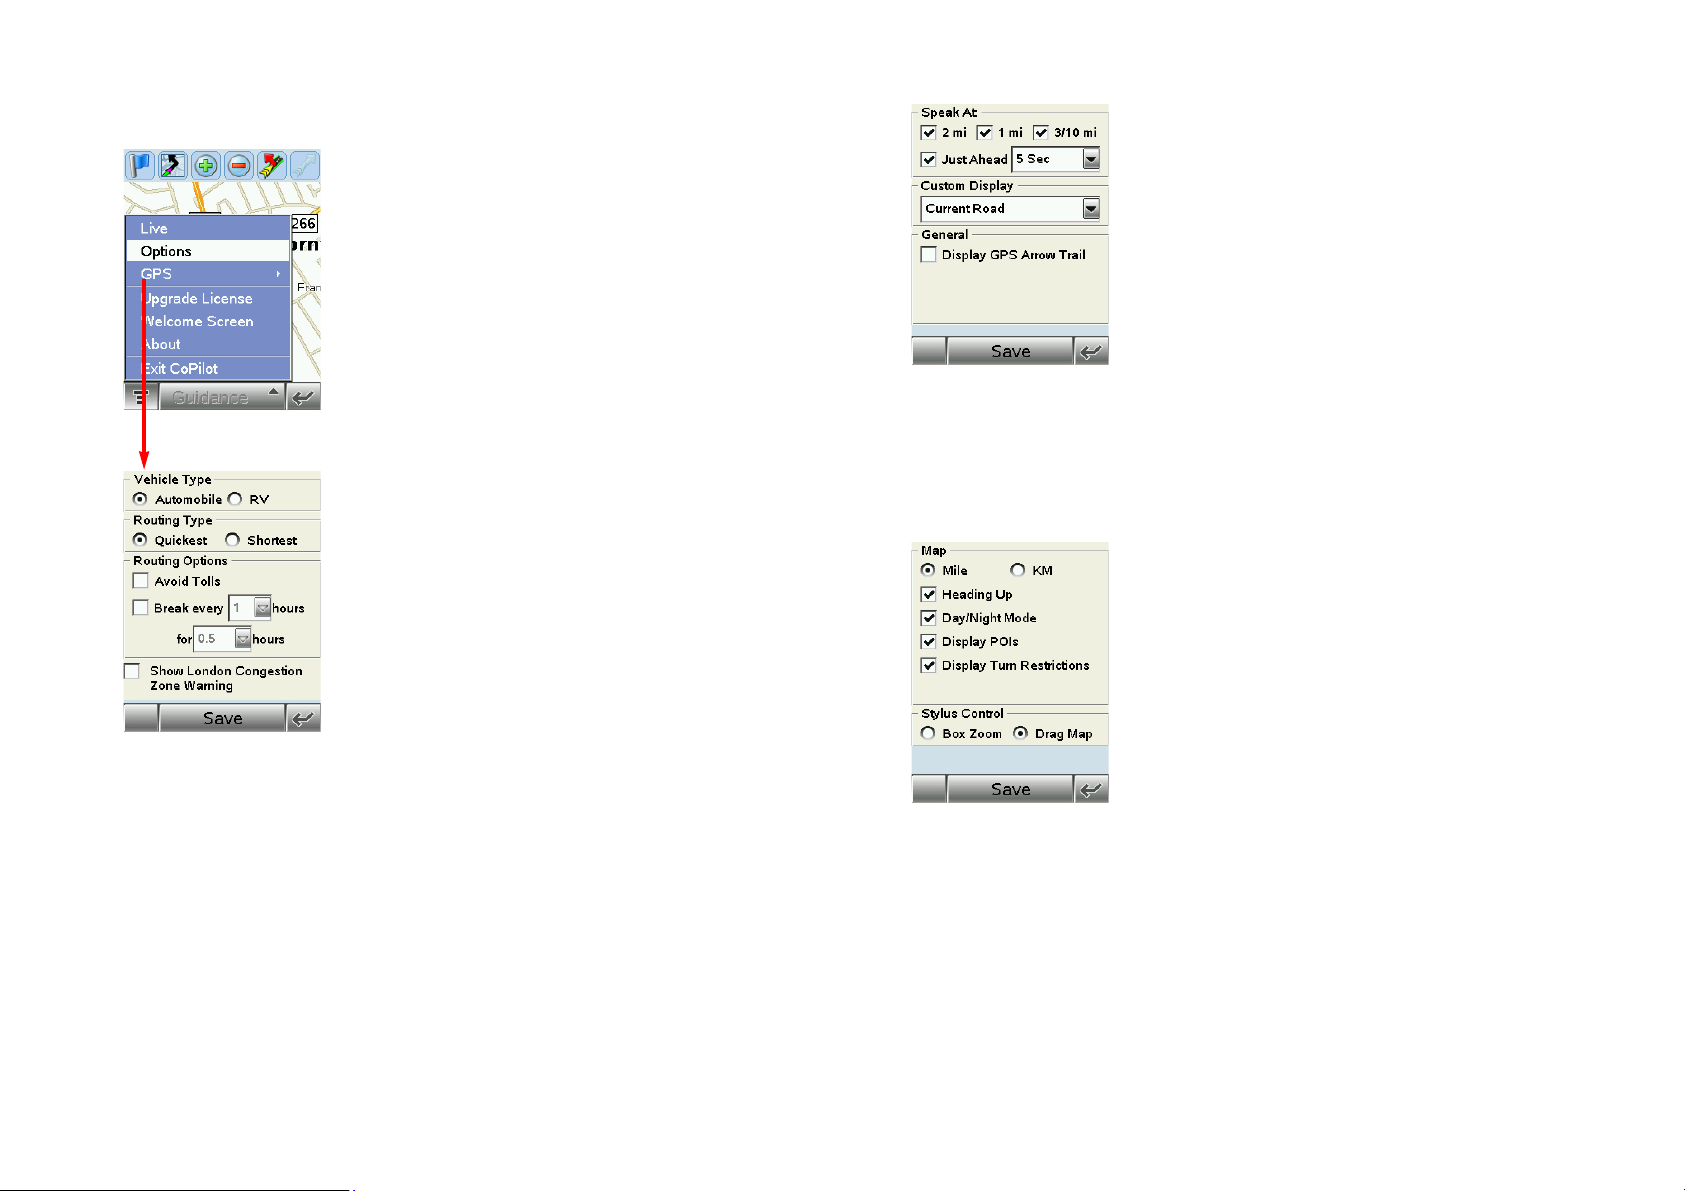
Routing
In the Routing tab, the vehicle type options are
Automobile or RV. RV routes favor major roads and
avoid sharp turns and U-turns wherever possible.
The Quickest routing type is based on the most practical
route in terms of road quality, terrain, and urban/rural
classifications. Shortest routing travels the least distance
where possible while maintaining some level of practicality.
More routing options are:
Avoid Tolls — Check to avoid tolls wherever possible and practical.
Break every ___ hours for ___ hours — Check to have the ETA for your trip adjusted to
reflect stops for breaks.
Display Congestion Zone Warning — (United Kingdom only) Check to have CoPilot
provide a warning when your trip will pass through a congestion zone (gives you the option
to route around it) or when your destination is within a congestion zone (gives you the
option to continue after warning).
Guidance
In the Guidance tab, the settings under Speak Turn
Warning At determine how often and where CoPilot will
give you next turn information out loud. All, none, or some
boxes can be checked. A pick list gives the options for Just
Ahead: by default you will be alerted 5 sec/100 ft before
every turn (5 seconds or 100 feet, whichever is closest),
but you can choose to have CoPilot speak to you sooner
(2 -8 seconds before each turn, or 100 feet).
The pick lists under Custom Display give you display
options for the line above the ETA in the Driver Safety
screen. This line can display the current road, nearest
crossroad, nearest major road, nearest town, ETA, or speed.
NOTE: Defaults are set here, but you can also toggle through the options by tapping the line
itself in the Driver Safety Screen.
Tick Display Route Arrow to have a yellow turn arrow appear on your route on the map as
you approach each turn (this option is turned on by default). Tick Display GPS Arrow Trail
to keep a trail of arrows that tracks your position as you drive on the map.
Map
Data areas that are currently downloaded to your mobile
device are shown at the bottom of this screen.
Options in the Map tab are:
Mile — Use miles as the unit of distance.
KM — Use kilometers as the unit of distance.
Heading Up — The map display will always track your
position moving upward.
North Up — The map display will always maintain north at
the top as you drive.
Box Zoom — This option is selected by default. It enables you to zoom into an area on the
map by drawing a box around it with the stylus.
Drag Map — Selecting Drag Map lets you use the stylus to drag the map in any
direction to a desired location. Place the stylus on the map and move it across the screen.
Use the tick boxes for automatic Night Mode display from early evening to early morning,
and to display Points of Interest, and to display turn restrictions.
- 23 -
- 24 -
Page 15
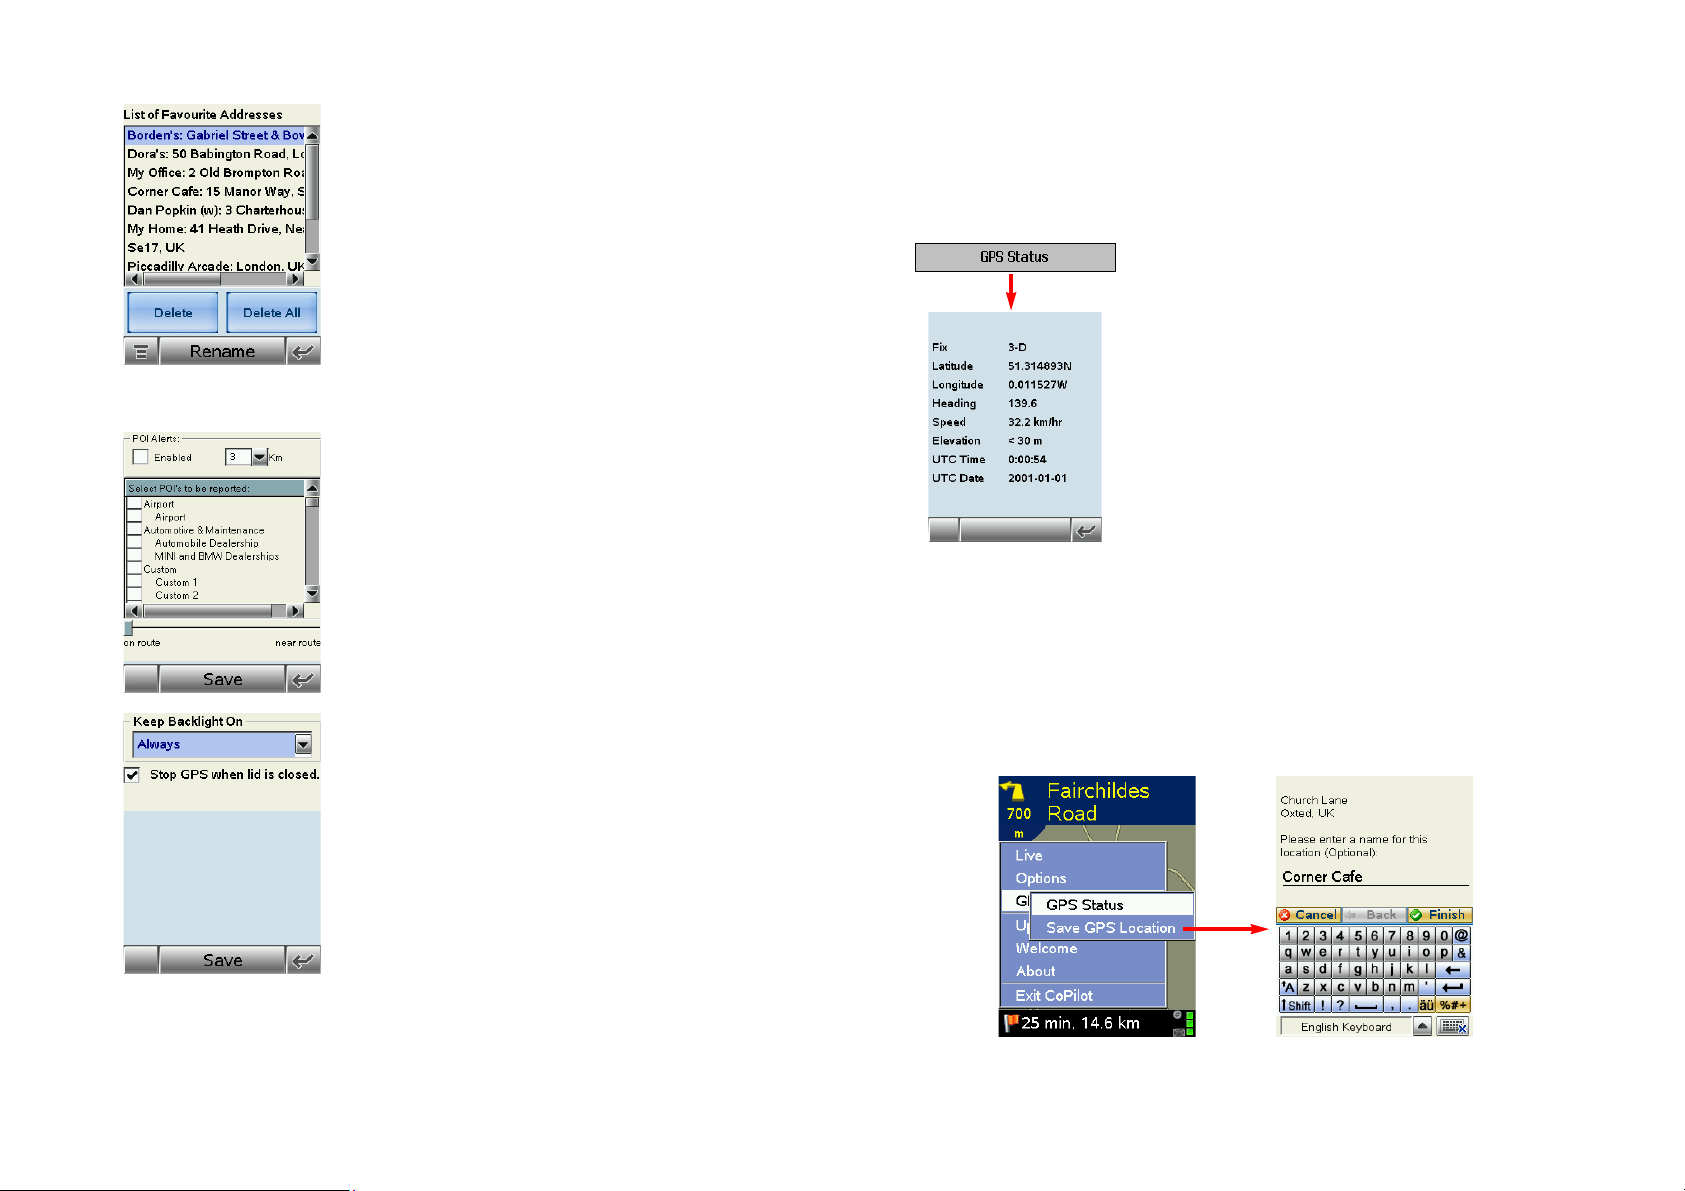
Favourites
Tap t h e Favorites tab to open your List of Favourite
Addresses.
To change the assignment of your work or home address,
highlight your choice on the list, then tap Menu and choose
Set as work or Set as home.
NOTE: POI’s cannot be edited, you will get a “No matches
found” error message if you try.
To delete a favourite, highlight it and tap Delete, or tap
Delete All to delete all.
NOTE: When your favourites list is filled (50), each
new address will replace the address that has been
inactive for the longest period of time.
POI Alerts
Ta p Enabled to enable POI Alerts. CoPilot will then alert
you to the presence of points of interest as you approach
them. You can use the drop-down pick list to set how far
away you’ll be when you receive the alerts. In the list of POI
categories, select which types of POIs should be reported.
Move the slider bar at the bottom of the screen to limit
alerts to POIs right on your route or to include POIs that
are nearby.
Power
Tap t h e Pow er button to set options for conserving
battery life.
Ta p Stop GPS when lid is closed to switch off GPS
reception when you close the lid. This will save power, but
it will also add a slight delay to satellite acquisition the next
time you open the lid.
Ta p Keep backlight on to always maintain a lighted display.
Note: This will drain your battery more rapidly.
The GPS Menu
The GPS menu is a sub-menu of the main screen Menu. Tap Menu > GPS to access
these features.
GPS Status
To view your satellite activity at any time, first tap the
GPS Status option. Here you will receive information
on speed, lat/long position, heading, and time and date.
Save Current Location
Select Save GPS Location from the GPS menu to save your current location as a favourite
place (you must be receiving GPS data to do this). A prompt will ask you to assign a location
name to your current latitude/longitude position. After you enter a name, your current
location will be saved in the Favourites list (see Favourites, p. 7).
NOTE: Remember that when your favourites list is filled (50), each new address will replace
the address that has been inactive for the longest period of time.
- 25 -
- 26 -
Page 16

Modes Menu
CoPilot has four modes of operation on the mobile device. Tap the pop-up Mode menu at the
bottom of the screen to select Guidance, Navigating, Walking , or Planning Mode.
Guidance Mode
In Guidance Mode, you enter one or more destinations,
then tap the Start Driving button to start driving and
receive guidance. This mode provides you with on-screen
and spoken driving directions and other information
relevant to your trip, such as estimated time of arrival
and distance to the next stop.
Navigating Mode
While in Navigating Mode, CoPilot will track your position as you drive. Unlike in Guidance
Mode, you won’t receive turn instructions or voice prompts.
This tracking feature is an ideal way to see your location on the map if you don’t want to be
distracted by CoPilot’s guidance features.
Reference: Guidance Mode Screens & Toolbars
on Your Mobile Device
The following is a summary guide to the screens and toolbars you will see on your mobile
device as you operate CoPilot in Guidance Mode.
Welcome Screen
The Wel come screen appears when you first open CoPilot.
If you don’t want to see it at startup, uncheck Show this
screen at startup. This screen can be accessed from the
Menu at any time. Welco me screen options are:
• Going To to enter a destination and receive guidance
• Help topics about basics such as trip entry, hardware
setup, and options
• Options to change CoPilot routing, guidance, and map
options
• Live Setup for Live Communications
Walking Mode
Take CoPilot with you wherever you go! Walking Mode provides an as-the-crow-flies distance
and direction line to your destination, directions that are perfect for walking.
Planning Mode
Planning Mode lets you use your mobile device as a pre-trip planning tool or easy-to-use
reference guide. Planning Mode lets you view static maps and directions without the need for
GPS reception.
Trip itineraries you create in Planning Mode can be saved and then loaded in any mode at a
later time (generate directions, then select Menu > Save Trip As).
- 27 -
Going To Screen
This screen displays a scrollable list of all stops in the current
trip, numbered in the order CoPilot will route to them.
Tap the stylus on a stop to open a menu that lets you delete
the stop, zoom to it on the map, move it up or down on the
list, or make it a waypoint (an unreported stop that guides
your route along preferred roads). You can also optimize the
stop order for a more efficient route using this menu.
Ta p Add Stop to enter another stop in the Going To screen,
New Trip to delete all stops and start a new trip, or Start
Driving to receive guidance.
- 28 -
Page 17

Select Stop Screen
Determining Current Position
No GPS Signal
In this screen you add stops to your trip. There are nine
different types of stop entry to choose from:
• Enter a new Address
• Program or enter a Home address
• Program or enter a Wor k address
• Select from your Favourite list
• Search for a Point of Interest (POI)
• Enter an Intersection
• Enter a Contact
• Enter a Latitude/Longitude point
• Enter a previously Saved Trip
This screen may momentarily appear when you tap "Start
Driving", however if it remains on for an extended period it
may indicate that your mobile device is faulty.
When you see this screen, CoPilot is in the process of
determining where you are.
Heavy foliage, tall buildings, or any other structures
obstructing communications may interfere with CoPilot's
ability to track your location. Like your car radio, GPS
tracking can also be affected by weather conditions if severe.
CoPilot will continue tracking as soon as adequate signals are
available.
Driver Safety Screen
CoPilot automatically displays the text-only Driver Safety Screen when your speed exceeds 16
k.p.h. and is the recommended view for safe driving. If you are a passenger and want to see the
map at this point, tap the top of the screen, tap the Change View toolbar button (second
from the left) and pick a map view (see Toolbar Buttons, p. 33). When you’re within about 1
kilometer of a turn, CoPilot automatically switches to the Map Screen.
Next turn instruction.
Next turn arrow and distance to next turn.
Customizable display lines, tap to cycle through your current
road, nearest crossroad, nearest major road, nearest town,
ETA, or speed.
ETA and Distance to Next Stop display.
Messaging, Live, and GPS Status indicators. (Green = 3D fix,
Red = 2D fix, Yellow = no fix)
- 29 -
- 30 -
Page 18

Map Screen
Goi
i
The Map Screen displays when you are traveling at less than 16 k.p.h. or are at a standstill.
It combines a large map display and concise text instructions. When you’re within 1 kilometer
of a turn, CoPilot automatically switches to the map.
To invoke the toolbar and menu bar, tap the top of
the screen.
Next turn directional arrow.
Distance to next turn.
Route ahead highlighted in green, upcoming turn marked with
yellow arrow.
Messaging, Live, and GPS Status indicators. (GPS reception is
good when green, fair when yellow. Red indicates no fix.)
ETA and Distance to Next Stop display.
Itinerary Screen
The Itinerary provides turn-by-turn driving directions. In this screen you can highlight a road to
avoid and CoPilot will generate a detour around that road (see Selective Routing, p. 22).
Toolbar for easy access to guidance screens and trip editing.
Can also be used to avoid roads, and scroll up or down in the
Itinerary.
Distance between turns.
Direction of turns along your route.
Names of roads for upcoming turns.
Toolbar Buttons
(Tap at the top of the screen if the toolbar is not visible.)
ng To - Takes you to the
Going To screen where you
can add a stop or start a new
trip.
Zoom In - Zooms in for a
closer look at the map.
Zoom Out - Zooms out to a
more distant view of the map.
Detour - Generates an
alternate route from your
current position.
Cancel Detour - Returns to
the original route after a
detour has been created.
View: Ta p t h e View button (second from left on the toolbar —
its appearance will reflect the current view) and choose a view from
the drop-down menu.
Driver Safety Screen - Text only, switches to the map
below 16 k.p.h.
Next Turn - Map screen, view from your current position
to the next turn.
Destination - Map screen, view from your current position
to your final destination.
Where Am I - Map screen, close-up view of your current
position.
3D View - Map screen in 3D.
Trip Itinerary Screen - Basic text overview of all your
upcoming screens.
Avo
d Road - In the
Itinerary screen, causes
CoPilot to generate an
alternate route that does not
include the road that is
highlighted in the driving
directions.
Cancel Avoid - In the
Itinerary screen, this button
restores the original route
after the Avoid Road button
has been used.
Scroll Up - In the Itinerary
screen, scrolls the driving
directions up.
Scroll Down - In the
Itinerary screen, scrolls the
driving directions down.
- 31 -
- 32 -
Page 19

Trip Planning on Your Mobile Device
You can use CoPilot on your mobile device for trip planning. Planning Mode allows you to run
a trip on your mobile device even when you're not in your car. You'll get driving directions and
maps that you can use for reference before your trip begins.
1. First turn on your mobile device
and launch CoPilot (tap Programs >
CoPilot). In the Going to Screen, tap
the Mode button and select Planning.
3. Note: the first stop (0) on the Plan
Trip list is the starting point of your
trip. If you have a GPS fix, CoPilot will
use that as the starting point.
2. The Plan Trip screen will open.
Ta p Add Stop, then add stops to your
trip as you would in Guidance Mode.
To pick a stop from the map, see p. 19.
4. Now you’ll see your route on the
map. You can tap the zoom buttons on
the toolbar to zoom your view in and
out.
5. To see driving directions, tap the
View button, then tap the Itinerary
button in the nested toolbar that
pops up.
6. Your trip, along with the trip
itinerary, can be saved and then opened
later in Guidance Mode (see below).
Saving and Loading Trip Itineraries
To save a trip itinerary you put together in Planning or Guidance Mode, select Save Trip As
from the pop-up Menu. Give the trip a name and tap Finish. At a later time you can open the
trip in Guidance Mode using the Saved Trip option in the Select Stop screen.
- 33 -
- 34 -
Page 20

Installing CoPilot to Your Desktop
CoPilot Live comes fully installed and ready to use for route guidance on your mobile device.
However, you will want to install CoPilot to your desktop if 1) you’d like to use the extensive
trip planning features available with a desktop installation, or 2) you’re adding a data region.
To learn more about CoPilot’s desktop trip planning features, see p. 55-68.
To install CoPilot to your desktop, first turn on your computer and set up your mobile device.
Follow the steps below to install:
1. Insert the CoPilot Install Disc in your CDROM drive. Click Next in the Welcome screen
and follow the Installation Wizard’s on-screen
instructions.
2. When the installation is complete, a CoPilot
icon will appear on your desktop or laptop.
Double-click it to start the application.
Adding a Data Region
If you have purchased an additional data region after your initial purchase of CoPilot, you will
need to modify the original (“Base”) installation and activate the new region.
IMPORTANT: You can only use your Expansion Product Key AFTER you have installed
CoPilot. If you have not yet installed CoPilot, please do so first and then follow the instructions
below.
ON YOUR DESKTOP/LAPTOP:
1. Insert your CoPilot Install Disc into your CD-ROM drive.
2. Select Modify and click Next when the InstallShield Wizard appears.
3. Enter your Expansion Product Key when prompted.
4. Follow the on-screen instructions.
ON YOUR MOBILE DEVICE:
1. Open CoPilot on your mobile device.
2. CoPilot may ask you to confirm your destination or to enter a new one. Enter any
destination to proceed.
3. Tap Menu > Upgrade Licence at the bottom of the screen.
4. Enter your Expansion Product Key when prompted.
5. Follow the on-screen instructions.
If you have any questions, please visit www.alk.eu.com/motorola.
- 35 -
- 36 -
Page 21

Licence Update
The CoPilot desktop software contains street-level maps for all of Europe, and CoPilot is
offered with different licences that allow you to use some or all of these maps on your mobile
device. Licences are available for the following:
(1) Single region - Detailed street-level maps for any of the following regions: Alps Ski
Region, Benelux (Belgium, the Netherlands, and Luxembourg), France, Germany, Italy,
Pyrenees, Scandinavia, and the United Kingdom.
(2) Pan-Europe - Complete street-level maps for all of Europe.
After purchasing the licence, go to Menu > Update Licence/ Activate, and input your new
activation code. The CoPilot desktop software already contains complete European maps,
which can now be downloaded to your mobile device for in-vehicle use. If you purchased
CoPilot with a single region licence and later want to use street maps from other regions, you
will need to purchase an update licence from your dealer.
Region Selection
If you purchased an additional data region, when downloading map data to your mobile device
you will need to make sure the proper region is active. To do this, on your desktop in Planning
mode, click the Map menu > Region > and check the desired region.
Map Download to Your Mobile Device
If you need to change your map data or if you purchase additional map data regions, you will
need to transfer the new maps from your desktop or laptop computer to your mobile device.
You select the data to download from one or more data areas that you specify in the CoPilot
application on your desktop. It’s a simple process.
To begin the data download process, open the application on your desktop/laptop, then click
the Data Download Wizard icon or pick Data Download Wizard from the File menu.
CoPilot gives you two options for downloading data:
• Download directly to storage card in the storage card slot of your mobile device —
follow steps (1), (2), and (3a) below.
• Download to a storage card in a Storage Card Reader — follow steps (1), (2), and
(3b) below.
(1) Choose a Storage Location:
1. Open the CoPilot application on your desktop/laptop, then click the Data
Download Wizard icon in the sidebar on the left. Make sure your mobile device is
connected. CoPilot will scan your computer to detect which drive options are
available.
2. Click on the Drive Name pick list that appears and
select either the drive letter of your Storage Card
Reader (if you are using one) or the drive letter
assigned to the storage card in your mobile device.
Click Next.
NOTE: When you connect your mobile device to
your desktop/laptop. Windows will assign two drive
letters to it: one for the storage card in your device
and one for the main memory of your device. Open My Computer and check the drive
letter assignments to confirm which drive letter corresponds to your storage card.
- 37 -
(2) Select a Data Area:
Select a data area using one of four methods (see Data Selection Options p. 41-46 for a
description of each method):
City Radius to select an area around a town or city;
Map Area to select an area directly from the map;
- 38 -
Page 22

Tr i p to select a corridor along a route between two places;
Region to select a whole country or region.
(3) Download the Data:
(3a) To a Storage Card in your Mobile Device:
1. Ensure that your mobile device is connected to the desktop/laptop.
2. Clicking the Download icon will take you to a screen where Available Area(s) for
download are displayed on the left. To designate an area to include in the download,
highlight it and then click on the right arrow button to move it to the Data Included in
This Download list on the right. To take an area off the list, highlight it and click the left
arrow button.
3. After confirming that the area(s) you would like to download are in the Data Included
in This Download list, click Download to complete the map data download process
(see Download Options, p. 47).
4. Your data is now ready to be used by CoPilot.
(3b) Using a Storage Card Reader:
1. Make sure the Storage Card for your mobile device is inserted in the Storage Card Reader.
2. Clicking the Download icon will take you to a screen where Available Area(s) for
download are displayed on the left. To designate an area to include in the download,
highlight it and then click on the right arrow button to move it to the Data Included in
This Download list on the right. To take an area off the list, highlight it and click the left
arrow button.
3. After confirming that the area(s) you would like to download are in the Data Included
in This Download list, click Download to complete the map data download process
(see Download Options, p. 47).
4. Remove the Storage Card from the Storage Card Reader and insert it into the mobile
device. Your data is now ready to be used by CoPilot.
Data Selection Options
After you specify a location where the data will be stored, you will be prompted to select a
region on the map to download. CoPilot gives you a choice of four ways to select a data
region, described p. 41-46 below.
Region Download
To download a whole country or CoPilot data region, click the Region option in the Data
Download Wizard, then select a region in the next screen and click Next.
The country or region you select must be included in the region that was installed on your
mobile device (if not, a warning will appear and you won’t be able to proceed with the
download). Region downloads generally take the longest amount of time, depending on the
size of the selected region.
- 39 -
- 40 -
Page 23

City Radius Data Selection
This method allows you to quickly select data in the shape of a circle surrounding any city on
the map. In the Data Download Wizard you type a city name and country abbreviation or
postal code and enter the distance you would like the radius to extend around the city, then
click Next.
The Wizard displays a map that shows the city and the radius you chose. At this point you can
zoom the map in and out using zoom buttons and adjust the size of the data area by altering
the radius of the circle.
Follow these steps to download City Radius data:
1. Click the City Radius icon in the Data
Download Wizard.
2. Enter a City, Country or Postal Code,
and a radius around the area that you would
like to download. Click Next to verify that the
area is correct.
4. Name the selection, thenclick Next.
5. You will return to the Data Selection menu
where you can select another data area if you
like, using any method. When you finish
selecting data areas, click the Download icon
and you will be taken to the final screen where
you can build your download.
Map Area Data Selection
This method of selecting data allows you to choose an area of data by drawing a box on the
Data Download Wizard's map screen.
In the Wizard, you enter a city name near which you would like to select data, then click
Next. The map will zoom to that location. Then you create a box around the desired area by
clicking and dragging your mouse across the map. The street-level data within that box will be
selected.
You can zoom the map in and out using the zoom buttons and adjust the size of the data area
by redrawing the box.
Follow these steps to download Map Area data:
- 41 -
1. Click the Map Area icon in the Data
Download Wizard.
3. Using the Data Download Wizard toolbar
you can zoom in or out, change the radius, or
go back to the previous screen. When you are
satisfied with your selection, click Next.
Note: CoPilot’s available memory calculations
subtract 15 MB from the available memory on
your storage card (if you are using one)
to account for support files.
- 42 -
Page 24

2. Enter a City, State or ZIP code (address
optional) within the area that you would like to
download. Click Next.
3. Click and hold the left mouse button
and drag the cursor to draw a box around
a desired area. The size of the area will be
displayed in the toolbar. Click Next.
Note: CoPilot’s available memory calculations
subtract 15 MB from the available memory
on your storage card (if you are using one)
to account for support files.
4. Name the selection, then click Next.
5. You will return to the Data Selection menu
where you can select another data area if you
like, using any method. When you are finished
selecting data areas, click the Download icon
to go to the final screen where you can build
your download.
Trip Data Selection
The Trip method of selecting data is by far the most customizable method. This option allows
you to run a trip and select street-level data specific to that trip, thereby avoiding unneeded
data and saving valuable memory space.
Once the trip is run, the Data Download Wizard automatically selects circles of data around
your origin and destination, and a corridor of data along your route. You can then click
Options to adjust the radius of the circles and the width of the corridor.
The Trip Itinerary for each trip you download will be stored on your mobile device. Multiple
trips can be downloaded to the mobile device for later use (see Trip Tr ansfe r, p. 50).
Follow these steps to download Trip data:
1. Click the Tr i p icon.
2. Enter at least a start and end place for your
trip. In the Cities and Addresses tab, type a City,
State or ZIP Code and press <Enter>.
Optionally, you can enter an address in the same
way. Click the Add Stop button to add this
place to your trip.
You may enter one or multiple destinations. Use
the buttons to the right of the Itinerary to zoom
to a stop on the map, change the order of stops,
or delete a stop.
- 43 -
- 44 -
Page 25

3. To search for a POI, click the Points of Interest
tab, enter a City, State or a ZIP Code and click
the Find button.
You can speed up your search by selecting a POI
Category and/or Ty p e . Highlight a selection,
click Select, then Add Stop.
6. You will return to the Data Selection menu
where you can select another data area if you
like, using any method. When you are finished
selecting data areas, click Download. Trip
itineraries that were created using the Tri p
download method will be transferred along with
map data (see p. 50 for details).
NOTE: For a more detailed description of trip entry, open CoPilot Help from the desktop
application (Help menu > Help Contents and Search).
4. When all your stops have been entered, click
Select Data.
By default a 33 kilometer radius around all
stops and a width of 4 miles along the corridor
which connects them will be highlighted.
Note: CoPilot’s available memory calculations
subtract 15 MB from the available memory on
your storage card (If you are using one)
to account for support files.
5. To customize these distances for any trip,
click Options and enter your own distances,
then click OK.
Download Options
When you’re ready to execute a download, the Wizard will display a list of Available Area(s)
for download on the left side of the window. To designate an area to include, click on it and
then click on the right arrow button to move it to the Data Included in This Download
list. If you need to move an area off the Included list, click on it and use the left arrow button.
To delete an area from memory, click on it and click Delete.
Notice that the amount of available map memory and the memory required for all the areas on
the Included list is shown beneath the list. NOTE: CoPilot's available memory calculations
subtract 15 MB from the your storage card (if you are using one) to account for support files.
IMPORTANT: Each data download overwrites the data that is already on your
mobile device. If any data areas are already loaded on your mobile device, they will be
overwritten by the new download. Therefore, your download must include all areas that you
wish to have available on your mobile device.
- 45 -
- 46 -
Page 26

Check Include EU Highway Network to download CoPilot’s complete European Highway
Network along with your data. This additional download requires approximately 59 MB of
space on your mobile device. When this network is loaded, major roads, cities, and some
points of interest outside your selected data region will be shown on the map and you’ll be
able to receive guidance as you drive anywhere in the European Union.
Check Download Favourites to download your Favourites list from the Trip Planner
window on your desktop along with map data. These addresses will then be available as
Favourites for trip entry on the mobile device.
POI Download Options
When you download a data region, youl get all roads within that region. Also included are
regional points of interest (POI) such as gas stations, hotels, restaurants, visitor attractions,
etc.
CoPilot now lets you control the number and types of POI that get downloaded along with
map data. You can save space on your mobile device by eliminating categories of POI that
you’re not interested in seeing.
To select which POI categories you want, choose POI Download Options from the Edit
menu in the desktop application or, when you first open the Data Download Wizard, click the
Options button in the Wizard. Check the categories you wish to select (click the plus sign
next to each category to see the included sub-categories).
Click Save Settings to save the set of categories you create. Click Restore Default to
return to CoPilot’s default categories.
- 47 -
- 48 -
Page 27

Trip Transfer
When you use the Tr ip download option, CoPilot transfers whole trips to your mobile device.
The trip you create, including its Itinerary, is transferred along with the surrounding data
corridor, and it becomes the current trip.
The Tr i p download option creates a .TRP file that is placed in the Save directory in the
CoPilot installation folder on your mobile device. Subsequent downloads will add more .TRP
files to this folder. The number of trips that may be stored is limited only by the available
memory on your mobile device.
If multiple trips are downloaded, the last one to be added will open as the current trip. Use the
Saved Trip stop entry option on your mobile device to open stored .TRP files.
Importing Custom Places
CoPilot’s Custom Place Import Wizard enables you to import addresses from your Outlook
Contacts database, an Excel file, or text file. (If you are using another type of database or
contact manager, you can export your contacts/locations to an Excel or text file before
importing them into CoPilot.) These points are then added to CoPilot’s POI database in a
category and type of your choice (the default category is “Custom”). Once they are in the
database, they are displayed on maps as pushpins and included in search results when you
search for points of interest on your mobile device or in the Trip Planner window on your
desktop/laptop.
NOTE: CoPilot now allows importing of multiple POIs with the same name (e.g. an entire
database of “Starbucks”).
To access the Wizard, choose Import Custom Places from the Tools menu in Planning
Mode on the desktop, then follow the step-by-step instructions given by the Wizard.
Steps for Importing:
1. In Planning Mode on your desktop/ laptop, choose
Import Custom Places from the Tools menu to
open the Import Custom Places Wizard.
2. Choose Import from Microsoft Outlook or
Import from an existing file (this can be a .txt text
file or an Excel file). Click Next.
- 49 -
3. In the next Wizard screen, type the path to the file
you want to import or Browse for it, and use the
Category pick list to indicate a POI category for
your imported places (by default they are assigned to
“Custom”). You can also choose a Ty p e from the pick
list. To edit the type name, highlight it on the pick list
and click Edit Type Name below. Click Next when
ready.
- 50 -
Page 28

4. In the next screen you'll see the data from your file
sorted into columns. If the columns you see in the
screen have not sorted the address data correctly, you
need to indicate which delimiter CoPilot should
recognize when it separates the fields in your file into
columns. Each field — e.g. name, street address, city,
state, etc. — needs to be separated by a delimiter
such as a tab, semicolon, or comma. If your file uses a
delimiter other than a comma, tab, or semicolon, click
Other and type the delimiter in the box to the right.
If the first row of your file consists of column
headings, you should check Column headings in
first row. Click Next when ready.
5. Now, following the instructions on the screen,
click each column heading and match the column
headings with your data. To be accepted by CoPilot,
each imported place must have at least four fields:
Name, Address1, City, and State. Click Next
when ready.
- 51 -
6. In the next screen, following the instructions, you
can assign a name to the set of columns you just
defined to save you time the next time you import
addresses.
To skip this step, uncheck Save the columns as a
new set. Click Finish.
7. When processing is finished, the Data Import Status window shows you how many places
in your file were matched with addresses in the CoPilot database. A plus sign in the Accept
column indicates a match. Places that failed to match appear in red and do not have a plus sign.
8. To edit a failed or incomplete match, highlight it and click Edit (see Editing Custom Places,
next page). POI addresses can also be edited after they are added to the database using the
Custom Place Manager.
9. When you are satisfied with the list of addresses, click Add to add these places to the
CoPilot database.
Options below the list let you 1) choose whether to add all addresses on the list to the
database, or just those that were accepted, and 2) determine how CoPilot will handle any
address that duplicates one already in the database.
- 52 -
Page 29

Editing Custom Places in the Database
After custom places have been added to the database, they can be edited at any time. Select
Manage Custom Places from the Tools menu, then highlight the custom place you wish to
edit, click Edit, and make your changes. Click Apply when finished.
NOTE: By default, addresses entered as Custom Places are assigned to the Custom POI
category. You can change this assignment at any time by selecting another Category from the
drop-down pick list as you edit.
Trip Planning on Your Desktop
You can use CoPilot's desktop functions to map out routes and print maps and driving
directions before getting on the road. Desktop trip planning is an additional feature of
CoPilot that is in no way connected to using your mobile device for route guidance.
On the following pages you will find brief descriptions of CoPilot’s desktop trip planning
capabilities. For more detailed descriptions, open CoPilot Help from the desktop application
(Help menu > Help Contents and Search, or click the Help button on the toolbar).
Go to Desktop Trip Planning in the Contents tab.
To begin planning a trip on your desktop, click the Planning icon in the sidebar to the left of
the map. Using the drop-down menus you can select from a number of planning features. Many
of these features can also be accessed from the toolbar. Place your cursor on any toolbar
button without clicking to see what it does.
New Trip
- 53 -
New Trip button or New Trip in
the File menu.
Opens the Trip Planner window where you can create a new trip, arrange the order of stops on
your route, add or edit Favourites (these can be downloaded to your mobile device along
with map data), search for Points of Interest, or use your Contacts database to add stops
to your trip. Click Run to receive driving directions and a map.
- 54 -
Page 30

Run Trip
t
S
S
O
Save Trip
ave Trip button or Save Trip.../
ave Trip As... in the File menu.
Generates the route for the trip you
entered. Displays a detailed Tr ip
Summary, Map and Driving Directions.
Opens a standard Windows dialog where you can
name your trip and save it to your hard drive
either before or after running it in the Trip Planner.
Open Trip
Edit Trip
pen Trip button or Open
Edit Trip button or Edit Trip in
he Tr i p menu.
Takes you back to the Trip Planner window where
you can edit stops on your existing trip or click
Clear to delete all stops and begin a new trip.
Trip... in the File menu.
Opens a standard Windows dialog where you can
select a saved trip to open in the Trip Planner
window.
- 55 -
- 56 -
Page 31

Print
a
Z
y
o
s
w
Z
y
o
s
w
Zoom In
Print button or Print... in the
File menu.
Help
Help button or Help Contents
nd Search in the Help menu.
Takes you to the standard Windows Print
options for printing the active window that
contains your map or driving directions. Activate
the map or directions by clicking on it or selecting
it in the Window menu. Select Print TravPak...
from the File menu to print driving directions, an
overview map, and a zoomed map of each stop.
oom In button or Zoom In
in the Map menu.
Each time you click this button,
our view will be zoomed in by
ne increment. The zoom level is
hown in the title bar of the map
indow.
Zoom Out
oom Out button or Zoom Out
in the Map menu.
Each time you click this button,
our view will be zoomed out by
ne increment. The zoom level is
hown in the title bar of the map
indow.
Opens the CoPilot Help window with the
Contents tab open on the left. From here you
can search for help by topic, use the Index, or
Search for a word or phrase.
- 57 -
- 58 -
Page 32

More Detail
S
C
d
z
S
C
d
z
Z
Z
T
y
C
d
M
s
t
w
Zoom To Region
More Detail button or Detail >
how More in the Map menu.
lick once to increase the level of
etail you see on the map by one
increment without changing the
oom level.
Less Detail
Less Detail button or Detail >
how Less in the Map menu.
lick once to decrease the level of
etail you see on the map by one
increment without changing the
oom level.
oom to Region button or
oom Region in the Map menu.
his function allows you to zoom
our map view to a specific area.
hoices in the sub-menu will
epend on which CoPilot data
region(s) were purchased.
Refresh Map
Refresh Map button or Refresh
ap in the Map menu. When
crolling through a map you may
notice it takes a few seconds for all
he data to catch up. This function
ill snap the entire screen to a
new map.
- 59 -
- 60 -
Page 33

Pick Stops
T
t
c
S
t
d
t
c
s
d
o turn on Pick Stop mode, click
he Pick Stops button or right-
lick on the map and select Pick
tops. Then click on any point on
he map to enter it as a stop. The
map view must be zoomed in to
level 11 or 12. At lower zoom
levels, keep clicking on the map
until level 11 is reached (level is
isplayed in the CoPilot window
itle bar).
In the dialog that opens, you can
hoose to enter the point as a
tart place, a waypoint, or a
estination.
Options (Tools Menu)
Landmark Reporting
Select Landmark Reporting from
the drop-down Tr i p menu.
Help Menu
In this window you can control how many
Landmarks CoPilot points out when
generating driving directions.
Use the drop-down Help menu to access
CoPilot Help for assistance with all aspects of
the software and to quickly access ALK’s web
site.
(For North America only) In this menu you will
also find helpful travel links and a link to the
ALK data corrections e-mail address. With
street-level data changing every day, you may
discover some errors. Please drop us an email. With your help we will be able to
improve our map data with every update.
Select Options from the drop-down
Tools menu.
In this window you can change the way you view your desktop maps and various application
settings. For example, in the General tab you can choose the measure of distance (miles vs.
kilometers), and the Map tab lets you adjust the appearance of features on the map such as
roads and points of interest.
- 61 -
- 62 -
Page 34

Reference: CoPilot on Your Desktop
The following is a guide to the main screens you will see as you use CoPilot on your desktop/
laptop computer for trip planning.
Map Window
Menus and toolbar buttons to access all
of CoPilot's desktop features.
Click on a tab to frame any stop on
your route.
Map of area around your destination.
Zoom in and move your cursor
over a street to view its name.
Distance Scale.
Latitude/longitude position of your
cursor on the map.
Trip Planner Window (Cities & Addresses)
Click Cities and Addresses.
Enter city name/country, or postal
code. Enter an address (optional), with
the option to add a Name to it. Click
the Add Stop button to add the stop
to the Itinerary.
Move stops up or down on your
Itinerary, zoom to stop location on the
map, delete a stop, or add a favourite.
See p. 67 for routing options.
Trip Planner Window (Points of Interest)
Click Points of Interest tab.
Enter a city or postal code in which
you would like to search, a radius
within which to search, choose a
category and type from the dropdown menu, and click the binoculars
to search. You can also enter a name
to narrow down the search in the
POIs that start with box.
You will be given a list of matches to
your search criteria. Highlight your
selection and click Select. Click the
Add Stop button to add it to your
Itinerary.
Trip Planner Window (Favourites)
Select Favourites tab.
Highlight a selection from your list
of places by clicking on it. You can
zoom to it on the map, or Delete it
from the list using the buttons to the
right. Click the Add Stop button to
add a favourite to your Itinerary.
- 63 -
See p. 67 for routing options.
- 64 -
Page 35

Trip Planner Window (Contacts)
Enter a person’s first or last name and
hit <Enter>. CoPilot will search your
Contacts database for matches.
Select the Contacts address type (as
defined in Outlook) to get the
appropriate address, then click the
Add Stop button to add it to your
Itinerary.
Driving Directions and Map (Split Screen)
When you click Run in the Trip Planner window, your route will be calculated and driving
directions and a map will display. To print either one, click on it and choose Print from the
File menu. To print directions plus all map views, choose TravPak Printing.
Atlas, Start, and End
tabs will zoom to the
map view of those
places respectively.
Driving directions give you turnby-turn instructions including
ramps and exits, and distance and
time between turns.
Routing Options
Click the Options button in the Trip Planner
window to access CoPilot routing options.
Auto and Quickest is the default setting, and
provides the quickest routing for automobiles
based on practical considerations such as road
quality, terrain, and urban/ rural classifications.
RV routing favors major roads and avoids
sharp turns and U-turns where possible.
Click Advanced to set general road
preferences.
Drag the sliding bars to the left or right to
avoid or favor each road type.
Set the road speeds CoPilot uses in its route
calculations for each type of road by either
typing or clicking the up and down arrows
under Rural and Urban for each road type.
- 65 -
Trip Summary
Select Run in the Trip Planner window to run
the trip.
The Trip S u m m ar y will show start and end
places, and the number of stops in between
them.
Total distance and time for trip.
Estimated fuel cost for your trip based on
entries in the Fuel Cost Calculator (Tr i p menu).
Click OK to view map and driving directions.
- 66 -
Page 36

Fuel Cost Calculator
To calculate an estimate of your fuel costs for
a trip, select Fuel Cost Calculator from the
Tr i p menu before you run your route. Fill in
the average cost per gallon of fuel that you
expect to pay, and the distance per gallon you
can expect to get in your vehicle. Click OK,
then run your trip. A fuel cost estimate based
on what you entered will be calculated and
shown in the Trip Summary that CoPilot
creates for every trip you run.
CoPilot Live Communications
CoPilot Live allows you to maintain two-way communication with drivers who are using
CoPilot and to actually see where they are currently located. You can do this using a computer
with CoPilot installed or from our CoPilot Live web page.
Using this CoPilot Live functionality requires the following:
1) If you want to track and message other drivers: An Internet connection on the
computer you have CoPilot installed on, or access to our CoPilot Live web page through
a normal web browser.
2) If you want others to track and send messages to you: CoPilot Live must be
running on your mobile device in your vehicle. You must have a wireless Internet
connection.
CoPilot Live Web Page
As a CoPilot user, you can create an account on our website that allows you to join the
CoPilot Live Network. Then your family, friends, and coworkers can "see" you and
communicate with you anywhere in the world! Through the website you can do all of the
following:
1) Send text messages to CoPilot users using large, customizable, one-touch response
buttons to ensure driver safety.
2) Real-time tracking of other people who are on the road. See their current location,
destination, ETA and much more.
3) Send itinerary updates including new stops and revised destinations — you can coordinate
changes in plans with someone who's on the road right now without forcing them to pull
over and enter new information.
4) Create an online account from where you can send temporary or permanent tracking
numbers to friends and family. You can also create and join groups with other CoPilot
users and manage all your account preferences.
Since you're the one who owns CoPilot, it's likely that your friends and family will be the ones
logging onto the CoPilot Live web site to communicate with you. However, setting up your
own account allows you to distribute tracking numbers and have tighter control of the security
so you know who has access to you while you're on the road.
For more information and complete details, visit the CoPilot Live Tracking Website at:
http://live.alk.eu.com.
- 67 -
- 68 -
Page 37

On the following pages you'll see how you can communicate with someone on the road from
within CoPilot (the Live Mode sections) and what it's like to be the driver using CoPilot when
someone else is communicating with you (the Driving with Live sections). To set up your mobile
device for tracking/messaging from within CoPilot or on the web, see Driving with Live - Mobile
Device Setup, p. 77-78.
Live Mode - Overview
Although the CoPilot Live web page is the best way to communicate with people who are on
the road, you can also use Live Mode from within CoPilot on your desktop as shown in the
following Live Mode sections.
In Planning Mode click on the Live icon on the sidebar to the left of the map. The upper
portion of the new pane that opens is the Vehi c l e List . Your connection to the CoPilot Live
network is displayed above the Vehicle List. Remember that you must have an Internet
connection to get onto the CoPilot Live network.
The Screen Name of the driver is displayed on the Vehicle List, with columns for the vehicle's
next stop, ETA, speed, location, and time of last update. To see all columns, expand the pane
(place the cursor on the right edge until it becomes an arrow and drag).
Login Status
Live Mode - Automatic Vehicle Location (AVL)
Vehicle Location
In Live Mode on your desktop you can track the location of the driver. Double-clicking the
vehicle in the Vehicle List will center the map on the driver's last reported location. The vehicle
location updates at an interval specified by the driver on his mobile device (see Driving with Live
— Mobile Device Setup, p. 75) as long as both you and the driver are running CoPilot Live.
Live Mode - Send/Receive Messages
To send a message to the driver, click the Send Message button on the toolbar or right click
on the vehicle and select Send Message from the pop-up window.
Vehicl e L i s t
Message Center
Below the Vehicle List is the Message Center. The text of sent and received messages will
appear here.
NOTE: All of CoPilot Live's communications are done in real-time. This means information is
only transferred when you and the person in his vehicle are using CoPilot Live at the same
time. In this sense CoPilot Live communication is similar to using a telephone —
communication only occurs when both parties are on at the same time. ALK does not actively
log driver's location information, nor do we use this information for any purpose other than to
transfer it between authorized users.
- 69 -
Standard Response Buttons
Text to Send
Customizable Response Buttons
Send Button
Changes Number of
Customizable Response
Buttons
- 70 -
Page 38

Click your cursor in the space just below the Standard Response Buttons, and begin
typing. The Standard Response Buttons are included in every message and are described in
detail in Driving with Live - Receive/Respond To Messages (p. 77).
You have complete control over the Customizable Response Buttons:
1) Choose to display 1-4 buttons by clicking the corresponding number at the bottom of the
screen.
2) Change the text of each button — the driver will see whatever text you enter and when
the driver responds, the text of the button will be sent back to you.
Once you have typed your message and specified your Customizable Response Buttons, click
the Send button to send your message to the driver. When the driver responds to your
message, the response is displayed in the Message Center:
Live Mode - Send Trip Itinerary Updates
To send a Trip Itinerary Update to the driver, click the New Trip button on the toolbar and
create a trip itinerary in the Trip Planner window just as you would in Planning Mode
(see p. 55).
Then click the Send button:
Trip Planner Window
Message and Driver’s Response
Advanced:
Clicking on the Advanced tab of the Send Message window will expand the view. From the
Advanced view you can save frequently used message text and button layouts that you can
recall for future messages.
- 71 -
Send Button
Send Trip
Confirmation
In the Send Trip Confirmation window you can specify whether you want the new trip
itinerary to replace the driver's existing trip, add as the next stop(s) in the driver's current
itinerary, or add as the last stop(s) in the driver's current itinerary. Click OK to send the trip
itinerary.
NOTE: CoPilot Live always uses the driver's current location as the start point for giving
route guidance.
- 72 -
Page 39

When the driver responds to your trip itinerary update, the response is displayed in the
Message Center:
Send Trip Confirmation
To set up access to CoPilot’s Live Network on the Web:
1. Go to the CoPilot Live Web login page at
http://live.alk.com. Click Create a new account,
and enter all the required information including a User
Name and Password.
2. Open CoPilot on your mobile device. Tap the Menu >
Live to access Live options and settings.
3. Tap t h e Login button to enter a Screen Name that will
identify you to the person on the other end for messaging
and tracking. (See NOTE on next page to change your
screen name, user name, and/or password.)
4. Enter the same User Name and Password you used to
create your account on the web (Step 1) and click Apply.
Driving with Live - Mobile Device Setup
If you would like access to CoPilot’s Live Network on the Web so that your friends, family, and
co-workers can message and track you from anywhere in the world, you’ll need to set up your
mobile device for web tracking. Once you do this setup, you’ll gain the security features and
functionality provided with the CoPilot Live Network.
The setup for the web is simple. You (the driver) must first create a login account using the
CoPilot Live Web login page. Once you have created a User Name and Password on the web,
you then enter the same user name and password — once only — within the CoPilot
application on your mobile device to complete the setup.
To set up your mobile device for tracking and messaging, you (the driver) must first enable this
functionality using the main screen Menu.
Follow the steps on the next page to quickly get set up for Live Networking.
- 73 -
5. Tap t h e Settings button in the Live screen to adjust
how long messages are displayed. In this screen you can also
indicate how often your current position should be sent to
the Live Network. Depending on the plan offered by your
wireless data service provider, sending data at infrequent
intervals will be more cost-effective.
- 74 -
Page 40

6. Ta p t h e Connection button in the Live screen to select
which mobile operator’s network you will be using. You can
also select when CoPilot should connect to the Live
network and/or press the Connect button to connect
immediately.
7. Once you’ve connected to the Live network, you’ll be
able to send invitations to friends, family, and colleagues —
tap the Invitations button in the Live screen. From here
you can create new invitations or manage existing invitations.
8. When you send an invitation, enter the recipient’s e-mail
address and any comments. The recipient will receive an
e-mail with a web link that will point to the CoPilot web site
and automatically log them in so they can view your position
and send messages.
You are now set up for messaging and tracking on
the web.
NOTE: Your screen name, user name, and/or password can
be changed as many times as you like. However, you’ll need
to change your user name or password on the Live Web
page before changing them in CoPilot. This is not required
for your screen name.
Driving with Live - Receive/Respond To
Messages
When you are the driver and a message is sent to you,
CoPilot displays it on top of all other windows.
If you tap the Defer button (see below) or do not respond
within the time limit you set up, the message will be put in a
queue and the Information button in the lower right
corner of the CoPilot guidance screen will turn from gray to
red. You’ll need to tap the Information button to read the
message. If other messages have been queued behind it, the
messages will appear in the order they were sent.
On the top are the three Standard Response Buttons
which appear on every message (shown below). You can also
tap one of the Customizable Response Buttons at the
bottom of the screen that the message sender has included. The text on the button is
sent back.
Defer Message: Defers the message, which will reappear later. Useful when
you need to concentrate on the turn instructions and the road.
More Information: Sends a response back that you need more information.
- 75 -
Delete Message: Deletes the message-notice of the delete is sent back.
- 76 -
Page 41

Driving with Live Receive Trip Itinerary Updates
When you are the driver and a Trip Itinerary Update is sent to you, CoPilot Live displays it
on top of all other windows.
Yo u c a n Accept or Decline the change to your trip itinerary. If you accept the change,
CoPilot Live will automatically start giving route guidance using the new itinerary.
About GPS Technology
The Global Positioning System (GPS), developed by the U.S. Department of Defense, is a
constellation of 24 satellites that orbit the Earth twice daily. Each satellite contains an atomic
clock that is accurate to the nanosecond, and constantly emitting radio waves toward Earth.
GPS sensors (hardware devices for receiving data) can receive these signals from the satellites,
and using their own internal clock can calculate the amount of time it has taken for the signal
to be received. GPS relies on the fact that radio waves travel at the speed of light to calculate
distances, and the exact location of the sensor is figured by combining the data received from
four satellites.
Using the data from these four satellites, GPS is able to give you the latitude, longitude and
elevation of your present location, and also your road speed and direction of travel on a route.
Given the right conditions, a GPS sensor can identify your geographic position anywhere in the
world within a matter of a few meters.
How CoPilot Uses GPS
CoPilot uses the GPS positional data that it receives from the hardware unit you place on your
dashboard to display your current position on a map as you drive. This is called "tracking".
CoPilot also uses the GPS data it receives to guide you along your planned route if you enter a
destination on your mobile device. CoPilot guides you with audible prompts as you drive as
well as on-screen directions.
Tracking will begin automatically when you have satellite reception. In order to get route
guidance, you have to enter a destination on your mobile device. Tracking may also be used
without receiving guidance instructions when you’re in Navigating Mode. In this case, you'll see
your trip tracked on the map on your mobile device as you drive, but you won't see a
highlighted route on the map and you won't be given driving directions.
- 77 -
GPS Accuracy
The GPS signal CoPilot receives from the constellation of satellites has a rated accuracy of
within 5 - 10 meters. This means that 95% of the time the reported location is within 15 - 30
feet of your exact position. CoPilot takes this location information and enhances it further by
"snapping" it to our street and highway network. Occasionally, CoPilot will place you on the
wrong road. If this occurs, keep driving and CoPilot will automatically correct itself and find
your proper position.
At times, CoPilot's GPS tracking will be less accurate or fail to work at all because the unit is
unable to receive satellite signals. Heavy foliage, tall buildings, or any other structures
obstructing communications will interfere with CoPilot's ability to track your location. Like
your car radio, GPS tracking can also be affected by weather conditions if severe. CoPilot will
continue tracking as soon as adequate signals are available. Despite these limitations, you can
expect CoPilot to provide you with useable and accurate information most of the time.
CoPilot will alert you if accurate information is unavailable.
- 78 -
Page 42

Software Registration
Registered users are entitled to technical support, discounts on new versions of CoPilot,
new product information, and software enhancements.
NOTE: Software activation does NOT register your software, they are two separate
processes.
In North America: You can register your software at www.alk.com (click "Support
Center") or call ALK® Technologies at 609-252-8191 (M-F, 9:00 AM - 5:00 PM EST).
In Europe: Go to www.alk.eu.com and click "Support Center".
In Australia: Go to www.travroute.com.au and click "Support".
ALK Technologies has a one-per-licensing non-transferable registration. Unauthorized
purchases from private owners are not supported or under warranty, and special pricing does
not apply.
Technical Support
After registering your software, you're entitled to technical support and discounts on new
versions of CoPilot. For technical support or to contact us with any other concerns, visit
www.hellomoto.com.
CoPilot® End-User Licence Agreement
NOTE: On the following pages there are three separate licence agreements for users of
North American, European, and Australian Data.
THIS IS A LEGAL AGREEMENT BETWEEN YOU, THE USER (either an individual or an
entity), AND ALK TECHNOLOGIES, INC. ("ALK"). IF YOU DO NOT AGREE TO THE
TERMS OF THIS LICENCE, DO NOT OPEN THE PACKAGE. Promptly return the unopened
CD-ROM package and accompanying materials (including written materials and containers) to
the dealer from which you obtained them for a full refund.
OPENING THE PACKAGE OR USING THE ENCLOSED SOFTWARE INDICATES YOUR
ACCEPTANCE OF THE TERMS OF THIS LICENCE.
®
Technologies, Inc. LICENCE AGREEMENT
ALK
CoPilot | Linux with NORTH AMERICAN DATA
LICENCES: 1 User
1. Grant of Licence:
This ALK Licence Agreement ("Licence") is a single-user, non-exclusive, non-transferable
licence agreement and not an agreement for sale. ALK hereby licences the Help Files and CDROM software identified above (collectively, "the Software") to you under the following terms
and conditions.
The Software may not be loaded onto a network of any type. You may use the Software on any
compatible personal computer, provided you use it on only one computer at a time. The
Software is "in use" on a computer when it is loaded into the temporary memory (i.e., RAM)
or installed into the permanent memory (e.g., hard disk, CD-ROM, or other storage device) of
that computer. You may make a single back-up or archival copy of the Software for back-up
purposes only. You may not transfer this Software or assign this Licence Agreement to another
party.
You are not permitted to, during the term of this Licence Agreement and thereafter:
• Use the Software on a network or file server.
• Use or copy the Software or the accompanying documentation except as provided in this
Licence Agreement.
• Alter, merge, modify, or adapt the Software or the accompanying documentation in any
way including disassembling or decompiling this Software.
• Loan, lease, sell, transfer, or sublicence the Software or the accompanying documentation.
• Copy, loan, lease, sell, transfer, or sublicence any output of this Software (including but not
limited to printed maps and driving itineraries); However, you may provide a limited
number of printed copies of a single trip to family members or traveling companions.
• You are not permitted to use the Software for motor-carrier tariff or routing purposes.
• Electronic reproduction and transmission of output to remote locations is not permitted.
- 79 -
- 80 -
Page 43

ALK retains all rights not expressly granted. Nothing in this Licence Agreement constitutes a
waiver of ALK's rights under the U.S. copyright laws or other applicable copyright laws or any
other federal or state law.
2. Term:
This Licence is effective upon receipt by you of the Software and upon opening the package.
The Licence is effective until terminated. You may terminate this Licence at any time by
returning all copies of the Software, and any portions thereof, to ALK. The Licence terminates
automatically if you fail to comply with any of the terms of this Licence Agreement. You agree
upon such termination to return or destroy this CD-ROM and all other copies of the Software
and certify in writing to ALK that you have done so.
3. Limited Warranty:
ALK warrants that all disc(s) on which the Software is furnished shall, for a period of 90 days
from delivery (the "Warranty Period") be free, in normal use, from defects in material and
workmanship. ALK will have no responsibility to replace any disc(s) that have been damaged by
accident, abuse, or misapplication.
Customer Remedies: ALK's entire liability and your exclusive remedy shall be, at ALK's option,
either (a) return of the price paid or (b) replacement of the disc(s) that does not meet ALK's
Limited Warranty, and that is returned to ALK with a copy of your receipt.
Except as specifically provided above, ALK MAKES NO OTHER WARRANTY OR
REPRESENTATION, EITHER EXPRESS OR IMPLIED, WITH RESPECT TO THE SOFTWARE
OR DOCUMENTATION, INCLUDING ANY WARRANTY AS TO THE QUALITY,
PERFORMANCE, MERCHANTABILITY, OR FITNESS FOR A PARTICULAR PURPOSE. IN
NO EVENT WILL ALK TECHNOLOGIES, INC. BE LIABLE FOR DIRECT DAMAGES IN
EXCESS OF THE LICENCE FEE OR ANY INDIRECT, SPECIAL, INCIDENTAL, OR
CONSEQUENTIAL DAMAGES ARISING OUT OF THE USE OR INABILITY TO USE THE
SOFTWARE OR DOCUMENTATION, EVEN IF ADVISED OF THE POSSIBILITY OF SUCH
DAMAGES. IN NO CASE SHALL ALK'S LIABILITY EXCEED THE AMOUNT OF THE
LICENCE FEE.
While the information contained in the Software was believed to have been correct at the time
of publication, ALK cannot guarantee its accuracy and shall not be subject to liability for any
errors or omissions. Information in the Software and its accompanying preprinted materials is
subject to change without notice and does not represent a commitment or endorsement on
the part of ALK. Routes and miles generated by the Software are not suitable for commercial
truck use.
THE WARRANTY AND REMEDIES SET FORTH ABOVE ARE EXCLUSIVE AND IN LIEU OF
ALL OTHERS, ORAL OR WRITTEN, EXPRESS OR IMPLIED. No ALK dealer, distributor,
agent, or employee is authorized to make any modification or addition to this warranty. Some
states do not allow the exclusion or limitation of implied warranties or limitation of liability
for incidental or consequential damages, so the above limitation or exclusion may not apply to
you.
4. Licencee's Responsibility:
You assume all responsibility for, and ALK shall not be liable for, all action taken, decisions
made, and advice given as a result of your use of the Software.
5. US Government Restricted Rights:
The Software and documentation are provided with restricted and limited rights. Use,
duplication, or disclosure by the Government is subject to restrictions set forth in
subparagraphs (c) (1) and (2) of the Commercial Computer Software-Restricted Rights clause
at 48 CFR 52.227-19, as applicable. Manufacturer is ALK Technologies, Inc., 1000 Herrontown
Road, Princeton, NJ 08540.
6. General:
The export or re-export of the Software may be restricted by the laws of the United States
and other countries, and you shall not export this Software in violation of any such applicable
laws. This Licence Agreement is governed by the laws of the State of New Jersey.
© Copyright 1990-2005 ALK Technologies, Inc.
--------------------------------------------------------------------------
Exit Authority (c) 1999-2005 Zenrin USA, Inc. All rights reserved.
--------------------------------------------------------------------------
Disclosure for products containing Canadian Postal Code and/or Canadian StreetLevel Data: Based on Computer File(s) licenced from Statistics Canada. © Copyright, HER
MAJESTY THE QUEEN IN RIGHT OF CANADA, as represented by the Minister of Industry,
Statistics Canada 2005. ALK Technologies, Inc. is an Authorized User of selected Statistics
Canada Computer File(s) and Distributor of derived Information Products under Licensing
Agreement 6147. No confidential information about an individual, family, household,
organisation or business has been obtained from Statistics Canada.
- 81 -
- 82 -
Page 44

®
ALK
Technologies, Inc. LICENCE AGREEMENT
CoPilot | Linux with EUROPEAN DATA
LICENCES: 1 User
IMPORTANT: Please read the following agreement ("Licence") carefully.
THIS IS A LEGAL AGREEMENT BETWEEN YOU, THE USER (either an individual or an
entity), AND ALK Technologies, Inc. ("ALK"). IF YOU DO NOT AGREE TO THE TERMS OF
THIS LICENCE, DO NOT INSTALL THE SOFTWARE. Promptly return the package and
accompanying materials (including written materials and containers) to the dealer from which
you obtained them for a full refund.
Acceptance: Installation or use of the enclosed ALK Technologies, Inc. ("ALK") software (the
"Software") on your computer constitutes your acceptance of these terms. If you do not agree
to the terms of this Licence, you must immediately delete the Software from your computer
and destroy any copies you made of the Software and of any written materials relating to the
software, and promptly return the Software and, if bought as part of a package, any associated
devices to your retailer for a refund.
Licence: ALK grants you, as an individual, a Licence to install and use one copy of the
Software on a single personal computer at a time. Your Licence to use the Software is subject
to you complying with the terms of this Licence. A Licence is required for each installation of
the Software, unless the Software is (i) installed temporarily on a computer during the repair
or maintenance of the computer on which the Software is normally installed and (ii) is
immediately deleted from such computer as soon as those repairs or maintenance are
complete. You may make one copy of the Software for backup purposes only.
Copyright: United States copyright law and international treaty provisions protect the
Software. You agree that no title to the intellectual property in the Software is transferred to
you. You further acknowledge that title and ownership rights will remain the exclusive
property of ALK, and you will not acquire any rights to the Software except as expressly set
out in this Licence. You agree that any copies of the Software will contain the same proprietary
notices that appear on and in the Software.
Prohibited Use: Unless you have ALK's prior written permission, you may not (i) use, copy,
modify, alter, or transfer the Software or accompanying documentation, except as expressly
permitted in this Licence; (ii) translate, disassemble, decompile, or reverse engineer the
Software (iii) sublicence or lease the Software or its documentation; or (iv) use the Software in
a multi-user or networked environment or on a rental basis or in a time-sharing or computer
service business.
Limited Warranty: ALK warrants that the Software will perform substantially in accordance
with the accompanying written materials for a period of 30 days from the date of purchase.
Any implied warranties relating to the Software are limited to such 30 day period provided that
limitation is permitted by applicable law.
End-User Remedies: If the Software does not conform to the "Limited Warranty" above,
ALK's entire liability and your sole and exclusive remedy will be, at ALK's option, either to (i)
correct the error, or (ii) help you work around the error, or (iii) accept a return and issue a
refund through your retailer. The Limited Warranty is void if failure of the Software has
resulted from your fault, abuse, or misapplication. If we correct an error in the Software for
you, then the unexpired portion of the Limited Warranty period as at the date you informed
us of the error will apply to the corrected software once you have received the corrected
version.
NO OTHER WARRANTIES: EXCEPT AS SET OUT IN THE LIMITED WARRANTY, ALK
DOES NOT WARRANT THAT THE SOFTWARE IS ERROR FREE. ALK DISCLAIMS ALL
OTHER WARRANTIES WITH RESPECT TO THE SOFTWARE, WHETHER EXPRESS OR
IMPLIED, INCLUDING BUT NOT LIMITED TO IMPLIED WARRANTIES OF
MERCHANTABILITY, FITNESS FOR A PARTICULAR PURPOSE AND NONINFRINGEMENT OF THIRD PARTY RIGHTS. Some jurisdictions do not allow the exclusion
of implied warranties or limits on how long an implied warranty may last, or an exclusion of
incidental damages. This means the above limitations or exclusions may not apply to you. This
warranty gives you pecific legal rights and you may also have other rights depending on your
country.
No Liability for indirect loss: In no event will ALK be liable to you for any loss of profit,
wasted time, lost business or for any incidental, or indirect loss of any kind arising out of the
performance or use of the Software, even if ALK has been advised of the possibility of such
damages.
Termination: Without prejudice to its other rights, ALK may terminate this Licence if you fail
to comply with these terms and conditions. In that situation, you must destroy all copies of the
Software.
Choice of Law: This Licence is governed by the laws of England.
-----------------------------------------------------------------------------
END USER DATA LICENCE AGREEMENT
for Navigation Technologies, Inc.
PLEASE READ THIS END USER LICENCE AGREEMENT CAREFULLY BEFORE USING THE
NAVTECH DATABASE
NOTICE TO THE USER:
THIS IS A LICENCE AGREEMENT - AND NOT AN AGREEMENT FOR SALE - BETWEEN
YOU AND NAVIGATION TECHNOLOGIES B.V. FOR YOUR COPY OF THE NAVTECH
NAVIGABLE MAP DATABASE, INCLUDING ASSOCIATED COMPUTER SOFTWARE,
MEDIA AND EXPLANATORY PRINTED DOCUMENTATION PUBLISHED BY
NAVIGATION TECHNOLOGIES (JOINTLY "THE DATABASE"). BY DULY SIGNING AND
RETURNING THIS AGREEMENT TO US AND IN ANY EVENT BY USING THE DATABASE,
YOU ACCEPT AND AGREE TO ALL TERMS AND CONDITIONS OF THIS END USER
LICENCE AGREEMENT ("EULA"). IF YOU DO NOT AGREE TO THE TERMS OF THIS
EULA, PROMPTLY RETURN THE DATABASE, ALONG WITH ALL OTHER
ACCOMPANYING ITEMS, TO YOUR SUPPLIER FOR A REFUND.
- 83 -
- 84 -
Page 45

OWNERSHIP
The database and the copyrights and intellectual property or neighboring rights therein are
owned by Navigation Technologies or its licensors. Ownership of the media on which the
Database is contained is retained by Navigation Technologies and/or your supplier until after
you have paid in full any amounts due to Navigation Technologies and/or your supplier
pursuant to this EULA or similar agreement(s) under which goods are provided to you.
LICENCE GRANT
Navigation Technologies grants you a non-exclusive licence to use the Database for your
personal use or, if applicable, for use in your business' internal operations. This licence does
not include the right to grant sub-licences.
LIMITATIONS ON USE
The Database is restricted for use in the specific system for which it was created. Except to
the extent explicitly permitted by mandatory laws (e.g. national laws based on the European
Software Directive (91/250) and the Database Directive (96/9)), you may not extract or
reutilize substantial parts of the contents of the Database nor reproduce, copy, modify, adapt,
translate, disassemble, decompile, reverse engineer any portion of the Database. If you wish to
obtain interoperability information as meant in (the national laws based on) the European
Software Directive, you shall grant Navigation Technologies reasonable opportunity to provide
said information on reasonable terms, including costs, to be determined by Navigation
Te c h n o l o g i e s .
TRANSFER OF LICENCE
You may not transfer the Database to third parties, except when installed in the system for
which it was created or when you do not retain any copy of the Database, and provided that
the transferee agrees to all terms and conditions of this EULA and confirms this in writing to
Navigation Technologies.
LIMITED WARRANTY
Navigation Technologies warrants that, subject to the Warnings set out below, for a period of
12 months after acquisition of your copy of the Database, it will perform substantially in
accordance with Navigation Technologies' Criteria for Accuracy and Completeness existing on
the date you acquired the Database; these criteria are available from Navigation Technologies
at your request. If the Database does not perform in accordance with this limited warranty,
Navigation Technologies will use reasonable efforts to repair or replace your non-conforming
copy of the Database. If these efforts do not lead to performance of the Database in
accordance with the warranties set out herein, you will have the option to either receive a
reasonable refund of the price you paid for the Database or to rescind this EULA. This shall be
Navigation Technologies' entire liability and your sole remedy against Navigation Technologies.
Except as expressly provided in this section, Navigation Technologies does not warrant nor
make any representations regarding the use of results of the use of the database in terms of its
correctness, accuracy, reliability, or otherwise. Navigation Technologies does not warrant that
the Database is or will be error free. No oral or written information or advice provided by
Navigation Technologies, your supplier or any other person shall create a warranty or in any
way increase the scope of the limited warranty described above. The limited warranty set forth
in this EULA does not affect or prejudice any statutory legal rights that you may have under the
legal warranty against hidden defects.
If you did not acquire the Database from Navigation Technologies directly, you may have
statutory rights against the person from whom you have acquired the Database in addition to
the rights granted by Navigation Technologies hereunder according to the law of your
jurisdiction. The above warranty of Navigation Technologies shall not affect such statutory
rights and you may assert such rights in addition to the warranty rights granted herein.
LIMITATION OF LIABILITY
The price of the Database does not include any consideration for assumption of risk of
consequential, indirect or unlimited direct damages which may arise in connection with your
use of the Database. Accordingly, in no event shall Navigation Technologies be liable for any
consequential or indirect damages, including without limitation, loss of revenue, data, or use,
incurred by you or any third party arising out of your use of the Database, whether in an
action in contract or tort or based on a warranty, even if Navigation Technologies has been
advised of the possibility of such damages. In any event Navigation Technologies' liability for
direct damages is limited to the price of your copy of the Database.
THE LIMITED WARRANTY AND LIMITATION OF LIABILITY, SET FORTH IN THIS EULA,
DO NOT AFFECT OR PREJUDICE YOUR STATUTORY RIGHTS WHERE YOU HAVE
ACQUIRED THE DATABASE OTHERWISE THAN IN THE COURSE OF A BUSINESS.
WAR NINGS
The Database reflects reality as existing before you received the Database and it comprises
data and information from government and other sources, which may contain errors and
omissions. Accordingly, the Database may contain inaccurate or incomplete information due to
the passage of time, changing circumstances, and due to the nature of the sources used. The
Database does not include or reflect information on - inter alia - neighborhood safety; law
enforcement; emergency assistance; construction work; road or lane closures; vehicle or
speed restrictions; road slope or grade; bridge height, weight or other limits; road or traffic
conditions; special events; traffic congestion; or travel time.
GOVERNING LAW
This Agreement shall be governed by the laws of the jurisdiction, in which you reside at the
date of acquisition of the Database. Should you at that moment reside outside the European
Union or Switzerland, the law of the jurisdiction within the European Union or Switzerland
where you acquired the Database shall apply. In all other cases, or if the jurisdiction where you
acquired the Database cannot be defined, the laws of the Netherlands shall apply. The courts
competent at your place of residence at the time you acquired the Database shall have
jurisdiction over any dispute arising out of, or relating to this Agreement, without prejudice to
Navigation Technologies' right to bring claims at your then current place of residence.
- 85 -
- 86 -
Page 46

ALK Technologies, Inc. LICENCE AGREEMENT
CoPilot | Linux with AUSTRALIAN DATA
LICENCES: 1 User
THIS IS A LEGAL AGREEMENT BETWEEN YOU, THE USER (either an individual or an
entity), AND ALK Technologies, Inc. ("ALK"). IF YOU DO NOT AGREE TO THE TERMS OF
THIS LICENCE, DO NOT INSTALL THE SOFTWARE. Promptly return the package and
accompanying materials (including written materials and containers) to the dealer from which
you obtained them for a full refund.
INSTALLING THIS SOFTWARE INDICATES YOUR ACCEPTANCE OF THE TERMS OF THIS
LICENCE.
1. Grant of Licence:
This ALK Licence Agreement ("Licence") is a single-user, non-exclusive, non-transferable
licence agreement and not an agreement for sale. ALK hereby licences the on-line User Guide
and CD-ROM software identified above (collectively, "the Software") to you under the
following terms and conditions.
The Software may not be loaded onto a network of any type. You may use the Software on any
compatible personal computer, provided you use it on only one computer at a time. The
Software is "in use" on a computer when it is loaded into the temporary memory (i.e., RAM)
or installed into the permanent memory (e.g., hard disk, CD-ROM, or other storage device) of
that computer. If the Software is permanently installed on the hard disk or other storage
device of a computer (other than a network server) and one person uses that computer more
than 80 percent of the time it is in use, then that person may also use the Software on a
portable or home computer. You may make a single back-up or archival copy of the Software
for back-up purposes only. You may not transfer this Software or assign this Licence
Agreement to another party.
You are NOT permitted, during the term of this Licence Agreement and thereafter to:
• Use the Software on a network or file server.
• Use or copy the Software or the accompanying documentation except as provided in this
Licence Agreement.
• Alter, merge, modify, or adapt the Software or the accompanying documentation in any
way including disassembling or decompiling this Software.
• Loan, lease, sell, transfer, or sublicence the Software or the accompanying documentation.
• Copy, loan, lease, sell, transfer, or sublicence any output of this Software (including but not
limited to printed maps and driving itineraries); However, you may provide a limited
number of printed copies (up to 10) of a single trip to family members or traveling
companions.
• You are not permitted to use the Software for motor-carrier tariff or routing purposes.
• Electronic reproduction and transmission of output to remote locations are not
permitted.
ALK retains all rights not expressly granted. Nothing in this Licence Agreement constitutes a
waiver of ALK's rights under the U.S. copyright laws or other applicable copyright laws or any
other federal or state law.
2. Term:
This Licence is effective upon receipt by you of the Software and upon opening the package.
The Licence is effective until terminated. You may terminate this Licence at any time by
returning all copies of the Software, and any portions thereof, to ALK. The Licence terminates
automatically if you fail to comply with any of the terms of this Licence Agreement. You agree
upon such termination to return or destroy this CD-ROM and all other copies of the Software
and certify in writing to ALK that you have done so.
3. Limited Warranty:
ALK warrants that all media on which the Software is furnished shall, for a period of 90 days
from delivery (the "Warranty Period") be free, in normal use, from defects in material and
workmanship. ALK will have no responsibility to replace any disc(s) that have been damaged by
accident, abuse, or misapplication.
Customer Remedies: ALK's entire liability and your exclusive remedy shall be, at ALK's option,
either (a) return of the price paid or (b) replacement of the media that does not meet ALK's
Limited Warranty, and that is returned to ALK with a copy of your receipt.
Except as specifically provided above, ALK MAKES NO OTHER WARRANTY OR
REPRESENTATION, EITHER EXPRESS OR IMPLIED, WITH RESPECT TO THE SOFTWARE
OR DOCUMENTATION, INCLUDING ANY WARRANTY AS TO THE QUALITY,
PERFORMANCE, MERCHANTABILITY, OR FITNESS FOR A PARTICULAR PURPOSE. IN
NO EVENT WILL ALK BE LIABLE FOR DIRECT DAMAGES IN EXCESS OF THE LICENCE
FEE OR ANY INDIRECT, SPECIAL, INCIDENTAL, OR CONSEQUENTIAL DAMAGES
ARISING OUT OF THE USE OR INABILITY TO USE THE SOFTWARE OR
DOCUMENTATION, EVEN IF ADVISED OF THE POSSIBILITY OF SUCH DAMAGES. IN NO
CASE SHALL ALK'S LIABILITY EXCEED THE AMOUNT OF THE LICENCE FEE.
While the information contained in the Software was believed to have been correct at the time
of publication, ALK cannot guarantee its accuracy and shall not be subject to liability for any
errors or omissions. Information in the Software and its accompanying preprinted materials is
subject to change without notice and does not represent a commitment or endorsement on
the part of ALK. Routes and miles generated by the Software are not suitable for commercial
truck use.
THE WARRANTY AND REMEDIES SET FORTH ABOVE ARE EXCLUSIVE AND IN LIEU OF
ALL OTHERS, ORAL OR WRITTEN, EXPRESS OR IMPLIED. No ALK dealer, distributor,
agent, or employee is authorized to make any modification or addition to this warranty. Some
jurisdictions do not allow the exclusion or limitation of implied warranties or limitation of
liability for incidental or consequential damages, so the above limitation or exclusion may not
apply to you.
- 87 -
- 88 -
Page 47

4. Licencee's Responsibility:
You assume all responsibility for, and ALK shall not be liable for, all action taken, decisions
made, and advice given as a result of your use of the Software.
5. General:
The export or re-export of the Software may be restricted by the laws of the United States
and other countries, and you shall not export this Software in violation of any such applicable
laws. This Licence Agreement is governed by the laws of the State of New Jersey.
-----------------------------------------------------------------------------------
LICENCE AGREEMENT FOR WHEREIS™ DATA
1. GRANT OF LICENCE
Telstra Corporation Limited (ABN 33 051 775 556) ("Telstra") through its agent Sensis Pty Ltd
(ABN 30 007 423 912) ("Licensor") grants you a non-exclusive, non-transferable licence to use
the mapping data ("Whereis Data") contained in this CD-ROM on the following terms
("Licence"). The Licence commences when you click on the "I Agree" button at the end of
these terms and continues until terminated in accordance with this agreement.
2. RIGHTS OF USE
You may only use the Whereis Data for your own personal use. You may only install and use
the Whereis Data on one device at any one time. You must not copy, reverse engineer, adapt,
modify, distribute, publish in any form or permit any other person to use or deal with the
whole or any part of the Whereis Data. You must use reasonable steps to prevent any
unauthorised copying or use of the Whereis Data; and immediately notify the Licensor if you
become aware of any unauthorised copying or use of the Whereis Data by any person or of
any other infringement of the Licensor's rights in relation to the Whereis Data. The contact
details of the Licensor are as follows: Sensis Pty Ltd, 181-189 Victoria Parade, Collingwood,
Victoria 3066, Australia.
3. PROPERTY AND OWNERSHIP
All intellectual property rights (including copyright and any trade marks used by the Licensor
and Telstra) in and to the Whereis Data are the sole and exclusive property of, or a use under
licence by, the Licensor (or its licensors). Except to the extent permitted by this Licence, you
do not acquire any intellectual property rights in or to the Whereis Data.
4. EXCLUSION OF LIABILITY
To the extent permitted by law, the Licensor does not make any warranties of any kind,
whether express or implied, including any implied warranty of merchantability or fitness of the
Whereis Data for a particular purpose. Licensor's liability for breach of any condition or
warranty implied by statute which cannot be excluded is (to the extent permitted by law)
limited to, in the case of the supply of goods, the repair, replacement or re-supply of the goods
or of equivalent goods or the payment of the cost of repairing or replacing the goods or of
acquiring equivalent goods; and in the case of the supply of services, supplying the services
again, or the payment of the cost of having the services supplied again, provided that there shall
be no such limitation for breach of such a condition or warranty where the relevant law
prohibits such limitation.
Subject to this clause 4, the Licensor, its employees, agents and contractors will not be liable
(whether in contract, tort or otherwise) to you or any other person for any loss, costs,
damage or injury of any kind whatsoever (including incidental or consequential loss) wholly or
partly arising out of or in connection with the use of or inability to use the Whereis Data.
5. TERMINATION
The Licensor may terminate the Licence immediately if you are in breach of any provision of
this agreement. Your rights under this agreement cease immediately upon termination of the
Licence and you must immediately cease using the Whereis Data; and at the Licensor's
election, return to the Licensor at the details described in clause 2.5 or destroy all materials
bearing or containing the Whereis Data and, if required by the Licensor, shall certify that the
Whereis Data and all such copies have been returned or destroyed. Termination of the Licence
does not affect any rights or remedies which accrued prior to termination.
6. GENERAL
You may not assign or sub-licence your rights under this Licence. This agreement constitutes
the entire agreement between the parties. Any previous agreements, understandings and
negotiations cease to have any effect. A provision of, or a right created under, this agreement
may not be waived except in writing signed by the Licensor. This agreement is governed by the
laws in force in the State of Victoria, Australia. A reference to a person includes a reference to
a firm, corporation or other corporate body.
- 89 -
- 90 -
 Loading...