

R
User Manual

Welcome
Thank you for buying CoPilot Live 7.
This guide will tell you everything you need to know about
using CoPilot Live 7.
This PDF is interactive to make it easier for you to navigate through it to find the
information you are looking for. Here are some tips for using it:
Click on the titles in the contents page to be taken straight to the section of •
your choice.
Click •
Click on • red text and page numbers to be taken to the page referenced.
You can also use the Bookmarks and Pages tab in Adobe Acrobat Reader to
help you navigate the document.
at the bottom of each page to go back to the contents page.
CoPilot Live can be used on a range of PDAs and Smartphones.
For a list of compatible devices, please visit:
www.alk.eu.com/copilot/compatibility.asp
To help you find information relating specifically to PDAs or Smartphones,
please use the below key:
for PDAs/touch screen devices
for Smartphones /non-touch screen devices
Note: Depending upon your device and/or screen orientation (portrait/landscape)
the user interface will vary. This can change the view of the menu layout.
2
User Manual Welcome

Contents
Getting starte01 d
Checklist ......................................................................................................... 5
Installing CoPilot Central................................................................................... 6
Preparing your Mobile Device ........................................................................... 6
Installing CoPilot Live 7 .................................................................................... 6
Starting up ...................................................................................................... 7
Activating CoPilot ............................................................................................. 7
Select language and voice .............................................................................. 10
Select a distance measurement ...................................................................... 10
Tips and Tricks .............................................................................................. 10
Configuring GPS ............................................................................................ 11
Setting up a Bluetooth GPS Receiver ............................................................... 11
Setting up a built in GPS Receiver ................................................................... 12
Using other GPS receivers .............................................................................. 12
In us02 e
Selecting a destination ................................................................................... 13
Nearby points of interest ................................................................................ 14
Advanced POI Search..................................................................................... 15
Adjusting the POI settings .............................................................................. 16
To choose a Recent destination ...................................................................... 17
To choose a Contact’s address as a destination ............................................... 17
To choose an Intersection for your destination ................................................. 17
Selecting a destination using Lat and Long ...................................................... 18
Saving your Current Location .......................................................................... 18
Other ways to select a destination................................................................... 18
Selecting multiple stops for your journey ......................................................... 19
Customising your trip ..................................................................................... 19
Setting waypoints .......................................................................................... 20
Saving destinations in your planned trip as favourites ....................................... 20
Saving a trip .................................................................................................. 21
Loading a saved trip ...................................................................................... 21
Deleting a planned trip ................................................................................... 21
Preview your route ......................................................................................... 21
Begin driving ................................................................................................. 23
Safety Cameras* ............................................................................................ 23
Traffic Service* .............................................................................................. 23
Guidance ...................................................................................................... 23
Driving views ................................................................................................. 24
On screen information .................................................................................... 24
Setting display mode ...................................................................................... 25
Driver Safety.................................................................................................. 25
3D ................................................................................................................ 25
2D Where Am I? ............................................................................................ 25
2D Next Turn ................................................................................................. 26
2D Destination ............................................................................................... 26
Itinerary ........................................................................................................ 26
Personalis03 e
Saving a destination as Home ......................................................................... 27
Saving a destination as Work .......................................................................... 27
Save your Favourite destinations ..................................................................... 28
Edit or delete Favourites ................................................................................. 28
Night Map ..................................................................................................... 29
Customising the guidance screen ................................................................... 29
Setting route preferences ............................................................................... 30
Saving a route preference .............................................................................. 30
Loading a saved routing profile ....................................................................... 30
Edit your road preferences ............................................................................. 30
Personalising the voice instructions ................................................................. 31
Setting Map Styles ......................................................................................... 31
3
User Manual Contents

Contents
Applying Themes ........................................................................................... 31
Customising routing options ........................................................................... 31
Advance04 d
Optimising stops ............................................................................................ 32
Setting detours .............................................................................................. 32
Change your whole journey ............................................................................ 33
Ending a Detour ............................................................................................. 33
Avoiding Traffic* ............................................................................................. 33
CoPilot Live Traffic Service .............................................................................. 34
Setting-up CoPilot Live traffic ......................................................................... 34
Additional Traffic Settings ............................................................................... 35
Using traffic incidents..................................................................................... 36
You can also... ............................................................................................... 36
CoPilot Live ................................................................................................... 37
To create a CoPilot Live web account .............................................................. 38
To enter your Live account details into CoPilot:................................................. 38
Live connection status ................................................................................... 39
Adjusting CoPilot Live communication settings ................................................ 39
Setting map preferences ................................................................................ 40
Setting Map Styles ......................................................................................... 40
Setting route preferences ............................................................................... 41
Saving a route preference .............................................................................. 41
Loading a saved routing profile ....................................................................... 41
Edit your road preferences ............................................................................. 42
Adjusting your Safety View ............................................................................. 42
Checking the GPS status ................................................................................ 43
Track Playback .............................................................................................. 43
Adjusting the volume ..................................................................................... 43
Adjusting the Guidance Settings ..................................................................... 44
Safety Alert settings ....................................................................................... 44
Setting the Language and Speech .................................................................. 44
Device settings ............................................................................................. 45
Keyboard....................................................................................................... 45
Backlight ....................................................................................................... 45
Playing a demo .............................................................................................. 45
About CoPilot ................................................................................................ 45
Licensing ...................................................................................................... 46
Transferring your CoPilot Live License ............................................................. 46
Data Region .................................................................................................. 46
CoPilot Centra05 l
CoPilot Central............................................................................................... 47
Create a map ................................................................................................ 47
Download a map............................................................................................ 48
Plan a Trip ..................................................................................................... 49
Entering an Address or City ............................................................................ 49
Trip Options ................................................................................................... 50
Transfer Trip from CoPilot Central to your mobile device ................................... 51
Download Updates ......................................................................................... 51
Purchase upgrades ........................................................................................ 51
Find out more ................................................................................................ 51
Suppor06 t
Support ......................................................................................................... 52
EUL07 A
4
User Manual Contents
01
Getting started
Checklist
First check the contents of your box with the list below.
CoPilot Live
memory card
CoPilot Live Bluetooth
GPS Receiver*
* Optional accessory. Only included in certain CoPilot Live navigation kits.
+
Car mount may vary
5
User Manual 01 Getting started
Companion DVD
Car Mount*
+
Product Key
Car Charger*
DocumentationCoPilot Central Desktop
Splitter cable*
01
Getting started
Installing CoPilot Central
CoPilot Central is a tool to help you manage CoPilot effectively and easily, but
you do not need to install it in order to use CoPilot on your device.
Using the CoPilot Central software you can plan trips and re-install CoPilot to
your storage card, as well as purchase upgrade licenses and maps for other
regions.
Insert the DVD into the DVD drive of your PC.•
An installation wizard will automatically launch.•
Follow the on screen instructions.•
Tips: CoPilot Central
For more information on CoPilot Central see page 47.
Preparing your Mobile Device
Insert the supplied CoPilot Live memory card into •
the memory card slot of your mobile device.
Note: The CoPilot Live card supplied includes adaptors that will fit MicroSD,
MiniSD and standard SD slots. For details on how to insert a Memory Card
please see the documentation that came with your mobile device.
Important: Make sure you set the correct date and time on your mobile
device to get the best GPS functionality.
Installing CoPilot Live 7
Turn on your mobile device, the CoPilot installer will •
automatically start.
Note: If the installer doesn’t start automatically
use File Explorer to navigate to Storage Card >
2577 and select AUTORUN.
You will be asked to accept the License agreement for CoPilot Live 7. Select •
I Accept to continue.
Please review the GPS information on the next •
screen and then select OK.
Select a location for your installation, we •
recommend that you install on your device.
Select Install to continue.
6
User Manual 01 Getting started
01
Getting started
CoPilot Live 7 will now be installed. This may take a few minutes, please be
patient.
A message advising the successful installation of the CoPilot Live •
application will be displayed.
• Select OK
• Done.
Starting up
Once the installation has completed, select the CoPilot
icon
on the Today screen. CoPilot will launch.
Note: Alternatively, select Start > CoPilot, or Start >
Programs > CoPilot to launch the application.
You will be asked to enter your Product Key.•
Your product key can be found on the product key card
that came with your CoPilot software. Enter your product
key in the boxes provided. Select Next to continue.
Activating CoPilot
After you have entered your product key you will be
asked to activate your software.
Press Next to activate now or Cancel if you prefer
to activate the license later. If you press cancel you
will still be able to use your CoPilot software under
an evaluation license for 4 days.
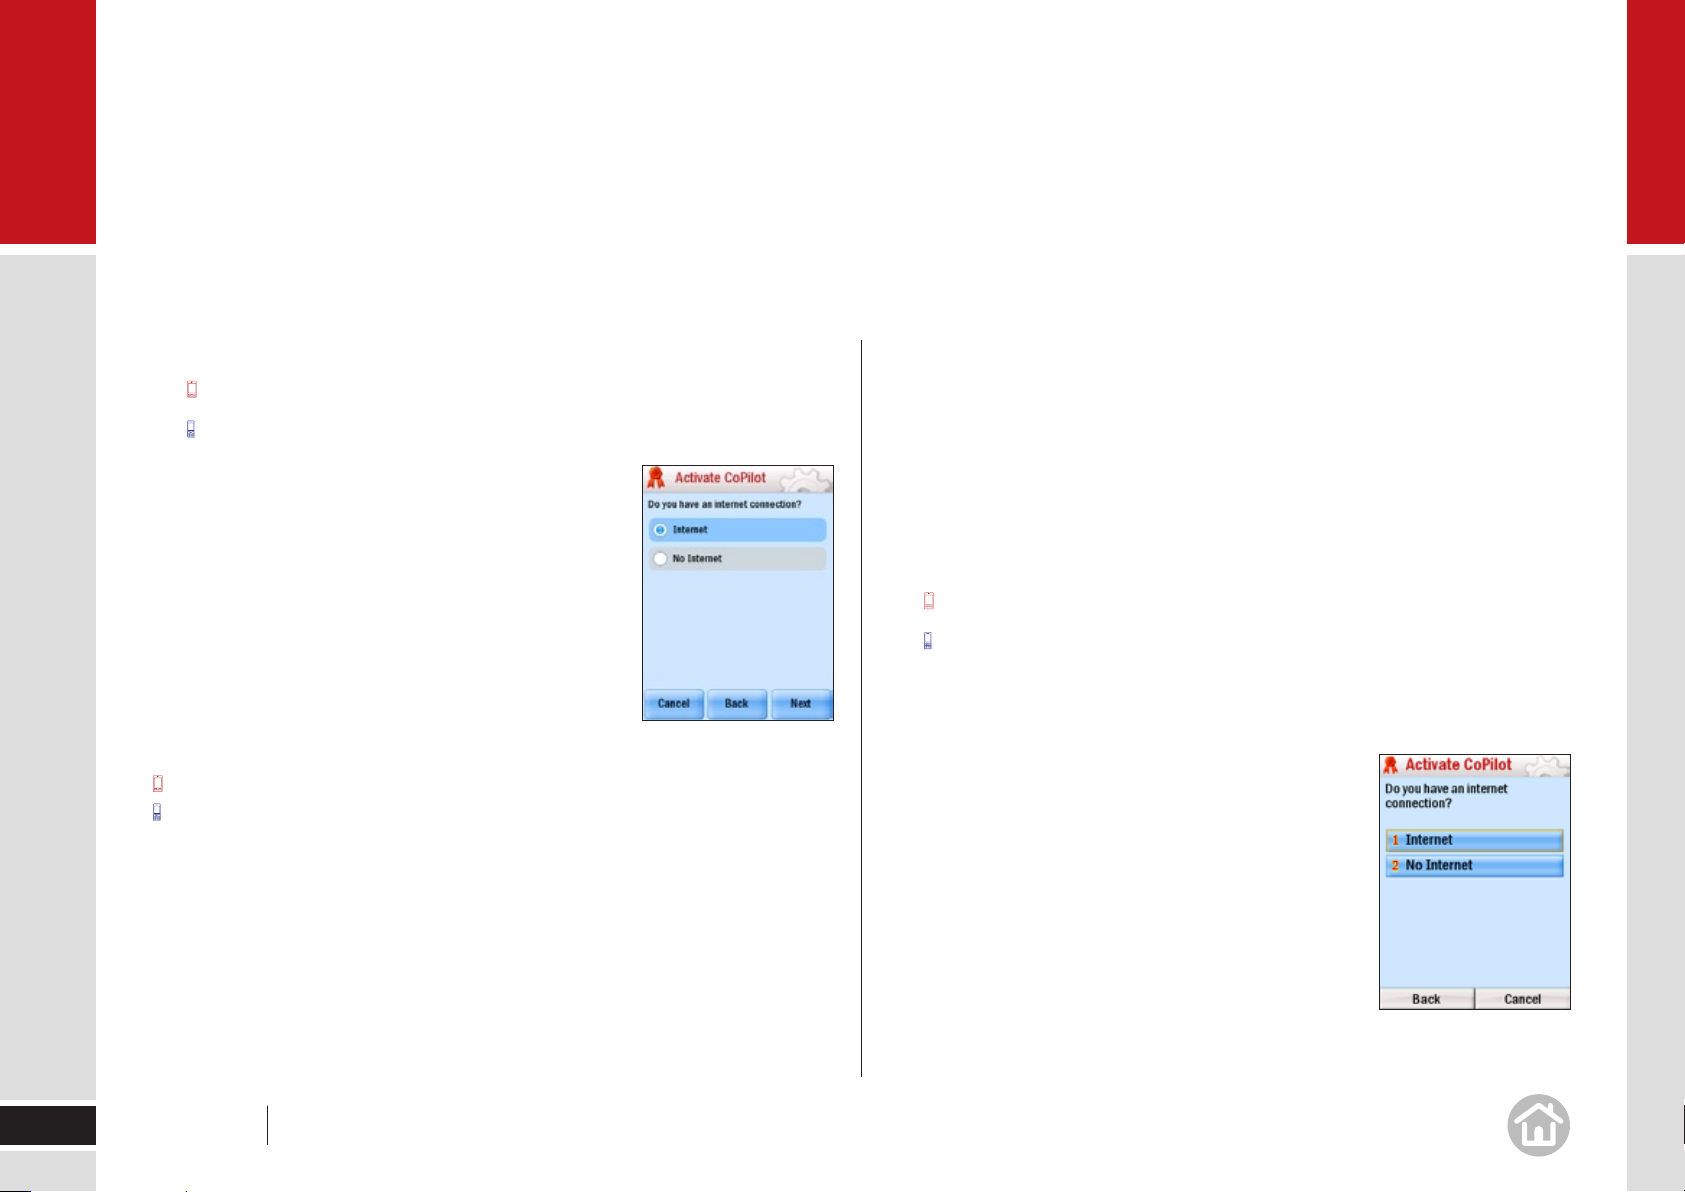
You can activate CoPilot:
Automatically• using the internet connection
of your mobile device.
Automatically• using the internet connection of
your PC.
Manually• using a PC connected to the Internet.
7
User Manual 01 Getting started
01
Getting started
Automatically activating CoPilot on your mobile
• Tap on Internet to select it and then tap Next.
• Use the action key/press 1 on your keypad to select Internet.
Enter your email address when requested and •
press Next.
CoPilot will try to connect to the internet using the
internet connection on your mobile device.
Note: To activate this way you must have a mobile
internet connection set up on your device.
Note: If a connection can’t be made an error screen
will show and you will be asked to return to the
previous screen to re-try or you can select ‘No Internet’.
Ta p Back to do this.
Select Options > Back to return to the previous screen.
Automatically activating CoPilot via a PC internet connection
If you connect your mobile device to your PC you can use the PC internet
connection to activate automatically.
Note: Your mobile device needs to be connected to your PC via either
Microsoft ActiveSync (PCs running Windows XP or earlier) or Windows Mobile
Device Center (PCs running Windows Vista).
Your PC must be connected to the internet to activate automatically.
• Tap on Internet to select it and then tap Next.
• Use the action key/press 1 on your keypad to select Internet.
CoPilot will automatically activate via your PC’s internet connection to the
activation server.
8
User Manual 01 Getting started
01
Getting started
Activation through the CoPilot activation website
at http://activate.alk.com
1 Select No Internet from the Activate CoPilot screen. Press Next.
Use the action key/press 2 on your keypad to select No Internet.
The next screen will show your product key and license number.2
Now, visit the CoPilot activation website at http://activate.alk.com and enter 3
your product key, license number and email address as requested. Press
Submit. Your activation code will be displayed on-screen and will be sent to
you by email.
On your mobile device, press 4 Next to continue to the next screen. Enter
your activation code and press Next.
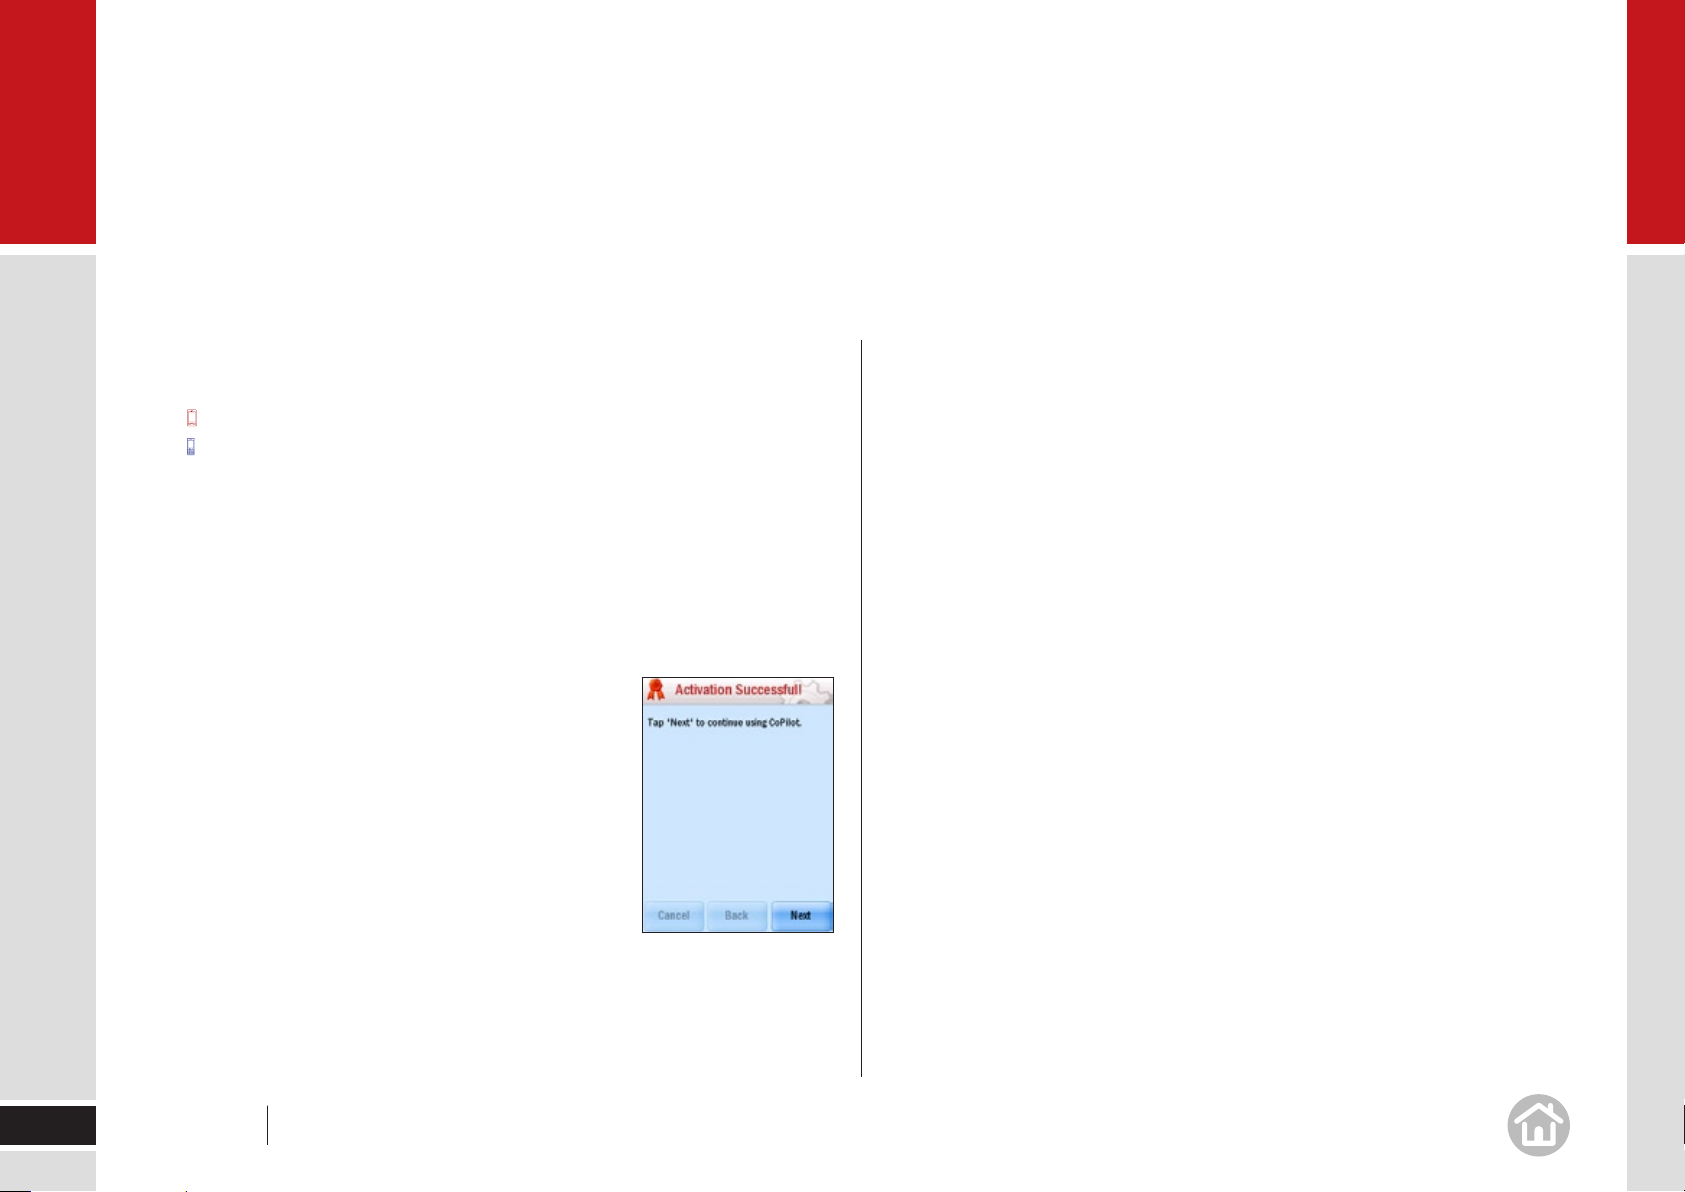
After activation
When activation is completed you will see the message
Activation successful.
Press • Next to continue using CoPilot.
Data activation
You will now need to confirm the map region that you wish to activate. Select
your preferred map region from the list and press Next. You will be asked to
confirm your data selection. Press Finish to confirm your selection. Your license
activation is now complete.
9
User Manual 01 Getting started
01
Getting started
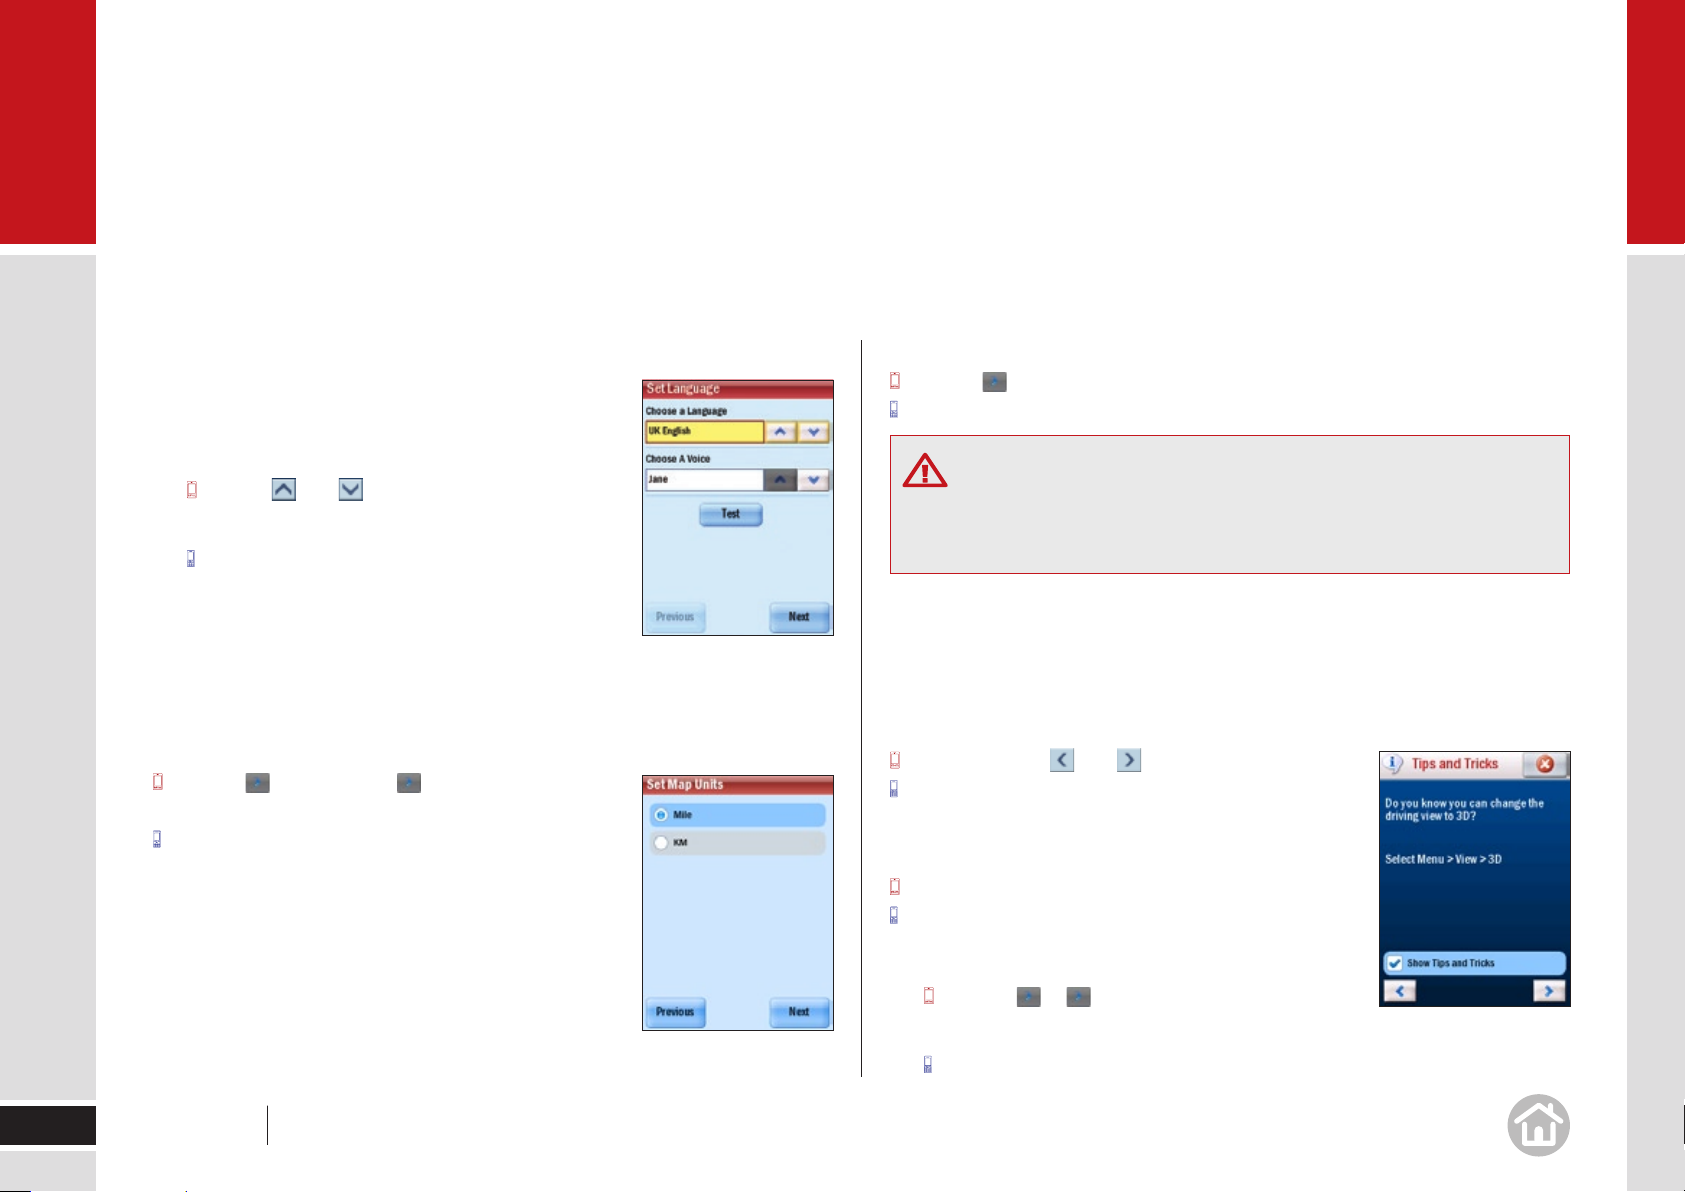
Select language and voice
On the Set Language screen you can choose which
language you would like CoPilot to use and which voice
you would like to hear guidance instructions in.
• Use the and arrows to choose your
preferred option.
• Use the action key to select your preferred
options.
Select • Test to hear a sample of the voice you have
chosen.
When you are happy with your selections press Next.
Note: You can change these settings at anytime,
Menu > > Settings > >
Language & Speech.
Menu > More > Settings > More >
Language & Speech.
Note: You can change these settings at anytime,
Menu > > Settings > Map
Menu > More > Settings > Map.
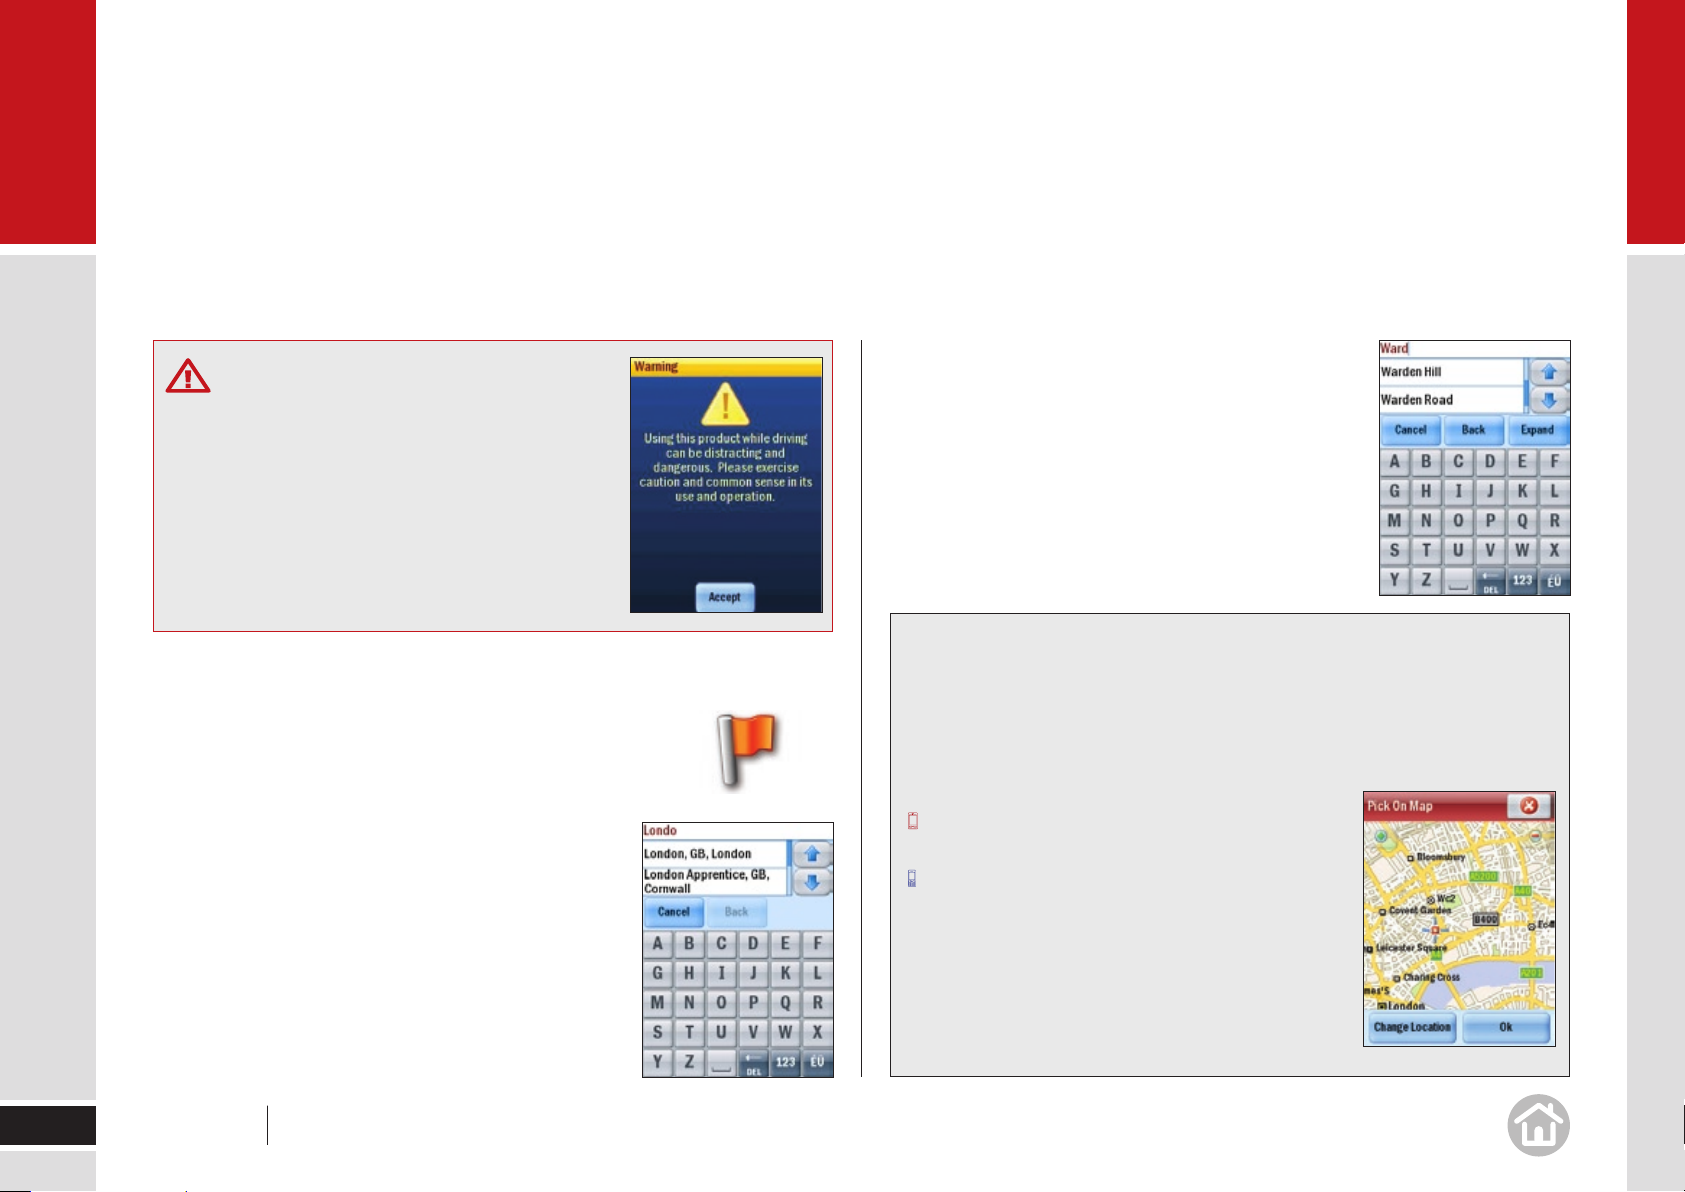
Safety Warning
You will be asked to accept the Safety Warning for CoPilot Live 7. Please read
this carefully and then select Accept.
Tips and Tricks
CoPilot has loads of great features, to help you get to know and understand
them we have included Tips and Tricks at start up.
To turn off the Tips and Tricks uncheck the ‘Show Tips and Tricks’ box.
To see more use and .
Press 1 or 2 on your keypad to view more tips and
tricks.
To close:
Click on the cross.
Press Done.
10
Select a distance measurement
Choose between Miles and Kilometres for the distance
unit used in maps and instructions. Press Next.
User Manual 01 Getting started
To view Tips and Tricks at any time
• Menu > > > Tips & Tutorials >
Tips & Tricks
• Menu > More > Tips & Tutorials > Tips & Tricks.
01
Getting started
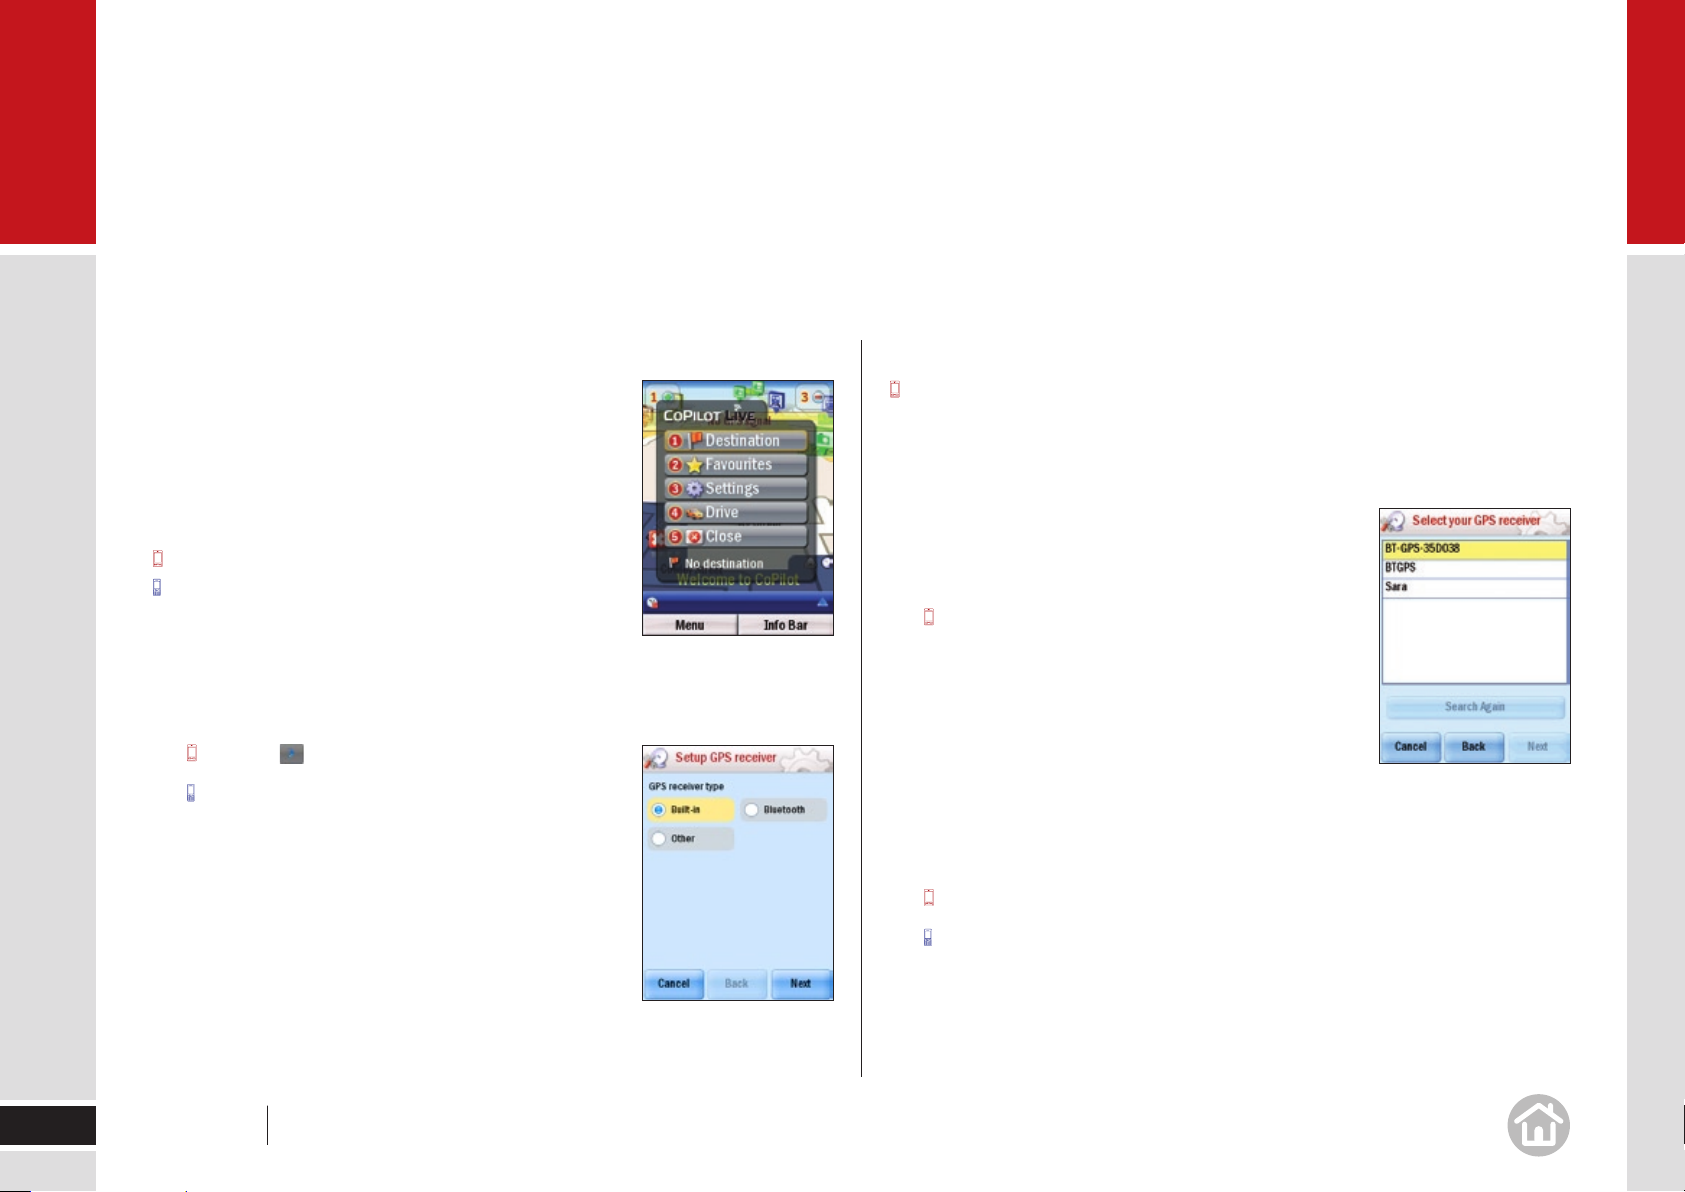
Welcome Screen
On the Welcome screen we have included a quick
menu which allows you to easily enter a Destination,
select your Favourites, access your Settings, or Drive
to set off.
To close the quick menu:
Click on the cross.
Select Close.
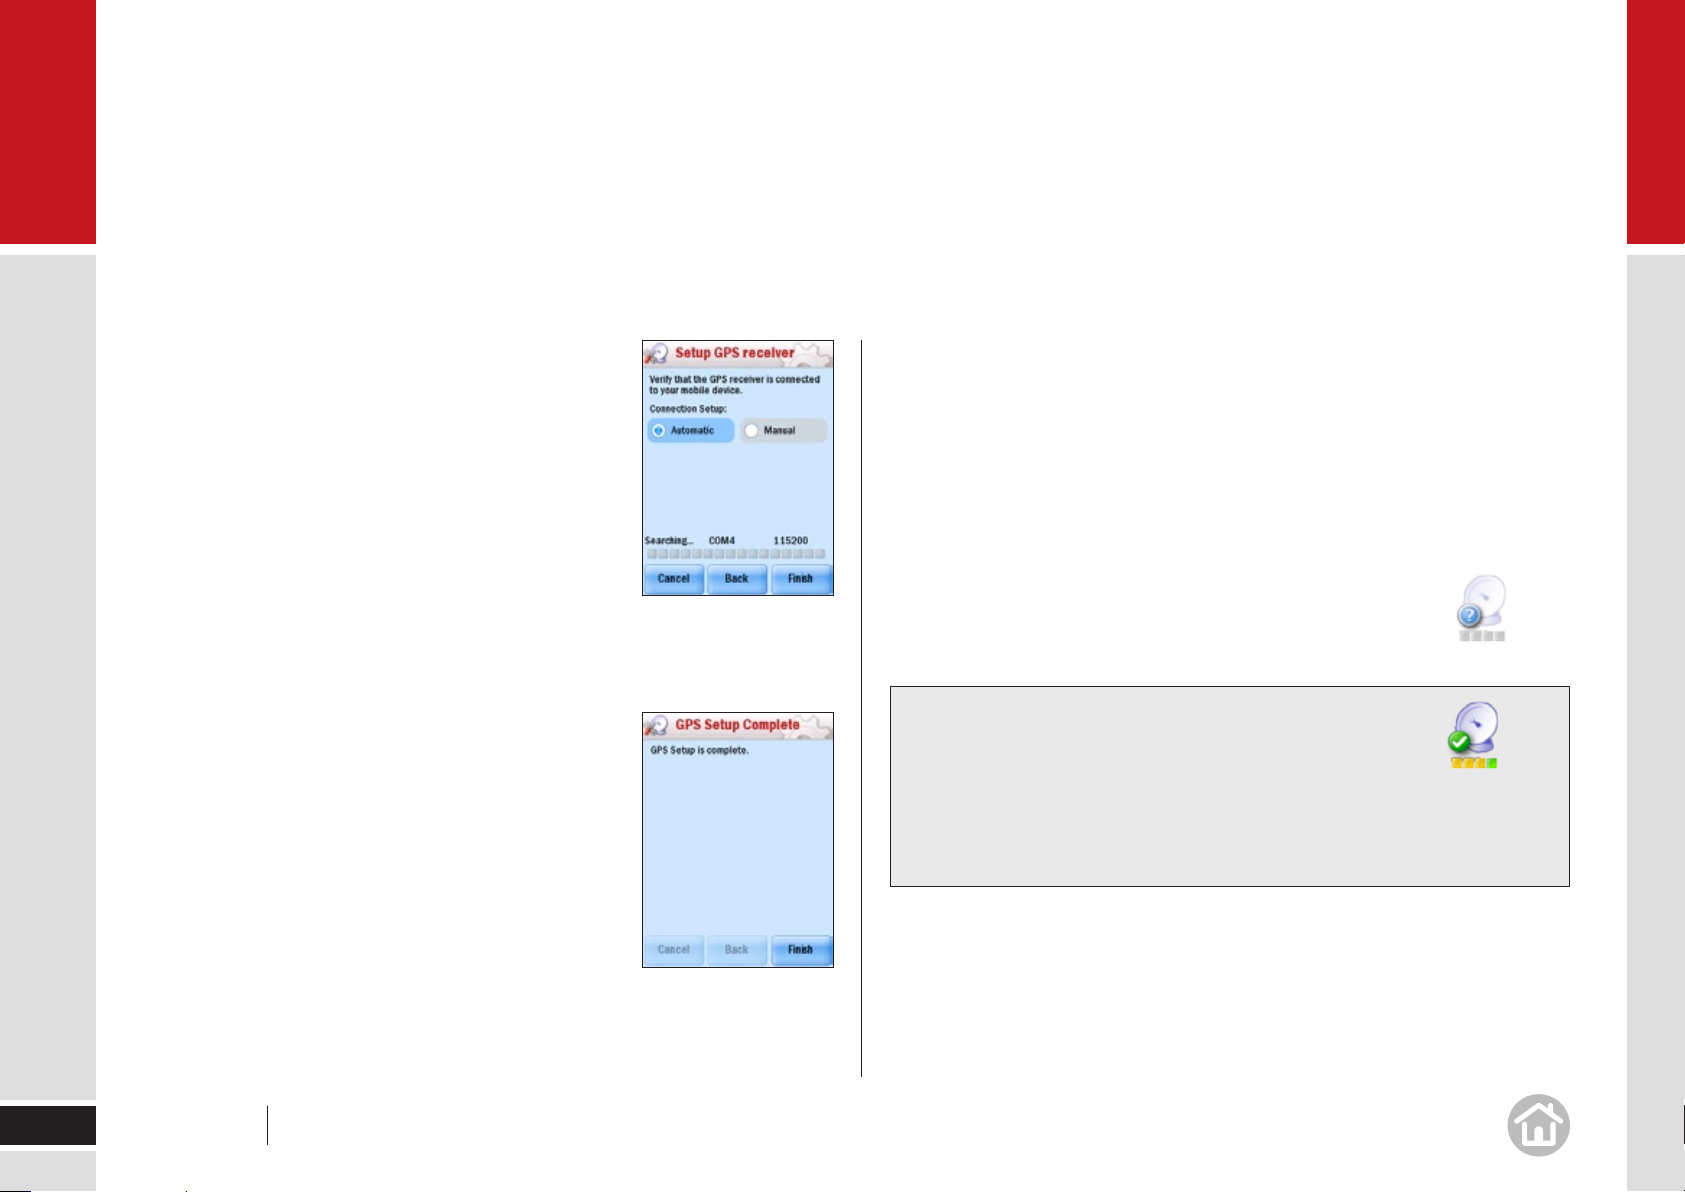
Configuring GPS
You will need to set up your GPS receiver before you can begin navigating.
• Menu > > Settings > GPS > Setup GPS
• Select Menu > More > Settings > GPS >
Setup GPS.
On the Setup GPS Receiver screen choose between:
Built In -to use the GPS receiver built in to your 1
mobile device.
Bluetooth- to set up a connection between your 2
mobile device and the Bluetooth GPS receiver.
Other – recommended when you are using any other GPS receiver. 3
Once you have chosen, tap Next.
Setting up a Bluetooth GPS Receiver
Switch on your Bluetooth receiver•
Select ‘• Bluetooth’ on the Setup GPS receiver
screen.
Press Next.
CoPilot will automatically begin searching for Bluetooth
devices in your immediate vicinity. Once it has
completed the search it will display a list of all nearby
GPS devices.
Select your GPS receiver from the list. •
Note: If you are using the GPS receiver supplied with your CoPilot software it
will appear in the list with a name starting with BT-GPS.
• Ta p Next. To complete set up tap Finish.
• Press the action key on your keypad. To complete setup press Finish.
You’re ready for your first journey!
Note: The first time you use the GPS receiver it may take a moment to
determine your position.
11
User Manual 01 Getting started
01
Getting started
Setting up a built in GPS Receiver
If you selected Built-In you will need to choose
between Automatic and Manual. We recommend
Automatic setup.
With Automatic selected, press Finish. CoPilot will find
and connect to the GPS receiver in your device.
To set up Manually, select Manual, you will need
to select the COM Port that the GPS is connected
to and the BAUD rate for the device. Please consult
your device manufacturer for this information. When you have entered the
information press Finish to continue.
Once setup has been completed select Finish to
complete the process.
Note: If you get the message GPS Setup failed the
COM Port and/or BAUD information were incorrect.
Please try again.
You’re ready for your first journey!
Using other GPS receivers
If you selected Other you will need to connect the GPS Receiver manually.
You will need to select the COM Port that the GPS is connected to and the BAUD
rate for the device. Please consult your device manufacturer for this information.
Press Finish to continue. Once setup has been completed select Finish to exit.
You’re ready for your first journey!
Note: The first time you use the GPS receiver it may take
a moment to determine your position.
Tips: GPS Signal
You will not be able to receive a GPS signal inside
buildings, tunnels, garages, multi-storey and basement
car parks. To work effectively the GPS receiver needs
to have a clear line of sight to the sky.
12
Note: The first time you use the GPS receiver it may
take a moment to determine your position.
User Manual 01 Getting started
02
In use
Safety information
Do not attempt to change the settings, or set
a destination on CoPilot while you are driving. Ask
a passenger to make changes, or pull over safely.
Do not leave your Mobile Device or GPS loose
in the car while driving. Ensure they are correctly
seated in a car mount.
potential matches. Select the correct street name
when it appears in the list below.
Enter the house number and select • Finish, or just
select Finish to skip this step.
A Route screen will then appear, showing you a preview
map of the route. Select Drive to begin navigating
your route.
Tips: Quick Destination Entry
13
Selecting a destination
CoPilot uses GPS satellites to calculate your exact position
so you don’t have to enter your starting point. Simply enter
your destination and CoPilot will take you there, providing
detailed turn instructions all the way.
Select • Menu > Destination > Address.
Enter the city/town name of your destination.•
Select the correct city or area when it appears •
in the list below. Scroll down to see more address
options matching what you have typed.
Enter the first three or four letters of the street •
name. As you enter the street name CoPilot will list
User Manual 02 In use
In the UK or Netherlands, if you know the full postcode of your destination,
select Menu > Destination > Address. Enter in the postcode. Select a
street name and key in a house number then press Finish.
You can also select a destination from the map.
Menu > Destination, scroll to the next page and
select Pick on Map.
Menu > Destination > More > Pick on Map.
A map of the area around your current location will
be displayed. Pan and zoom around the map and
select your desired destination when you find it.
There are even more ways to enter destinations in
CoPilot, for more information see pages 17 and 18.
02
In use
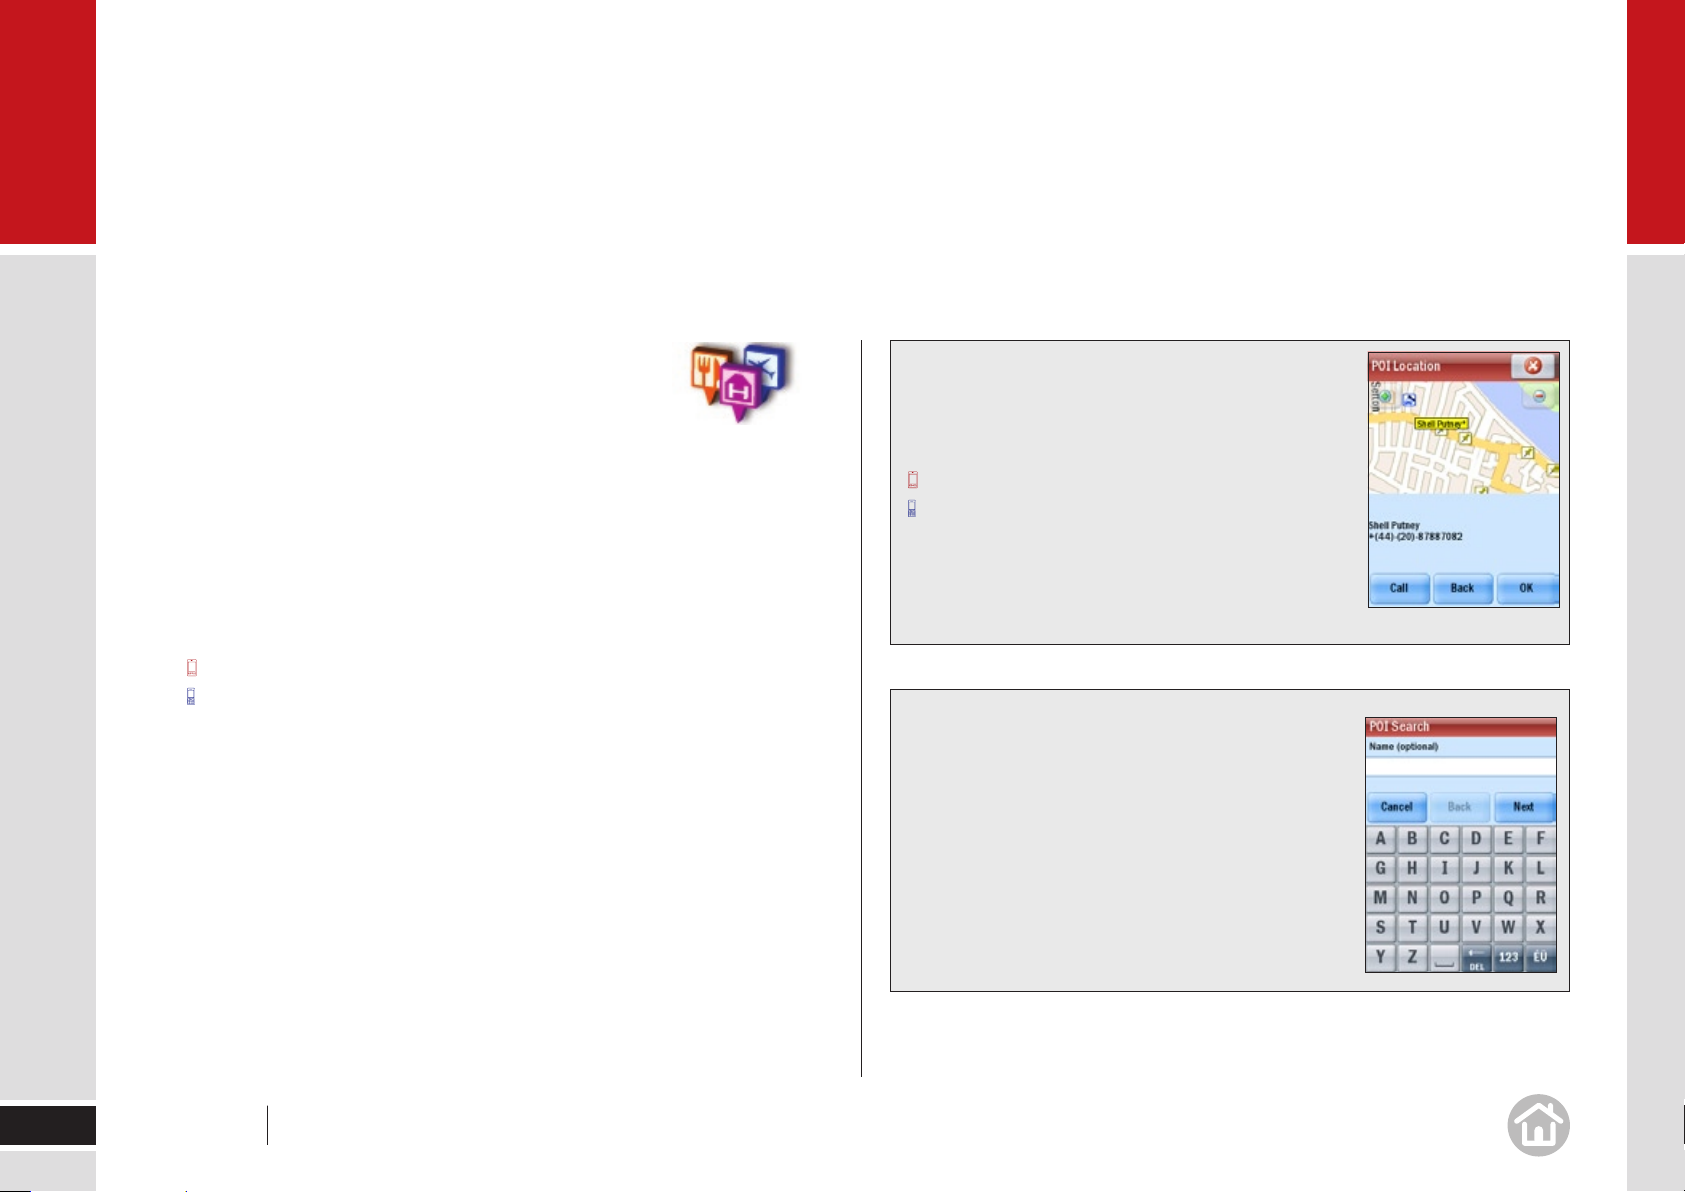
Nearby points of interest
If you’re running low on fuel, looking for a place to park or
you fancy a bite to eat, CoPilot has thousands of readyloaded Points of Interest (POIs) to search.
Select • Menu > Nearby POI.
From the list, select a category. For example, Petrol Station. •
After a few moments a list of nearby petrol stations will appear, in order of
distance from your current location.
Select the petrol station you wish to visit. •
Ta p OK.
Press the action key.
A preview map of the route to your selected POI will appear.
Select • Drive to begin navigating the route.
Tip: Call ahead
You can call direct to a selected POI. Once you have
found a POI, select it then:
Ta p Details.
Press Options > Details.
If the phone number for this POI is available the Call
button will be available. Press Call to ring the POI
via your mobile device.
Tip: POI in the city
You can search for a POI within a city, near your
current location or along your route by pressing
Menu > Destination > Points of Interest.
You can search for a particular POI within a
category, by name. For more details, see
Advanced POI Search on page 15.
14
User Manual 02 In use
02
In use
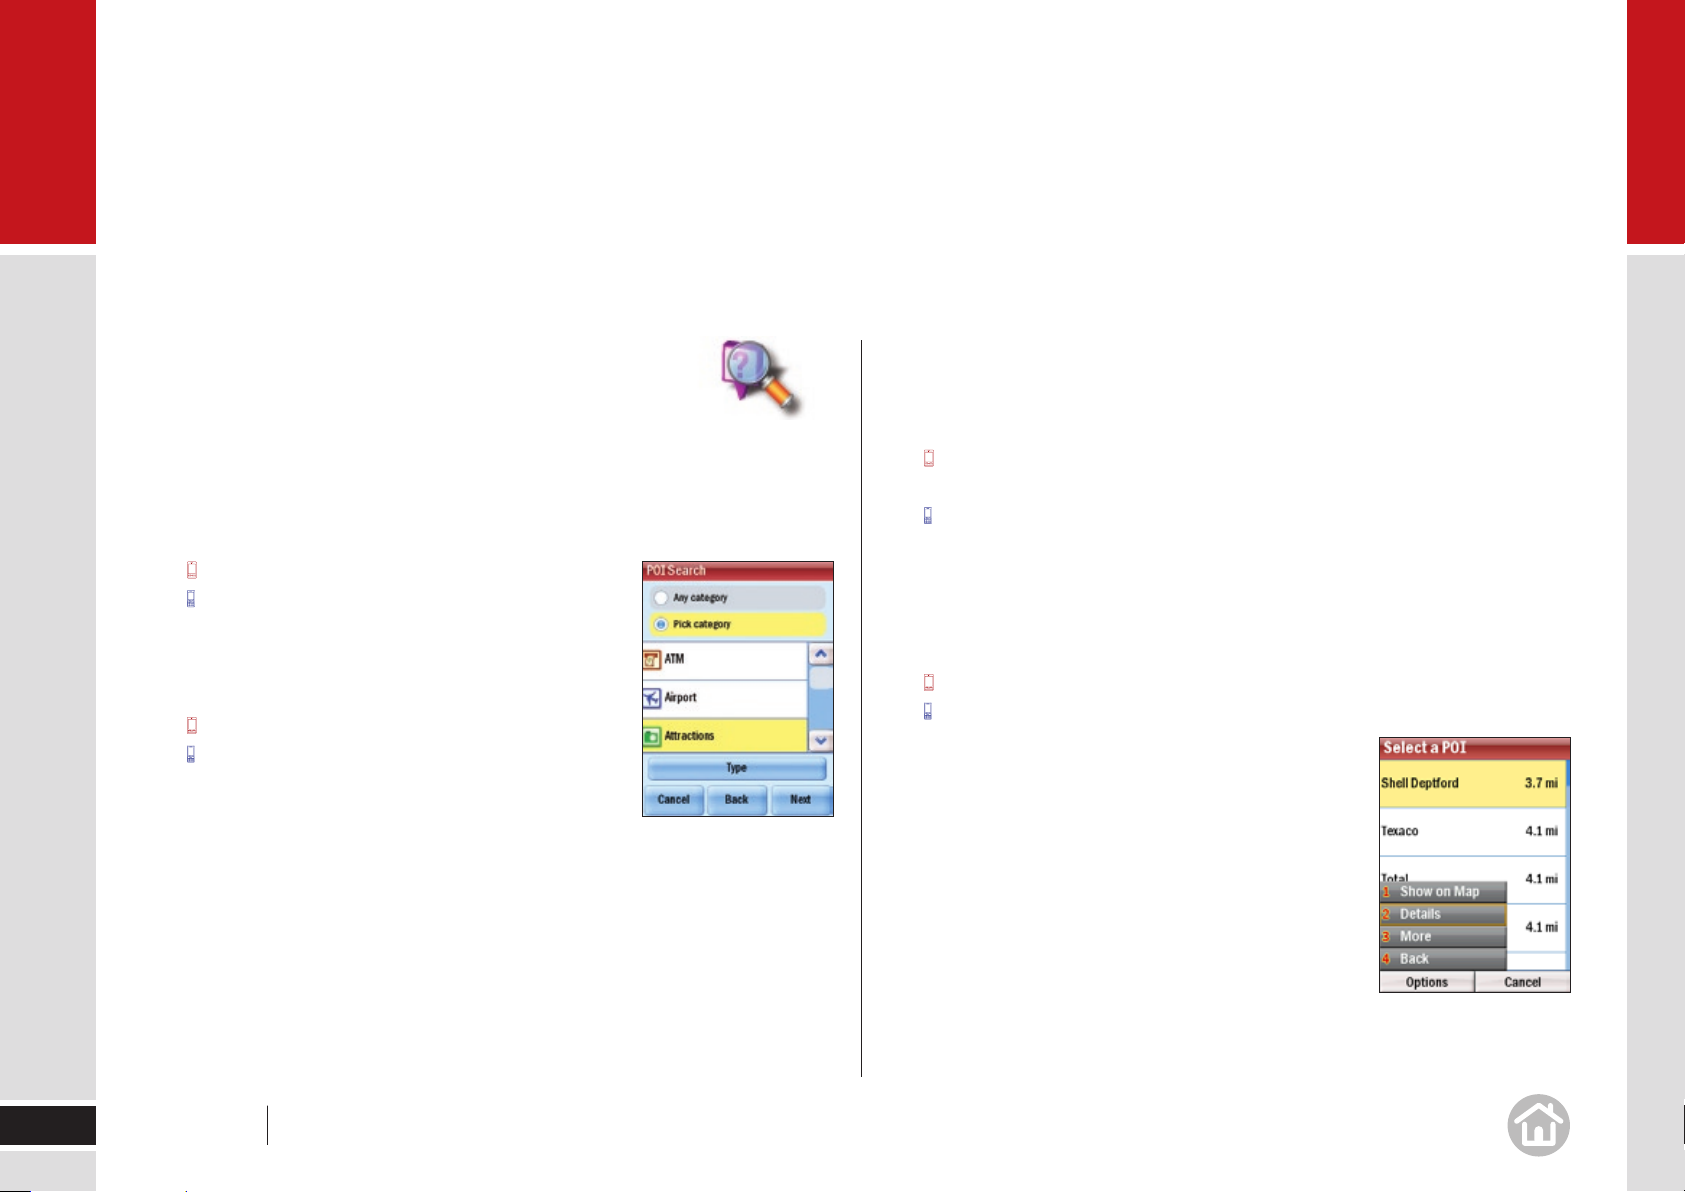
Advanced POI Search
If you want to visit a specific POI without inputting the
address, you can search the POI database and set it
as a destination.
Select • Menu > Destination > Points of Interest.
If you know the name of the place you want to visit, enter it here.
• Ta p Next.
Scroll down to continue.
Choose to select a category or search all. If you •
check the Pick Category box, select the correct
category. Select Type to specify a subcategory.
Ta p Next.
Scroll down to continue.
Select a location option: choose from • Near current
location, Along my route or In a City to search
for a related POI. Press Next.
For • Near current location and Along my route, the POI list will be
automatically generated. If you selected In a City, enter the name of the city
or town nearest the POI you are searching for.
CoPilot will then search the thousands of POIs. When complete a list of the
nearest matches will appear on screen.
Select the correct POI from the list. •
• Press Details to view it on a map. CoPilot will also display the phone
number of the POI if available.
Press Options > Show on Map to view the POI on a map.
Select Options > Details to display the phone number for the POI if
available. Press Call to ring the POI via your mobile device or press Back to
return to the POI list.
For CoPilot to create a route from your current location to your selected POI: •
Select OK.
Press the action key.
15
User Manual 02 In use
02
In use
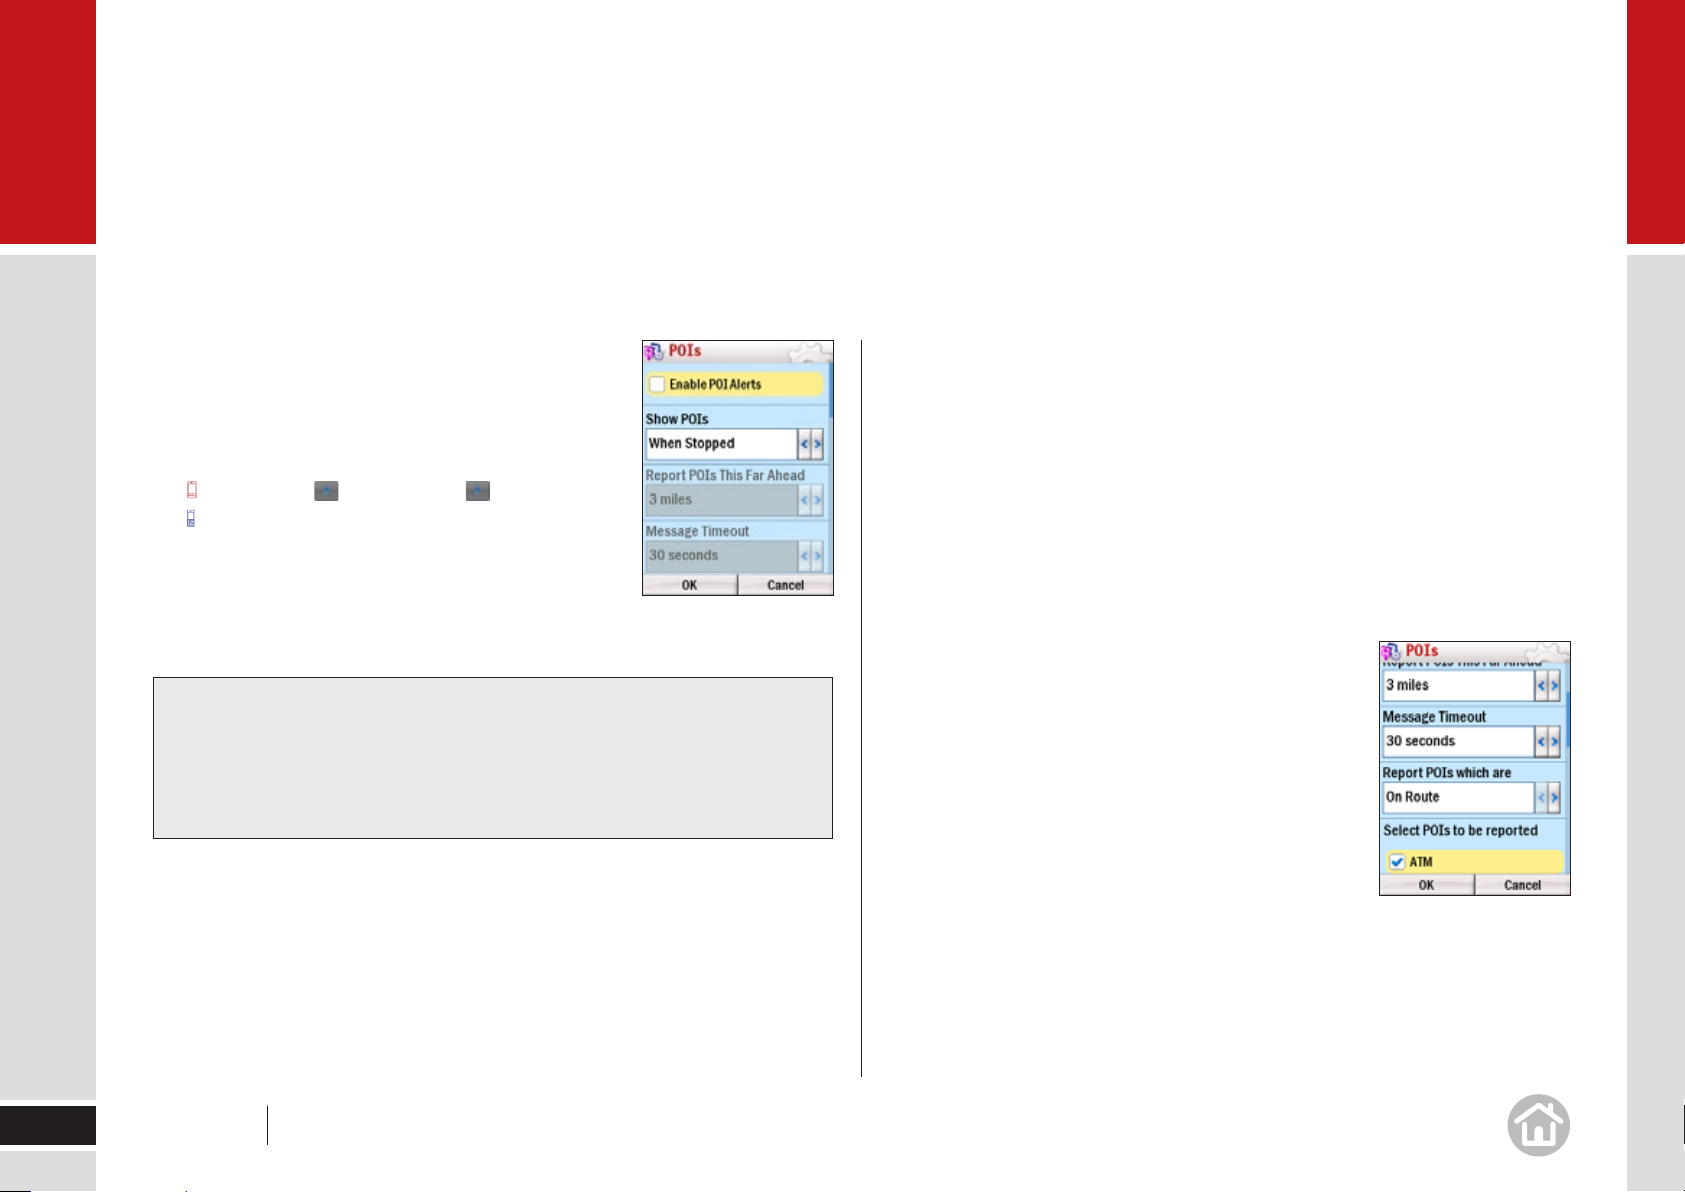
Adjusting the POI settings
You can choose when to have POIs shown on screen
and the distance at which you are alerted to them
by adjusting the POI settings.
• Ta p Menu > > Settings > > POIs.
Select Menu > More > Settings > POIs.
Enable the POIs by checking the box. Disable •
by unchecking.
Choose to • Show POIs Always, Never or When Stopped from picklist.
Tip: Call Ahead
If you choose to show POIs on a map, you can select the POI and CoPilot
will display the phone number if available. Press Call to ring the POI via
your mobile device.
In the • Report POIs this far ahead field, select a distance between
0.2 and 25 miles.
Select how long POI messages are displayed with the • Message Timeout
picklist. Select between 5 seconds and 5 minutes.
Select whether to show POIs that are on your route or nearby it. Select •
between On Route and Near Route.
Select specific POI categories to display by checking the boxes. •
Select • OK to apply the settings and return to the Settings menu.
16
User Manual 02 In use
02
In use
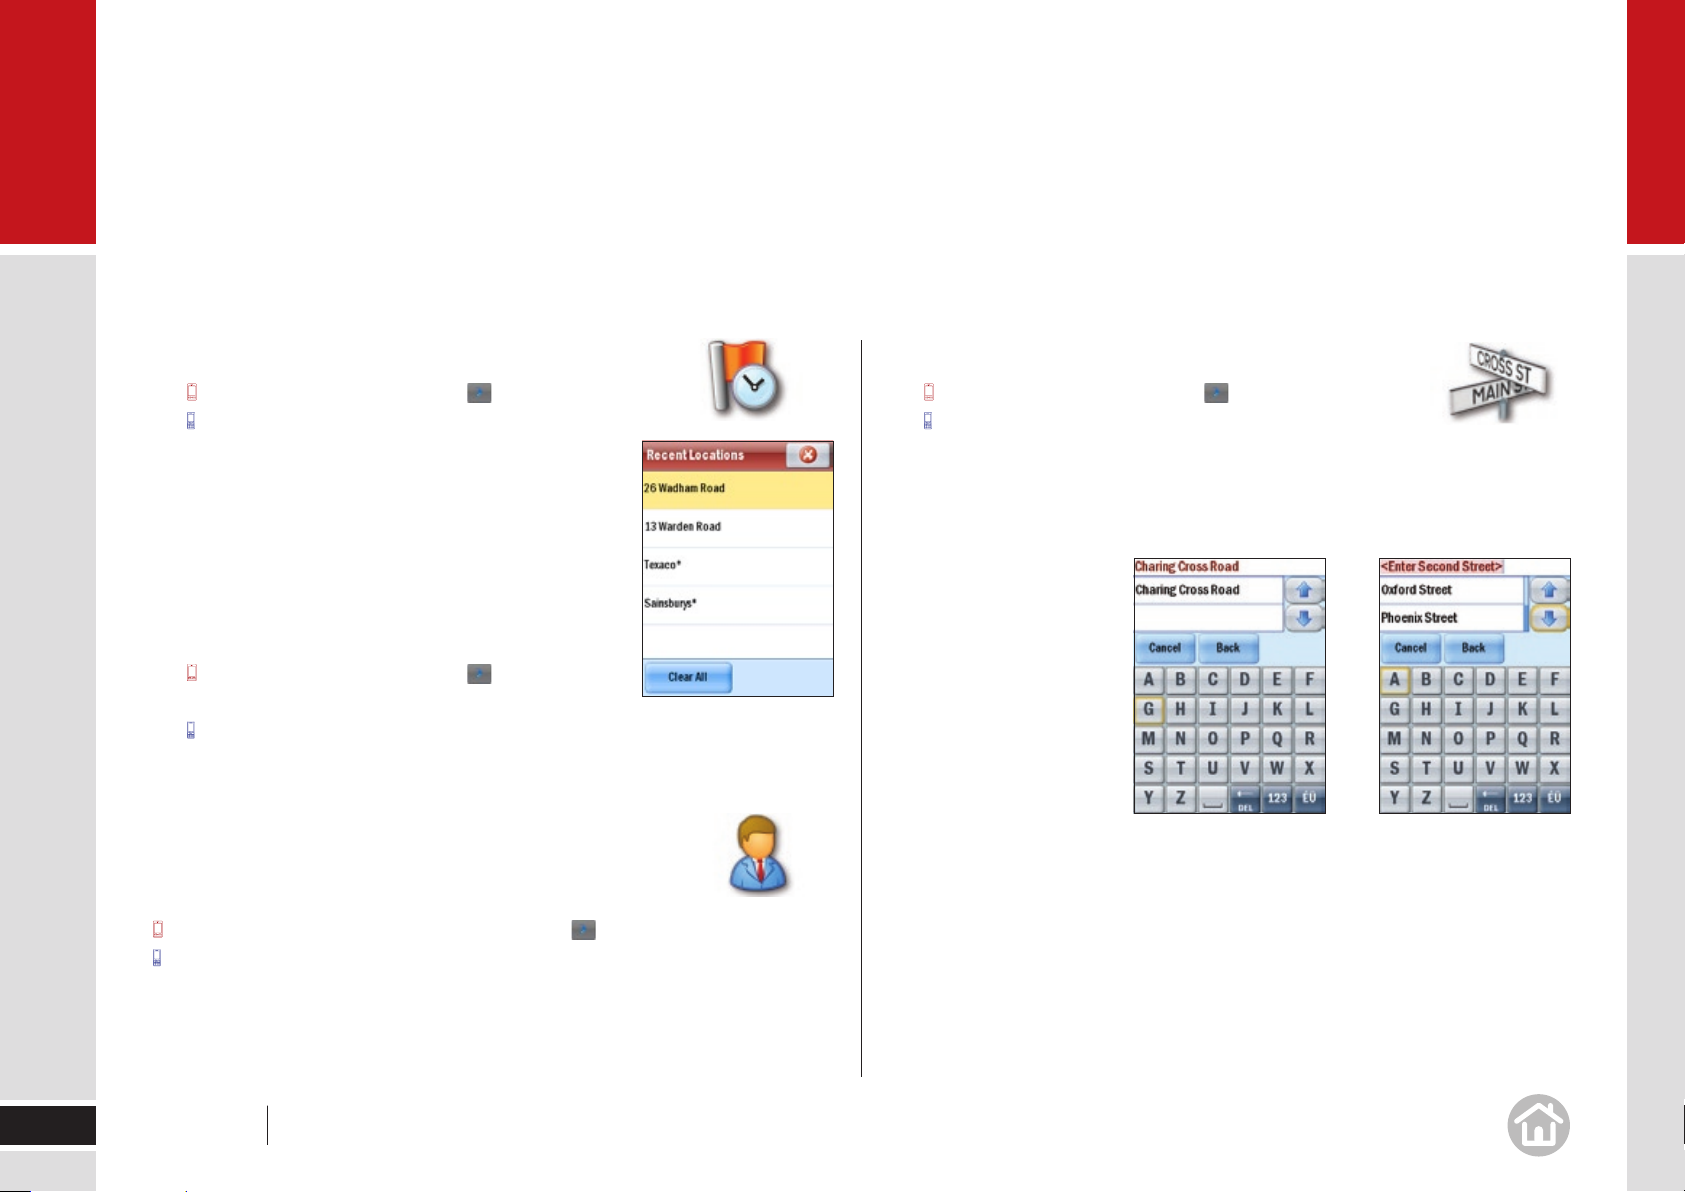
To choose a Recent destination
• Select Menu > Destination > > Recent.
Select Menu > Destination > Recent.
Recent provides quick and easy access to the last
50 destinations that you entered.
Note: Your recent list will store the last 50 addresses
you have entered. When the list is full each new
address will replace an older inactive address.
To delete the list:
• Select Menu > Destination > > Recent >
Clear All.
Select Menu > Destination > Recent > Clear All.
To choose a Contact’s address as a destination
You can select an address from any Contacts that you have
stored in your device.
To select a contact tap Menu > Destination > > Contact.
Select Menu > Destination > More > Contact.
To choose an Intersection for your destination
• Select Menu > Destination > > Intersection.
Select Menu > Destination > More > Intersection.
Enter the city/town name of your destination. You will be asked to enter the first
road and then the second. CoPilot will calculate your route to the point where
they meet
17
Enter your contact name to automatically recall the address saved in your
mobile device.
User Manual 02 In use

02
In use
Selecting a destination using Lat and Long
If you know the latitude and longitude of your destination
you can enter them directly.
• Ta p Menu > Destination > > Coordinates.
Menu > Destination > More > Coordinates.
Choose to set the latitude and longitude in Degrees •
Minutes Seconds, Decimal Degrees or Decimal
Minutes. You can also use the OS Grid.
Enter a latitude and longitude in the appropriate •
format depending on which one you selected.
CoPilot will take a few moments to find the point.
When it is located a map will appear with the location
pinpointed by a red flag.
Select • Drive to begin navigating your route.
Saving your Current Location
If you are outside and have a GPS fix, you can save your current location.1
2 Menu > > Save Current Location.
Menu > More > Save Current Location.
Enter a name for the destination. Press 3 Save.
The location will be saved in your Favourites list which can be accessed to 4
enter the saved location as a destination in the future.
Other ways to select a destination
CoPilot offers a variety of ways to enter and save a personal destination. You
can save locations as Home and Work for one click route finding, see page 27.
In addition, CoPilot let’s you save your Favourite destinations so you can access
them quickly see page 28.
18
User Manual 02 In use

02
In use
Selecting multiple stops for your journey
CoPilot allows you to plan a trip with multiple destinations.
• Ta p Menu > > Plan or Edit Trip.
Select Menu > Plan or Edit Trip.
Select • Add Stop and choose Address.
Add the first address in the same way as detailed •
above; see Selecting a destination on page 13.
Select • Add Stop again to add your second, third,
fourth, etc. address.
Customising your trip
When you have entered all your required stops you can
change the order they appear in.
Select the address you wish to move. •
A pop-up menu will appear containing a list of options.
Press Options to display a pop-up menu showing a
list of options.
Select Move Up, Move Down, Move to Start or Move
to End.
The selected stop will move to its new position in the trip list.
Tips: Show on Map
If you select Show on Map from the pop-up menu, a map of the area
around the selected stop will be displayed.
Click the cross to return to the trip list.
Press Done to return to the trip list.
CoPilot has an Optimise Stops function to find the most efficient route.
For more details see Optimising stops on page 32.
19
User Manual 02 In use

02
In use
Setting waypoints
CoPilot can route you through a certain point without
considering it as a stop. By setting Waypoints you can
adjust CoPilot’s route, to calculate a detour via the waypoint.
• Select Menu > > Plan or Edit Trip.
Select Menu > Plan or Edit Trip.
Enter the address or place in the same way
detailed in Selecting a Destination on page 13.
The address will appear on the trip list as a Stop, •
with a flag icon next to it. Select the address you
wish to change to a Waypoint.
• A pop-up menu will appear containing a list of
options. Tap Set as Waypoint.
Select Options > Set as Waypoint.
The address will now be listed as a Waypoint, with an arrow icon in front of the
address or place to indicate that is it a Waypoint.
Saving destinations in your planned
trip as favourites
You can save addresses listed on the trip list as Favourite
destinations so you can access them quickly.
Select the address you wish to save as a favourite.•
• A pop-up menu will appear containing a list of
options. Tap Add to Favourites.
Select Options > Add to Favourites.
Tip: Do more with Favourites
For more information on Favourites see page 28.
20
Tip: Make a Waypoint a Stop
To change a Waypoint back to a Stop:
Tap the address and select Set as Stop from the pop-up menu.
Select Options > Set as Stop.
User Manual 02 In use

02
In use
Saving a trip
When you have finished entering all your destination
addresses, you can save your trip to access at a later
date, rather than start driving right away.
Select • Save Trip.
Enter a name for the trip you are saving.•
Press • Save and the trip will be saved to the
storage card.
Loading a saved trip
• Ta p Menu > > Plan or Edit Trip.
Menu > Plan or Edit Trip.
The last trip you planned will automatically load. If you
wish to load an older trip, select Load Trip and pick the
trip you wish to load from the list.
Press Open.
Select the action key on your keypad to load the trip.
Deleting a planned trip
Select • Clear.
You will be asked to confirm this selection. To continue with deleting the trip
select Yes in the Are you Sure? window.
Tip:
Alternatively, the user can press
Menu > > Clear Destination.
Menu > More > Clear Destination.
Preview your route
Once a multi-stop trip has
been entered, press Calculate
then a Route screen will then
appear, showing you a preview
map of the route.
21
User Manual 02 In use

02
In use
To set the routing options for your trip; select:
Routing
Options > Routing
The available settings are:
Vehicle type• : Choose from Automobile, RV,
Motorcycle, Bicycle, Walking or Straight Line.
Routing type• : Choose whether you want CoPilot
to always choose the route quickest in time
or the shortest in distance. Or a route which avoids motorways.
Routing profile• : select a routing profile
Tick the checkbox if you would like to display the routing type screen each •
time you add a destination so you can apply a profile or set the routing
options.
Select • OK to apply your new routing preferences.
To see the preview options for your journey, select:
Preview
Options > Preview
Route Demo• : See a preview of your journey,
including instructions. You can chose to speed
up the demo with Faster or slow it down
by selecting Slower. Press Close to exit.
Turn Maps• : Displays a map of each turn
of the journey. You can choose to see the Next or Previous turn. Press
Close to exit.
Itinerary• : Shows each direction in a written list with the distance to each
turn. Press Close to exit.
To adjust your planned trip, select,
Edit
Options > Edit
You may wish to:
Add a stop•
22
Delete a stop•
Change your stop order•
Optimise the trip•
User Manual 02 In use

02
In use
Begin driving
Select Drive to begin navigating your route.
Tip: Altering a trip
Once a user has pressed Drive they can change
the trip entered by selecting:
Menu > > Clear Destination.
Menu > More > Clear Destination.
Tip: Starting points
If you are planning a trip in advance and are
not at the start point of your journey CoPilot
will ask you to select your starting location. You
can choose to navigate to the starting point,
or to navigate directly to the destination from your
current location.
Safety Cameras**
CoPilot will tell you when you are approaching Safety
Cameras, to enable this feature, or adjust the warning
distance please see Safety Alerts on page 44.
** Note: Not available in certain regions
Traffic Service*
CoPilot can automatically display any traffic incidents
that affect your route and can recommend an alternate
route if required. For more information see page 34.
* CoPilot Live Traffic may be provided
as an optional service.
Guidance
CoPilot will guide you to your destination with clear
on-screen and spoken instructions. Whenever you are
approaching your next turning, CoPilot will speak to you
to alert you to the upcoming direction change.
23
User Manual 02 In use

02
In use
Driving views
You can choose from six different screen display options.
To access, select Menu > Driving Views. For more details
on each view see Setting Display Mode on page 25.
In the default mode, your screen will look like the one below.
Zoom in Zoom out
Note: To see how to change what is displayed here, see page 25.
On screen information
The street name of the next approaching turn is displayed at the bottom of the
map. You can choose what useful information is displayed at the base of your
screen when you are driving, please see Customising the guidance screen on
page 29.
zoom in
distance to next turn
next turn direction
Information options
zoom out
next turn arrow
route ahead highlighted
drivers current position
next approaching turn
24
Tip: Take a closer look
Use the and in 2D or 3D driving views to zoom in or out
of the map view. Press 1 or 3 on your keypad in 2D or 3D driving views to
zoom in or out of the map view.
User Manual 02 In use

02
In use
Setting display mode
You can choose from six different screen display options.
To access select Menu > Driving Views.
Driver Safety
We recommend you choose Driver Safety, which displays a simple turn
instruction arrow with concise next turn instructions in large type. In driver
safety mode, a map is only displayed as you approach a turn or are travelling
below 10mph.
3D
Shows your current position, next turn and surrounding roads
using a birds eye view.
2D Where Am I?
Displays your current location, next turn and surrounding
roads on a 2D map.
25
Tip: Adjusting your Safety View
You can alter the settings of the driver safety view. See Adjusting your
Safety View on page 42.
User Manual 02 In use

02
In use
2D Next Turn
Displays your current location and auto zooms into
the next turn on a 2D map.
2D Destination
This view shows the route from your current position
to your destination.
Itinerary
This view shows each direction and turn in a written list,
including distances.
You can use the Itinerary to check your route before
you travel.
Tip: Take a closer look
Use the and in 2D or 3D driving views to zoom in or out
of the map view. Press 1 or 3 on your keypad in 2D or 3D driving views to
zoom in or out of the map view.
26
User Manual 02 In use

03
Personalise
Enter and save personal destinations, change the map style and colour
scheme, adjust your routing options, and select the voice that guides you to
your destination. With CoPilot Live 7 you can personalise your device to behave
exactly the way you need.
Saving a destination as Home
Tip: Postcode search
In the UK or Netherlands, if you know the full postcode of your destination,
select Menu > Destination > Address. Enter in the postcode. Select a
street name and key in a house number then press Finish.
27
Save your home address so you don’t have to enter it every
time you wish to be directed home.
Select • Menu > Destination > Home.
Enter your home city/town name.•
Select the correct city or area when it appears in the list below the city field. •
Scroll down to see more address options matching what you have typed.
Enter your street name. As you enter the •
street name CoPilot will list potential matches.
Select the correct street name when it appears
in the list below.
Enter your house number and select • Finish, or just
select Finish to skip this step.
User Manual 03 Personalise
Saving a destination as Work
Save your work address so you don’t have to enter
it every time you wish to be directed to work.
Select • Menu > Destination > Work.
Enter your work city/town name.•
Select the correct city or area when it appears in the list below the city field. •
Scroll down to see more address options matching what you have typed.
Enter the street name. As you enter the street name CoPilot will list potential •
matches. Select the correct street name when it appears in the list below.
Enter your office number and select • Finish, or just select Finish
to skip this step.

03
Personalise
Save your Favourite destinations
You can save other addresses to your Favourites list,
so you can access them quickly.
Select • Menu > Destination > Favourites.
• Ta p Add New and CoPilot will return to
the Destination menu.
Select Options > Add New and CoPilot will
return to the Destination menu.
Choose to add the favourite by inputting the •
address/postcode (select Address) or by locating
it on a map (Pick on Map) or any of the other ways
to enter a destination.
When you’ve successfully added the address or location, it will appear in your
Favourites list.
Edit or delete Favourites
To edit or delete a location in your Favourites list:
Ta p Manage, select a favourite and choose to Edit,
Delete or Delete All.
Select Options then choose either Edit, Delete or
Delete All.
Edit• will open an enter address screen so you can
change the location.
Delete• will erase the currently highlighted location.
Delete all• will erase all the locations in your favourite(s) list. Including your
Home and Work addresses.
Note: You will be asked to confirm you wish to delete an item. If you select Yes
the address/es will be lost.
28
User Manual 03 Personalise

03
Personalise
Night Map
Night Map can be activated on any of the display screen
modes. It dims the screen display to reduce glare and
eye strain when driving at night.
CoPilot will automatically switch to night mode based on the time and your
location, or you can do it manually from the Driving Views menu.
Ta p Menu > Driving Views > > Night Map.
Select Menu > Driving Views > More > Night Map.
To switch off Night Mode:
Ta p Menu > Driving Views > > Day Map.
Select Menu > Driving Views > More > Day Map.
You can also alter the day and night mode settings from the Map styles screen.
See Setting Map Styles on page 31 for details.
Customising the guidance screen
You can choose what useful information is displayed
at the base of your screen when you are driving.
• Ta p in the bottom right hand corner
of the screen.
Select Info Bar.
Choose from Destination, Current Road, Next
Crossroad, Next Major Road, Nearest Town, ETA
& Distance, Speed & Distance, Altitude & Heading,
Latitude & Longitude.
29
User Manual 03 Personalise

03
Personalise
Setting route preferences
You can set up your preferences to best suit you. Here’s how.
• Ta p Menu > > Settings > Routing.
Menu > More > Settings > Routing.
The available settings are:
Vehicle type• : Choose from Automobile, RV,
Motorcycle, Bicycle, Walking or Straight Line.
Routing type• : Choose whether you want CoPilot
to always choose the route quickest in time
or the shortest in distance. Or a route which
avoids motorways.
Toll Roads• : Choose to Use, Always Avoid or Avoid
if Possible all toll roads your route may encounter.
Congestion Charges• : Set CoPilot to Avoid or Allow congestion charge
zones, or to Warn When Routing through one.
General• : Tick the boxes to Avoid Ferries and/or keep International Borders Open.
Select • OK to apply your new routing preferences.
Loading a saved routing profile
To load an existing profile select Load Routing Profile
and select one of your previously saved ones or the
Default profile.
Click OK twice to return to the Settings menu and
apply the profile.
Select Options > Load. Press OK to return to the
Settings menu and apply the profile.
Edit your road preferences
Scroll to the bottom of the page and select View/Edit Road Preferences.
The available settings are:
For each road type• : Choose whether you want CoPilot to Strongly Avoid,
Avoid, Neutral, Favour or Strongly Favour when choosing a route.
Speed• : Select an appropriate speed for each road, you can increase
or decrease the speed in increments of 5.
30
Saving a route preference
To save a routing profile scroll to the bottom of the page and select Save as
Routing Profile when prompted enter a name for your profile and select OK.
User Manual 03 Personalise
Note: Please note, it is not recommended to change the default route and road
preferences in CoPilot as this will affect the route calculated and ETA shown.

03
Personalise
Personalising the voice instructions
You can alter the voice with which the guidance
instructions are spoken.
• Ta p Menu > > Settings > > Language
and Speech.
Menu > More > Settings > More > Language
& Speech.
Select a voice. You can select • Test to hear a
sample of the chosen voice.
For more detail on altering the Language and Speech
options see page 44.
Setting Map Styles
• Ta p Menu > > Settings > Map Styles.
Menu > More > Settings > Map Styles.
You can select from a range of industry standard
map presentation styles and colour schemes using
the Map Style list. A preview is shown each time
you select one, once you are happy with your
selection select OK.
Applying Themes
You can change the colour scheme of your CoPilot.
Menu > > Settings > > > Themes.
Menu > More > Settings > More > More >
Themes.
Select a theme from the picklist. Select Apply Theme
to apply the chosen theme.
Customising routing options
Once a destination has been entered the Route
screen will appear, showing you a preview map
of the route. To define a routing profile for your journey,
select:
Routing
Options > Routing
For more details see Preview your route on page 21.
31
For more detail on changing the Map Styles
see page 40.
User Manual 03 Personalise

04
Advanced
Optimising stops
CoPilot has an Optimise Stops function, which
will automatically rearrange the stops within
a trip to create the most efficient order.
When you have planned a trip with more than
3 stops, select Optimize.
CoPilot will take a few seconds to reorder your
stops for the most efficient journey.
Note: Your start point and destination
will not be altered.
Setting detours
You can program CoPilot to make a detour on a part of the calculated route.
Select • Menu > Detour.
From the Detour options, select • Avoid Roads.
An itinerary of your journey will appear. Select the road you would like to avoid
then select:
CoPilot will take a few moments to plan an alternative to
the selected road.
CoPilot will show any change in distance the new route will
cause to your journey, and display a map of the new
route.
Select • Accept and CoPilot will begin directing you
according to the new route.
If you decide not to use the new route, select •
Decline. CoPilot will then return to your original
route.
CoPilot will save the details of roads you wish to avoid,
to clear the memory, select Menu > Detour > Clear
Avoided Roads
Tip: Avoiding multiple roads
To avoid additional roads, select a road to avoid and press Avoid Road.
Repeat as many times as required.
32
Avoid Road
Avoid
User Manual 04 Advanced

04
Advanced
Change your whole journey
If you are unhappy with the whole route CoPilot has planned for you, tap
Menu > Detour > Alternate route.
CoPilot will compile a different route for you if a sensible alternative exists.
A map of the proposed detour will be displayed. Select Accept to agree
or Decline to return to the previous route.
Ending a Detour
If you are on a detour route and would like to return to the
original journey, select Menu > Detour > End Detour.
Avoiding Traffic*
You can program CoPilot to make a detour from the
programmed route to avoid traffic.
Select • Menu > Detour.
From the five Detour options, select •
Avoid All Traffic.
CoPilot will use GPRS or TMC information to find traffic
incidents and will automatically plan another route,
avoiding traffic congestion.
CoPilot will announce the distance the new route will
add/subtract from your journey and begin directing you.
Select • Accept and CoPilot will begin directing you according to the new
route
If you decide not to use the new route, select • Decline.
CoPilot will then return to your original route.
* CoPilot Live Traffic may be provided as an optional service.
33
User Manual 04 Advanced

04
Advanced
CoPilot Live Traffic Service
The optional CoPilot Live traffic service provides
information about real-time traffic incidents on your route
or in a specific location.
Traffic information can be delivered to CoPilot Live in one of two ways:
Using a mobile Internet connection1
Via the RDS TMC network (requires a TMC receiver)2
The availability of CoPilot Live traffic varies by region and retailer.
For more information, please visit www.copilotlive.com/eu
CoPilot Live will automatically display any traffic incidents that affect your route
and can calculate an alternative route if required.
You can also search for traffic incidents in other locations before you set-off.
Setting-up CoPilot Live traffic
Traffic information delivered via Mobile Internet1
Select • Menu > Traffic > Traffic (GPRS) Connect
To use traffic information delivered via the mobile Internet, you will need
to have wireless Internet enabled on your mobile device. To find out if your
device has wireless Internet or if your SIM is data enabled, please contact
your mobile network operator. Using wireless internet with the Live service
may result in data charges from your mobile network operator.
TMC Traffic2
Firstly connect a TMC receiver to your mobile device.•
In CoPilot Live, select • Menu > Traffic > Settings.
Select • TMC.
Select • TMC Settings.
Select the correct GPS COM port and Baud Rate settings •
(please refer to your TMC Receiver’s instructions).
Select • Connect.
We recommend that you select • Automatic in the TMC Tuner/
RDS section. (You can search for a traffic signal manually
by selecting Manual.
34
In the next screen, press • OK
User Manual 04 Advanced
• Select Close then OK.
Select OK twice.

04
Advanced
Additional Traffic Settings
To adjust the alert settings and define how CoPilot uses
GPRS or TMC traffic information.
• You can also select Menu > > Settings >
> > Traffic.
Select Menu > More > Settings > More >
Traffic.
Then select from these options:
Traffic Source:• Select GPRS Wireless to receive traffic information using
the mobile Internet or select TMC to obtain traffic
information via the RDS TMC network.
Default Incident Action• : Select Avoid to set
CoPilot to automatically detour around reported
incidents, select Ignore if you do not want
to be automatically detoured.
Speak Incidents• : Choose under which
circumstances traffic incidents are spoken
by CoPilot.
To search for traffic incidents along your current route:
Select • Menu > Traffic > Traffic on Route.
To search for traffic incidents in a City:
Select • Menu > Traffic > Traffic in a City.
Enter the city/town name of where you would like
to check for traffic destination.
To search for all traffic incidents:
Select • Menu > Traffic > View Traffic Incidents.
35
Incident Timeout• : Choose how long Incident information is displayed on
screen from the picklist.
User Manual 04 Advanced

04
Advanced
Using traffic incidents
Once CoPilot has found traffic incidents highlight
and select one to view detailed information relating
to the incident. Select from the following options:
Ignore• continue on your planned route.
Avoid• calculate a new route avoiding the incident.
Show Map• display the incident on a map.
Close to return to the traffic incidents list.
You can also...
Map all displays all reported traffic incidents on a map.
Avoid All – calculates a route which avoids all reported incidents.
Ignore All – continue on your planned route.
Tip: You Can Also Select
Menu > Detour > Avoid All Traffic.
To delete traffic incidents:
Select Menu > Traffic > Clear traffic Incidents.
36
User Manual 04 Advanced

04
Advanced
CoPilot Live
CoPilot Live enables you to share your location with other
people in real time on the Internet. They can view your
location live on the map, send you instant messages and
even new destinations.
CoPilot Live’s in-built location tracking can enable friends, family or colleagues
to see where you are and communicate with you in real time, wherever you go.
You will be able to:
Let others see your exact location on an Internet map. •
Enable others to send you instant messages from the web site when •
you are on the road.
Allow others to see your destination and estimated time of arrival.•
Let others send you new stops that are automatically added to your •
CoPilot Live itinerary.
Send tracking invites by e-mail directly from CoPilot Live.•
Note: To use CoPilot Live you will need to have wireless internet enabled
on your mobile device. To find out if your device has wireless Internet or if
your SIM is data enabled,please contact your mobile network operator. Using
wireless internet with the Live service may result in data charges from your
mobile network operator.
To set up CoPilot Live you will need to register for an account.
Go to http://live.alk.com to sign up.
37
User Manual 04 Advanced

04
Advanced
To create a CoPilot Live web account
If you want to use the Live functionality of CoPilot, you’ll need to create
a user account on the ALK website at http://live.alk.com.
Connect your computer to the internet.1
Browse to the 2 http://live.alk.com website.
In the login page click on 3 Create your new account here.
Enter an easy-to-remember 4 Account Name and Password
for your account.
Add your name and email address details.5
Select time zone 6 GMT and Account Region Europe.
Click on 7 Submit.
Note: Using wireless internet with the Live service may result in data charges
from your mobile network operator.
To connect to the Live server:
• Ta p Menu > > Live > Connect
Select Menu > More > Live > Connect.
To enter your Live account details into
CoPilot:
1 Select Menu > > Live > Settings.
Select Menu > More > Live > Settings.
In the Live Settings screen, select 2 Edit.
In the Live Account Information screen enter 3
a Device Name of your choice, followed by the
Account Name and Password created for your
Live Account. Press OK.
Define the time intervals at which CoPilot Live 4
sends your position.
Define how long a Live message is displayed 5
onscreen.
Press 6 OK to apply the Live settings
Note: You will need to exit and restart CoPilot Live for
the Live settings to take effect.
38
User Manual 04 Advanced

04
Advanced
To send an invitation to a contact so they can monitor your progress:
• Ta p Menu > > Live > Invitations.
Select Menu > More > Live > Invitations.
• Ta p New.
Select Options > New.
Enter a display name for your contact and their email address.•
If you would like to set a validity period for the invitation, select •
the Expires checkbox and enter the number of days.
Select • Next, you have the option to enter a message to go with the invite
or just press send to send the invitation.
To see your messages:
• Ta p Menu > > Live > Messages.
Select Menu > More > Live > Messages.
Live connection status
CoPilot Live uses a GPRS mobile signal to send and receive messages.
A green circular symbol will appears in the bottom right corner of the screen
when CoPilot Live is enabled.
Adjusting CoPilot Live communication
settings
Once you have connected to the internet you can alter
your settings
Login Information: Select Edit to set your Device
name and enter your Account Name and Password for
the Live service.
Internet Connection: Choose your Internet connection
using the picklist, this list is automatically created
based on your phone setting.
Send Position Every: CoPilot will update your position
on the Live server at the interval chosen here.
Hide Message After: when you receive a new
message it will be displayed on the main screen. It will
automatically be hidden after the time selected here.
39
User Manual 04 Advanced

04
Advanced
Setting map preferences
You can also set up what sort of maps CoPilot uses.
• Ta p Menu > > Settings > Map.
Select Menu > More > Settings > Map.
The available settings are:
Units• : Choose to display Miles or KM on your
maps.
Map Rotation• : Choose Heading Up to always be
travelling upwards on the screen, or select North
Up to hold the map static as you travel along your
route.
• Stylus control: Select Box Zoom or Drag Map.
General• : Choose whether to display turn restrictions by checking
or unchecking the box. Check the box marked ‘Display View Shortcuts’
to display a driving view button which allows you to quickly change
between driving views.
Select • OK to apply the settings and return to the Settings menu.
Setting Map Styles
• Ta p Menu > > Settings > Map Styles.
Select Menu > More > Settings > Map Styles.
Choose the default setting for the day or night mode from
the list. The options are Automatic, Night and Day.
If you select Automatic, CoPilot will automatically switch to night mode
when it starts to get dark, based on the current time and location.
Select Styles: Choose to display Day or Night map
styles.
You can select from a range of industry standard map
presentation styles and colour schemes using the Map
Style list. A preview is shown each time you select one,
once you are happy with your selection select OK.
40
User Manual 04 Advanced

04
Advanced
Setting route preferences
You can set up your preferences to best suit you. Here’s
how.
• Ta p Menu > > Settings > Routing.
Menu > More > Settings > Routing.
The available settings are:
Vehicle type• : Choose from Automobile, RV,
Motorcycle, Bicycle, Walking or Straight Line.
Routing type• : Choose whether you want CoPilot
to always choose the route quickest in time or
the shortest in distance. Or a route which avoids
motorways.
Toll Roads• : Choose to Use, Always Avoid or Avoid
if Possible all toll roads your route may encounter.
Congestion Charges• : Set CoPilot to Avoid or Allow congestion charge
zones, or to Warn When Routing through one.
General• : Tick the boxes to Avoid Ferries and/or keep International Borders
Open.
Saving a route preference
To save a routing profile scroll to the bottom of
the page and select Save as Routing Profile when
prompted enter a name for your profile and select OK.
Loading a saved routing profile
To load an existing profile select Load Routing Profile and
select one of your previously saved ones or the Default
profile.
Click OK twice to return to the Settings menu and apply
the profile.
Select Options > Load. Press OK to return to the Settings menu and apply
the profile.
41
Select • OK to apply your new routing preferences.
User Manual 04 Advanced

04
Advanced
Tip: Edit your routing preference
Edit your routing preferences by loading a saved profile, changing the
settings and resaving with the same name.
Edit your road preferences
Once you have saved a Routing profile you can set your
road preferences. Scroll to the bottom of the page and
select View/Edit Road Preferences. The available
settings are:
For each road type• : Choose whether you want
CoPilot to Strongly Avoid, Avoid, Neutral, Favour
or Strongly Favour when choosing a route.
Speed• : Select an appropriate speed for each
road, you can increase or decrease the speed
in increments of 5.
Note: Please note, it is not recommended to change the default route and road
preferences in CoPilot as this will affect the route calculated and ETA shown.
Adjusting your Safety View
• Ta p Menu > > Settings > > Driver Safety.
Select Menu > More > Settings > More > Driver Safety.
From here you can alter the settings of the Safety View in the following
ways:
Display Map Near Turns• : Decide whether to show a 2D/3D zoomed map
on the approach to each turn or always show the Driver Safety screen.
Select Yes to display the map or No not to.
When the Turn is Within• : If you selected Yes above, choose the distance
before the turn you would like the map to be displayed. The distance can
be set between 0.3 miles and 1 mile.
Map Type• : If Display Map Near Turns is set to Yes, select whether to use
a 2D or 3D map when approaching turns.
42
User Manual 04 Advanced

04
Advanced
Checking the GPS status
• Ta p Menu > > Settings > GPS > GPS Status.
Select Menu > More > Settings > GPS > GPS
Status.
The GPS Status screen shows detailed information
regarding the GPS fix and signal strength which your
Mobile device uses for guidance. From this screen you
can see your current latitude and longitude position,
the UTC time and date, your speed and your elevation
(feet above sea level).
Note:
You will not be able to receive a GPS signal inside buildings, tunnels,
garages, multi-storey and basement car parks. To work effectively the GPS
receiver needs to have a clear line of sight to the sky.
Track Playback
You can play back a previously completed journey.
• Ta p Menu > > Settings > GPS > Track
Playback.
Select Menu > More > Settings > GPS > Track Playback.
Select the journey from the list.•
• Ta p Play to start playback.
Select Options > Play.
You can adjust the playback speed using the • Track
Playback Speed list. The available speeds are
between 1.O X and As Fast As Possible.
To stop playback, select • Stop.
To exit, select • Cancel.
Adjusting the volume
• Ta p Menu > > Settings > Volume.
Select Menu > More > Settings > Volume.
43
User Manual 04 Advanced

04
Advanced
Adjusting the Guidance Settings
You can adjust the way CoPilot guides you.
• Ta p Menu > > Settings > > > Guidance.
Select Menu > More > Settings > More > Guidance.
Select at what distances you want CoPilot to speak to you when •
approaching a turn.
Select what information you wish to be displayed •
on the customisable part of the screen, the
options are Destination, Current Road, Next
Crossroad, Next Major Road, Nearest Town,
ETA & Distance, Speed & Distance, Altitude
& Heading, Latitude & Longitude.
Check the box to • Display Route Arrow,
or uncheck to remove.
Safety Alert settings
Safety alerts let you know where safety cameras are
located by providing on-screen and audio warnings. You
can set the distance at which you want to be alerted.
• Ta p Menu > > Settings > > Safety Alerts.
Select Menu > More > Settings > More > Safety Alerts.
Enable• or Disable the alerts by checking or unchecking the box.
Adjust the distance before a safety camera you would like to hear the alert.•
Setting the Language and Speech
• Ta p Menu > > Settings > > Language and
Speech.
Select Menu > More > Settings > More >
Language & Speech.
Select a language from the • Choose a Language
picklist.
Select a voice from the Choose a Voice picklist. •
Select Test to hear a sample of the chosen voice.
44
User Manual 04 Advanced

04
Advanced
Device settings
You can set how CoPilot interacts with your device.
Keyboard
Menu• > > Settings > > Device.
Select the keyboard type of choice from the drop-down menu. The options
are Alphabetical, QWERTY, AZERTY.
Backlight
Adjust your mobile devices backlight settings to save battery.
• Menu > > Settings > > Device.
Menu > More > Settings > More > Device.
The options are On with GPS, Always On, On Near Turn, or Use Device’s
Settings.
Playing a demo
CoPilot contains a demonstration journey to a pre-defined
destination, to view the demo.
• Menu > > > Play Demo.
Menu > More > Play Demo.
Speed up by selecting • Faster or slow down by
tapping Slower.
Press Close to exit the demo mode.
About CoPilot
To access the version, data number and product key •
of your CoPilot software:
Ta p Menu > > Settings > > > > About CoPilot.
Menu > More > Settings > More > More > About CoPilot.
45
User Manual 04 Advanced

04
Advanced
Licensing
• Ta p Menu > > Settings > > > Licensing
Menu > More > Settings > More > More >
Licensing.
The Licensing settings allow you to upgrade or
deactivate license regions. To upgrade you must have
already purchased a license for the new region online
at http://www.alk.eu.com.
Once you have a Product Key for your upgrade:
Select Upgrade.
Select Options > Upgrade.
You will need to activate your upgrade license in the
same way you activated your CoPilot Live license. Please follow the installation
procedure as described on page 7.
Transferring your CoPilot Live License
If you wish to use your CoPilot Live application and maps license on a different
mobile device, select Deactivate and follow the on-screen instructions.
Data Region
If you have multiple data regions on your device you can
choose which one to use in the Data Region setting.
• Ta p Menu > > Settings > > > > Data Region
Menu > More > Settings > More > More > Data Region.
Choose from the available regions in the list.
46
User Manual 04 Advanced

05
CoPilot Central
CoPilot Central
CoPilot Central desktop companion software allows you to plan trips, create
maps, download updates for your mobile device and purchase map upgrades.
Please refer to page 6 for information on Installing CoPilot Central.
Open • CoPilot Central using the desktop shortcut or from your PC
programs menu.
You can decide whether to install the latest CoPilot Central updates. •
We highly recommend that you install any updates to ensure you get
the best out of CoPilot Central.
Select Country2 . This lets you easily download entire countries.
Click • Select Country and pick the countries you wish to download.
47
Note:
An Internet connection is required to download updates.
Create a map
There are four ways to select map areas:
Entire Region1 . This lets you easily download an entire map region
e.g. Europe.
Click • Entire Region to download the region. Click Send to Device
to download the maps to your Mobile Device.
User Manual 05 CoPilot Central
Click • Next.
Click • Send to Device.
Area Selection3 . You can draw a box around an area of the map and save
it as a custom map area to download.
Click • Area Selection.
Move around and zoom-in/zoom out of the map to find the area you •
wish to download.
Use the mouse to draw a box around the area you wish to download.•

05
CoPilot Central
Enter a name for the area in the • Region Name box that appears and
select OK.
You can then choose to • Send to Device immediately or select Not Yet
to download later.
Location Radius4 . You can select and download a circular map area around
a town or city and save it as a custom map area to download.
Click • Location Radius.
Move around and zoom-in/zoom out of the map to find the area you •
wish to download.
Use the mouse to draw a circle around the area you wish to download.•
Enter a name for the area in the • Region Name box that appears
and select OK.
You can then choose to • Send to Device immediately or select Not Yet
to download later.
Download a map
Once you have selected the map areas you can download them to your mobile
device by selecting Send Maps to Device on the left-hand panel.
Double check that all the areas you wish to download are selected.•
Ensure the • Highway Network check box is ticked if you would like to
download the major roads around Europe to link your region with Major
Cities.
If you are replacing your storage card, ensure the • Support Folders
check box is ticked.
48
Press • Next. A summary of the map regions to be downloaded will also
be displayed.
User Manual 05 CoPilot Central

05
CoPilot Central
The total memory size of the maps to be downloaded will be •
also displayed, as well as the destination where the maps will be
downloaded to. CoPilot Central will check that you have sufficient
storage space for the maps.
If you would like to download maps to an alternative location, use •
the drop-down menu to select one if available.
Once you are ready to begin the download, select • Send to Device.
Plan a Trip
Click on Plan a Trip in the main window. Add a starting point by clicking in the
left hand panel and searching for the address details in the pop up window.
You can add more stops, re-order and optimise your trip just like you can with
CoPilot Live on your mobile device.
Entering an Address or City
Press the Address button on the toolbar, or select Add Stop to open •
the Find a Location pop-up box.
Enter the Street, City/town, Postal Code and Country of your destination.•
Press Search. CoPilot Central will list possible address matches.•
Select the correct street name when it appears in the list and •
press Add to Trip.
49
Tip:
You can also select a street from the map by right-clicking on the street and
selecting Add as Trip Stop.
User Manual 05 CoPilot Central

05
CoPilot Central
Trip Options
You can set up your Trip Options to best suit you.
Press the Trip Options box on the left hand panel or select • Trip > Trip
Options.
The available settings are:
Profile:
Vehicle type choose from Auto or RV.•
Preferred route choose whether you want CoPilot Central to always •
choose the route quickest in time or the shortest in distance.
Tick the boxes to Avoid Tolls and/or keep International Borders Open •
on your route.
Roads:
Road Type: Set your road preferences using the slider controls to Avoid •
or Favour each road types when calculating a route.
Speed: Select an appropriate rural and urban speed for each road.•
Fuel:
Enter your fuel consumption details and CoPilot Central will calculate •
the estimated fuel cost for a trip.
50
User Manual 05 CoPilot Central

05
CoPilot Central
Transfer Trip from CoPilot Central to your mobile device
Once you have finished entering all your destinations, you can send your
trip from CoPilot Central to your mobile device to access at a later date.
Connect your mobile device to your PC using the synchonisation cable.•
Press the • Send Trip to Device button on the toolbar. Alternatively,
you can select Trip > Send to Mobile Device or simply press the
Send Trip to Device button in the left hand panel.
Select the destination drive associated with your mobile device •
and press OK.
Purchase upgrades
Choose Online from the menu to connect to the CoPilot website. Here you
can purchase licenses to other regional maps.
Find out more
There are help files available for CoPilot Central. Just click on Help > CoPilot
Help and select one of the options. Everything you need to know is just a click
away.
51
User Manual 05 CoPilot Central

06
Support
Support
Please visit www.alk.eu.com/support/ for technical support and to register
your CoPilot Live.
52
User Manual 06 Support

07
EULA
END-USER LICENCE AGREEMENT FOR COPILOT® SOFTWARE
Please read the following agreement (“Licence”) carefully.
Acceptance: Installation or use of the enclosed ALK Technologies, Inc. (“ALK”) software (the “Software”) on your
device constitutes your acceptance of these terms. If you do not agree to the terms of this Licence, you must
immediately delete the Software from your device and destroy any copies you made of the Software and of any
written materials relating to the Software, and promptly return the Software and, if bought as part of a package,
any associated devices to your retailer for a refund.
Licence: ALK grants you, as an individual, a non-exclusive, non-transferable right and licence to install and use
one copy of the Software on a single device at a time. If your Software includes CoPilot Central, you may install
and use the CoPilot Central portion on a different device than the CoPilot portion. Your licence to use the Software
is subject to you complying with the terms of this Licence. A licence is required for each installation of the
Software, unless the Software is (i) installed temporarily on a computer during the repair or maintenance of the
device on which the Software is normally installed and (ii) is immediately deleted from such device as soon as
those repairs or maintenance are complete. You may make one copy of the Software for backup purposes only.
Copyright: United States copyright law and international treaty provisions protect the Software. You agree that no
title to the intellectual property in the Software is transferred to you. You further acknowledge that title and
ownership rights will remain the exclusive property of ALK, and you will not acquire any rights to the Software
except as expressly set out in this licence. You agree that any copies of the Software will contain the same
proprietary notices that appear on and in the Software.
Prohibited Use: Unless you have ALK’s prior written permission, you may not (i) use, copy, modify, alter, or transfer
the Software or accompanying documentation, except as expressly permitted in this Licence; (ii) translate,
disassemble, decompile, or reverse engineer the Software (iii) sublicense or lease the Software or its
documentation; or (iv) use the Software in a multi-user or networked environment or on a rental basis or in a
time-sharing or computer service business.
the error, or (iii) accept a return and issue a refund through your retailer. The Limited Warranty is void if failure of
the Software has resulted from your fault, abuse, or misapplication. If we correct an error in the Software for you,
then the unexpired portion of the Limited Warranty period as at the date you informed us of the error will apply to
the corrected software once you have received the corrected version.
NO OTHER WARRANTIES: EXCEPT AS SET OUT IN THE LIMITED WARRANTY, ALK DOES NOT WARRANT THAT THE
SOFTWARE IS ERROR FREE. ALK DISCLAIMS ALL OTHER WARRANTIES WITH RESPECT TO THE SOFTWARE,
WHETHER EXPRESS OR IMPLIED, INCLUDING BUT NOT LIMITED TO IMPLIED WARRANTIES OF MERCHANTABILITY,
FITNESS FOR A PARTICULAR PURPOSE AND NON-INFRINGEMENT OF THIRD PARTY RIGHTS. Some jurisdictions
do not allow the exclusion of implied warranties or limits on how long an implied warranty may last, or an exclusion
of incidental damages. This means the above limitations or exclusions may not apply to you. This warranty gives
you specific legal rights and you may also have other rights depending on your country.
No Liability for indirect loss: In no event will ALK be liable to you for any loss of profit, wasted time, lost business or
for any incidental, or indirect loss of any kind arising out of the performance or use of the Software, even if ALK
has been advised of the possibility of such damages.
Termination: Without prejudice to its other rights, ALK may terminate this Licence if you fail to comply with these
terms and conditions. In that situation, you must destroy all copies of the Software.
Limitations on Export: You hereby expressly agree not to export or re-export the Software, in whole or in part, in
violation of any export laws or regulations of the United States.
DISCLOSURE FOR PRODUCTS CONTAINING CANADIAN POSTAL CODE AND/OR CANADIAN STREET-LEVEL DATA:
Based on Computer File(s) licensed from Statistics Canada. © Copyright, HER MAJESTY THE QUEEN IN RIGHT OF
CANADA, as represented by the Minister of Industry, Statistics Canada 2003. ALK Technologies, Inc. is an
Authorized User of selected Statistics Canada Computer File(s) and Distributor of derived Information Products
under Licensing Agreement 6147. No confidential information about an individual, family, household, organisation
or business has been obtained from Statistics Canada.
53
Limited Warranty: ALK warrants that the Software will perform substantially in accordance with the accompanying
written materials for a period of 30 days from the date of purchase. Any implied warranties relating to the
Software are limited to such 30 day period provided that limitation is permitted by applicable law.
End-User Remedies: If the Software does not conform to the “Limited Warranty” above, ALK’s entire liability and
your sole and exclusive remedy will be, at ALK’s option, either to (i) correct the error, or (ii) help you work around
User Manual 07 EULA
U.S. Government Restricted Rights: The Software is provided with restricted and limited rights. Use, duplication, or
disclosure by the U.S. Government is subject to restrictions as set forth in the appropriate subparagraphs of the
Commercial Computer – Restricted Rights clause at 48 C.F.R. 52.227-19 or in the appropriate subparagraphs of
the Rights in Technical Data and Computer Software clause at 252.227-7013 of the Defence Federal Acquisition
Regulations. The Copyright to the Software is held by ALK Technologies, Inc., 1000 Herrontown Road, Princeton,
NJ 08540 USA.

07
EULA
Choice of Law: This Licence is governed by the laws of England.
END USER LICENSE FOR SPEECH PLAYBACK
This license applies to the speech playback function included in your Software, if any.
Copyright (c) 2002, Xiph.org Foundation. Neither the name of the Xiph.org Foundation nor the names of its
contributors may be used to endorse or promote products derived from this software without specific prior written
permission.
THIS SOFTWARE IS PROVIDED BY THE COPYRIGHT HOLDERS AND CONTRIBUTORS ``AS IS’’ AND ANY EXPRESS
OR IMPLIED WARRANTIES, INCLUDING, BUT NOT LIMITED TO, THE IMPLIED WARRANTIES OF MERCHANTABILITY
AND FITNESS FOR A PARTICULAR PURPOSE ARE DISCLAIMED. IN NO EVENT SHALL THE FOUNDATION OR
CONTRIBUTORS BE LIABLE FOR ANY DIRECT, INDIRECT, INCIDENTAL, SPECIAL, EXEMPLARY, OR CONSEQUENTIAL
DAMAGES (INCLUDING, BUT NOT LIMITED TO, PROCUREMENT OF SUBSTITUTE GOODS OR SERVICES; LOSS OF
USE, DATA, OR PROFITS; OR BUSINESS INTERRUPTION) HOWEVER CAUSED AND ON ANY THEORY OF LIABILITY,
WHETHER IN CONTRACT, STRICT LIABILITY, OR TORT (INCLUDING NEGLIGENCE OR OTHERWISE) ARISING IN ANY
WAY OUT OF THE USE OF THIS SOFTWARE, EVEN IF ADVISED OF THE POSSIBILITY OF SUCH DAMAGE.
Restrictions. Except where you have been specifically licensed to do so by ALK, and without limiting the preceding
paragraph, you may not (a) use this Data with any products, systems, or applications installed or otherwise
connected to or in communication with vehicles, capable of vehicle navigation, positioning, dispatch, real time
route guidance, fleet management or similar applications; or (b) with or in communication with any positioning
devices or any mobile or wireless-connected electronic or computer devices, including without limitation cellular
phones, palmtop and handheld computers, pagers, and personal digital assistants or PDAs.
Warning. The Data may contain inaccurate or incomplete information due to the passage of time, changing
circumstances, sources used and the nature of collecting comprehensive geographic data, any of which may lead
to incorrect results.
No Warranty. This Data is provided to you “as is,” and you agree to use it at your own risk. ALK and its licensors
(and their licensors and suppliers) make no guarantees, representations or warranties of any kind, express or
implied, arising by law or otherwise, including but not limited to, content, quality, accuracy, completeness,
effectiveness, reliability, fitness for a particular purpose, usefulness, use or results to be obtained from this Data, or
that the Data or server will be uninterrupted or error-free.
54
END USER LICENSE AGREEMENT FOR NAVTEQ DATA
This licence applies to NAVTEQ data included in your Software, if any, as well as to NAVTEQ data you obtain
separately that is formatted for use with your Software.
The data (“Data”) is provided for your personal, internal use only and not for resale. It is protected by copyright,
and is subject to the following terms and conditions which are agreed to by you, on the one hand, and ALK
Technologies Inc. (“ALK”) and its licensors (including their licensors and suppliers) on the other hand.
© 2007 NAVTEQ. All rights reserved.
Personal Use Only. You agree to use this Data together with COPILOT for the solely personal, non-commercial
purposes for which you were licensed, and not for service bureau, time-sharing or other similar purposes.
Accordingly, but subject to the restrictions set forth in the following paragraphs, you may copy this Data only as
necessary for your personal use to (i) view it, and (ii) save it, provided that you do not remove any copyright notices
that appear and do not modify the Data in any way. You agree not to otherwise reproduce, copy, modify,
decompile, disassemble or reverse engineer any portion of this Data, and may not transfer or distribute it in any
form, for any purpose, except to the extent permitted by mandatory laws.
User Manual 07 EULA
Disclaimer of Warranty: ALK AND ITS LICENSORS (INCLUDING THEIR LICENSORS AND SUPPLIERS) DISCLAIM ANY
WARRANTIES, EXPRESS OR IMPLIED, OF QUALITY, PERFORMANCE, MERCHANTABILITY, FITNESS FOR A
PARTICULAR PURPOSE OR NON-INFRINGEMENT. Some States, Territories and Countries do not allow certain
warranty exclusions, so to that extent the above exclusion may not apply to you.
Disclaimer of Liability: ALK AND ITS LICENSORS (INCLUDING THEIR LICENSORS AND SUPPLIERS) SHALL NOT BE
LIABLE TO YOU: IN RESPECT OF ANY CLAIM, DEMAND OR ACTION, IRRESPECTIVE OF THE NATURE OF THE CAUSE
OF THE CLAIM, DEMAND OR ACTION ALLEGING ANY LOSS, INJURY OR DAMAGES, DIRECT OR INDIRECT, WHICH
MAY RESULT FROM THE USE OR POSSESSION OF THE INFORMATION; OR FOR ANY LOSS OF PROFIT, REVENUE,
CONTRACTS OR SAVINGS, OR ANY OTHER DIRECT, INDIRECT, INCIDENTAL, SPECIAL OR CONSEQUENTIAL
DAMAGES ARISING OUT OF YOUR USE OF OR INABILITY TO USE THIS INFORMATION, ANY DEFECT IN THE
INFORMATION, OR THE BREACH OF THESE TERMS OR CONDITIONS, WHETHER IN AN ACTION IN CONTRACT OR
TORT OR BASED ON A WARRANTY, EVEN IF ALK OR ITS LICENSORS HAVE BEEN ADVISED OF THE POSSIBILITY OF
SUCH DAMAGES. Some States, Territories and Countries do not allow certain liability exclusions or damages
limitations, so to that extent the above may not apply to you.

07
EULA
Export Control. You agree not to export from anywhere any part of the Data provided to you or any direct product
thereof except in compliance with, and with all licenses and approvals required under, applicable export laws, rules
and regulations.
Entire Agreement. These terms and conditions constitute the entire agreement between ALK (and its licensors,
including their licensors and suppliers) and you pertaining to the subject matter hereof, and supersedes in their
entirety any and all written or oral agreements previously existing between us with respect to such subject matter.
Governing Law. The above terms and conditions shall be governed by the laws of the Netherlands, without giving
effect to (i) its conflict of laws provisions, or (ii) the United Nations Convention for Contracts for the International
Sale of Goods, which is explicitly excluded. You agree to submit to the jurisdiction of the Netherlands for any and
all disputes, claims and actions arising from or in connection with the Data provided to you hereunder.
55
User Manual 07 EULA

Copyright © 2007. ALK Technologies Ltd. All rights reserved
 Loading...