

Page 1

Moderna - User Manual
1
Table of Contents
1. Safety precautions
2. What’s in the box ........................................3
3. Features.......................................................4
4. Initial setup..................................................5
4.1 Plug for power ..........................................5
4.2 Installation ................................................6
4.4 Loading media .........................................7
4.4.2 Inserting memory cards ......................7
4.4.3 Care of memory card (not included) ...8
4.5 Switching on or off the unit .......................8
5. General controls .........................................9
5.1 Front panel ...............................................9
5.2 Right panel ...............................................9
5.3 Remote control .........................................10
5.3.1 Notes on the remote control ...............10
6. Basic operations.........................................11
6.1 Main menu ...............................................11
6.2 Volume control .........................................11
6.3 Function menu .........................................12
7. Photo mode .................................................13
7.1 Accessing Photo mode ............................13
7.2 Selecting photos ......................................13
7.3 Auto tilting ................................................14
7.4 Photo function menu ................................14
8. Music mode .................................................15
8.1 Accessing Music mode ............................15
8.2 Selecting music ........................................15
8.3 Music function menu ................................16
8.4 Music playback mode ..............................16
9. Combo mode ...............................................17
9.1 Accessing Combo mode ..........................17
9.2 Selecting photos and music .....................17
9.3 Accessing photo and music function
menus ............................................................18
.....................................2
10. Video mode ...............................................19
10.1 Accessing Video mode ...........................19
10.2 Selecting video ......................................19
ideo function menu ..............................20
10.3 V
10.4 Video playback mode .............................20
11. Folder mode ..............................................21
11.1 Accessing Folder mode ..........................21
11.2 Selecting fi les .........................................21
12. Clock mode ...............................................23
12.1 Accessing Clock mode ...........................23
12.2 Clock display ..........................................23
12.3 Setting date and time .............................23
13. Setting Mode .............................................24
13.1 Accessing setting mode .........................24
13.2 Navigating in setting mode .....................24
13.3 Language ...............................................25
13.4 Slideshow Mode .....................................25
13.5 Picture Play Mode ..................................25
13.6 Music Repeat Mode ...............................25
13.7 Video Repeat Mode ...............................25
13.8 Display Mode .........................................25
13.9 Date .......................................................25
13.10 Time .....................................................25
13.10 Alarm ....................................................25
13.11 Brightness ............................................25
14. Troubleshooting .......................................26
15. Specifi cations ...........................................27
16. Limited warranty .......................................27
17. FCC notice.................................................28
Page 2

Moderna - User Manual
2
• Use only the included DC adaptor for power.
• Never open the cabinet under any circumstances. Any repairs or internal adjustments should
be made only by a qualifi ed service personnel.
• Never operate this product with the cabinet removed.
• Do not use your unit immediately after transporting it from a cold place to a warm place, as
condensation may cause the system to malfunction.
• Keep your unit away from humid areas and abnormally hot places.
• Do not touch the unit with wet hands. If any liquid enters the unit cabinet, take the unit to a
qualifi ed service personnel for inspection.
• No naked fl ame sources, such as lighted candles, should be placed on the unit.
• Disconnect the system from AC power before cleaning the exterior of the unit with a soft
clean cloth.
• DO NOT use liquid and gaseous detergent to clean the unit as it may cause damage to the
unit.
1. Safety precautions
Congratulations! With the purchase of an Ality Moderna digital photo frame, you are about
to begin the enjoyment of this multimedia player for the playback of digital photos, music
and movies. Please read these instructions carefully before starting operations. Following
the instructions in this manual will enable you to obtain optimum performance from your
Moderna digital photo frame. Please retain this manual for future reference.
Page 3

Moderna - User Manual
3
2. What’s in the box
Please check the following items are included in the package:
Moderna digital photo frame
Cradle
Remote control
Power adapter
USB cable
Quick start guide
User manual
Safety precautions / What’s in the box
VIDEO
Page 4

Moderna - User Manual
4
3. Features
Startup: Automatic start mode
Photo format supported: jpeg, bitmap
Photo display features:
• Photo browsing: thumbnail style (4x3)
• Automatic slideshow with 16 transition modes
• Selectable interval time between photos
• Slideshow with background music
• Zoom and pan mode
Audio format supported: mp3 , wave
Audio playback features:
• Play, stop and pause mode
• Repeat playback
Video format supported: avi
Memory card supported:
• MS (Memory Stick),
• SD (Secure Digital),
• MMC (Multimedia Card) and
• CF (Compact Flash) card
• xD-Picture Card
Remote control: infrared remote control
File extension of JPEG fi le is .jpg
File extension of bitmap fi le is
.bmp
File extension of mp3 fi le is .mp3
File extension of WAVE fi le is
.wav
Page 5

Moderna - User Manual
5
4. Initial setup
Bottom view of the cradle
4.1 Plug for power
Insert the adaptor cable plug to the receptor which is either
1) on the right side of the photo frame or 2) at the bottom of
the cradle. Connect the adaptor to the power outlet.
The photo frame is powered by the
adapter which can directly connect
with the frame or the cradle.
Adaptor
cable plug
Connect to
power outlet
Features / Initial setup
Right side of the photo frame
Cable plug
receptor
When charging with the cradle, make sure the charging
contacts of the photo frame are in contact with those of the
cradle. The charging contacts are located at the bottom and
left panels of the photo frame.
Charging contacts
Charging contacts
Bottom panel (for landscape position)
Left panel (for portrait position)
Photo frame
Cradle
Page 6

Moderna - User Manual
6
4.2 Installation
You may place the photo frame onto the cradle for power in
either portrait or landscape orientation.
Landscape position
Portrait position
Display will rotate automatically
for upright viewing according to
the orientation of the photo frame.
Page 7

Moderna - User Manual
7
4.4 Loading media
4.4.1Transferring fi les to the unit from your computer
To transfer fi les to the unit, switch off the unit and connect it
to your computer with a USB connection cable. The unit will
appear as a removable disc drive on your computer.
From Windows Explorer, highlight all the fi les/folders you
want to transfer to the unit and drag them to the drive letter
that is associated with it.
After transferring fi les, please turn off the unit, disconnect
the USB cable and power on the unit again. Such action
is necessary to resume the unit to normal operation mode
from PC-connection mode.
4.4.2 Inserting memory cards
You can insert either MS, CF, MMC, SD or xD memory
card or USB device into corresponding memory card slot or
USB connector. Refer to “Device mode” for selecting media
source.
The larger end of the USB cable
should be connected to the
computer while the smaller end
to the unit.
Attention:
Make sure all data are transferred
to the unit before unplugging the
USB connection. Refer to the
instructions of your computer
system for safely unplugging the
USB connection.
Initial setup
Memory Stick (MS),
Compact Flash (CF), Multimedia
Card (MMC), Secure Digital (SD)
card, xD-Picture Card (xD)
CF
MS / MMC /SD / xD
USB device
Page 8

Moderna - User Manual
8
4.4.3 Care of memory card (not included)
• Do not touch the golden electrodes.
• Use a soft dry cloth to clean any dirt.
• Do not bend memory cards.
• Do not operate or store the memory cards in places
with frequent static electricity or electrical noise (e.g.
speaker, TV set). Recorded data may be damaged.
• It is normal for memory card to get warm after being
used for a long time.
• Always put it in storage case after removing from the
unit.
• Do not store memory card near fi re, places with high
temperature/ humidity or in direct sunlight.
4.5 Switching on or off the unit
Slide the main power switch located on the right panel of the
unit to power on or off the unit.
If you have more than one media source in the unit, a selection menu will show. Press or on the remote control to
select your desired media source and then press ENTER to
start using the unit.
Refer to the following sections
for details on selecting fi les and
playback of various types of fi le.
Page 9

Moderna - User Manual
9
5. General controls
5.1 Front panel
5.2 Right panel
1 SD, MMC, MS, xD card slot
2 CF card slot
3 Main power switch
4 USB device connector
5 USB connection jack (for computer connection)
6 DC power input jack
1
2
3
4
5
6
General controls
Remote control sensor
Page 10
Moderna - User Manual
10
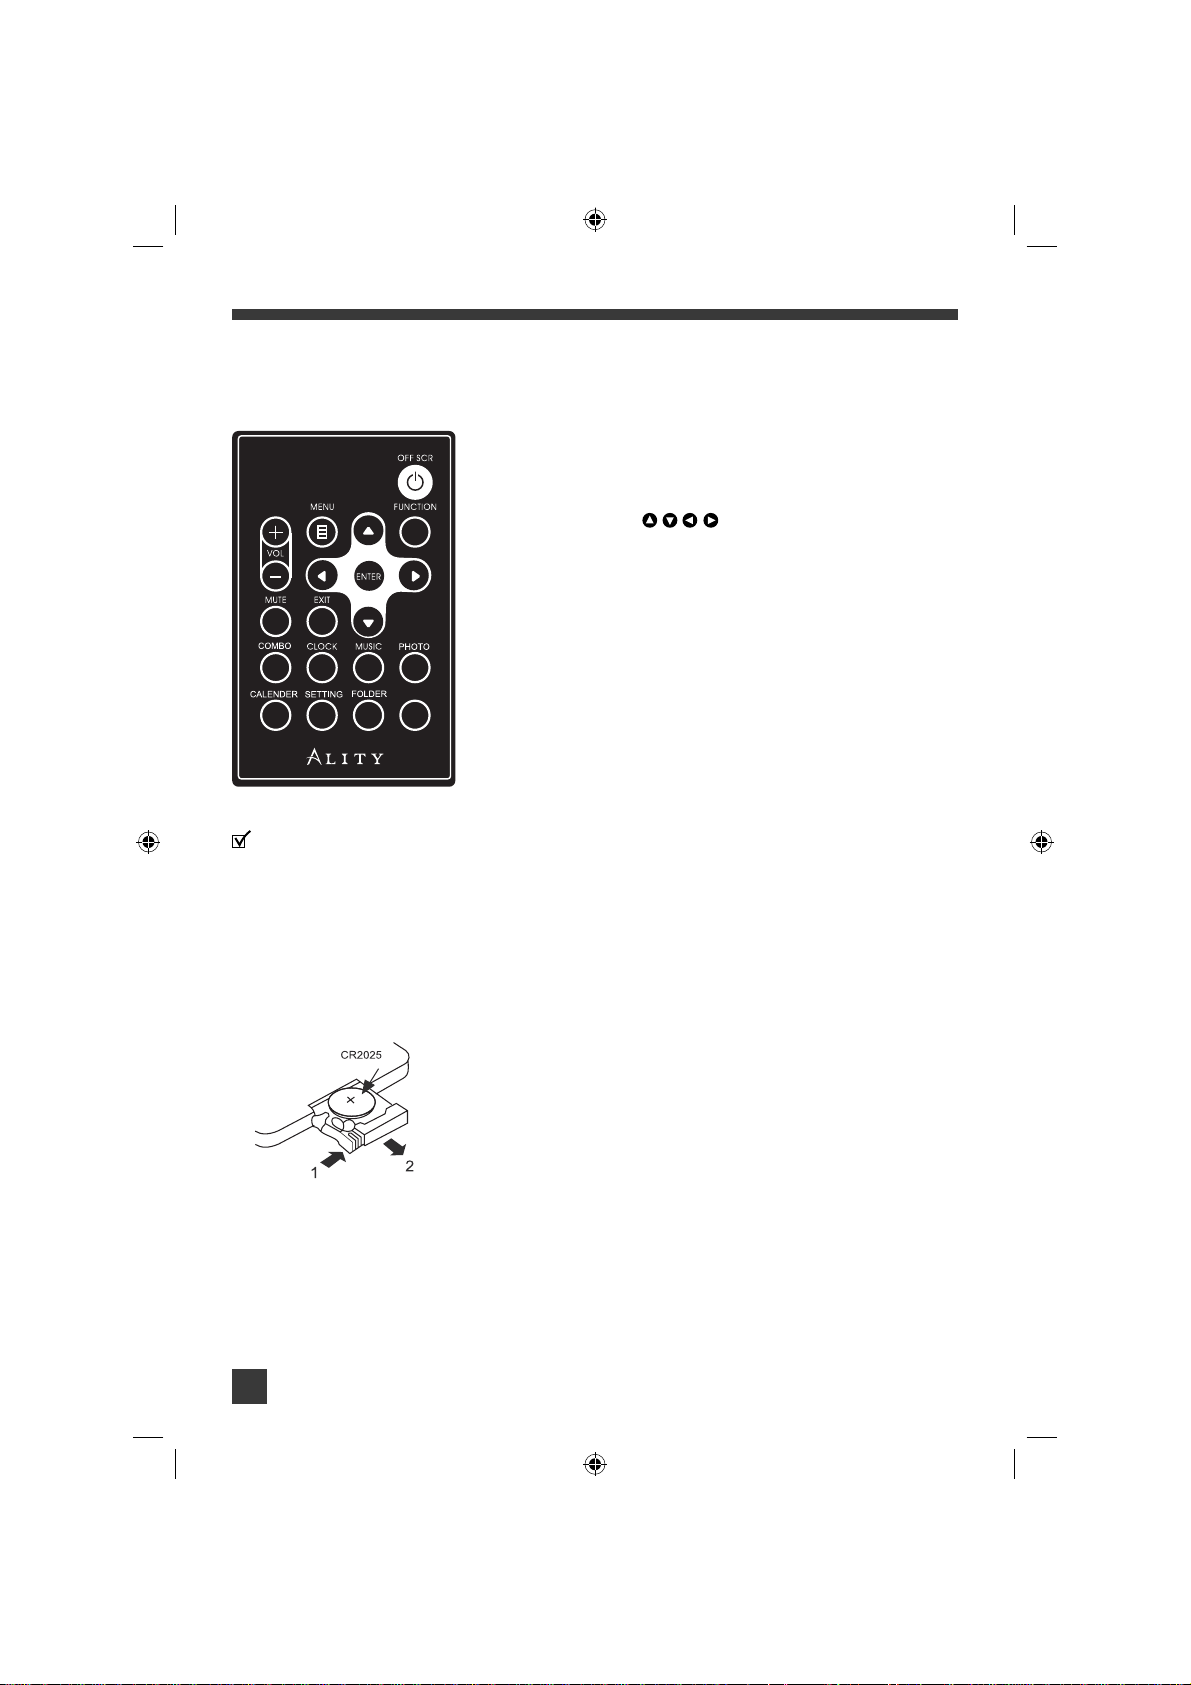
OFF SCR – turns the unit’s screen on or off
VOL + / – – increases or decreases volume
MENU – accesses the main menu
FUNCTION – accesses the function menu
Navigation keys (
) – moves in the indicated
direction during menu navigation
ENTER – confi rms selection
MUTE – mutes or restores the sound output
EXIT – returns to the previous screen
COMBO – starts photo slideshow and music playback in the
internal memory
CLOCK – accesses the clock display function
MUSIC – plays music fi les in the internal memory
PHOTO – plays photo fi les in the internal memory
CALENDER – accesses the clock display function (refer to
CLOCK)
SETTING – accesses the setting menu
FOLDER – accesses the folder mode in the internal memory
VIDEO – plays video fi les in the internal memory
5.3 Remote control
5.3.1 Notes on the remote control
• On the remote control, remove the plastic tab from the battery compartment before fi rst use.
• To replace battery, slide the release lock to the right and pull out the battery tray. (One button, type CR2025, battery required)
• When using the remote control, make sure you are pointing to the remote sensor located at
the front of the unit.
CAUTION
Danger of explosion if battery is incorrectly installed.
Replace only with the same or equivalent type of battery.
OFF SCR key only turns on or off the screen without switching off the power completely. The main power switch
is on the right panel (refer to section 4.4).
VIDEO
Page 11
Moderna - User Manual
11
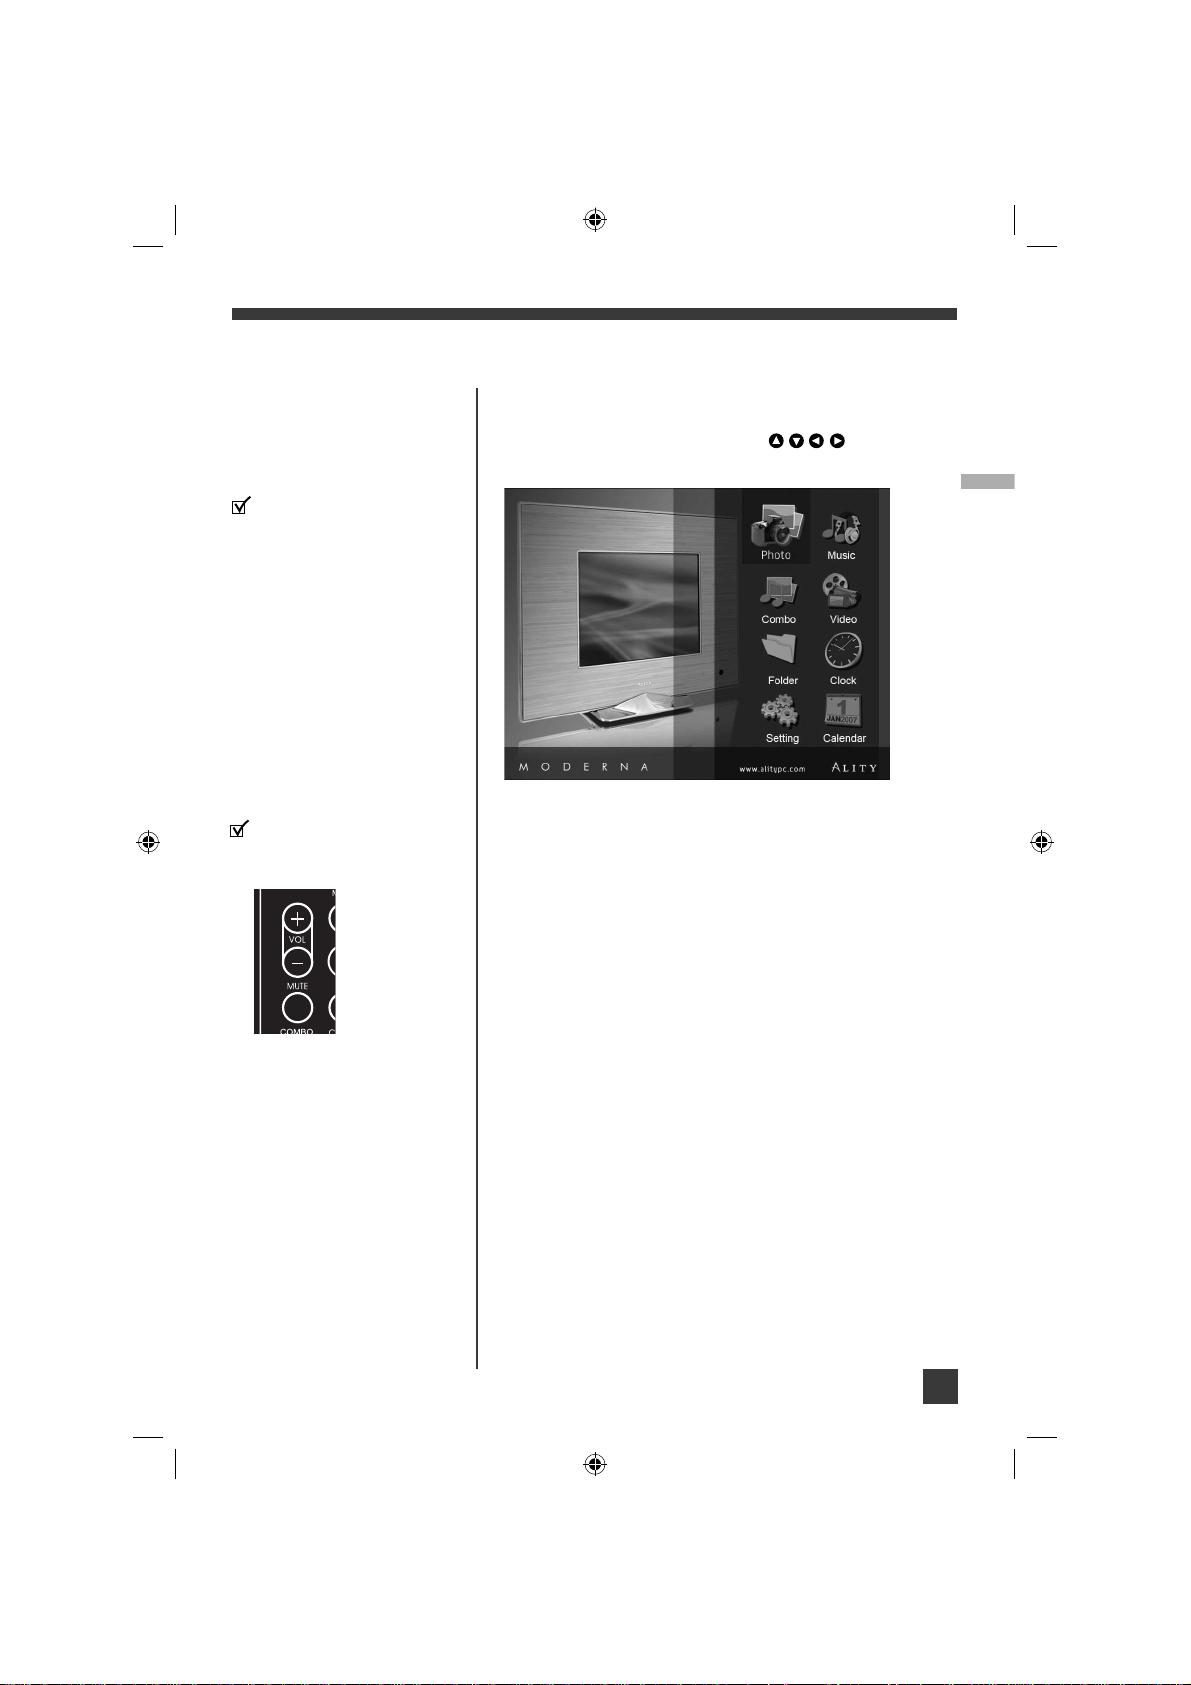
6.1 Main menu
Eight modes are available and shown on the main menu for
selection, use the navigation keys ( ) to select one
of them and press ENTER.
6.2 Volume control
• For media with sound output, press VOL + / – for
volume adjustment
• Press MUTE to mute sound output temporarily. Press
MUTE again to restore the sound output.
6. Basic operations
Main menu can be seen once
the unit is power on for selecting
a mode.
Available modes are:
Photo (section 7),
Music (section 8),
Combo (section 9),
Video (section 10),
Folder (section 11),
Clock (section 12), and
Setting (section 13).
Volume can only be controlled
on the remote control with the
volume and mute keys.
Basic operations
Page 12
Moderna - User Manual
12
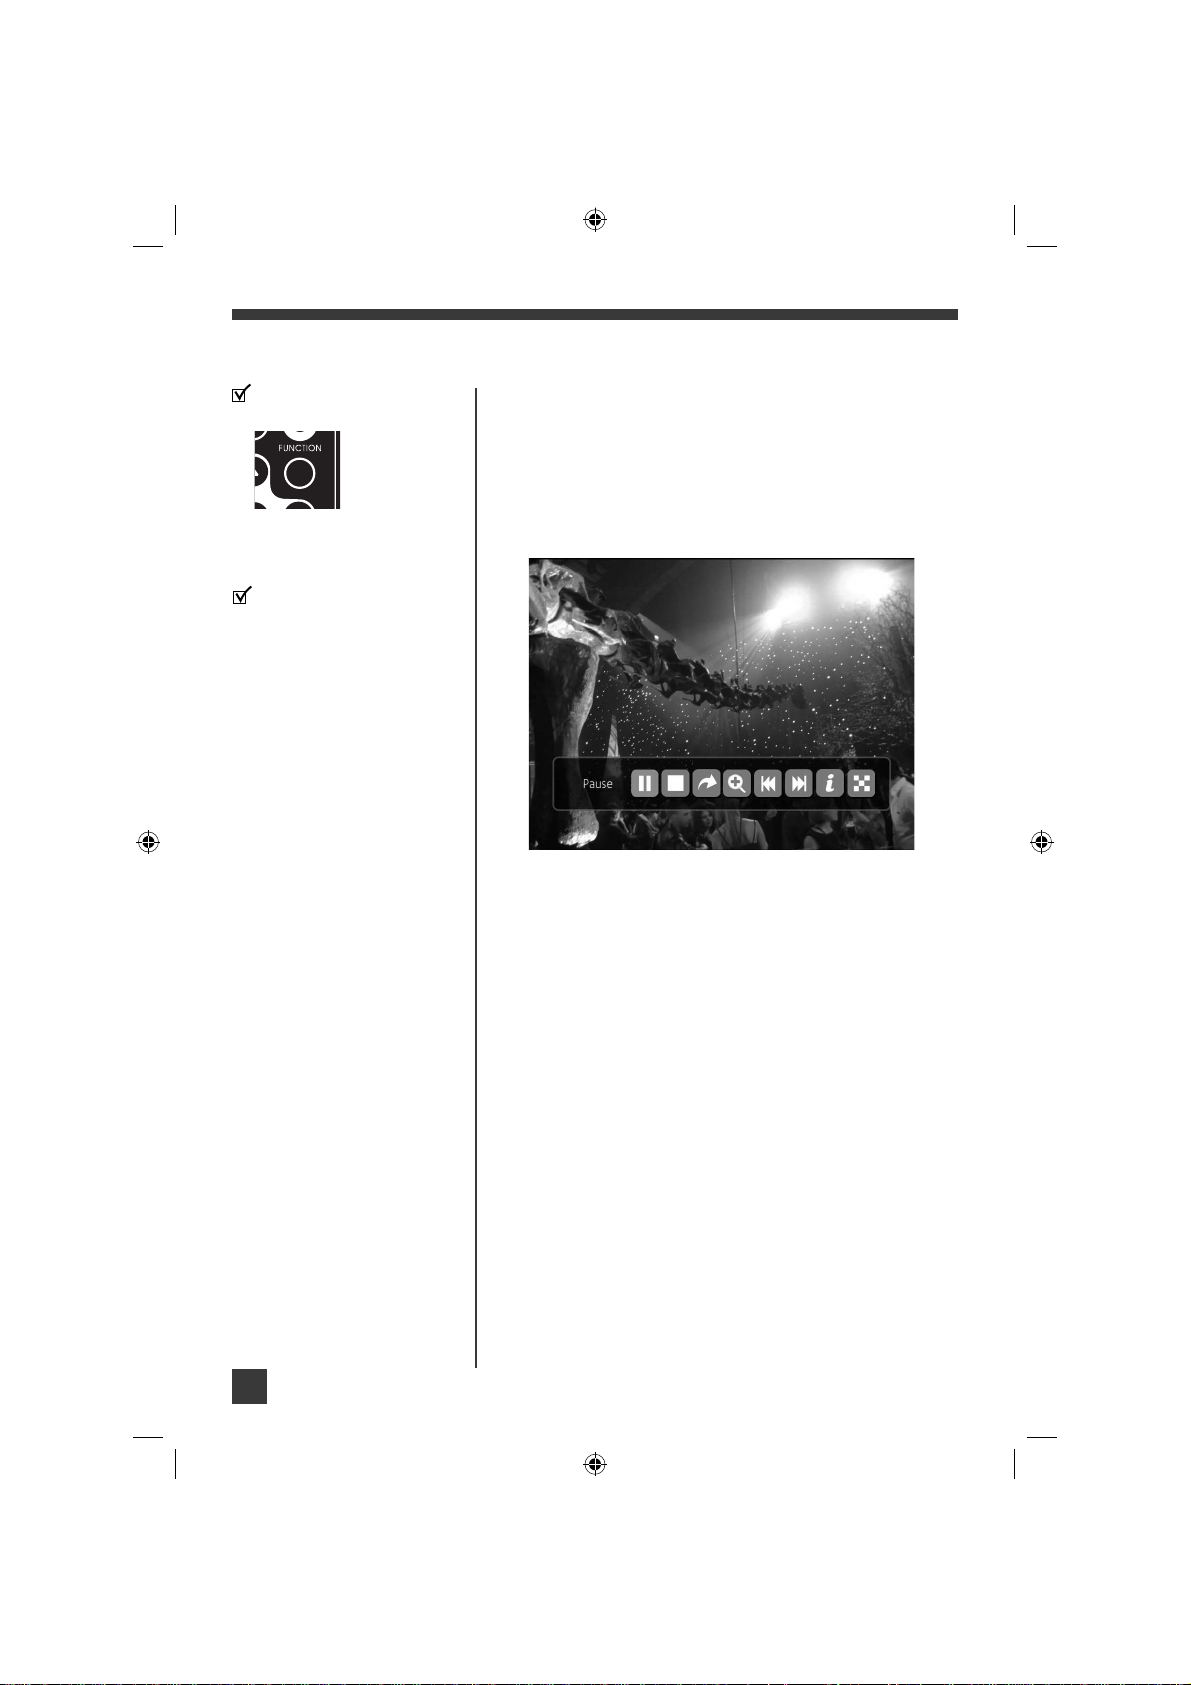
6.3 Function menu
• During playback of photos, music and movies, press
FUNCTION on the remote control to show the function
menu located at the bottom of the screen for more
features.
• The availability of features depends on the type of fi le
being played. Press or to select one of feature icons
and then press ENTER for selection.
An example of the function menu
shows at the bottom of the screen.
Press FUNCTION for more
features during playback.
Page 13
Moderna - User Manual
13
7. Photo mode
You can view digital photos (jpeg or bitmap) with this mode.
7.1 Accessing Photo mode
• In the main menu, use the navigation keys
( ) to select Photo mode and then press
ENTER.
OR
• Press PHOTO on the remote control to access this
mode directly.
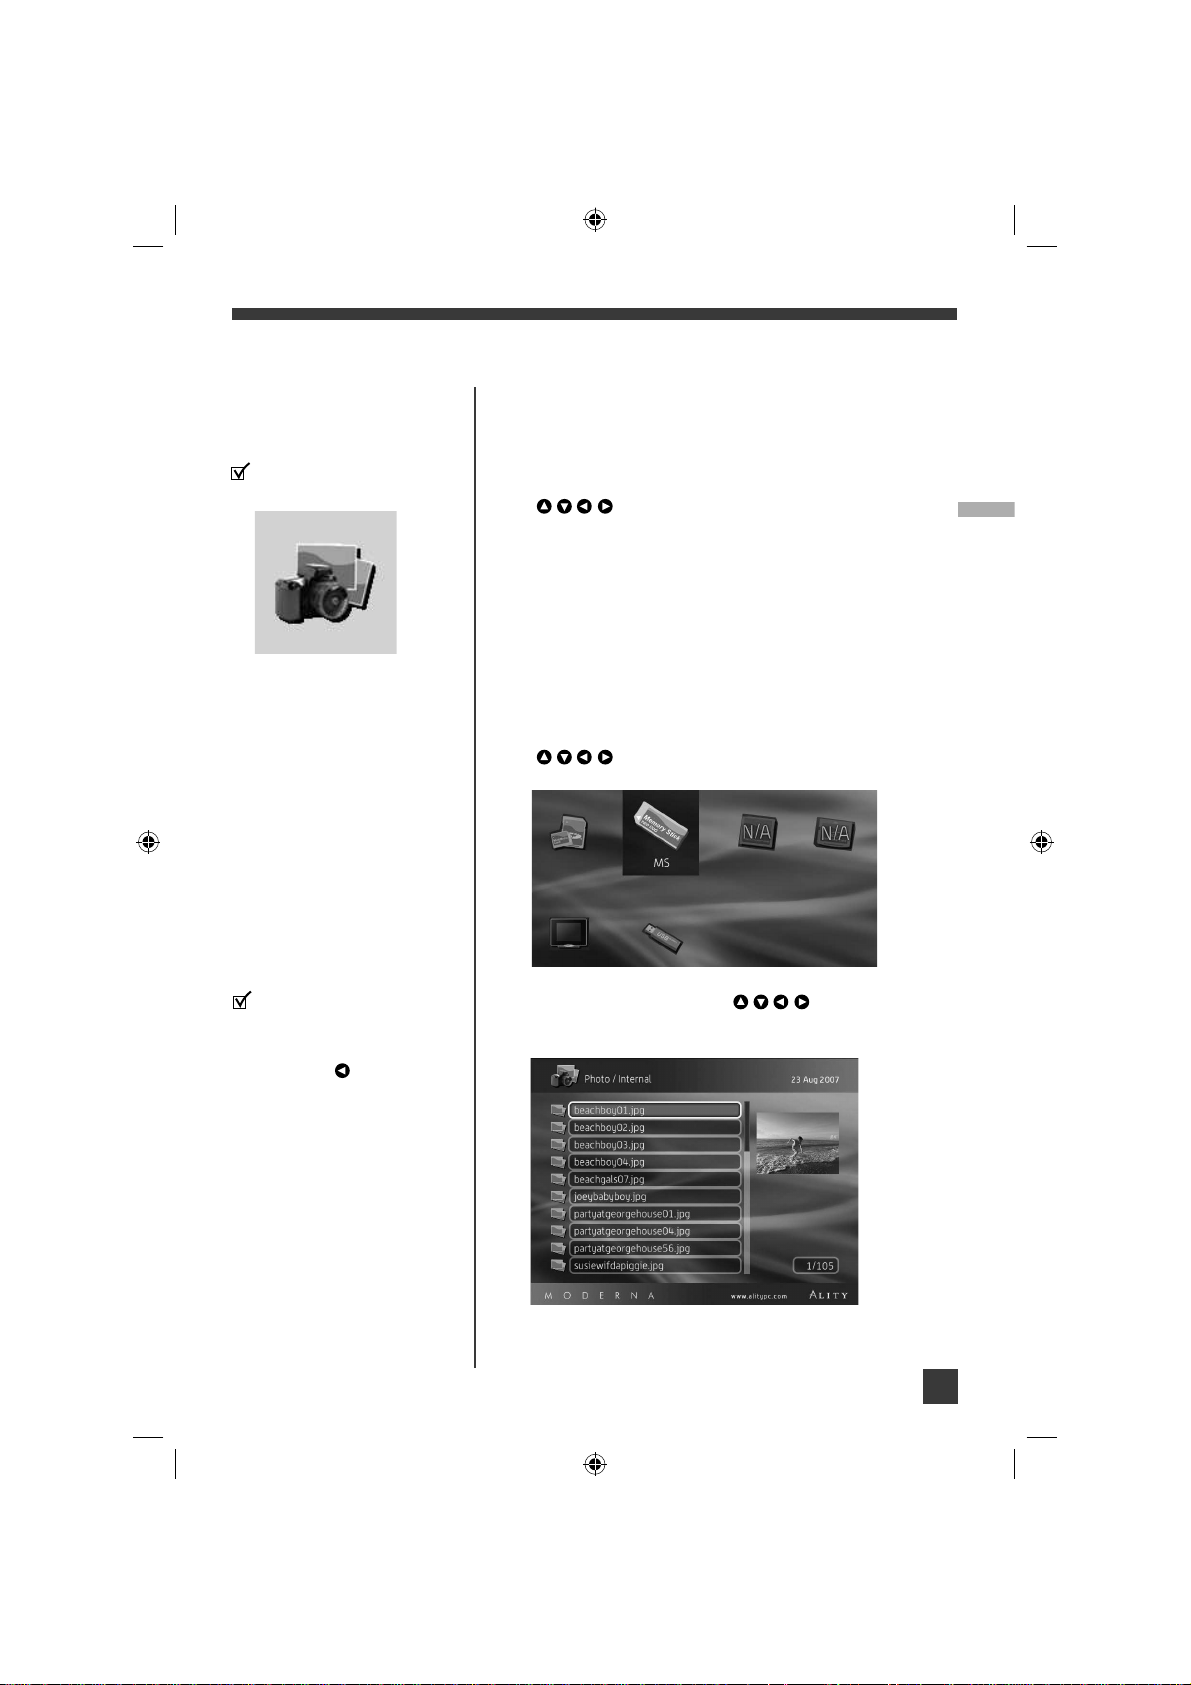
7.2 Selecting photos
1. In Photo mode, available media sources (e.g. SD or CF
card) are listed on the screen, press the navigation keys
( ) to select a desired one and then press
ENTER.
2. Files available in the selected media source are listed,
press the navigation keys ( ) to select a
desired fi le and then press ENTER to start slideshow
from the selected fi le.
In the main menu, select the
Photo mode icon as below:
Photo mode
If sub-folders exists in the selected
media source, select the subfolder and then press ENTER to
view its content. To exit the sub-
folder, press .
Page 14
Moderna - User Manual
14
7.3 Auto tilting
This photo frame is equipped with Auto Tilting function,
your photos will be displayed according to their orientation
(portrait or landscape).
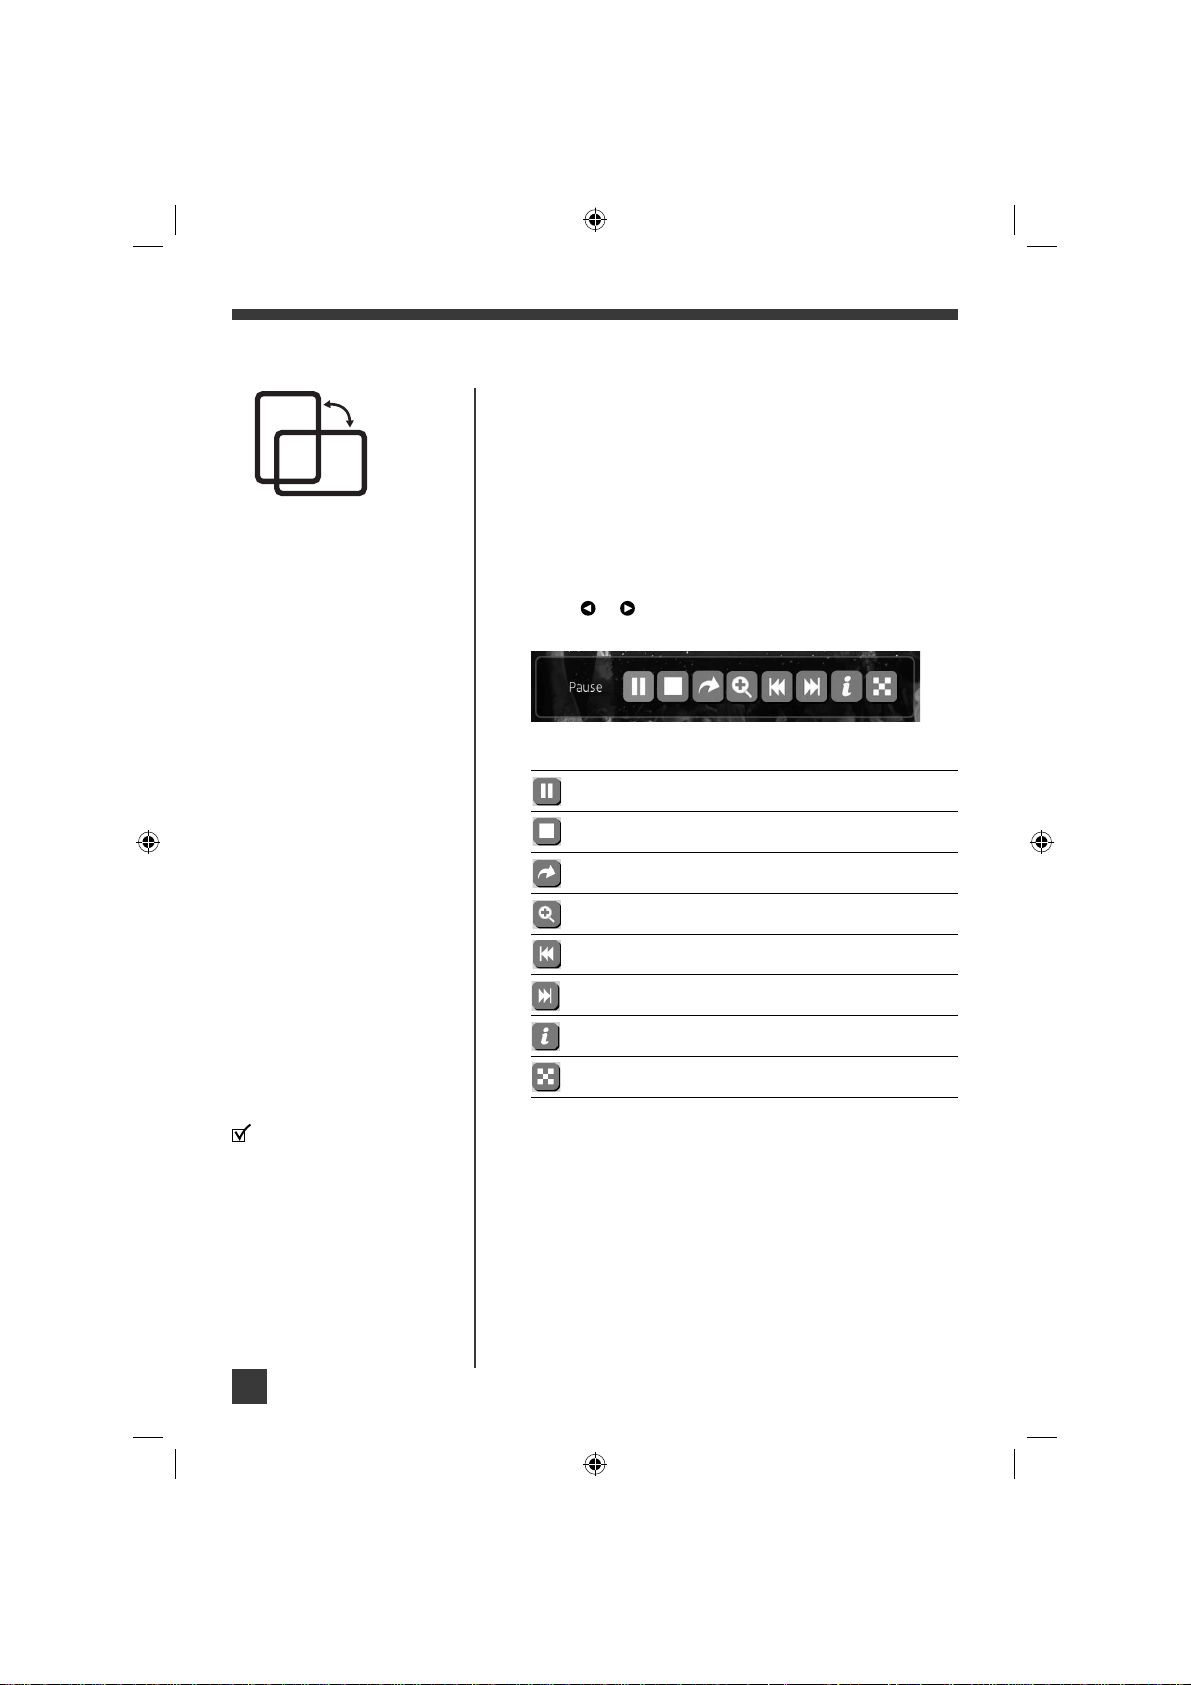
7.4 Photo function menu
1. During slideshow, press FUNCTION on the remote
control to show the function menu at the bottom of the
screen for more features.
2. Press or to highlight one of the feature icons and
then press ENTER to select the feature.
Refer to section 13.4 and 13.5
for slideshow settings including
slideshow time and transition
mode.
Icons
Features
Pauses slideshow
Stops playback
Rotates photo
Activates zoom mode (press ENTER repeatedly to select zoom sizes)
Goes to previous fi le
Goes to next fi le
Show or hides fi le information
Displays photos in thumbnail style
3. Press FUNCTION again to exit the function menu.
Page 15
Moderna - User Manual
15
8. Music mode
In the main menu, select the
Music mode icon as below:
You can play digital audio format fi les with this mode.
8.1 Accessing Music mode
• In the main menu, use the navigation keys
( ) to select Music mode and then press
ENTER.
OR
• Press MUSIC on the remote control to access this mode
directly.
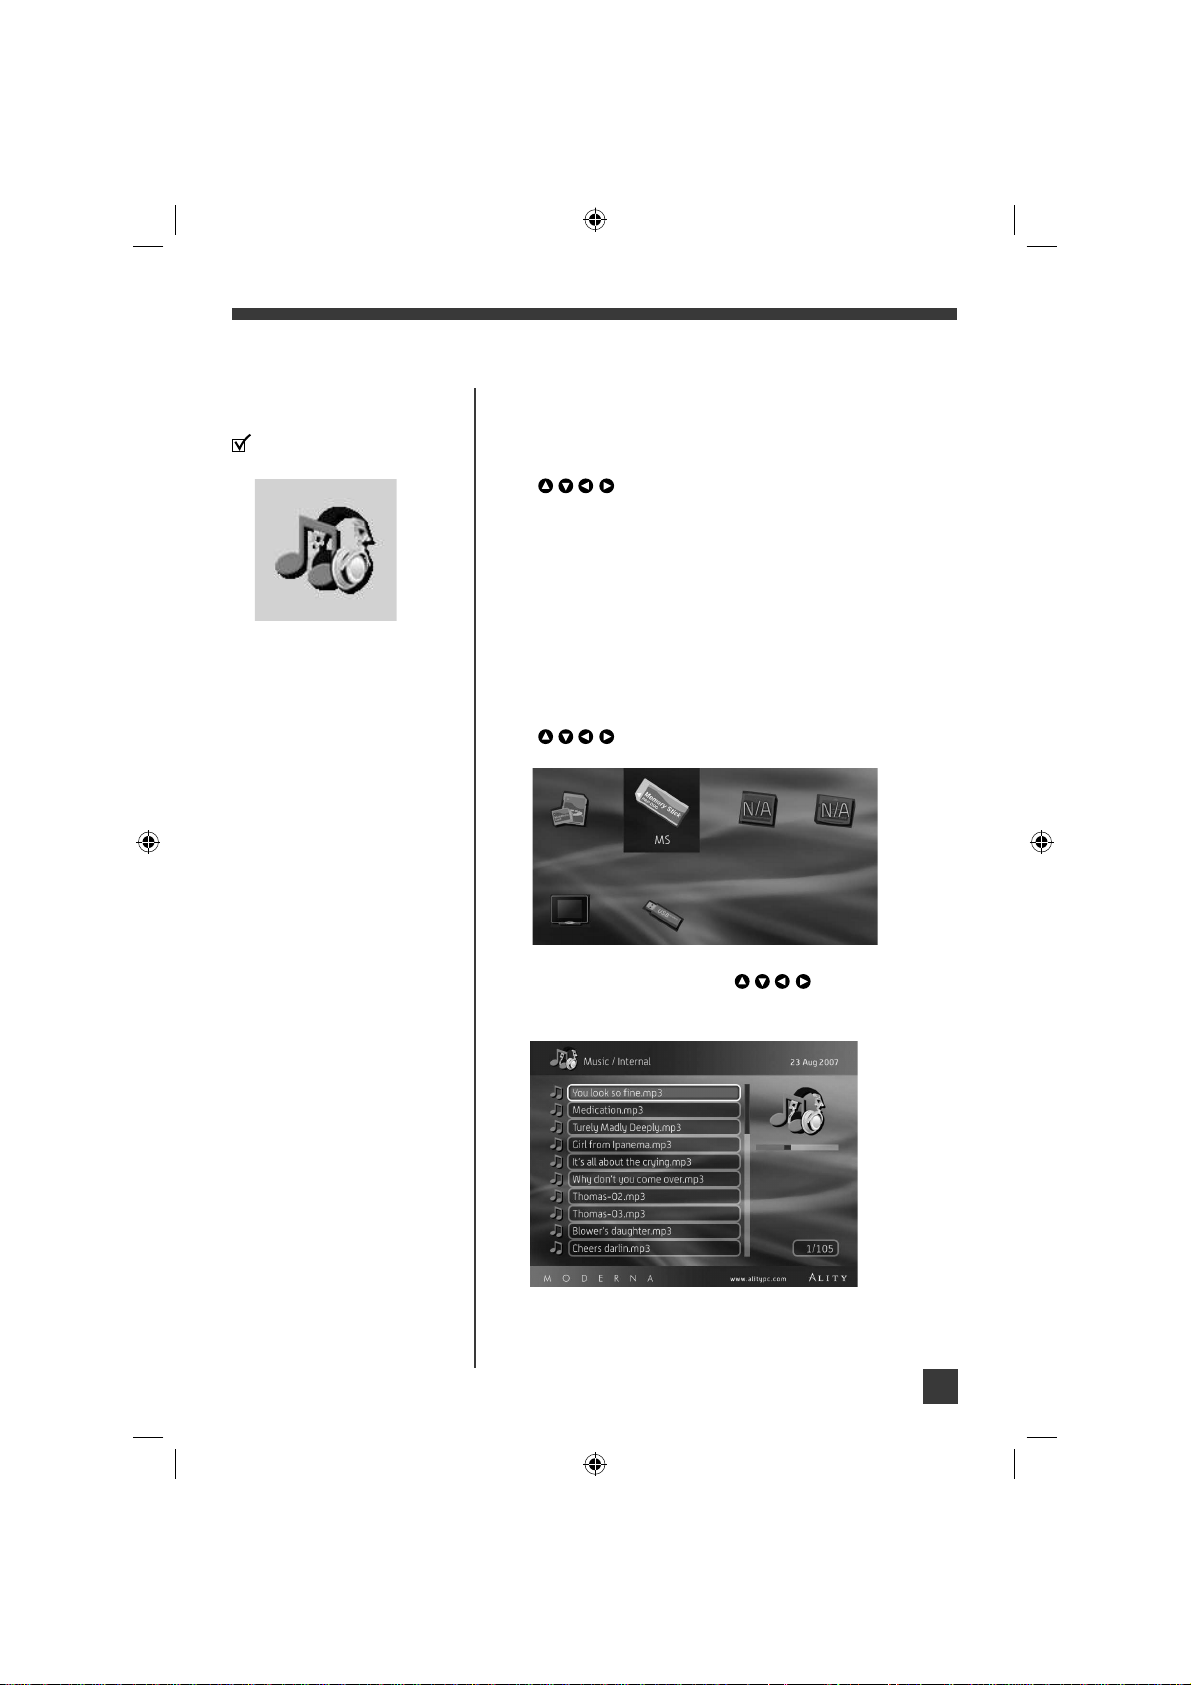
8.2 Selecting music
1. In Music mode, available media sources (e.g. SD or CF
card) are listed on the screen, press the navigation keys
( ) to select a desired one and then press
ENTER.
2. Files available in the selected media source are listed,
press the navigation keys ( ) to select a desired
fi le and then press ENTER to start playback of the
selected fi le.
Page 16
Moderna - User Manual
16
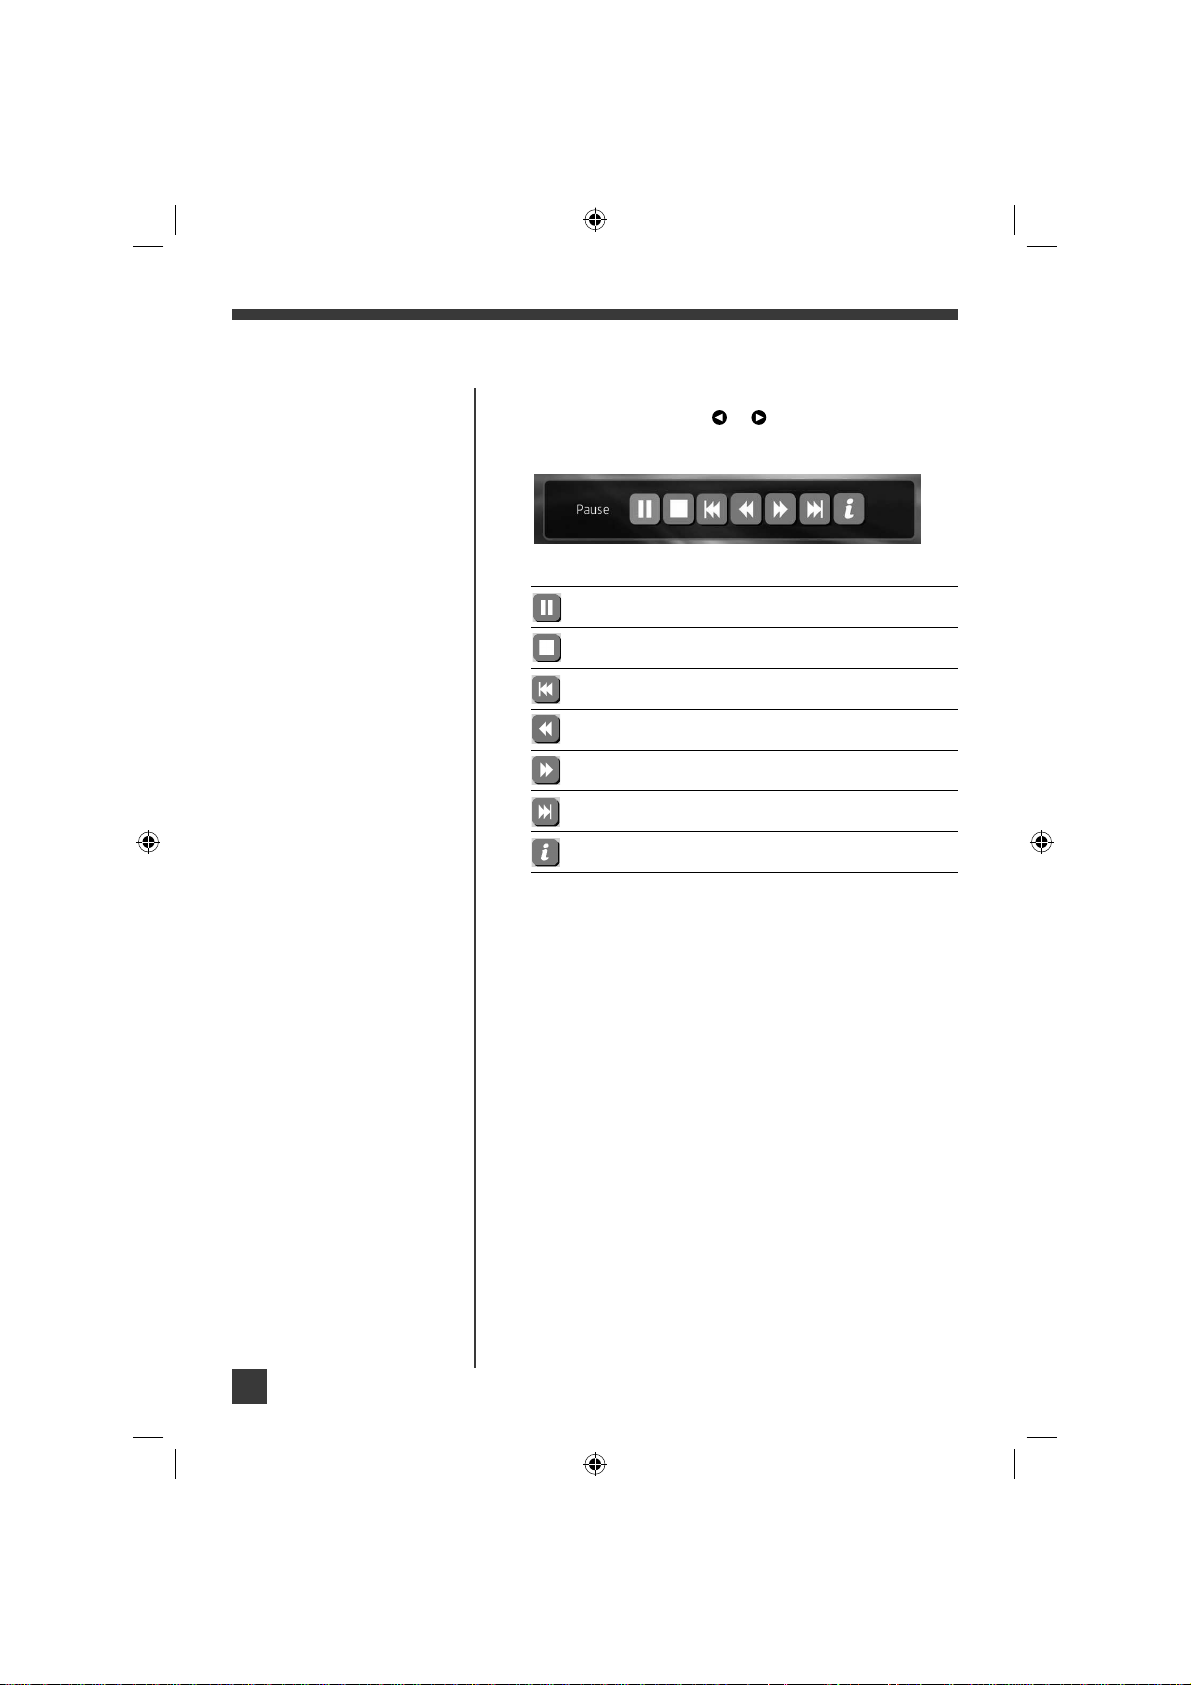
8.3 Music function menu
1. During playback, press or to highlight one of the
feature icons and then press ENTER to select the
feature.
Icons
Features
Pauses playback
Stops playback
Goes to previous fi le
Fast reverse playback
Fast forward playback
Goes to next fi le
Show or hides fi le information
2. Press FUNCTION again to exit the function menu.
8.4 Music playback mode
To activate repeat and random playback of music fi les.
Refer to section 13.6 for details.
Page 17
Moderna - User Manual
17
9. Combo mode
In the main menu, select the
Combo mode icon as below:
You can play both photo and music at the same time under
this mode.
9.1 Accessing Combo mode
• In the main menu, use the navigation keys
( ) to select Combo mode and then press
ENTER.
OR
• Press COMBO on the remote control to access this
mode directly.
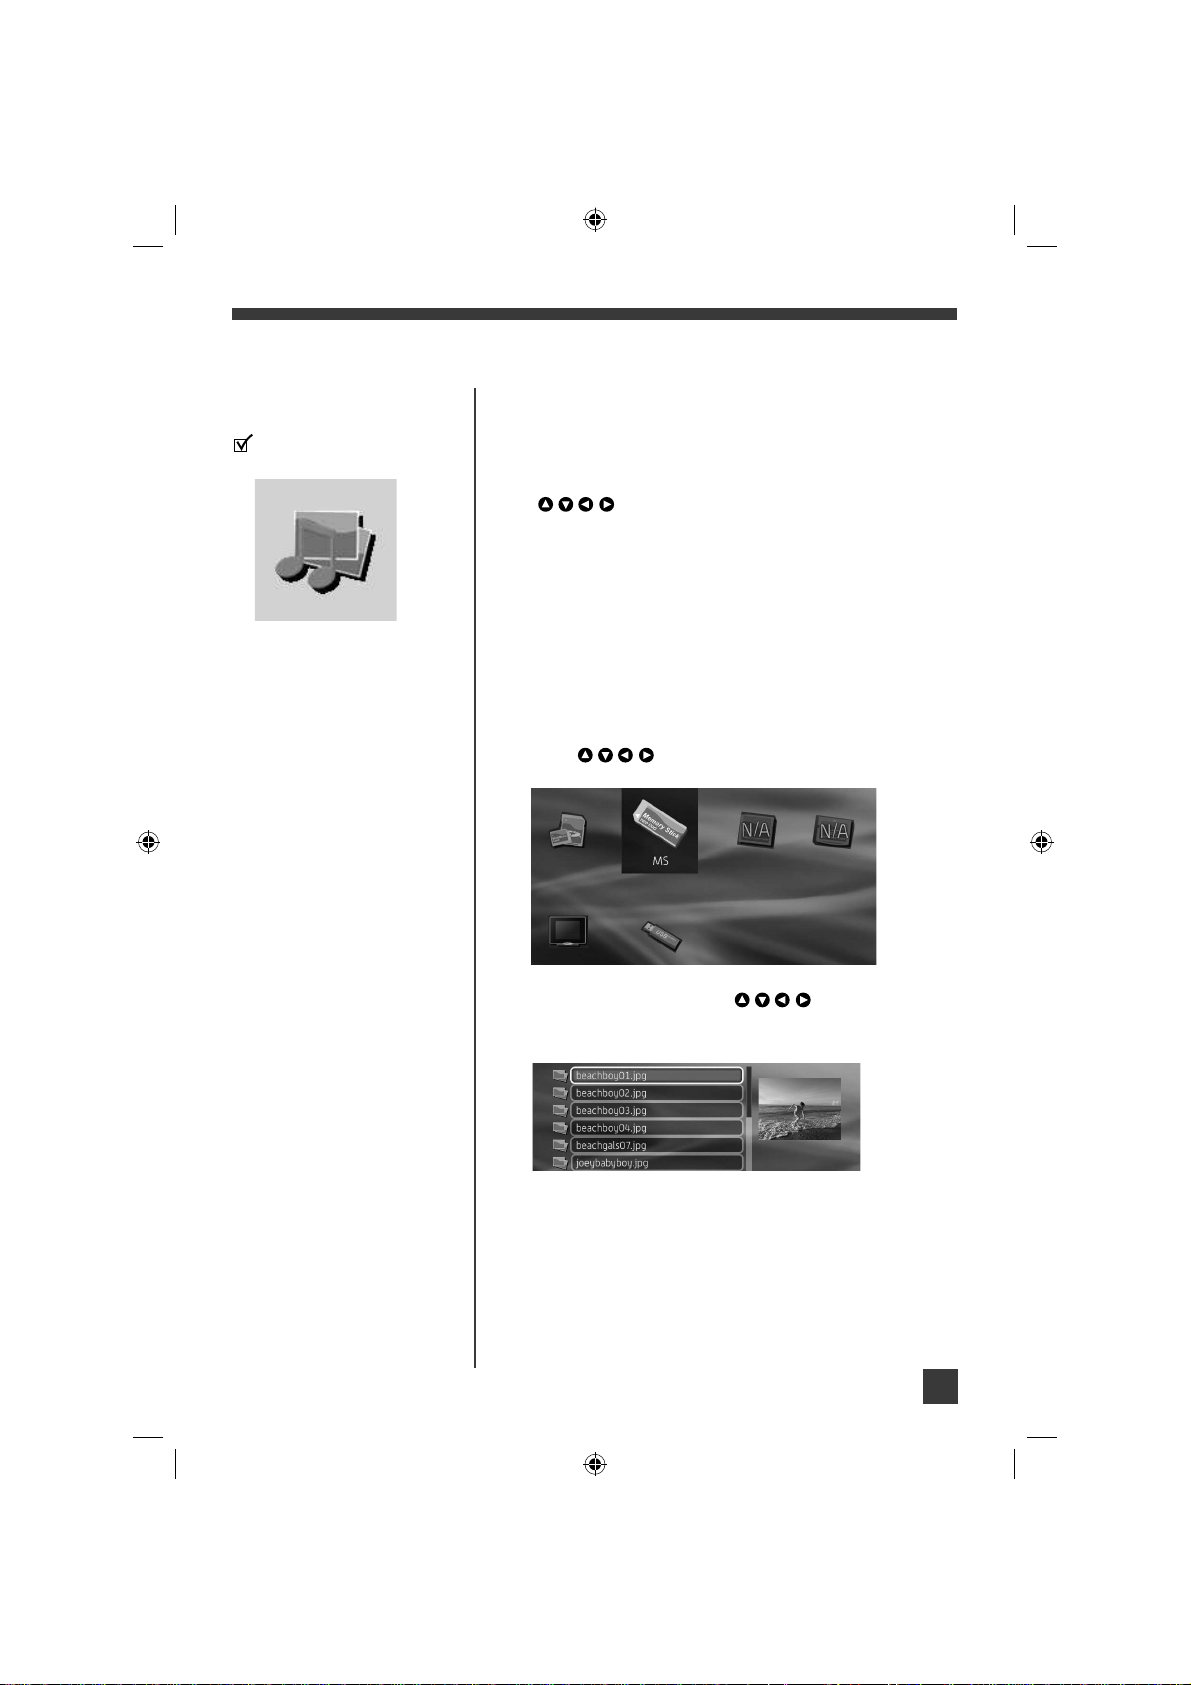
9.2 Selecting photos and music
1. In Combo mode, available media sources (e.g. SD or
CF card) are listed on the screen, press the navigation
keys ( ) to select a desired one and then press
ENTER.
2. Files available in the selected media source are listed,
press the navigation keys ( ) to fi rst select a
desired Photo/Music fi le and then press ENTER to start
slideshow from the selected fi le.
• To start slideshow with a specifi c photo fi le, select the
desired photo fi le fi rst and the fi rst music fi le in the
selected media source will then be played automatically
while the slideshow is playing.
• To start slideshow with a specifi c music fi le, select the
desired music fi le fi rst and the fi rst photo fi le in the
selected media source will then be played automatically
while the slideshow is playing.
Page 18
Moderna - User Manual
18
9.3 Accessing photo and music function
menus
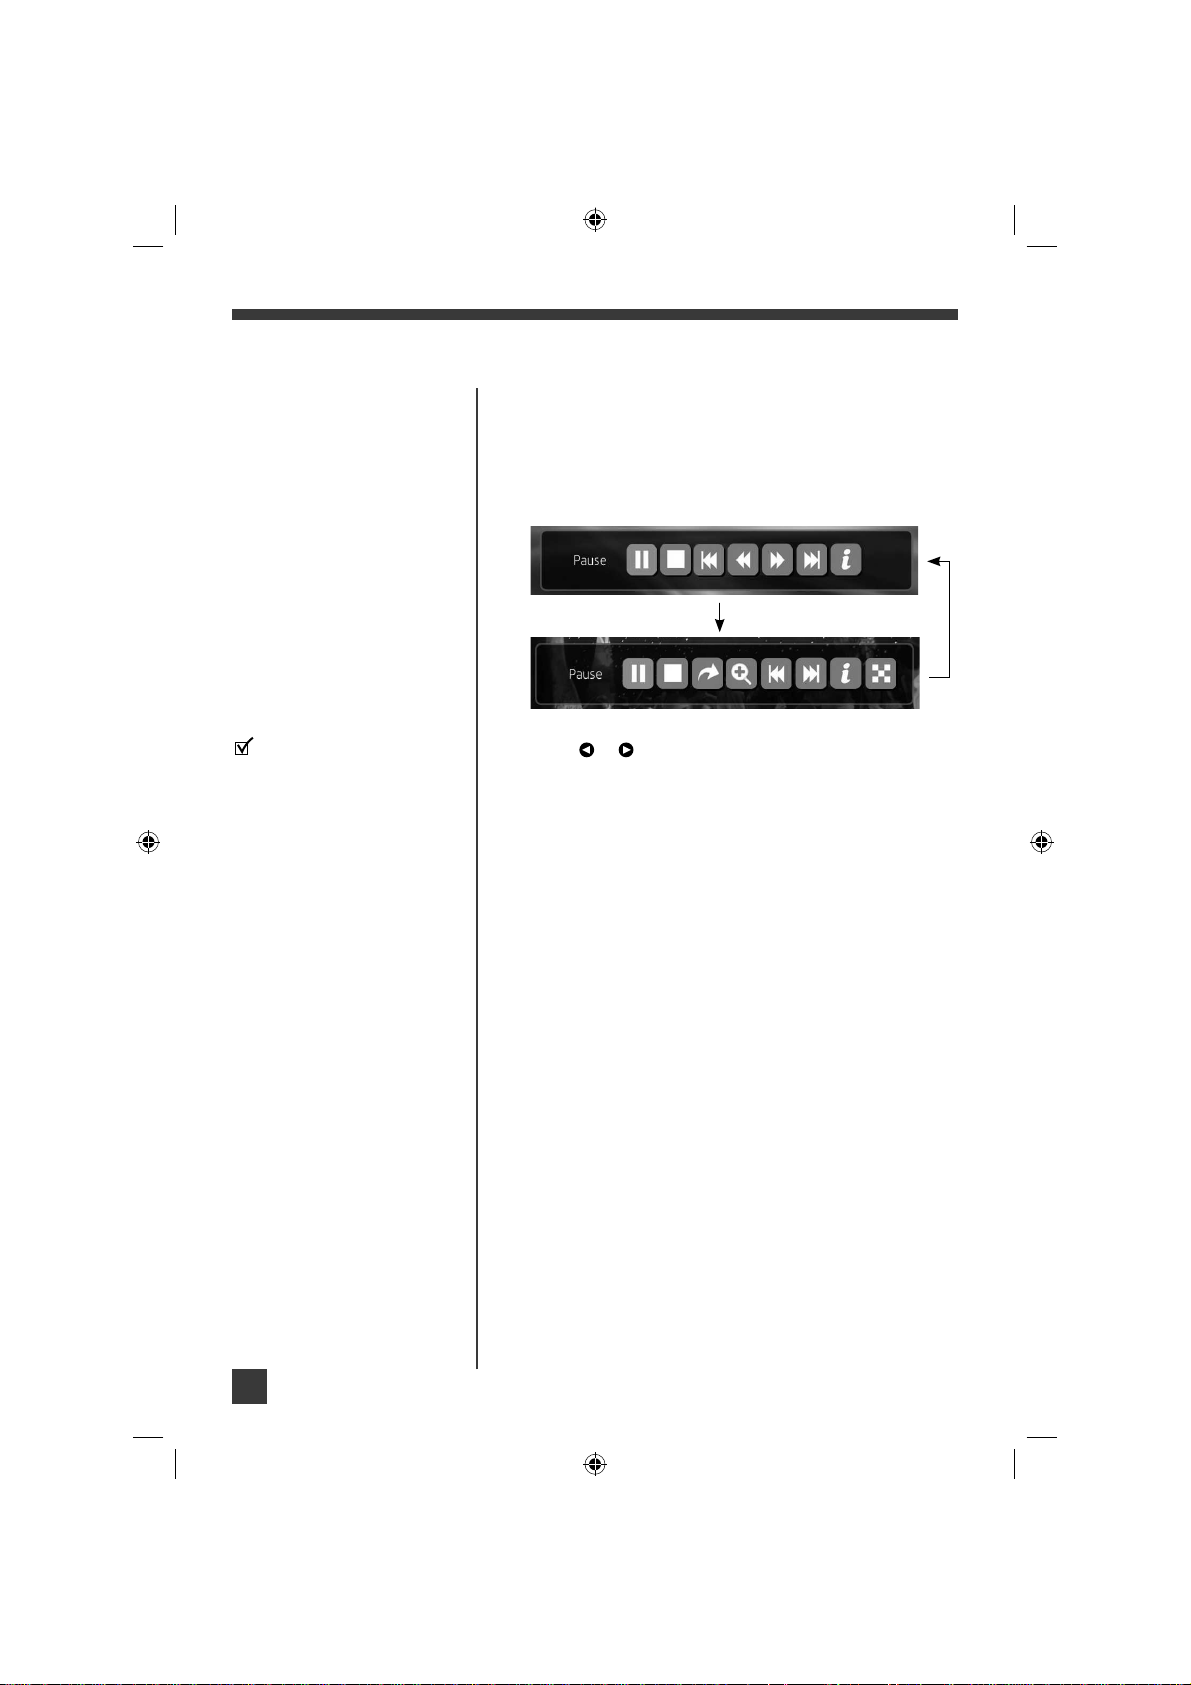
1. During playback, press FUNCTION repeatedly on the
remote control to show the photo or music function
menu at the bottom of the screen for more features.
2. Press or to highlight one of the feature icons and
then press ENTER to select the feature.
Refer to section 7.4 for details on
Photo function menu.
Refer to section 8.3 for details on
Music function menu.
Music function menu
Photo function menu
Page 19
Moderna - User Manual
19
10. Video mode
In the main menu, select the
Video mode icon as below:
Video mode lets you watch digital movies from the unit.
10.1 Accessing Video mode
• In the main menu, use the navigation keys
) to select Video mode and then press
ENTER.
• Press VIDEO on the remote control to access this mode
directly.
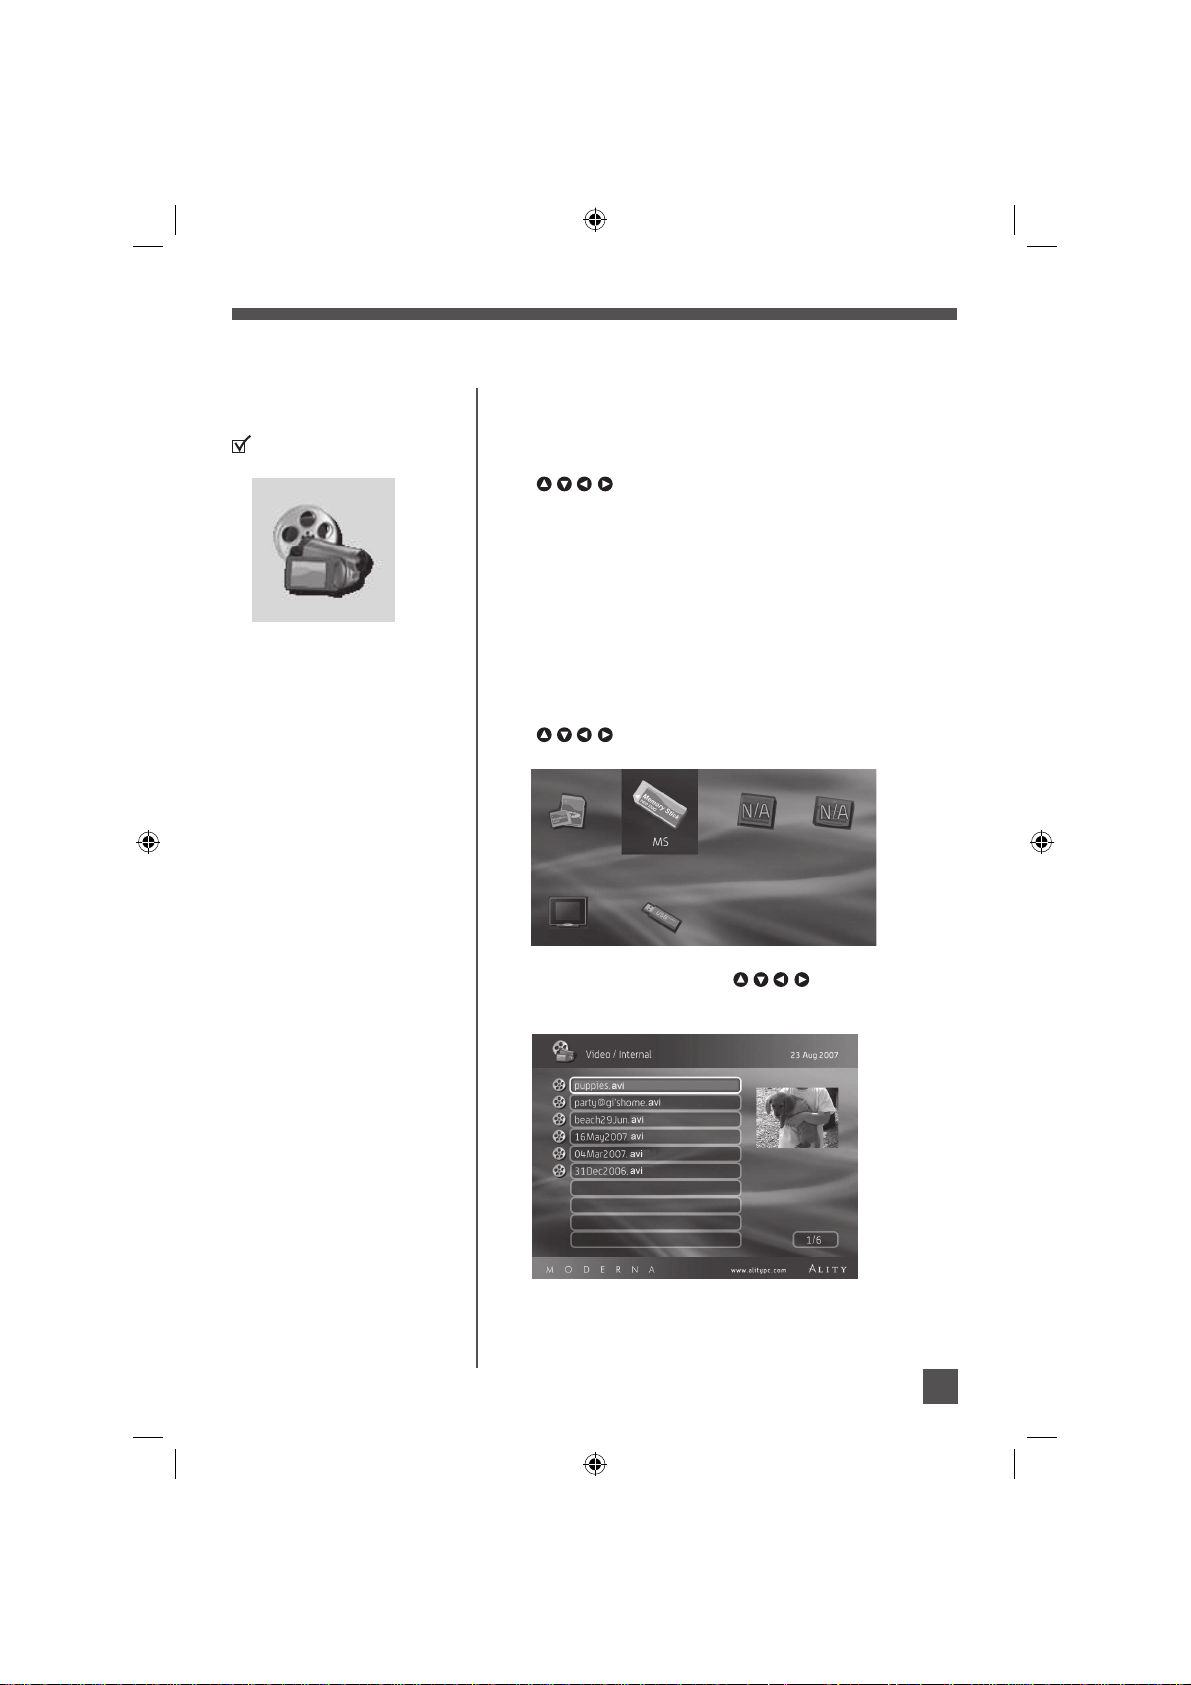
10.2 Selecting video
1. In Video mode, available media source (e.g. SD or CF
card) are listed on the screen, press the navigation keys
(
) to select a desired one and then press
ENTER.
2. Files available in the selected media source are listed,
press the navigation keys (
) to select a desired
selected file.
(
OR
files and then press ENTER to start playback of the
Page 20
Moderna - User Manual
20
10.3 Video function menu
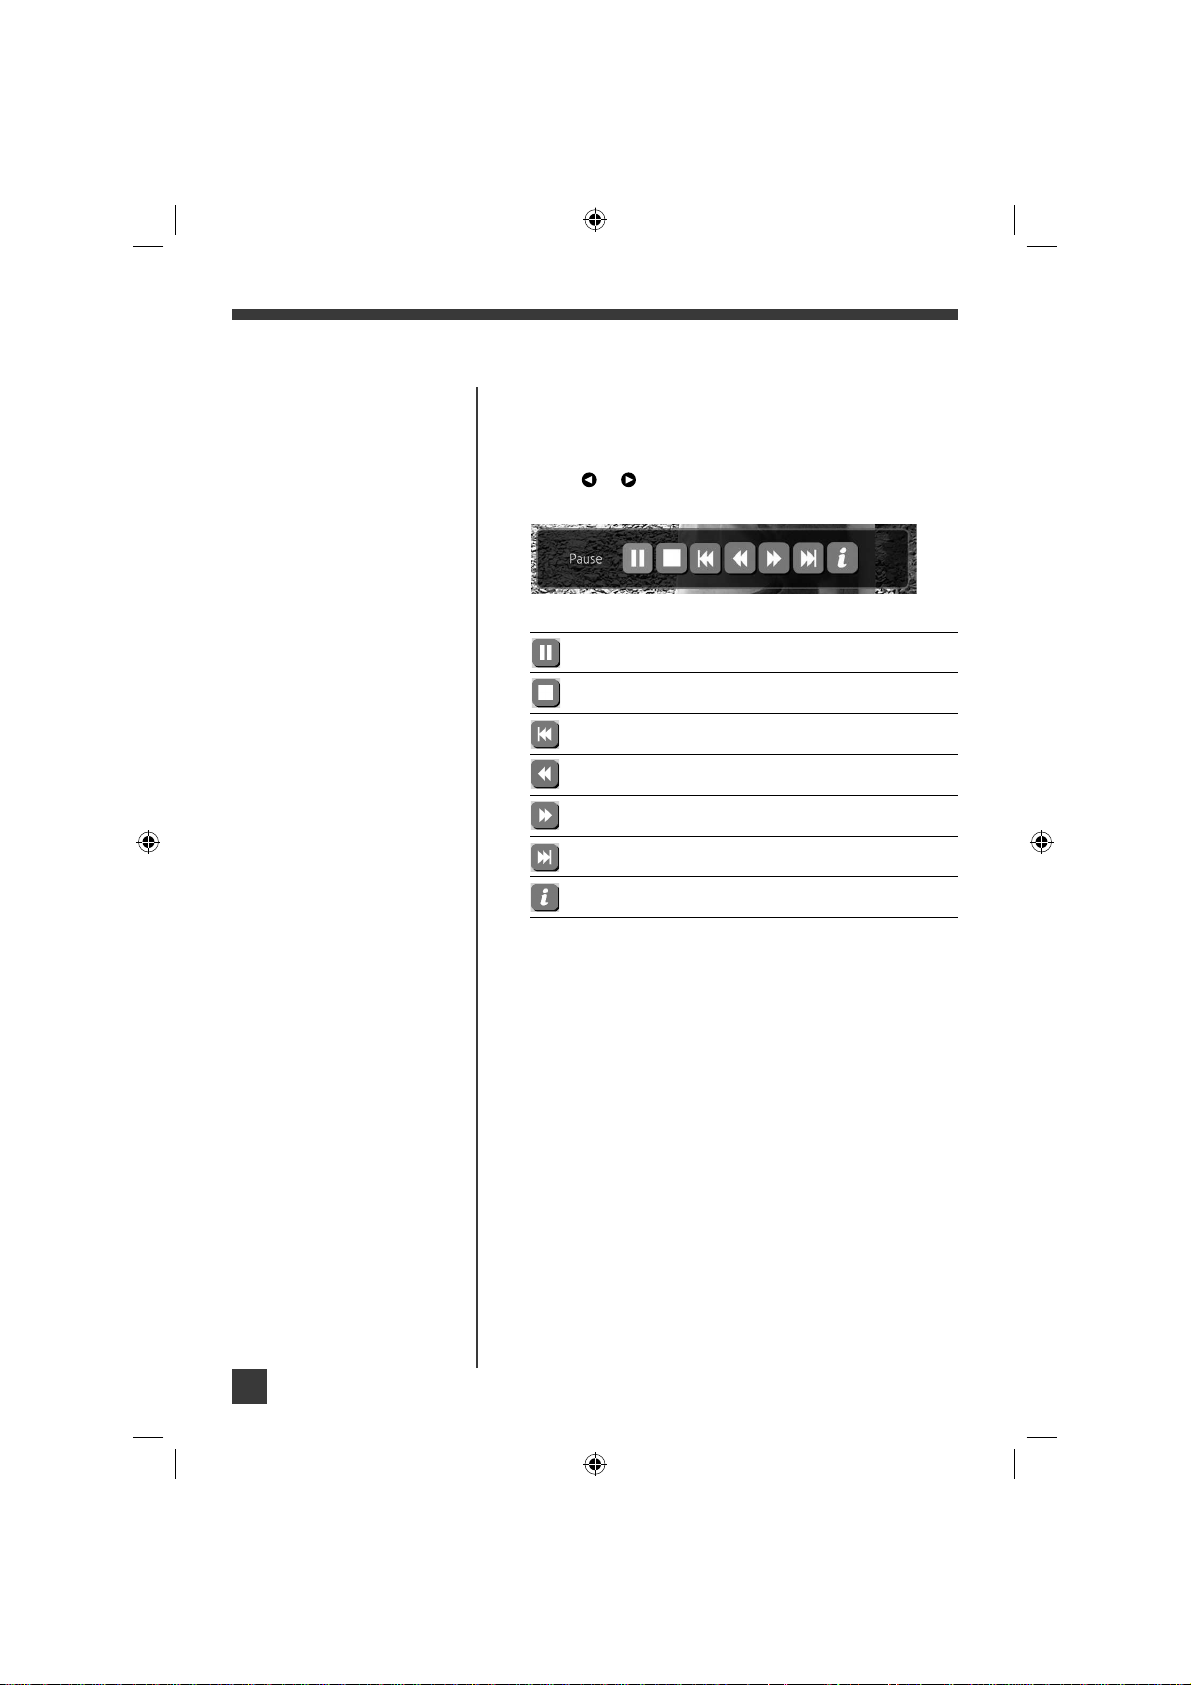
1. During playback, press FUNCTION on the remote
control to show the function menu at the bottom of the
screen for more features.
2. Press or to highlight one of the feature icons and
then press ENTER to select the feature.
Icons
Features
Pauses playback
Stops playback
Goes to previous fi le
Fast reverse playback
Fast forward playback
Goes to next fi le
Show or hides fi le information
3. Press FUNCTION again to exit the function menu.
10.4 Video playback mode
To activate repeat and random playback of video fi les. Refer
to section 13.7 for details.
Page 21
Moderna - User Manual
21
In the main menu, select the
Folder mode icon as below:
11. Folder mode
Folder mode lets you browse the fi le directory for fi le
searching.
11.1 Accessing Folder mode
• In the main menu, use the navigation keys
( ) to select Folder mode and then press
ENTER.
OR
• Press FOLDER on the remote control to access this
mode directly.
11.2 Selecting fi les
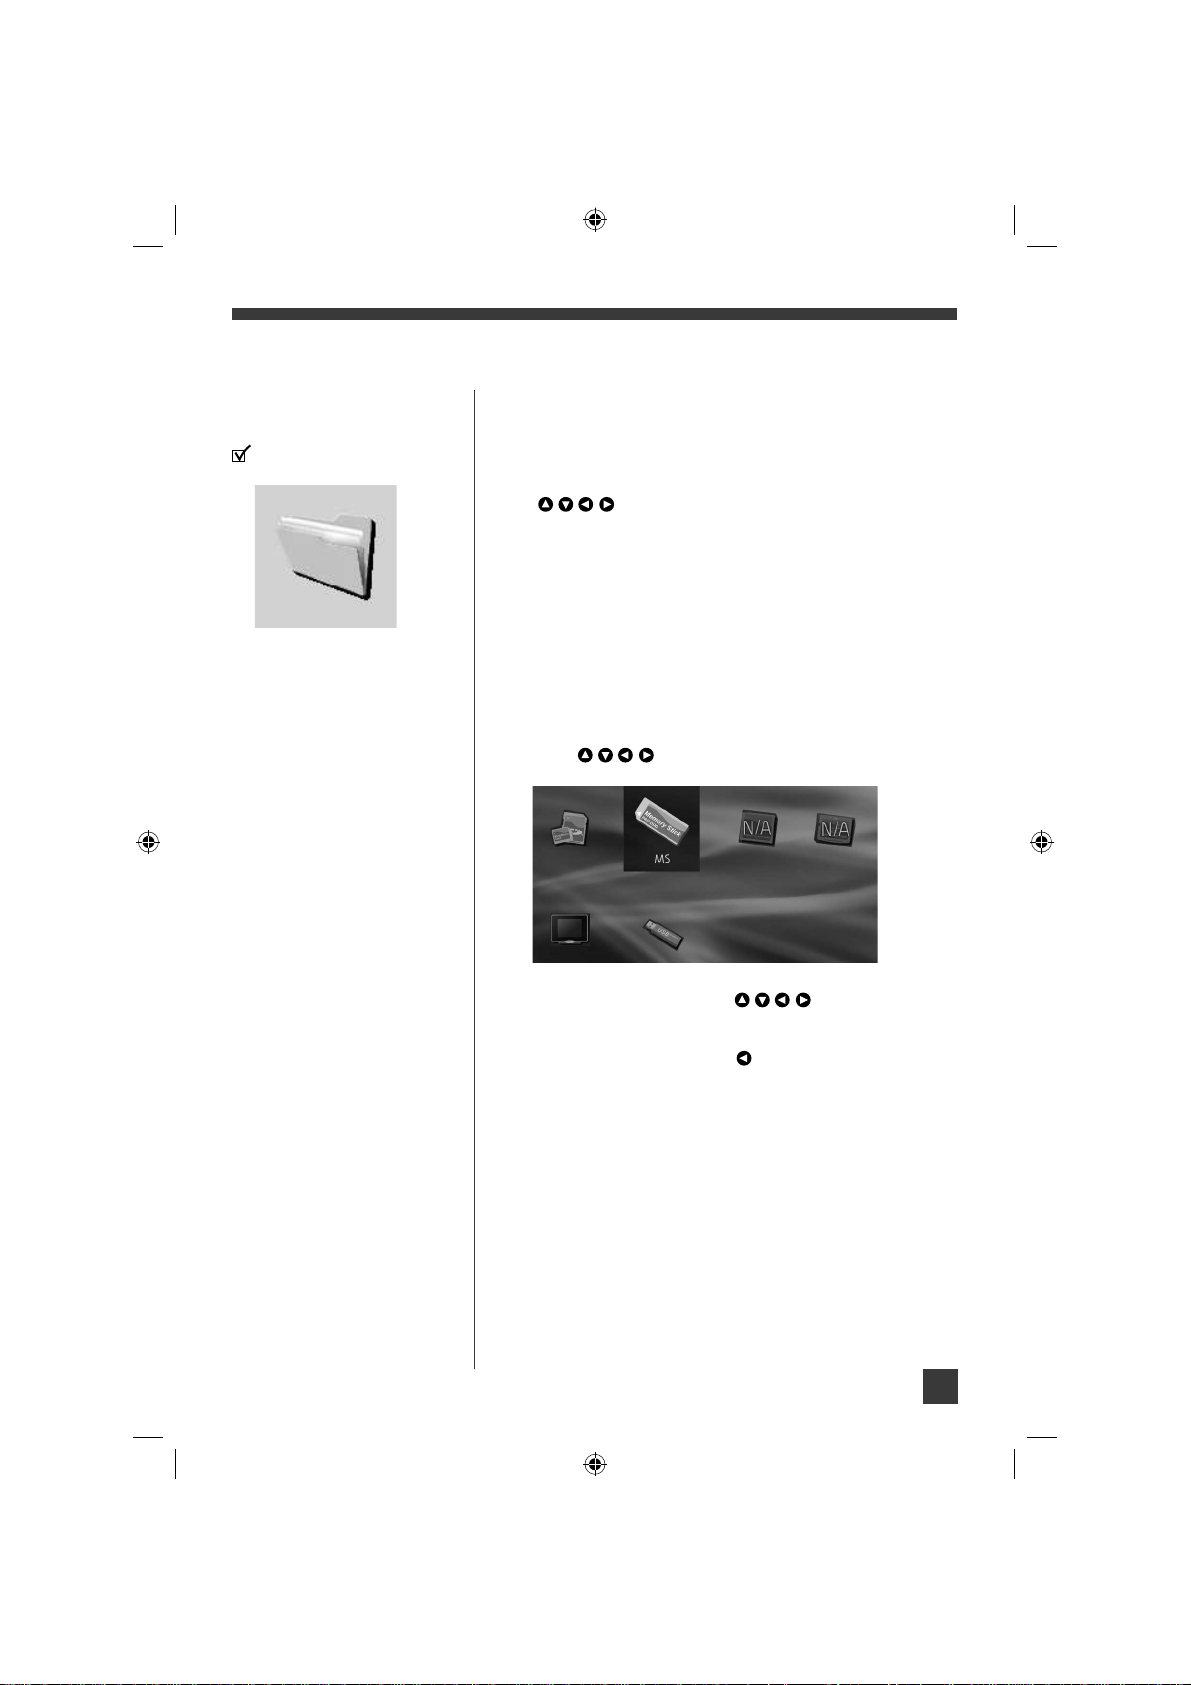
1. In Folder mode, available media sources (e.g. SD or
CF card) are listed on the screen, press the navigation
keys ( ) to select a desired one and then press
ENTER.
2. Files available in the selected media source are listed,
press the navigation keys ( ) to browse items.
• Press ENTER while a folder is highlighted to view its
content.
• To exit from a folder, press .
3. Press ENTER while a fi le is highlighted to start
playback.
Page 22
Moderna - User Manual
22
4. Press to select a highlighted file and then press
FUNCTION on the remote control to show the function
menu including “Return”, “Paste” and “Delete”.
5. Press
or to highlight one of the feature icons and
then press ENTER to select the feature.
Return – return to file list
Paste – paste the selected file to a selected destination
For example: copying a file from CF card to internal
memory:
1. Press
to select a highlighted file (e.g. in CF card).
2. Press
to go back to Folder / device menu.
3. Press the navigation keys (
) to select a desired
device (eg. Internal memory) and then press ENTER.
4. Press FUNCTION of the remote control.
5. Select “Paste” and press ENTER.
6. When you see the “Copy” menu, press ENTER to copy
selected file to the Internal memory.
Delete – delete all selected files
1. Press
to select a highlighted file.
2. Press FUNCTION of the remote control.
3. Select “Delete” and press ENTER.
4. When you see the “Delete” menu, press ENTER to
confirm deleting file.
Read below for explanation of the
function menu.
Page 23
Moderna - User Manual
23
12. Clock mode
Clock mode displays current date and time.
12.1 Accessing Clock mode
• In the main menu, use the navigation keys
( ) to select Clock mode and then press
ENTER.
OR
• Press CLOCK on the remote control to access this
mode directly.
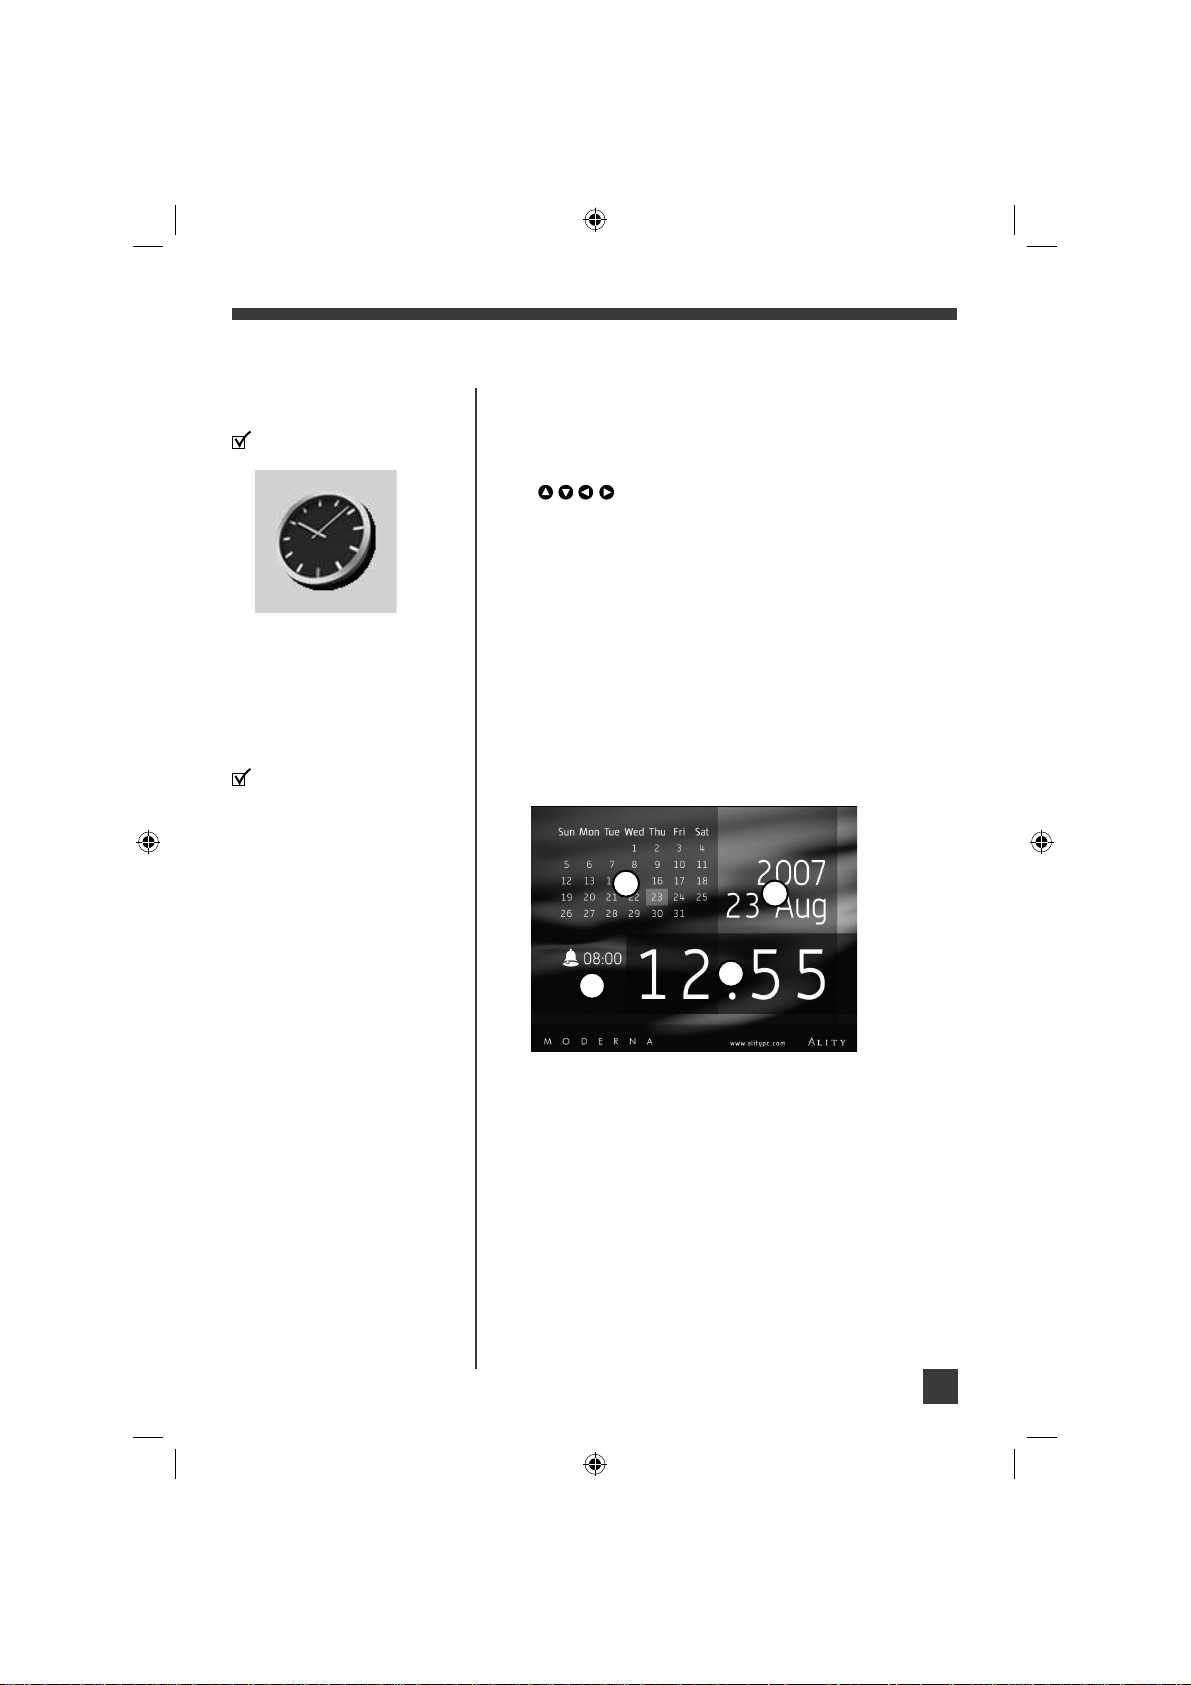
12.2 Clock display
Refer to the diagram below for details:
• 1 = Calendar
• 2 = Current date
• 3 = Current time
• 4 = Alarm time (if set)
12.3 Setting date and time
To set the date and time for the unit, refer to sections 13.9
and 13.10 for details.
In the main menu, select the Clock
mode icon as below:
1
2
3
4
Refer to section 13 for setting the
alarm.
Page 24
Moderna - User Manual
24
13. Setting Mode
Setting mode lets you define preferences before using the
unit.
13.1 Accessing setting mode
• In the main menu, use the navigation keys
(
) to select Setting mode and then press
ENTER.
• Press SETTING on the remote control to access this
mode directly.
13.2 Navigating in setting mode
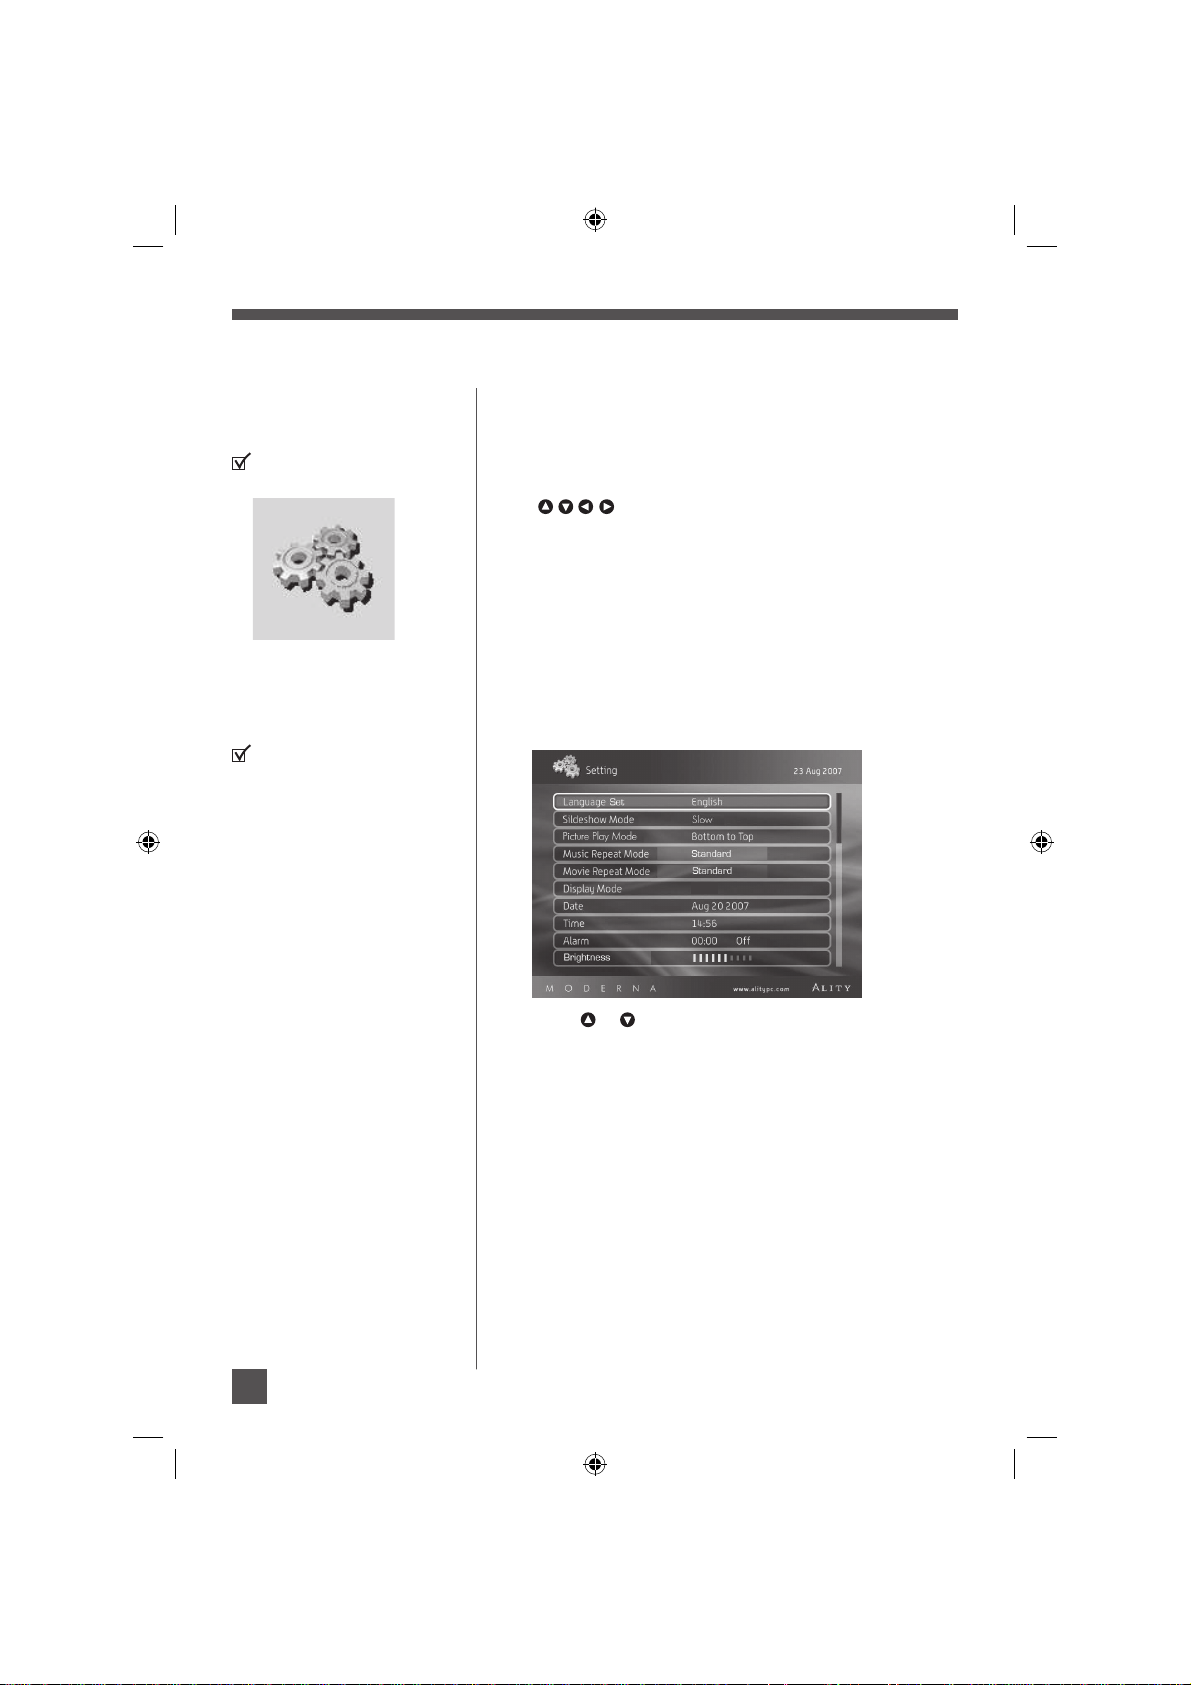
1. Once you have entered Setting mode, the following
setting items are available:
2. Press
or to highlight one of the items and then
follow the instructions in the following sections for
setting up respective item.
In the main menu, select the
Setting mode icon as below:
Setting menu items:
• Language set
• Slideshow Mode
• Picture Play Mode
• Music Repeat Mode
• Video Repeat Mode
• Display Mode
• Date
• Time
• Alarm
• Brightness
OR
4:3
Page 25
Moderna - User Manual
25
13.3 Language Set
Press or to select the menu language.
13.4 Slideshow Mode
Press or to select the display time for each picture in
the slideshow.
13.5 Picture Play Mode
Press or to select the transition mode for the slideshow.
13.6 Music Repeat Mode
Press or to select a repeat mode for music playback.
13.7 Video Repeat Mode
Press or to select a repeat mode for video playback.
13.8 Display Mode
Press or to select a screen display ratio (16:9 or 4:3).
13.9 Date
Press ENTER and then press or to shift among date,
month and year. Press or to adjust values. When
fi nished, press ENTER.
13.10 Time
Press ENTER and then press or to shift hour and
minute. Press or to adjust values. When fi nished, press
ENTER.
13.10 Alarm
Press ENTER and then press or to shift among hour,
minute and ON/OFF of the alarm. Press or to adjust
values. When fi nished, press ENTER.
13.11 Brightness
Press or to adjust the screen brightness.
Slideshow Mode defi nes how long
each photo will be displayed in
slideshow mode.
Picture Play Mode defi nes the
manner when photos change from
one to another (e.g. from left to
right, from up to down)
Playback modes for both music
and video: Standard or Random
The alarm clock setting can be
checked in clock mode (section
12)
Page 26
Moderna - User Manual
26
14. Troubleshooting
If it appears that your unit is not functioning, fi rst consult this checklist. It may be that something
simple has been overlooked. Under no circumstances should you try to repair the unit yourself,
as this will invalidate your warranty. Only qualifi ed service personnel can remove the cover or
service this unit.
The unit does not turn on.
• Make sure the unit is plugged into a working AC outlet or is fully charged (only for version
with battery).
No picture
• Make sure you have not selected output to external display device.
• Make sure you have correctly insert media card.
The remote control is not working.
• Make sure the battery is not empty.
• Make sure you are pointing the remote control directly at the unit while pressing the buttons.
• Make sure you are not using the remote too far from the unit.
• Make sure there is no obstacle between the remote control and the unit.
There is no sound from the unit.
• Make sure you have not pressed the MUTE button.
Buttons do not work.
• Try turn off the unit and turn on again to reset it. Do not touch the buttons until the main
selection menu is shown.
Some fi les do not display on screen.
• Check if the fi les you are trying to play is encoded in a format supported by this unit.
Cannot play music, picture or video fi les.
• Make sure the mp3 fi les are not damaged. Try playing them on another player.
• Make sure the fi les formats are support by the unit. Refer to the table below.
Content
JPEG, BMP
MP3, WAV
Motion-JPEG
MPEG4 ASP
Minimum
16x16
32k bps
–
–
Maximum
5120x3480
256k bps
10fps@720x480
720x480
MS
Yes
Yes
Yes
No
MMC
Yes
Yes
Yes
No
SD/xD
Yes
Yes
Yes
<100KB
CF/Internal Memory
Yes
Yes
Yes
<250KB
Page 27

Moderna - User Manual
27
15. Specifi cations
Power supply: DC 10V
Operation current: 1.5 A
Power consumption: max 18 W (max 10W for the unit operation without battery
charging)
Output system: NTSC
File format: JPEG, BMP, MP3, WAV, AVI, MPEG
Memory Card: MS, SD, MMC, CF and xD card
Control mode: Remote control
16. Limited warranty
Our company will repair the product against troubles arising under normal use and operation
conditions (non man-made problems such as abuse and misuse) for a period of one (1) year
from the date of original purchase (warranty period).
Our company is not responsible for malfunction due to indirect, special and
accidental causes.
Service / repair charges apply to the following conditions within Warranty period:
A. Malfunction due to misuse (not following instructions in the user manual).
B. Damage due to impact.
C. Damage caused by service performed by anyone other than our company.
D. Malfunction due to connections with other equipment.
E. Damage due to fi re, natural hazards etc.
Page 28

Moderna - User Manual
28
17. FCC notice
The manufacturer is not responsible for any radio or TV interference caused by unauthorized
modifi cations to this equipment. Such modifi cations could void the user authority to operate the
equipment.
This equipment has been tested and found to comply with the limits for a Class B digital device,
pursuant to Part 15 of the FCC Rules. These limits are designed to provide reasonable protection against harmful interference in a residential installation. This equipment generates, uses
and can radiate radio frequency energy and, if not installed and used in accordance with the
instructions, may cause harmful interference to radio communications. However, there is no
guarantee that interference will not occur in a particular installation. If this equipment does cause
harmful interference to radio or television reception, which can be determined by turning the
equipment off and on, the user is encouraged to try to correct the interference by one or more of
the following measures:
• Reorient or relocate the receiving antenna.
• Increase the separation between the equipment and receiver.
• Connect the equipment into an outlet on a circuit different from that to which the receiver is
connected.
• Consult the dealer or an experienced radio/TV technician for help.
This device complies with Part 15 of the FCC Rules. Operation is subject to the following two
conditions: (1) this device may not cause harmful interference, and (2) this device must accept
any interference received, including interference that may cause undesired operation.
 Loading...