

Page 1

Network Video Recorder
Quick Installation Guide
Page 2

1 -
Getting Started
1
Package Contents
Check the items contained in the package carefully. You should
have the following items. Once any item contained is damaged
or missing, contact the authorized dealer of your locale.
5 One Network Video Recorder
5 One AC Power Adapter with power cord
5 One Ethernet Cable (RJ-45 type)
5 One External Antenna (for wireless model only)
5 Four Screws
5 Four Rubber Pads
5 One Installation CD-ROM
5 One Quick Installation Guide
-
Page 3
Setting Up the Device
2 -
2
Installing the new unformat Hard Disk Drive
1. Disconnect the power cable of the device.
2. Remove two screws on the rear panel, and then remove the
rear panel.
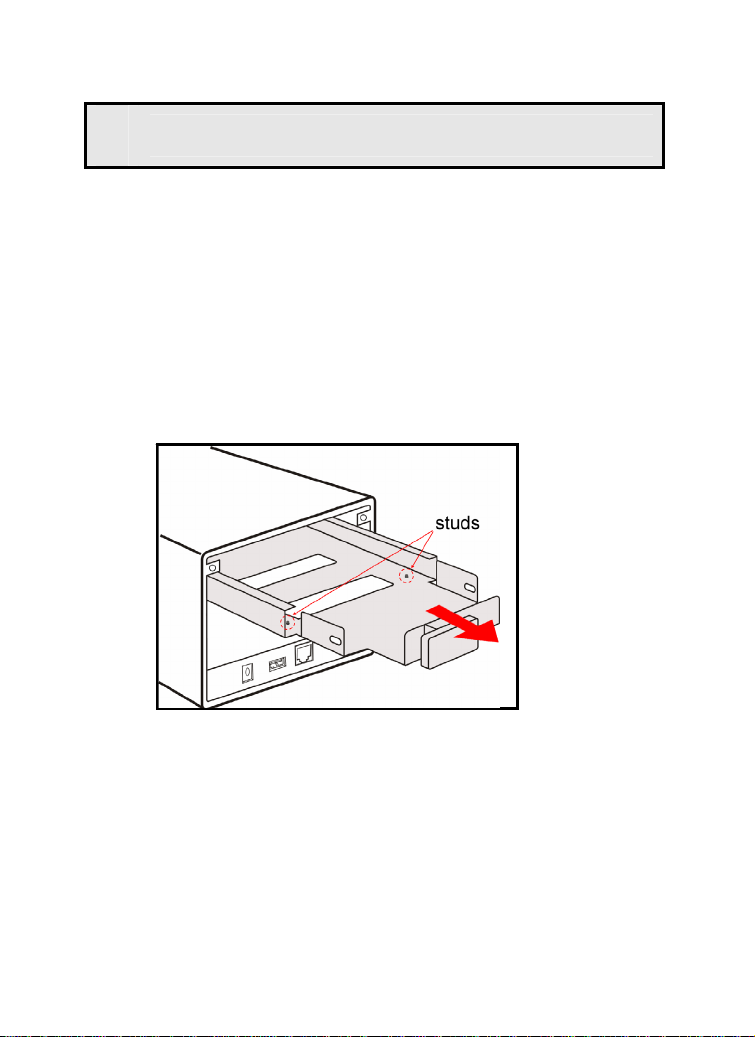
3. Pull the bracket out from the disk bay.
4. Place the hard disk drive on the bracket, and then secured
with two screws.
While placing the hard disk drive onto the bracket, align the
screw holes on the bottom of hard disk drive with the studs
on the base of bracket. The two studs are designed to
ensure the hard disk drive will be installed on the bracket
securely.
5. Push the bracket into the disk bay all the way until it
connects the device.
6. Replace the rear panel and secure two screws.
-
Page 4
Connecting the Network
3 -
Connecting to LAN
Plug an Ethernet cable to the LAN connector located on the
device’s rear panel, and then connect it to the network or
directly to a computer for configuration.
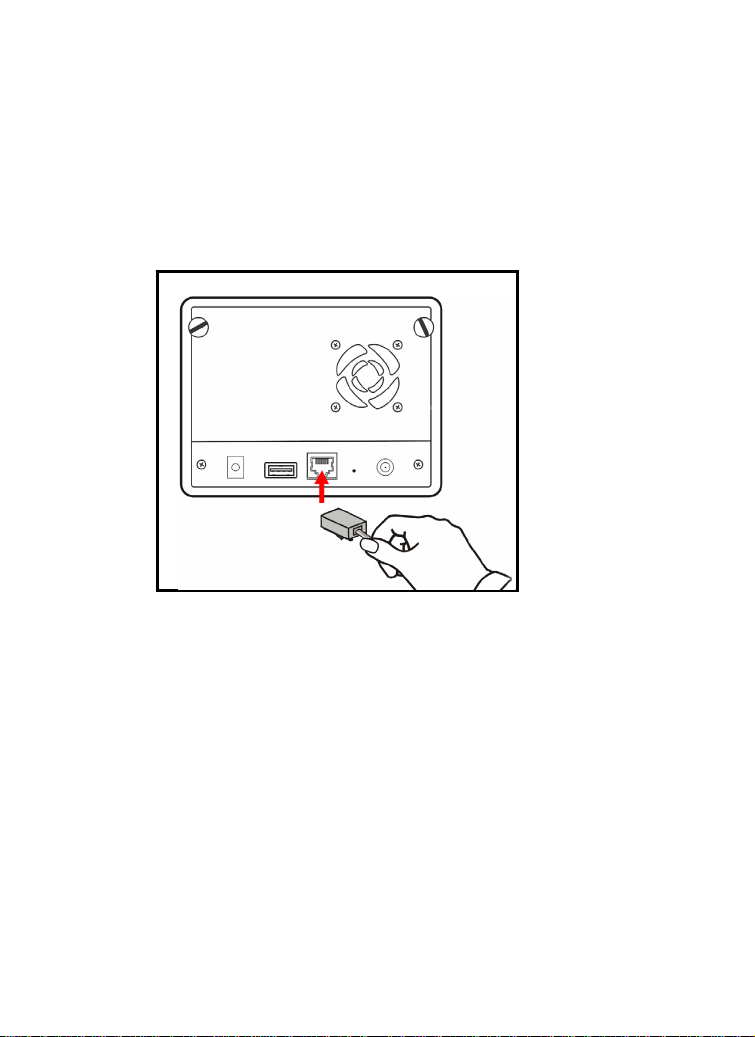
Connecting to WLAN (for wireless model)
If you use the wireless model your wireless network, you need
to attach the included external antenna to the device.
When the device is powered on, the network video recorder
will automatically search any access point with “default” SSID.
NOTE If the device cannot connect to your wireless network,
you need to install the device in LAN and proceed with
WLAN settings.
-
Page 5

Connecting the Power Adapter
4 -
Plug the AC power adapter to the power connector located on
the device’s rear panel, and then connect it to your local power
supply.
-
Page 6

Accessing the Device
5 -
3
Accessing the Device via My Network Places
Since you have built a connection between the Network Video
Recorder and your PC, you can easily access the device via My
Network Places.
1. On your PC, click Start > My Network Places.
2. Find the device with its device named (such as NVRxxxx) in
My Network Place.
3. Double-click the device icon. When the login window
appears, enter the User name (the default is admin) and
password (the default is admin), and then click OK to access
the Network Video Recorder.
-
Page 7

Using IPFinder
6 -
1. Insert the Installation CD-ROM into your computer’s CD-ROM
drive to initiate the Auto-Run program.
2. Click the IPFinder item to launch the utility. The control
panel will appear as below.
Display the connected
device(s).
Double click to link
the device.
Click About to get the Version information of IPFinder.
Click Link to connect the selected device.
Click Change IP to modify the IP address of the selected device.
Click Search to find the IP address of the connected device(s).
Click Exit to close the utility.
3. Once you get the IP address of the device, launch the Web
browser to access your device.
TIP The Installation CD-ROM provides a setup program that
allows you to install IPFinder on your computer.
-
Page 8

Web Configuration Utility
7 -
4
Accessing the Web Configuration Utility
The Web-based configuration utility allows you to access and
manage the Network Video Recorder easily.
Launch the Web browser and then enter the IP address (the
default is 192.168.0.20) in the Address bar and press ENTER to
access the Web Configuration Utility.
TIP Since the default configuration of the device is DHCP
mode enabled, you are recommended to use IPFinder to
search the IP address that is assigned to the device by the
DHCP server, and then click Link to access the network
video recorder via the Web browser.
-
Page 9

Using the Setup Wizard
8 -
On the Web Configuration Utility screen, click Setup Wizard in
the menu bar to start the wizard, which will guide you through
the necessary settings step-by-step.
LAN Setup
TCP/IP Setup
Wireless Setup (for wireless model)
Set up Space Type
Setup Summary
-
Page 10

Formatting the Hard Disk Drives
9 -
On the Web Configuration Utility screen, click System in the
menu bar, and then you can format the hard disk drives from
the Configuration sub-menu area.
z Delete all files
Select this option and click Apply to delete all files
stored on the installed hard disk drives.
z Format all disks and reset default
Select this option and click Apply to format the
installed hard disk drives and reset the device to the
default configuration. Select the Keep log file check
box to save the log file when reset.
z Backup Config file
Select this option and click Apply to save the current
customized configuration of the device as a file on your
PC.
z Restore Config file
Click Browse to find the configuration file, and then
click Apply to restore the customized configuration.
-
Page 11

10 -
Adding Users for the Device
On the Web Configuration Utility screen, click Authorization
Setup in the menu bar, and then you can add users for the
device from the User sub-menu area.
1. Click Add and then assign the user name in the Select User
box, and give a brief instruction in the User Description box.
If you have set up groups for organization, you can assign
the user to a group from the Group list.
2. Enter the password twice for the new user in the Password
and Confirm Password boxes, and then select the
Permission type (Admin or User).
3. Specify the storage quotas for the user from the Quota
option of Space Status.
4. When completed, click Apply to add the user. You can
change the user’s setting by selecting the user and then
clicking Edit, or remove the user by selecting the user and
then clicking Delete.
-
Page 12

11 -
Tips
4
For more information, please refer to the User Guide on the
provided Installation CD-ROM.
If you have any problem on the product(s), please contact your
local authorized dealer.
A-Link technical support E-mail techsupport@a-link.com
phone +35860041020 (2,67€/min + local network fee)
or by
-
 Loading...