

Page 1
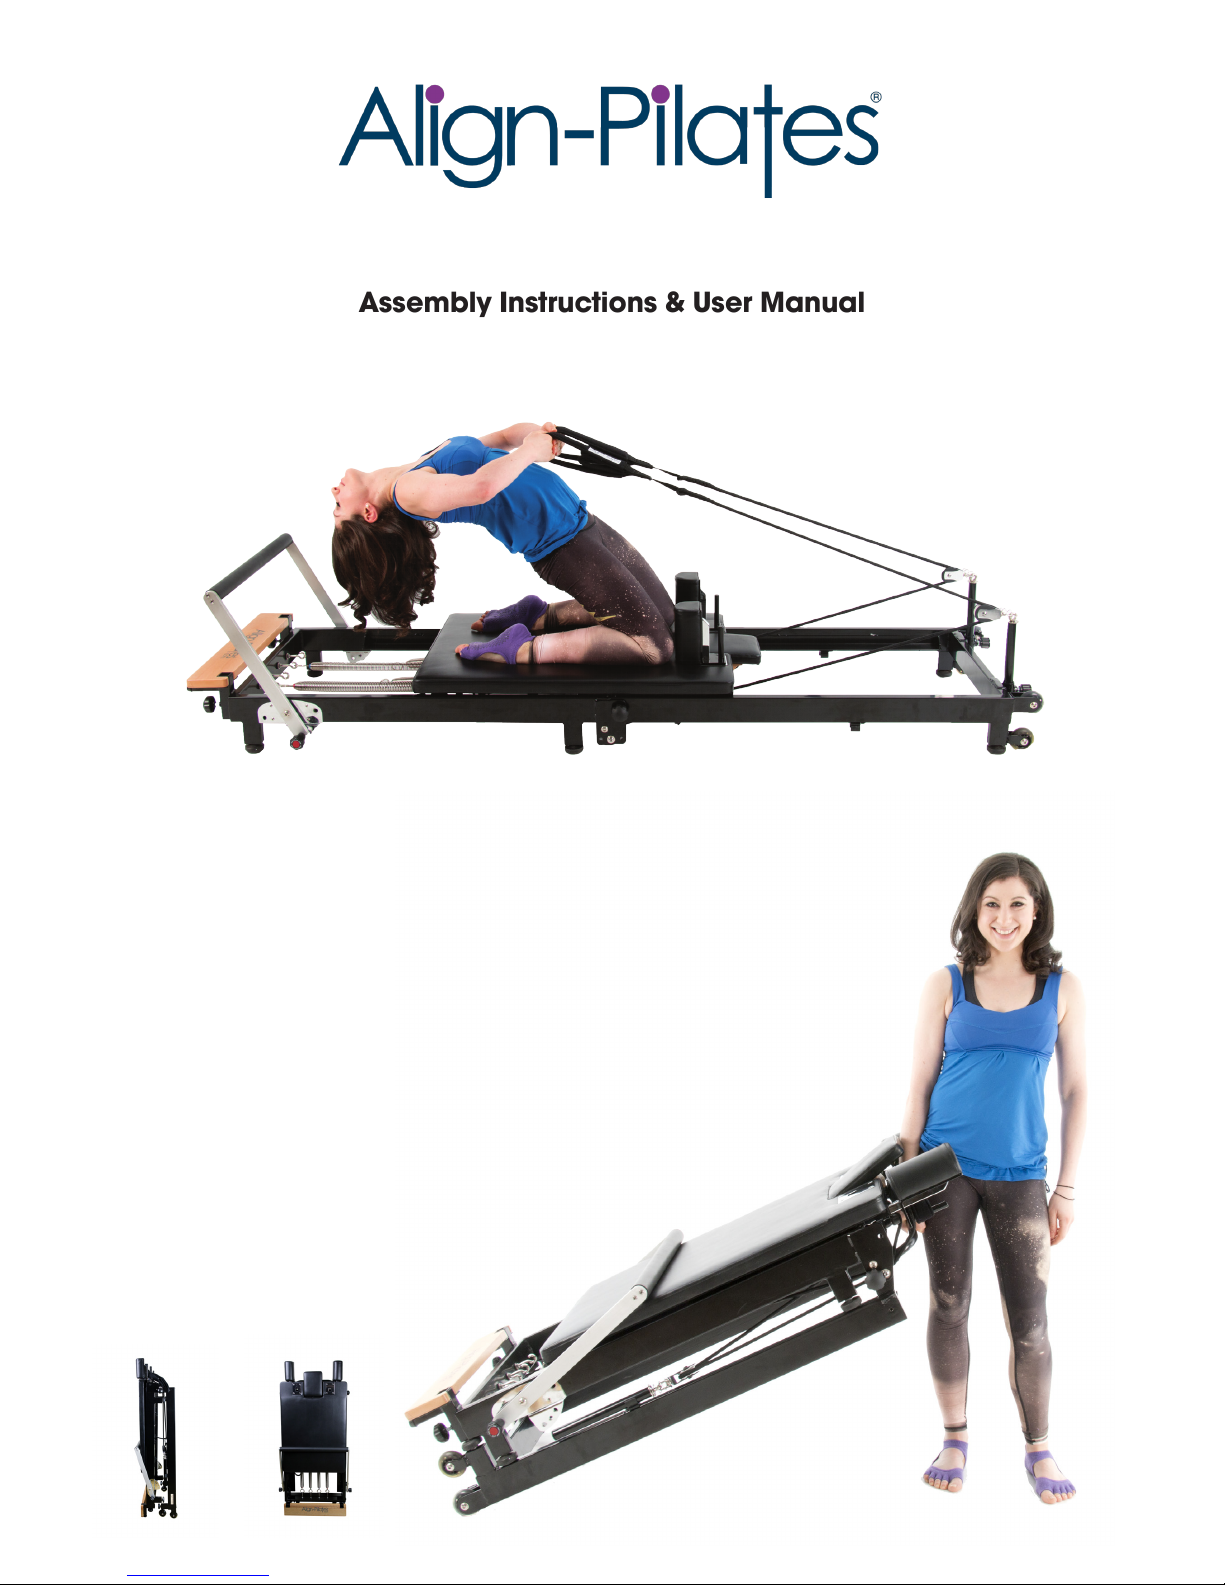
F1 FOLDING REFORMER
Assembly Instructions & User Manual
Contents
1. Introduction
2. Reformer Schema
3. Unpacking the F1 reformer
4. Unfolding your F1 Reformer & Adjusting the Foot ¬bar
5. Levelling the frame
6. Assembly of the carriage bed & attaching the ropes
7. Placing the bed in the frame and final assembly
8. Attaching & Adjusting the Rope risers
9. Attach the Double Loop handles
10. Installing & Locking the Shoulder rests
11. Working with springs
12. Folding the F1 reformer.
13. Adjusting the rope length
14. Periodic Maintenance
15. Troubleshooting Smooth Running of your F1
16. Basic Reformer safety
17. Accessories for the F1 Reformer.
18. Align-Pilates Limited Lifetime Warranty
Page 2

1. Introduction
The F1 reformer was developed to bring the benefits of a Pilates Reformer workout in to your home, without
the need to have a space dedicated to your Pilates workout. Featuring the same springs as our
professional reformers, the F1 offers smooth progressive resistance and a range of adjustments to fine tune
the machine for your workout. The F1 folds up in a matter of minutes into a compact and self-contained
machine that can be easily wheeled around and stored safely out of the way.
Specification & Adjustability
• Travel: 95cm
• Resistance: 4 Nickel plated music wire springs (2 Medium, 1 Strong and 1 Light)
• Foot bar positions: 2 plus down & stowage position
• Removable rope risers with 3 height options & 4 easy rope length adjustments.
• New Align-Pilates double loop handles with “silent” metal free connectors for a quieter workout.
• 3 position head rest, with locking string for stowage.
• Steel frame with 8 wheel design. Removable & lockable shoulder rests. Locking bolts to lock reformer
both open and closed. 4 Wheels to enable movement of the reformer when open or closed. 6 adjustable feet to ensure your reformer sits flat and can run smoothly.
• Max User Weight: 120Kg. Suitable for users: 145cm – 193cm (4’10 – 6’4”).
Dimensions:
Open Size (maximums): 247cm x 70cm x 47cm
Carriage size: 89cm x 58cm (w)
Folded size (maximums) 143.5cm x 70cm x 34.5cm
Weight: 55Kg
Packaging & Delivery:
Delivered in 2 boxes with total GW of 60.5Kg being:
Box 1: Frame 120 x 73 x 31.5cm GW 41.5Kg
Box 2: Carriage 95 x 62.5 x 17cm GW 19Kg
BEFORE YOU START
You may find it beneficial to see a video on how to open & close your F1 reformer before you start. Please
scan the QR code below to take you to the video or search YouTube for “Fold F1 Reformer”
How to fold your
Align-Pilates F1
Reformer
How to unfold your
Align-Pilates F1
Reformer
2. Reformer Schema with parts labelled
Page 3
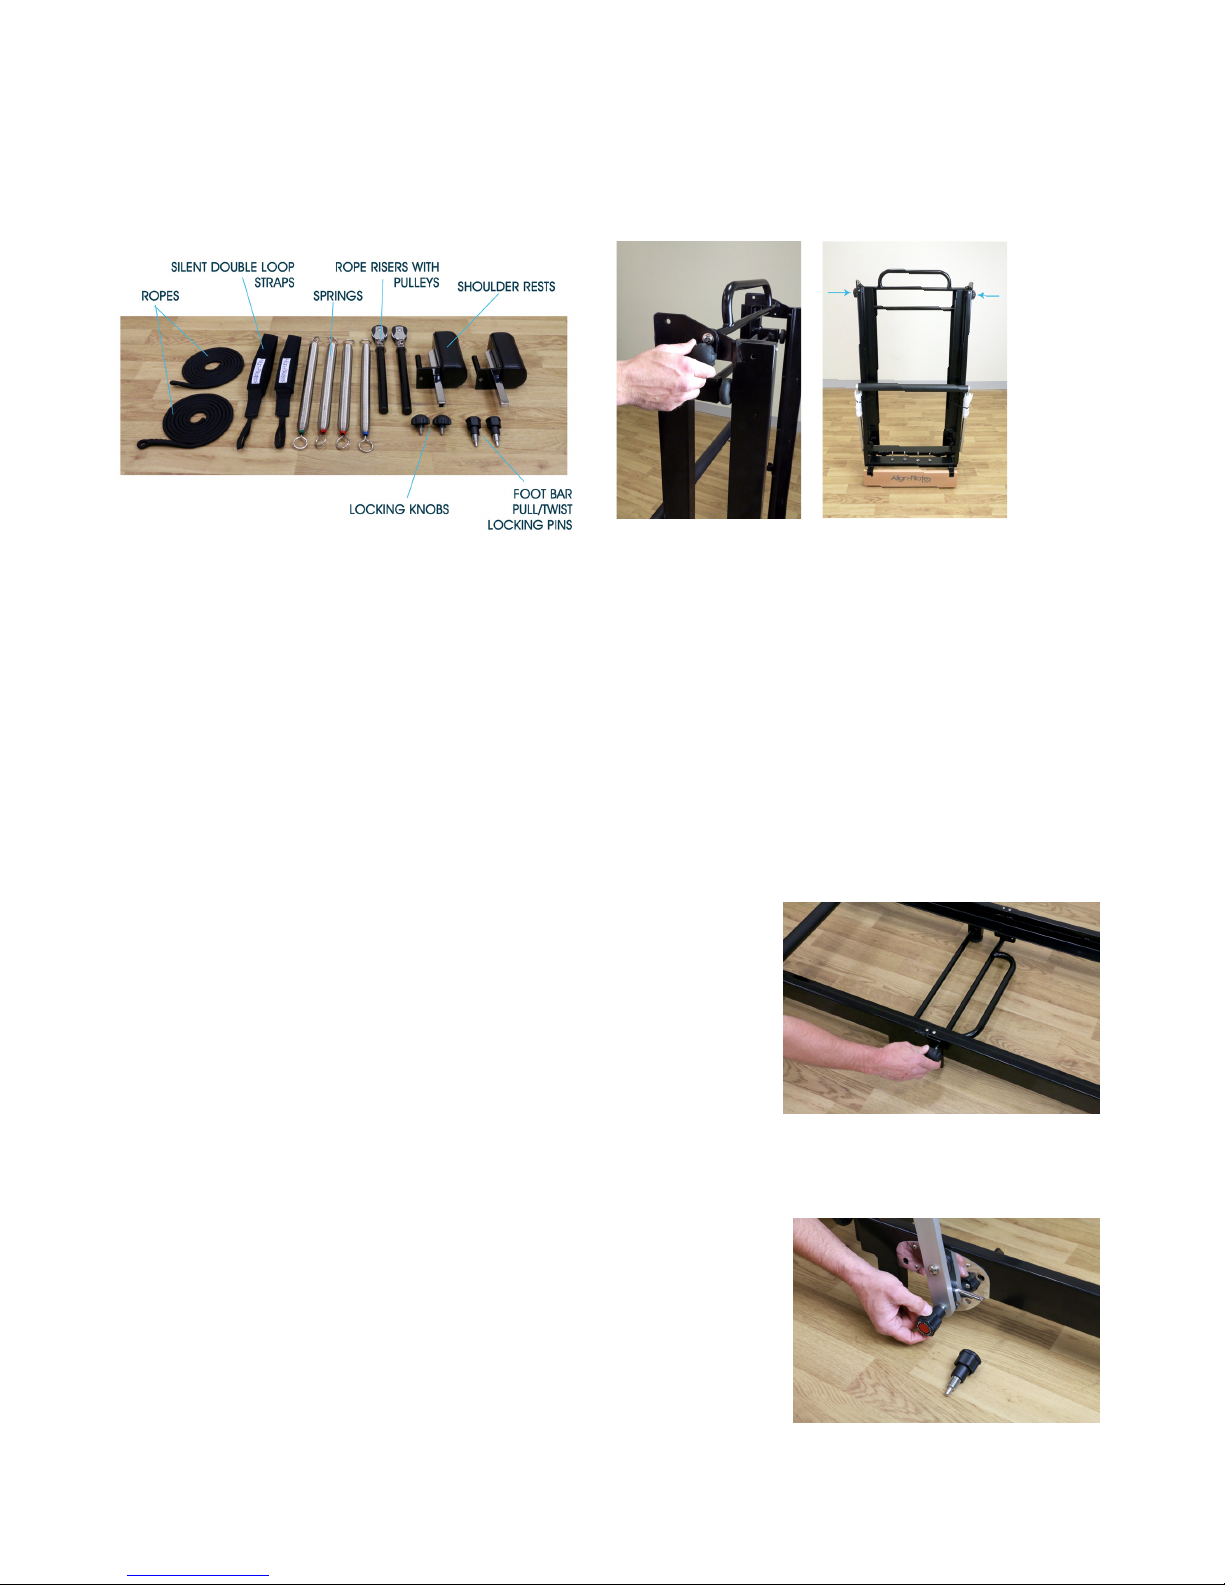
3. Unpacking the F1 reformer
Allowing for space to assemble the reformer, carefully open both boxes and remove the polystyrene
blocks and other packaging material from the boxes. The smaller of the two boxes contains the
carriage bed and two additional boxes, open both of these smaller boxes and lay out the parts, as shown
in Fig.1 (leave the carriage bed in the box for now). Locate the two locking knobs, as labelled in Fig.1. See
Fig.2 for the location of the locking knobs when the reformer is in the folded position.
With assistance, lift the F1’s frame out of the box and stand it on its feet, being careful to hold the frame
in the closed position, screw in one locking knobs to keep the F1 folded as shown in Fig.2 & Fig.3 (blue arrows), then carefully cut the two cable ties that secure the aluminium foot bar to the frame.
4. Unfolding your F1 Reformer & Adjusting the Foot bar
Please watch the video before unfolding for the first time. You can see the video QR code on page 2 of
this manual.
Warning: We recommend that the F1 reformer is opened and closed by two people to minimise the
chance of injury. However the F1 can be opened and closed by a single person with relative ease, as
the lifting weight is similar to lifting a heavy suitcase. If planning to open and close the F1 on your own we
suggest familiarising yourself with the process using 2 people first and always be sure to use correct lifting
technique. If you have back or similar issues you should avoid opening the F1 alone.
Locate the foot bar pull/twist locking pins, as labelled in Fig.1. Screw
in the first locking pin (being careful not to cross thread the hole) and
secure the foot bar in the desired position. Then screw in the second
locking pin. The pin holds the foot bar in position but the knob then
needs to be tightened to prevent any movement.
To move the foot bar first loosen one knob by turning anti-clockwise,
then pull back on the knob and simultaneously turn the knob clockwise to hold the pin in the retracted position. Now loosen the second
knob and pull out to retract the pin, move the foot bar to the desired
position and release the pin to locate in the hole and retighten the
knob. Return to the first knob, rotate anti-clockwise to release the pin
and then tighten the knob. See Fig.6.
Both pins must be properly engaged to secure the foot bar.
Fig.1 Fig.2
Fig.5
Fig.3
Fig.4
Noting that upon opening the F1, the standing platform will remain
approximately where it is whilst the wheels move away, first ensure
there is space for the reformer to open. First carefully unscrew the two
locking knobs, whilst using your foot to prevent the reformer opening.
Then with your hands towards the centre of the lowering/lifting handle
and your palm facing towards the carriage (to avoid wrist injury) slowly
lower the frame to the floor. Be sure to keep your hands and clothing
clear of the hinge points and be careful not to lower the centre leg
on to your foot. Once flat on the floor replace the locking knobs, as
shown in Fig.4. The reformer must always be locked open before use.
Page 4
5. Levelling the frame
The F1 has 6 adjustable feet to ensure the reformer is level or it will not run smoothly. The feet are adjusted
by screwing them in or out to adjust the height. Using a spirt level, adjust the feet to level the frame, ensuring that each foot is firmly in contact with the floor. Tip: Always lower a high spot before raising a low spot.
6. Assembly of the carriage bed & attaching the ropes
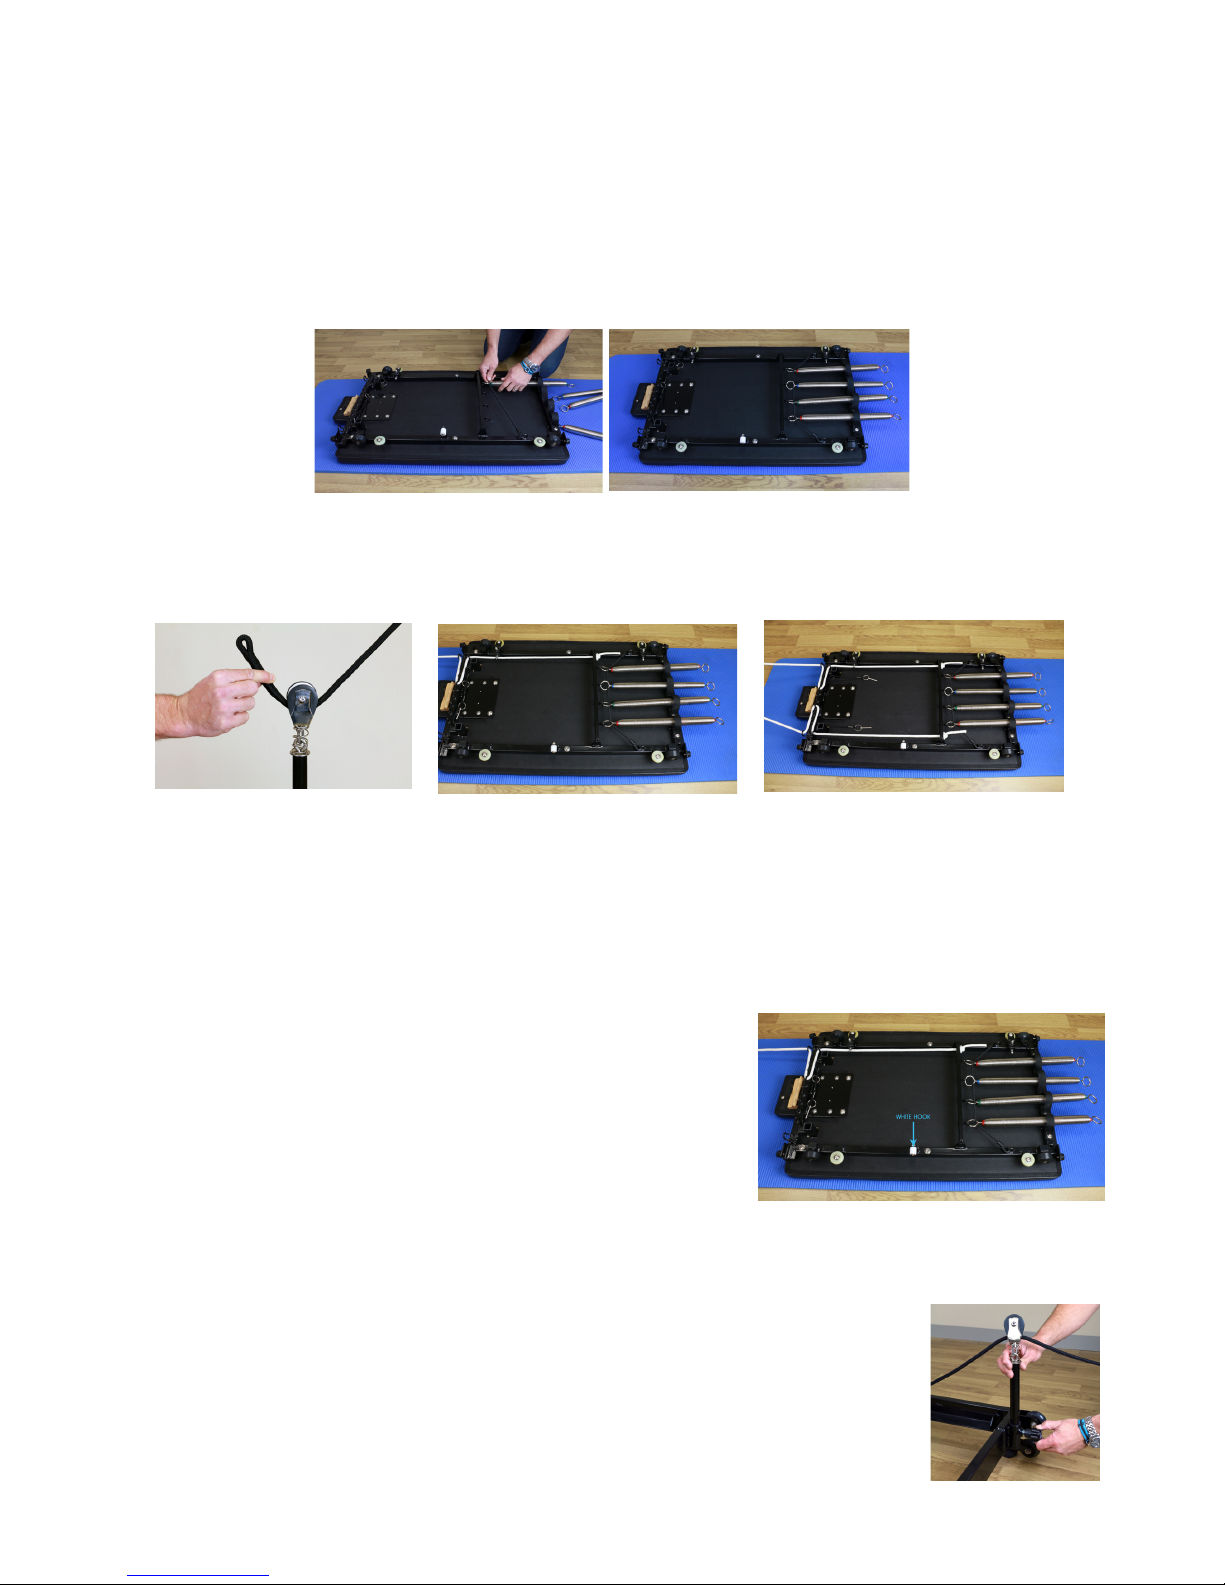
Remove the carriage bed from its box and lay it face down on a soft surface, such as clean carpet, to
avoid damaging the leatherette upholstery. Remove the elastic retaining strap and attach the x4 springs,
as shown in Figs.6 & 7. Now pass the elastic retaining band through the eye of each of the springs and
reattach the hooks to secure the springs.
Locate the pair of rope risers with rope pulleys and the pair of ropes (Note: each rope has an eyelet on
one end). Thread the unfinished end of each rope through one of the rope pulleys, see Fig.8, and lay out
each rope riser with rope threaded through the pulley, at the headboard end of the bed.
Thread the ropes into the carriage bed. Following Fig.9, thread the ropes into the bed (For illustration
purposes Fig.9 & 10 show white ropes). Once each rope has been threaded, tie a simple “over-hand”
knot on the end of each rope, then ensure the tails are the same length - once they are pull the knot tight.
You may need to fine tune the final knot position to ensure the ropes are the same lengths. Use the series
of hooks to quickly adjust the length of each rope, as shown in Fig.10. For more details see point 13.
7. Placing the bed in the frame and final assembly
Lower the foot bar to the position closest to the foot board.
On the reformer bed note the position of the white “hook” - see
Fig.11. This hook runs beneath the wheel runner when in use and it
there to prevent the carriage from tipping - care must be taken to
“hook” it under the runner as the bed is installed into the frame.
With assistance, lift up the carriage bed and flip it over, ensuring
the springs are pointing towards the foot bar. Now carefully lower
8. Attaching & Adjusting the Rope risers
Partially unscrew the rope riser fastener on the end of the frame and insert the rope riser.
Pull back on the fastener and slide the rope riser to the desired height. When happy with
the height, let go of the fastener and twist to tighten, securing it in place. Be sure that
the locking pin is engaged in one of the holes of the rope riser to secure it safely in position Fig.12.
The F1 allows you to set your ropes at 4 different heights. To adjust the rope height
simply loosen the fastener then pull out to release the pin. You can then move the rope
riser up or down into one of the 4 holes.
Fig.8 Fig.9
Fig.10
Fig.11
Fig.12
Fig.6
Fig.7
the carriage bed into the frame, taking care not to hit the frame, gently angle the bed so that the
“hook” (Fig.11) passes beneath the wheel runner of the frame. Once the carriage bed is in position, gently slide the bed to the foot of the reformer and attach one of the springs.
Page 5
10. Installing & Locking the Shoulder rests
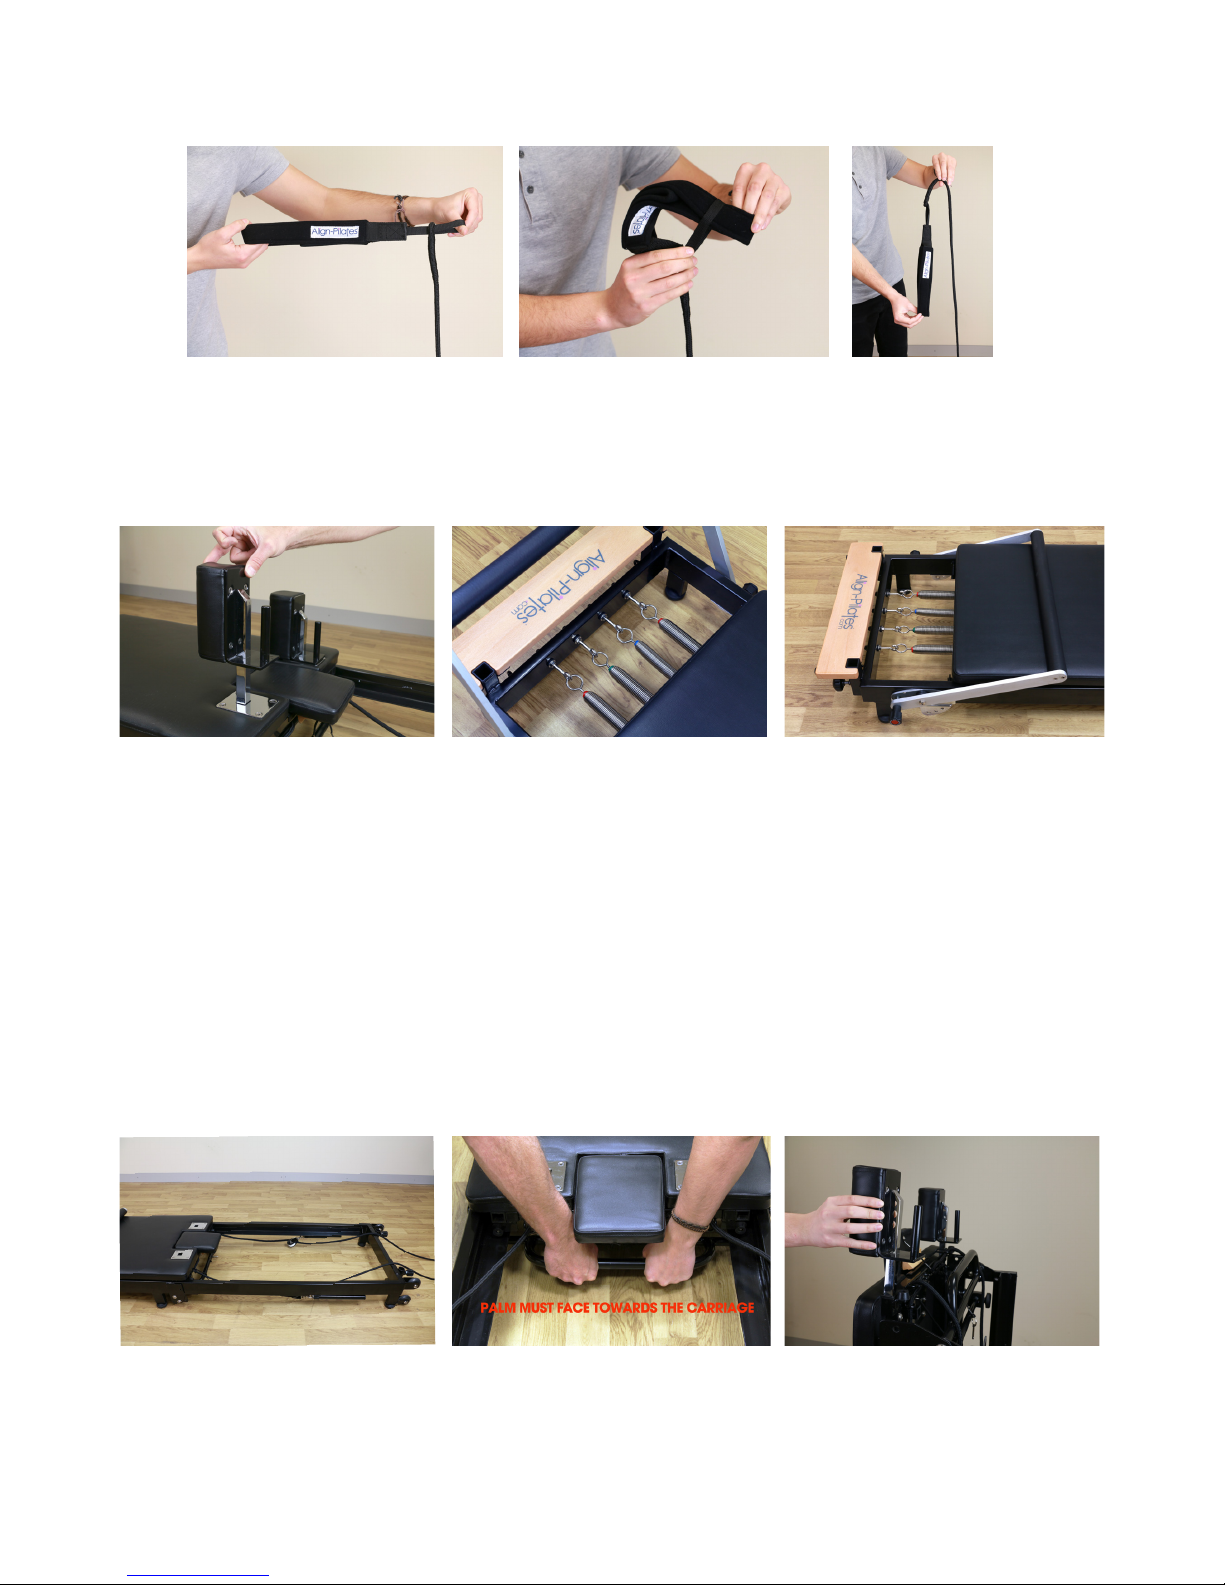
Finally install the shoulder rest by sliding the chrome bar in to the receiver - see Fig.16. Once inserted
the shoulder rests lock in to place with a pin that is attached to the underside of the carriage that inserts
through the hole in the bottom of the chrome bar. Note: If the shoulder rests are not locked the locking
pins will knock against the lifting / lowering bar when in use, so always be sure to lock the shoulder rests.
11. Working with springs
The F1 is fitted with 4 springs, in 3 strengths to offer a wide range of possible resistances. Green = Strong,
Red = Medium, Blue = Light. See Fig.17. The springs can be used in any combination, although when
using the reformer for asymmetric exercises, please ensure the springs selected are on the same side
that you are working on, or set equally in the middle, to ensure the carriage runs true. (E.g. when doing
a hip flexor stretch with one foot on the floor and the other on the shoulder rest.) Warning: After unfolding
your reformer and before use always check that the springs are properly attached to the underside of the
carriage by pulling them firmly - the spring should stretch but not move or the spring may have become
unhooked.
12. Folding the F1 reformer
Watch the video before doing for the first time (see point 13). Attach at least one spring to the carriage,
then fold and lock the foot bar so that it is positioned closest to the carriage - see Fig.18. This will hold the
carriage to the frame when the reformer is folded. Remove the rope risers and attach them into the clips
on the underside of the frame and lay the ropes on the floor in the centre of the frame see Fig.19
Remove the shoulder rests and set to one side, then remove the locking knobs and with assistance, with
one person on either side of the reformer, place hands in the indicated position on the lowering/lifting
handle as per Fig.20. Carefully lift the reformer until it is fully upright, whilst preventing the reformer from reopening with your foot replace the locking knobs. Note: the F1 must always be locked when in the closed
position to prevent accidental opening. The shoulder rests can now be stored as per Fig. 21 and the ropes
hung from the shoulder rests. The head rest can then be secured using the locking string. It is now safe to
wheel the reformer away for storage - simply tip on to the wheels and move like a wheel barrow.
9. Attach the Double Loop handles
Thread the nylon loop of the handle through the rope eyelet and then thread the loop handle through the
nylon eyelet to secure the handle to the rope as per Figs.13, 14 & 15. Pull tight to check it is secure.
Fig.13
Fig.16
Fig.19
Fig.14
Fig.17
Fig.20
Fig.15
Fig.18
Fig.21
Page 6
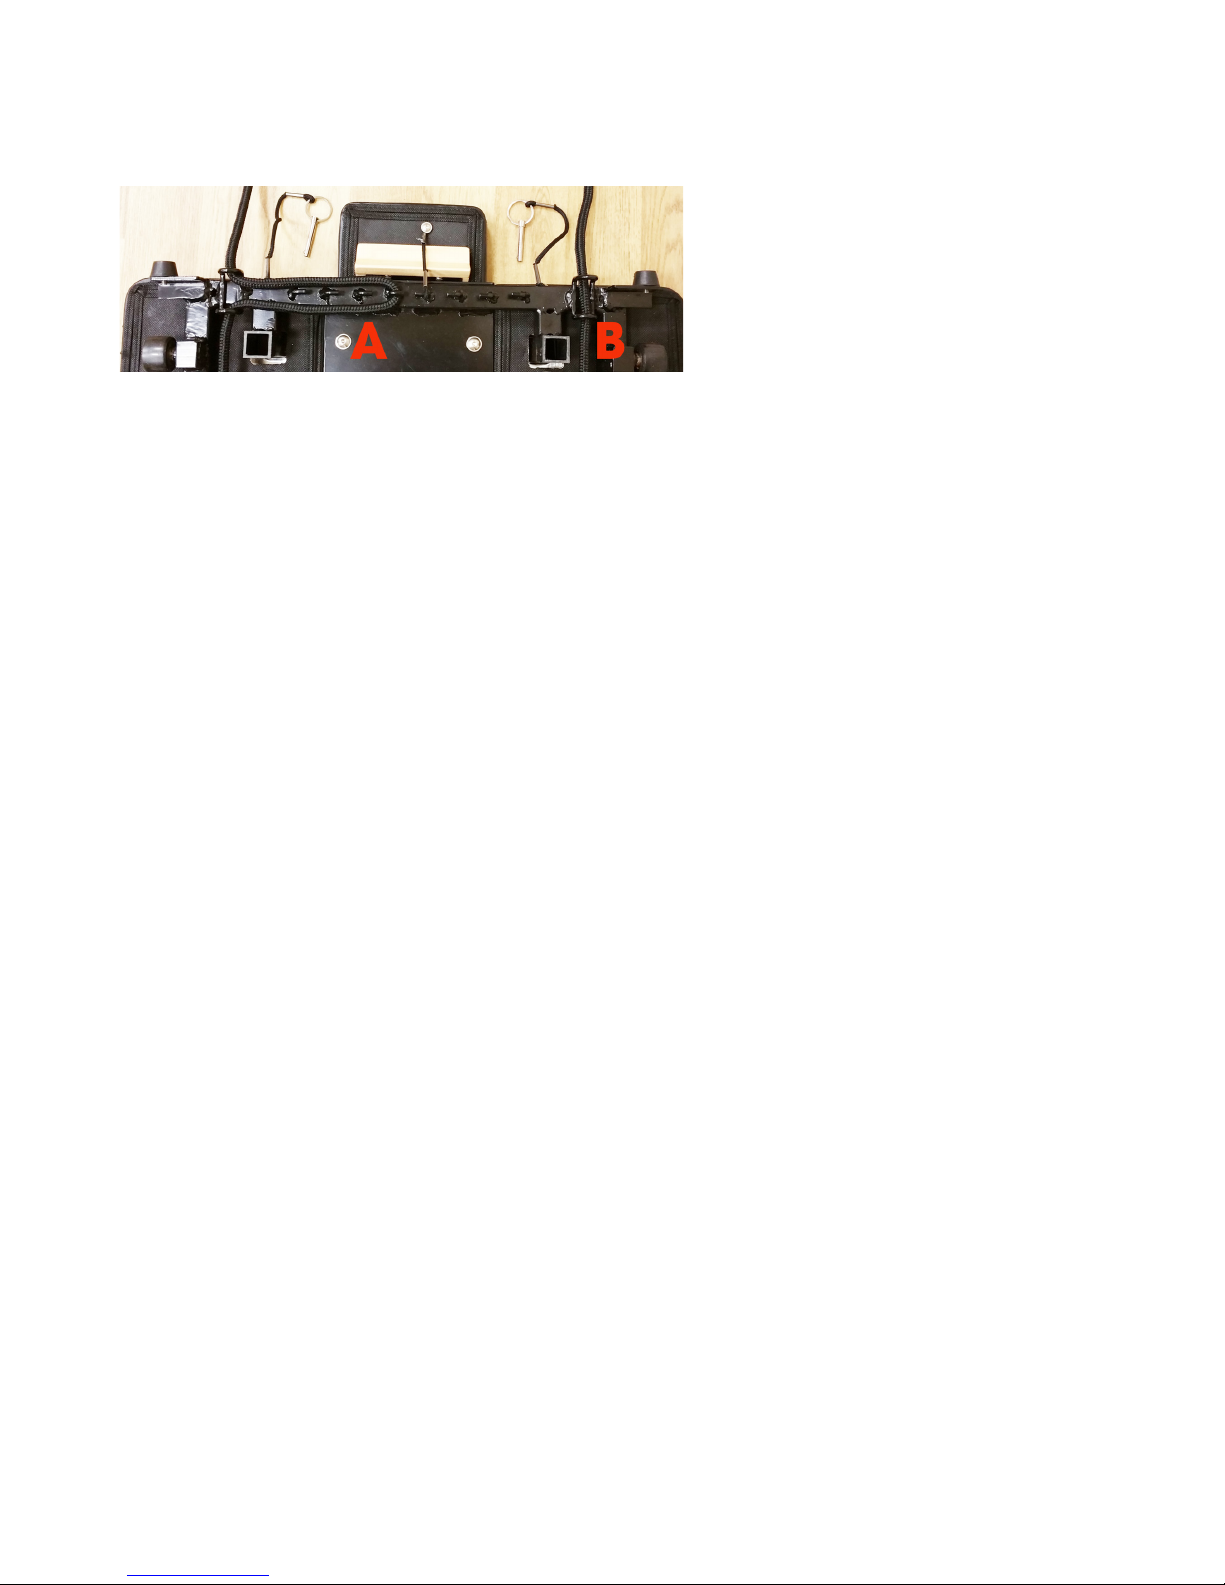
13. Adjusting the rope length
Once your ropes are set up as outlined in point 6, fine tuning the rope length is easy. Simply move the
rope along the hooks. When the rope is not on any hooks it is at its longest (Fig. 22 B) and when the rope is
over the centre hook it is at its shortest (Fig. 22 A). There are 5 available rope lengths adjustment positions.
14. Periodic Maintenance
It is important to check your equipment regularly to ensure its smooth and safe operation. In a studio
environment routine inspection should be done weekly or at any time when operation is sub-optimal.
Periodic maintenance should include:
Springs - check for wear and tear or signs of deformation e.g. not returning to original length. Springs
should be replaced at least every two years or immediately if showing signs of fatigue.
Foot Bar - check that all allen bolts securing the bar to the aluminium arms and to the steel engagement
bar and through the frame are tight and that the Foot bar Twist/Pull locking pin is working properly. Note if
the red button sticks out on its own this is a warning sign to show the locking pin is not properly engaged.
Runners - ensure the runners are clean and free from grit to enable the smooth running of the reformer. If
excess dirt is spotted on the runners then the wheels may also need cleaning. We recommend cleaning
the runners with a window cleaner eg. Windowlene.
Ropes and Handles - check ropes for signs of wear, fraying or nicks and replace if damaged. Check
stitching on handles is intact and handles are not overly worn. Check the handle clips are working.
PVC Upholstery - always ensure that belts, jewellery and shoes are removed when working on the
equipment as buckles, rings, watches and bangles can all end up damaging the upholstery. For care of
upholstery we recommend using water in an atomiser with a few drops of tea tree oil, which has natural
disinfectant properties. Avoid getting any of the cleaning spray on the ropes.
Wheels - Remove the carriage and check for smooth rotation and signs of damage. If the wheels are not
turning smoothly or the wheels are damaged this will impede smooth running and the wheels need to be
replaced.
Shoulder Rests - check the pads are securely bolted on to the metal frame - if loose retighten.
Spring hooks - hand check that all eye hooks will not move. If loose remove, apply loctite and retighten.
Nuts & Allen Bolts - check all nuts and bolts are tight, including those on the rope pulley wheels and those
securing the head rest.
The Main Hinge & Lifting Bar - check
Congratulations! You are now ready to use your F1 Reformer. Now would be a good time to make a note
to replace your springs in 2 years or, within 3,000 hours of use, whichever is sooner. We hope that you enjoy
using your new reformer and that its use brings many benefits.
Troubleshooting Smooth Running of your F1
If you reformer is not running smoothly please follow these step in order to get it back up and running
smoothly
1) Check the reformer is level using a spirit level
2) Check the runners and wheels are clean and free from dirt and grit
3) Check the wheel Alignment of the side wheels
Occasionally the side wheels on your reformer may be knocked out of alignment. You will know this if you
hear squeaking where the side of one of the horizontal wheels hits the side of the runner. If this is the case
adjustment is easy by following these simple steps
a) Identify which side of the carriage the fixed wheels are on (this should be the right hand side if looking
from the spring bar end towards the head rest).
b) Disconnect all springs and roll the carriage to the riser end of the reformer. Now push the carriage from
the side ensuring that both the fixed side wheels are touching the side wall of the runner.
Fig.22
Page 7
17. Accessories for your F1 reformer
If you have not already purchased them the following accessories may be of interest to enhance your
F1 Reformer. To see the complete range of Align-Pilates apparatus & a complete range of Pilates Studio
equipment & mat work accessories please visit www.Align-Pilates.com
16. Basic Reformer & Exercise Safety
If you are not familiar with using a Pilates reformer we suggest you seek advice from a qualified Pilates professional in order to learn how to get the most out of your reformer and to cover the basic safety aspects
of using this type of equipment. A number of companies also offer short safety induction courses.
1) Pilates is about smooth and controlled movement, when performing exercises tr y to prevent the carriage from slamming in to the carriage stop and do not allow springs to recoil in an uncontrolled
manner as this will damage the spring and shorten its life.
2) Secure the carriage with at least one spring when your Reformer is not in use, Do not get on the carriage when there are no springs attached unless you deliberately want to do this.
3) When standing on the reformer always put your first foot on the standing platform and then the other on
the carriage. When getting off the reformer from standing take your foot off the carriage first and then step
down off the standing platform
4) Use your reformer is as clear a space as possible, the side of reformer should be at least a meter away
from the wall in order to allow enough room for leg rotation with feet in straps.
5) When using a reformer less is often more, remember that when performing certain exercises less spring
resistance makes the exercise more challenging.
6) Before starting any exercise program, consult a physician.
7) Before using the equipment, read and follow instructions in the safety manual and obtain thorough
instruction from a Qualified Trainer.
8) Use equipment only for intended exercises.
9) Stop exercising if you experience chest pain, feel faint, have difficulty breathing or experience musculoskeletal discomfort.
10) Keep clothing, body and hair free from all moving parts.
11) Do not use if equipment appears worn, broken or damaged. Do not attempt to repair equipment
yourself.
12) Do not allow children to use or be around equipment without adult supervision.
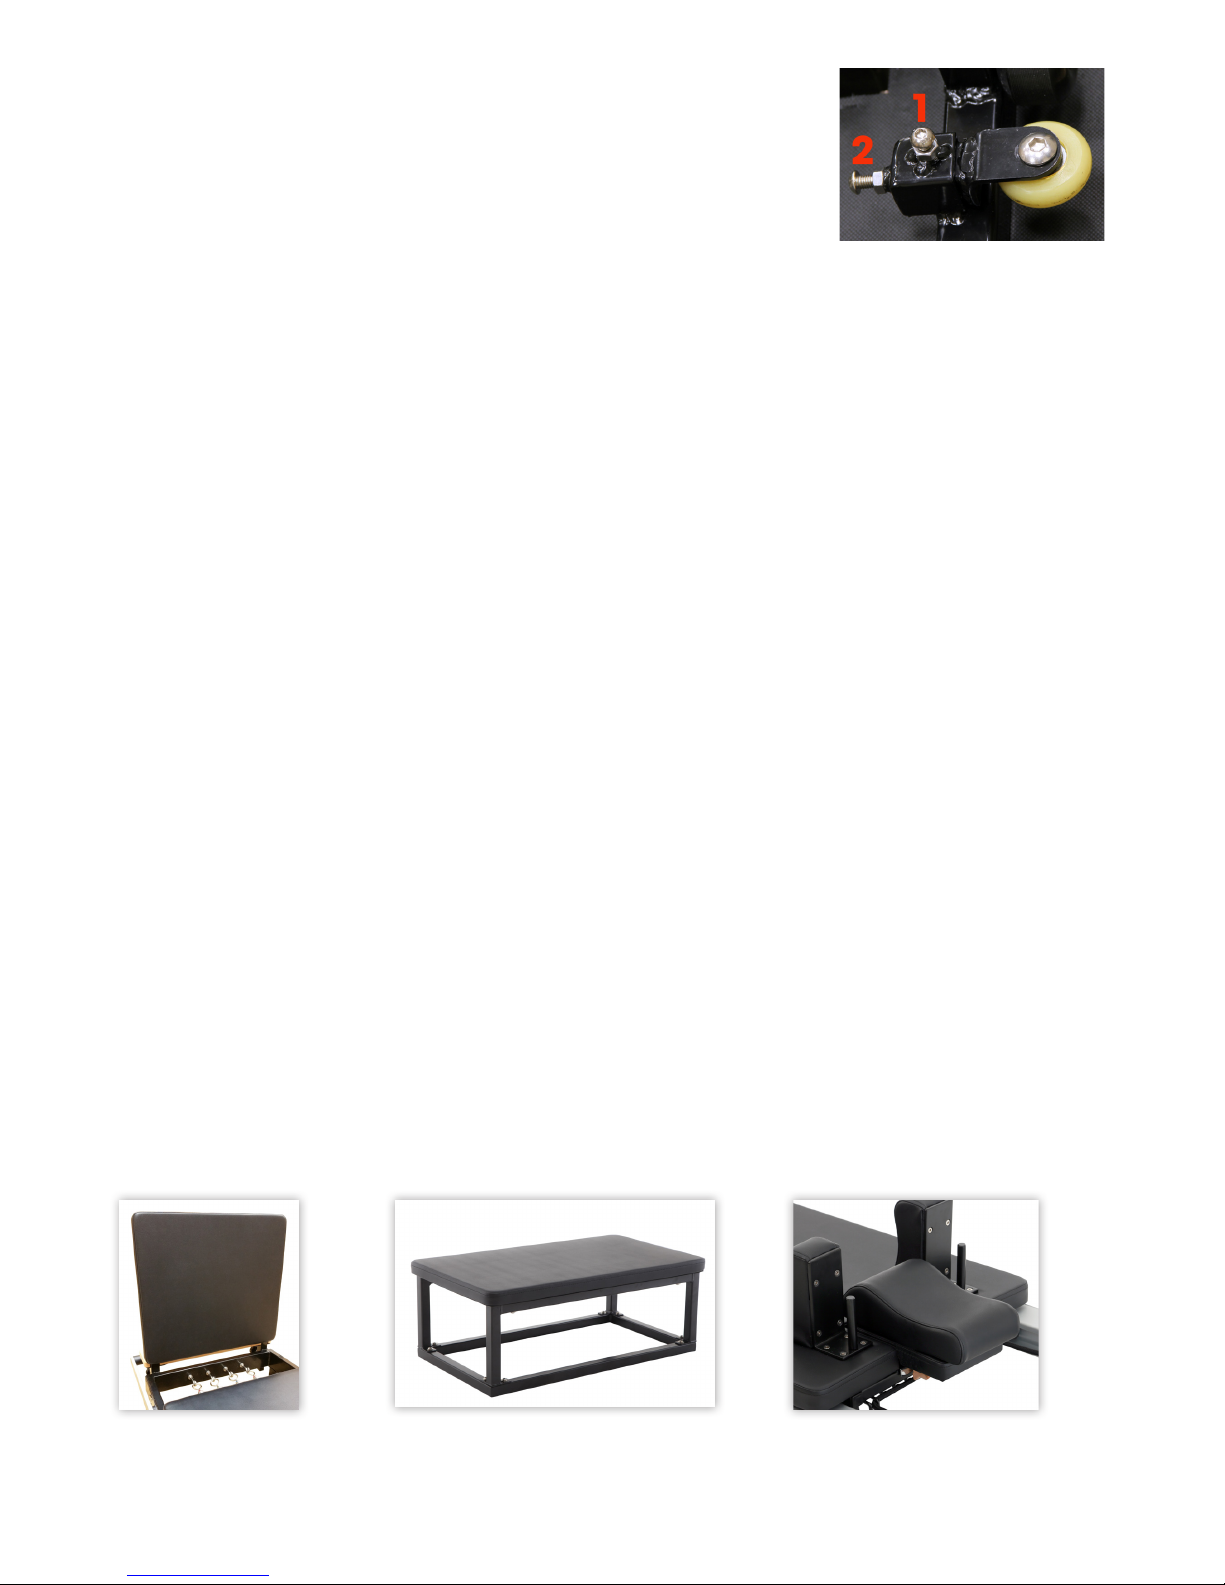
c) Now tilt the reformer on its right hand side and using an 8mm spanner
slacken the locking nuts (Fig 23) on each of the adjustable side wheels, then
screw in or out allen Bolt 2 (Fig 23) so that the adjustable side wheel stops
approximately 2mm from the edge of the runner. Holding the allen bolt in
position with an allen key retighten the locking nut 2. Then tighten the allen bolt 1 and as before tighten the locking nut. Repeat the process for the
other side wheel.
d) Lower the reformer, ensuring it is level and then with NO springs attached gently move the carriage for the full length of the frame and back, ensuring you push it from a central position so as
to keep it in line, now attach a pair of springs and check that the bed is running smoothly with no
squeaking, additional fine tuning may be necessary to achieve optimal performance.
4) Check the wheels and bearings are not damaged. If damaged replace.
Fig.23
F1 Jump Board Sitting Box & Foot Strap Neck Pillow
Page 8

13. ALIGN-PILATES™ LIMITED LIFETIME WARRANTY
Terms of Limited Lifetime Warranty
Align-Pilates offers the following limited lifetime warranty, for the periods as stated below from the date of
purchase, to the original owner of their products, upon presentation of an original invoice in their name.
The warranty covers domestic usage only - the F1 is not warranted for commercial or professional use.
Align-Pilates will repair or replace any mechanical part that malfunctions due to defects in materials and/
or workmanship during the warranty period. The warranty excludes normal wear and tear, damage due
to negligence or misuse, abuse, modification or unauthorized repair; scratches to the finish, and tears or
indents in the upholstery. Align-Pilates will, at its discretion, repair or replace any parts deemed defective
during the warranty period. If we opt to repair or replace your apparatus, this may require that your product is returned for inspection at our premises prior to sending out replacement apparatus. Parts repaired
or replaced under the terms of this warranty will be warranted for the remainder of the original warranty
period only. This warranty does not cover shipping charges, customs clearance fees (where applicable) or
any costs incurred in installing repaired or replacement parts shipped under the provisions of this warranty.
This warranty will be null & void if springs are not changed as specified or, if all safety, maintenance and
usage instructions as specified in the manuals are not observed or, if the equipment is used for any other
purpose other than for Pilates repertoire or if the equipment has been subjected to accident, abuse, improper service, or modification not authorised by the Align-Pilates.
Duration of Limited Warranty
1) The F1 reformer carries a 2 year warranty for the main steel frame and standing platform and the following warranty on other parts
a) Springs
2 year / 3,000 hours warranty is given on all springs, excepting that a decrease of 5% of the spring power
per 1,500 hours usage is acceptable according to internationally standards. Align-Pilates Springs should
be replaced after a maximum of 3,000 hours use or 2 years, whichever is earlier. In the event of any signs
of damage or wear springs should be replaced immediately regardless of age or usage.
b) All other parts including wear and tear parts including wheels, straps, ropes: 1 year
c) Upholstery
The upholstery fabric on Align-Pilates equipment will be replaced if it fails to give normal wear for 90 days
from the date of delivery. Proof of damage may be required. This warranty does not cover cuts, scratches,
burns, stains, soiling, or damages caused by unreasonable use such as wearing jewellery or inappropriate clothing whilst using the equipment. Align-Pilates reserves the right to substitute an equivalent fabric if
an identical fabric is not available. Upholstery must be properly cared for laid out in the manual.
Warranty Return Procedure
The customer must call Align-Pilates or its authorized Distributor for authorization prior to returning the equipment. The customer is responsible for the cost of returning products to Align-Pilates (or their appointed
Distributor) for warranty adjustment should this be deemed necessary. The customer is responsible for any
damage or loss during shipment back to Align-Pilates (or their appointed Distributor). The customer is responsible for the cost of return freight to them in the event Align-Pilates decline to make a warranty adjustment. Align-Pilates do not accept responsibility for any items returned without a pre-approved authorization number, which must be clearly marked on the outside of the package.
Limitation of Liability
The above is our exclusive warranty and is in lieu of all other warranties, express or implied, including warranties of merchantability or fitness for any purpose. In no event shall Align-Pilates or their Distributors be
liable for incidental, consequential or punitive damages.
Further Information
This warranty is issued by Align-Pilates Equipment Ltd
Contact details: 430 Enterprise Way, Vale Park, Evesham, Worcs WR11 1 AD, UK.
Telephone + 44 1386 425920. Email: [email protected]
For more information about Align-Pilates equipment please visit: www.align-pilates.com
 Loading...