

Page 1
1
Copyright@2015 HeliPal.com. All Rights Reserved
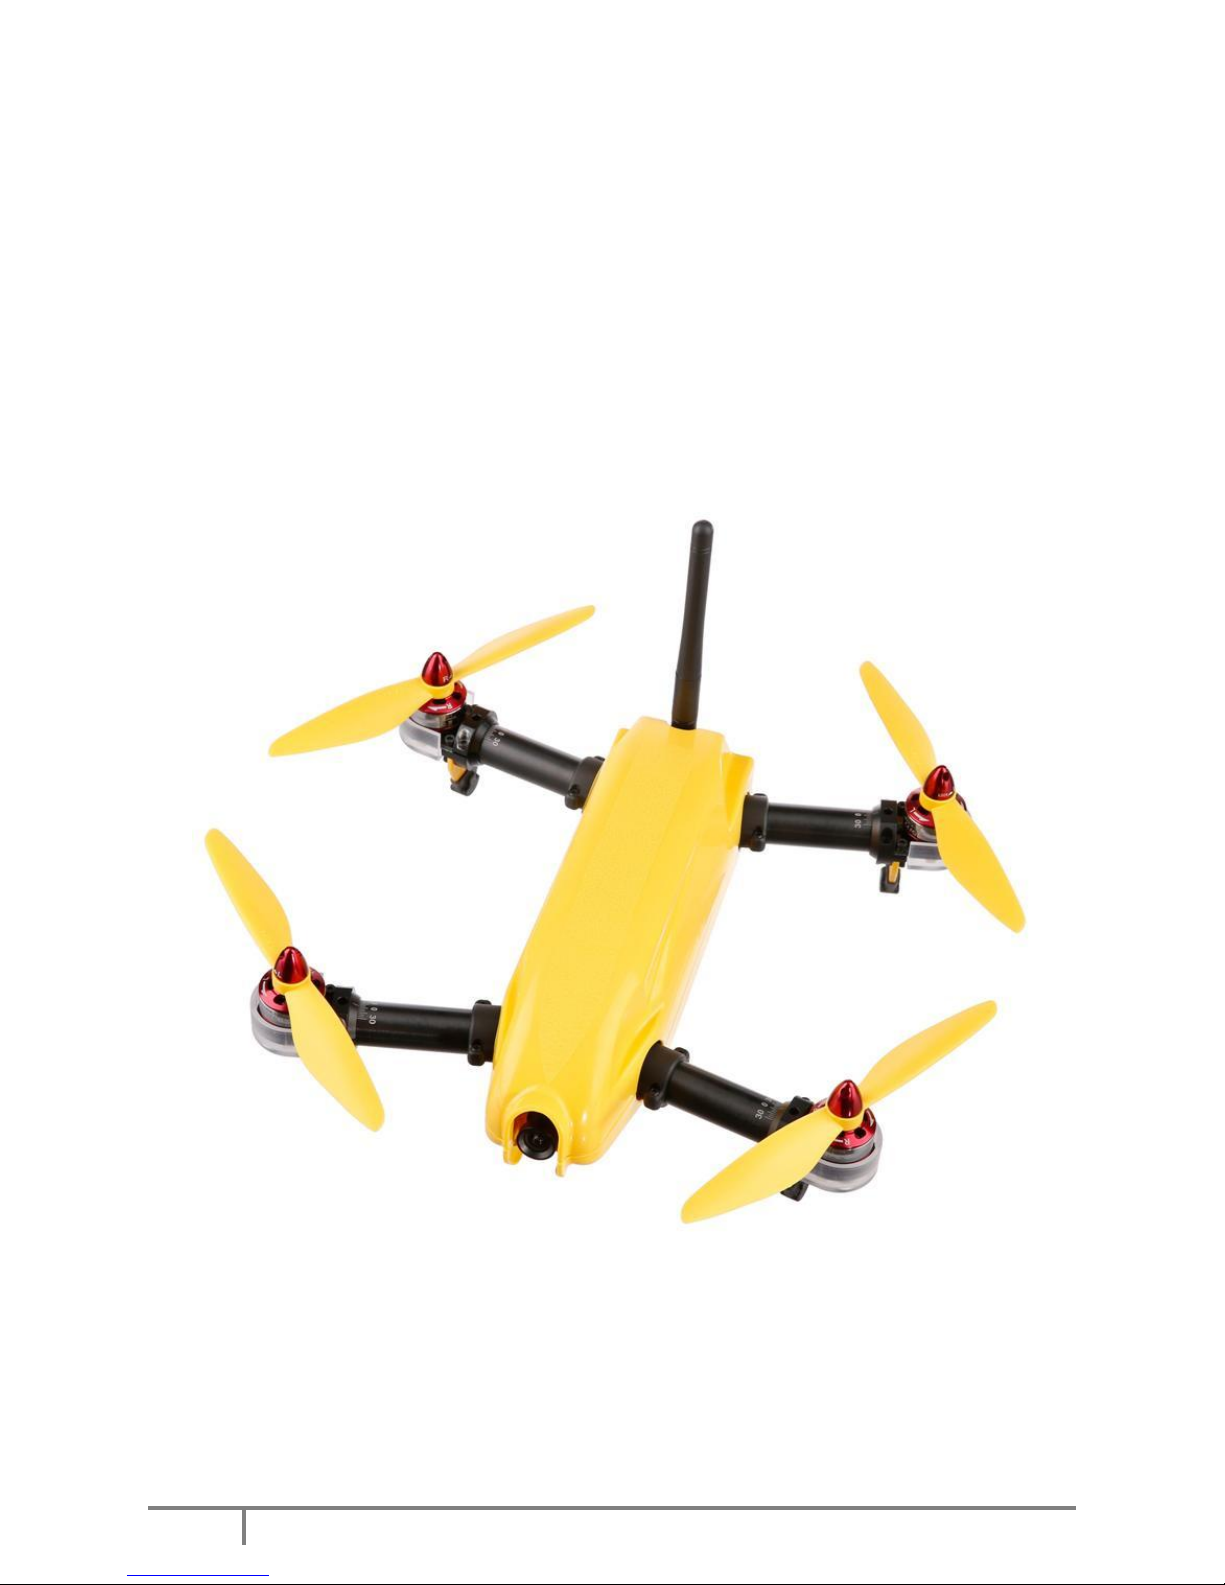
Align MR25
Racing Quad
w/RadioLink AT9 Radio Controller
USER MANUAL V1
Page 2

2
Copyright@2015 HeliPal.com. All Rights Reserved
DISCLAIMER
Please read this disclaimer carefully before using this product. This product is a
hobby with motors but not a toy which is not suitable for people under the age of
18. By using this product, you hereby agree to this disclaimer and signify that you
have read them fully. You agreed that you are responsible for your own conduct
and content while using this product, and for any consequences thereof.
Before you fly the drone
1) Make sure all connections are good, and keep children and animals away
during flying, firmware update, system calibration and parameter setup.
2) Always fly the drone away from unsafe conditions, such as obstacles, crowds,
high-voltage lines, etc.
3) Do not use in bad weathers such as rainy day, snow, windy (more than
moderate breeze), hail, lighting, tornadoes, hurricanes etc.
4) Check whether the propellers and the motors are installed correctly and firmly
before flight. Make sure the rotation direction of each propeller is correct.
5) Check whether all parts of the drone are in good condition before flight. Do not
fly with aging or broken parts.
6) Never overcharge LiPo batteries. Do not charge above 4.2V per cell. When the
battery is fully charged, disconnect it from the charger. Never leave the battery
charger unattended during charging.
7) Never discharge batteries to below 3.3V per cell
8) Remove batteries when not using the drone.
Page 3
3
Copyright@2015 HeliPal.com. All Rights Reserved
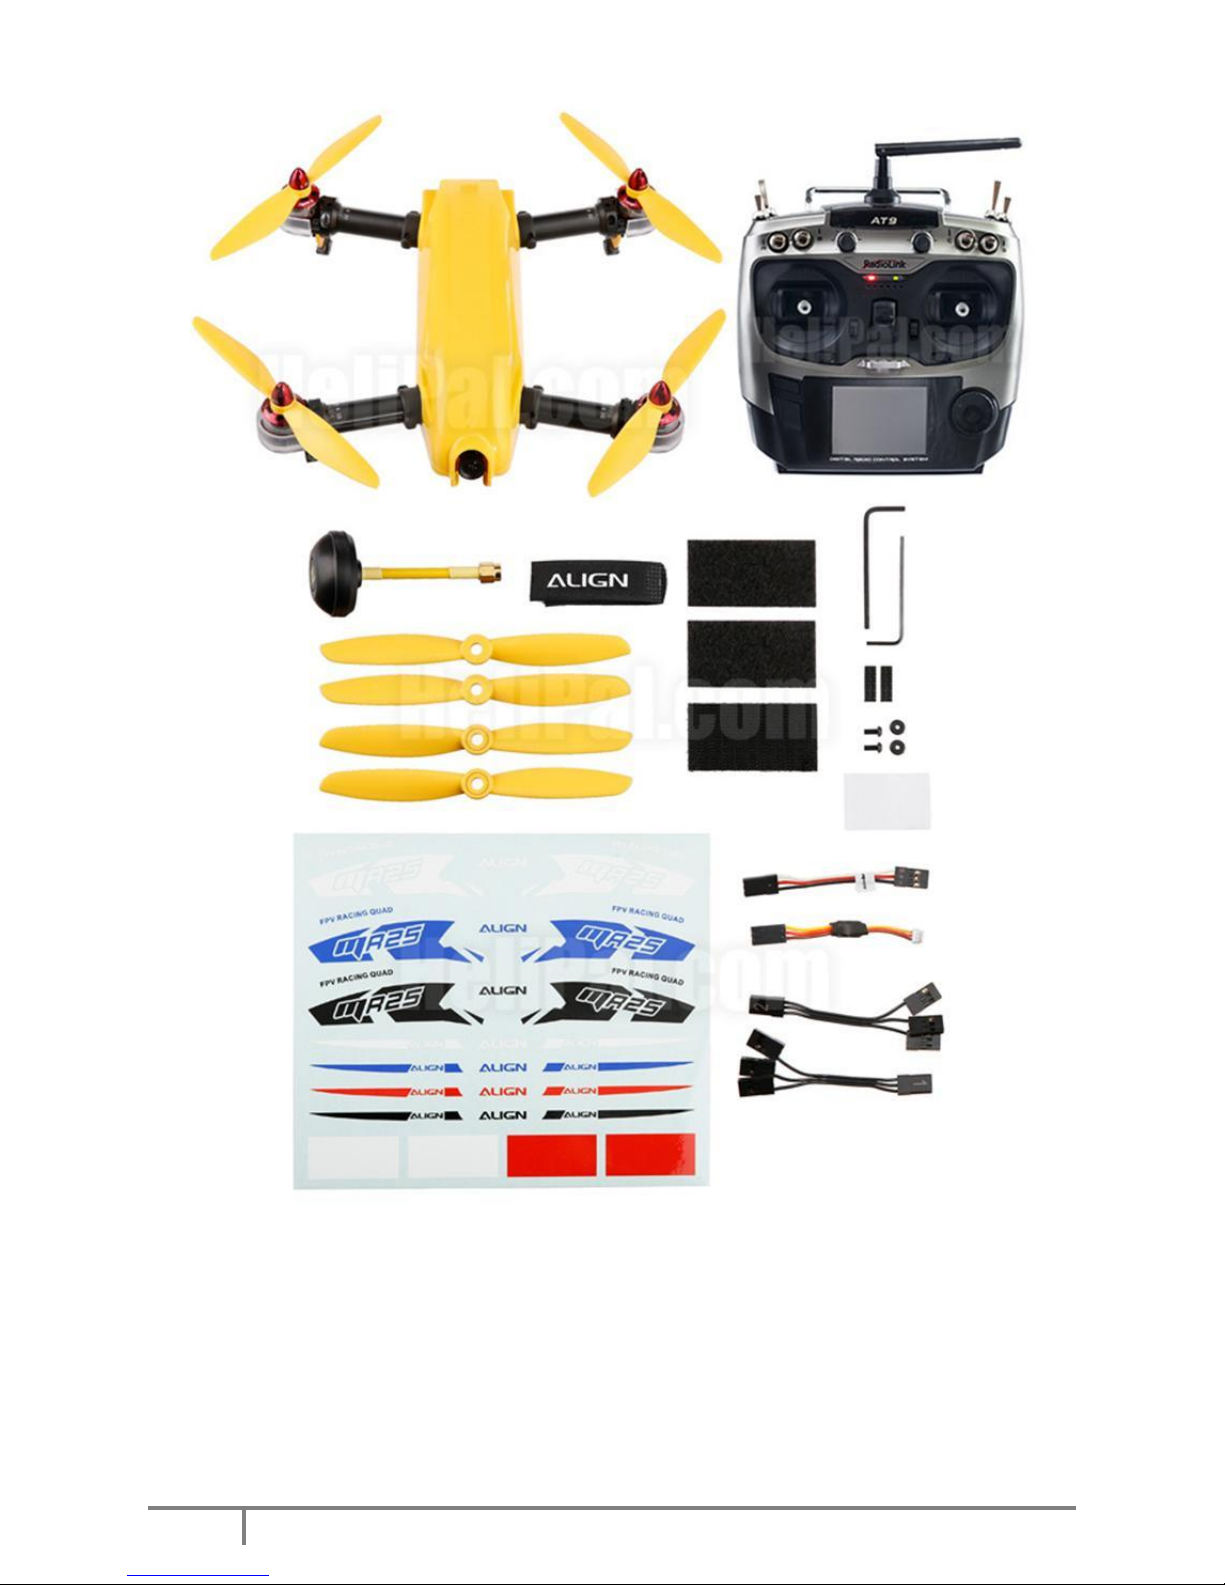
Package includes:
1. Fully-Assembled and Ready-to-Fly Align MR25 FPV Drone (w/ RadioLink R9D
Receiver with conventional connection)
2. RadioLink AT9 Radio System
3. 4pcs of 5" Propeller
4. 4pcs of 6" Propeller
5. English Manual and Decals
6. 5.5mm Hex Nut Cross Wrench (for airframe locknut)
Page 4
4
Copyright@2015 HeliPal.com. All Rights Reserved
Important Notes
I. Remove main canopy tips:
A. Gently hold the front of the canopy notch and pull it up
B. Slightly remove two rear latch and push forward to open
II. Transmitter Type - We are using conventional connection between the Radio
Receiver and Quad.
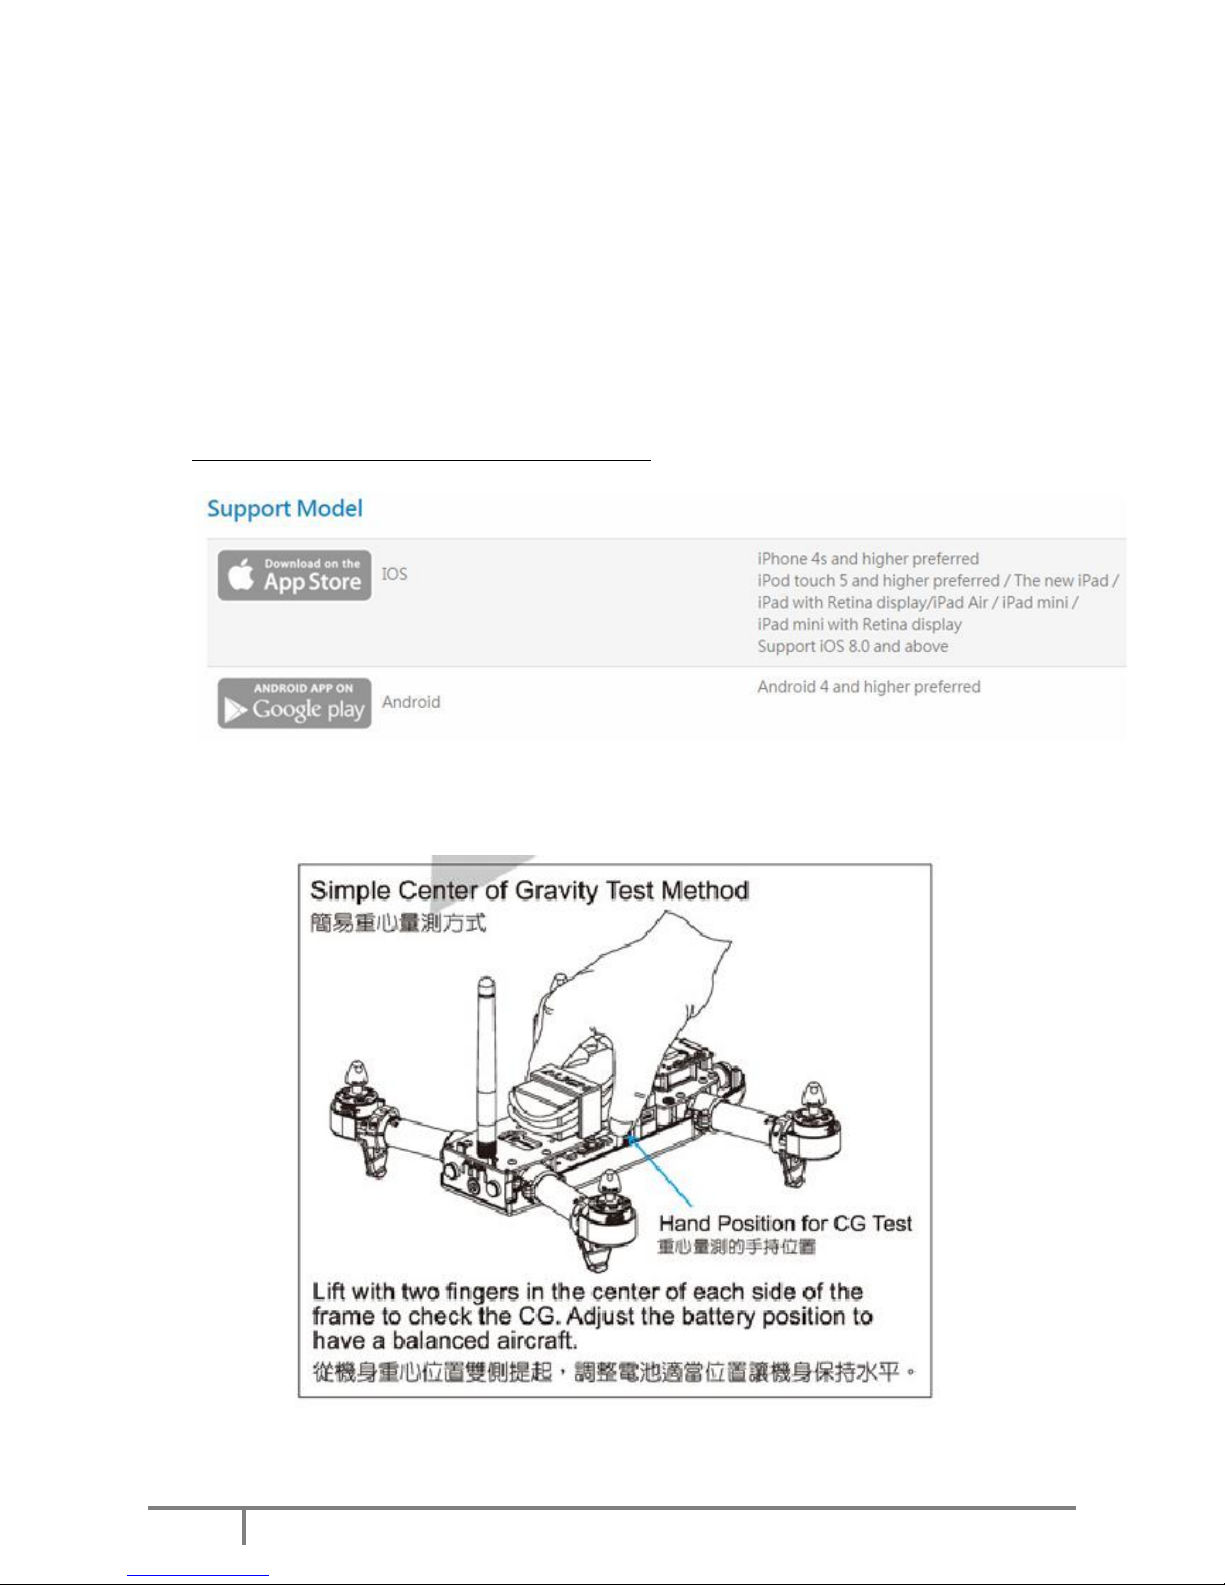
III. For Advance Flight controller parameters setup requires, you need to use the
ALIGN MRS App which can be found with the link below
http://www.align.com.tw/download-en/mrs/
IV. Always make sure the center of gravity in the correct level position as imbalance
CG would affect flight stability and performance
Page 5
5
Copyright@2015 HeliPal.com. All Rights Reserved
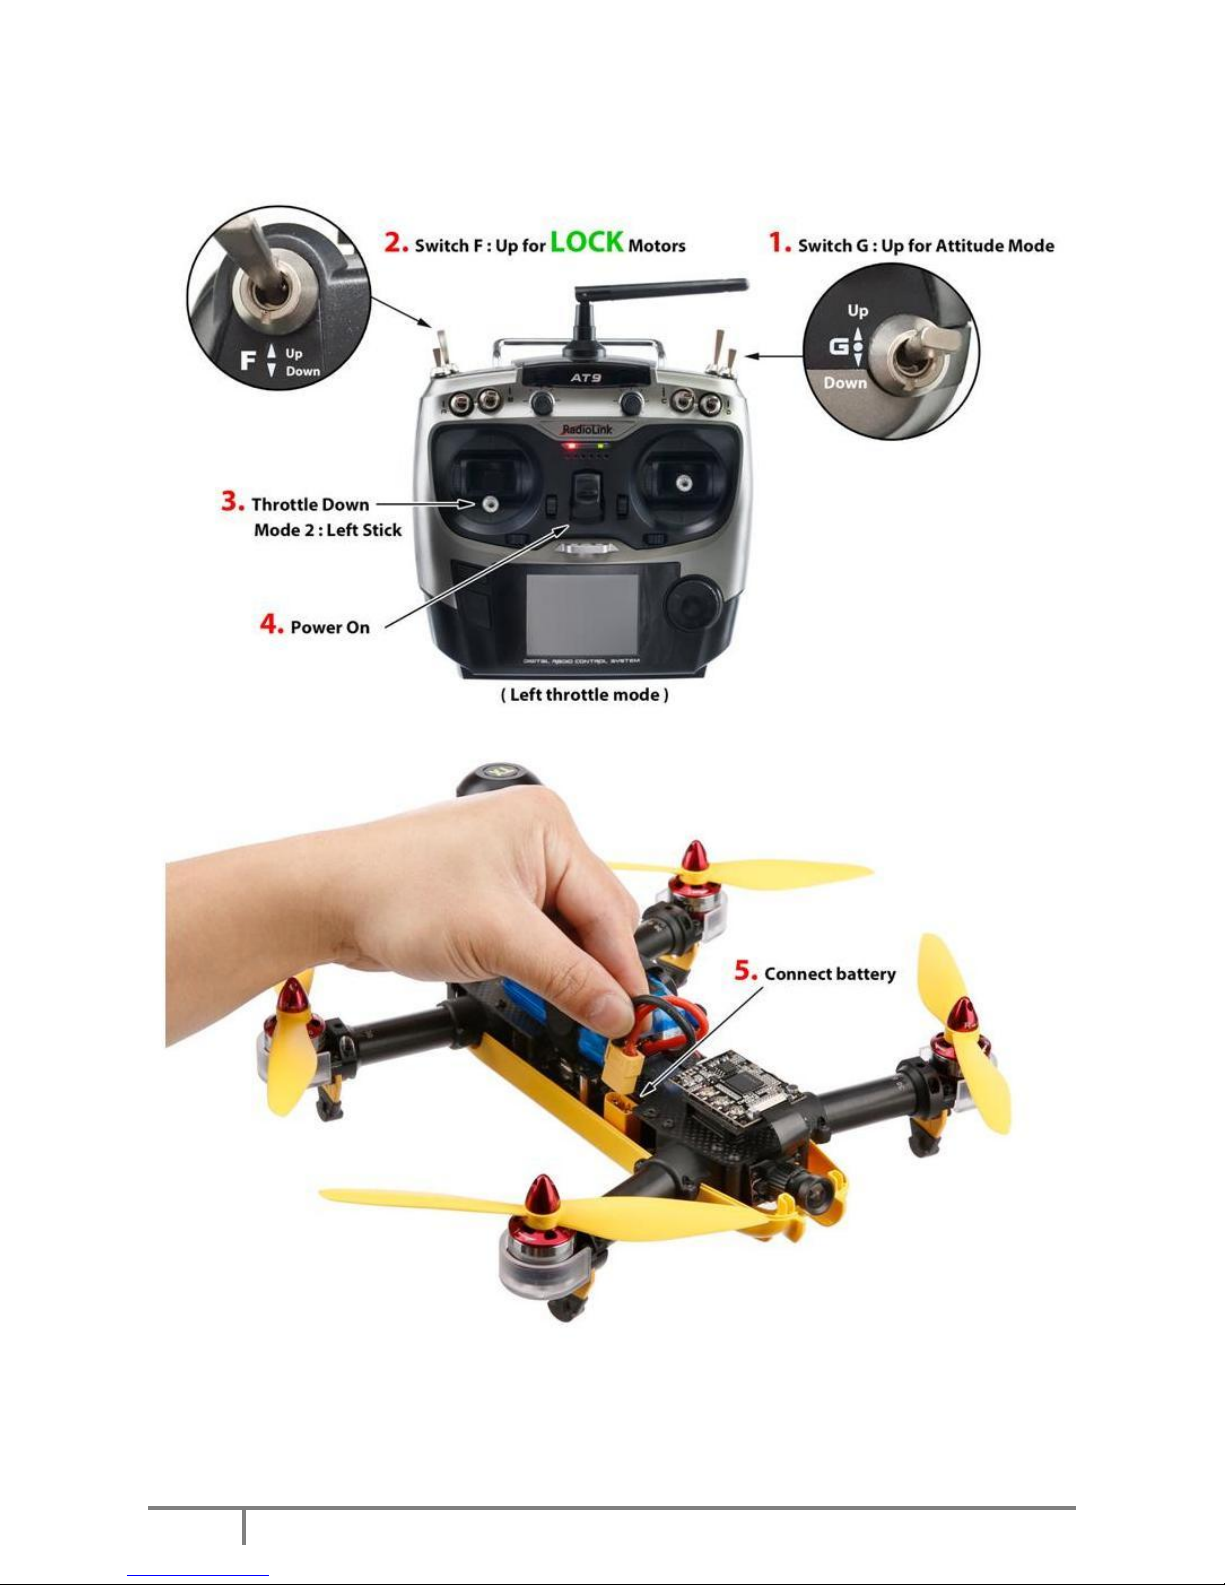
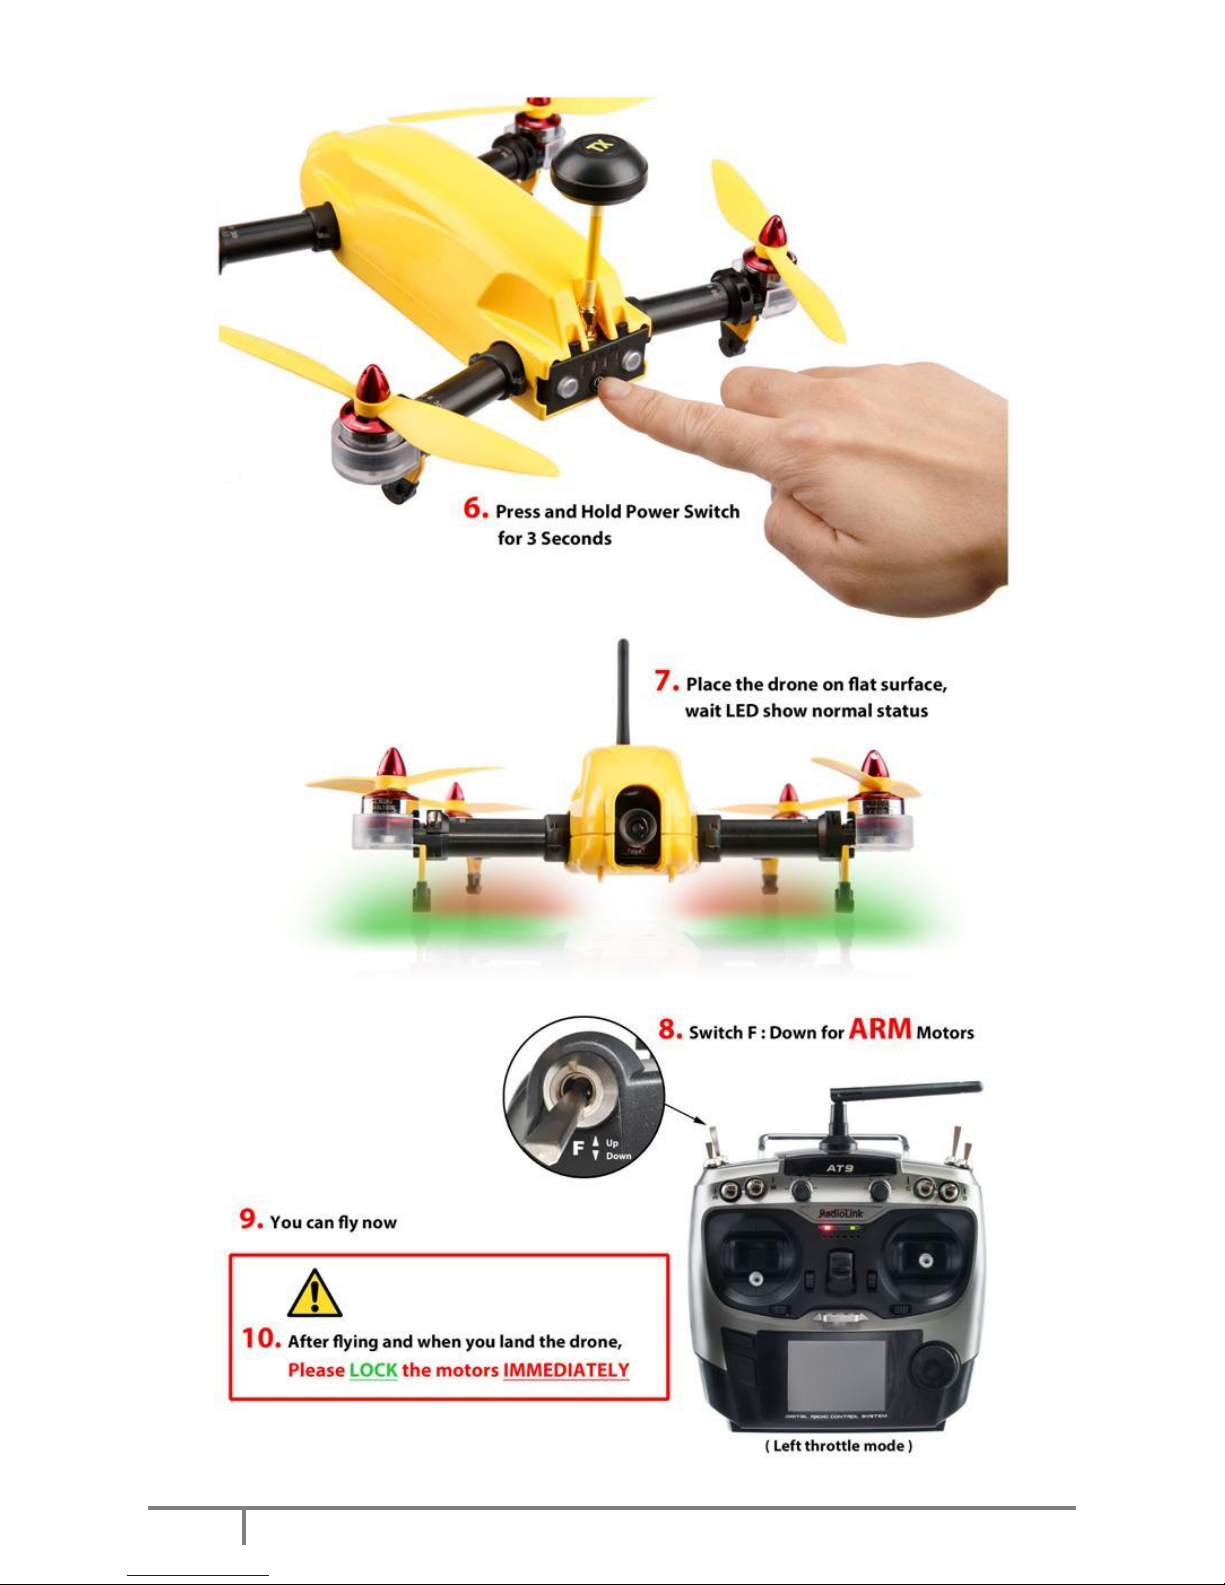
Quick Start
Page 6
6
Copyright@2015 HeliPal.com. All Rights Reserved
Page 7
7
Copyright@2015 HeliPal.com. All Rights Reserved
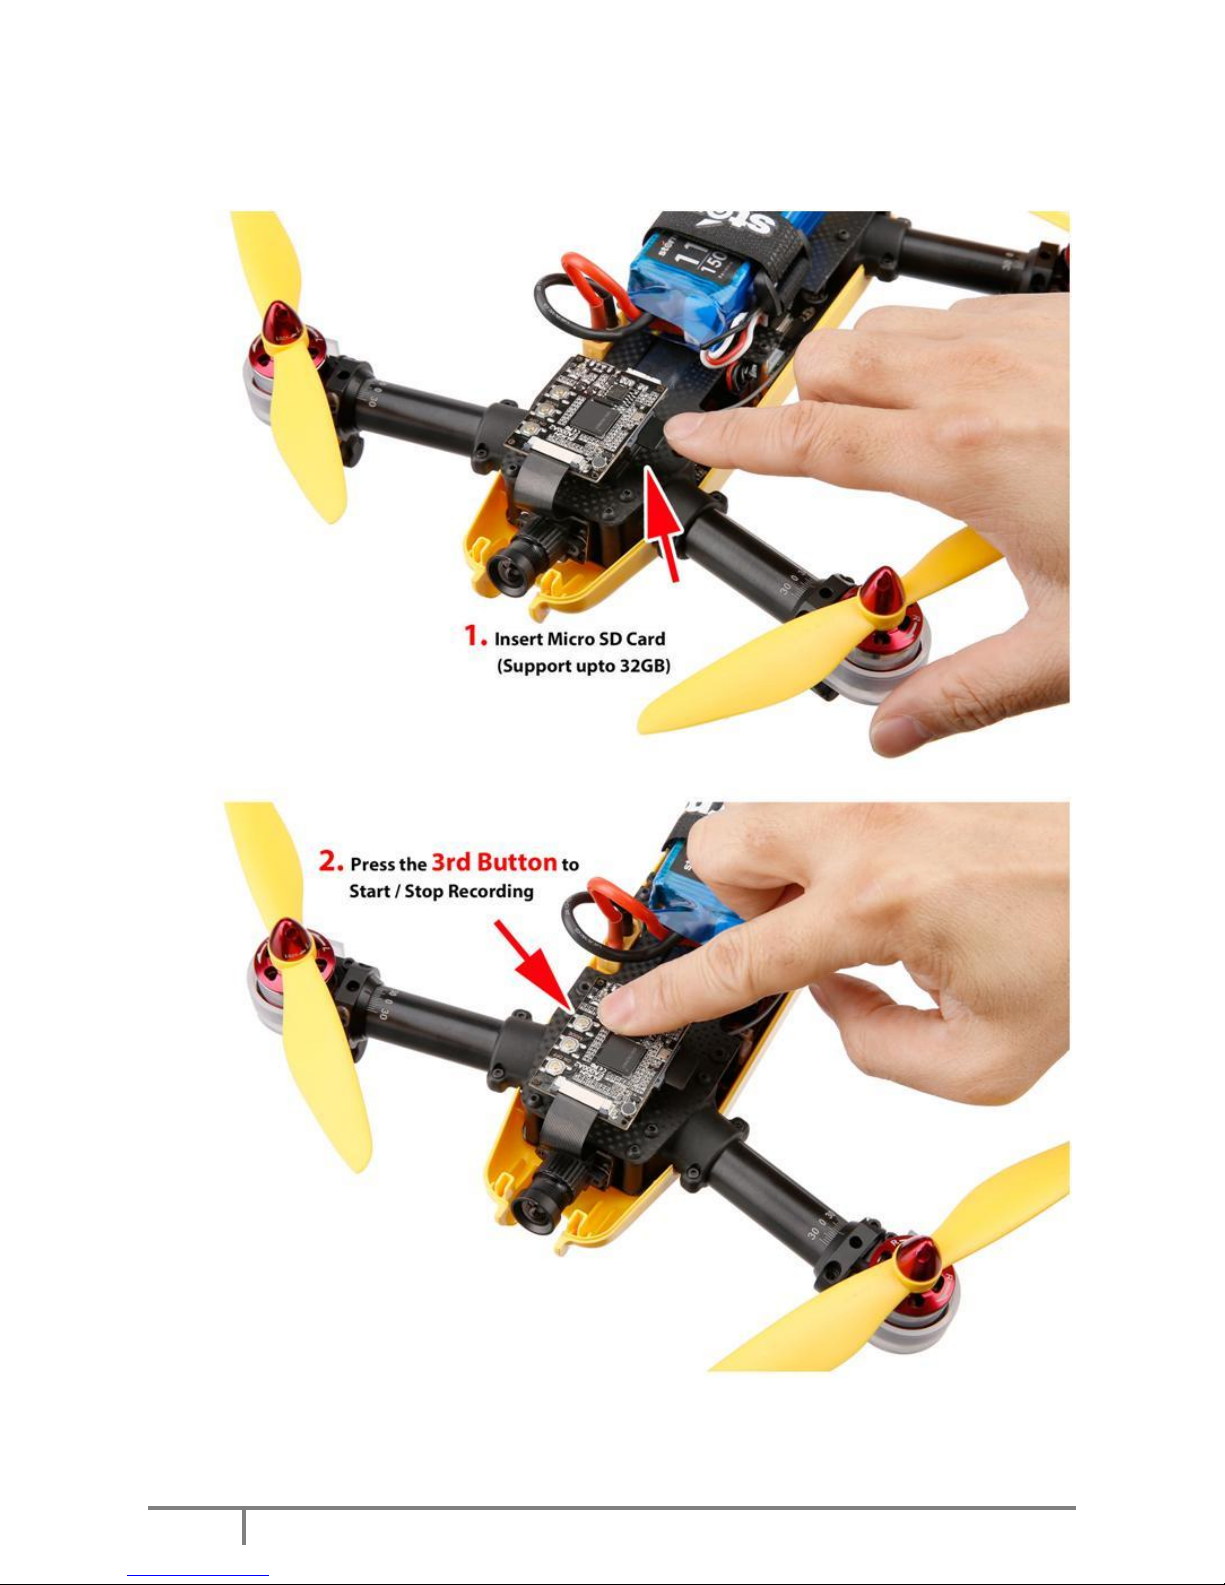
How to start recoding?
Page 8
8
Copyright@2015 HeliPal.com. All Rights Reserved
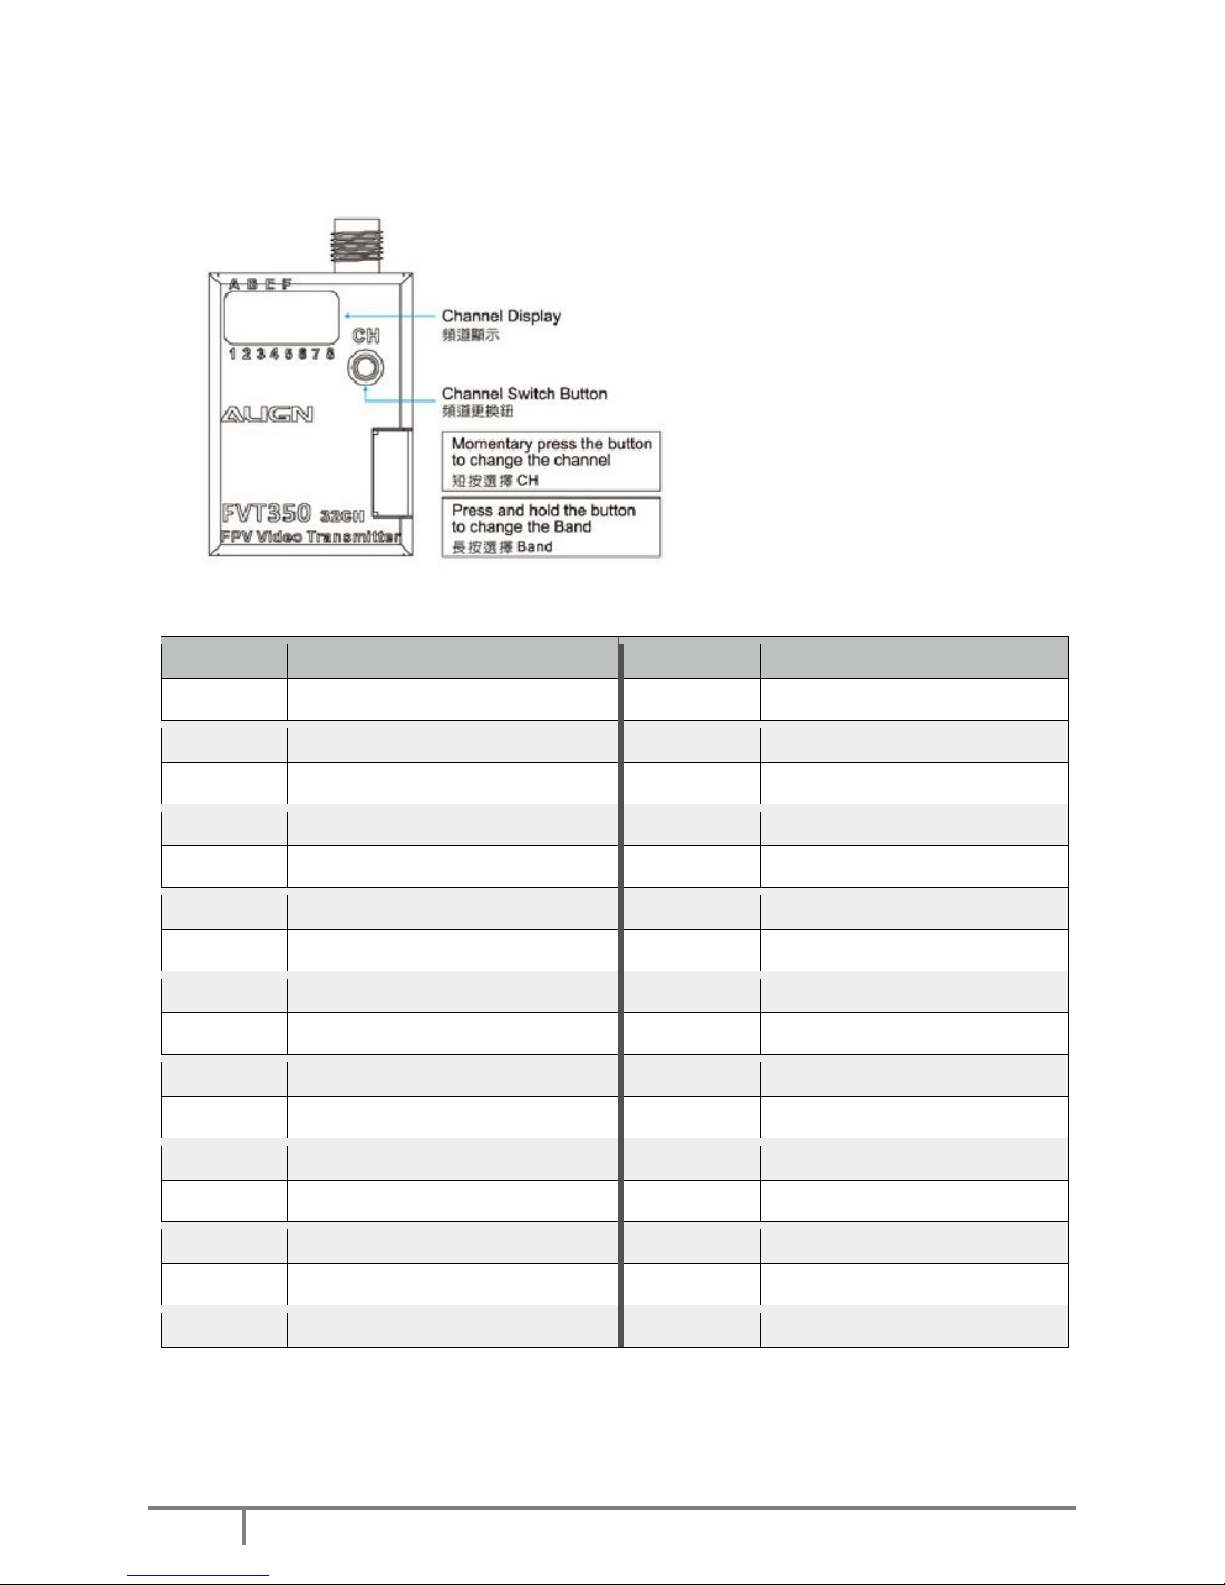
FPV System
Align video transmitter has up to 32 different video channels available to avoid interference with
other channels.
If two or more drones are flying at the
same time, try to select different video
frequency to avoid video interference.
The bigger different in video frequency
between drones, the less interference
generated.
Always check the supported channels of
you FPV reception devices such as
monitor, goggle
Frequency
Frequency/Channel
Frequency
Frequency/Channel
5645MHz
E4
5805MHz
A4
5665MHz
E3 (Default)
5809MHz
B5
5685MHz
E2
5820MHz
F5
5705MHz
E1
5825MHz
A3
5725MHz
A8
5828MHz
B6
5733MHz
B1
5840MHz
F6
5740MHz
F1
5845MHz
A2
5745MHz
A7
5847MHz
B7
5752MHz
B2
5860MHz
F7
5760MHz
F2
5860MHz
F8
5765MHz
A6
5865MHz
A1
5771MHz
B3
5866MHz
B8
5780MHz
F3
5885MHz
E5
5785MHz
A5
5905MHz
E6
5790MHz
B4
5925MHz
E7
5800MHz
F4
5945MHz
E8
Page 9
9
Copyright@2015 HeliPal.com. All Rights Reserved
FAQ
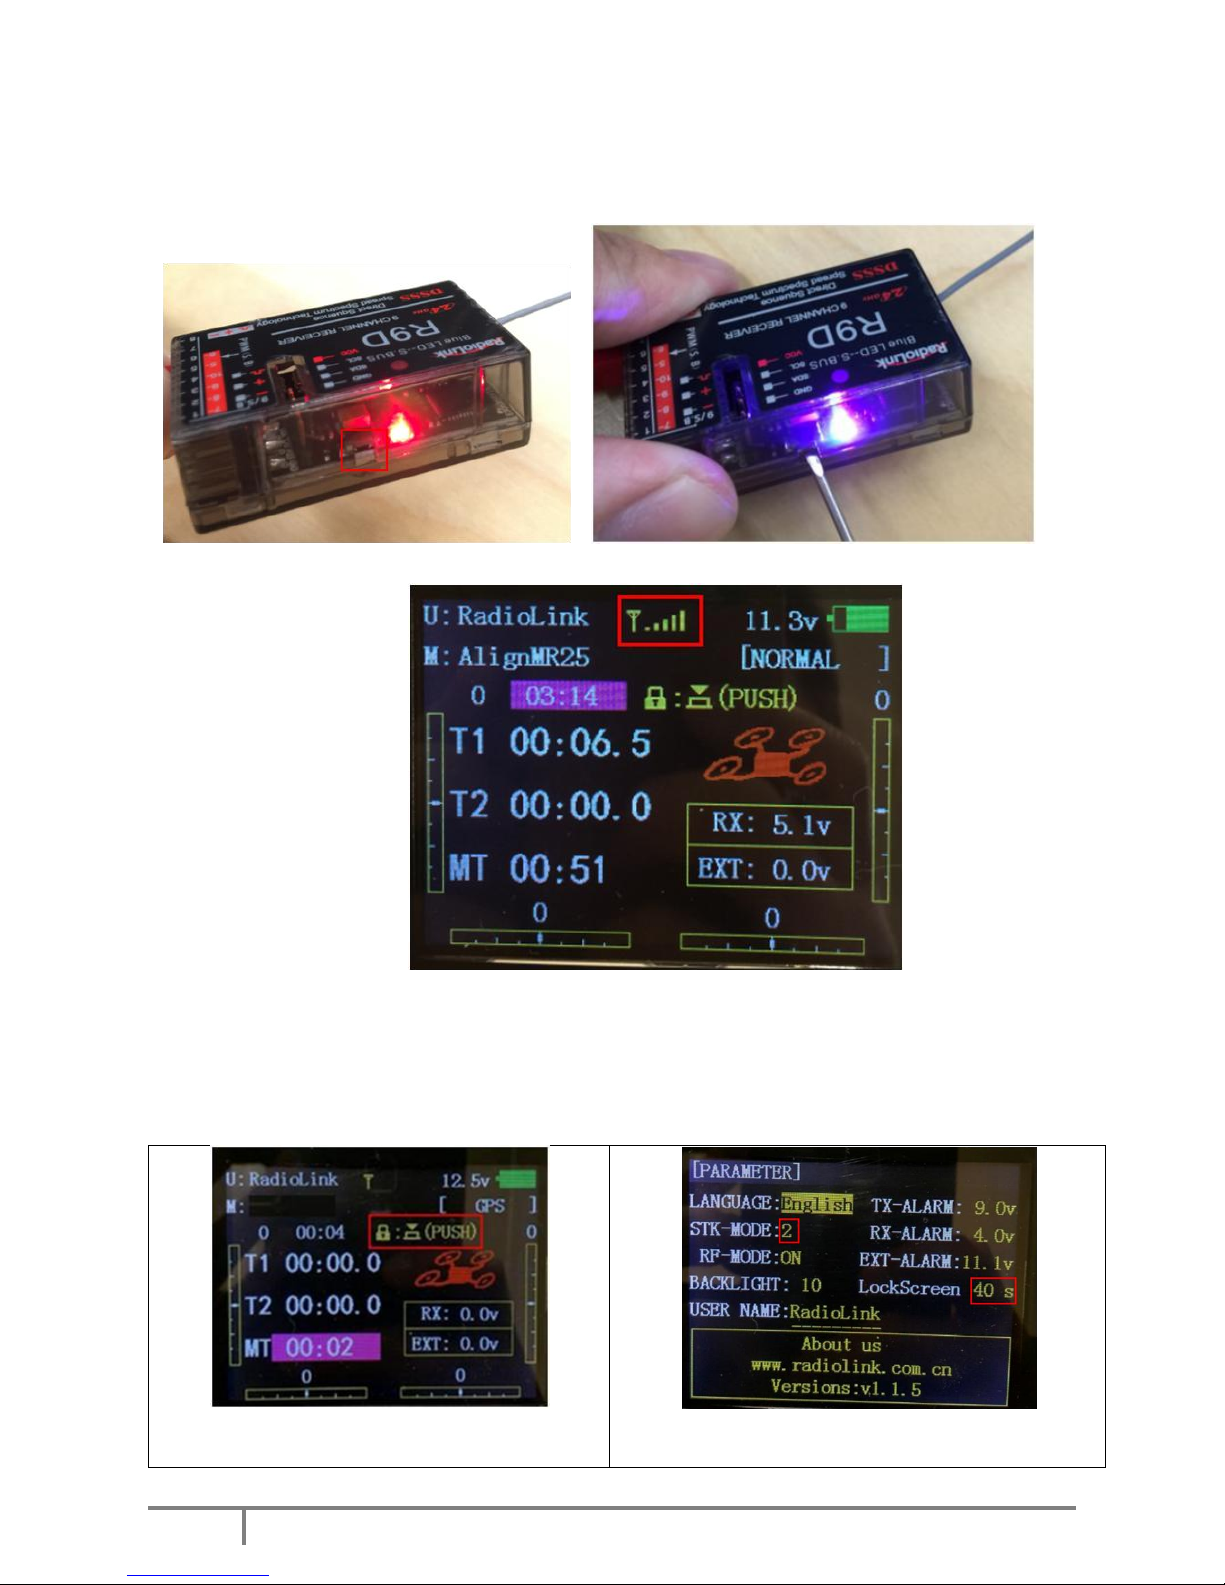
Lost connection with radio controller
If you’re the drone cannot response to the radio controller stick travel, the connection between
radio controller and receiver may lost and you can try to re-bind them by following the procedure
below:
Press the switch inside the receiver twice with small screwdrivers to make LED indicator turns RED to set the
control mode to Conventional Mode. (Skip this step if it is default in Red light)
Use the small screwdrivers to press and hold the switch inside the receiver until it is flashing with light in Blue and
Purple, Switch on the radio controller, it will start searching for available receiver. Receiver will stop flashing while the
bind process complete and the radio controller will the signal strength on the screen
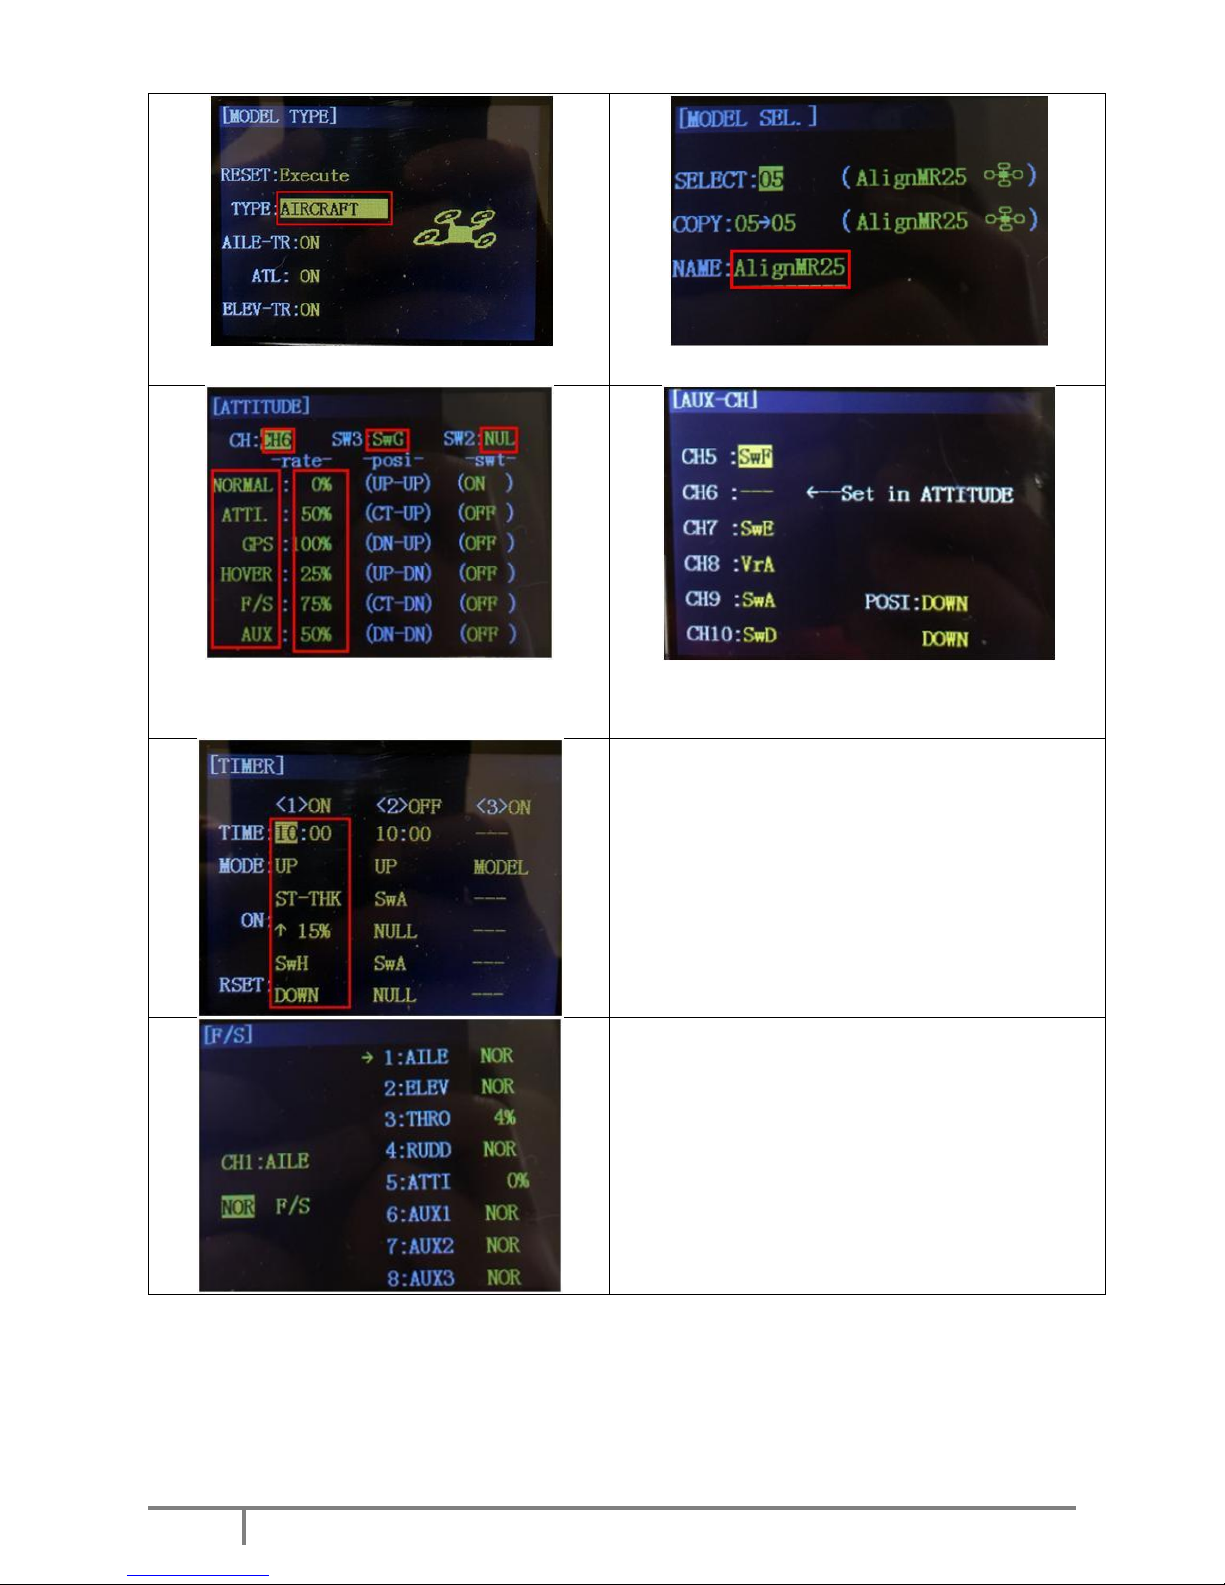
Radio Controller Parameters
If you reset your radio controller (AT9) setting, you can apply the setting below:
1) Press and Hold the controller wheel (With wordings
“PUSH”) to unlock the manual. Press and Hold Mode
Button to go into basic menu page
2) [STK-MODE] = 2 (Stick Mode)
[LockScreen] = 30s (Time to lock screen)
Page 10
10
Copyright@2015 HeliPal.com. All Rights Reserved
3) [TYPE] = AIRCRAFT
4) [SELECT] = 01
[NAME] = SRD-CC3D (Any name you want)
5) Go to [AUX-CH] -> ATTITUDE, apply the setting below:
[CH] = CH6 [SW3] = SwG [SW2] = NUL
[NORMAL] = 0% [ATTI.] = 50% [GPS] = 100%
[HOVER] = 25% [F/S] = 75% [AUX] = 50%
6) [CH5] = SwF [CH6] = ----- [CH7] = SwE
[CH8] = VrA [CH9] = SwA [CH10] = SwD
7) [1] [TIME] = 10:00
[1] [MODE] = UP
[1] [ON][1] = ST-THK (Using Throttle Stick to start the
timer)
[1][ON] [2] = 15% ( Move the indicator over the value, set
throttle stick to around 15%, Press and hold “Push” button
to recognize the throttle value and move the wheel to change
the arrow sign)
[1][RESET] [1] = SwH (Using Switch H to responsible for the
reset timer action)
[1][RESET] [2] = DOWN (Using Switch H’s down action to
reset the timer)
8) Go to [F/S], apply the setting below:
[1] [AILE] = NOR
[2] [ELEV] = NOR
[3] [THRO] = 4%
[4] [RUDD] = NOR
[5] [ATTI] = 0%
[6] [AUX1] = NOR
[7] [AUX2] = NOR
[8] [AUX3] = NOR
 Loading...