

Alicat Flow Vision SC User Manual

Alicat Scientic, Inc.
7641 N Business Park Drive
Tucson, Arizona 85743
USA
Alicat.com

Notice: Alicat Scientic, Inc. reserves the right to make any
changes and improvements to the products described in
this manual at any time and without notice. This manual is
copyrighted. This document may not, in whole or in part, be
copied, reproduced, translated, or converted to any electronic
medium or machine readable form, for commercial purposes,
without prior written consent from the copyright holder.
Note: Although we provide assistance on Alicat Scientic
products both personally and through our literature, it is the
complete responsibility of the user to determine the suitability
of any product to their application.
The manufacturer does not warrant or assume responsibility for
the use of its products in life support applications or systems.
For more information regarding this or any Alicat product, please
contact us at:
Alicat Scientic, Inc
7641 N Business Park Drive
Tucson, Arizona 85743
USA
Ph: 520-290-6060
888-290-6060
Fax: 520-290-0109
email: info@alicatscientic.com
Web site: www.alicatscientic.com
01/08/2013 Rev.2 DOC-FVISIONSCMAN
2

Table of Contents
Welcome to Flow Vision™ SC 5
System Requirements 5
Section 1 - Getting Started 6
Installing the Software 6
Launching Flow Vision™ SC 9
Section 2 - Setting up Flow Vision™ SC 10
Registering Flow Vision™ SC 10
Flow Vision™ SC Menu and Menu functions 10
File Menu 11
Properties Menu 11
Polling Menu 12
View Menu 12
Window Menu 12
Macro Menu 12
Help Menu 12
Flow Vision™ SC Screen Layout 13
Tabs 13
Moving & Docking Modules in the Flow Vision™ Window 14
Section 3 - Communicating with a Device 15
Connecting To An Instrument And Receiving Data 15
Adding a Device to a Known COM Port 15
Searching for Devices 16
Opening the Device Window 17
Display Tab 17
General Tab 18
Gas Select™ 18
Averaging 18
Tare 19
Control Tab (Controllers only) 19
Control Loop 19
Valve Tuning 20
Valve Offset 20
Info Tab 20
Polling a Device 21
3

Table of Contents
Removing a Device 21
Setting Software Alarms 21
Creating Custom Modiers 22
Section 4 – Optional Modules 23
Data Logs 23
Splitting Data Files 25
Starting and Stopping Data Logs 25
Charts 27
Creating Charts 27
Charting 29
Scripts 30
Descriptions of Simple Script Commands 31
Write Address 31
Change Set-point (Scale Units) 31
Change Set-point (% of Full Scale) 31
Tare 31
Reset Total 31
Sample Script 32
Running the Script 33
Terminals 34
Uninstalling Flow Vision™ SC 35
Troubleshooting and FAQs 36
Contact Information 37
4

Welcome to Flow Vision™ SC
Flow Vision™ SC is a graphic based software package that allows you to
operate any Alicat ow or pressure instrument via a graphical user interface.
Flow Vision™ SC lets you: access information from your Alicat instruments;
make changes in commands to those instruments; monitor performance; log
data; chart data; and communicate directly with the unit via a terminal window.
If you have used earlier versions of Alicat Scientic’s Flow Vision™ software,
we are sure you will nd many new and improved functions in this latest
version: Flow Vision™ SC.
Note: Identiers and scripts from earlier versions of Flow Vision™ are not
recognized by Flow Vision™ SC.
System Requirements
• Microsoft® Windows® XP® or Microsoft® VISTA®, Windows® 7
• Microsoft® .NET Framework Version 3.0
(A copy of Microsoft® .NET Framework can be downloaded at:
http://www.microsoft.com/downloads/details.aspx?Familyd=262D25E3F589=4842-8157-034D1E7CF3A3&displaylang=en)
• 18 MB hard disk space
• Available COM port that supports 19200 baud communications*
* Note: Some laptops are not equipped with serial ports. A virtual serial port
can be created using a USB to Serial adapter.
5
Section 1 - Getting Started
In this section you will learn about:
• How to install Flow Vision™ SC to your computer
• How to start using Flow Vision™ SC
Installing the Software
In order to begin using the Flow Vision™ SC software, you will need to install
the software onto the computer to which you plan to connect your Alicat ow
or pressure instrument.
To install the software, place your original Flow Vision™ SC CD into the CD or
DVD drive on your computer or laptop. If your computer does not have a CD
or DVD drive installed, please contact the vendor from whom you purchased
the computer, the manufacturer of the computer or your company’s computer
technician.
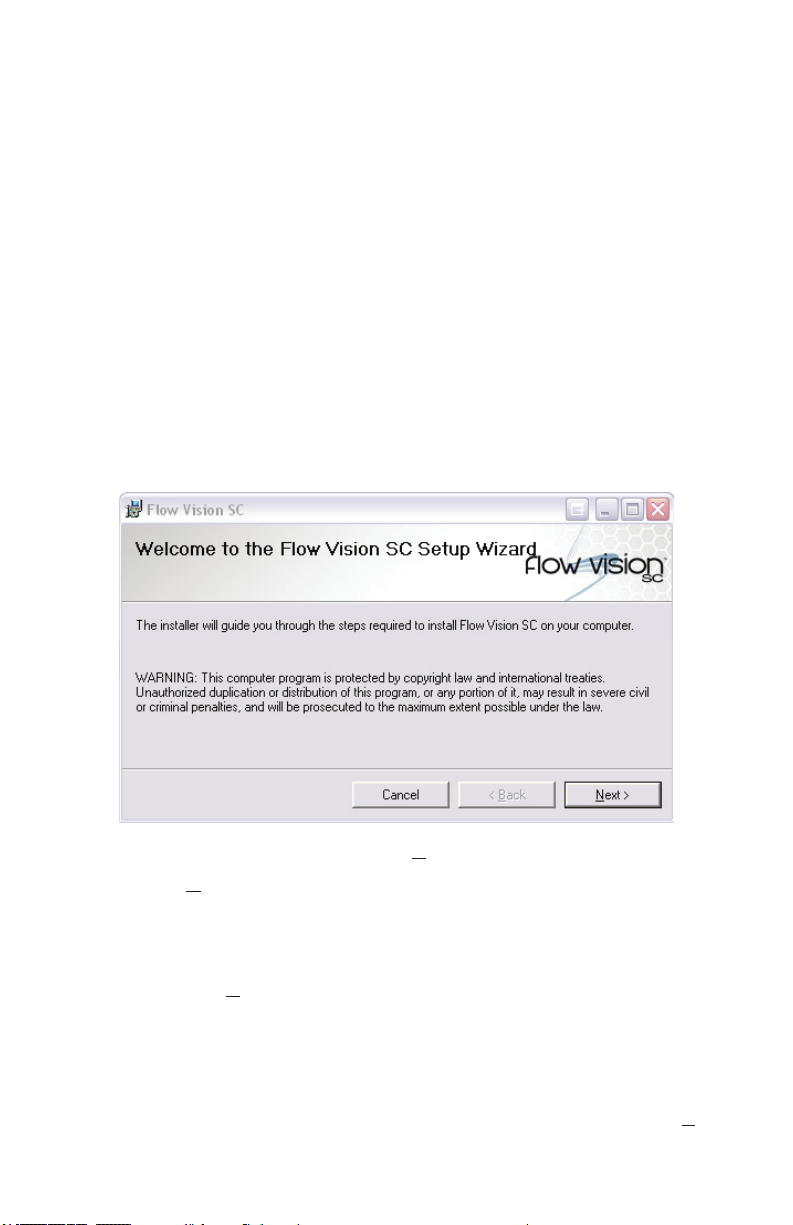
Once you have placed the CD into the computer’s drive, you should hear some
noise from the computer’s drive. In a moment, you will see the installation
screen on your monitor:
To continue, choose the button marked “Next >”.
Upon clicking “Next” the End User License Agreement will be shown.
Please read the Agreement carefully and if you agree to the terms listed, use the
mouse pointer to place a check mark in the box next to the sentence indicating
that you agree to the End User License Agreement. After you have done that
you can click the “Next” button to continue with the software installation. If
you do not agree to the terms listed, cancel the installation, remove the CD
from your computer and contact your software vendor to arrange returning the
software for a refund.
You can abort the installation at any time by choosing the button marked
“Cancel” or revert to the previous step by choosing the button marked “Back”.
6
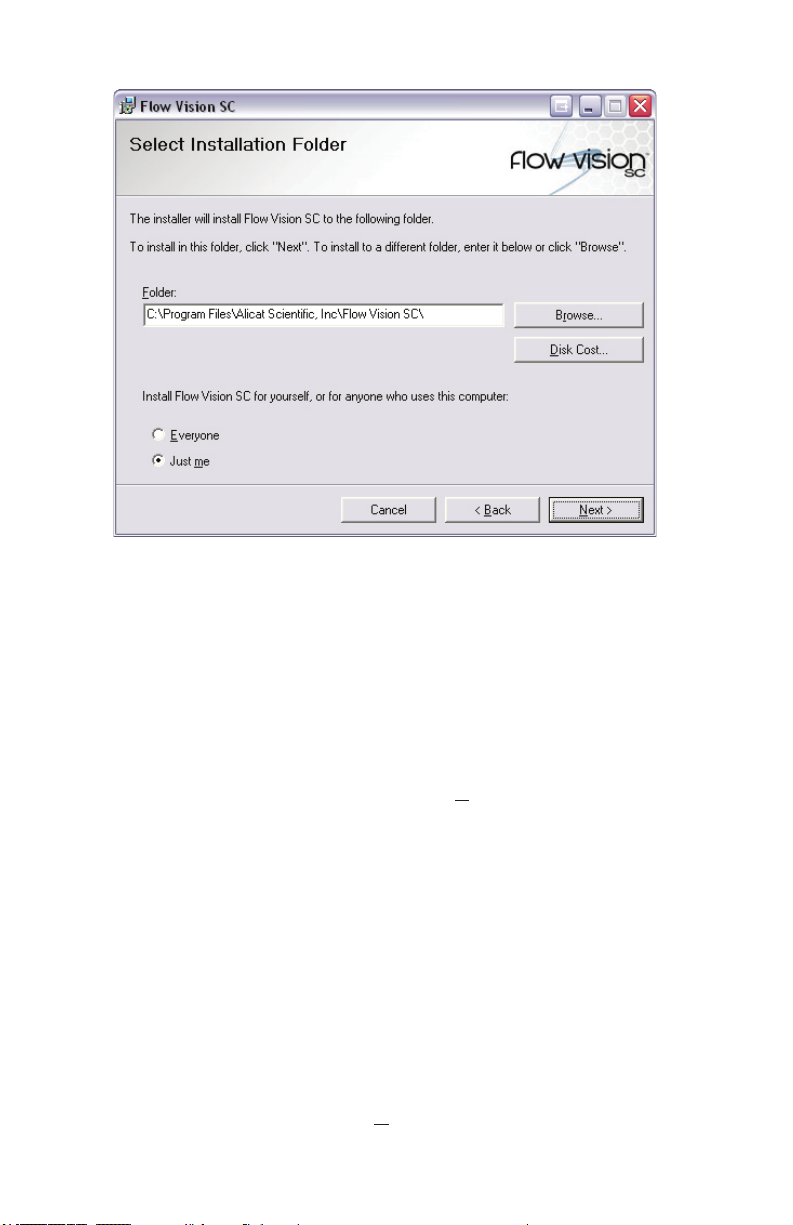
The next screen will ask into which directory you would like to install the Flow
Vision™ SC software.
By default, the program will create a program folder and subfolder in the
“Program Files” folder in your main drive directory. This location is suitable for
most users. If you would like to install Flow Vision™ SC into a different location,
you can manually enter the location’s address in the space provided or you can
choose the button marked “Browse” and select the appropriate directory.
If you are using a computer at your company and are unsure of the appropriate
location for installation, please request assistance from your company’s IT
department.
You can review the amount of space required on your computer to install Flow
Vision™ SC by choosing the button marked “Disk Cost”.
A window will appear showing available drives in the computer, the size of
each drive, how much space is available on each drive, the space required for
Flow Vision™ SC, and the amount of space that will be available after Flow
Vision™ SC is installed.
This allows you to select the most appropriate location for Flow Vision™ SC
to be installed based on drive space constraints.
To exit this screen and continue with the installation process, select the button
marked “OK”.
You will also be asked if you would like to install Flow Vision™ SC for yourself
only or for anyone who uses the computer. Flow Vision™ SC’s operation
will not be affected in any way by this selection. Once you have made your
selections, click the button marked “Next”.
7
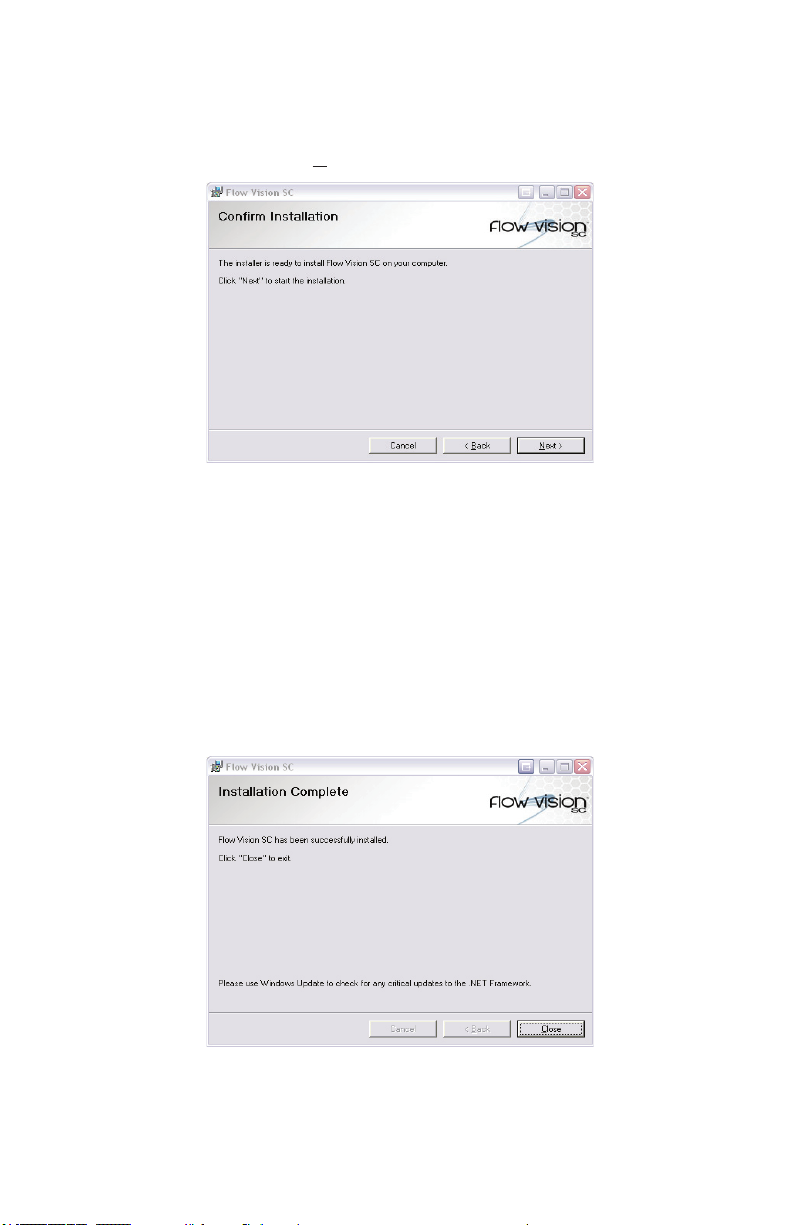
The following screen will inform you that Flow Vision™ SC is ready to be
installed. You can take this opportunity to go back and make changes or to
cancel the installation.
If you are satised with your choices, you can continue with the installation by
choosing the button marked “Next”.
You will not see an installation screen with a progress bar visually indicating
the progress of the installation of Flow Vision™ SC onto your computer.
Do not turn off or restart the computer during the installation process.
Turning off or restarting the computer during this process will cause Flow
Vision™ SC to not install properly and possibly cause damage to your computer.
When the installation process is complete, a screen will appear indicating that
Flow Vision™ SC has been successfully installed on your computer. To exit
this screen and the Flow Vision™ SC installation process, select the button
marked “Close”.
Once you have selected “Close”, the installation screen will disappear from
your screen.
8
You can now remove the Flow Vision™ SC CD from your computer. You will no
longer need the Flow Vision™ SC CD to run the software.
Be sure to keep the Flow Vision™ SC CD and the case with the Registration
Key Label in a safe place in the event you need to reinstall the software.
Launching Flow Vision™ SC
With Flow Vision™ SC installed to your computer, you can now begin using the
Flow Vision™ SC program.
In order to begin you must rst start the program.
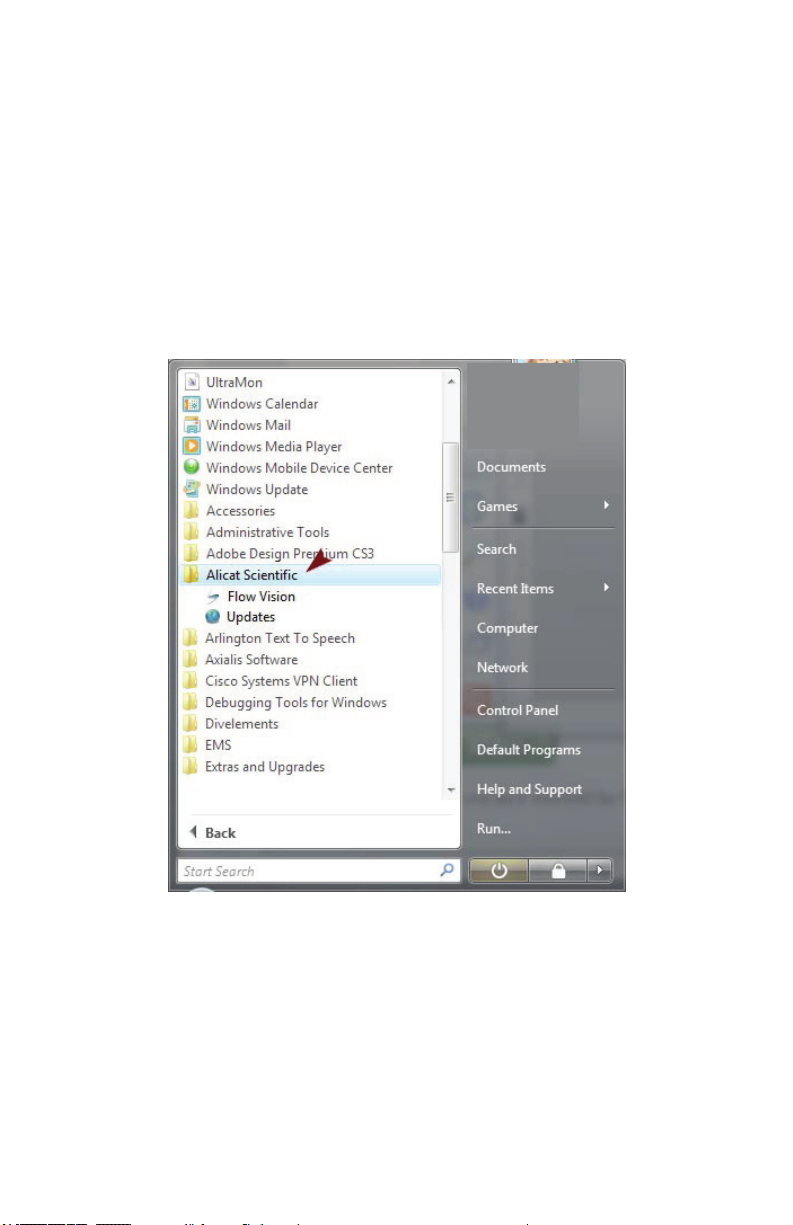
To start the program you will need to select the Flow Vision™ SC program
shortcut from the Start Menu.
>>Start Menu>Alicat Scientic>Flow Vision
Once you have selected the Flow Vision™ SC shortcut from the Start Menu,
the program will begin.
After registration, the application will gather information about your system.
Specically, Flow Vision™ SC probes your computer for available COM ports.
This process only occurs on the rst launch of Flow Vision™ SC. All subsequent
launches will load more quickly.
9
Section 2 - Setting up Flow Vision™ SC
In this section you will learn about:
• Registering Flow Vision™ SC
• Flow Vision™ SC Menu and Menu functions
• Flow Vision™ SC screen layout
Registering Flow Vision™ SC
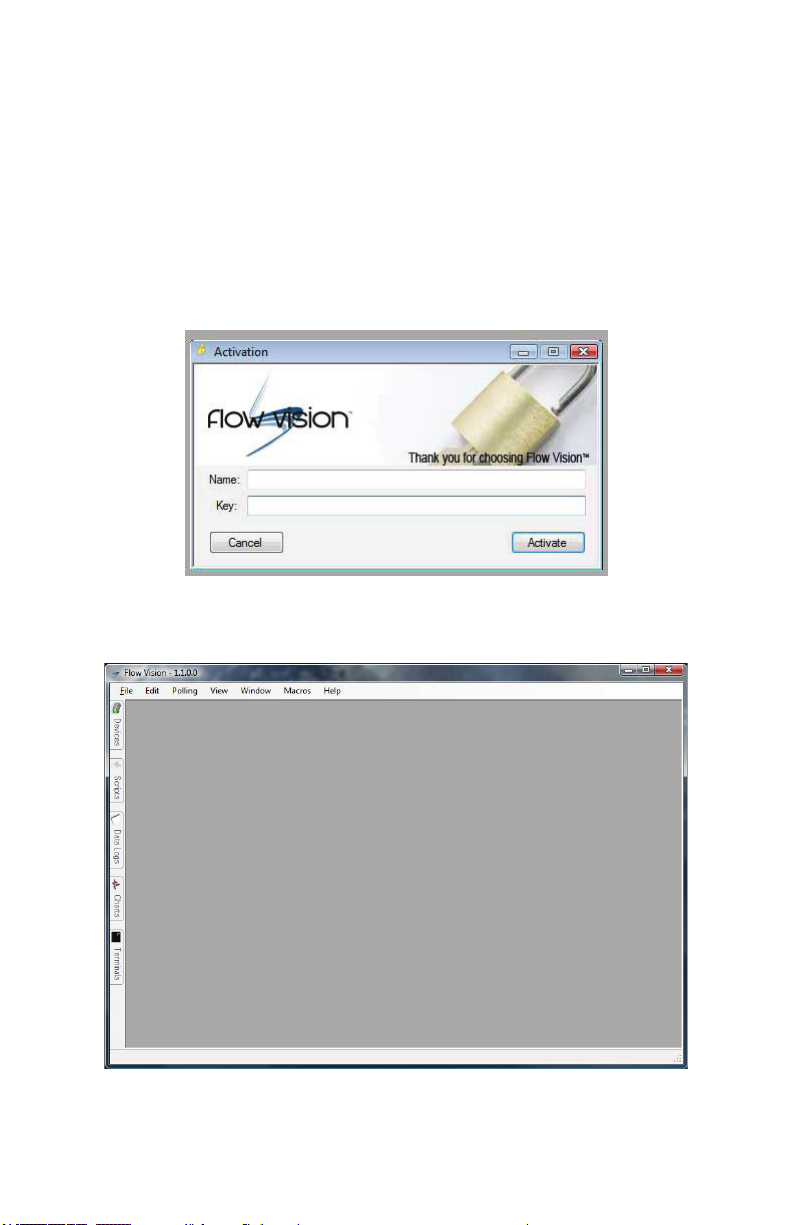
Before Flow Vision™ SC will launch, it needs to be registered. A registration
key label is afxed to the CD case in which the Flow Vision™ SC CD is stored.
Please enter the name and registration key from the registration key label in
the appropriate elds. After successful registration, the application will launch.
Flow Vision™ SC Menu and Menu functions
When you start Flow Vision™ SC for the rst time you will see this screen:
Along the top of the screen you will nd the menu functions: File; Edit; Polling;
View; Window; Macros and Help.
10
To access a menu, place your mouse cursor over the desired menu and click
the left mouse button.
To select a function from the menu point the mouse arrow to the desired
function and once it is highlighted, click the left mouse key.
Explanations of each menu and its sub-functions follow.
File Menu
The le menu allows you to exit the program.
Edit Menu
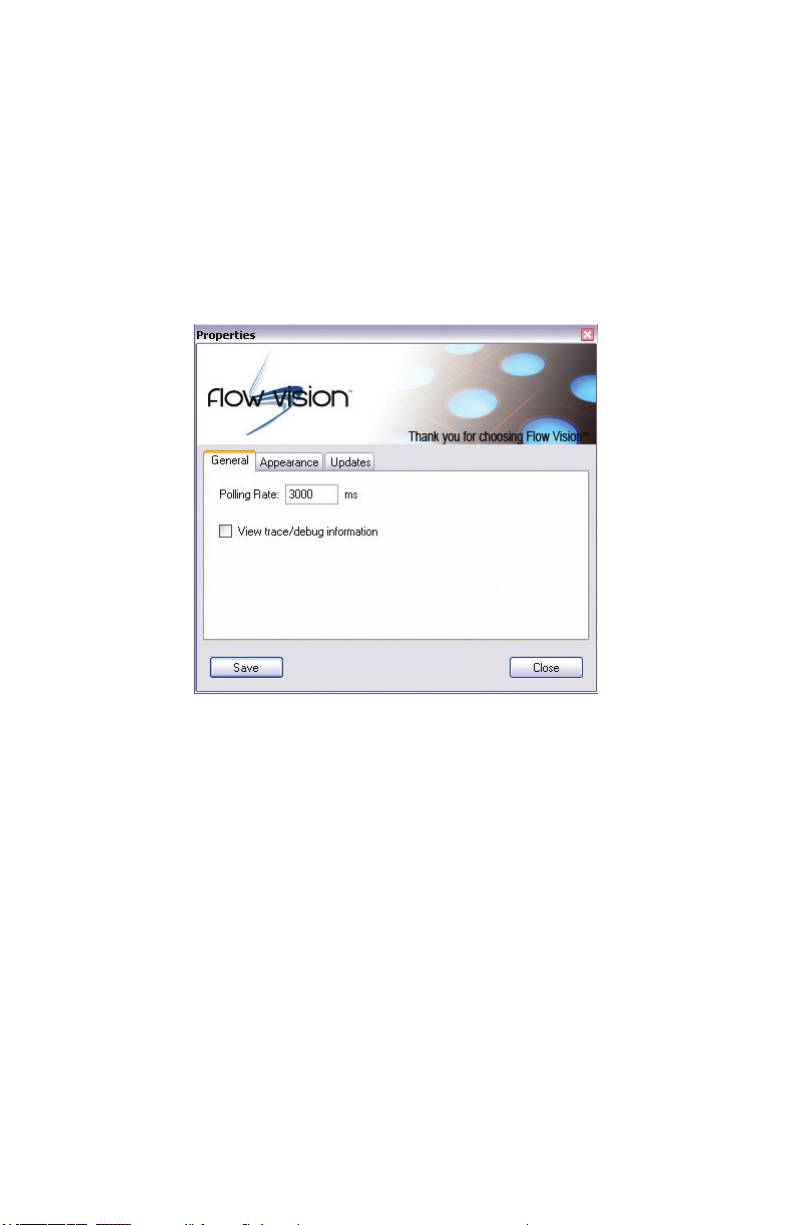
The edit menu allows you to access the “Properties” section of Flow Vision™ SC.
In this section, you can make changes as to how Flow Vision™ SC functions.
The polling rate is the time interval for the software to take data from the
instrument, measured in milliseconds.
Increasing the polling rate (lengthening the time interval) will reduce the
frequency at which data is taken from the instrument by the software.
Conversely, decreasing the polling rate (shortening the time interval) will
increase the frequency at which data is taken from the instrument by the
software.
The “View trace/debug information” option will allow you to view in-depth
information about the application.
The options on the “Appearance” tab allow you to modify the way Flow Vision™
SC looks, including background color and image.
The “Updates” tab is used to modify the Flow Vision™ SC updating settings.
You can disable automatic updates on this tab.
11
Polling Menu
Polling is the term used to describe communicating with the instrument. The
Polling Menu will allow you to initialize or terminate polling via the software.
To initialize polling select “Start Polling” > “All” and to terminate polling select
“Stop Polling” > “All”.
View Menu
The View Menu allows you to choose how the main screen will appear when
you start the program. Flow Vision™ SC is a modular program and each
function of the software is represented by a module. The View Menu lets you
select which modules will be available when the program starts. Modules are
explained in detail later in this manual.
The View Menu also allows you to save variations of screen layouts in the event
multiple users have different preferences or you have different requirements at
different times. You can save and load modules as you require via the View Menu.
Window Menu
The Window Menu allows you to arrange open windows in a specic way. The
formats are Cascade, Tile Horizontally, Tile Vertically and Icon.
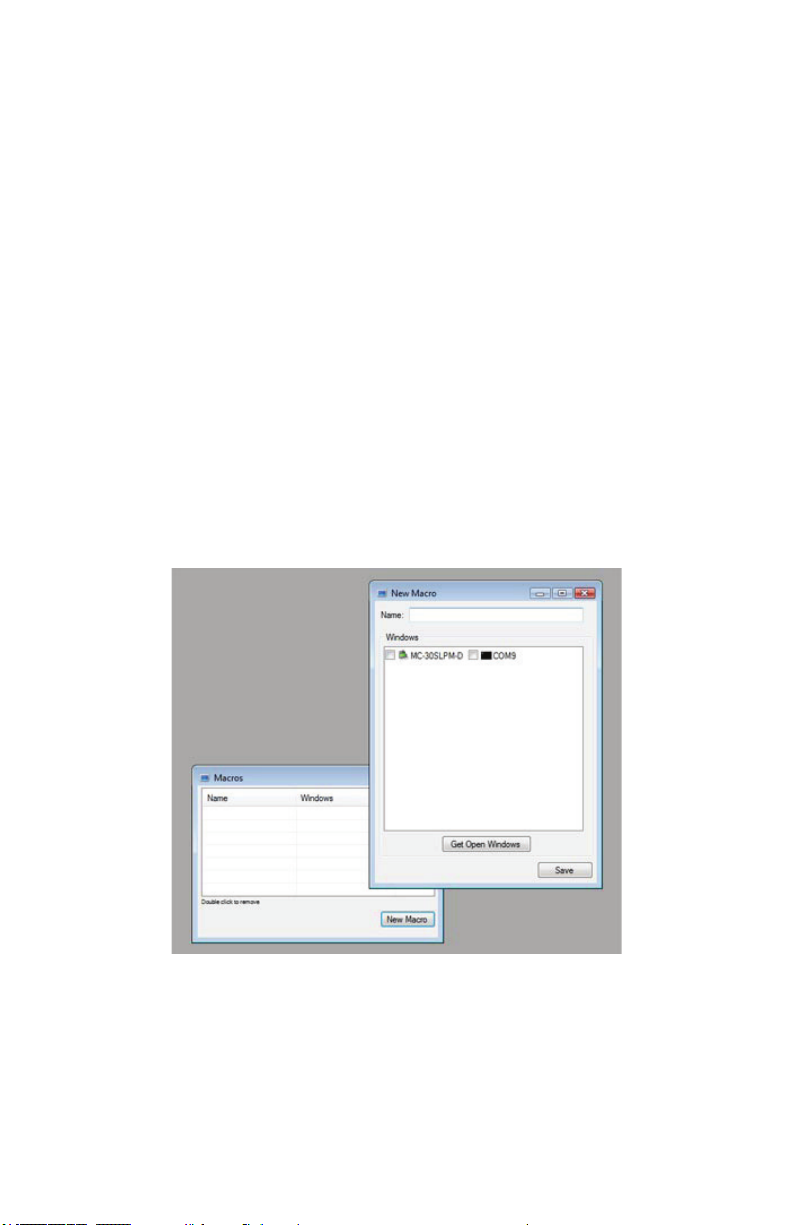
Macro Menu
The Macro Menu allows you to store groups of windows that are launched
together. Saved window macros are launched through the Macro Menu item.
Help Menu
The Help Menu contains documentation that will answer questions about
the software and how it is used. You can access Flow Vision™ SC version
information by selecting the “About” tab.
The “Register” tab will allow you to enter a CD Key if your CD Key has been
compromised or if you receive a new CD Key from the software vendor.
12
 Loading...