

Page 1
Page 1
Page 2
Gas Supply Conversion and Orifice Replacement Guide
PURPOSE:
If a barbeque or side burner unit is to be operated with a different gas supply other than the one
provided by the factory, a conversion kit is required. This change must be done in order to ensure that:
• The unit is safe to operate.
• The unit has correct combustion of gas.
• The unit outputs the expected heat (BTUH’s).
• Your warranty is maintained.
By changing from Natural Gas (NG) to Liquid Propane (LP) or vice versa, the heat output as well
as the regulating pressure and oxygen content of the gas/air mixture also changes. Therefore a change
in orifice (gas injector) size is required, (usually larger or smaller depending on the application), as well
as a change in the main pressure regulator setting to allow for proper gas pressure to the valves and
burners.
On the next pages you will find the necessary information to replace orifices, adjust burners and
convert pressure regulators to suit your application. This information is generalized due to the different
models manufactured, nevertheless it applies to all of them in the same fashion as it indicates the location and how to access orifices and regulators.
For additional information, all conversion kit numbers and components are listed at the end of this
guide in the appendix section.
WARNING:
As the unit will be partially disassembled during gas supply conversion and orifice replacement, it
is necessary to remove all power sources to the unit (including but not limited to: barbeques lights, rotisserie motor and igniter module batteries) as well as all gas supplies (Natural gas or Liquid propane).
Alfresco Gourmet Grills recommends a qualified gas technician to perform this service.
HOW TO OBTAIN SERVICE:
For warranty, service, contact your local Alfresco Gourmet authorized service agency. Provide him with the Model # and Serial # (located under drip pan), date of installation, and a brief description of the problem. If you need assistance in locating the authorized service agency in your
area, contact your local dealer. He will have a listing of authorized service agents in you area.
We want you to remain a satisfied customer. If a problem occurs that cannot be resolved to
your satisfaction, please us know. Write Alfresco Gourmet Grills. Customer Service Department.
7039 East Slauson Ave, Commerce, CA 90040. Or call Customer Service/Parts at (888) 383-8800
or (323) 722-7900 or fax us at (323) 726-4700. Visit us at: www.alfrescogrills.com
WARNING
ELECTRICAL PARTS
AND COMPONENTS
DISCONNECT ALL POWER
SUPPLIES AND BATTERIES
BEFORE SERVICING
WARNING
FLAMMABLE GAS
DISCONNECT ALL PROPANE
OR NATURAL GAS SUPLIES TO
THIS UNIT BEFORE SERVICING
Page 2
Page 3

BARBEQUES:
A typical barbeque unit will have the following burner components:
MODEL:
SMOKER "U" BURNER SEAR-ZONE™ ROTISSERIE SIDE BURNER
AGBQ-30 1 2 ~ 1 ~
AGBQ-30SZ 1 1 1 1 ~
AGBQ-30IR 1 ~ 2 1 ~
AGBQ-42 1 3 ~ 1 ~
AGBQ-42SZ 1 2 1 1 ~
AGBQ-56 1 3 ~ 1 2
AGBQ-56SZ 1 2 1 1 2
AGBQ-56BFG 1 3 1 1 ~
AGSB-2 ~ ~ ~ ~ 2
AGSB-SZ ~ ~ 1 ~ ~
BURNER QUANTITIES:
TYPICAL BARBEQUE
Figure 1
FRONT PANEL
SMOKER TRAY
STEPS:
KNOBS
DRIP TRAY
Figure 2
1– Remove the knobs from the valve stems by pulling them straight out of the valve stems.
2– Remove the smoker and drip trays.
3– Remove the front panel screws (4) located at each corner (2 facing down and 2 on the upper corners)
4– Remove the front panel to expose valves, gas manifold and igniter assembly. (Figure 2)
Page 3
Page 4
Barbeques cont.
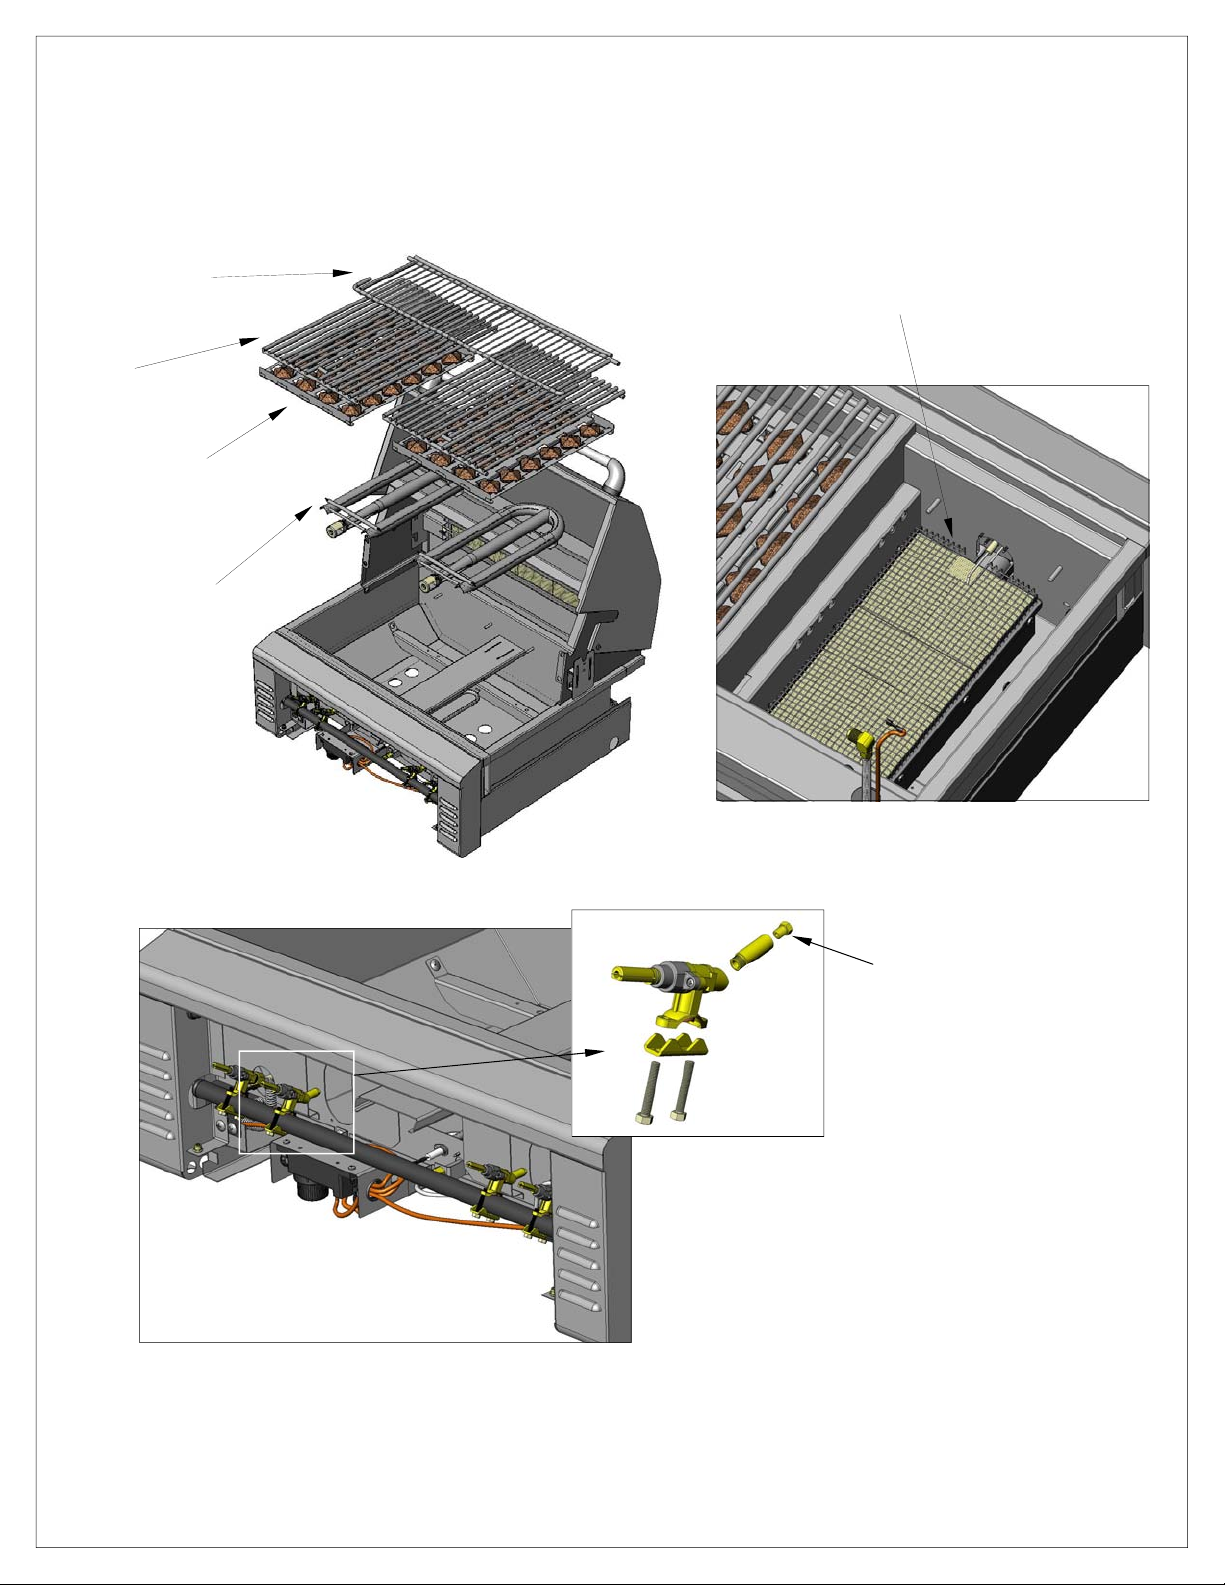
5– Remove warming rack, grills, briquette trays and “U” burners from the barbeque unit. (Figure 3)
6– Should your barbeque unit be equipped with a Sear-Zone™ burner, also remove it. (Figure 4)
WARMING
RACK
GRILL
BRIQUETTE
TRAY
“U” BURNER
(Figure 3)
SEAR-ZONE™
BURNER
(Figure 4)
“U” Burner orifice
Location at end of
Brass nipple.
(Figure 6)
(Figure 5)
7– Now that the gas manifold and valves are exposed (Figure 5), remove and replace each valve’s
orifice for the proper gas supply, Natural Gas or Liquid Propane. Standard “U” burners have an
angled valve with an orifice located in the valve’s body, on the back at the end of an adapter nipple.
(Figure 6)
Page 4
Page 5
Barbeques cont.
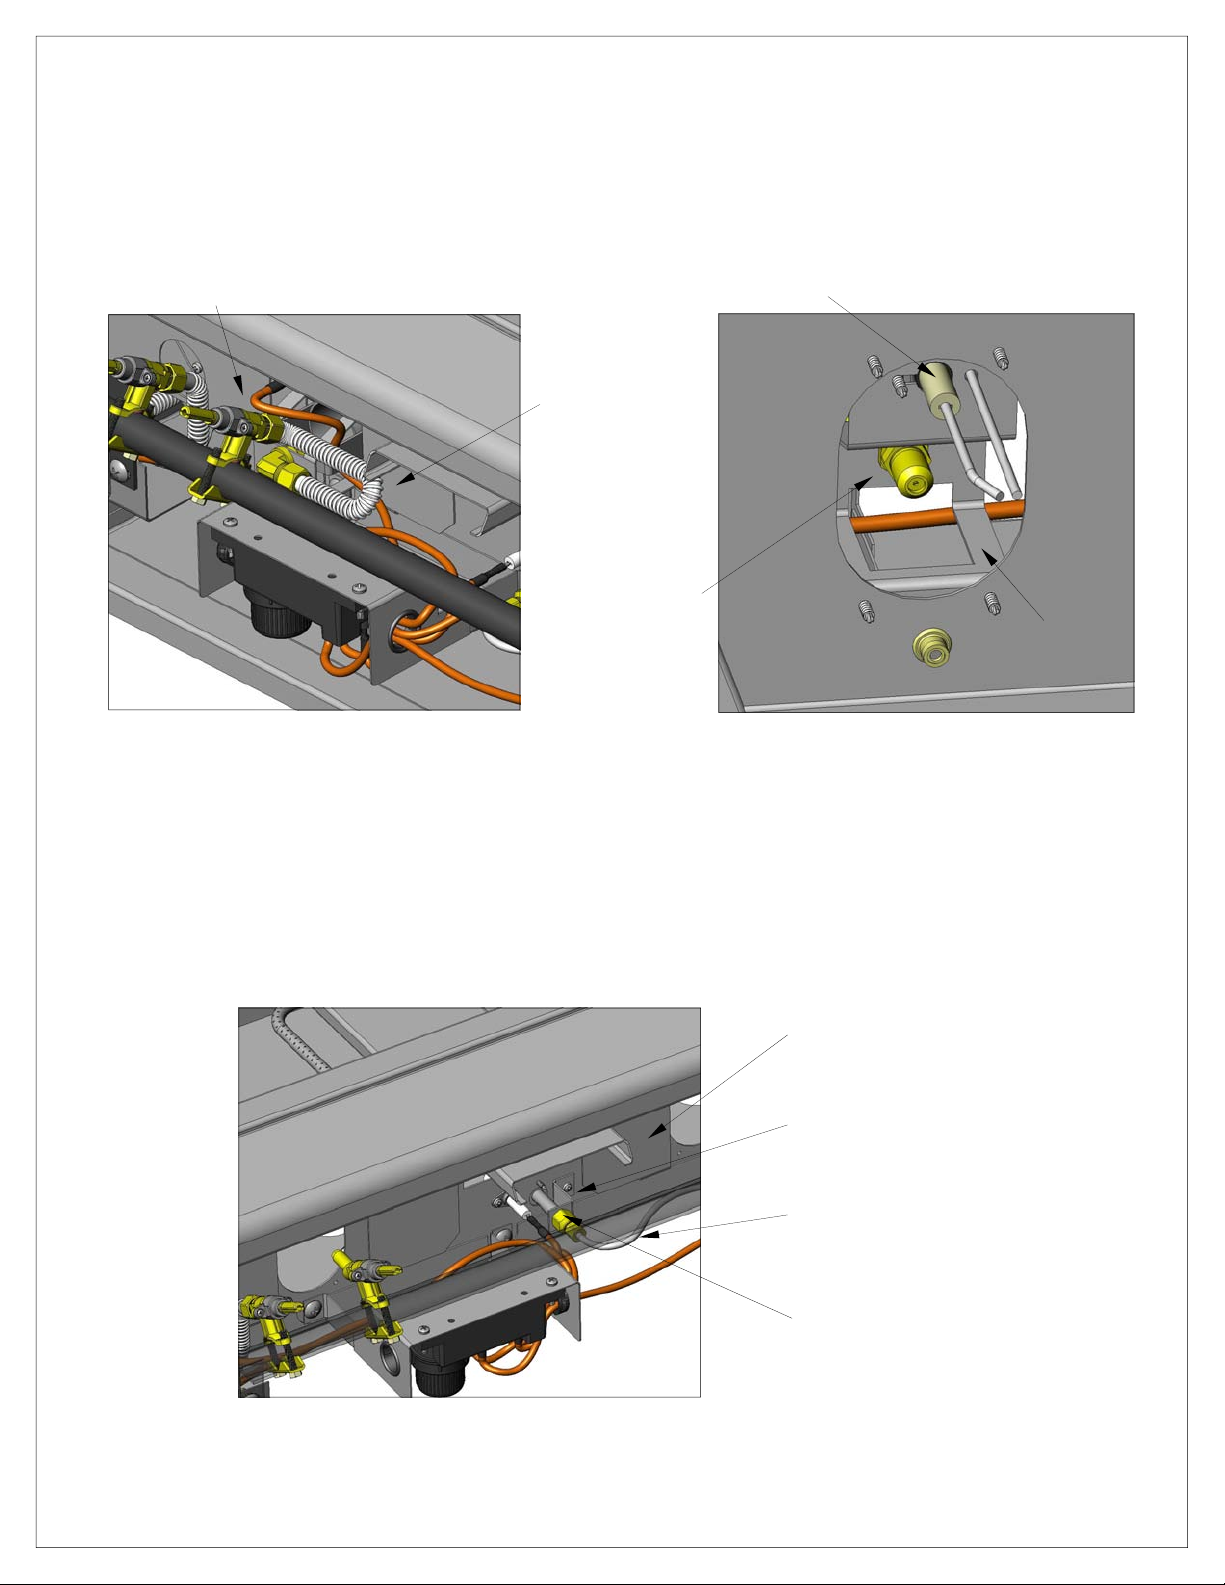
8– If your unit is equipped with a Sear-Zone™ burner, the valve has an orifice mounted externally to the
valve body. The orifice is directly attached to the barbeque fire box with a bracket and connected to
the valve with a flexible stainless tube. (Figure 7)
It is mounted on this bracket along with the Sear-Zone™ igniter electrode. Remove and replace this
orifice from the inside of the firebox. (Figure 8)
VALVE BODY ELECTRODE
FLEXIBLE
PIPING
SEAR-ZONE™
ORIFICE
MOUNTING
BRACKET
(Figure 7)
(Figure 8)
9– The smoker unit’s orifice is also mounted externally from the control valve body. It is connected with a
small 3/16” Ø aluminum tube. The orifice is mounted on a bracket attached to the fire box.
To replace this orifice, remove the mounting bracket from the fire box and gently bend the aluminum
tubing outward to prevent kinks. After replacement, re-install bracket / orifice assembly back into the
fire box. (Figure 9)
FIRE BOX
BRACKET
3/16ӯ ALUMINUM TUBING
(Figure 9)
SMOKER ORIFICE
Page 5
Page 6

Barbeques cont.
10– To replace the rotisserie orifice, it must be accessed from the back of your barbeque unit.
Just like the Sear-Zone™ and the smoker unit, the rotisserie unit has an externally mounted orifice
connected to the valve body with a long flexible stainless tube.
Remove the rear rotisserie access plate (Figure 10) and locate the orifice on the compression fitting
that is mounted on the burner bracket( Figure 11). Replace orifice and re-install the access cover.
ACCESS
COVER
(Figure 10)
BRACKET
COMPRESSION FITTING
FLEXIBLE TUBING
ORIFICE
(Figure 11)
SIDE BURNERS:
Side burners can be found as separate units such as AGSB-2 (2 burner unit) and AGSB-SZ
(Sear-Zone™ unit) or built within the frame of the barbeque such as our AGBQ-56 model Deluxe Grill.
In either case, their respective orifices are installed and accessed in the same fashion. If a side
burner is part of a barbeque such as the Deluxe Grill, gas will be supplied to the burner from the same
manifold that feeds the main unit. All Individual units have their own pressure regulators.
If the side burner is part of a Deluxe Grill, the manifold will be accessed in the same fashion as shown on
page# 4 — item # 7. For all other side burners, follow the next few steps.
Page 6
Page 7
AGSB-2 Dual Side Burner
STEPS:
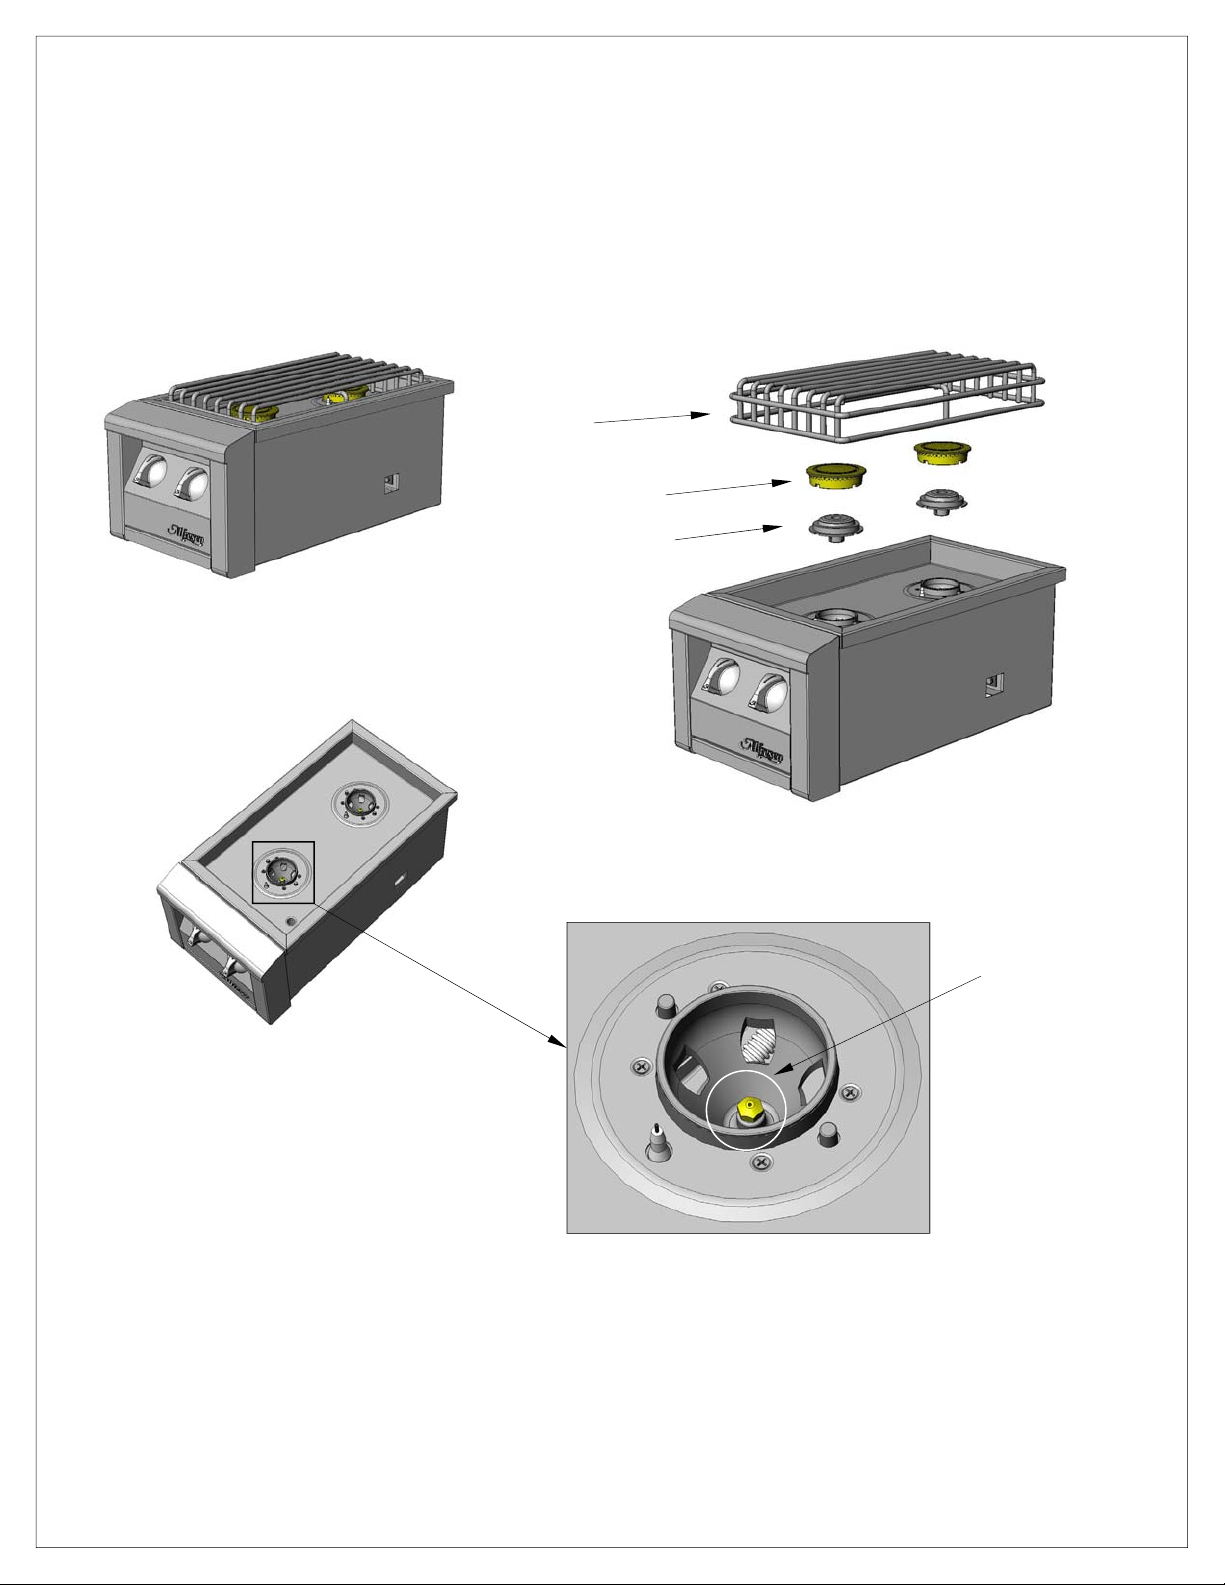
1- A dual side burner unit AGSB-2 (Figure 12) has the orifices readily available. Simply remove the top
grate, burner external brass caps and inner aluminum caps. (Figure 13)
2– Orifices are accessible directly from the top( Figure 14). Remove and replace each orifice as required
and re-assemble the side burners.
GRATE
EXTERIOR CAP
INTERIOR CAP
(Figure 12)
TOP VIEW
(Figure 14)
(Figure 13)
Orifice
Located inside
burner body.
AGSB-SZ Sear-Zone™ Side Burner
STEPS:
1- A Sear-Zone™ side burner unit AGSB-SZ (Figure 15) has the orifice located inside the firebox
assembly in the same configuration as a barbeque grill. To access the orifice remove the top grate,
Sear-Zone™ burner, knob, drip tray and front control panel (Figure 16)
Page 7
Page 8

Side Burners cont.
GRATE
SEAR-ZONE™ BURNER
(Figure 15)
FRONT PANEL
KNOB
DRIP TRAY
VALVE BODY ELECTRODE
(Figure 16)
SEAR-ZONE™
ORIFICE
FLEXIBLE
PIPING
(Figure 17)
MOUNTING
BRACKET
(Figure 18)
2– Once the front panel is removed the Sear-Zone™ orifice will be viewable (Figure 17). It is located
externally from the control valve in similar configuration as the barbeque unit. (Refer to page 5 point 8).
It is however, easier to reach the orifice from the inside of the fire box assembly as it is mounted on
a support bracket next to the electrode assembly. (Figure 18). Remove and replace.
Re-assemble the unit.
Page 8
Page 9

PRESSURE REGULATORS:
Your barbeque grill as well as side burner unit is equipped with a dual gas supply (NG or LP supply) pressure regulator standard from the factory. It is necessary however, to reverse an internal plunger
within the regulator to allow for correct pressure to flow to the gas manifold.
Also, when converting from natural gas (NG) to liquid propane (LP) your conversion kit will include a
1/2ӯ MPT to 3/8ӯ Male Compression adapter nipple. This nipple is required to connect your regulator
to a standard propane tank and hose kit.
All pressure regulators are located on the back of the units and on the left side. ( Figures 19, 20 & 21)
BARBEQUE GRILL
AGSB-2 SIDE BURNER AGSB-SZ SIDE BURNER
(Figure 19) (Figure 20) (Figure 21)
STEPS:
1– Locate the inlet elbow (1/2” Ø black pipe elbow) and attach the hose regulator nipple using gas
approved gas plumbing seal of yellow Teflon® tape. (This step only applies to NG to LP conversion)
(Figure 22)
ROTATE ELBOW
IF NECESSARY
FITTING—HOSE ADAPTOR
1/2ӯ NPT x 3/8ӯ COMP.
(NG TO LP ONLY!)
(Figure 22)
PRESSURE
REGULATOR
Page 9
Page 10

Pressure Regulators cont.
2– To convert to pressure regulator from NG to LP (or vice-versa) , remove the brass cap located on the
large round dome of regulator body. The cap has a sealing washer; do not lose or damage this seal ling washer as it is required for a gas tight seal. (Figure 23)
3– Located on the cap is also a black plastic plunger. This plunger provides the correct pressure to a
spring located inside the body of the regulator.
It is necessary to reverse
the direction of the plunger so it provides the right amount of pressure to
the spring inside the body of the regulator.
To reverse
the plunger pull it out of the brass cap by pushing it sideways until it snaps and pops out.
4– The plunger is labeled “NAT” or “LP” for natural gas or liquid propane. (Figure 24). The regulator is
set to the correct pressure according to the way the plunger faces the regulator body. If the plunger
label reads ”NAT” towards”
the body of the regulator , it will be set for natural gas. If it reads “LP” it
will be set for liquid propane.
PRESSURE REGULATOR
BODY (DOME SIDE)
(Figure 24)
(Figure 23)
PLUNGER
SEALING WASHER
BRASS CAP
PLUNGER DETAIL:
The regulator plunger is labeled “NAT” for Natural gas or
“LP” for liquid propane. (The “LP” side has a wide disk on
the end.) The side facing the body of the regulator determines what use is the regulator set for.
Example: The image above (Figure 23) is showing a regu-
lator set for natural gas.
5– Once the regulator plunger has been reversed for it’s appropriate use and snapped back into the
brass cap, re-install the cap with the sealing washer back into the body or the regulator.
Your barbeque grill or side burner is now converted to it’s new gas supply. Re-check all orifices and
seals for proper tightness before applying power, gas supply and lighting your unit to adjust burners.
Page 10
Page 11

BURNER ADJUSTMENT:
As a final step it is now necessary to adjust some burners for the correct air / gas mixture. All
burners operate in the same fashion with the exception of the gas valves.
Gas valves for Sear-Zone™ and Rotisserie burners have a direct feeding valves. Gas valves for
“U” shaped and Smoker burners have “idling” valves. “Idling” valves permit adjustment for the “LOW”
setting in the valve to prevent the flame from going out, so they require adjustment when changing the
gas supply type.
“Direct” feed valves do not have a “LOW” adjustment because they are designed for high BTUH
and high gas flow operation such a the one required on Sear-Zone™ and Rotisserie burners. These
burners will not go out even on their lowest setting. They are designed to run always on HIGH setting, so
there is no adjustment necessary after a gas supply change.
To adjust idling valves on “U” burners and Smoker burners follow the next steps:
1– Verify that all burner holes are clean and free of debris.
2– Turn the valve to “HI” and light up the burner by pressing
the igniter button. Let the unit “WARM UP” for 10 minutes.
3– Once the burner is lit and warmed up, turn to “LOW” setting.
If the flame starts to go out you must adjust the “IDLE” port
inside the valve.
4– Using a small flat screwdriver, insert the screwdriver blade
through the stem of the valve and adjust.
(Figure 25)
Counter clockwise for MORE gas flow, clockwise for less.
(Figure 25)
5– Adjust the flame so the burner is fully lit around the perimeter
when the knob is in the LOW position.
6- “U” burners also have an AIR INLET adjustment. If the flame around the perimeter of the burner
seems to detach from the burner body, too much air is being injected into the burner.
Adjust the air / gas mix by loosening the adjustment lock screw and turn clockwise for LESS air,
counter clockwise for MORE. (Figure 26)
If the flame turns yellow in color, there is not enough AIR into the gas mixture. Adjust the air inlet
until the flame is light blue in color with small yellow tips for proper burning. You might need to
repeat step 4 and 6 a few times to find an adequate balance.
FLAT
SCREWDRIVER
VALVE
STEM
AIR MIX
ADJUSTOR
“U” BURNER
ADJUSTMENT
(Figure 26)
LOCK SCREW
Your unit is now fully converted to a new gas supply and ready for use.
Page 11
Page 12

APPENDIX:
• ORIFICE CONVERSION KITS……………………………………… PAGE 13 ~20
• PROPANE KIT # 1 (BARBEQUES WITH AND W/O SIDE BURNERS) …………… PAGE 21
• PROPANE KIT # 2 (SIDE BURNERS UNITS ONLY) ………………………… PAGE 22
Page 12
Page 13

REV.N°: DESCRIPTION: DATE: BY:
R
'U' BURNER
ORIFICE
FRONT VIEW
SIDE VIEW
ISO VIEW
ZEAR-ZONE™
BURNER
ORIFICE
ROTISSERIE
BURNER
ORIFICE
SMOKER HOSE ADAPTER
BURNER NIPPLE
ORIFICE
April 18, 2005 1:33:31 PM
SUPERIOR EQUIPMENT SOLUTIONS
7039 EAST SLAUSON AVENUE
COMMERCE, CA. 90040
LAST SAVED BY: »» adrian ««
ALL ORIFICES & NIPPLES SHOWN ACTUAL SIZE
MODELS: USE:
AGBQ-30 KIT DESCRIPTION:
AGBQ-30SZ KIT NUMBER:
AGBQ-30I
ITEM ORIFICE PART # QTY:
"U" BURNER - LP 1.55 mm 220-0282 2
SEAR-ZONE™ - LP 52 GA. 220-0290 2
ROTISSERIE - LP 57 GA 220-0284 1
SMOKER - LP 65 GA 220-0288 1
THE INFORMAT ION CONTAINED IN T HIS DRAWING IS THE
SOLE PROPERTY OF SUPERIOR EQUIPMENT SOLUTIONS
INC. ANY REPRODUCTION IN PART OR AS A WHOLE
WITHOUT WRITTEN PERMISSION FROM SUPERIOR
EQUIPMENT SOLUTIONS, INC. IS PROHIBITED.
DRAWN BY:
CREATED:
ADRIAN CRISCI
April 18, 2005 11:42:20 AM
NG Î LP
AGCK-30/NG-LP
190-0007
220-0275 1HOSE ADAPTER NIPPLE
PROJECT TITLE:
DRAWING TITLE:
CONVERSION KITS
AGCK-30/NG-LP CONVERSION KIT
I:\DWGS\Alfresco\CONV.KITS\
DRAWING NO.:
190-0007
SHEET 1
OF
1
Page 14

REV.N°: DESCRIPTION: DATE: BY:
FRONT VIEW
SIDE VIEW
ISO VIEW
'U' BURNER
ZEAR-ZONE™ SMOKER
ORIFICE BURNERBURNER
ORIFICE
ROTISSERIE
ORIFICE
BURNER
ORIFICE
April 18, 2005 1:45:21 PM
SUPERIOR EQUIPMENT SOLUTIONS
7039 EAST SLAUSON AVENUE
COMMERCE, CA. 90040
LAST SAVED BY: »» adrian ««
ALL ORIFICES & NIPPLES SHOWN ACTUAL SIZE
MODELS: USE:
AGBQ-30 KIT DESCRIPTION:
LP Î NG
AGCK-30/LP-NG
AGBQ-30SZ KIT NUMBER:
AGBQ-30IR ITEM ORIFICE PART # QTY:
"U" BURNER - NG 2.55 mm 220-0281 2
SEAR-ZONE™ - NG 39 GA. 220-0891 2
ROTISSERIE - NG 50 GA 220-0283 1
SMOKER - NG 60 GA 220-0287 1
THE INFORMAT ION CONTAINED IN T HIS DRAWING IS THE
SOLE PROPERTY OF SUPERIOR EQUIPMENT SOLUTIONS
INC. ANY REPRODUCTION IN PART OR AS A WHOLE
WITHOUT WRITTEN PERMISSION FROM SUPERIOR
EQUIPMENT SOLUTIONS, INC. IS PROHIBITED.
DRAWN BY:
CREATED:
ADRIAN CRISCI
April 18, 2005 11:42:20 AM
PROJECT TITLE:
DRAWING TITLE:
CONVERSION KITS
AGCK-30/LP-NG CONVERSION KIT
I:\DWGS\Alfresco\CONV.KITS\
190-0008
DRAWING NO.:
190-0008
SHEET 1
OF
1
Page 15

REV.N°: DESCRIPTION: DATE: BY:
'U' BURNER
ORIFICE
FRONT VIEW
SIDE VIEW
ISO VIEW
ZEAR-ZONE™
BURNER
ORIFICE
ROTISSERIE
BURNER
ORIFICE
SIDE
BURNER
ORIFICE
SMOKER
BURNER
ORIFICE
HOSE ADAPTER
NIPPLE
April 18, 2005 1:59:14 PM
SUPERIOR EQUIPMENT SOLUTIONS
7039 EAST SLAUSON AVENUE
COMMERCE, CA. 90040
LAST SAVED BY: »» adrian ««
ALL ORIFICES & NIPPLES SHOWN ACTUAL SIZE
MODELS: USE:
AGBQ-42 KIT DESCRIPTION:
AGBQ-42SZ KIT NUMBER:
AGBQ-56 ITEM ORIFICE PART # QTY:
AGBQ-56SZ "U" BURNER - LP 1.55 mm 220-0282 3
SEAR-ZONE™ - LP 52 GA. 220-0290 1
ROTISSERIE - LP 56 GA 220-0286 1
SIDE BURNER - LP 1.15 mm 220-0292 2
SMOKER - LP 65 GA 220-0288 1
THE INFORMAT ION CONTAINED IN T HIS DRAWING IS THE
SOLE PROPERTY OF SUPERIOR EQUIPMENT SOLUTIONS
INC. ANY REPRODUCTION IN PART OR AS A WHOLE
WITHOUT WRITTEN PERMISSION FROM SUPERIOR
EQUIPMENT SOLUTIONS, INC. IS PROHIBITED.
DRAWN BY:
CREATED:
ADRIAN CRISCI
April 18, 2005 11:42:20 AM
NG Î LP
AGCK-42/56/NG-LP
190-0009
220-0275 1HOSE ADAPTER NIPPLE
PROJECT TITLE:
DRAWING TITLE:
CONVERSION KITS
AGCK-42/56/NG-LP CONVERSION KIT
I:\DWGS\Alfresco\CONV.KITS\
DRAWING NO.:
190-0009
SHEET
1
OF
1
Page 16

REV.N°: DESCRIPTION: DATE: BY:
FRONT VIEW
SIDE VIEW
ISO VIEW
'U' BURNER
ZEAR-ZONE™ SMOKER
ORIFICE BURNERBURNER
ORIFICE
ROTISSERIE
ORIFICE
BURNER
ORIFICE
SIDE
BURNER
ORIFICE
April 18, 2005 2:04:49 PM
SUPERIOR EQUIPMENT SOLUTIONS
7039 EAST SLAUSON AVENUE
COMMERCE, CA. 90040
LAST SAVED BY: »» adrian ««
ALL ORIFICES & NIPPLES SHOWN ACTUAL SIZE
MODELS: USE:
AGBQ-42 KIT DESCRIPTION:
AGBQ-42SZ KIT NUMBER:
AGBQ-56 ITEM ORIFICE PART # QTY:
AGBQ-56SZ
"U" BURNER - NG 2.55 mm 220-0281 3
SEAR-ZONE™ - NG 39 GA. 220-0891 1
ROTISSERIE - NG 48 GA 220-0285 1
SIDE BURNER - NG 1.78 mm 220-0291 2
SMOKER - NG 60 GA 220-0287 1
THE INFORMAT ION CONTAINED IN T HIS DRAWING IS THE
SOLE PROPERTY OF SUPERIOR EQUIPMENT SOLUTIONS
INC. ANY REPRODUCTION IN PART OR AS A WHOLE
WITHOUT WRITTEN PERMISSION FROM SUPERIOR
EQUIPMENT SOLUTIONS, INC. IS PROHIBITED.
DRAWN BY:
CREATED:
ADRIAN CRISCI
April 18, 2005 11:42:20 AM
LP Î NG
AGCK-42/56/LP-NG
190-00010
PROJECT TITLE:
DRAWING TITLE:
CONVERSION KITS
AGCK-42/56/LP-NG CONVERSION KIT
I:\DWGS\Alfresco\CONV.KITS\
DRAWING NO.:
190-0010
SHEET OF
1
1
Page 17

REV.N°: DESCRIPTION: DATE: BY:
'U' BURNER
ORIFICE
FRONT VIEW
SIDE VIEW
ISO VIEW
ZEAR-ZONE™
ROTISSERIE
BURNER BURNER
ORIFICEORIFICE
SMOKER HOSE ADAPTER
BURNER
NIPPLE
ORIFICE
April 18, 2005 2:10:42 PM
SUPERIOR EQUIPMENT SOLUTIONS
7039 EAST SLAUSON AVENUE
COMMERCE, CA. 90040
LAST SAVED BY: »» adrian ««
ALL ORIFICES & NIPPLES SHOWN ACTUAL SIZE
MODEL: USE:
AGBQ-56BFG KIT DESCRIPTION:
KIT NUMBER:
ITEM ORIFICE PART # QTY:
"U" BURNER - LP 1.55 mm 220-0282 3
SEAR-ZONE™ - LP 52 GA. 220-0290 1
ROTISSERIE - LP 57 GA 220-0284 2
SMOKER - LP 65 GA 220-0288 1
HOSE ADAPTER NIPPLE
THE INFORMAT ION CONTAINED IN T HIS DRAWING IS THE
SOLE PROPERTY OF SUPERIOR EQUIPMENT SOLUTIONS
INC. ANY REPRODUCTION IN PART OR AS A WHOLE
WITHOUT WRITTEN PERMISSION FROM SUPERIOR
EQUIPMENT SOLUTIONS, INC. IS PROHIBITED.
DRAWN BY:
CREATED:
ADRIAN CRISCI
April 18, 2005 11:42:20 AM
NG Î LP
AGCK-56BFG/NG-LP
190-0011
220-0275 1
PROJECT TITLE:
DRAWING TITLE:
CONVERSION KITS
AGCK-56BFG/NG-LP CONVERSION KIT
I:\DWGS\Alfresco\CONV.KITS\
DRAWING NO.:
190-0011
SHEET
1
OF
1
Page 18

REV.N°: DESCRIPTION: DATE: BY:
FRONT VIEW
SIDE VIEW
ISO VIEW
'U' BURNER
BURNER
ROTISSERIEZEAR-ZONE™
BURNERORIFICE
ORIFICEORIFICE
SMOKER
BURNER
ORIFICE
April 18, 2005 2:12:09 PM
SUPERIOR EQUIPMENT SOLUTIONS
7039 EAST SLAUSON AVENUE
COMMERCE, CA. 90040
LAST SAVED BY: »» adrian ««
ALL ORIFICES & NIPPLES SHOWN ACTUAL SIZE
MODEL: USE:
AGBQ-56BFG KIT DESCRIPTION:
KIT NUMBER:
ITEM ORIFICE PART # QTY:
"U" BURNER - NG 2.55 mm 220-0281 3
SEAR-ZONE™ - NG 39 GA. 220-0891 1
ROTISSERIE - NG 50 GA 220-0283 2
SMOKER - NG 60 GA 220-0287 1
THE INFORMAT ION CONTAINED IN T HIS DRAWING IS THE
SOLE PROPERTY OF SUPERIOR EQUIPMENT SOLUTIONS
INC. ANY REPRODUCTION IN PART OR AS A WHOLE
WITHOUT WRITTEN PERMISSION FROM SUPERIOR
EQUIPMENT SOLUTIONS, INC. IS PROHIBITED.
DRAWN BY:
CREATED:
ADRIAN CRISCI
April 18, 2005 11:42:20 AM
LP Î NG
AGCK-56BFG/LP-NG
190-0012
PROJECT TITLE:
DRAWING TITLE:
CONVERSION KITS
AGCK-56BFG/LP-NG CONVERSION KIT
I:\DWGS\Alfresco\CONV.KITS\
DRAWING NO.:
190-0012
SHEET
1
OF
1
Page 19

REV.N°: DESCRIPTION: DATE: BY:
FRONT VIEW
SIDE VIEW
ISO VIEW
SIDE HOSE ADAPTER
BURNER
NIPPLE
ORIFICE
April 18, 2005 2:15:23 PM
SUPERIOR EQUIPMENT SOLUTIONS
7039 EAST SLAUSON AVENUE
COMMERCE, CA. 90040
LAST SAVED BY: »» adrian ««
ALL ORIFICES & NIPPLES SHOWN ACTUAL SIZE
MODEL: USE:
AGSB-2 KIT DESCRIPTION:
KIT NUMBER:
ITEM ORIFICE PART # QTY:
SIDE BURNER - NG 1.78 mm 220-0291 2
SIDE BURNER - LP 1.15 mm 220-0292 2
THE INFORMAT ION CONTAINED IN T HIS DRAWING IS THE
SOLE PROPERTY OF SUPERIOR EQUIPMENT SOLUTIONS
INC. ANY REPRODUCTION IN PART OR AS A WHOLE
WITHOUT WRITTEN PERMISSION FROM SUPERIOR
EQUIPMENT SOLUTIONS, INC. IS PROHIBITED.
DRAWN BY:
CREATED:
ADRIAN CRISCI
April 18, 2005 11:42:20 AM
NG
ÍÎ
LP
AGCK-SB-2/NG/LP
190-0013
220-0275 1HOSE ADAPTER NIPPLE
PROJECT TITLE:
DRAWING TITLE:
CONVERSION KITS
AGCK-SB-2/NG/LP CONVERSION KIT
I:\DWGS\Alfresco\CONV.KITS\
DRAWING NO.:
190-0013
SHEET 1
OF
1
Page 20

REV.N°: DESCRIPTION: DATE: BY:
FRONT VIEW
SIDE VIEW
ISO VIEW
SEAR-ZONE™
ORIFICE
HOSE ADAPTER
NIPPLE
April 18, 2005 2:17:44 PM
SUPERIOR EQUIPMENT SOLUTIONS
7039 EAST SLAUSON AVENUE
COMMERCE, CA. 90040
LAST SAVED BY: »» adrian ««
ALL ORIFICES & NIPPLES SHOWN ACTUAL SIZE
MODEL: USE:
AGSB-SZ KIT DESCRIPTION:
KIT NUMBER:
ITEM ORIFICE PART # QTY:
SEAR-ZONE™ - NG 39 GA. 220-0891 1
SEAR-ZONE™ - LP 52 GA. 220-0290 1
THE INFORMAT ION CONTAINED IN T HIS DRAWING IS THE
SOLE PROPERTY OF SUPERIOR EQUIPMENT SOLUTIONS
INC. ANY REPRODUCTION IN PART OR AS A WHOLE
WITHOUT WRITTEN PERMISSION FROM SUPERIOR
EQUIPMENT SOLUTIONS, INC. IS PROHIBITED.
DRAWN BY:
CREATED:
ADRIAN CRISCI
April 18, 2005 11:42:20 AM
NG
ÍÎ
LP
AGCK-SB-SZ/NG/LP
190-0014
220-0275 1HOSE ADAPTER NIPPLE
PROJECT TITLE:
DRAWING TITLE:
CONVERSION KITS
AGCK-SB-SZ/NG/LP CONVERSION KIT
I:\DWGS\Alfresco\CONV.KITS\
DRAWING NO.:
190-0014
SHEET 1
OF
1
Page 21

REV.N°: DESCRIPTION: DATE: BY:
BILL OF MATERIAL - PORPANE KIT FOR BARBEQUES WITH OR W/0 SIDE BURNERS
NO.
1
2
3
PART NUMBER DESCRIPTION
220-0275 NIPPLE - 1/2" MPT X 3/8" MPT
220-0300 REGULATOR / HOSE KIT FOR LP GAS
NONE PROPANE TANK - GENERIC - CUSTOMER SUPPLIED
QTY.
1
1
1
3
2
1
April 18, 2005 2:31:18 PM
SUPERIOR EQUIPMENT SOLUTIONS
7039 EAST SLAUSON AVENUE
COMMERCE, CA. 90040
LAST SAVED BY: »» adrian ««
THE INFORMAT ION CONTAINED IN T HIS DRAWING IS THE
SOLE PROPERTY OF SUPERIOR EQUIPMENT SOLUTIONS
INC. ANY REPRODUCTION IN PART OR AS A WHOLE
WITHOUT WRITTEN PERMISSION FROM SUPERIOR
EQUIPMENT SOLUTIONS, INC. IS PROHIBITED.
DRAWN BY:
CREATED:
ADRIAN CRISCI
April 18, 2005 2:21:36 PM
NOTE:
ITEM # 1 - HOSE NIPPLE ADAPTER
IS PROVIDED WITH ALL NATURAL
GAS TO LIQUID PROPANE ORIFICE
CONVERSION KITS.
PROJECT TITLE:
DRAWING TITLE:
PROPANE KITS
PROPANE KIT FOR BBQ UNITS
I:\DWGS\Alfresco\CONV.KITS\PROPANE KITS\
DRAWING NO.:
PROP-KIT-01
SHEET
1
OF
1
Page 22

REV.N°: DESCRIPTION: DATE: BY:
BILL OF MATERIAL - PROPANE KIT FOR SIDE BURNERS ONLY
NO. PART NUMBER DESCRIPTION QTY.
1
2
3
220-0275 NIPPLE - 1/2" MPT X 3/8" MPT 1
220-0301 LP GAS - REGULATOR / HOSE KIT 1
NONE PROPANE TANK - GENERIC - CUSTOMER SUPPLIED 1
1
2
3
NOTE:
ITEM # 1 - HOSE NIPPLE ADAPTER
IS PROVIDED WITH ALL NATURAL
GAS TO LIQUID PROPANE ORIFICE
CONVERSION KITS.
April 18, 2005 2:34:25 PM
SUPERIOR EQUIPMENT SOLUTIONS
7039 EAST SLAUSON AVENUE
COMMERCE, CA. 90040
LAST SAVED BY: »» adrian ««
THE INFORMAT ION CONTAINED IN T HIS DRAWING IS THE
SOLE PROPERTY OF SUPERIOR EQUIPMENT SOLUTIONS
INC. ANY REPRODUCTION IN PART OR AS A WHOLE
WITHOUT WRITTEN PERMISSION FROM SUPERIOR
EQUIPMENT SOLUTIONS, INC. IS PROHIBITED.
DRAWN BY:
CREATED:
ADRIAN CRISCI
April 11, 2005 9:29:49 AM
PROJECT TITLE:
PROPANE KITS
DRAWING TITLE:
PROPANE KIT FOR SIDE BURNERS ONLY
I:\DWGS\Alfresco\CONV.KITS\PROPANE KITS\
DRAWING NO.:
PROP-KIT-02
SHEET 1
OF
1
 Loading...