

Page 1
Page 2

ALF-PZA-BIA KIT FOR BUILT IN CONSTRUCTION
KIT INSTALLATION:
Once you have removed all the packing material that your Alfresco™ Pizza Oven was shipped with,
the built-in BIA-Kit can be installed on the unit. The Built-in conversion Kit consists of 3 items:
The installation can be done by simply removing the top
cover of the ALF-PZA unit and replacing it with the built-in
hood.
Once the BIA Hood is installed, it should look like
Figure # 3. The vent flue and vent cap (TYPE B
Rated) will be added later during construction of
the non-combustible built-in enclosure.
2
• A high pitched top cover
• A Type B, adjustable, double-walled vent pipe
• A Type B vent cap.
• Remover the top by lifting straight up. (Do not remove
the top radiant stone, it’s designed to stay there)
(See Figure # 1)
• Install the BIA-Kit Hood by laying it on top and sliding
forward until all the screw holes located in it’s sides
and back line-up correctly with the holes in the body
of the ALF-PZA.
(See Figure # 2)
• Fasten all 9 self tapping screws to permanently fix the
BIA Hood to the body of the ALF-PZA Unit.
BIA HOOD
N
W
O
D
D
R
A
W
R
O
F
Figure # 2
Figure # 1
VENT FLUE VENT FLUE
Figure # 3
LIFT UP
TOP COVER
ALF-PZA UNIT
VENT CAP
SCREWS
AROUND
PERIMETER
Page 3

BUILT IN ENCLOSURE GENERAL BUILDING PROVISIONS:
When installing the
used must be made. As a general rule, the materials and construction methods should be the same as
the requirements for an outdoor fireplace while maintaining all local building codes.
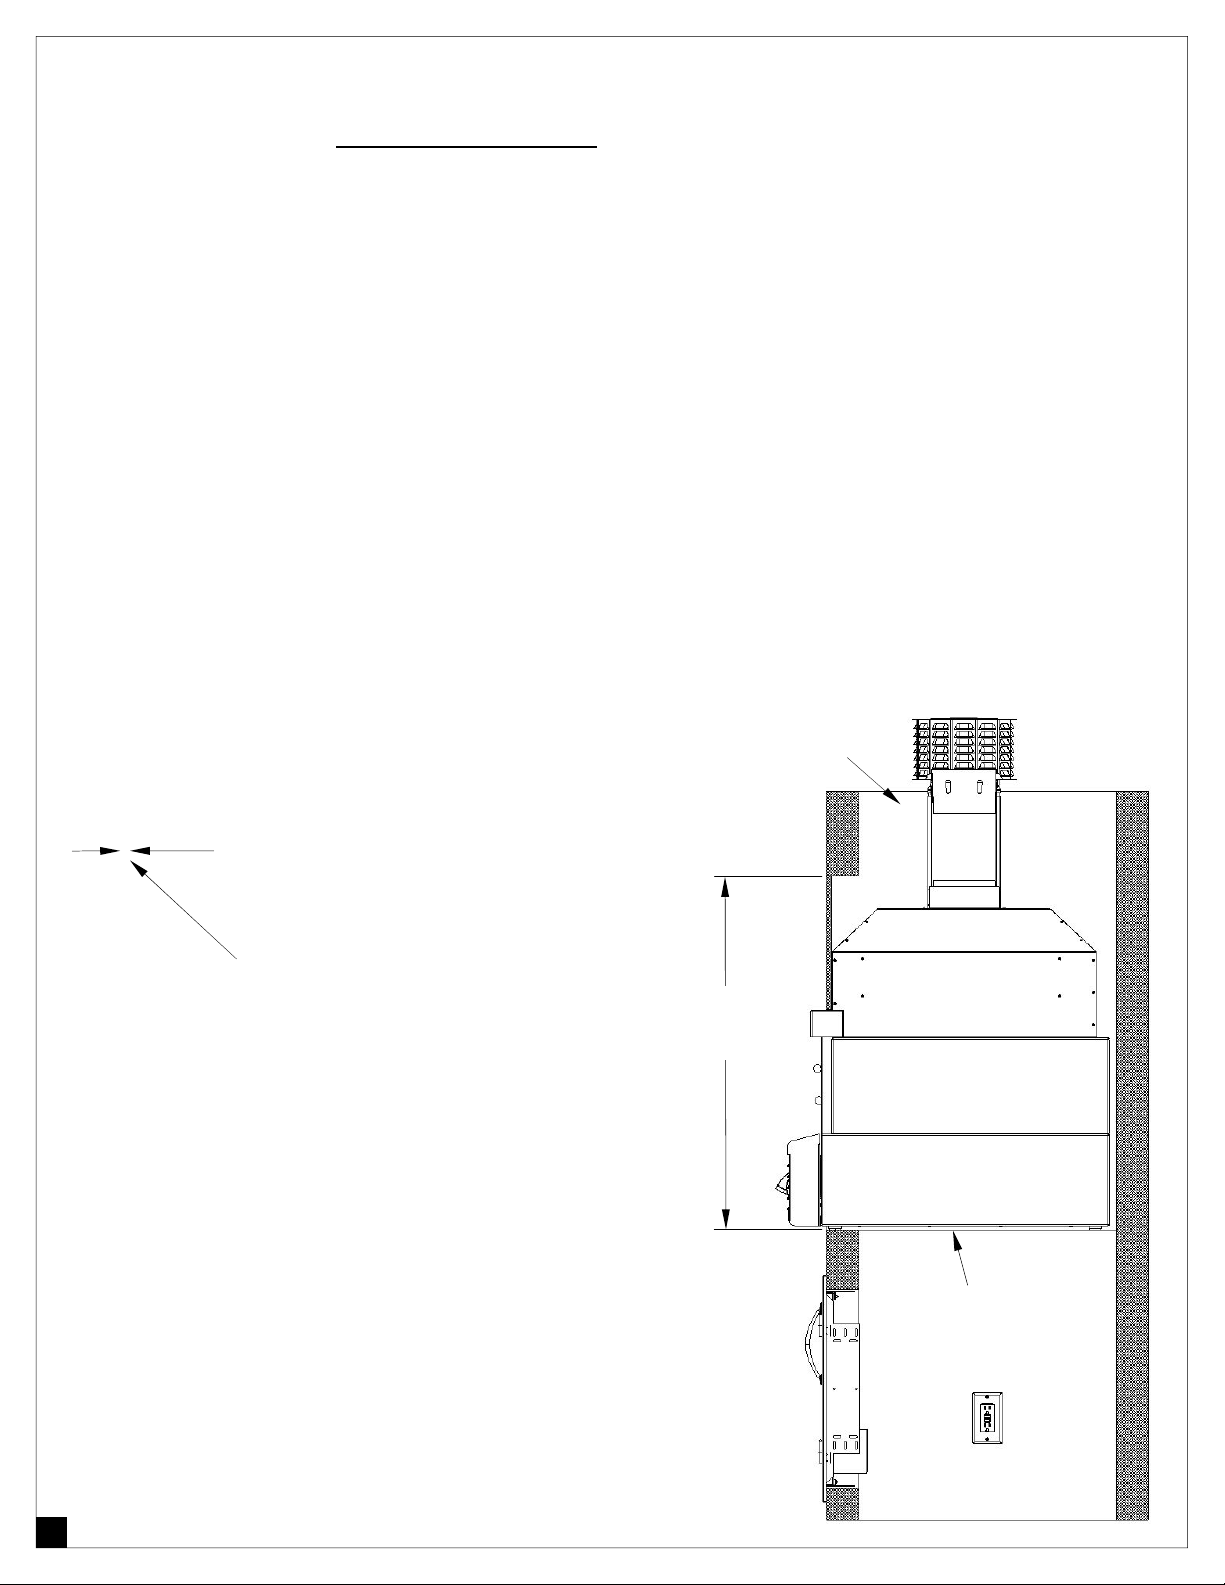
The image on the right, Figure # 4, shows how the Alfresco™
Pizza Oven might look like in a built-in configuration.
When building the pizza oven into a non-combustible structure, it
is critical to have access to the bottom of the unit. This will be the
only means of service and maintenance as the oven will no longer
be removable.
Alfresco™ Pizza Oven as a built-in unit, careful consideration to the materials
Alfresco™ recommends installing an AB-30 double sided door
for service, storage, gas supply and electrical power access.
The Pizza Oven must rest on two 2” ledges to give it proper sup-
port and must have free air intake from the bottom of the oven.
The built-in construction should have ample ventilation under the
oven in order to have the proper combustion.
Dimensions shown on Figure # 5 below are shown as reference
to aid in the design and planning only.
Figure # 4
Figure # 5
3
Page 4
(Building Provisions cont.)
As shown on Figure # 5, the 33” minimum height requirement, is the minimum opening requirement to
be able to slide the unit into an already-built non-combustible enclosure.
This requirement is not necessary if the non-combustible enclosure is built around the unit with materials such as with brick and mortar.
When covering up the front of the BIA Hood with non-combustible materials, it is recommended that a
total thickness of the backing board and fascia material does not exceed 1/2” thickness in order to
leave the vertical columns and top of the ALF-PZA oven opening exposed. (See Figure # 6)
The BIA Hood is made with a double wall design. Installation of screws around the sides to support
masonry backing materials is allowed. We recommend using stainless screws when doing so.
When designing the built in enclosure, noncombustible, weather proof materials must be
used on all sides. Additional rain proofing is
strongly recommended on the top section of the
built in enclosure as to have a complete weather
tight assembly around all areas, including but not
limited to the vent flue design. (See Figure # 7)
1/2” RECOMMENDED
FACIA MATERIALS
Figure # 6
CONSTRUCTION SCREWS
ARE ALLOWED ON ALL
SIDES OF THE BIA-HOOD
TO SUPPORT MASONRY
BACKING MATERIALS.
It is highly recommended to install access doors
below the ALF-PZA unit when designing the built
in construction. (such as Alfresco’s AB Doors).
The access is required for piping (LP or NG) shut
off valves, electrical supply and equipment maintenance and cleaning as stated on page 3.
NOTE: Additional consideration must be made to
ventilation under the unit. The construction below
the Pizza oven must have proper air circulation in
order to have proper gas combustion. The bottom
section of the built-in enclosure must have a minimum of 1 Sq.Ft. of standard building construction
vents to provide ample air circulation.
4
TOP MUST BE CLOSED
AND WEATHER TIGHT
33” MINIMUM
TO SLIDE INTO
CONSTRUCTION
ACCESS DOOR
FOR SERVICE
Figure # 7
2” WIDE SIDE LEDGE
REQUIRED SUPPORT
POWER 115 VAC
(GFCI RECOMMENDED)
Page 5

GAS SUPPLY INSTALLATIONS:
Because of the Alfresco™ Pizza Oven’s unique design, it is possible to install the gas supply (NG
or LP) from a place below the unti in addition to the standard back supply location.
The oven is constructed with an opening at the bottom heat shield to facilitate connections from below.
(See figure # 8)
Standard connections through the back panel can be converted to bottom connections as follows:
• Removing the 3/8” (LP) or 1/2” (NG) Brass compression
fitting on the back,
• Rotating down the 90° 1/2” elbow immediately behind
the back panel,
• Re-installing the appropriate size compression fitting for
a flexible hose connections, or…
• Hard-piping the oven with 1/2” NPT piping.
BOTTOM HEAT
TURN DOWN
ELBOW
SHIELD
CONNECTION
OPENING
ELECTRICAL
CORD
Figure # 8
3/8” OR 1/2”
COMPRESSION
FITTING
(2) 90° 1/2” ELBOWS
CONVERTIBLE
PRESSURE
REGULATOR
When designing a built in enclosure with gas supplies connected from the bottom of the unit, a shut-off
valve with unrestricted access is required.
Always shut off the gas supply when the unit is not in use to ensure safety.
For additional ALF-PZA-BIA product dimensions which might aid in the construction of your built-in enclosure, please refer to the ALF-PZA-BIA Specification Sheet found in our website;
www.alfrescogrills.com
5
Page 6

6
 Loading...