

Alfa Romeo Stelvio 2018 Owner’s Manual

2018 OWNER’S MANUAL
VEHICLES SOLD IN CANADA
With respect to any Vehicles Sold in Canada, the name
FCA US LLC shall be deemed to be deleted and the name
FCA Canada Inc. used in substitution therefore.
DRIVING AND ALCOHOL
Drunken driving is one of the most frequent causes of
accidents.
Your driving ability can be seriously impaired with blood
alcohol levels far below the legal minimum. If you are
drinking, don’t drive. Ride with a designated nondrinking driver, call a cab, a friend, or use public transportation.
WARNING!
Driving after drinking can lead to an accident.
Your perceptions are less sharp, your reflexes are
slower, and your judgment is impaired when you
have been drinking. Never drink and then drive.
This manual illustrates and describes the operation of
features and equipment that are either standard or optional on this vehicle. This manual may also include a
description of features and equipment that are no longer
available or were not ordered on this vehicle. Please
disregard any features and equipment described in this
manual that are not on this vehicle.
FCA US LLC reserves the right to make changes in design
and specifications, and/or make additions to or improvements to its products without imposing any obligation
upon itself to install them on products previously manufactured.
Copyright © 2017 FCA US LLC

DEAR CUSTOMER
Dear Customer,
Wewould like to congratulate and thank you for choosing Alfa Romeo.
Wehave written this Owner’s Manual to help you get to know all of the features of your vehicle and use it in the best possible way.
Please take the necessary time to familiarize yourself with all the dynamic features of your vehicle.
Here you will find important information and warnings regarding the use of your vehicle, and how to achieve the best performance
from the technical features of your Alfa Romeo.
You are advised to read through the Owner’s Manual before taking it on the road for the first time. It is important to become familiar
with the controls of your vehicle, especially with sections concerning the brakes, handling, transmission, and vehicle behavior on
different road surfaces.
This Owner’s Manual also provides a description of special features and tips, as well as essential information for the safe driving,
care, and maintenance of your Alfa Romeo over time.
In the provided Warranty Booklet, you will also find a description of the services that Alfa Romeo offers to its customers. The New
Vehicle Limited Warrantywill detail the terms and conditions for maintaining its validity.
Weare sure that these will help you to get in touch with and appreciate both your new vehicle and the service provided by the people
at Alfa Romeo.
For questions or comments pertaining to your vehicle, please contact the Alfa Romeo Customer Care Center:
P.O. Box 21–8004
Auburn Hills, MI 48321–8004
Phone: 1-844-Alfa-USA (1-844-253-2872)

READ THIS CAREFULLY
Refueling
Do not use fuel containing methanol or ethanol E85. Using these mixtures may cause misfiring and driving issues, as well as damage vital components
of the supply system.
For further details on the use of the correct fuel, refer to "Fuel Requirements" in the "TechnicalSpecifications" chapter.
Starting The Engine
Make sure that the electric park brake is engaged and that the transmission is in PARK(P)or NEUTRAL (N). Next, press the brake pedal, and then push
the engine START/STOP button.
Parking On Flammable Material
The catalytic converter develops high temperatures during operation. Do not park the vehicle on grass, dry leaves, pine needles or other flammable
material, as doing so is a fire hazard.
Respecting The Environment
The vehicle is fitted with a system that carries out a continuous diagnosis of the emission-related components in order to help protect the
environment.
Electrical Accessories
If you decide to add electrical accessories after purchasing the vehicle, (with the risk of gradually draining the battery), contact your authorized
dealer. They can calculate the overall electrical requirement and check that the vehicle's electric system can support the required load.
Scheduled Servicing
Correctly performed maintenance procedures are essential for ensuring that your vehicle continuously maintains its quality in performance and
safety features, environmental friendliness, and low running costs.

VEHICLE CHANGES / ALTERATIONS
Accessories Purchased By The Owner
Warning!
Any change or alteration of the vehicle might seriously affect its safety and road handling, thus causing accidents, in which the occupants could
even be fatally injured.
If you decide to install electrical accessories that require a permanent electrical supply (e.g. radio, satellite anti-theft system, etc.) or
accessories that in any case drain the electrical supply after purchasing the vehicle, contact your authorized dealer. Dealer personnel
will check whether the vehicles's electrical system is able to withstand the load required or whether it needs to be integrated with a
more powerful battery.
Note: Use caution when adding additional spoilers, alloy wheel rims, or non-standard wheel hubs: they could reduce the ventilation
of the brakes and affect efficiency under sharp and repeated braking, or on long descents. Make sure that nothing obstructs the
pedal (mats, etc.).
FCA US LLCshall not be liable for damage caused by the installation of accessories either not supplied or recommended by FCA US
LLCand/or not installed in compliance with the provided instructions.
Installing Electrical/Electronic Devices
FCA US LLCauthorizes the installation of transceivers provided that installation is carried out at a specialized center, in compliance
with manufacturer's specifications.
Note: Local authorities may not allow the vehicle on the road if devices that modify the features of the vehicle have been installed.
This also may void the warranty in relation to faults caused by the change either directly or indirectly related to it.
FCA US LLCshall not be liable for damage caused by the installation of accessories either not supplied or recommended by FCA US
LLCand/or not installed in compliance with the provided instructions.
Radio Transmitters And Mobile Phones
Radio transmitter equipment (vehicle mobile phones, CB radios, amateur radio etc.) cannot be used inside the vehicle unless a
separate antenna is mounted externally.
Transmission and reception of these devices may be affected by the shielding effect of the vehicle body. As far as the use of
approved mobile phones is concerned, follow the usage instructions provided by the mobile phone Manufacturer.
Caution!
The use of these devices inside the passenger compartment (without an external antenna) may cause the electrical systems to malfunction.
This could compromise the safety of the vehicle in addition to constituting a potential hazard for passengers' health.
If mobile phones/laptops/smartphones/tablets are inside the vehicle and/or close to the electronic key, a reduced performance of the Passive
Entry/Keyless Start system may occur may occur.

HOWTO USE THIS MANUAL
Operating Instructions
Each time an instruction is given that concerns direction (left/right or forward/backward), it is written to be read from the
perspective of an occupant in the driver's seat. If a direction is written from a different perspective, it will be specified as such in the
text as appropriate.
The figures in the manual are only examples: this might imply that some details of the image do not correspond to the actual
arrangement of your vehicle.
To identify the chapter with the information necessary, you can consult the index at the end of this manual.
Chapters can be rapidly identified with dedicated graphic tabs, located at the side of each odd page. There is also a key for getting to
know the chapter order and the relevant symbols in the tabs. Additionally, there is a textual indication of each current chapter at the
side of each even page.
Warnings And Cautions
While reading this Owner’s Manual you will find a series of WARNINGSthat must be carefully followed to prevent incorrect use of the
components of the vehicle, which could cause accidents or injuries.
There are also CAUTIONS to prevent procedures that could damage your vehicle.
Therefore all WARNINGSand CAUTIONS must always be carefully followed.
WARNINGSand CAUTIONS are recalled in the text with the following symbols:
Personal Safety:
Vehicle Safety:
Note: This Owner’s Manual describes all vehicle models. Optional equipment meant for specific markets or particular models
are not identified as such in the text: you need to consider only the information related to the model you own. Any content
introduced throughout the production of the model, outside the specific request of options at the time of purchase, will be
identified by the indicator: — if equipped.
The data contained in this publication is intended to help you use your vehicle in the best possible way. FCA US LLC aims for
constant improvement of the vehicles produced. For this reason, it reserves the right to make changes to the model described
for technical and/or commercial reasons.
For further information, contact your authorized dealer.
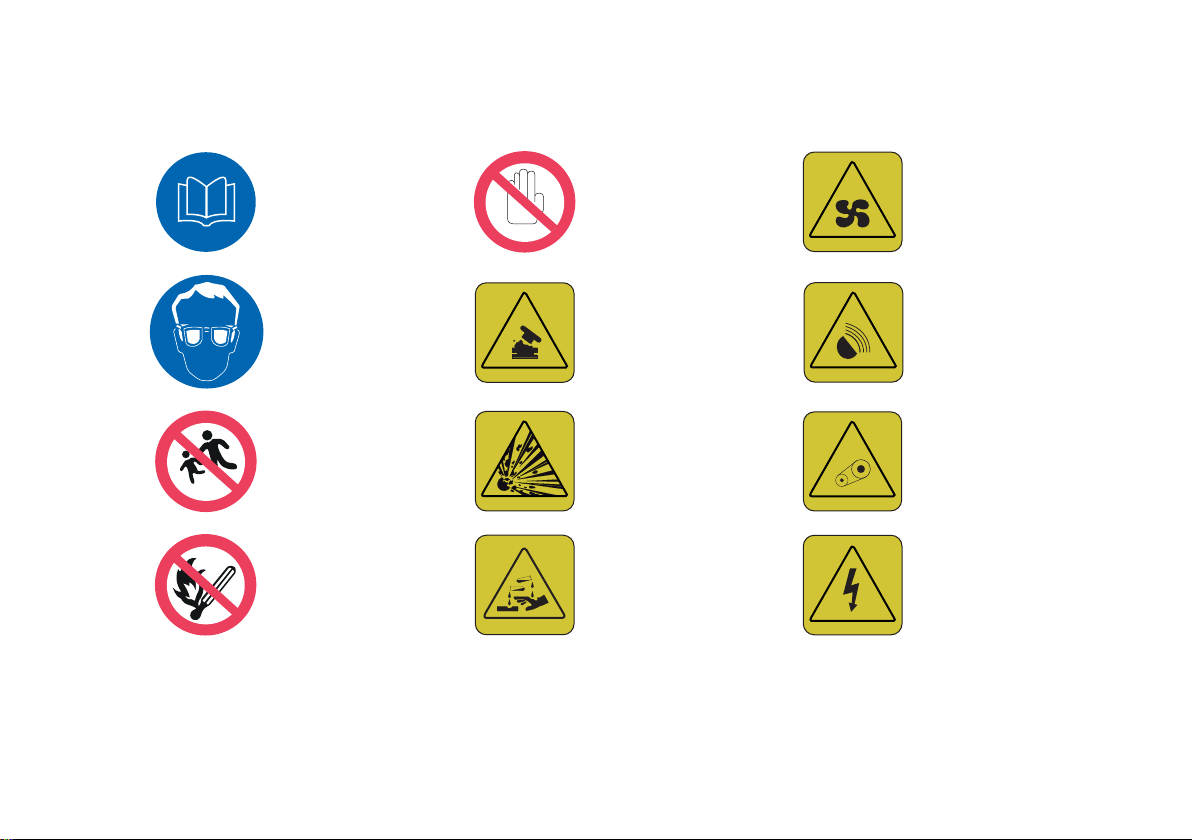
Symbols
Some vehicle components have colored labels with symbols indicating precautions to be observed when using this component. It is
important to follow all warnings when operating your vehicle. See below for a brief description of each symbol.
READ THE OWNER
HANDBOOK
PROTECTYOUR EYES
KEEP CHILDREN ATA
DISTANCE
DO NOT APPROACH
FLAMES
DO NOTTOUCHWITH
HANDS
DO NOT OPEN THE CAP
WHEN THE ENGINE IS
HOT
BURSTING
CORROSIVE LIQUID HIGH VOLTAGE
COMPONENT CAN START
AUTOMATICALLY ALSO
WHEN ENGINE IS OFF
DO NOT OPEN: HIGH
PRESSURE GAS
MOVING PARTS KEEP PARTS
OF YOUR BODYAND
CLOTHES AWAY

GRAPHICAL TABLE OF CONTENTS
GETTING TO KNOW YOUR VEHICLE
GETTING TO KNOW YOUR INSTRUMENTPANEL
SAFETY
STARTING AND OPERATING
IN CASE OF EMERGENCY
SERVICING AND MAINTENANCE
TECHNICAL SPECIFICATIONS
CUSTOMER ASSISTANCE
INDEX

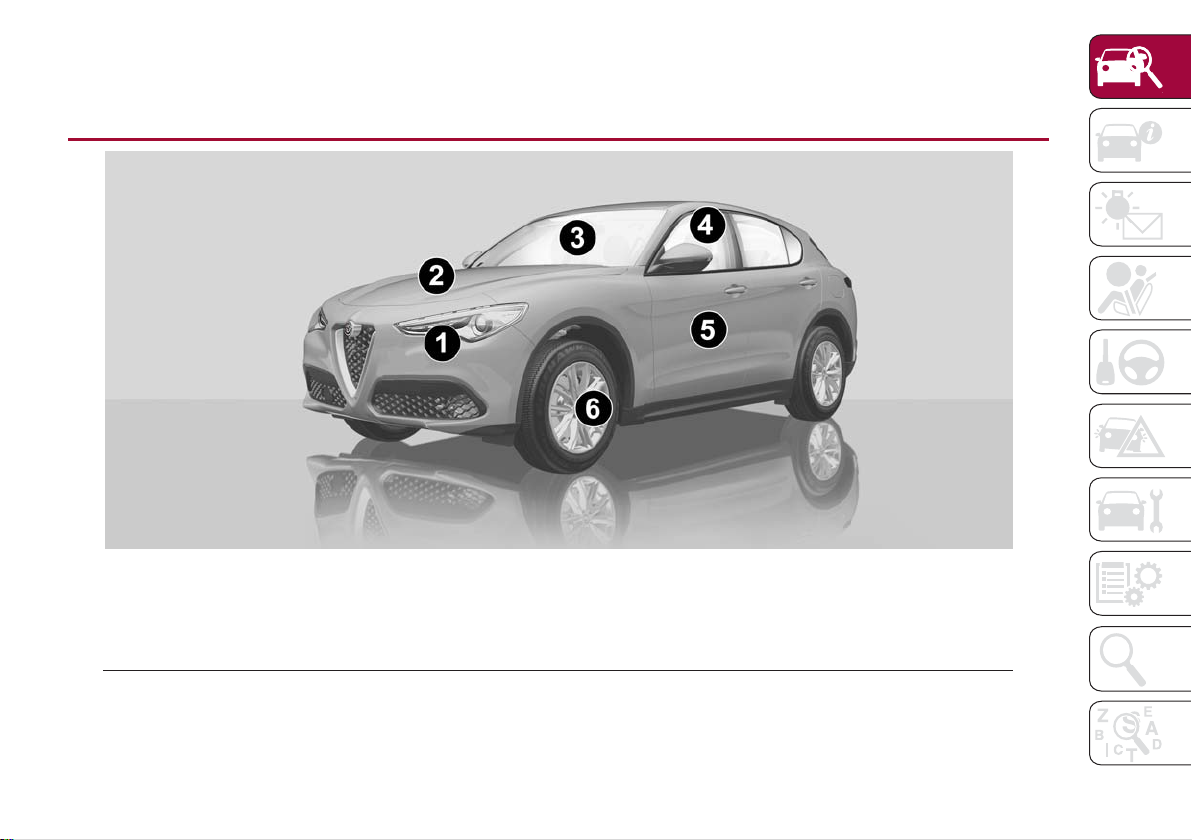
FRONTVIEW
GRAPHICAL TABLE OF CONTENTS
Front View
1 — Headlights 4 — Mirrors
2 — Engine Compartment 5 — Doors
3 — Windshield 6 — Wheels And Tires
03016V0001EM
9
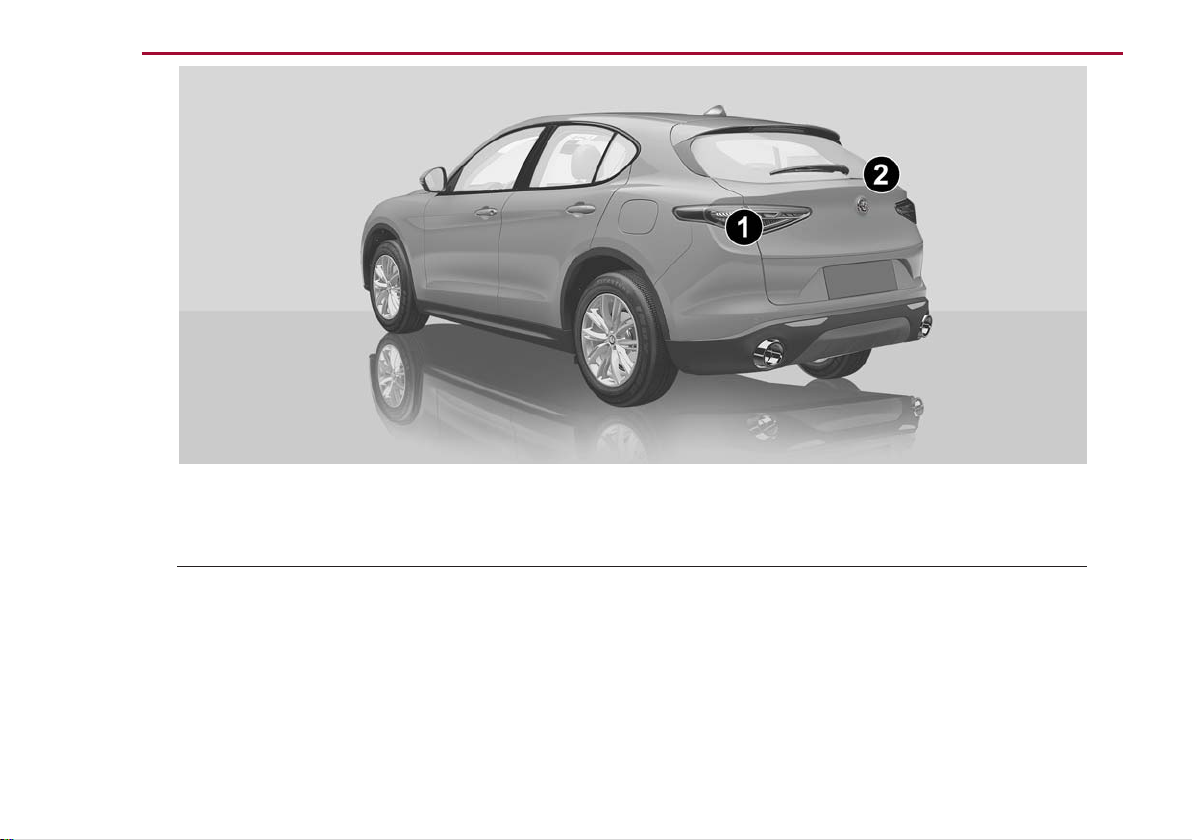
REAR VIEW
10
Rear View
03026V0001EM
1 — Tail Lights
2 — Liftgate

INSTRUMENTPANEL
Instrument Panel
1 — Headlight Switch 5 — Instrument Cluster 9 — Climate Controls
2 — Air Vents 6 — Steering Wheel 10 — Glove Compartment
3 — Multifunction Lever 7— Windshield Wiper Stalk 11 — Passenger-Side Air Bag
4 — Controls On The Steering Wheel 8 — Information and Entertainment
System
03036V0001EM
11
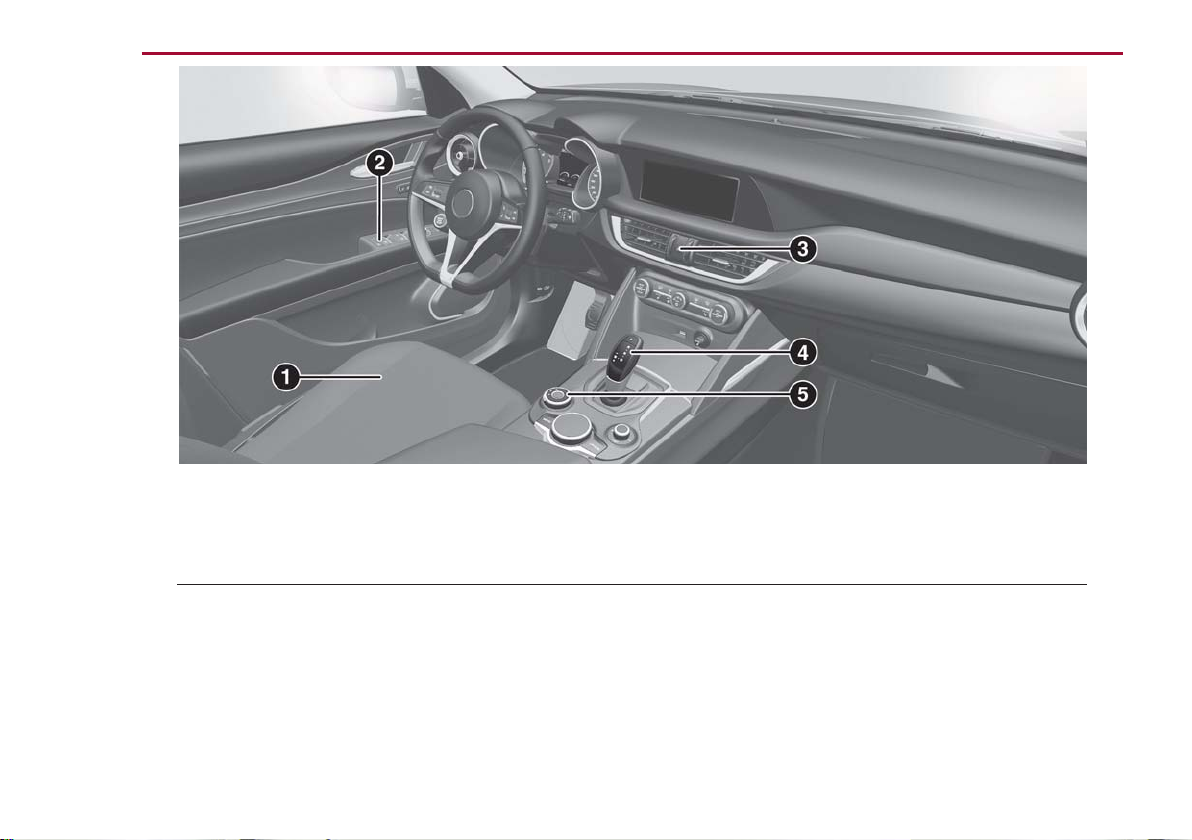
VEHICLE INTERIOR
12
Vehicle Interior
03046V0001EM
1 — Driver Seat 4— Gear Selector
2 — Power Windows/Power Mirrors Controls 5 — Alfa DNA Drive Mode Selector
3 — Hazard Warning Lights

GETTING TO KNOW YOURVEHICLE
In this section, you will find important
information to help you become familiar
with the features needed to operate your
vehicle, and how they function.
KEYS ....................14
IGNITION SYSTEM ............17
ENGINE IMMOBILIZER .........18
SECURITY ALARM SYSTEM—
IF EQUIPPED ................19
DOORS...................21
SEATS....................26
HEAD RESTRAINTS ...........30
STEERING WHEEL ............32
MIRRORS ..................33
EXTERIOR LIGHTS ............34
INTERIOR LIGHTS ............37
WINDSHIELD WIPERS ..........40
CLIMATE CONTROL ...........42
POWERWINDOWS............50
POWER SUNROOF — IF EQUIPPED . .51
HOOD....................53
POWER LIFTGATE ............54
INTERNAL EQUIPMENT .........58
13
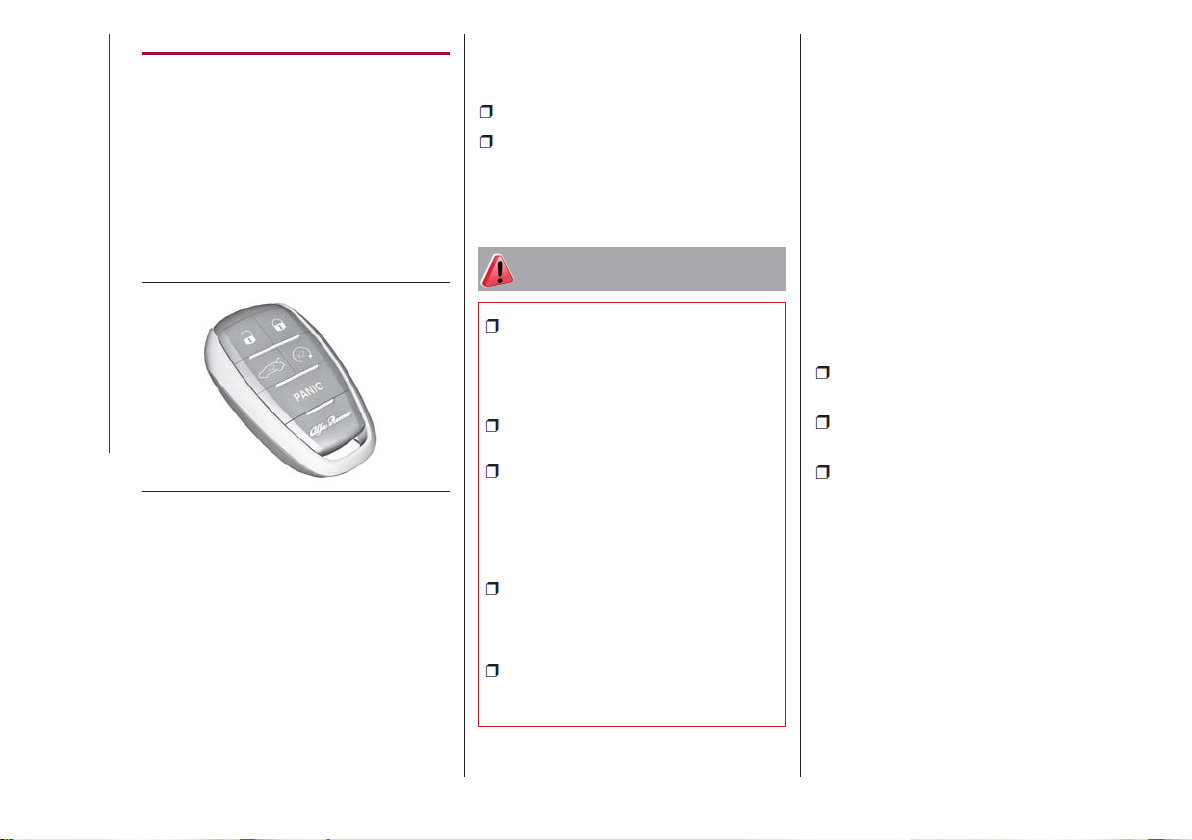
KEYS
Key Fob
Your vehicle uses a keyless ignition
system. This system includes a key fob
and a keyless push button ignition.
The Remote Keyless Entry key fob allows
you to lock or unlock the doors and
liftgate or activate the Panic Alarm from
a distance. The key fob does not need to
be pointed at the vehicle to activate the
system.
GETTING TO KNOW YOURVEHICLE
Key Fob
PANIC Function
The key fob contains a PANIC button.
Should you ever feel threatened, push
this button and the vehicle security alarm
will sound.
To activate the PANIC function, push and
hold the PANICbutton for at least one
second. When the panic alarm is active,
the headlights turn on, the turn signals
flash, the horn honks intermittently, and
04016S0001EM
all interior adjustable lights turn on.The
panic alarm will remain active for three
minutes, and can be deactivated:
By pushing the PANIC button again.
Automatically if the vehicle speed
exceeds 5 mph (8 km/h).
In both cases, the panic alarm is
immediately deactivated.
Warning!
Before exiting a vehicle, always shift the
automatic transmission into PARK,apply the
parking brake, turn the engine OFF, remove
the key fob from the vehicle and lock your
vehicle.
Never leave children alone in a vehicle, or
with access to an unlocked vehicle.
Allowing children to be in a vehicle
unattended is dangerous for a number of
reasons. A child or others could be seriously
or fatally injured. Children should be warned
not to touch the parking brake, brake pedal
or the gear selector.
Do not leave the key fob in or near the
vehicle, or in a location accessible to
children. A child could operate power
windows, other controls, or move the vehicle.
Do not leave children or animals inside
parked vehicles in hot weather. Interior heat
build-up may cause serious injury or death.
Operation
Unlocking The Doors And The Liftgate
Briefly pushing the unlock button on the
key fob will unlock the doors and liftgate,
turn on the interior lights, and flash the
turn signals once (if activated from the
Information and Entertainment System).
Push and release the unlock button on the
key fob once to unlock the driver side
front door or twice within one second to
unlock all doors and the liftgate.
It is, however, possible to change the
current setting through the Information
and Entertainment System menu, so that
the system unlocks:
All doors on the first push of the key
fob unlock button.
The driver door on the first push of the
key fob unlock button.
The liftgate "independently" or "with
doors".
Flashing of the turn signals upon
locking/unlocking the doors, and
activation of the courtesy light upon
unlocking the doors, can be activated or
deactivated through the Information and
Entertainment System. For further
information, refer to the Information and
Entertainment System Owner’s Manual
Supplement.
The doors can also be unlocked by using
the emergency key, located inside the
key fob.
14
Door And Liftgate Locking
Briefly pushing the lock button on the key
fob will lock the doors and liftgate, switch
off the internal lights, and flash the turn
signals (if activated in the Information
and Entertainment System).
If one or more doors are open, these
doors will also lock, and this is indicated
by a rapid flashing of the turn signals. The
doors will unlock again only if the key fob
is detected inside the passenger
compartment.
The doors can be locked by using the
emergency key in the driver’s side door
lock.
Opening The Liftgate
Rapidly push the button on the key fob
twice to open the liftgate. The turn
signals will flash to indicate that the
liftgate has been opened.
Remote Start
The remote start
button on the key fob
enables engine starting
(push the remote start
button on the key fob
twice to enable engine
starting).
Car Finder
The Car Finder feature will temporarily
activate the turn signals and headlights
to assist with locating the vehicle in a
crowded area.
To activate, push the lock or unlock
button to remotely and temporarily
activate the turn signals and headlights.
Pushing the lock or unlock button again
will reactivate the lights switch on timer
(if the parking lights function was already
active, it will remain active).
This function is available only if the doors
are closed.
04016S0099EM
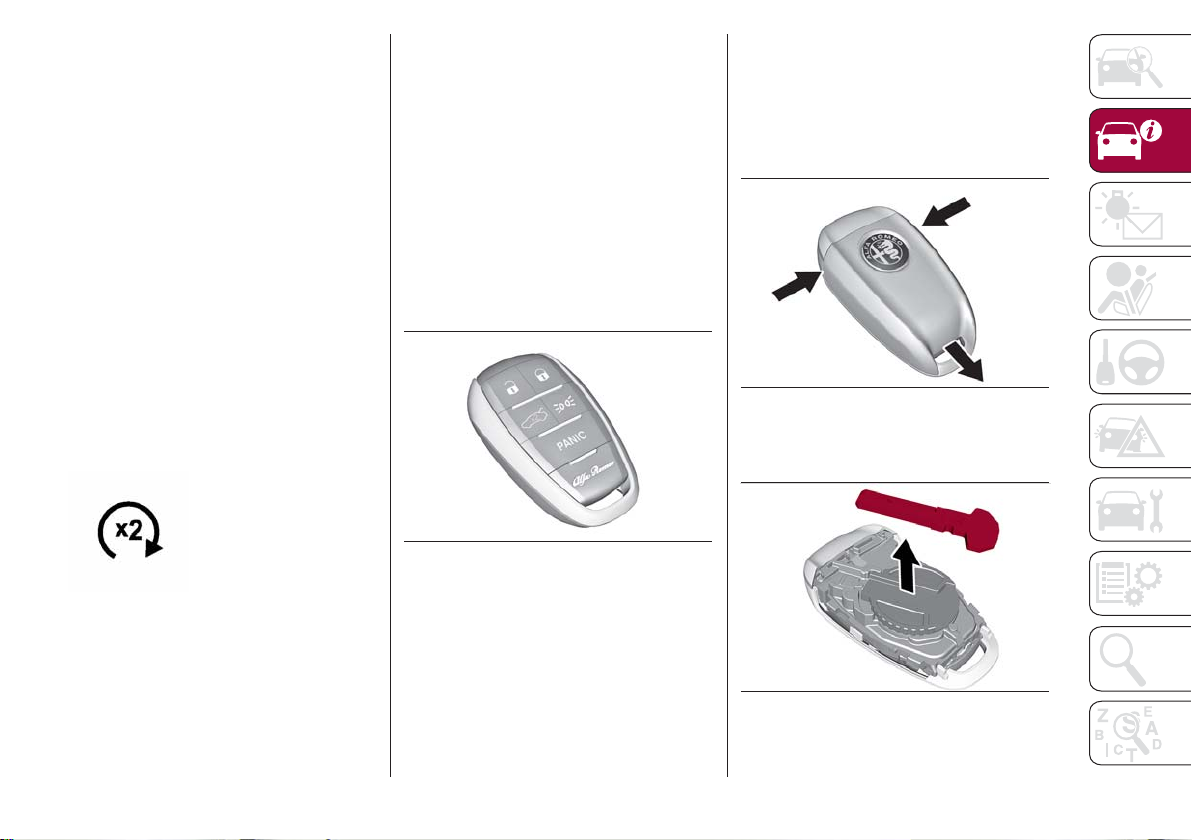
Key Fob
Replacing The Electronic Key Fob
Battery
To replace the battery, proceed as
follows:
1. Push the sides of the key fob inward
and extract the cover pulling downwards.
04016S0002EM
Key Fob Cover Removal
2. Remove the emergency key from its
housing.
Removing Emergency Key
04016S0003EM
15
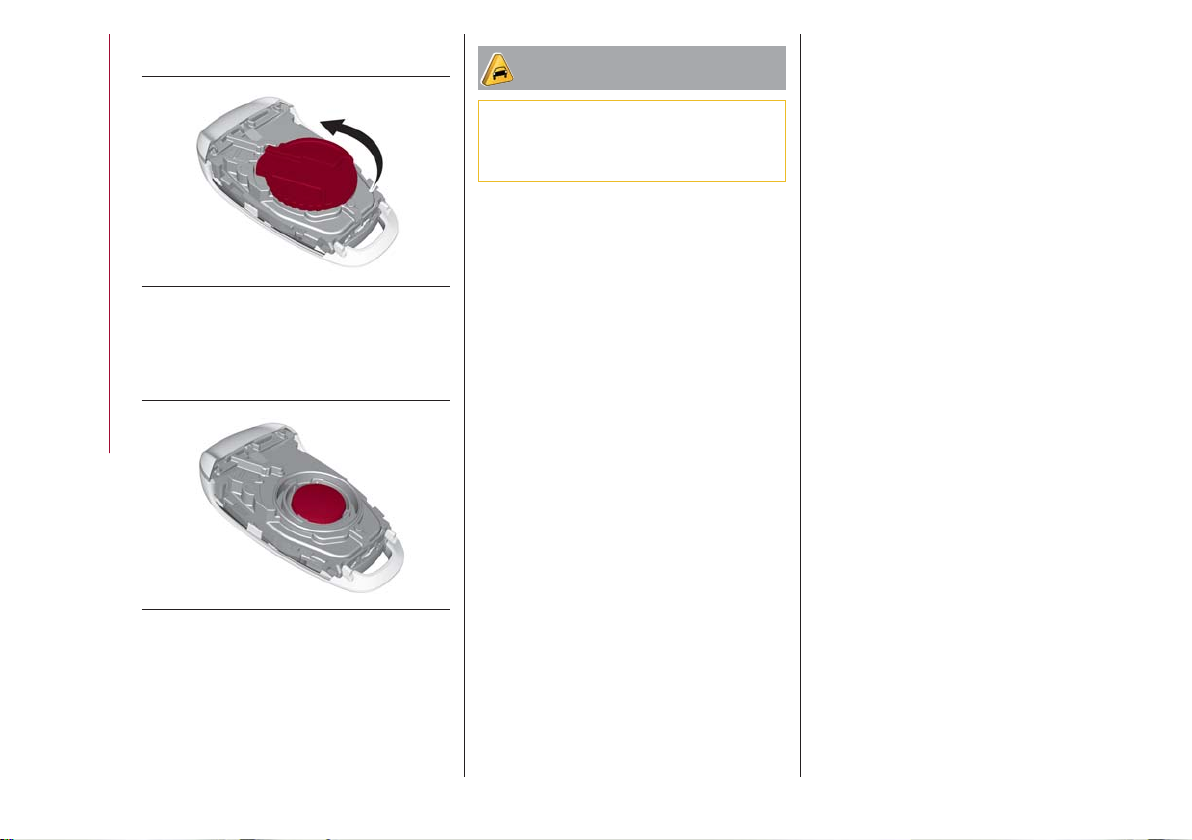
3. Remove the battery plug by rotating it
counter clockwise.
Removing Battery Plug
4. Remove the battery from its slot and
replace it with a new one of the same
type.
GETTING TO KNOW YOURVEHICLE
04016S0004EM
Caution!
The battery replacement operation must be
done with care, in order not to damage the
electronic key.
Request For Additional Keys
The system can recognize up to eight key
fobs with remote control.
To guarantee that the engine starts and
the vehicle operates correctly, use only
electronic key fobs specifically coded for
the vehicle’s electronics.
If an electronic key fob is coded for a
vehicle, it cannot be used on any other
vehicle.
General Information
The following regulatory statement
applies to all radio frequency (RF)
devices equipped in this vehicle:
This device complies with Part 15 of the
FCC Rules and with Industry Canada
license-exempt RSS standard(s).
Operation is subject to the following two
conditions:
1. This device may not cause harmful
interference, and
2. This device must accept any
interference received, including
interference that may cause undesired
operation.
Note: Changes or modifications not
expressly approved by the party
responsible for compliance could void the
user’s authority to operate the
equipment.
16
Battery Location
04016S0005EM
Proceed in reverse order to reassemble
the key.
IGNITION SYSTEM
Operation
To activate the keyless ignition, the key
fob must be inside the vehicle.
04026S0001EM
Keyless Ignition START/STOP Button
The keyless ignition has the following
modes:
STOP: engine off, steering locked.
Some electrical devices (e.g. central door
locking system, alarm, etc.) are still
available.
ON: all electrical devices are available.
This state can be entered by pushing the
ignition button once, without pressing the
brake pedal.
AVV: engine starting. This state can be
entered by pushing the ignition button
once while pressing the brake pedal.
Note:
With the keyless ignition in the ON
position: if 30 minutes pass with the
gear selector in P (Park) and the engine
stopped, the keyless ignition will
automatically reset to the STOP
position.
With the engine started, it is possible
to remove the key fob from the vehicle.
The engine will remain running and the
instrument cluster will indicate the
absence of the key fob when the door is
closed.
For more information on engine start-up,
refer to "Starting The Engine" in "Starting
And Operating."
Warning!
Never use the PARKposition as a
substitute for the parking brake. Always
apply the parking brake fully when parked to
guard against vehicle movement and
possible injury or damage.
When exiting the vehicle, always make
sure the ignition is in the OFF mode, remove
the key fob from the vehicle, and lock your
vehicle.
Never leave children alone in a vehicle, or
with access to an unlocked vehicle. Allowing
children to be in a vehicle unattended is
dangerous for a number of reasons. A child
or others could be seriously or fatally injured.
Children should be warned not to touch the
parking brake, brake pedal or the
transmission gear selector.
Do not leave the key fob in or near the
vehicle, (or in a location accessible to
children), and do not leave the ignition in the
AVV or ON/RUN mode. A child could operate
power windows, other controls, or move the
vehicle.
Be sure the parking brake is fully
disengaged before driving; failure to do so
can lead to brake failure and a collision.
Always fully apply the parking brake when
leaving your vehicle, or it may roll and cause
damage or injury. Also be certain to leave the
transmission in PARK. Failure to do so may
allow the vehicle to roll and cause damage or
injury.
Driving the vehicle with the parking brake
engaged, or repeated use of the parking
brake to slow the vehicle may cause serious
damage to the brake system.
Caution!
If the Brake System Warning Light remains
on with the parking brake released, a brake
system malfunction is indicated. Have the
brake system serviced by an authorized
dealer immediately.
17
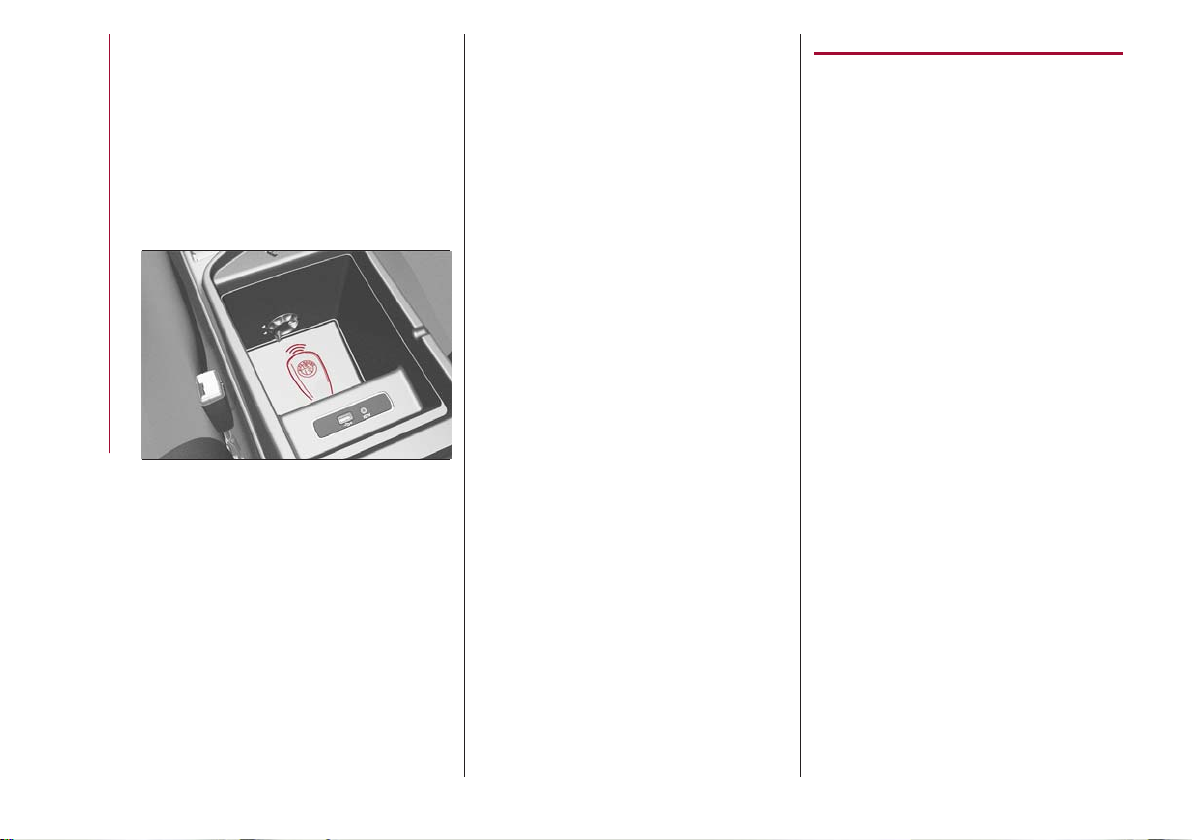
Starting With A Discharged Key Fob
Battery
If the key fob battery is discharged,
proceed as follows to start the vehicle:
1. Lift the front armrest.
2. Lay the key fob on the key fob outline
found on the floor of the armrest
compartment while pushing the
START/STOPbutton to start the ignition.
GETTING TO KNOW YOURVEHICLE
Key Fob Placement Location
Steering Wheel Lock — If Equipped
Your vehicle may be equipped with a
passive electronic steering wheel lock.
The steering wheel lock is engaged when
the driver door is opened with the ignition
OFF. The steering wheel lock releases
when the ignition is cycled ON.
04026V0002EM
General Information
The following regulatory statement
applies to all radio frequency (RF)
devices equipped in this vehicle:
This device complies with Part 15 of the
FCC Rules and with Industry Canada
license-exempt RSS standard(s).
Operation is subject to the following two
conditions:
1. This device may not cause harmful
interference, and
2. This device must accept any
interference received, including
interference that may cause undesired
operation.
Note: Changes or modifications not
expressly approved by the party
responsible for compliance could void the
user’s authority to operate the
equipment.
ENGINE IMMOBILIZER
Engine Immobilizer Operation
The Engine Immobilizer system prevents
unauthorized use of the vehicle by
disabling engine starting.
The system does not need to be enabled
or activated. Operation of the
immobilizer is automatic whether the
vehicle's doors are locked or unlocked.
When the ignition is set to ON, the Engine
Immobilizer system identifies the code
transmitted by the key. If the code is
recognized as valid, the Engine
Immobilizer system enables engine
starting.
When the ignition is brought back to
STOP, the Engine Immobilizer system
deactivates the engine control unit,
disabling engine starting.
For the correct engine starting
procedures, refer to “Starting The
Engine” in “Starting And Operating.”
18
Irregular Operation
If the key code is not recognized during
starting, the Engine Immobilizer
Failure/Break-in Attempt
displayed on the instrument panel (refer
to "Warning Lights And Messages" in
"Getting ToKnow Your Instrument
Panel").This condition leads to the engine
turning off after two seconds. In this
case, switch the ignition to STOPand
then to ON; if it is still blocked, try with
the other keys provided. If it is still not
possible to start the engine, contact an
authorized dealer.
If the Engine Immobilizer Failure/
Break-in Attempt
while driving, this means that the system
is running a self-diagnosis (e.g. due to a
voltage drop). If the display persists,
contact an authorized dealer.
Note:
Do not tamper with the Engine
Immobilizer system. Any modifications
or alterations could cause the protection
function to be deactivated.
icon is
icon is displayed
The Engine Immobilizer system is not
compatible with certain aftermarket
remote starting systems. The use of
these devices could cause problems
when starting, as well as the
deactivation of the protection function.
All keys provided with the vehicle
have been programmed in accordance
with the electronics on the vehicle itself.
Each key has its own code which must
be stored by the system's control unit.
Contact an authorized dealer to have
new keys (up to eight) stored with a
code.
SECURITY ALARM SYSTEM — IF EQUIPPED
Alarm Activation
The vehicle security alarm monitors the
vehicle doors and ignition for
unauthorized operation. When the vehicle
security alarm is activated, interior
switches for door locks are disabled.The
system provides both audible and visible
signals.
While armed, the alarm will sound in the
following scenarios:
Opening of doors/hood/liftgate
(perimeter protection)
Operation of ignition with a key which
is not validated
Cutting of the battery cables
Movement inside the passenger
compartment (volumetric protection —
if equipped)
Unexpected lifting/tilting of the
vehicle (anti-lift protection —
if equipped)
Activation of the alarm triggers the
acoustic warning and the turn signals.
Note: The alarm system is activated by
the Engine Immobilizer system, which is
automatically activated when you get out
of the vehicle with the key fob and lock
the doors.
19
GETTING TO KNOW YOURVEHICLE
20
To Arm The Alarm
With the doors, hood, and liftgate closed
and the keyless ignition system placed in
the STOP position, push and release the
lock button on the key fob.The alarm can
also be armed by pushing the Passive
Entry door handle button, located on the
exterior door handle. Refer to "Doors" in
"Getting ToKnow Your Vehicle”for
further information.
When the alarm is armed, the warning
lights on the door handle trim remain on.
04046V0001EM
Lock/Unlock Switches
The activation of the alarm is preceded
by a self-diagnosis stage: if a fault is
detected, the system emits a further
acoustic signal.
If a second acoustic signal is emitted
after the alarm is already armed, wait
about four seconds and disarm the alarm
by pushing the unlock switch. Verify that
the doors, hood, and liftgate are closed
correctly. Then, reactivate the system by
pushing the lock switch.
If the alarm emits an acoustic signal even
when the doors, hood, and liftgate are
correctly closed, a fault has occurred in
system operation. In this case, contact an
authorized dealer.
To Disarm The Alarm
Push the unlock button on the key fob to
disarm the alarm. While disarming, the
following operations are performed:
Two brief flashes of the turn signals
(if programmed).
Two brief acoustic signals
(if programmed).
Doors are unlocked.
The alarm can also be disarmed using the
Passive Entry System, by grasping one of
the Passive Entry front door handles with
a valid key fob in hand to unlock. For
further information refer to "Passive
Entry" in "Doors."
Note: The alarm does not disarm when
the doors are unlocked by inserting the
blade of the emergency key into the door
handle lock cylinder.
Anti-Lift Protection — If Equipped
The vehicle security alarm system
monitors the doors and liftgate for
unauthorized entry and the ignition
switch for unauthorized operation.
To ensure the correct operation of the
protection, completely close the side
windows. If a perimeter violation triggers
the security system, the alarm will sound
and the exterior lights will flash.
To ensure the correct operation of the
Volumetric/Anti-Lift Protection system,
completely close the side windows.
To disable the function, push the
Volumetric/Anti-Lift Protection button
before activating the alarm.
04046S0002EM
Volumetric/Anti-Lift Protection Button
When the function is disabled, this is
indicated by the light on the
Volumetric/Anti-Lift Protection button
flashing for several seconds.
Any disabling of the Volumetric/Anti-Lift
Protection must be repeated each time
the ignition is cycled off.
To Disarm The Alarm Using Passive Entry
To completely deactivate the alarm (e.g.
during a long period of vehicle inactivity),
insert the blade of the emergency key,
found inside the key fob, into the door
handle lock cylinder and turn the
emergency key to the right (clockwise) to
lock the door(s).
DOORS
Locking And Unlocking Doors From The
Inside
If all doors are closed properly, they will
automatically lock once the vehicle has
exceeded approximately 12 MPH
(20 km/h) (“Auto Relock” function active).
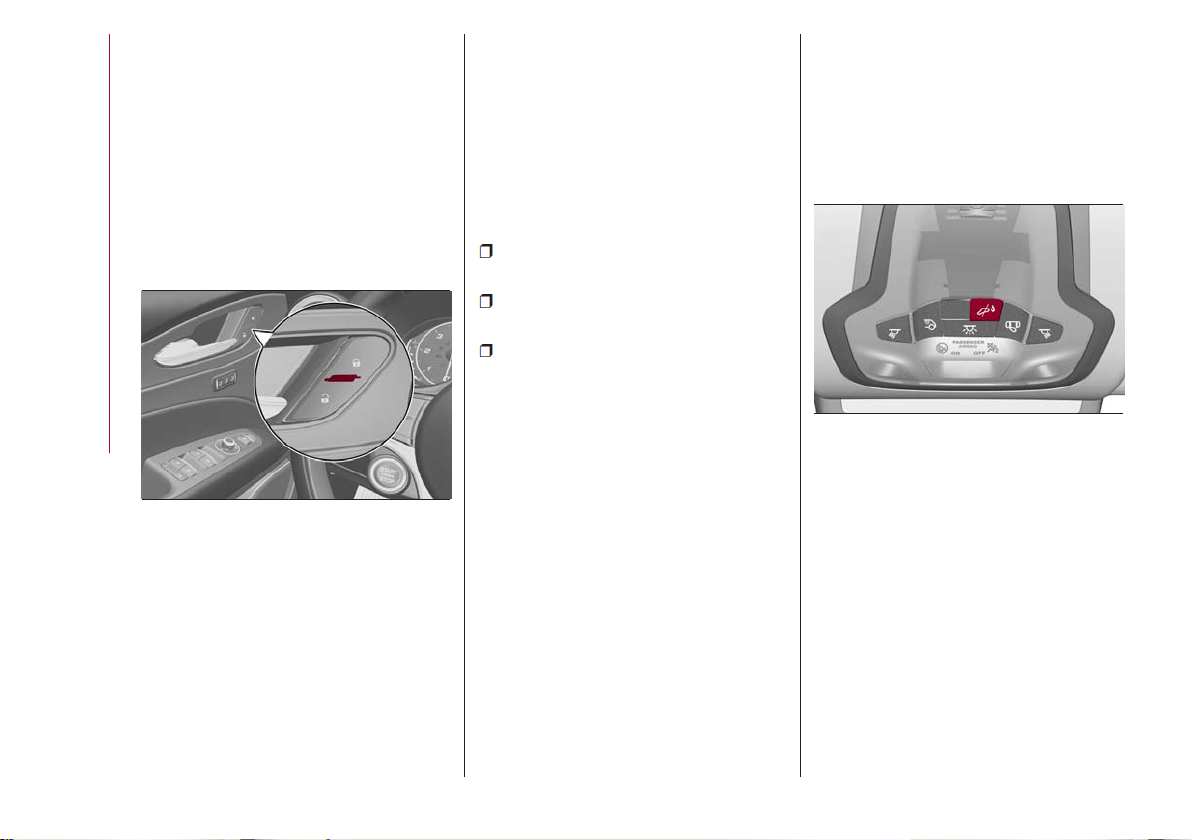
Push the interior lock button on the driver
or passenger side door panel trim to lock
the doors.
Push the interior lock button on the rear
door panel trim to lock the rear doors
only.
With doors locked, push the unlock
button on the interior trim panel to
unlock the doors.
04056V0001EM
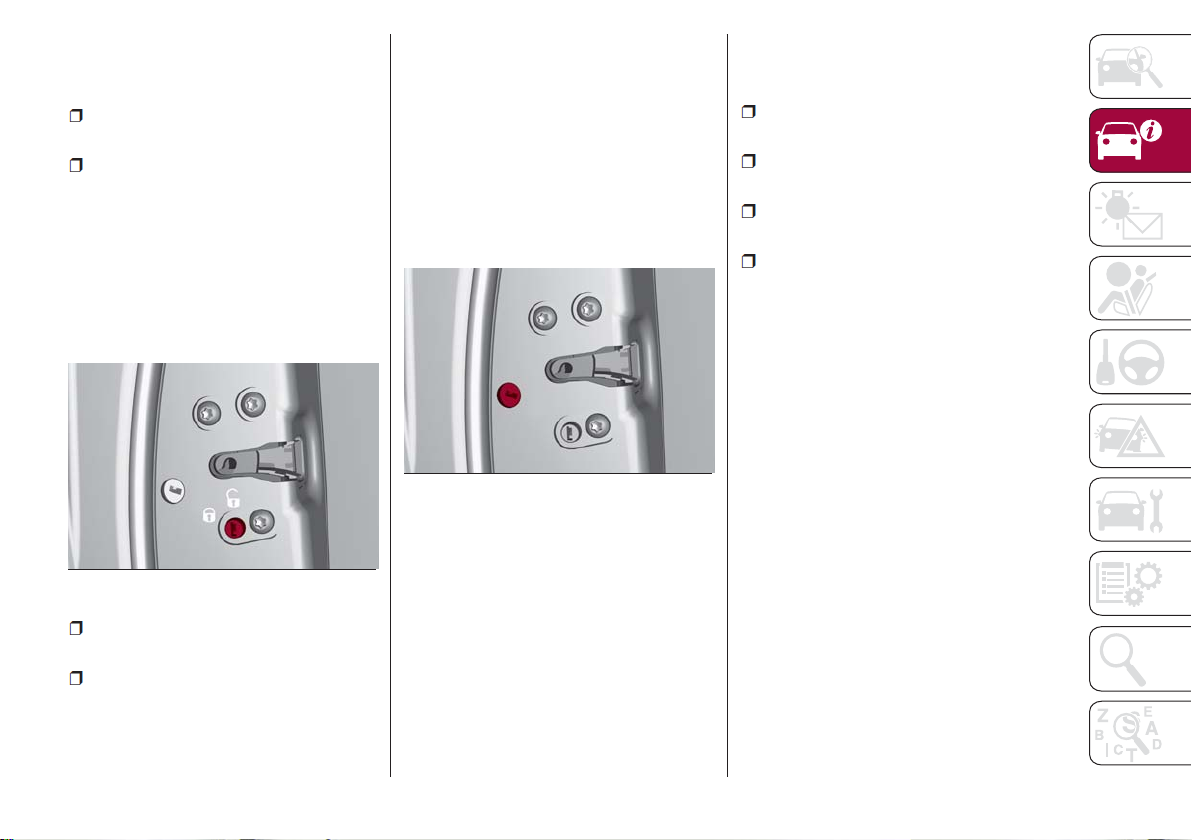
Door Lock And Unlock Switch Panel
Warning!
Do not leave children or animals inside
parked vehicles in hot weather. Interior heat
build-up may cause serious injury or death.
For personal security and safety in the
event of a collision, lock the vehicle doors as
you drive as well as when you park and leave
the vehicle.
Before exiting a vehicle, always shift the
automatic transmission into PARK,apply the
parking brake, turn the engine OFF, remove the
key fob from the vehicle and lock your vehicle.
Never leave children alone in a vehicle, or
with access to an unlocked vehicle.
Allowing children to be in a vehicle
unattended is dangerous for a number of
reasons. A child or others could be seriously
or fatally injured. Children should be warned
not to touch the parking brake, brake pedal
or the gear selector.
Do not leave the key fob in or near the
vehicle, or in a location accessible to
children. A child could operate power
windows, other controls, or move the vehicle.
Caution!
Locking/Unlocking Doors From The
Outside
When locking the doors from the outside
with the doors closed, push the lock
button on the key fob.
The door lock can be activated with all
doors locked and the liftgate open.When
the lock button on the key fob is pushed,
all locks are activated, including the
liftgate if it is open. The liftgate will be
locked when it is closed.
When unlocking the doors from the
outside, push the unlock button on the
key fob.
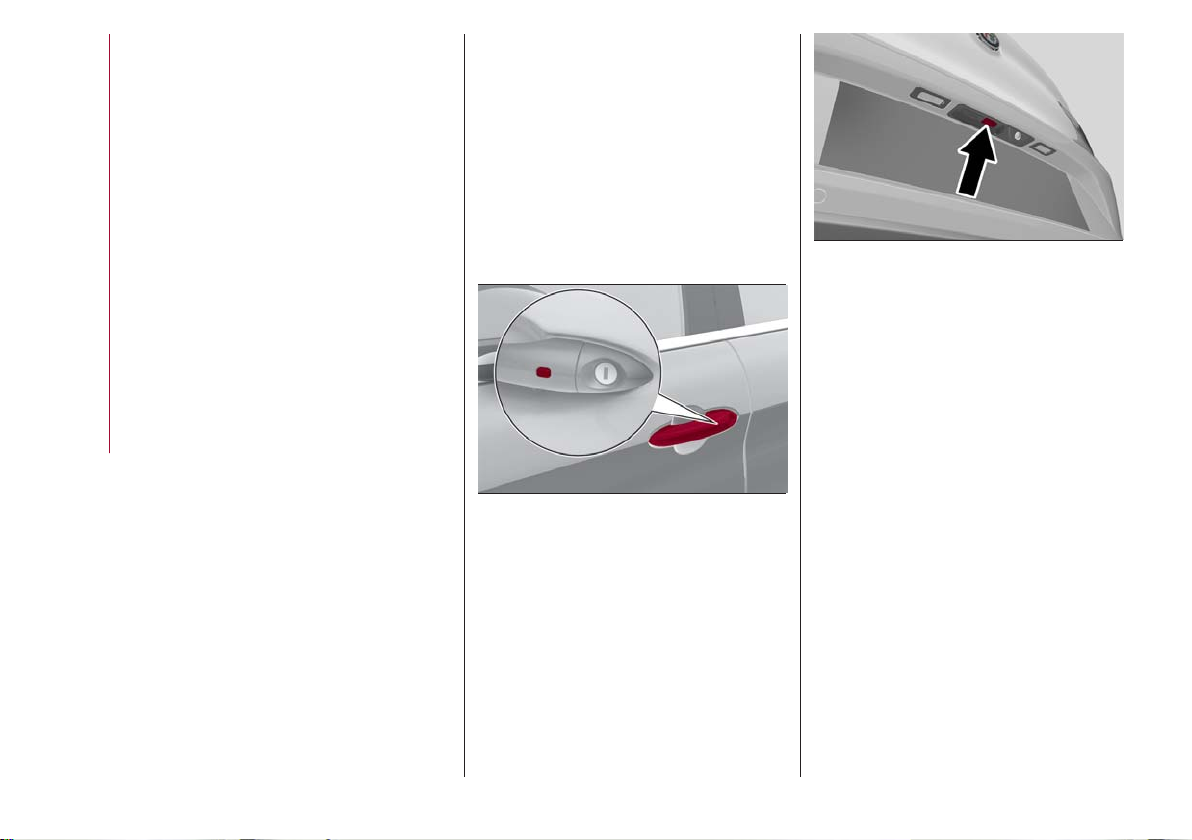
Locking/Unlocking Doors From The
Outside In An Emergency
If the battery is discharged or the key fob
is inoperable, you can lock or unlock the
doors from the outside by inserting the
blade of the emergency key, found inside
the key fob, into the door handle lock
cylinder and turn the emergency key as
follows.
Lock — Turn the emergency key to the
right (clockwise)
Unlock — Turn the emergency key to
the left (counter clockwise)
An unlocked vehicle is an invitation. Always
remove the key from the ignition and lock all
of the doors when leaving the vehicle
unattended.
21
Passive Entry
The Passive Entry system can identify
the presence of a key fob near the doors
and liftgate.
The system enables the doors and
liftgate to be locked or unlocked without
pushing any button on the key fob.
The key fob is detected only after the
system recognizes the presence of a
hand on one of the front door handles. If
the detected key fob is valid, the doors
and the liftgate are unlocked (refer to the
Information and Entertainment System
Owner’s Manual Supplement for Passive
Entry Settings).
Note: The key fob may not be able to be
detected by the vehicle keyless-go
system if it is located next to a mobile
phone, laptop, or other electronic device;
these devices may block the key fob’s
GETTING TO KNOW YOURVEHICLE
wireless signal and prevent the
keyless-go system from starting the
vehicle.
Grasping the handle of the driver's door
unlocks the driver's side door, or all doors
depending on the mode set using the
Information and Entertainment System
(refer to the Information and
Entertainment System Owner’s Manual
Supplement for Passive Entry Settings).
Note: If wearing gloves, or if it has rained
and the door handle is wet, the activation
sensitivity of the Passive Entry function
may be reduced, resulting in a longer
reaction time.
Door Locking
To lock the doors, proceed as follows:
1. Make sure that you have the key fob
and are close to the driver’s or
passenger’s side door handle.
2. Push the PassiveEntry door handle
button or the Passive Entry liftgate
button, which is located next to the
external liftgate release button. This will
lock all doors and the liftgate. Door
locking will activate the alarm as well.
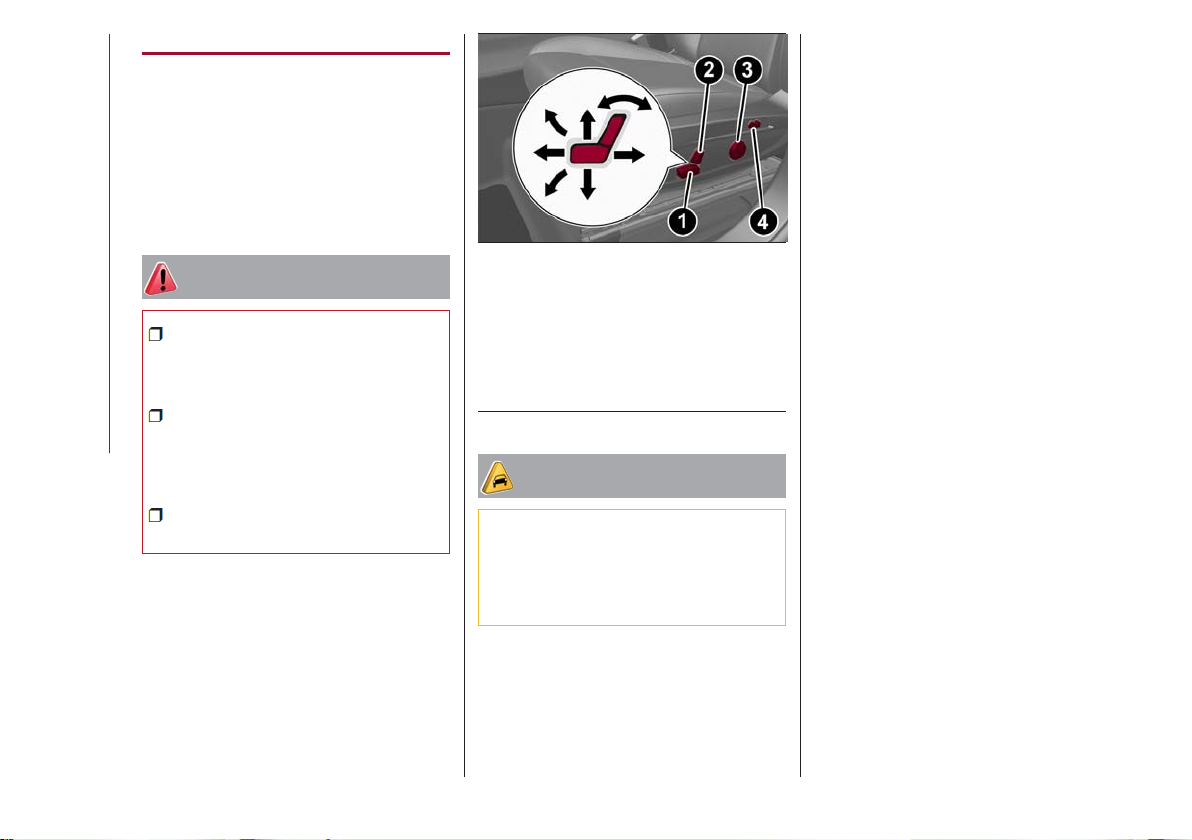
04056S0003EM
Passive Entry Door Handle Button
External Liftgate Release Button
04056V0005EM
Note: After pushing the Passive Entry
door handle button, you must wait two
seconds before the doors can be
unlocked again using the passive entry
door handle button. This feature makes it
possible to check whether the vehicle has
been locked correctly by pulling the door
handle within two seconds. The doors will
not be unlocked again.
The vehicle doors and liftgate can be
locked by pushing the lock button on the
key fob or on the interior door lock.
Driver Side Door Emergency Opening
If the key fob does not work, e.g. because
its battery is discharged or the vehicle
battery is discharged, the emergency key
can be used to unlock the driver side
door.
To remove the emergency key from the
key fob, proceed as follows:
1. Push the sides of the key fob inward
and extract the cover pulling downwards.
22

2. Remove the emergency key from the
key fob housing.
3. Insert the emergency key in the driver
side door lock cylinder and turn it to the
left (counter clockwise) to unlock the
door.
To avoid leaving the key fob inside
the vehicle accidentally, the Passive
Entry function features an automatic
door unlocking function.
Once all of the vehicle doors are
closed and locked, the vehicle will
attempt to locate the key fob inside or
outside of the vehicle.
Emergency Key Release Buttons
Emergency Key
Note:
The emergency key blade is not
directional and can be inserted
indifferently into the lock.
04016S0002EM
04016S0003EM
Passive Entry Door Handle Button
04056S0003EM
04056V0001EM
Interior Lock Switch Panel
While pulling the handle, do not push the
door lock/unlock button on the handle.
Do NOTGrab The Door Handle
04056S0004EM
When Locking
If the key fob is detected inside the
vehicle, the Passive Entry function
automatically unlocks all the vehicle
doors and flashes the turn signals.
If one or more key fobs are inside the
passenger compartment, the lock button
on the key fob inside the passenger
compartment is temporarily disabled.
The vehicle will not unlock the doors if an
unauthorized key fob has been detected
close to the outside of the vehicle.
If the Passive Entry function is disabled
using the Information and Entertainment
System, the keyless-go system to avoid
accidentally leaving the key fob inside
the vehicle is deactivated.
23
GETTING TO KNOW YOURVEHICLE
24
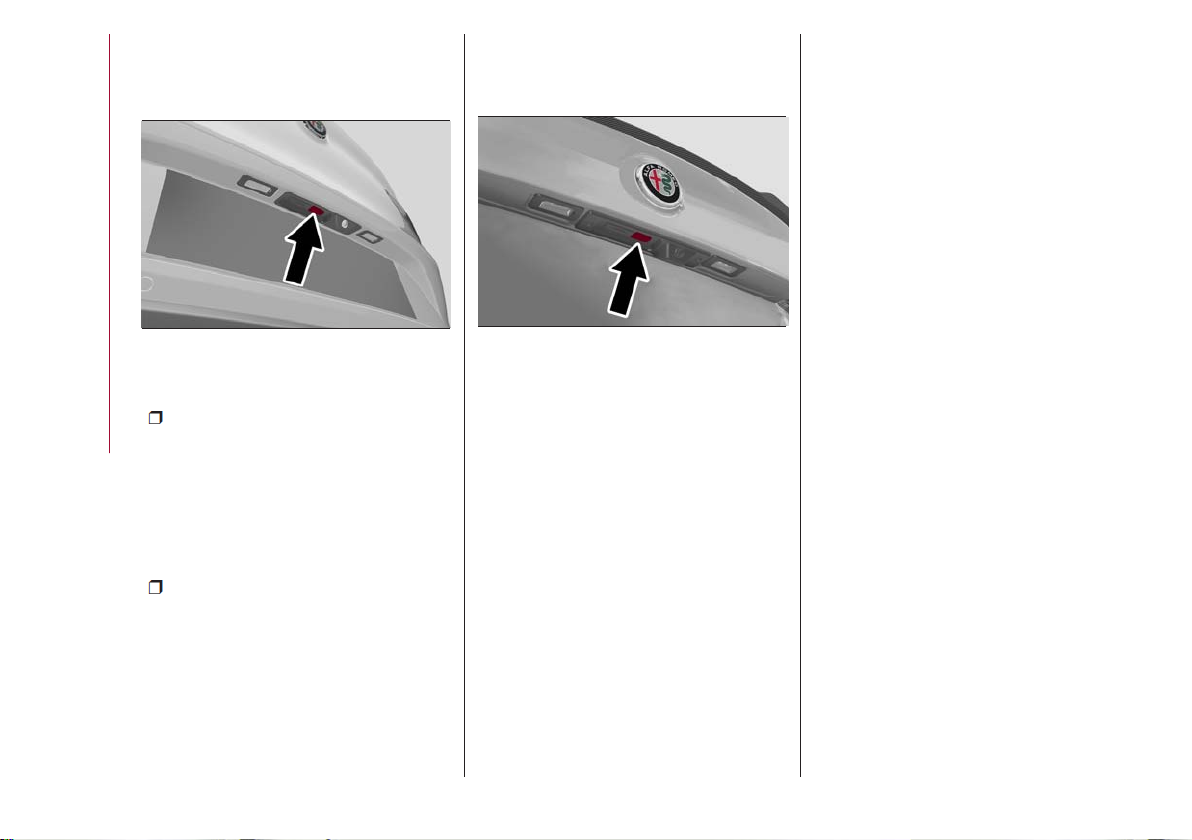
Liftgate Access
Approaching the liftgate with a valid key
fob, push the opening button to open the
liftgate.
04056V0005EM
External Liftgate Release Button
Note:
If the key fob is inadvertently
forgotten inside of the cargo area, and
an attempt is made to close it from
outside, the liftgate will not lock.With
the doors locked, the liftgate unlocked,
and the key fob detected inside the
vehicle, the liftgate will unlock again and
the lights flash twice.
Before driving, make sure the
liftgate is closed correctly.
Liftgate Lock
The liftgate of the vehicle may still be
locked by pushing the lock button on the
key fob, pushing the door lock button on
the door handles, or pushing the lock
button on the interior door panel of the
vehicle.
On vehicles equipped with Passive Entry,
the liftgate and the doors can be locked
by pushing the button located near the
opening button of the liftgate.
04056S0006EM
Passive Entry Liftgate Button
System Activation/Deactivation
The Passive Entry system can be
activated or deactivated using the
Information and Entertainment System.
General Information
The following regulatory statement
applies to all radio frequency (RF)
devices equipped in this vehicle:
This device complies with Part 15 of the
FCC Rules and with Industry Canada
license-exempt RSS standard(s).
Operation is subject to the following two
conditions:
1. This device may not cause harmful
interference, and
2. This device must accept any
interference received, including
interference that may cause undesired
operation.
Note: Changes or modifications not
expressly approved by the party
responsible for compliance could void the
user’s authority to operate the
equipment.
Power Lock
The power lock is a safety device that
prevents the operation of the interior
door handles and the door lock and
unlock buttons. The power lock also
prevent opening of the doors from inside
the passenger compartment.
It is recommended to lock the vehicle
doors each time the vehicle is parked.
Activating The Power Lock
The power lock is enabled on all the doors
by quickly pushing the lock button on the
key fob twice.
The turn signals will flash to let you know
that the power lock is active.
If one or more of the doors are not closed
correctly, the power lock will not activate,
preventing a person from getting stuck
inside the passenger compartment by
entering the vehicle, and then closing, the
open door.
Deactivating The Power Lock
The power lock disengages
automatically:
When the doors are unlocked, pushing
the unlock button on the key fob.
When the keyless ignition is placed in
the ON position.
Child Safety Locks
To provide a safer environment for small
children riding in the rear seats, the rear
doors are equipped with a
Child-Protection Door Lock system.
This device can only be engaged with the
doors open.
04056S0007EM
Child Safety Lock Positions
Lock position: device locked (door
opened from exterior only)
Unlock position: device unlocked (door
may be opened from the inside)
The Child Safety Locks remain locked
even if the doors are unlocked.
Note: The rear doors cannot be opened
from the inside when the Child Safety
Lock is engaged.
Unlocking The Doors With A Discharged
Battery
Proceed as follows to unlock the doors if
the vehicle battery is discharged.
1. With the doors unlocked insert the
emergency key from the key fob into the
door lock manual release lock cylinder.
04056S0008EM
Door Lock Manual Release Lock
Cylinder
2. Turn the manual release lock cylinder
clockwise for the right door locks or
counterclockwise for the left door locks.
3. Remove the key/screwdriver from the
manual release lock.
Proceed in one of the following ways to
realign the door lock device (only when
the battery charge has been restored):
Push the lock button on the electronic
key
Push the unlock button on the door
panel
Unlock driver’s door lock with the
emergency key
Operate the internal door handle
Note: For the rear doors, if the Child
Safety Locks are engaged, and the
previously described locking procedure is
carried out, operating the internal handle
will not open the door. Instead, it will only
realign the lock release device. Toopen
the door, the outside handle must be
used. The door central locking/unlocking
buttons are not deactivated when the
emergency lock is engaged.
25
SEATS
The front seats can be adjusted to ensure
maximum comfort for the occupants.
When adjusting the driver’s seat, keep
the shoulders resting firmly against the
backrest, the wrists within reach of the
top of the steering wheel, and the seat
close enough to allow the driver to fully
depress the brake pedal.
Warning!
It is dangerous to ride in a cargo area,
inside or outside of a vehicle. In a collision,
people riding in these areas are more likely
to be seriously injured or killed.
Do not allow people to ride in any area of
your vehicle that is not equipped with seats
GETTING TO KNOW YOURVEHICLE
and seat belts. In a collision, people riding in
these areas are more likely to be seriously
injured or killed.
Be sure everyone in your vehicle is in a
seat and using a seat belt properly.
Power Front Seats
The power seat switch is located on the
outboard side of the seat near the floor.
Use this switch to move the driver's seat
up, down, forward, and rearward, or to
recline the seatback.
Power Seat Adjustment
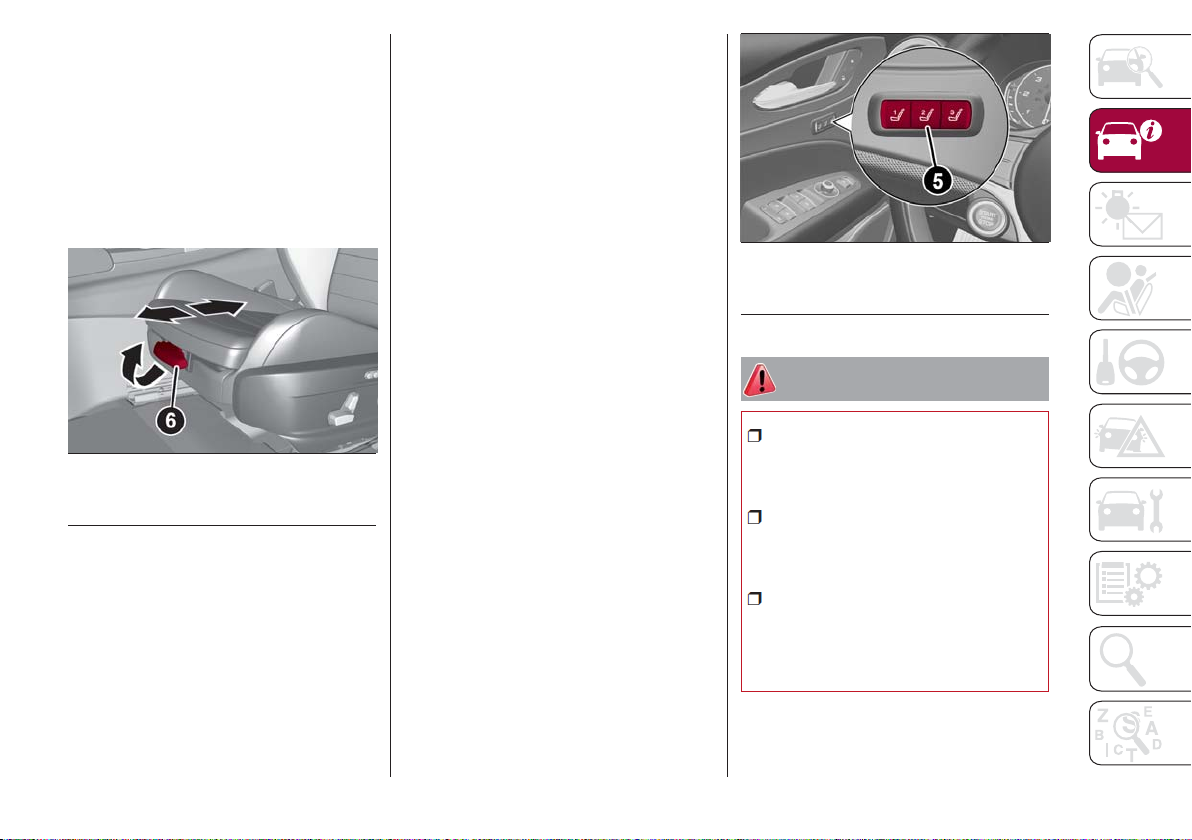
04066V0003EM
1 — Seat Switch (For/Rear/Height
Adjustment)
2 — Seatback Switch
3 — Lumbar Adjustment
4 — Power Adjustable Bolster Buttons
— If Equipped
Caution!
Do not place any article under a power seat
or impede its ability to move as it may cause
damage to the seat controls. Seat travel may
become limited if movement is stopped by an
obstruction in the seat's path.
Forward/Rearward Adjustment
Push the seat switch forward or rearward
to adjust to your desired position.
Seatback Recline
The angle of the seatback can be
adjusted forward or rearward. Push the
seatback switch forward or rearward,
and the seat will move in the direction of
the switch. Release the switch when the
desired position is reached.
Power Lumbar — If Equipped
Vehicles equipped with power driver or
passenger seats may also be equipped
with power lumbar. The power lumbar
switch is located on the outboard side of
the power seat. Push the switch forward
or rearward to increase or decrease the
lumbar support. Push the switch upward
or downward to raise or lower the lumbar
support.
Height Adjustment
The height of the seats can be adjusted
up or down. Pull upward or push
downward on the seat switch, and the
seat will move in the direction of the
switch. Release the switch when the
desired position is reached.
Seat Angle Adjustment (Tilting) —
If Equipped
The seat angle can be adjusted in four
directions. Lift or push the front part of
seat switch to move the front part of the
seat in the corresponding direction.
Release the seat switch when the seat
has reached the desired position.
26
Power Bolster Adjustment —
If Equipped
Push the power bolster adjustment
buttons to regulate the width of the
backrest through the lateral padding.
Seat Cushion Extension — If Equipped
Lift the adjustment lever and push the
front of the cushion forward or backward
to extend the cushion by a few inches
(centimeters).
04066S0017EM
Seat Cushion Extension
6 — Adjustment Lever
Driver Memory Seat
The driver memory seat buttons can
store and recall three different driver’s
seat positions, as well as outside power
mirror positions. Storing and recalling
can be done with the ignition in the ON
mode and the driver’s side door closed, or
for 3 minutes after having opened the
driver's side door. An audible chime is
heard to confirm a memory profile is set
or recalled. To set a memory profile, first
adjust your seat (and power mirror
position if desired) until you are in the
desired position. Then, push the memory
button you want to assign the set
position to for 1.5 seconds. When a new
seat position is memorized, the
previously memorized position on the
same button is automatically
overwritten. Recalling a memorized
position can also be done for
approximately 3 minutes after the doors
are opened and for approximately
1 minute after the engine is stopped. To
recall a memorized position, push the
assigned button briefly.
Driver Memory Seat Buttons Location
04066V0015EM
5 — Driver Memory Seat Buttons
Warning!
Adjusting a seat while driving may be
dangerous. Moving a seat while driving could
result in loss of control which could cause a
collision and serious injury or death.
Seats should be adjusted before
fastening the seat belts and while the vehicle
is parked. Serious injury or death could result
from a poorly adjusted seat belt.
Do not ride with the seatback reclined so
that the shoulder belt is no longer resting
against your chest. In a collision you could
slide under the seat belt, which could result in
serious injury or death.
27
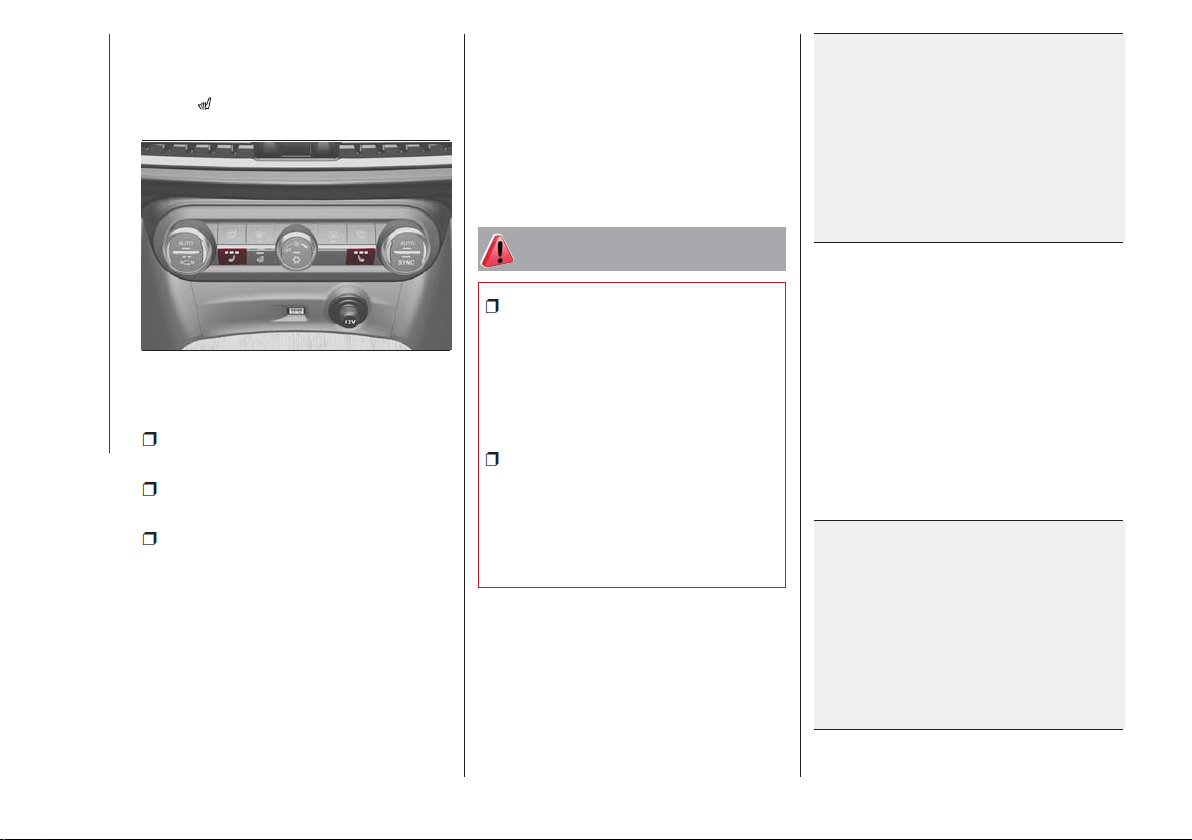
Heated Seats — If Equipped
With the engine in the ON position, push
the driver or passenger heated seat
button
located on the instrument
panel.
The “Minimum” setting is automatically
deactivated once a certain period of time
has elapsed. This varies on a
case-by-case basis, in accordance with
the specific operating conditions.
Note: To preserve the battery charge,
this function cannot be activated when
the engine is OFF.
GETTING TO KNOW YOURVEHICLE
28
Heated Seat Buttons
04066V0004EM
You can select three heating levels:
Maximum — Three orange indicators
illuminated on the buttons
Average— Twoorange indicators
illuminated on the buttons
Minimum — One orange indicator
illuminated on the buttons
After selecting a heating level, heat will
be felt within a few minutes.
A quick push of the heated seat button
will select the heat levels in order of
highest to lowest. A fourth push of the
button will turn the heated seat off.
Warning!
Persons who are unable to feel pain to the
skin because of advanced age, chronic
illness, diabetes, spinal cord injury,
medication, alcohol use, exhaustion or other
physical condition must exercise care when
using the seat heater. It may cause burns
even at low temperatures, especially if used
for long periods of time
Do not place anything on the seat or
seatback that insulates against heat, such
as a blanket or cushion. This may cause the
seat heater to overheat. Sitting in a seat
that has been overheated could cause
serious burns due to the increased surface
temperature of the seat.
Rear Seats
The rear seats allow for three
passengers.
Rear Seat
04066V0005EM
The seats and the seat belts are
considered components of the vehicle’s
Occupant Restraint System.
Note: Refer to the "Seat Belt Systems"
in the "Safety" chapter for the proper
positioning of the seat belts.
Split Folding Rear Seat
The rear seat allows the luggage
compartment to be partially (40/20/40)
or totally extended.
04066V0005EM
Rear Seat
 Loading...