

Page 1
5 MINUTI
Page 2
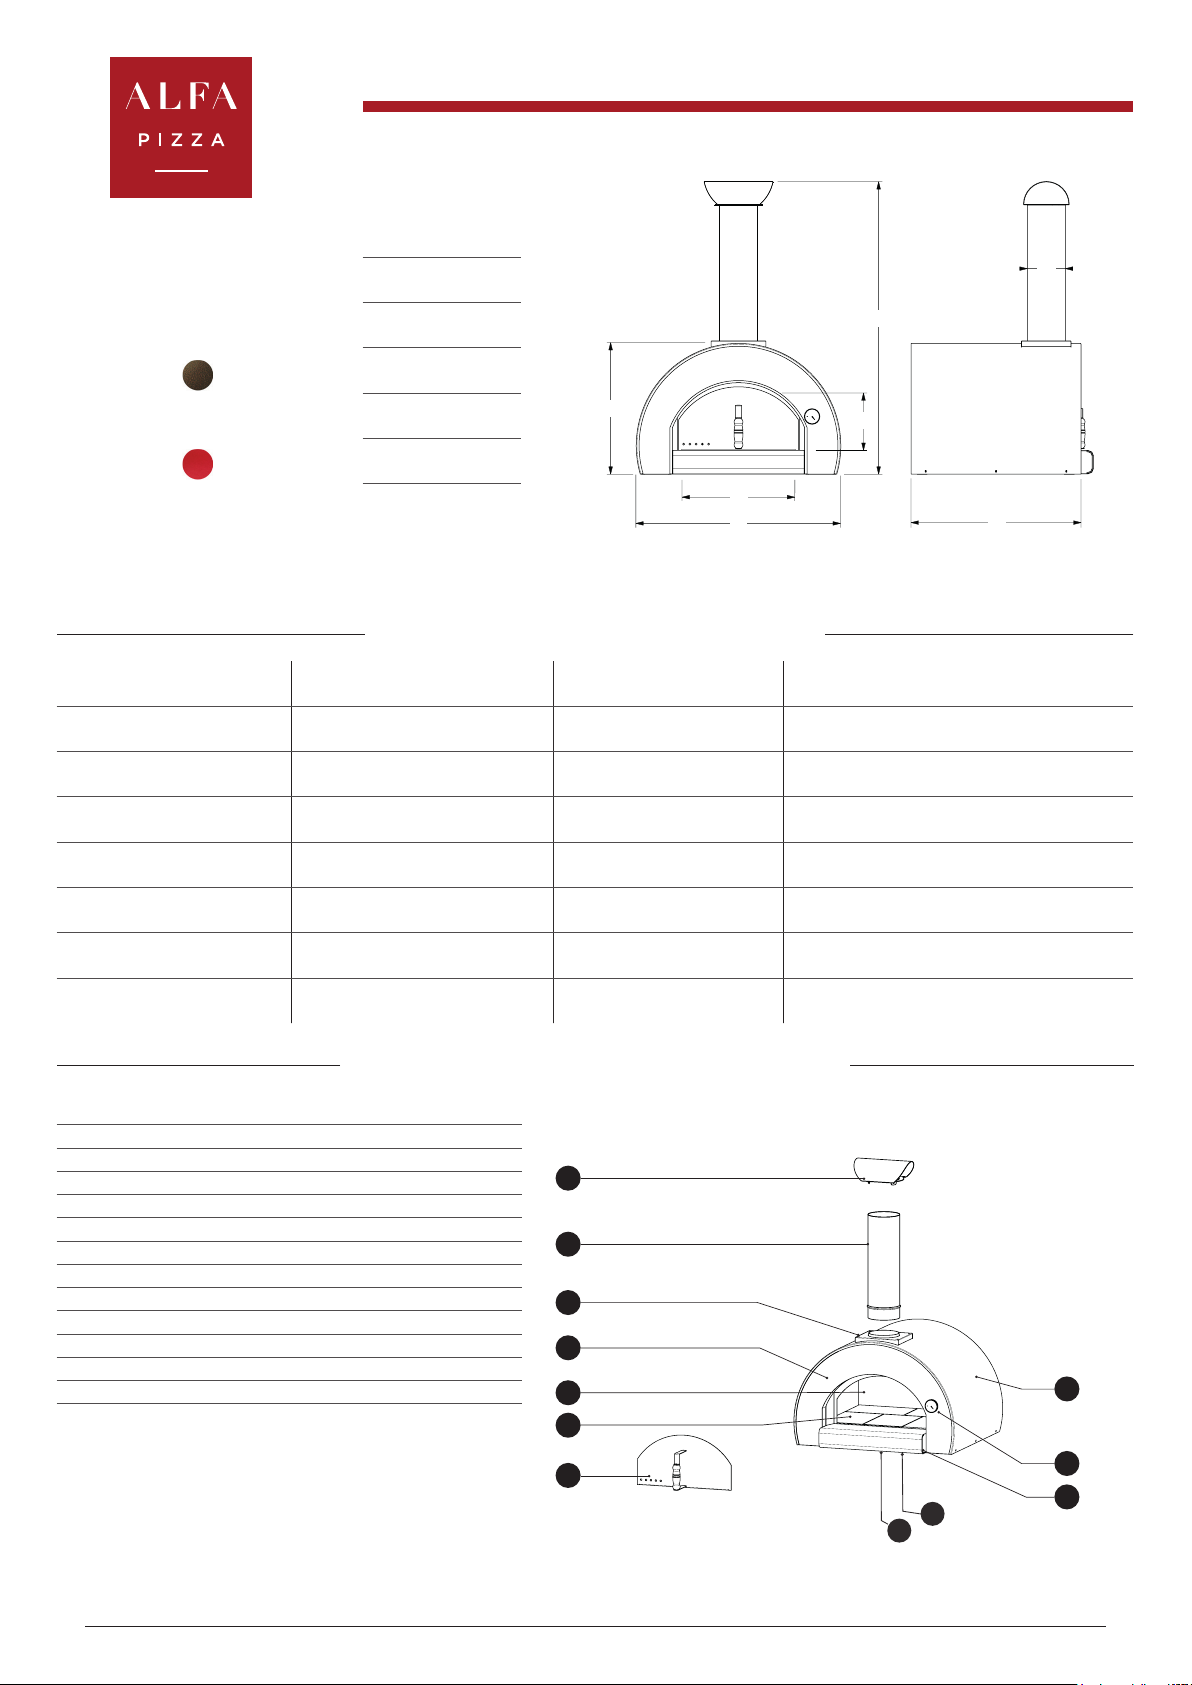
SCHEDA TECNICA /
TECHNICAL SPECIFICATION
FORNO A LEGNA
5 MINUTI TOP
FX5MIN-LRAM-T
rame
FX5MIN-LROA-T
rosso
antico
conforme a UNI 10474 e EN 13229
UNI 10474 and EN 13229 compliant
Peso
Weight
Area piano forno
Oven oor area
Dim. piano forno
Oven oor dim.
Minuti per scaldare
Heating time (min)
N° pizze alla volta
Pizza capacity
Infornata di pane
Bread capacity
Temperatura massima
Max oven temperature
Consumo medio
Average fuel consumption
MISURE /
A
B
C
D
E
F
G
DIMENSIONS
82,0 cm /
32,5 in
68,0 cm /
32,3 in
120,0 cm /
47,6 in
46,0 cm /
18,1 in
25,0 cm /
9,8 in
15,0 cm /
5,9 in
53,0 cm /
20,8 in
CARATTERISTICHE TECNICHE /
77 kg
169,7 lbs
0,3 m2
3,2 ft2
60 x 50 cm
23,6 x 19,7 in
15
2
2 kg
4,4 lbs
400°C
752°F
3 kg/h
6,6 lbs/h
Combustibile consigliato
Minimum ue draught
Flusso volumetrico fumi
Flue smokes mass ow
Emissioni CO al 13% O
CO emission at 13% O
G
TECHNICAL DETAILS
Materiali utilizzati
Used material
Tipo di refrattario
Type of refractory
Recommended fuel
Carica nominale
Rated charge
Tiraggio minimo
Temperatura fumi
Smoke temperature
F
C
E
D
A
lamiera ferro, acciaio inox, bra ceramica
iron sheet, stainless steel, ceramic ber
Tavella silico-alluminoso
Alumina silicate bricks
Ciocchi diam. Max 5 cm, potature
Max 1,9 In diam. logs, trimmings
6,9 kg/h
15,2 Lbs/h
57,7 g/s
2
2
0,31% 3843 mg/Nm
B
10 Pa
3
395°C
743°F
MONTAGGIO E COMPONENTI /
CODICE N° DESCRIZIONE
a SPZP_01_024 1 Comignolo
b TI150_500_SAT 1 Canna fumaria
c SFMN_01_070 1 Flangia
d SML-01-045 1 Archetto
e CMB-01-027 1 Cupola camera forno
f 1 Piano refrattario
g SFMN_01_031 1 Sportello
h CRT-01-027-RAMAP 1 Cupola forno 5 Minuti rame
h CRT-01-027-ROSRA 1 Cupola forno 5 Minuti rosso antico
i YT63-135 1 Termometro
j SML-03-0163 1 Davanzale
l 1 SIPOREX-600-500-50
m CMB-01-026 1 Vasca camera forno
ASSEMBLY AND PARTS LIST
a
b
c
d
e
f
g
h
i
j
m
l
alfapizza.it
Page 3
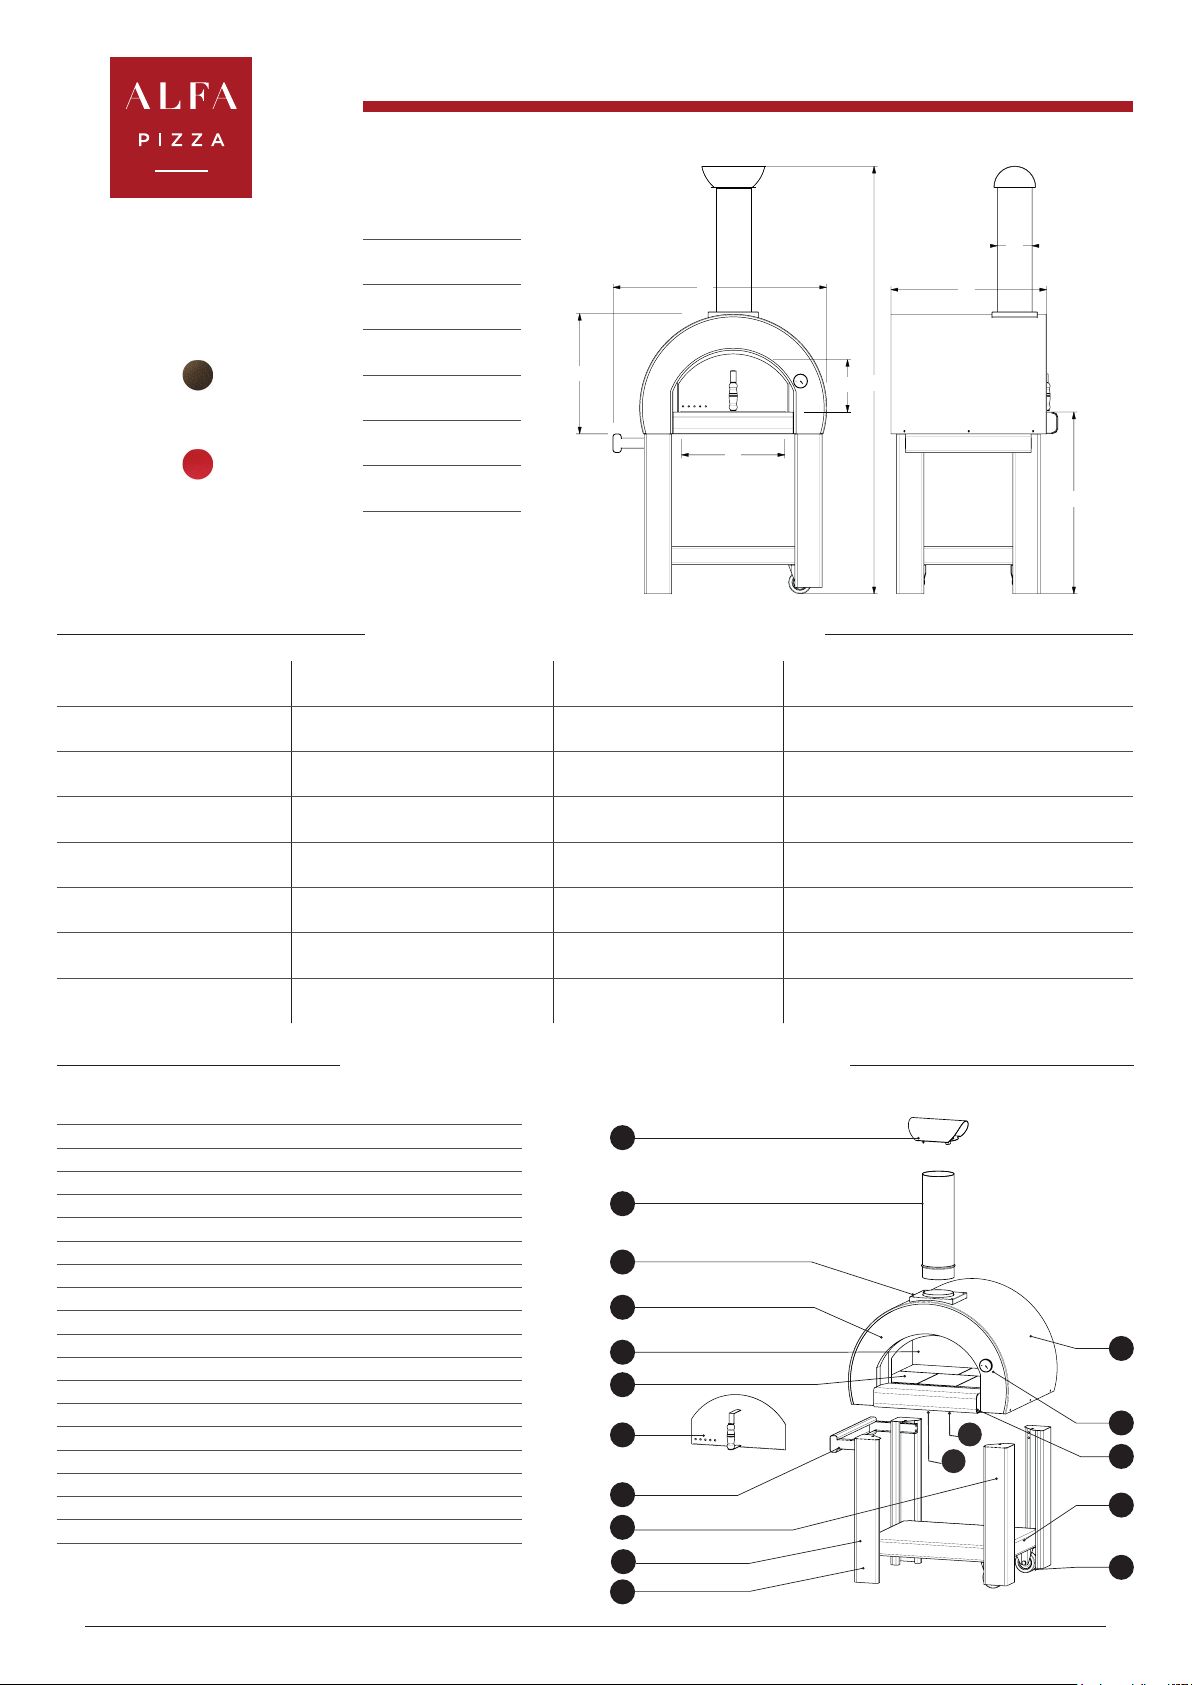
SCHEDA TECNICA /
TECHNICAL SPECIFICATION
FORNO A LEGNA
5 MINUTI
FX5MIN-LRAM
rame
FX5MIN-LROA
rosso
antico
conforme a UNI 10474 e EN 13229
UNI 10474 and EN 13229 compliant
Peso
Weight
Area piano forno
Oven oor area
Dim. piano forno
Oven oor dim.
Minuti per scaldare
Heating time (min)
N° pizze alla volta
Pizza capacity
Infornata di pane
Bread capacity
Temperatura massima
Max oven temperature
Consumo medio
Average fuel consumption
MISURE /
A
B
C
D
E
F
G
H
DIMENSIONS
93,0 cm /
36,6 in
68,0 cm /
32,3 in
178,0 cm /
70,1 in
46,0 cm /
18,1 in
25,0 cm /
9,8 in
15,0 cm /
5,9 in
80,0 cm /
31,5 in
53,0 cm /
20,8 in
H
CARATTERISTICHE TECNICHE /
100 kg
220 lbs
0,3 m2
3,2 ft2
60 x 50 cm
23,6 x 19,7 in
15
2
2 kg
4,4 lbs
400°C
752°F
3 kg/h
6,6 lbs/h
Combustibile consigliato
Minimum ue draught
Flusso volumetrico fumi
Flue smokes mass ow
Emissioni CO al 13% O
CO emission at 13% O
A
D
TECHNICAL DETAILS
Materiali utilizzati
Used material
Tipo di refrattario
Type of refractory
Recommended fuel
Carica nominale
Rated charge
Tiraggio minimo
Temperatura fumi
Smoke temperature
F
B
C
E
G
lamiera ferro, acciaio inox, bra ceramica
iron sheet, stainless steel, ceramic ber
Tavella silico-alluminoso
Alumina silicate bricks
Ciocchi diam. Max 5 cm, potature
Max 1,9 In diam. logs, trimmings
6,9 kg/h
15,2 Lbs/h
10 Pa
57,7 g/s
2
2
0,31% 3843 mg/Nm
395°C
743°F
3
MONTAGGIO E COMPONENTI /
CODICE N° DESCRIZIONE
a SPZP_01_024 1 Comignolo
b TI150_500_SAT 1 Canna fumaria
c SFMN_01_070 1 Flangia
d SML-01-045 1 Archetto
e CMB-01-027 1 Camera forno
f 1 Piano refrattario
g SFMN_01_031 1 Sportello
h FMN_01_077 1 Maniglione base forno 5 Minuti
i BAS-03-0111 2 Gamba destra 5 Minuti
j BAS-03-0112 Gamba sinistra anteriore 5 Minuti
k BAS-03-0112 Gamba sinistra posteriore 5 Minuti
l CRT-01-027-RAMAP 1 Cupola forno 5 Minuti rame
l CRT-01-027-ROSRA 1 Cupola forno 5 Minuti rosso antico
m YT63-135 1 Termometro
n SML-03-0163 1 Davanzale
o SFMN_01_072 1 Ripiano inferiore
p 1NNA100AFI0 2 Ruote
q 1 SIPOREX-600-500-50
r CMB-01-026 1 Vasca camera forno
ASSEMBLY AND PARTS LIST
a
b
c
d
e
f
g
h
i
j
k
l
q
r
m
n
o
p
alfapizza.it
Page 4

32 x1 x
INSTALLAZIONE E MONTAGGIO / INSTALLATION AND ASSEMBLY / INSTALACIÓN Y MONTAJE /
INSTALLATION ET MONTAGE / INSTALLATION UND MONTAGE
1
Rimuovere prima la scatola, il polistirolo e successi-
IT
vamente le gambe del forno e gli altri pezzi.
Non gettare il polistirolo, servirà per il montaggio.
First remove the box, the polystyrene and then the
EN
legs of the oven and the other pieces.
Do not dispose of the polystyrene, you will need it
for assembly.
Primero quite la caja, el poliestireno y después las
ES
patas del horno y las otras piezas.
No tire el poliestireno, será necesario para el montaje.
Retirer d’abord le boitier, le polystyrène et ensuite
FR
les pieds du four et les autres pièces.
Ne jeter pas le polystyrène, il servira pour le mon-
tage.
Zuerst den Karton, das Polystyrol und anschließend
DE
die Beine des Ofens und die anderen Teile entfernen.
Das Polystyrol nicht wegwerfen, es wird für die
Montage benötigt.
2
Togliere la pellicola laser lm da tutti i componenti
IT
del forno prima di proseguire con il montaggio. Per
facilitarne il distacco, utilizzare aria calda (es. Asciugacapelli). Non utilizzare oggetti taglienti.
Remove the laser lm from all parts of the oven
EN
before proceeding with the installation. To facilitate
removal use hot air (e.g. Hair dryer). Do not use
sharp tools.
Quite la película laser lm de todos los componen-
ES
tes del horno antes de proceder al montaje. Para
facilitar la remoción utilize aire caliente (ej. el secador de pelo). No utilice objetos alados.
Retirer le lm laser de toutes les parties du four
FR
avant de procéder au montage. Pour faciliter le
retrait utiliser de l’air chaud (par ex: un sèche cheveux). Ne pas utiliser d’objets tranchants.
Bevor mit der Montage fortgefahren wird, ist von al-
DE
len Teilen die Laserlm-Folie zu entfernen. Damit es
einfach ist mit warmer Luft (z.b. Haarfön). Verwenden Sie keine scharfen Gegenstände.
4
Page 5

3
Fissare le due gambe più corte alla base di ap-
IT
poggio usando 4 viti per ciascuna gamba, come
mostrato nell’immagine in basso. Ricordarsi che le
gambe più corte si trovano nella parte destra del
forno (a).
Attach the two shorter legs to the support base
EN
using 4 screws for each leg, as shown in the image
below. Remember that the shorter legs are on the
right part of the oven (a
Fije las dos patas más cortas a la base de apoyo,
ES
usando 4 tornillos por cada pata, como ilustrado en
la imagen siguiente. Recuerde que las patas más
cortas están en la parte derecha del horno (a).
Fixer les deux pieds plus courts à la base d’appui
FR
en utilisant 4 vis pour chaque jambe, comme le
montre l’image du bas. Se rappeler que les pieds
plus courts se trouvent dans la partie droite du four
(a).
Die beiden kürzeren Beine mit 4 Schrauben pro
DE
Bein am Traggestell befestigen, so wie in der Abbildung unten gezeigt. Es ist darauf zu achten, dass
sich die kürzeren Beine auf der rechten Seite des
Ofens benden müssen (a).
a
5
Page 6

4
Posizionare la piastra per le ruote sotto le fessure
IT
della base di appoggio (a). Fissare le ruote alla piastra avvitando 8 viti (4 per ruota) (b).
Place the plate for the wheels under the slots in the
EN
support base (a). Attach the wheels to the plate
tighten the 8 screws (4 per wheel) (b).
Posicione la placa para las ruedas debajo de las
ES
ranuras de la base de apoyo. Fije las ruedas a la
placa atornillando 8 tornillos (4 por rueda) (b).
Positionner la plaque de recouvrement pour les
FR
roues sous les fentes de la base d’appui (a). Fixer
les roues à la plaque de recouvrement en vissant 8
vis (4 pour chaque roue) (b).
Die Platte für die Räder unter den Schlitzen des
DE
Traggestells platzieren (a). Die Räder an der Platte
befestigen 8 Schrauben anschrauben (4 pro Rad)
(b).
5
Inserire la maniglia nelle fessure delle gambe (a) e
IT
ssarla alle gambe usando 2 viti per parte (b).
Insert the handle into the slots of the legs (a) and
EN
fasten it to the legs using 2 screws per side (b).
Introduzca la manija en las ranuras de las patas (a)
ES
y fíjela a las patas usando 2 tornillos por parte (b).
Insérer la manille dans les fentes des pieds (a) et la
FR
xer aux pieds en utilisant 2 vis pour chaque partie
(b).
Den Gri in die Schlitze der Beine einstecken (a)
DE
und mit jeweils 2 Schrauben an den Beinen befestigen (b).
a
b
a
b
6
Page 7

6
7
Posizionare il forno sul carrello e ssarlo usando 4
IT
viti, una per gamba.
Place the oven on the cart and secure it using 4
EN
screws, one for each leg.
Posicione el horno encima del carro y fíjelo usando
ES
4 tornillos, uno por pata.
Positionner le four sur le chariot et le xer en utili-
FR
sant 4 vis, une pour chaque pied.
Den Ofen mit 4 Schrauben, eine pro Bein, auf dem
DE
Wagen befestigen.
Posizionare il termometro come descritto nel dise-
IT
gno, poi posizionare la canna fumaria, il comignolo
e lo sportello.
Place the thermometer, as described in the dia-
EN
gram, then position the chimney ue, chimney pot
and the counter.
Posicione el termómetro como descrito en el di-
ES
bujo, entonces coloque el conducto de humos, el
sombrerete y la puerta.
Positionner le thermomètre comme décrit dans
FR
le dessin, puis positionner le carneau montant, la
cheminée et la porte du four.
Das Thermometer wie in der Zeichnung beschrie-
DE
ben positionieren und anschließend den Rauchabzug, den Schornstein und die Tür.
IL FORNO È PRONTO PER L’USO / THE OVEN IS READY TO USE / EL HORNO ESTÁ LISTO PARA EL USO / LE
FOUR EST PRÊT POUR L’UTILISATION / DER OFEN IST FÜR DEN GEBRAUCH BEREIT
7
Page 8

ALFA REFRATTARI S.R.L.
via Osteria della Fontana 63, 03012 Anagni (FR), Italy
web site: www.alfaforni.com
web site: www.alfaovens.com
e-mail: info@alfaforni.com
tel: +39 0775.7821 - fax: +39 0775.782218
 Loading...