

Page 1
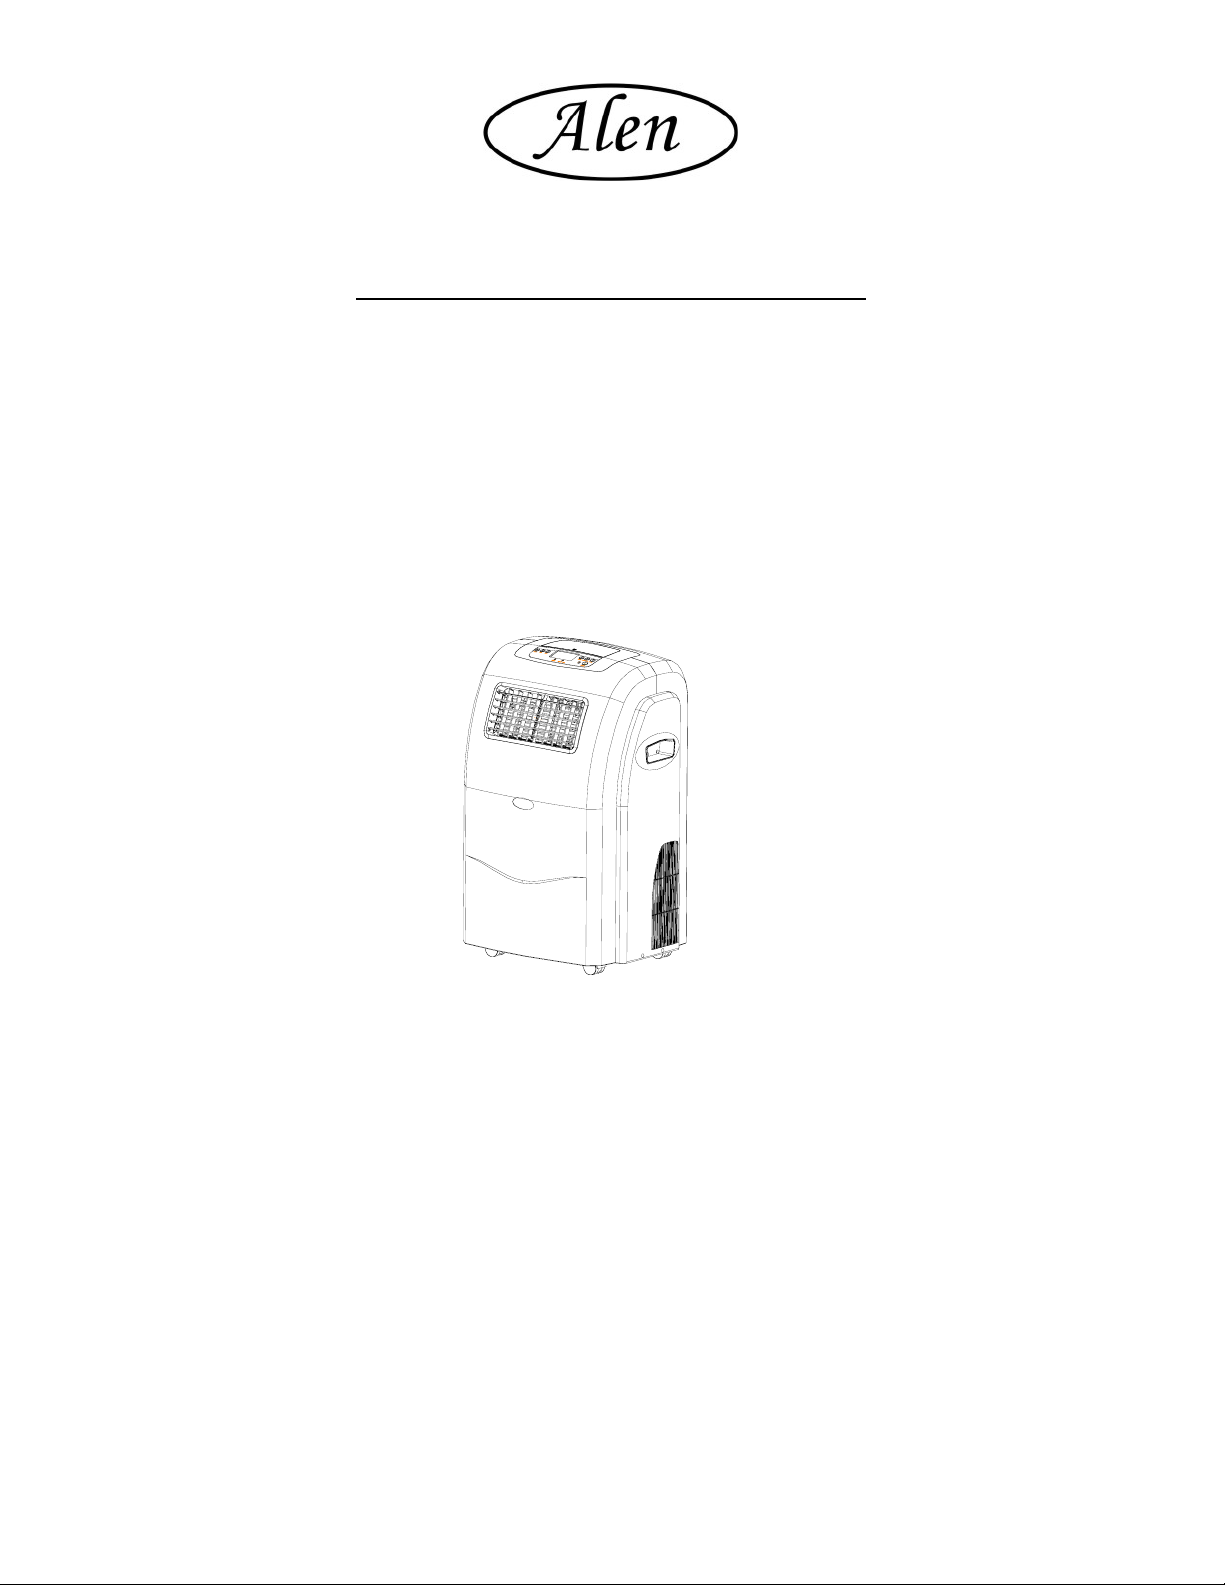
MOBILE AIR CONDITIONER
USER’S MANUAL
Read Rules for Safe Operation and Instructions Carefully
Page 2

CONTENTS
1. SAFETY RULES …………………………………………………………...2
2. NAME OF PARTS ………………………………………………………...3
3. ACCESSORIES …………………………………………………………….3
4. OPERATION PANEL OF THE AIR CONDITIONER ……………..…… 4-5
5. OPERATION AND INDICATION SECTIONS OF REMOTE
CONTROLLER ……………………………………………….………..6-7
6. OPERATION METHOD………………………………………….…..… 8-10
7. KEY-OPERATING INSTRUCTION FOR THE AIR
CONDITIONER..…………………………………………………..…. 11-13
8. INSTALLATION ..………………………………………………......… 13-15
9. MAINTENANCE …………………………………………………………15
10.TROUBLE SHOOTING ..…………………………………………………16
2
Page 3

SAFETY RULES
1. Do not connect unit to any AC socket in disrepair.
2. Do not use in the following locations:
A: Next to source of fire
B: An area where oil is likely to splash.
C: An area exposed to direct sunlight.
D: An area where water is likely to splash.
E: Near a bath, a shower or a swimming pool.
3. Never insert your fingers or any foreign objects into the air outlet. Take special care to warn children of these
dangers.
4. Always store the unit upright in order to maintain the compressor in a proper condition.
5. Be sure to unplug the unit before cleaning.
6. The heater must not be located immediately below a socket outlet.
7. If the appliance is covered, there is a risk of overheating.
8. If the plug or electrical cord is damaged, it must be replaced by a repair shop appointed by the manufacturer,
because special purpose tools are required.
NOTE: The air-conditioner can be connected only a supply system impedance of no more than 0.4582 ohm. If
unsure, please consult your supply authority for system impedance information.
3
Page 4
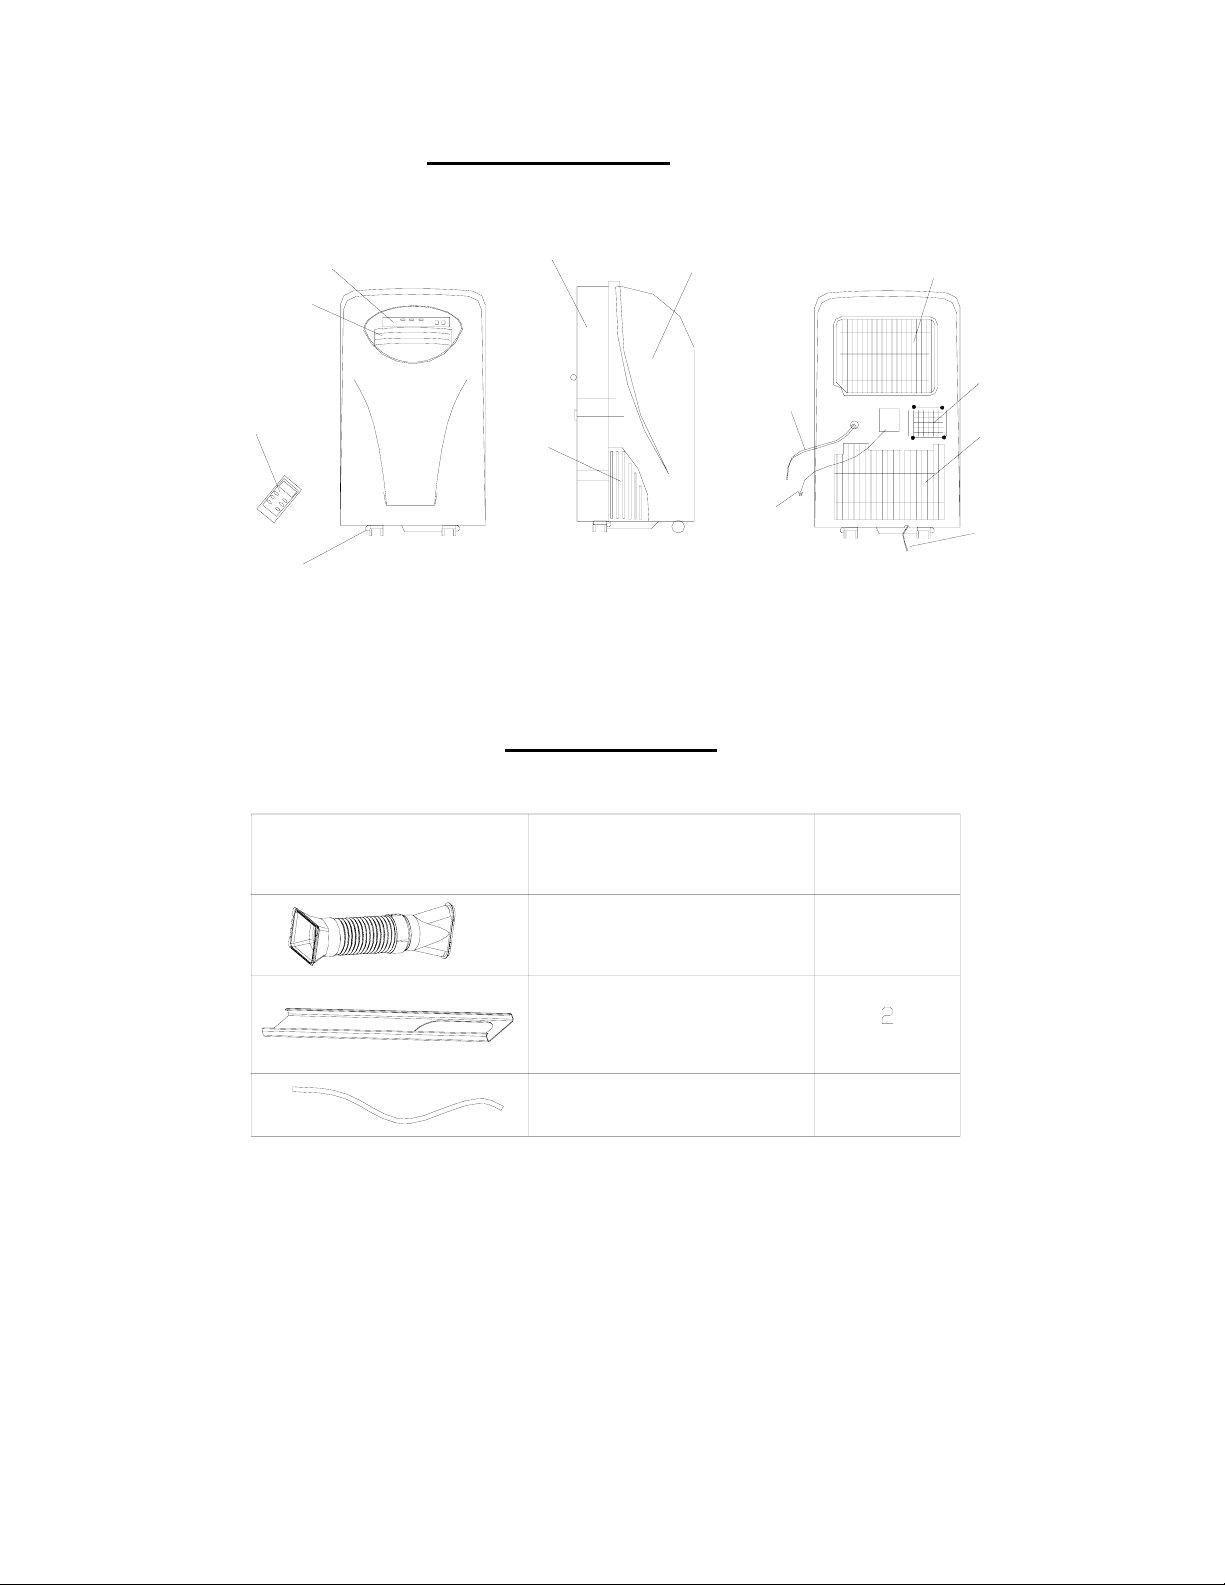
NAME OF PARTS
REAR COVER
OPERATION
PANEL
AIR OUTLET
FRONT COVER
AIR INLET
REMOTE
CONTROLLER
CASTER
FRONT VIEW
Fig.1
AIR INLET
ACCESSORIES
PARTS
SIDE VIEW
PARTS NAME
DUCT ASSEMBLY
WATER PUMP
DRAIN HOSE
POWER CORD
AIR OUTLET
AIR INLET
CONTINUOUS
DRAIN HOSE
REAR VIEW
QUANTITY
1
INSTALLTION PLATE
WATER PUMP DRAIN HOSE
1
Fig.2
Check all the accessories are included in the package and please refer to the installation instructions for their
usage.
4
Page 5
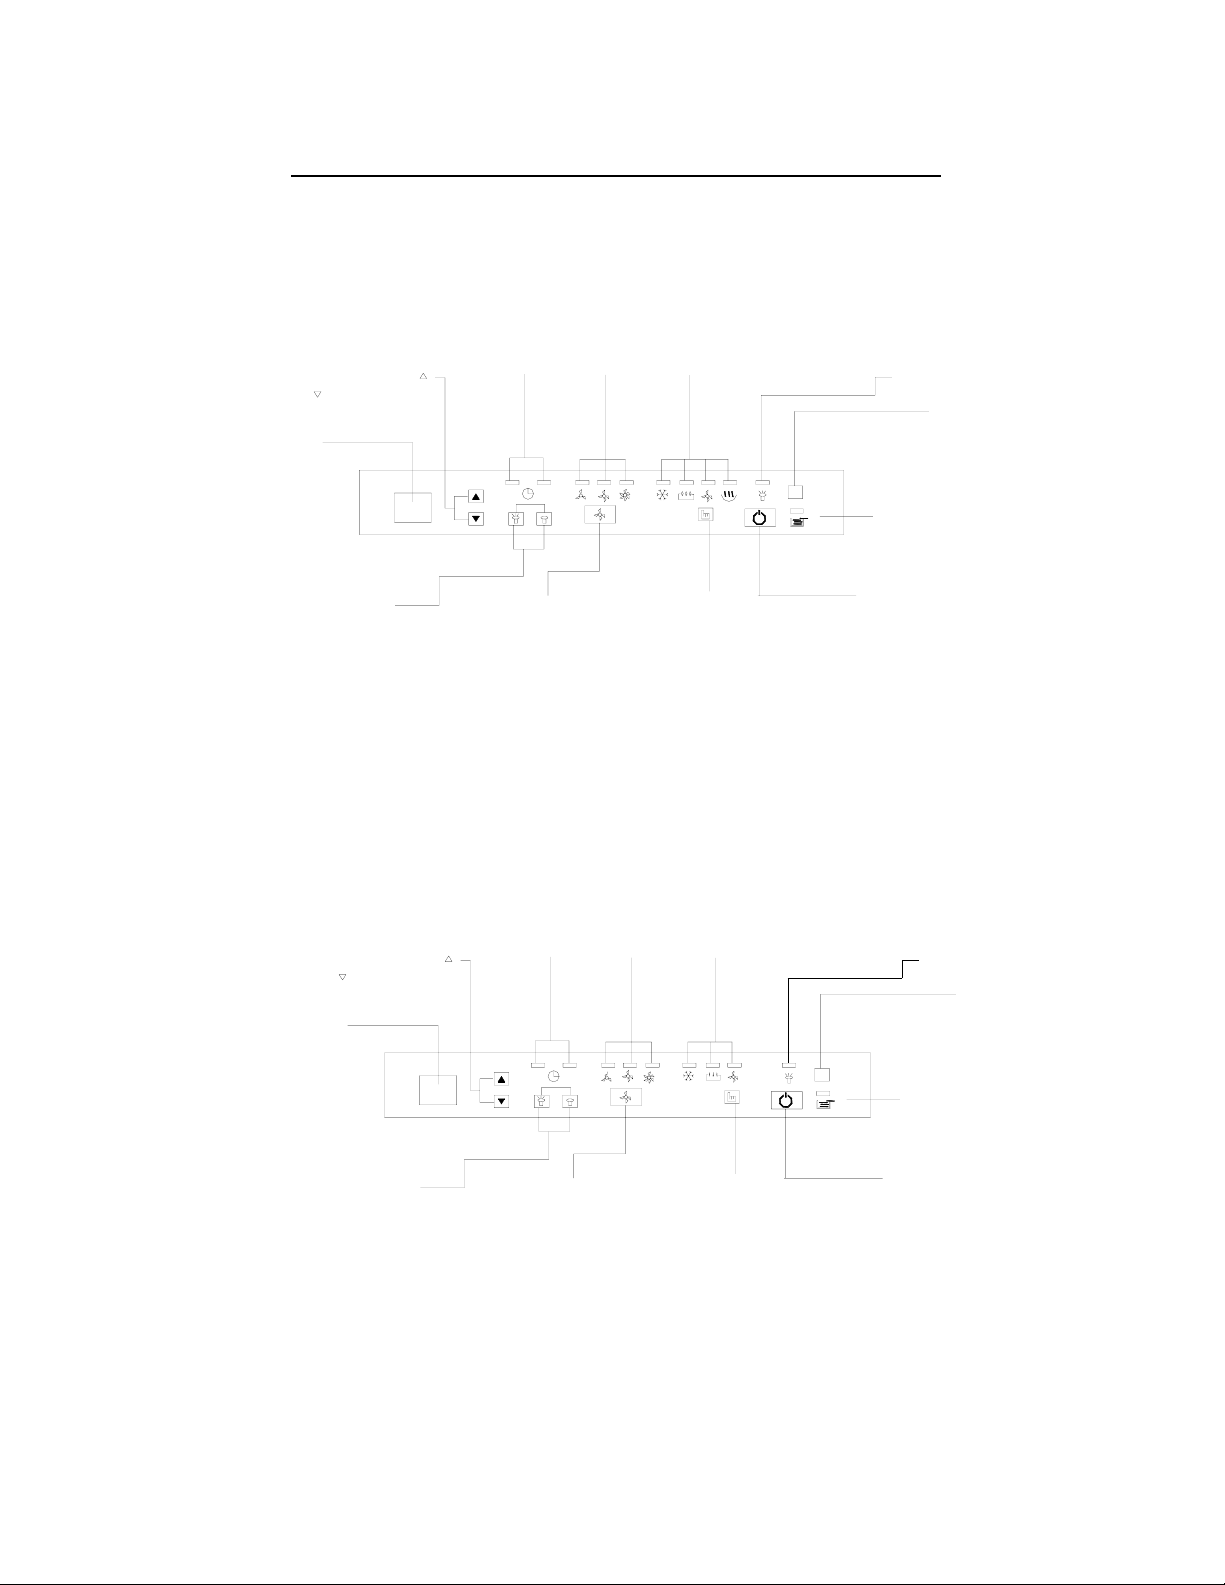
OPERATION PANEL OF THE AIR CONDITIONER
i.
A model display indicators (with electricity heating):
ly
light
Set
e
e
Fig.3
ii. A model display indicators (only cooling):
light
Set
Fig.4
5
Page 6
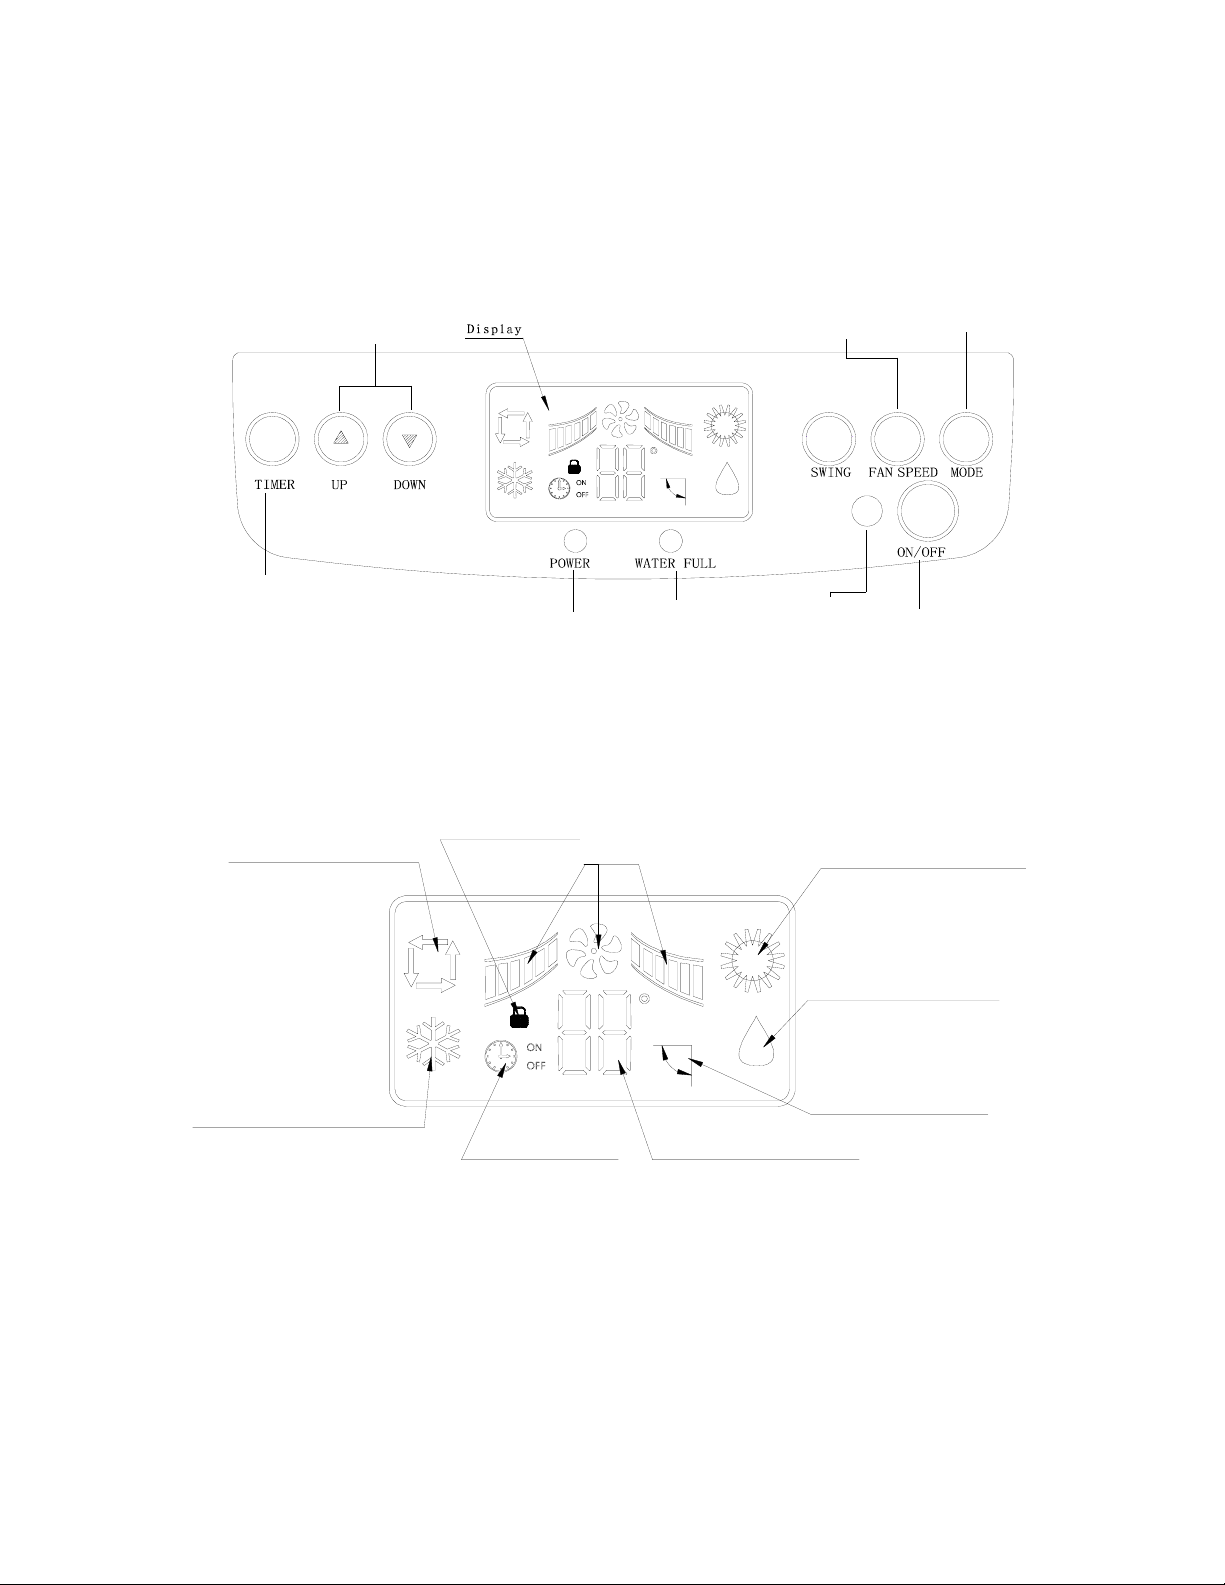
● B model display indicators :
F
Receiver
Fig.5
DISPLAY:
Auto mode indicate
Locked indicate
Fan speed
Heating mode indicate
mode indicate
F
Cooling mode indicate
Timer indicate
Note: 1.The AutoCoolingHeatingDry mode indicators will not display in the Fan mode.
2.The relevant display light according the set content by remote controller.
3.Air conditioner does not operate normally when set temperature indicator displaies unnormally, please
contact with the distributor for service.
<<Could you remove #2, #3 above? I do not understand what they mean.>>
Fig.6
Digital display
Swing indicate
6
Page 7
p
g
y
R
O
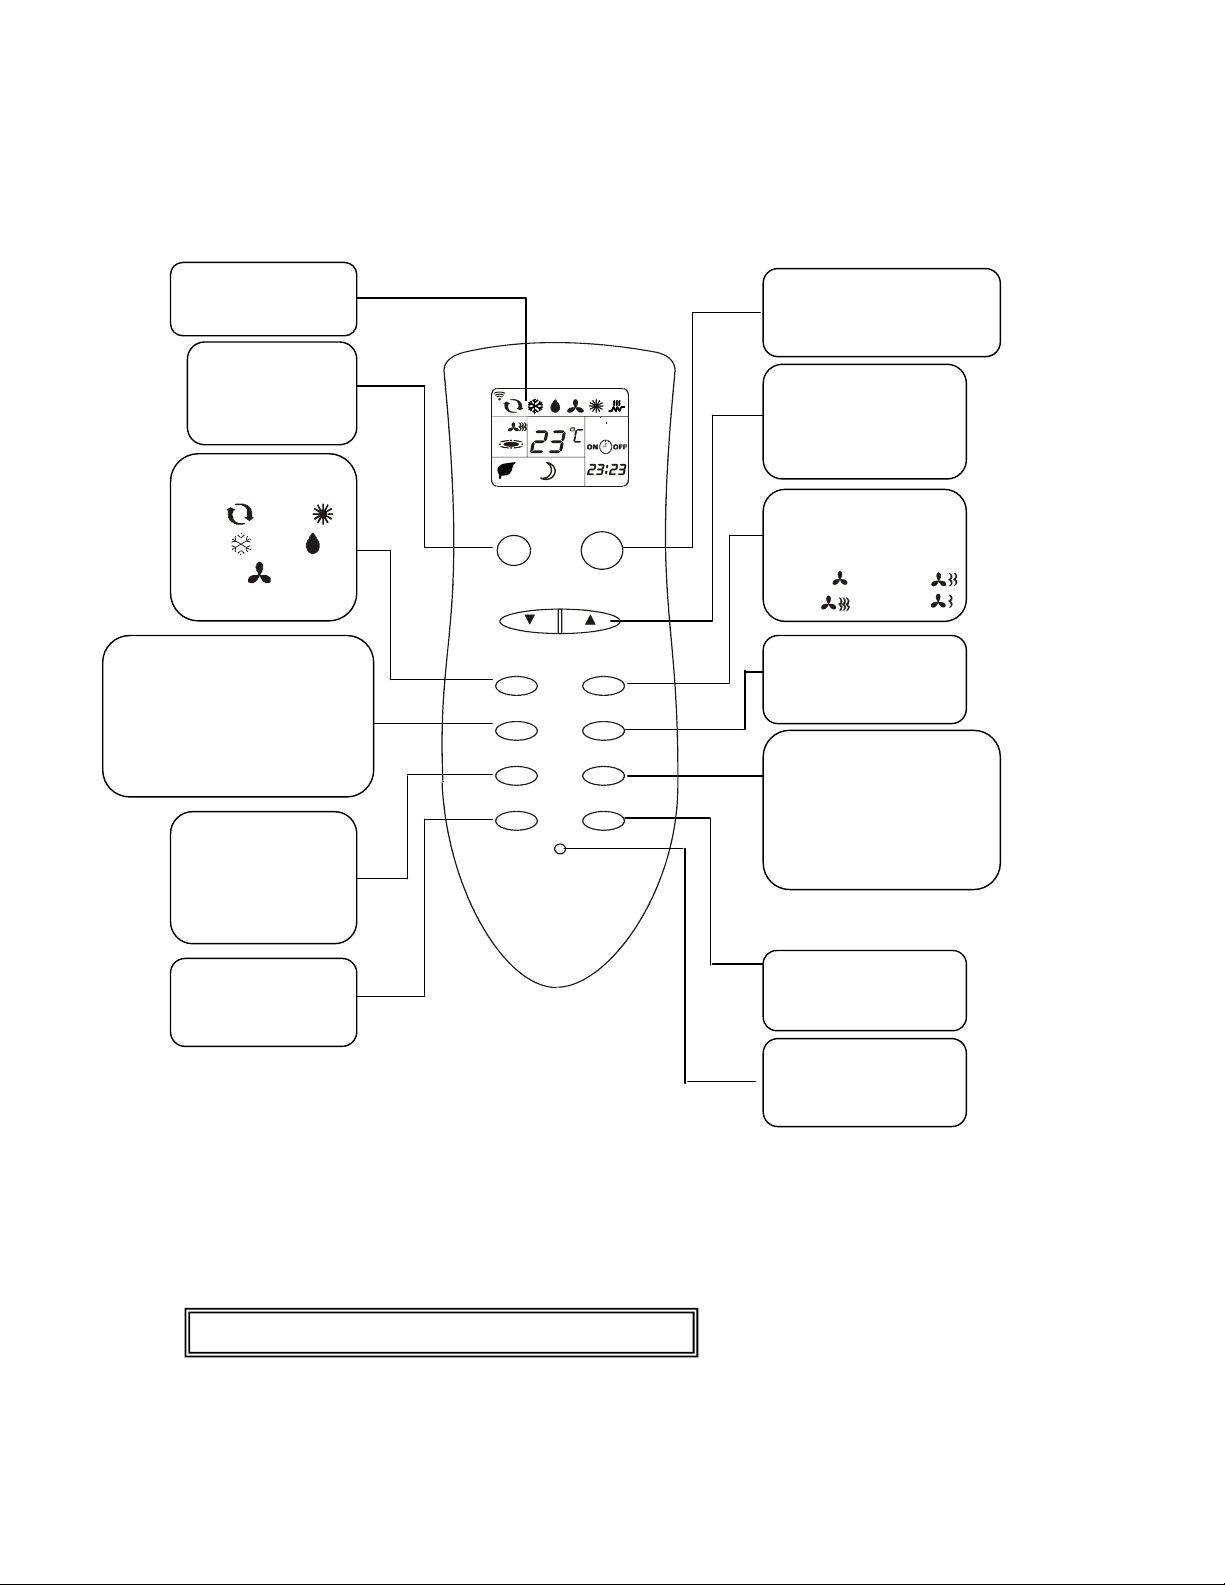
OPERATION OF THE REMOTE CONTROL
Display Screen
For settin
For setting sleep
function.
displa
Sleep Button
SET TEMP
AUT
PROGRAM
ON/OFF Button
Press this button to start /
stop air conditioner.
T emp Adjustment Buttons
Press “▼” to decrease temp.
Press “▲” to increase temp.
Mode selection Button
For selecting
AUTO
COOL
SWEEP
DRY
HEAT
SLEEP
ON/OFF
TEMPERATURE
Fan speed button
For selecting indoor fan
speed:
Auto Medium
AUT
High Low
AUH Button
To change the condition of starting
auxiliary electric heater when air
conditioner in HEAT mode.
Time setting Button
Press this button to
set timer or the clock
time.
Hour Button
Press this button to
change hour setting.
MODE
AUH
TIME
HOUR
FAN SPEED
FAN SW EEP
TIME
MINUTE
RESET
Airflow sweep Button
For changing louver
position.
Timer selection Button
Selecting procedures:
On timer → Off timer→
Program control →Timer
cancelled →On timer
Minute Button
Press this button to change
the minute setting.
Reset Button
Reset remote control to
the original status.
Remarks: Tem
erature can be set between60~89.
7
Page 8
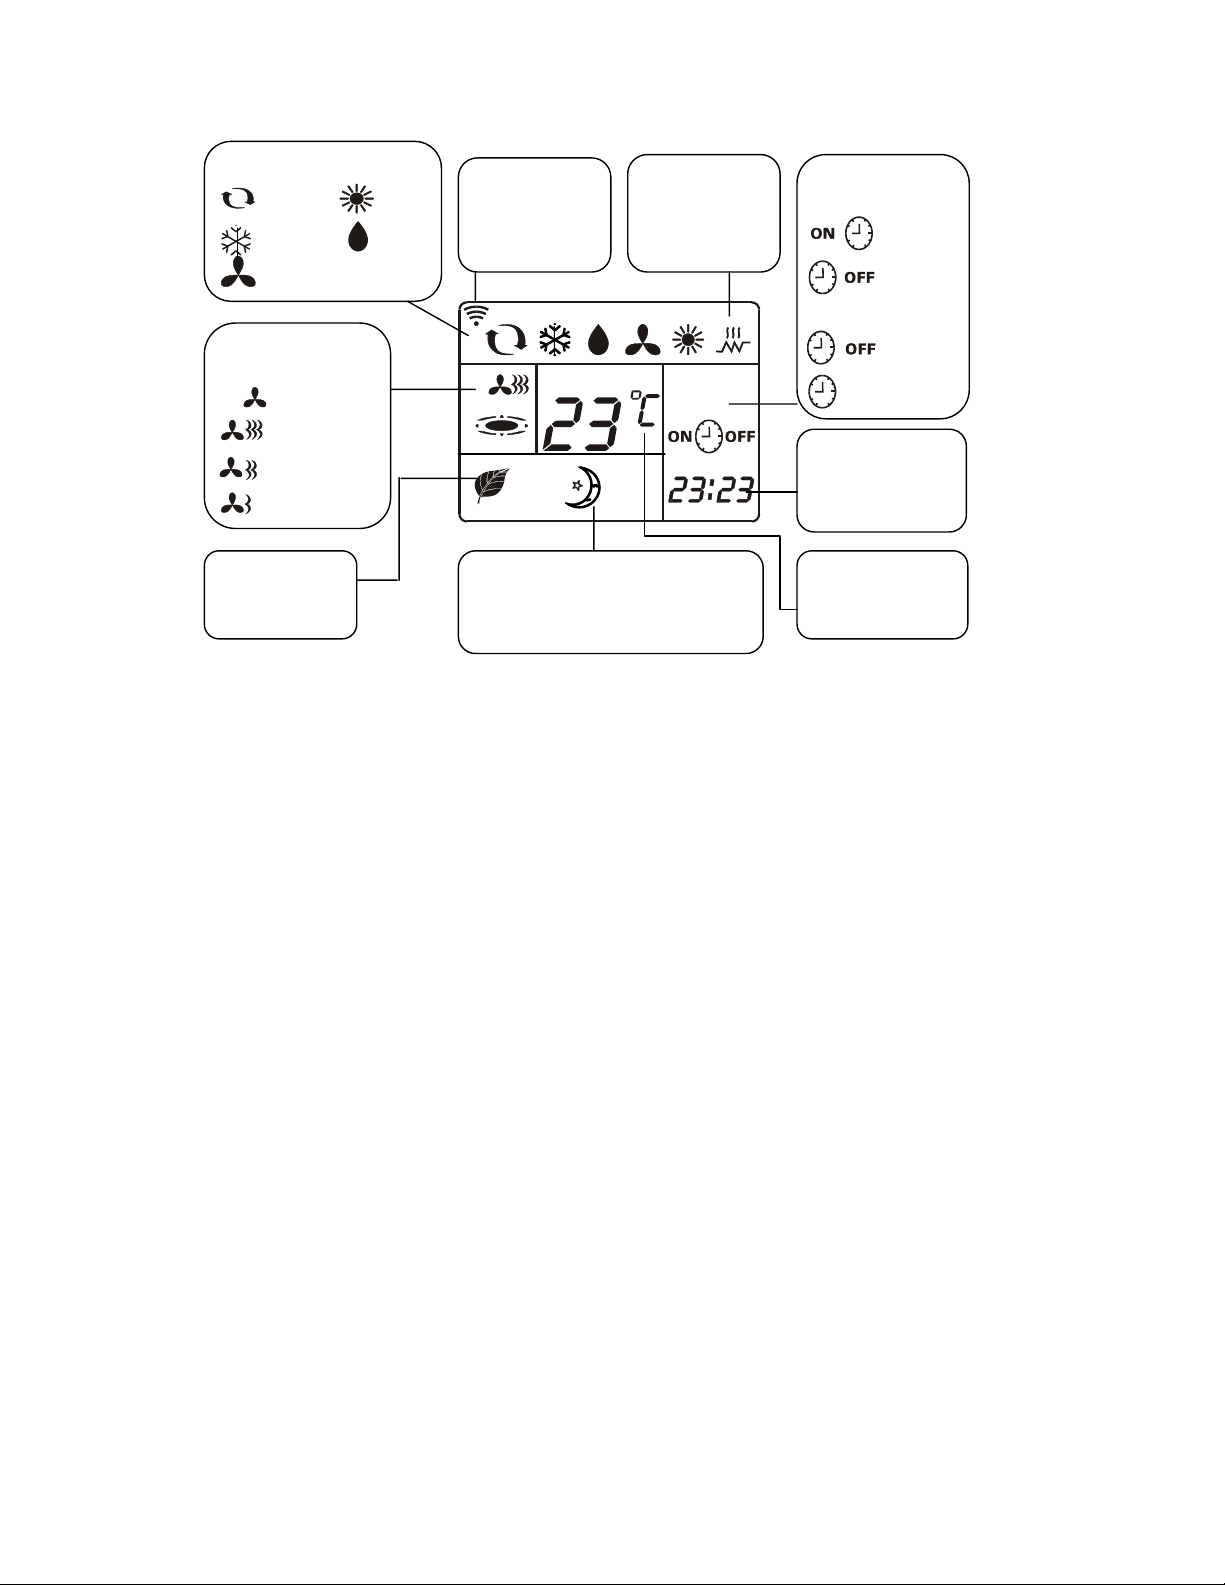
Remote Controller Display
p
r
Operating Mode Selection
Display
AUTO
COOL
FAN
HEAT
DRY
Signal Emission
Symbol
It appears when
control signal is
emitted.
Wind Speed Selection
AUT
Low speed
Display
Auto
High speed
Medium speed
AUT
SET TEMP
Air refresh Display
(Not available)
Sleep Mode Display
Displayed when Pressing “SLEEP”
button the unit will enter into sleeping
operation.
Instructions for the remote controller
z The remote controller uses two AAA alkaline battrries. Under normal condition, the batteries last for
about 6 months. Please use two new batteries of similar type (pay attention to the poles in installing).
After replacing the batteries, please use a point object (such as pen tip) to press “Reset” button.
z The effective control distance of the remote controller is about 8 yards.
z When using the remote controller, please point the signal emitter towards the air conditioner receiver;
There should be no obstacles between the remote controller and the air conditioner.
z Do no press two buttons simultaneously on the remote control.
z Do not use wireless equipment (such as mobile phone) near the air conditioner. If interference occurs
because of this, please switch off the air conditioner, pull out power plug, then plug again and switch
on after a while.
z If direct sunlight is hitting the the receiver on the air conditioner it may not be able to receive the signal
from the remote controller.
z Take care not to drop theh remote control and keep from direct sunlight or heat sources.
z Keep the remote control dry, if it gets wet use a soft, dry cloth for cleaning.
z The batteries must be removed from the remote control before it is scrapped and disposed of safely.
AUH Display
It appears when
ressing the AUH
key is add in HEAT
mode.
PROGRAM
Timer setting
Display
ON timer
OFF time
PROGRAM
Program
Timer canceled
Time Display
Displays the time of
clock or timing
ON/OFF.
Display
displayed when
temp is displayed.
8
Page 9
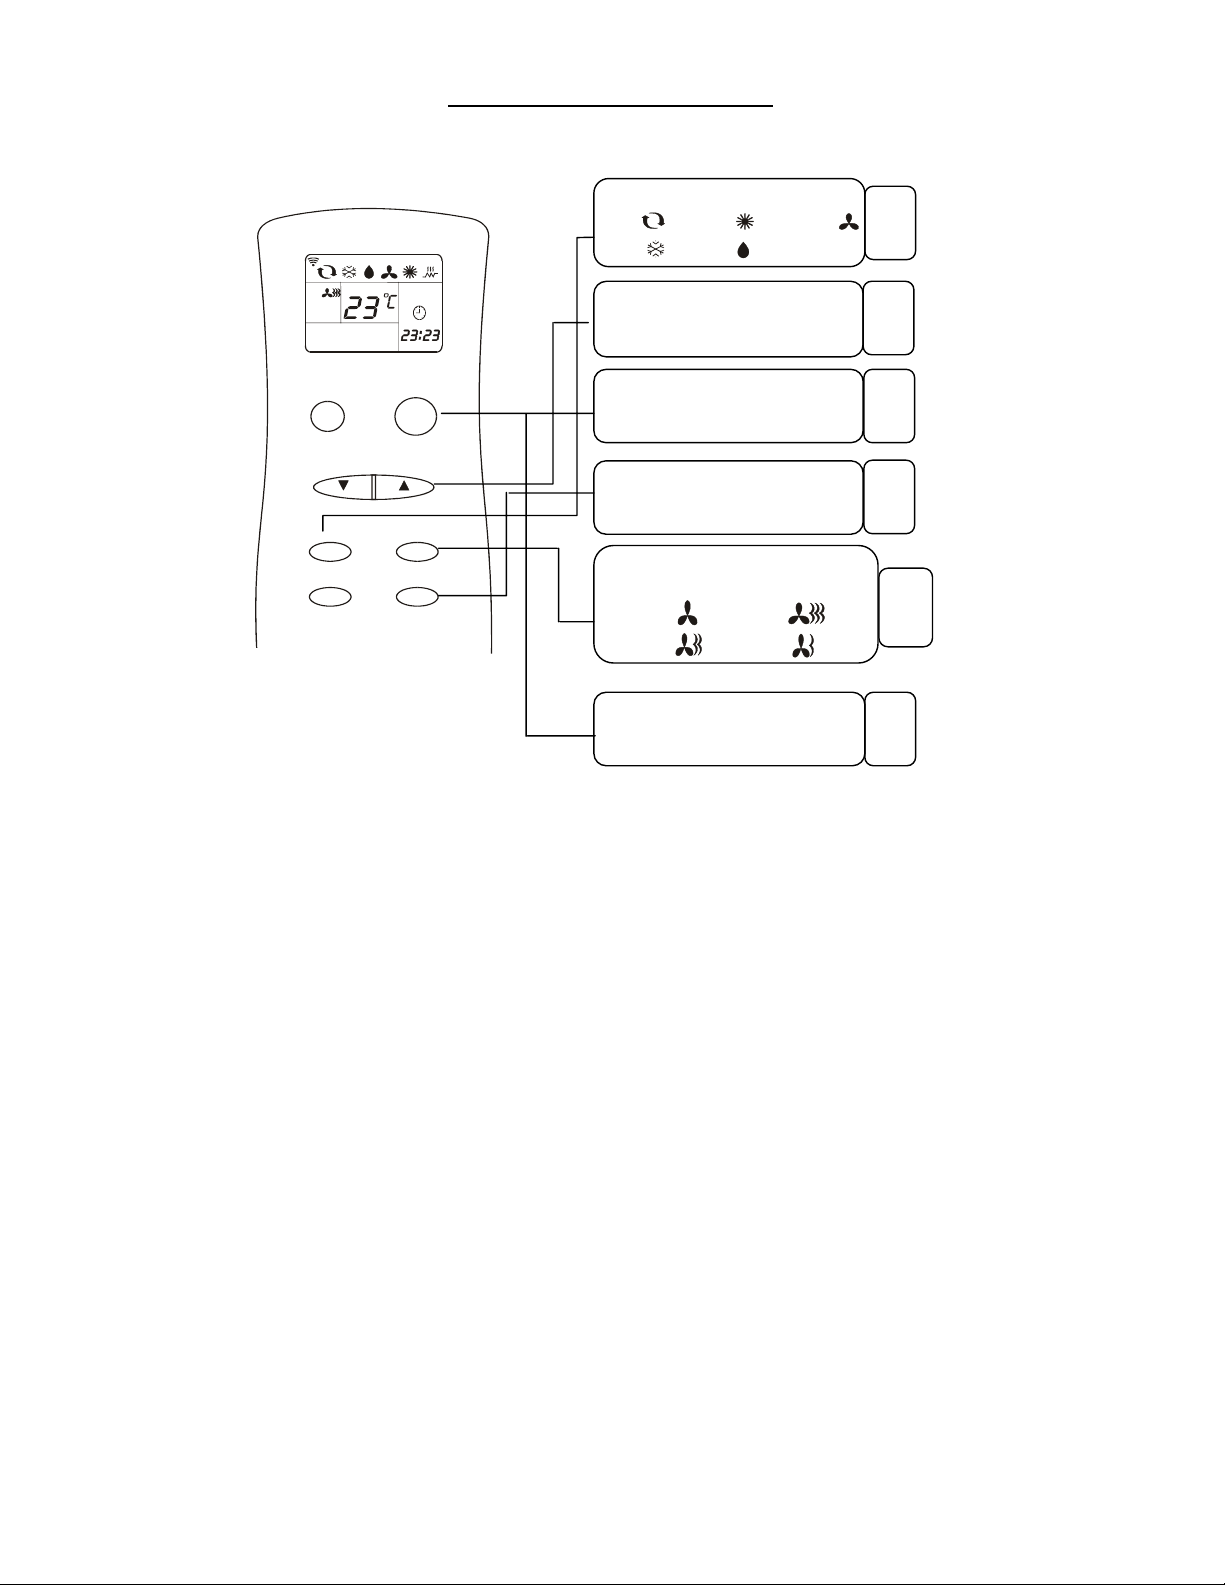
OPERATION METHOD
AUTO, HEAT, COOL,FAN and DRY operation
SET TEMP
AUTO
SLEEP
TEMPERATURE
MODE
AUH
ON/OFF
FAN SPEED
FAN SWEEP
Setting Operation Mode
Auto Heat Sweep
Cool Dry
T emp Adjustment Buttons
Press “ ▲ ” “ ▼ ” buttons to set
temp as needed.
Switch On
Press ON/OFF button to start air
conditioner.
Press “FAN SWEEP” button to select
airflow direction.
Four speeds can be selected:
Auto High
Medium Low
Press ON/OFF button to stop air
conditioner.
Airflow selection
Setting Fan Speed
AUT
Switch Off
1
2
3
4
5
6
Remarks:
1.When “AUTO” mode is set, the air conditioner will adjust the fan speed and select the COOL or DRY
mode according to the indoor temperature.
2.When “AUTO” mode is set, SLEEP and AUH functions are not available.
3.When “DRY” mode is set, in accordance with the D-value between indoor temperature and set
temperature, the air conditioner will start or stop the cooling operation and fan speed automatically to
decrease room humidity. The fan speed may change to maintain the humidity.
4.When “FAN” mode is set, temperature can’ t be adjusted. Step 2 of Operating precudures is not effective.
Only high, medium and low fan speed can be set; no Auto fan speed.
5.In the cooling-only model,the “AUH” function is not available and there is no AUTO-HEAT mode.
9
Page 10
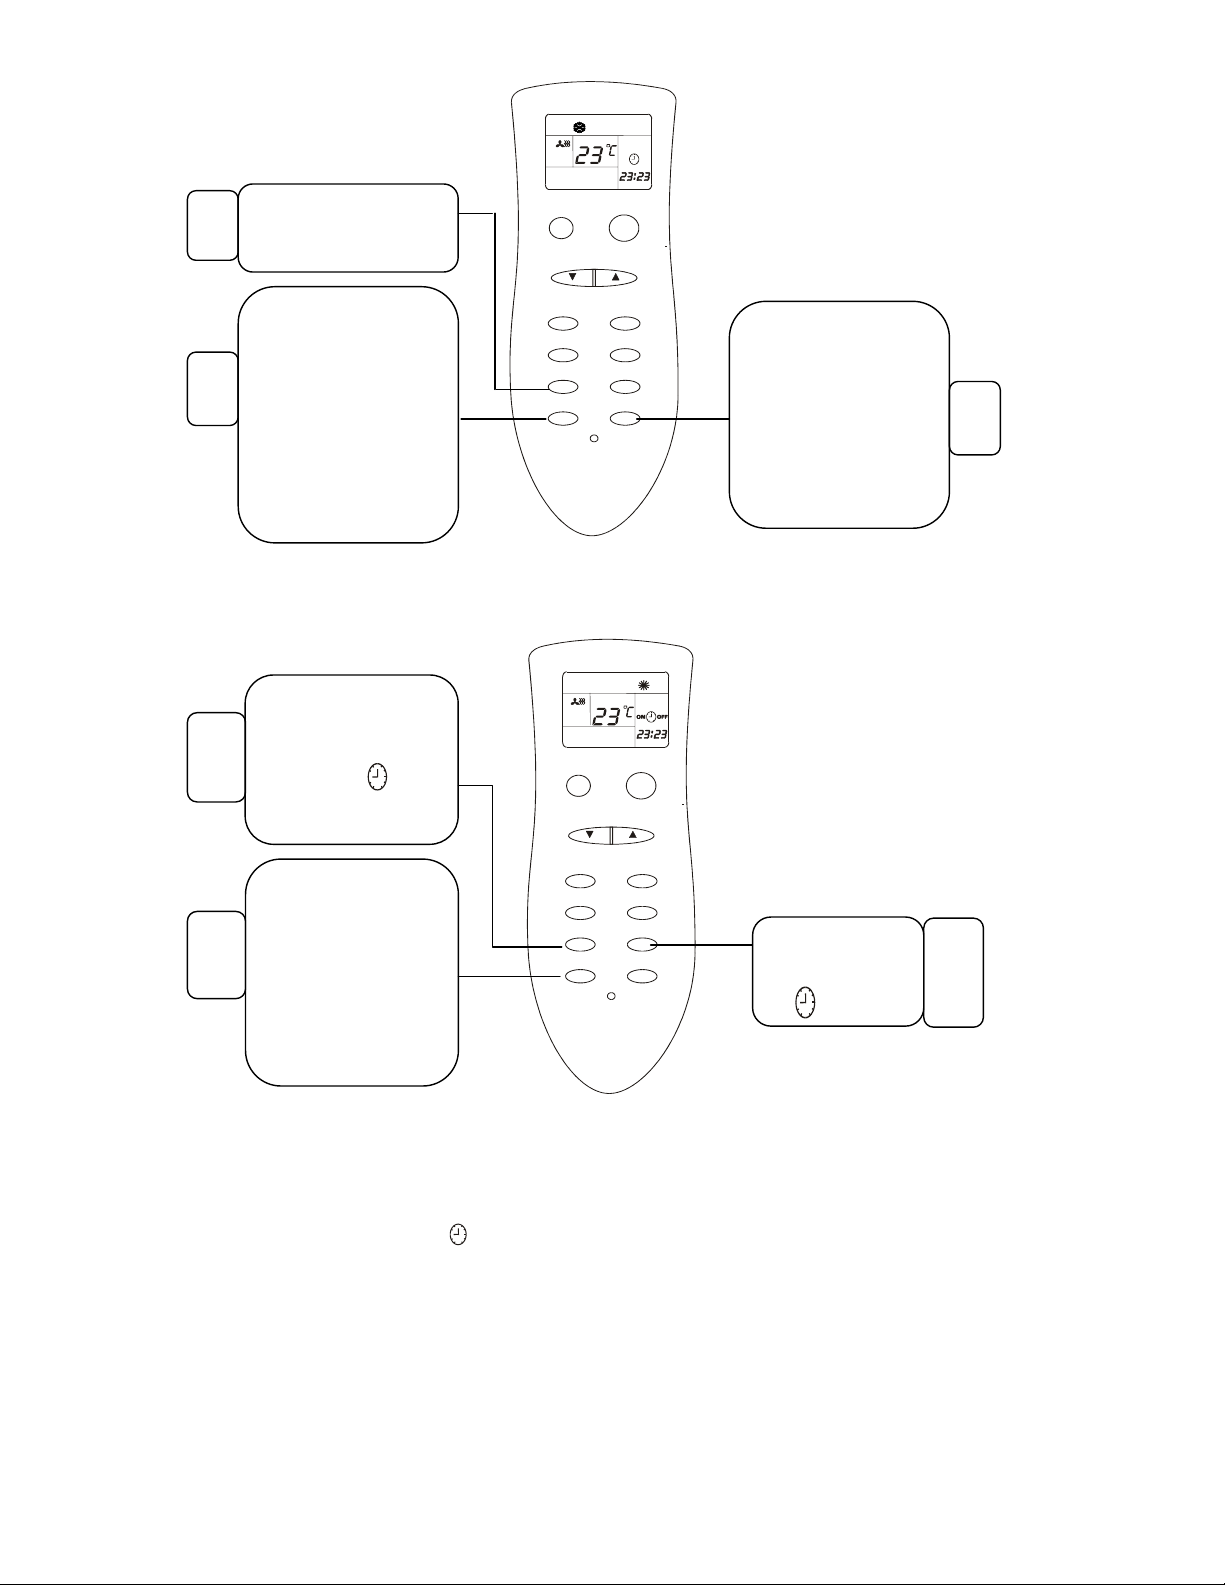
Clock Setting
R
b
y
d
k
r
R
R
t
t
r
R
R
Press “TIME” button to
select , clock display
1
will flash.
Press “HOUR” button to
change the hour display,
each press of HOU
button will increase or
2
decrease the time display
y 1 hour; hour displa
will be change
continuously when
pressing it continuously.
SET TEMP
SLEEP
TEMPERATURE
MODE
AUH
TIME
HOU
RESET
ON/OFF
FAN SPEED
FAN SWEEP
TIME
MINUTE
Press “MINUTE” button
to change the minute
display, (the method as
step 2). The cloc
display will flash for 10
seconds after setting, the
remote controlle
displays current time.
3
On Timer
Set the clock time as
Clock Setting,
Press “TIME” button to
1
select ON , clock
display will flash.
Press “HOUR” or
“MINUTE” button; se
the time to turn on the
air conditioner on timer.
2
At this time if user press
“MINUTE” button, i
will increase o
decrease by 10 minutes.
Note:
1. When on timer function is set, air conditioner will be turned off immediately. It will be turned on at the set
time; symbol “ ON ” will be deleted. If the set time is as same to the current time, air conditioner will be
turned on at this time of next day.
2. Press “ON/OFF” to cancel “On Timer” function, air conditioner will be turned on immediately.
SET TEMP
SLEEP
TEMPERATURE
MODE
AUH
TIME
HOU
RESET
ON/OFF
FAN SPEED
FAN SWEEP
TIME
MINUTE
Press “TIMER”
button to select
ON .
3
10
Page 11
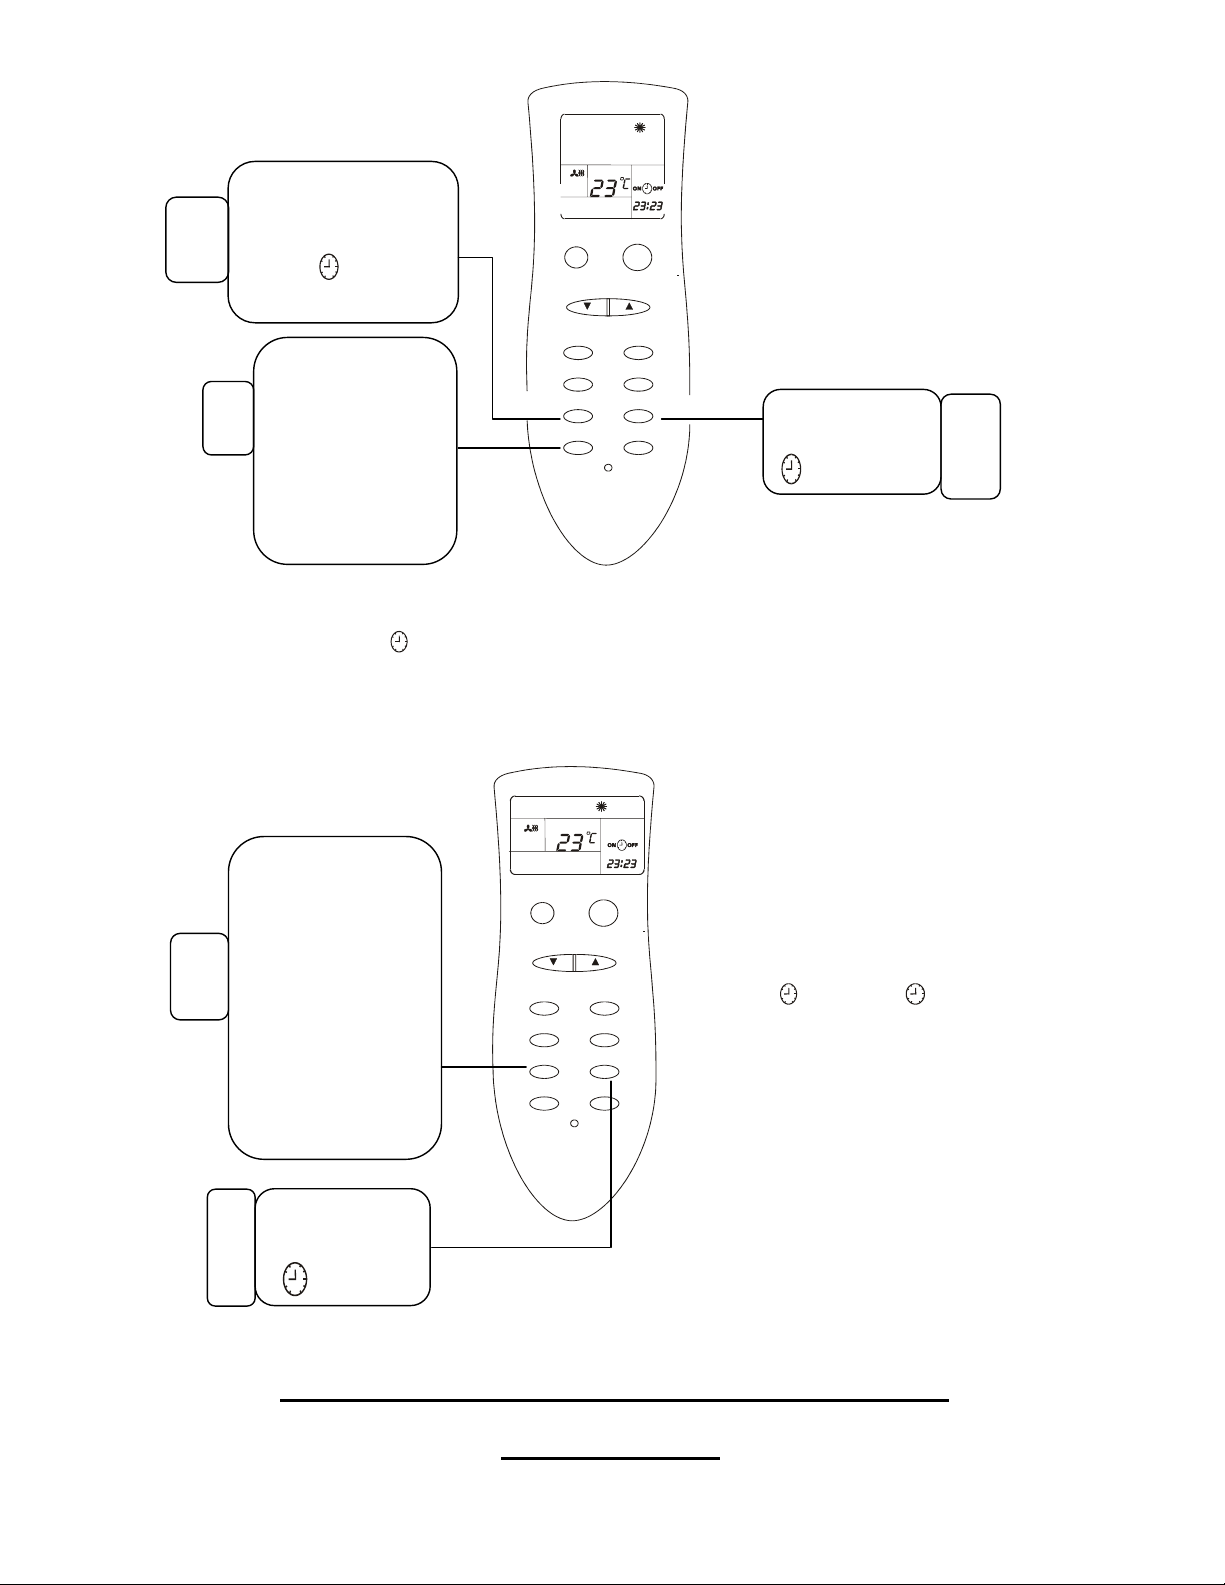
Off Timer
R
t
f
b
R
Set the clock time as
Clock Setting,
Press “TIME” button to
1
select OFF, clock
display will flash.
Press “HOUR” or
“MINUTE” button; se
the time to turn on the
air conditioner on
2
timer. At this time i
user press “MINUTE”
utton, it will increase
or decrease by 10
minutes.
Note:
1. When off timer function is set, air conditioner will be turned on immediately. It will be turned off at the set
time; symbol “ OFF ” will be deleted. If the set time is as same to the current time, the air conditioner
will be turned off at this time of next day.
2. Press “ON/OFF” to cancel “Off Timer” function, air conditioner will be turned off immediately.
SET TEMP
SLEEP ON/OFF
TEMPERATURE
FAN SPEED
MODE
AU
FAN SWEEP
H
TIM
TIME
E
MINUT
HOUR
E
RESET
Press “TIMER”
button to select
OFF .
3
Program Control
1. Refer to Clock
Setting to Set the
clock time.
2. Refer to On
Timer to Set the
1
time to turn on the air
conditioner.
3. Refer to Off
Timer to Set the
time to turn off the air
conditioner.
Press “TIMER”
button to select
2
PROGRAM
SET TEMP
SLEEP ON/OFF
TEMPERATURE
FAN SPEED
MODE
AU
FAN SWEEP
H
TIM
TIME
E
MINUT
HOUR
E
RESET
PROGRAM
Note:
1. In accordance with the clock
time , air conditioner will select
to work in “On Timer” or “Off
Timer” mode automatically.
PROGRAM
ON
PROGRAM
OFF
2. Air conditioner will be turned
on/off at the set time everyday. If
user turns off the air conditioner
by hand before the set time, then
“Off timer” function will be
cancelled; but “On timer”
function is still effective. If user
turns on the air conditioner by
hand before the set time, then
“On timer” function will be
cancelled; but “Off timer”
function is still effective.
KEY-OPERATING INSTRUCTON FOR THE AIR
CONDITIONER
11
Page 12
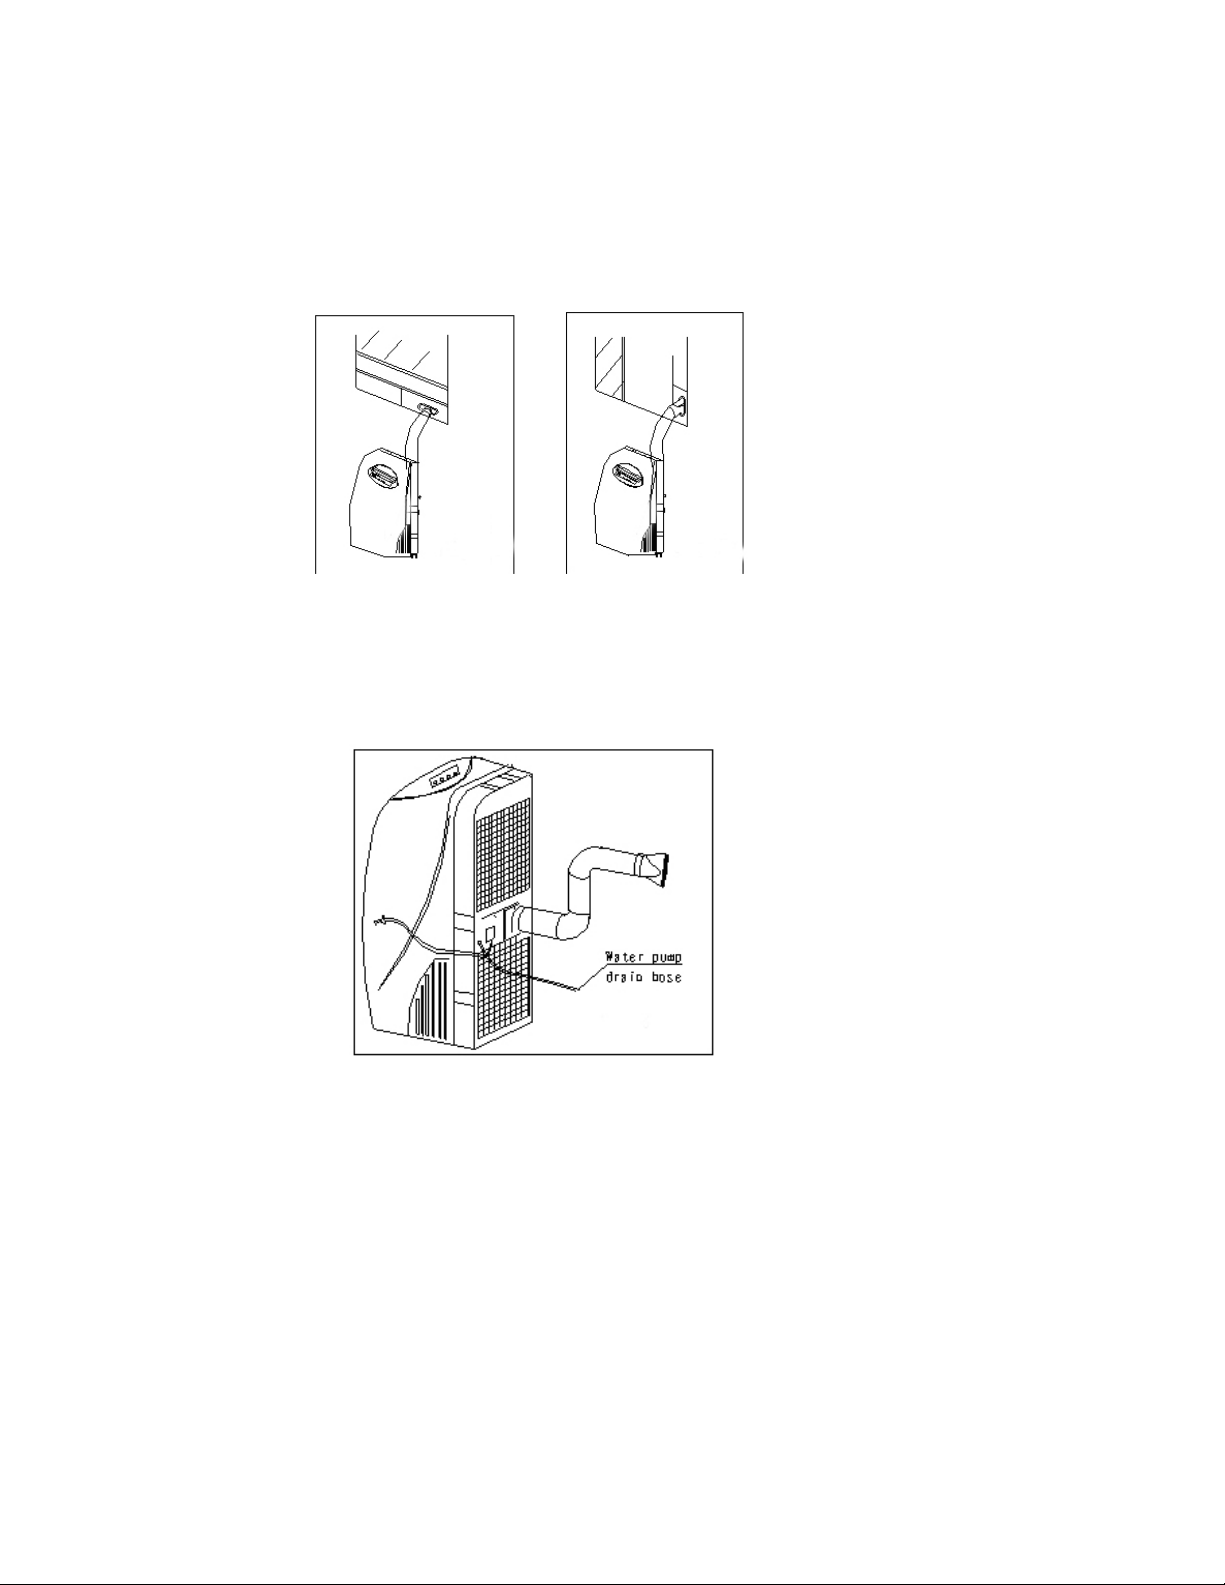
Before Starting This Unit
1) Select a suitable location ,make sure you have easy access to an electrical outlet.
2) Install the Flexible Exhaust Hose and the Adjustable Window Slider Kit as depicted in Fig.7 Fig.7a
NOTE: Step 2) is required only while using the cooling mode.
Fig.7 Fig.7a
3) Plug the unit into the grounded electrical outlet.
4) Make sure the water pump drain hose is correctly installed, as Fig.8 .
5) Press the on/off button to turn on the unit.
Fig.8
1. BEFORE USE
Made sure the duct is installed well.
Dehumidifying and Cooling Operations
- The operating range for dehumidifying is 60-89,and the operating range for cooling operating is 60
-89.
- If the cooling or dehumidifying operations have been switched off and need switching on again in a short
time, allow approximately three minutes for the cooling or dehumidifying operations to resume.
- Make sure the water pump drain hose is correctly connected to the unit.
12
Page 13

Power supply:
- Insert the plug of the air conditioner into a standard three prong outlet.
2. COOLING OPERATION
- Connect the power and press the “ ON/OFF ” button.
- Press the “ MODE” button several times until the cooling indicator light comes on.
- Press the “ TEMP SETTING” buttons▲or ▼ to select your desired room temperature. (60-89)
- Press the ″FAN SPEED″ button to choose the fan speed: AutoHighMediumLow.
3. DEHUMIDIFYING OPERA TION
- Connect the power and press the “ ON/OFF ” button.
- Press the “MODE” button several times until the dehumidifying indicator light comes on.
- Press the “TEMP SETTING” buttons▲or ▼ to select your desired room temperature. (60-89)
- The fan will often run at a fixed low speed at this setting.
- Keep windows and doors closed for the best dehumidifying effect.
4. HEA TING OPERA TION (not available for cooling-only type air conditioner)
- Connect the power and press the “ ON/OFF ” button.
- Press the “MODE” button several times until the heating indicator light comes on.
- Press the “TEMP SETTING” button▲or▼to select your desired room temperature. (60-89)
- Press the “FAN SPEED” button to choose the fan speed: AutoHighMediumLow.
- The fan will delay to be off for a few minutes when the AUH has been off.
5. FAN OPERATION
- Connect the power and press the “ ON/OFF ” button.
- Press the “MODE” button several times until the fan indicator light comes on.
- Press the “FAN SPEED” button to choose the fan speed: HighMediumLow.
6. TIMER OPERATION
Setting the on timer:
- Press the “TIMER ON” button or “TIMER” button when the air conditioner is off . Press the “TEMP SETTING”
button▲or▼to select the time you need turn on the unit .
- The starting time is adjustable from 01 to 24.
- The operation paned window will display “ ON ”or the timer-on indicate light.
Setting the off timer:
- Press the “TIMER OFF” button when the air conditioner is on. Press the “TEMP SETTING” button▲or▼
to select the time you need turn off the unit.
- The turning off time is adjustable from 01 to 24.
- The operation paned window will display “ OFF ”or the timer-off indicate light.
7. WATER PUMP DRAINAGE
Connect the water pump drain hose to the unit before operating. When the water level of the internal water
-
tank reaches a predetermined level, the water pump will be activated and drain the condensed water
outside through the connected drain hose. The maximum delivery lift is 3.0m(10 feet).(Under this
condition, ensure the rubber stopper is attached to continuous drainage plug at the bottom of the unit.
13
Page 14
This is located on the back-side of the AC.)
8. CONTINUOUS DRAINAGE
- When you plan to leave this unit unused for a long time or do not want to use the water pump, remove the
rubber stopper from the continuous drainage plug and attach a tube or hose for continuous drainage. All
the water in the water tank will drain once the continuous drainage plug is removed.(Under this condition,
the water pump is not activated.)
NOTE: 1. This type of air conditioner’ s waterproof level is IPX0. Do not use it in the laundry or bathroom.
a) Fuse:RF1-20 5A 250V or F3.15AL250V,rated current:5A or 3.15A.
3. The rules of line must accord with the standard of exporting countries or nations.
4. Seconds after pressing ”UP” and “DOWN” simultaneously, operation panel is locked and the displayer
shows “LOCKED”. All buttons on operation panel are invalid, but the remote controlling signals are valid.
Pressing again”UP” and “DOWN” si multaneously, the operation panel is unlocked and the “LOCKED” o n
displayer disappears. Then operation panel comes back to the normal state.
INSTALLATION
1. IMPORTANT:
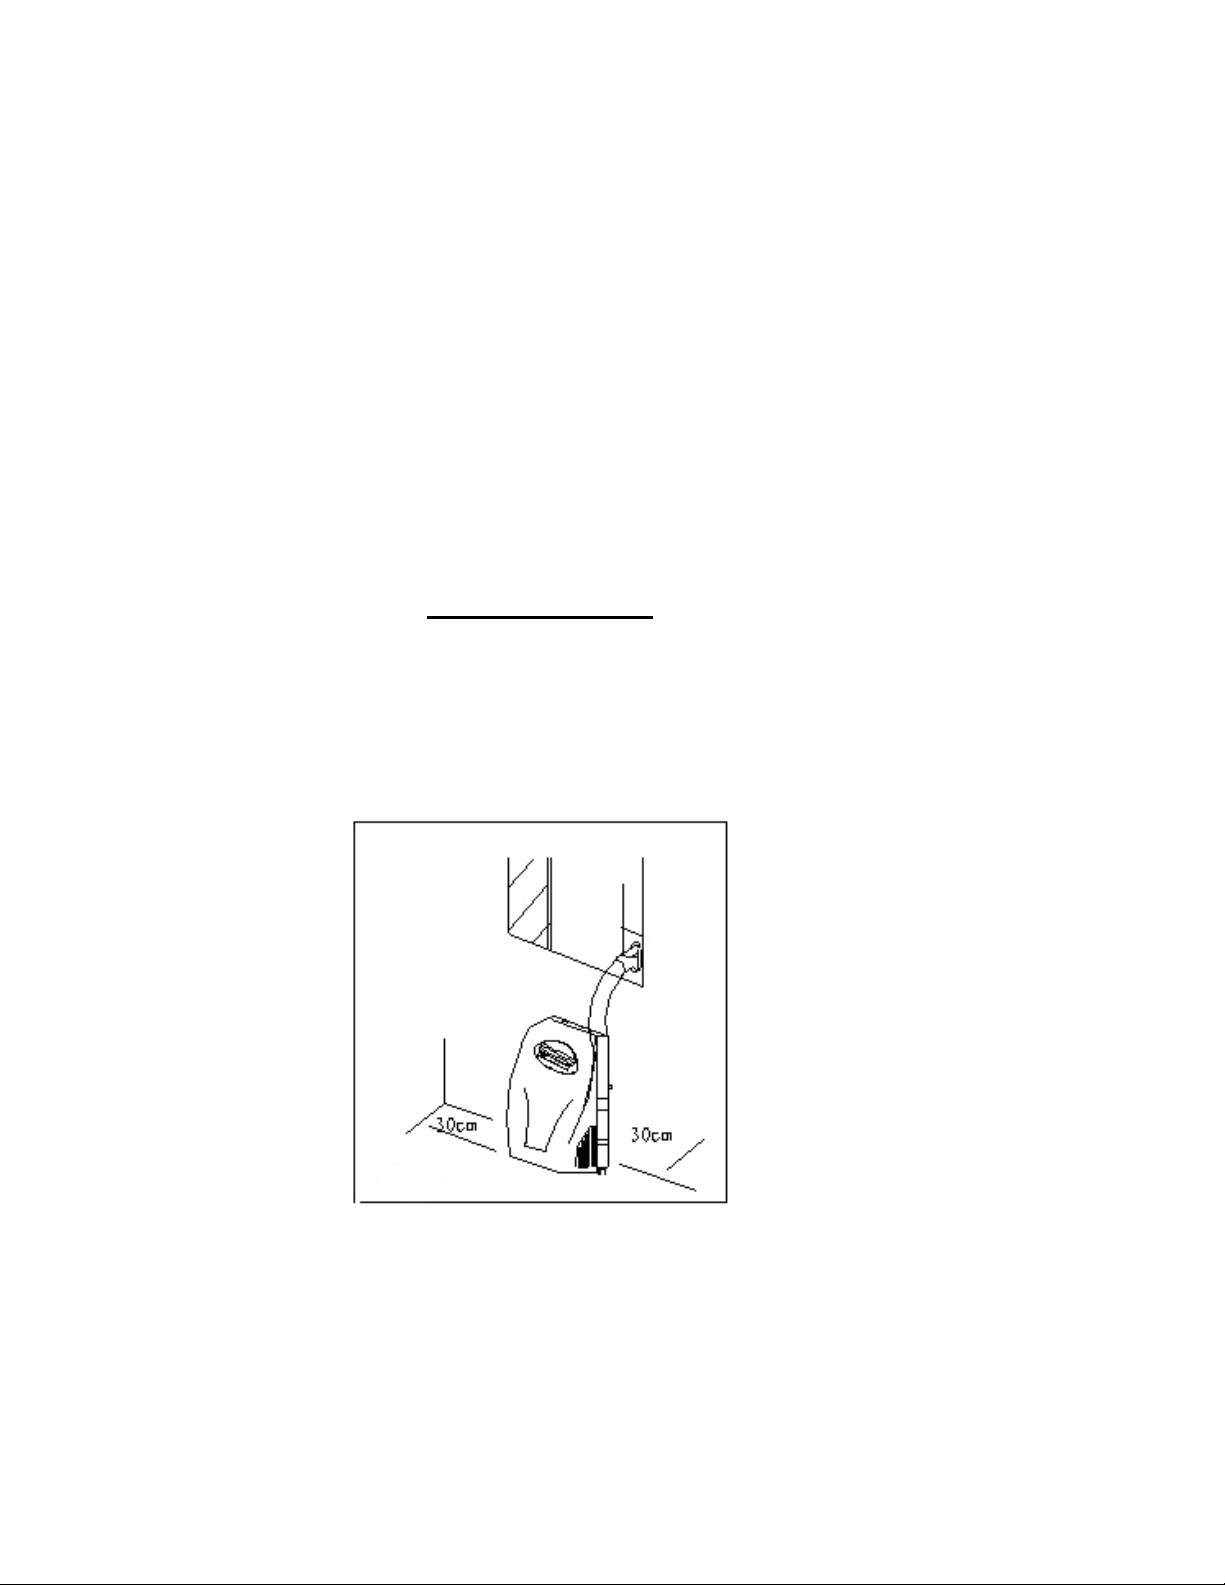
Install the portable air conditioner in a flat and spacious location where the air inlets or outlets will not be
blocked. A minimum clearance of 12 inches from a wall or other obstacles should be kept(as Fig.9 show). The
appliance shall not be used in the laundry. The plug shall be accessible after the appliance is positioned.
Wiring shall be done according to National rules.
Fig.9
2. DUCT MOUNT INSTRUCTIONS:
14
Page 15
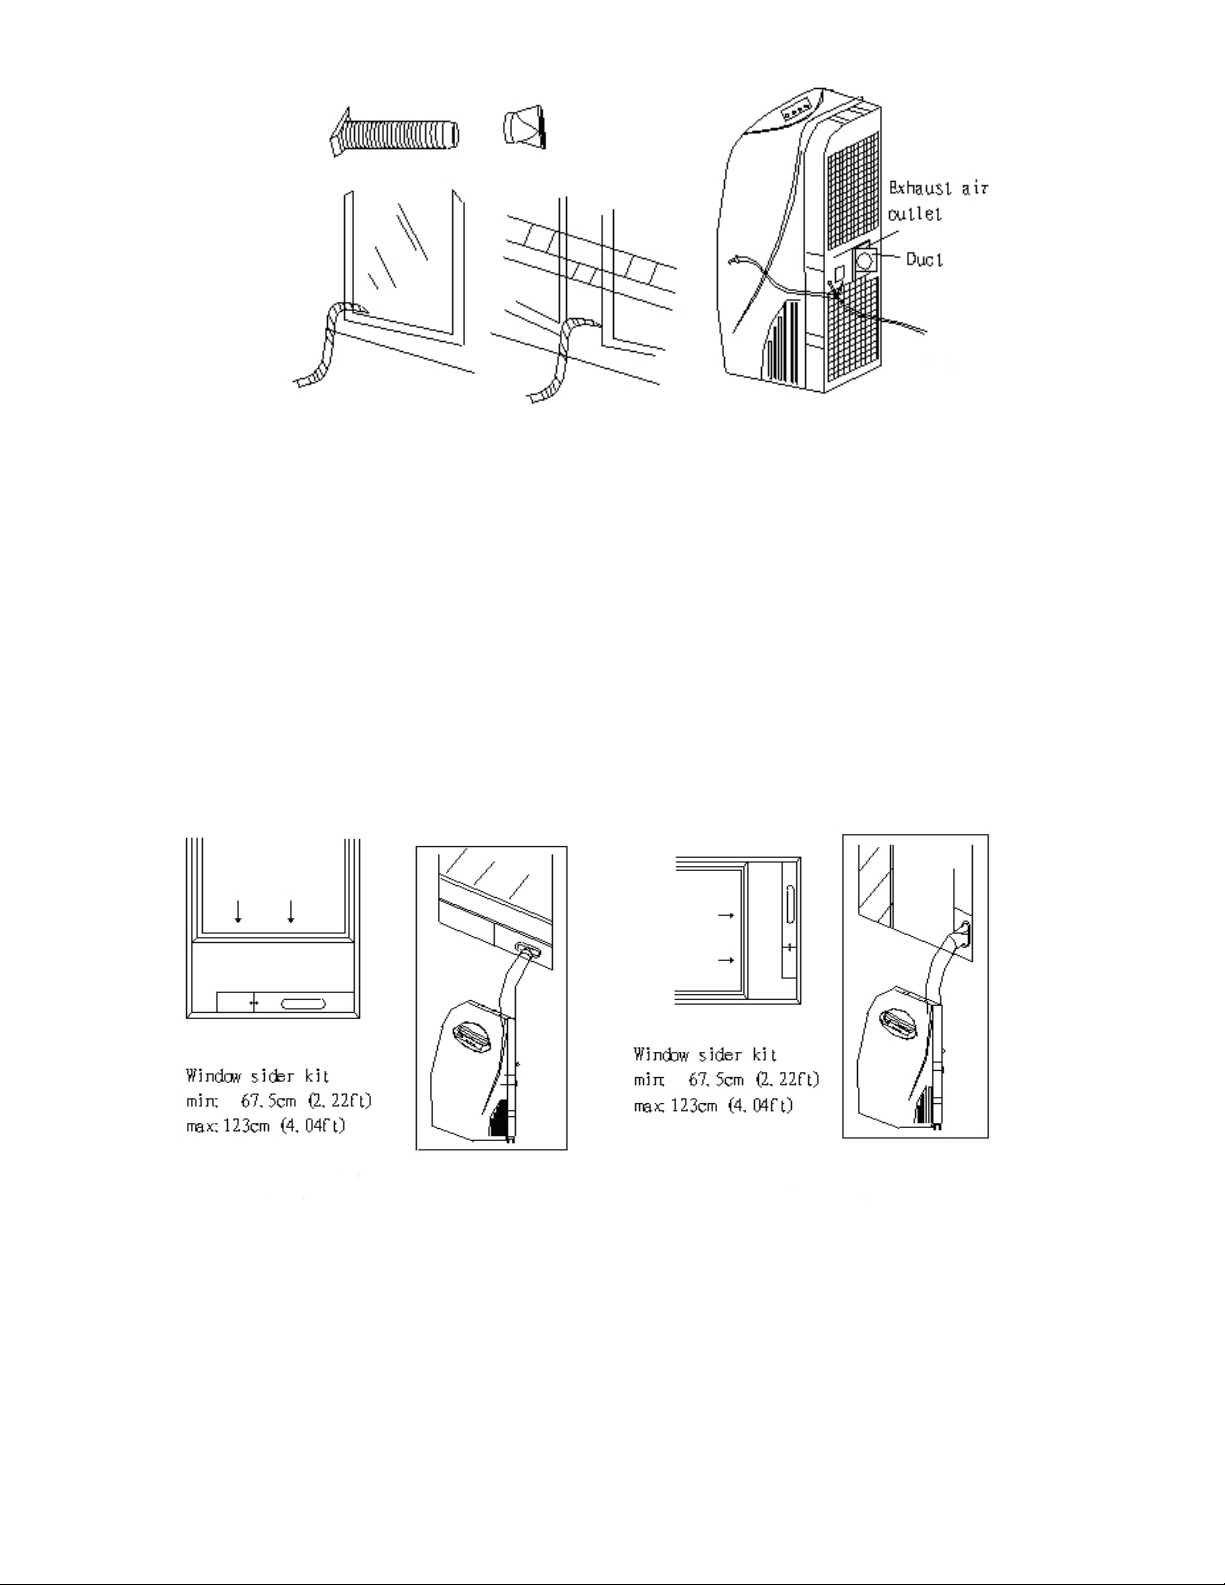
Fig.10
A) TEMPORARY
1. Attach one end of the duct to the exhaust air outlet of the mobile air conditioner, first fit the left
side of the duct on the exhaust air panel, then the right side duct. Push it downwards, be sure to
fix thoroughly.(See the fig.10 )
2. Put the end of duct to a nearby window.
Window Kit Installation
Your window kit has been designed to fit most standard “Vertical” ,and “horizontal” window applications ,
However, it may be necessary for you to improvise/modify some aspects of the installation procedures for certain
types of window .
Please refer to Fig.11&Fig.11a for minimum and maximum window openings.
Fig.11 Fig.11a
Drain Tank Safety Feature
This unit is equipped with a internal water tank, two full-safe switch mechanisms, one is used to control the
water pump drainage, the other is used to monitor the water level inside the internal water tank. When the water
level reaches a predetermined altitude, the digital display shows “E5” and the water full indicator light
illuminates. Cut off the power and move the unit outside carefully, remove the rubber blockage from the back
drainage hole and drain the water off. The unit will continue operating properly.
15
Page 16
MAINTENANCE
IMPORTANT:
1) BE SURE TO UNPLUG THE UNIT BEFORE CLEANING.
2) DO NOT USE GASOLINE, THINNER OR OTHER CHEMICALS TO CLEAN THE UN I T.
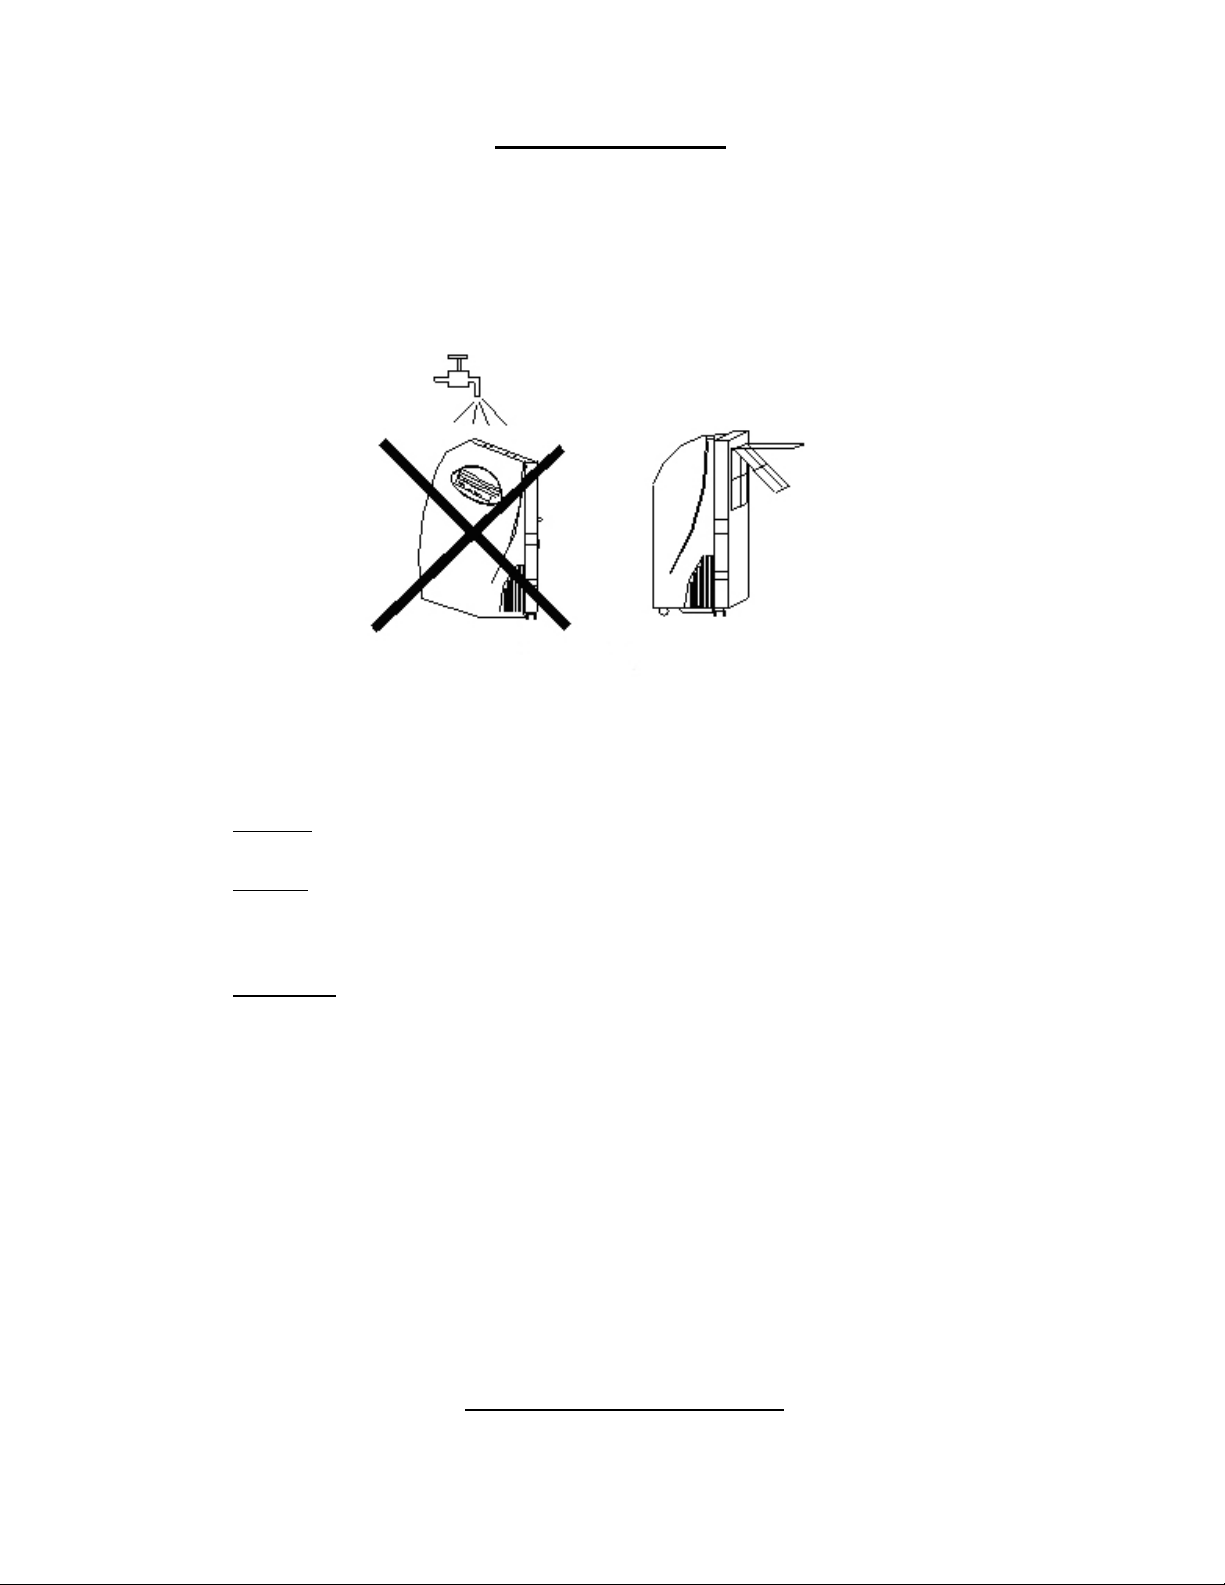
3) DO NOT WASH THE UNIT DIRECTLY UNDER A TAP OR USING A HOSE.
4) IF THE POWER CORD IS DAMAGED, IT SHOULD BE REPAIRED BY MANUFACTURE OR ITS AGENCY.
1.
AIR FILTER
- Clean the air filter at least once every two weeks to prevent inferior fan operation from dust build-up.
- Removal
Pull out the filter cover and remove the air filter from the filter cover.
- cleaning
Wash the air filter by immersing it gently in warm water (about 104)with a neutral detergent. Rinse the
filter and dry it in a shady place.
Fig.12
- Mounting
Attach the air filter to the filter cover using the attachment hooks on the inner surface of the cover. Put the
filter cover back to the unit.
2. UNIT ENCLOSURE
- Use a lint-free cloth soaked with neutral detergent to clean the unit enclosure. Finished by a dry clean
cloth.
TROUBLE SHOOTING
16
Page 17
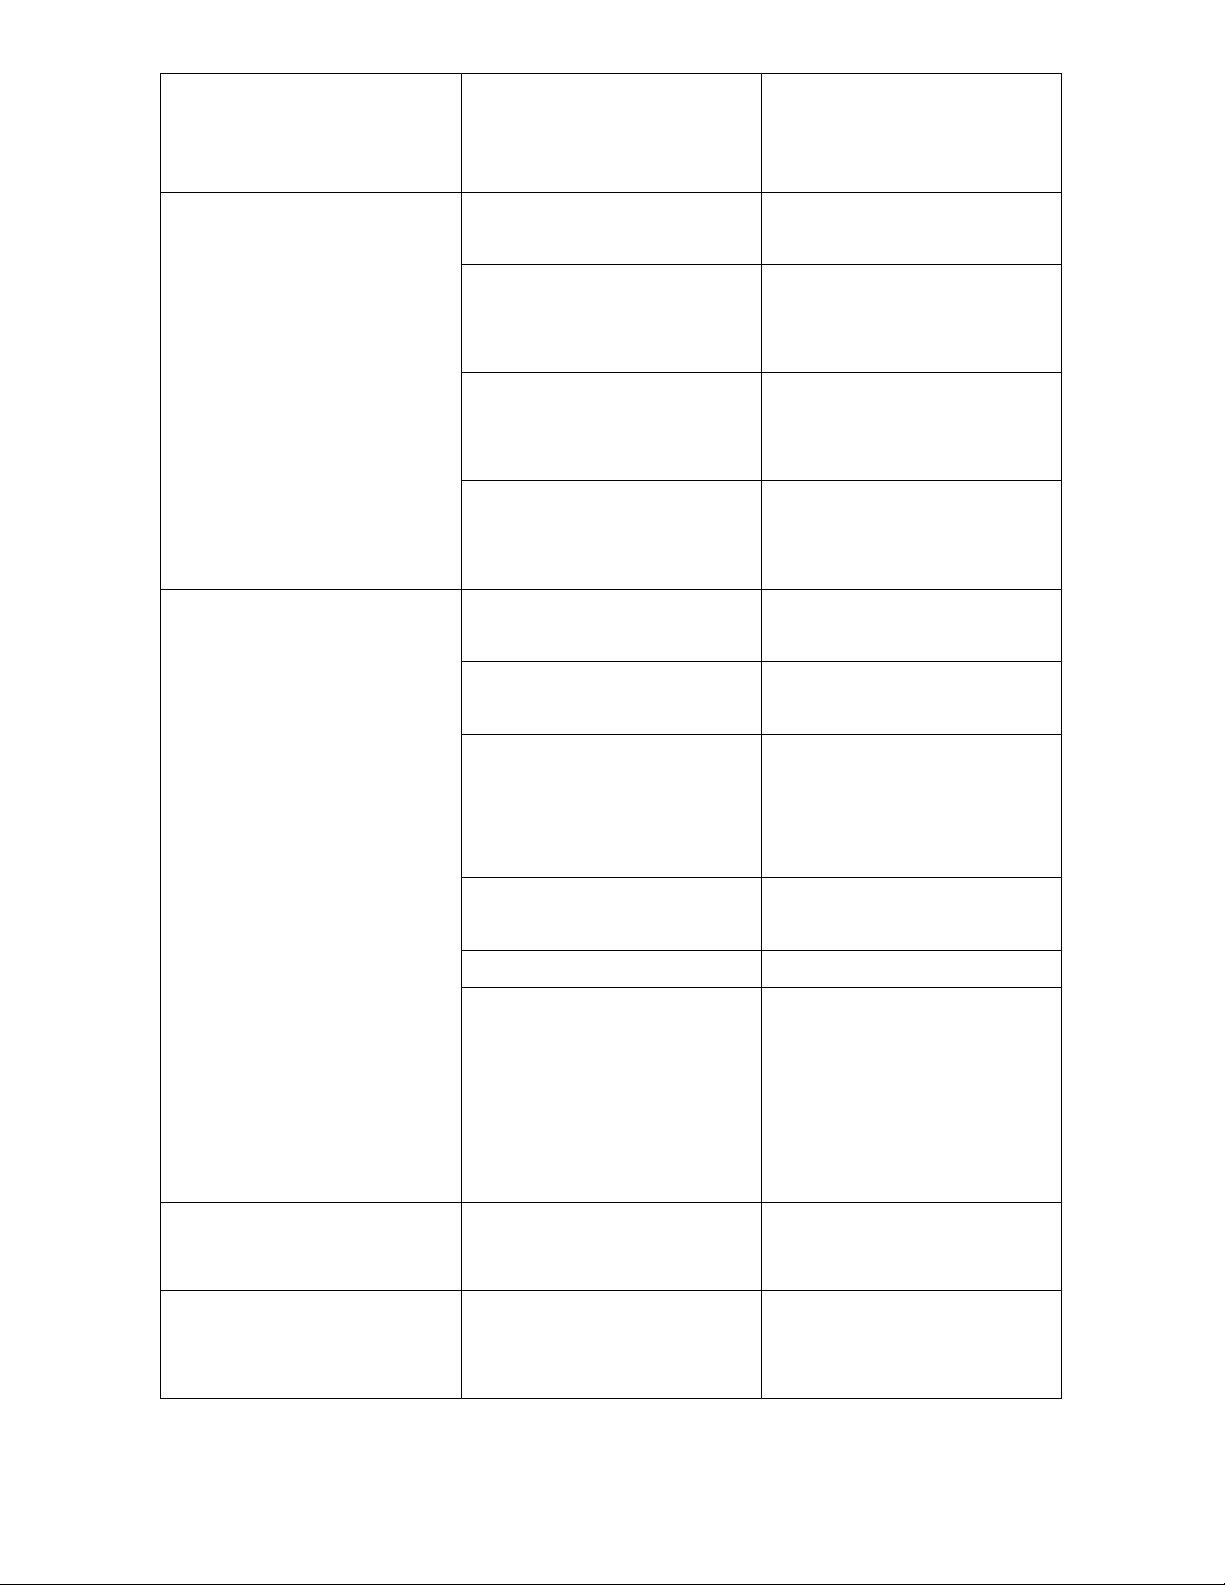
PROBLEM POSSIBLE CAUSES
SUGGESTED
REMEDIES
1. UNIT DOES NOT START
WHEN PRESSING ON/OFF
BUTTON
2. NOT COOL ENOUGH
- Water full indicator blinks,
water tank is full.
- Room temperature is higher
than the set temperature.
(Heating mode)
- Room temperature is lower
than the set temperature.
(Cooling mode).
- LCDI plug was tripped. Press the reset button on the
- The windows or doors in the
room are not closed.
- There are heat sources inside
the room.
- Exhaust air duct is not
connected or blocked.
Dump the water in the water
tank.
Reset the temperature.
Reset the temperature.
LCDI plug. Press On/Off
button on the air conditioner.
Make sure all the windows and
doors are closed.
Remove the heat sources if
possible.
Connect the duct and make
sure it can function properly.
3. NOISY OR VIBRATION
4. GURGLING SOUND
For best performance keep as
short and straight as possible.
- Temperature setting is too
high.
Air filter is blocked by dust. Clean the air filter.
- AC stopped cooling after
checking each item above.
- The ground is not level or not
flat enough.
The sound comes from the
flowing of the refrigerant
inside the air-conditioner.
Decrease the set temperature.
Turn unit off for 3 minutes,
press the reset button on the
LCDI plug, turn the AC back
on and select a temperature
lower than the room
temperature.
Place the unit on a flat, level
ground if possible.
It is normal.
NOTE: When the pipe sensor or the room sensor is error, the digital display shows “E1”or“E2” accordingly.
17
Page 18

18
 Loading...