

Page 1
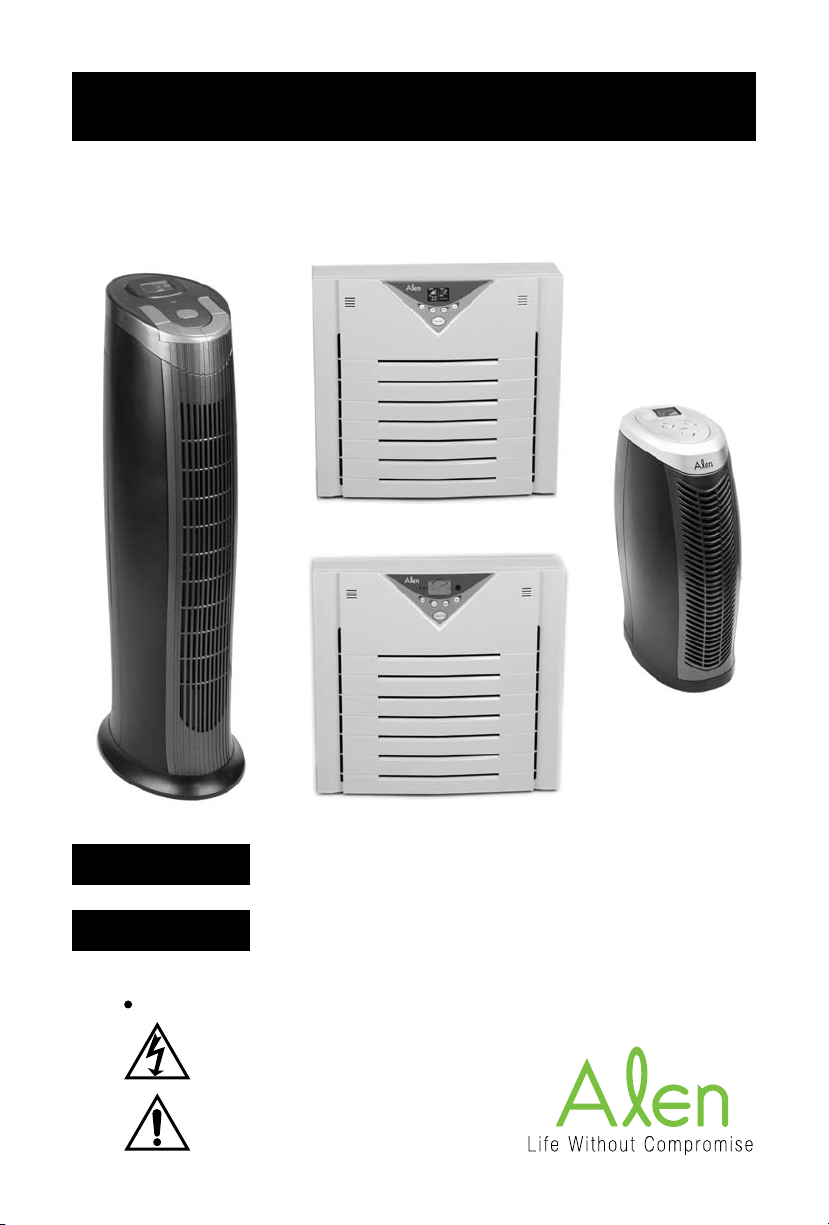
USER MANUAL
HEPA AIR PURIFIER
MODEL: A375UV, A350, T300 and T100
A350
T300
WARNING
CAUTION
Electrical Hazard Symbols
ELECTRICAL
SAFETY / ALERT
T100
A375UV
This symbol refers to hazards or unsafe practices which can
result in severe personal injury or death
This symbol refers to hazards or unsafe practices which can
result in severe personal injury or death and the potential for
product or property damage.
Page 2

CONTENTS
Important Safeguards..................................................3
Indoor Air Quality Control...........................................4
How To Assemble And Use.........................................6
Model Specications
A375UV
...............................................................6
A350
...................................................................10
T300....................................................................12
T100....................................................................16
How To Clean And Maintain........................................17
Warranty Information...................................................18
Warranty Registration Card
2
Page 3

IMPORTANT!
Congratulations on your purchase of an Alen HEPA Air Purier. Please study this
manual carefully to familiarize yourself with the special features and functions of your
Alen HEPA Air Purier system.
Please Read Before Starting
Read all instructions before operating the air purier.
This product operates at 120AC, 60Hz only.
Do not run power cords under carpets, and do not cover with throw rugs.
Arrange cord such that it will not be tripped over.
Do not use with a damaged cord or plug, and keep the cord away from heated surfaces.
Do not insert any foreign objects into the air inlet or outlet grill.
Only use this appliance for its intended purpose of air cleaning in non-industrial
environments.
Do not use attachments or lters not recommended by Alen.
Do not place appliance on a soft surface such as a bed or other soft furnishings.
Only use this appliance in an upright position.
Do not clean the appliance with chemical solvents or corrosive materials.
Direct Ultra Violet light exposure to the eyes can cause temporary or chronic adverse
effect to eyes.
Do not let children operate this electrical appliance without proper supervision.
Indoor use only.
Save these instructions for future reference.
3
Page 4

AIR CLEANING SYSTEMS and INDOOR AIR QUALITY
Why should I be concerned with the air
I am breathing?
Sometimes it may be better to not know what is in the air, but since you are reading
this we’ll share what the leading health agencies are reporting.
First a little background on particulate matter. The particles that oat through the
air are a combination of solid particles and liquid droplets. Particles are measured
in microns, where a micron is one millionth of a meter (10-6 meters) and is also
called a micrometer. The particles that we can see with the naked eye are those
larger than 50 microns. A human hair is approximately 100 microns in diameter. The
airborne particles that result in allergies or impact our health are much smaller and
not visible with the naked eye. Mold spores and pollen particles are from 2 to 10
microns. At times they can be visible but this is when there is a large concentration
massed together.
Before we get to the types of particles in the air, let’s review the particulates in the
air that are 10 microns and smaller and why we need to care about them. Particles
10 microns and smaller can pass through and deposit in our respiratory system
and are referred to as respiratory particulates. The concern here is that the smaller
particles can be breathed deep into the lungs. These smallest of particles tend to
stay suspended in the air longer than very large particles such as dust so there is a
greater chance for inhalation. They can also serve as a vehicle to transport contaminants deep into the lung area.
Particles 5 microns and larger are trapped in the throat and nasal regions, particles
between 1 and 5 microns are trapped in the trachea (leads to the lungs) and larger
lung branches and particles less than 1 micron in size go to the alveolar area which
are the tiny air sacs in the lungs. This is where the exchange of oxygen and carbon
dioxide takes place.
The primary composition of our air is made up of Nitrogen, Oxygen, Argon and
Carbon Dioxide. All of this is obviously invisible to us. Unfortunately, the respiratory
particulates are also not visible to the naked eye. Here is a summary of the common “pollutants”:
Bacteria: 0.2 - 5 microns
Mold spores: 2 – 10 microns
Pollen: 10-20 microns
Dust mites: 300 microns (feces 20 microns) – most common allergen in US
Viruses: 1 micron and smaller
4
Page 5

AIR CLEANING SYSTEMS and INDOOR AIR QUALITY
How do we get rid of these micro particles? As we have said, the most effective tech-
nology to safely remove these particles is with HEPA ltration. A true HEPA lter is
rated at removal of 99.97% of particles that are 0.3 microns and larger. An interesting
fact is that the effectiveness of HEPA lters increases over time which is the opposite
of the ionic or lter-less technologies as those plates get dirty the ability to charge and
collect particles decreases. Also, since these particles can be easily breathed into our
respiratory system, the last thing you want to do is have to clean them regularly and
come into contact with the stuff you’re trying to avoid. In addition, HEPA lters also
perform better at the removal of particles smaller than 0.3 microns.
To kill bacteria, UV lamps have been proven effective. The Alen T300 and A375UV
specically address these concerns as well as offer HEPA ltration for mold spores,
pollen, dust, etc.
We are proud to announce the latest line of
Dehumidiers to join Alen Indoor Air Quality products.
To give you a brief understanding about the importance of source control of MOLD,
below is an outline that explains why the use of a dehumidier in your room/indoor
environment is vital to the source control.
What is SOURCE CONTROL?
1) Source of moisture/humidity
2) Temperature Control and
3) Filtering the air
MOLD loves humidity. An indoor environment with 65% or above in humidity is a very
fertile place for mold. So, use a dehumidier and control the humidity in the air.
Please visit the www.alencorp.com dehumidier section for more information about
the models of dehumidiers that Alen manufactures.
5
Page 6

HOW TO ASSEMBLE AND USE
Reminder: Make sure the HEPA lter is properly installed before use.
Where to locate:
1) Keep the unit in a place at least 2 yards away from the TV set, radio, etc.
to avoid interference.
2) Do not blow air directly into the air purier.
3) Keep both sides of the unit more than 6 inches away from the wall.
4) Do not place the unit where the air inlet or outlet grill could come in
contact with a curtain.
5) Place the air purier in a well-ventilated location of the room.
6) Placing the unit close to the source of the air pollution may further improve
indoor air quality.
Setting the Control Panel for A375UV Ultra
1) Plug the unit into an electric outlet, the unit will be ready to run. Press the On/Off
button to start running, re-press it to stop.
2) When the air purier is turned on the fan will run at medium speed for 3 seconds
before running at low speed (default speed). Press the speed button each time,
the fan speed will cycle.
3) While the air purier is on, press the TIMER button to the desired run time
(hours). The air purier will automatically turn off once the timer has counted
down to zero.
4) Press the ion key to turn on the ionizer while the fan is running, press it again to
turn off the ionizer.
5) Press the UV lamp button to turn on the UV lamp, which is used to help to kill
harmful bacteria in the air. Press it again to turn off the UV lamp.
6) When the HEPA replacement light is lit up the HEPA lters needs to be replaced.
7) When the unit runs in auto mode, the dust and odor sensors can sense the air
quality in the room and automatically adjust the fan speed. The particle sensor
6
Page 7
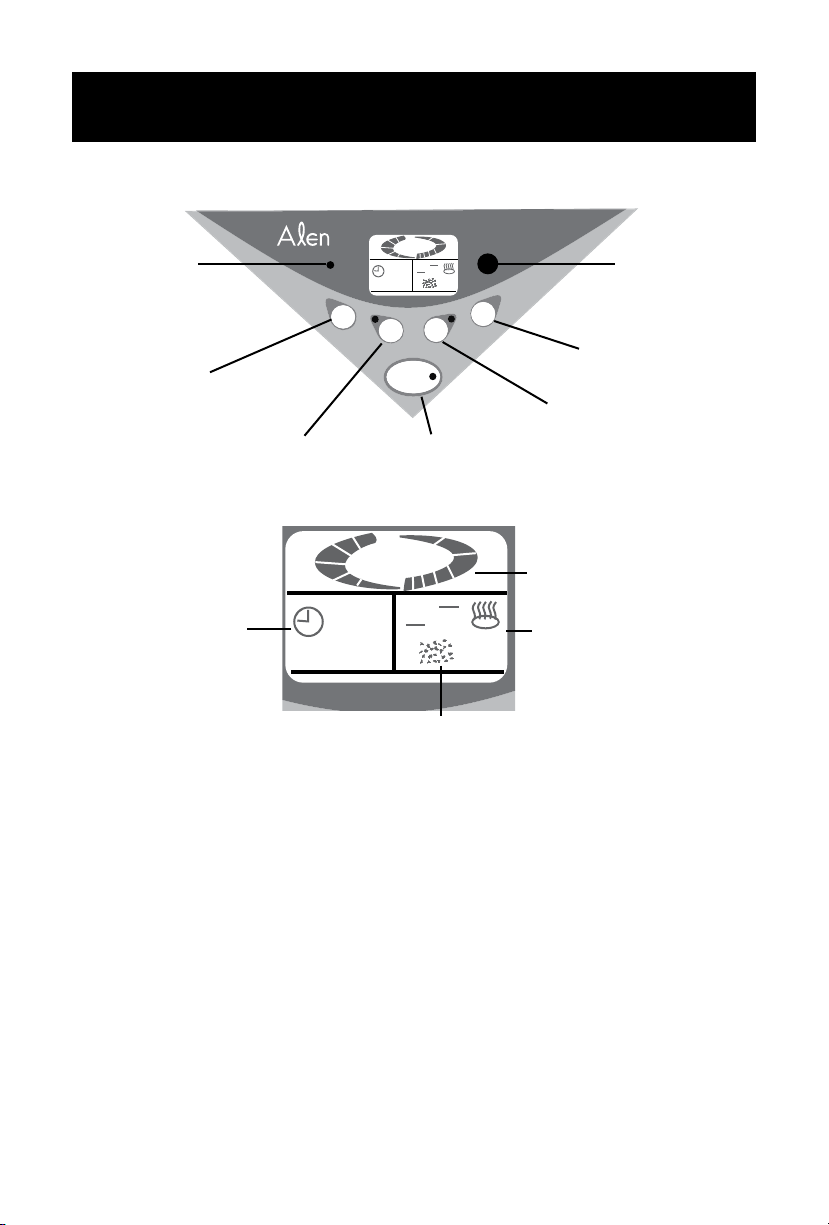
A375UV ULTRA PRODUCT FEATURES
S
PEE
D
UV
IONIZER
T
IME
R
ON /
OFF
CLEAN
INDICATOR
SMELL
TIMER ON/OFF DUST
0 56
4
SMELL
TIMER ON/OFF DUST
0 56
4
Control Panel for A375UV Ultra
Filter
Replacement
Indicator
Remote control
sensor
Timer button
Fan Speed button
Ionizer button
UV button
On/Off Button
LCD Display for A375UV Ultra
Fan Speed
Timer
Particle Sensor
can sense the presence of tobacco and dust particles in the air. The higher the
dust particle level, the further the indicator bar moves from left to right.
Odor Sensor
8) The odor sensor can also detect cosmetic and aerosol odors. As the odor level
increases, the odor indicator’s bar moves from right to left. If the air purier is
moved to a new location, the sensor needs a short period of time to adjust to the
new environment. During this time the indication of air cleanliness may not reect
the real air conditions.
9) FILTER REPLACEMENT
for 5 seconds to
: When the lter is replaced, press the TIMER button
RESET the lter replacement indicator light.
NOTICE: If the air quality is extremely poor, you may replace the
HEPA lter before all the bars are lit.
7
Page 8
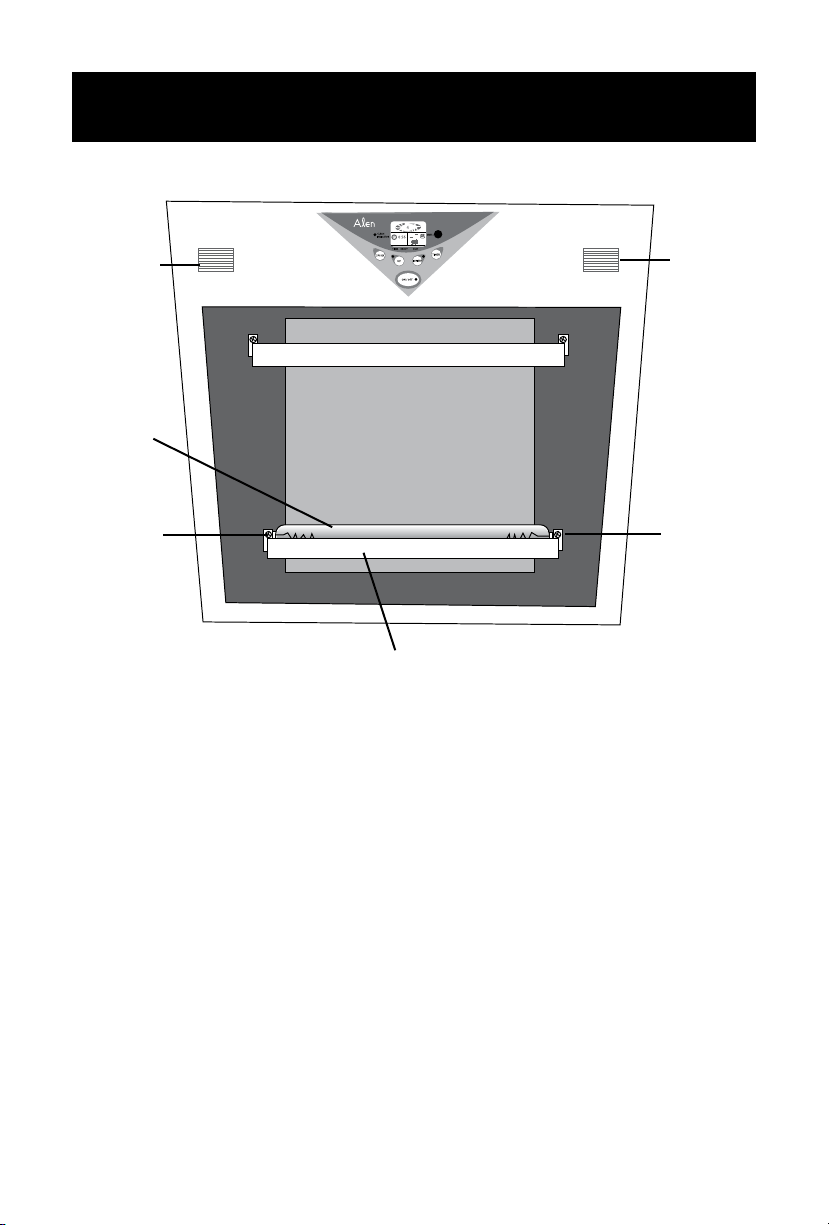
REPLACING A375UV BULB
Particle &
odor sensor
UV Bulb
L. screw
Metal Bar across the UV bulb
Particle &
odor sensor
R. screw
Replacing the UV Bulb
1) Before replacing the UV bulb, please unplug the unit and remove the cover.
2) Lay down the unit and pull up on the lower end if the front cover and push toward
the display panel at the top and remove.
3) Remove the HEPA lter by lifting the pull strings on either side of the lter.
4) Remove the metal bar across the UV bulb by removing the R. & L. screws.
5) Hold the edge of the UV bulb and gently twist a quarter turn until it unlocks
from the socket. Pull the pins out of the side of the socket, one at a time.
6) Remove the UV bulb. Gently handle the new UV bulb on the ends only.
7) Gently insert the UV bulb into the socket and twist a quarter backward and put
back the metal bar with the screws.
8) Reinstall the cover by hinging at the top and pressing the bottom of the cover to
snap into place.
8
Page 9

A375UV FEATURES AND SPECS
Features
1) Pre-lter - Traps larger dust particles.
2) HEPA Filter with carbon - Removes particles as small as 0.3 microns from the air
at 99.97% effectiveness.
3) Activated Carbon Filter reduces odor.
4) Built-in Ionizer
Releases the property concentration of negative ions to keep the air fresh.
5) Fan speed settings & 12 hours times - 4 fan speeds.
6) Filter replacement Indicator - noties you when it is time to replace the lters.
7) Digital Display - displays the operation more of the unit.
8) Soft touch button control - sensitive soft touch buttons, easy to operate.
9) UV bulb sterilization - the germicidal UV bulb is used for bacteria control.
10) Photocatalyst Filter - the photocatalyst lter is used to decompose odors in the air
such as formaldehyde, alcohol and ammonia, and kill viruses and bacteria in the
air too.
11) R
emote ContRol - the set up button is used to set the three modes: On Time,
Off Time and Fan Speed.
Increase/Decrease: An auxiliary key of the set up key, used to increase/
decrease operation time and fan speed. Each time it is pressed, the present
time will be increased /decreased by 30 minutes or the fan speed will increase/
decrease to the next level.
Model A375UV Specications
Voltage 120V AC
Frequency 60 Hz
Watts 108W
Max. Coverage Area 800 sq ft
Net Weight 19 lbs
Dimensions 18.5” x 9” x 17.5”
Replacement Filter BF25A
9
Page 10
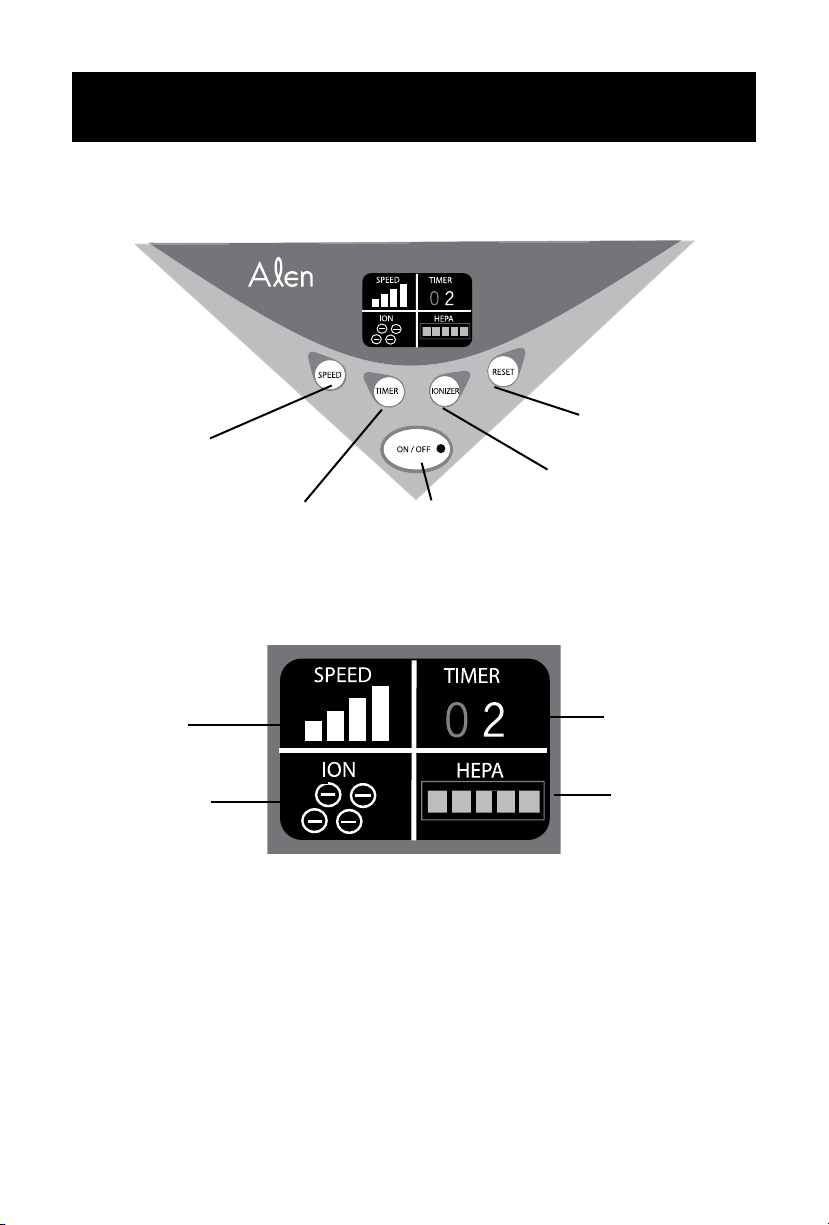
A350 PRODUCT FEATURES
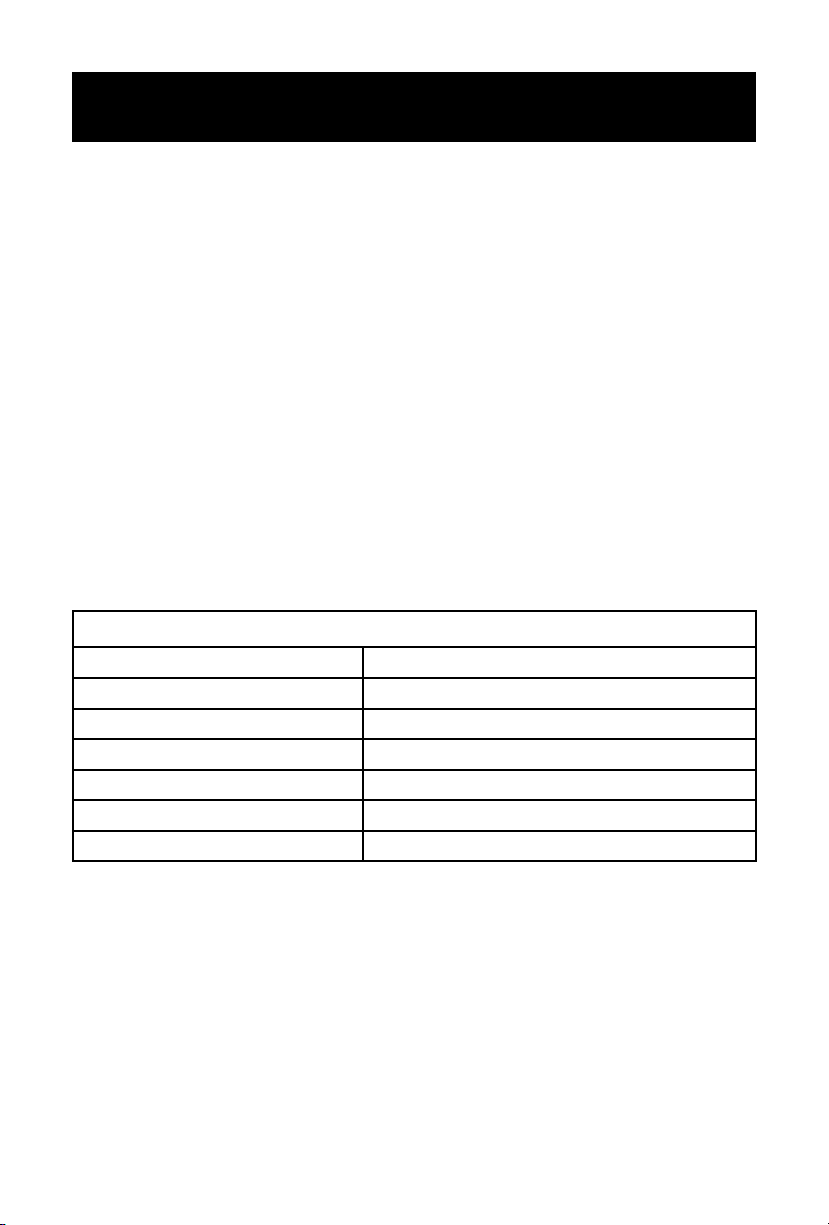
Control Panel for A350
Fan Speed button
Timer button
LCD Display for A350
Fan Speed
Ionizer on/off
Display
Setting the Control Panel for A350
Reset button
Ionizer button
On/Off Button
Timer
HEPA lter
replacement
indicator
1) Plug the unit into an electric outlet, the unit will be ready to run. Press the On/Off
button to start running, re-press it to stop.
2) When the air purier is turned on the fan will run at medium speed for 3 seconds
before running at low speed (default speed). Press the speed button each time,
the fan speed will cycle.
10
Page 11
A350 PRODUCT FEATURES
3) While the air purier is on, press the TIMER button to the desired run time
(hours). The air purier will automatically turn off once the timer has counted
down to zero.
4) Press the ion key to turn on the ionizer while the fan is running, press it again to
turn off the ionizer.
5) When the HEPA bars are lit up the HEPA lters needs to be replaced.
6) FILTER REPLACEMENT
for 5 seconds to
NOTICE: If the air quality is extremely poor, you may replace the HEPA lter before all
the bars are lit.
RESET the lter replacement indicator light.
: When the lter is replaced, press the RESET button
Model A350 Specications
Voltage 120V AC
Frequency 60 Hz
Watts 100W
Max. Coverage Area 800 sq ft
Net Weight 18.2 lbs
Dimensions 18.5” x 9” x 17.5”
Replacement Filter BF15 or BF25A
11
Page 12
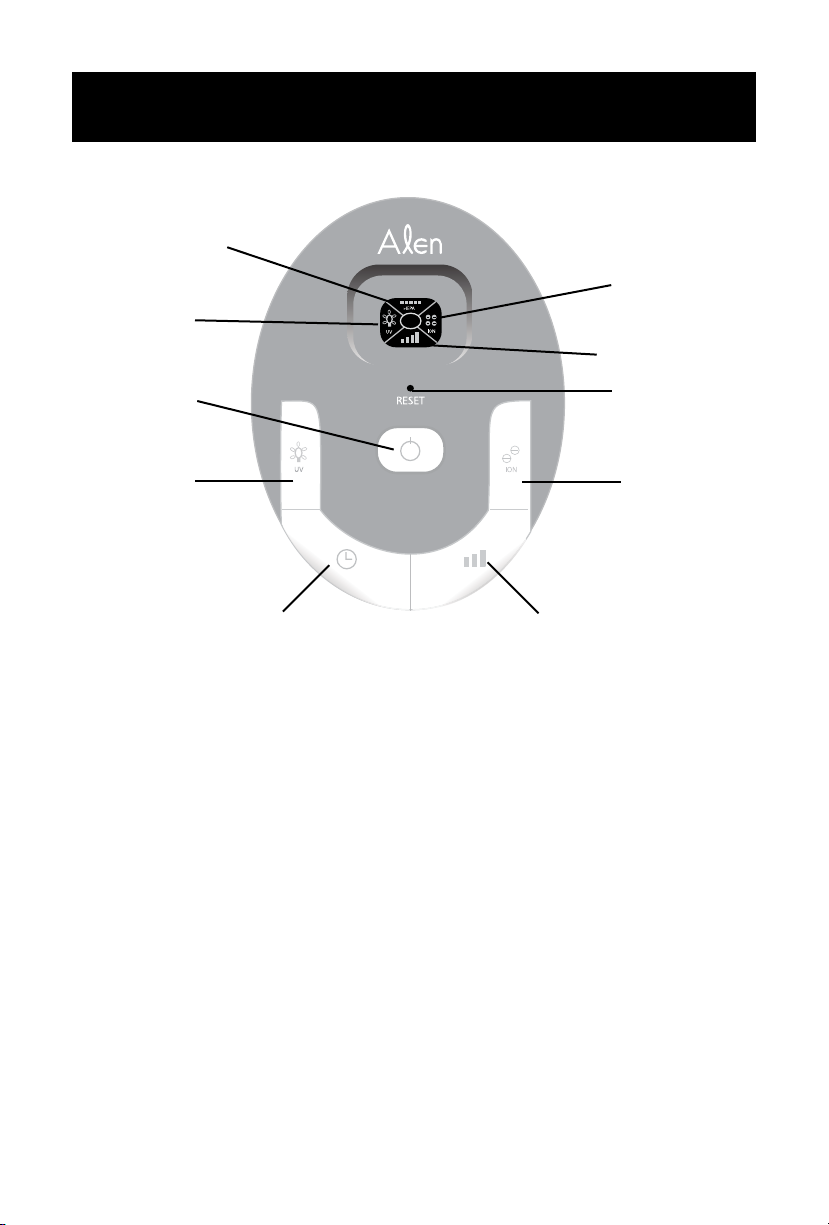
HEPA lter
replacement display
UV on/off display
T300 PRODUCT FEATURES
T300 CONTROL PANEL
Ionizer on/off
display
Fan speed display
On/Off switch
UV button
Timer button
Fan Speed button
Reset button
Ionizer button
Setting the Control Panel
1) Plug the unit into an electric outlet, the unit will be ready to run. Press the On/Off
button to start running, repress it to stop.
2) When the air purier is turned on the fan will run at medium speed for 3 seconds
before running at low speed (default speed). Press the speed button each time,
the fan speed will cycle.
3) While the air purier is on, press the TIMER button to the desired run time
(hours). The air purier will automatically turn off once the timer has counted
down to zero.
4) Press the ion key to turn on the ionizer while the fan is running, press it again to
turn off the ionizer.
5) Press the UV lamp button to turn on the UV lamp, which is used to help to kill
harmful bacteria in the air. Press it again to turn off the UV lamp.
6) When the HEPA bars are lit up the HEPA lters needs to be replaced. Press and
hold the reset button.
12
Page 13
T300 FEATURES AND SPECS
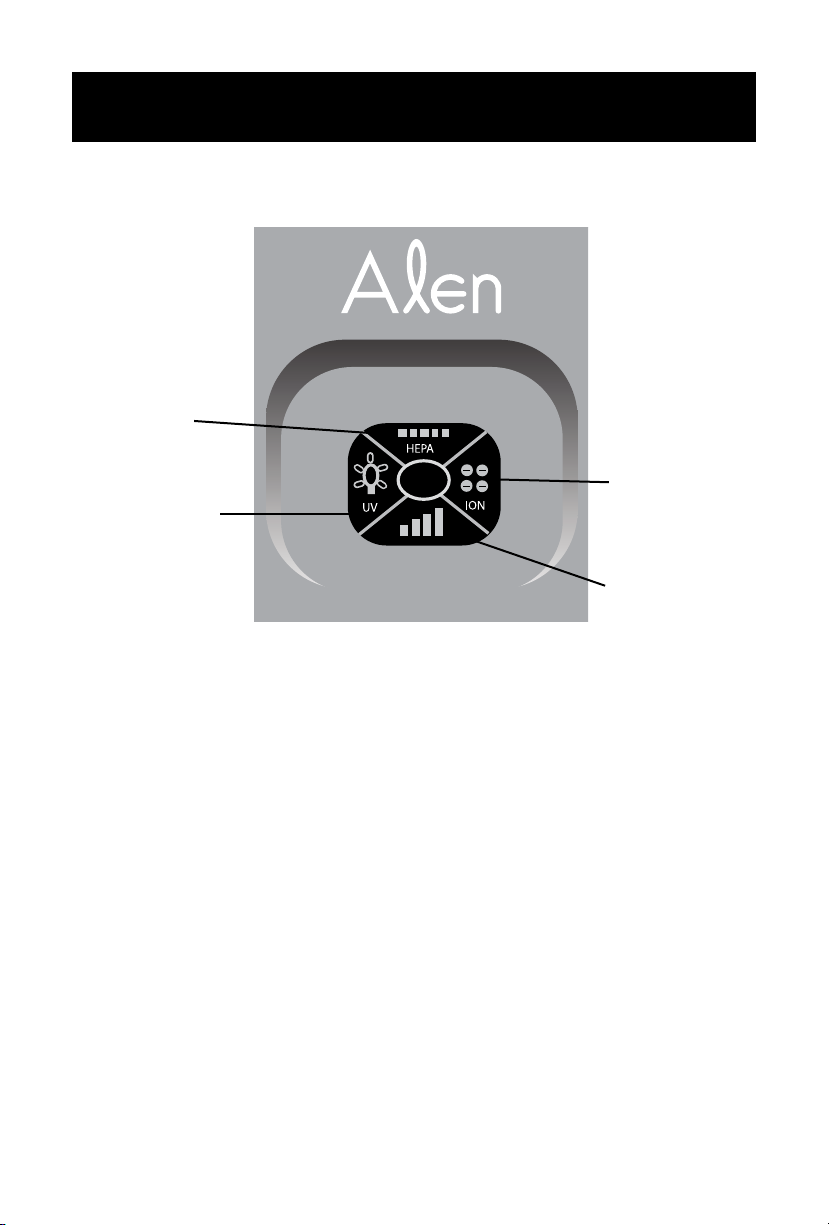
HEPA lter
replacement
indicator
UV on/off display
Ionizer on/off
display
Fan speed display
LED Display
1) Fan speed indicator - the rst bar is lit when the fan speed is quiet. The rst two
bars are lit when the fan speed is low. The rst three bars are lit when the fan
speed is medium. When all the four bars are lit the fan speed is high.
2) Timer indicator - the digit of the timer indicates the hour(s) preset. Once the timer is
set, the timer will start to count down till zero, then the unit will turn off automatically.
3) Ion indicator - The ion indicator is lit while the ionizer is in operation.
4) HEPA lter replacement indicator - this air purier contains a timer that indicates
when the HEPA lter should be changed. Under normal conditions, when the
HEPA lter counter reaches 4000 hours, all of the HEPA lter bars will be
illuminated. Depending upon the environment and operation of the unit, the lter
life may be shortened and will be reected in the lter replacement indicator. If in
doubt, it is recommended to replace the lter to ensure optimal performance.
13
Page 14

T300 FEATURES AND SPECS
Features
1. Pre-lter - Traps larger dust particles.
2. HEPA Filter - Removes particles as small as 0.3 microns from the air at
99.97% effectiveness.
3. Activated Carbon Filter
4. Built-in Ionizer
Releases the property concentration of negative ions to keep the air fresh.
5. Fan speed settings & 12 hours times.
6. Filter replacement Indicator - noties you when it is time to replace the
lters.
7. Digital Display - displays the operation more of the unit.
8. Soft touch button control - sensitive soft touch buttons, easy to operate.
9. UV bulb sterilization - the germicidal UV bulb is used for bacteria control.
Model T300 Specications
Voltage 120V AC
Frequency 60 Hz
Watts 60W
Coverage Area 300sq ft
Net Weight 11.3 lbs
Dimensions 11.1” x 8” x 28”
Replacement Filter TF30
14
Page 15
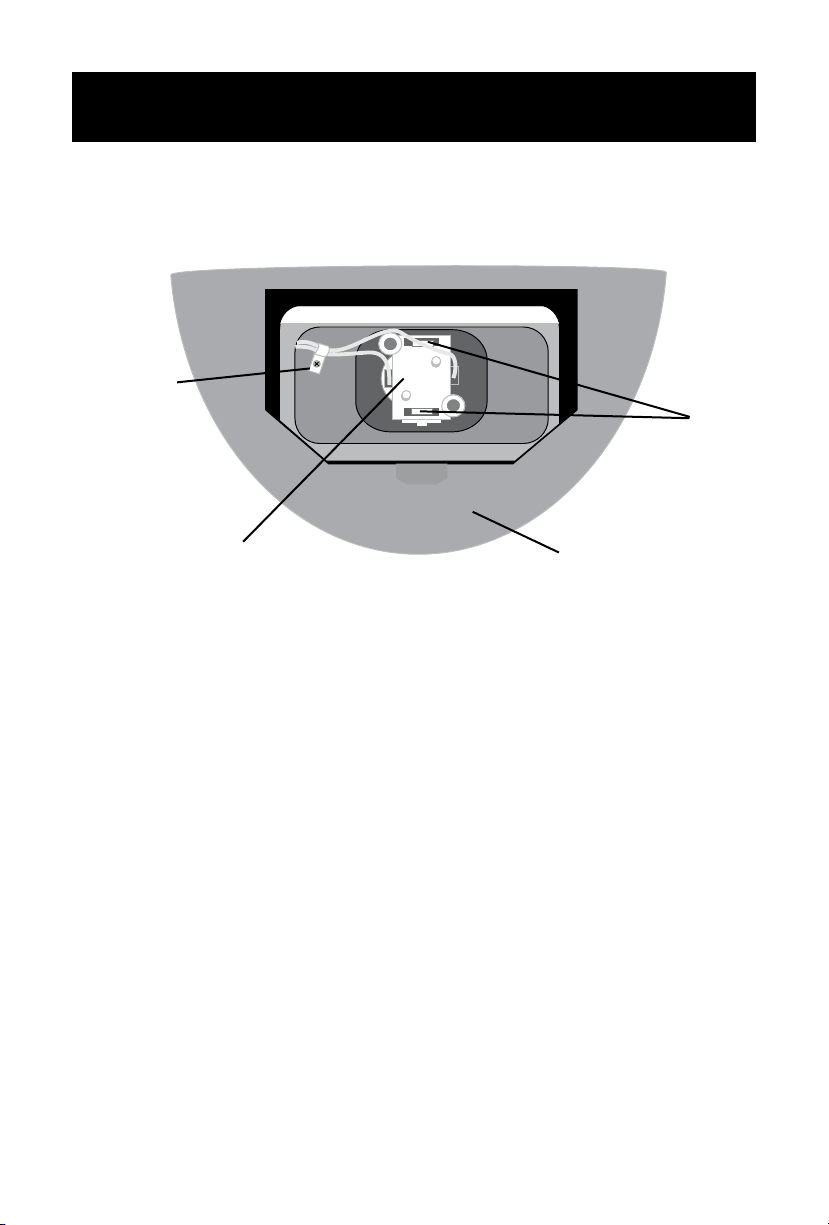
T300 REPLACING THE UV BULB
Wire Harness
(screw)
UV Lamp
Bulb Holder
Replacing the UV Bulb
UV LAMP CASING
Clip
Base of T300
Air Purier
1) Before replacing the UV bulb, please unplug the unit.
2) Lay the unit on its side and remove the screws of the UV bulb casing cover at the
base of the unit.
3) Unscrew the screw from the wire harness.
4) Use one or two at tip screw drivers to push outward the CLIP on the UV lamp
bulb holder. If unable to use two at tip screw drivers at the same time, hold the
UV lamp bulb holder and push the clip outward one at a time but do not let the
CLIP move back in when you are pushing the other clip outward.
5) Take out the UV lamp bulb but do not touch the bulb when replacing the new one.
6) Push the UV bulb holder back into the unit and secure the wire harness screw
and the secure the base to the unit with the screws.
15
Page 16
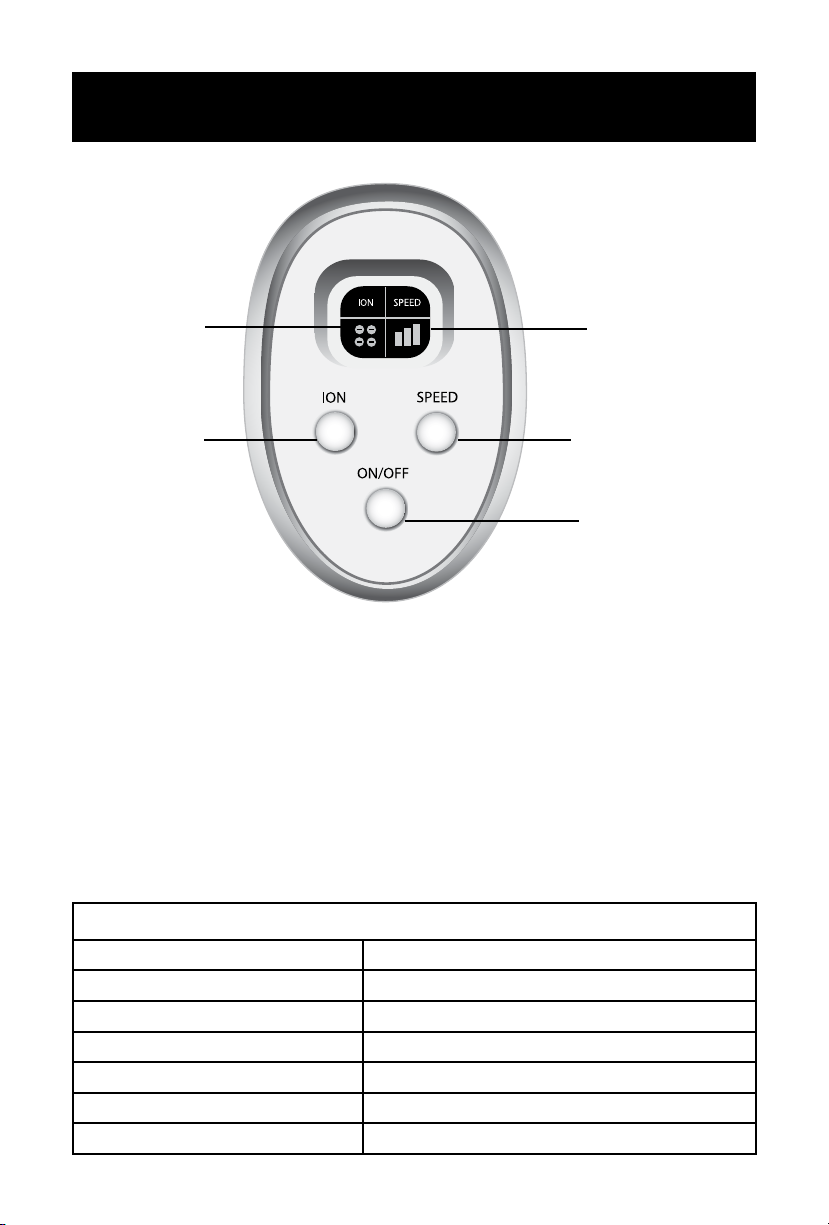
T100 FEATURES AND SPECS
Ionizer on/off
display
Ionizer button
Fan Speed display
Fan speed button
On/Off button
Setting the Control Panel for T100
1) Plug the unit into an electric outlet, the unit will be ready to run. Press the On/Off
button to start running, repress it to stop.
2) When the air purier is turned on the fan will run at medium speed for 3 seconds
before running at low speed (default speed). Press the speed button each time,
the fan speed will cycle.
3) Press the ion key to turn on the ionizer while the fan is running, press it again to
turn off the ionizer.
4)
FILTER REPLACEMENT: Change the lter every 6 months for optimum performance.
Model T100 Specications
Voltage 120V AC
Frequency 60 Hz
Watts 45W
Coverage Area 150 sq ft
Net Weight 5 lbs
Dimensions 10” x 6.2” x 14.5”
Replacement Filter TF30
16
Page 17

HOW TO CLEAN AND MAINTAIN YOUR AIR PURIFIER
Warning: Prior to cleaning or other maintenence, this appliance must be
unplugged from the power supply.
1) A. With the front of the unit facing up, pull the lower end of the inlet grill.
(A350, A375UV)
B. Release the inlet grill by pressing from the locking switch and pull forward.
(T300, T100)
2) Remove the inlet grill from the unit.
3) A. Remove the HEPA lter by lifting the pull string. (A350, A375UV)
B. Grasp the right and left frame of the lters through the recess on the side of the
lter enclosure, and remove the lters. (T300, T100)
4) The pre-lter can be removed from the HEPA lter for cleaning, after cleaning the
pre-lter can be reused.
5) Clean the pre-lter after every 200-300 hours of use, or you can clean it accord
-ing to the air condition on the room. The pre-lter can be cleaned with a vacuum
or by washing.
6) Clean the inlet grill after 200 - 300 hours use, or you can clean it according to
TROUBLE SHOOTING
Problem Reason Solution
1) Press the ON/OFF button.
2) Check to make sure the unit is plugged in.
3) Check to make sure the lters are properly installed and the inlet grill is installed
and locked into place.
1) Make sure nothing is in front or at the
back of the air purier.
2) Check the lter and the HEPA lter re-
placement indicator and replace if necessary.
1) Turn on the unit, then insert a small object
(such as a pin or a paper clip) into the hole
marked RESET until the indicator is off.
Unit will not operate
Reduce air ow or
poor ltering
The HEPA indication
bars are still lit after
the replaced
1) ON/OFF button has not been pressed.
2) Unit is unplugged.
3) The inlet grill has not been installed or
locked into place.
1) The inlet or outlet grill may be blocked
2) The HEPA lter may be clogged
1) The unit has not been reset.
17
Page 18

ALEN AIR PURIFIER LIFETIME WARRANTY
Alen Air Purier Lifetime Warranty Program
Alen offers the industry’s rst Lifetime Warranty program for all our Air Puriers. We
warrant your Alen Air Purier to be free from defects in material or workmanship for as
long as you own it.
We offer a convenient auto-ship lter replacement program that is administered
through www.alencorp.com. In this program we ship you a replacement lter(s) every
six (6) months.
Alen will, at its option, either furnish a replacement part or replace your air purier
provided the product is determined to be defective as a result faulty material or workmanship while in normal use. Replacement parts or units will be either new or refurbished. Alen’s sole obligation under this warranty is to replace, or at Alen’s discretion,
to repair, free of charge, all defective parts.
This warranty will be valid only for units in possession of the original purchaser. Proof
of purchase must be presented to Alen’s warranty service representative. All parts or
units that are replaced become the property of Alen. To obtain warranty service, the
defective product or part must be shipped or delivered to: Alen’s authorized service
center. All postage, insurance and shipping charges are the responsibility of the Purchaser and are not included in this warranty.
Your Lifetime Program remains in effect only if:
1. Your Alen Air Purier is operated in accordance with the instructions provided in
the Alen User Manual. This includes replacing the lter at least once every six (6)
months of use to prevent excessive stress on the motor.
2. Your Alen Air Purier is connected to a proper power supply (see voltage label on
machine).
3. The unit shows no evidence of tampering, mishandling, neglect, accidental dam
age, modication, and/or repair by anyone other than authorized Alen service
personnel.
4. Ownership of the Air Purier has never been transferred.
For service or to register your air purier, please visit: www.alencorp.com
Miscellaneous
No one is authorized to make any other warranties on behalf of Alen. It is expressly
understood that the replacement warranty of Alen shall be in lieu of any and all other
warranties, express or implied, including warranties of merchantability or tness
for a particular use or purpose, and further that Alen shall not be liable for any loss
or damage directly or indirectly arising from the use of the dehumidier, or for any
consequential damages arising from such use including damages from water leakage. Alen’s sole liability with respect to any defect shall be for the replacement of the
defective part(s). Some states do not allow such limitations and exclusions, so the
above may not apply to you. This warranty gives specic legal rights. You may also
have other rights which vary from state to state.
18
Page 19

ALEN AIR PURIFIER LIFETIME WARRANTY REGISTRATION
Thank you for purchasing your Alen air purier. To register your product with Alen, please complete this registration form.
The easier and fastest way is to complete the product registration form online by visiting our company website at
http://www.alencorp.com. Here you can also sign up for our auto-ship lter replacement program.
Name:
Address:
City: State: Zip:
Phone: Email:
Model: Date Purchased:
Dealer/Store where purchased:
Page 20

Here
Place
Stamp
Suite 342
1497 Main Street
Alen Corporation
Product Registration
Dunedin, FL 34698
 Loading...