

Page 1
Page 2
CONTENTS
Package Components..................................................3
Preparation...................................................................5
Installation....................................................................6
Motor limit position adjustment...................................11
Operation.…………………………………………….....12
Maintenance....……………………………………........15
WARNING
Please read and insure you understood this
instruction before install, adjust, service and
maintain the awnings. This awning must be
installed and serviced by qualified person.
Please be sure to take good care of this ma-
nual for daily maintenance !
Page 3
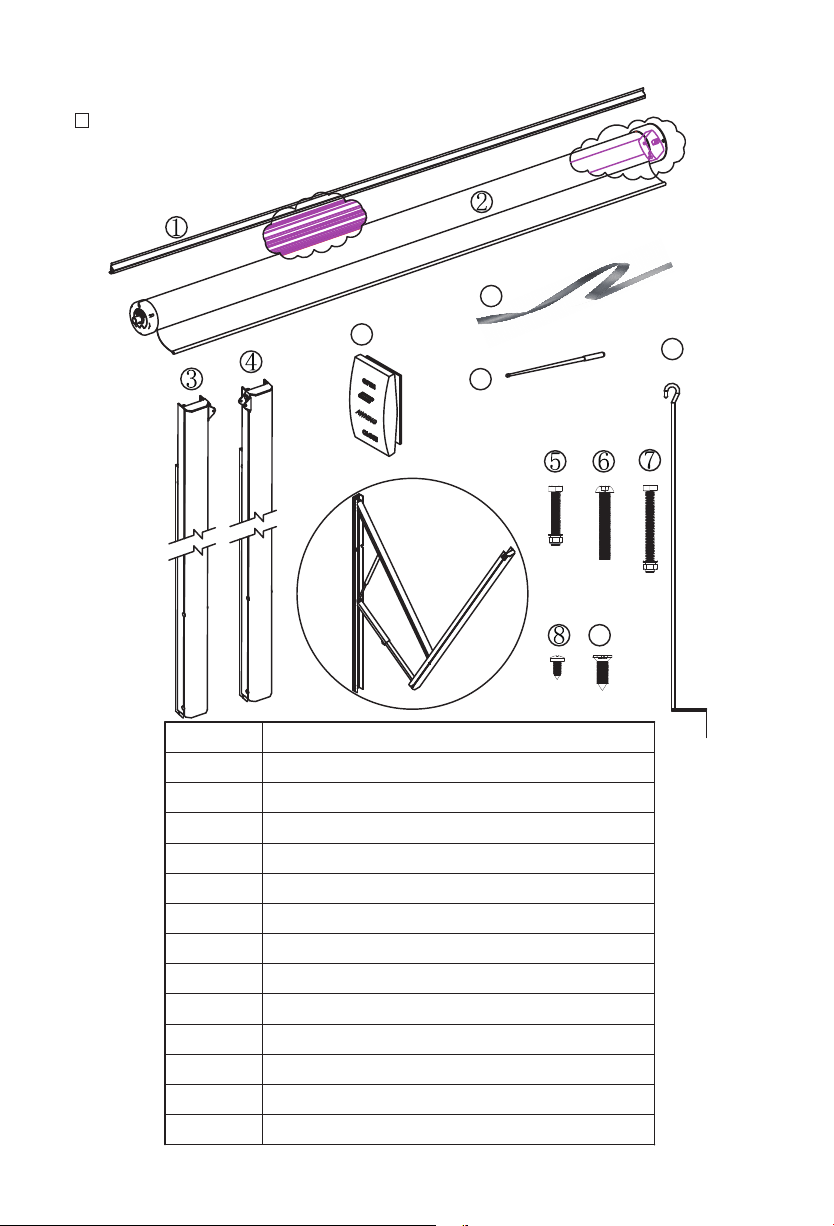
Package Components
W5700
11
ITEM
1
2
3
4
5
6
7
8
9
10
11
12
13
12
13
DESCIPTION
Fabric lock rail
Fabric tube
Left arm
Right arm
M5x40 Hex head screws
M6x50 Screw
M6x60 Hex head screws
Ø4.2x13.5 Self-tapping screw
M6X16 Screw
Hand crank
belt
Switch
Adjustable rod
10
9
3
Page 4
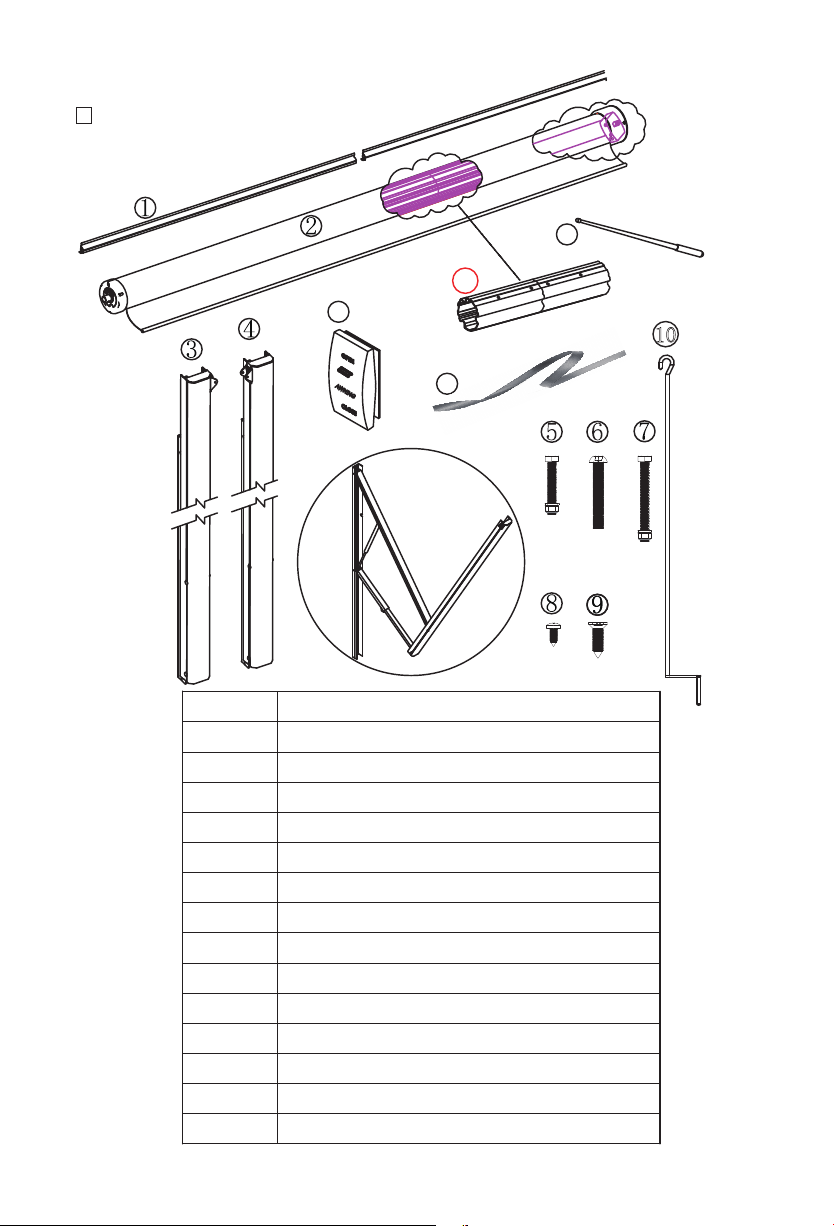
Package Components
W5700C
14
13
12
10
11
ITEM
1
2
3
4
5
6
7
8
9
10
11
12
13
4
14
Fabric lock rail
Fabric tube
Left arm
Right arm
M5x40 Hex head screws
M6x50 Screw
M6x60 Hex head screws
Ø4.2x13.5 Self-tapping screw
M6X16 Screw
Hand crank
belt
Switch
Fabric tube connector
Adjustable rod
DESCIPTION
Page 5
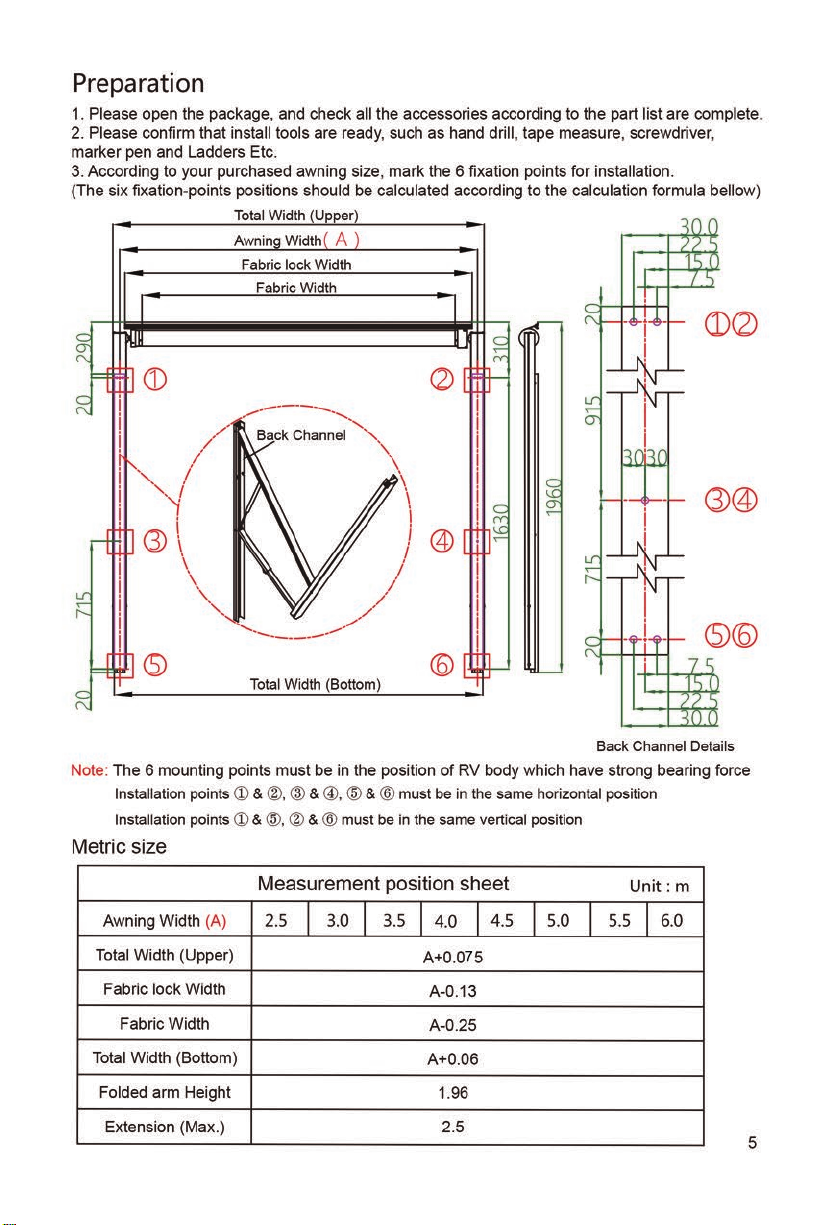
7
Page 6
Imperial Size
Awning Width (A)
Total Width (Upper)
Fabric lock Width
Fabric Width
Total Width (Bottom)
Folded arm Height
Extension (Max.)
Measurement position sheet
8’ 9’ 10’ 11’ 12’13’14’15’16’17’18’19’20’21’
〃
A+2.95
〃
A-5.12
〃
A-9.84
〃
A+2.36
〃
77.17
〃
8
Unit:ft/in
REMARK:
“A”=Awning width (Left arm center to right arm center)
Please check the above measurement sheet carefully, and calculate the correct installation
position accordingly.
Installation Steps
Step.1
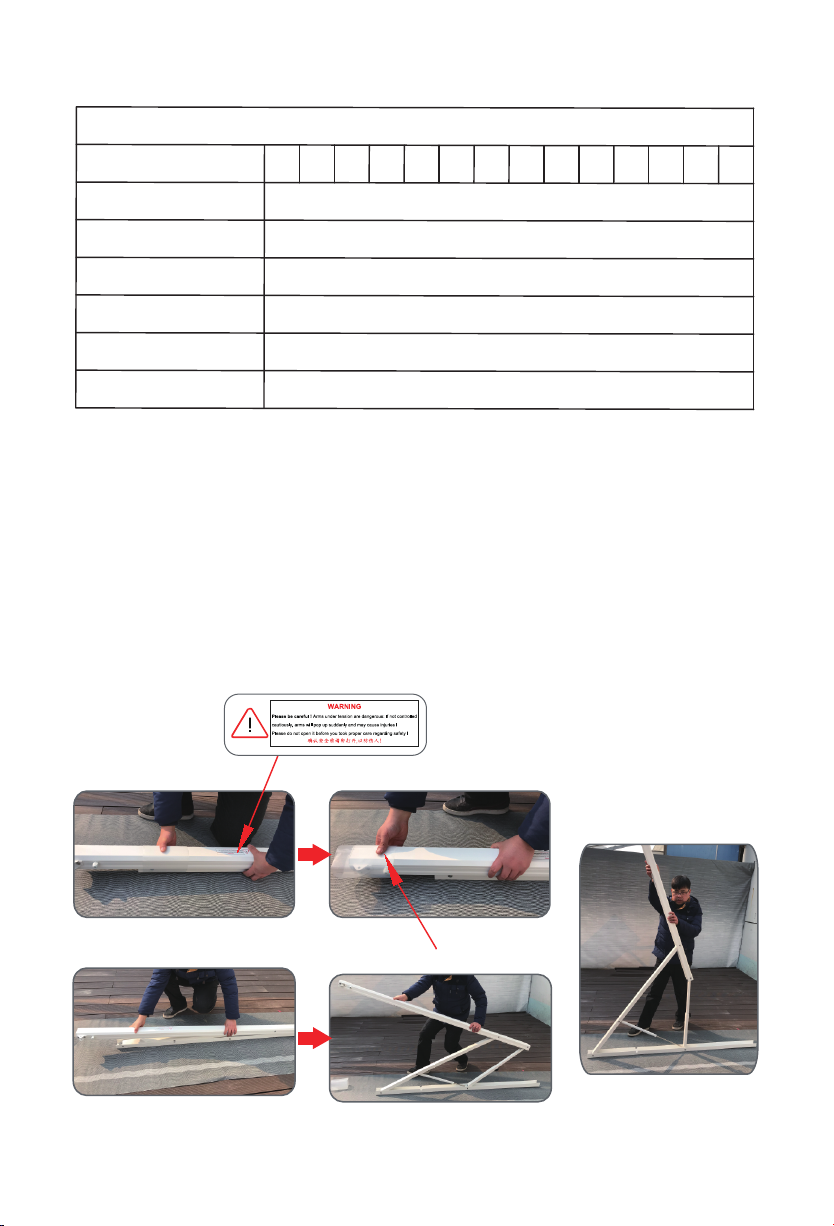
1. Please open the plastic protection sleeve from two arms first. ( Attention: This is gas piston arm,
it will open automatically when the sleeve is released, when you take out sleeve, please firmly
grasp the arms and observe your surroundings, to avoid personal injury and product damage),
see Pic.1
a
protect sleeve cover
b
e
c
6
Pic.1
d
Page 7
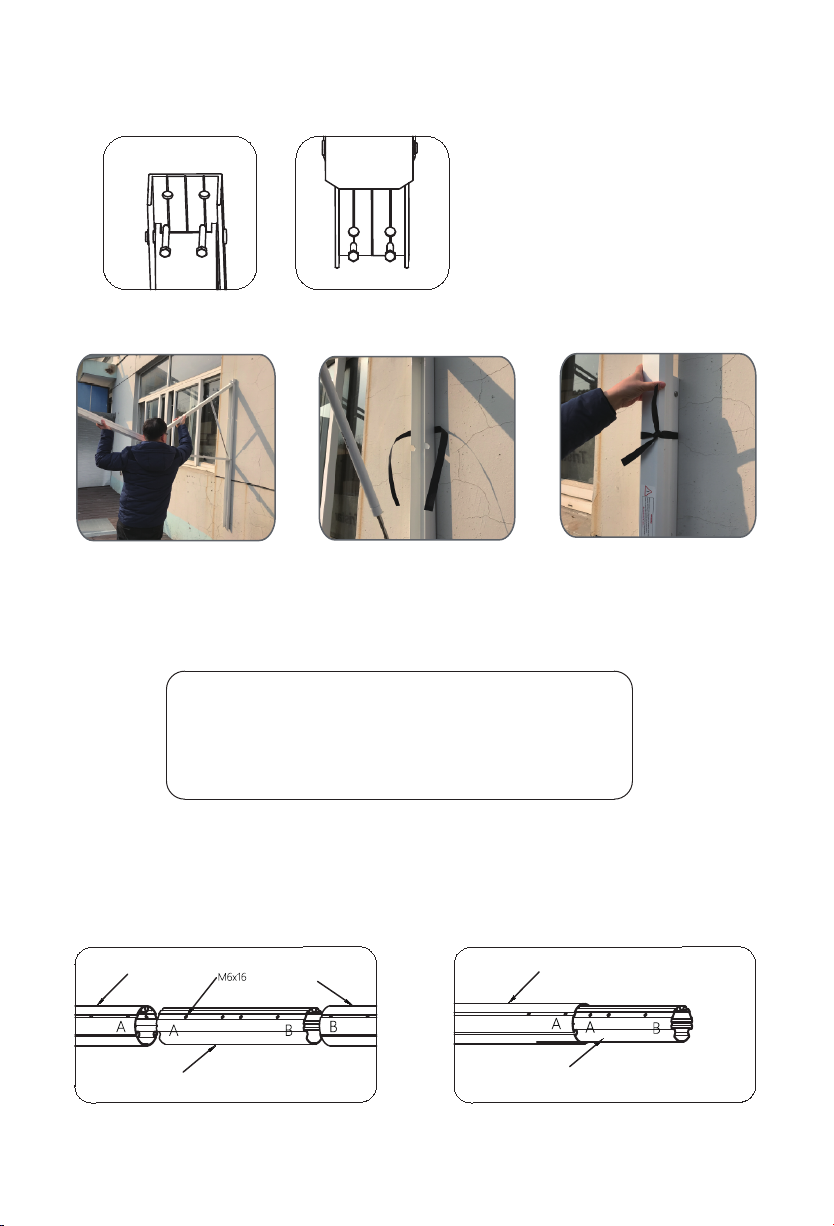
2. Install the open arm in the pre-marked installation position, as shown in Pic.2 & Pic.3-a.
Please put the belt behind the arm before installation, see Pic. 3-b.
Pic.2
a
Pic.3
3. After arms are fixed, please use offered belt tie up the left & right arm , avoiding private injure
see pic.3-c
b
c
ATTENTION !
If you choose our modular type(W5700C)
Please connect the fabric tube first before
you start Step 2
1. Connect the fabric tube
Please find the fabric roller tube (right side cover with a motor and wire, left side only have a cover,
and the rest is the middle part). And take out the tube connector from the roller tube then connect
all tubes with M6X16 Screws piece by piece. see bellow pics.( please be sure all three sides tube
fix tight, or the tube will be curved easily during operation).
fabric tube
fabric tube connector
fabric tube
fabric tube
fabric tube connector
a
b
7
Page 8
fabric tube
fabric tube connector
c
d
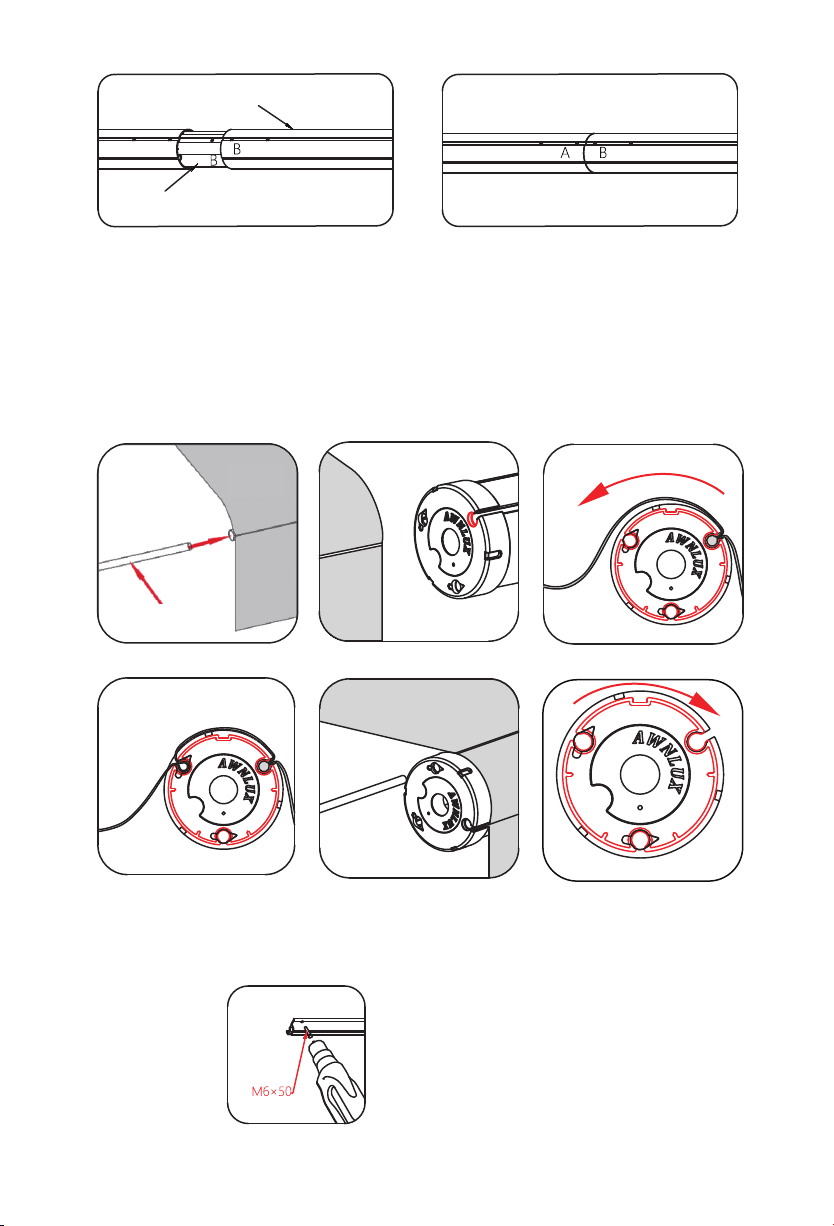
2. Roller tube fabric fixation
a. Insert the poly cord into valance fabric slop.See Pic.a
b. Finished step “a” and slide the valance fabric into groove No.1. See Pic.b
c. Pull the fabric to hole No.2 direction.
d. Fold the fabric and then insert it to punched hole No.2
e. Slide the poly cord to hole NO.2 and then fix roller tube fabric well.
f. Rolling the fabric towards the roller tube clockwise direction( Groove NO.1 direction).
Fabric
1
2
Poly cord
a
Poly cord
b
c
2
1
3
d
e
f
Step.2
Please fix the fabric lock rail on the wall of the car, see pic.4
Remark: After installing, please use structural glue on the back of fabric lock rail in case of water
leakage
8
Pic.4
Page 9
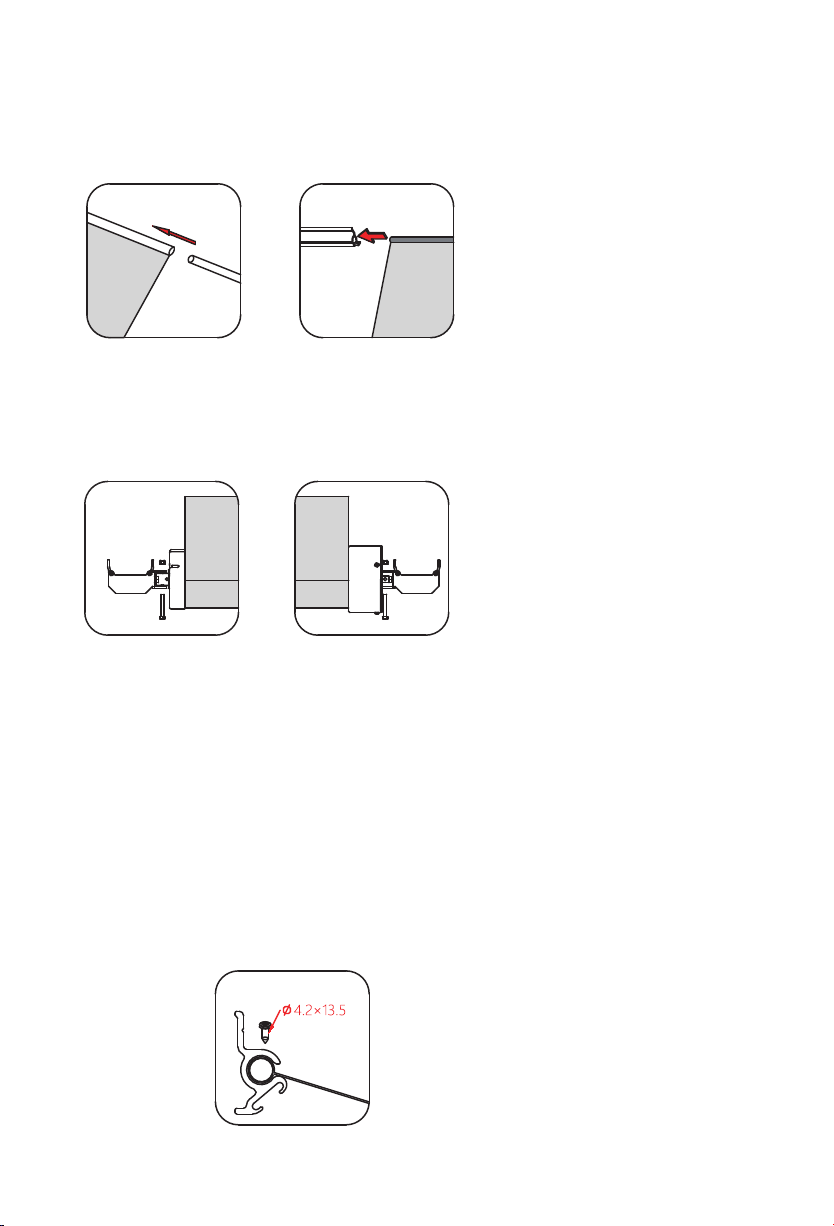
Step.3
Fabric fixation on Car
Find out the poly cord and get across fabric loop, then put the fabric into the fabric lock rail,
see Pic.5
Fabric
poly cord
Pic.5
Step.4
Please install the roller tube on the left arm and right arm , see PIC.6
Remark: Please Be sure the connect motor part is on right arm.
Pic.6
Step.5
After installing the roller tubes, loosen the ropes on the arms (the arms will be slightly opened but
not completely opened), in this case, temporarily connect the motor, switch and power supply,
operate method as Step9.
Adjust the motor limit position when power on, operate method Step10.
Step.6
After Done Step 5, please open and close the awning normally, and ensure if the fabric is plan &
smooth. If not, please pull the fabric to adjust it well. After you confirm fabric is ok, please use the
self-tapping screws to fix fabric on both end of fabric locking rail,see Pic.7
Pic.7
9
Page 10
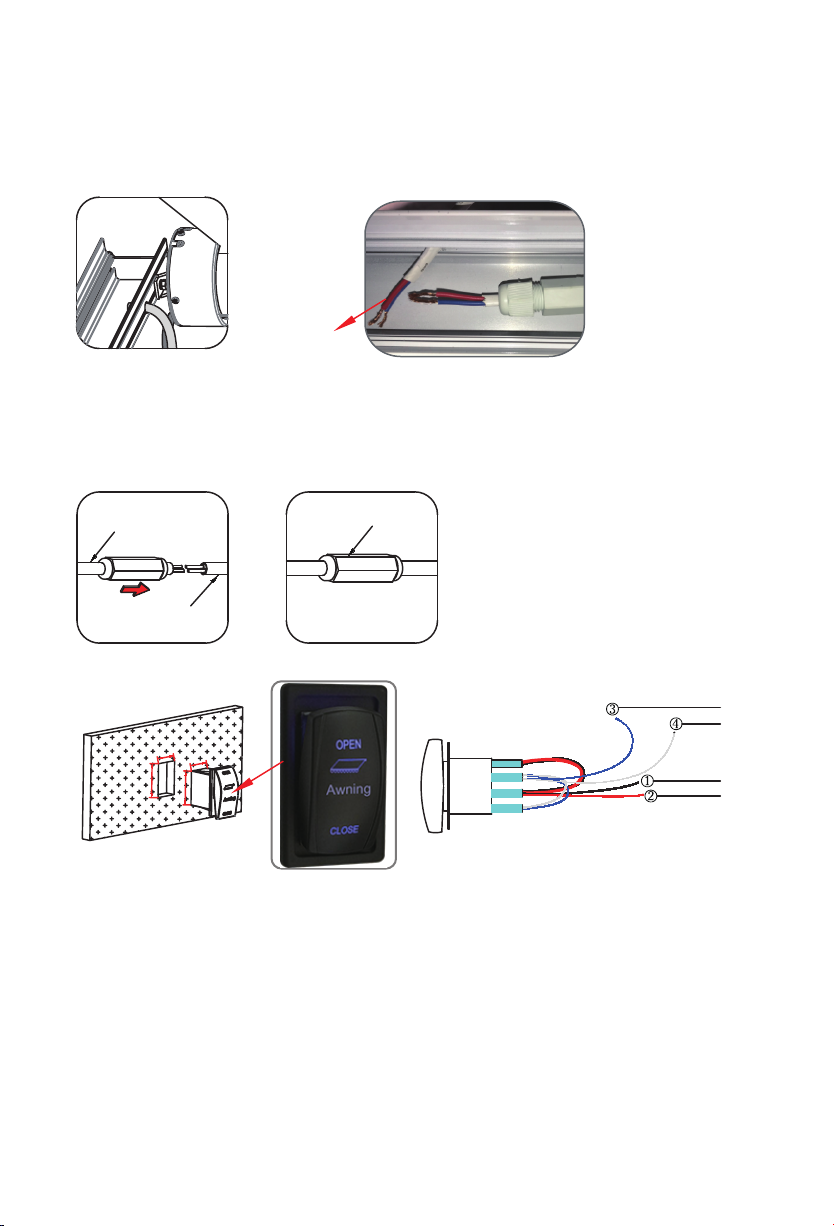
a
b
a
b
Step.7
After adjust motor limit position, Please open the awning completely, and remove the temporary
wires.Please Connect the power cord of the motor from the hole on the right side arm, then
connect with cable which put inside of the arm, and then hide the connector in the protection shell,
See Pic.8.
motor cable
Pic.8
Step.8
Connect the motor to the car power cord and hide the connector in the protection shell to prevent
water intake.See Pic.9
motor cable
protection shell
power cable
Pic.9
Step.9
blue
white
black
red
Pic.10
Switch installation
Please open the hole in the car wall according to the switch bottom shell size.
Wiring instructions
1. Without LED light
a. ①wiring (+) & ②wiring (-) for the power cord, please connect with the car power supply.
b. ③wiring & ④wiring are for motor, please connect with motor cable(motor cable no “+”,
“-” differences)
2. With LED light stripe
a. ①wiring
b. ③wiring & ④wiring are the parallel wires for controlling the motor and LED light , please
connect with motor and led light cable( motor and LED light cable need parallel connection)
10
(+) & ②wiring(-) for the power cord, please connect with the car power supply.
Page 11
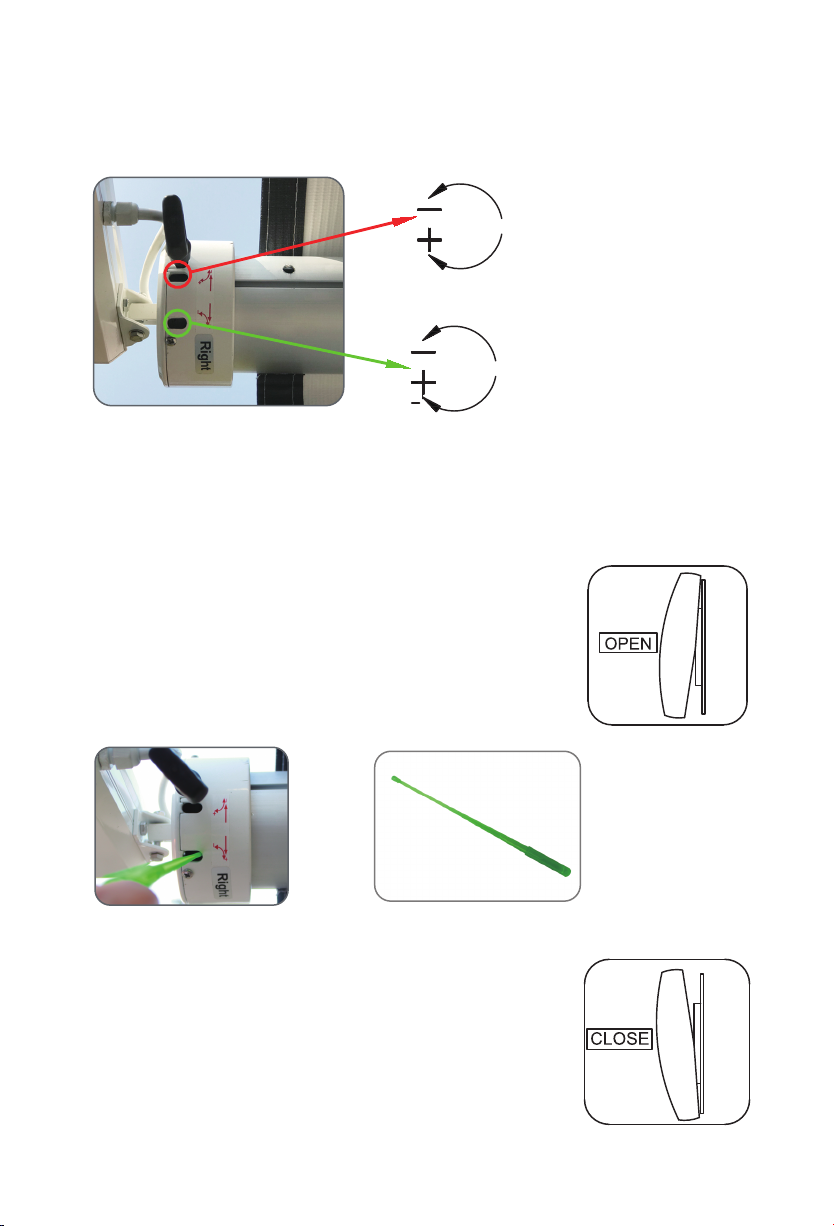
Step.10
Motor (DC 12V) limit position adjustment.
Motor limit position: To control awning close or open max. position by adjusting the winding
number of the motor's positive and negative direction
Upper hole control awning close
CLOSE
Bottom hole control awning open
OPEN
Pic.11
Remark:
In the following adjustment processing, please always pay attention to the state of awning, not
too much adjustment motor, only adjust slowly (0.5-1 turns every time), otherwise the motor will
completely lose its function.
Max.OPEN Position
1. Turn the switch to “OPEN” position , as shown in Pic.12
The awning begins to open;
2. When the awning can not be fully opened, insert the adjusting rod
into the bottom hole of motor, and adjust it to “+” direction
until it is completely open.
3. When the awning is fully open but the motor is still running, insert
the adjusting rod into bottom hole of motor and adjust to
the “-“ direction until the motor stop running.
Pic.12
Pic.13
Completely Close Adjustment
1. Completely Close Adjustment
2. Turn the switch to the CLOSE position, as shown in Pic.14,
the awning starts to close;
3. When the awning can not be fully closed, insert the adjusting rod
into upper hole of the motor, and adjust to "-" direction. Until awning
completely close
4. When the awning is completely closed ,but the motor is still running,
insert the adjusting rod into upper hole of the motor and adjust to "+"
direction until the motor stop running.
Pic.14
11
Page 12
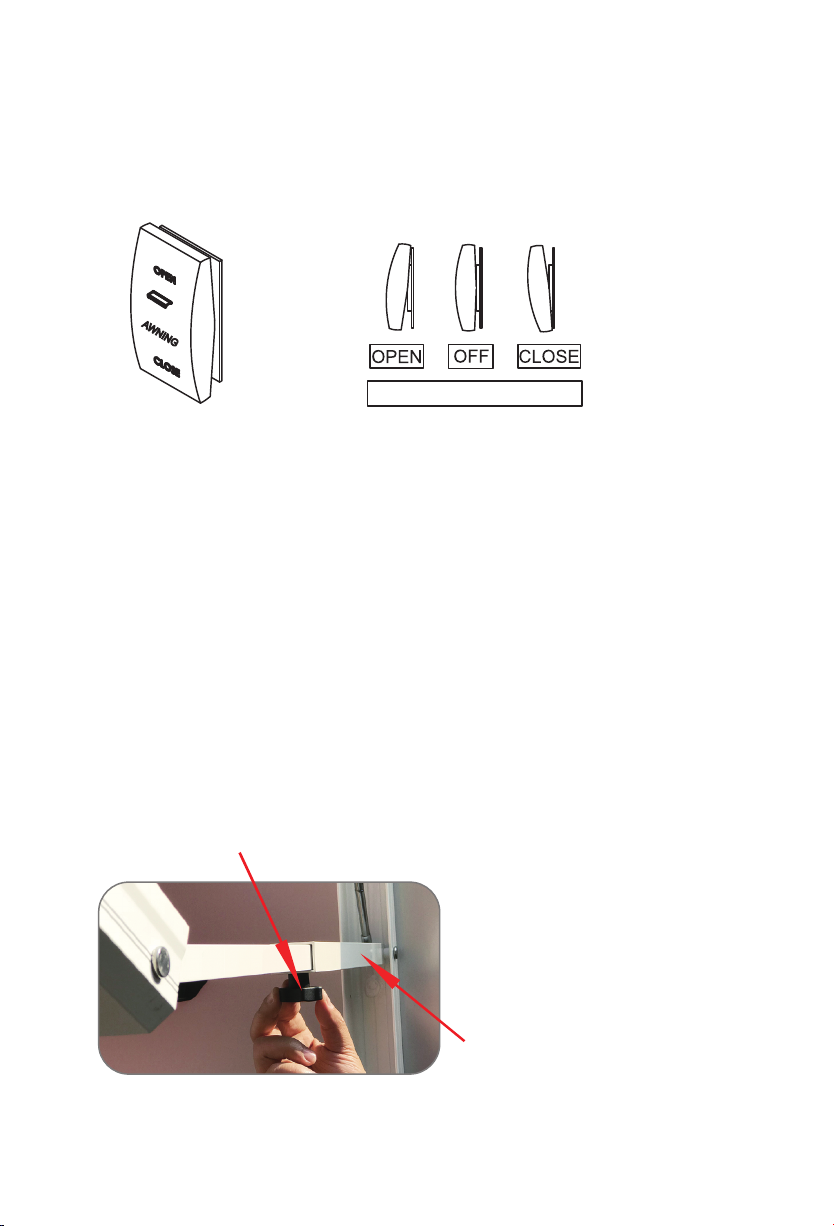
How to operate awning
OPEN AWNING
Attention: Maintain a horizontal distance of at least 2.5m between fully open awning and any
permanent object. Do NOT face awning toward permanent objects that may interfere with
awning operation.Failure to obey this caution could result in injury.
Pic.15
Switch Appearance May Vary
Switch instructions
1. With LED light
OPEN: Open the awning
OFF: 1. Awning will stop when button is released no matter how far awning extend/retracted
2. Turn off the LED lights
COSE: close awning
2. Without LED light:
OPEN: Open the awning
OFF: .Awning will stop when button is released no matter how far awning extend/retracted
COSE: close awning
Adjust Awning Pitch (Optional)
The FRTA (fabric roller tube assembly) will be lower than RV’s awning rail when hardware is fully
extended. This pitch (slope) will help accommodate water run off. If a steeper pitch is desired,
the FRTA must be lowered
To lower FRTA:
1. With awning fully extended, loosen adjustable knob on adjustable pitch arm assembly
(bottom arm).
abjustable knob
12
Adjustable pitch arm assembly
Pic.16
Page 13
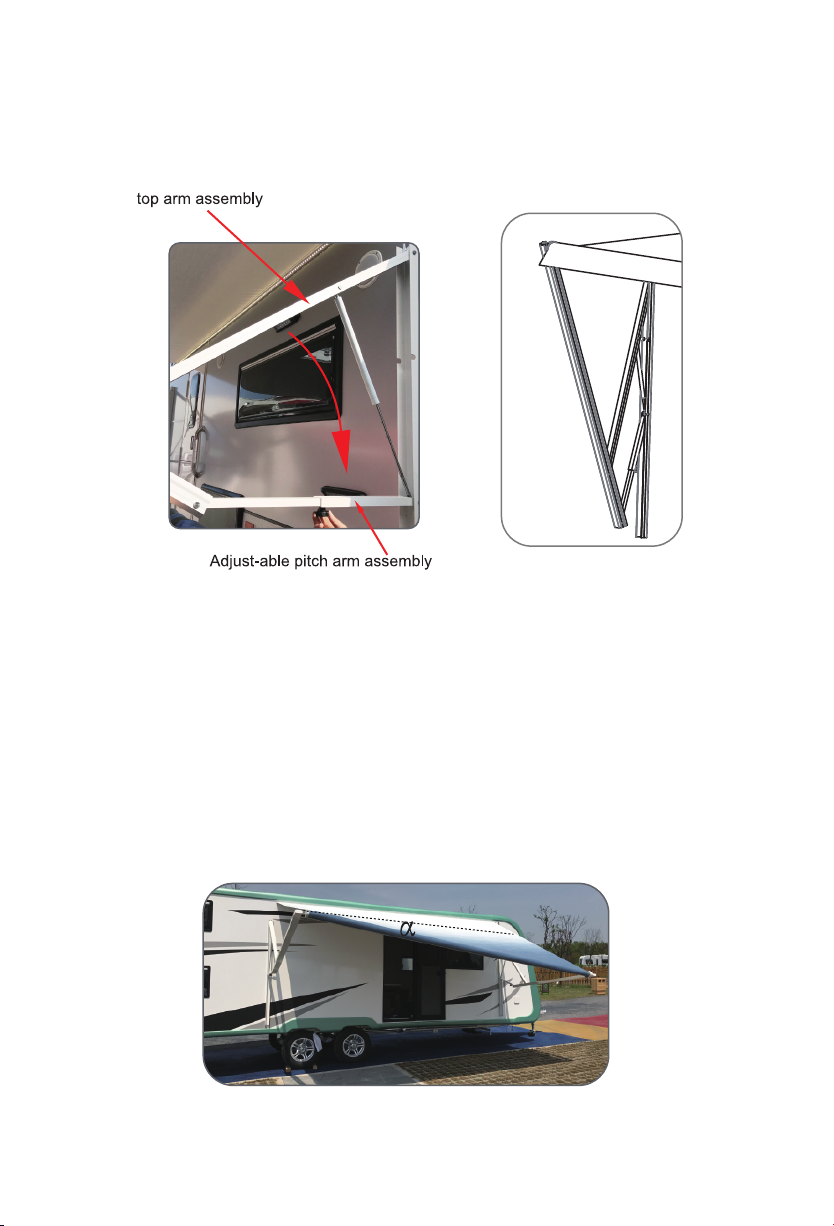
2. Keep CLEAR of openings around adjustable pitch arm assembly while adjusting awning pitch
(slope). Adjustable pitch arm assembly (bottom arm) will telescope. Failure to obey this caution
could result in injury.Do NOT allow corner of entry door to contacts awning fabric. Otherwise,
obrading wear or tearing of awning fabric could be occured.Pull top arm assembly down to lower
FRTA to desired height.While holding top arm assembly in place, tighten adjustable knob to set
pitch (slope).
Pic.17
3. Do NOT allow water to pool or snow to accumulate on awning fabric. Or the awning will become
unstable, and could bend or collapse. When it has heavy rain or snow is expected, place awning
in stowed (closed) position.Lowering one arm assembly into water shed position (to create a
slope from other arm assembly) will allow water run-off during light rain.
a. With awning fully extended, verify top arm assembly nearest entry door is fully extended, and
that adjustable knob is tightened.
b. Pull top arm assembly (farthest from entry door) down until awning slopes approximately 15°
maximum from other arm assembly. After adjusting the tilt angle you want, lock the knob to use
the awning 15° degrees (with the horizontal angle).
Pic.18
13
Page 14
4.Close Awning
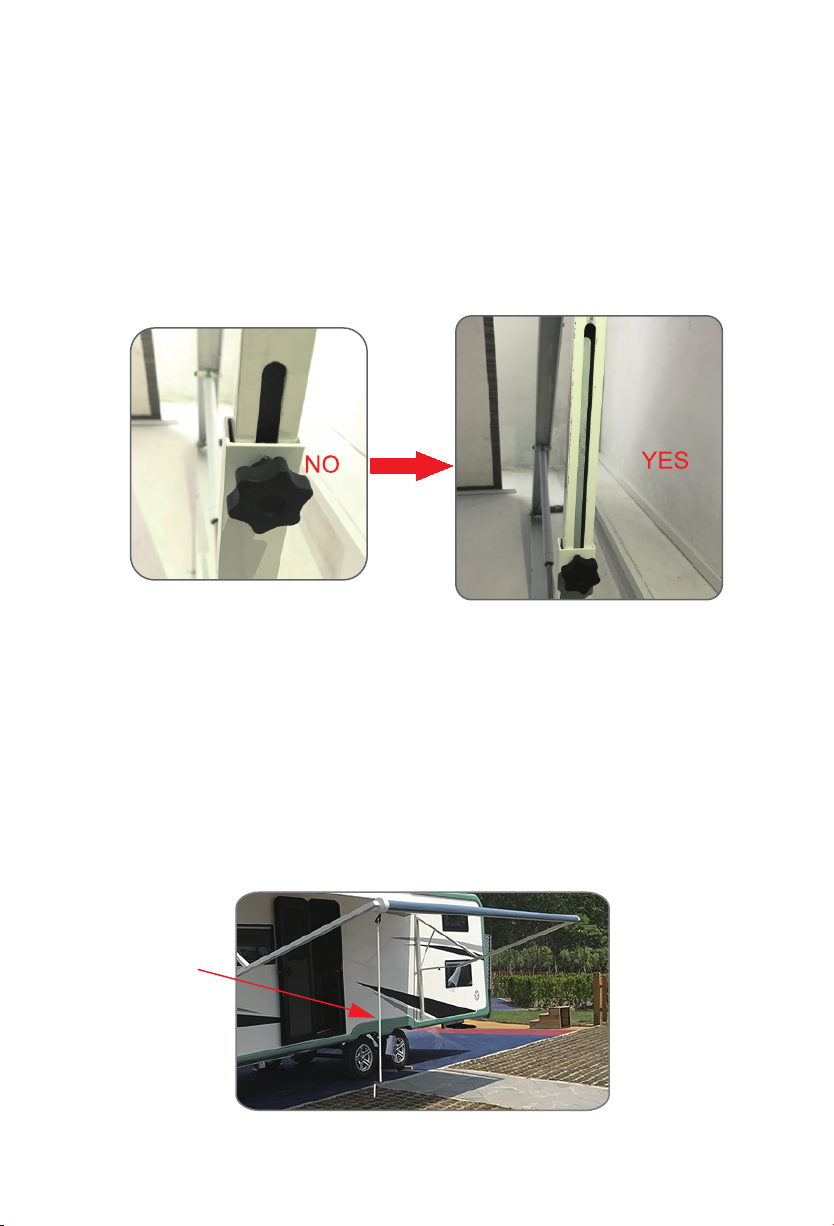
a. Loosen adjustable knobs to allow awning to reset to original position. Then lightly tighten
knobs on both arm assemblies to help ensure rattlefree travel.Pull top arm assembly down
to verify knob is NOT too tight. Adjustable pitch arm as-sembly MUST still slide as normal.
see Pic.15
b. Keep CLEAR of arm assemblies while closing awning. Arm as-semblies will [fold / close]
against back channel. Failure to obey this warning could result in death or serious injury.
c. Press and hold toggle to retract (ON) position on (fixed/wired) remote awning switch until
awning is fully closed. Awning will automatically stop when button is released no matter
how far awning is extended/retracted.
Pic.19
Max.extention
5. Emergency function-Manual control
a. In particular case, if there is a power cut or motor damage, but the awning needs to be used,
the manual control system can be worked. Each awning is equipped with a motor crank at the
motor right side , Use our handle crank to hook the black crank and turn it clockwise or anti clockwise to close or open awning
b. Note that there should be no object to block the awning when it closed or opened. If the awn ing is blocked and the manual function continues, it will be damaged, which is not covered by
the warranty.
Remarks: Manual control just an emergency function, please do not use this function when
motorized function on.
Handle crank
P14
Pic.20
Page 15
ATTENTION
Failure to obey the following notices could
damage product or property!
1.Precautions: Failure to obey the following notices could damage product
or property
a. Do NOT use insecticides or other sprays near awning fabric. These could cause stains,
and could adversely affect fabric’s ability to repel water.
b. Do NOT expose awning to adverse environmental conditions, corrosive agents, or other
harmful conditions.
c. Do NOT allow corner of entry door to contact awning fabric. Otherwise, premature wear or
tearing of awning fabric could occur.
d. NEVER close awning (for storage) when wet. The combination of moisture and dirt could
result in mildew, discoloration, and stains.If it is necessary to roll up awning (temporarily)
while it’s wet, make sure you roll it out and let it dry (as soon as conditions allow) before
rolling it up again.
e. Do NOT allow dirt, leaves, or other debris to accumulate on awning, which could cause
abrasion and stains. Mildew could grow on dirt and organic debris causing permanent
discoloration, stains, and odors to awning fabric.
f. Do NOT use strong chemicals or abrasives to clean parts. To prevent damage to the surface
of the protective layer, neutral detergent can be used.
2.Fabric Care &maintenance:
Vinyl fabric offers the advantage of durability and water resistance.Wrinkling may be more
noticeable when retracted, and after prolonged periods of stowage (rolled up).In warm weather,
open it up for a period of time to minimize the wrinkling .Leave awning open during warm
weather to minimize the wrinkling over time.
a. To clean the fabric
Do NOT use abrasive or cor-rosive cleaners, mildew removers, or hard bristle brushes on
awning fabric. Liberally drench open awning fabric with cleaning solution.Close awning, let it
soak for 10minutes, then open awning again.Remove solution COM-PLETELY from awning
fabric. Bleach will degrade awning fabric if NOT completely rinsed off.
Thoroughly hose off top and bottom of fabric with clean water.
b. To repair a pinhole, or if a spot of coating flakes off from top layer of vinyl fabric
Apply a very small dab of VLP (Vinyl Liquid Patch) on tip of cotton swab. Gently roll cotton
swab around pinhole. The VLP will melt the coating (on fabric) and that will quickly fill in pin hole and blend with all colored vinyls.NEVER close (roll up) awning when vinyl liquid patch is
wet. Otherwise, damage to other parts of awning fabric (melting through layers) will occur.
Allow VLP to dry thoroughly before stowing (rolling up) awning .
P15
Page 16

W20180130EN
 Loading...