

Page 1
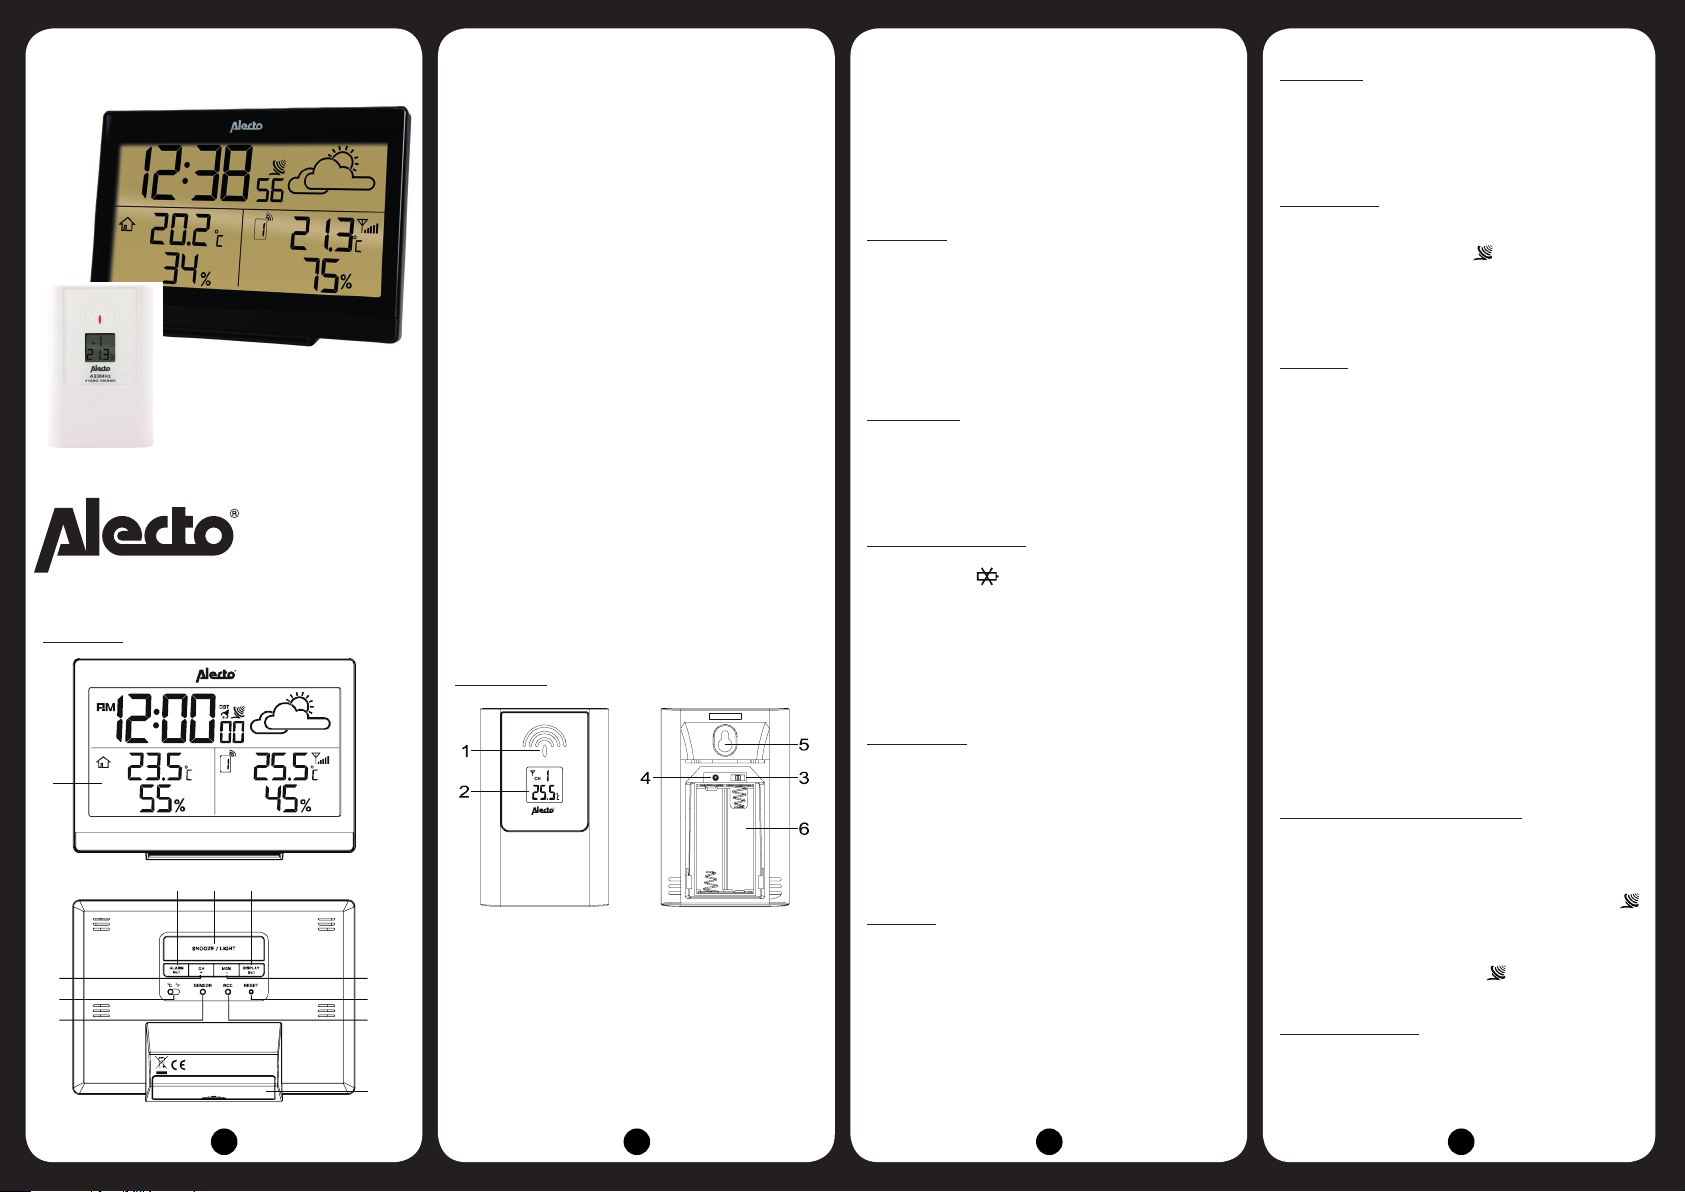
1. Display:
1
2
36
45
7
8
9
10
11
2
36
45
User’s manual
Weather station with wireless outdoor sensor
WS-2300
Overview:
Indoor unit:
7
8
10
9
11
Shows time, indoor and outdoor temperature and weather
forecast.
2. SNOOZE / LIGHT button :
Snooze button for the alarm function.
Also turns on the display lighting.
3. ALARM SET button :
For checking and setting the wake-up alarm.
4. CH/+ button:
Selection button when using multiple outdoor units and
the ‘+’ button during setup.
5. MEM/- button:
Memory button when checking min and max values and
the ‘-’ button during setup.
6. DISPLAY SET button:
Function setup button.
7. °C / °F switch:
To switch the temperature display between
degrees Celsius and degrees Fahrenheit.
8. SENSOR button:
To pair the indoor unit with the outdoor unit.
9. RCC button:
To turn the DCF receiver on or off.
10. RESET button:
To restart the indoor unit in case of a (possible) error.
11. Battery compartment.
Outdoor unit:
433MHz
HYGRO-THERMO
1. Monitor-LED: Illuminates as soon as the outdoor
unit is sending measurement data to the indoor
unit.
2. Display, shows alternately the temperature and the
humidity.
3. CH 1.2.3 switch:
To set the outdoor unit to a different channel.
RESETCH 1 2 3
4. RESET button: To restart the outdoor unit in case
of a (possible) error.
5. Suspension eye: Provision to suspend the outdoor
unit from a wall.
6. Battery compartment.
Power supply:
Indoor unit:
Slide down the battery cover at the rear of the unit
and insert 2 AA 1.5V batteries according to the markings inside the battery compartment. Slide the battery
cover back onto the indoor unit.
The indoor unit will now start a 1 minute scan to
search for the outdoor unit. Therefore, you’ll need to
insert the batteries into the outdoor unit within that
minute.
Outdoor unit:
Slide down the battery cover at the rear of the unit,
slide the CH switch to the position ‘1’ and insert 2 AA
1.5V batteries according to the markings inside the
battery compartment. Slide the battery cover back
onto the outdoor unit.
Weak battery warning:
As soon as the batteries of the outdoor unit become
exhausted, the symbol will illuminate on the
display of the indoor unit.
Now please replace the batteries of the outdoor unit.
The indoor unit does not provide a battery warning.
Replace the batteries of this unit as soon as the
display becomes dim or weak.
Pairing the indoor unit / outdoor unit:
Automatically:
As soon as you insert the batteries into the indoor
unit, the indoor unit will start a 1 minute scan to
search for the signal of the outdoor unit. Therefore,
if you insert the batteries into the outdoor unit within
that minute and the units will ‘nd’ each other, they
will be automatically paired and the display of the
indoor unit will show the temperature transmitted by
the outdoor unit.
Manually:
If the units cannot be paired automatically, or after
replacing the batteries, you can pair the outdoor unit
(again) with the indoor unit as follows:
1. use a sharp object to briey press the RESET
button on the rear of the indoor unit
2. use a sharp object to briey press the RESET
button on the rear of the outdoor unit
3. the units will nd each other (again) after several
seconds and the indoor unit will display the temperature transmitted by the outdoor unit.
Clock:
Introduction
The WS-2300 is provided with a built-in DCF
receiver which receives the DCF time signal from
Frankfurt. This signal ensures that the clock shows
the time very accurately, provided a strong enough
signal is being received.
Automatically:
As soon as you insert the batteries into the indoor
unit, the clock will start searching for the DCF radio
signal for the time while the antenna symbol
is ashing. After several seconds or minutes the
WS-2300 will start showing the correct time. In
extreme cases, it can take over a day before the DCF
time is shown.
Manually:
If the clock cannot receive the radio signal or cannot
receive it well enough, you can set the clock manually as follows:
1. press and hold the DISPLAY SET button for
2 seconds, 12Hr or 24Hr will appear in the
display
2. use +/- to set the time format, then briey press
the DISPLAY SET button
3. use +/- to set the hours and then briey press the
DISPLAY SET button
4. use +/- to set the minutes and then briey press
the DISPLAY SET button
5. use +/- to set the seconds to 0 (this allows you to
have the clock run synchronously with your own
clock) and then briey press the DISPLAY SET
button
6. use +/- to set the hour difference compared to the
DCF time. E.g. for use in the Benelux select ‘0’
and then briey press the DISPLAY SET button
The clock is now set manually.
When the DCF receiver is enabled and a strong
signal is being received, the receiver will overwrite
the clock display.
Switching the DCF receiver on/off:
You can turn off the DCF receiver as follows, allowing you to have only the time and date shown on the
display according to your programming:
• turn off: press and hold the RCC button at the
rear of the indoor unit for 4 seconds until the
antenna symbol disappears.
You can turn the receiver back on as follows:
• turn on: briey press the RCC button at the rear
of the indoor unit until the antenna symbol
starts ashing
‘DST’ in the display.
‘DST’ stands for Daylight Saving Time.
‘DST’ illuminates when the displayed time is the
daylight saving time.
1 2 3 4
Page 2
Alarm
Setting & turning on the wake-up alarm:
1. press and hold the ALARM SET button for
2 seconds
2. use +/- to set the hours and briey press the
ALARM SET button
3. use +/- to set the minutes and briey press the
ALARM SET button, the alarm time is now saved
(and is also activated immediately)
Switching on/off:
Briey press 2x the ALARM SET button. When
the wake-up alarm is currently enabled, “ ” will be
shown; if “ ” is not illuminated, the alarm is disabled.
Operation:
• As soon as the set time is reached, the alarm will
sound for up to 120 seconds.
• Press the ALARM SET button to stop the alarm
signal earlier or press the SNOOZE/ LIGHT
button to enable the snooze function; the wake-up
alarm will then sound again after 5 minutes.
• The alarm is repeated daily.
Temperature display
Use the °C / °F switch at the rear of the indoor unit
to display the temperature in degrees Celsius or in
degrees Fahrenheit.
The symbol is followed by the indoor temperature.
Behind that the outdoor unit is shown from outdoor unit 1.
Use the CH button at the rear of the indoor unit to
display the temperature from outdoor unit 2 or 3 or
press and hold the CH for 2 seconds to automatically
start scrolling through all channels. Briey press the
CH button to stop this scan.
See also chapter ‘Expansion’.
Max/min temperature:
Briey press the MEM button to check the maximum
temperature measured, press the MEM button again
for the minimum temperature.
Press and hold the MEM button for 3 seconds to
delete the MAX and MIN values. Also after replacing
the batteries of pressing the RESET button, the MAX
and MIN values are deleted.
Ice alarm:
As soon as the outdoor temperature falls within a
range of +3°C and -2°C, the symbol starts ashing in the display.
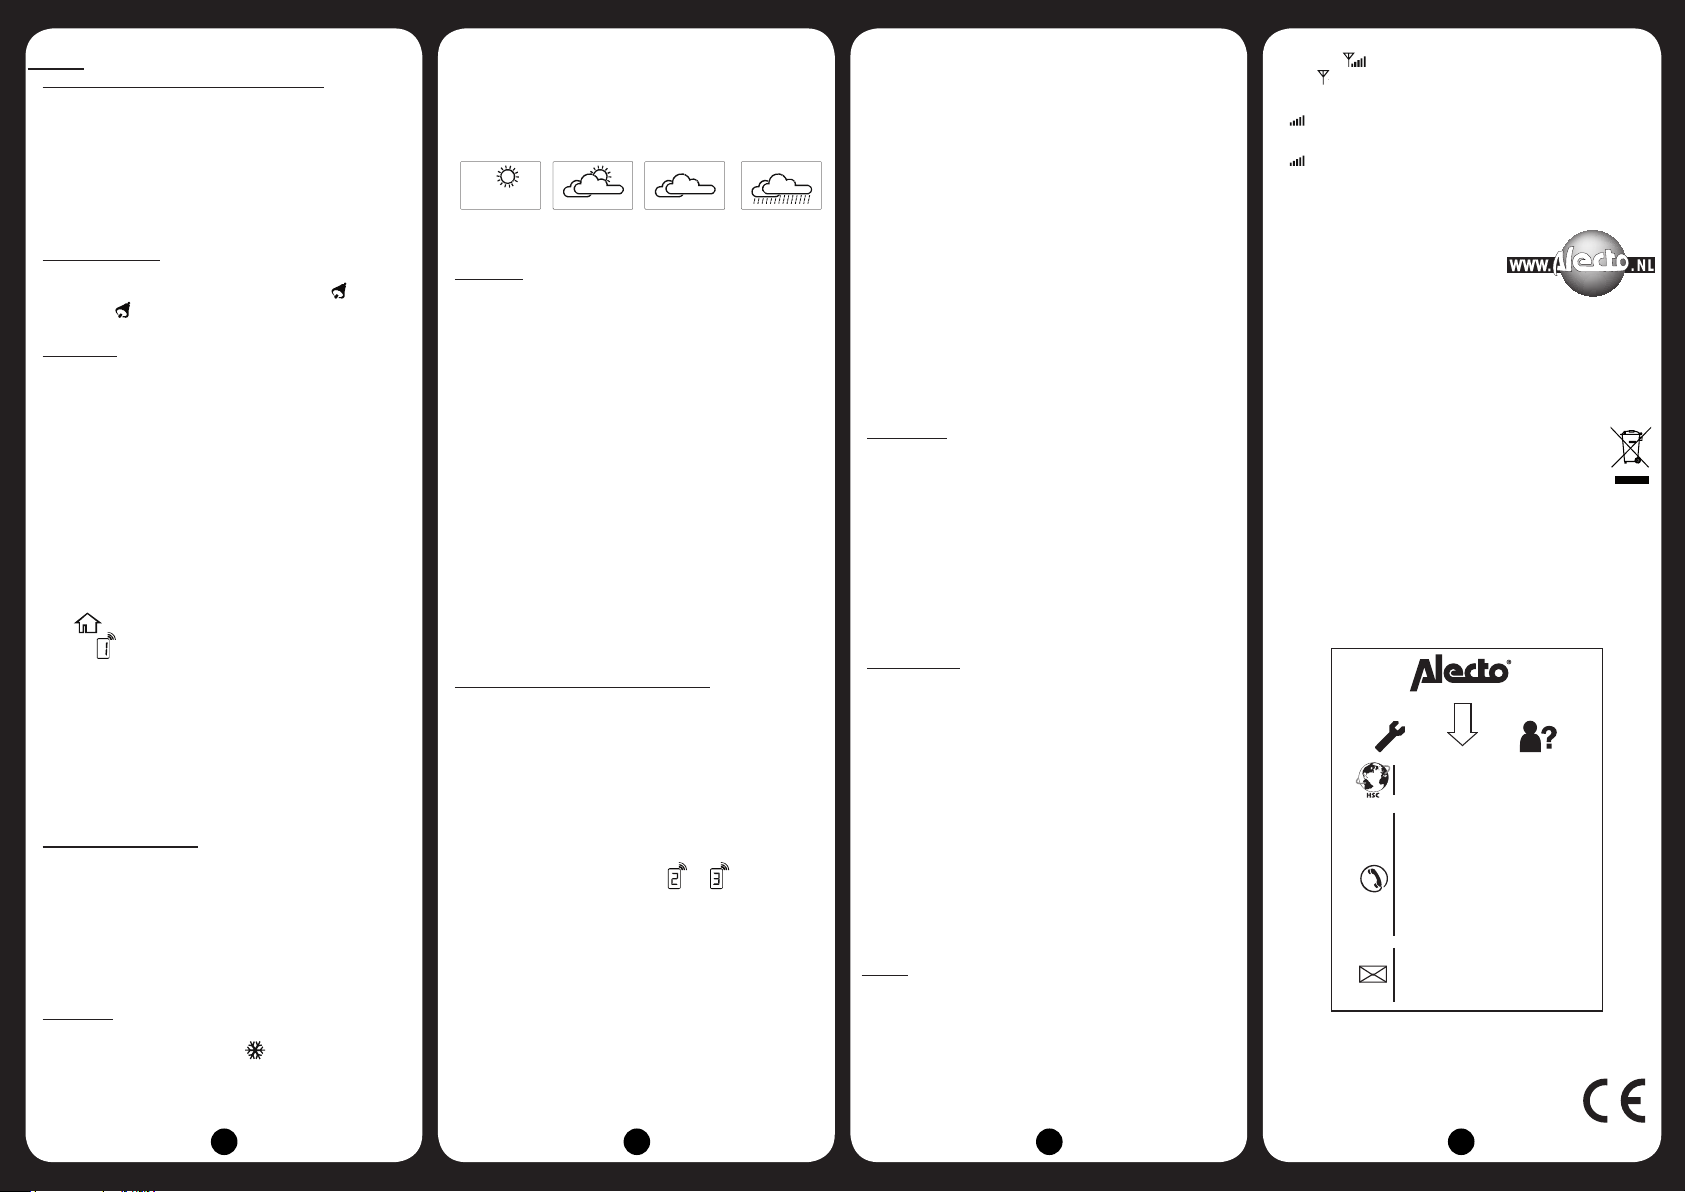
Weather forecast:
The WS-2200 can predict the weather for the
following 12 to 24 hours based on the changes in air
pressure and shows this forecast using the following
icons:
Sunny partly
cloudy
Remarks:
• the accuracy of a forecast based on air pressure
is 70% to 75%; please keep in mind that a correct
display of the weather forecast is not guaranteed.
• the prediction is based on the coming 12 to 24
hours and does not necessarily represent the
current weather conditions.
• the ‘Sunny’ forecast shown at night means an
open weather type.
• the ‘Rainy’ prediction during winter, usually means
snow.
cloudy rainy
Expansion:
You can register up to 3 outdoor units to the indoor
unit to have the temperature measured at 3 different
locations (e.g. in your greenhouse, pet room, different bedrooms, etc.). You can order additional outdoor
via the Alecto customer service at phone number 073
6411 355 (Netherlands) or 03 238 5666 (Belgium) or
via the internet at www.alecto.nl
Registering additional outdoor units:
1. slide down the battery cover at the rear of the
new outdoor unit and insert 2 AA 1.5V batteries
according to the markings inside the battery
compartment.
2. just above the batteries at the rear of the outdoor
unit, slide the ‘CH’ channel switch to position 2 or
position 3.
3. slide the battery cover back onto the outdoor unit.
4. now repeatedly and briey press the CH at the
rear of the indoor unit until or illuminates
(depending on whether you’ve selected ‘CH-2’ or
‘CH-3’ in the outdoor unit) and then briey press
the SENSOR button.
5. the indoor unit will now start searching for the out-
door unit and as soon as the units nd each other,
the temperature will be shown on the display of
the indoor unit.
Reset/System error:
If the WS-2300 shows a possible error, you may have
to reset the indoor and outdoor unit.
1. use a sharp object to press the reset button at the
rear of the indoor unit.
2. use a sharp object to press the reset button at
the rear of the outdoor unit (for this, you’ll need to
briey remove the battery cover from the outdoor
unit).
The indoor and outdoor units will then be reset and a
new pairing scan will start. After several seconds, you
can continue using the WS-2300.
If you still have no connection or sound, please
contact the customer service of Alecto via the phone
number 073 6411 355 (Netherlands) or 03 238 5666
(Belgium) or via internet www.alecto.nl
Specications:
Indoor unit:
measurement range: -40°C ~ 70°C (-40°F ~ 158°F)
recommended operating temperature:
0°C ~ 45°C (32°F ~ 113°F)
resolution: 0.1°C / 0.1°F
DCF receiver: DCF-77
power supply: 2x 1.5V battery, size AA
battery lifespan: 1 year
dimensions: 140(W)x100(H)x47(D)mm
weight: 213g (batt incl.)
amount of outdoor units to register: max 3
Outdoor unit:
measurement range: -40°C ~ 70°C (-40°F ~ 158°F)
recommended operating temperature:
-20°C ~ 55°C (-4°F ~ 131°F)
resolution: 0,1°C / 0,1°F
power supply: 2x 1,5V battery, size AA (*)
battery lifespan: 1 year
dimensions: 65(W)x100(H)x35(D)mm
weight: 75g (batt incl.)
*: for long-term use at temperatures below 0°C,
we recommend using Lithium batteries which you
can order via the Alecto customer service at phone
number 073 6411 355 (Netherlands) or 03 238 5666
(Belgium) or via the internet at www.alecto.nl.
Radio:
transmission frequency: 433MHz
channels: 3
reception interval: 60-64sec.
range: 50m
Symbol :
Only illuminates: no outdoor unit is registered
on this channel.
ashing: the indoor unit is searching
for the outdoor unit.
remains lit: the indoor unit is connected
to the outdoor unit
Declaration of conrmity
The declaration of conformity
is available on the website
WWW.ALECTO.NL
Environment:
At the end of its lifespan, this product should not be
discarded as normal domestic waste, but is must be
taken to a collection point for the recycling of electric
and electronic equipment.
Don’t throw away exhausted batteries, take
them to your local depot for small chemical
waste.
Service Help
WWW.ALECTO.NL
SERVICE@ALECTO.NL
NL 073 6411 355
(Lokaal tarief)
BE 03 238 5666
(Lokaal tarief)
(Tarif local)
DE 0180 503 0085
Lokale Festnetzkosten
Hesdo, Australiëlaan 1
5232 BB, ‘s-Hertogenbosch
The Netherlands
ver1.2
5 6 7 8
 Loading...