

Aldi Sourcing Asia 00054160S Users Manual

English .....06
Español ....45
DIGITAL WEATHER STATION
ESTACIÓN METEOROLÓGICA DIGITAL
ID: #07177
m
y
h
a
n
s
e
c
o
n
t
r
o
l
.
c
o
m
C
E
R
T
I
F
I
E
D
User-friendly
Manual
User Manual
Manual
del usuario

Dok. /Rev.-Nr. 195508_ 20170 629
Contents
Overv iew ........................................................................................................ 3
Use................................................................................................................... 4
Packa ge contents/device par ts
................................................................... 6
Gener al informati on
.......................................................................................7
Readin g and storin g the user manu al ...........................................................7
Expl anation of s ymbols .....................................................................................7
Safet y
.............................................................................................................. 8
Prope r use ............................................................................................................ 8
Safet y instru ctions .............................................................................................8
Batt ery notes ......................................................................................................13
Firs t use
.........................................................................................................16
Check ing the weat her statio n and packa ge contents ............................. 16
About t ime signals........................................................................................ 16
Preparing the radio se nsor for use
............................................................. 17
Inser ting or rep lacing bat teries .....................................................................17
Using ad ditional r adio senso rs .......................................................................1 7
Insta lling the ra dio sensor ..............................................................................18
Preparing the base uni t for use
..................................................................19
Power ing the base un it ................................................................................... 1 9
Searc hing for sign als ........................................................................................21
Manua l settings................................................................................................. 22
Insta lling the bas e unit ...................................................................................2 4
Time fu nctions
............................................................................................. 24
Displ ay (time func tions) ..................................................................................2 4
Alarm s ................................................................................................................25
Summe r time .....................................................................................................2 7
Time zo ne ...........................................................................................................27
Time fo rmat ........................................................................................................ 27
Weathe r data
................................................................................................ 28
Displ ay (weather da ta) ....................................................................................28
Switch ing betwe en radio sens ors ................................................................29
Maxim um and minimu m values ....................................................................30
Tempera ture and humi dity trend .................................................................30
Unit s of temperat ure........................................................................................ 31
Air pre ssure
................................................................................................... 31
Displ ay (air pressur e) ....................................................................................... 31
Curre nt air pressu re and air pre ssure trend ............................................... 31
Maxim um and minimu m values ....................................................................32
Weathe r forecast
..........................................................................................32
Displ ay (weather fo recast).............................................................................. 32
Weathe r forecas t symbols ...............................................................................3 3
Moon ph ases
................................................................................................ 34
Other f unctions
............................................................................................ 35
Displa y backlig ht ..............................................................................................35
USB cha rging por t ............................................................................................35
Oper ation mode ................................................................................................36
Low bat tery war ning .......................................................................................36
Reset ting the wea ther stati on .......................................................................3 6
Cleaning
........................................................................................................37
Storage
.........................................................................................................3 8
Troub leshooting
.......................................................................................... 39
Technic al data
............................................................................................... 41
Dispo sal
........................................................................................................4 3
Dispo sing of the pac kaging ............................................................................43
Dispo sing of old app liances............................................................................4 3

3
A
45678
1
2
3
9
12
13
1 2 3
45678
9
12
13
11 10
10
11

4
C
14
24
B
14
15
16
17 18
19
20
21
22
23
5
D
25
26
27
28
29
30
31
27
26
30
31
28
29
25
A
B
6
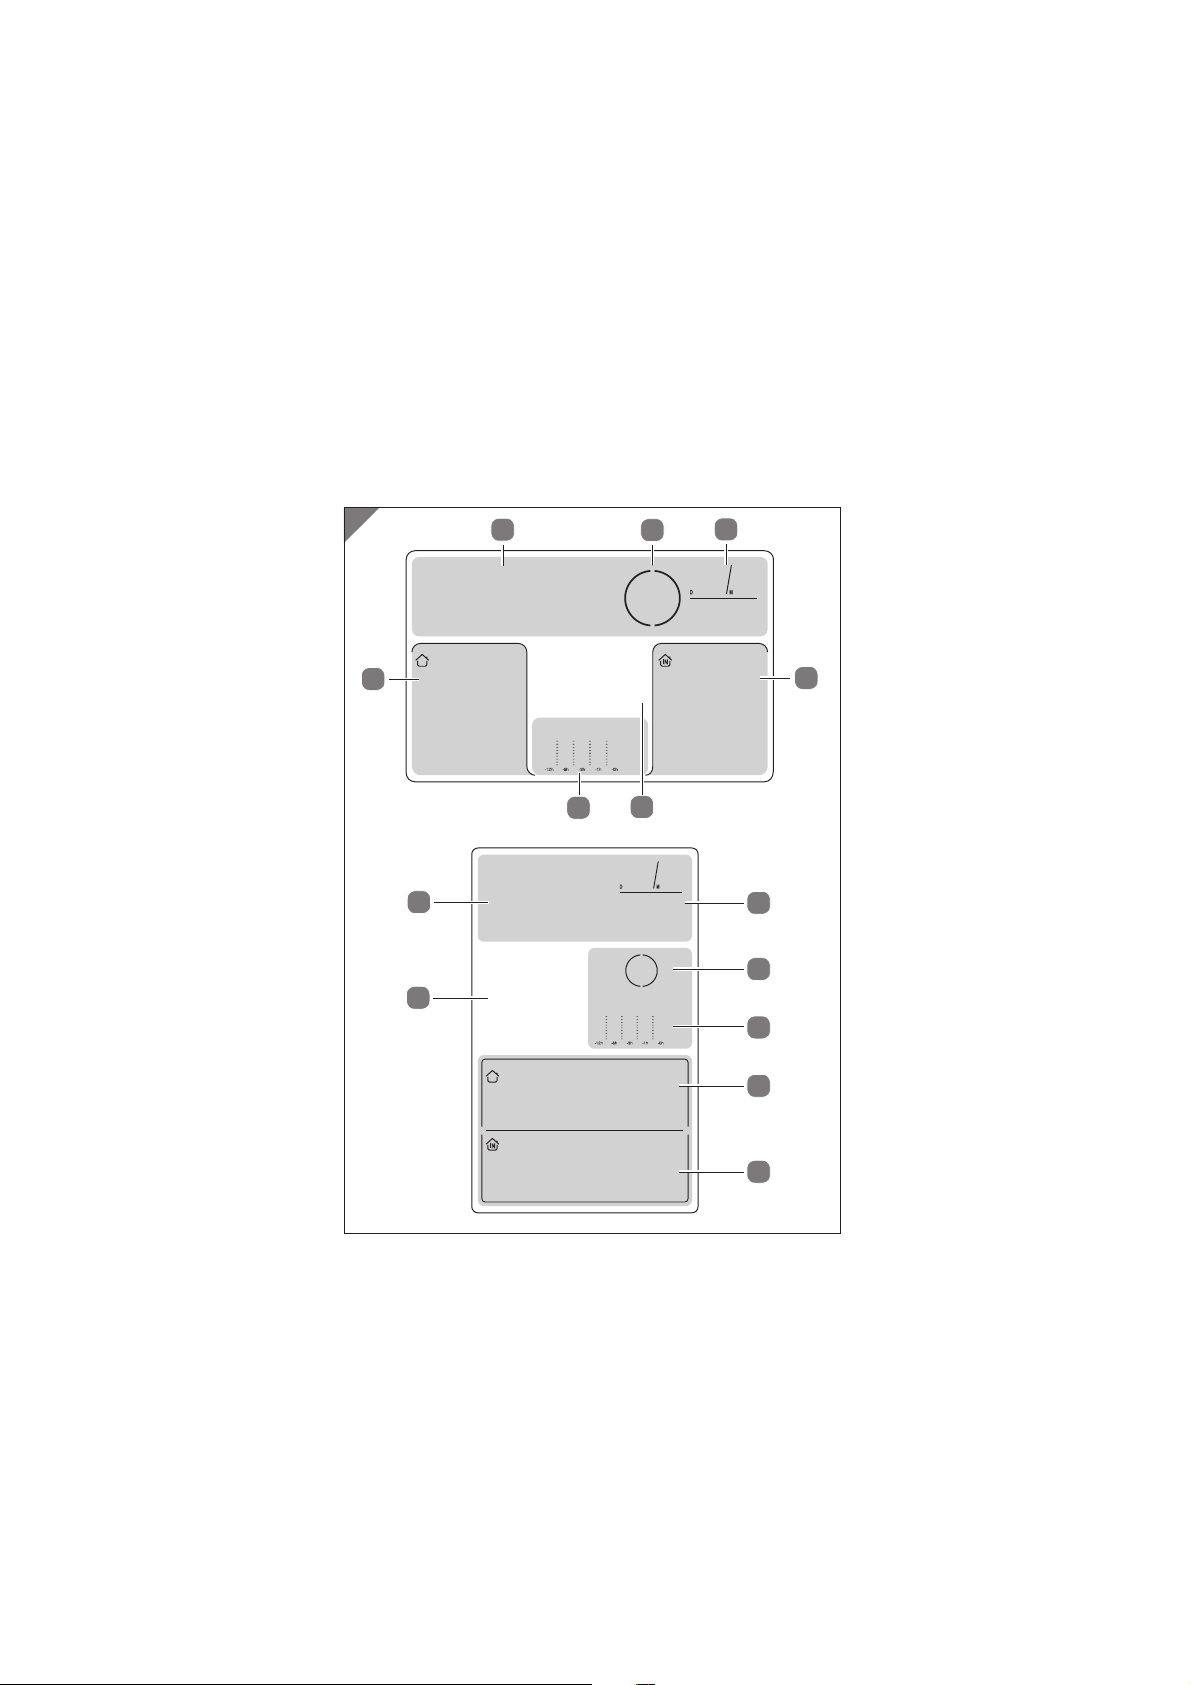
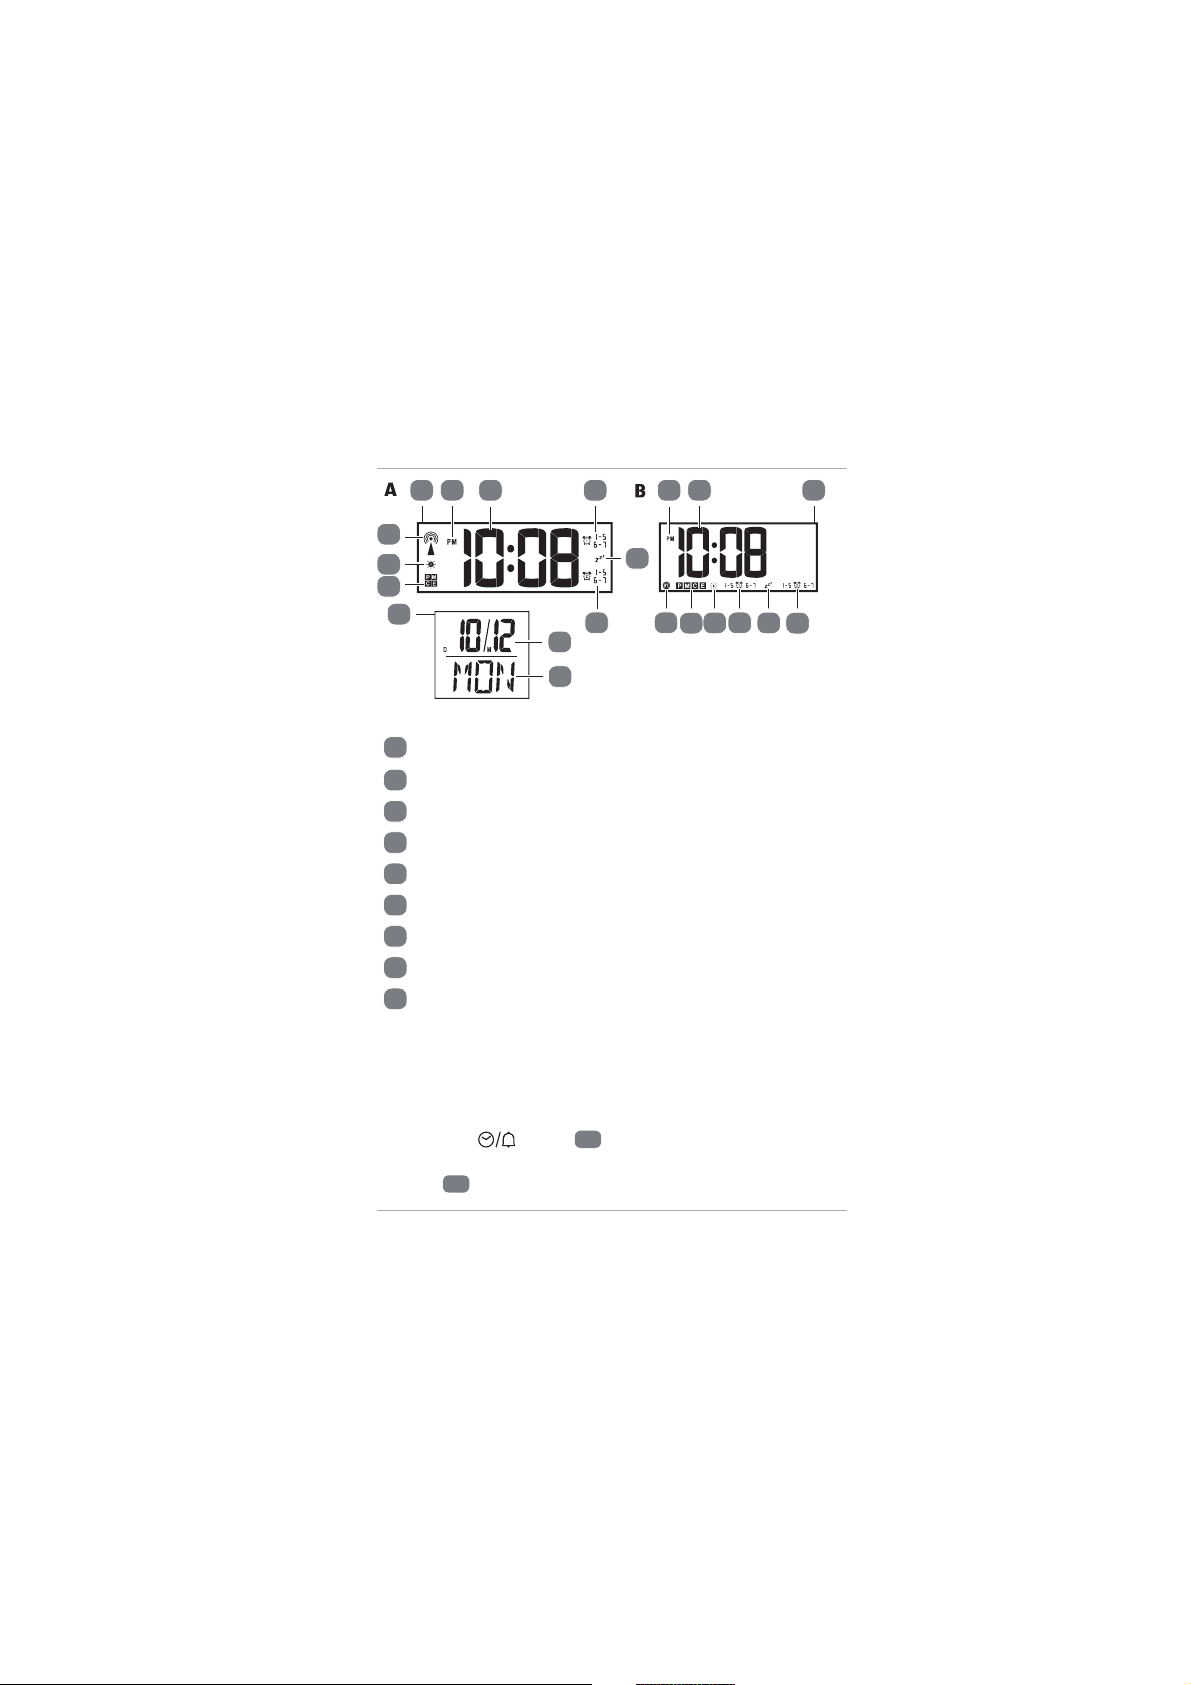
Package contents⁄device parts
1
Base unit
2
Display (base unit)
3
SNOOZE/LIGHT button
4
button
5
button
6
button
7
button
8
button
9
Hanging hole
10
Foldout stand
11
Battery compartment
(base unit)
12
DC input jack
13
USB charging port
14
Radio sensor
15
Display (radio sensor)
16
Signal indicator light
17
Temperature unit switch
18
Channel switch
19
Battery compartment
door (radio sensor)
20
Battery compartment
(radio sensor)
21
Output plug
22
Power adaptor
23
Battery, 4×
24
Hanging bracket
25
Clock and alarm
26
Moon phase
27
Date and weekday
28
Indoor weather
29
Weather forecast
30
Air pressure
31
Outdoor weather
A = Horizontal version
B = Vertical version

General information
7
General information
Reading and storing the user manual
This user manual accompanies the digital weather
station (hereafter referred to as “weather station”),
and contains important information on setup and use.
Before using the weather station, read the user manual
carefully. This particularly applies to the safety instructions.
Failure to do so may result in personal injury or damage to the
weather station.
Store the user manual for future use. Make sure to include
this user manual when passing the weather station on to
third parties.
Explanation of symbols
The following symbols and signal words are used in this user
manual, on the weather station or on the packaging.
WARNING!
This signal symbol/word designates a hazard with moderate
risk, which may result in death or severe injury if not avoided.
CAUTION!
This signal symbol/word designates a hazard with low risk,
which may result in minor or moderate injury if not avoided.
Safety
8
NOTICE!
This signal word warns of possible damage to property.
This symbol provides you with useful additional
information regarding setup and use.
Safety
Proper use
The weather station is exclusively designed for showing
time and weather information. It is only intended for indoor
private use and not suitable for commercial purposes.
Only use the weather station as described in this user
manual. Any other use is considered improper and may result
in damage to property or even personal injury. The weather
station is not a toy for children.
The manufacturer or vendor cannot be held liable for
damages incurred through improper or incorrect use.
Safety instructions
WARNING!
Risk of electric shock!
A faulty electrical installation, excessive line
voltage or incorrect operation may result in
an electric shock.

Safety
9
− Only use the power adaptor provided
with the weather station.
− Only use the power adaptor in dry
and indoor areas. Do not let the power
adaptor come into contact with water or
other liquids.
− Connect the power adaptor only to an
alternating current (AC) power supply.
Make sure that the voltage corresponds
with the voltage details on the device.
The power adaptor must be operated
using (100 ~ 240 V, 50/60 Hz) alternating
current (AC).
− Only connect the power adaptor to a
properly installed and easily accessible
power outlet so that you can quickly pull
the plug in an emergency.
− Fully unwind the power adaptor cord
before connecting it. Make sure that
the cord cannot get damaged by sharp
edges or hot objects.
− Never cover the power adaptor. Ensure
that sufficient ventilation is provided
in order to prevent the power adaptor
from overheating.

Safety
10
− Do not use the power adaptor if the
housing or cord is defective or has
other visible damages. In the event of
damage, only have the power adaptor
serviced by the manufacturer, its
customer service team or a similarly
qualified person to avoid risks.
− The power adaptor cord cannot be
replaced. If the cord or the power
adaptor is damaged, they must be
thrown away and replaced by a power
adaptor of the same model.
− Always remove the power adaptor from
the power outlet if:
• you want to clean the weather station or do not intend on
using the weather station for a prolonged period of time;
• the weather station is not working properly;
• during thunderstorms.
− Always pull the plug, not the cord when
you are removing the power adaptor
from the power outlet.
Safety
11
WARNING!
Danger for children and persons with
impaired physical, sensory or mental
capacities (e.g. partially disabled persons,
older persons with reduced physical and
mental capacities) or lack of experience
and knowledge (e.g. older children).
− If they are supervised or have been
instructed in how to safely use the
weather station and have understood
the risks associated with operating it,
this weather station may be used by
children ages eight and over as well as
persons with impaired physical, sensory
or mental capacities or those lacking
experience and knowledge. Children
may not play with the weather station.
Cleaning and user maintenance must not
be performed by unsupervised children.
− Keep children under the age of eight
away from the weather station and
power cord.
− Make sure that children do not play
with the plastic wrapping. They may get
caught in it when playing and suffocate.

Safety
12
NOTICE!
Risk of damage!
If you do not use the weather station (base
unit and radio sensor) properly, you may
damage it.
− Do not use the weather station in a
damp place (e. g. bathroom) and avoid
dust, splashing or dripping water, heat
sources, extreme temperatures and
direct sunlight.
− Make sure the weather station stays away
from magnetic fields (e. g. speakers).
− Make sure no foreign objects penetrate
the housing of the weather station.
− Do not exert pressure on the display
surface of the weather station, as this
may cause the surface to break.
− Do not allow sharp or pointed objects to
come in contact with the surface of the
weather station.
− Keep the weather station from falling.
Failure to do so may break the weather
station.
− Do not place the weather station near
Safety
13
any heat sources. Never place naked
flames such as burning candles on or
immediately next to the weather station.
− Under no circumstances should you
open the housing of the weather station.
There are no user-serviceable parts
inside. Improper repairs may damage
the weather station. Repairs should
only be carried out by professional
technicians. The only exception is the
removal of the battery compartment
door to replace the batteries.
− The radio sensor must be protected from
direct exposure to moisture such as rain.
Battery notes
WARNING!
Health hazards!
There is a high health hazard if children or
animals swallow the batteries.
− Store the batteries so they are not
accessible to children and animals. If you
suspect a battery has been swallowed,
seek immediate medical advice.
Safety
14
WARNING!
Risk of explosion
Improper handling of batteries increases the
risk of explosion.
− Store the batteries in a cool, dry place.
Never expose the batteries to excessive
heat (e.g. direct sunlight) and never
dispose of them in a fire.
− Only use batteries of the same type.
− Ensure the correct polarity when inserting
the batteries. This is shown in the battery
compartments. Incorrect installation may
damage the weather station.
− Always use batteries of premium quality.
Batteries of poor quality may leak and
cause damage.
− Before inserting the batteries, make
sure the contacts inside the battery
compartment and on the battery itself
are clean and intact. Clean them if
necessary.
− Always replace all batteries in a battery
compartment at the same time.

Safety
15
− Remove the batteries from the weather
station if they are dead. Also remove the
batteries if you do not intend on using
the weather station for a prolonged
period of time. Otherwise, the batteries
may leak and cause damages.
− If the batteries are leaking, remove
them immediately to prevent damaging
the weather station. Do not remove the
batteries with your bare hands or allow
the battery fluid to come into contact
with skin, eyes or mucus membranes.
Wear normal household rubber gloves
to do so. If, however, your skin has come
into contact with the battery fluid, wash
your hands immediately and consult a
physician if necessary.
− Batteries should only be installed or
replaced by an adult.
− Keep the weather station away from
children when the battery cover is
removed.
− Remove the batteries before disposing
of the weather station.

First use
16
First use
Checking the weather station and
package contents
NOTICE!
Risk of damage!
If you are not cautious when opening the
packaging with a sharp knife or other
pointed object, you may quickly damage
the weather station.
− For this reason, be very careful when
opening it.
1. Take the weather station out of the packaging.
2. Check to make sure that all components and accessories
have been received (see Fig. A and B).
3. Check whether the weather station or the individual parts
exhibit damage. If this is the case, do not use the weather
station. Contact the manufacturer via the service address
indicated on the warranty card.
About time signals
The base unit of the weather station is a radio-controlled
clock and can receive the time signals emitted through the
signal transmitter in your country. If the base unit is located
within the transmission range, it can receive the signals and
synchronize with the broadcasted time and date several
times a day. In case of a failure in signal reception, the base
Preparing the radio sensor for use
17
unit can continue to run accurately and attempt to look for
time signals at the next designated time. If no signals can be
found, the time and date can also be set manually.
Preparing the radio sensor for use
Inserting or replacing batteries
− Do not use any rechargeable batteries, as their
voltage is low. This influences the measuring
precision.
− Preferably use alkaline batteries which last longer, particularly with low outdoor temperature.
1. Remove the battery compartment door
19
on the back of
the radio sensor 14.
2. Pay attention to the correct battery polarity (+ or –).
For battery replacement, remove the old batteries first.
Insert 2 batteries
23
(size: AAA, provided) into the battery
compartment 20.
3. Close the battery compartment door.
The radio sensor will detect the temperature and humidity
of the surroundings and send the collected data to the
base unit once a minute. Both the temperature (°C/°F) and
humidity (%) will be shown on the display 15 of the radio
sensor. The signal indicator light 16 will blink once when the
data have been sent.
Using additional radio sensors
The weather station is supplied with one radio sensor.
If necessary, you can operate it with up to three radio sensors.
Additional sensors are available through the after sales
support. Please check the price and details with the support.

Preparing the radio sensor for use
18
The contact details are on the warranty card.
The radio sensors can be located in different rooms or
outdoors. Each sensor must have its own radio sensor
number (1–3) allocated to it.
To use additional radio sensors:
1. Remove the battery compartment door 19 on the back of
the radio sensors.
2. Set a dedicated radio sensor number (1–3) for each radio
sensor using the channel switch
18
.
The selected radio sensor number (e.g.
= radio sensor
number 1) will show on the display 15.
3. Set a dedicated temperature unit (°C/°F) for each radio
sensor using the temperature unit switch
17
.
The selected temperature unit will show on the display.
4. Close the battery compartment door.
The base unit will receive the weather data from all available
radio sensors (see chapter “Preparing the base unit for use”).
In the event of interference from nearby equipment
transmitting radio signals, you may change the radio sensor
number to avoid the interference.
Installing the radio sensor
Take note of the tips below to ensure the best
possible signal receptions.
− Only install the radio sensor outdoors in a dry, shaded area
(e.g. under a roof).
− When installing on a wall, ensure that no electric cables,
gas or water pipes are buried beneath the wall surface
before drilling any holes.
Preparing the base unit for use
19
− The maximum distance between the base unit and radio
sensor should not be greater than 100 m (direct visible
distance). Building materials, such as concrete walls, may
reduce or prevent signal reception between the base unit
and radio sensor.
− Do not place the base unit and radio sensor on the floor.
This limits the transmission range.
− Electronic devices such as televisions and computers can
disrupt the signal reception.
− At low temperature during winter, the performance of the
radio sensor batteries may fall significantly. This reduces
the transmission range.
1. Mount the hanging bracket
24
on a wall using the
hanging or screw hole (nail or screw not provided).
2.
At
tach the radio sensor
14
to the hanging bracket
(see Fig. C).
Preparing the base unit for use
Powering the base unit
The base unit can be powered by batteries or
an alternating current (AC) power supply using
the power adaptor.
Inserting or replacing batteries
1. Open the battery compartment 11 on the back of the
base unit 1.
2. Pay attention to the correct battery polarity (+ or –).
For battery replacement, remove the old batteries first.
Insert 2 batteries 23 (size: AAA, provided) into the battery
compartment.

Preparing the base unit for use
20
3. Close the battery compartment.
4. The display 2 will turn on and an alarm tone will sound
once the batteries have been inserted. Wait for about
30 minutes. During this time the base unit gathers the
weather data and receives the time signals (see chapter
“Searching for signals”).
Operating with the power adaptor
NOTICE!
Risk of damage!
If the weather station is connected via the
power adaptor to a power outlet, it operates
with a DC voltage. The batteries may leak
and damage the unit.
− Remove any batteries from the base unit
when connecting it to a power outlet.
1. Connect the output plug 21 of the power adapter 22 to
the DC input jack 12 of the base unit 1.
2. Connect the power adaptor to a power outlet. Only
connect the power adaptor to an AC power supply
(100 ~ 240 V, 50/60 Hz).
The display 2 will turn on and an alarm tone will sound
once the power adaptor has been connected to an outlet.
Wait for about 30 minutes. During this time the base unit
gathers the weather data and receives the time signals
(see chapter “Searching for signals”).
Preparing the base unit for use
21
Searching for signals
Once the base unit has been powered, it will start searching
for weather data and time signals:
1. The base unit will first detect the air pressure for about
20 seconds. During this time, the value of air pressure will
blink in the air pressure display area
30
.
− Press the
button 8 if you want to stop the detection.
2. The base unit will then search for weather data from all
available radio sensors. During this time, the reception
icon (
) 51 (see chapter “Weather data”) blinks in the
outdoor weather display area 31, indicating the base unit
is searching for the weather data.
− When the weather data have been successfully received,
the reception icon will turn off and the current weather
data will show in the outdoor weather display area.
− When no weather data have been received, the reception
icon will turn off and no outdoor weather data will be
available.
− In case of an unsuccessful search for weather data, press
and hold the
button 4 to initiate a new search.
However, this can only be carried out after the search for
time signals has been completed.
3. Around 3 minutes after the base unit has been powered,
it will search for time signals emitted through the signal
transmitter in your country.During this time, the time
signal icon (
or ) 38 (see chapter “Time functions”)
blinks in the clock and alarm display area 25, indicating
the base unit is searching for the time signals.
− When the time signals have been successfully received,
the time signal icon (
or ) will remain visible and the
current date and time will show in the clock and alarm
Preparing the base unit for use
22
display area. The base unit will continue to receive time
signals every night (up to 3 times) and synchronize with
the displayed time.
− During the search for time signals, all other setting
functions (e.g. manual and alarm settings) will be disabled.
− When no time signals have been received after about
7 minutes, the time signal icon will turn off.
− In case of an unsuccessful search for the time signals, press
and hold the
button 5 to initiate a new search.
In order to ensure the best possible signal receptions,
avoid placing the base unit in buildings with lots
of concrete and metal structures, or near electronic
equipment such as TVs, computers, power lines, radio
transmitters, etc. If necessary, relocate the base unit.
4. As the synchronized time is only a coordinated universal
time, press the
button to select a time zone (indicated
by the time zone icon on the display, see chapter “Time
functions”) that corresponds to your location.
− Time zone: P = Pacific, M = Mountain, C = Central, E = Eastern
Manual settings
This operation allows you to manually set the date and time,
select the time format, adjust the weather forecast and air
pressure, etc.
1. Press and hold the button 8 until the “year” blinks
on the display.
2. Press the
6 or 5 button to set the year.
3. Press the button. The “month” will blink on the
display.
4. Press the or button to set the month.
5. Press the button. The “day” will blink on the display.
Preparing the base unit for use
23
6. Press the
or button to set the day.
7. Press the button. The “hour time” will blink on the
display.
8. Press the
or button to set the hour time.
9. Press the button. The “minute time” will blink on
the display.
10. Press the
or button to set the minute time.
11. Press the button. The “time format” will blink on the
display.
12. Press the
or button to select a time format
(12-hour or 24-hour).
13. Press the SET button. The “summer time” (default value:
0FF) will blink and the summer time icon (
or
) 37
(see chapter “Time functions”) will show on the display.
14. Press the
or button to turn ON or OFF the
summer time.
15. Press the button. The graphical weather forecast will
blink on the display.
16. Press the
or button to select a weather forecast
condition according to the forecast on TV or internet.
The weather station computes weather forecasts based
on changes in air pressure. However, when using the
weather station for the first time, it may take up to a few
days of collecting sufficient information for more accurate
forecasts. Manual setting of the weather forecast can
slightly accelerate this process.
17. Press the
button. The “air pressure” will blink on the
display.
18. Press the
or button to adjust the air pressure.
If desired, enter the altitude-related or more accurate
Time functions
24
air pressure values of your location obtained from the
internet or the local authorities.
19. Press the
button. The manual settings are now
complete.
The base unit will automatically exit manual settings when no
buttons have been pressed for about 20 seconds.
Installing the base unit
− For best signal reception, install the base unit
near a window.
− When installing on a wall, ensure that no electric
cables, gas or water pipes are buried beneath
the wall surface before drilling any holes.
Using the foldout stand
1. Pull out the foldout stand 10 on the back of the base unit.
The stand has two locking positions.
2. Place the base unit on a flat surface.
Hanging on a wall
1. Fix a nail or screw (not provided) on the wall.
2. Slip the hanging hole 9 over the head of the nail or screw.
Time functions
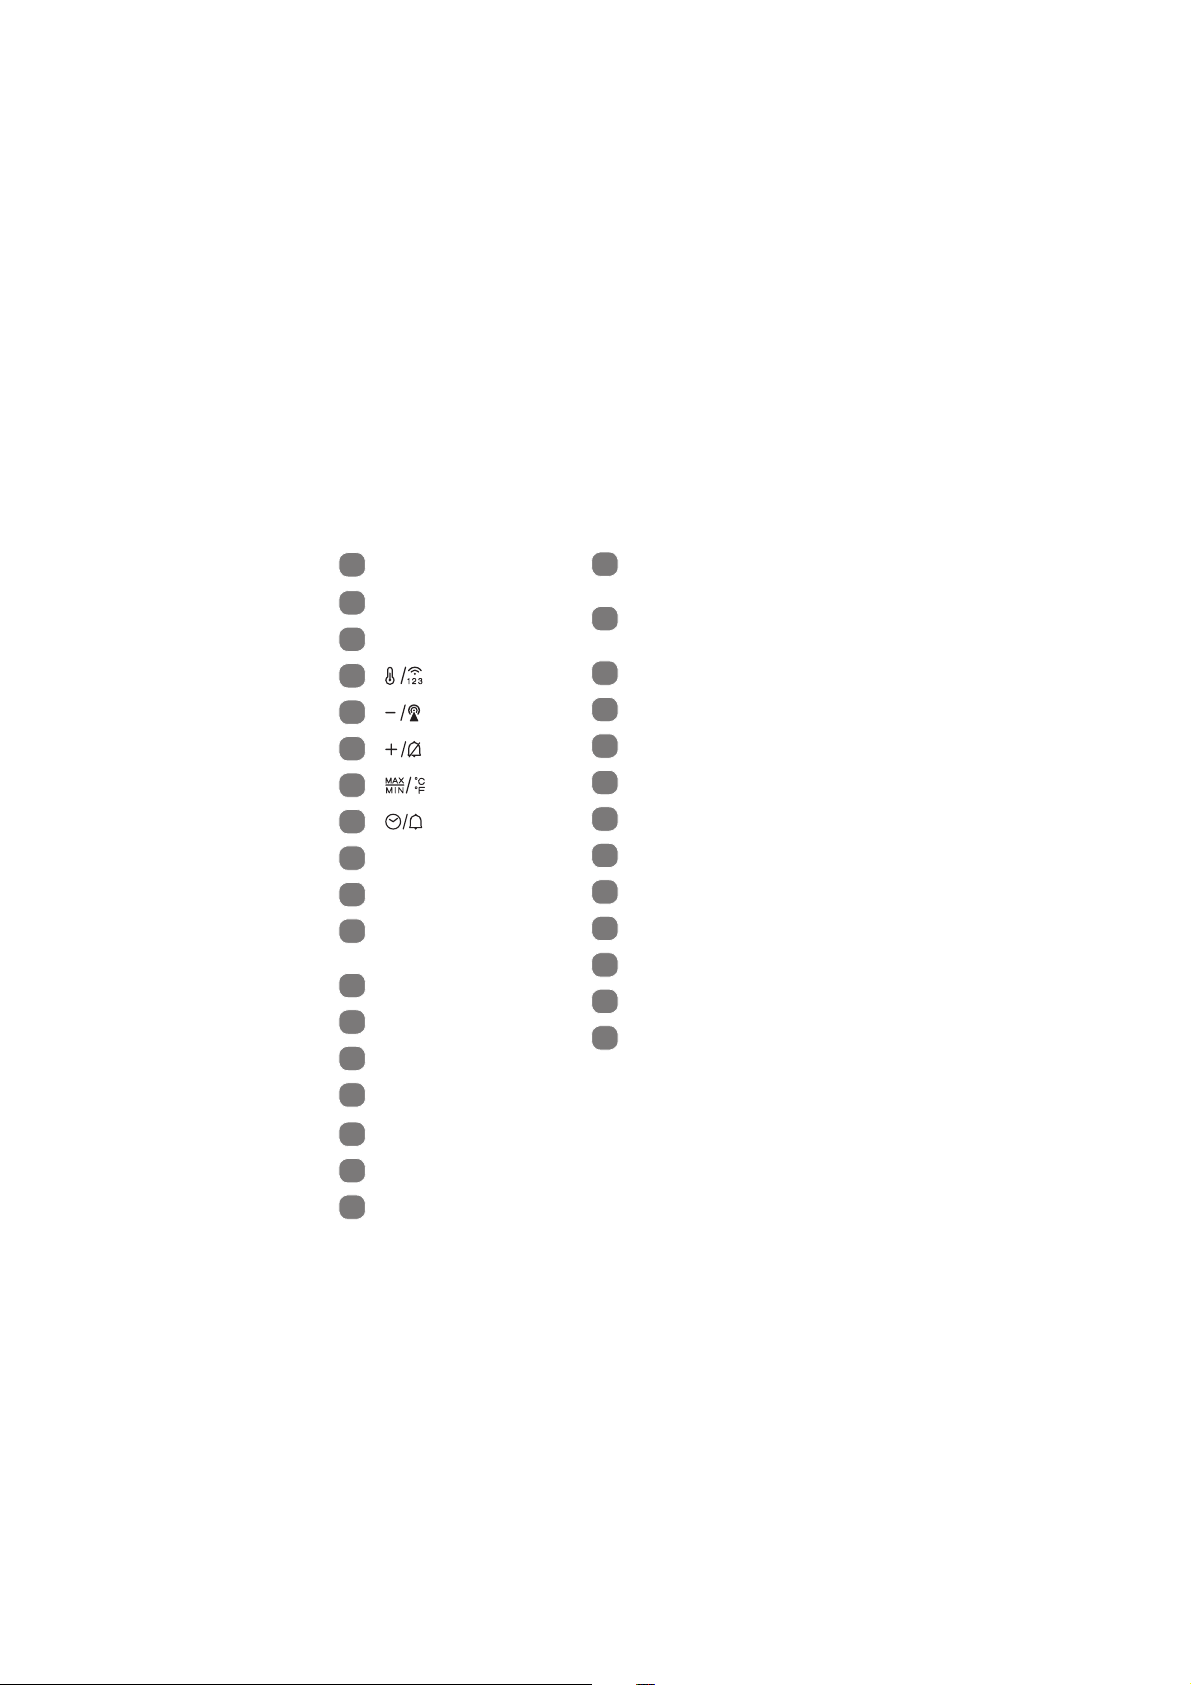
Display (time functions)
The date and time information is displayed in the date and
weekday area 27 and clock and alarm area 25 of the display.
Time functions
25
38
33
36
37
34
34
25 25
27
39
40
37
38
32
33
36
34
35
32
35
34
A = Horizontal ver sion, B = Vertical version
32
PM time (12-hour format)
33
Time (hours, minutes) / year
34
Alarm 1 and alarm 2
35
Snooze
36
Time zone
37
Summer time
38
Time signal
39
Day and month
40
Day of the week
Alarms
The alarm clock allows 2 alarm times to be set.
To set the alarm times:
1. Press the button 8 to select an alarm setting
(indicated by “AL1” or “AL2” in the clock and alarm display
area
25
).
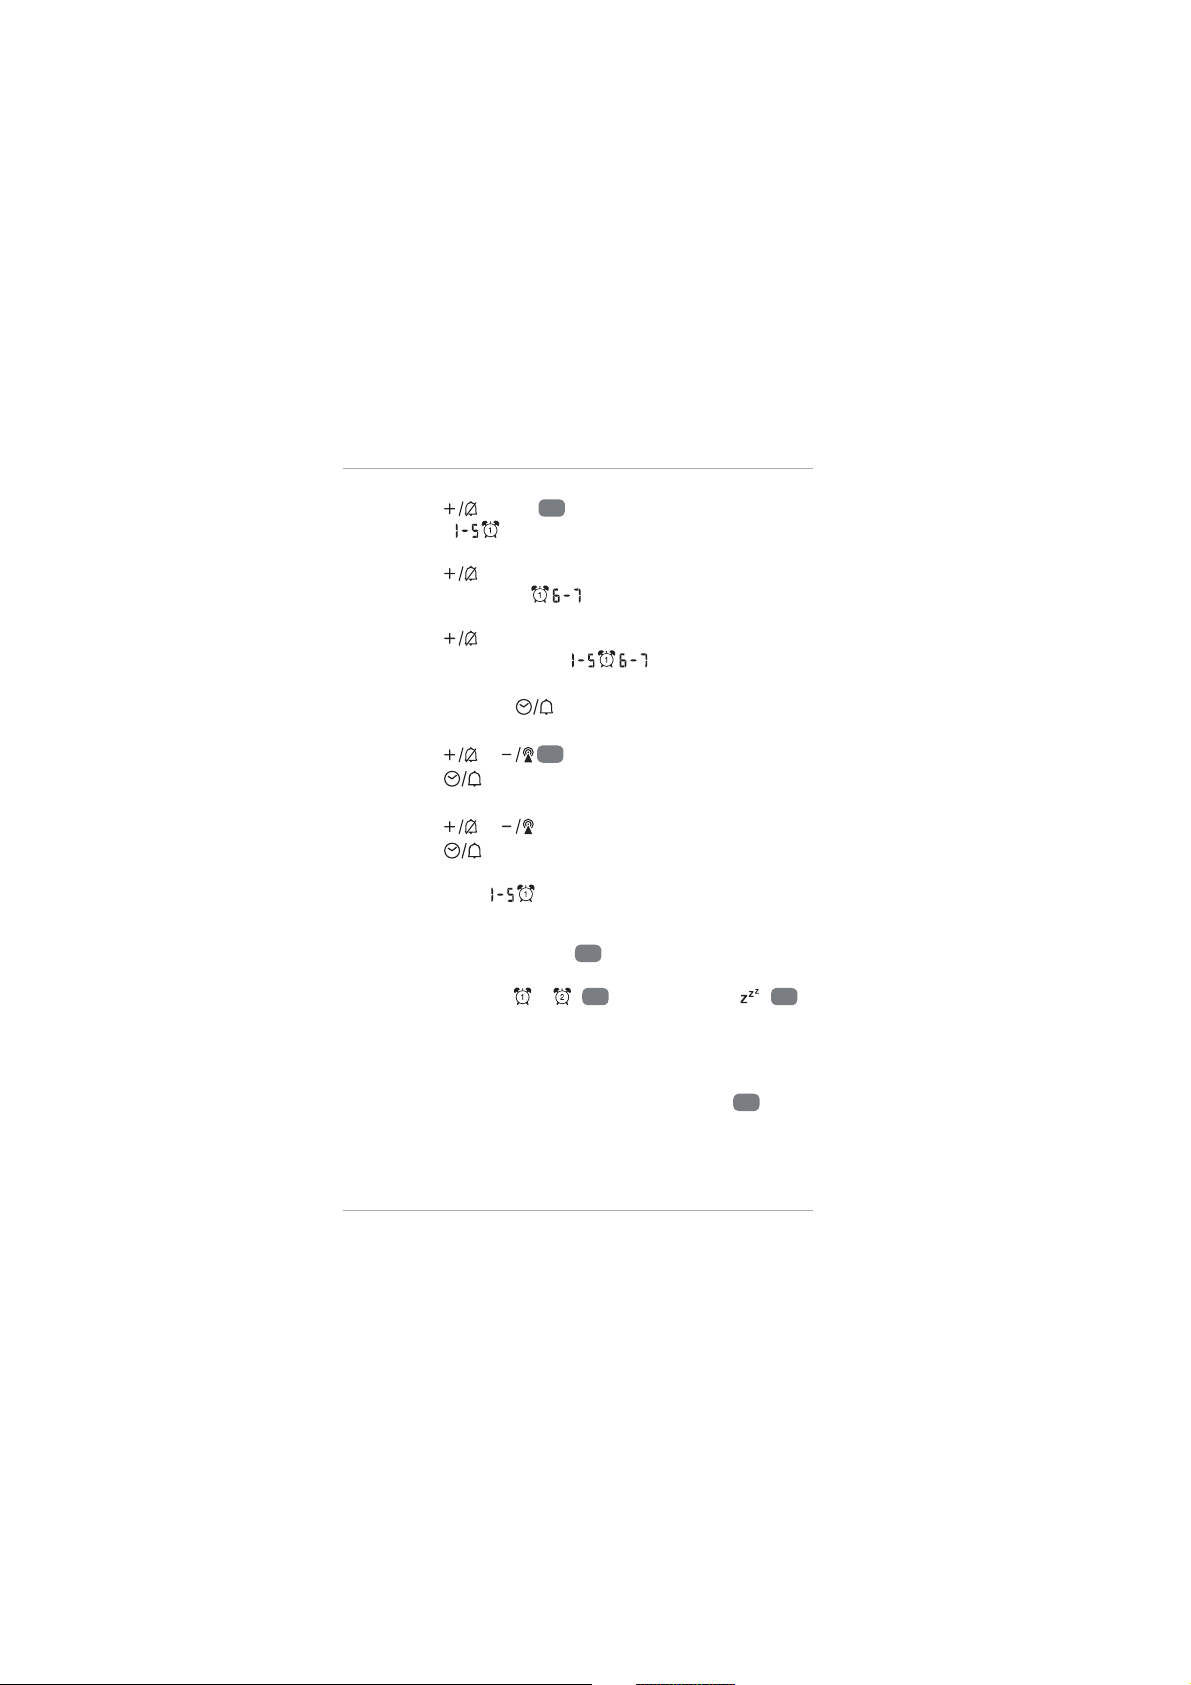
Time functions
26
2. Select the weekday or weekend alarm. To do so:
Press the
button 6 once to select the weekday
alarm (e.g. ). The alarm will sound from Monday to
Friday.
Press the button a second time to select the
weekend alarm (e.g. ). The alarm will sound during
the weekend.
Press the button a third time to select both weekday
and weekend alarms (e.g. ). The alarm will
sound every day.
3. Press and hold the
button until the “hour time” of
the selected alarm setting blinks.
4. Press the
or 5 button to set the hour time.
5. Press the
button. The “minute time” will blink on
the display.
6. Press the
or button to set the minute time.
7. Press the
button. The alarm time is now set.
The alarm will be automatically switched on with the
alarm icon (e.g.
) showing on the display.
To briefly silence the alarm (Snooze function):
Press the SNOOZE/LIGHT button 3. The alarm will sound again
after the snooze period (5 minutes) is over. During the snooze
period, the alarm icon ( or ) 34 and snooze icon ( ) 35
will blink. To cancel the snooze function, press any button except
the SNOOZE/LIGHT button.
To turn off the alarm when it sounds:
Press any button (except the SNOOZE/LIGHT button 3)
on the base unit. The alarm will also stop without pressing
any buttons after 2 minutes. The alarm remains switched on
and will sound again at the same time on the following day if
the alarm setting is applicable.
 Loading...