

Page 1
ASSEMBLY INSTRUCTIONS
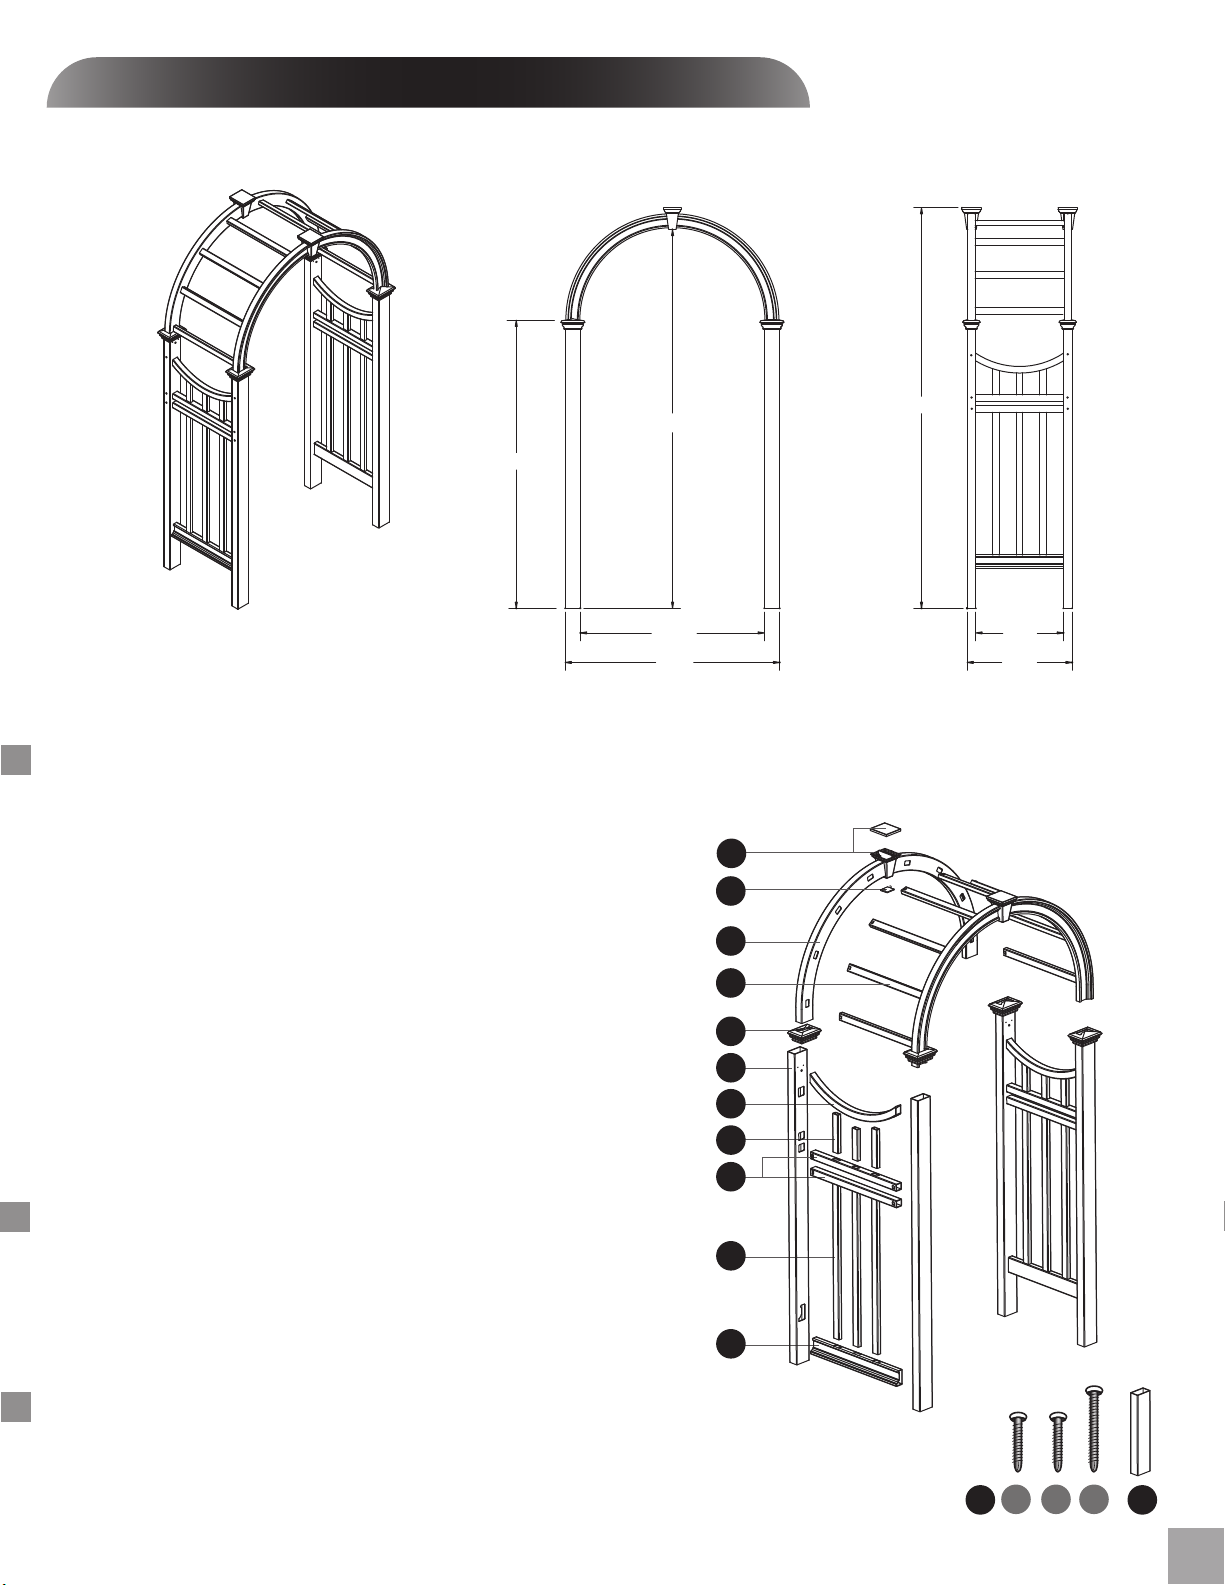
Arbor / Arch
86.58 in
65.85 in
167 cm
Please read through before starting assembly.
1. Arch Keystone (10836) & Top Lid (10668-1) & Keystone Inserts (10837) -(2 of each)
2. Keystone Bottom Plate (2) - 10666-1
3. Arches (4) - (2 ea. Right 10671-1 , 2 ea. Left 10670-1)
4. Arch Rafters (8) - 10672-1
5. Post Caps (4) - (2 ea. Right 10674-1 , 2 ea. Left 10673-1)
6. Posts (4) (2 ea. Right 10676-1 , 2 ea. Left 10675-1)
7. Side Panel Horizontal Bent Top Rails (2) - 10656-1
8. Side Panel Vertical Spindles Short (6 Total, 4 Long (A)10679-1, 2 Short (B) 10678-1)
9. Side Panel Horizontal Mid-Rails (4) - 10681-1
10. Side Panel Vertical Spindles Long (6 for Bottom Panel) - 10680-1
11. Side Panel Horizontal Bottom Rails (2) - 10662-1
12. Hardware (in plastic bag)
13.
1 1/2” (4 cm) Self-Auguring Screws - 20005 -(16 for Keystone & Arch to Post)
14.
1 1/2” (4 cm) Self-Auguring Screws - 20005 (8 for ground anchors)
15. 3” (8 cm) Self-Auguring Screws - 20007- (12 for Top & Mid Rails to Post)
13. Ground Anchoring Stakes (4) - 10844
220 cm
42 in
107 cm
49 in
124 cm
Tools You Will Need
• Cordless Drill
• Hammer
• Tape Measure
• Level
• Stool or Short Ladder
• Shovel
91.57 in
223 cm
20 in
51 cm
24 in
61 cm
1
2
3
4
5
R
6
7
8
9
10
11
General Information
• Read Instructions through carefully before beginning assembly.
• When assembling components, place on a non-abrasive surface (i.e. shipping box) to avoid
scratching.
• We recommend an area approx 10’x 8’ (3 m x 2.4 m) for unobstructed assembling.
• You should not need to use excessive force when assembling components.
a
12
Not to Scale
cb
13
1
Page 2
STEP ONE
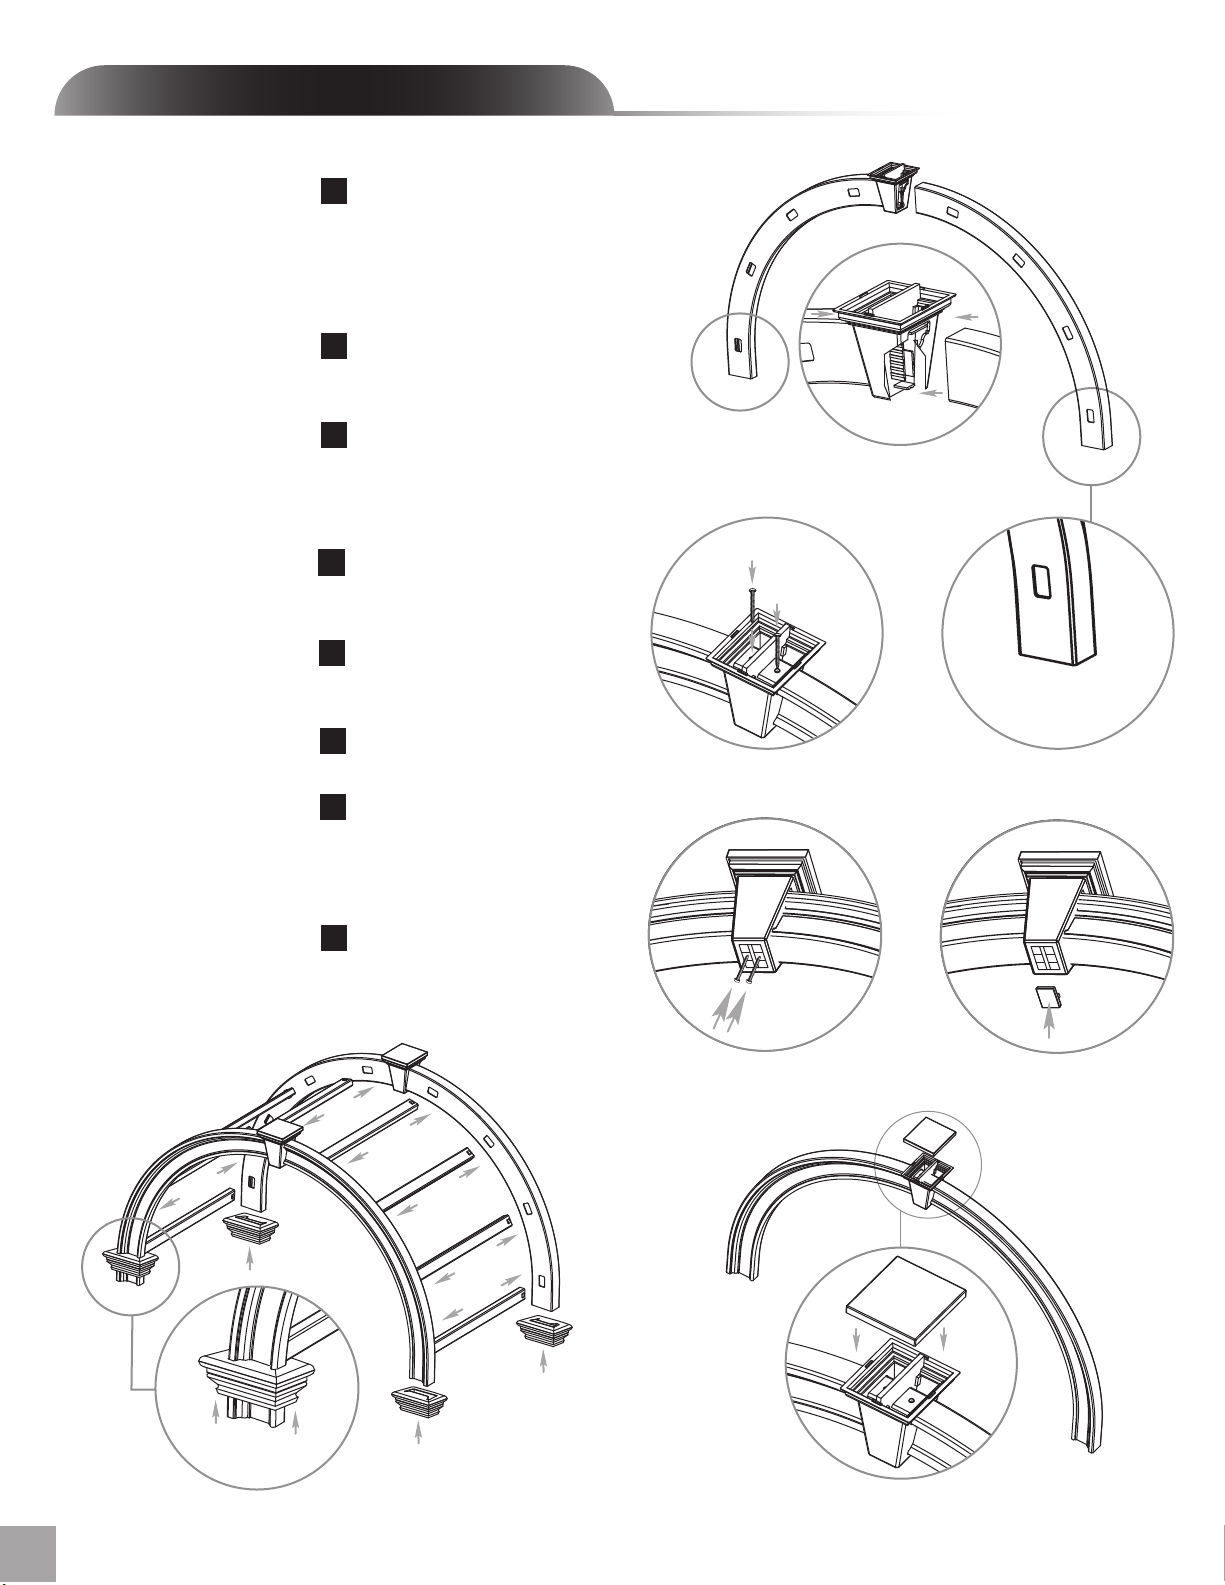
Assemble the Arch System
1
Insert arches into arch keystone ensuring they terminate flus
to the internal connector. Ensure that the “R” and “L” identi-
fications
protruding out of the internal connector should fit outside the arches.
Ensure that the arches are orientated properly as per illustration.
are located at the bottom of the arch assembly. The tabs
h
2
Fasten the arch system to the keystone by installing the small
(1 1/2 in. / 4 cm.) screws into the two pre-drilled holes provided.
3
Invert the arch system and install two small (1 1/2 in./ 4 cm.)
screws from the bottom of the keystone into the two predrilled flanges on either side of the bottom of the insert. This
will connect the bottom
of the arches to the insert.
4
Seal the bottom hole on the keystone by inserting the bottom
plate as provided.
5
Install the top cap on the arch keystone. Push down firmly
so the cap locks into position.
6
Repeat for other arch.
7
Insert arch rafters (8) into the holes on the arches until they
bottom out inside the arches. There are “locking tabs” located
at each end of these rafters that once inserted into the holes
will lock into place.
R
1
L
L
“R” and “L” identifications
at the bottom of the
2
arch assembly.
8
Install post caps on the bottom of all arches. Slide up into
temporary position until they hit the first rafter.
7
Slide up to
8
the first rafter.
3 4
5
2
The Arbor / Arch
Page 3
STEP T WO
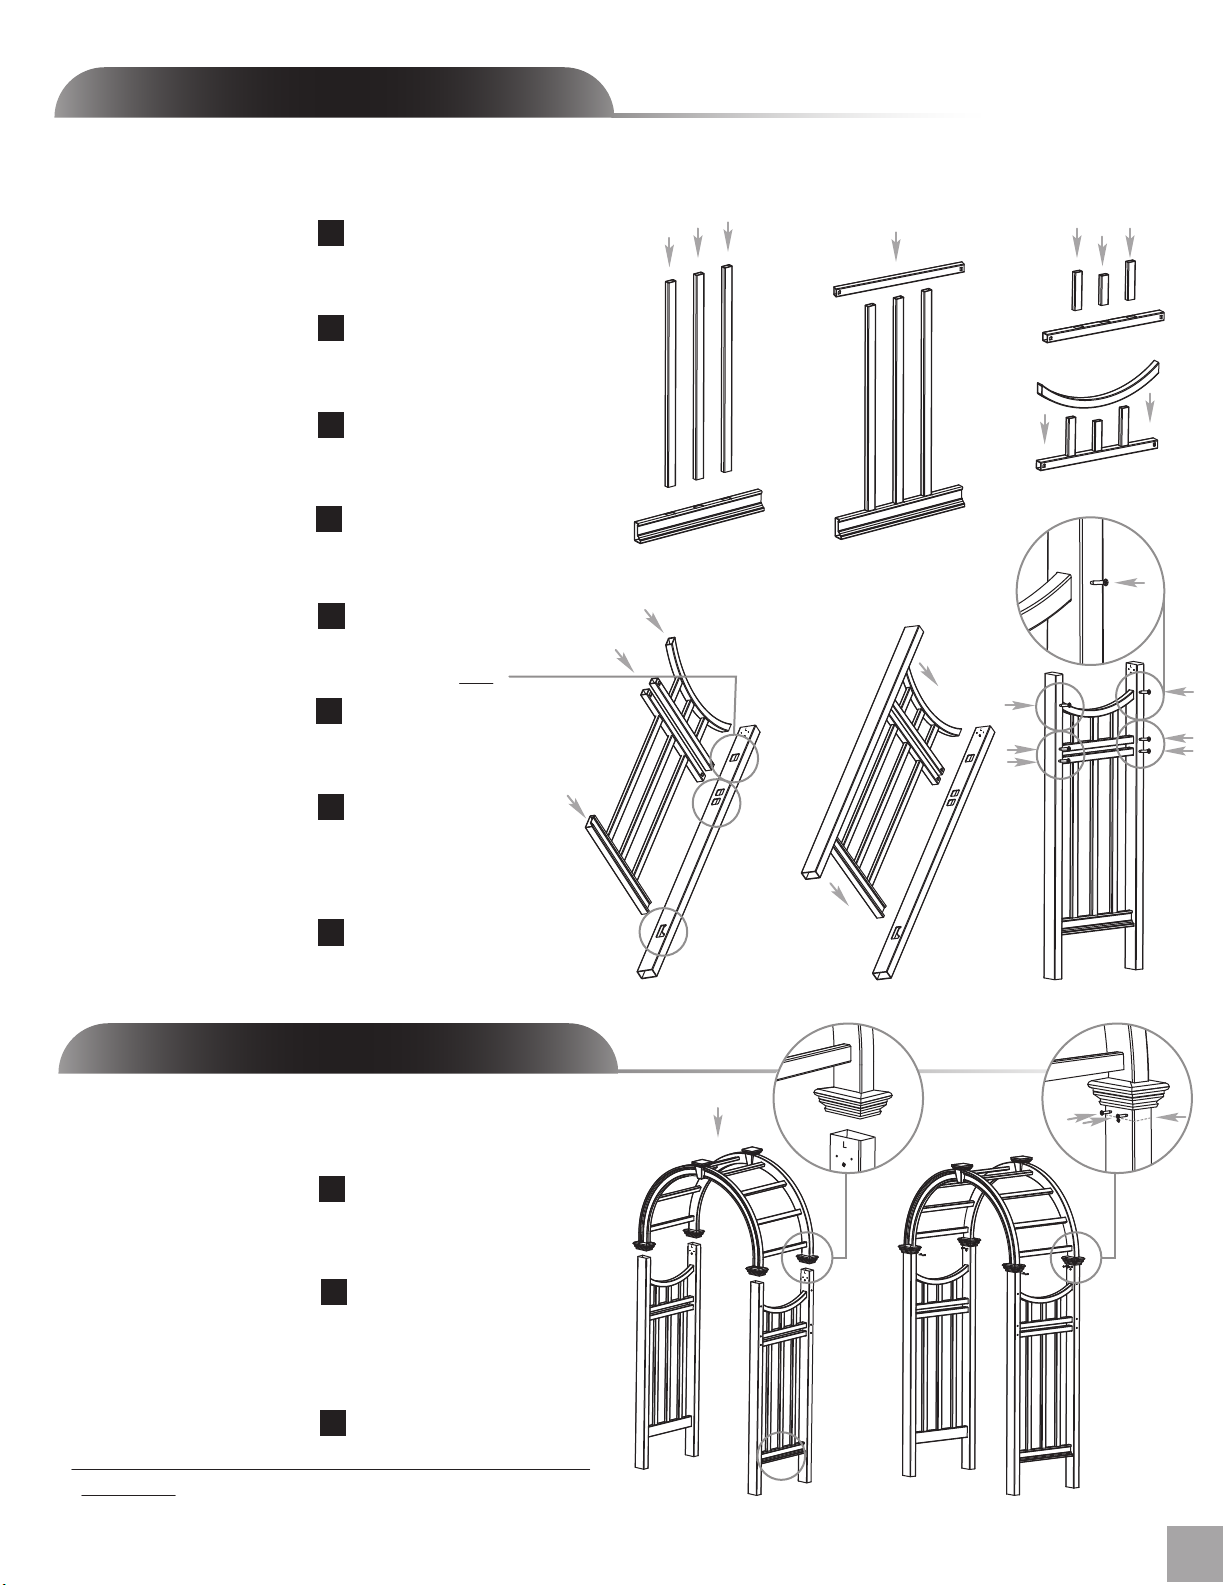
Assemble the Top & Bottom Side Panels
1
Lay out the horizontal bottom rail and insert the three long
vertical spindles.
2
Slide one horizontal mid-rail over the ends of the spindles
to complete the bottom panel.
3
Layout the other horizontal mid-rail and insert the three shorter
spindles in the pattern identified on the illustration.
4
Slide the horizontal bent top rail over the ends to complete
the top side panel to complete the top panel.
5
Set out one post and complete the side panel by inserting it int
the post. Start with the bent top rail first.
6
Layout the second post with holes facing upwards and insert
the completed panel and connected post into.
o
NOTE: Some of the horizontal rails have locking tabs located
at both ends. Once inserted and pushed into the routered
holes, they will lock into place.
A
A
B
3
4
1
Insert
1st
2
7
Fasten the horizontal bent top rail and both horizontal mid
rails to the posts by installing 6 long (3 in./ 8 cm.) screws into
posts as illustrated.
8
Repeat for other side panel.
STEP T H REE
Connect Arch System to Side Panels
1
Set out both side panels ensuring that bottom rail profiles
are facing outwards.
2
Insert the assembled arch into the top of all four posts
until the arch bottoms rest on top of the "stopper" bolts.
You will need a helper.
Insert
2nd
Insert
5
3rd
6
7
*
Bottom
*
of Arch
3
Pull the post caps down into final position over the posts
and fasten the arch system to the posts by installing 2 short ( 1
1/2 in. / 4 cm) screws per post as illustrated.
2
3
1
The Arbor / Arch
3
Page 4
STEP FOUR
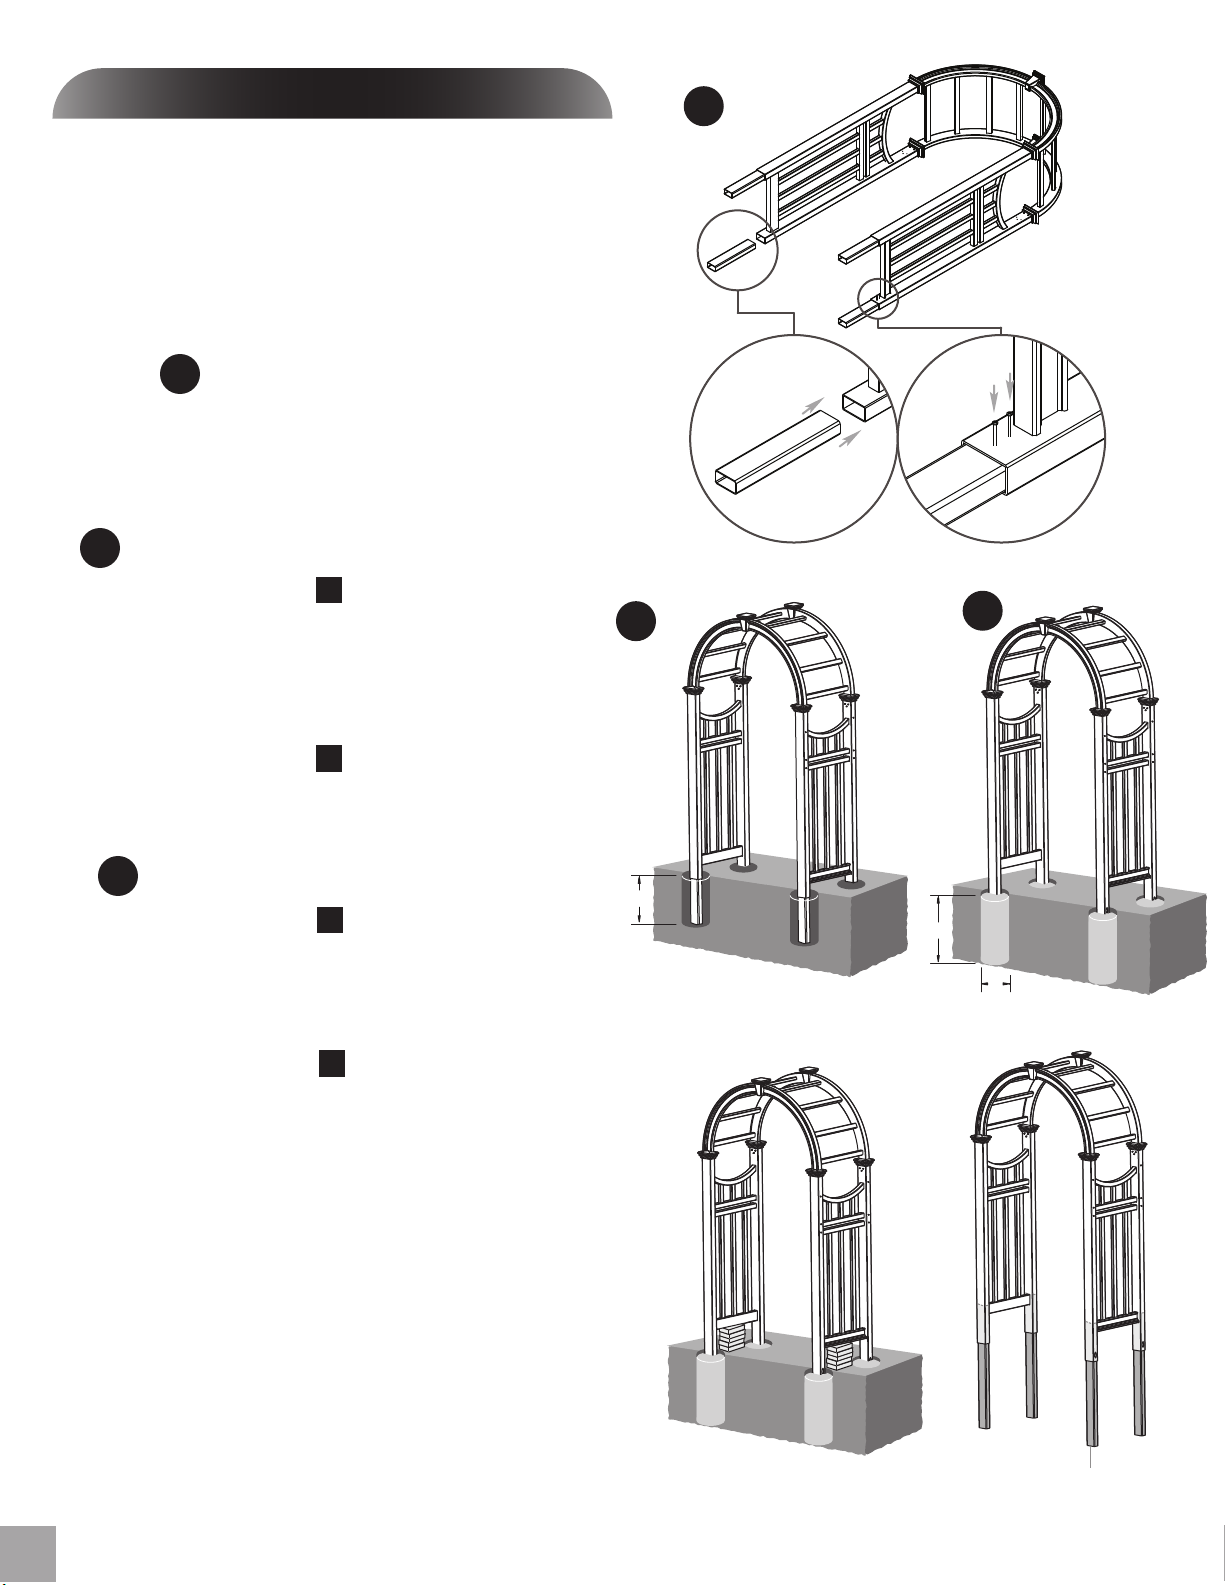
Ground Anchors Installation
Arbors must be well secured to prevent tipping over from wind load etc.
We have provided four ground anchors for securing the arbor either
into the ground or a concrete footing. In some cases it may be acceptable
to secure the arbor to an existing structure such as a fence post. If you
are installing your arbor on concrete or a deck, see your hardware
store for the appropriate galvanized bracketing hardware.
A Install Ground Anchors
Insert the ground anchors into each of the post until they
reach the bottom rail.
Fasten each posts with two of the provided screws as shown.
B Into Earth Without Concrete Footing
1
Move the arbor to its final location (you will need a helper).
you are satisfied with the location, mark the positions of
then move the arbor aside and lay it carefully on it’s side.
holes approx 12” (30 cm) deep. Carefully move the arbor back
position and level it both
vertically and horizontally.
the posts,
Excavate 4
When
into
B
A
C
2
Backfill the holes with the excavated soil to cover the anchors.
C Into Earth With Concrete Footing
1
Complete A #1 above, with the excep
least 6” (15 cm) wide x 18” (46 cm) deep. Fill holes with wet cement
within 3” (8 cm)
purchase separately). Carefully
Support the arbor plumb and level over the holes with bricks,
stones or blocks of wood under the bottom rail of the side
panel.
of your grade (you will need 2 bags of pre-mix concrete -
The post bottoms should insert themselves approx
1/2” (1.3 cm)into
Optional
If you plan on attaching a fence or bench to the arbor, or in the
event of extreme wind conditions we
using the ground anchors provided. Consider purchasing pressure
treated lumber and trimming it down to 3 1/4 (8.3 cm) wide
and cutting
posts until
panel. Fasten
it into 36” lengths. Insert into the bottom of all four
they hit the bottom horizontal rail on the side
accordingly with screws and install either directly
into the ground
or into a
tion of excavating the holes
move the arbor back into position.
2
the concrete.
would not recommend
concrete footing.
12"
30 cm
at
18"
46 cm
6"
15 cm
1
Optional
2
2“ x 4” (5 cm x 10 cm) Wood Insert
(Purchase Separately)
4
 Loading...