

Page 1
Page 1 of 1
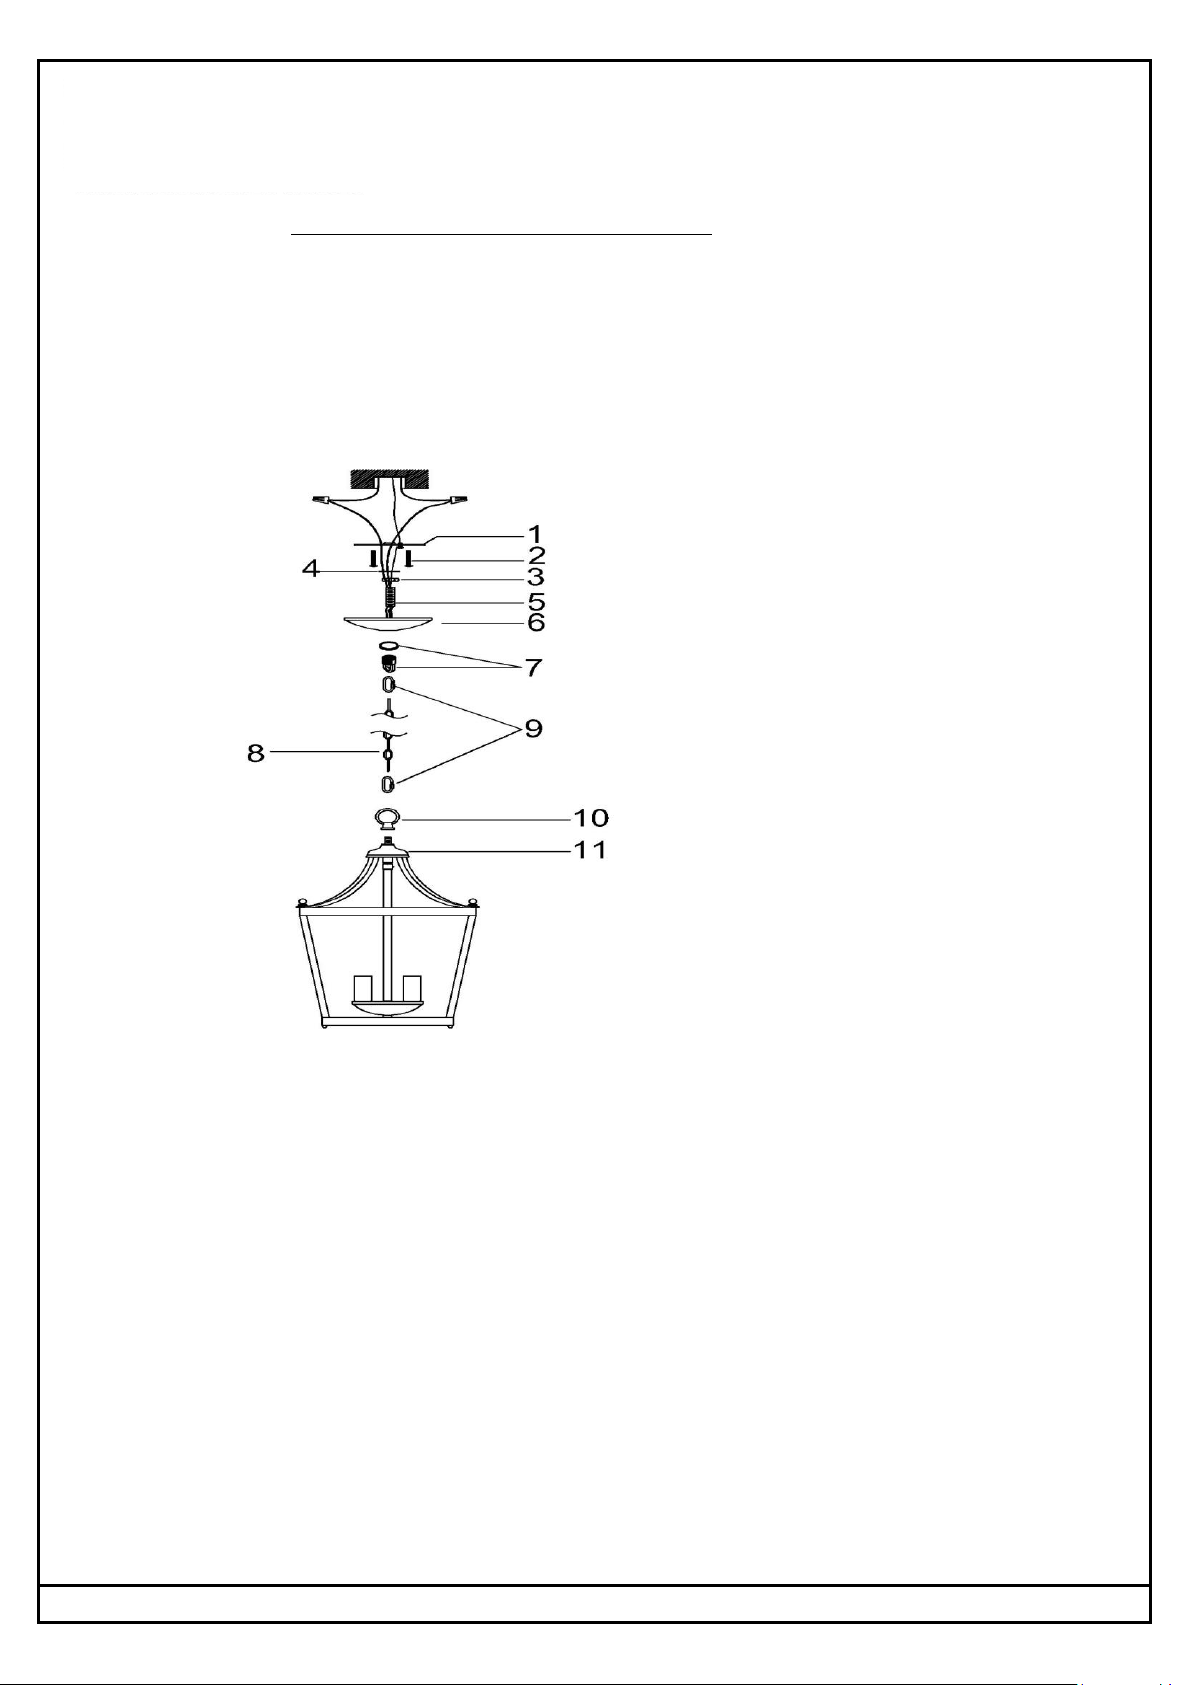
Components
1. Mounting Bar
2. Outlet Box Mounting Screw
3. Hex Nut
4. Washer
5. Nipple
6. Canopy
7. Threaded Ring & Screw Collar Loop (1/8-27IP)
8. Chain
9. Chain Link
10. Loop
11. Fixture
Last Updated: 01/11/2019
Important Safety information (Please read before proceeding)
ASSEMBLY AND INSTALLATION INSTRUCTIONS
1. Remove the fixture, parts and all mounting hardware bags (orange) from the carton and verify that all parts are present according to the illustration sheet. All parts must be used
as indicated. Do not replace any parts, leave any parts out, or use any parts which are worn out or broken. Failure to follow the instructions could cause a hazardous situation,
voids the warranty and violates the U.L. listing of the fixture.
2. To prevent the electric shock, turn off the main power at the circuit breaker before installing the fixture. NEVER attempt to install, clean or replace bulbs without shutting off
the electricity to the fixture.
3. Never use light bulbs with wattage ratings that exceed the fixtures maximum rating. Always make sure the electric current is turned off before changing the bulbs.
4. If you experience difficulties installing the lighting fixture or it fails to work as expected, please contact a local qualified licensed electrical contractor.
5. Please contact your local Capital Lighting Fixture reseller with any assembly or installation questions. Your local reseller can also provide you with replacement parts for your new
fixture.
1. Pass Lead wire thru Loop (10), then screw it onto end of Nipple of Fixture Top (11) tightly.
2. Take Nipple (5) from parts bag and screw in Screw Collar Loop (7), and run Hex Nut (3) and Washer (4)down Nipple (5), then screw Nipple (5) into
Mounting Bar (1). Mounting Bar (1) must be positioned with extruded thread faced into Outlet Box. Nipple (5) must protrude out the back of
Mounting Bar (1).
3. Attach Mounting Bar (1) to Outlet Box with Outlet Box Mounting Screws (2).
4. Unscrew the Threaded Ring from Screw Collar Loop (7). Take Canopy (6) and pass over Screw Collar Loop (7). Approximately one half of the
Screw Collar Loop exterior threads should be exposed. Adjust Screw Collar Loop (7) by turning assembly up or down in Mounting Bar (1). Remove
Canopy (6).
5. After desired position is found, tighten Nipple (5) onto Screw Collar Loop (7) and tighten Hex Nut (3) with Washer (4) against the Mounting Strap
(1).
6. Slip Canopy (6) over Screw Collar Loop (7) and thread on Threaded Ring. Attach Chain (8) and Chain Link (9) with fixture connected to bottom of
Screw Collar Loop (7). Unscrew Threaded Ring, let Canopy (6) and Threaded Ring slip down.
7. Pass lead wire and ground wire through chain links no more than 3 inches apart, then pass wires through Threaded Ring, Canopy (6), Screw Collar
Loop (7), Nipple (5) and into Outlet Box.
8. Connect fixture ground wire to the outlet box ground wire with wire connector supplied; connect the common wire of the lamp cord to the
power supply white wire with wire connector supplied; connect supply wire of the lamp cord to the power supply black wire with wire connector
supplied. Note: This fixture is wired using 2 conductor Lamp cord. The insulation between the two conductors on the lamp cord can be split down
the center for better access to the two conductors. The common wire on the lamp cord is identified as the conductor with ribs embossed in the
rubber wire insulation.
9. Raise Canopy (6) to ceiling, verify all wires are securely inside Canopy (6), then secure Canopy (6) in place by tightening Threaded Ring onto Screw
Collar Loop (7).
Assembly Instructions
 Loading...