

Page 1
EASY CONNECT®
INSTALLATION INSTRUCTIONS
INSTRUCTIONS PERTAINING TO RISK OF FIRE OR INJURY TO PERSONS
READ ALL INSTRUCTIONS
IMPORTANT SAFETY
INSTRUCTIONS
!
SAFETY PRECAUTIONS:
1. TURN OFF ELECTRICAL POWER BEFORE STARTING INSTALLATION OF LIGHT FIXTURE.
2. WIRING SUPPLIES AS REQUIRED BY LOCAL ELECTRICAL CODE.
3. THIS PRODUCT MUST BE INSTALLED IN ACCORDANCE WITH THE APPLICABLE INSTALLATION CODE BY
A PERSON FAMILIAR WITH THE CONSTRUCTION AND OPERATION OF THE PRODUCT AND THE
HAZARDS INVOLVED.
4. TO CLEAN THE FIXTURE, TURN OFF THE POWER, WAIT FOR IT TO COOL, AND WIPE THE FIXTURE WITH
A CLEAN, SOFT CLOTH.
NOTE: Product may not look exactly as shown in figures.
INSTALLATION:
Step 1
SAVE THESE INSTRUCTIONS
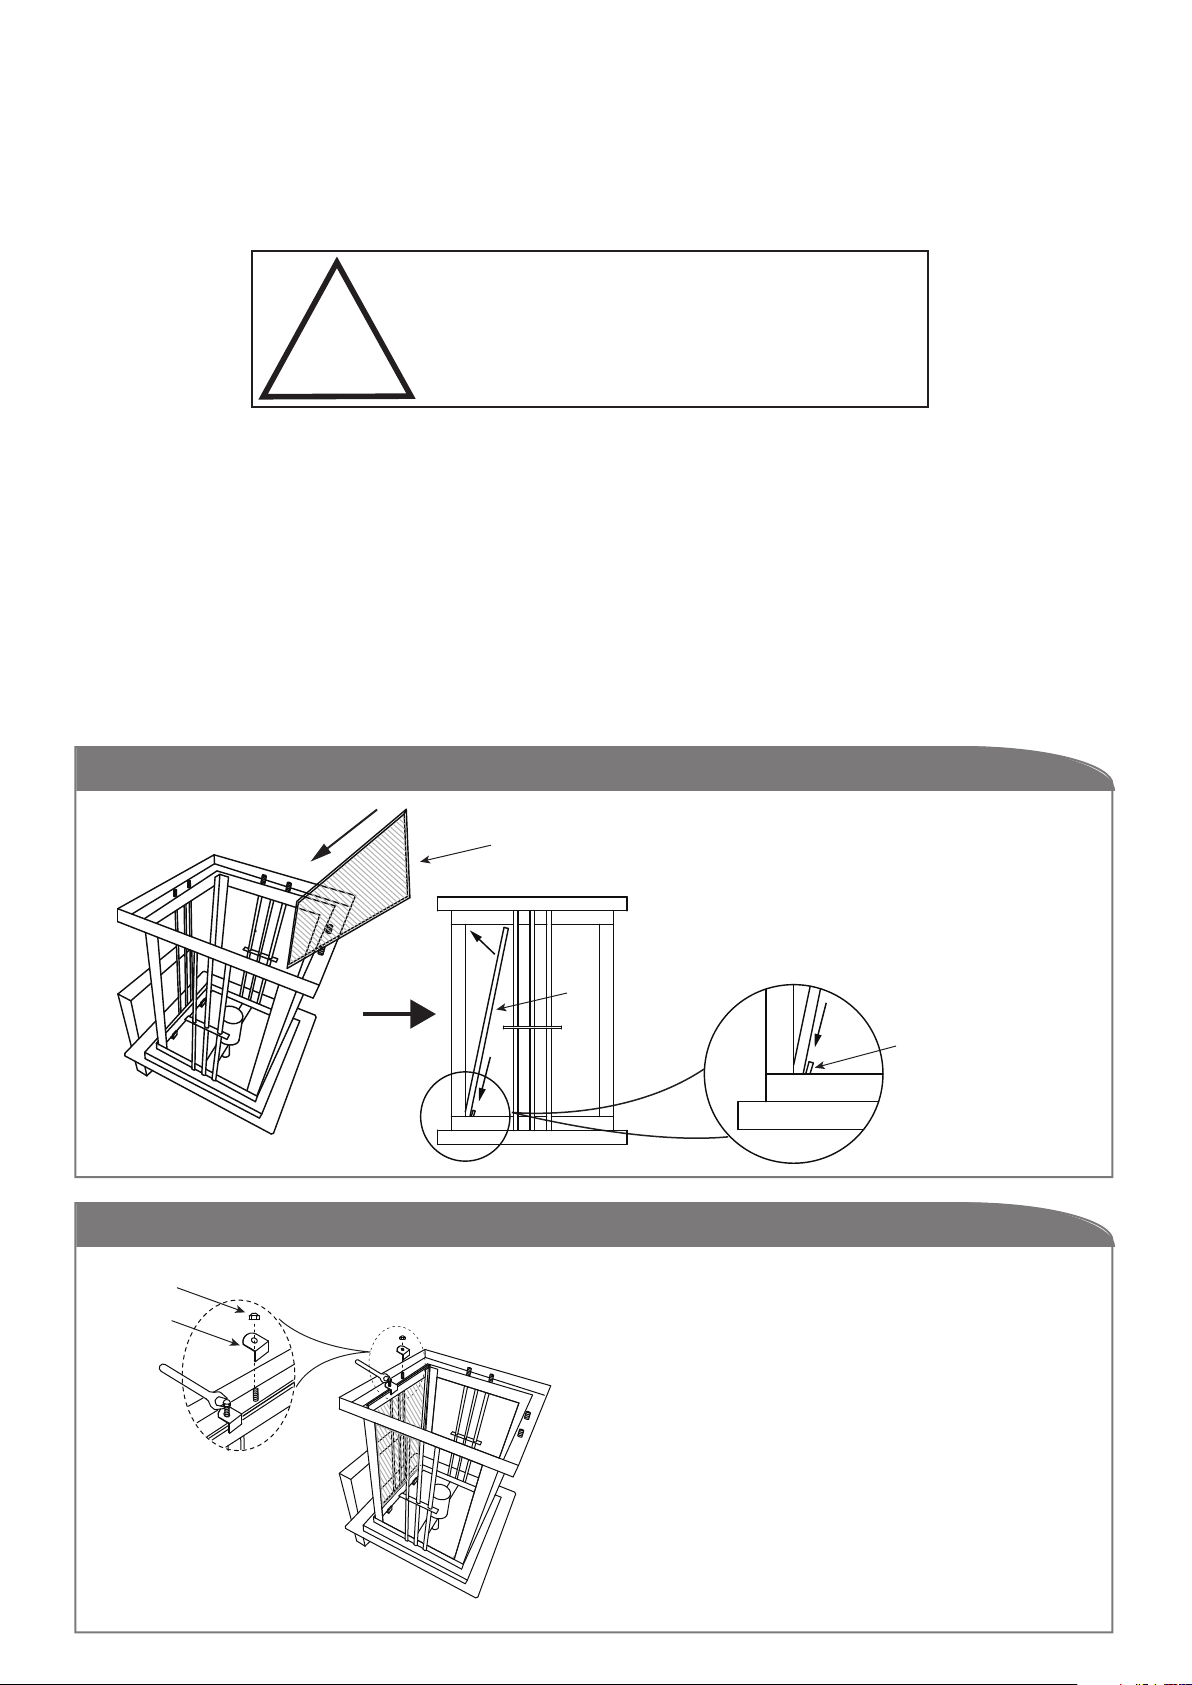
Glass
a. Position the fixture as shown for easy
installation.
Step 2
Nut
Clip
b. Insert glass as shown.
c. Position glass behind 2 clips.
Glass
Clip
Position the clip over the stud on the fixture and
secure it with the nut.
Repeat steps for other glasses.
1
Page 2
Step 3 Step 4
Electrical
box screws
Option 1
Easy Connect
mounting
bracket
N
L
Green
Electrical
Box
White
(Ground)
(Neutral)
Black (Live)
Green (Ground)
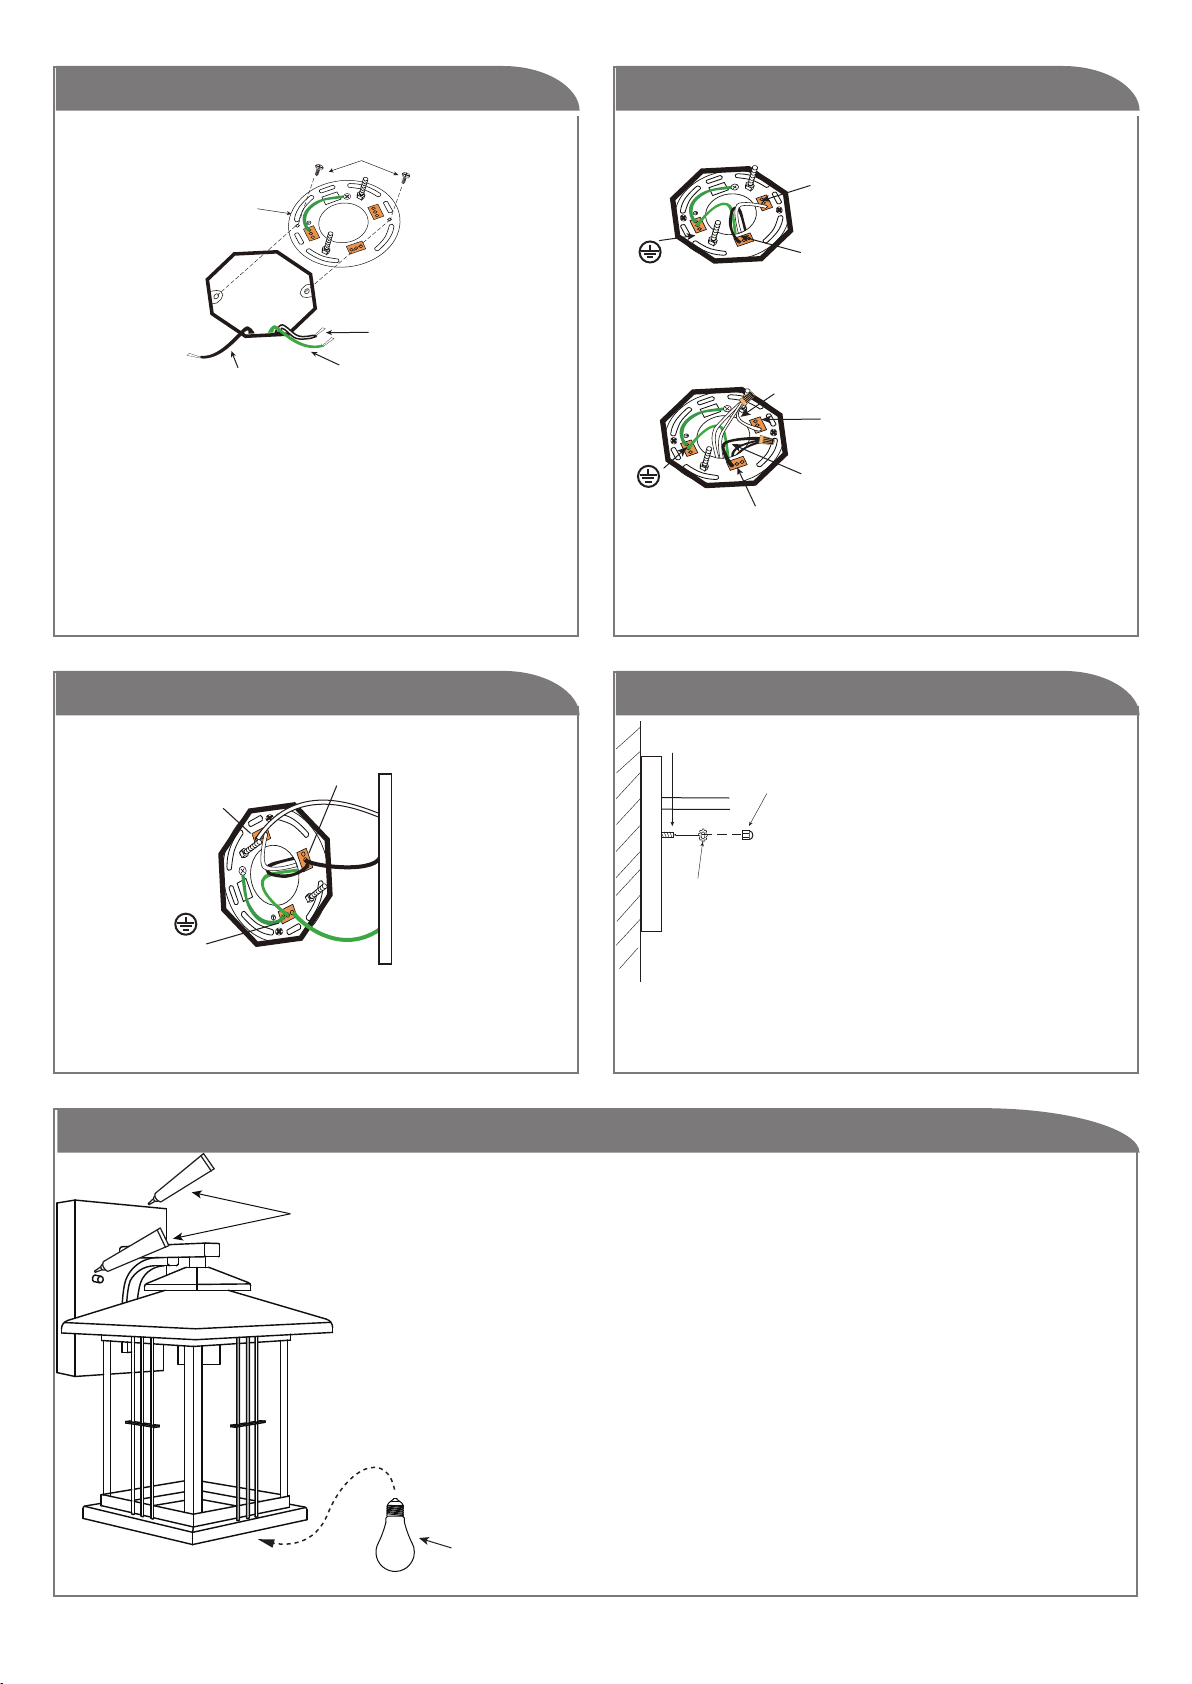
Attach easy connect mounting bracket to electrical
box with electrical box screws (not included).
Option 2
Green
(Ground)
Step 5 Step 6
N
L
Jumper Wire
N
L
Jumper Wire
(L)
Black (Live)
(N)
White
(Neutral)
(L)
Black
(Live)
(N)
White
(Neutral)
Option 1: Connect (push)
electrical wires from
electric box (house
wiring) into correct
inserts.
Option 2: For multiple
black (live) & white
(neutral) wires joined in
the electrical box (house
wiring), attach a single
“black” and “white”
Jumper Wire
before connecting. Strip
7mm from a 6” Jumper
Wires (AWG 12-24)
supplied. Then connect
(push) wires into correct
inserts.
(L)
(N)
Black (Live)
White
(Neutral)
N
L
Fixture
Green
(Ground)
Connect (push) electrical wires from fixture into
correct inserts.
Step 7
Weather
Resistant
Caulking
(not included)
Install the proper bulb type and wattage (not included).
Stud
Cap Nut
Star
Washer
Tuck electrical wires into electrical box and
position fixture over studs on mounting bracket
assembly. Secure fixture in place with star washers
and cap nuts.
After Installation, seal around the top and side perimeter between
the fixture and the wall surface with weather resistant caulking.
The bottom should be left un-caulked to prevent moisture
build-up. Apply a small amount of weather resistant caulking
around the side perimeter between the cap nut and mounting plate.
Bulb
2
Page 3
MODE D’ INSTALLATION®
CONNECTEUR EASY CONNECT
INSTRUCTIONS CONCERNANT LE RISQUE
D’INCENDIES OU LES DOMMAGES CORPORELS
LISEZ TOUTES LES INSTRUCTIONS
INSTRUCTIONS DE SÛRETÉ
!
IMPORTANTES
GARDEZ CES INSTRUCTIONS
MISE EN GARDE:
1. FERMER LE COURANT AU DISJONCTEUR AVANT DE DÉBUTER L’INSTALLATION DE LA FIXTURE.
2. FOURNITURES ÉLECTRIQUES TELLES QUE PRESCRITES PAR LES NORMES LOCALES.
3. CE PRODUIT DOIT ÊTRE INSTALLÉ SELON LE CODE D’INSTALLATION PERTINENT, PAR UNE PERSONNE
QUI CONNAIT BIEN LE PRODUIT ET SON FONCTIONNEMENT AINSI QUE LES RISQUES INHÉRENTS.
4. POUR NETTOYER LE LUMINAIRE, L’ÉTEINDRE, ATTENDRE QU’IL SOIT FROID, PUIS LE NETTOYER AVEC
LINGE PROPRE ET DOUX.
N.B.: Peut différer de l’illustration.
INSTALLATION:
Étape 1
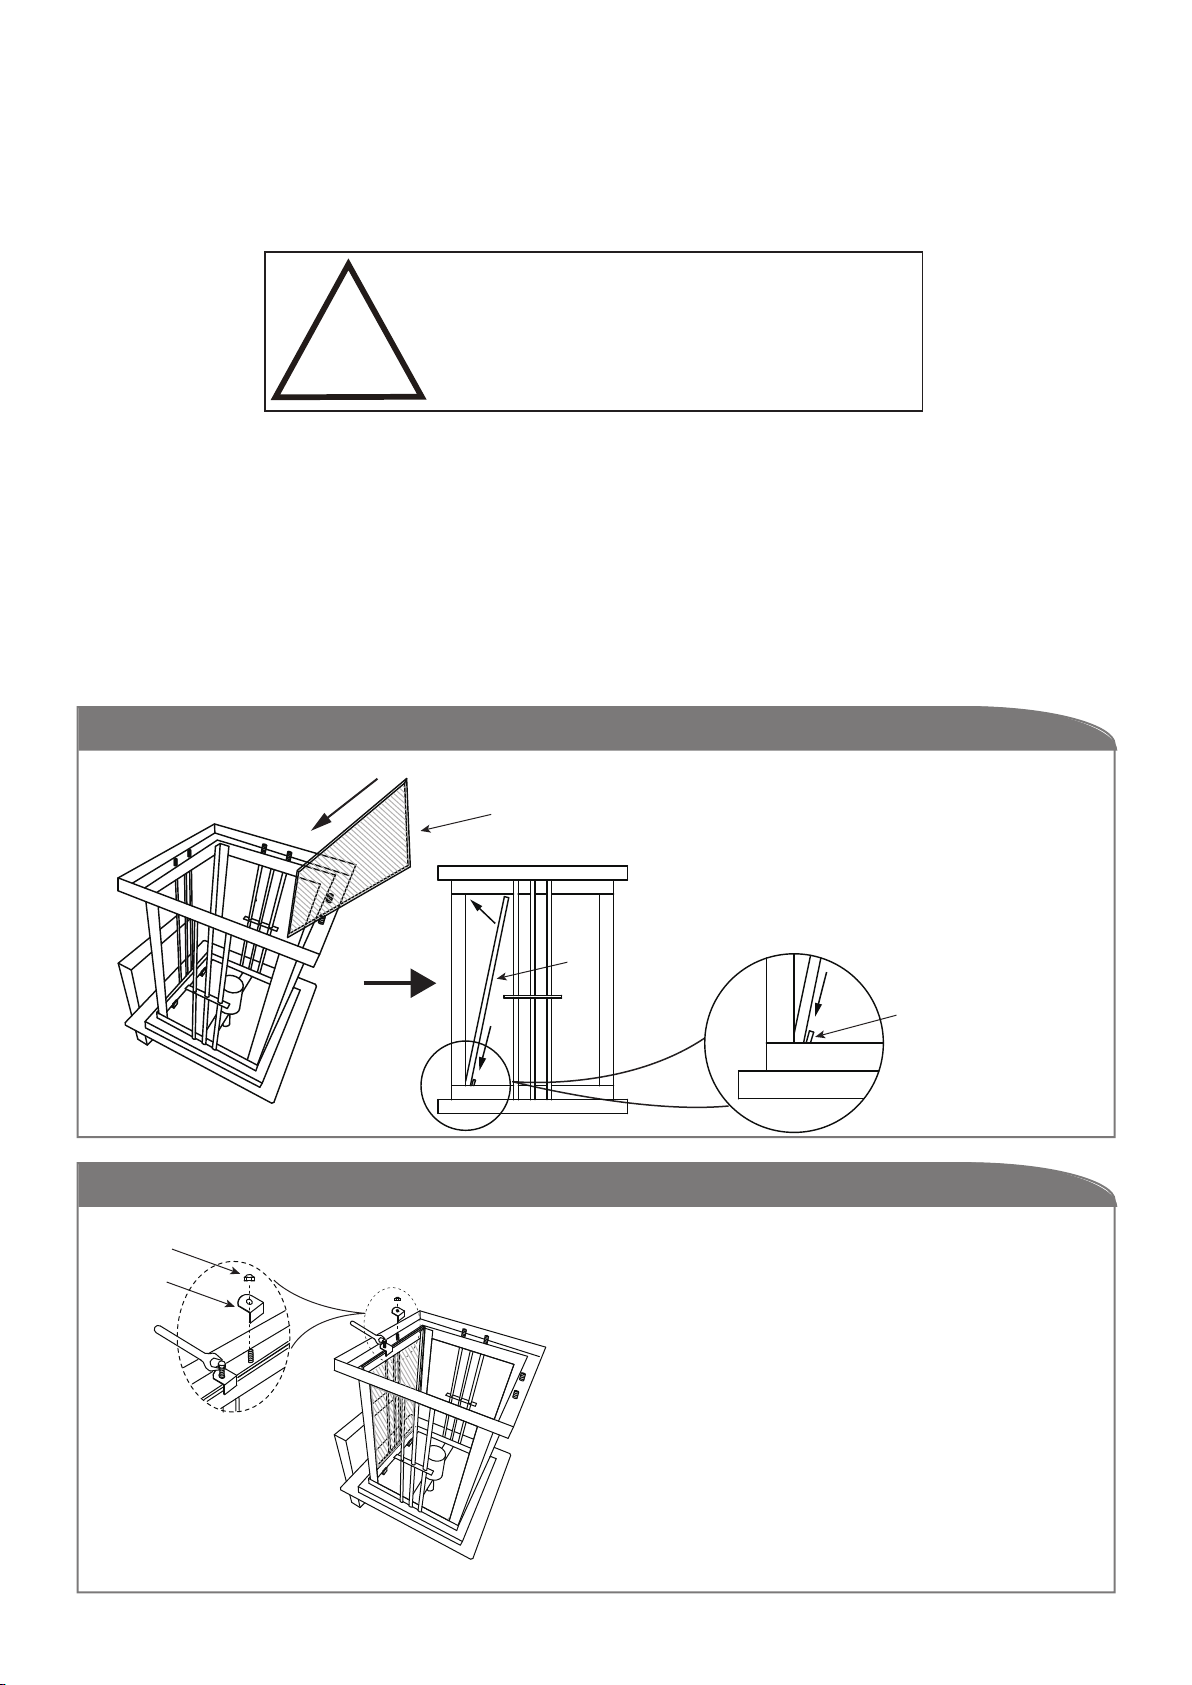
Vitre
a. Poser le luminaire tel qu’illustré pour faciliter
l’installation.
b. Insérer le verre tel qu’illustré.
c. Placez le verre derrière les 2 pinces.
Étape 2
Écrou
Pince
Vitre
Pince
Placer la pince sur le goujon et fixer en postion à
l’aide de l’écrou.
Répéter les étapes pour les autres verres.
1
Page 4
Étape 3 Étape 4
Vis De La Boîte
Ferrure de
Électrique
montage Easy
Noir
(Sous Tension)
Connect
Electrical
Box
N
L
Blanc
(Neutre)
Vert
(Mise À Terre)
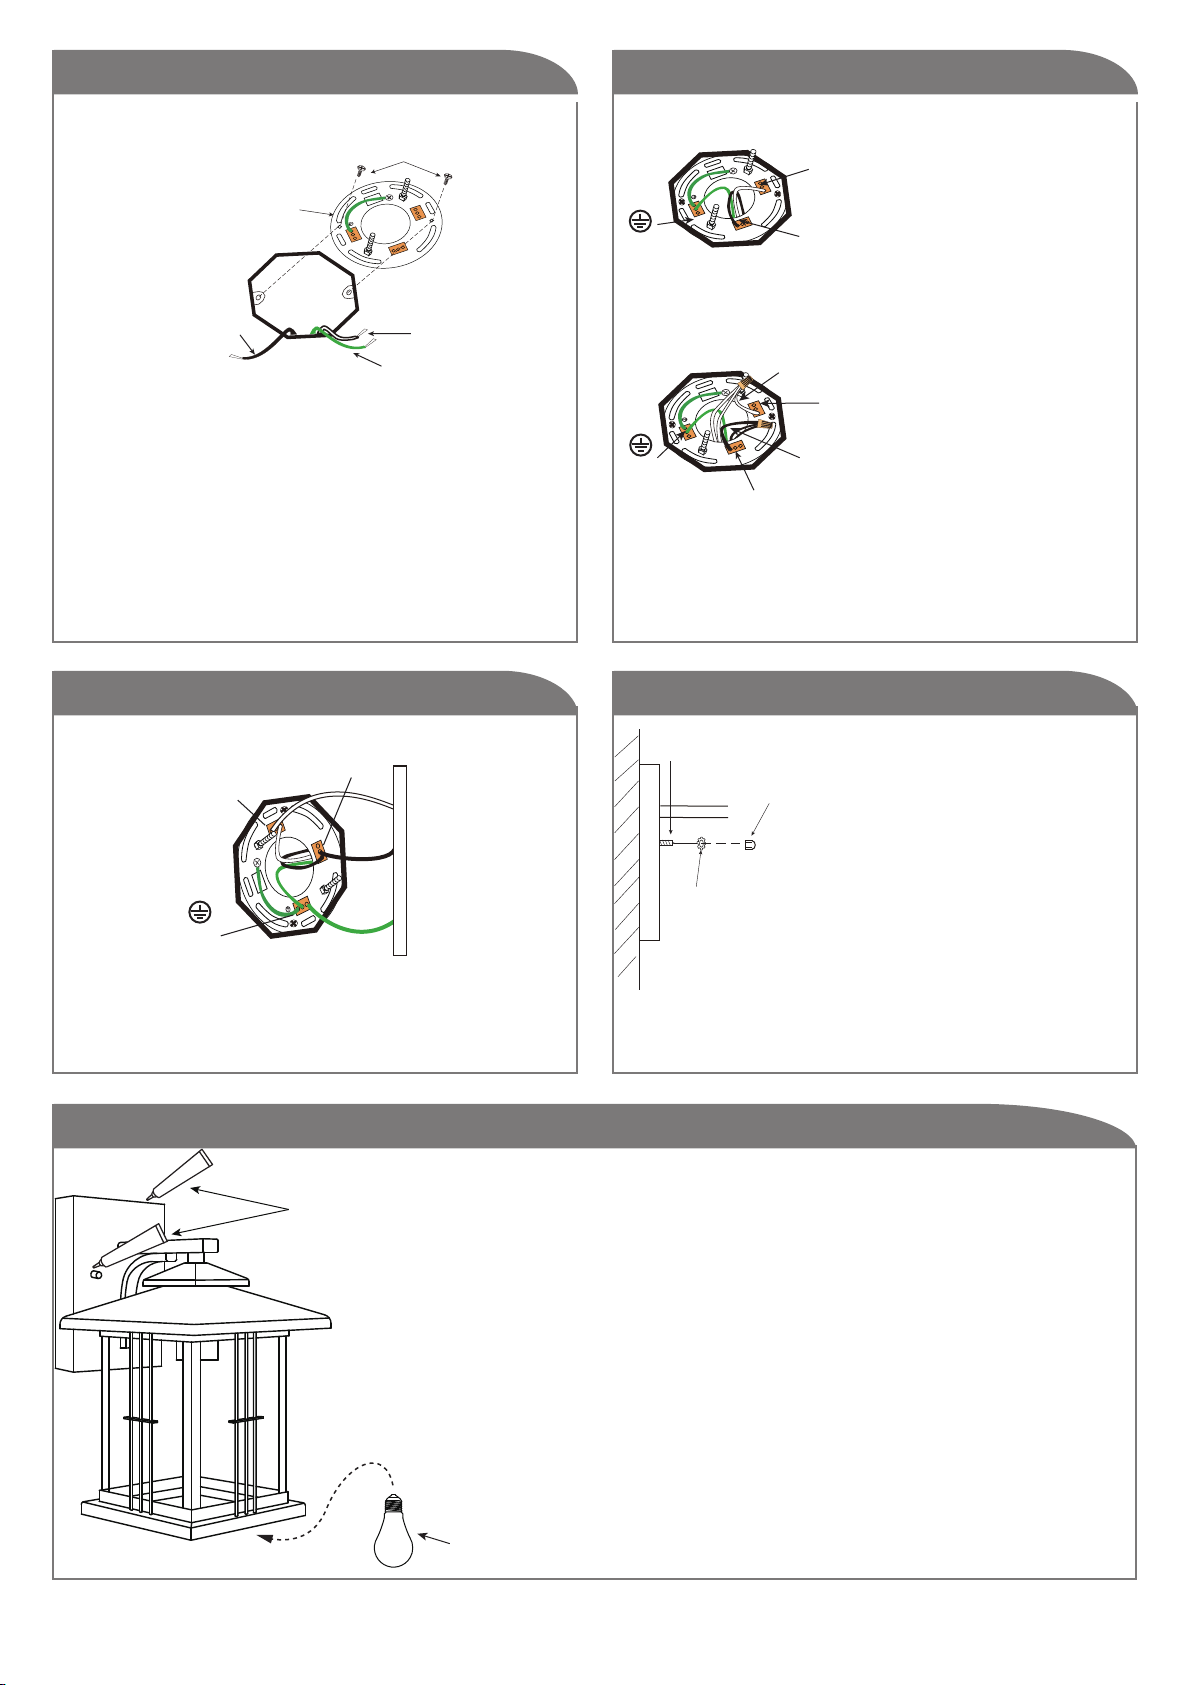
Posez la ferrure de montage easy connect à la boîte
électrique à l'aide des vis de la boîte électrique (en sus).
Option 1
Vert
(Mise À Terre)
Option 2
Vert
(Mise À Terre)
(Sous Tension)
N
(Neutre)
L
Noir
(Sous Tension)
Fil De Pontage
N
(Neutre)
L
Fil De
Pontage
(L)
Noir
(N)
Blanc
(L)
(N)
Blanc
Option 1: Poussez pour
brancher les fils de la
boîte électrique (courant
de la maison) dans les
insertions appropriées.
Noir (sous tension), blanc
(neutre), vert (mise à
terre)
Option 2: Lorsque vous
avez plus d'un fil noir
(sous tension) ou blanc
(neutre) liés ensemble
dans la boîte électrique
(filage de la maison),
posez un fil de pontage
''noir'' et un fil de pontage
''blanc'' avant le
branchement. Retirez
7mm de la gaine d'un fil
de pontage de 6'' (AWG
12-24) inclus. Posez
(poussez) les fils dans les
insertions appropriées.
Étape 5 Étape 6
(N)
Blanc
(Neutre)
N
Vert
(Mise À Terre)
(L)
Noir
(Sous Tension)
L
Fixture
Goujon
Rondelle
étoilée
Poussez délicatement les fils à l’intérieur de la
boîte électrique et placez le luminaire sur les
Connect (push) electrical wires from fixture into
correct inserts.
goujons sur la ferrure de montage. Serrez le
luminaire en place à l’aide des écrous étoilés
et les écrous à capuchon.
Étape 7
Calfeutrage Resistant
Aux Intempéries
(en sus)
Posez l'ampoule de type et de wattage requise (en sus).
Ecrou
A Tete
Ampoule
Après l’installation, scellez autour des périmètres du haut et des
cotés avec un scellant contre les intempéries. Le dessous ne
devrait pas etre scellé pour prévenir une accumulation
d’humidité. Appliquez une petite quantité de calfeutrage
autour du périmètre entre l’écrou à capuchon et la plaque de
montage.
2
 Loading...