

Page 1
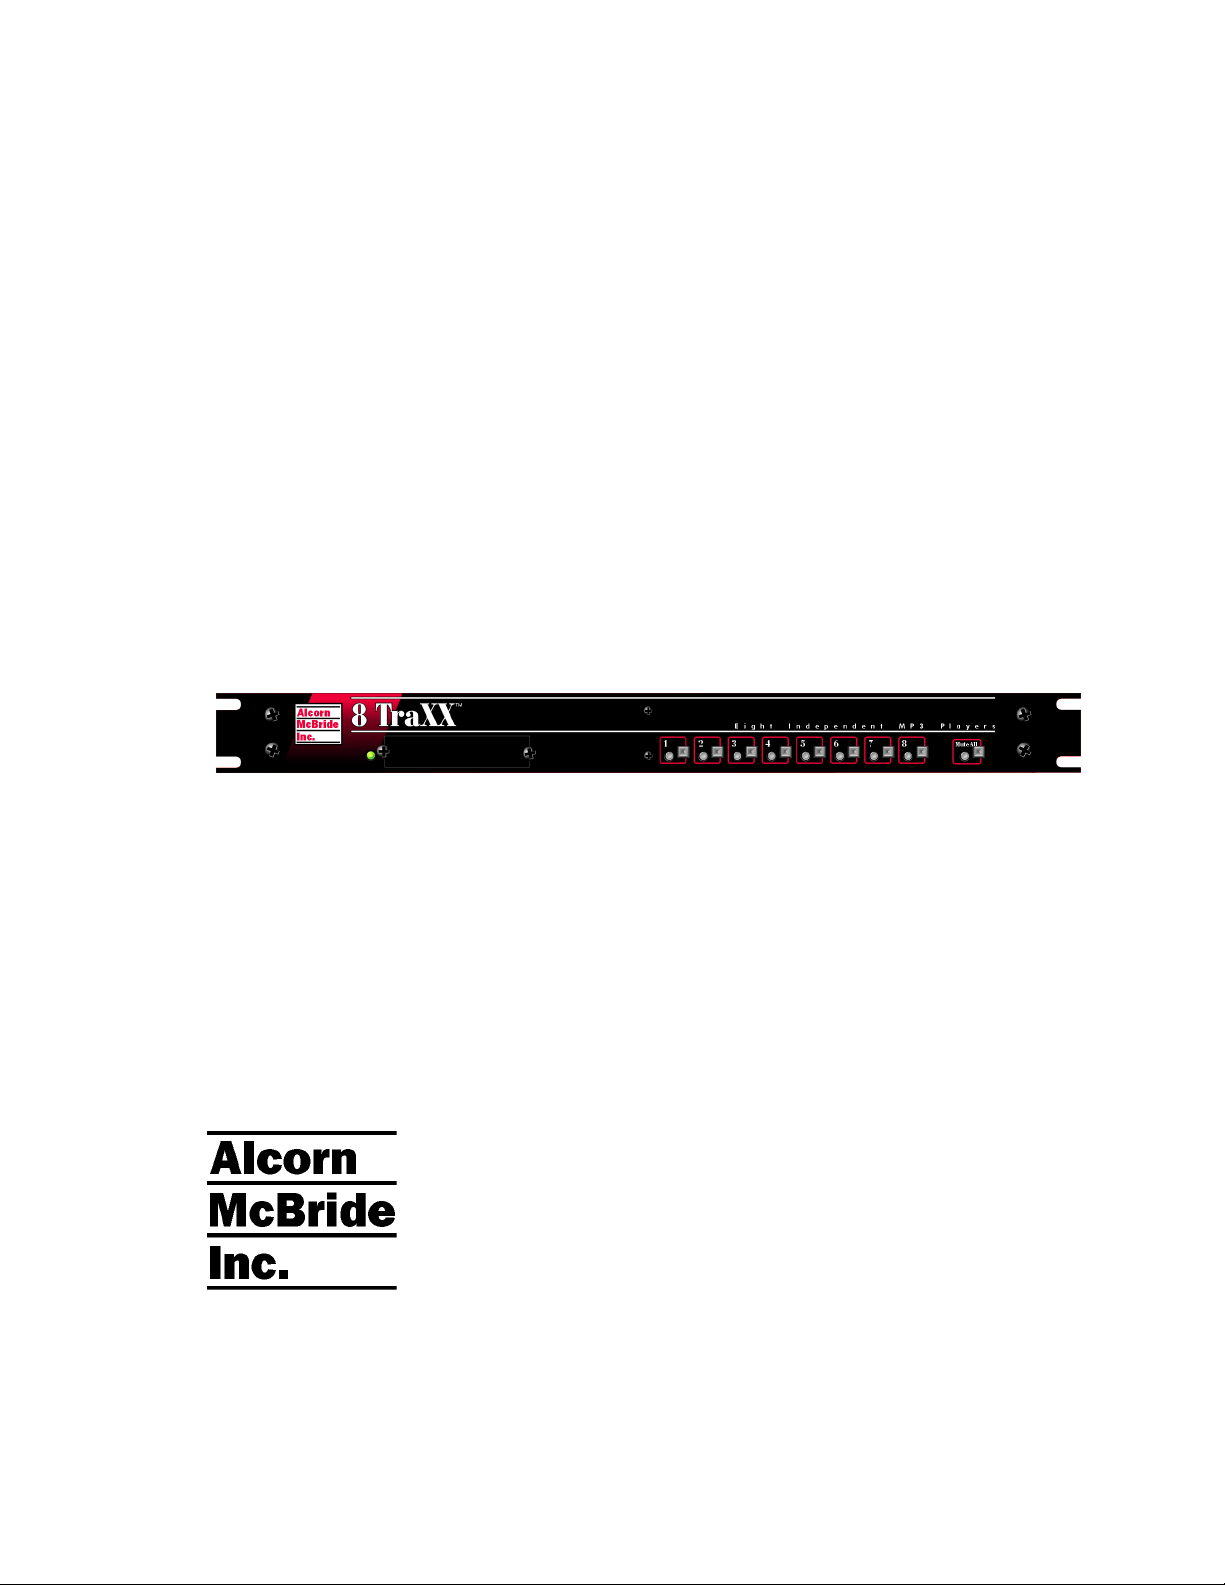
8 TraXX
Eight Independent MP3 Players
User’s Guide
Page 2

Page ii February 9, 2005 • Alcorn McBride 8TraXX User’s Manual • Rev 1.7 •
Page 3

Every effort has been made to assure the accuracy of the information contained in this manual, and the
reliability of the Alcorn McBride 8TraXX hardware and software. Errors can sometimes go undetected,
however. If you find one, please bring it to our attention so that we can correct it for others. Alcorn McBride
welcomes comments and suggestions on the content and layout of its documentation.
Applications described herein are for illustrative purposes only. Alcorn McBride Inc. assumes no responsibility
or liability for the use of these products, and makes no representation or warranty that the use of these products
for specific applications will be suitable without further testing or modification. Alcorn McBride products are
not intended for use in applications where a malfunction can reasonably be expected to result in personal injury.
Customers using or selling Alcorn McBride products for use in such applications do so at their own risk, and
agree to fully indemnify Alcorn McBride for any damages resulting from such improper use or sale.
This publication was created using Microsoft Word 2000, Version 9.0. Camera-ready art and illustrations were
produced using Corel DRAW!, Version 6.0.
8TraXX™ is a trademark of Alcorn McBride Inc., all rights reserved.
Copyright 2000 Alcorn McBride, Inc. All rights reserved.
Hardware Design: Jim Carstensen, Jeremy Scheinberg
Firmware Design: Jim Carstensen, Chris Harden
Mechanical Design: Martin Chaney
Part Number: 110-100580
Document Revision: 1.7
February 9, 2005
Alcorn McBride Inc.
3300 S. Hiawassee Rd.
Bldg. 105
Orlando, FL 32835
(407) 296-5800
FAX: (407) 296-5801
Internet: http://www.alcorn.com
e-mail: [email protected]
February 9, 2005 • Alcorn McBride 8TraXX User’s Manual • Rev 1.7 • Page iii
Page 4

Page iv February 9, 2005 • Alcorn McBride 8TraXX User’s Manual • Rev 1.7 •
Page 5

Table of Contents
Welcome!____________________________________________________________________________ 1
Features_____________________________________________________________________________ 1
Front Panel Controls and Indicators _____________________________________________________ 2
Test Channel Buttons _________________________________________________________________ 2
Channel Status LEDs _________________________________________________________________ 2
Mute All Button and LED _____________________________________________________________ 2
Unit Status LED _____________________________________________________________________ 3
Error Indications_____________________________________________________________________ 3
Rear Panel Controls and Connectors _____________________________________________________ 4
Audio Outputs ______________________________________________________________________ 4
Parallel Control Inputs ________________________________________________________________ 4
RS-232C Serial Connector ____________________________________________________________ 5
MIDI In and Thru____________________________________________________________________ 5
Configuration DIP Switches____________________________________________________________ 5
Power _____________________________________________________________________________ 5
RS232C Serial Control ________________________________________________________________ 6
Play File to Channel __________________________________________________________________ 6
Loop Play __________________________________________________________________________ 6
Assign Sound _______________________________________________________________________ 7
Reset Channel_______________________________________________________________________ 7
Mute/UnMute Channel________________________________________________________________ 7
Keylock Control _____________________________________________________________________ 8
Version Request _____________________________________________________________________ 8
Completion Acknowledge Mode ________________________________________________________ 9
Error codes ________________________________________________________________________ 10
Making MP3 Files ___________________________________________________________________ 11
MIDI Control _______________________________________________________________________ 12
File Names__________________________________________________________________________ 13
Using More Than 511 sounds __________________________________________________________ 14
File Compatibility____________________________________________________________________ 15
Troubleshooting Guide _______________________________________________________________ 16
Specifications _______________________________________________________________________ 17
Part Numbers ______________________________________________________________________ 17
February 9, 2005 • Alcorn McBride 8TraXX User’s Manual • Rev 1.7 • Page v
Page 6

Page vi February 9, 2005 • Alcorn McBride 8TraXX User’s Manual • Rev 1.7 •
Page 7

Welcome!
Where vibration is a
concern, Flash is the
best choice.
Thanks for purchasing The Alcorn McBride 8TraXX™. The 8TraXX replaces
multi-track tape machines, CDs and solid state audio players in permanent audio
playback installations, providing hours of high-quality, maintenance-free digital
audio.
The 8Traxx lets you play eight independent stereo tracks from a single, economical
rack-mount unit. It’s perfect for dark rides, museums, and interactive displays. Each
track is individually triggered by its own discrete input – contact closure or voltage –
allowing direct connection to proximity sensors or switches. Or all tracks can be
controlled from a single RS-232 serial or MIDI port.
8Traxx offers the latest in Digital Audio Repeater technology, combining MP3
audio with Compact Flash for a rugged, reliable, maintenance-free solution to your
playback needs. Access time is nearly instantaneous! All eight tracks are completely
independent, and offer superb audio quality. Standard play-back time is 20 minutes
total. Larger Compact Flash media can provide several hours of playback!
Sounds are simply copied onto the media from your laptop computer or using an
optional Compact Flash docking cradle.
For data storage, the unit provides a socket for installing removable Compact Flash
or Micro Drive media.
Features
The 8TraXX offers a wide range of features including:
• 8 Independent Stereo Audio Channels
• High-quality MP3 Audio Format
• Encode audio on any PC
• Compact Flash Media Included
• Voltage or Contact Closure Control
• Start, Stop and Mute Each Track
• RS-232 and MIDI Control
February 9, 2005 • Alcorn McBride 8TraXX User’s Manual • Rev 1.7 • Page 1
Page 8
f
f
Front Panel Controls and Indicators
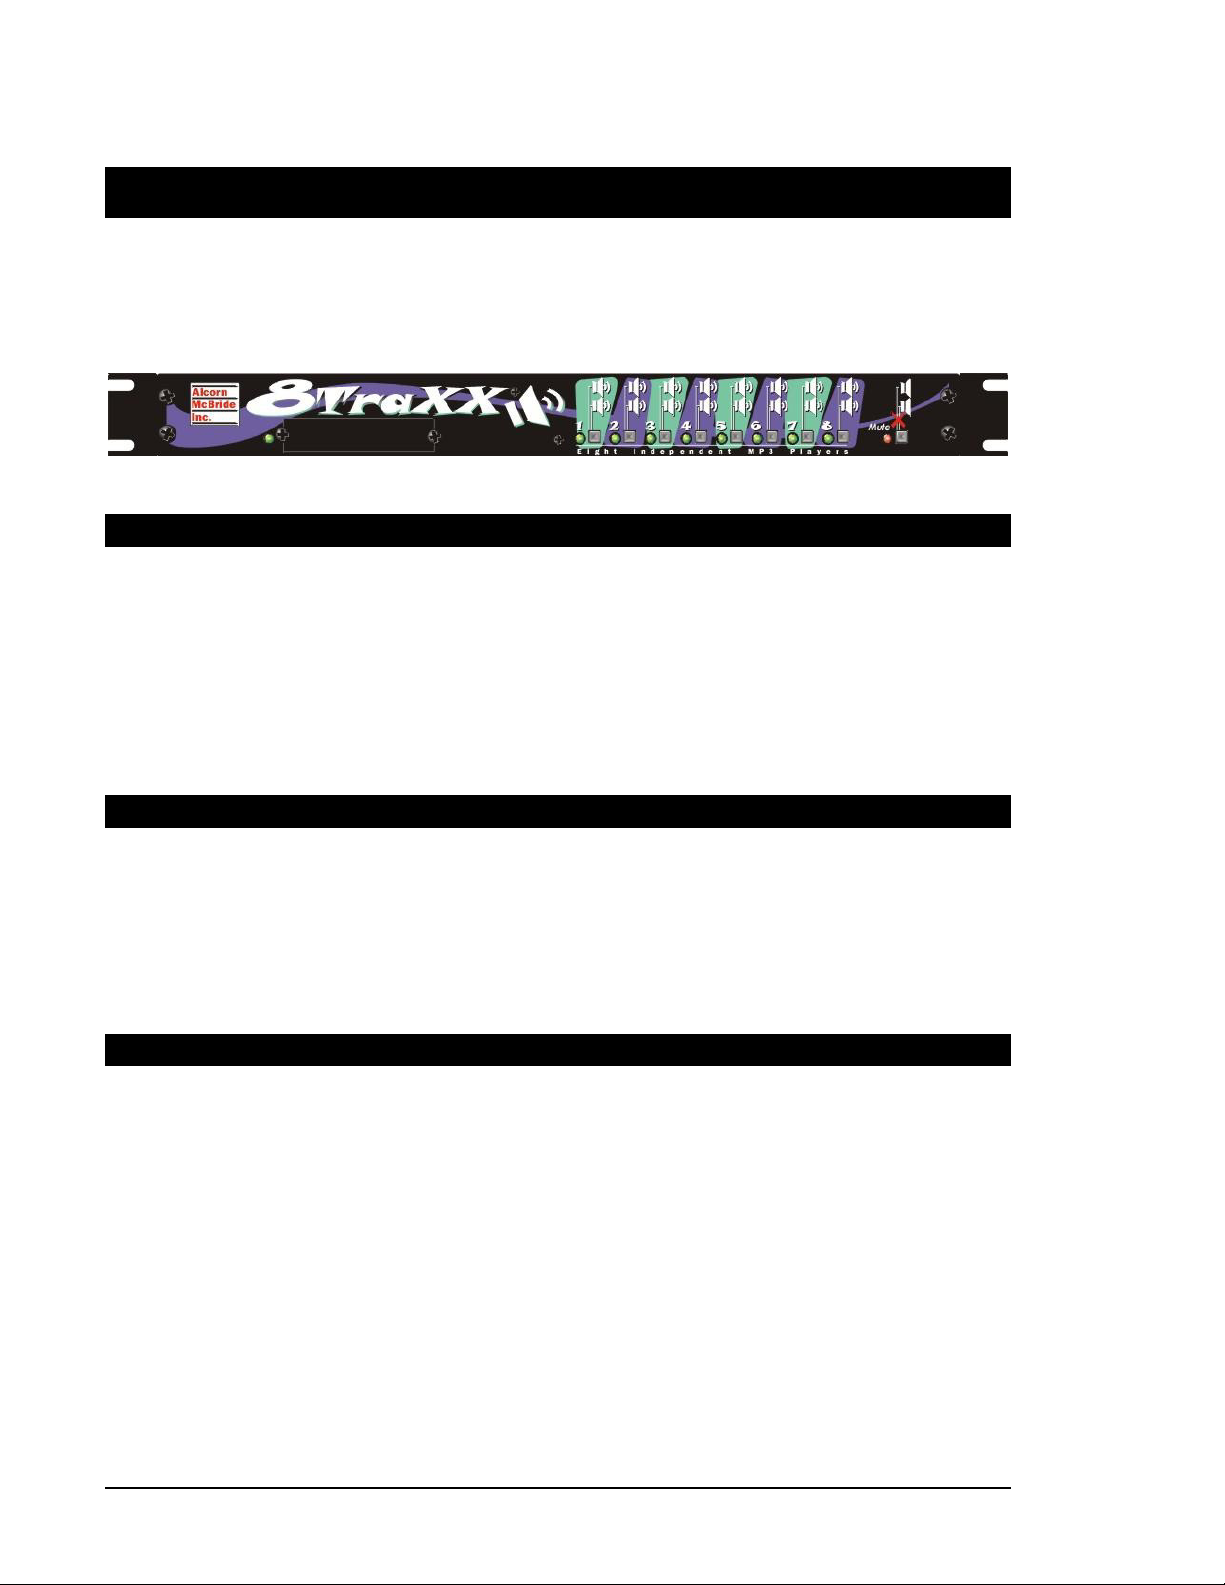
The 8TraXX provides controls that can accommodate a wide variety of installations. The front panel
incorporates eight test pushbuttons, a mute-all button, media status indicator, playing status indicators, mute
status indicator, and a Compact Flash slot. All front panel buttons can be disabled by a special serial command
for systems requiring tamper-free remote control.
Test Channel Buttons
The numbers next to the
test button match the
channel and file
numbers (i.e. Button
number 1 plays file
number 1 to channel 1,
Button number 2 plays
ile number 2 to track 2,
etc.
The front panel contains a row of eight pushbuttons. These buttons allow you to test
play each of the unit’s 8 channels. When a test channel button is pressed, the file
with the same number as the button number will be activated and played out the
corresponding channel. Pressing a button once plays the sound. Pressing it again
while the sound is playing stops playback. Holding the button down causes the
sound to loop from end to beginning.
Channel Status LEDs
While the 8TraXX is
booting up, the channel
status LEDs will
illuminate one at a time
rom left to right,
indicating channel
initialization.
Next to each Channel Test button is a green LED. If a channel is currently playing,
the corresponding LED will be illuminated. A channel LED flashes if an error
occurs on the corresponding channel. Refer to the Error Indicators section below for
details.
Mute All Button and LED
A pushbutton on the far right of the front panel causes all channels to mute.
Pressing the button once causes all channels to mute. Pressing it again causes all
channels to unmute.
The red LED next to the Mute-All pushbutton is activated whenever any of the
8TraXX channels are muted.
Page 2 February 9, 2005 • Alcorn McBride 8TraXX User’s Manual • Rev 1.7 •
Page 9
You should always
f
f
ormat your Compact
Flash media in the
8TraXX before using it
or the first time.
Formatting erases all
sounds that may be in
the media.
Unit Status LED
Error Indications
Using the Mute All Button to Format Media
The Mute All button is also used to format the Compact Flash media. To format the
media, hold down the Mute All Button during the entire power-on cycle, when the
Channel Status LEDs are flashing. THIS WILL ERASE ANY SOUNDS STORED
IN THE MEDIA. After boot-up is complete, the Unit Status LED activates
indicating that the media is being formatted. Formatting is complete when the Mute
All LED illuminates.
This LED is primarily used to indicate media activity. It illuminates whenever the
Compact Flash media is being accessed. The LED is also used for error indication
(refer to error indication section below).
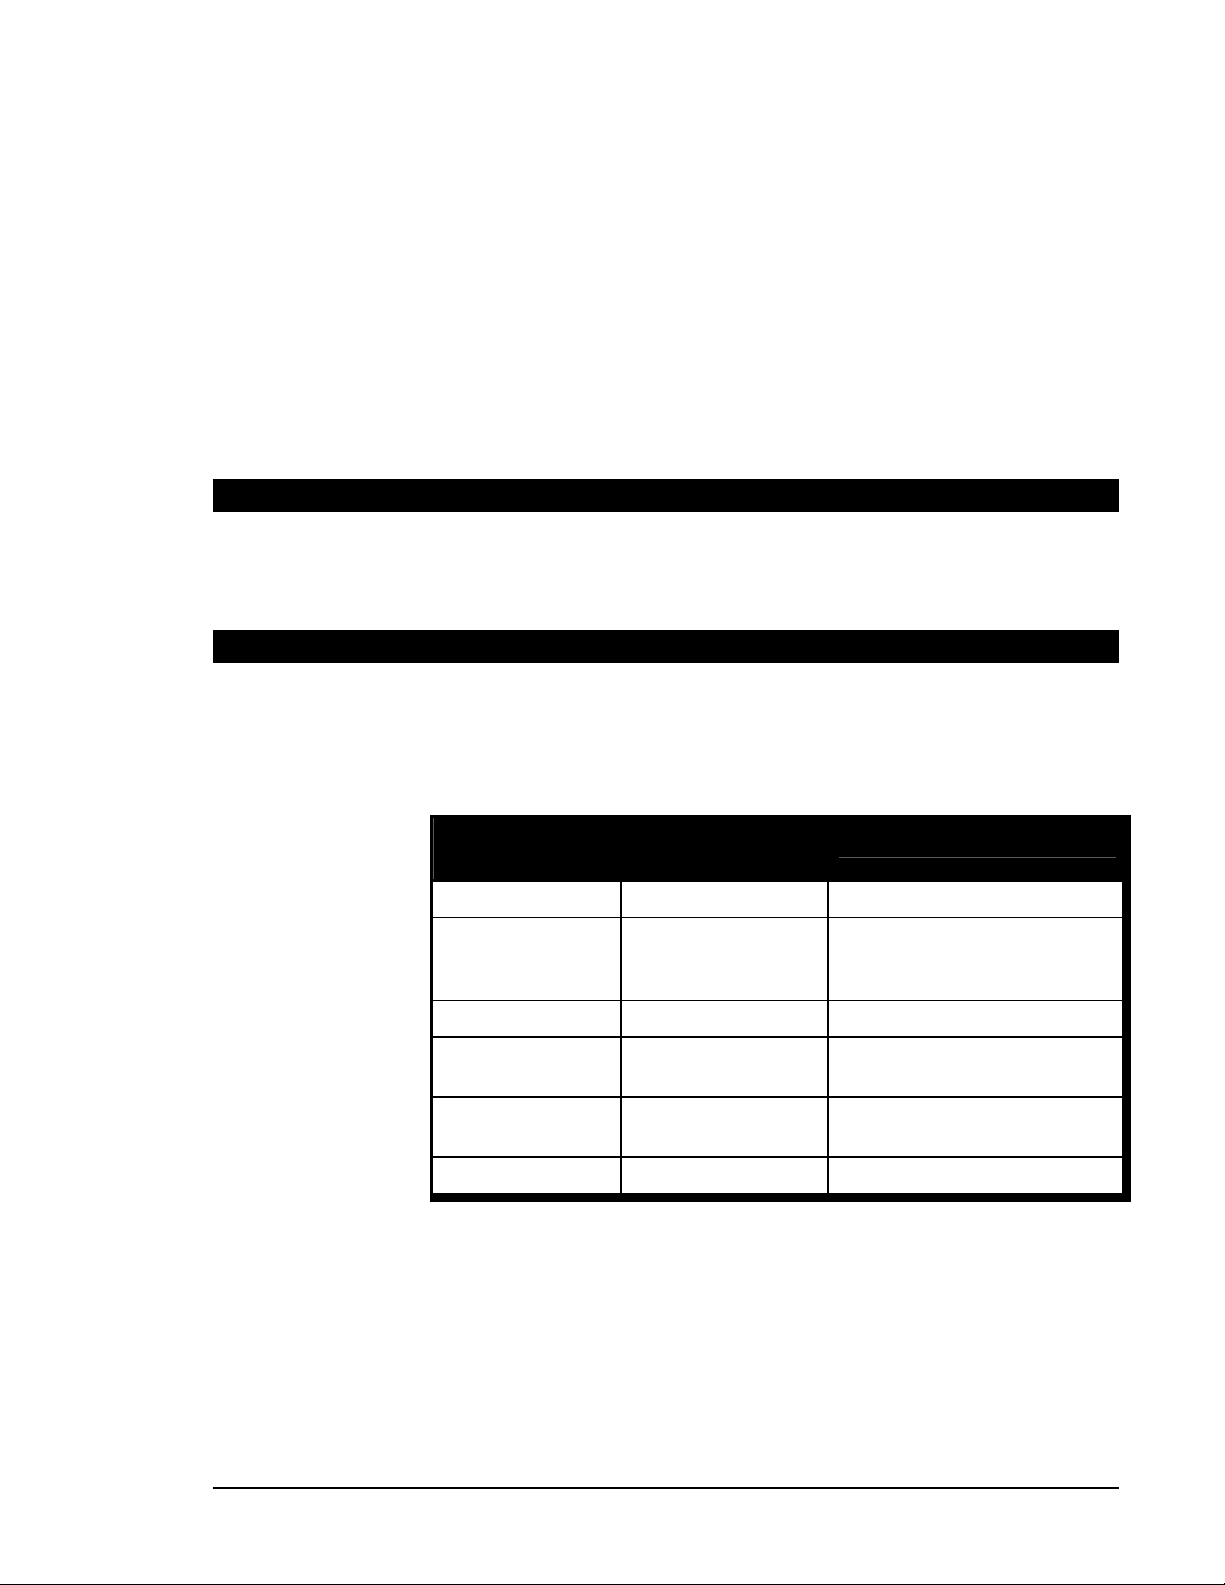
The Channel Status LEDs and Unit Status LED on the 8TraXX are used together to
indicate various error conditions. The following table provides a key to the possible
LED behavior combinations and the corresponding error or unit status that is
indicated.
Unit Status
LED Behavior
Channel Status
LED Behavior
LED Meaning
Off Off Idle
On Off Media activity (either reading to
or writing from Compact Flash
socket)
On On Channel playing
On Flashing Channel error - requested file not
available or unsupported file type.
Flashing N/A Media error – can’t read media, or
unsupported media format.
Flashing Flashing Bootup
February 9, 2005 • Alcorn McBride 8TraXX User’s Manual • Rev 1.7 • Page 3
Page 10
f
f
Rear Panel Controls and Connectors
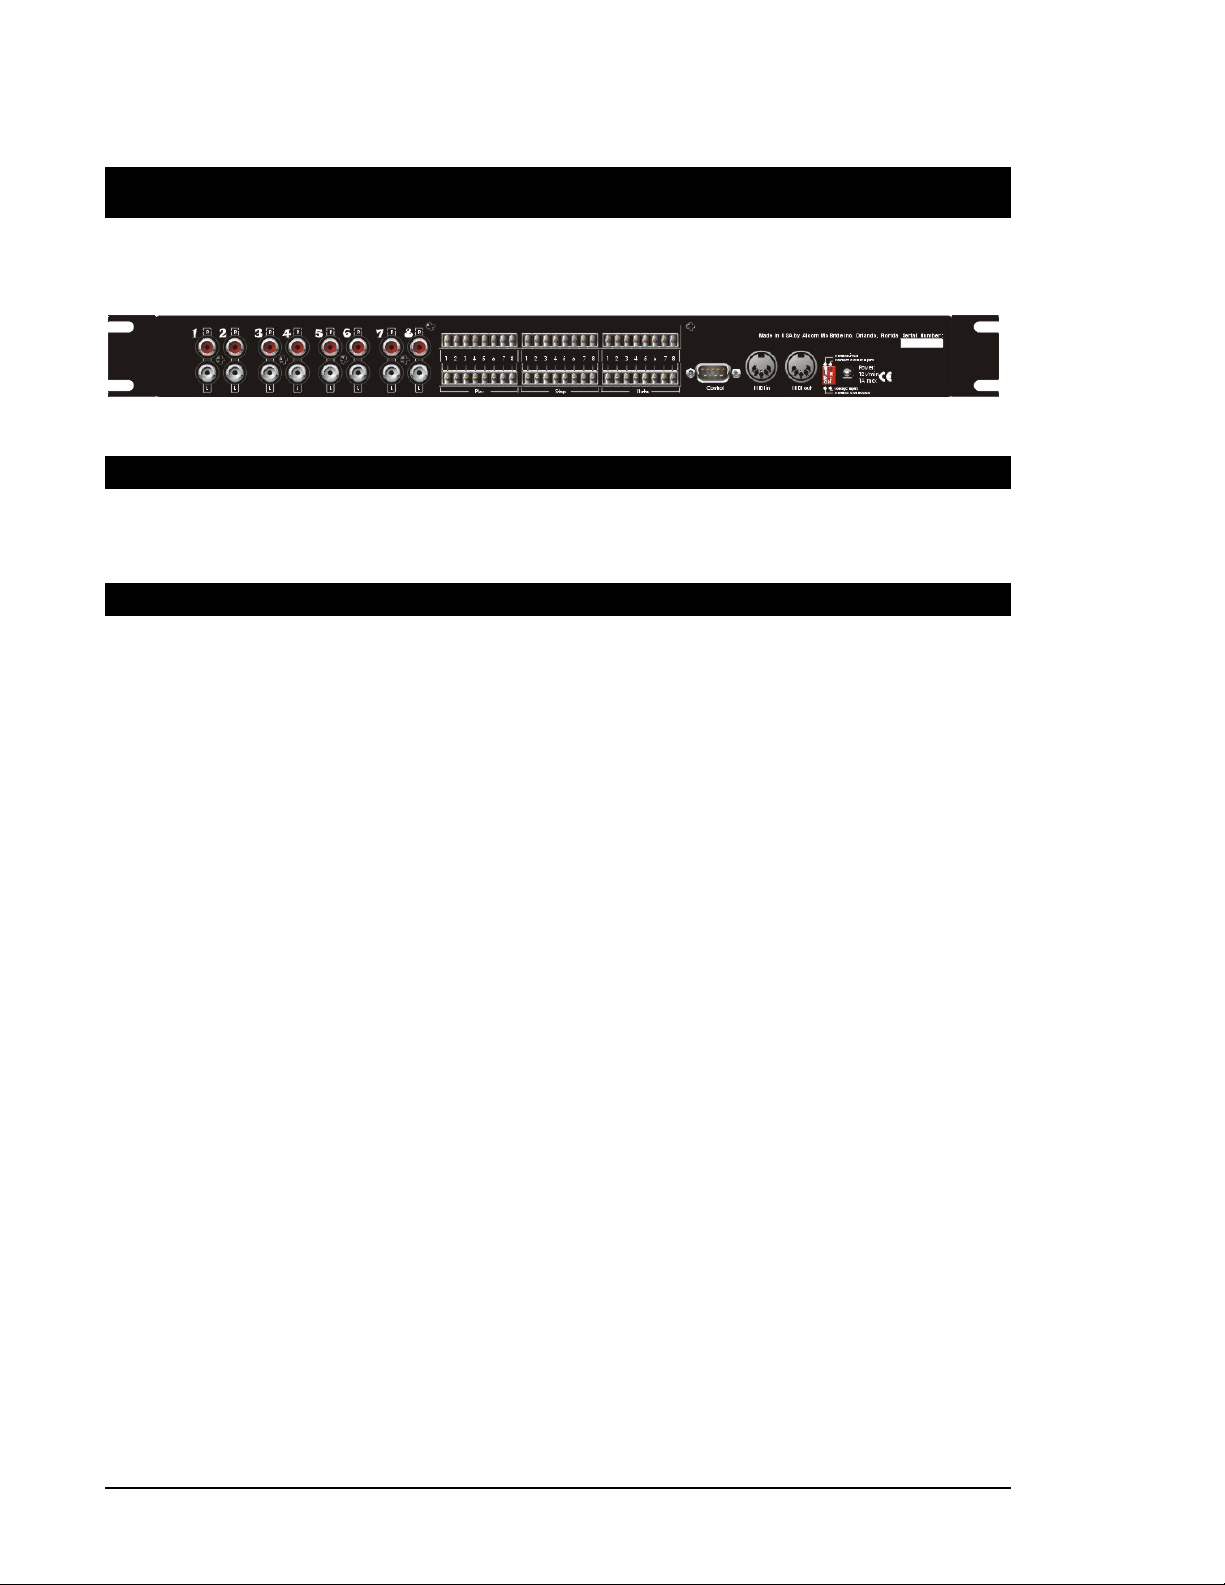
The rear panel includes RCA jacks for 8 stereo channels of unbalanced stereo audio,
parallel control inputs, configuration DIP switches, serial control connectors and the
power input jack:
Audio Outputs
Eight sets of RCA jacks supply analog line-level stereo signals suitable for
connection to a multi-channel amplifier or powered loudspeakers.
Parallel Control Inputs
There are three sets of parallel control inputs: 8 Play inputs, 8 Stop inputs, and 8
Mute inputs. These inputs can be configured to accept contact closures or voltage
inputs using the configuration DIP switch (see below).
Sound numbers range
rom 1 – 511 for
interruptible mode, and
1001 to 1511 for
uninterruptible mode.
Sound numbers refer to
the prefix of the sound
ile number. Please
refer to the File Naming
Convention section of
this manual for details.
The front panel Mute
LED illuminates if any
of the parallel Mute
inputs is active.
Play Inputs:
Each play input activates its corresponding channel. Play inputs 1 through 8 play sound
numbers 1 through 8 respectively through channels 1 through 8 respectively. Repeatedly
activating a play input while a channel is playing will restart the channel.
It is possible to prevent sounds from restarting during play by adding 1000 to the sound
number (i.e. Sound number 1 is named 1001, etc.) Sound numbers 1001 or higher are
uninterruptible, meaning that the sound will play to completion unless stopped by a parallel
Stop input or serial Stop command. In this case, Play Input 1 plays Sound Number 1001,
Play Input 2 plays sound Number 1002, and so on. These sounds will not restart if another
Play Input for that channel is received during playback. Refer to the section Interruptible
versus Uninterruptible Operation in this manual for more information.
In all cases, a Play input which is maintained at the point where the sound finishes causes the
sound to loop back to the beginning and start over.
Stop Inputs:
Each Stop input stops playback of the corresponding channel.
Mute Inputs:
Activation of a channel’s Mute input causes the corresponding channel to mute. The input
must be maintained in order for the channel to remain muted.
Page 4 February 9, 2005 • Alcorn McBride 8TraXX User’s Manual • Rev 1.7 •
Page 11
RS-232C Serial Connector
p
p
A serial cable is
rovided with each
8TraXX.
This input is a standard DB-9 male RS-232C connector, intended to be connected to
a PC or control system using a straight-through (not null-modem) 9-pin cable. The
pinout appears below. Please refer to the Serial Protocol section for a list of control
commands.
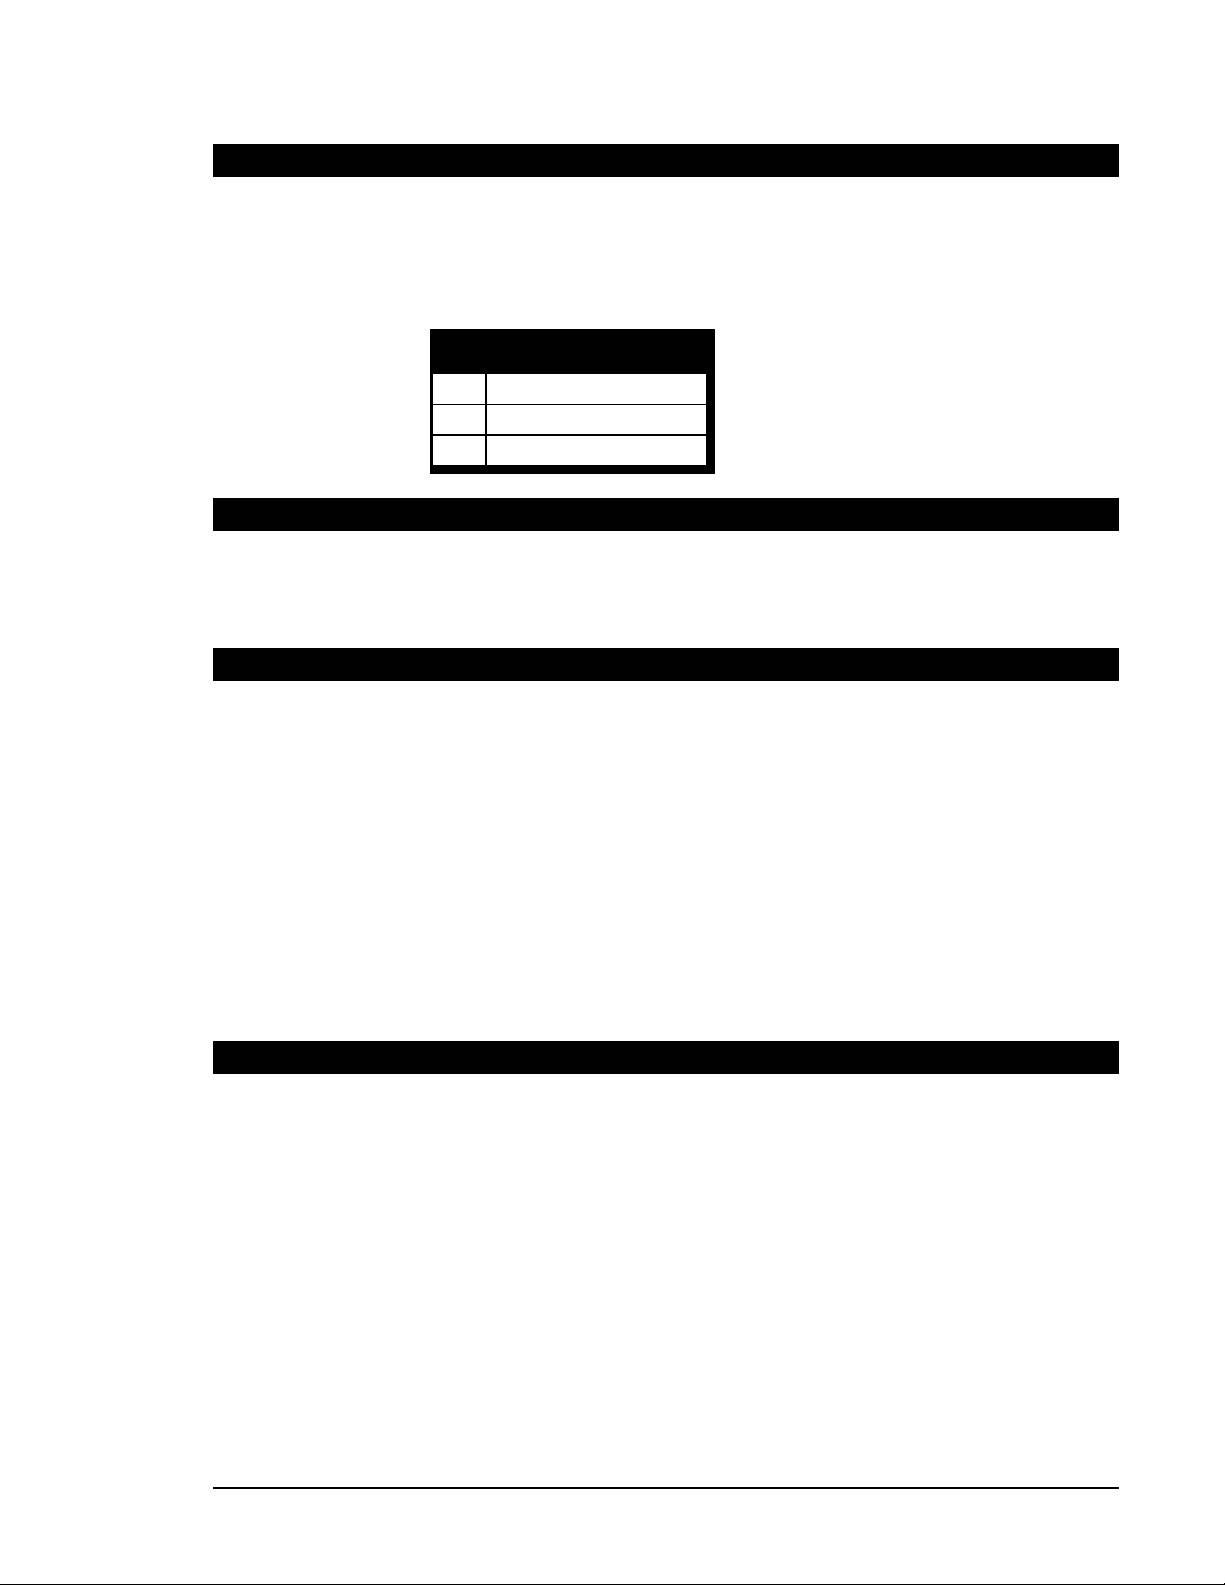
Pin Function
2 TXD (data from 8TraXX)
3 RXD (data to 8TraXX)
5 GND
MIDI In and Thru
These 5-pin DIN connectors provide the MIDI control interface to the unit. The
8TraXX uses standard control change MIDI command protocol. Please refer to the
Serial Protocol section of the manual for a list of commands.
Configuration DIP Switches
There are two small switches near the power connector.
Ground Lift
Be sure to configure the
8TraXX’s switches
before connecting the
arallel control
interface.
Power
In the event of AC hum or noise, this switch may be set to the off position to isolate
the 8TraXX circuit ground from the chassis.
Contacts/Voltage Inputs
This switch configures the parallel control inputs for either dry contact closure operation or
voltage input operation. For voltage input operation, the input voltage should be at least
12VDC and not more than 24VDC.
The power input is a 2.5x5.5x10mm barrel connector with center pin (+) and the
outer rim (-). The 8TraXX requires a minimum of 9VDC at 1 Amp. It may be
operated from a vehicle battery or other DC source, as long as the input voltage does
not exceed 14VDC. An external 115 or 230 VAC power supply is provided with the
unit.
February 9, 2005 • Alcorn McBride 8TraXX User’s Manual • Rev 1.7 • Page 5
Page 12

RS232C Serial Control
The 8TraXX may be controlled using serial RS-232 messages via the DB-9 Serial
Connector. The data format is:
9600 Baud, No Parity, 8 bits, 1 Stop bit
The protocol is ASCII-based. Upper or lower case characters can be used
interchangeably.
Unlike with parallel
control, RS232 and
MIDI control allow you
to play any sound to any
channel.
<CR> is a byte with the
hexadecimal value 0D.
Play File to Channel
Description: This command causes the 8TraXX to play a specific sound file to a channel.
Command Bytes: cPL <CR> or ncPL<CR> or nncPL<CR> or nnncPL<CR> or nnnncPL<CR>
where n, nn, nnn, or nnnn is the sound number in ASCII
and c is the channel number in ASCII
Message Response: R<CR>
Comments: If no sound number is specified, the number specified with the last Select File
Sound numbers 1 through 511 are interruptible, meaning that they will restart if
Sound numbers 1001 through 1511 are uninterruptible, meaning that they will play
Channel numbers range from 1 through 8, or “*” for All Channels
Examples: Play file 215 to channel 4. 2154PL<CR>
Play file 1 to channel 7. 17PL<CR>
Some commands (i.e. Play, Assign Sound) commands contain data fields
specifying which sound number you want to play, and to which channel you want it
to play to. Other commands (i.e. Mute, Stop) only specify which channel is to be
affected by the particular command.
The details of these commands are listed below.
Throughout the following <CR> means carriage return.
command (see below) will be used.
commanded to play again while currently playing.
through to completion (unless receiving a stop command) even if another play
command is received while playing.
Loop Play
Description: This command causes the 8TraXX to select the specified sound file and play it to the
specified channel, automatically looping it back to the start when the sound finishes.
Command Bytes: cLP<CR> or ncLP<CR> or nncLP<CR> or nnncLP<CR> or nnnncLP<CR>
where n, nn, nnn, or nnnn is the sound number in ASCII
and c is the channel number in ASCII
Message Response: R<CR>
Comments: If no sound number is specified, the number specified with the last Select File
command (see below) will be used.
Page 6 February 9, 2005 • Alcorn McBride 8TraXX User’s Manual • Rev 1.7 •
Page 13

Sound numbers 1 through 511 are interruptible, meaning that they will restart if
commanded to play again while currently playing.
Sound numbers 1001 through 1511 are uninterruptible, meaning that they will play
through to completion (unless receiving a stop command) even if another play
command is received while playing.
Channel numbers range from 1 through 8, or “*” for All Channels
Examples: Play and Loop file 215 to channel 4. 2154LP<CR>
Play and Loop file 1 to channel 7. 17LP<CR>
Assign Sound
Description: This command causes the 8TraXX to assign a sound file to a specific channel. If the
next play command is sent without a sound number specified, the sound number
assigned to the particular channel in the Select File command is used. This is
especially useful for All Channel play commands, where you can leave the sound
number unspecified, and the channel number is specified as ‘*’. The 8Traxx will
start playback of all channels at the same time, using the assigned sound numbers for
each channel specified by a previous Select File command.
Command Bytes: ncSE<CR> or nncSE<CR> or nnncSE<CR> or nnnncSE<CR>
where n, nn, nnn, or nnnn is the sound number in ASCII
and c is the channel number in ASCII
Message Response: R<CR>
Comments: Sound numbers range from 1 to 511 for interruptible play, and from 1001 to 1511
for uninterruptible play.
Channel numbers range from 1 through 8, or “*” for All Channels
Examples: Assign file 215 to channel 2. 2152SE<CR>
Assign file 4 to channel 1. 41SE<CR>
Reset Channel
Description: This command causes the 8TraXX to stop playback of the specified channel.
Command Bytes: cRJ<CR>
where c is the channel number in ASCII
Comments: Channel numbers range from 1 through 8, or “*” for All Channels
Message Response: R<CR>
Mute/UnMute Channel
Description: This command causes the 8TraXX to mute or unmute the specified channel.
Command Bytes: ncAD<CR>
where n is “0” for mute, “1” for unmute
and c is the channel number in ASCII
Comments: Channel numbers range from 1 through 8, or “*” for All Channels
Message Response: R<CR>
February 9, 2005 • Alcorn McBride 8TraXX User’s Manual • Rev 1.7 • Page 7
Page 14

Keylock Control
Description: This command is used to disable the front panel pushbuttons of the 8TraXX.
Command Bytes: nKL<CR>
where n is “0” for disable front panel pushbuttons, “1” for enable pushbuttons
Message Response: R<CR>
Version Request
Description: This command is used request the operating system version.
Command Bytes: ?V<CR>
Message Response: Alcorn McBride 8TraXX Vxx.xx<CR>
Where xx.xx is the current version of the installed firmware.
Note: The firmware version can also be obtained by holding down the 8
applied to the 8TraXX. The channel LEDs on the front panel will indicate the version as XXXX.XXXX, where
the first four LEDs indicate the binary whole number and the last four LEDs indicate the binary decimal
number part of the version.
For example (‘X’ is LED on, ‘O’ is LED off)
OOOXOXOX indicates firmware version 1.5
After this operation, the 8TraXX must be power-cycled to reboot.
th
front panel channel button as power is
Page 8 February 9, 2005 • Alcorn McBride 8TraXX User’s Manual • Rev 1.7 •
Page 15

Completion Acknowledge Mode
Description: This command is used to select the method by which the 8TraXX issues a
completion acknowledge message. There are 5 completion acknowledge modes
possible, each of which is selected by issuing a separate serial command. The
completion acknowledge mode remains as long as the 8TraXX is powered. In all
cases the Message Response is R<CR>. Note: The unit defaults to no completion
acknowledge whenever the unit first powers up.
Command Bytes: RAK<CR> Selects simple channel response mode.
CH<CR> is sent upon a channel stopping, where CH =
ASCII representation of the channel number, from 0
through 7.
The remaining modes are designed specifically for interfacing to Alcorn McBride
Show Controllers. The 8TraXX protocol file implements these commands. Please
refer to the Alcorn McBride Show Control User’s Manual for details.
<flag offset>FAK<CR> Selects Flag Offset Mode.
An Alcorn 8-bit Set Flag message is sent, where each
channel completion sets a corresponding flag in the show
controller starting at the flag number designated by the
flag offset parameter. This parameter is in HEX, and has
a range of 0x40 to 0x77.
<variable offset>WAK<CR> Selects Variable Offset Mode.
An Alcorn 8-bit Set Variable message is sent, where each
channel completion sets a corresponding variable in the
show controller to a 1 starting at the variable number
designated by the variable offset parameter. This
parameter is in HEX, and has a range of 0x00 to 0x17.
<variable>VAK<CR> Selects Set Variable Mode.
An Alcorn 8-bit Set Variable message is sent, where each
channel completion sets the show controller variable
designated by the variable parameter to the completed
channel, starting at one (i.e. The variable is set to a ‘3’.
when channel 3 completes.) This parameter is in HEX,
and has a range of 0x00 to 0x1f .
<sequence offset>SAK<CR> Selects Start Sequence Mode.
An Alcorn 8-bit Start Sequence message is sent, where
each channel completion starts a corresponding sequence
in the show controller beginning at the offset designated
by the sequence offset parameter. This parameter is in
HEX, and has a range of 0x00 to 0xff .
February 9, 2005 • Alcorn McBride 8TraXX User’s Manual • Rev 1.7 • Page 9
Page 16
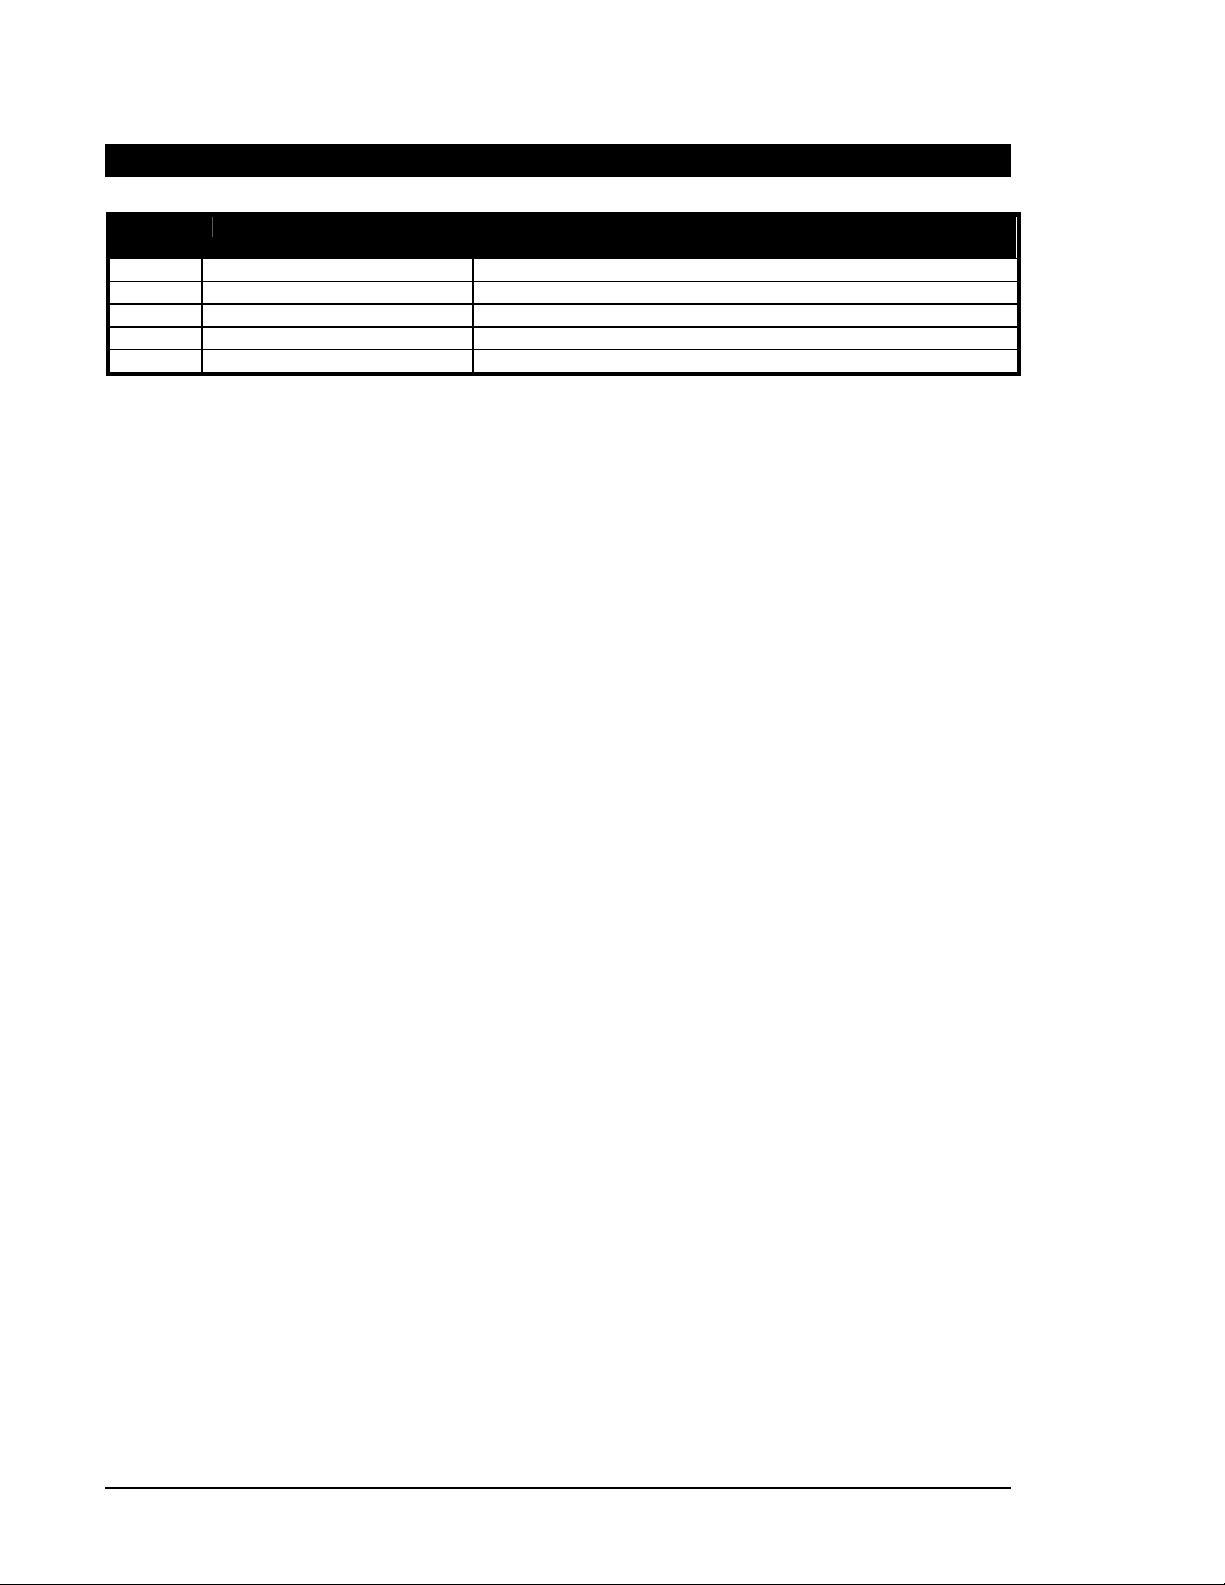
Error codes
Error
Code
E00 Communication Error Check your serial connections
E04 Feature Not Available Yet Have you entered the correct command? Check for avail.
E11 Media Not Present Is the Compact Flash inserted? Formatted? A recommended brand?
E12 Search Error Selecting the correct file? Is the file on the card? Is it named correctly?
E20 Format Error Has the Compact Flash been properly formatted?
Description What to Do:
Page 10 February 9, 2005 • Alcorn McBride 8TraXX User’s Manual • Rev 1.7 •
Page 17
Making MP3 Files
Encoding
Making MP3 files involves using an encoder, and you can find them readily
available from the web. A couple that we have seen work well are Audio Catalyst,
which is available from Xing Technology Corporation (www.xintech.com), and
Music Match JukeBox available from MusicMatch (www.musicmatch.com).
Fraunhofer IIS Institute in partnership with Thomson Multimedia own patents on
tools that make MP3-compliant bitstreams. Due to the fact that Fraunhofer charges a
royalty from each encoder distributor, it is difficult to find a freeware MP3 encoder.
But at the time of this printing, MusicMatch (mentioned above) does have a free
encoding utility in their Jukebox. Audio Catalyst is a lot more flexible than
MusicMatch Jukebox, but you’ll need to purchase it.
Quality
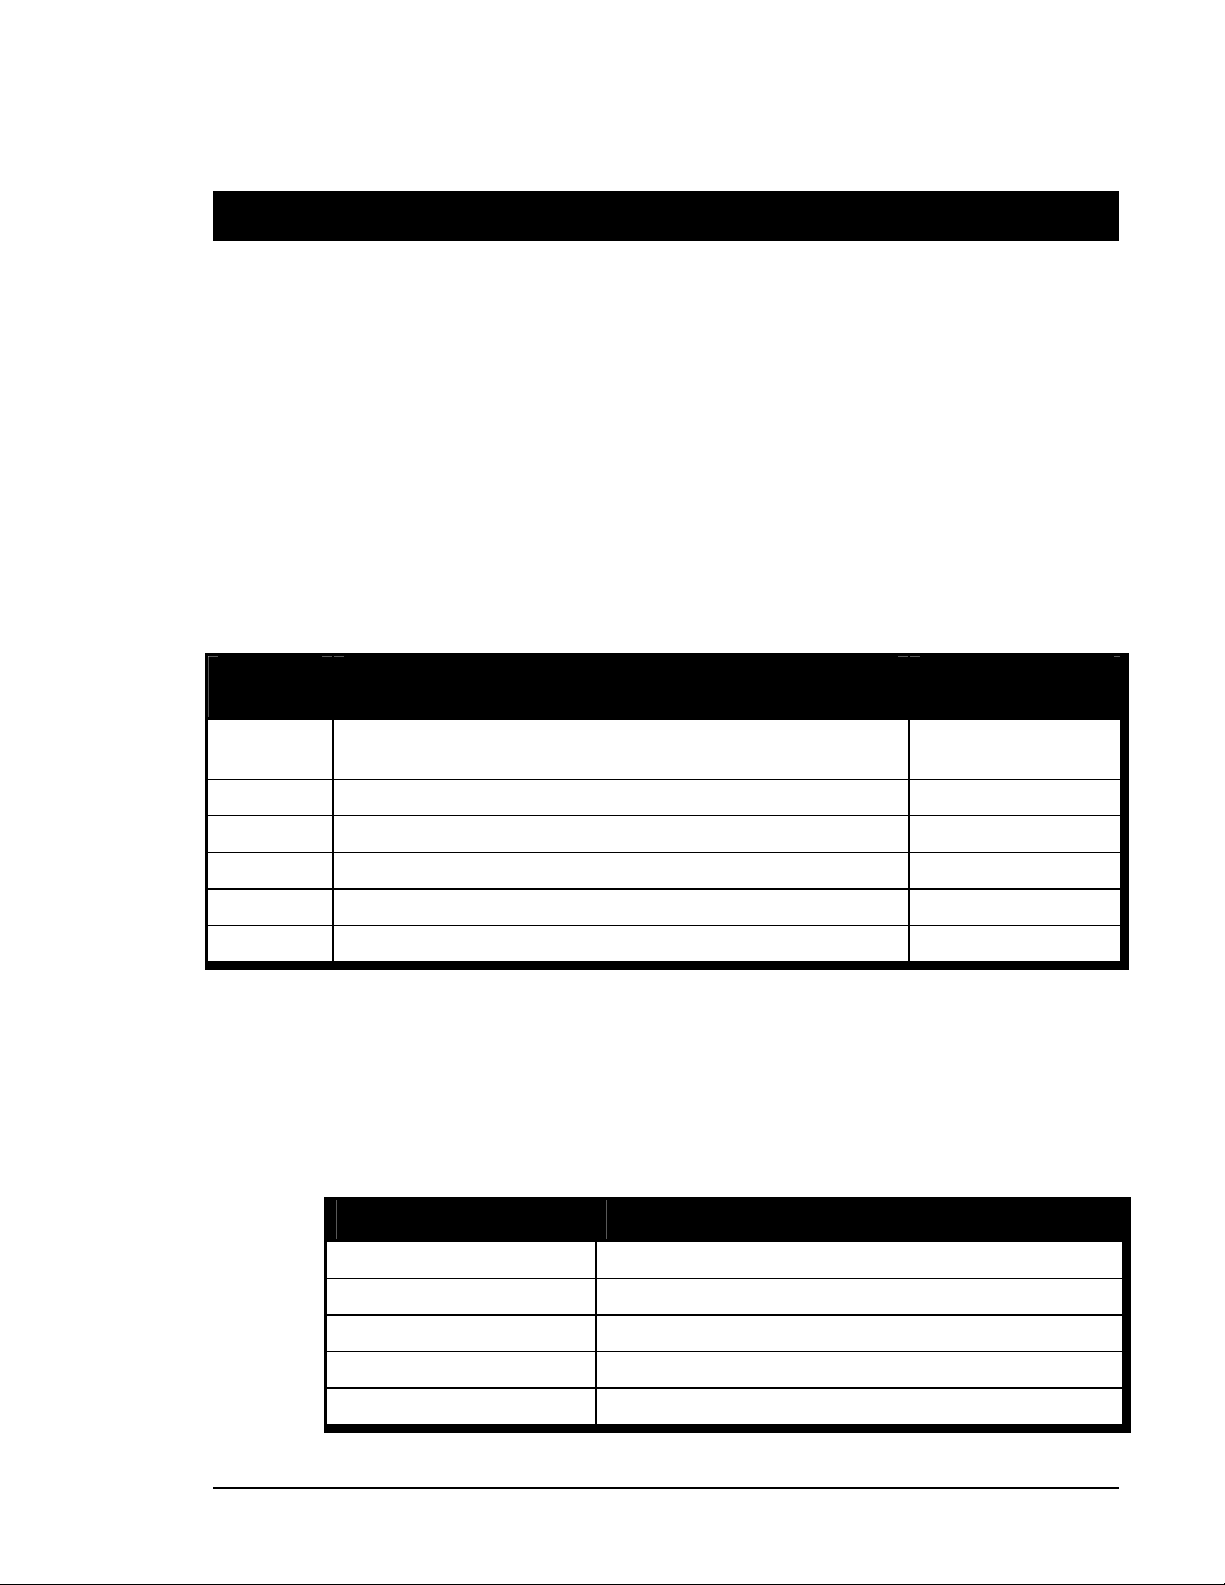
Below is a useful comparison of bitrates, quality, and file size. All you will need to
do is choose the bitrate at which you want the file encoded, which best fits in with
your storage space requirements. The most common bitrate is bolded.
Bitrate
(Kbps)
Original
WAV
80 FM radio quality. .594Mbytes
96 Near CD quality .712Mbytes
128 Close enough to CD Quality most listeners can’t tell a difference 0.950Mbytes
160 Better than CD quality – good for high end stereos 1.19Mbytes
320 Best quality, good for archiving, but takes up lots of memory 2.38Mbytes
Quality File Size/min
Best quality achievable is whatever the source is. 10.47Mbytes
Bandwidth Limitations
Due to varying response times on compact flash media and bandwidth limitations in
the unit, follow this table in encoding your clips according to the number of channels
you are using. If you plan to use more channels later, then you may prefer using a
smaller bitrate to keep from re-encoding. You may need to follow these
recommendations if healthy channels drop out during playback of new channels.
This table is based on a SanDisk 64MB card. Performace can vary by brand
and size.
Number of Channels Recommended Highest Bitrate
1-2 320Kbps or less
3 256Kbps or less
4-6 160Kbps or less
6-7 128Kbps or less
8 112Kbps or less
February 9, 2005 • Alcorn McBride 8TraXX User’s Manual • Rev 1.7 • Page 11
Page 18

MIDI Control
The 8TraXX may also be controlled using MIDI control change messages via the 5pin DIN Connector. The data format is:
31250 Baud, No Parity, 8 bits, 1 Stop bit
Unlike with parallel
control, MIDI and
RS232 control allow
you to play any sound to
any channel.
The protocol is in accordance with MIDI Control Change protocol. As shown in
the following table, the Status Byte (`76) is always followed by two data bytes that
determine the channel to be addressed and the activity to be triggered (i.e. Play,
Stop, Mute, etc.) All number in the table are decimal.
Message Format: (Status Byte)(Control Number)(Control Value)
Function Status Byte
(control change)
Play Channel 176 64 – 71 select
Play & Loop
Channel
Stop Channel 176 80 – 87 select
Mute /Unmute
Channel
Disable/Enable
Front Button
Stop All
Channels
Examples:
Play sound 1 to channel 2 176,73,0
Play and loop sound 4 to channel 5 176,76,3
176 72 – 79 select
176 88 – 95 select
176 122 0 = Disable buttons
176 123 0
Control Number
Range
channels 1 - 8
channels 1 – 8
channels 1 – 8
channels 1 – 8
Control Value Range
0 – 121 selects sound
number 1 - 122
0 – 121 selects sound
number 1 - 122
0
0 = Mute channel
127 = Unmute channel
127 = Enable buttons
Stop channel 4 176,83,0
Unmute channel 6 176,93,127
Stop all channels 176,123,0
Page 12 February 9, 2005 • Alcorn McBride 8TraXX User’s Manual • Rev 1.7 •
Page 19

f
f
f
f
File Names
The 8TraXX uses the
number part of the file
name to identify the
sound number.
The media must be
ormatted in the
8TraXX, but files may
be copied using a PC
with a Compact Flash
adapter. Care should be
taken to avoid long
ilenames, or other
eatures not supported
by the FAT16 file
system.
Do not delete files and
then copy additional
ones. This will fragment
the media. To delete
iles, copy all of the
required files to the
PC’s hard drive, format
the Compact Flash card
in the 8TraXX, and then
recopy the desired files.
File names are represented in simple DOS 8.3 format – in other words, an eight
character name, a period, and then a three character extension. The following is
an example of valid file names for the 8TraXX:
SND00001.MP3 (sound number one - interruptible)
SND00020.MP3 (sound number twenty - interruptible)
SND01005.MP3 (sound number five – uninterruptible)
The name is made up of eight characters beginning with SND followed by the
number of the file (5 digits from 00001 to 00511, or 01001 to 01511), and then
followed by the .MP3 extension.
Interruptible versus Uninterruptible Operation
The number part of the file name identifies the sound number. Sound numbers
can range from 1 to 511, and 1001 to 1511. The two ranges provide a way for
the 8TraXX to determine whether or not a sound is allowed to be interrupted
while playing and start over, or if it should keep playing through to completion
and ignore incoming play requests.
Sound numbers 1001 to 1511 are uninterruptible, meaning that repeated play
requests will not cause the sound to start over from the beginning while playing.
An example of where this might be used is in a museum kiosk, where a guest
trips a break-beam sensor to start an audio presentation. The audio will continue
playing through, even though the guest might continually trip the sensor while
listening to the presentation.
Sound numbers 1 to 511 are interruptible, meaning that repeated play requests
during playback will cause the sound to start over. An example of where this
might be used is in a shooting gallery, where you want the sound to be heard
every time a gun’s trigger is pulled.
The parallel play inputs 1 through 8 will either play sound numbers 1 through 8,
or sound numbers 1001 through 1008, whichever it finds first. If the sound
number is 1001 through 1008, the sound will play in uninterruptible mode. If the
sound number is 1 through 8, the sound will play in interruptible mode.
Important Note: When using a PC to copy your audio files to the media, avoid
copying files after performing delete operations. This will cause the media to
become fragmented and the 8TraXX will malfunction during playback. Always
format the media in the 8TraXX first, and then copy files to it all at once.
February 9, 2005 • Alcorn McBride 8TraXX User’s Manual • Rev 1.7 • Page 13
Page 20

Using More Than 511 sounds
Any sounds in the root
directory will still be
accessible. If there are
duplicate file names
between sounds existing
in the root and
“sounds” directory, the
root directory sounds
take precedence. They
will, however not be
uninterruptible unless
numbered between
10000 to 19999.
You can access up to 9,999 sounds on the 8TraXX. In order to do this, create a
subdirectory on the Compact Flash media named “sounds” and copy your MP3
files to that directory. Sounds can be numbered as shown below:
SND00001.MP3 up to SND09999.MP3
Interruptible versus Uninterruptible Operation
With files in the “sounds” subdirectory, any sound number greater than 10000
will be uninterruptible (see previous section for description of uninterruptible
operation). In this case, sounds can be numbered as shown below:
SND10001.MP3 up to SND19999.MP3
Important Note: There cannot be any sound files with duplicate sound numbers
in the lower 4 digits. For example, you can’t have
SND10020.MP3 and SND00020.MP3
Page 14 February 9, 2005 • Alcorn McBride 8TraXX User’s Manual • Rev 1.7 •
Page 21

File Compatibility
The following provides a detailed outline of the various parameters and
specifications for the types of audio files that the 8TraXX is capable of playing. In
general, the 8TraXX can play MP3 files at any of the popular bitrates or resolutions.
All features specified for Layer III in ISO/IEC 11172-3 (MPEG 1
All features specified for Layer III in ISO/IEC 13838-3.2 (MPEG
Lower sampling frequency extension, (not specified by ISO) called
Decodes Layer III Stereo Channels, Dual Channel, Single Channel
Supports all the MPEG 1 and 2 sampling frequencies and the
Audio)
2 Audio)
MPEG 2.5
(Mono)
extension to MPEG 2.5 including: 48, 44.1, 32, 24, 22.05, 16,
12, 11.025, 8 KHz.
Accepts MPEG 2.5 Layer III (MP3) elementary compressed
bitstreams with data rate from 8Kbits/s up to 320 kbit/s, and
also variable bitrate files up to 320kbits/s.
Note: A few software encoders generate large MP3 data packet sizes, where many
bytes of data appear between sequence headers. For best results and quick file
seaming (skipping between files on one track), make sure that your encoder places
sequence headers at least every 512 bytes. Otherwise there may be an unacceptable
playback response when skipping between files on a single track.
February 9, 2005 • Alcorn McBride 8TraXX User’s Manual • Rev 1.7 • Page 15
Page 22

Troubleshooting Guide
Q: I’ve copied several files from my PC onto a Compact Flash, but they do not play.
A: The Compact Flash may have been pre-formatted in a way that is incompatible
with the 8TRAXX operating system. Refer to the Formatting section of the manual
to find out how to format the media.
Q: When playing back files, the audio seems to jump from one file to the next,
interrupting the currently playing file in the middle.
A: The media has become fragmented. Format the media in the 8TRAXX and then
re-copy all the files to it.
Q: It seems that the 8TraXX is not responding to a Stop command very quickly. It
sometimes takes seconds for the sound to stop after issuing the command or
pressing the front panel button.
A: The sound file has a corrupted or missing sequence header. Try re-encoding the
file.
Q: When skipping between files on a single track I hear pops and squeaks in the
audio.
A: Make sure that all sound files played to a track have identical encoding
parameters (i.e. bitrate, sample frequency, encoding format, etc.).
Q: When skipping between files on a single track, there is a long delay between
when I issue the play command and the sound actually starts playing.
A: The MP3 data files you are playing might contain larger than normal data packet
sizes. The 8TraXX waits until a sequence header (at the beginning of a data packet)
comes along when playing a file before “seaming” to another file. If the data
packets are too long, the 8TraXX has to play a lot of data before finding a header.
Try re-encoding the file using a different encoder to reduce the packet size.
Q: Why can’t I get more than a few channels to play at once? When I start the fifth
channel, channels 3 and 4 stop playing.
A: Your bandwidth may be too high. See the section labeled “Bandwidth
Limitations” in the “Making MP3’s” section for details.
For the answers to other questions, check out the Alcorn McBride Knowledge Base
at http://www.alcorn.com/kb
If you don’t find it there, please email our technical support staff at
Page 16 February 9, 2005 • Alcorn McBride 8TraXX User’s Manual • Rev 1.7 •
Page 23

Specifications
Audio:
Playback Time:
Response Time:
Power:
Physical:
Controls:
Tracks: 8 Stereo (16 channels)
DAC Resolution: 16 Bits
Deviation from Linear phase: +/-0.5 dB
Total Harmonic Distortion: 0.008%
Dynamic Range (A-weighted): 94dB
Inter-Channel Isolation: 90dB
Inter-Channel Gain Mismatch: 0.1 dB
Frequency Response: 10 to 20 Khz +/-0.1 dB
Maximum Phase Non-Linearity: 5 degrees
Line Output Level: Unbalanced, 4.07V P-P max (3.70 typical) into 20K
Line Output Load: 10K Ohm Minimum, 100pF Maximum
1 MByte/minute with excellent audio quality
Over 20 minutes of audio from included Compact Flash card
Hours of audio from optional larger Compact Flash card or Micro Drive
Response Time less than 33 msec.
Less than 33 msec.
9 VDC to 14 VDC at 1 Amp max
Adapter for 115 or 230 volts provided
115/230 volts, 50/60 Hz, 30 W max
5.5" x 1.75" x 11"
4 lbs.
0°C (32°F) to 38°C (100°F), free air circulation
0-90% relative humidity, non-condensing
20 g max Vibration (with removable Compact Flash Card)
Test Button for each track
Mute All button
Playing LED for each track
Mute All LED
Connectors:
Part Numbers
Side mounted switch for ground lift
Side mounted switch for input type: contact/voltage
Phoenix type screw terminals for discrete controls (mating connectors included)
RCA type Phono connectors for left and right line level outputs for each track
Barrel connector (2.5 mm x 5.5 mm x 10 mm) for power
DB-9M serial RS-232 connector
2 x 5-pin DIN Female (MIDI In, MIDI Thru)
8TraXX with 110 VAC Power Supply 8TraXX-110
8TraXX with 220 VAC Power Supply 8TraXX-220
Spare 110 VAC Power Supply PS9V110
Spare 220 VAC Power Supply PS9V220
Compact Flash Docking Station for USB port CFUSB-1
Compact Flash to PC-Card Adapter CFPC-1
Compact Flash Media Contact factory for sizes and part numbers
Micro Drive Media Contact factory for sizes and part numbers
February 9, 2005 • Alcorn McBride 8TraXX User’s Manual • Rev 1.7 • Page 17
 Loading...