

Page 1
REF: Alcolizer HH4 Alcohol Tester User Manual V1 Page 1 © Alcolizer Technology
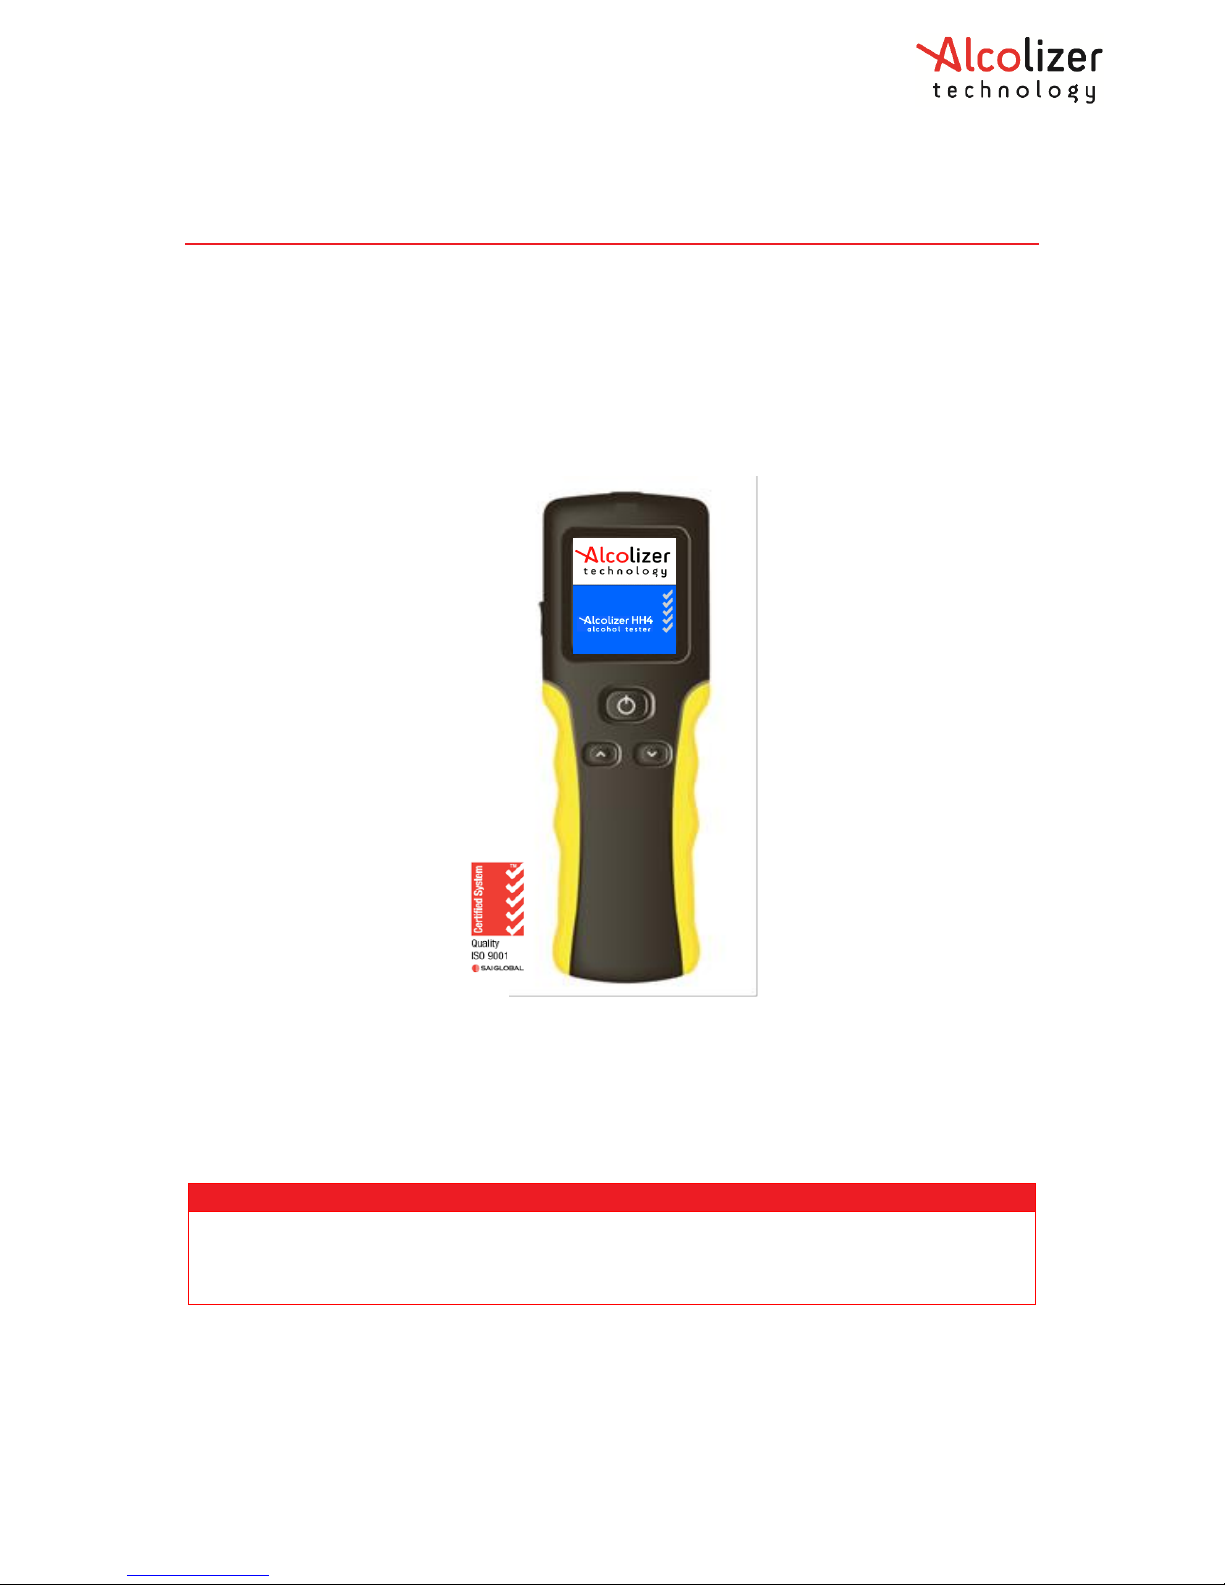
Alcolizer HH4 Alcohol Tester User Manual
User Manual
Di
Disclaimer – External Documents note to reader
The BAC reading obtained by correct use of this device is only considered accurate at the time of testing.
Great care has been taken to ensure the accuracy of each reading.
Neither the manufacturer, the distributor, nor the owner accepts liability or responsibility due to any action
or claim arising from the reading produced by this device, whether used correctly or incorrectly.
Page 2

REF: Alcolizer HH4 Alcohol Tester User Manual V1 Page 2 © Alcolizer Technology
Contents
1 Introduction ....................................................................................................................... 4
2 Description of HH4 ............................................................................................................. 4
2.1 Equipment Overview ................................................................................................... 4
2.2 Device Overview .......................................................................................................... 4
2.2.1 Test Key ................................................................................................................ 5
2.2.2 LCD Colour Graphics Display ................................................................................ 5
2.2.3 Mouthpiece Locator and Sample Inlet Spigot ..................................................... 6
2.2.4 Up and Down Buttons .......................................................................................... 6
2.2.5 USB Port ............................................................................................................... 6
2.2.6 Battery Charger Port ............................................................................................ 6
3 Operating Instructions ....................................................................................................... 6
3.1 General Information .................................................................................................... 6
3.2 Turning On The Device ................................................................................................ 7
3.3 Charging the Battery ................................................................................................... 7
3.4 Testing Types ............................................................................................................... 8
3.4.1 Mouthpieces ........................................................................................................ 8
3.4.2 Mouthpiece Testing ............................................................................................. 9
3.4.3 Taking a Mouthpiece (Active) Breath Sample ................................................... 10
3.4.4 Analysing a Mouthpiece Breath Sample ............................................................ 12
3.4.5 Passive Testing ................................................................................................... 13
3.4.6 Enabling Passive Standard ................................................................................. 13
3.4.7 Taking a Passive Standard Breath Sample ......................................................... 14
3.4.8 Analysing a Passive Breath Sample .................................................................... 16
3.4.9 Enabling Passive Only......................................................................................... 17
3.4.10 Taking a Passive Only Breath Sample ................................................................ 17
3.4.11 Pressure Activated Passive- Blow Testing .......................................................... 18
3.4.12 Enabling Pressure Activated .............................................................................. 18
3.5 Back Operation .......................................................................................................... 19
3.6 Shutting Down ........................................................................................................... 19
4 Test Options Menu .......................................................................................................... 20
4.1 Test Cancel ................................................................................................................ 20
4.2 Test Refusal ............................................................................................................... 20
5 Setup Menu ...................................................................................................................... 21
6 Printing Function .............................................................................................................. 23
Page 3

REF: Alcolizer HH4 Alcohol Tester User Manual V1 Page 3 © Alcolizer Technology
6.1 Accessing Bluetooth .................................................................................................. 23
6.2 Enabling Bluetooth .................................................................................................... 23
6.3 Bluetooth Printer PIN ................................................................................................ 24
6.4 Pairing the Printer ..................................................................................................... 25
6.5 Printer Driver ............................................................................................................. 28
6.5.1 Installing the Printer Driver................................................................................ 28
6.6 Auto Print .................................................................................................................. 29
6.6.1 Auto Print Standard ........................................................................................... 29
6.6.2 Auto Print Passive .............................................................................................. 30
6.7 Ticket Format Type .................................................................................................... 30
7 Sending Data (Serial) ........................................................................................................ 30
7.1 Accessing Bluetooth .................................................................................................. 30
7.2 Enabling Bluetooth .................................................................................................... 30
7.3 Bluetooth Printer PIN ................................................................................................ 31
7.4 Pairing as Serial Device .............................................................................................. 31
7.5 Auto Send .................................................................................................................. 33
7.5.1 Auto Send Standard ........................................................................................... 34
7.5.2 Auto Send Passive .............................................................................................. 34
8 Area Code ......................................................................................................................... 35
9 Records ............................................................................................................................ 36
9.1 Accessing Records ..................................................................................................... 36
9.2 Clearing Records ........................................................................................................ 37
10 Calibration ........................................................................................................................ 37
10.1 Calibration Alerts ................................................................................................... 37
10.2 Calibration Process ................................................................................................ 38
11 Specifications ................................................................................................................... 38
12 Alcoconnect ..................................................................................................................... 39
12.1 Installing Alcoconnect Software ............................................................................ 39
12.2 Using Alcoconnect ................................................................................................. 39
12.2.1 Navigating around the Event Log Page .............................................................. 41
12.2.2 Set Log Settings (Filtering Data) ......................................................................... 42
12.2.3 Saving Event Logs ............................................................................................... 42
12.2.4 Erasing Event Logs or Clear Logs on the Device................................................. 42
Page 4

REF: Alcolizer HH4 Alcohol Tester User Manual V1 Page 4 © Alcolizer Technology
1 Introduction
This User Manual details the operation of the Alcolizer HH4 Alcohol Tester and Alcoconnect
software for managing and analysing breath test results.
The manual is divided into various Sections and Sub-sections to enable the user to access
the required information with ease. It includes Cautions and Notes applicable to the HH4
device and Specifications table.
2 Description of HH4
2.1 Equipment Overview
The HH4 Equipment List includes the following items:
• HH4 Handheld Device (Li-ION powered)
• USB Cable
• Battery Chargers (240VAC and 12VDC Vehicle Charger)
• Wrist Strap
• Carry Bag or Hard Plastic Carry Case (Optional), and
• Bluetooth Printer (Optional)
2.2 Device Overview
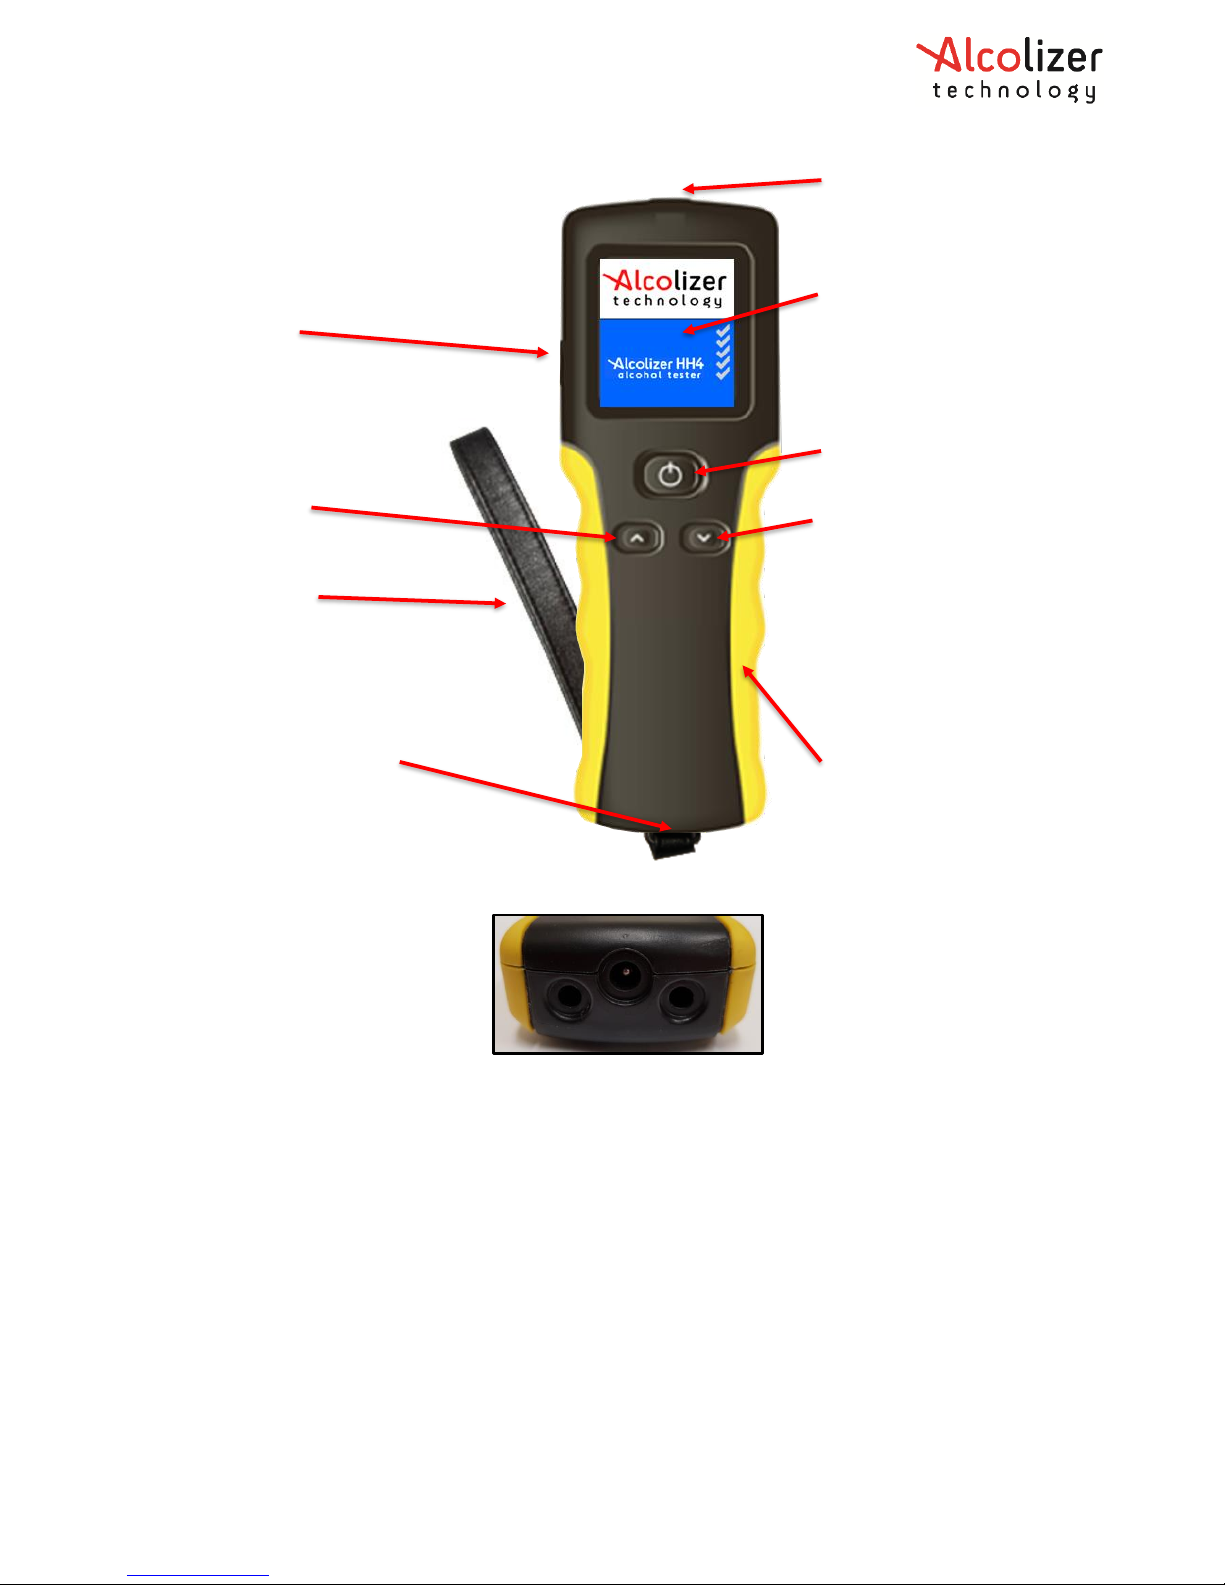
The HH4 is a handheld device consisting of a hard-plastic case, rubberised hand grip, wrist
strap and the following user displays, buttons and adaptor sockets. (Refer to Figure 1)
• Mouthpiece Locator and Sample Inlet Spigot
• LCD Colour Graphics Display
• Test Key
• Up and Down Buttons
• USB Port
• Wrist Strap, and
• Battery Charging Port (refer to Figure 2- Charging Port)
Note
This User manual is applicable to the Alcolizer HH4 alcohol tester running firmware
version FR-1.0.0 and later.
Page 5
REF: Alcolizer HH4 Alcohol Tester User Manual V1 Page 5 © Alcolizer Technology
Figure 1 - User Display, Buttons and Adapter Sockets
Figure 2 - Charging Port
2.2.1 Test Key
The Test Key activates selected functions.
2.2.2 LCD Colour Graphics Display
Displays the various functions of the device including:
• Welcome screen which included days remaining until the next calibration (If Activated)
• Various Test Modes (Mouthpiece, Passive Standard and Passive Only)
• Extensive menus and options
• Ready Notification
• Blow Notification including progress bar
• BAC Level in various formats
• Printer Setup
• Records Information
Down Button
Test Key
Battery Charging Port
Rubberised
Hand Grip
LCD Colour
Graphics
Display
Mouthpiece
Spigot Locator
Wrist Strap
Up Button
USB Port
Page 6

REF: Alcolizer HH4 Alcohol Tester User Manual V1 Page 6 © Alcolizer Technology
These and other displays are explained in the Operating Instructions Section of this manual.
2.2.3 Mouthpiece Locator and Sample Inlet Spigot
This disposable mouthpiece (sample tube) is located on the Mouthpiece Locator which
surrounds the Sample Inlet Spigot.
2.2.4 Up and Down Buttons
The Up and Down buttons allow access to various sub menus. Operation of both buttons
also facilitates access to the Off function (Refer to Section 3).
2.2.5 USB Port
The USB Port facilities connection of the device to a USB equipped computer using the cable
included with the device. Refer to Section 12 for instructions on using the Alcoconnect
toolbox.
2.2.6 Battery Charger Port
The Battery Charging Port is located beneath a moisture proof cap under the wrist strap
bracket and facilities connection to the battery chargers included with the device.
3 Operating Instructions
3.1 General Information
The following information should be observed when conducting a breath test analysis using
this device:
• To obtain an accurate reading, alcohol should not be consumed, or mouthwash
containing alcohol used for at least 15 minutes prior to using this device.
• Blood Alcohol Concentration (BAC) readings can continue to rise or fluctuate for up
to two hours after alcohol is last consumed. Should the BAC readings be near or
over the local threshold, drinking should be cease, then a re-test conducted after 15
minutes.
• Driving or operating machinery should not occur until a new test shows a decline in
the BAC reading and the BAC reading is below the local legislation legal limit.
• It can take up to one hour for the average person’s system to absorb a 0.01 BAC
before the level returns to zero. In such circumstances further testing later in the day
or the following morning is strongly recommended.
CAUTION
While the HH4 is a robust device, it does contain sensitive instrumentation and should not
be subject to rough handling or become submerged in water.
Do not store the device in direct sunlight or places where extreme temperature conditions
can occur.
Note
The HH4 has optional functions which may or may not be active on your device. The
screen images shown in this User Manual may differ to your device depending on the
options fitted or functions enabled.
Page 7
REF: Alcolizer HH4 Alcohol Tester User Manual V1 Page 7 © Alcolizer Technology
3.2 Turning On The Device
Turn the device on as follows:
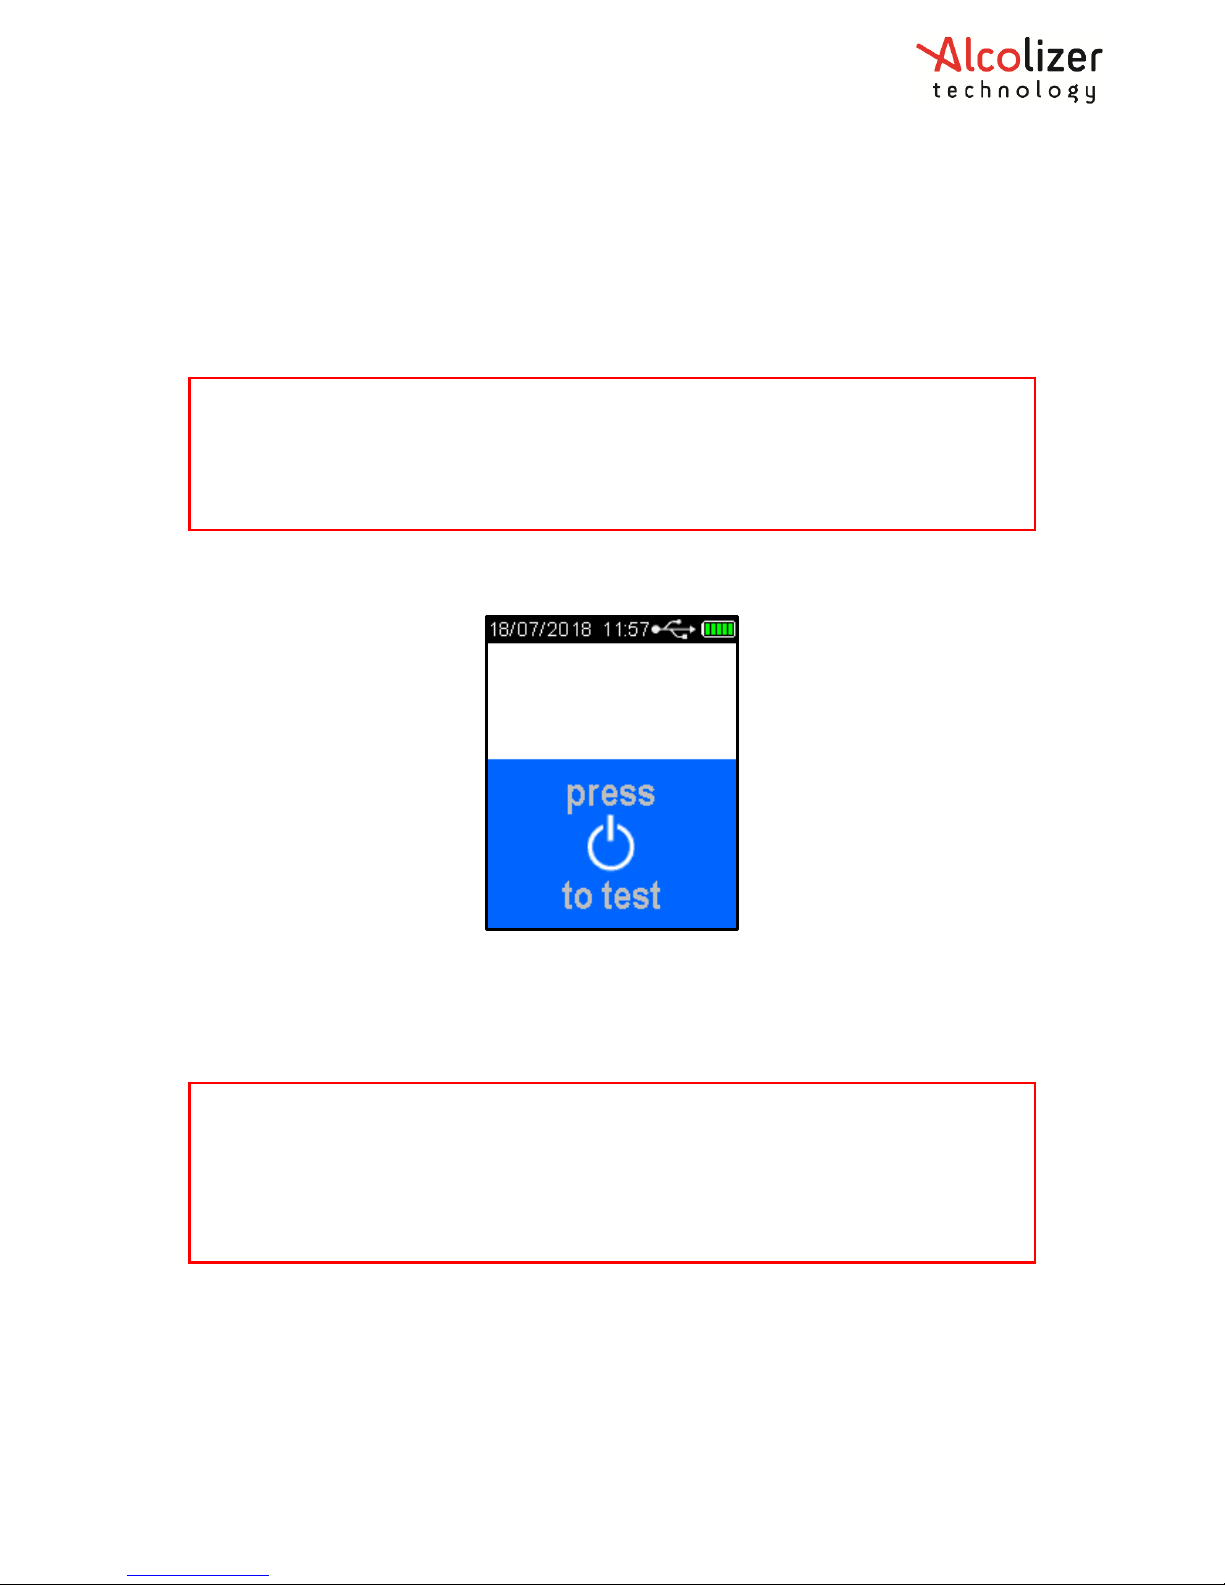
• Press either the Test Key or Up/ Down buttons. A company logo screen will appear
for a period of five seconds prior to the test screen displaying. The logo screen can
be terminated sooner by pressing either the Test Key or Up/ Down buttons a second
time.
• The Display will show press to test (Refer to Figure 3).
Figure 3 - Press To Test Message
3.3 Charging the Battery
Prior to initial use, the HH4 battery should be fully charged. The battery charge cycle may
take up to two hours.
Charge the battery as follows:
• Connect the charger DC socket to the HH4 battery charging port (Refer to Figure 2)
• Connect the AC or DC (vehicle) plug to a suitable power supply and switch on power.
The device will automatically start, and Charging will be displayed.
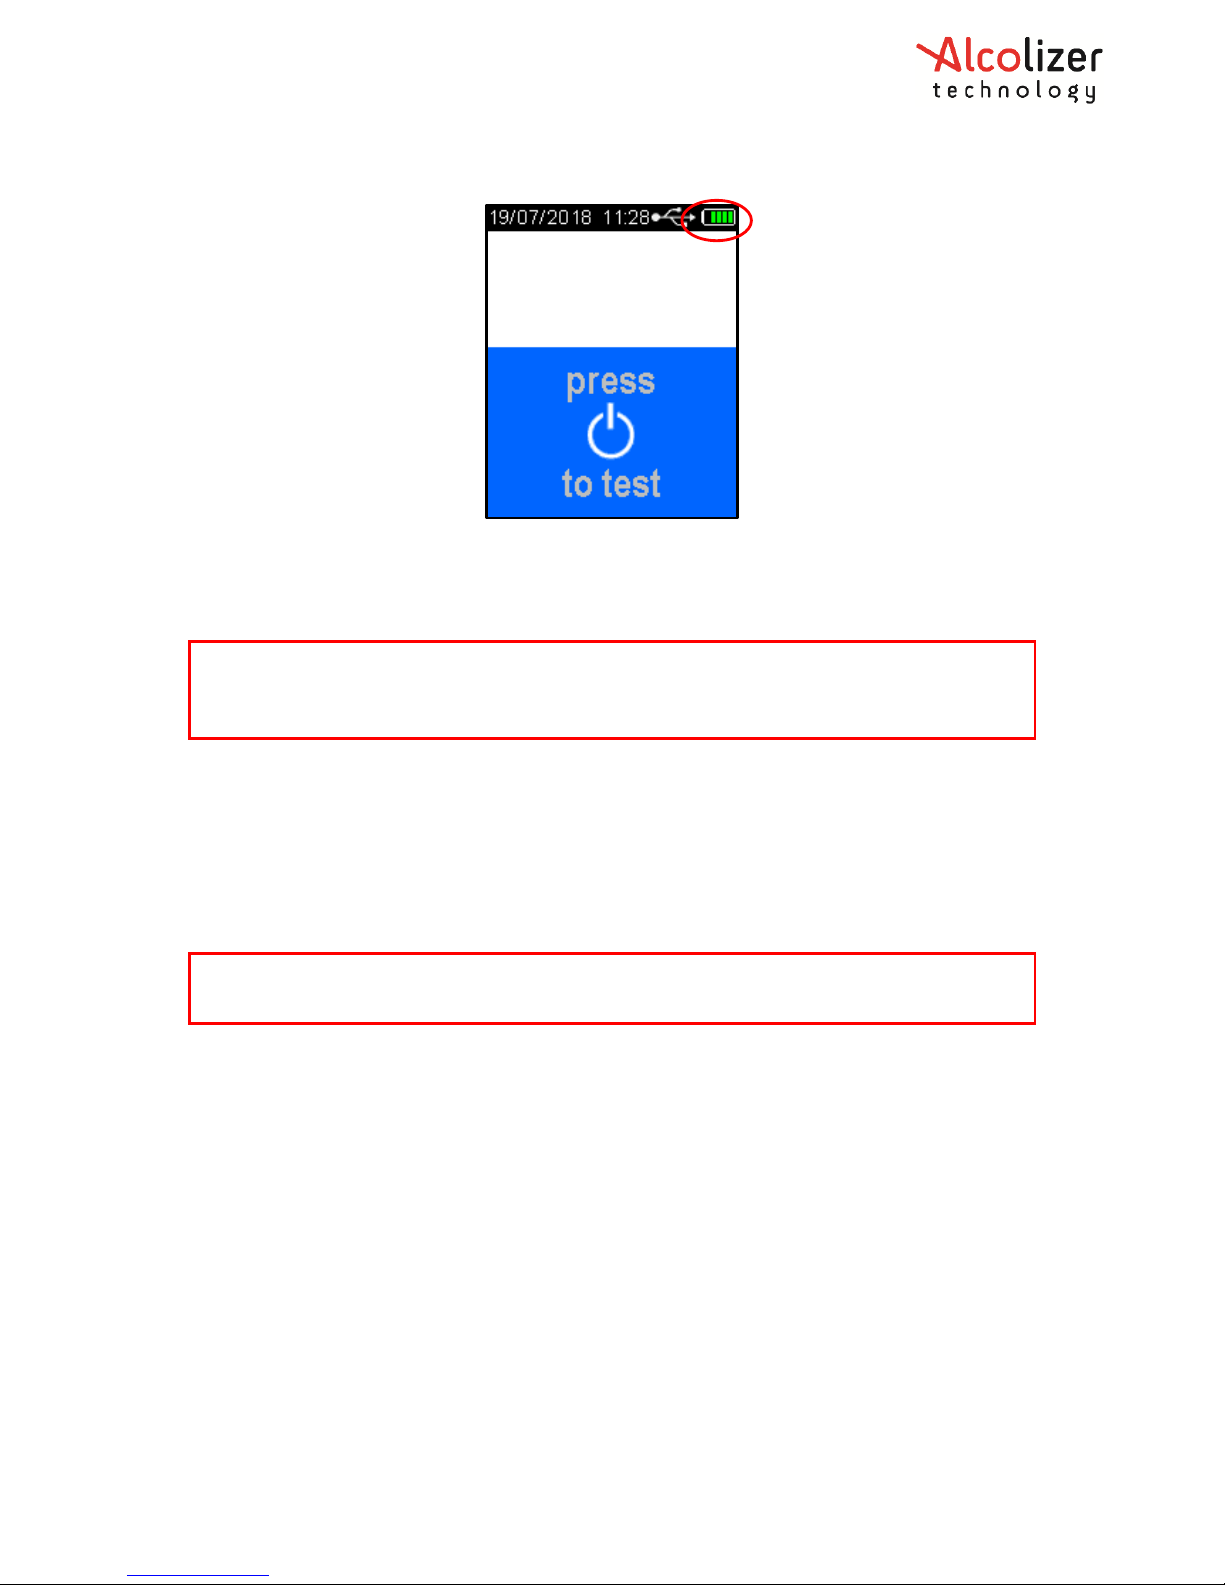
When the battery is fully charged, the battery condition indicator on the LCD Colour
Graphics Display will display five bars. (Refer to Figure 4 - Battery Condition Indicator)
Note
On specially configured devices, additional information may be displayed on start-up e.g.
Device serial number, Sample module serial number and days till calibration.
To permanently display this information, hold the Test key down for an extended period
upon start up.
CAUTION
The battery in the HH4 device is a Li-ION battery. As such it should not be tampered with
in anyway. Should any problems occur that are related to the battery, contact your local
Alcolizer representative for advice.
Only use the battery charger supplied with the Alcolizer certified equipment. Use of non
Alcolizer battery chargers could damage the device and render it inoperative.
Page 8
REF: Alcolizer HH4 Alcohol Tester User Manual V1 Page 8 © Alcolizer Technology
Figure 4 - Battery Condition Indicator
Recharge the battery when the Battery Condition Indicator shows one bar to ensure testing
will not be interrupted by a flat battery.
3.4 Testing Types
The HH4 can perform both Mouthpiece and Passive (Passive Standard and Passive Only)
testing. Mouthpiece testing provides a BAC reading in g/100ml (or other formats as
required) and Passive testing will display the presence of alcohol in breath. Following a
Passive test that indicates the presence of alcohol, a Mouthpiece test should then be
performed if an accurate BAC is required.
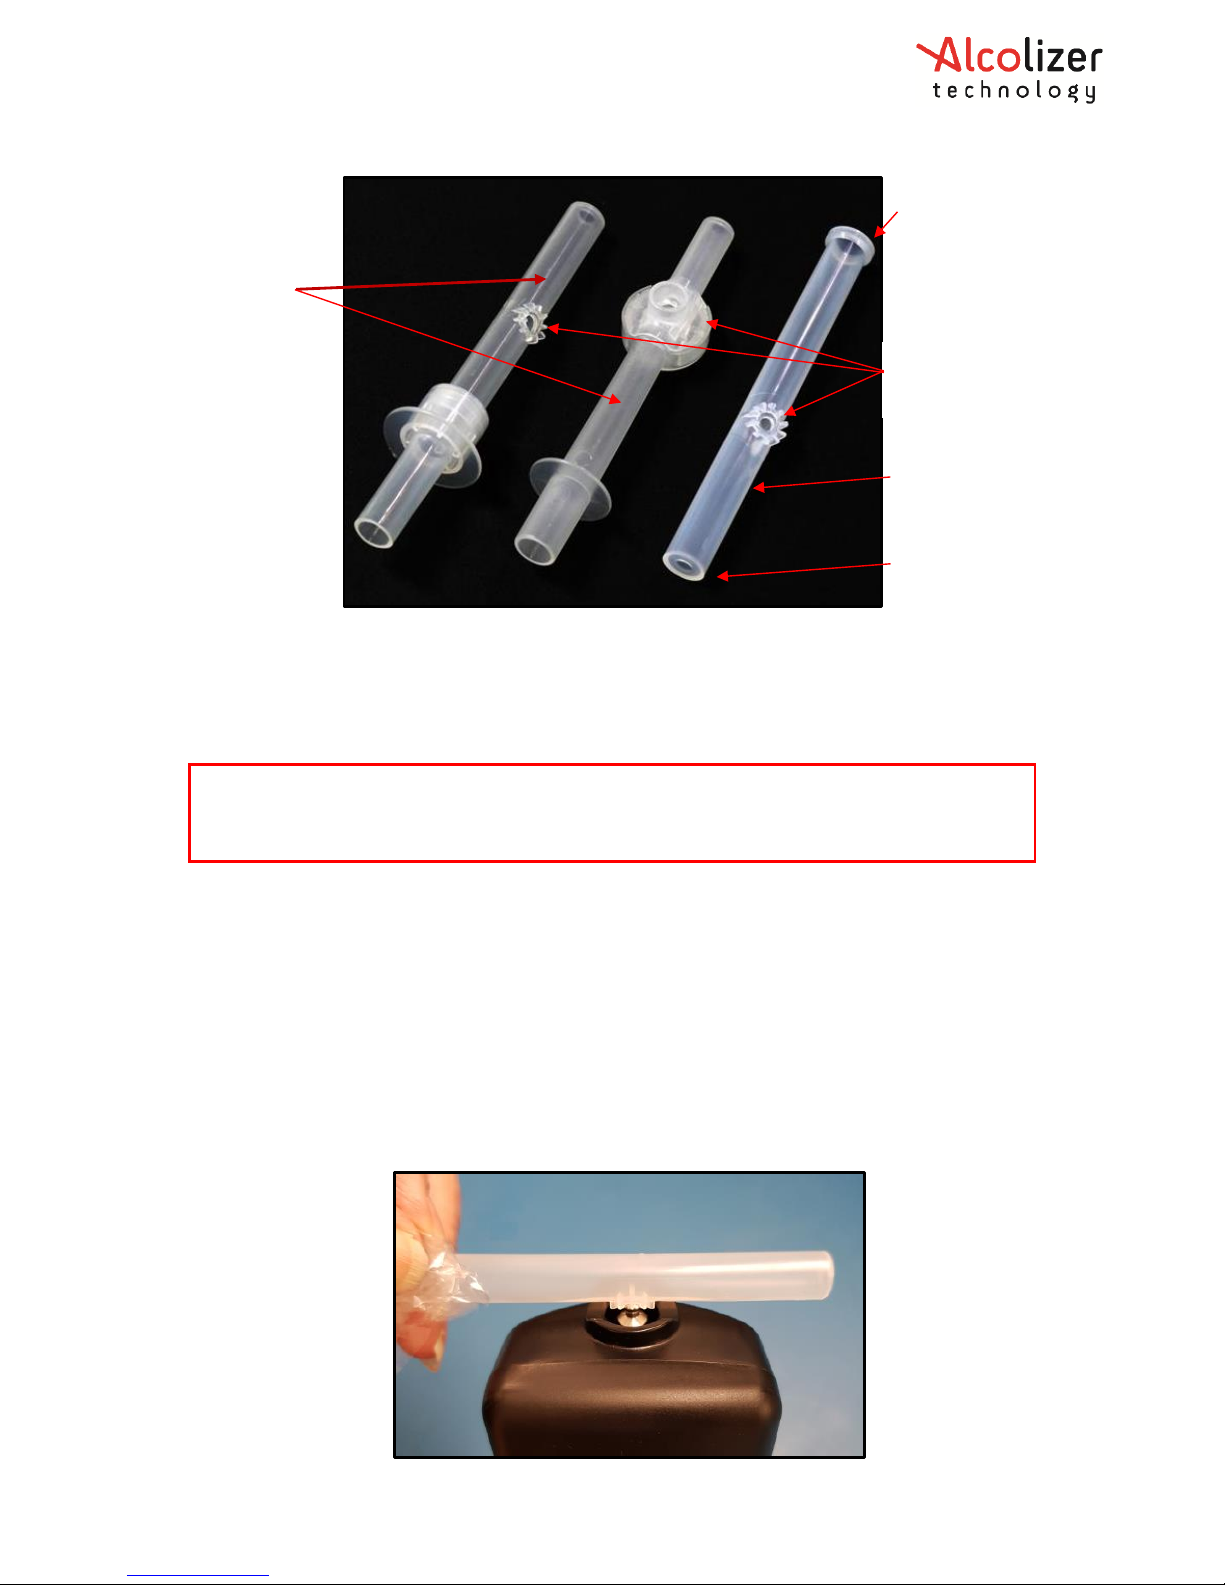
3.4.1 Mouthpieces
There are two types of Mouthpieces available for use on the HH4 (Refer Figure 5).
Mouthpiece Types:
• Spit Trap Non-Return Valve Mouthpiece (2 variants), and
• Standard Spigot Locator Mouthpiece.
Note
The device cannot be used for testing during charging but can be used for accessing
Records.
Note
Mouthpiece testing is also referred to as Standard or Active testing.
Page 9
REF: Alcolizer HH4 Alcohol Tester User Manual V1 Page 9 © Alcolizer Technology
Figure 5 - Mouthpiece Types
The advantage of using the spit trap mouthpieces is that most of the saliva in the exhaled
breath is collected in the mouthpiece and does not enter the device.
3.4.2 Mouthpiece Testing
Attach the mouthpiece to the device as follows:
• Grasp the mouthpiece at the ribbed end and tear the plastic wrapping from the non-
ribbed end, downwards to expose the sample inlet hole.
• Locate the mouthpiece sample inlet port over the mouthpiece locator in line with
the recess that surrounds the spigot (Refer Figure 6).
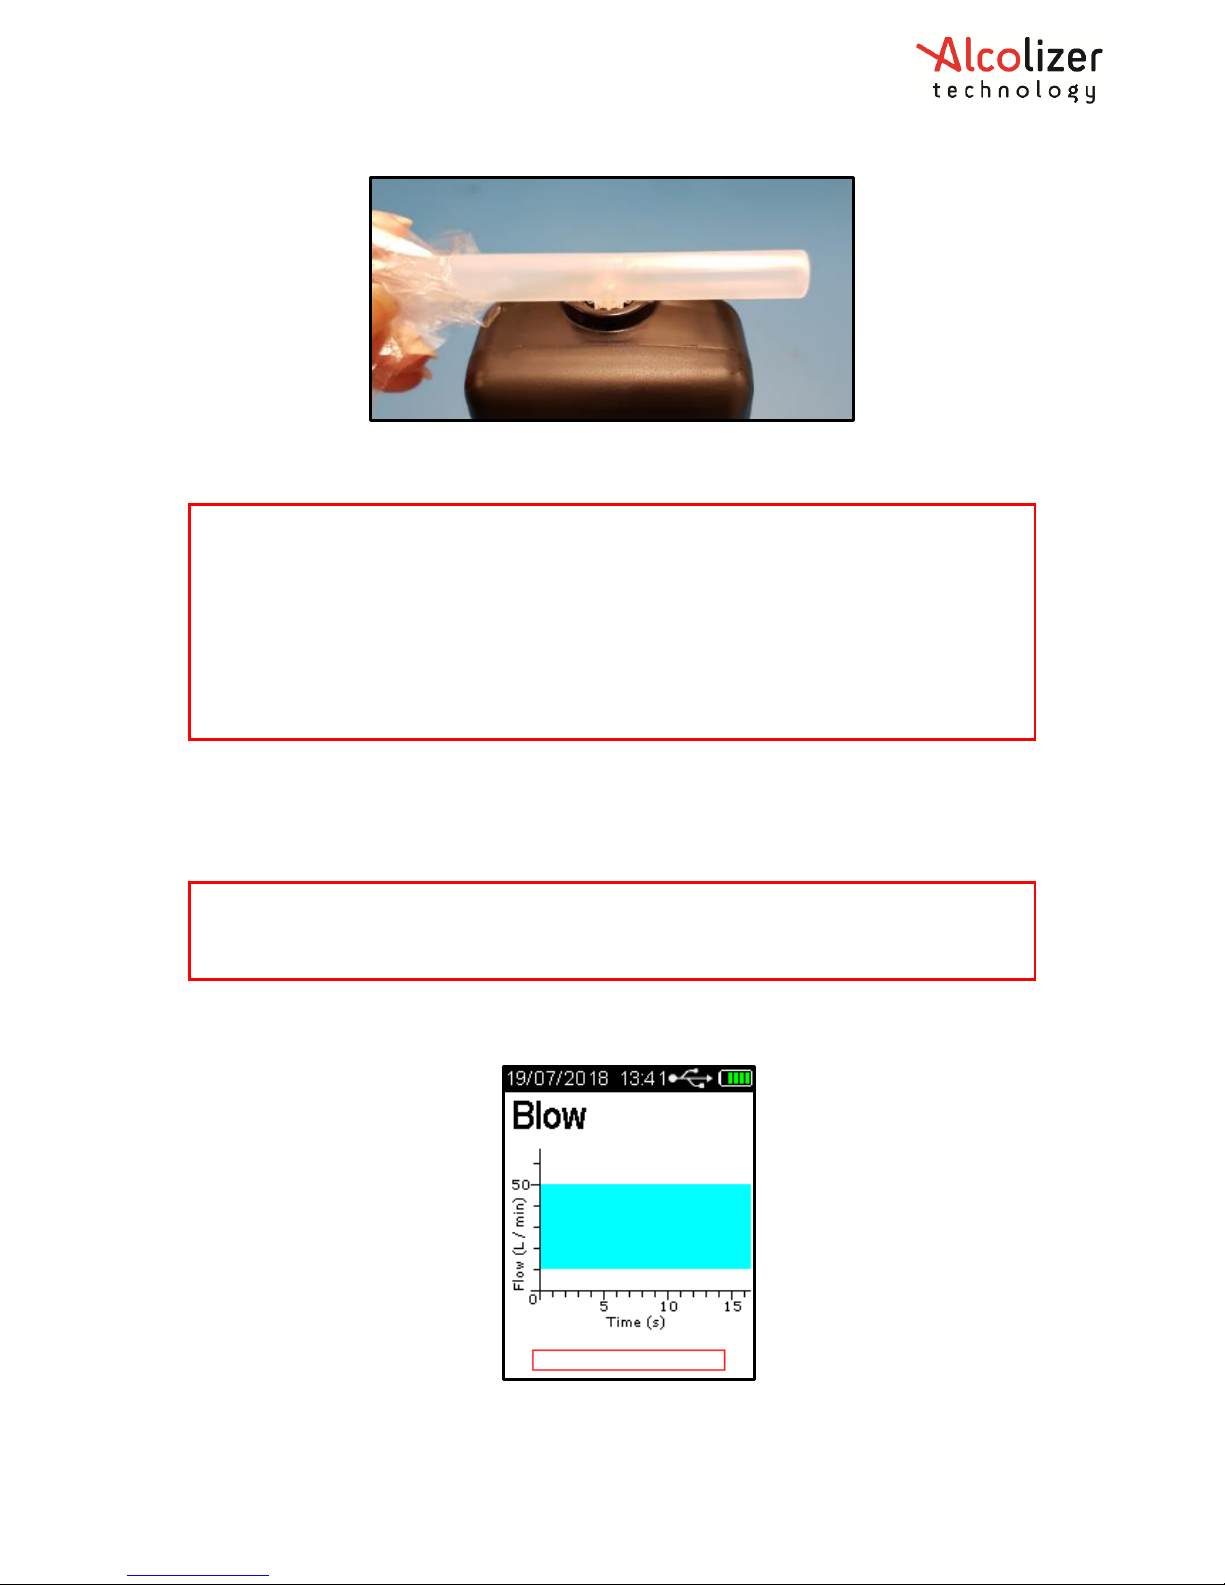
• Press the mouthpiece sample inlet port onto the locator until it is attached securely
(Refer Figure 7). The orientation of the mouthpiece will not affect the sampling.
• Remove the remaining portion of the plastic wrap just prior to testing to ensure
hygienic use.
Figure 6 - Locating the Mouthpiece
CAUTION
To maintain a healthy sampling environment, the following procedures must be strictly
adhered to.
Non-Return
Spit Trap
Mouthpieces
Ribbed
Sample Inlet
Ports
Standard
Mouthpiece
Non-Ribbed End
Page 10
REF: Alcolizer HH4 Alcohol Tester User Manual V1 Page 10 © Alcolizer Technology
Figure 7 - Mouthpiece Correctly Positioned
3.4.3 Taking a Mouthpiece (Active) Breath Sample
Perform a Mouthpiece Test as follows:
• Press the Test key and the device will perform a self-test and Please wait... and a
progress bar will be displayed.
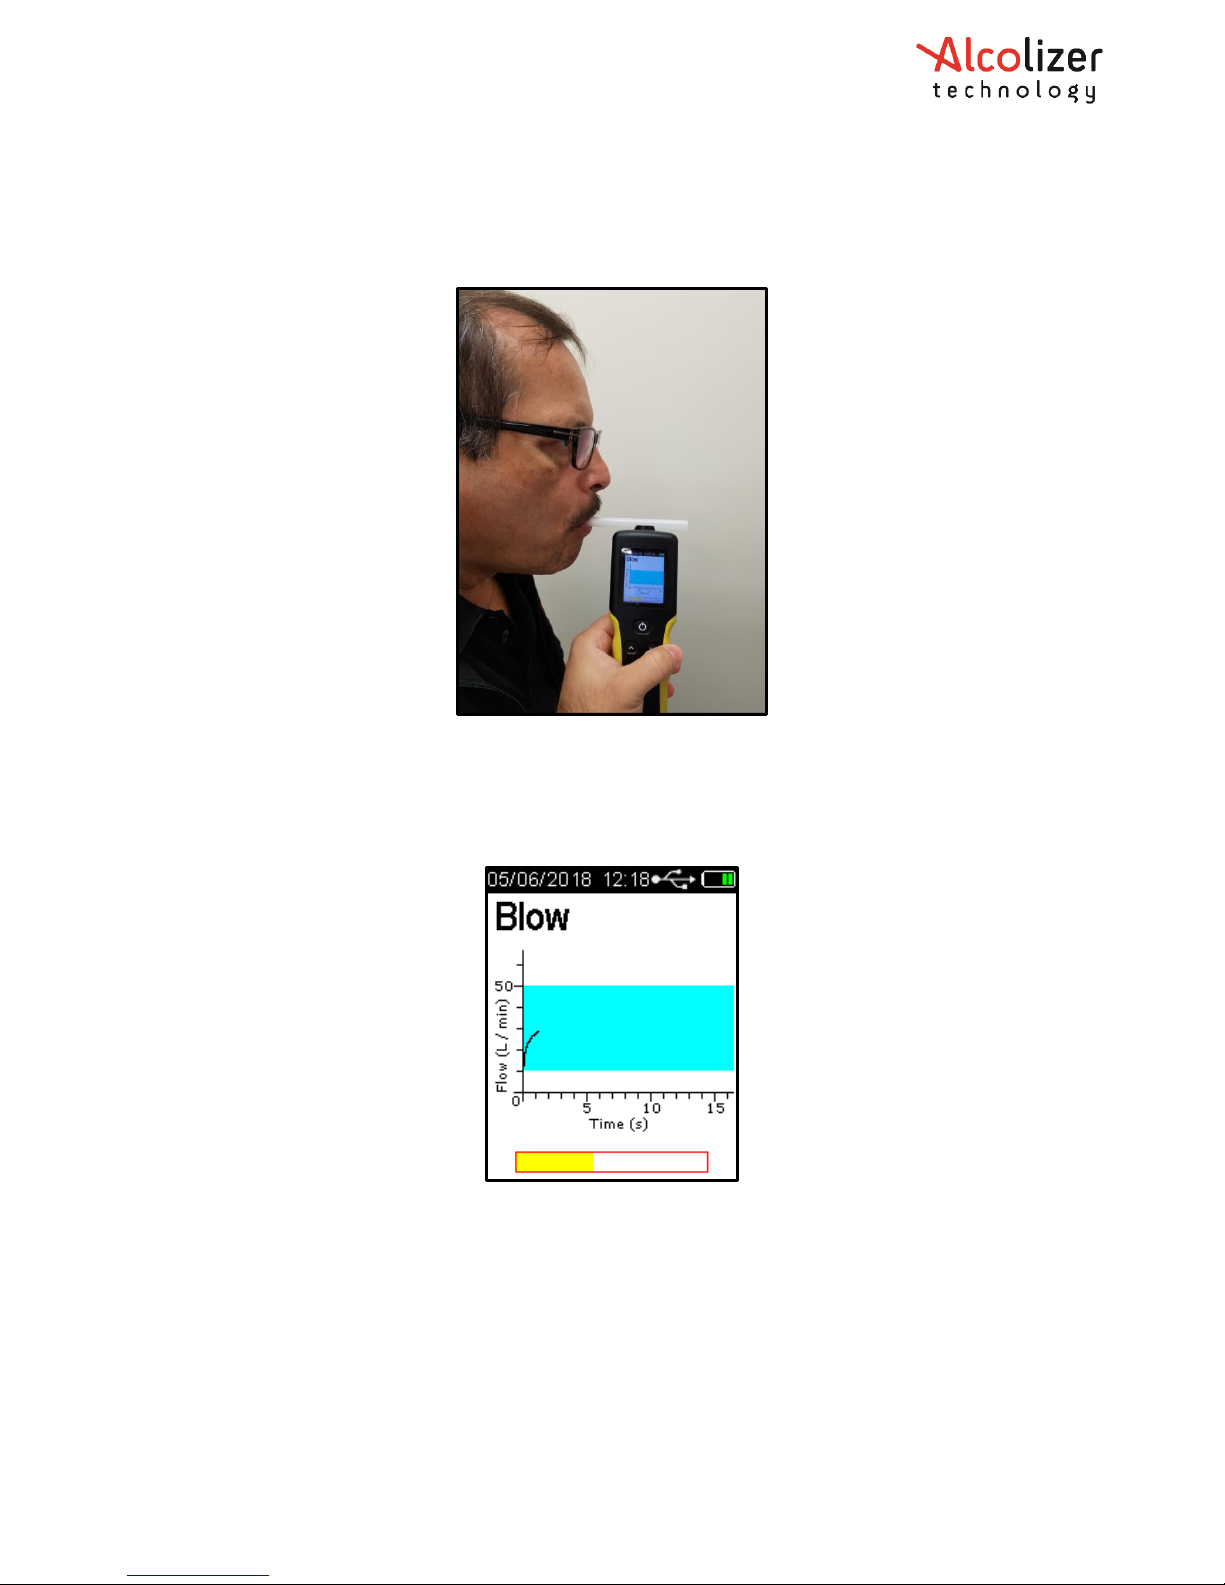
• Blow will be displayed when the device is ready (Refer to Figure 8).
Figure 8 - Blow is displayed when the device is ready
Note
Before taking a breath sample, ensure the subject has not consumed alcohol for at least
15 minutes.
If any step in a breath test sequence is not completed or the device is left idle for a
prolonged period of time, the device will then terminate the breath test and display Test
timed out. The device will return to the press to test display
The standard breath test time out period is 60 seconds. If a test time out does occur
during a breath test, a new breath test must be performed.
Note
If the self-check is unsuccessful an error code will be displayed, and the device will not
accept a breath sample.
Page 11
REF: Alcolizer HH4 Alcohol Tester User Manual V1 Page 11 © Alcolizer Technology
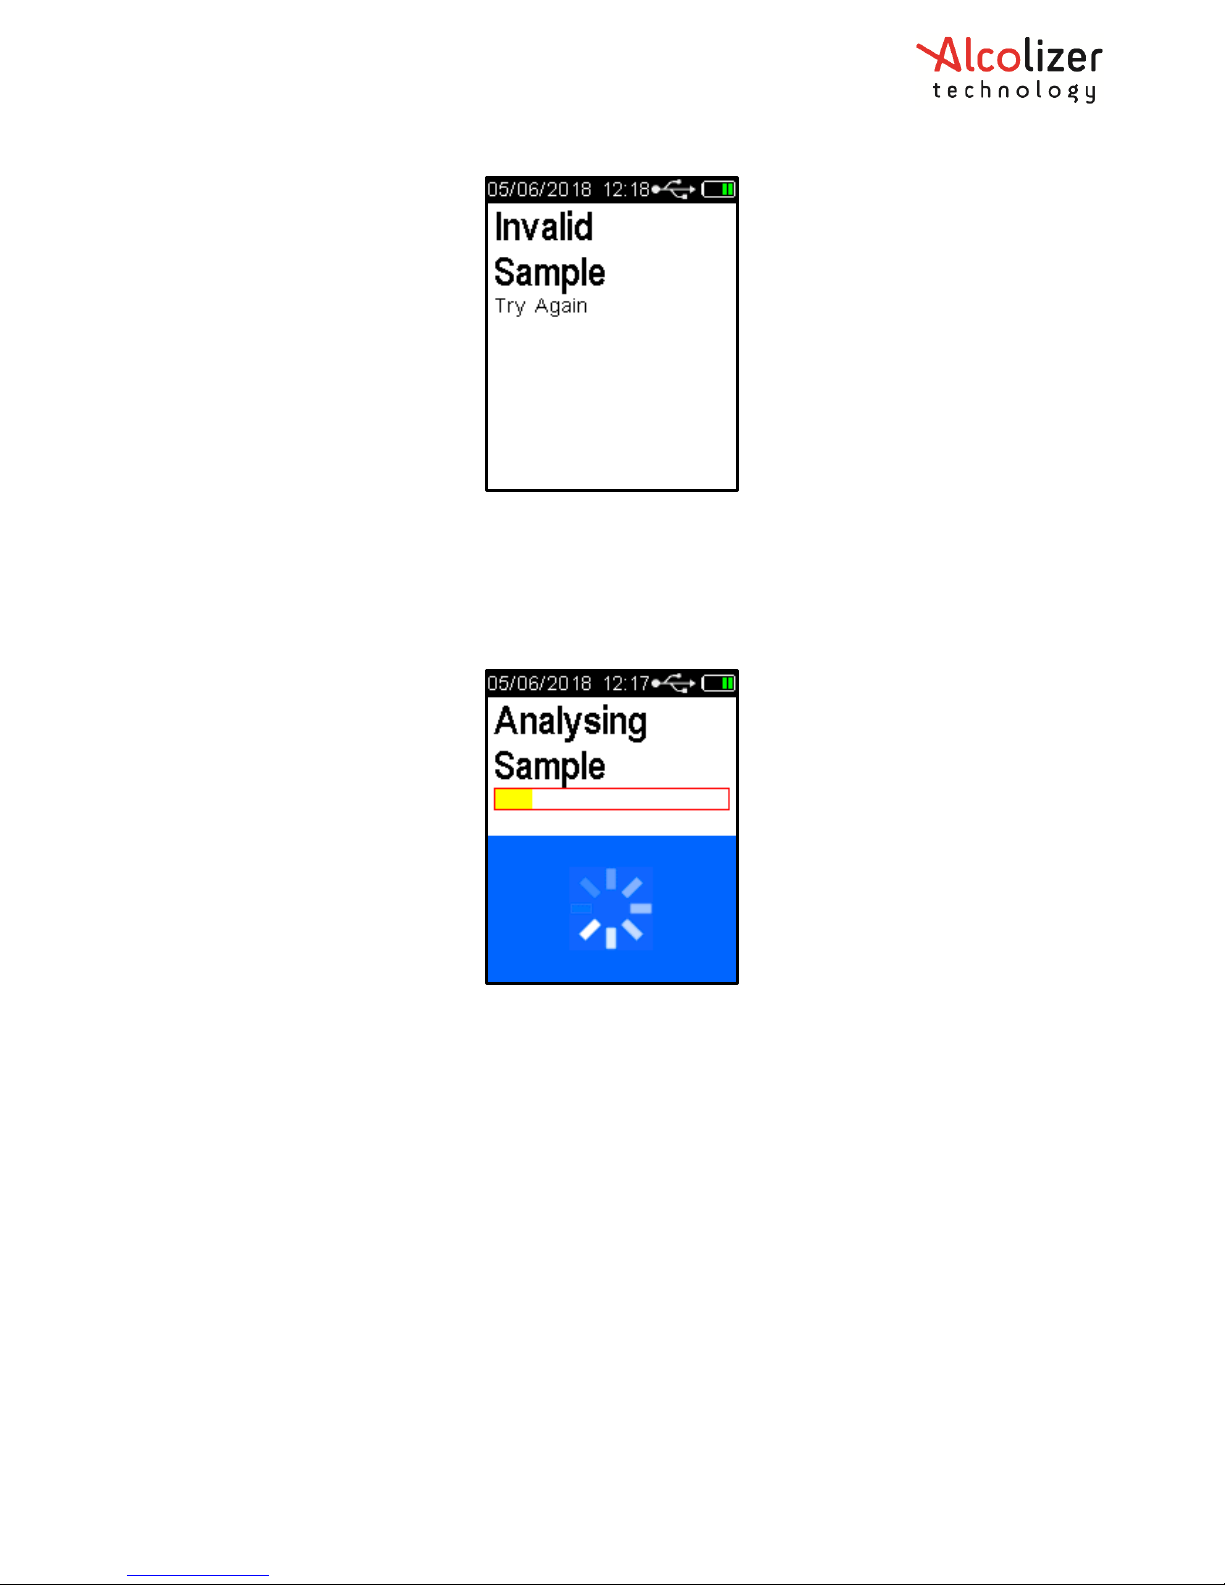
After taking a deep breath, the test subject places their mouth over the mouthpiece inlet
(ribbed end) and blows a gentle to medium breath sample into the mouthpiece (Refer
Figure 9).
Figure 9 - Providing A Sample
• The exhaled flow is indicated via a bar graph; showing air flow over time in seconds
(Refer to Figure 10). A beeping sound is also heard during the breath sample delivery
phase, indicating a satisfactory breath sample is being delivered.
Figure 10 - Sample Process Bar
• The test subject continues blowing until the device takes a sample of the exhaled
breath volume, indicated by a click and long beep sound.
• The frequency of the sound beeps increases with the intensity of the blow pressure.
Blowing too hard or too soft will result in Invalid Sample Try Again being displayed
(Refer Figure 11). The device will return to the Blow screen, another sample can now
be taken.
Page 12
REF: Alcolizer HH4 Alcohol Tester User Manual V1 Page 12 © Alcolizer Technology
Figure 11 - Invalid Sample Try Again Message
3.4.4 Analysing a Mouthpiece Breath Sample
After a valid breath sample is taken, the Analysing Sample message is displayed until the
device calculates the BAC reading. This will normally take a few seconds. In cold climate
conditions it may take longer to display the BAC reading (Refer to Figure 12)
Figure 12 - Analysing Sample Message
When the BAC reading is calculated, it will be displayed on the screen together with the unit
of measurement (e.g. g/100ml, g/210L) and be retained until the Recovering period has
ended.
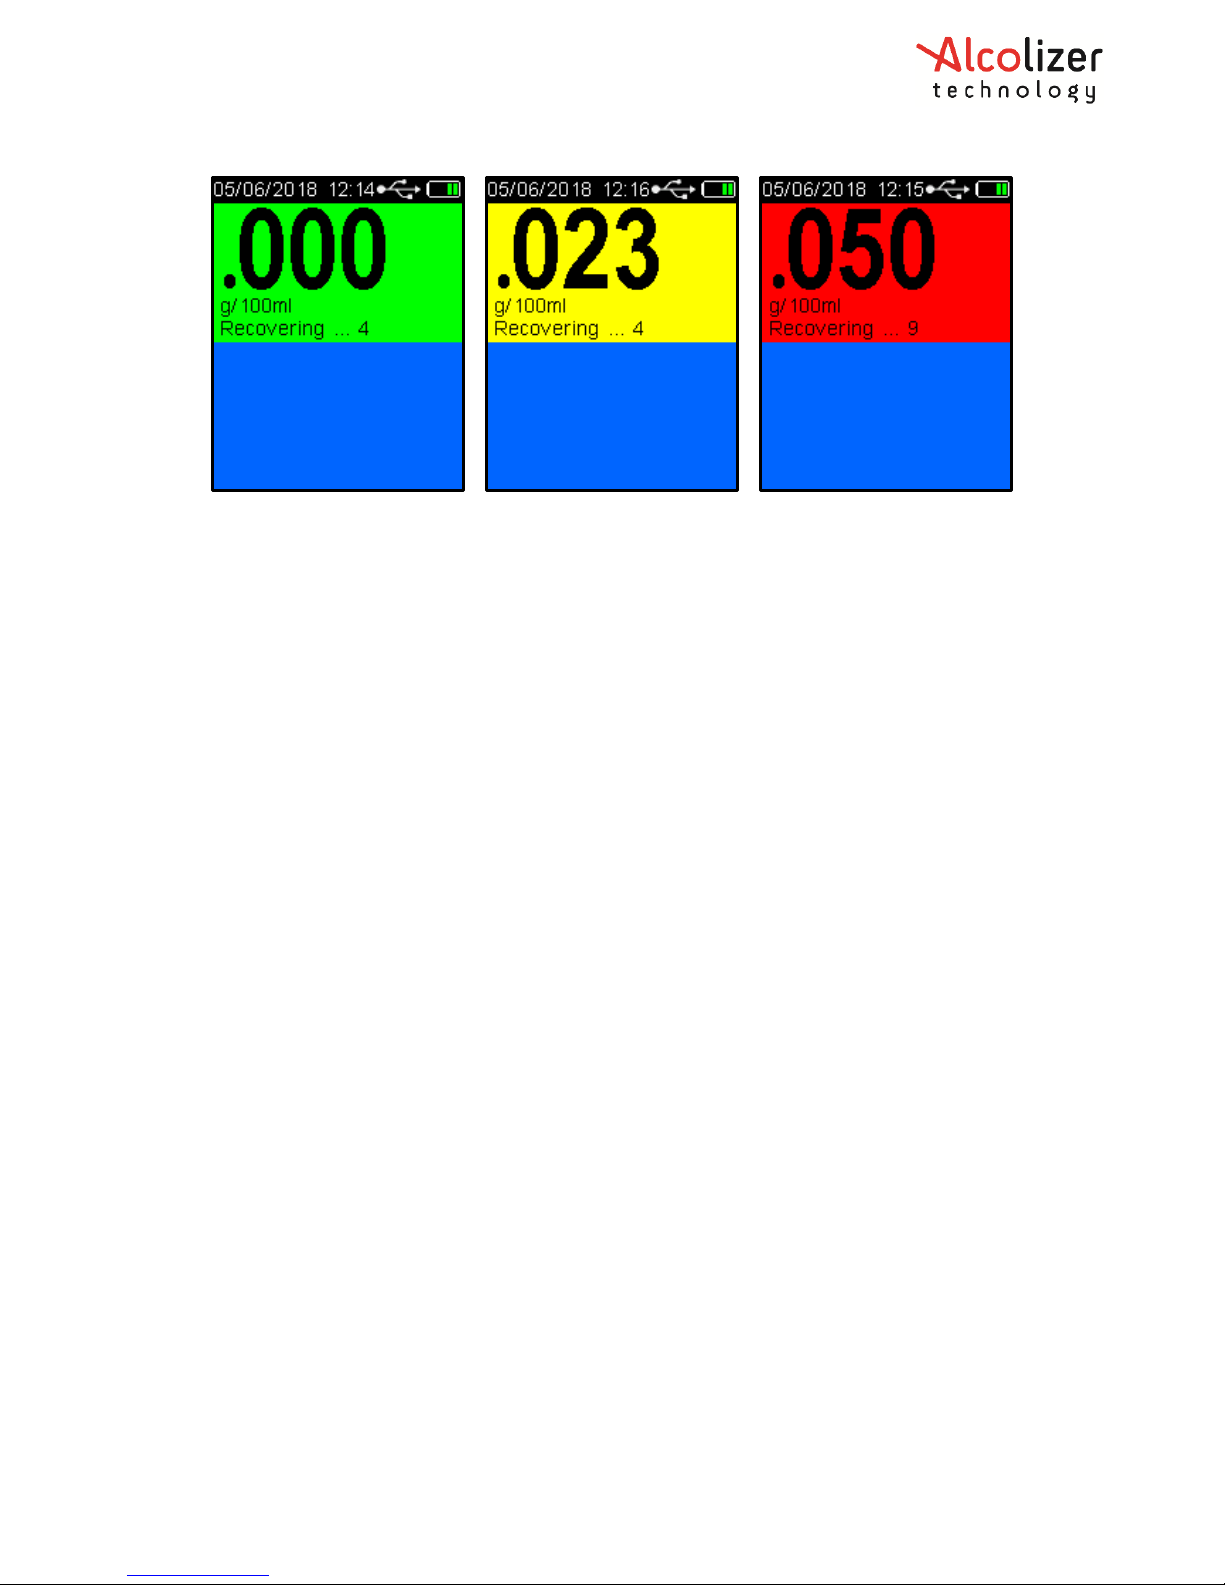
The screen colour will vary depending on the percentage of alcohol present; green for zero
to 0.019g/100ml, orange for 0.020g/100ml to 0.049 g/100ml, g/210L and red for readings
greater than 0.050 g/100ml, g/210L. The Recovering period is indicated by Recovering
shown on the display (Refer to Figure 13)
Page 13
REF: Alcolizer HH4 Alcohol Tester User Manual V1 Page 13 © Alcolizer Technology
Figure 13 - Various BAC and Screen Colours Displayed
The Recovering period is the time the fuel cell sensor requires to recover from the previous
breath test. This period will vary according to BAC readings displayed, longer for higher
readings.
Remove the used mouthpiece by rotating it and it will come away from the spigot easily.
Dispose of the mouthpieces in a responsible manner.
To perform another breath test, repeat paragraph 3.4.2.
3.4.5 Passive Testing
Passive testing is a test that is performed without using a mouthpiece. The HH4 can perform
two types passive testing, that is trigged by button or blow pressure.
All Passive testing is performed by holding the device approximately 50mm in front of the test
subject’s mouth and asking them to count or talk so that exhaled breath may be picked up by
the device and analysed for the presence of any alcohol.
When using Passive Standard testing, a Mouthpiece test is automatically enabled should the
device detect alcohol on the subject’s exhaled breath. Passive Only testing does not prompt
the user to perform further testing.
3.4.6 Enabling Passive Standard
If passive standard mode has not been enabled, proceed as follows:
• With the screen displaying press to test, press the Up and Down buttons
simultaneously. The User Menu will be displayed.
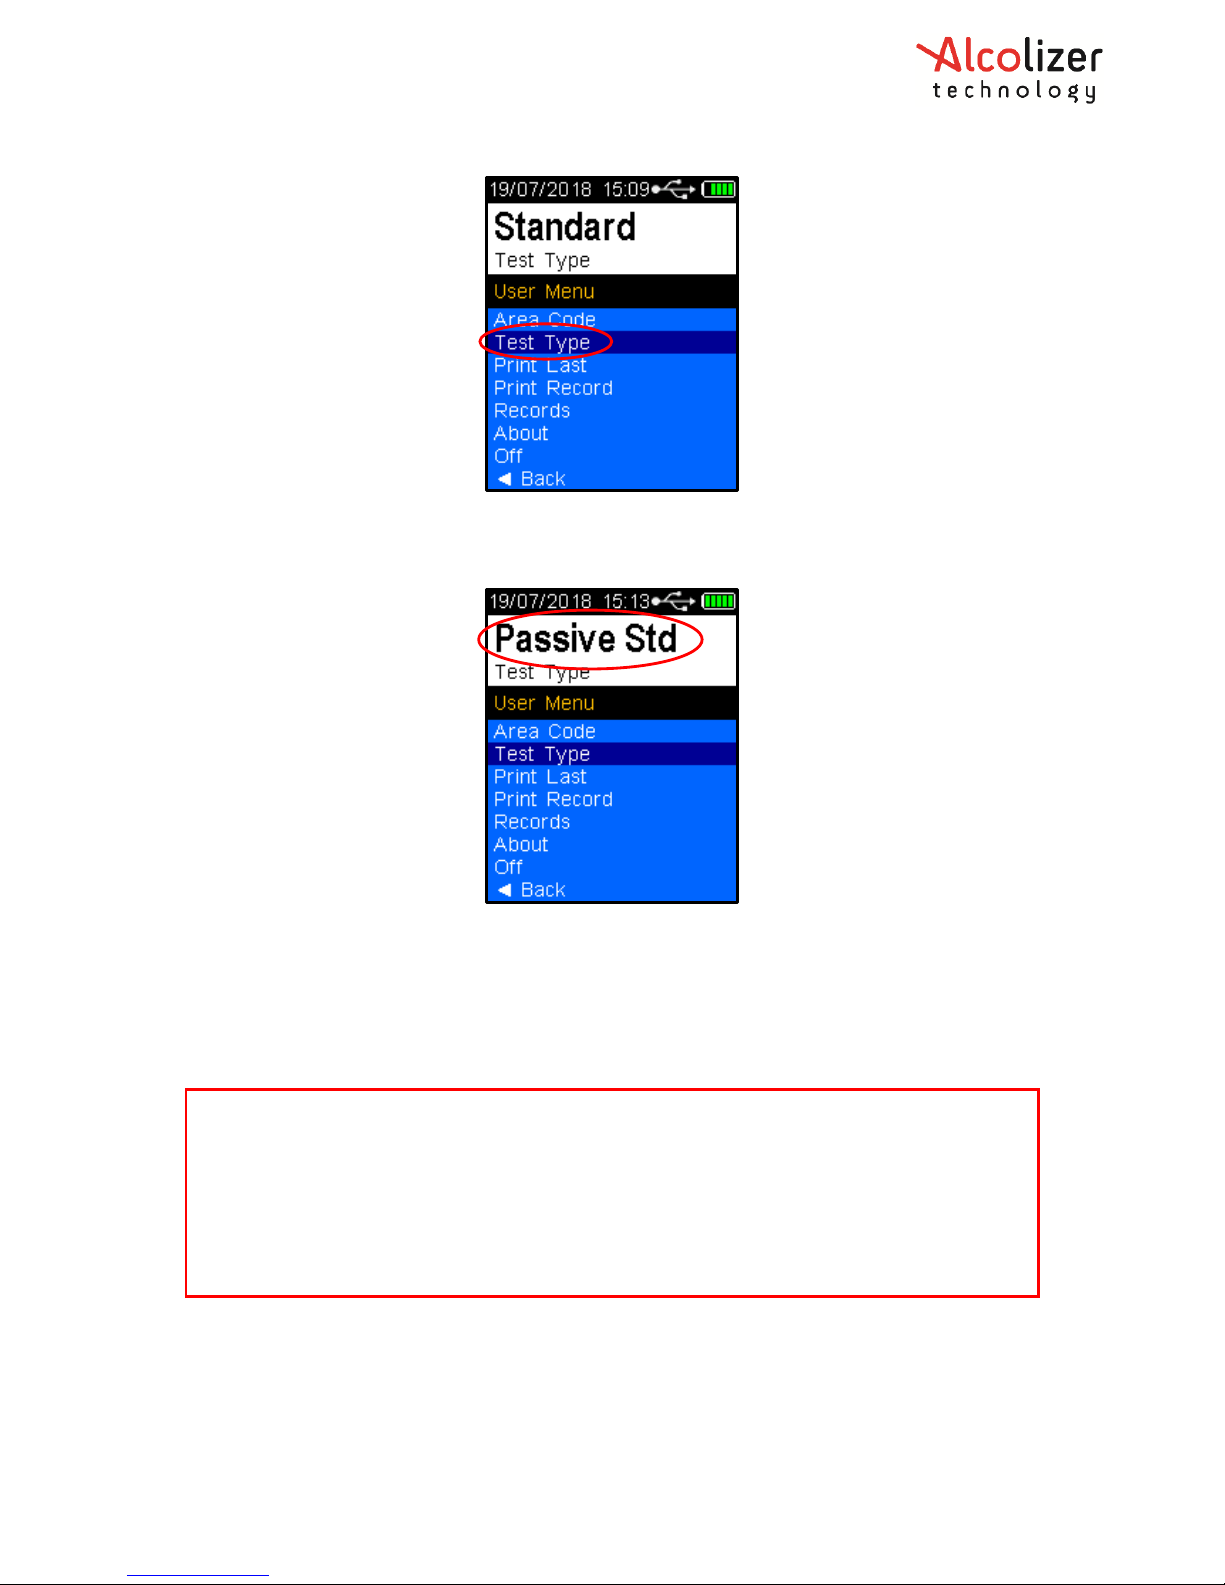
• Press the down button to scroll down to Test Type (Refer to Figure 14).
Page 14
REF: Alcolizer HH4 Alcohol Tester User Manual V1 Page 14 © Alcolizer Technology
Figure 14 - Test Type Displayed
• Press the Test key until Passive Std is displayed (Refer to Figure 15).
Figure 15 - Passive Standard Displayed
• Press the Up and Down buttons simultaneously. Passive Standard is now enabled or
press the Down button until Back is highlighted then press the Test key to leave the
User Menu.
3.4.7 Taking a Passive Standard Breath Sample
Perform a Passive Standard test as follows:
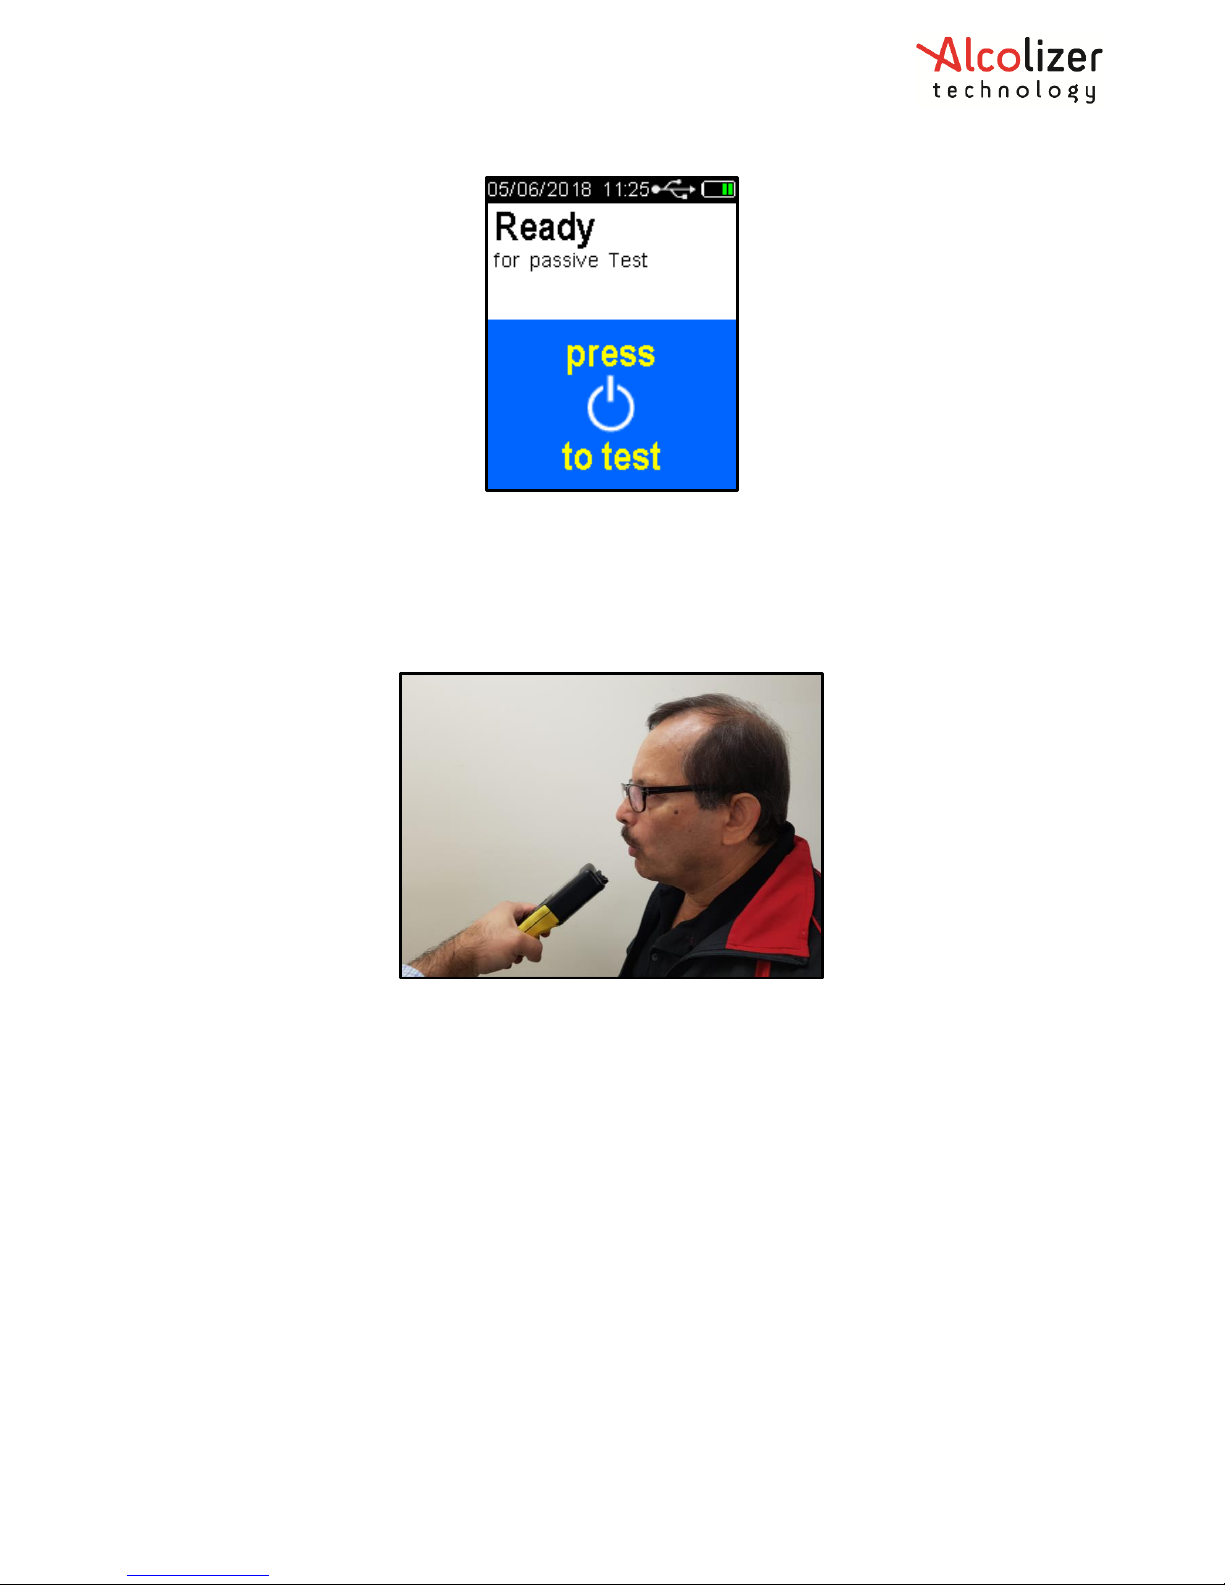
• On the press test screen, press the Test key. Ready for passive test is displayed (Refer
to Figure 16)
Note
If any step in a breath test sequence is not completed or the device is left idle for a
prolonged period of time, then the device will terminate the breath test and display Test
timed out the device will return to the press passive test display.
The standard breath test time out period is 60 seconds. If a test time out does occur during
a breath test, a new breath test must be performed. Press the Test key to perform a new
passive breath test as per steps above.
Page 15
REF: Alcolizer HH4 Alcohol Tester User Manual V1 Page 15 © Alcolizer Technology
Figure 16 - Ready for Passive Test Message
• Press the Test button. The device will perform an electronic auto check and then
return to Ready for passive Test.
• Hold the device 50mm in front of the test subjects mouth: so that the subject is
breathing or talking directly into the device’s sample inlet port (Refer to Figure 17).
Figure 17 - Providing a Passive Sample
• Ask the Subject to start counting from 20 onwards with a one second rhythm, until
you tell them to stop, “20…21…22…23…24…25…etc.”
• Press the Test button while the subject is counting. The device will make a series of
clicking sounds as the sample is being taken,
• The device is set to take three pump samples. During these three pumps the
operator must hold the device steady and at the same distance from the subject.
The device will give three sample pump clicks, followed by a long beep sound.
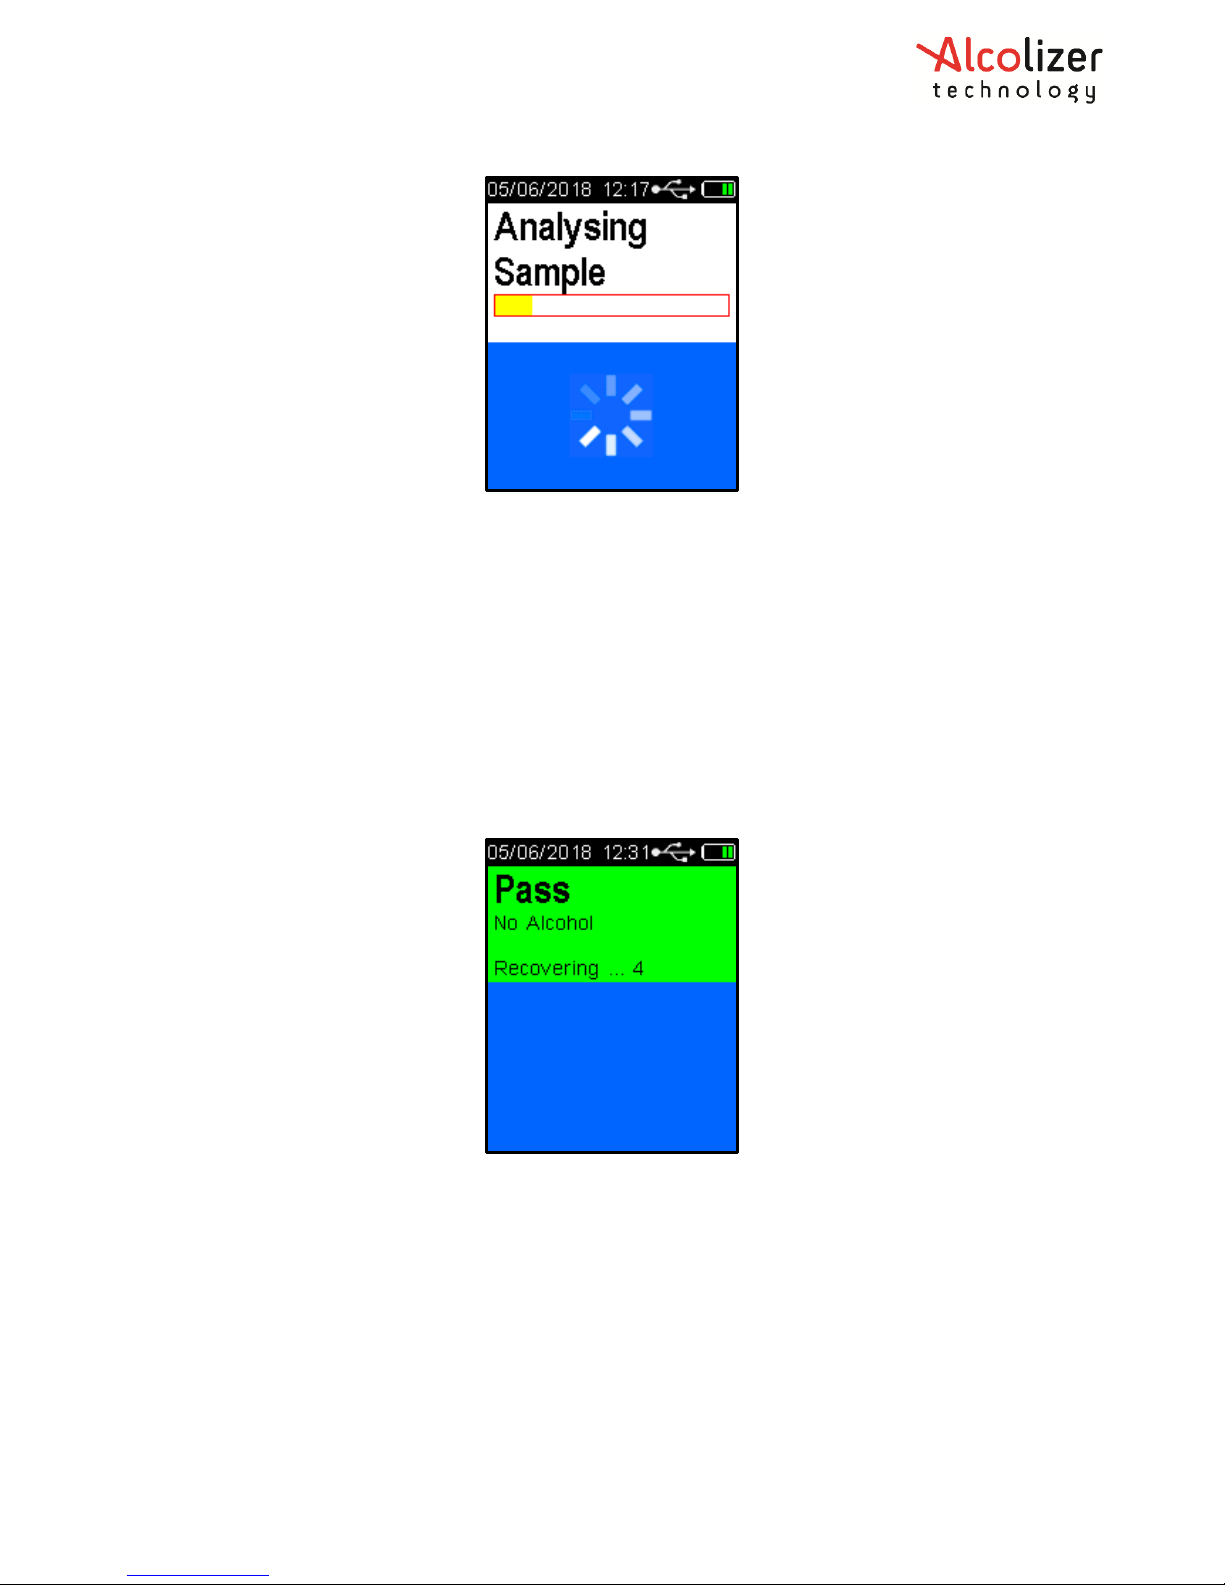
Analysing Sample will then be displayed (Refer to Figure 18).
Page 16
REF: Alcolizer HH4 Alcohol Tester User Manual V1 Page 16 © Alcolizer Technology
Figure 18 - Analysing Sample Message
3.4.8 Analysing a Passive Breath Sample
• After a valid breath sample is taken, the Analysing Sample message is displayed until
the device determines if alcohol is present. This will normally take a few seconds. In
cold climate conditions it may take longer to display the result.
• When the Passive standard reading is calculated, it will be displayed and retained until
the Recovering period has ended.
• If a Pass No Alcohol reading is displayed the device has indicated that no alcohol was
detected in the near vicinity of subject’s exhaled breath. When the Recovering
period has ended the device is ready for the next Passive standard breath test (Refer
to Figure 19).
Figure 19 - Pass No Alcohol Message
• To perform another Passive Standard breath test, repeat these steps again.
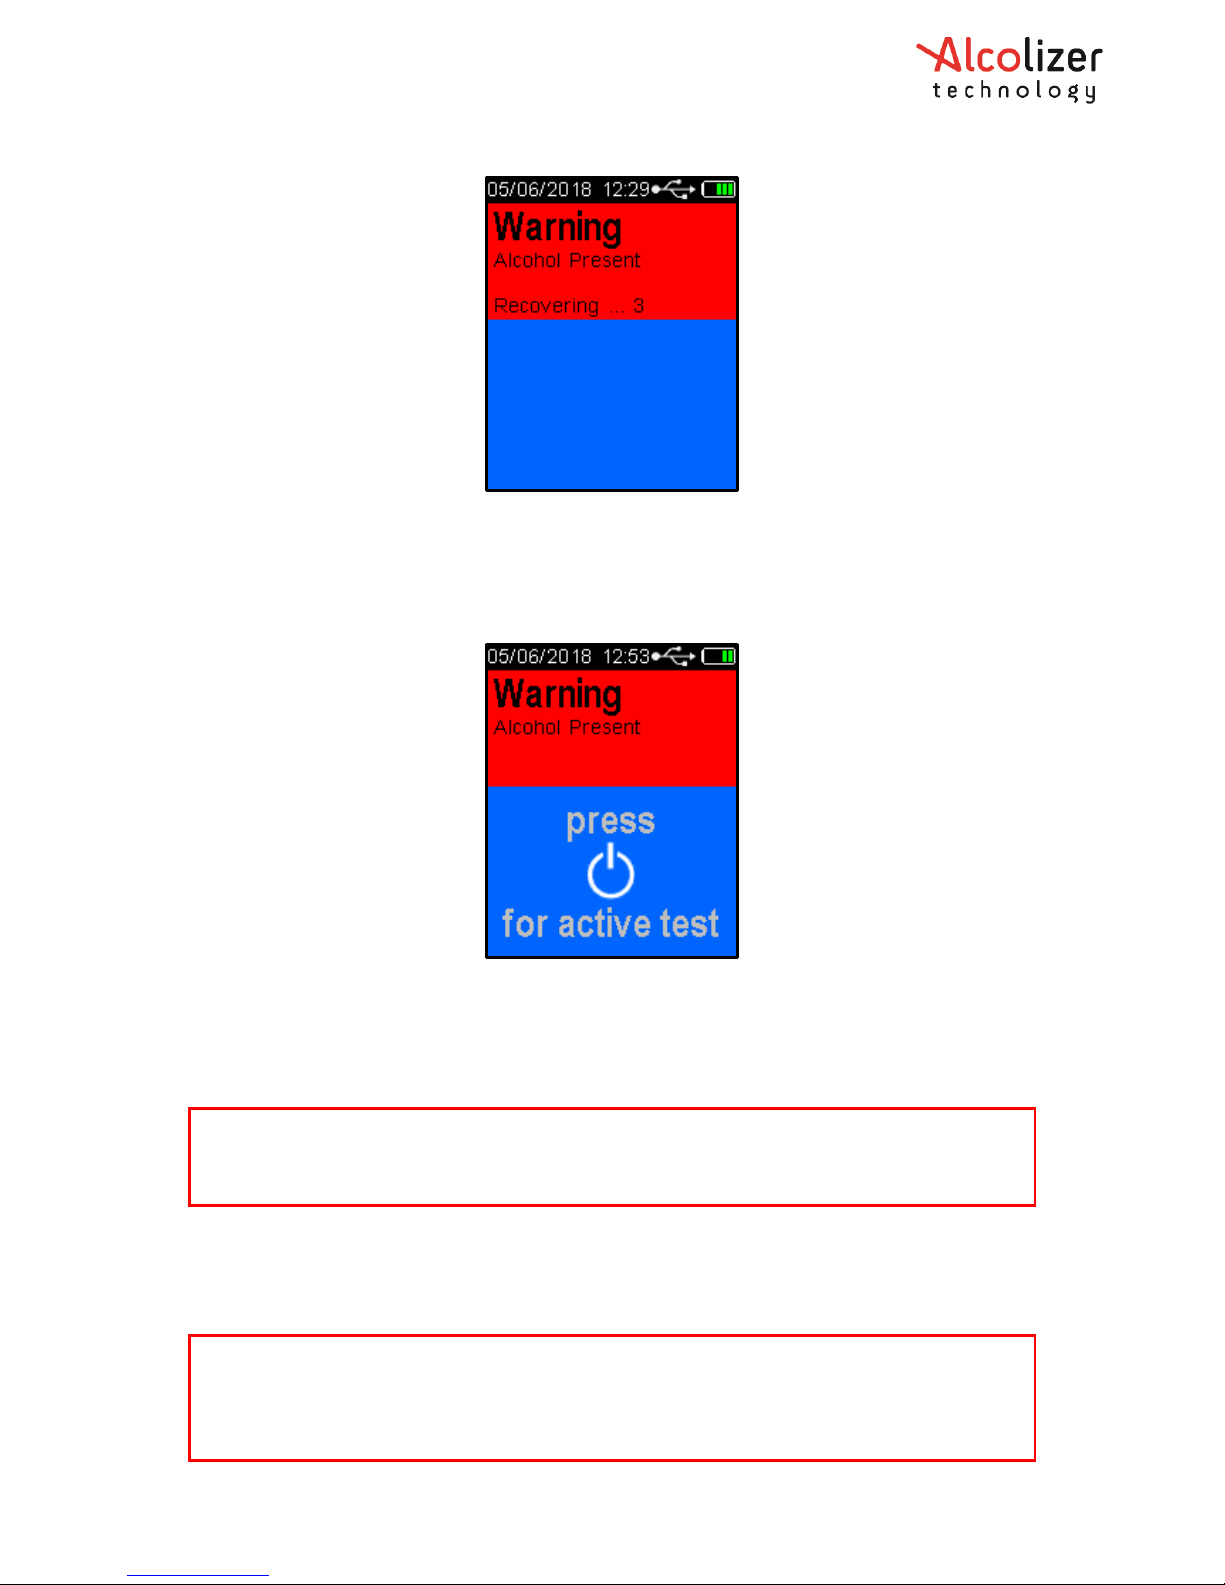
• If a Warning Alcohol Present reading is displayed the device has indicated that
alcohol was detected in the near vicinity of subject’s exhaled breath (Refer to Figure
20).
Page 17
REF: Alcolizer HH4 Alcohol Tester User Manual V1 Page 17 © Alcolizer Technology
Figure 20 - Warning Alcohol Present Message
• After the recovery period has ended, the device is enabled automatically to take an
Active (Mouthpiece) sample (Refer to Figure 21). Perform an Active test in
accordance with the procedures in paragraph 3.4.2.
Figure 21 - Warning Alcohol Present/ Press for Active Test Display
3.4.9 Enabling Passive Only
To enable Passive Only, perform the same steps as in paragraph 3.4.6. Press the Test key
until Passive Only is displayed.
3.4.10 Taking a Passive Only Breath Sample
The procedures for performing a Passive Only test are the same as those for performing a
Passive Standard test (refer paragraph 3.4.7).
Note
A Passive Only test will not automatically enable an Active (Mouthpiece) test the same
way a Passive Standard test does.
Note
When a Warning Alcohol Present reading is displayed after performing a Passive Only
test, it is strongly recommended that a Mouthpiece Breath Test be performed, after the
recovery period has ended.
Page 18
REF: Alcolizer HH4 Alcohol Tester User Manual V1 Page 18 © Alcolizer Technology
3.4.11 Pressure Activated Passive- Blow Testing
The Pressure Activated Passive testing is used when it is desired that the subject’s blow starts
a sampling.
3.4.12 Enabling Pressure Activated
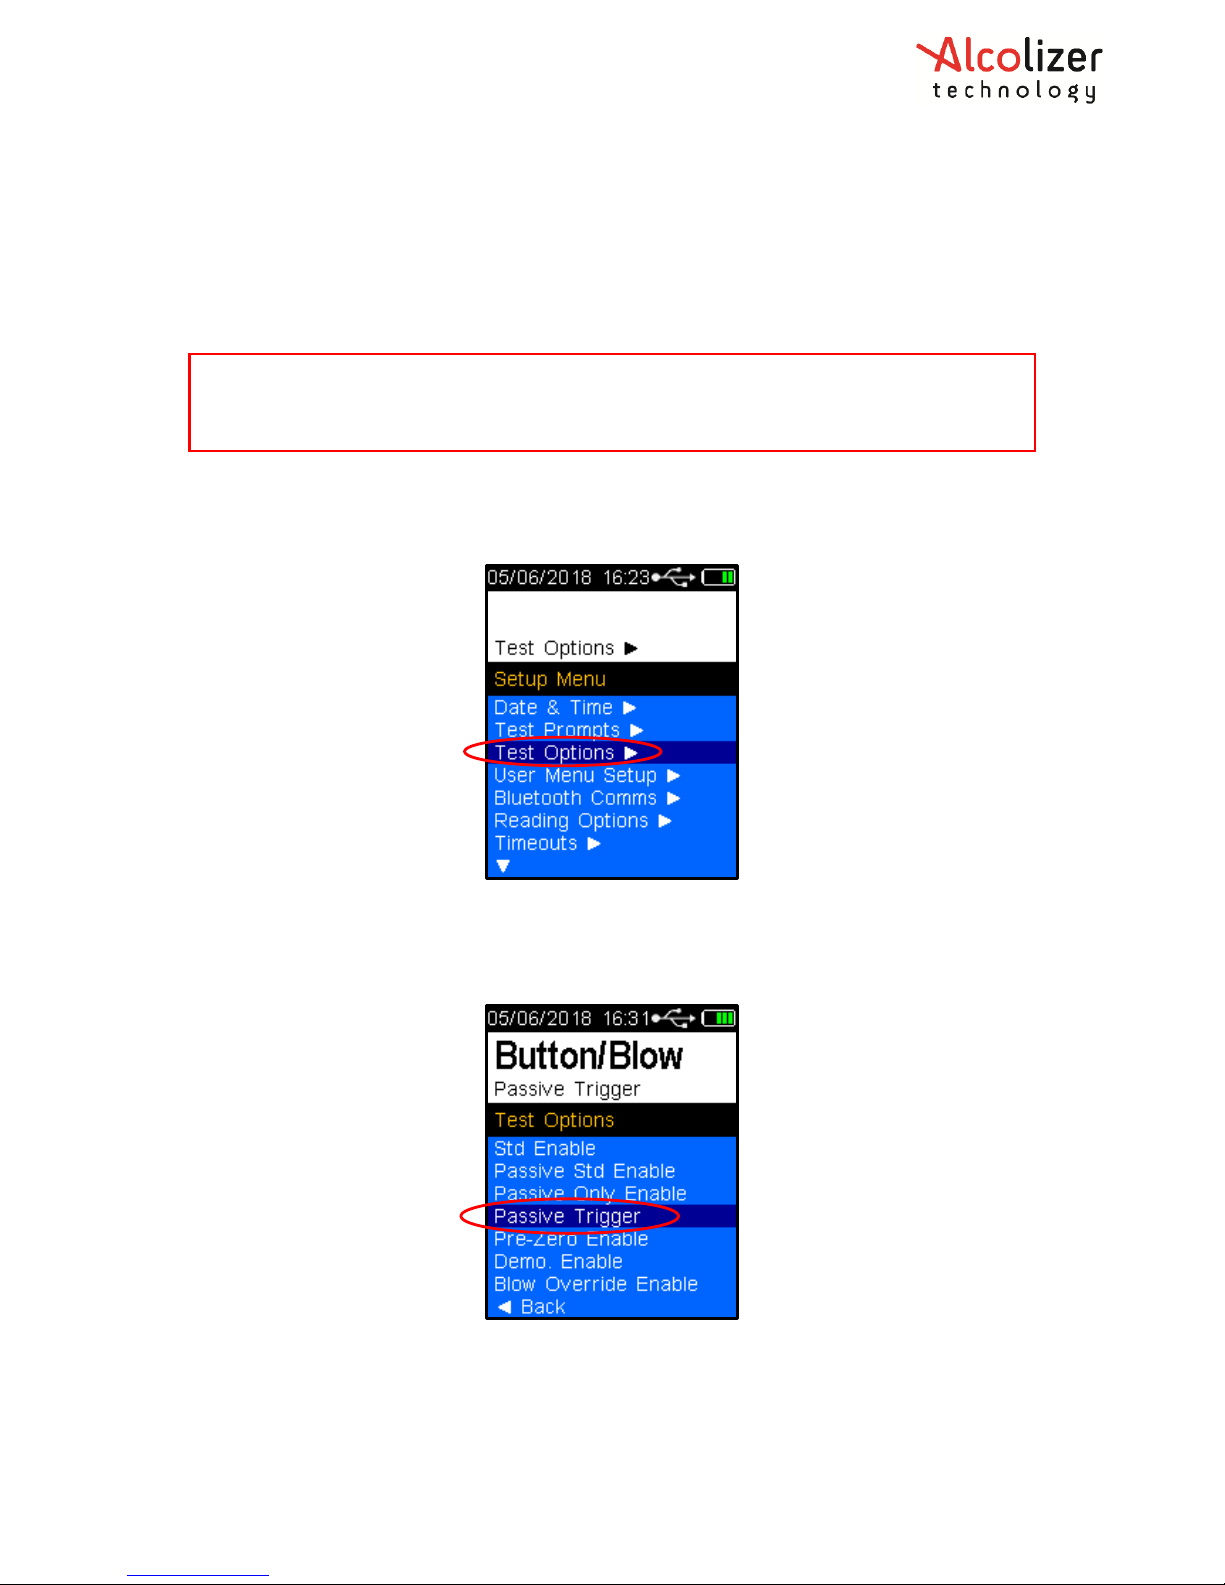
To enable the pressure activated, access the device setup menu (refer to paragraph 5)
Enable the pressure activated as follows:
• Press the Down button until Test Options is highlighted (Refer to Figure 22).
Figure 22 - Test Options Menu
• Press the Test key. The screen will display the Test Options.
• Using the down button, scroll down to Passive Trigger (Refer to Figure 23).
Figure 23 - Passive Trigger
• Press Test key to select Blow or Button/Blow.
• Then go down to Back and Back again
Note
Pressure Activated or Passive Blow testing stands for the triggering method used on
Passive testings.
Page 19
REF: Alcolizer HH4 Alcohol Tester User Manual V1 Page 19 © Alcolizer Technology
3.5 Back Operation
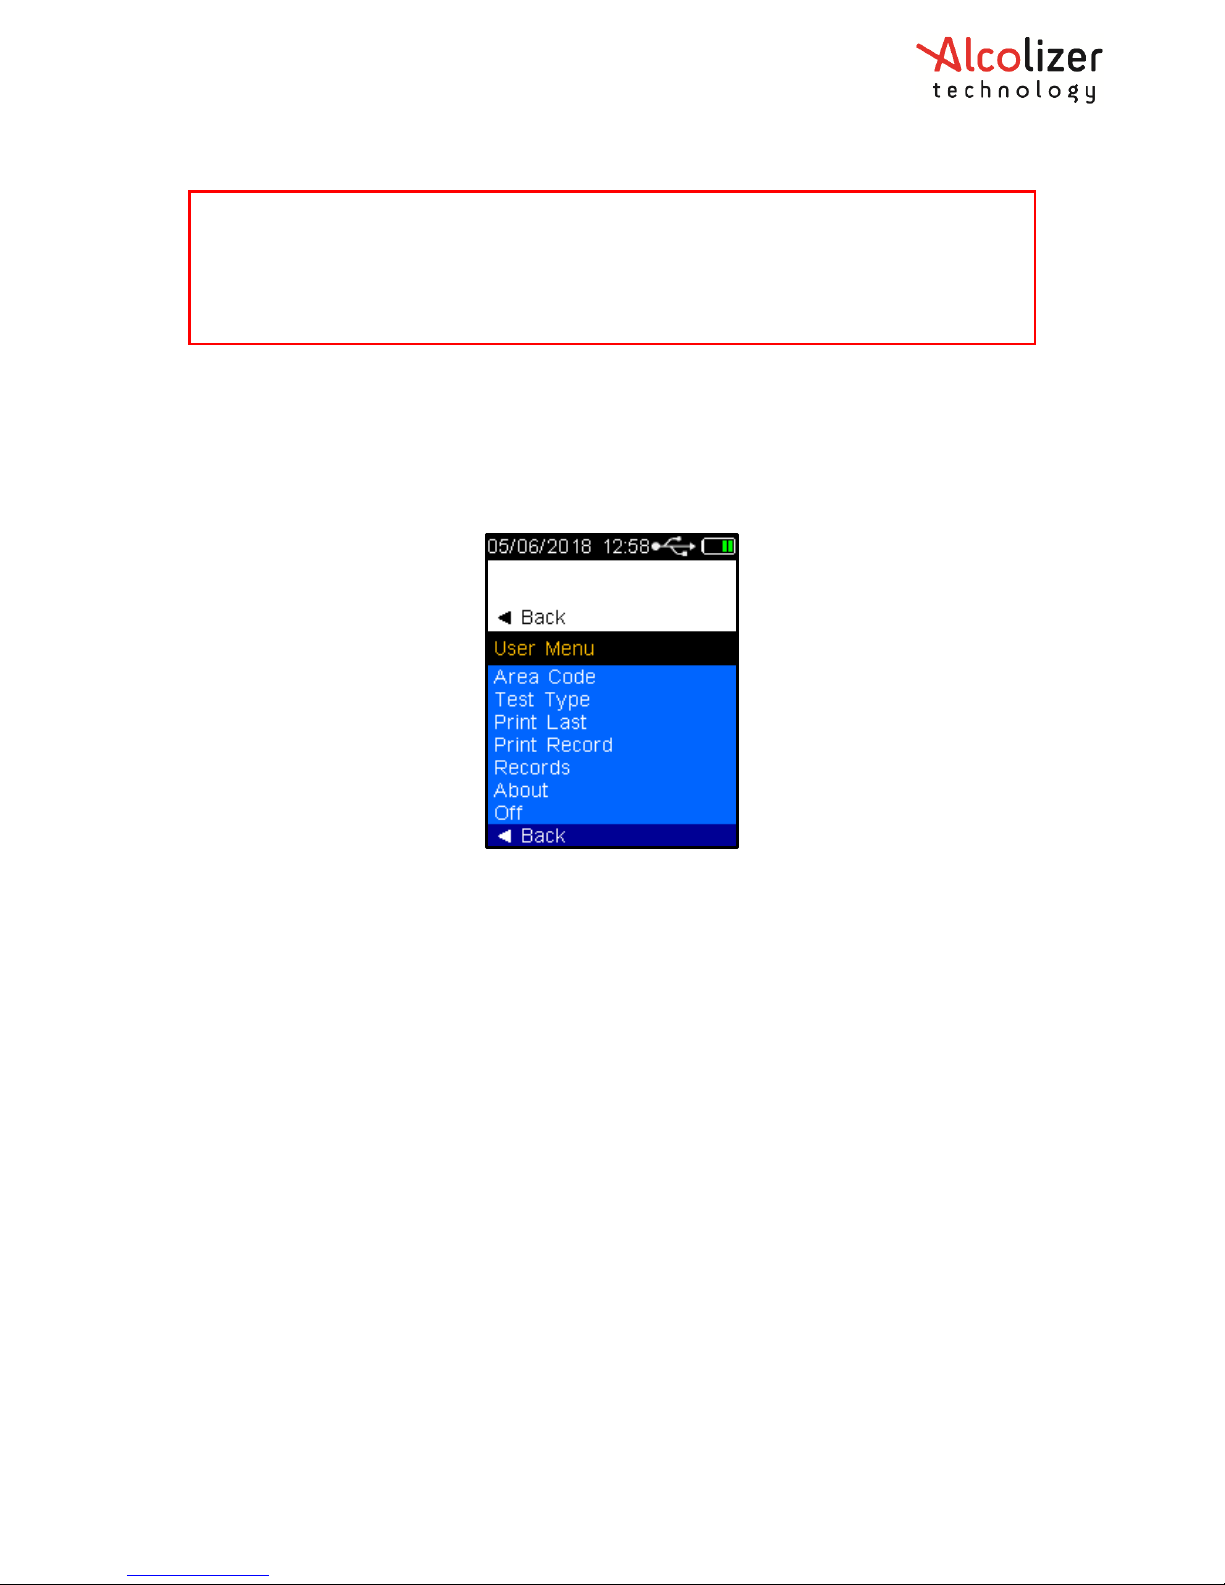
The user menu includes a Back selection which when selected will return to the previous
screen. To select Back, proceed as follows:
• Press the Up/down buttons until Back is highlighted (Refer to Figure 24).
Figure 24 - Screen Back Selection
• Press the Test key and the display will return to the previous screen.
3.6 Shutting Down
The HH4 will automatically shut down after a period of inactivity. Should the device be
required to be shut down manually (e.g. to conserve battery life), perform the following
procedures:
• With the screen displaying press to test, Press the Up and Down buttons
simultaneously. The User Menu will be displayed (Refer to Figure 13).
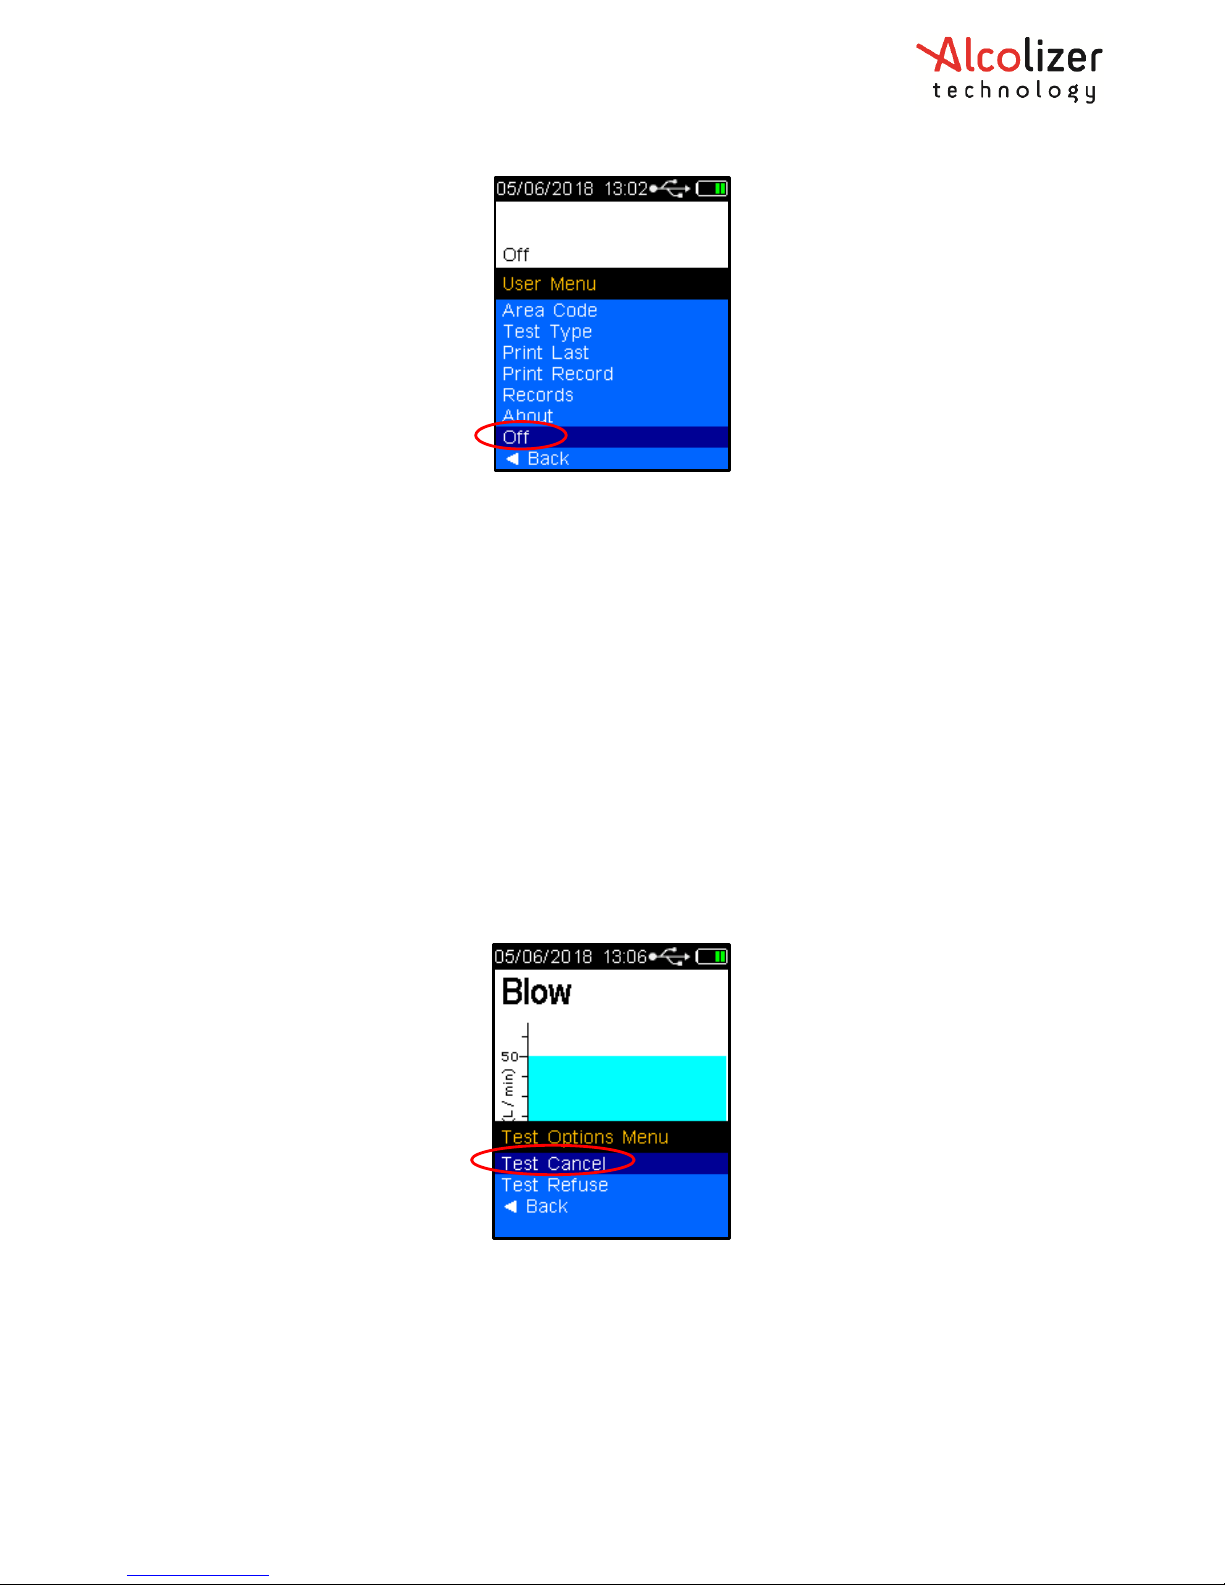
• Using the down button, scroll down to Off. (Refer to Figure 25).
Note
Blow Only Passive Trigger set the Passive Standard and Passive Only to take a sample only
when a difference in pressure is detected on device’s spigot locator.
Button/Blow Passive Trigger set both Passive testing to take a sample by pressing the test
button or when a difference in pressure is detected.
Page 20
REF: Alcolizer HH4 Alcohol Tester User Manual V1 Page 20 © Alcolizer Technology
Figure 25 - Off Displayed
• Press the Test Key and the device will turn off.
To further conserve battery life, the device will automatically switch off the display back
light after two minutes. To re-activate the device following back light power down, Press the
Test key or Up/down buttons. The device will display the last screen that was activated at
the time the back light switched off.
4 Test Options Menu
4.1 Test Cancel
If the user wishes to cancel a test, perform the following steps:
• With the Blow screen displayed, Press the Up and Down buttons simultaneously. The
Test Options Menu will be displayed and using the down arrow to Test Cancel is
selected (Refer to Figure 26).
Figure 26 - Test Options Menu and Test Cancel
• Press the Test key and the screen will return to the press to test display.
4.2 Test Refusal
If a test is refused, the user can activate the Test Refuse option as follows:
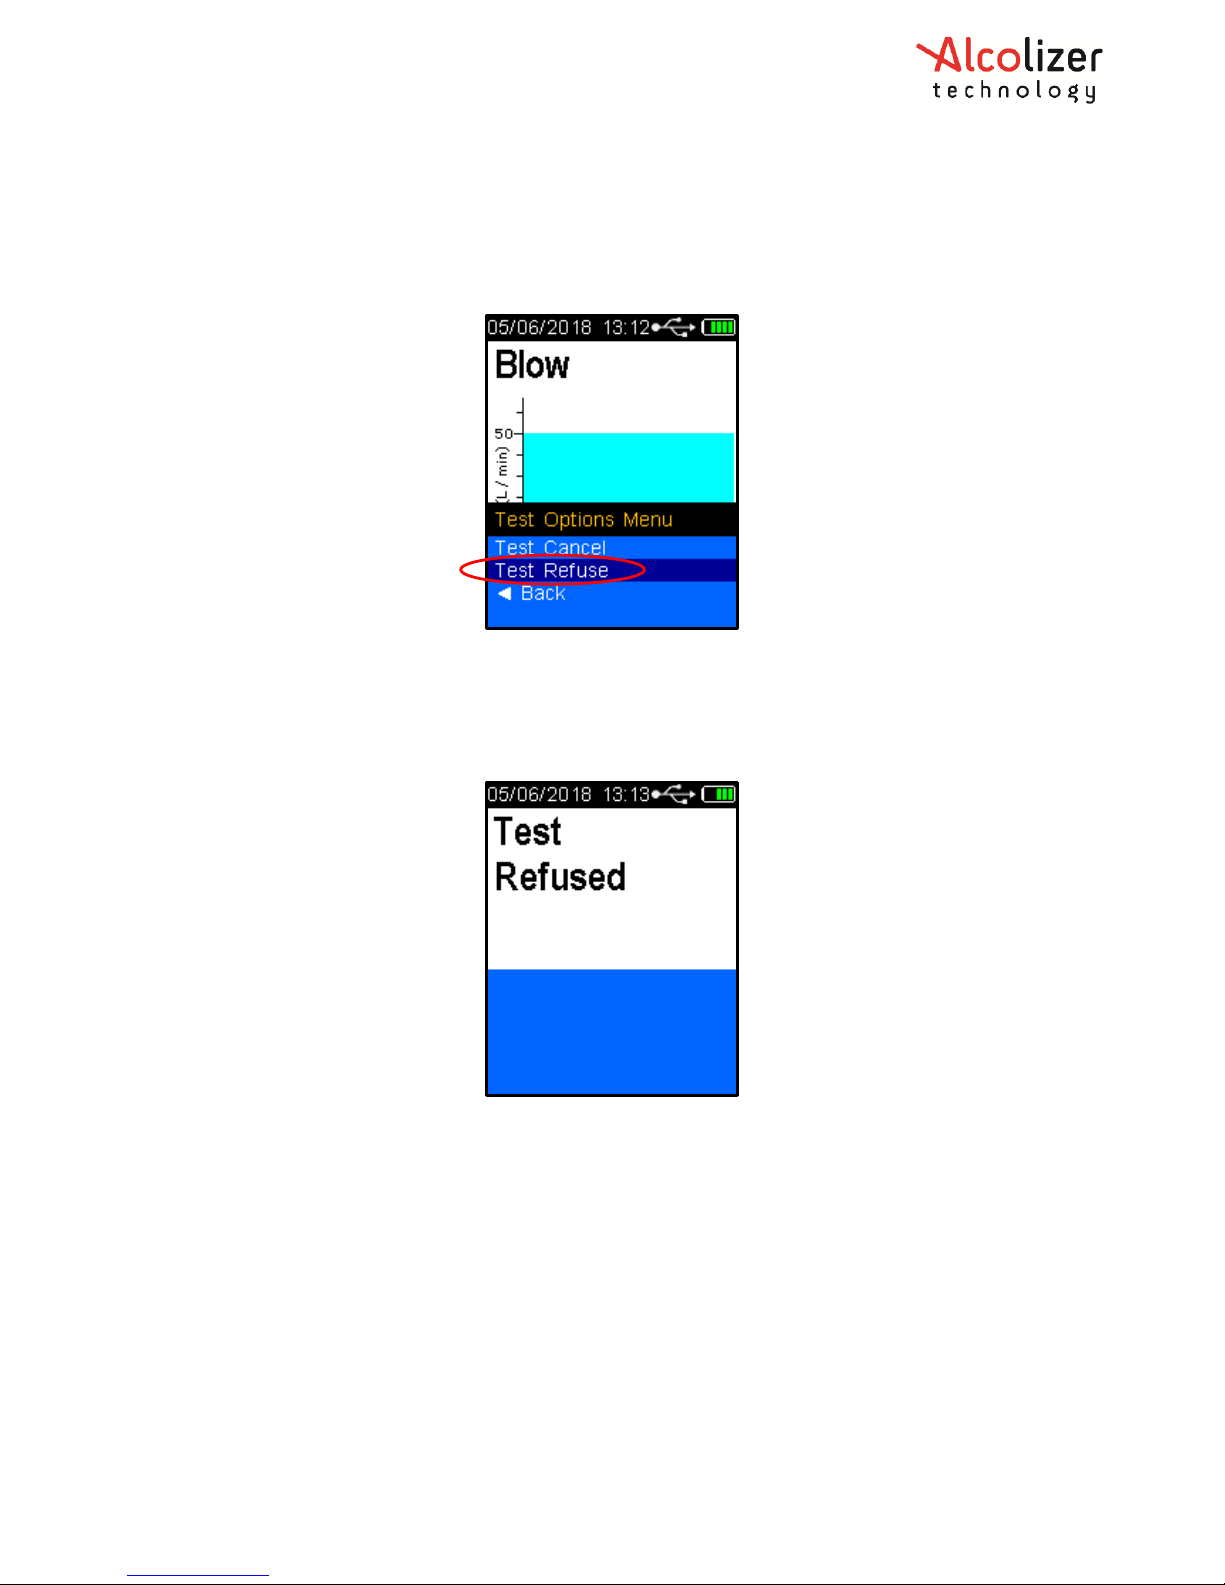
• With the Blow screen displayed, press the Up and Down buttons simultaneously. The
Test Options Menu and Test Cancel is displayed (Refer to Figure 26).
• Press the Down button to highlight Test Refuse (Refer to Figure 27).
Page 21
REF: Alcolizer HH4 Alcohol Tester User Manual V1 Page 21 © Alcolizer Technology
Figure 27 - Test Refuse Displayed
• Press the Test key. The device will beep rapidly for one second and Test Refused will
be displayed flashing momentarily (Refer to Figure 28). The screen will then return to
the press to test display. The test refusal will be recorded in Records.
Figure 28 - Test Refused Displayed
5 Setup Menu
To access the setup menu, perform the following procedures:
• Switch the HH4 device on (refer to paragraph 3.6).
• With the screen displaying press to test, Press the Up and Down buttons
simultaneously for approximately five seconds. The menu screen will be displayed
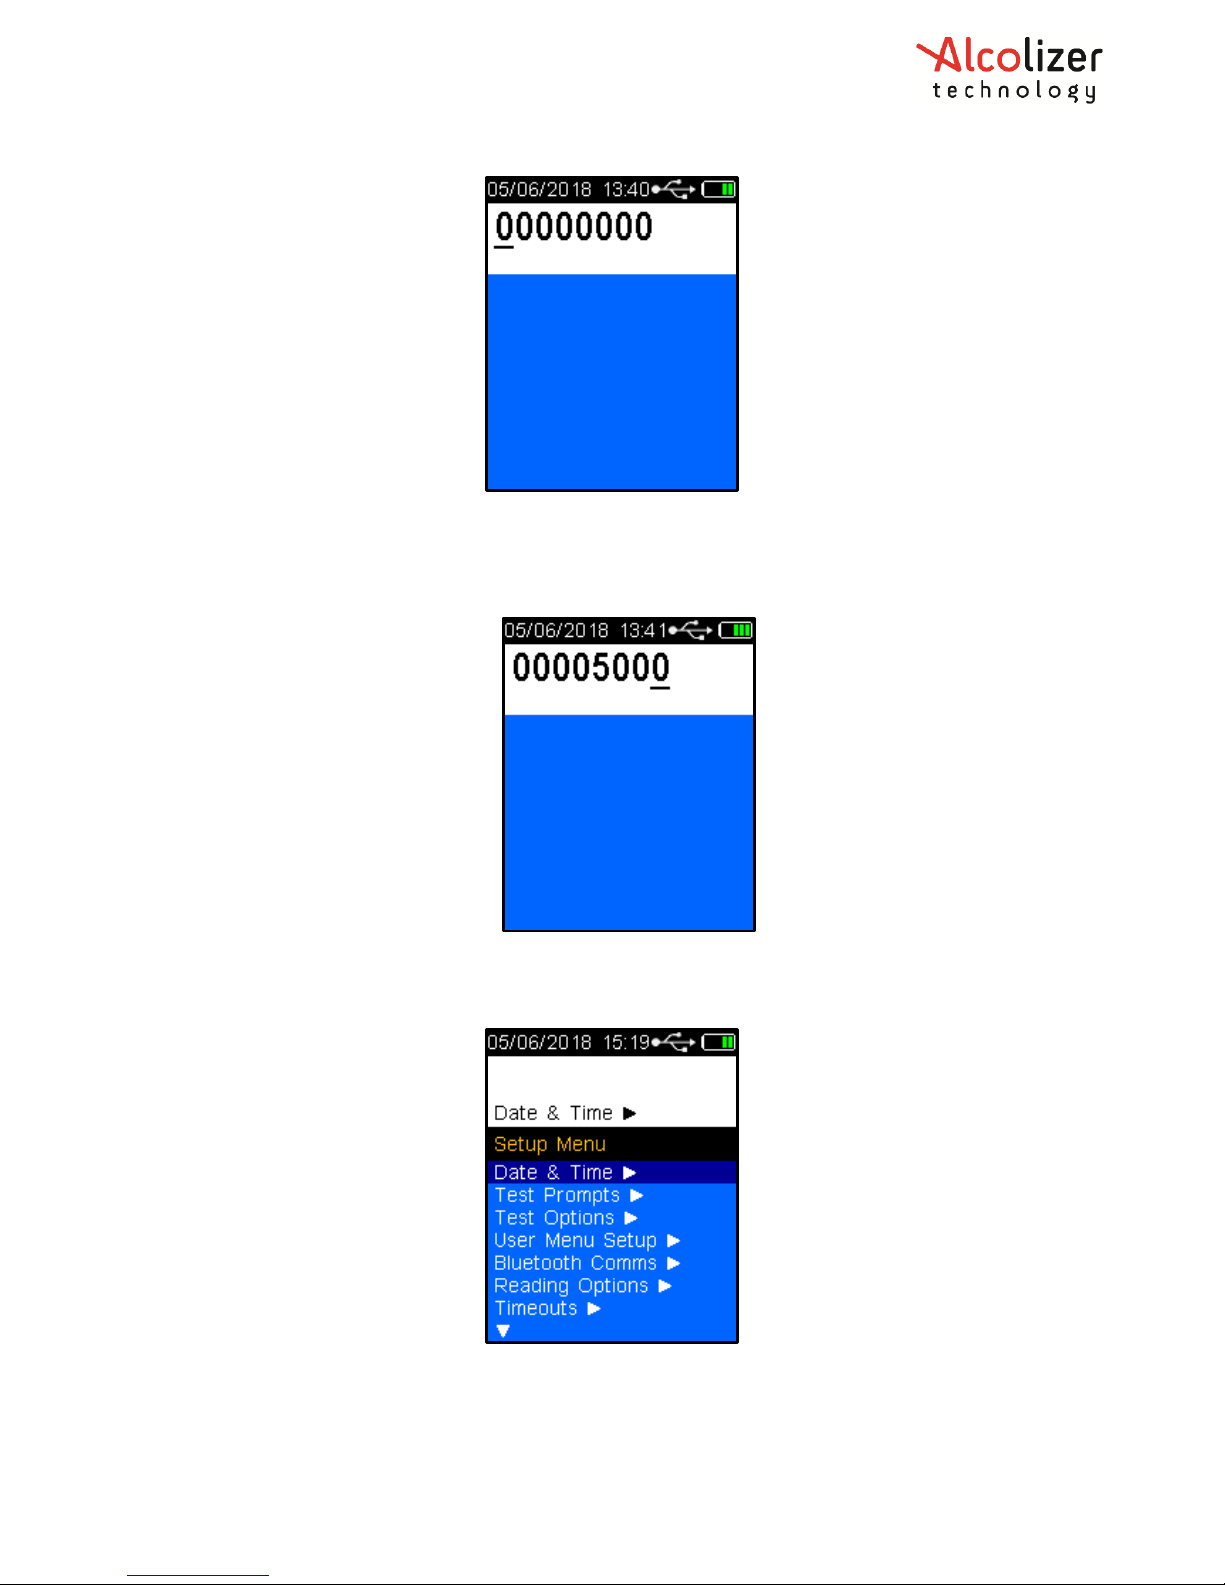
during this process and then the password set-up code ‘00000000’ will be displayed
(Refer to Figure 29).
Page 22
REF: Alcolizer HH4 Alcohol Tester User Manual V1 Page 22 © Alcolizer Technology
Figure 29 - Password Set-up Code
• Press the Test key until the cursor is under the fifth ‘0’.
• Press the Up button until that number is ‘5’ (Refer to Figure 30).
Figure 30 - Password Set Up Code 00005000
• Press the Test Key until the Setup Menu is displayed (Refer to Figure 31).
Figure 31 - Setup Menu
Page 23
REF: Alcolizer HH4 Alcohol Tester User Manual V1 Page 23 © Alcolizer Technology
6 Printing Function
The printing function (if installed) enables the printing of records by connecting the HH4 to a
portable printer via Bluetooth connection.
The device supports the following printers:
• Axiohm A631
• SPRT SP-T5
• SPRT SP-T7
• Custom S’Print
• Custom MYPrinter
• Bixolon SPP-R200
• Zicox HDM322
6.1 Accessing Bluetooth
To establish the connection with the printer via Bluetooth, access the device set up menu
(Refer to Section 5).
6.2 Enabling Bluetooth
Establish Bluetooth connectivity as follows:
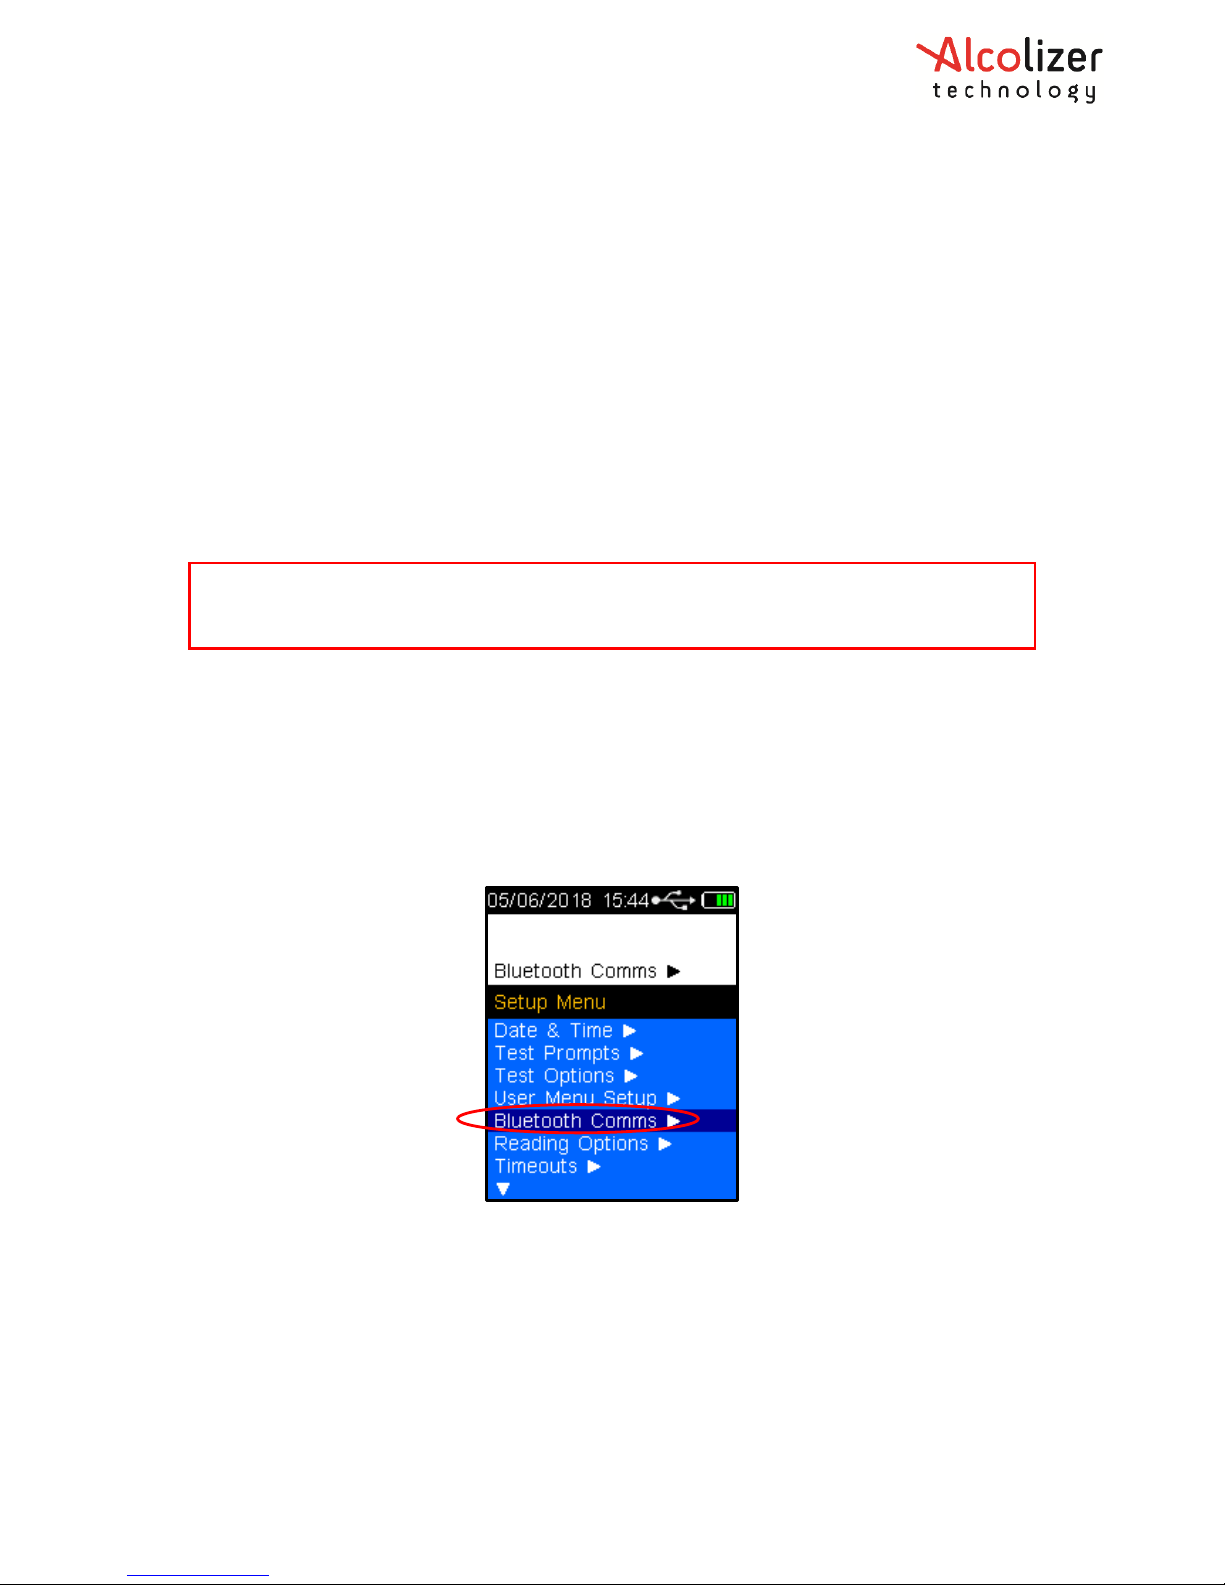
• Press the Down button until Bluetooth Comms is highlighted (Refer to Figure 32).
Figure 32 - Bluetooth Comms
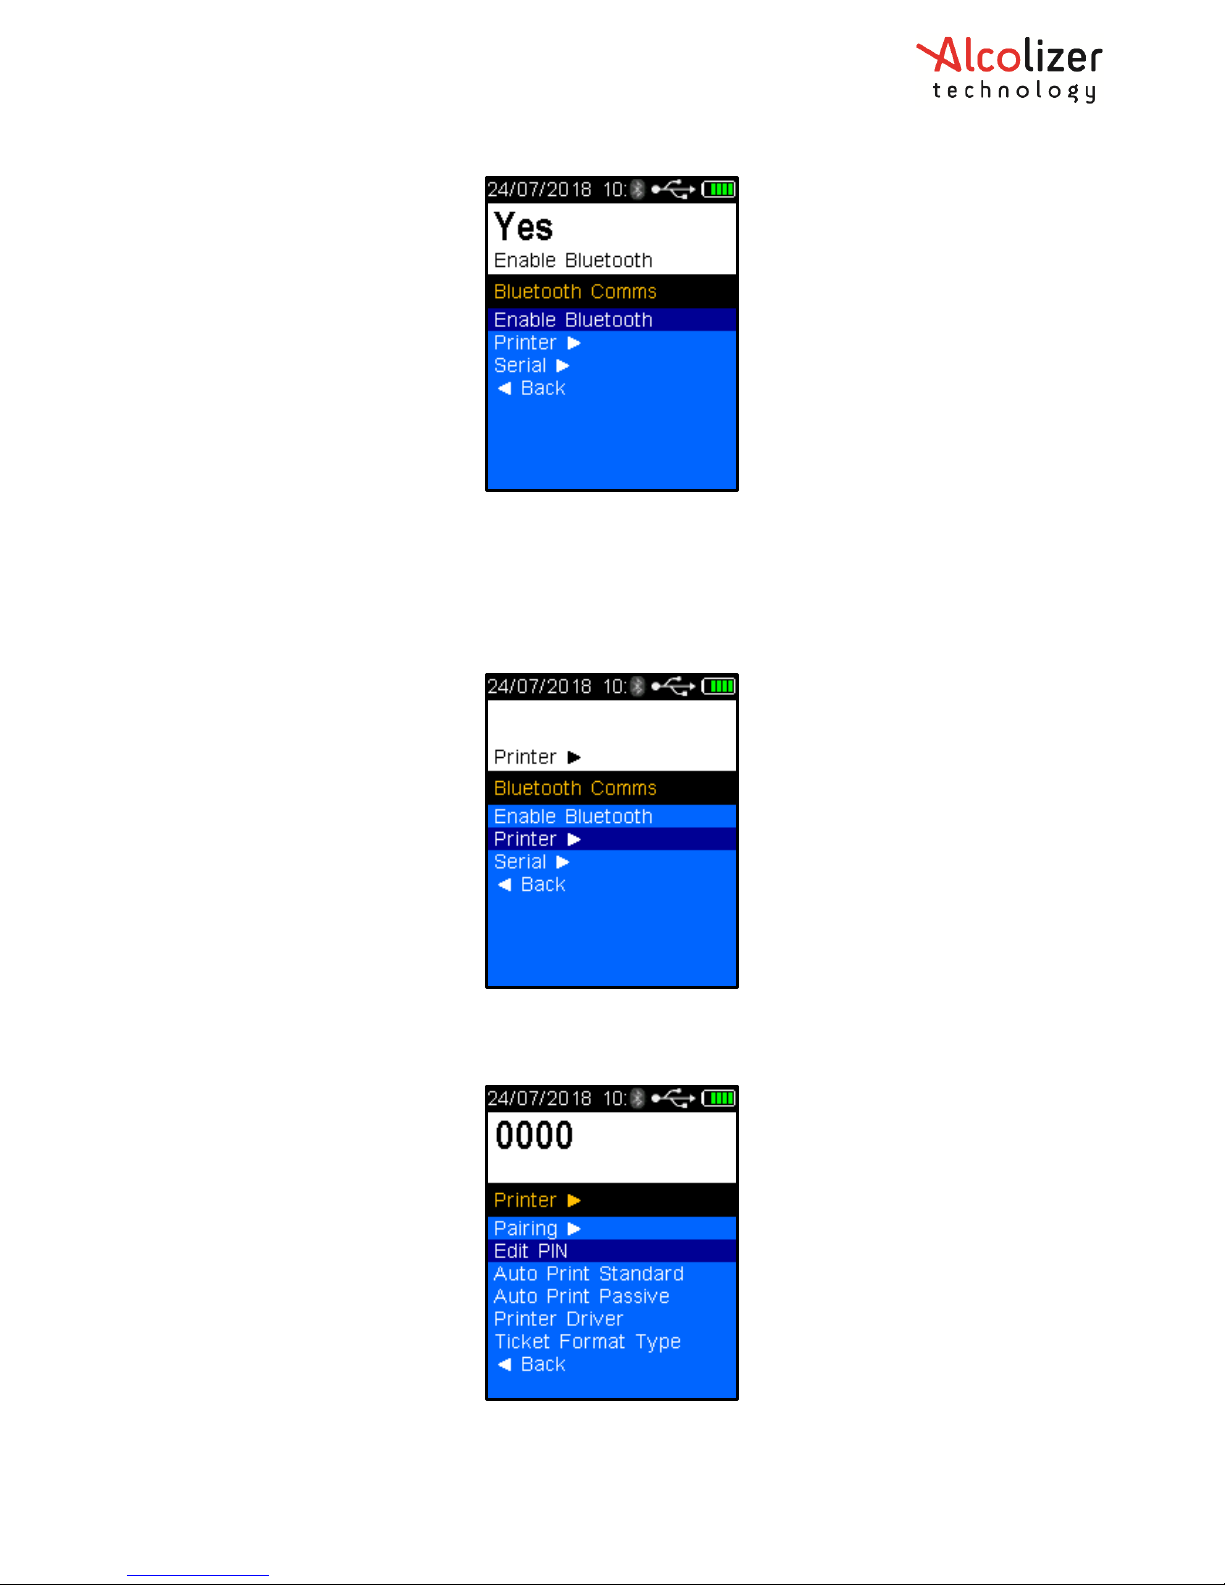
• Select the test key to Enable Bluetooth (Refer to Figure 33).
Note
For information on operating the printer, refer to the appropriate printer User Manual.
Page 24
REF: Alcolizer HH4 Alcohol Tester User Manual V1 Page 24 © Alcolizer Technology
Figure 33 - Enable Bluetooth
6.3 Bluetooth Printer PIN
A Bluetooth Printer is required to proceed, to set the PIN proceed as follows:
• Press the down button once and use the test key to select Printer (Refer to Figure
34).
Figure 34 - Selecting Printer
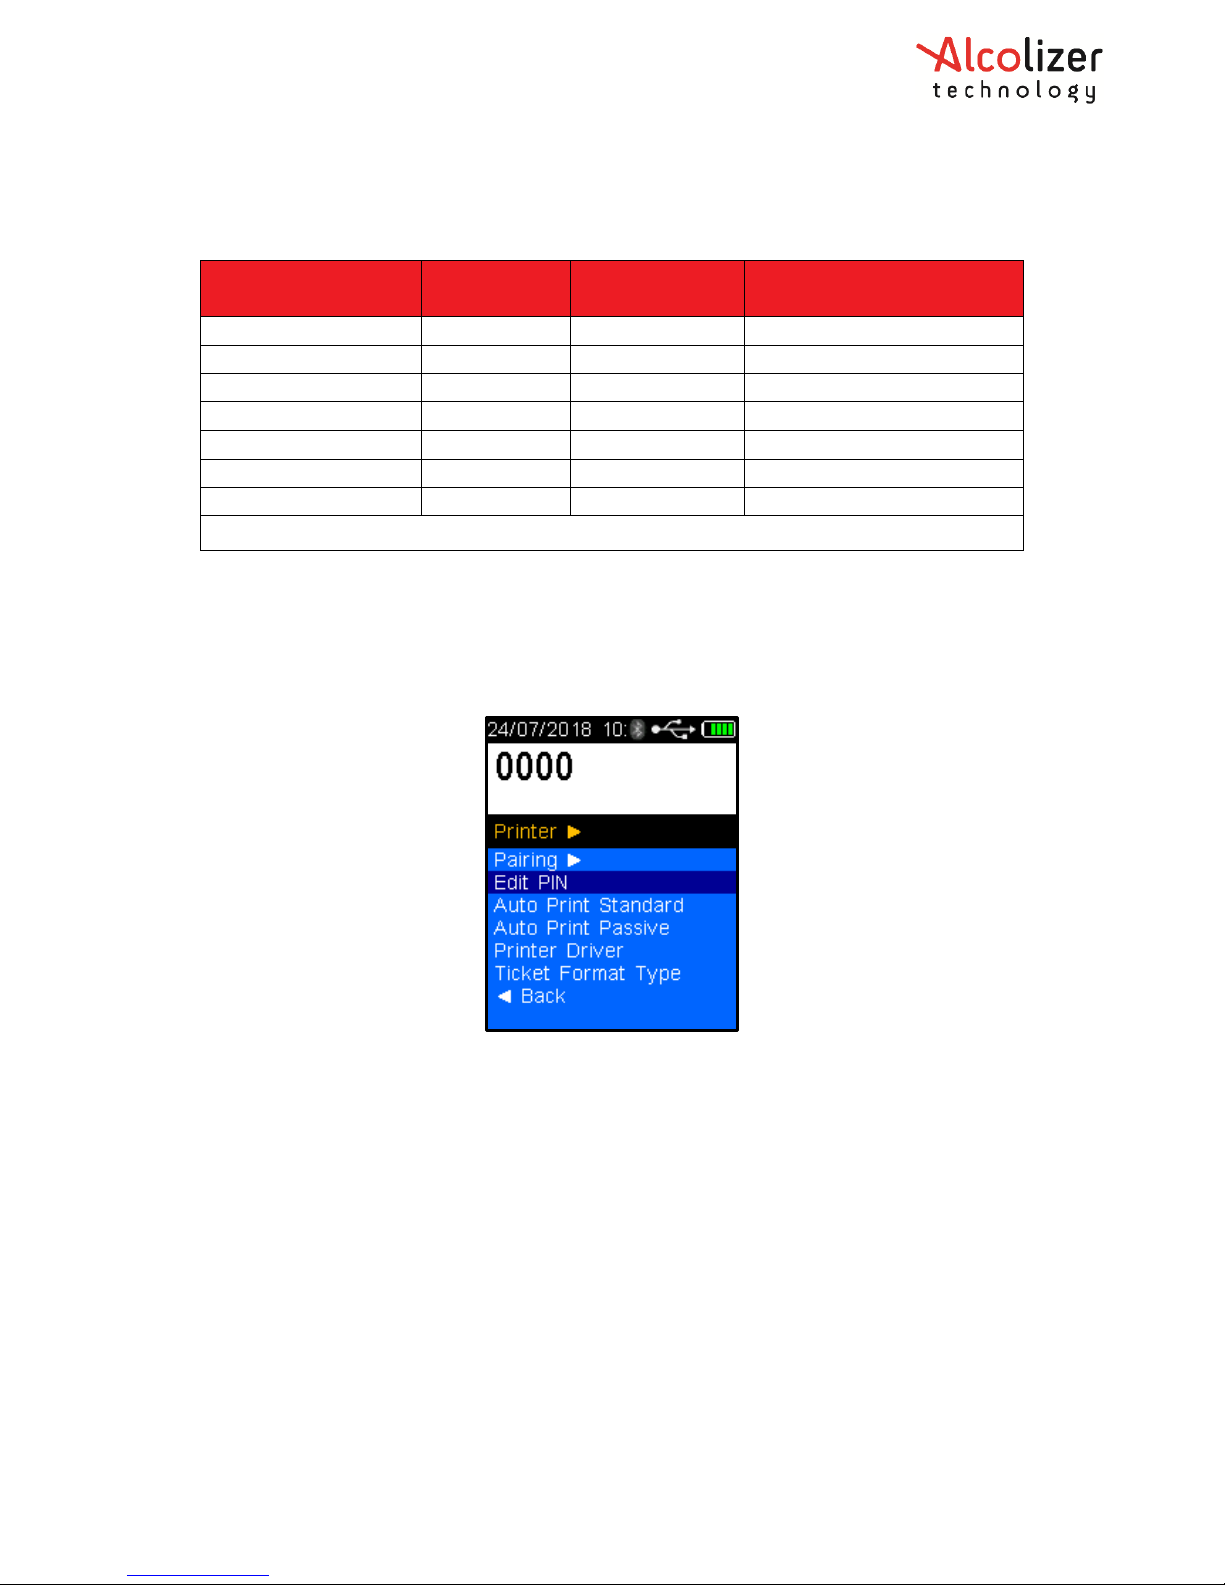
• Use the down arrow and test key to select Edit PIN (Refer to Figure 35).
Figure 35 - Edit PIN
Page 25
REF: Alcolizer HH4 Alcohol Tester User Manual V1 Page 25 © Alcolizer Technology
• Refer to the below table for the printer PIN length and number. The
Communications Ranger is provided as additional information.
Standard Printers
PIN Digit
Length
PINs
Communication Range
Bixolon SPP-R200
4
0000
Up to 10 metres
Axiohm 631
6
631200
Up to 10 metres
Custom S’Print
5
12345
Up to 5 metres
Custom MYPrinter
4
0000
Up to 5 metres
Zicox HDM322
4
0000
Up to 3 metres
SPRT SP-T5
4
1234
Up to 0.5 metre
SPRT SP-T7
4
1234
Up to 5 metres
NOTE: If the printer is not listed, refer to the printer User Manual for PIN
Using the Up/down buttons, select the PIN length that applies to the printer, e.g. for the
Bixolon SPP-R200, select 4.
Use the Up or Down buttons to display the first number of the PIN, e.g. 0.
Press the Test key to advance to the next number.
Figure 36 - PINs Entered
6.4 Pairing the Printer
To Pair the device to the nominated printer, proceed as follows:
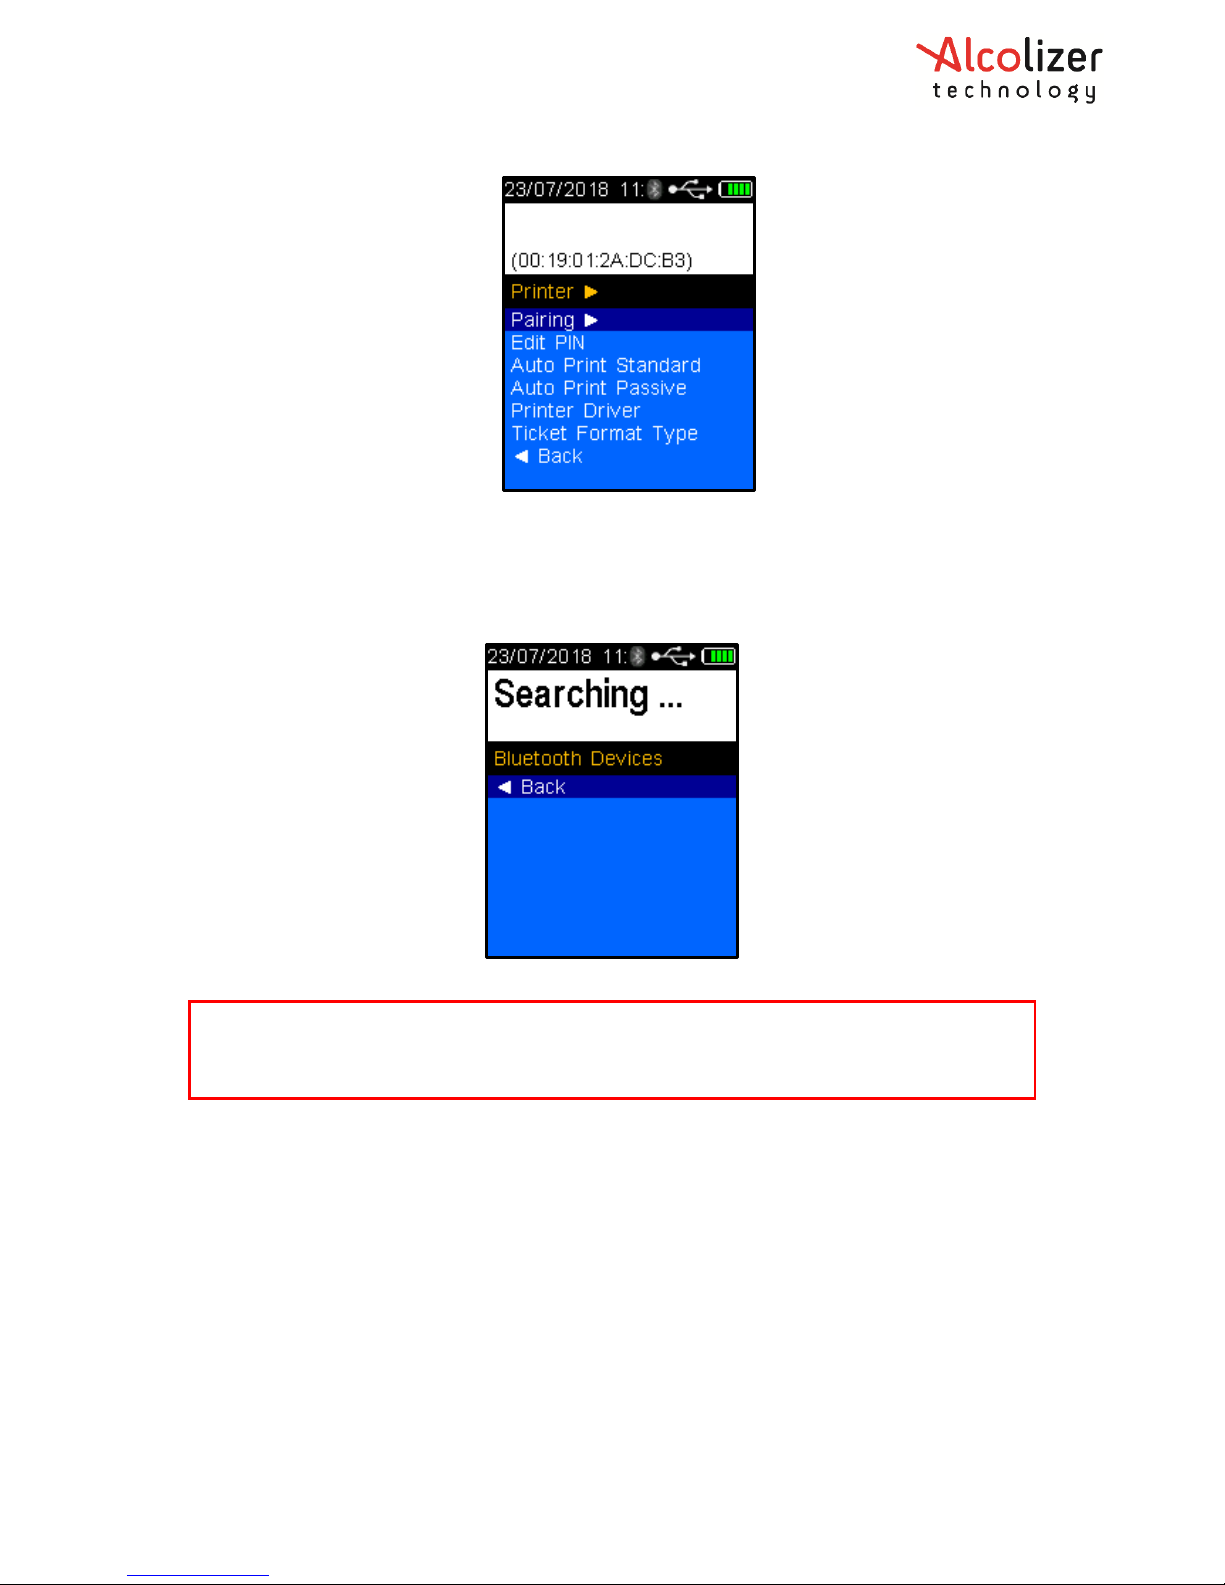
• Select the up button once and use the test key to select Pairing (Refer to Figure 37).
Page 26
REF: Alcolizer HH4 Alcohol Tester User Manual V1 Page 26 © Alcolizer Technology
Figure 37 - Pairing Selected
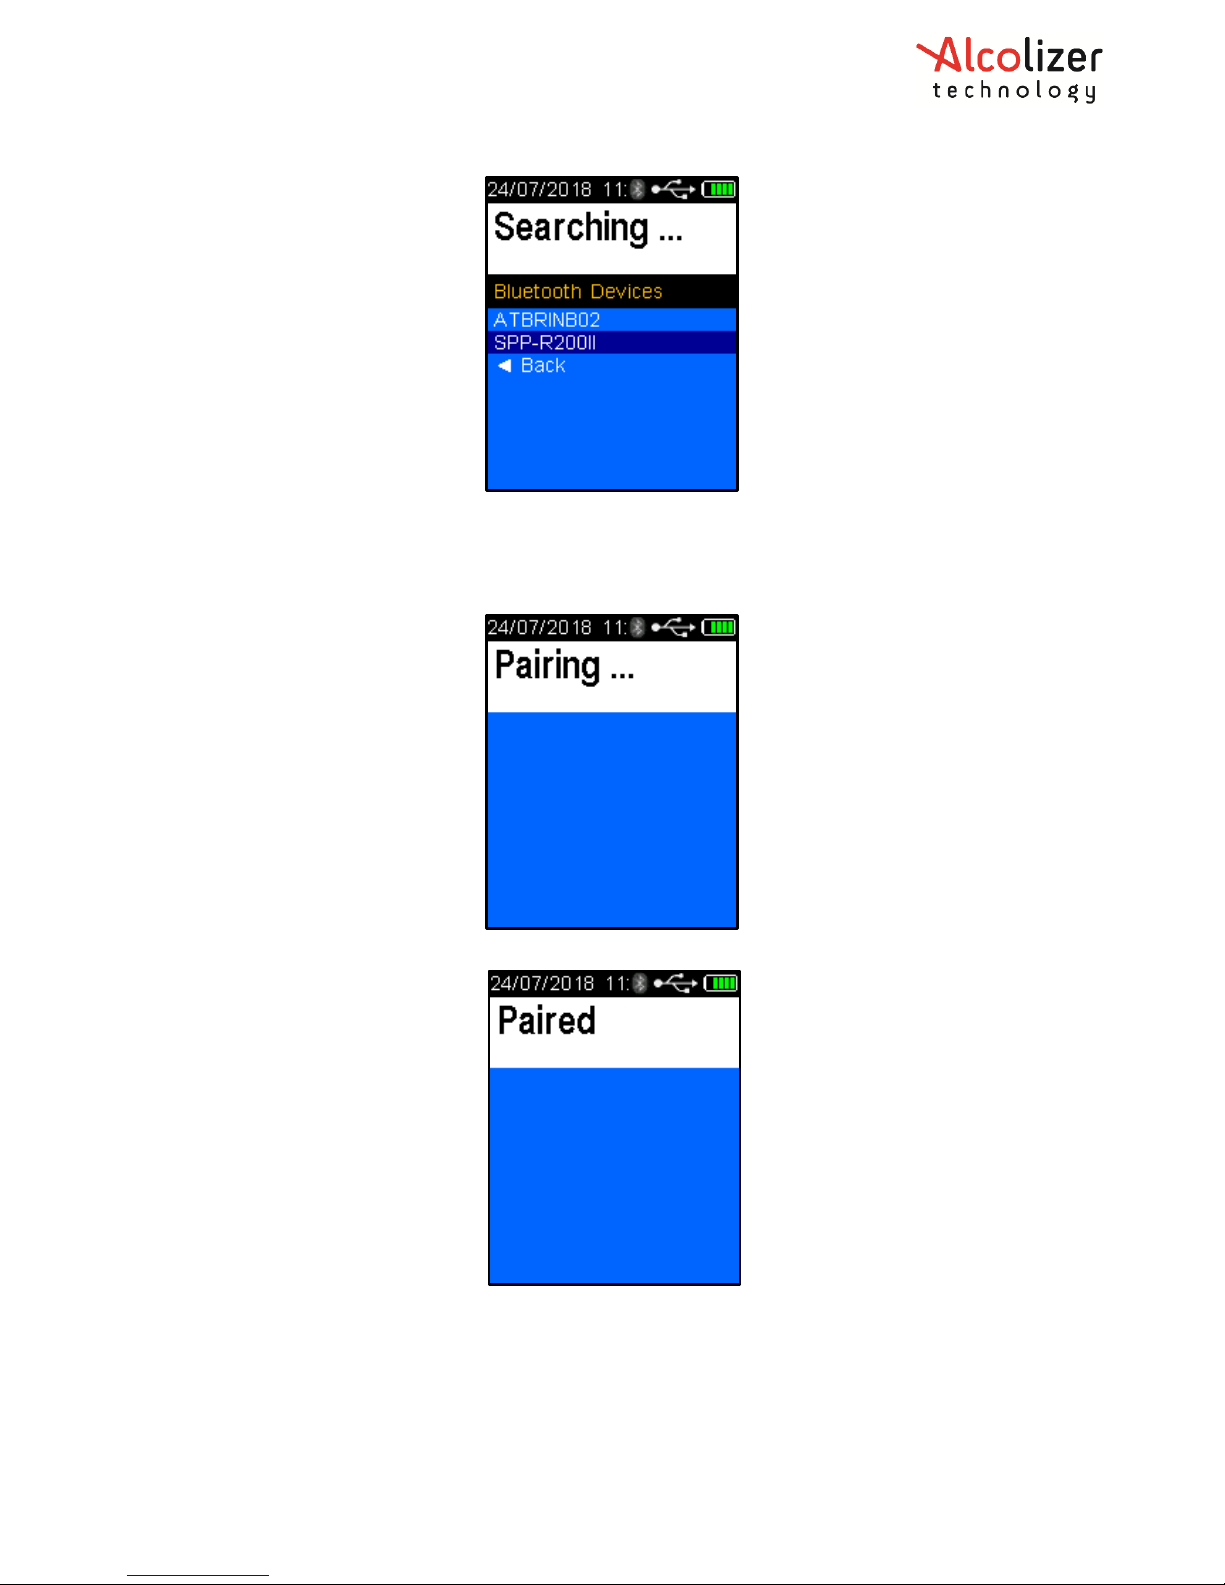
• Place the HH4 device next to the Bluetooth printer and switch the printer on. Press
the test key and he HH4 will search for the printer and display Searching… (Refer to
Figure 38).
Figure 38 - Searching Displayed
When the HH4 identifies the printer, the printer type will be displayed, e.g. “SPP-R200”
(Refer to Figure 39).
NOTE
The HH4 will search and display all Bluetooth devices in range. To avoid attempting to
connect to a device other than the intended printer, move other Bluetooth items away.
Page 27
REF: Alcolizer HH4 Alcohol Tester User Manual V1 Page 27 © Alcolizer Technology
Figure 39 - Printer Identified
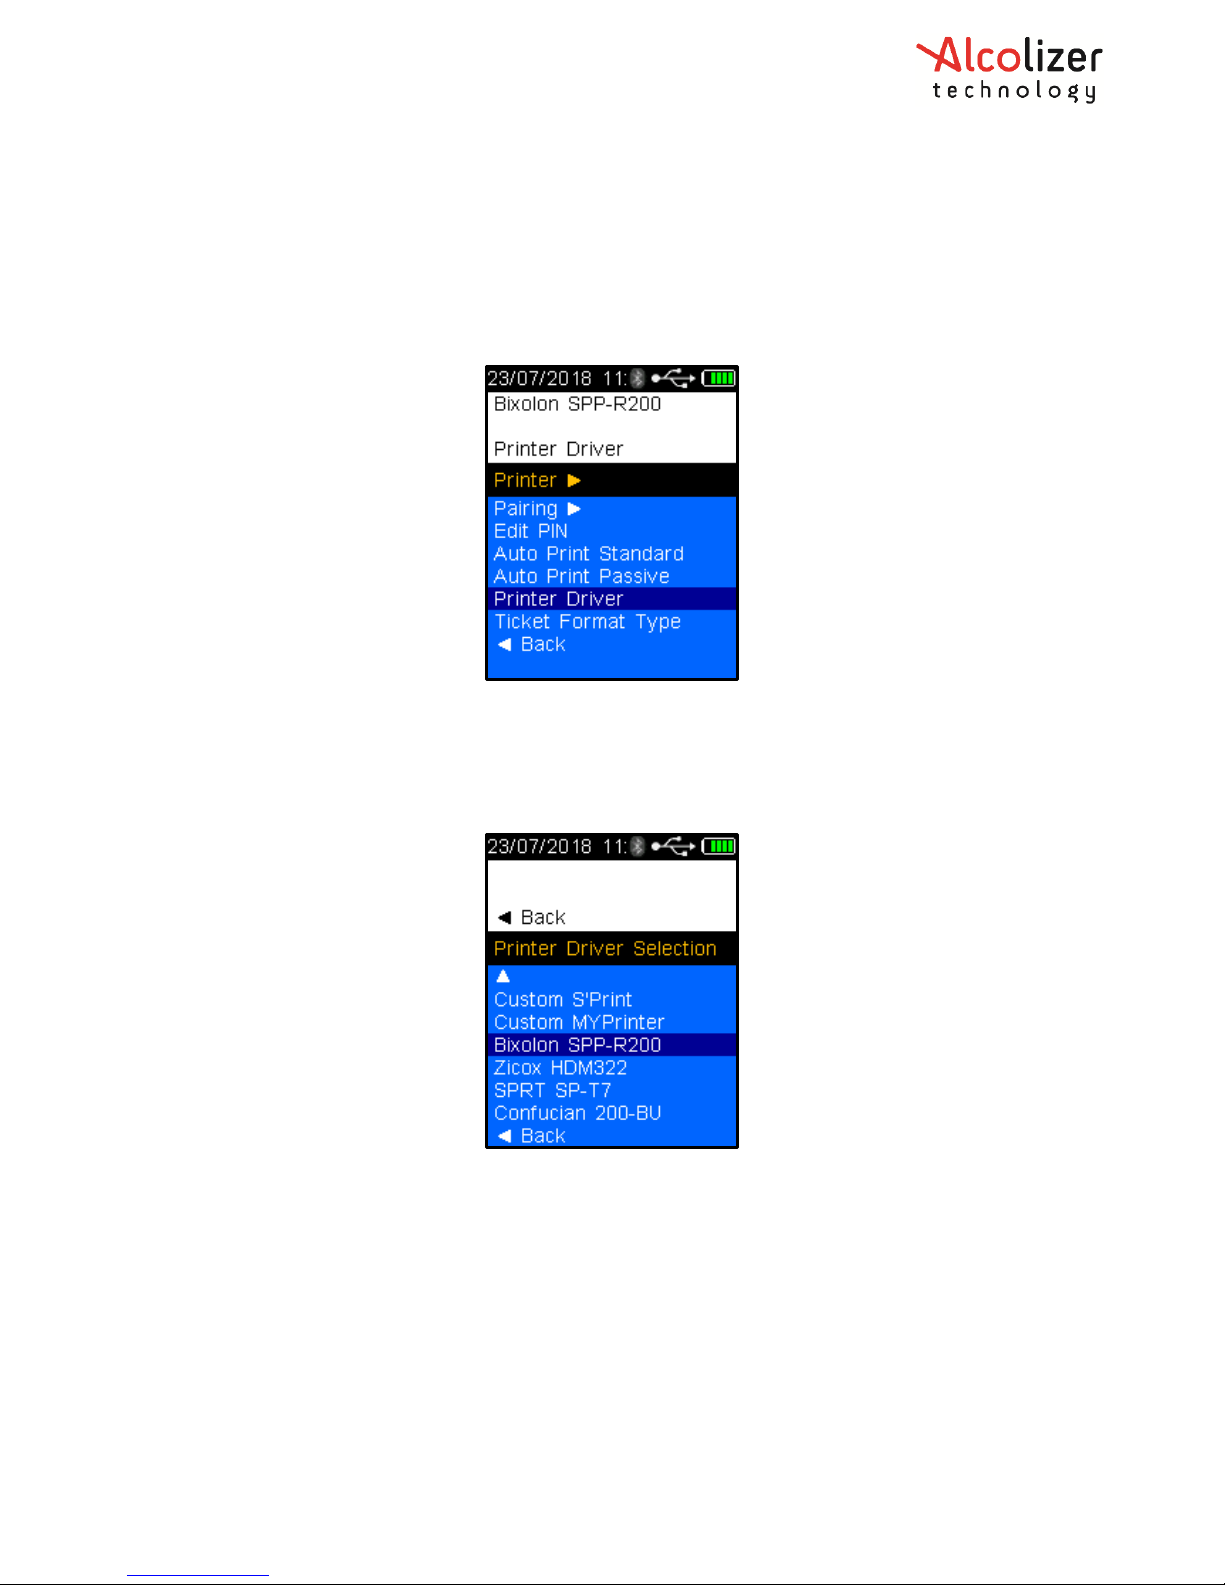
Press the test key to accept the selected printer, the device will then show Pairing… then
Paired
Figure 40 - Printer Pairing...
Figure 41 - Printer Paired
Page 28
REF: Alcolizer HH4 Alcohol Tester User Manual V1 Page 28 © Alcolizer Technology
6.5 Printer Driver
6.5.1 Installing the Printer Driver
To install the printer driver, proceed as follows:
• Access the Printer Menu as described in paragraphs 5
• Press the Down button and scroll down to Printer Driver (Refer to Figure 42).
Figure 42 - Printer Driver Selected
• Press the test key to select
• Press the down button and scroll down to the printer brand and type, e.g. Bixolon
SPP-R200 and press the test key to select (Refer to Figure 43).
Figure 43 - Printer Selected
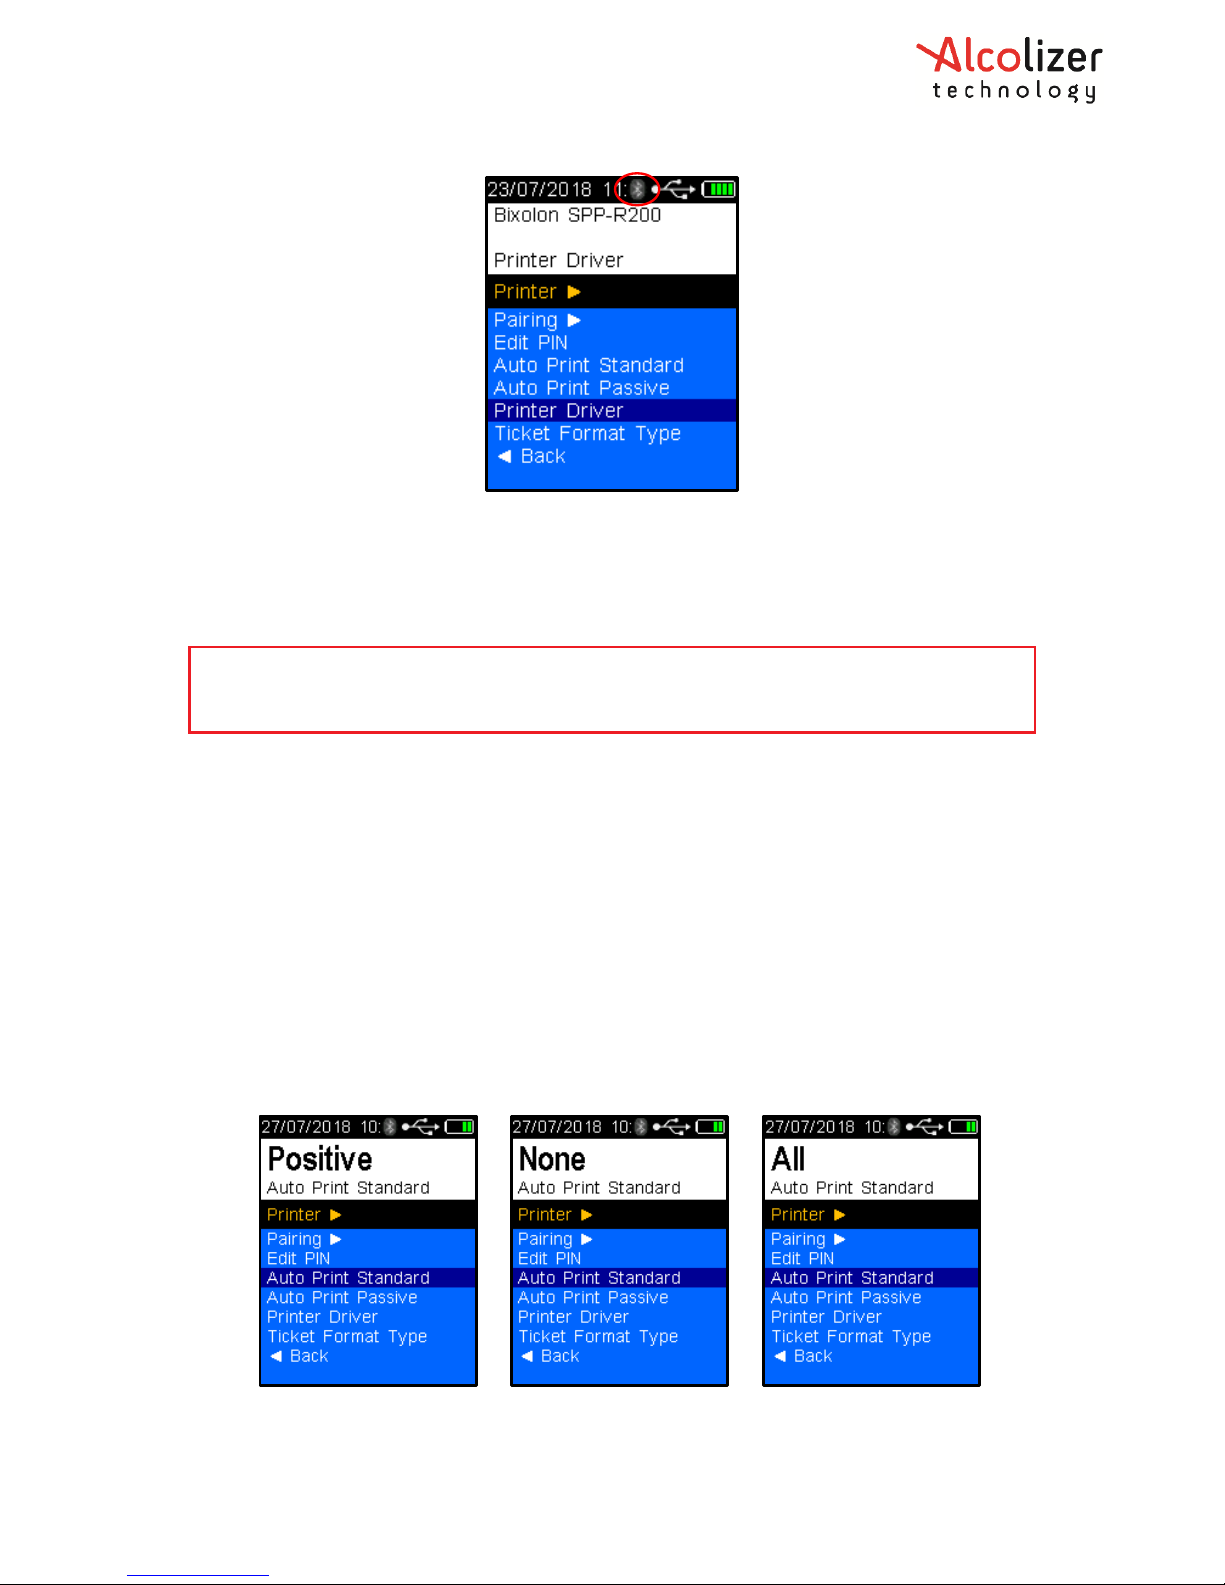
Once the HH4 device is paired with the printer the Bluetooth icon is visible on the screen at
all times (Refer to Figure 44).
Page 29
REF: Alcolizer HH4 Alcohol Tester User Manual V1 Page 29 © Alcolizer Technology
Figure 44 - Bluetooth Icon on Screen
6.6 Auto Print
The Auto Print functions allow the automatic printing of results via a Bluetooth connection
to a paired printer.
6.6.1 Auto Print Standard
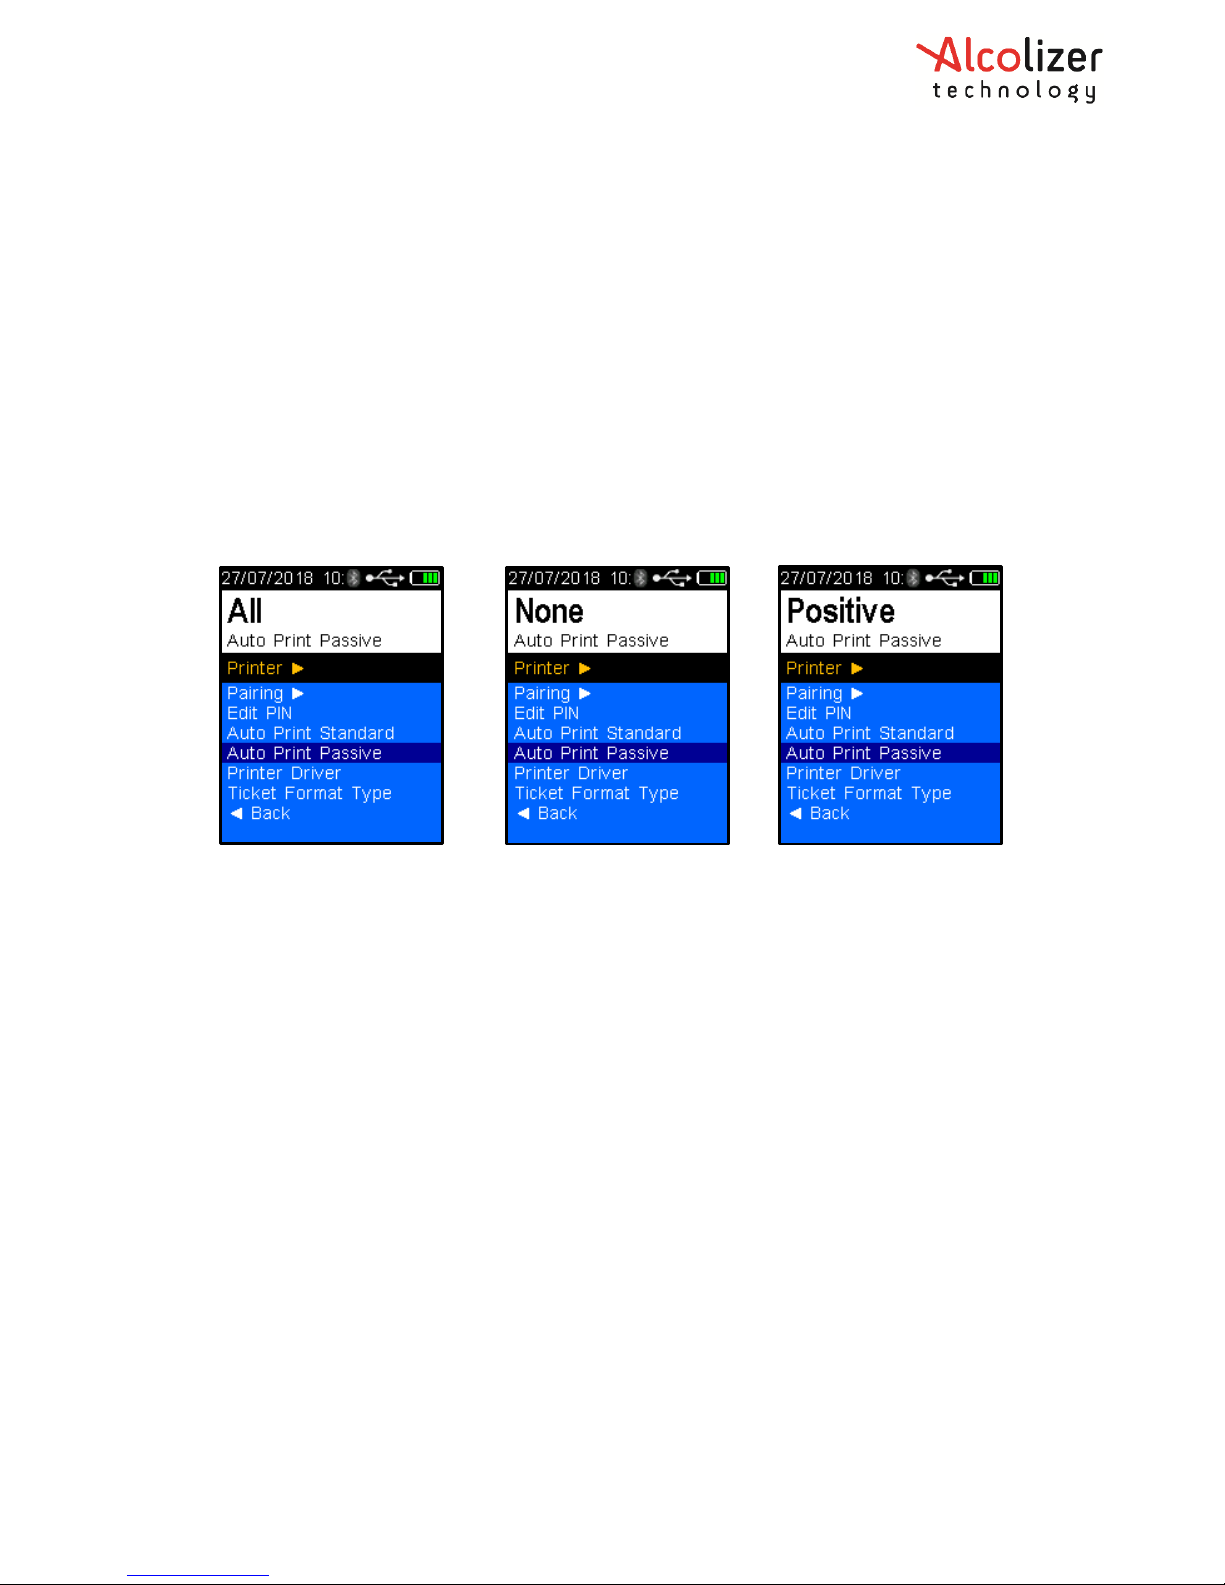
Auto Print Standard applies only to Mouthpiece (Active) testing. Depending on the Auto
Print Standard option selected, the following information will be printed following tests:
• Positive – if alcohol is detected: a complete report including device serial number,
record no, date, time, result etc will be printed.
• All – regardless of results: a complete report including the device serial number,
record no, date, time, result etc will be printed.
• None – regardless of results: nothing transmitted.
To set the HH4 to Auto Print Standard, scroll down until Auto Print Standard is highlighted.
Positive is the default option. To select All or None, press the Test key until the desired
option is highlighted.
NOTE
To ensure the correct operation of the Auto Print function, Auto Send Standard and Auto
Send Passive must be set to None!
Page 30
REF: Alcolizer HH4 Alcohol Tester User Manual V1 Page 30 © Alcolizer Technology
6.6.2 Auto Print Passive
Auto Print Passive applies only to Passive testing. Depending on the Auto Print Passive
option selected, the information may be printed following the various tests except None.
The result will be either false if no alcohol is detected or true if alcohol is detected per the
following explanations:
• Positive – if alcohol is detected: A short report including the device serial number,
record number, date, time and a pass/fail result.
• All – if alcohol is either detected or not: A short report including the device serial
number, record number, date, time and a pass/fail result.
• None – regardless of results: nothing transmitted.
To set the HH4 to Auto Send Passive, scroll down until Auto Print Passive is highlighted in a
similar manner to Auto Send Passive. Positive is the default option. To select All or None,
press the Test key until the desired option is highlighted.
6.7 Ticket Format Type
• Ticket Format Type 0- Default Format, Standard English
• Ticket Format Type 1- Vietnamese Format 1
• Ticket Format Type 2- Vietnamese Format 2
• Ticket Format Type 3- Extended English ticket format with main and sample module
serial numbers
• Ticket Format Type 4- Chinese Format
• Ticket Format Type 5- Taiwan (Specific Alterations)
• Ticket Format Type 6- Taiwan (Specific Alterations)
7 Sending Data (Serial)
7.1 Accessing Bluetooth
To establish the connection with the printer via Bluetooth, access the device set up menu
(Refer to Section 5).
7.2 Enabling Bluetooth
Refer to Section 6.2
Page 31
REF: Alcolizer HH4 Alcohol Tester User Manual V1 Page 31 © Alcolizer Technology
7.3 Bluetooth Printer PIN
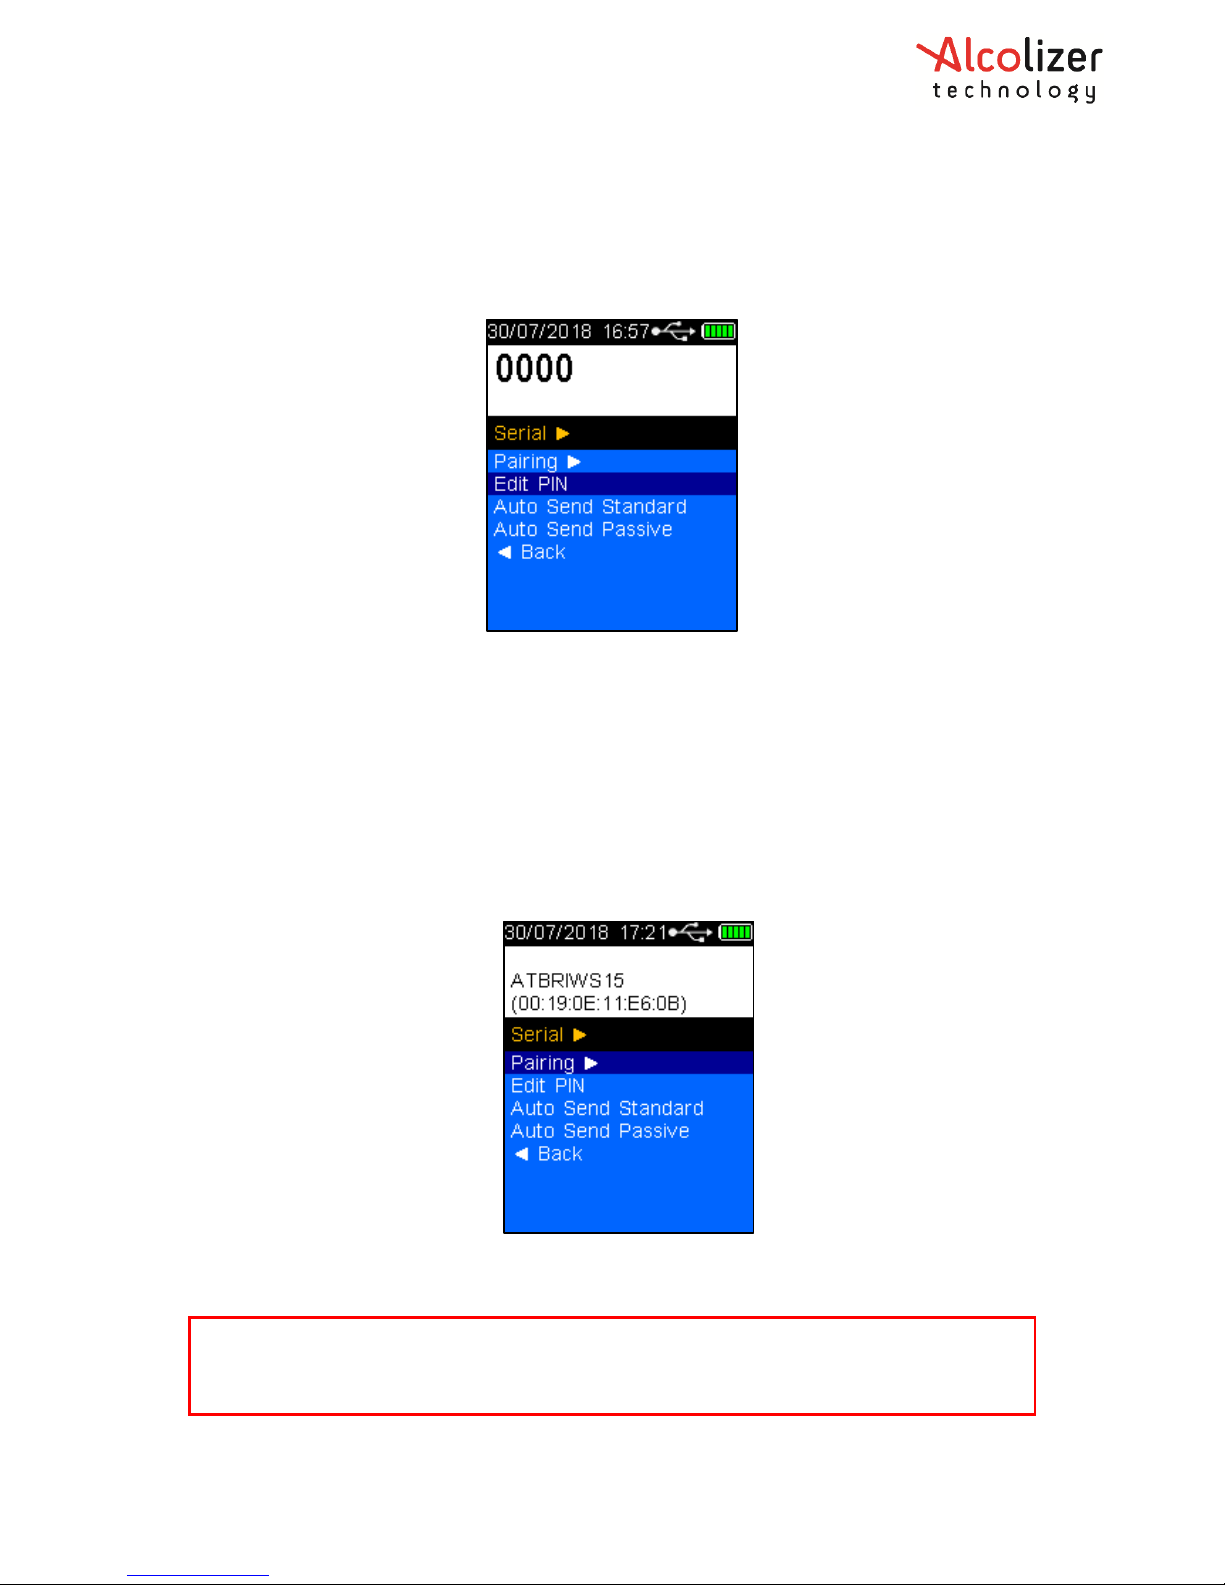
A serial PIN number is required to paring device to a computer or other device. If a PIN is
not setup, device will use as default ‘0000’.
• Use the down arrow and test key to select Edit PIN.
Figure 45 - Serial PIN
7.4 Pairing as Serial Device
To Pair the device to a computer as serial device proceed as follows:
• Setup an incoming Bluetooth COM port.
• Ensure application on computer is running this incoming Bluetooth COM port.
• Go to Bluetooth device option on computer and select ‘Add Bluetooth’.
• Select ‘Pairing’ on HH4 to search for Bluetooth devices (Refer to Figure 46).
Figure 46 - Pairing Selected
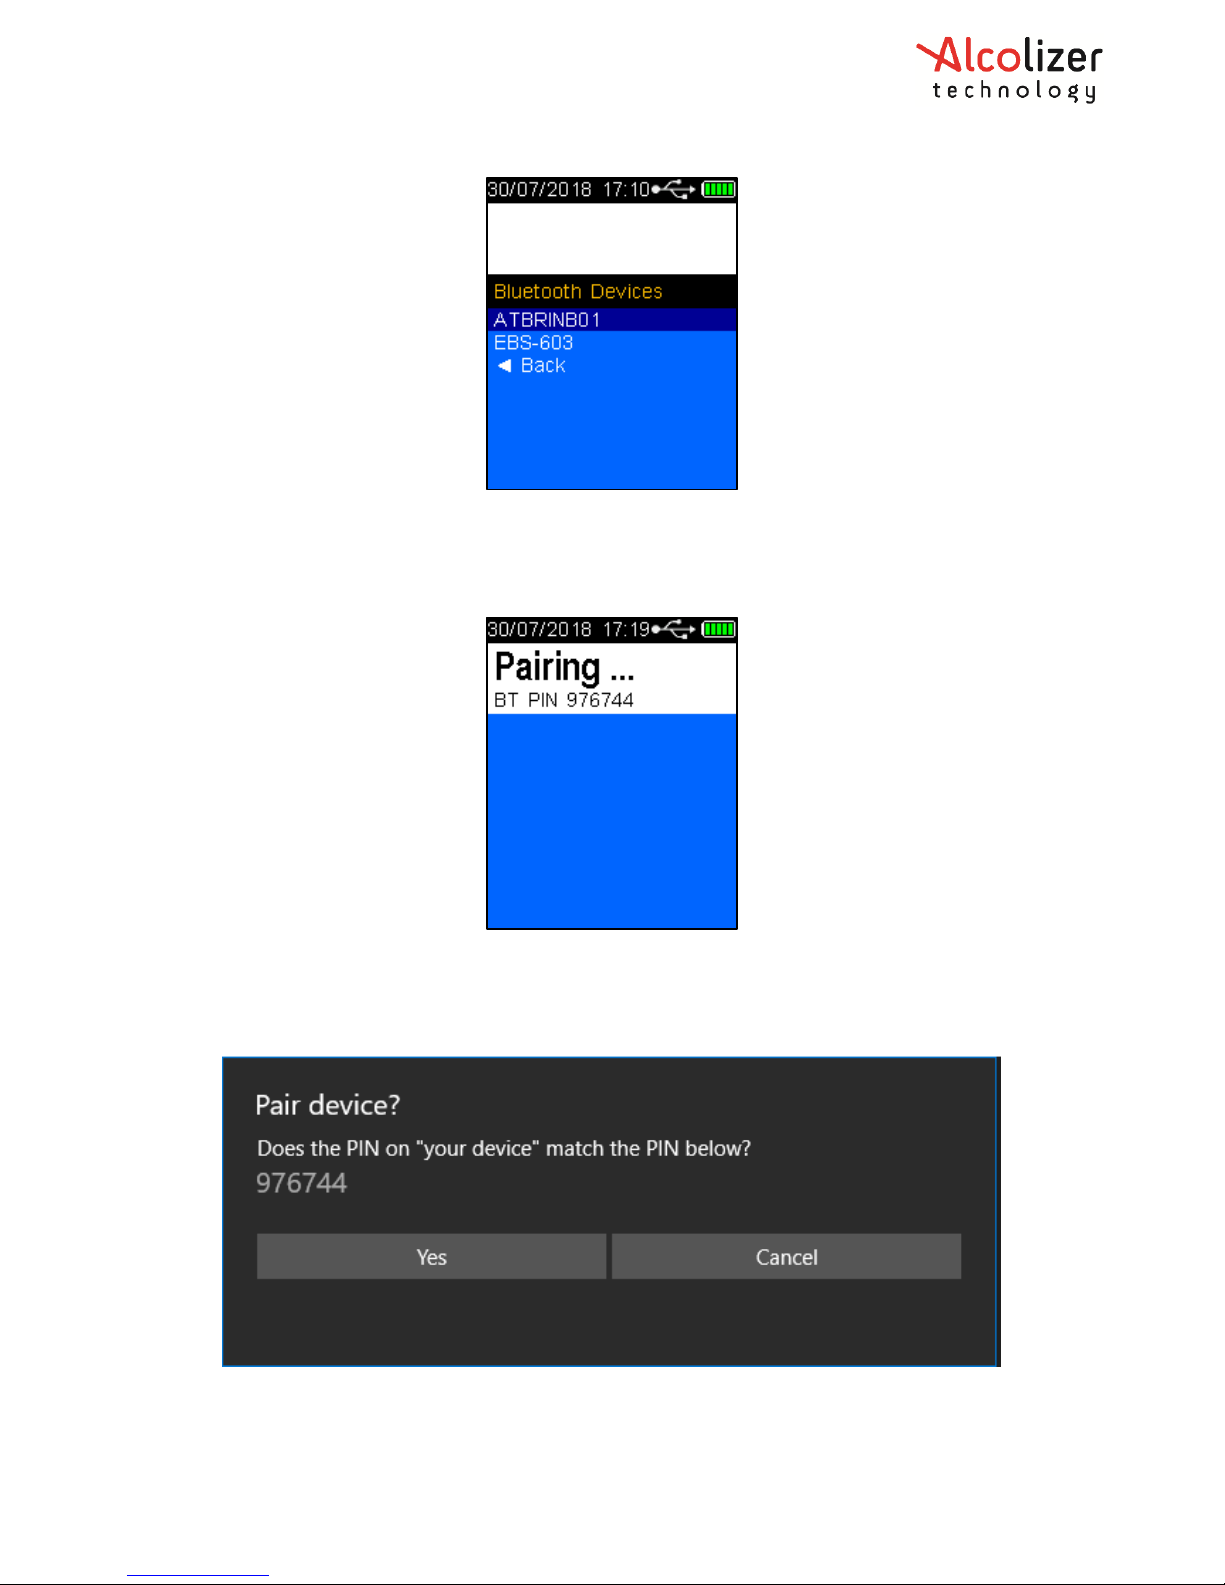
• Select the Bluetooth device which HH4 require to be paired (Refer to Figure 47).
NOTE
The HH4 will search and display all Bluetooth devices in range. To avoid attempting to
connect to a device other than the intended printer, move other Bluetooth items away.
Page 32
REF: Alcolizer HH4 Alcohol Tester User Manual V1 Page 32 © Alcolizer Technology
Figure 47 – Bluetooth Devices
• Press the test key to pair HH4 with device. Unit will display a PIN number sent by the
computer in this case.
Figure 48 - Printer Pairing...
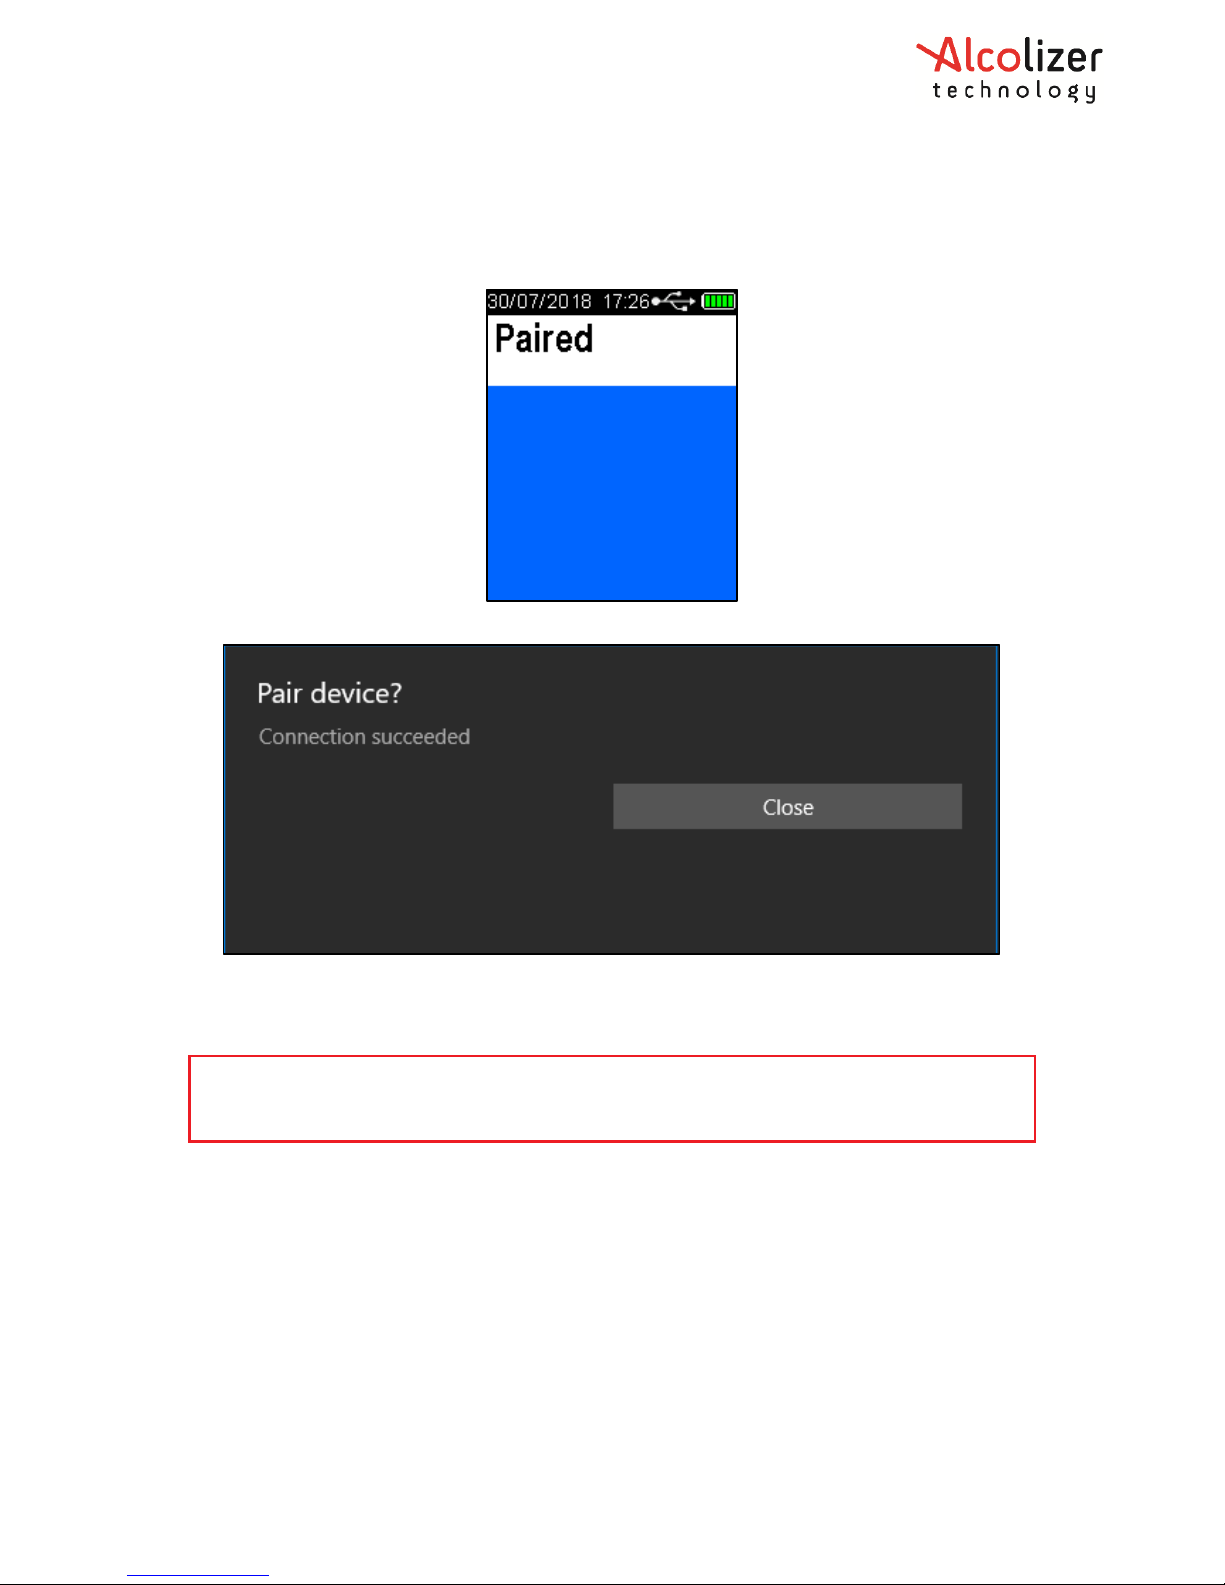
• Follow instruction on computer screen to confirm PIN so pairing is completed.
Figure 49 - Pairing Confirmation
Page 33
REF: Alcolizer HH4 Alcohol Tester User Manual V1 Page 33 © Alcolizer Technology
• Select ‘Yes’ to pair if PIN match with displayed on HH4 screen. Then, HH4 will be
paired with computer.
Figure 50 – HH4 Paired
Figure 51 - Device Paired
7.5 Auto Send
The Auto Send functions allow the automatic sending of results via a Bluetooth connection
to a paired device (laptop computer, PC) in a serial data format. The data can be
read/received by a serial terminal application e.g. Putty.
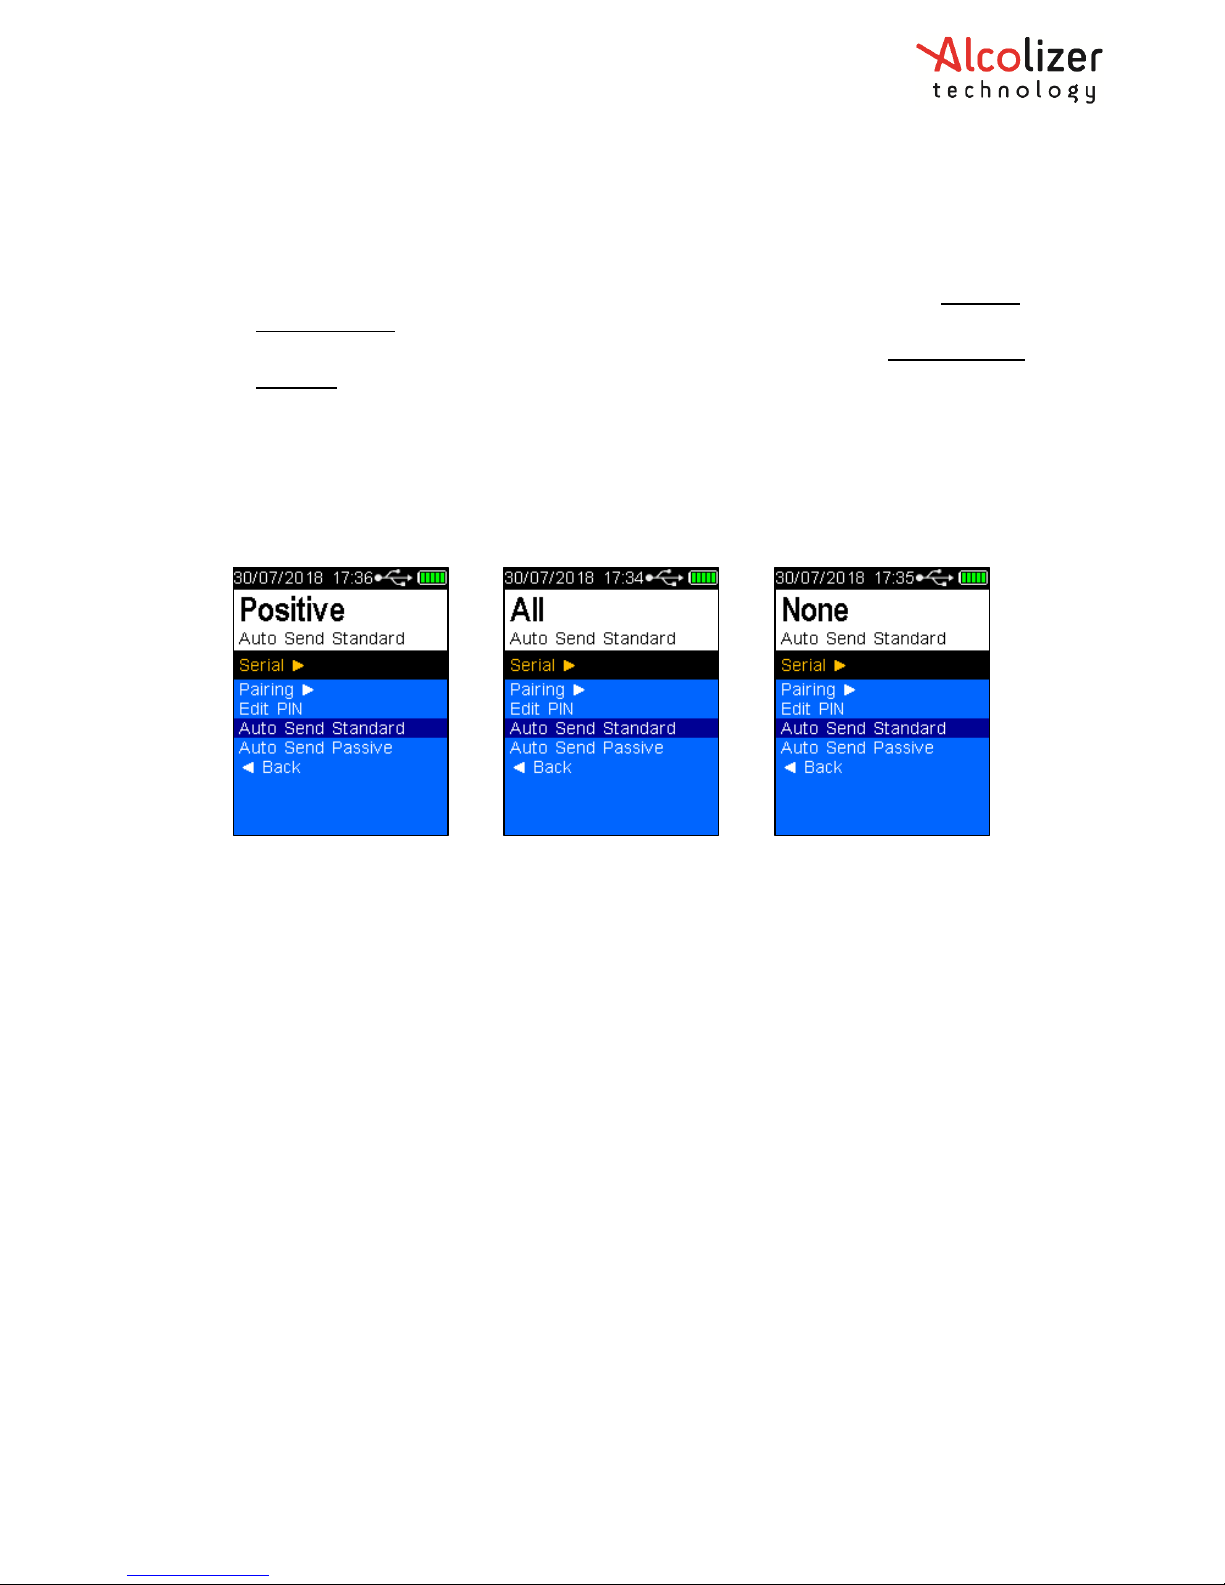
There are two Auto Send modes and each of these has three options. These are Auto Send
Standard and Auto Send Passive. Both have the following options:
• Positive – sends positive results after test is completed.
• All – sends positive and zero results after test is completed.
• None – regardless of results: nothing transmitted.
NOTE
To ensure the correct operation of the Auto Send function, Auto Print Standard and Auto
Print Passive must be set to None!
Page 34
REF: Alcolizer HH4 Alcohol Tester User Manual V1 Page 34 © Alcolizer Technology
7.5.1 Auto Send Standard
Auto Send Standard applies only to Mouthpiece (Active) testing. Depending on the Auto
Send Standard option selected, the following information will be transmitted following
tests:
• Positive – if alcohol is detected: a complete report including time, location (lat/long
if GPS enabled), test type, result etc will be transmitted.
• All – regardless of results: a complete report including time, location (lat/long if GPS
enabled), test type, result etc will be transmitted.
• None – regardless of results: nothing transmitted.
To set the HH4 to Auto Send Standard, scroll down until Auto Send Standard is highlighted.
Positive is the default option. To select All or None, press the Test key until the desired
option is highlighted.
7.5.2 Auto Send Passive
Auto Send Passive applies only to Passive testing. Depending on the Auto Send Passive
option selected, the information may be transmitted following the various tests except
None. The result will be either false if no alcohol is detected or true if alcohol is detected as
per the following explanations:
• Positive – if alcohol is detected: A short report including time, device information,
test type, etc will be transmitted.
• All – if alcohol is either detected or not: a short report including time, device
information, test type, etc will be transmitted.
• None – regardless of results: nothing transmitted.
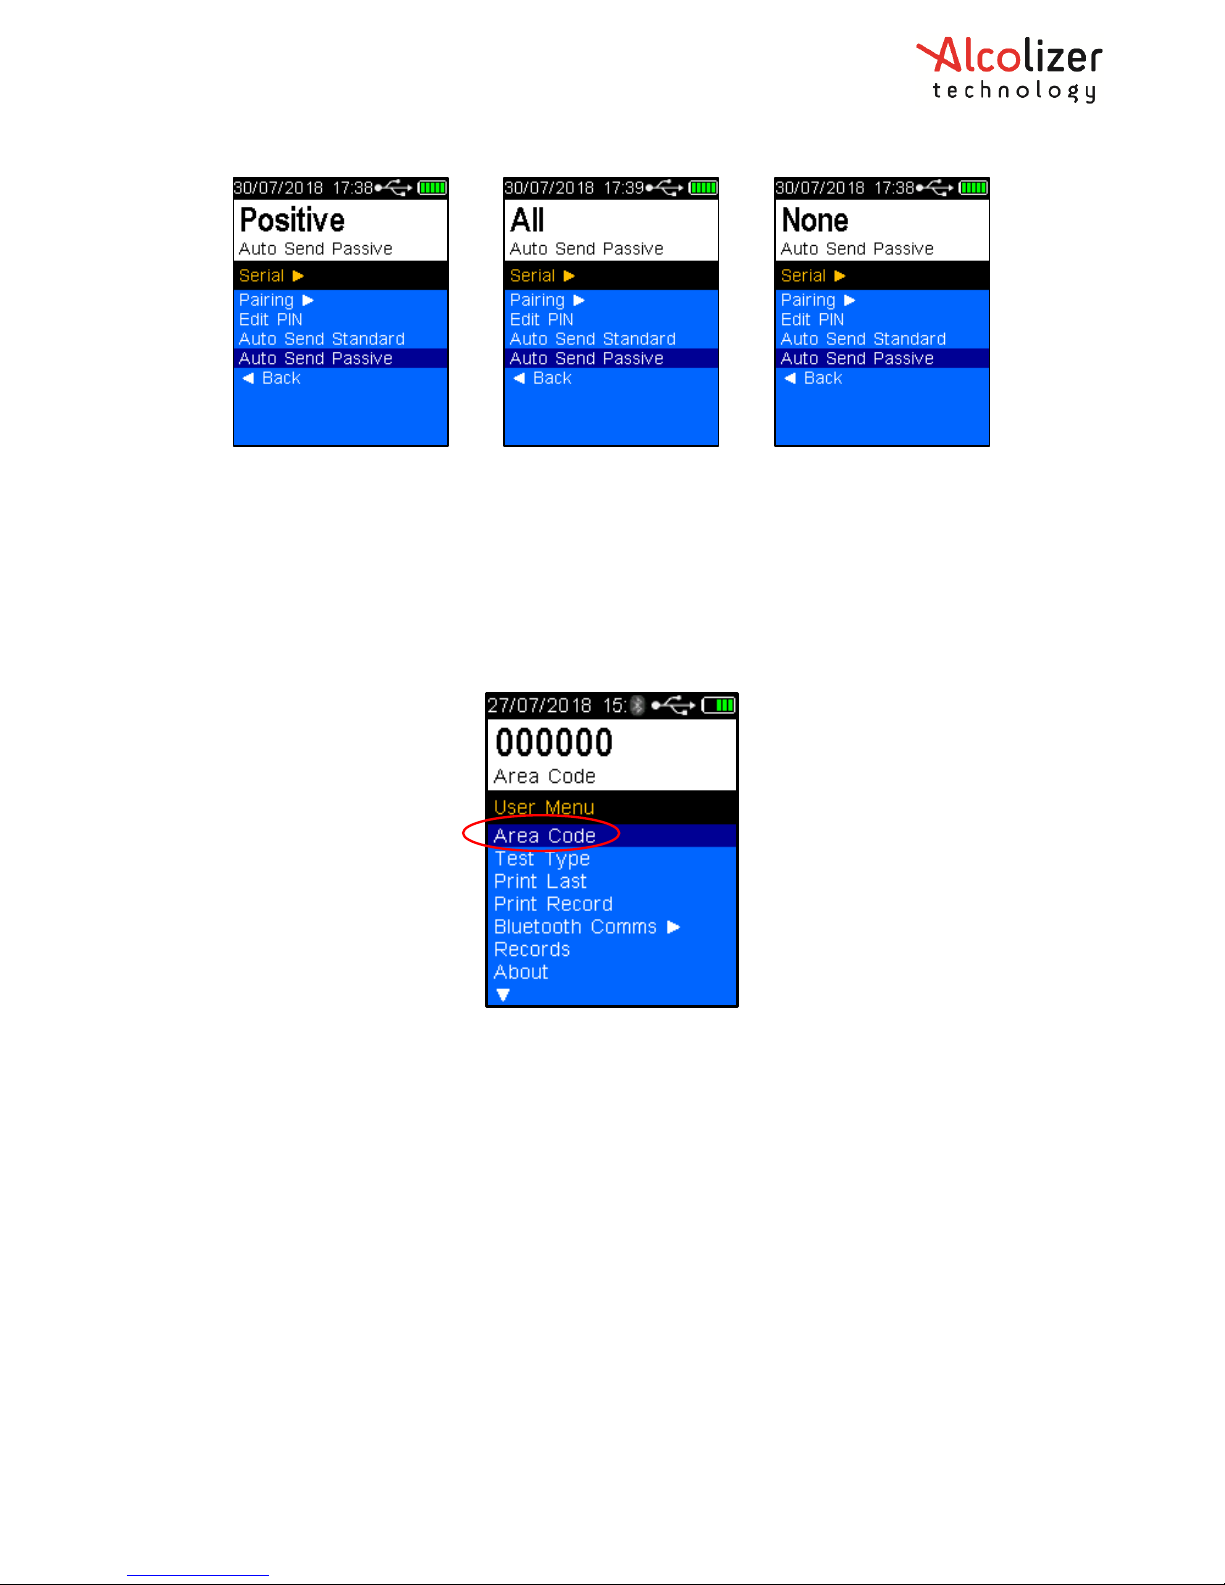
To set the HH4 to Auto Send Passive, scroll down until Auto Send Passive is highlighted.
Positive is the default option. To select All or None, press the Test key until the desired
option is highlighted.
Page 35
REF: Alcolizer HH4 Alcohol Tester User Manual V1 Page 35 © Alcolizer Technology
8 Area Code
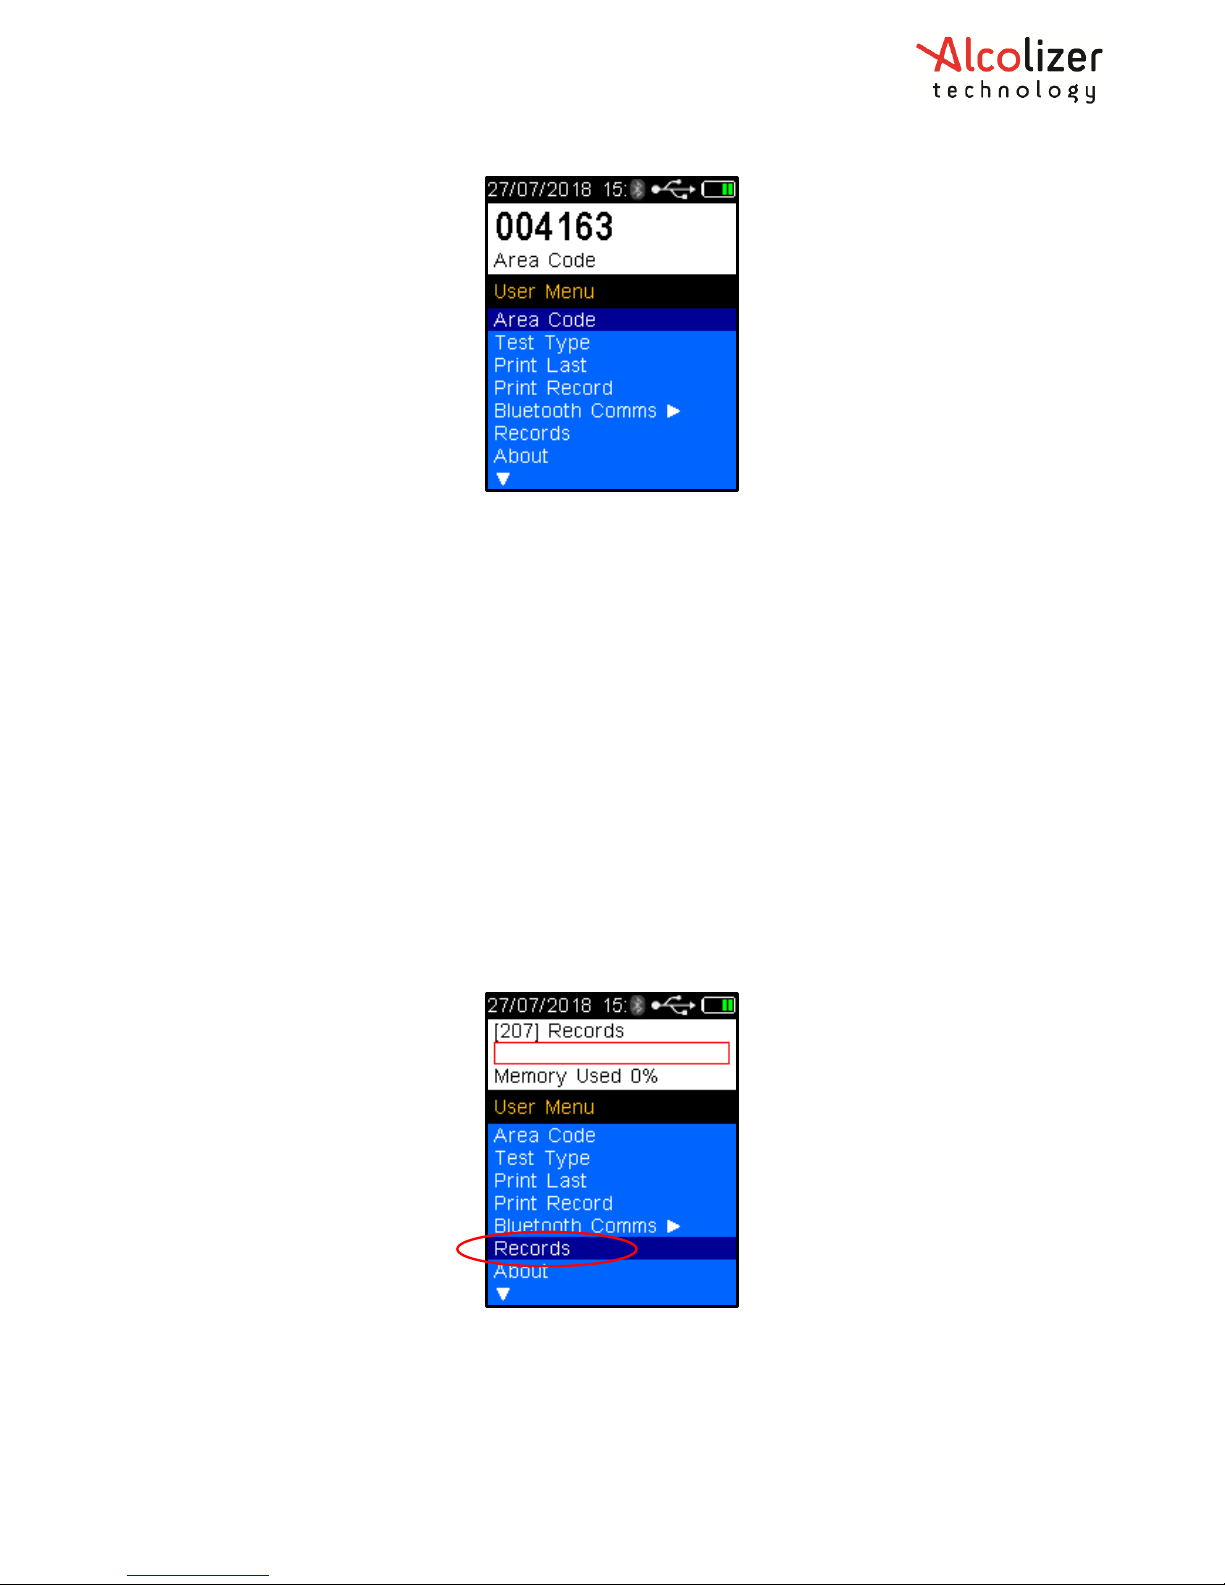
Area codes are used to identify the location of a breath test. To set an area code, perform
the following procedures:
• With the screen displaying press to test, press the Up and Down buttons
simultaneously. The User Menu will be displayed.
• Press the Down button and scroll to Area Code
Figure 52 - Area Code Displayed
Press the Test key. The cursor will move below the first digit.
Use the Up/down buttons to advance the digit to the required number.
When the correct number is displayed, press the Test key. The number will be set, and the
cursor will move the next digit. Repeat steps if necessary to all required numbers are
displayed.
Page 36
REF: Alcolizer HH4 Alcohol Tester User Manual V1 Page 36 © Alcolizer Technology
Figure 53 - Area Code Set
The Area Code is now set.
Press the Down button until Back is displayed.
Press the Test Key to return to the press to test screen.
9 Records
9.1 Accessing Records
Records are retained in the instrument and can be downloaded via the Alcoconnect
software support (Refer to Section 12). It is recommended that records are periodically
downloaded and erased from the device. Access the records as follows:
• Switch the device on
• With the screen displaying press to test, press the Up and Down buttons
simultaneously, the User Menu will be displayed.
• Using the down button, scroll down to Records (Refer to Figure 54 – Records Figure
54).
Figure 54 – Records
Press Test key to activate the records.
Press the Up/down buttons to navigate through records as required.
Press the Up and Down buttons simultaneously to return to the User Menu.
Page 37
REF: Alcolizer HH4 Alcohol Tester User Manual V1 Page 37 © Alcolizer Technology
9.2 Clearing Records
As the device automatically stores records, the memory will eventually reach capacity and
unless the data is downloaded, the storage of records will cease.
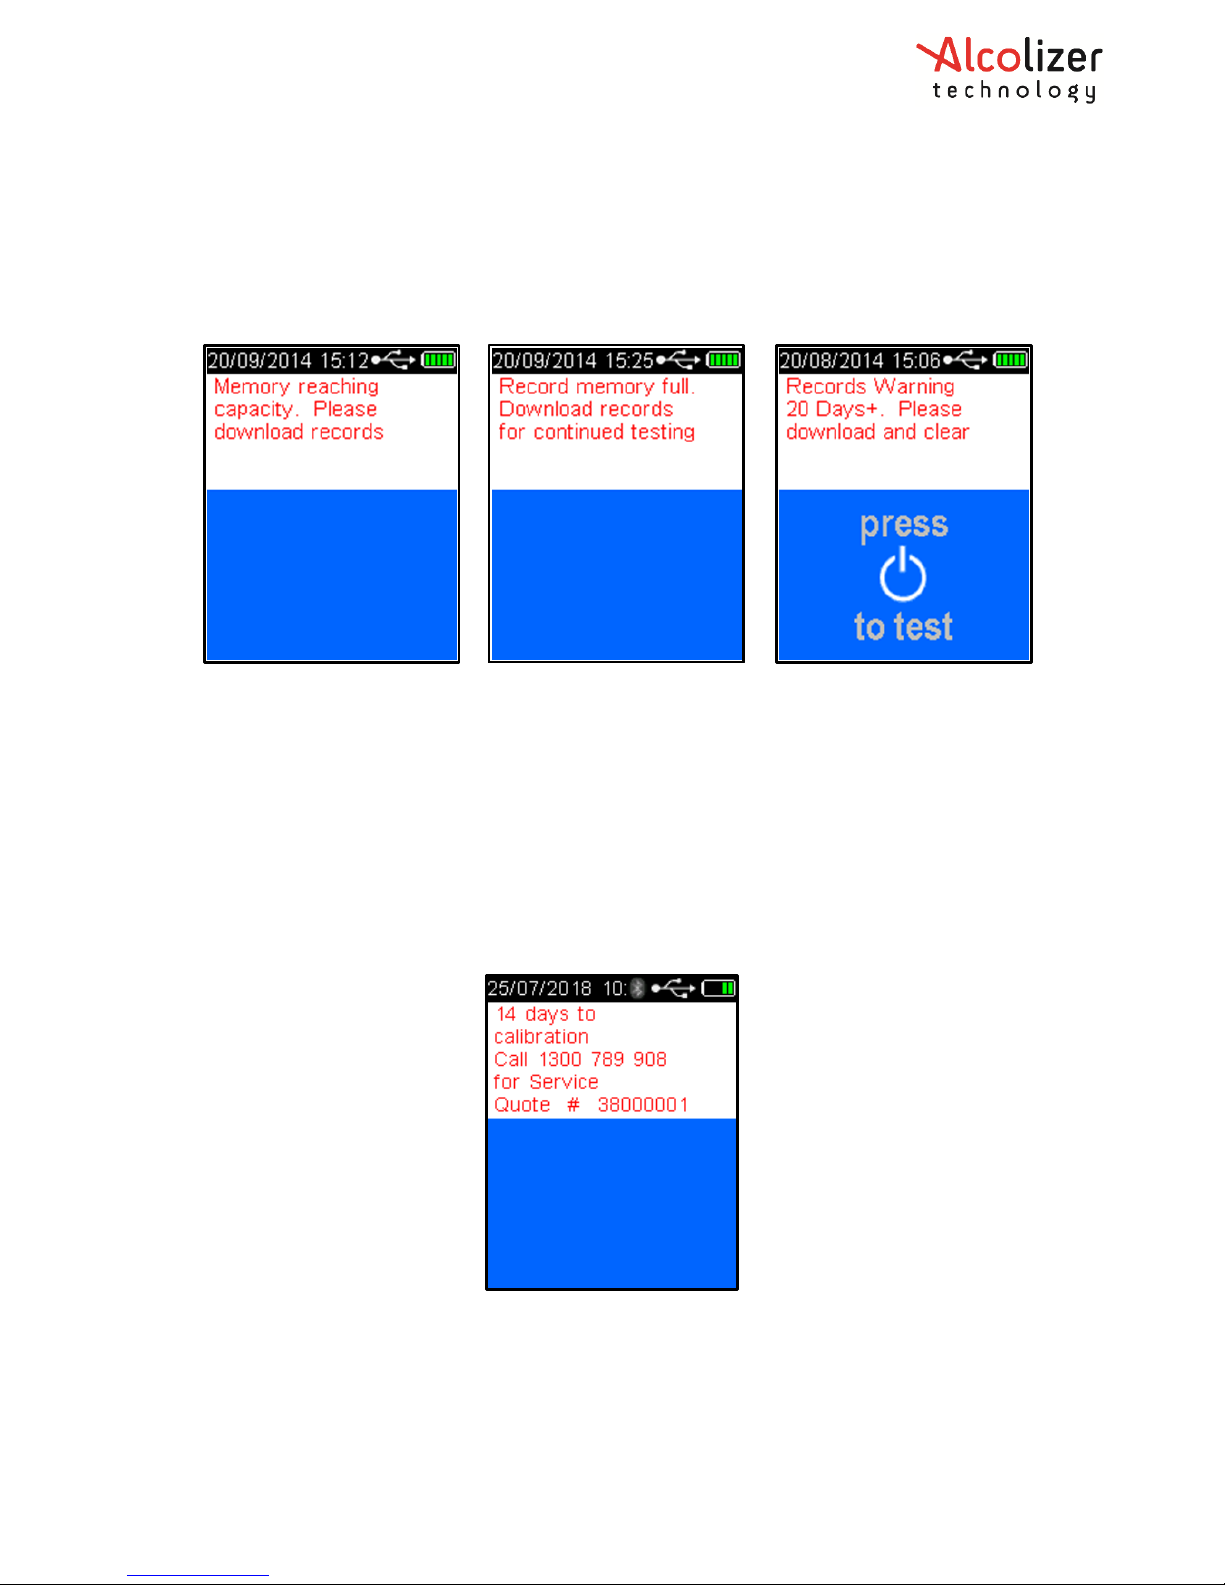
The device provides a series of warnings regarding memory capacity including memory
reaching capacity, memory full and days since the memory has been full.
Figure 55 - Memory Capacity Warnings
10 Calibration
10.1 Calibration Alerts
The Alcolizer HH4 requires calibration every six months (190 Days) as per Australian
Standards Certification Requirement.
The device will display a warning message after switching on if 14 days or less remain before
calibration is required (Refer to Figure 56).
Figure 56 - Days to Calibration Displayed
To cancel the warning message, press the test key and the device will resume normal
operations until zero days to calibration is reached.
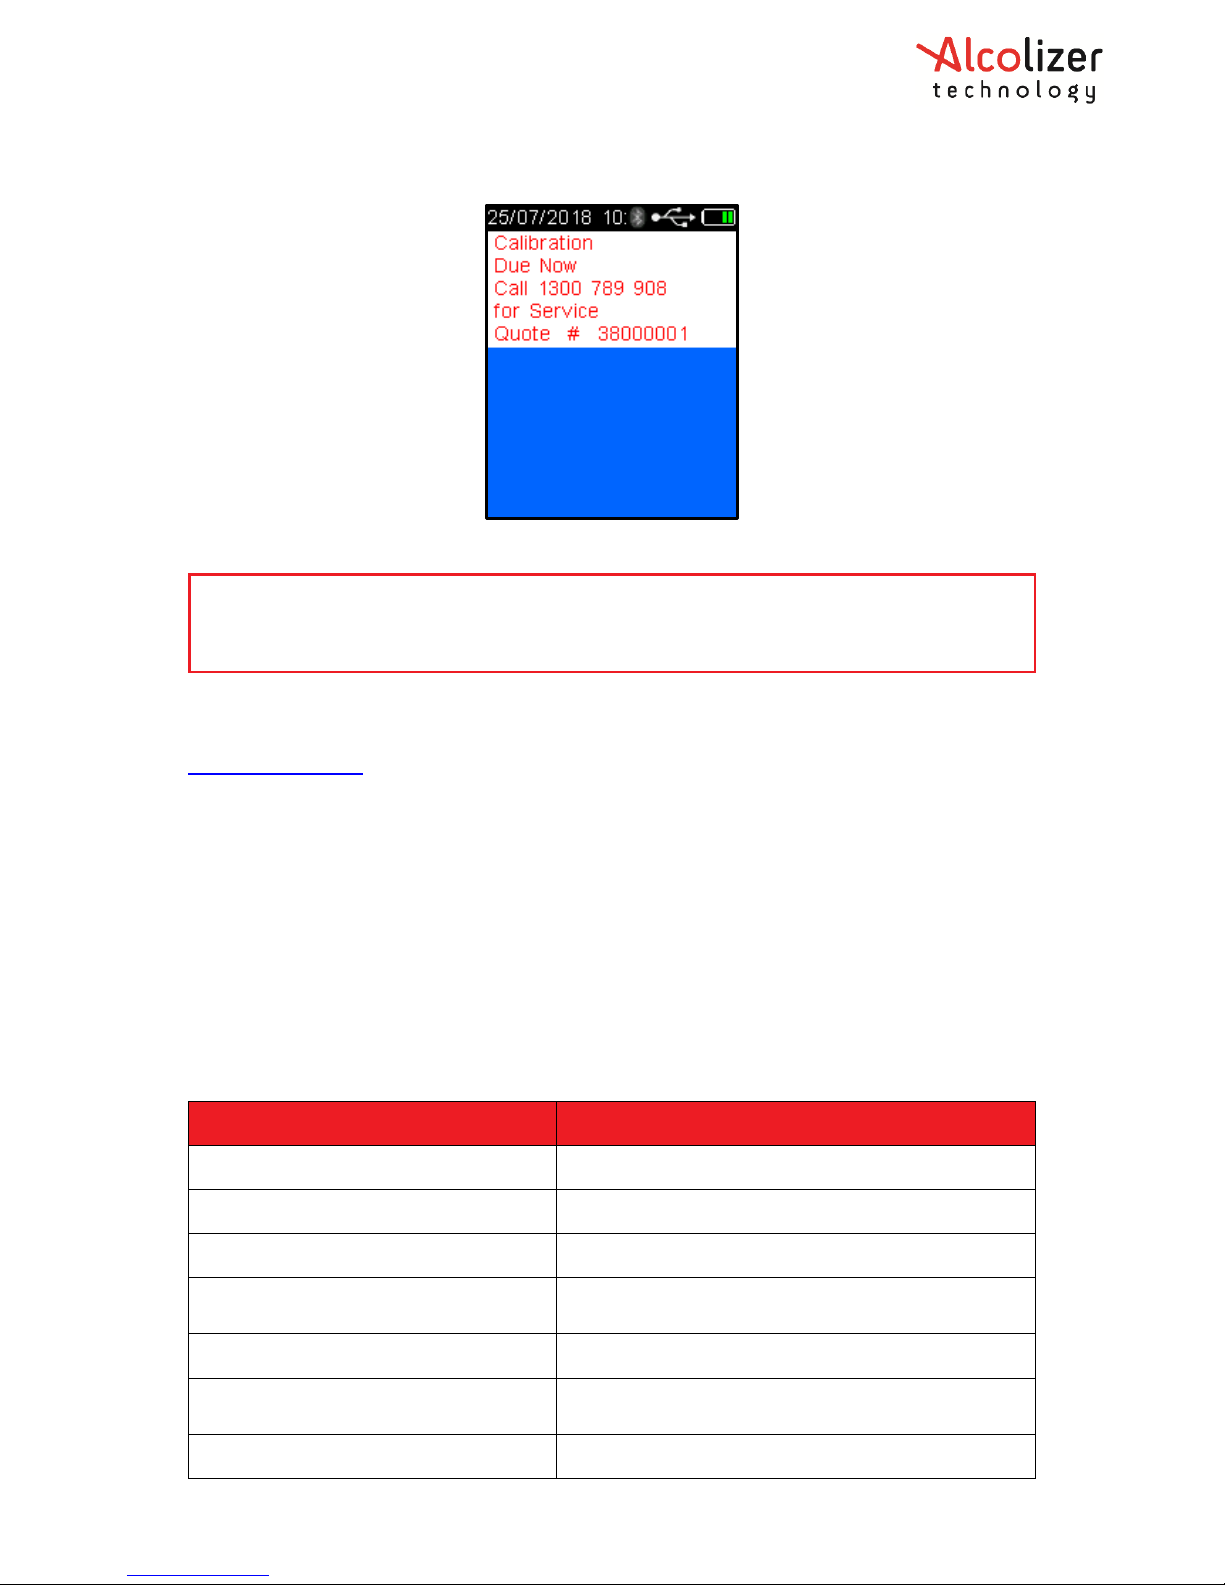
When the calibration warning message period has expired, the Calibration Due Now screen
is displayed, the device is locked and preventing any further breath tests until the device is
calibrated (Refer to Figure 57).
Page 38
REF: Alcolizer HH4 Alcohol Tester User Manual V1 Page 38 © Alcolizer Technology
Figure 57 - Calibration Due Now Message
10.2 Calibration Process
The Alcolizer HH4 calibration can be quickly and conveniently booked online at
www.alcolizer.com
The Serial Number of the instrument, your Purchase Order number if you have an account
with us, or credit card details will be required. Then post your Alcolizer HH4 to our Service
Centres in Cleveland or Perth.
• Unit 9/ 132-140 Ross Court, Cleveland QLD 4163
• 36 Mumford Place, Balcatta WA 6021
11 Specifications
The technical specifications of the HH4 are detailed below,
Instrument Application
Industry – Mouthpiece and Passive
BAC Range
0.000 - 0.500 g/100ml (BAC)
Accuracy
Better than 0.005 at 0.100 g/100ml (BAC)
Test Time
Within 3-5 seconds
Recovery Time
Instant for 0.000 BAC reading (reading on-screen
for 2 seconds)
Mouthpiece Type
Standard spigot locator or non-return valve
Sensor Type
Law enforcement grade electrochemical fuel cell
(premium platinum)
Power Supply
Rechargeable Li-Ion battery system
CAUTION
It is recommended that calibration of the device is performed before the warning
message period expires. This will ensure uninterrupted testing can continue.
Page 39
REF: Alcolizer HH4 Alcohol Tester User Manual V1 Page 39 © Alcolizer Technology
Weight
272g (Including battery and cover)
Dimensions
202mm H x 63mm W x 39mm D
Calibration
Six monthly calibration at Alcolizer Technology’s
service facilities
12 Alcoconnect
Alcoconnect assist is the analysis of data downloaded from the HH4 device.
The Alcoconnect software can be downloaded from www.alcolizer.com
12.1 Installing Alcoconnect Software
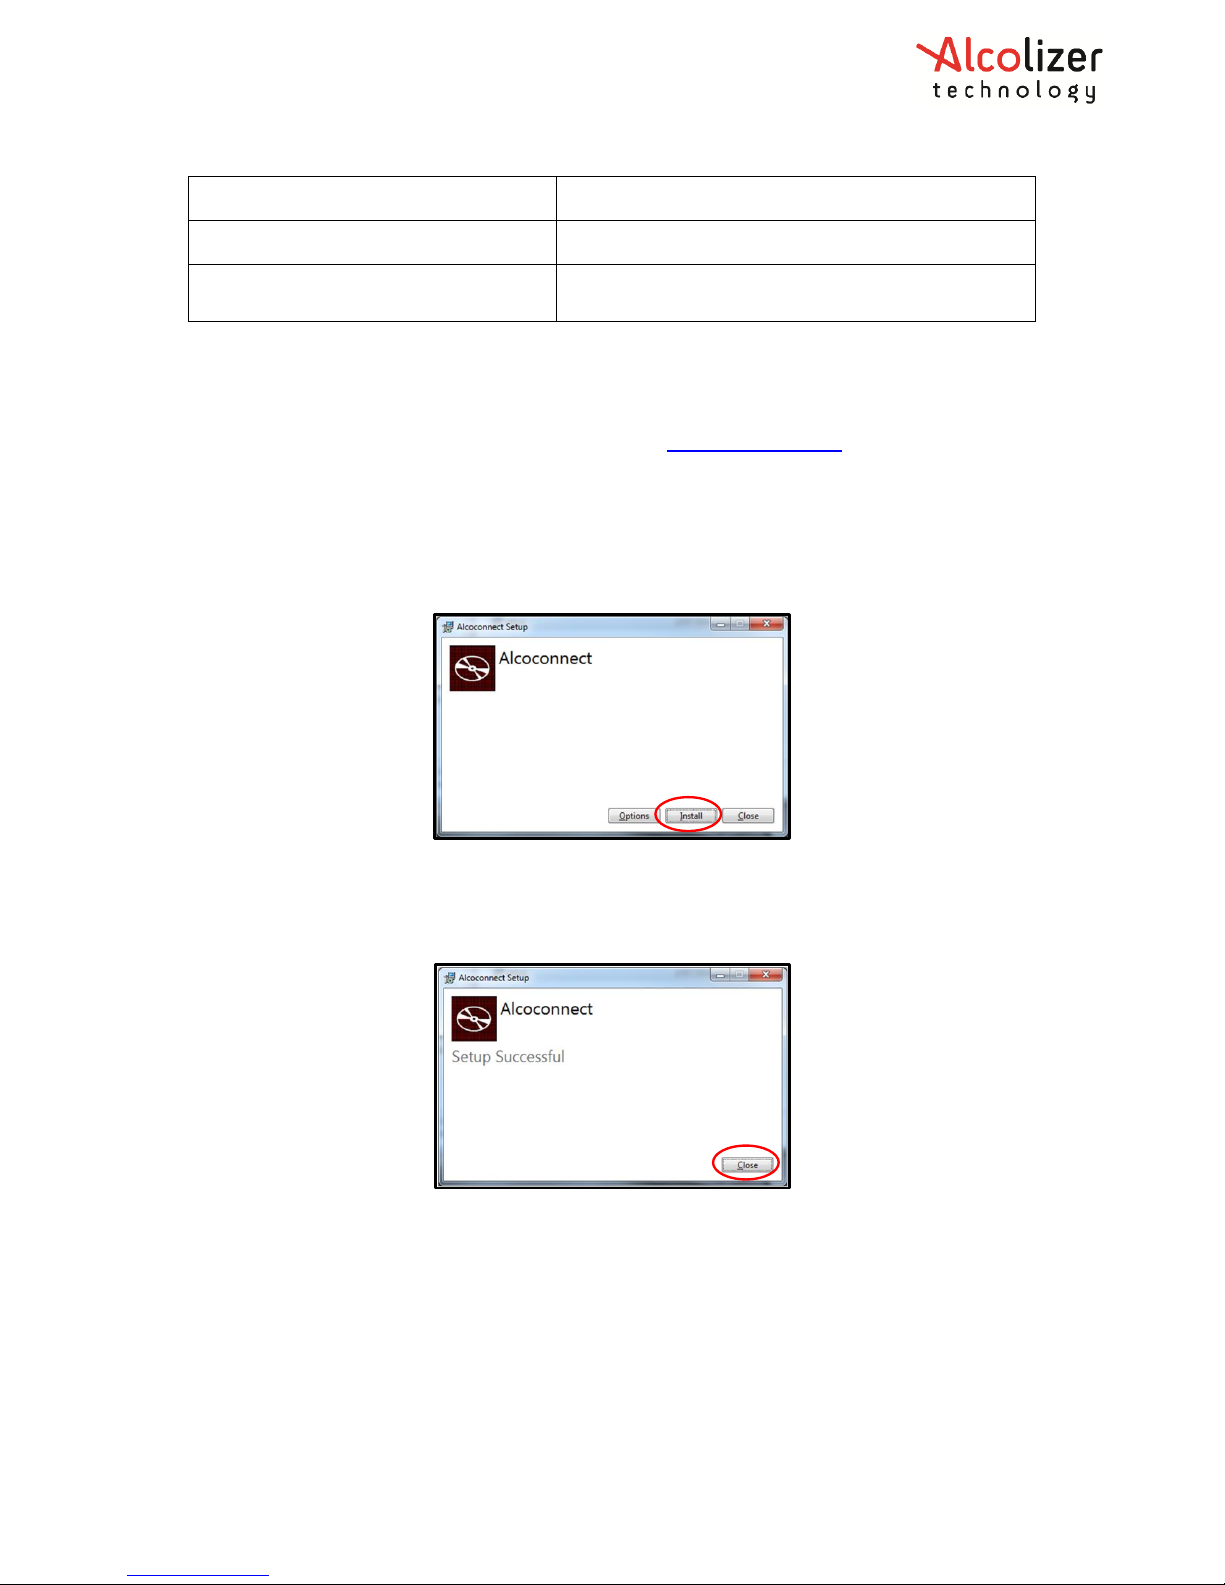
On the Alcoconnect Setup window, click Install (Refer to Figure 58).
Figure 58 - Alcoconnect Setup Window
Once the program is installed the Alcoconnect Setup window will display Setup Successful.
Click on Close (Refer to Figure 59).
Figure 59 - Setup Successful
Following a successful installation, an Alcoconnect icon will appear on the Desktop.
12.2 Using Alcoconnect
Once installed onto the computer, access Alcoconnect as follows:
• Connect the device to the computer via the USB cable
• Double click the Alcoconnect icon
• Turn the HH4 device on
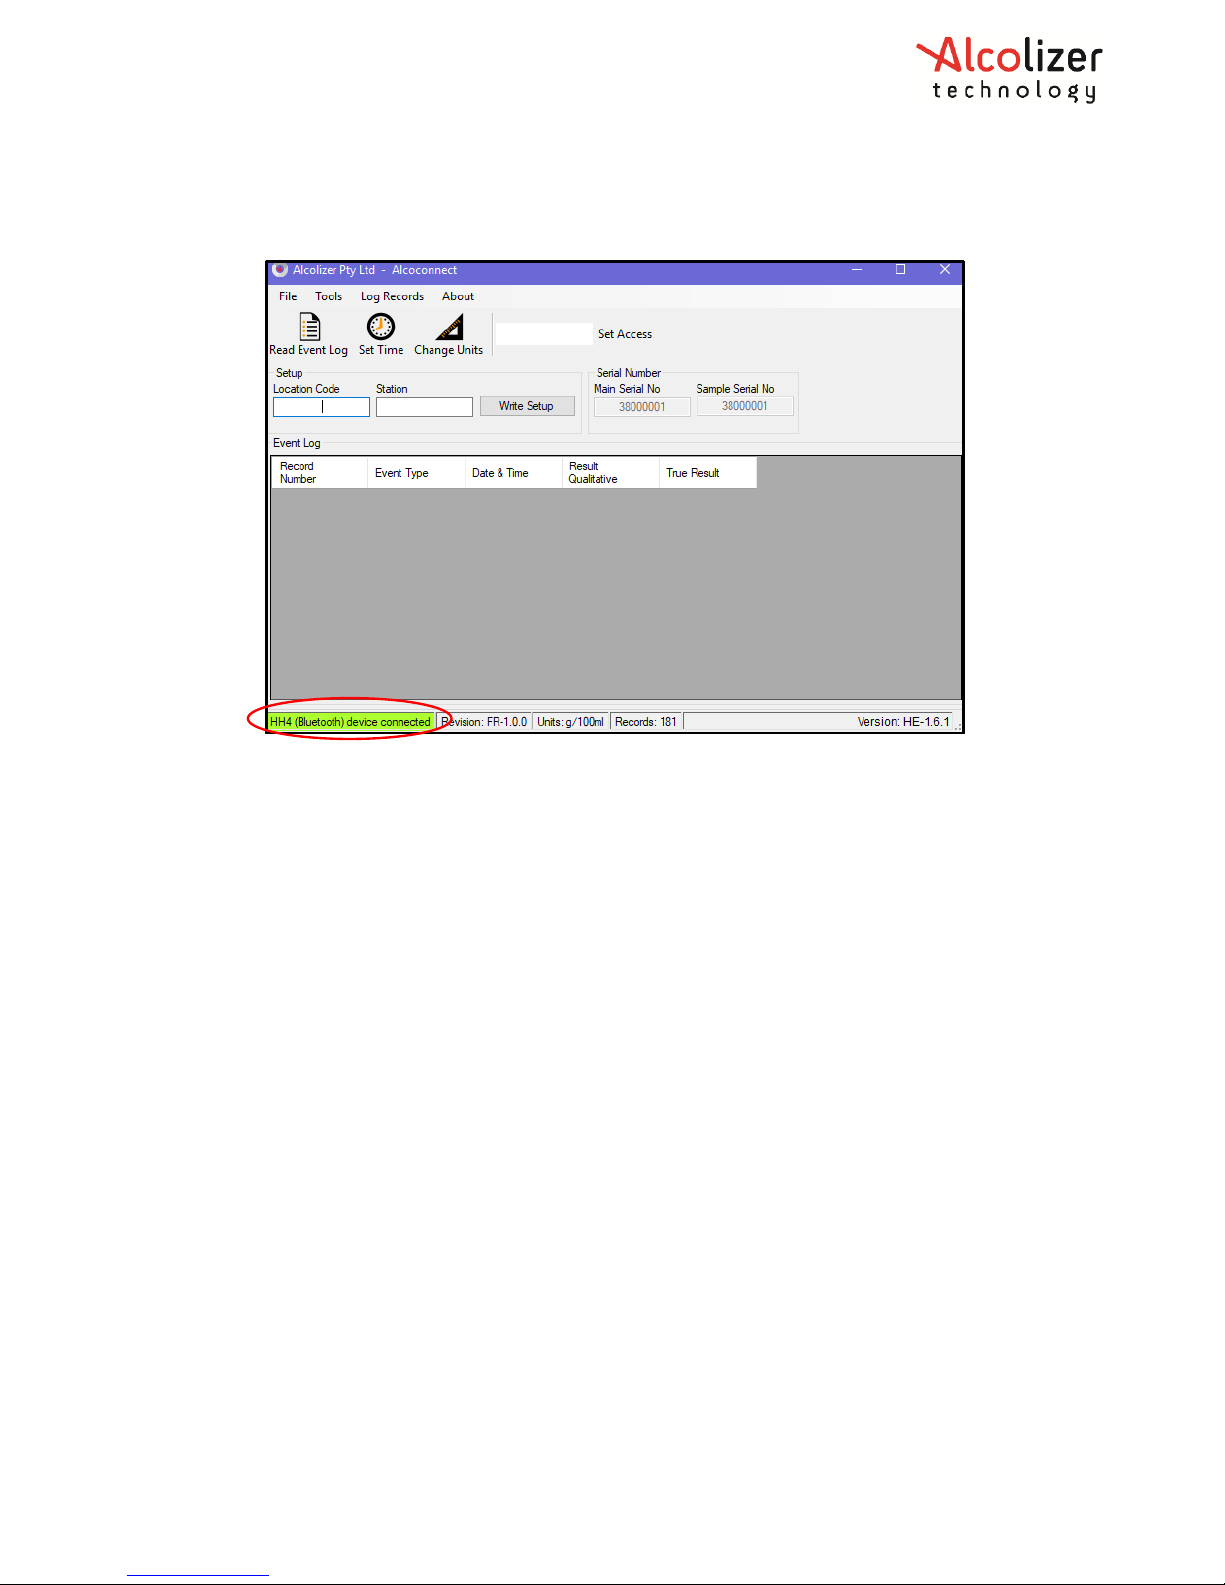
• The Read Event Log window will be displayed (Refer to Figure 60).
Page 40
REF: Alcolizer HH4 Alcohol Tester User Manual V1 Page 40 © Alcolizer Technology
• A successful connection between the HH4 and the computer will be shown by a
green segment on the Read Event Log window (Refer to Figure 60).
Figure 60 - Read Event Log Window
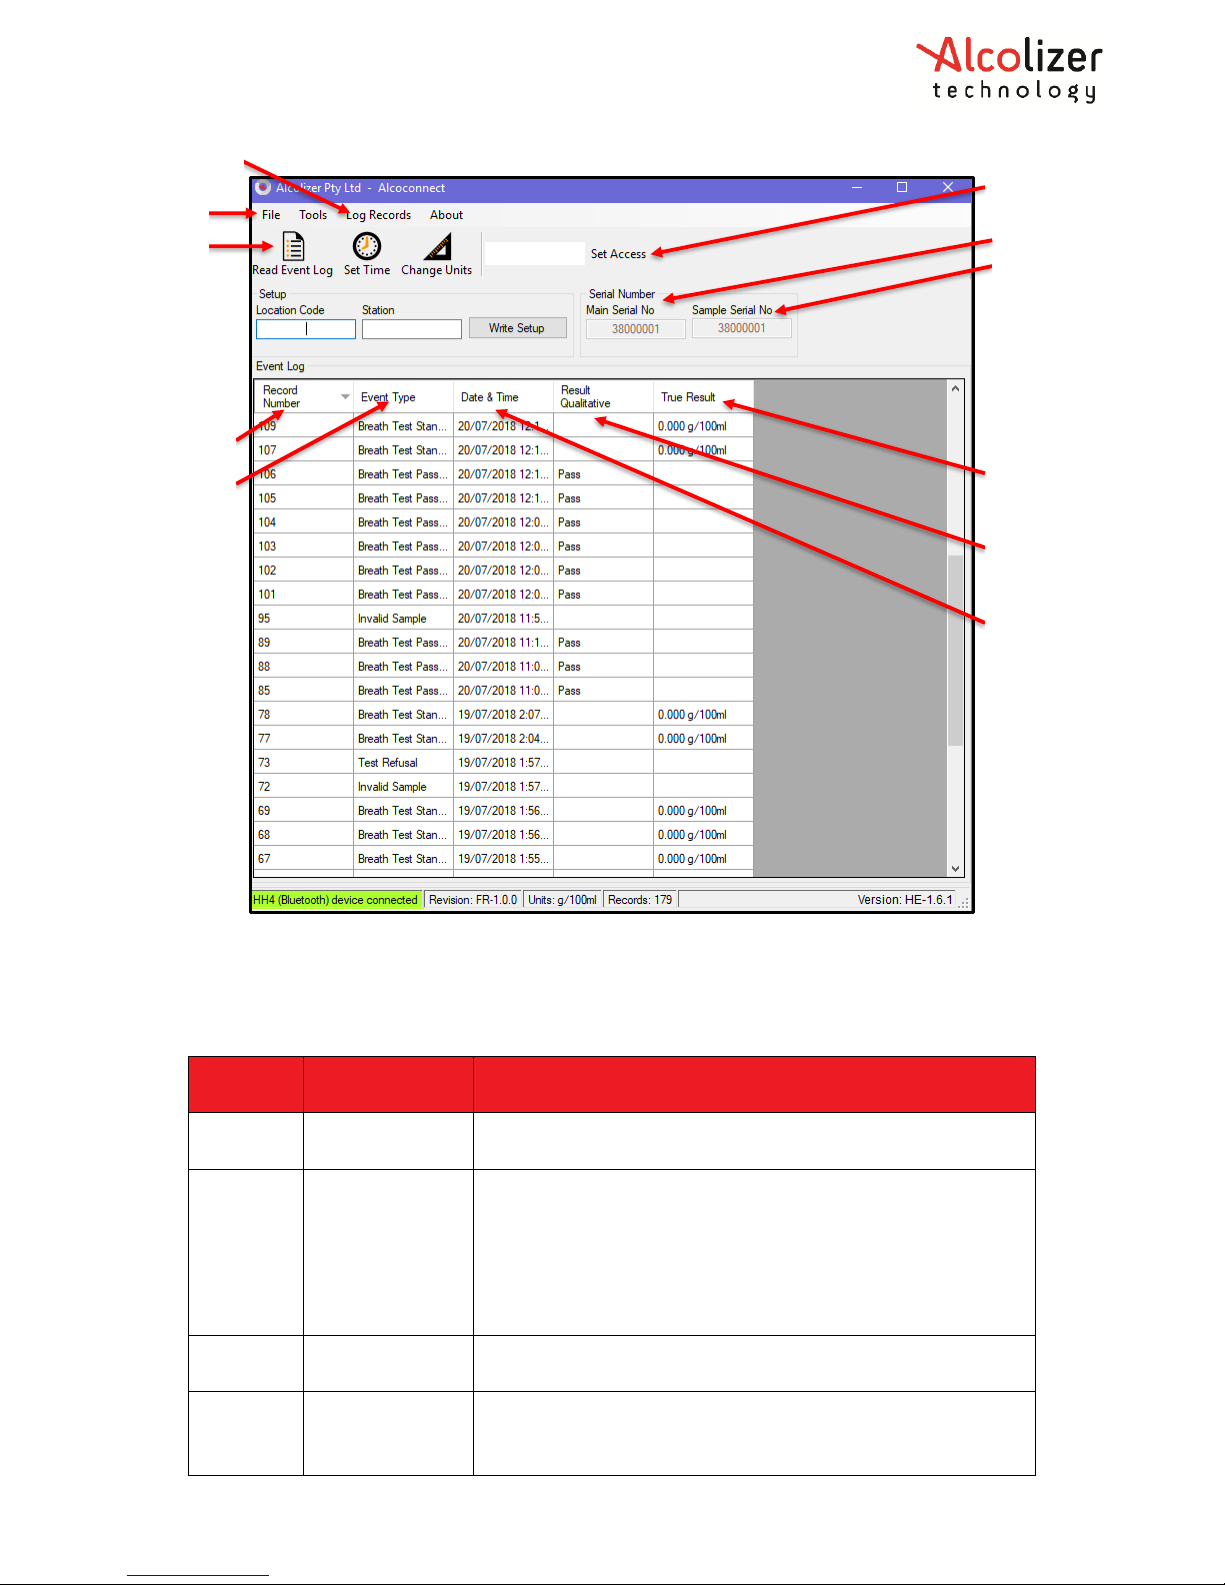
Click the Read Event Log icon and the Event Log will then be displayed (Refer to Figure 61).
Page 41
REF: Alcolizer HH4 Alcohol Tester User Manual V1 Page 41 © Alcolizer Technology
Figure 61 - Event Log
12.2.1 Navigating around the Event Log Page
Refer to the below table and Figure 61 for a description of the Event Log page.
Figure
Reference
Icon, Button or
Heading
Description
1
Read Event Log
Icon
Select to download records from the HH4.
2
File Icon
Select for:
Save Event Log – save as a .csv or xml file to a file location
in computer or elsewhere.
Language - Choose a language if the HH4 is configured for
multiple languages.
Options - Set Log Settings.
3
Log Records
Activates the Event Log application. Same function as the
Read Event Log icon.
4
Set Access
Used by authorised persons to access certain Alcoconnect
functionality. Select the icon after inputting correct access
code.
1 2 3
4
5
6
7 8 9
10
11
Page 42
REF: Alcolizer HH4 Alcohol Tester User Manual V1 Page 42 © Alcolizer Technology
5
Sample Serial
Number
The serial number of the sample module.
6
Record Number
The number of each record.
7
Event Type
The type of test performed or event. E.g. breath test type
(passive, standard), test timeout or refusal etc.
8
Date and Time
The data and time of the event.
9
Result
Qualitative
Passive test result.
10
True Result
Mouthpiece test result.
11
Serial Number
Main Serial No
The serial number of the HH4.
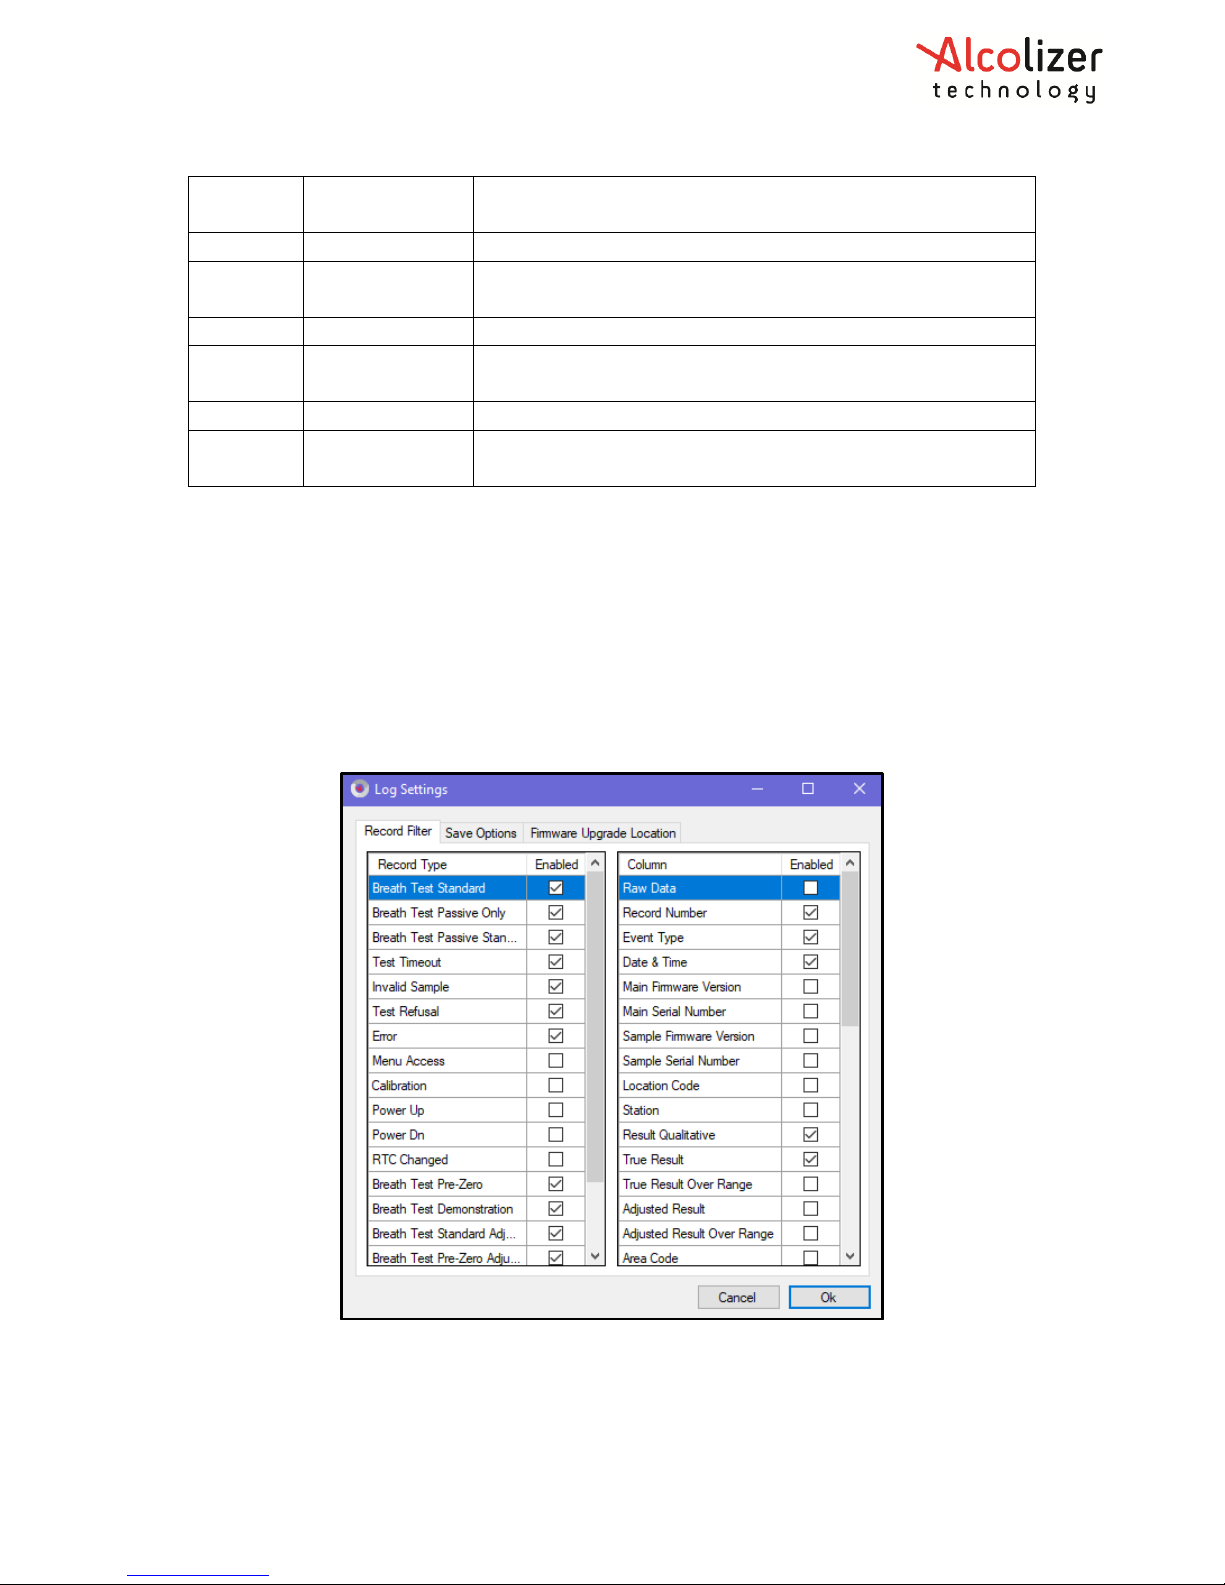
12.2.2 Set Log Settings (Filtering Data)
To filter the data, access the Log Settings by clicking on File, then Options. The Log Setting
window will appear (Refer to Figure 62). The required criteria can be made by enabling/disenabling the record types.
12.2.3 Saving Event Logs
Event Logs can be saved for future analysis by clicking File, then Save Event Log. The data
can then be saved to the required location on the PC or laptop as a .csv or .xml file.
To maintain the security of data, files must be saved and protected by the user.
Figure 62 - Log Settings Window
12.2.4 Erasing Event Logs or Clear Logs on the Device
Insert access code ‘00005000’ at set address field to enable additional features.
 Loading...