

Mini 3D Sound Bar and Subwoofer
User’s Guide
If you need assistance
Toshiba’s Support Web site support.toshiba.com
Call Toshiba Customer Support Center
Within the United States at (800) 631-3811
Outside the United States at (949) 583-3050
For more information see Troubleshooting on page 19 in this guide
GMAA00400010
07/12

2
Table of contents
Introduction ....................................................................................... 8
Safety icons ........................................................................................ 8
Box contents ....................................................................................... 8
Mini 3D Sound Bar speaker system controls ..................................... 9
Remote control .................................................................................. 11
Mini 3D Sound Bar speaker system placement .................................. 11
Mini 3D Sound Bar speaker system connections ............................... 11
3D Sound ........................................................................................... 16
Audio playback mode ......................................................................... 17
Playback via Bluetooth
Troubleshooting ................................................................................. 19
Maintenance ....................................................................................... 19
Specifi cations ..................................................................................... 20
®
-enabled devices ........................................... 18
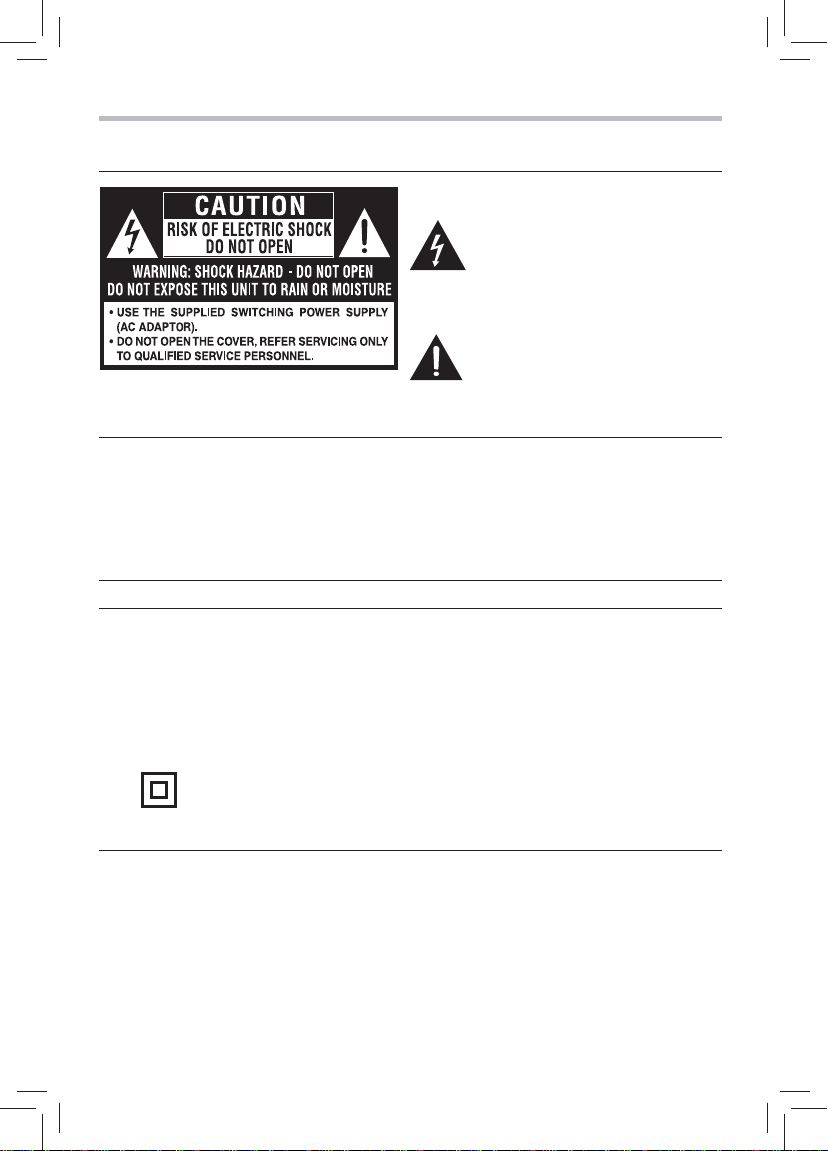
Safety precautions
The lightning fl ash with an arrowhead
symbol, within the equilateral triangle, is
intended to alert the user to the presence
of uninsulated “dangerous voltage”
within the product’s enclosure that may
be of suffi cient magnitude to constitute a
risk of electric shock to persons.
The exclamation point within the
equilateral triangle is intended to alert
Remark: The marking plate is located on the
bottom enclosure.
WARNING: TO REDUCE THE RISK OF FIRE OR ELECTRIC SHOCK, DO NOT EXPOSE THIS
APPLIANCE TO RAIN OR MOISTURE. DANGEROUS HIGH VOLTAGES ARE PRESENT INSIDE THE
ENCLOSURE. DO NOT OPEN THE CABINET.
REFER SERVICING TO QUALIFIED PERSONNEL ONLY.
TO PREVENT ELECTRIC SHOCK, MATCH WIDE BLADE OF PLUG TO WIDE SLOT OF AC POWER
OUTLET, THEN FULLY INSERT.
the user to the presence of important
operating and maintenance (servicing)
instructions in this User’s Guide.
3
To ensure proper use of this product, please read
this User’s Guide carefully and retain for future
reference. Should the unit require maintenance,
contact an authorized service location. Use
of controls or adjustments or performance of
procedures other than those specifi ed herein may
result in hazardous radiation exposure.
The symbol for Class II
(Double lnsulation)
• The mains plug is used as disconnect device
and it should remain readily operable during
intended used. In order to disconnect the
apparatus from the mains completely, the
main plug should be disconnected from the
mains socket outlet completely.
• Minimum 10 cm (4 inches) distances around
the apparatus for suffi cient ventilations.
• Never use the apparatus in environments
that exceed the recommended operating
temperatures of 41 F to 95 F (5 C - 35 C).

4
Important safety instructions
1. Read these instructions.
2. Keep these instructions.
3. Heed all warnings.
4. Follow all instructions.
5. Do not use this apparatus near water.
6. Clean only with a dry cloth.
7. Do not block any of the ventilation openings.
Install in accordance with the manufacturer’s
instructions.
8. Do not install near any heat sources such
as radiators, heat registers, stoves, or other
devices (including amplifi ers) that produce
heat.
9. Do not defeat the safety purpose of the
polarized or grounding-type plug. A polarized
plug has two blades with one wider than the
other. A grounding type plug has two blades
and a third grounding prong. The wide blade
or the third prong is provided for your safety.
If the provided plug does not fi t into your
outlet, consult an electrician for replacement
of the obsolete outlet.
10. Protect the power cord from being walked on
or pinched particularly at plugs, convenience
receptacles, and the point where they exit
from the apparatus.
11. Only use attachments/accessories specifi ed
by the manufacturer.
12. Unplug this apparatus during lightning
storms or when unused for long periods of
time.
13. Refer all servicing to qualified service
personnel. Servicing is required when the
apparatus has been damaged in any way,
such as the power-supply cord or plug is
damaged, liquid has been spilled or objects
have fallen into the apparatus, the apparatus
has been exposed to rain or moisture, does
not operate normally, or has been dropped.
14. Do not overload wall outlets; extension cords,
or integral convenience receptacles as this can
result in a risk of fi re or electric shock.
15. Never expose the apparatus to dripping or
splashing or place items such as vases,
aquariums, any other item fi lled with liquid,
or candles on top of the unit.
16. Do not place anything on top of this unit.
17. Do not place the apparatus on amplifi ers or
equipment that may produce heat.
18. Never block or cover the slots or openings in
the unit.
Never place the main console:
• on a bed, sofa, rug or similar surface.
Never place the main console or the subwoofer:
• too close to drapes, curtains, or walls; or
• in a confi ned space such as a bookcase,
built-in cabinet, or any other place with poor
ventilation.
The slots and openings are provided to protect
the unit from overheating and to help maintain
reliable operation.
19. If the apparatus should emit smoke or an
unusual odor, immediately disconnect the
power cord from the wall outlet. Wait until the
smoke or smell stops, then ask your dealer for
a check and repair. Neglecting to do so may
cause fi re.
20. During lighting, do not touch the connecting
cables or the apparatus.
21. Warning: To prevent the spread of fi re, keep
candles or other open fl ames away from this
product at all times.
About the remote control battery
DO NOT INGEST BATTERY, CHEMICAL BURN HAZARD
The remote control supplied with this product contains a coin / button cell
battery. If the coin / button cell battery is swallowed, it can cause severe
internal burns in just 2 hours and can lead to death. Keep new and used
batteries away from children. If the battery compartment does not close
securely, stop using the product and keep it away from children. If you
think batteries might have been swallowed or placed inside any part of the
body, seek immediate medical attention.
Use only button cell batteries recommended by the manufacturer as
replacements. The button cell battery can explode if not replaced, used,
handled, or disposed of properly. Dispose of the button cell battery as
required by local ordinances or regulations.
California Perchlorate Information:
Products containing CR (manganese dioxide) lithium coin cell batteries
may contain perchlorate. Perchlorate Material – special handling may
apply. See http://www.dtsc.ca.gov/hazardouswaste/perchlorate.
5

6
USA
Federal Communications Commission
Statement
FCC Compliance Statement
This device complies with Part 15 of the FCC Rules.
Operation is subject to the following two conditions:
(1) This device may not cause harmful interference,
and (2) This device must accept any interference
received, including interference that may cause
undesired operation.
Interference
This equipment has been tested and found to comply
with the limits for a Class B digital device, pursuant
to Part 15 of the FCC Rules. These limits are
designed to provide reasonable protection against
harmful interference in a residential installation. This
equipment generates, uses, and can radiate radio
frequency energy and, if not installed and used in
accordance with the instructions, may cause harmful
interference to radio communications. However,
there is no guarantee that interference will not occur
in a particular installation. If this equipment does
cause harmful interference to radio or television
reception, which can be determined by turning the
equipment off and on, the user is encouraged to try
to correct the interference by one of the following
measures:
• Reorient or relocate the receiving antenna.
• Increase the separation between the equipment
and receiver.
• Connect the equipment into an outlet on a circuit
different from that to which the receiver is
connected.
• Consult the dealer or an experienced radio/TV
technician for help.
Important: Any changes or modifi cations not
expressly approved by the party responsible for
compliance could void the user’s authority to
operate this equipment.
Bluetooth® Wireless Technology and Your
Health
The products with Bluetooth® wireless technology,
like other radio devices, emit radio frequency
electromagnetic energy.
The level of energy emitted by devices with Bluetooth
wireless technology however is much less than the
electromagnetic energy emitted by wireless devices
such as mobile phones.
®
Because products with Bluetooth
wireless technology
operate within the guidelines found in radio frequency
safety standards and recommendations, TOSHIBA
believes Bluetooth
®
wireless technology is safe for
use by consumers.
These standards and recommendations refl ect the
consensus of the scientifi c community and result
from deliberations of panels and committees of
scientists who continually review and interpret the
extensive research literature.
In some situations or environments, the use of
®
Bluetooth
wireless technology may be restricted
by the proprietor of the building or responsible
representatives of the organization.
These situations may, for example, include in any
other environment where the risk of interference to
other devices or services is perceived or identifi ed as
harmful.
If you are uncertain of the policy that applies on the
use of wireless devices in a specifi c organization or
environment (e.g. airports), you are encouraged
to ask for authorization to use the device with
®
Bluetooth
wireless technology prior to turning on
the equipment.
®

Precautions
7
On Safety
Do not handle the adapter power cord with wet
hands.
When connecting or disconnecting the adapter
power cord, grip the plug and not the cord
itself. Pulling the cord may damage it and
create a hazard. When you are not going to use
the unit for a long period of time, disconnect
the adapter power cord.
On Recycling
This unit’s packaging materials are recyclable
and can be reused. Please dispose of any
materials in accordance with your local
recycling regulations.
Batteries should never be thrown away or
incinerated but disposed of in accordance with
your local regulations concerning chemical
wastes.
Copyright
This guide is copyrighted by Toshiba America Information Systems, Inc. with all rights reserved.
Under the copyright laws, this guide cannot be reproduced in any form without the prior written
permission of Toshiba. No patent liability is assumed, however, with respect to the use of the
information contained herein. ©2012 by Toshiba America Information Systems, Inc. All rights
reserved.
Notice
The information contained in this manual, including but not limited to any product specifi cations, is
subject to change without notice.
TOSHIBA CORPORATION AND TOSHIBA AMERICA INFORMATION SYSTEMS, INC. (TOSHIBA)
PROVIDES NO WARRANTY WITH REGARD TO THIS MANUAL OR ANY OTHER INFORMATION
CONTAINED HEREIN AND HEREBY EXPRESSLY DISCLAIMS ANY IMPLIED WARRANTIES OF
MERCHANTABILITY OR FITNESS FOR ANY PARTICULAR PURPOSE WITH REGARD TO ANY OF THE
FOREGOING. TOSHIBA ASSUMES NO LIABILITY FOR ANY DAMAGES INCURRED DIRECTLY OR
INDIRECTLY FROM ANY TECHNICAL OR TYPOGRAPHICAL ERRORS OR OMISSIONS CONTAINED
HEREIN OR FOR DISCREPANCIES BETWEEN THE PRODUCT AND THE MANUAL. IN NO EVENT
SHALL TOSHIBA BE LIABLE FOR ANY INCIDENTAL, CONSEQUENTIAL, SPECIAL, OR EXEMPLARY
DAMAGES, WHETHER BASED ON TORT, CONTRACT OR OTHERWISE, ARISING OUT OF OR IN
CONNECTION WITH THIS MANUAL OR ANY OTHER INFORMATION CONTAINED HEREIN OR THE
USE THEREOF.
Trademarks
The Bluetooth
SIG, Inc. and any use of such marks by Toshiba Corporation is under license.
®
word mark and logos are registered trademarks owned by Bluetooth

8
Sonic Emotion is a registered trademark of sonic emotion ag.
All other brand and product names are trademarks or registered trademarks of their
respective companies.
Introduction
Safety icons
This guide contains safety instructions that must be observed to avoid potential hazards
that could result in personal injuries, damage to your equipment, or loss of data. These
safety cautions have been classifi ed according to the seriousness of the risk, and icons
highlight these instructions as follows:
Indicates an imminently hazardous situation which, if not avoided, will
result in death or serious injury.
Indicates a potentially hazardous situation which, if not avoided, could
result in death or serious injury.
Indicates a potentially hazardous situation which, if not avoided, may
result in minor or moderate injury.
Indicates a potentially hazardous situation which, if not avoided, may
result in property damage.
NOTE
Provides important information.
Box contents
Mini Sound Bar
Subwoofer
Remote Control with CR2025 (3V) Battery
AC power cord
AC Adapter
RCA cable
User’s Guide (this manual)
Warranty sheet
Agency and regulatory documents

Mini 3D Sound Bar Speaker System Controls
Front panel
9
12 3 4
(Sample Illustration) Front panel
Item Description Function
1 INPUT button Selects sources (
2 Bluetooth® button Selects Bluetooth® mode.
3 VOLUME +/- buttons Adjusts the volume level.
4 Power button Turns the unit on or restores it to the standby mode.
5 Remote sensor Receives the remote control’s signals.
6 Bluetooth® indicator Blinking blue: pairing. Solid blue: paired.
7 Power indicator Indicates whether the unit is ON or in STANDBY (OFF) mode.
Green: ON. Red: STANDBY.
OPTICAL, COAXIAL, AUX IN or LINE IN)
56
7
.

10
Back panel
8 9 10 11 12 13 14
(Sample Illustration) Back panel
Item Description Function
8 DC IN jack Connection for the supplied AC adaptor.
See “Connecting the AC adapter” on page16
9 SUBWOOFER jack Connection for the subwoofer.
See “Connecting the subwoofer” on page15
10 OPTICAL jack Connection for an optical audio output device using an optical
audio cable (not supplied).
See “Using the OPTICAL jack” on page14
11 COAXIAL jack Connection for a coaxial audio output device using a coaxial
digital audio cable (not supplied).
See “Using the COAXIAL jack” on page14
12 L/R AUX IN jacks Connection for an audio output device using an RCA cable
(supplied). See “Using the L/R AUX IN jacks” on page15
13 LINE IN jack Connection for an audio output device using a LINE IN cable
(not supplied). See “Using the 3.5mm LINE IN jack” on page15
14 R/C/L balance switch Selects the audio channel (right / center / left).

Remote control buttons
11
1
3
4
7
8
(Sample Illustration) - Remote
control buttons
Using the remote control
You can select from three different sound modes (Movie, Music, or Game), depending
on the type of source you want to experience. It is recommended that you select a Sound
Mode based on the source material and your personal taste.
Point the remote control at the remote sensor and press the buttons.
Distance: Approximately 16’ (5m) from the front of the remote sensor.
Angle: About 30° in each direction from the front of the remote sensor.
2
5
6
9
Item Description Function:
1 POWER Press to turn the Sound Bar ON or
2 MUTE Press to turn the sound off; press
again to turn the sound back on.
3 VOLUME +/- Press to adjust the volume level.
4 INPUT Press to select the audio source
5 PAIRING Press to select Bluetooth® mode.
6 3D Press to toggle 3D mode on and off.
7 MOVIE Press to select the Movie audio mode.
8 MUSIC Press to select the Music audio mode.
9 GAME Press to select the Game audio mode.
put it in standby mode
.
.
NOTE
Remove the plastic sheet before operating the remote control.
(Sample Illustration) Remote control - remove the plastic sheet

12
(Sample Illustration) Remote control - changing the battery
To Change Battery
1 Open the battery door.
2 Insert one CR2025 (3V) size battery.
Never throw the battery into a fi re. Doing so may cause the battery to
explode. The remote control supplied with this product contains a button
cell battery that could be ingested by children. Do not leave button cell
batteries within reach of children.
Do not expose the remote sensor to a strong light source such as direct
sunlight or other illumination. This can damage the sensor resulting in the
inability to operate the unit via the remote control.
There is a danger of explosion if battery is incorrectly replaced. Replace it
only with the same or equivalent type.
Do not drop or expose the remote control to electric shock. Do not use the
remote control in excessively hot or humid places. Do not spill water or
place anything wet on the remote control. Do not open the remote control.
If the remote control will not be used for a long period of time, remove the
battery to avoid damage caused by battery leakage corrosion.

13
NOTE
NOTE
If the remote control does not operate correctly, or if the operating range is
reduced, replace the battery with a new one.
If the battery is dead or if you will not be using the remote control for a
long time, remove the battery to prevent battery acid from leaking into the
battery compartment.
Do not expose the battery to excessive heat such as from direct sunlight
or fi re.
When discarding the battery, environmental problems must be considered
and local rules or laws governing the disposal of these battery must be
strictly followed.
Press the remote control buttons at intervals of approximately one second
to ensure correct operation.
Mini 3D Sound Bar Speaker System Placement
The Mini 3D Sound Bar can be placed freestanding on a table. For the best surround sound experience, place
your subwoofer as shown below.
1 foot
Mini 3D Sound Bar
Subwoofer
(Sample Illustration) Subwoofer placement
NOTE
Place the subwoofer at least 1 foot (300mm) away from the TV.

14
Mini 3D Sound Bar Speaker System Connections
Getting sound from external sources
Follow these instructions to route external audio signals from devices such as a TV
to the Mini 3D Sound Bar via the OPTICAL, COAXIAL, L/R AUX IN and LINE IN
jacks.
Using OPTICAL jack
1 Connect an optical cable (not supplied) from the OPTICAL jack on the Mini 3D
Sound Bar to the OPTICAL OUT jack on a TV, set-top box, DVD, or other audio
device.
2 Press the INPUT button to switch to the OPTICAL input.
Digital optical cable (not supplied)
(Sample Illustration) Digital optical cable connection
Using COAXIAL jack
1 Connect an digital audio coaxial cable (not supplied) from the COAXIAL jack on the
Mini 3D Sound Bar to the COAXIAL OUT jack on a TV, set-top box, DVD, or other
audio device.
2 Press the INPUT button to switch to the COAXIAL input.
Digital audio coaxial cable
(not supplied)
(Sample Illustration) Digital audio coaxial cable connection

Using L/R AUX IN jacks
1 Connect an RCA audio cable (supplied) from the L/R AUX IN jacks on the Mini
3D Sound Bar to the AUDIO OUT jacks on a TV, set-top box, DVD, or other audio
device.
2 Press the INPUT button to switch to the AUX IN inputs.
RCA audio cable
(supplied)
(Sample Illustration) Analog audio cable connection
Using the 3.5mm LINE IN jack
1 Connect an 3.5mm audio cable (not supplied) from the LINE IN jack on the Mini 3D
Sound Bar to the LINE OUT jack on an audio device.
2 Press the INPUT button to switch to the LINE IN input.
Portable music player or other
audio device
3.5mm audio cable
(not supplied)
15
(Sample Illustration) 3.5mm audio cable connection
Connecting the Subwoofer
Connect the supplied subwoofer to the SUBWOOFER jack on the back of the unit.
(Sample Illustration) Connecting the subwoofer
subwoofer

16
Connecting the AC adapter
Using an AC adapter other than the one supplied with the unit may damage
the unit.
(Sample Illustration) Connecting the AC Adapter
The included AC adapter is for use with this unit only. Do not use it with
other equipment.
If you are not going to use the unit for an extended period of time, disconnect
the AC adapter from the wall outlet.
Whenever the AC adapter is plugged in to a wall outlet, the AC adapter will
draw some power, even when the unit is turned off.
3D Sound
You can select from three different sound modes (Movie, Music, or Game), depending
on the type of sources you want to experience. Select a Sound Mode based on the source
material and your personal taste.
About Sonic Emotion 3D Sound
Sonic Emotion Absolute 3D is the listening experience. Absolute 3D uses wave fi eld
synthesis and sound fi eld reproduction to eliminate the physical dimensions of a room
and transform it into a virtual sound fi eld.
With wave fi eld synthesis, sonic waves are produced and dispersed throughout the
listening room ensuring that localization of virtual sound sources does not depend on or
change with the listener’s position. As in a natural environment, real sounds are heard
from all around regardless of the device position.
AC Adapter
(supplied)
AC Power Cord
(supplied)

Audio Playback mode
Press the Audio Mode buttons on the remote control to select the audio mode of your
preference via the Movie, Music, or Game button on your remote control.
(Sample Illustration) Audio playback modes
Sonic Emotion Absolute 3D is the listening experience. Absolute 3D uses wave fi eld
synthesis and sound fi eld reproduction to eliminate the physical dimensions of a room
and transform it into a virtual sound fi eld.
With wave fi eld synthesis, sonic waves are produced and dispersed throughout the
listening room ensuring that localization of virtual sound sources does not depend on
or change with the listener’s position. As in a natural environment, real sounds are
heard from all around regardless of the device position.
17

18
Playback via Bluetooth®-enabled devices
1 Press the button to switch the Mini 3D Sound Bar to enable Bluetooth mode.
The blue indicator illuminates and fl ashes, meaning that it is searching for available
Bluetooth-enabled devices.
2 Turn on the Bluetooth mode of your other Bluetooth-enabled device (e.g. Smart
phone, tablet, notebook etc.). Your other device will search for the T oshiba Mini 3D
Sound Bar. If your device does not automatically start searching, you may have to
enable the search feature on your device.
3 Once the Mini 3D Sound Bar is detected by your Bluetooth-enabled device, select
“Toshiba Mini 3D Sound Bar” to pair it with the Mini 3D Sound Bar. Once the two
devices are paired successfully, the blue indicator will stop fl ashing.
Once the devices have been paired, you can play music and video fi les on your other
device and enjoy the sound from the Mini 3D Sound Bar.
The device is away the mini sound bar around 8~10M (open area, no object block), then
the connection will not be good, and the sound may be intermittent, after disconnected,
user needs to repeat the procedure above items 2~3 for Bluetooth re-connection.
Pair the Mini 3D Sound Bar with another Bluetooth® device
1 Disconnect your Bluetooth-enabled device (e.g. Smart phone, tablet, notebook, etc.)
from the Mini 3D Sound Bar.
2 Press the button on the Mini 3D Sound Bar until the blue indicator fl ashes.
3 Turn on the Bluetooth mode of your other device (e.g. iPhone, Smart phone etc.),
and select “Toshiba Mini 3D Sound Bar” on your other device.
NOTE
For details, please refer to the user’s manual of your Bluetooth-enabled
device.
The Mini 3D Sound Bar can only be paired with one Bluetooth-enabled
device at a time. If the Mini 3D Sound Bar is already paired with a
Bluetooth-enabled device, you will not be able to pair it with another
Bluetooth-enabled device, even though it may display the name “Toshiba
Mini 3D Sound Bar”.
Music playing with Bluetooth if cut off by remote control will be resumed
if the bluetooth is turned on with remote control again. However, if it is
turned off and on again manually by hand physically on the Bluetooth
button, the music will not be resumed.

Troubleshooting
19
Problem
The Mini 3D Sound Bar
does not turn on.
No sound from the Mini 3D
Sound Bar
No sound from the subwoofer
Remote control is not
working correctly.
Solution
Make sure that the AC adapter is connected to the Mini 3D Sound
Bar, and that it is plugged into a wall socket.
Press the Power (
Sound Bar, and check to see if the power indicator is glowing
green.
Press the Volume +/- buttons of the Mini 3D Sound Bar.
Make sure that the source you have selected is sending
audio. If you are connected to your TV, make sure that
your TV is confi gured to output audio (see the TV’s menu
settings).
Make sure that there are no loose audio connections.
Make sure that you have selected the correct audio source
(input).
Press the Mute button on the remote control to make sure
that the sound is not muted.
Make sure that the subwoofer is connected correctly.
Make sure that:
• The plastic sheet is removed before operating the
remote control.
• The remote control is pointed directly at the remote
sensor on the front of the Sound Bar.
• The remote control is not being used too far away
from the Mini 3D Sound Bar (the maximum range is
approximately 16’).
• Nothing is obstructing the remote sensor (located on
the front).
) button located on the top of the Mini 3D
Maintenance
Servicing
Please refer to relevant topics in the Troubleshooting and Maintenance section of
this manual before returning the product.
If the product becomes inoperative, do not try to correct the problem by yourself.
There are no user-serviceable parts inside. Turn it off, unplug the power plug, and
please refer to support.toshiba.com for an Authorized Service Center.
Cleaning the cabinet
Never use a solvent, thinner, benzene or alcohol to clean the Mini 3D
Sound Bar. Do not spray insecticide near it. Such chemicals may discolor
the surface or cause damage.

20
Specifi cations
Sound Bar
Power requirements 19 volts DC, 3.42A
Power output 10watts x 4 (per channel at 4ohms, 1 kHz/THD10%)
Impedance 4 ohms
Dimensions (width x height x depth) 11.4” x 2.8” x 3.9” (290 x 72 x 100mm)
Weight 1.93 lbs (0.875kg)
Frequency Response 350Hz - 15KHz
S/N ratio >55dB
Distortion <10%
Subwoofer
Power output 20W 8 ohms 100Hz/THD10%
Impedance 8 ohms
Dimensions (width x height x depth) 8.7” x 8.7” x 8.7” (220 x 220 x 220mm)
Weight 6.25 lbs (2.84kg)
NOTE
These models comply with the specifi cations listed above.
Designs and specifi cations are subject to change without notice.
These models may not be compatible with features and/or specifi cations
that may be added in the future.
 Loading...