

Page 1

T-Mobile® Sparq™
Page 2
Introduction ..................................................
Table of contents
Thank you for purchasing the T-Mobile® Sparq™ phone.
Widget Bar
- Convenient at-a-glance view of Widget applications
- Sub-menu shortcuts for quick access
Power media applications
- Music player & Radio
- Webcam
- Camera
Bluetooth
Safety and use .....................................................................................................................................6
1 Your cellphone ............................................................................................................................. 11
..................14.................................................................................................................. snoci rab sutatS 1.1
1.2 Personalize mainscreen .................................................................................................................... 16
1.3 Simple menu ........................................................................................................................................16
2 Getting started ............................................................................................................................ 17
2.1 Set-up ......................................................................................................................................................17
2.2 Power on your cellphone ................................................................................................................ 19
3 Making a call ................................................................................................................................ 20
3.1 Calling your voicemail ...................................................................................................................... 20
3.2 Receiving a call .................................................................................................................................... 21
12.......................................................................................................................................... llac a gniruD 3.3
3.4 Conference calls .................................................................................................................................. 22
32............................................................................................................................... egnarra uneM 4
5 Messages ........................................................................................................................................ 24
5.1 Access ..................................................................................................................................................... 24
42......................................................................... edom lanoitnevnoc dna edom lanoitasrevnoC 2.5
52................................................................................................................................... egassem etaerC 3.5
52....................................................................................................................................................... strelA 4.5
62................................................................................................................................. snoitpo elbaliavA 5.5
6 Email ................................................................................................................................................ 28
6.1 Access .....................................................................................................................................................28
6.2 Email account set-up......................................................................................................................... 28
6.3 Create Email ..........................................................................................................................................29
92........................................................................................................................................................ xobnI 4.6
6.5 Outbox ....................................................................................................................................................29
1 2
Page 3

6.6 Sent ...................................................................................................................................................29
6.7 Drafts................................................................................................................................................29
6.8 Available options ............................................................................................................................29
7 Instant messaging ....................................................................................... 31
7.1 Access ..............................................................................................................................................31
7.2 Open a Palringo account online ................................................................................................31
7.3 Sign in/Sign out ...............................................................................................................................31
7.4 Add service .....................................................................................................................................32
7.5 Chat ..................................................................................................................................................32
7.6 Contacts ..........................................................................................................................................32
7.7 Groups .............................................................................................................................................32
8 Contacts ...................................................................................................... 33
8.1 Consulting your Conacts ...........................................................................................................33
8.2 Adding a contact ............................................................................................................................34
8.3 Available options ............................................................................................................................35
9 Calls ............................................................................................................. 36
9.1 Call log ............................................................................................................................................36
9.2 My numbers ...................................................................................................................................36
9.3 Call settings .....................................................................................................................................37
10 Media applications ...................................................................................... 39
10.1 Music ...............................................................................................................................................39
10.2 Image ................................................................................................................................................40
10.3 Video ................................................................................................................................................41
10.4 Radio .................................................................................................................................................41
11 Web2Go ....................................................................................................... 43
11.1 Wap ...............................................................................................................................................43 17.1 Calendar ..........................................................................................................................................57
11.2 Weather..............................................................................................................................................43 17.2 Calculator ........................................................................................................................................57
17.3 Notes ................................................................................................................................................58
12 Entertainment ............................................................................................. 45
12.1 Stopwatch ........................................................................................................................................45
12.2 Java ....................................................................................................................................................45
13 Camera ........................................................................................................ 46
13.1 Access ..............................................................................................................................................46
13.2 Camera ............................................................................................................................................46
13.3 Video ................................................................................................................................................48
14 Profiles ......................................................................................................... 49
14.1 General ............................................................................................................................................49
14.2 Meeting ............................................................................................................................................50
14.3 Outdoor ..........................................................................................................................................50
14.4 Indoor...............................................................................................................................................50
14.5 Silence ..............................................................................................................................................50
14.6 Flight mode .....................................................................................................................................50
15 File manager ................................................................................................ 51
15.1 My audios ........................................................................................................................................51
15.2 My images ........................................................................................................................................51
15.3 My videos ........................................................................................................................................51
15.4 My creations ...................................................................................................................................52
15.5 Others files .....................................................................................................................................52
15.6 Cellphone ........................................................................................................................................52
15.7 Memory card ..................................................................................................................................52
15.8 Managing audios, images, videos and creations .......................................................................53
15.9 Formats and compatibility ...........................................................................................................54
15.10 Memory status ...............................................................................................................................54
16 Bluetooth ..................................................................................................... 55
17 Others .......................................................................................................... 57
17.4 Clock ................................................................................................................................................58
17.5 Converter ........................................................................................................................................59
3 4
Page 4

18 Settings ........................................................................................................................................... 60
18.1 Cellphone settings ..............................................................................................................................60
18.2 Call settings ..........................................................................................................................................62
18.3 Security ...................................................................................................................................................62
18.4 Network ..................................................................................................................................................63
18.5 Connectivity ..........................................................................................................................................63
19 ln put mode ....................................................................................................................................64
20 Warranty ......................................................................................................................................... 67
21 Troubleshooting .............................................................................................................................70
Safety and use ...............................................
We recommend that you read this chapter carefully before using your cellphone. The manufacturer disclaims any liability for
damage, which may result as a consequence of improper use or use contrary to the instructions contained herein.
TRAFFIC SAFETY:•
Given that studies show that using a cellphone while driving a vehicle constitutes a real risk, even when the hands-free kit is used
(car kit, headset...), drivers are requested to refrain from using their cellphone when the vehicle is not parked. Check the laws
and regulations on the use of wireless telephones and their accessories in the areas where you drive. Always obey them. The use
of these devices may be prohibited or restricted in certain areas.
When driving, do not use your cellphone and headphone to listen to music or to the radio. Using a headphone can be dangerous
and forbidden in some areas.
When switched on, your cellphone emits electromagnetic waves that can interfere with the vehicle’s electronic systems such as
ABS anti-lock brakes or airbags. To ensure that there is no problem:
When switched on, your cellphone emits electromagnetic waves that can interfere with the vehicle’s electronic systems such as
ABS anti-lock brakes or airbags. To ensure that there is no problem:
- do not place your cellphone on top of the dashboard or within an airbag deployment area,
- check with your car dealer or the car manufacturer to make sure that the car’s electronic devices are shielded from cellphone
RF energy..
CONDITIONS OF USE:•
You are advised to switch off the cellphone from time to time to optimize its performance.
Remember to abide by local authority rules of cellphone use on aircrafts.
Switch the cellphone off when you are in health care facilities, except in designated areas. As with many other types of equipment
now in regular use, cellphones can interfere with other electrical or electronic devices, or equipment using radio frequency.
Switch the cellphone off when you are near gas or flammable liquids. Strictly obey all signs and instructions posted in a fuel depot,
gas station, or chemical plant, or in any potentially explosive atmosphere.
When the cellphone is switched on, it should be kept at least 15 cm from any medical device such as a pacemaker, a hearing aid or
insulin pump. In particular when using the cellphone you should hold it against the ear on the opposite side to the device, if any.
To avoid hearing impairment, answer the call before holding your cellphone to your ear. Also move the handset away from your
ear while using the “hands-free” option because the amplified volume might cause hearing damage.
It is recommended to have proper supervision while small children use your cellphone.
When replacing the cover please note that your cellphone may contain substances that could create an allergic reaction.
Always handle your cellphone with care and keep it in a clean and dust-free place.
5 6
Page 5

Do not allow your cellphone to be exposed to adverse weather or environmental conditions (moisture, humidity, rain, infiltration
of liquids, dust, sea air, etc.). The manufacturer’s recommended operating temperature range is -10°C to +55°C (the max value
depends on device, materials and housing paint/texture).
Over 55°C the legibility of the cellphone’s display may be impaired, though this is temporary and not serious.
Do not open or attempt to repair your cellphone yourself.
Do not drop, throw or try to bend your cellphone.
Do not paint it.
Use only batteries, battery chargers, and accessories which are recommended by TCT Mobile Limited and its affiliates and are
compatible with your cellphone model.TCT Mobile Limited and its affiliates disclaim any liability for damage caused by the use
of other chargers or batteries.
Your cellphone should not be disposed of in a municipal waste. Please check local regulations for disposal of electronic phones.
Remember to make back-up copies or keep a written record of all important information stored in your cellphone.
Some people may suffer epileptic seizures or blackouts when exposed to flashing lights, or when playing video games. These
seizures or blackouts may occur even if a person never had a previous seizure or blackout. If you have experienced seizures or
blackouts, or if you have a family history of such occurrences, please consult your doctor before playing video games on your
cellphone or enabling a flashing-lights feature on your cellphone. Parents should monitor their children’s use of video games or
other features that incorporate flashing lights on the cellphones. All persons should discontinue use and consult a doctor if any of
the following symptoms occur: convulsion, eye or muscle twitching, loss of awareness, involuntary movements, or disorientation.
To limit the likelihood of such symptoms, please take the following safety precautions:
- Play at the farthest distance possible from the screen.
When you play games on your cellphone, you may experience occasional discomfort in your hands, arms, shoulders, neck, or
other parts of your body. Follow these instructions to avoid problems such as tendinitis, carpal tunnel syndrome, or other
musculoskeletal disorders:
- Take a minimum of a 15-minute break every hour of game playing.
- If your hands, wrists, or arms become tired or sore while playing, stop and rest for several hours before playing again.
- If you continue to have sore hands, wrists, or arms during or after playing, stop the game and see a doctor.
Prolonged exposure to music at full volume using the music player may damage your hearing. Set your cellphone’s volume
to it’s lowest setting prior to inserting headphones in your ears and adjust the volume to your preference. Only use
headphones that are recommended by TCT Mobile Limited and it’s affiliates.
PRIVACY:•
Please note that you must respect the laws and regulations in force in your jurisdiction or other jurisdiction(s) where you will use
your cellphone regarding taking photographs and recording sounds with your cellphone. Pursuant to such laws and regulations,
it may be strictly forbidden to take photographs and/or to record the voices of other people or any of their personal attributes,
and reproduce or distribute them, as this may be considered to be an invasion of privacy.
It is the user’s sole responsibility to ensure that prior authorization be obtained, if necessary, in order to record private or
confidential conversations or take a photograph of another person; the manufacturer, the seller or vendor of your cellphone
(including the operator) disclaim any liability which may result from the improper use of the cellphone.
BATTERY AND ACCESSORIES:•
Before removing the battery from your cellphone, please make sure that the cellphone is switched off.
Observe the following precautions for battery use:
- Do not attempt to open the battery (due to the risk of toxic fumes and burns).
- Do not puncture, disassemble or cause a short-circuit in a battery,
- Do not burn or dispose of a used battery in the garbage or store it at temperatures above 60°C.
Batteries must be disposed of in accordance with locally applicable environmental regulations. Only use the battery for the
purpose for which it was designed. Never use damaged batteries or those not recommended by TCT Mobile Limited and/or
its affiliates.
This symbol on your cellphone, the battery and the accessories means that these phones must be taken to collection
points at the end of their life:
- Municipal waste disposal centers with specific bins for these items of equipment
- Collection bins at points of sale.
They will then be recycled, preventing substances being disposed of in the environment, so that their components can be
reused.
In European Union countries:
These collection points are accessible free of charge. All phones with this sign must be brought to these collection points.
In non European Union jurisdictions:
Items of equipment with this symbol are not be thrown into ordinary bins if your jurisdiction or your region has suitable recycling
and collection facilities; instead they are to be taken to collection points for them to be recycled.
In the United States you may learn more about CTIA’s Recycling Program at www.recyclewirelessphones.com
CAUTION: RISK OF EXPLOSION IF BATTERY IS REPLACED BY AN INCORRECT TYPE. DISPOSE OF USED BATTERIES
ACCORDING TO THE INSTRUCTIONS
CHARGERS•
Home A.C./ Travel chargers will operate within the temperature range of: 0°C to 40°C.
The chargers designed for your cellphone meet with the standard for safety of information technology equipment and office
equipment use. Due to different applicable electrical specifications, a charger you purchased in one jurisdiction may not work in
another jurisdiction. They should be used for this purpose only.
Characteristics of power supply (depending on the country):
Travel charger: Input: 100-240 V, 50/60 Hz, 0.15 A
Output: 5 V, 350/400 mA
Battery: Lithium 670 mAh
7 8
Page 6

RADIO WAVES:•
THIS CELLPHONE MEETS THE GOVERNMENT’S REQUIREMENTS FOR EXPOSURE TO RADIO WAVES.
Your cellphone is a radio transmitter and receiver. It is designed and manufactured not to exceed the emission limits for exposure
to radio-frequency (RF) energy. These limits are part of comprehensive guidelines and establish permitted levels of RF energy for
the general population. The guidelines are based on standards that were developed by independent scientific organizations through
periodic and thorough evaluation of scientific studies. These guidelines include a substantial safety margin designed to ensure the
safety of all persons, regardless of age and health.
The exposure standard for cellphones employs a unit of measurement known as the Specific Absorption Rate, or SAR. The SAR
limit set by public authorities such as the Federal Communications Commission of the US Government (FCC), or by Industry
Canada, is 1.6 W/kg averaged over 1 gram of body tissue. Tests for SAR are conducted using standard operating positions with the
cellphone transmitting at its highest certified power level in all tested frequency bands.
Although the SAR is determined at the highest certified power level, the actual SAR level of the cellphone while operating can
be well below the maximum value. This is because the cellphone is designed to operate at multiple power levels so as to use
only the power required to reach the network. In general, the closer you are to a wireless base station antenna, the lower the
power output of the cellphone Before a cellphone model is available for sale to the public, compliance with national regulations
and standards must be shown.
The highest SAR value for this model cellphone when tested is 0.854 W/Kg for use at the ear and 1.24 W/Kg for use close to
the body.
While there may be differences between the SAR levels of various cellphones and at various positions, they all meet the
government requirement for RF exposure. For body-worn operation, the cellphone meets FCC RF exposure guidelines provided
that it is used with a non-metallic accessory with the handset at least 1.5 cm from the body. Use of other accessories may not
ensure compliance with FCC RF exposure guidelines.
The World Health Organization (WHO) considers that present scientific information does not indicate the need for any special
precautions for use of cellphones. If individuals are concerned, they might choose to limit their own or their children’s RF
exposure by limiting the length of calls, or using “hands-free” devices to keep cellphones away from the head and body. (fact
sheet n°193). Additional WHO information about electromagnetic fields and public health are available on the following website:
http://www.who.int/peh-emf.
Note: This equipment has been tested and found to comply with the limits for a Class B digital device pursuant to part 15 of the
FCC Rules. These limits are designed to provide reasonable protection against harmful interference in a residential installation.
This equipment generates, uses and can radiate radio frequency energy and, if not installed and used in accordance with the
instructions, may cause harmful interference to radio communications. However, there is no guarantee that interference to radio
or television reception, which can be determined by turning the equipment off and on, the user is encouraged to try to correct
the interference by one or more of the following measures:
- Reorient or relocate the receiving antenna.
- Increase the separation between the equipment and receiver.
- Connect the equipment into an outlet on a circuit different from that to which the receiver is connected.
- Consult the dealer or an experienced radio/ TV technician for help.
Changes or modifications not expressly approved by the party responsible for compliance could void the user’s authority to
operate the equipment.
For the receiver devices associated with the operation of a licensed radio service (e.g. FM broadcast), they bear the following
statement:
This device complies with Part 15 of the FCC Rules. Operation is subject to the condition that this device does not cause harmful
interference.
For other devices, they bear the following statement:
This device complies with Part 15 of the FCC Rules. Operation is subject to the following two conditions:
(1) this device may not cause harmful interference
(2) this device must accept any interference received, including interference that may cause undesired operation.
Your cellphone is equipped with a built-in antenna. For optimal operation, you should avoid touching it or degrading it.
As cellphone devices offer a range of functions, they can be used in positions other than against your ear. In such circumstances the
device will be compliant with the guidelines when used with headset or usb data cable. If you are using another accessory ensure
that whatever phone is used is free of any metal and that it positions the cellphone at least 2cm away from the body.
• LICENCES
Obigo® is a registered trademark of Obigo AB.
microSD Logo is a trademark.
The Bluetooth word mark and logos are owned by the Bluetooth SIG, Inc. and any use of such marks by
TCT Mobile Limited and its aliates is under license. Other trademarks and trade names are those of
their respective owners.
T-Mobile® Sparq™ Bluetooth QD ID B016876
eZiText™ and Zi™ are trademarks of Zi Corporation and/or its Affiliates.
Java™ and all Java™ based trademarks and logos are trademarks or registered trademarks of Sun
Microsystems, Inc. in the U.S. and other countries.
is a registered trademark of Opera Mini.
Hearing Aid Compatibility
Your cellphone is rated: "For Hearing Aid", to assist hearing device users in finding phones that may be compatible with their
hearing devices.
This device is HAC M3 compatible.
For more information please refer to "Hearing Aid Compatibility with Mobile Phones" leaflet or visit our website http://www.
alcatel-mobilephones.com/
9 10
Page 7
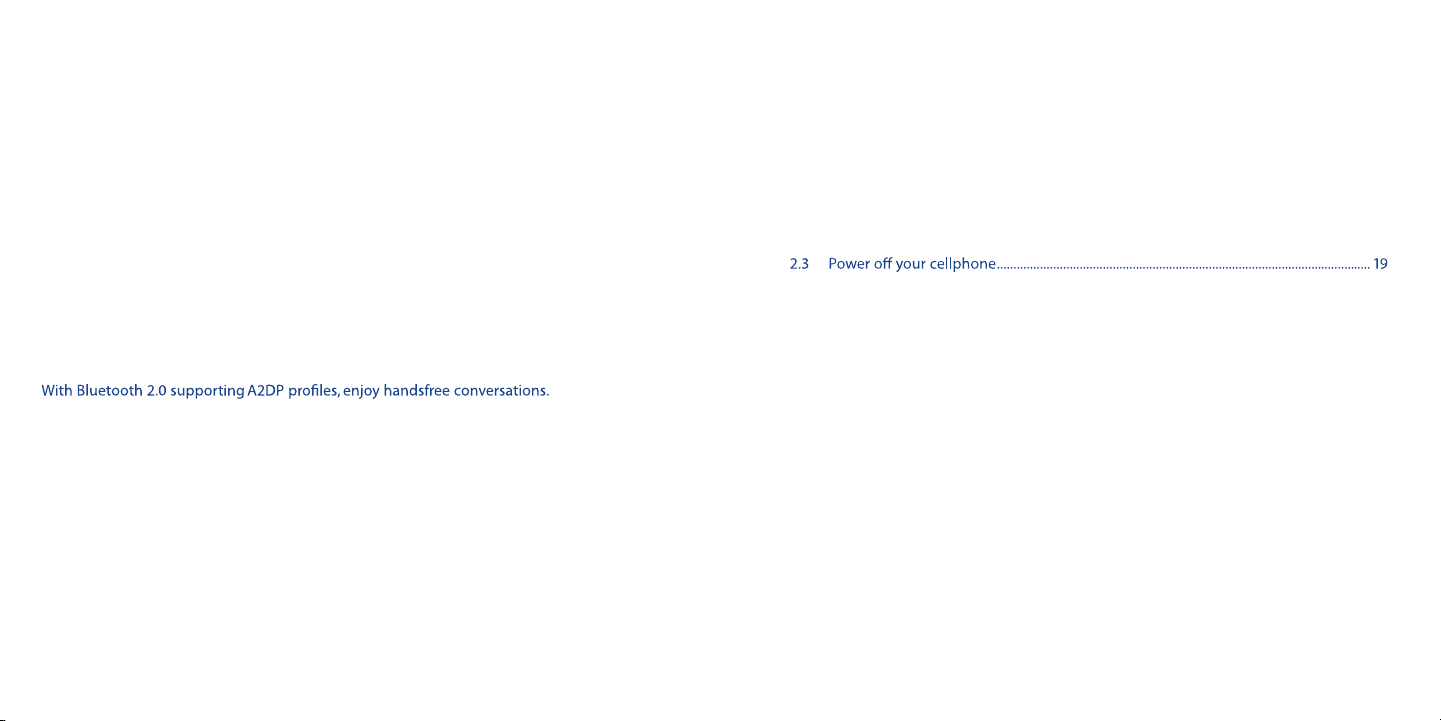
Your cellphone ......................................
1
Status bar
Navigation key:
confirm an option
Simple menu
Left softkey
Answer/Send call/
Call log
Voicemail
Lock/Unlock
Widget bar to access
favorite applications
Right softkey
Switch on/Switch
off/End call/Return
to main screen
Vibration alert
11 12
Left softkey
Function key
Right softkey
Delete key
Enter key
Page 8

Confirm an option (press the middle of the key)
Press navigation key from the main screen to view application lists from widget
bar, and then press navigation key to access sub-menus accordingly.
Access your voicemail (hold down)
Input top-half character (press once), press twice to lock in this mode
Left softkey
Right softkey
Answer
Send a call
Access Call log (Redial) (press)
Switch on/Switch off the cellphone (hold down)
End call
Return to the main screen
1.1 Status bar icons
(1)
Battery charge level
Vibrate alert: your cellphone vibrates, but does not ring or beep with the exception
of the alarm (see page 49).
Bluetooth status (Activated).
Bluetooth status (Connected to an audio device).
Headset connected.
Keypad locked.
Call forwarding activated: your calls are forwarded (see page 37).
Alarm or appointments programmed (see page 58).
Level of network reception.
Voicemail message arrived.
Missed calls.
Stopwatch is active.
Radio is on.
WAP alerts
(2)
.
Roaming.
Memory card scanning completed.
SIM card missing.
(1)
The icons and illustrations in this guide are provided for informational purposes only.
(2)
Depending on your network operator.
13 14
Page 9

GPRS connection status (Activated).
GPRS connecting.
Music player active.
Message receipt in progress.
Sending a SMS.
Sending a MMS.
Silence mode: your cellphone does not ring, beep or vibrate with the exception of the
alarm (see page 49).
SMS unread
(Flicking)Message list is full: your cellphone cannot accept any new messages. You
must access the message list and delete at least one message on your SIM card.
Flight mode.
A2DP connected.
1.2 Personalize mainscreen
You may customize your mainscreen by selecting through key from the main screen.
1.2.1 Widget bar
You may customize widget lists on the main screen as a convenient shortcut to your desire. To
add/remove a widget, select “Edit widgets” and use
pressing “Save”. To reorder widgets, select “Reorder widgets” and choose one item by pressing
/ key, scroll up or down to the required position, place using the / key, and then confirm
by selecting “Done” with key.
Two widgets cannot be removed: Calls, Messages.
1.2.2 Change wallpaper
You will be directed to "My images" with this option. You may choose one image as your
favourite wallpaper. (see page 51)
key to mark/unmark, and then confirm by
1.3 Simple menu
Four frequently-used applications from the main screen will be displayed when you slide open
your cellphone: Messages, Email, Directory, Wap. You can quickly choose any of the above
by selecting
full main menu screen.
with the left softkey, or you may select with the right softkey to switch to the
15 16
Page 10
Getting started ......................................
2
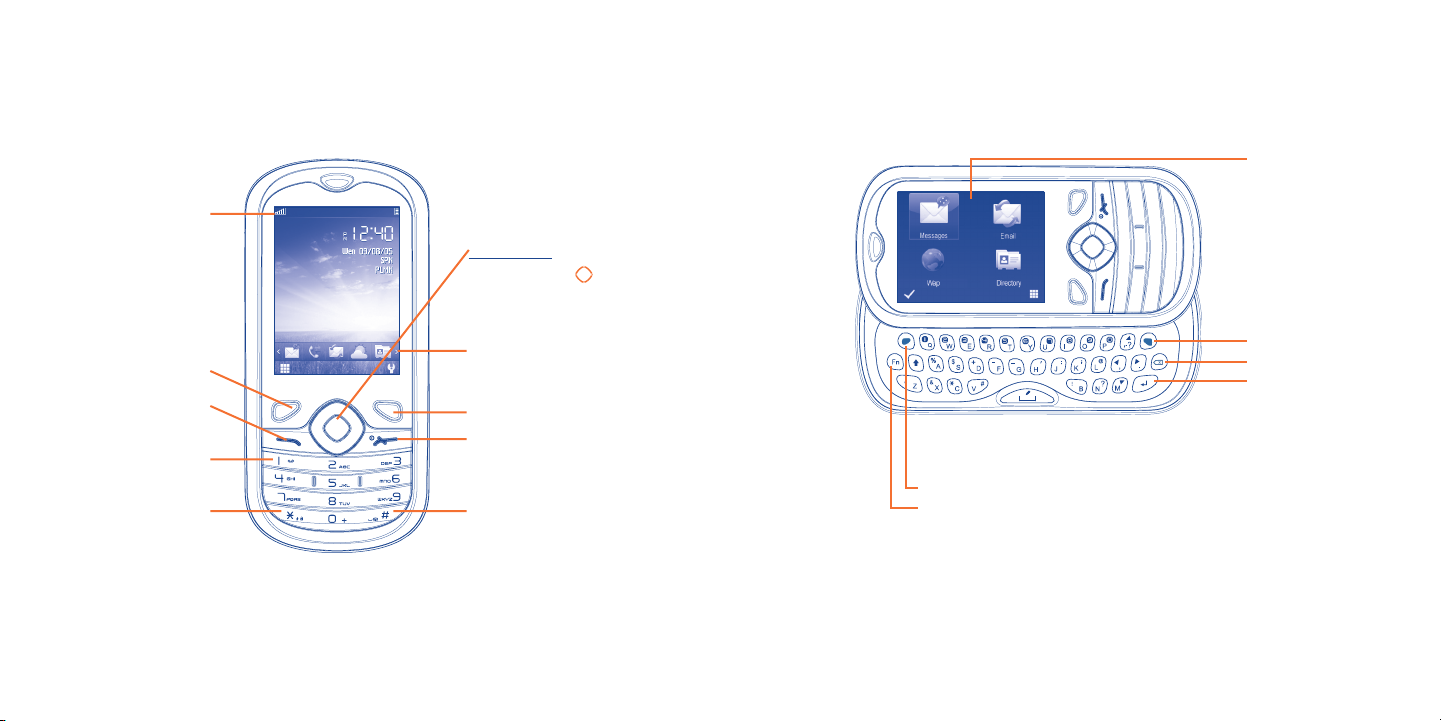
2.1 Set-up
Removing or installing the back cover
Installing or removing the battery
Insert and click the battery into place, then close the cellphone cover. Unclip the cover, then
remove the battery.
Charging the battery
Inserting or removing the SIM card
You must insert your SIM card to make phone calls.
Place the SIM card with the chip facing downwards and slide it into its housing. Make sure that it
is correctly inserted. To remove the card, press the bottom and slide it out. Please power o your
cellphone before you remove the SIM card.
(1)
Please use only TMobile approved SIM cards in your T-Mobile® Sparq™.
(1)
17 18
Connect the battery charger
• Charging may take about 20 minutes to start if the battery is flat.
• Be careful not to force the plug into the socket.
• Make sure the battery is correctly inserted before connecting the charger.
• The mains socket must be near to the cellphone and easily accessible (avoid electric extension
cables).
Page 11

• When using your cellphone for the first time, charge the battery fully (approximately 3 hours).
You are advised to fully charge the battery ( ).
The charge is complete when the animation stops.
2.2 Power on your cellphone
Hold down the
then confirm with the key. The main screen is displayed.
If you do not know your PIN code or if you have forgotten it, contact your network
operator. Do not leave your PIN code with your cellphone. Store this information in a
safe place when not in use.
If cell broadcast messages are displayed, use the
to return to the main screen.
While the cellphone is searching for a network, “Searching/Emergency” will be displayed.
In the power on screen, you also have access to the functions of “Radio”, “Camera”, “Music
player”, etc. even if there is no SIM card inserted.
key until the cellphone powers on, type in your PIN code if necessary and
key to browse through them or press the
2.3 Power off your cellphone
Hold down the key from the main screen.
Making a call ...........................................
3
Dial the desired number then press the key to place the call. If you make a mistake, you may
short press key to delete the incorrect digits one by one, or you may long press key to
delete all.
To hang up the call, press the
Making an emergency call
If your cellphone has network coverage, dial emergency number and press the
an emergency call. This works even without a SIM card and without typing the PIN code or
unlocking the keypad.
key.
key to make
3.1 Calling your voicemail
Your voicemail is provided by your network to avoid missing calls. It works like an answering
machine that you can consult at any time. To access your voicemail, hold down the key.
If the access number for your operator’s voicemail service does not work, dial the number that
you were given. To change this number at a later date, refer to “My numbers” (see page 36).
To use your voicemail service from abroad, contact your network operator before
leaving.
19 20
Page 12

3.2 Receiving a call
When you receive an incoming call, press the key to talk and then hang up using the
key.
icon is displayed, the vibrator is activated and there is no ringtone. If the icon is
If the
displayed, the cellphone neither rings nor vibrates.
The caller’s number is displayed if it is transmitted by the network (contact your network
operator to check service availability).
Muting the ringtone
To mute ringtone of current incoming call, press
key.
Rejecting a call
Press the
key once, or reject it by SMS (Options\Reject call with SMS).
key. Answer the call by pressing the
3.3 During a call
During a call, following options are available:
- New call (Hold the current call and dial another number)
- Hold (Hold the current call)
- Mute (Mute the current call)
- DTMF (Enable/Disable sending DTMF during the call)
- Volume (Adjust the vloume level)
PROMPT: You may also adjust sound level by using
key directly during a call.
- Switch audio patch (Switch the audio path between the Bluetooth headset and cellphone)
- Directory (Enter the directory)
- Messages (Enter Message Center)
- Calendar (Enter Calendar)
- Sound recorder (record your current call).
You can switch the audio speech from handset to Bluetooth device when connected.
You may also use Handsfree function with
WARNING: move the handset away from your ear while using the “handsfree” option because
the amplified volume might cause hearing damage.
Handling two calls
• Answering a second call (ensure that “Call waiting” is activated, see page 37).
• To call a second party during a call, dial the number directly.
during a call.
3.4 Conference calls
Your cellphone allows you to talk to several people at the same time (up to five). If you are on a
double call, press “Options” and select “Conference”. If a third call comes in, answer it by
pressing the key and speak with your new caller.
This caller becomes a member of the conference if you press “Options” and select “Add to
conference”. Pressing
To end the conference call, press “Options” and select “End conf.”.
disconnects the current call.
21 22
Page 13

Menu arrange .................................
4
Main menu is designed to vary according to your preference.
You may access this function by selecting “Menu arrange” from the main menu.
Change the order
Press left softkey from the main menu screen and select “Move” or hold down
is shown, then move the cursor to your favorite destination and confirm with key.
Show/Hide
Access “Menu arrange”, press
Restore factory settings
Access “Menu arrange”, select “Options”, choose “Restore factory settings” to return to
the default menu display.
to show/hide the main menu items.
key till tick “√”
Messages .........................................
5
You can create, edit and receive SMS, MMS with this cellphone.
MMS enables you to send video clips, images, photos, animations and sounds to other compatible
mobiles and e-mail addresses.
The MMS function can only be used if the service is provided by your operator, and if
your contract includes the MMS option and if all the parameters for MMS have been
entered (see page 27).
5.1 Access
You may access this menu using the following options:
- Access from the main menu by selecting “Messages”.
- Access from the simple menu by selecting “Messages”. (see page 16)
- Select
from widget bar, and then enter the sub-menu you require.
5.2 Conversational mode and conventional mode
In conversational view mode you can view chat history in chronological order. In conventional view
mode you may have access to the following folders: Inbox, Outbox, Sent, Drafts, Voicemail,
Broadcast SMS, Empty folder, Templates, Settings, etc. Conversational view mode is set as
default. You may switch to conventional mode by selecting “Options\Settings\Conversational
mode\On(Off)”. The following instructions are based on conversational mode.
23 24
Page 14

5.3 Create message
You can select “Messages\Write msg” from the main menu, or access from widget to
create text/multimedia message. One or more recipients can be added in the list and you can
remove a recipient by pressing . Press “Directory” through key to multi-select recipients
from Directory.
An SMS will be converted to MMS automatically when images, videos, audio, slides or attachments
are inserted, Subject, CC/BCC/email address is added; or the message contains more than 8 pages
of text.
An SMS message of more than a certain number of characters (the number of characters
depends on your language) will be charged as several SMS. An MMS message containing
photos and/or sounds may also be billed as more than one message.
5.4 Alerts
5.4.1 Setting messages
The storage of provisioning messages.
5.4.2 Voicemail
View and edit the voicemail number.
5.4.3 Broadcast SMS
Store the received Broadcast SMS.
5.4.4 WAP alerts
Store WAP push messages.
5.5 Available options
5.5.1 View
With this option, you can view details of the selected thread.
5.5.2 Delete
To delete a thread (containing all chat history), select “Options\Delete” , and then confirm with
/ key.
5.5.3 Settings
Conversational mode
This option enables you to switch on/off conversational message view mode.
Text messages
Profile settings • Profiles can be retrieved directly from SIM card.
Alternatively, you can create your own profile.
Common settings • Delivery report, request for acknowledgement of delivery report On/
Off. Reply path
Alphabet
• Enables the definition of SMS data coding for management SMS sending.
Management
Memory status • Memory used on the cellphone.
Preferred storage • Select default message storage, SIM or cellphone.
Preferred. bearer • Bearer preference.
(1)
: show reply path.
(1)
Depending on your network operator.
25 26
Page 15

Multimedia messages
Edit • Set edit mode, image size and signature.
Sending • Set the values for validity period, Read report, etc.
Retrieve • Set the values for Home network, Roaming network, etc.
Edit profiles • Follow the same procedure as for setting your WAP connection.
Memory status • Memory used on the cellphone.
Email ...............................................
6
Your cellphone has an email client with the settings pre-defined for a few popular email services
like – GoogleMail, Windows live, Yahoo, AOL, etc. Besides this, you can set up other POP3 or
IMAP4 email accounts that you may be using.
Broadcast SMS
Receiving mode • Enable to receive broadcast SMS.
Languages • Language selection.
27 28
6.1 Access
Press through key from the main screen to enter the main menu, and then select “Email”,
or your may access from the simple menu “Email” (see page 16).
6.2 Email account set-up
Pre-defined email service
If you own an email account of predefined services, you can install it to your cellphone by
selecting the service (GoogleMail, yahoo, etc.), entering the username, password and account
name, and then confirming with
New email service
To set up a new email account other than the predefined email services, press “Options\New
account”, select “Other Email accounts”.
You are required to enter your email address, select protocol
then enter your incoming server address and outgoing server address, and then input your user
name, password and account name, select “Save”.
Consult your email service provider for more information about protocol.
(1)
key.
(1)
(POP3 or IMAP4) and network,
Page 16

6.3 Create Email
Select “Email\Options\Create Email” to enter write email interface.Input the initial letter of
the recipient name. Subsequent letters may be added for accurate search. Input the next recipient
to add one more Email address.
6.4 Inbox
Folder of all received Emails.
6.5 Outbox
Folder of all unsent Emails.
6.6 Sent
Folder of all sent Emails.
6.7 Drafts
Folder of all draft Emails.
6.8 Available options
Select • Select to enter the menu.
Send and receive • To connect the email server in order to receive/send mails.
Send and receive all
accounts
Create Email • To create a new Email.
Edit account • To edit the detailed configuration information of the selected
Delete account • To delete the current selected account.
New account • To create a new email account.
Empty folder • Delete all emails in “Inbox/Outbox/Sent/Drafts”.
Delete marked • To delete the marked mail in the selected folder.
Delete all • To delete all the mails in the selected folder.
Delete all marked • To delete all marked mails in all folders.
Empty all folders • Delete all emails in all folders.
• To connect all email accounts’ server in order to receive/send mails.
account.
29 30
Page 17

Instant messaging ........................
7
Palringo Instant messaging (IM) allows you to chat with other people using Palringo account. You
can also connect to other popular IM services through Palringo, like Yahoo, AIM, GG, ICQ, Google
talk, iChat etc. Please note that the services may be upgraded depending on your client version.
7.4 Add service
Various services (Yahoo, Google, ICQ etc.) can be added by “Menu\Services\Add Service”.
7.5 Chat
To start a chat, select one online contact, then “Menu\Private chat”. During chat, you can also
exchange voice or photo messages with your community.
7.1 Access
To access Palringo, press from the main screen to enter the main menu, select .
7.2 Open a Palringo account online
Before activating this service, you are required to open a Palringo account online. There are three
ways to do this:
• Click “Menu”, select “Register”.
• You can also open account directly on website:
http://www.palringo.com/en/gb/.
7.3 Sign in/Sign out
To connect to Palringo instant messaging server, please click “Menu”, then select “Sign in”. You
are required to input your Palringo account information, like username (Email address), password,
sign in status, etc.
To sign out, click “Menu”, then “Sign out”.
31 32
7.6 Contacts
• Add a contact
To add a contact, click “Menu”, then select “Add contact”.
First, you need to specify which service, Yahoo for example, you want to add the new contact to.
Then input the contact’s email address.
Your request will be sent to the contact for approval. Once accepted, the contact’s name
and status will appear on your contact list.
• Delete a contact
To delete a contact, select one contact, then “Menu\Delete contact”. The selected contact will
be removed from your contact list.
7.7 Groups
With this menu, you can “Join a group” or “Create a new group”. You can begin chatting with
all members in the group simultaneously.
Page 18

Contacts ........................................
8
8.1 Consulting your directory
You may have access to this function from the main menu by selecting “Contacts”, or your may
access from the simple menu “Contacts” (see page 16).
The whole contact list is categorized by Favorite, Most called and All contacts.
Favorite
Most called
Searching for a contact
You can search for a contact by inputing the initial of their name. Subsequent letters may be added
to refine the search.
Viewing a contact
Select a name from your directory to read the contact information.
Sending vCard via Bluetooth
Selecting the vCard you wish to transfer (“Options\Send vCard\By Bluetooth”).
Making the call
Press the
be called, you must first choose the number from the list (Mobile, Home, Work, etc.) using
the
key once the name is selected. If several numbers are associated with the name to
key. Press the key to make the call.
Information in the directory and the diary may be sent to and received from a computer
using the PC suite.
8.2 Adding a contact
You can add a new contact by selecting “Options\Add contact”.
When you create a new contact in the phone directory, at least one of the following fields must be
filled in: First name, Last name, Image, Mobile, Home, Work, Email, Birthday, Add birthday reminder,
URL, Address, Ringtone, Group, Copy to SIM/ Not copy to SIM.
You can move from one field to another using the
Adding birthday reminder
You can set a birthday reminder when editing contact information. This will remind you at regular
intervals during the day prior to the set date.
If you use your cellphone abroad, store the numbers in your directories in international
format “+” followed by the country code (see page 20).
key.
33 34
Page 19

8.3 Available options
From the list of names in Favorite/Most called, All contacts, you can access the following
options:
Add contact • Add a contact (name, numbers, address, e-mail, etc.) in the directory.
Send message • Send an SMS/MMS/Email to a contact you selected from the directory.
Delete contact • Delete the selected contact.
Group • You can view, send messages or e-mails to the group you select or you can
create, delete groups as you want.
View mode • You may view contacts stored in cellphone only or both in SIM and
cellphone.
More • Import
from SIM
• Export to
SIM
• My number Type in, modify or send the user’s own number by SMS.
• Memory
status
Copy the whole directory from SIM to cellphone only if
there is sufficient memory.
Copy the whole directory from cellphone to SIM only if
there is sufficient memory.
View used and available space in SIM and Phone directory.
Calls ..................................................
9
9.1 Call log
You can access your call log by pressing the key from the main screen or selecting from the
main menu, then select “Call log”. Once enter this menu, following lists will be displayed:
Missed calls
Outgoing calls (Redial)
Answered calls/Rejected calls
Select a number from the call memory and press “Options” through
Save to directory, Edit before call, etc.
key to Send message,
9.2 My numbers
Type in or modify your cellphone number or the number to access your voicemail and confirm.
Your cellphone number is usually written on your SIM card.
35 36
Page 20

9.3 Call settings
You can access a number of items with this option:
9.3.1 Call waiting
Activate/deactivate the notification of a second incoming call by a beep.
9.3.2 Call forwarding
You can activate, cancel or verify the status of the call forwarding to the voicemail or to a specified
number. The following configurations are possible:
• Unconditional: systematic forwarding of all your calls. The
icon is displayed.
• Conditional: if your line is busy, if you don’t answer or if you are outside the network range.
9.3.3 Call barring
You can activate or deactivate the call barring for outgoing and incoming calls. The various options
are:
Outgoing calls • The following configurations are possible:
• All calls • All outgoing calls are barred.
• International calls • Outgoing international calls are barred.
• International • Outgoing international calls except those to your
except home country of subscription are barred.
Incoming calls • The following configurations are possible:
• All calls • All incoming calls are barred.
• When Roaming • Incoming calls are barred when you are abroad.
Cancel all • Deactivate all call barring.
barring
Change barring • Change the original Password for activating call
Password barring.
9.3.4 Caller ID
Activate/deactivate CLIR.
9.3.5 Auto redial
You can activate or deactivate the automatic callback of your party for calls that do not get
through the first time.
37 38
Page 21

10
Media applications ...............................
10.1 Music ......................................................................................
You may access this feature from the main menu by selecting “Music”.
You will have full flexibility of managing music both on your cellphone and memory card.
You can have access to your music files through one of the following:
All songs • Contains all songs both on cellphone memory and memory card.
My star list •
Folders • Category of songs in folder.
Album/Artist/ • Music files are categorized by Album, Artist or
Genre Genre based on information stored in the tags. Those missing such
Update songs • Update the information of songs saved in cellphone or memory card.
Use keys to manage the Music player:
: Set the volume level
: Go to previous/next title (press)
Fast play backward/forward (hold down)
You can simply add your favorite songs to “My star list” by holding down
during playing music (max 100).
information will be classified as “Unknown files”.
10.1.1 Settings
Access by pressing the right navigation key for following options:
Play mode • Enable you to switch between Normal, Repeat
current, Repeat all, Shuffle and Repeat shuffle.
Equalizer • Different music styles preset in the cellphone.
Bluetooth
settings
Display • Enable your player to display spectrum, song
10.1.2 Playing with lyrics
Lyrics can be displayed in synchronization with the music.
• With this setting, you can play music in Bluetooth,
Phone or both in Phone & Bluetooth.
information or lyric.
10.2 Image ......................................................................................
A library links to the images in “My creations” and “My images” in cellphone to be shown in
list, slide, or thumbnail, set as Wallpaper, Power on/off display, and Contact ID, or sent by MMS,
Email, Bluetooth.
39 40
Page 22

10.3 Video .......................................................................................
Contains all video clips both in cellphone and memory card and enables you to Play, Send (by
MMS, Email, or Bluetooth), Delete, Rename, Sort (by name, type, time or size), etc.
Use keys to manage the Video player:
: Set as play/pause
: Set the volume level
: Previous/next video
: Adjust the display screen size via left softkey
: Back to previous menu
10.4 Radio ......................................................................................
Your cellphone is equipped with a radio
a traditional radio with saved channels or with parallel visual information related to the radio
program on the display if you tune to stations that offer Visual Radio service. You can listen to it
while running other applications.
To use it, you must plug in your headset, which works as an antenna connected with your
cellphone.
(1)
with RDS functionality. You can use the application as
Available options:
Channel list • Open the list of saved stations.
Save channel • Save the current tuned station to the “Channel list”.
Auto search • Start auto search and stations will be automatically saved to “Channel
list”.
Enter the • Enter the frequency manually.
frequency
Turn off • Stop playing the radio.
Radio Recording • Record the radio: files will be automatically saved to “Notes”.
Settings • Use
navigation keys to manage settings.
Activate • Listen to the radio using loudspeaker or headset.
loudspeaker/
Play in headset
Activate mono • Switch between mono and stereo mode.
mode/stereo
mode
Update station •
(1)
name
Optimize radio •
Save RDS information as station name in the channel
list.
Optimize the audio quality.
frequency
(1)
The quality of the radio depends on the coverage of the radio station in that particular area.
41 42
Hold down the
key to enter “Manual tuning” mode and go to the previous/next
station by pressing the navigation keys in the Radio interface.
(1)
Availability dependant on RDS information detected.
Page 23

11
Web2Go .............................................
11.1 Wap .......................................................................................
11.1.1 Homepage
Launch the Wap browser with the preset homepage (Web2Go).
11.1.2 Bookmarks
Access your favorite sites.
11.1.3 Go to URL
Enter the URL of Wap site.
11.1.4 Recent pages
Pages which you recently browsed.
11.2.5 Offline pages
Pages available for offline viewing.
11.2.6 Service inbox
Store WAP push messages.
11.2.7 Settings
Customize your browser preferences.
11.3 Weather ..................................................................................
Your cellphone is equipped with a weather function for consulting up to 3-day forecasts of favorite
cities.
To access the function, you can press
the .
Available options:
More information
Forecast Display 3-day weather forecast.
Update Refresh weather information.
My cities List all my cities, you can add new city, set default city,
delete the selected city, etc. via “My cities\Options”.
Settings Set unit, update mode and network.
Search more weather information online.
through key to access the main menu and select
(1)
May cause additional network charges for data flow to provide this service. Extra fees might also be
charged in roaming states.
43 44
Page 24

12
Entertainment .....................................
13
Camera .........................................
12.1 Stopwatch ...............................................................................
The stopwatch is a simple application for measuring time with the possibility to register several
results and suspend/resume measurement.
12.2 Java .........................................................................................
12.2.1 Launch an application
Select “Java applications” to launch applications.
12.2.2 Java settings
The “Java” menu allows you to manage Java settings, in which you may set Java audio, vibration,
network and identify how much Heap size is available.
12.2.3 Java downloading
You can download new Java™ applications in the “Java” menu by selecting “Download
application” from “Options”. The list of available Web bookmarks dedicated to the application
download will then be displayed.
Select the appropriate bookmark to go to the desired Web page.
Each downloaded java game can be assigned as a main menu display for quick access.
12.2.4 Trusted certificates
View detailed information of the trusted certificates supported by your cellphone.
45 46
Your cellphone is fitted with a camera for taking photos and shooting videos that you can use in
different ways:
- store them in your “File manager\My creations”.
- send them in a multimedia message (MMS) to a cellphone or an email address.
- send them directly by Email or Bluetooth.
- customize your main screen (see page 60).
- select them as incoming call image to a contact in your directory.
- transfer them by data cable or microSD card to your computer.
13.1 Access
Select from the main menu to access this function.
13.2 Camera
13.2.1 Take a photo, save or delete
The screen acts as the viewfinder. Position the object or landscape in the viewfinder and press
to take the image and the images will be automatically saved. If you don’t want it, you may directly
delete it with key.
Page 25

13.2.2 Settings in framing mode
Before taking the photo, you can adjust a number of settings by using the following shortcuts:
From the photo shot screen, press the press
“Capture mode”, “Quality”, “Timer”, “Banding”, “Night mode”, “Exposure Value”, “White
balance”, “Color mode”, but also following ones:
My creations • Go to “File manager\My creations” to view the photos you have
taken.
Storage • You may choose saving location if MicroSD card is inserted.
Access Video • Access Video recording mode.
Restore default • Return all settings to default values.
Image size
Capture mode
Quality
Timer
Banding
My creations
Storage
through not only to access: “Image size”,
Access Video
Restore default
Night mode
Exposure Value
White balance
Color mode
13.3 Video
You can record a video clip of unlimited length, as long as the battery sustains and there is
sufficient memory.
We strongly advise you to change the default folder to “Memory card” to store your
photos and videos.
13.3.1 Framing mode
When you enter the “Video” function, your are in Framing mode. Use the mobile screen as a
viewfinder and press
Banding, Quality, Record audio, Color mode, Storage, Access camera, to access the “File
manager\My videos”, and to restore default value.
13.3.2 Recording mode
Once you have chosen your settings, you can launch the recording of your video-clip by pressing
key.
the
If you receive a call in recording mode, video recording will be stopped and a pop up message
will inquire if you want to save it.
for the settings of White balance, Exposure Value, Night mode,
13.2.3 Options available after taking the photo
Once you have taken a photo, five icons appear on the photo for your selection. By pressing
, , , , you can send your photo by Bluetooth, MMS and Email, assign it to a contact, or set as
wallpaper.
47 48
13.3.3 Further operations after shooting a video
After shooting a video, three icons will appear on the screen so you can choose to send your
video by Email, MMS, or Bluetooth.
In the list of “My videos”, press “Options” to play the video and send by MMS, Email or
Bluetooth.
Page 26

14
With this menu, you may personalize ringtones for different events and environments.
Profiles ..........................................
14.1 General
To modify the sound settings, select “Edit” and you will see the functions below using key:
Ringtone Select a melody from the list by scolling up/down.
Mode You may set your cellphone ringtone to Normal, Discreet (ring with beep),
Vibration (all sounds are replaced by vibrations except for alarms), Vibration
and Melody, Vibration then Melody, Beep and vibration, Silence (no sounds
except for alarms, the icon
Volume Adjust the volume by
Key beep Select the type of key beep.
Message beep Select a melody for a new incoming message.
Power on beep Select a Power on melody for your cellphone.
Power off beep Select a Power off melody for your cellphone.
will be displayed).
key.
14.2 Meeting
When this is selected the cellphone will not ring or beep unless an alarm has been set. A new
event will cause it to vibrate.
14.3 Outdoor
It is a profile designed for outdoor users who require louder ringtones.
14.4 Indoor
Ringtone/beep volume will be slightly lower than General mode volume.
14.5 Silence
This profile will turn off all ringtones, even notification sounds.
14.6 Flight mode
Voice calls, Bluetooth and messaging functions are barred. Can be used to increase standby
duration.
49 50
Page 27

15
You will have access to all audio and visual files stored in cellphone or memory card in File manager.
File manager ................................
15.1 My audios
Choose an audio for the ON/OFF screen, for an incoming call, a message alert, power on/off
ringtone or an alarm and scheduler.
The “My audios” album contains the following folders
- Music: full track music.
- Melodies: melodies that can be set as ringtone.
- Recorded: all recorded sounds.
- General: contains all audio files stored in cellphone or memory card.
DRM: Digital Rights Management feature allows sounds and images to be played while
protecting the associated copyright. DRM counter-based files and files with expired
rights will not be automatically played when scrolling the list.
(1)
:
15.2 My images
You can select an image or a photo as wallpaper, ON/OFF screen, or assign it to a contact in the
directory.
The images will be displayed in alphabetical order.
15.4 My creations
This feature stores all the photos captured by your cellphone.
15.5 Others files
A folder contains all downloaded java applications.
15.6 Cellphone
An entry to access all files in all folders stored in cellphone.
15.7 Memory card
You can access all files stored in the memory card here.
When a memory card is inserted for the first time, it will be scanned and the default
folders will be created.
Inserting or removing the memory card:
15.3 My videos
The “My videos” album contains all video clips recorded by the user, originally embedded in the
cellphone and downloaded to the cellphone or memory card.
(1)
The embedded folder names cannot be modified. However, in certain cases, you can modify, delete and
add items included in these folders.
51 52
Unclip the cover and insert the MicroSD card into the slot.
Unclip the cover and gently push the memory card until unlocked. Take out your MicroSD card
and clip the back cover.
Page 28

Available options
Open • Open a folder.
Create folder • Create more folders.
Delete folder • Remove folders.
Rename folder • Edit folder’s name.
Empty folder • Delete all files in one folder.
Memory card • To format or to query its memory status.
15.8 Managing audios, images, videos and creations
According to the item chosen, you can access some of the functions below:
View • View the selected image.
Play • Play the selected video.
(1)
• Send the audio/image/video.
Send
Delete • Delete the audio/image/video selected (not applicable for embedded items).
Set as • - Image
- SoundÆringtone, message beep, switch ON/OFF, assign it to a contact.
- VideoÆAssign it to a contact.
Mark/ • Mark/Unmark a tick on a file for further operation. Press Unmark
Download • Download new items.
Rename • Rename the audio/image/video.
Sort • Sort the files by name, type, time and size.
Move to • Move a file from the phone memory to the memory
phone/ card and vice-versa
memory card
Æwallpaper, switch ON/OFF, assign it to a contact.
on Mark
menu to mark all diretly.
Properties • Display part of the ID3 Tag content of an MP3 file.
Activate • DRM file option.
Copy to phone/
• Copy a file to the phone memory or the memory card.
memory card
15.9 Formats and compatibility
(1)
- Sounds: mp3, m4a, aac, midi, wav, amr, wma.
- Images: jpg, gif, wbmp, bmp
- Videos: 3gp, mp4
15.10 Memory status
Indicates how much space is used and how much is currently free on your cellphone and memory
card (if any).
15.10.1 Cellphone
View available memory space.
Your cellphone’s memory is shared among several functions: directory, calendar, messages, images,
melodies, games and video clips.
15.10.2 Memory card (MicroSD card)
View the memory available on your MicroSD card.
You are advised to save large files (like songs) on your microSD card.
(1)
Files marked with cannot be sent.
53 54
Page 29

16
Access this feature by pressing through key from the main screen to enter the main menu,
then selecting “Bluetooth”.
To use your cellphone with a Bluetooth device, you need to proceed in two steps:
- Pair and register the device to your cellphone,
- Select it to use hands-free communication. Only one Bluetooth audio device (your Bluetooth
Pair and register your Bluetooth device
Activate the Bluetooth feature by selecting the “Bluetooth\Activation\On” option. Then
enter the “Device list” menu to search for connectable Bluetooth devices and select the device
you want to be paired with in the list. If the bluetooth device has no keyboard, enter its default
password to register it with your cellphone. If the Bluetooth device has keyboard/keypad, enter
the same set of password on both handset and the device to get it registered.
From the list, press the “Options” softkey to connect/disconnect, rename, search for new devices
or delete an unconnected one from the list.
Bluetooth™ ...................................
headset or your Bluetooth car kit) can be connected during the communication.
Don’t forget to turn on your Bluetooth device and activate the pairing mode while
pairing it with your cellphone.
Available functions
Data transmit • Exchange files with another bluetooth device.
Handle a call • Initiate or receive a phone call with a Bluetooth headset.
Listen to music • Support A2DP profile.
Visibility • Select whether you want to hide (“Hidden”) or show to all (“Visible
to all”) your cellphone.
My phone’s name • You may change your cellphone name, which is visible to the others.
Always activate Bluetooth in your cellphone first before connecting it to a Bluetooth
device. Be aware that Bluetooth activation will slightly affect battery life of your
cellphone.
Bluetooth technology allows free wireless connections between all Bluetooth-compliant devices
within short range. Please make sure that the Bluetooth headset or the Bluetooth car kit and your
cellphone are in this range and set as “Visible to all”.
Your cellphone is Bluetooth™ v1.1, v1.2 and v2.0 compatible.
55 56
Page 30

17
Others ...................................................
17.1 Calendar .................................................................................
Once you enter this menu from the main menu, there is a monthly-view calendar for you to
keep track of important meetings, appointments, etc. Days with events entered will be marked
in color.
Available options:
Today's
appointments
All appointments • See all the created appointments.
Jump to date • Input the required date and it will be immediately highlighted.
Create • Create an appointment.
Synchronization • Synchronize with the account you've set.
• See today’s appointments.
17.2 Calculator ...................................................................................
Access this feature by selecting “Calculator” from the main menu.
Enter a number, select the type of operation to be performed using the navigation keys, and enter
the second number, then press
If you want to input a decimal, you may press
Once an operation is complete, you can select “Clear” to clear numbers and carry out a new
operation.
To return to the main screen, press the “Back” softkey.
key or key to display the result.
57 58
17.3 Notes ..........................................................................................
You can create a note in text or voice format by accessing “Notes” from the main menu.
Available options:
Open • Open and view note.
Send
New text note/
voice memo
Delete • Delete note.
Delete all • Delete all notes.
While recording a voice memo, you can define the audio format (AMR, WAV or AWB), Quality
(High/Low), and Storage (Phone, memory card).
• Send by SMS, MMS, Email or Bluetooth.
• Add new text note or voice memo.
17.4 Clock ...........................................................................................
17.4.1 Alarm
Your cellphone has a built-in alarm clock with a snooze feature. You can set up to five separate alarms
and choose whether or not the alarm should repeat.
Repeat • You may select Once (default)/Every day/Days or customize to your desire.
Snooze • The alarm will repeat at regular intervals.
Mode • You may select the mode of Ringtone: Ring, Vibration only, Silence, Radio
Vibration and Ring.
(1)
In Radio mode, you are required to plug in headset first. Your cellphone will power on automatically before
Radio is on.
(1)
or
Page 31

17.4.2 World clock
The World clock shows current local time and the time zone in different cities. You may view up to
3 cities at one time (Options\Set as my city).
17.4.3 Clock
Allows you to have settings of date and time, including 12/24h format.
You can also set the daylight saving adjustment.
17.5 Converter...................................................................................
17.5.1 Unit converter
You can use the Weight and Length conversion by selecting the unit you wish to convert via ,
then press
17.5.2 Currency converter
The currency converter allows you to:
• Convert a currency directly into euros and vice versa
• Convert between international currencies, both currencies must be selected by
requested to input the appropriate exchange rate.
to input the digits. Finally confirm with key or key.
(1)
.
keys. You are
18
From the main menu, select the menu icon and select the function of your choice in order
to customize your cellphone.
Settings .........................................
18.1 Cellphone settings
18.1.1 Display
Wallpaper
The wallpaper is displayed when you switch on your cellphone.
By selecting “Wallpaper” you can customize it by replacing the default image or animation
displayed on your cellphone.
Theme
This function enables you to customize the graphic style and the colours of your cellphone.
Brightness
You may adjust black level with respect to LCD display by pressing the
key.
(1)
For the former European national currencies, the currency converter uses the final Euro conversion rates
set on 31/12/1998, which are used in accordance with official conversion rules.
59 60
Page 32

Backlight
• Screen Allows you to reduce brightness for enhanced battery performance and to save power
during periods of expected inactivity.
• Keypad You may customize your keypad light by selecting On/O or inputting your preferred
duration directly.
Unlock the keypad
Short press the
key when locked.
The keypad will be unlocked automatically on receiving a call or plugging in the charger.
18.1.2 Headset mode
Switch audio play (incoming call, message beep, alarm beep...) between Headset only and Phone
& Headset.
18.1.3 Input mode
(1)
Please see chapter “Spanish input mode”, page 64. In addition to the specic characters table for
Cyrillic, Chinese, other data input modes are also available in your cellphone. This feature allows
you to write short messages and add names with special characters to your directory.
18.1.4 Numeric keys
By customising your keys, you can access any function directly from the main screen.
18.1.5 Auto lock
Your keypad will be locked automatically or you may lock it manually by long pressing the
key.
(1)
Depending on the language.
61 62
18.2 Call settings
See page 37.
18.3 Security
Activate PIN • The SIM card protection code is requested each time the cellphone is
Change PIN • Change PIN code.
Change PIN2
Activate phone
code
Change phone
code
Fixed dialed
number
powered on if this code is activated.
• A protection code for certain SIM card features (Billing/Cost/FDN, etc.)
will be requested if you attempt to access it, if the code is activated. Select
to update it with a new one (between 4 and 8 digits).
• It is requested each time the cellphone is powered on if this code is
activated.
• Change cellphone password, its initial one is 1234.
• Allows the cellphone to be “locked” so that it can only dial certain
numbers, or numbers with certain prefixes. To activate this function, PIN2
code is mandatory.
Page 33

18.4 Network
Network selection
•
Preferred
network
• Select network • The choice of network connection is left up to the user.
• Search mode • Network connection can be switched between “Manual ” and
GPRS connection
• When needed • GPRS mode active depending on connection requirements.
• Always • GPRS mode continuously active.
GPRS international roaming
• GPRS data services can be used while roaming.
• List of networks to which you wish to be
connected in order of priority (update this list using
“Automatic ”.
).
18.5 Connectivity
A set of prole settings for messaging (MMS, Email...) and Web connection.
19
There are two text entry methods that can be used to write messages:
• Normal
• Predictive with the eZi mode
Input mode
...........................................
Normal
This mode allows you to type text by choosing a letter or a sequence of characters.
Predictive eZi mode
This mode speeds up the writing of your text.
Press the key once and the word will be modied each time you press a key. As you go on, the
word will keep changing.
63 64
Page 34

Fn Key :
Press once:
input a top-half
character.
Press twice:
top-half
characters
inputting mode.
Shift key :
Press:
switch capital mode
Key :
Press:
access the Symbols table
Space key :
Press:
space between words
Hold down:
access the language list
key:
+
switch mode of input
method
Del key :
Press:
delete one by one.
Hold down:
delete all.
Enter key :
Confirm an option
Switch to a new
line (in SMS/ Emai/
IM)
Key
- Press:
insert a smart
punctuation
- Hold down:
insert 1
Key
- Press:
change input
methods
- Hold down: access
the language list
Key
- Press: access the symbovls
table
- Hold down: enter zero
Symbol table
Short press the key to display the
symbols table; the cursor is positioned
in the center. Use the navigation key
to move it and the key to select.
Navigation key:
:
-
validate the word
-
:
previous/next word
-
: page up/down
Keypad
- Press: alpha
input (a, b)
- Hold down:
numeric input
(1, 2, 3)
key:
- insert a space
65 66
Page 35

20
Personal Communications Devices, LLC (the Company) warrants to the original retail purchaser
of this wireless device that should this product or any part thereof during normal consumer usage
and conditions, be proven defective in material or workmanship that results in product faulure within
the first ninety (90) day period from the date of purchase, such defect(s) will without charge for parts
or labor directly related to the defect(s). The antenna, keypad, display, rechargeable battery and battery
charger, if included, are similarly warranted for ninety (90) days from date of purchase.
This Warranty extends only to consumers who purchase thr product in the United States or Canada
and it is not transferable or assignable. This Warranty does not apply to:
(a) Product subjected to abnormal use or conditions, accident, mishandling, neflect, unauthorized alteration,
misuse, improper installation or repair or improper storage;
(b) Product whose mechanical serial number or electronic serial number hasbeen removed, altered or
defaced.
(c) Damage from exposure to moisture, humidity, excessive temperatures or extereme environmental
conditions;
(d) Damage resulting from connection to, or use of any accessory or other product not approved or
authorized by the Company;
(e) Defects in apperance, cosmetic, decorative or structural items such as framing and non-operative parts;
(f) Product damaged from external causes such as fire, flooding, dirt, sand, weather conditions, battery
leakage, blown fuse, theft or improper usage of any electronic source.
The Company disclaims liability for removal or reinstallation of the product, for geographic coverage,
for inadequate signal reception by the antenna or for communications range or operation of the cellular
system as a whole. When sending your wireless device to Personal Communications Devices, LLC for
Warranty ..............................................
repair or service, please note that any personal data or software stored on the device
may be inadvertently erased or altered. Therefore, we strongly recommend you make a
backup copy of all data and software contained on your device before submitting it for
repair or service. This includes all contact lists, downloads (e.g., third-party software
applications, ringtones, games and graphics) and any other data added to your device. In
addition, your wireless device uses a SIM and MicroSD card, please remove the respective
card before submitting the device and store for later use when your device is returned,
Personal Communications Devices, LLC is not responsible for and does not guarantee
restoration of any third-party software, personal information or memory data contained
in, stored on, or integrated with any wireless device, whether under warranty or not,
returned to Personal Communications Devices, LLC for repair or service. To obtain repairs
or replacement within the terms of the Warranty, the product should be delivered with
proof of Warranty coverage (e.g.l dated bill of sale), the consumer's return address,
daytime phone number and/or fax number and complete description of the problem,
transportation prepaid, to the Company at the address shown below or to the place of
purchase for repair or replacement processing. In addition, for reference to an authorized
Warranty station in your area, you may telephone in the United States (800) 229-1235,
and in Canada (800) 465-9672 (in Ontario call 416-695-3060).
THE EXTENT OF THE COMPANY'S LIABILITY UNDER THIS WARRANTY IS
LIMITED TO THE REPAIR OR REPLACEMENT PROVIDED ABOVE AND, IN NO EVENT.
SHALL THE COMPANY'S LIABILITY EXCEED TEH PURCHASE PRICE PAID BY
PURCHASER FOR THE PRODUCT. ANY IMPLIED WARRANTIES, FOR A PARTICULAR
PURPOSE, SHALL BE LIMITED TO THE DURATION OF THIS WRITTEN WARRANTY.
ANY ACTION FOR BREACH OF ANY WARRANTY MUST BE BROUGHT WITHIN A
PERIOD OF 18 MONTHS FROM THE DATE OF ORIGINAL PURCHASE. IN NO CASE
SHALL THE COMPANY BE LIABLE FOR BREACH OF THIS OR ANY OTHER WARRANTY,
EXPRESS OR IMPLIED, WHATSOEVER. THE COMPANY SHALL NOT BE LIABLE FOR
67 68
Page 36

THE COMPANY SHALL NOT BE LIABLE FOR THE DELAY IN RENDERING SERVICE UNDER
THIS WARRANTY OR LOSS OF USE DURING THE TIME THE PRODUCT IS BEING REPAIRED OR
REPLACED.
No person or representative is authorized to assume for the Company any liability other than expressed
herein in connection with the sale of this product. Some states or provinces do not allow limitations on
howlong an implied warranty lasts or the exclusion or limitation of incidental or consequential damage
so the above limitation or exclusions may not apply to you. This Warranty gives you specific legal rights,
and you may also have other rights, which vary from state to state or province to province.
IN USA: Personal Communications Devices, LLC
555 Wireless Blvd.
Hauppauge, NY 11788
(800) 229-1235
IN CANADA: PCD Communications Canada, LTD
5535 Eglinton Avenue West, Suite #234
Toronto, ON M9C 5K5
(800) 465-9672
21
Before contacting customer service, you are advised to follow the instructions below:
• You are advised to switch off the cellphone from time to time to optimize its performance.
• You are advised to fully charge (
• Avoid storing large amounts of data in your cellphone as this may affect the performance of your cellphone.
and carry out the following checks:
My cellphone will not switch on
• Press
• Check the battery charge level
• Check the battery contacts, remove and reinstall your battery, then turn your cellphone back on
My cellphone has not responded for several minutes
• Press the
• Remove the battery and re-insert it, then switch the cellphone back on
My screen is difficult to read
• Clean your screen
• Use your cellphone in accordance with the recommended conditions of use
My cellphone turns off by itself
• Check that your keypad is locked when you are not using your cellphone
• Check the battery charge level
My cellphone will not charge properly
• Make sure that your battery is not completely discharged; the battery charge indicator can take several
• Make sure charging is carried out under normal conditions (0°C - +40°C)
• Make sure your battery is inserted. It must be inserted before plugging in the charger
• Make sure you are using an approved battery and charger for this phone
• When abroad, check that the electrical current is compatible
Troubleshooting ...................................
) the battery for optimal operation.
until the screen comes on
key
minutes and may be accompanied by a quiet whistling sound
69 70
Page 37

My cellphone will not connect to a network
• Try connecting in another location
• Verify the network coverage with your operator
• Check with your operator that your SIM card is valid
• Try selecting the available network(s) manually (see page 63)
• Try connecting at a later time if the network is overloaded
SIM card error
• Make sure the SIM card has been correctly inserted (see page 17)
• Verify with your operator that your SIM card is 3V or 1.8V compatible; the old 5V SIM cards cannot be
used
• Make sure the chip on your SIM card is not damaged or scratched
Unable to make outgoing calls
• Make sure you have dialled a valid number and press the
• For international calls, check the country and area codes
• Make sure your cellphone is connected to a network, and that the network is not overloaded or
unavailable
• Check your subscription status with your operator (credit, SIM card valid, etc.)
• Make sure you have not barred outgoing calls (see page 38)
Unable to receive incoming calls
• Make sure your cellphone is switched on and connected to a network (check for overloaded or unavailable
network)
• Check your subscription status with your operator (credit, SIM card valid, etc.)
• Make sure you have not forwarded incoming calls (see page 37)
• Make sure that you have not barred certain calls
The caller’s name does not appear when a call is received
• Check that you have subscribed to this service with your operator
• Your caller has concealed his/her number
The sound quality of the calls is not optimal
• You can adjust the volume during a call by means of the
• Check the network strength
key
key
I am unable to use the features described in the manual
• Check with your operator to make sure that your subscription includes this service
When I select a number from my directory, the number is not dialled
• Make sure that you have correctly recorded the number in your file
• Make sure that you have selected the country prefix when calling a foreign country
I am unable to add a contact in my directory
• Make sure that your SIM card directory is not full; delete some files or save the files in the phone directory
(i.e. your professional or personal directories)
My callers are unable to leave messages on my voicemail
• Contact your network operator to check service availability
I cannot access my voicemail
• Make sure your operator’s voicemail number is correctly entered in “My numbers”
• Try later if the network is busy
I am unable to send and receive MMS
• Check your cellphone memory available as it might be full
• Contact your network operator to check service availability and check MMS parameters (see page 27)
• Verify the server center number or your MMS profile with your operator
• The server center may be swamped; try again later
The flicking
• You have saved too many short messages on your SIM card; delete some of them or archive them in the
phone memory
“No service” is displayed
• You are outside of the network coverage area
I have already entered 3 incorrect PIN codes
• Contact your network operator to obtain the PUK code (Personal Unblocking Key)
icon is displayed on my standby screen
71 72
Page 38

I am unable to download new files
• Check for free space
• Delete some files
• Select the MicroSD Card to store the files you downloaded
• Check your subscription status with your operator
The cellphone can’t be detected by others via Bluetooth
• Make sure that Bluetooth is turned on and your cellphone is visible to other users (see page 55)
My cellphone is frozen, can’t power on
• Make sure your battery is not completely used up or damaged
• Remove your battery, remove your SIM card then reinstall them to power on again
• Hold down # and press power on/off key at same time to reset it
ALL User cellphone data: contacts, photos, messages and files, downloaded applications like Java games
will be lost permanently.
How to make your battery last longer
• Make sure you followed the complete charge time (minimum 3 hours)
• After a partial charge, the battery level indicator may not be exact. Wait for at least 20 minutes after removing
the charger to obtain an exact indication
• Switch on the backlight upon request.
• Extend email auto-check interval as long as possible.
• Update news, weather information. upon demand manually or set its auto-check interval longer.
• Exit Java background-running applications if they are not being used for a long time.
• Deactivate Bluetooth when not in use.
73
 Loading...