

Alcatel-lucent 610I, SPEEDTOUCH 610 1, 610S, 610V User Manual

TM
SpeedTouch
610/610i/610s/610v
Business DSL Router
Orientation Guide
600
SERIES


TM
SpeedTouch
Orientation Guide
610
3EC 37770 AAAA TCZZA Ed. 02

Status Released
Change Note PeckelbeenS
Short Title CD-UG ST610 R4.1
3EC 37770 AAAA TCZZA Ed. 02
Copyright
© 2002 THOMSON multimedia. All rights reserved. Passing on, and copying of this document, use and communication of its contents is not permitted without written authorization
from THOMSON multimedia. The content of this document is furnished for informational
use only, may be subject to change without notice, and should not be construed as a commitment by THOMSON multimedia. THOMSON multimedia assumes no responsibility or
liability for any errors or inaccuracies that may appear in this document.

Contents
1 SpeedTouch™610 Installation ...................................... 3
1.1. Get Acquainted with the SpeedTouch™610 .................................................... 4
1.2. SpeedTouch™610 Wiring ................................................................................... 8
1.3. SpeedTouch™610 Configuration Setup .......................................................... 11
1.3.1. Configuration Setup for MS Windows OSs ............................................................................. 12
1.3.2. Configuration Setup for other OSs ............................................................................................16
1.4. SpeedTouch™610 Internet Connectivity........................................................ 17
2 The SpeedTouch™610 Web Interface....................... 19
2.1. General Principles.............................................................................................. 20
2.2. Quick Tasks Links .............................................................................................. 23
2.3. IP Router Tasks Links ........................................................................................ 26
2.4. Connection Tasks Links..................................................................................... 31
2.5. LAN Services Tasks Links ................................................................................. 36
2.6. System Config Tasks Links................................................................................ 39
2.7. Advanced Tasks Links........................................................................................ 43
3 SpeedTouch™610 Advanced Concepts ..................... 45
3.1. Native Command Line Interface Access......................................................... 46
3EC 37770 AAAA TCZZA Ed. 02
3.2. Simple Network Management Protocol ......................................................... 48
1

4 Troubleshooting ........................................................... 49
2
3EC 37770 AAAA TCZZA Ed. 02

1 SpeedTouch™610 Installation
1 SpeedTouch™610 Installation
Introduction Thank you for purchasing the SpeedTouch610 Business DSL router !
Specially designed for Small/Medium Enterprises (SMEs) and Small Office/Home Office
(SOHO), the SpeedTouch610 Business Digital Subscriber Line (DSL) router offers
plenty of capabilities. With an easy installation, embedded firewall, embedded IPSec
based IP Virtual Private Networking (VPN) and remote management tools, the SpeedTo u c h 610 is a highly secure device.
Beyond the small business market, the SpeedTouch610 is the ideal solution for
connecting regional and branch offices back to corporate headquarters.
In this Orientation Guide This Orientation Guide will assist you in getting acquainted with the SpeedTouch610
Business DSL router and its broad range of service capabilities.
Documentation and
software updates
Due to the continuous evolution of DSL technology, existing products are regularly
upgraded.
For more information on the newest technological breakdowns, software upgrades, and
documents, please consult the SpeedTouch™ web sites at:
• http://www.speedtouch.com
3EC 37770 AAAA TCZZA Ed. 02
3

1 SpeedTouch™610 Installation
1.1. Get Acquainted with the SpeedTouch™610
Delivery check Check your SpeedTouch610 box for the following items:
• The SpeedTouch
• One power adapter
• One Cat.5 straight-through Ethernet cable (RJ45/RJ45)
• One DSL cable (RJ11/RJ11, RJ14/RJ14)
• Optionally, one or more cable filter(s)
• The SpeedTouch
• The SpeedTouch
610/610i/610s/610v
610 Quick Installation Guide (eight languages)
610 Orientation Guide (English only)
• The SpeedTouch
In the event of damaged or missing items, contact your product dealer for further
instructions.
Other materials The SpeedTouch610 box may also include other materials.
The Setup CD-Rom The Multi-OS SpeedTouch Setup CD-rom includes:
• The SpeedTouch
• SNMP MIBs,
• Adobe Acrobat Reader installation software
• One or more configuration profile files
• The SpeedTouch
• The SpeedTouch
• SpeedTouch
• Technical papers, white papers (PDF format).
Additional software, promotional items, and documentation may be available on the
CD-Rom.
Setup CD-rom.
Setup wizard (for MS Windows OSs only)
610 Quick Installation Guide (PDF format)
610 Orientation Guide (PDF format)
Application Notes (PDF format)
4
3EC 37770 AAAA TCZZA Ed. 02

1 SpeedTouch™610 Installation
Front and back panel
layout
The SpeedTouch610 is presented in a slimline housing:
Depending on the SpeedTouch610 model you purchased, the device can be equipped
with:
• One single 10/100Base-T Half-/Full-duplex MDI-X Ethernet port (optionally with
one 25.6Mb/s ATM-Forum port):
Power Switch Serial Console DSL Line PortDip Switches
25.6Mb/s
ATM-Forum port
Power Socket 10/100Base-T
Ethernet port
• A four port 10/100Base-T Half-/Full-Duplex auto-MDI/MDI-X Ethernet switch:
Power Switch
Serial Console DSL Line PortDip Switches
Power Socket 10/100Base-T Ethernet
switch
3EC 37770 AAAA TCZZA Ed. 02
5

1 SpeedTouch™610 Installation
Front panel LEDs The SpeedTouch™610 is equipped with 5 LEDs on its front panel, indicating the state of
the device during normal operation:
Indicator Description
Name Color State
LAN Green Flashing Ethernet LAN activity.
Off No Ethernet LAN activity.
Line TX Green Flashing ATM cell transmission on DSL line.
Off No transmission activity.
Line RX Green Flashing ATM cell reception on DSL line.
Off No reception activity.
Line Sync Green Flashing Initialization of DSL line.
On DSL line synchronized.
PWR/Alarm Green On Power on, normal operation.
Ethernet port(s) LEDs The back panel contains the following:
• The DC power inlet and power switch
• One or four 10/100Base-T Ethernet port(s)
• Optionally, the 25.6Mb/s ATM-Forum port
• Reset DIP switches
• Serial Console port
• The DSL Line port.
Each Ethernet port on the rear panel has two LEDs:
10MB/100MB LED
Indicator Description
Name Color State
Link Integrity/Activity LED
10/100Base -T
10MB/100MB Green Off 10Base-T Ethernet connectivity
On 100Base-T Ethernet connectivity
Off No connection on this port.
Integrity
Activity
Green
On Ethernet link up. No activity.
Flashing(*) Activity on this Ethernet port.
6
3EC 37770 AAAA TCZZA Ed. 02

1 SpeedTouch™610 Installation
DSL variants Four DSL variants of the SpeedTouch610 Business DSL routers exist:
• The SpeedTouch
The ADSL/POTS variant connecting to an analog POTS(*) line
• The SpeedTouch
The ADSL/ISDN variant connecting to a digital ISDN(**) line
• The SpeedTouch
The SHDSL variant connecting to a dedicated SHDSL(***) line
• The SpeedTouch
The SHDSL variant connecting to a dedicated VDSL(****) line
(*) Plain Old Telephone Service (POTS)
(**) Integrated Services Digital Network (ISDN)
(***) Symmetrical High speed Digital Subscriber Line (SHDSL)
(***) Very high speed Digital Subscriber Line (VDSL)
Use only the SpeedTouch™610 variant which is appropriate for the DSL service delivered to your local premises.
Check at your Service Provider whether your SpeedTouch610 variant meets the DSL
service requirements.
610 :
610i :
610s :
610v :
DSL service The appropriate DSL service must be available at your local premises:
• ADSL, SHDSL or VDSL service must be enabled on your phone line
• In case of ADSL, both POTS or ISDN and ADSL service are simultaneously avail-
able from the same copper pair. Therefore, you need a central splitter or distributed filters for decoupling ADSL and telephone signals.
Always contact your Service Provider for splitter/filter installation !
Public telephone lines carry voltages that can cause electric shock. Only install splitter/
filters yourself if they have been designed to be installed by unqualified personnel. Other
splitter/filters may only be installed by qualified service personnel.
3EC 37770 AAAA TCZZA Ed. 02
7

1 SpeedTouch™610 Installation
1.2. SpeedTouch™610 Wiring
Local network For Ethernet connectivity you need at least:
• A computer with installed Ethernet Network Interface Card (NIC)
• If needed, a hub or switch and the necessary connection cables.
Ethernet Cables In the SpeedTouch610 box, a full wired Cat.5 straight-through RJ45/RJ45 Ethernet
cable, further referred to as LAN cable is included.
You can use LAN cables other than the one provided in the box. However make sure to
use correct connection cables.
Wiring procedure Proceed as follows:
Step Action
More information on
Ethernet wiring
1 Use the included LAN cable to wire your computer's Ethernet port to (one
of) the SpeedTouch610 Ethernet port(s).
2 For local networking, repeat step 1 for each computer.
Note: If an additional hub or switch is used, please follow the installation
instructions supplied with the hub or switch.
3 Use the included DSL cable to wire the SpeedTouch610's Line port to your
telephone/DSL service wall outlet.
4 Plug the power adapter's coaxial jack into the SpeedTouch610 DC inlet.
Note: Always check first whether the included power adapter suits the local
power specifications.
For more information, see the application note “The SpeedTouch™ and Ethernet
Connectivity”.
8
3EC 37770 AAAA TCZZA Ed. 02
1 SpeedTouch™610 Installation
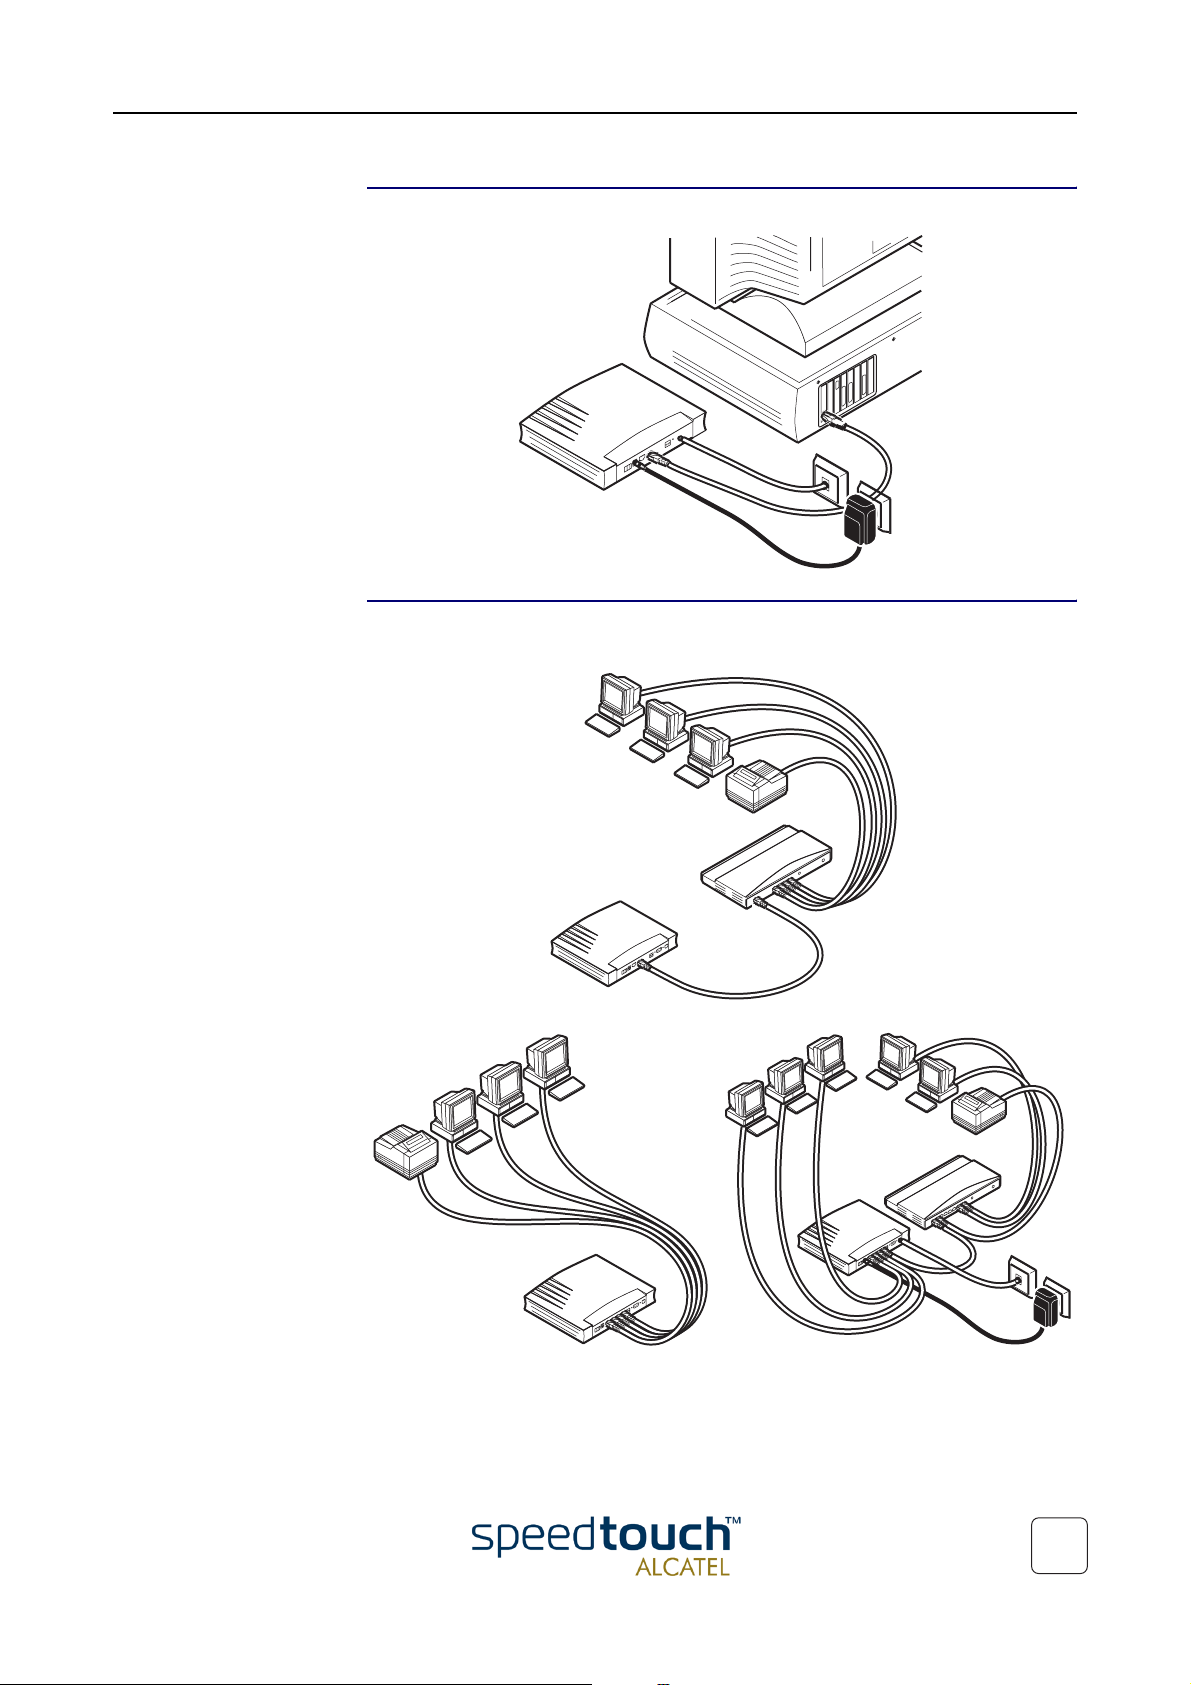
Single PC wiring Once all connections are made the result should look similar as below.
LAN wiring Using the SpeedTouch610 switch (if equipped) and/or an external hub you can
connect multiple PCs to your SpeedTouch610:
3EC 37770 AAAA TCZZA Ed. 02
9

1 SpeedTouch™610 Installation
Powering Once all previous steps are completed, you can turn the SpeedTouch610 on (I) with
POST phases As soon your SpeedTouch610 is turned on, you can check the “PWR/Alarm” LED to
the power switch.
see how the Power On Self Test (POST) progresses.
Phase “PWR/Alarm” LED Indication Description
1 Flashing red POST pending
2 Solid red Start-up failed
POST failed
Solid green Normal operation
10
3EC 37770 AAAA TCZZA Ed. 02

1 SpeedTouch™610 Installation
1.3. SpeedTouch™610 Configuration Setup
Internet connectivity As soon as the SpeedTouch610 is installed as described in section
“1.2. SpeedTouch™610 Wiring” on page 8 the SpeedTouch610 can be prepared for
Internet connectivity.
The configuration of your SpeedTouch610 can be done semi-automatically via the
SpeedTouch™ Setup configuration files (available on the SpeedTouch™ Setup CD-rom),
or manually via its web pages.
This section exclusively describes how to configure the SpeedTouch610 via the Setup
configuration files. For advanced configurations via the SpeedTouch610 web pages,
check chapter “2 The SpeedTouch™610 Web Interface” on page 19, that gives an over-
view of all the web pages and the relevant application notes.
What you need from
your SP
SpeedTouch™
configuration options
You must have a user account with an Internet Service Provider (ISP) for Internet
access. For this user account, it will provide you with:
• A user name (logon ID)
• A password.
Other information might be required depending on the provided CD-rom and/or
specific requirements of the ISP.
The method for configuring the SpeedTouch610 via the Setup configuration files
depends on the Operating System (OS) of your computer system.
In case your computer system runs:
• A Microsoft Windows OS
From the included SpeedTouch Setup CD-Rom a wizard will automatically guide
you through the configuration of both the SpeedTouch610 and your PC(s) for
setting up the appropriate configuration.
Proceed with subsection “1.3.1. Configuration Setup for MS Windows OSs” on
page 12.
• Another OS, e.g. Mac OS, Unix, Linux, etc.
The configuration of the SpeedTouch610 is done via uploading the appropriate
Setup configuration file from the included SpeedTouch Setup CD-Rom to your
SpeedTouch610.
3EC 37770 AAAA TCZZA Ed. 02
If needed, additional configuration of your computer(s) must be done manually.
Proceed with subsection “1.3.2. Configuration Setup for other OSs” on page 16.
11
1 SpeedTouch™610 Installation
1.3.1. Configuration Setup for MS Windows OSs
Microsoft Windows One of the following OSs must be installed on your PC(s):
• Microsoft Windows 95
• Microsoft Windows 98 or 98SE
• Microsoft Windows ME
• Microsoft Windows NT4.0
• Microsoft Windows 2000
• Microsoft Windows XP.
You may need the Windows installation CD-rom during installation.
TCP/IP Make sure that TCP/IP (*) is installed on your PC(s).
(*) Transmission Control Protocol (TCP) / Internet Protocol (IP)
The SpeedTouch™
Setup Wizard
The detection
procedure
The SpeedTouch Setup wizard can be divided into two parts:
• The detection procedure
• The configuration procedure.
Step Action
1 Insert the SpeedTouch Setup CD-rom in your PC's CD-rom drive. The
wizard will start automatically.
Note: In case the wizard does not start automatically, open a 'Run' window via
Start > Run from the Start menu and enter following path: D:\SetupST.exe,
where D is the drive letter of your CD-rom drive.
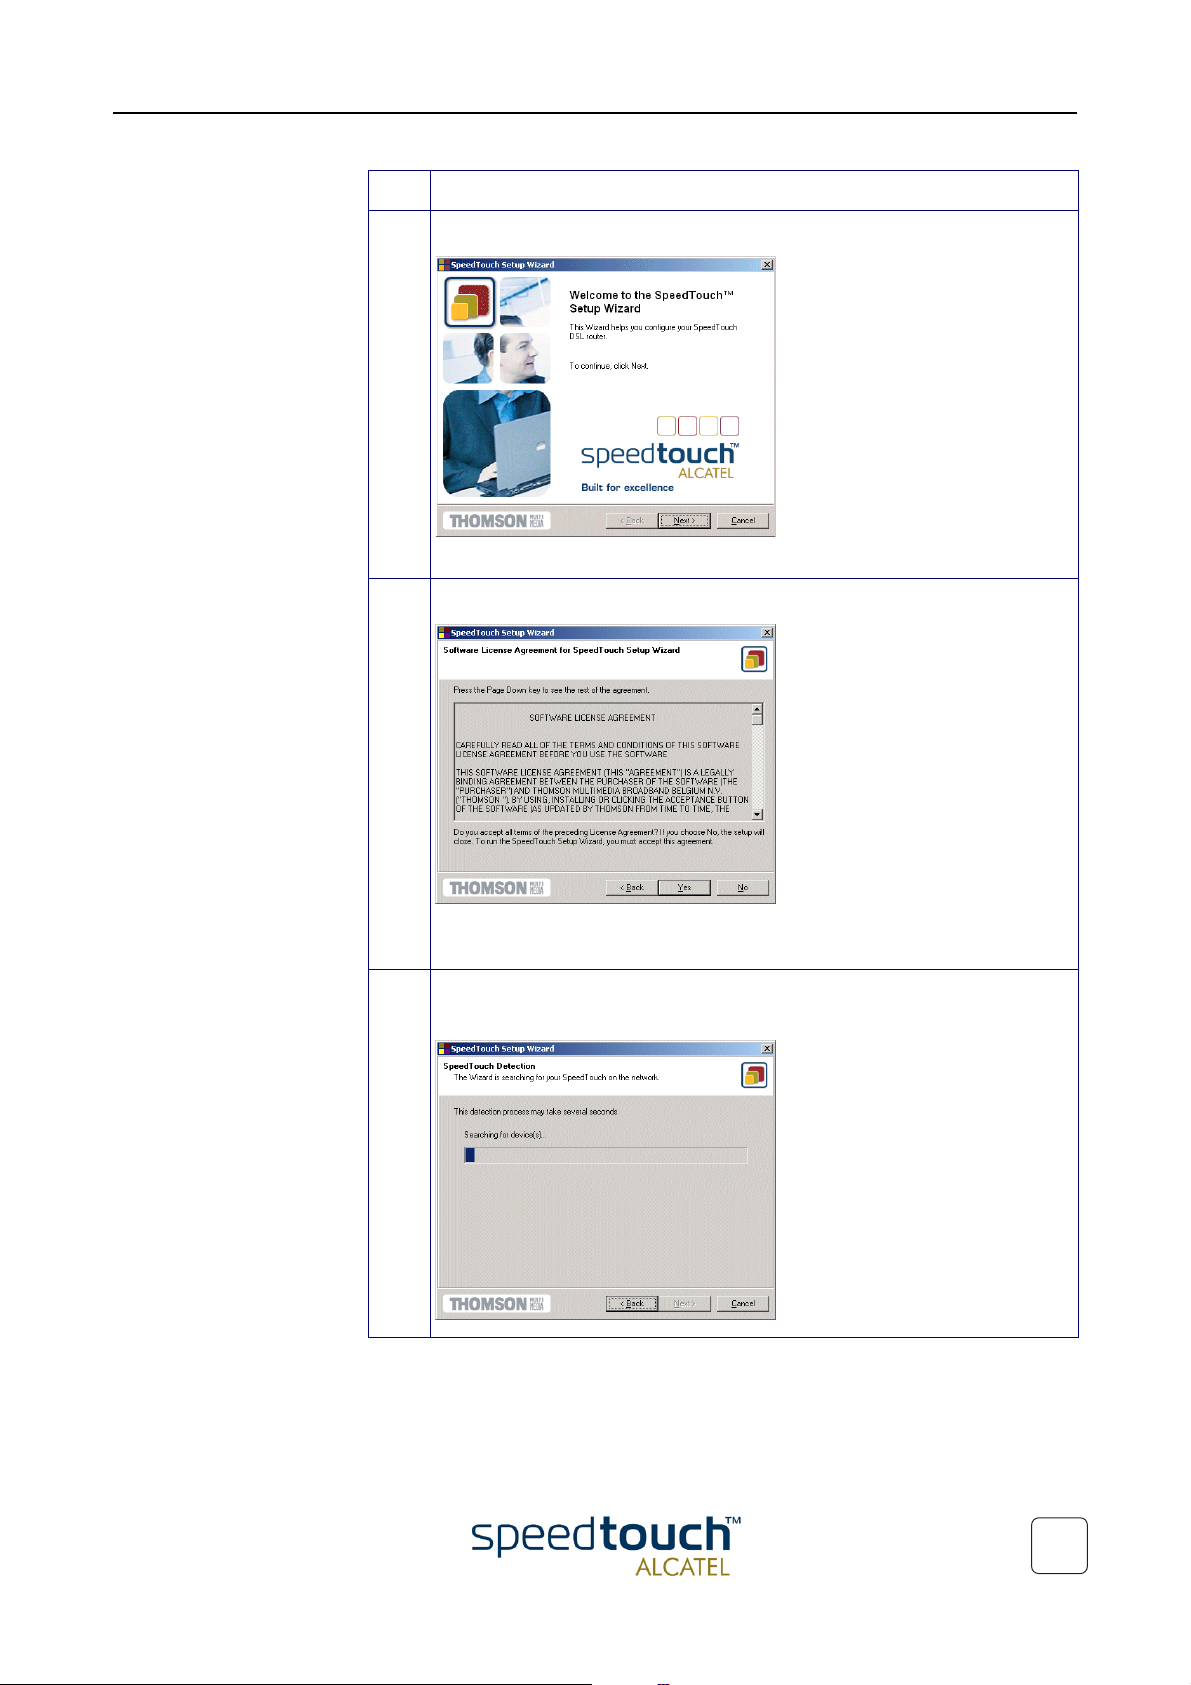
2 The SpeedTouch Welcome wizard pops up:
12
To start the SpeedTouch Setup wizard, click SPEED TOUCH Setup.
3EC 37770 AAAA TCZZA Ed. 02
1 SpeedTouch™610 Installation
Step Action
3 The Welcome to the SpeedTouch™ Setup Wizard window pops up:
Click Next to proceed.
4 The Software License Agreement for SpeedTouch™ window pops up:
Click Yes to accept the terms of the agreement and to continue with the
Setup wizard.
5 The Setup wizard will continue by searching for the SpeedTouch610 on the
network. The following window shows the detection progress:
3EC 37770 AAAA TCZZA Ed. 02
13
 Loading...