

Page 1

Page 2

This is the shared user manual for Alcatel Onetouch 5054S and 5054A model.
Table of Contents
Safety and use ����������������������������������������������������������������������������� 4
General information ���������������������������������������������������������������� 13
1 Your mobile �����������������������������������������������������������������������15
1.1 Keys and connectors ................................................................................15
1.2 Getting started .......................................................................................... 18
1.3 Home screen ..............................................................................................21
2 Text input ���������������������������������������������������������������������������32
2.1 Using the Onscreen Keyboard ...............................................................32
2.2 Text editing ................................................................................................. 33
3 Call, Call log and Contacts �����������������������������������������������34
3.1 Call ................................................................................................................34
3.2 Call log .........................................................................................................40
3.3 Contacts ......................................................................................................41
4 Messaging, Gmail/Email, Google Hangouts ��������������������47
4.1 Messaging ....................................................................................................47
4.2 Gmail/Email .................................................................................................53
4.3 Google Hangouts ......................................................................................59
5 Calendar & Alarm clock & Calculator ���������������������������� 62
5.1 Calendar ......................................................................................................62
5.2 Time ............................................................................................................ 64
5.3 Calculator ....................................................................................................67
6 Getting connected ������������������������������������������������������������68
6.1 Connecting to the Internet ....................................................................68
6.2 Chrome .......................................................................................................70
6.3 Connecting to Bluetooth devices..........................................................71
6.4 Connecting to a computer .....................................................................72
6.5 Sharing your phone's mobile data connection ...................................72
6.6 Connecting to virtual private networks ..............................................73
7 Google Play Store �������������������������������������������������������������75
7.1 Locate the item you want to download and install ..........................75
7.2 Download and install ................................................................................76
7.3 Manage your downloads ..........................................................................78
8 Multimedia applications ���������������������������������������������������80
8.1 Camera/Camcorder ..................................................................................80
8.2 Gallery ......................................................................................................... 83
8.3 YouTube ...................................................................................................... 86
8.4 Mix ................................................................................................................87
9 Google Maps ����������������������������������������������������������������������88
9.1 Get My Location .......................................................................................88
9.2 Search for a location ................................................................................89
9.3 Get driving, public transport or walking directions .......................... 90
9.4 Share a location .........................................................................................91
10 Others ��������������������������������������������������������������������������������92
10.1 File Manager ...............................................................................................92
10.2 Sound Recorder ........................................................................................92
10.3 Radio ............................................................................................................93
10.4 Notes ...........................................................................................................94
10.5 Other applications ....................................................................................94
11 Settings ������������������������������������������������������������������������������95
11.1 Wireless & network .................................................................................95
11.2 Device ..........................................................................................................97
11.3 Personal .....................................................................................................101
11.4 System ........................................................................................................105
1 2
Page 3

12 Making the most of your phone ������������������������������������108
12.1 Upgrade .....................................................................................................108
13 Accessories ����������������������������������������������������������������������109
14 Warranty ��������������������������������������������������������������������������110
15 Troubleshooting ���������������������������������������������������������������112
16 Specifications �������������������������������������������������������������������� 116
This product meets applicable national SAR limits of
1.6 W/kg. The specific maximum SAR values can be
found on page 9 of this user guide.
When carrying the product or using it while worn
on your body, either use an approved accessory
www.sar-tick.com
such as a holster or otherwise maintain a distance of
15 mm from the body to ensure compliance with RF
exposure requirements. Note that the product may be
transmitting even if you are not making a phone call.
PROTECT YOUR HEARING
To prevent possible hearing damage, do not listen at high volume levels
for long periods. Exercise caution when holding your device near your ear
while the loudspeaker is in use.
3 4
Safety and use ������������������������������
We recommend that you read this chapter carefully before using your mobile
phone. The manufacturer disclaims any liability for damage, which may result as a
consequence of improper use or use contrary to the instructions contained herein.
• TRAFFIC SAFETY:
Given that studies show that using a mobile phone while driving a vehicle constitutes
a real risk, even when the hands-free kit is used (car kit, headset...), drivers are
requested to refrain from using their mobile phone when the vehicle is not parked.
Check the laws and regulations on the use of wireless mobile phones and their
accessories in the areas where you drive. Always obey them. The use of these devices
may be prohibited or restricted in certain areas.
When driving, do not use your mobile phone and headphone to listen to music or to
the radio. Using a headphone can be dangerous and forbidden in some areas.
When switched on, your mobile phone emits electromagnetic waves that can
interfere with the vehicle’s electronic systems such as ABS anti-lock brakes or airbags.
To ensure that there is no problem:
-do not place your mobile phone on top of the dashboard or within an airbag
deployment area,
-check with your car dealer or the car manufacturer to make sure that the car’s
electronic devices are shielded from mobile phone RF energy.
• CONDITIONS OF USE:
You are advised to switch off the mobile phone from time to time to optimize its
performance.
Remember to abide by local authority rules of mobile phone use on aircrafts.
Operational Warnings: Obey all posted signs when using mobile devices in public
areas.
Follow Instructions to Avoid Interference Problems: Turn off your mobile device in
any location where posted notices instruct you to do so. In an aircraft, turn off your
mobile device whenever instructed to do so by airline staff. If your mobile device
offers an airplane mode or similar feature, consult airline staff about using it in flight.
Switch the mobile phone off when you are in health care facilities, except in
designated areas. As with many other types of equipment now in regular use, mobile
phones can interfere with other electrical or electronic devices, or equipment using
radio frequency.
Page 4

Switch the mobile phone off when you are near gas or flammable liquids. Strictly obey
all signs and instructions posted in a fuel depot, gas station, or chemical plant, or in
any potentially explosive atmosphere.
When the mobile phone is switched on, it should be kept at least 15 cm from any
medical device such as a pacemaker, a hearing aid or insulin pump. In particular when
using the mobile phone you should hold it against the ear on the opposite side to
the device, if any.
Read and follow the directions from the manufacturer of your implantable medical
device. If you have any questions about using your mobile device with your
implantable medical device, consult your healthcare provider.
To avoid hearing impairment, answer the call before holding your mobile phone to
your ear. Also move the handset away from your ear while using the “hands-free”
option because the amplified volume might cause hearing damage.
It is recommended to have proper supervision while small children use your mobile
phone.
Please note that your phone is a unibody device, the battery is not removable. Do
not attempt to disassemble your phone. If you disassemble your phone the warranty
will not apply. Also disassembling the phone may damage the battery, and may cause
leakage of substances that could create an allergic reaction.
Always handle your mobile phone with care and keep it in a clean and dust-free place.
Do not allow your mobile phone to be exposed to adverse weather or environmental
conditions (moisture, humidity, rain, infiltration of liquids, dust, sea air, etc.). The
manufacturer’s recommended operating temperature range is -10°C (14°F) to +55°C
(131°F) (the max value depends on device, materials and housing paint/texture).
Over 55°C (131°F) the legibility of the mobile phone’s display may be impaired,
though this is temporary and not serious.
Do not open or attempt to repair your mobile phone yourself.
Do not drop, throw or try to bend your mobile phone.
Do not use the mobile phone if the glass made screen, is damaged, cracked or broken
to avoid any injury.
Do not paint it.
Use only batteries, battery chargers, and accessories which are recommended by TCL
Communication Ltd. and its affiliates and are compatible with your mobile phone
model. TCL Communication Ltd. and its affiliates disclaim any liability for damage
caused by the use of other chargers or batteries.
Your mobile phone should not be disposed of in municipal waste. Please check local
regulations for disposal of electronic products.
Remember to make back-up copies or keep a written record of all important
information stored in your mobile phone.
Some people may suffer epileptic seizures or blackouts when exposed to flashing
lights, or when playing video games. These seizures or blackouts may occur even if
a person never had a previous seizure or blackout. If you have experienced seizures
or blackouts, or if you have a family history of such occurrences, please consult your
doctor before playing video games on your mobile phone or enabling a flashing-lights
feature on your mobile phone. Parents should monitor their children’s use of video
games or other features that incorporate flashing lights on the mobile phones.
All persons should discontinue use and consult a doctor if any of the following
symptoms occur: convulsion, eye or muscle twitching, loss of awareness, involuntary
movements, or disorientation. To limit the likelihood of such symptoms, please take
the following safety precautions:
- Play at the farthest distance possible from the screen.
When you play games on your mobile phone, you may experience occasional
discomfort in your hands, arms, shoulders, neck, or other parts of your body. Follow
these instructions to avoid problems such as tendinitis, carpal tunnel syndrome, or
other musculoskeletal disorders:
-Take a minimum 15-minute break for every hour of game playing.
-If your hands, wrists, or arms become tired or sore while playing, stop and rest for
several hours before playing again.
-If you continue to have sore hands, wrists, or arms during or after playing, stop the
game and see a doctor.
PROTECT YOUR HEARING
To prevent possible hearing damage, do not listen at high volume levels
for long periods. Exercise caution when holding your device near your ear
while the loudspeaker is in use.
5 6
Page 5

• PRIVACY:
Please note that you must respect the laws and regulations in force in your
jurisdiction or other jurisdiction(s) where you will use your mobile phone regarding
taking photographs and recording sounds with your mobile telephone. Pursuant to
such laws and regulations, it may be strictly forbidden to take photographs and/or to
record the voices of other people or any of their personal attributes, and duplicate
or distribute them, as this may be considered to be an invasion of privacy. It is the
user's sole responsibility to ensure that prior authorization be obtained, if necessary,
in order to record private or confidential conversations or take a photograph
of another person; the manufacturer, the seller or vendor of your mobile phone
(including the carrier) disclaim any liability which may result from the improper use
of the mobile phone.
• BATTERY:
Please note your phone is a unibody device, the battery is not removable. Observe
the following precautions:
- Do not attempt to eject, replace and open battery,
- Do not punctuate the back cover of your phone,
- Do not burn or dispose of your phone in household rubbish or store it at
temperature above 60°C.
Phone and battery as a unibody device must be disposed of in accordance with locally
applicable environmental regulations.
This symbol on your mobile phone, the battery and the accessories means
that these products must be taken to collection points at the end of their
life:
- Municipal waste disposal centers with specific bins for these items of
equipment
- Collection bins at points of sale.
They will then be recycled, preventing substances being disposed of in the
environment, so that their components can be reused.
In European Union countries:
These collection points are accessible free of charge. All products with this sign must
be brought to these collection points.
In non European Union jurisdictions:
Items of equipment with this symbol are not be thrown into ordinary bins if your
jurisdiction or your region has suitable recycling and collection facilities; instead they
are to be taken to collection points for them to be recycled.
In the United States you may learn more about CTIA’s Recycling Program at http://
www.gowirelessgogreen.org/
CAUTION: RISK OF EXPLOSION IF BATTERY IS REPLACED BY AN INCORRECT
TYPE. DISPOSE OF USED BATTERIES ACCORDING TO THE INSTRUCTIONS.
Battery Healthcare
User Interactions and Responsibilities to respect Section 8.1 of CTIA IEEE1725 CRD
document:
- Do not disassemble or open crush, bend or deform, puncture or shred
- Do not modify or remanufacture, attempt to insert foreign objects into the battery,
immerse or expose to water or other liquids, expose to fire, explosion or other
hazard.
- Only use the battery with a charging system that has been qualified with the system
per CTIA Certification Requirements for Battery System Compliance to IEEE 1725.
Use of an unqualified battery or charger may present a risk of fire, explosion, leakage,
or other hazard.
- Promptly dispose of used batteries in accordance with local regulations
- Avoid dropping the phone or battery. If the phone or battery is dropped, especially
on a hard surface, and the user suspects damage, take it to a service center for
inspection.
- Improper battery use may result in a fire, explosion or other hazard.
The phone shall only be connected to CTIA certified adapters, products that bear
the USB-IF logo or products that have completed the USB-IF compliance program.
• CHARGERS
Home A.C./ Travel chargers will operate within the temperature range of: 0°C (32°F)
to 40°C (104°F).
The chargers designed for your mobile phone meet with the standard for safety
of information technology equipment and office equipment use. Due to different
applicable electrical specifications, a charger you purchased in one jurisdiction may not
work in another jurisdiction. They should be used for this purpose only.
Characteristics of power supply (depending on the country):
Travel charger: Input: 100-240 V, 50/60 Hz, 200 mA
Output: 5 V, 1A
Battery: Lithium 2500 mAh
• RADIO WAVES:
THIS MOBILE PHONE MEETS THE GOVERNMENT’S REQUIREMENTS FOR
EXPOSURE TO RADIO WAVES.
7 8
Page 6

Your mobile phone is a radio transmitter and receiver. It is designed and manufactured
not to exceed the emission limits for exposure to radio-frequency (RF) energy. These
limits are part of comprehensive guidelines and establish permitted levels of RF
energy for the general population. The guidelines are based on standards that were
developed by independent scientific organizations through periodic and thorough
evaluation of scientific studies. These guidelines include a substantial safety margin
designed to ensure the safety of all persons, regardless of age and health.
The exposure standard for mobile phones employs a unit of measurement known
as the Specific Absorption Rate, or SAR. The SAR limit set by public authorities such
as the Federal Communications Commission of the US Government (FCC), or by
Industry Canada, is 1.6 W/kg averaged over 1 gram of body tissue. Tests for SAR are
conducted using standard operating positions with the mobile phone transmitting at
its highest certified power level in all tested frequency bands.
Although the SAR is determined at the highest certified power level, the actual SAR
level of the mobile phone while operating can be well below the maximum value. This
is because the mobile phone is designed to operate at multiple power levels so as to
use only the power required to reach the network. In general, the closer you are to
a wireless base station antenna, the lower the power output of the mobile phone.
Before a mobile phone model is available for sale to the public, compliance with
national regulations and standards must be shown.
The highest SAR value for 5054S model mobile phone when tested is 1.30 W/Kg for
use at the ear and 1.45 W/Kg for use close to the body.
The highest SAR value for 5054A model mobile phone when tested is 1.25 W/Kg for
use at the ear and 1.26 W/Kg for use close to the body.
While there may be differences between the SAR levels of various mobile phones
and at various positions, they all meet the government requirement for RF exposure.
For body-worn operation, the mobile phone meets FCC RF exposure guidelines
provided that it is used with a non-metallic accessory with the handset at least 15
mm from the body. Use of other accessories may not ensure compliance with FCC
RF exposure guidelines.
Additional information on SAR can be found on the Cellular Telecommunications &
Internet Association (CTIA) Web site: http://www.ctia.org/
The World Health Organization (WHO) considers that present scientific information
does not indicate the need for any special precautions for use of mobile phones. If
individuals are concerned, they might choose to limit their own or their children’s
RF exposure by limiting the length of calls, or using “hands-free” devices to keep
mobile phones away from the head and body. Additional WHO information about
electromagnetic fields and public health are available on the following website: http://
www.who.int/peh-emf.
9 10
Note: This equipment has been tested and found to comply with the limits for a Class
B digital device pursuant to part 15 of the FCC Rules. These limits are designed to
provide reasonable protection against harmful interference in a residential installation.
This equipment generates, uses and can radiate radio frequency energy and, if not
installed and used in accordance with the instructions, may cause harmful interference
to radio communications. However, there is no guarantee that interference to radio
or television reception, which can be determined by turning the equipment off and
on, the user is encouraged to try to correct the interference by one or more of the
following measures:
-Reorient or relocate the receiving antenna.
-Increase the separation between the equipment and receiver.
-Connect the equipment into an outlet on a circuit different from that to which the
receiver is connected.
-Consult the dealer or an experienced radio/ TV technician for help.
Changes or modifications not expressly approved by the party responsible for
compliance could void the user’s authority to operate the equipment.
For the receiver devices associated with the operation of a licensed radio service (e.g.
FM broadcast), they bear the following statement:
This device complies with Part 15 of the FCC Rules and Industry Canada licence-
exempt RSS standard(s). Operation is subject to the condition that this device does
not cause harmful interference.
For other devices, they bear the following statement:
This device complies with Part 15 of the FCC Rules and Industry Canada licence-
exempt RSS standard(s). Operation is subject to the following two conditions:
(1) this device may not cause harmful interference
(2) this device must accept any interference received, including interference that may
cause undesired operation.
Your mobile phone is equipped with a built-in antenna. For optimal operation, you
should avoid touching it or degrading it.
As mobile devices offer a range of functions, they can be used in positions other
than against your ear. In such circumstances the device will be compliant with the
guidelines when used with headset or usb data cable. If you are using another
accessory ensure that whatever product is used is free of any metal and that it
positions the mobile phone at least 15 mm away from the body.
IC Notice
This device complies with Industry Canada license-exempt RSS standard(s).
Operation is subject to the following two conditions:
(1) this device may not cause interference, and
Page 7

(2) this device must accept any interference, including interference that may cause
undesired operation of the device.
This Class B digital apparatus complies with Canadian ICES-003.
IC Radiation Exposure Statement
This EUT is compliance with SAR for general population/uncontrolled exposure limits
in IC RSS-102 and had been tested in accordance with the measurement methods and
procedures specified in IEEE 1528 and IEC 62209. This equipment should be installed
and operated with minimum distance 15 mm between the radiator and your body.
This device and its antenna(s) must not be co-located or operating in conjunction
with any other antenna or transmitter.
Please note by using the device some of your personal data may be shared with the
main device. It is under your own responsibility to protect your own personal data,
not to share with it with any unauthorized devices or third party devices connected
to yours. For products with Wi-Fi features, only connect to trusted Wi-Fi networks.
Also when using your product as a hotspot (where available), use network security.
These precautions will help prevent unauthorized access to your device. Your product
can store personal information in various locations including a SIM card, memory
card, and built-in memory. Be sure to remove or clear all personal information
before you recycle, return, or give away your product. Choose your apps and updates
carefully, and install from trusted sources only. Some apps can impact your product’s
performance and/or have access to private information including account details, call
data, location details and network resources.
Note that any data shared with TCL Communication Ltd. is stored in accordance
with applicable data protection legislation. For these purposes TCL Communication
Ltd. implements and maintains appropriate technical and organizational measures to
protect all personal data, for example against unauthorized or unlawful processing
and accidental loss or destruction of or damage to such personal data whereby the
measures shall provide a level of security that is appropriate having regard to
(i) the technical possibilities available,
(ii) the costs for implementing the measures,
(iii) the risks involved with the processing of the personal data, and
(iv) the sensitivity of the personal data processed.
You can access, review and edit your personal information at any time by logging into
your user account, visiting your user profile or by contacting us directly. Should you
require us to edit or delete your personal data, we may ask you to provide us with
evidence of your identity before we can act on your request.
11 12
• LICENSES
microSD Logo is a trademark.
The Bluetooth® word mark and logos are owned by the Bluetooth
SIG, Inc. and any use of such marks by TCL Communication Ltd. and its
affiliates is under license. Other trademarks and trade names are those of
their respective owners.
ALCATEL ONETOUCH 5054S/5054A Bluetooth
Declaration ID D026715
The Wi-Fi Logo is a certification mark of the Wi-Fi Alliance.
Google, the Google logo, Android, the Android logo, Google SearchTM,
Google MapsTM, Gmail TM, YouTube, Google Play Store, Google
Latitude TM and Hangouts TM are trademarks of Google Inc.
The Android robot is reproduced or modified from work created and shared by
Google and used according to terms described in the Creative Commons 3.0
Attribution License (the text will show when you touch and hold Google legal in
Settings\ About phone\ Legal information)
You have purchased a product which uses the open source (http://opensource.
org/) programs mtd, msdosfs, netfilter/iptables and initrd in object code and other
open source programs licensed under the GNU General Public License and Apache
License.
We will provide you with a complete copy of the corresponding source codes upon
request within a period of three years from the distribution of the product by TCL.
You may download the source codes from http://sourceforge.net/projects/alcatel/
files/. The provision of the source code is free of charge from internet.
Hearing Aid Compatibility
Your mobile phone is rated: «For Hearing Aid», to assist hearing device users in finding
mobile phones that may be compatible with their hearing devices.
5054S model is HAC M4/T4 compatible. Reference ANSI C63.19-2011
5054A model is HAC M4 compatible. Reference ANSI C63.19-2011
For more information please visit our website
5054S:
FCC ID: 2ACCJA010
IC: 9238A-0047
5054A:
FCC ID: 2ACCJA011
(1)
Varies by country.
(1)
.
http://www.alcatelonetouch.us
Page 8

General information �������������������
•Website: www.alcatelonetouch.us
www.alcatelonetouch.ca
•Facebook:www.facebook.com/alcatelonetouchusa
•Twitter: http://www.twitter.com/alcatel1touch
•Hotline Number: In the United States, call 855-386-0829 for technical
•Electronic labeling (Elabel) path: Touch Settings/Regulatory & Safety
On our Internet site, you will find our FAQ (Frequently Asked Questions) section. You
can also contact us by e-mail to ask any questions you may have.
An electronic version of this user guide is available in English and other languages
according to availability on our server: www.alcatelonetouch.us
5054S model is a transceiver that operates on GSM/GPRS/EDGE in quad-band with
850/900/1800/1900 MHz, UMTS in tri-band (2/4/5) and LTE FDD: B2/4/5/7/17.
5054A model is a transceiver that operates on GSM/GPRS/EDGE in quad-band with
850/900/1800/1900 MHz, UMTS in tri-band (850/900/1900/2100 MHz) and LTE FDD:
B1/2/4/7/28 full.
This equipment is in compliance with the essential requirements and other relevant
provisions of Directive 1999/5/EC. The entire copy of the Declaration of Conformity
for your telephone can be obtained through our website:
www.facebook.com/alcatelonetouchcanada
support. In Canada, call 855-844-6058 for technical support
or input "*#07#", you can find more information about labeling
www.alcatelonetouch.us.
(1)
�
Disclaimer
There may be certain differences between the user manual description and the
mobile phone’s operation, depending on the software release of your mobile phone
or specific carrier services.
TCL Communication shall not be held legally responsible for such differences, if
any, nor for their potential consequences, which responsibility shall be borne by the
carrier exclusively.
Electronic Recycling
For more information on Electronic Recycling, please:
1) Visit ALCATEL ONETOUCH Electronic Recycling Program website at http://
www.alcatelonetouch.us/Electronic-Recycling-Program-Accessibility-andCompliance/b/11522543011, or
2) Call ALCATEL ONETOUCH US Customer Support at 1-855-368-0829.
Protection against theft
Your mobile phone is identified by an IMEI (mobile phone serial number) shown on
the packaging label and in the product’s memory. We recommend that you note the
number the first time you use your mobile phone by entering *#06# and keep it in
a safe place. It may be requested by the police or your carrier if your mobile phone
is stolen.
(1)
Varies by country.
(2)
Contact your network carrier to check service availability.
(2)
13 14
Page 9
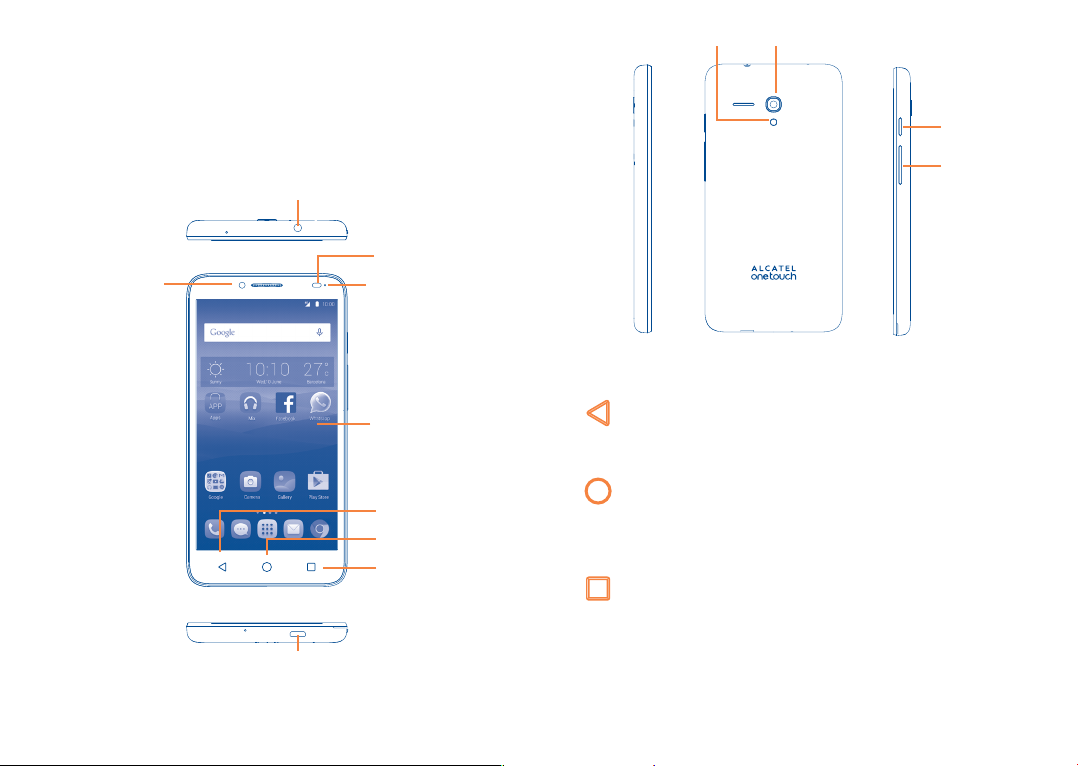
Your mobile ���������������������������
1
CameraCamera Flash/Flashlight
1�1 Keys and connectors
Headset connector
Friont
Camera
Micro-USB Connector
Proximity &
Light Sensor
LED indicator
Touch screen
Back key
Home key
Menu key
Power key
Volume key
Back key
•Touch to go back to the previous screen, or to close a dialog
box, options menu, the notification panel, etc.
Home key
• From any application or screen, touch to return to the Home screen.
•Long press to pop up Google search icon. Slide your finger to
the icon to open Google search.
Recents key
•Touch to view recently used applications.
15 16
Page 10

Power key
•Press: Lock the screen/Light up the screen.
•Press and hold: Show the popup menu to select from Power
off/Restart/Airplane mode.
•Press and hold the Power key and Volume up key to reset.
•Press and hold the Power key and Volume down key to
capture a screenshot.
•Press and hold the Power key for 8 seconds to power off or
hold it for 10 seconds or more to force reboot.
Volume Keys
• In call mode, adjusts the earpiece or headset volume.
•In Music/Video/Streaming mode, adjusts the media volume.
•In general mode, adjusts the ringtone volume.
•Mutes the ringtone of an incoming call.
•In camera preview mode, press Volume up or down key to
take a picture.
1�2 Getting started
1�2�1 Set up
Removing or installing the back cover
Inserting or removing the SIM card
You must insert your SIM card to make phone calls. Please power off your
phone before inserting or removing the SIM card.
To install, please open SIM card lock first, and then place the SIM card
into the slot with its chip facing downwards. Make sure that it is correctly
inserted. To remove the card, please open SIM card lock and take it out
from the slot.
Before inserting/removing the SIM card, you should ensure the
phone is off, to protect it from corruption or damage.
Your phone only supports micro-SIM card. Do not attempt to insert
other SIM type like mini and nano card, otherwise may cause phone
damage.
17 18
Page 11
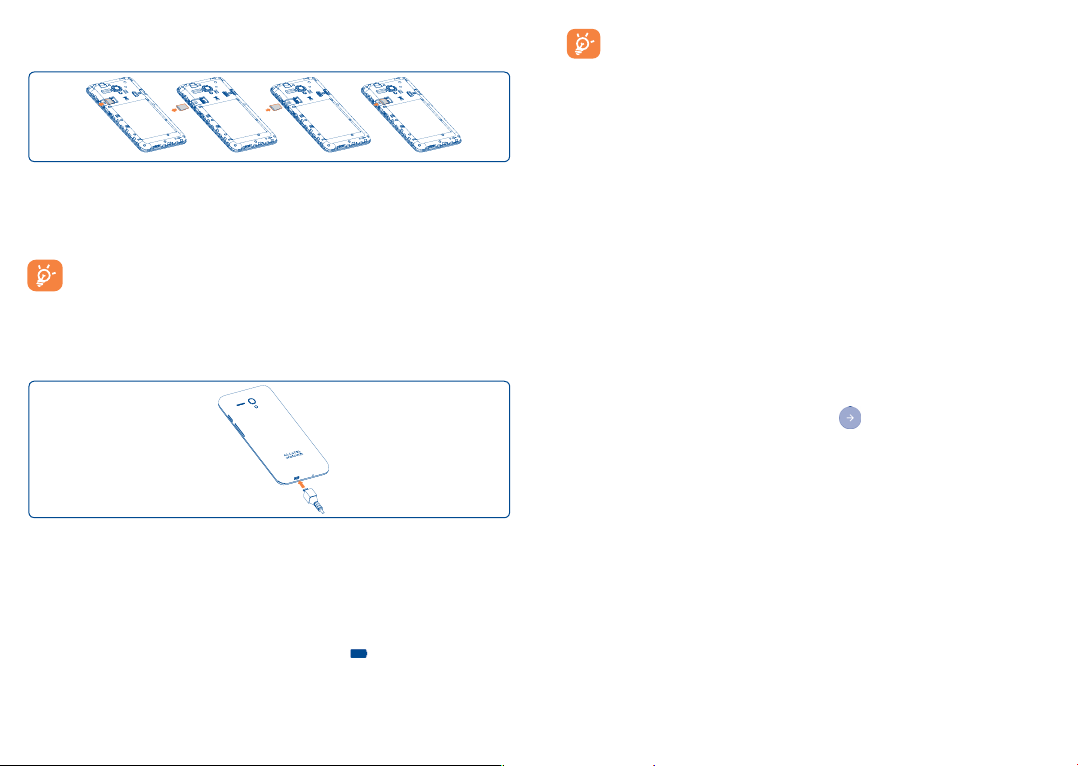
Installing or removing the microSD card
If the battery is very low, there will be no indication that power is
being received until the charge is sufficient to show the charging
status bar. To reduce power consumption and energy waste, when
battery is fully charged, disconnect your charger from the plug; switch off
Wi-Fi, GPS, Bluetooth or background-running applications when not
in use; reduce the backlight time, etc.
To install, please open microSD card lock first, and then place the microSD
card into the slot with the gold contact facing downwards. To remove the
external microSD card, please open microSD card lock and take it out
from the slot.
Before inserting/removing the microSD card, you should ensure the
phone is off, to protect it from corruption or damage. In addition,
regularly removing or inserting the SD card may cause the phone to
restart.
Charging the battery
Connect the battery charger to your phone and mains socket respectively.
•Make sure the battery is correctly inserted before connecting the
charger.
•When using your telephone for the first time, charge the battery fully
(approximately 5 hours).
You are advised to fully charge the battery (
indicated by the percentage on screen while the phone is powered off. The
percentage increases as the phone is charged.
19 20
). Charging status is
1�2�2 Power on your phone
Hold down the Power key until the phone powers on, unlock your phone
(Swipe, PIN, Password and Pattern) if necessary and confirm. The Home
screen is displayed.
If you do not know your PIN code or if you have forgotten it, contact your
network operator. Do not leave your PIN code with your phone. Store this
information in a safe place when not in use.
Set up your phone for the first time
The first time you power on the phone, you should set the following
options:
•Select the phone's language, then touch
•Select an enabled Wi-Fi then touch NEXT, otherwise touch SKIP�
•Set up Google Services by marking the corresponding checkboxes, touch
MORE to learn more about Google Services, then touch NEXT.
•Set up Location service after switching the toggle for Location, then
select the desired location mode.
•Touch FINISH to complete the setup process.
Even if no SIM card is installed, your phone will still power on and you will
be able to connect to a Wi-Fi network, (refer to section “6�1�2 Wi-Fi”),
sign into your Google account and to use some features.
.
Page 12
1�2�3 Power off your phone
Hold down the Power key from the Home screen until the phone options
appear, select Power off.
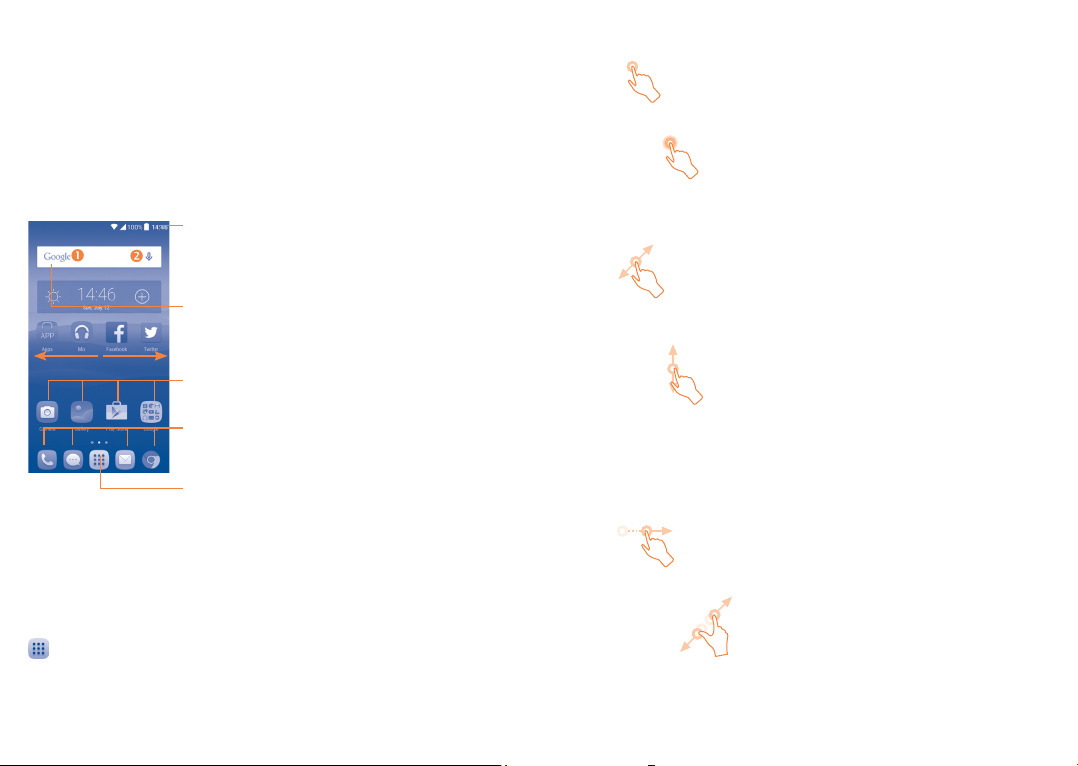
1�3 Home screen
You can bring all the items (applications, shortcuts, folders and widgets) you
love or use most frequently to your Home screen for quick access. Touch
the Home key to switch to the Home screen.
Status bar
•Status/Notification indicators
•Touch and drag down to open the
notification panel.
Search bar
•Touch to enter text search screen.
•Touch to enter voice search screen.
1�3�1 Using the touchscreen
Touch
To access an application, touch it with your finger.
Long press
To enter the available options for an item, long press the item. For example,
select a contact in Contacts, long press this contact, an options list will then
appear on screen.
Drag
Place and hold your finger on the screen to drag an object to another
location.
Touch an icon to open an
application, folder, etc.
Favorite tray applications
•Touch to enter the application.
•Long press to move or change applications.
Touch to enter application list.
The Home screen is provided in an extended format to allow more space
for adding applications, shortcuts etc. Slide the Home screen horizontally
left and right to get a complete view.
Reversible the screen
The phone supports reversible function, from the Home screen, touch
to open the applications list, touch Settings\Display\When device
is rotated, select Rotate screen contents or Stay in portrait view.
21 22
Slide/Swipe
Slide the screen to scroll up and down the applications, images, and web
pages… at your convenience. You can slide the screen horizontally too.
The device also supports one finger zooming in the Messaging, Browser,
Email, Camera and Gallery functions. Double touch the screen then slide
with one finger to zoom in/out.
Flick
Similar to swiping, but flicking makes it move quicker.
Pinch/Spread
Place the fingers of one hand on the screen surface and draw them apart
or together to scale an element on the screen.
Page 13

Status icons
Rotate
Automatically change the screen orientation from portrait to landscape by
turning the phone sideways to have a better screen view.
1�3�2 Status bar
From the status bar, you can view both phone status (to the right side) and
notification information (to the left side).
GPRS connected No signal
GPRS in use Alarm is set
EDGE connected Bluetooth is on
EDGE in use
3G connected Speakerphone is on
3G in use Headset connected
HSPA (3G+) connected Roaming
HSPA (3G+) in use No SIM card installed
HSPA+ connected Vibrate mode
HSPA+ in use Battery is very low
4G connected Battery is low
4G in use Battery is partially drained
Signal strength Battery is full
Wi-Fi is on Battery is charging
Connected to a Wi-Fi
network
Airplane mode
Connected to a Bluetooth
device
GPS is on
23 24
Page 14
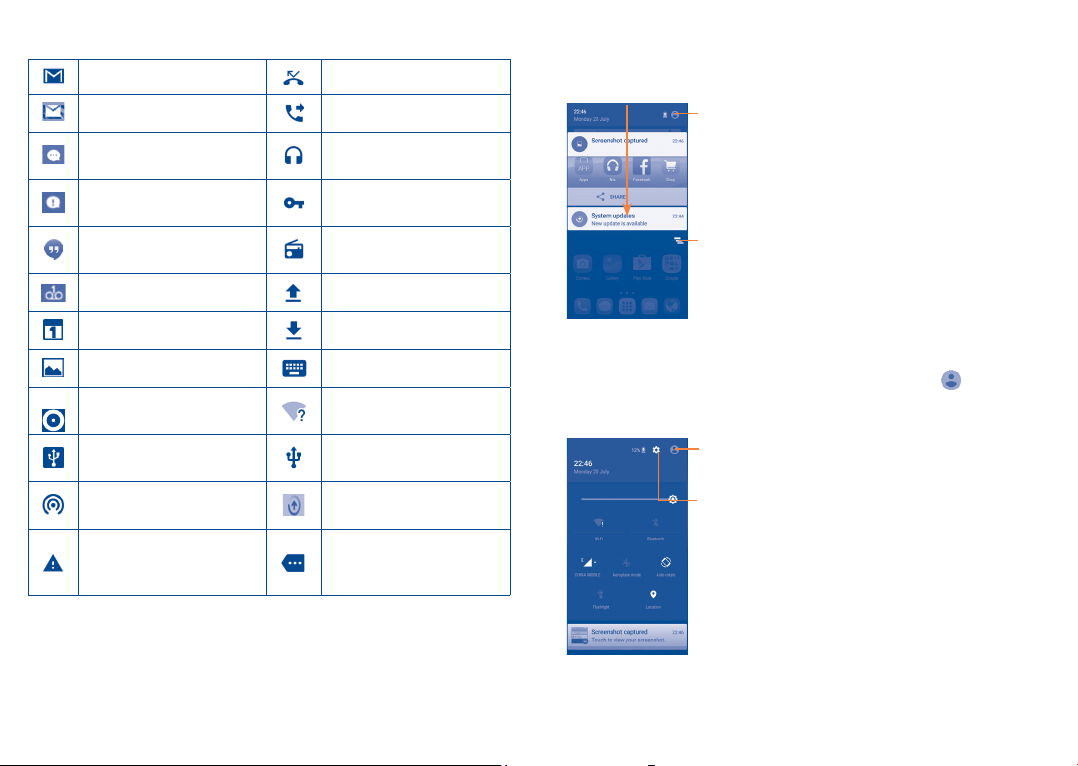
Notification icons
New Gmail message Missed call
New Email message Call forwarding is on
New text or multimedia
message
Problem with SMS or MMS
delivery
New Google Hangouts
message
New voicemail Uploading data
Song is playing
Connected to VPN
Radio is on
Notification panel
When there are notifications, touch and drag the Status bar down to open
the Notification panel to read more detailed information.
Touch to switch to the quick settings panel.
Touch to clear all event–based notifications
(other ongoing notifications will remain).
Upcoming event Download finished
Screenshot captured Select input method
Both USB tethering and
portable hotspot are on
USB tethering is on
Portable Wi-Fi hotspot
is on
Operator data use
threshold approaching or
exceeded
Touch and drag the Status bar down to open the Quick settings panel
or Notification panel. Touch and drag up to close it. When there are
notifications, you can touch them to access notifications directly.
25 26
An open Wi-Fi network is
available
Phone is connected via USB
cable
System update available
More notifications are
hidden
Quick settings panel
Touch and drag the Notification panel down or touch
Quick settings panel. You can enable or disable functions or change modes
by touching the icons.
Touch to enter user screen to edit and save owner's
name, phone number, and other information.
Touch to access Settings, where you
can set more items.
to open the
Page 15
1�3�3 Search bar
The phone provides a Search function which can be used to locate
information within applications, the phone or the web.
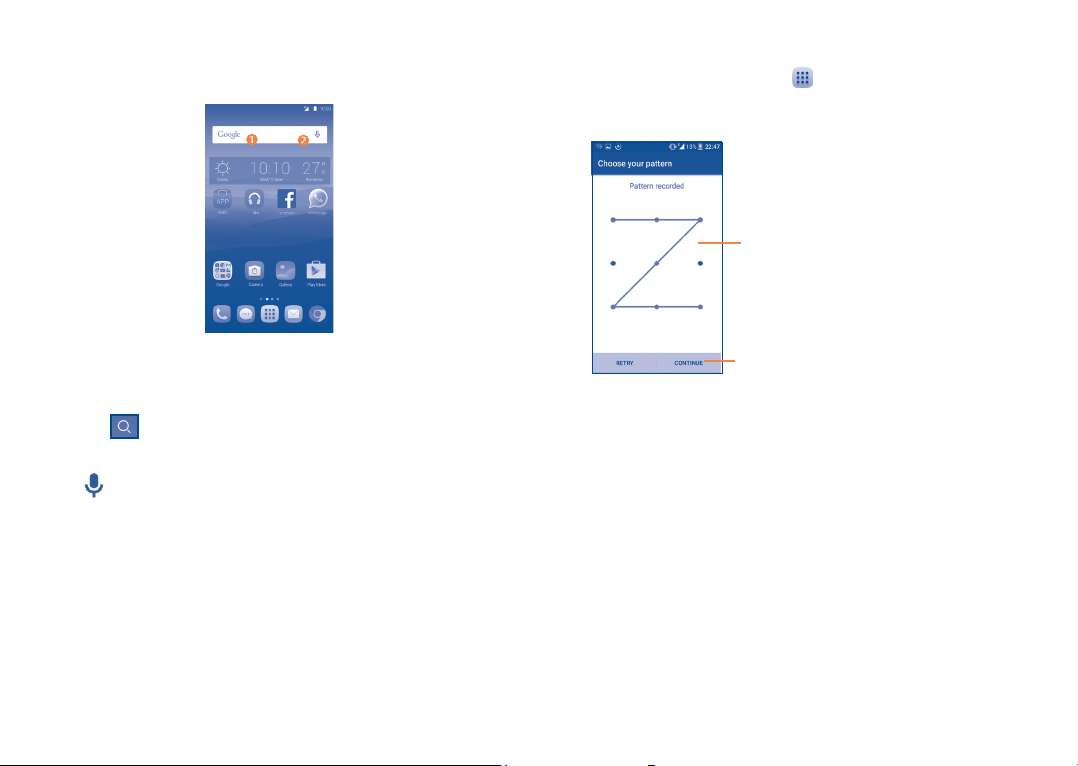
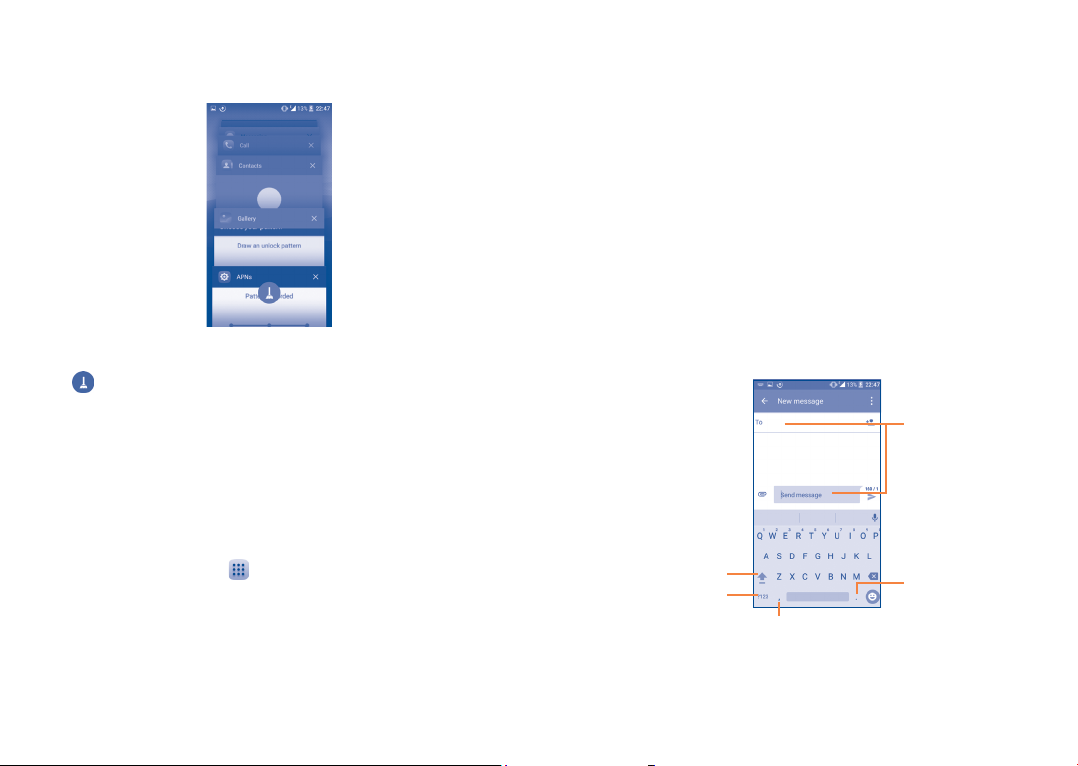
To create a screen unlock pattern (refer to section “Screen lock” for
detailed settings)
•From the Home screen, touch
touch Settings\Lock screen\Screen lock\Pattern.
•Draw your own pattern.
Draw your unlock pattern
to open the applications list, then
Search by text
• Touch the Search bar from the Home screen.
•Enter the text/phrase you want to search for.
•Touch the
Search by voice
•Touch
•Speak the word/phrase you want to search for. A list of search results will
display for you to select from.
icon on the keyboard if you want to search on the web.
from the Search bar to display a dialog screen.
1�3�4 Lock/Unlock your screen
To protect your phone and privacy, you can lock the phone screen by
choosing slide or creating a variety of patterns, PIN or password, etc.
27 28
Touch to confirm by drawing pattern again
To create a screen lock with PIN/Password
•Touch Lock screen\Screen lock\PIN or Password.
•Set your PIN or password.
To create a screen lock with swipe
•Touch Lock screen\Screen lock.
•Touch Swipe.
To lock phone screen
Press the Powe r key once to lock the screen.
Page 16

To unlock the phone screen
Press the Powe r key once to light up the screen, slide to draw the unlock
pattern you have created, or enter your PIN or password, etc. to unlock
the screen.
If you have chosen Swipe as the screen lock, you can press the Power
key to light up the screen, then swipe up to unlock the screen, swipe left
to enter Camera or swipe right to enter Call.
1�3�5 Personalize your Home screen
Add
You can long press a folder, an application or a widget to activate the Move
mode, and drag the item to your preferred Home screen.
Reposition
Long press the item to be repositioned to activate the Move mode, drag
the item to the desired position and then release. You can move items both
on the Home screen and the Favorite tray. Hold the icon on the left or
right edge of the screen to drag the item to another Home screen.
Double touch to enter the detailed screen
Swipe up to unlock the screen
Swipe left to enter Camera;
and right to enter Call
Remove
Long press the item to be removed to activate the Move mode, drag the
item up to the top of the X icon, and release after the item turns red.
Create folders
To improve the organization of items (shortcuts or applications) on the
Home screen and the Favorite tray, you can add them to a folder by
stacking one item on top of another. To rename a folder, open it and touch
the folder’s title bar to input the new name.
Wallpaper customization
Long press the empty area in the Home screen, then touch WALLPAPERS
to customize wallpaper.
1�3�6 Widgets and recently-used applications
Consult widgets
Long press the empty area in the Home screen, then touch WIDGETS
to display all widgets at the bottom of the Home screen.
Touch the selected widget and slide it to move to your preferred screen.
29 30
Page 17
Consult recently-used applications
To consult recently-used applications, touch the Recents key. Touch a
thumbnail in the window to open the related application.
Touch one thumbnail and slide it right/left or touch X to delete.
Touch
at the bottom of the screen to delete all thumbnails at once.
Text input ������������������������������
2
2�1 Using the Onscreen Keyboard
Onscreen Keyboard settings
Touch Settings\Language & input, touch the keyboard you want to set
up and a series of settings will become available for your selection.
Adjust the Onscreen Keyboard orientation
Turn the phone sideways or upright to adjust the Onscreen Keyboard
orientation. You can adjust it by changing the settings (Touch Settings\
Display\When device is rotated\Rotate screen contents).
2�1�1 Android keyboard
1�3�7 Volume adjustment
Using the volume key
Press the Volume key to adjust the volume. To active the vibrate mode,
press the Volume down key until the phone vibrates.
Using Settings menu
From the Home screen, touch
Settings\Sound & notification\Sound to set the volume of media,
ringtone, alarm, etc. to your preference.
to open the applications list, then touch
31 32
Touch to switch between
"abc/Abc" mode;
Long press to switch to
"abc/ABC" mode.
Touch to switch
between symbol and
numeric keyboard.
Touch to enter text
or numbers.
Long press to select
symbols.
Touch to enter voice input;
Long press to show input options.
Page 18
2�2 Text editing
You can edit the text you have entered.
•Long press or double touch within the text you would like to edit.
•Drag the tabs to change the highlighted selection.
•The following options will show: Select all
Paste
•Touch the
.
icon to go back without any action.
, Cut , Copy and
Call, Call log and Contacts ��
3
3�1 Call ���������������������������������������������������������������
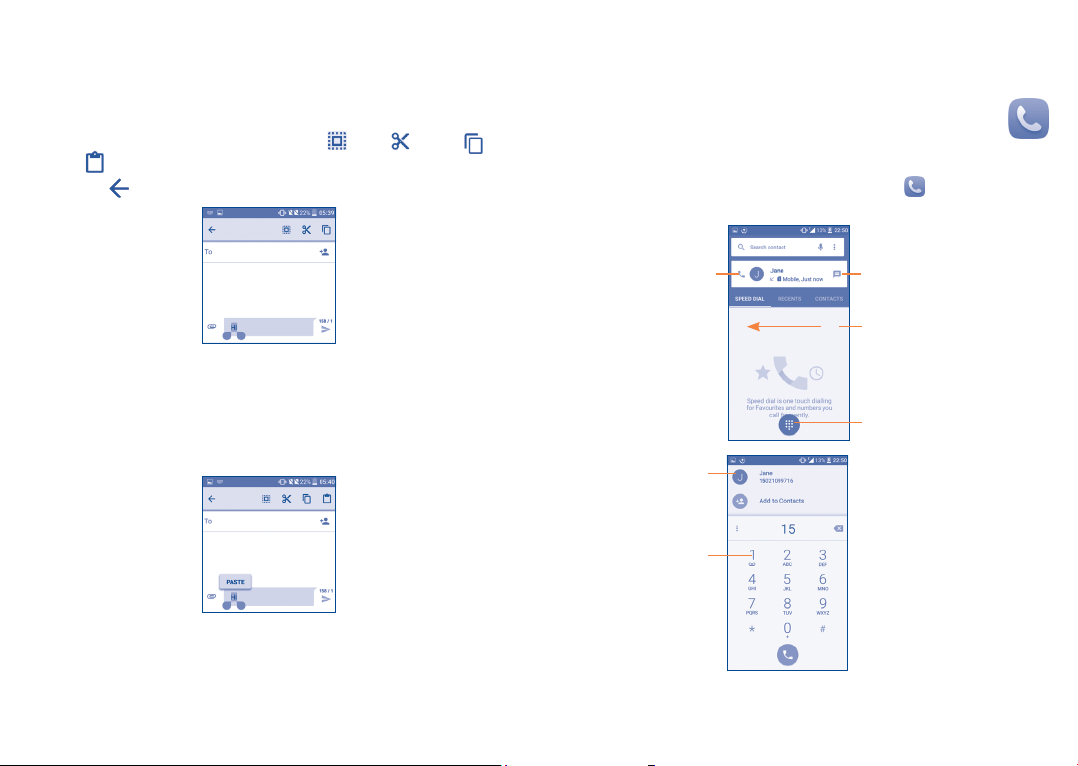
3�1�1 Placing a call
You can easily launch a call by using Call. Touch the icon on the Home
screen to access the Call application.
You can also insert new text if preferred
•Touch where you want to type, or long press the blank, the cursor will
blink and the tab will show. Drag the tab to move the cursor.
•If you have selected any text, touch the tab to show the PASTE icon
which allows you to complete pasting immediately.
33 34
Touch to call the
previewed number.
Display the
suggested
number(s).
Long press to
access voicemail.
Touch to send message to
the previewed number.
Slide to access the
RECENTS and
CONTACTS.
Touch to hide/display
keyboard.
Page 19

Enter the desired number from the keyboard directly and touch
place the call or select a contact from CONTACTS or RECENTS by
sliding or touching tabs, then to make the call.
The number you entered can be saved to Contacts by touching
then touching Create new contact.
If you make a mistake, you can delete the incorrect digits by touching
To hang up a call, touch
International call
To dial an international call, long press
international country prefix followed by the full phone number and finally
touch
Emergency call
If your phone has network coverage, dial the emergency number and touch
without typing the PIN code.
.
to make an emergency call. This works even without a SIM card and
.
to enter “+”, then enter the
35 36
to
and
3�1�2 Answering or rejecting a call
.
When you receive a call:
•Slide the
•Slide the
•Slide the
To mute the ringtone volume of an incoming call, press the Volume up/
down key, or turn the phone over (when the Settings\Gestures\Turn
over to mute option is activated).
icon to the right to answer;
icon to the left to reject;
icon upwards to reject the call by sending a preset message.
3�1�3 Calling your voicemail
Your voicemail is provided by your network to avoid missing calls. It works
like an answering machine that you can consult at any time.
To access your voicemail, long press
To set your voicemail number:
•From Call screen, touch
call settings\Voicemail\Setup\Voicemail number.
If you receive a voicemail, a voicemail icon
Open the Notification panel and touch New voicemail.
and then touch Settings\Call settings\Dual
.
appears on the Status bar.
Page 20
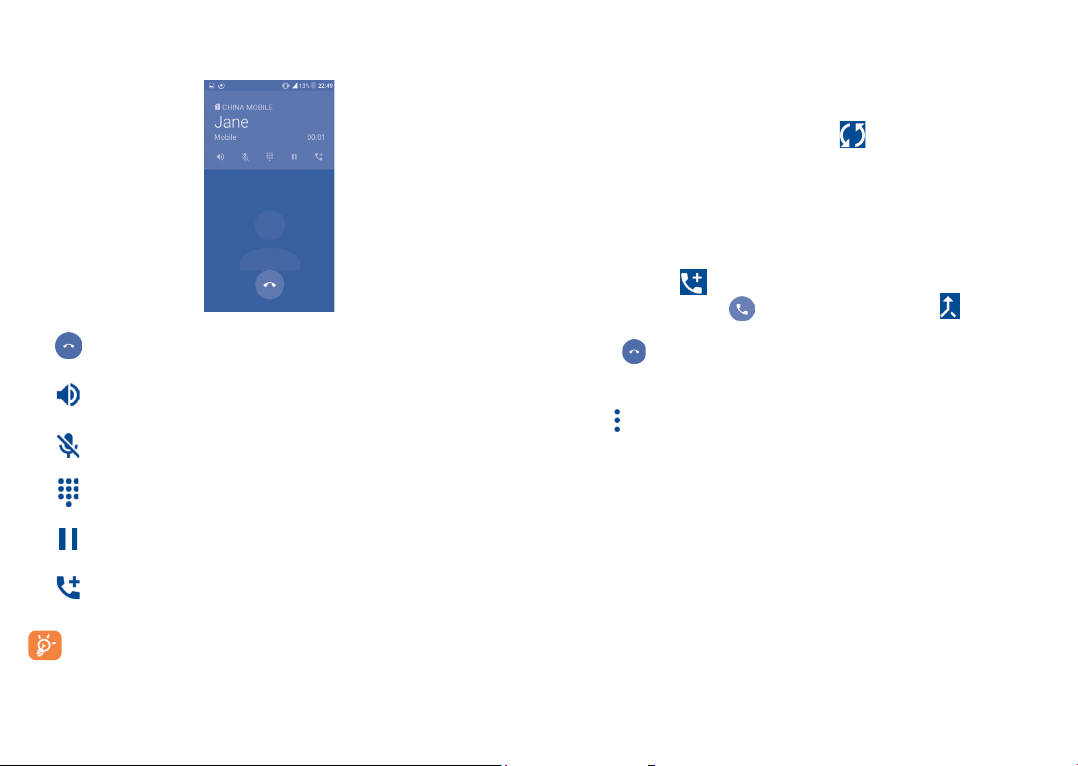
3�1�4 During a call
To adjust the volume during a call, press the Volume up/down key.
3�1�5 Managing multiple calls
With this phone you can handle multiple calls at the same time.
Swap calls
Touch to end the current call.
Touch to activate the speaker during the current call. Touch
this icon again to deactivate the speaker.
Touch to mute the current call. Touch this icon again to
unmute the call.
Touch to display the Dial pad.
Touch to hold the current call. Touch this icon again to
retrieve the call.
Touch to add a call.
To avoid accidental operation of the touchscreen during a call, the
screen will be locked automatically when you put the cellphone
close to your ear; and it will be unlocked when the cellphone is
taken away from your ear.
37 38
When you accept two calls, touch the
icon, you can now switch
between two lines. The current call will be put on hold and you are able
to join the other call.
Conference calls
(1)
You can set up a conference call as follows.
•Place a call to the first participant of the conference call.
•Touch the icon
•Then touch the icon
.
and then touch the icon to start the
conference.
•Touch
to end the conference call and disconnect all callers.
3�1�6 Call settings
Touch from the Call screen, then touch Settings. The following options
are available:
Call settings
• Dual call settings: select SIM 1 or SIM 2 to set under options.
Voicemail
- Service: Opens a dialog box where you can select your operator’s
voicemail service or another service.
- Setup: If you are using your operator’s voicemail service, this opens
a dialog box where you can enter the phone number to use for
listening to and managing your voicemail. You can enter a comma (,)
to insert a pause into the number — for example, to add a password
after the phone number.
(1)
Depending on your network operator.
Page 21

- Sound: Touch to set the sound when a new voicemail arrives.
- Vibrate: Mark the checkbox to enable vibration when a new
voicemail arrives.
Call barring: Touch to configure Call barring settings. Mark the check
box to activate the call barring for outgoing and incoming calls.
Service Dialing Numbers: You can place a call from the SDN list.
Call forwarding: Touch to configure how your calls are forwarded
when you are busy, unanswered or unreachable.
Additional settings
- Caller ID: Touch to use default operator settings to display your
number in outgoing calls.
- Call waiting: Mark the check box to notify you of new incoming
calls during a call.
Other call settings
• TTY mode: TTY mode can be used by people who are deaf, have poor
hearing or speech impairments.
• Hearing aids: Hearing aid mode can be used by people who are deaf,
have poor hearing or speech impairments. After connecting the phone
and hearing aid device, calls are linked to a relay service, which converts
incoming speech to text for the person using the hearing aid and
converts outgoing text from the hearing aid device to a spoken voice for
the person on the other end of the conversation.
• DTMF Tones: Dual Tone Multi-Frequency, or DTMF is a method for
instructing a telephone switching system of the telephone number to be
dialled, or to issue commands to switching systems or related telephony
equipment. Touch to enable DTMF tones.
3�2 Call log
You can access your call memory by touching RECENTS tab from the
Call screen to view Missed calls, Outgoing calls and Incoming calls.
Touch a contact or number to view information or further operations, you
can launch a new call, send SMS to the contact or number, view detailed
information of the call, or clear the call.
You can also add the number to Contacts by touching Add to contacts
(only available for unsaved phone numbers).
Touch View full call history to view All call log, touch
log to clear the entire call memory.
and Clear call
3�3 Contacts�������������������������������������������������������
Contacts enables quick and easy access to the contact you want to reach.
You can view and create contacts on your phone and synchronize these
with your Gmail contacts or other applications on the web or on your
phone.
3�3�1 Consult your Contacts
To access this feature, touch from the Home screen, then select
Contacts.
39 40
Page 22
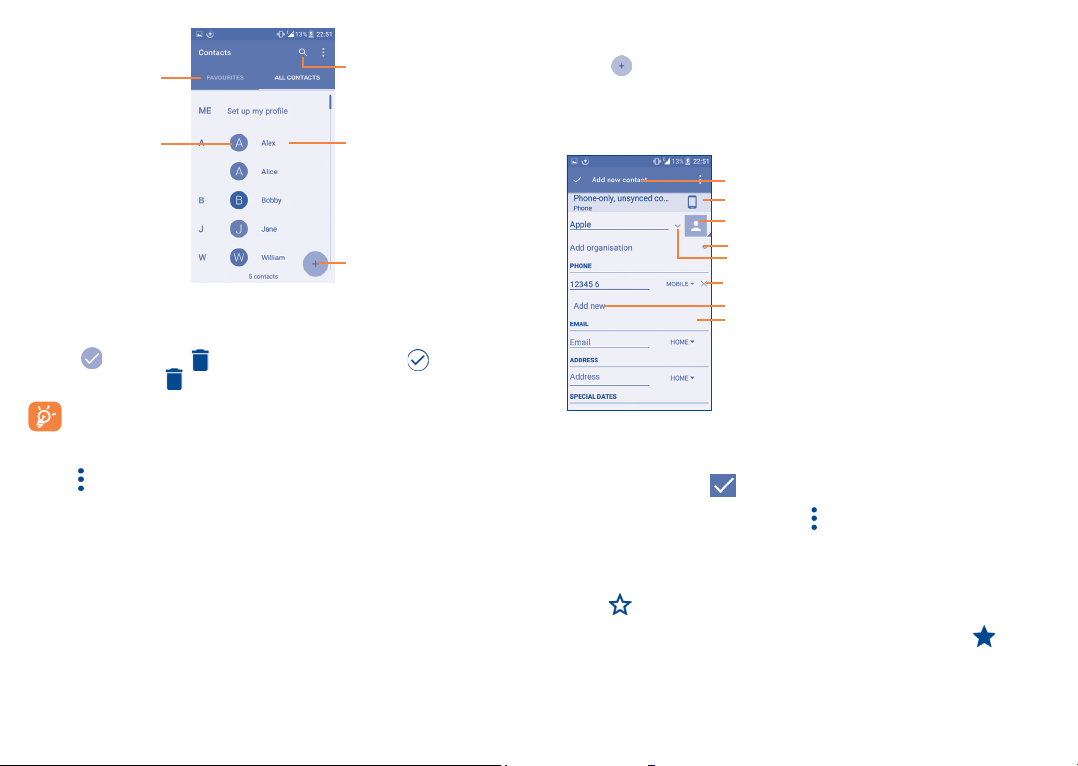
Touch to view your
favorite contacts.
Touch to select the
current contact or all
contacts to delete.
Touch to search in
Contacts
Touch image to open
Quick Contact panel.
Touch to add new contact.
Delete a contact
To delete a contact, touch the contact you want to delete, the icon will
turn to
contacts, then touch
, then touch and confirm to delete. Touch to select all
and confirm to delete all contacts.
The contact you have deleted will also be removed from other
applications on the phone or web the next time you synchronize
your phone.
Touch
to display the contacts list option menu, following actions are
enabled:
•Contacts to
Choose contacts to display.
display
•Import/export Import or export contacts between phone, SIM
card, microSD card
(1)
and phone storage.
•Accounts Manage the synchronization settings for different
accounts.
•Settings Touch to change the display of the sort list and
contact names.
41 42
3�3�2 Adding a contact
Touch in the contact list to create a new contact.
You are required to enter the contact's name and other contact
information. By scrolling up and down the screen, you can move from one
field to another easily.
Touch to save.
Touch to select Phone or SIM card.
Touch to select a picture for the contact.
Touch to add organization.
Touch to add different names.
Touch to delete the number.
Touch to add a number.
Touch to unfold the other predefined
labels of this category.
If you want to add more information, touch ADD ANOTHER FIELD at
the bottom to add a new category.
When finished, touch
To exit without saving, you can touch
Add to/remove from Favorites
To add a contact to favorites, you can touch a contact to view details then
touch
to add the contact to favorites (the star will turn white).
To remove a contact from favorites, touch the white star
contact details screen.
(1)
Only phone contacts can be added to Favorites.
to save.
and then touch Discard changes.
(1)
on the
Page 23
3�3�3 Editing your contacts
To edit contact information, touch in the contact details screen to edit.
When finished, touch
to save.
Change a contact’s default phone number
The default phone number (the number which has priority when making a
call or sending a message) will always be displayed under the contact name.
To change the default phone number, long press the number you want to
set as the default number from the contact's details screen, then select Set
default. A
appears before the number.
This choice is only available when the contact has more than one number.
3�3�4 Use Quick contact for Android
Touch a contact to open Quick Contact for Android, then you can touch
or the number to make a call, touch to send a message.
3�3�5 Importing, exporting and sharing contacts
This phone enables you to import or export contacts between your
phone, SIM card and phone storage.
From the Contacts screen, touch
to open the options menu, touch
Import/Export, then select Import from SIM card, Export to SIM
card, Import from phone storage, Export to phone storage or
Share visible contacts.
To import/export a single contact from/to your SIM card, select the contact
you want to import/export, and touch the
/ icon to confirm.
To import/export all contacts from/to your SIM card, touch the icon
and then the / icon to confirm.
You can share a single contact or contacts with others by sending the
contact's vCard to them via Bluetooth, Gmail, etc.
Touch a contact you want to share, touch the
icon and Share from
the contact details screen, and then select the application to perform this
action.
3�3�6 Displaying contacts
You can configure which list of contacts, for each account, you want to
display in the Contacts list. Touch and touch Contacts to display from
contacts list screen, then you can choose which contacts to display.
and Settings to sort the list by the given name or family name,
Touch
as well as viewing contact names by given/family name first.
3�3�7 Joining/Separating contacts
To avoid duplication, you can add any new contact information to existing
contacts in a single action.
(1)
The icons available on the Quick Contact panel depend on the information
you have for the contact and the applications and accounts on your phone.
43 44
(1)
Only applicable for phone contacts.
Page 24

Touch the contact which you want to add information to, touch
enter edit contact screen, then touch again and touch Join.
At this time, you are required to select the contact whose information
you want to join with the first contact. The information from the second
contact is added to the first one, and the second contact will no longer be
displayed in the Contacts list.
To separate contact information, touch the contact whose information you
want to separate, touch
again and touch Separate, touch OK to confirm.
to enter edit contact screen, then touch
to
3�3�8 Accounts
Contacts, data or other information can be synchronized from multiple
accounts, depending on the applications installed on your phone.
To add an account, touch
Add account or from the home screen, touch then Settings\
Accounts\Add account.
You are required to select the kind of account you are adding, like Google,
Corporate, etc.
As with other account setup, you need to enter detailed information, like
username, password, etc.
You can remove an account to delete it and all associated information
from the phone. Touch the account you want to delete, touch
Remove account, then confirm.
Turn on/off the sync & Auto-sync
Touch an account to enter the account screen, mark/unmark the
checkbox(s) to turn on/off the account’s auto-sync. When activated, all
changes to information on the phone or online will be automatically
synchronized with each other.
from the contacts list and touch Accounts/
and select
Sync manually
You can also synchronize an account manually from the Accounts screen.
Touch an account in the list, then touch
and select Sync now.
45 46
Page 25
Messaging, Gmail/Email,
4
Google Hangouts ������������������
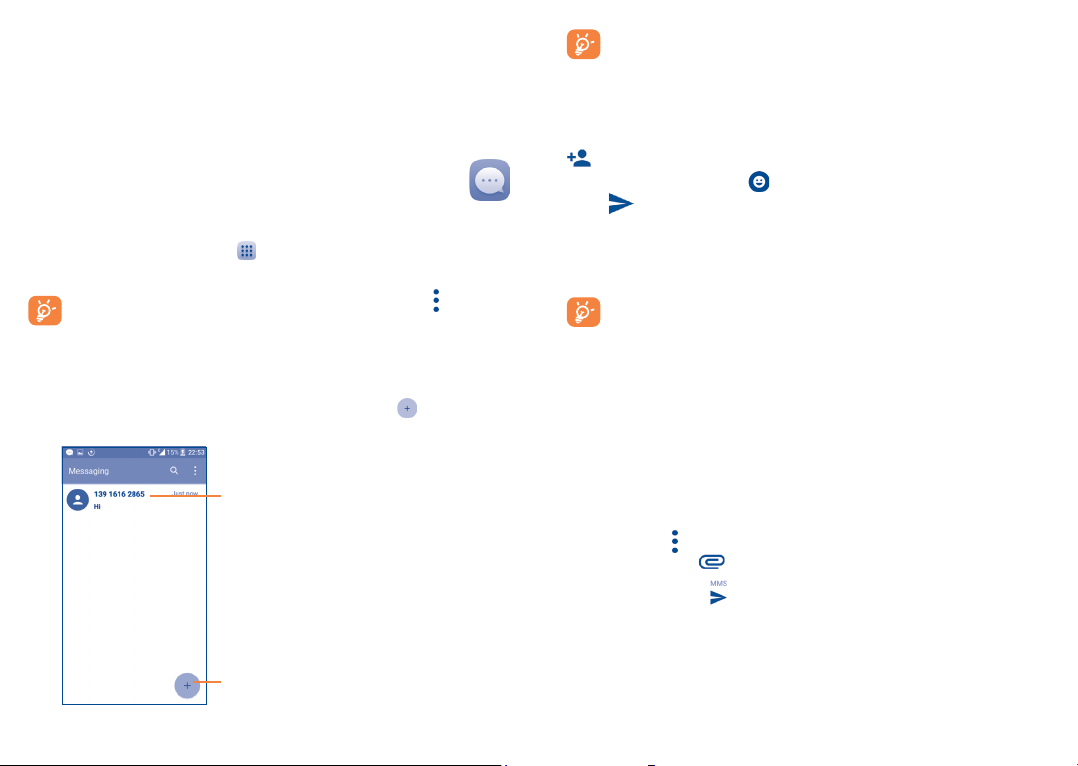
4�1 Messaging �����������������������������������������������������
You can create, edit and receive SMS and MMS with this phone.
To access this feature, touch
Messaging.
To check messages stored in your SIM card, touch the icon from
the Messaging screen, then touch Settings\Manage SIM
messages.
4�1�1 Write message
On the message list screen, touch the new message icon to write text/
multimedia messages.
from the Home screen then select
• Touch to view the whole message thread.
• Long press to activate delete mode.
For saved contacts, touch the photo to open the Quick Contact
panel to communicate with the contact. For unsaved contacts,
touch the photo to add the number to your Contacts�
Sending a text message
Enter the mobile phone number of the recipient in the To bar or touch
to add recipients and touch the Send message bar to enter the text
of the message. Touch the
touch
An SMS message of more than 160 characters will be charged as several
SMS. A counter will be on the right of the text box to remind you how
many characters are allowed to be entered in one message.
Sending a multimedia message
MMS enables you to send video clips, images, photos, animations, slides and
sounds to other compatible mobiles and e-mail addresses.
An SMS will be converted to MMS automatically when media files (image,
video, audio, slides, etc.) are attached or subject or email addresses are
added.
To send a multimedia message, enter the recipient's phone number in
the To bar and touch the Send message bar to enter the text of the
message. Touch
a subject. Touch the icon to attach a picture, video, audio and so on.
When finished, touch
to send the text message.
Specific letters (accented) will also increase the size of the SMS, this
may cause multiple SMS to be sent to your recipient.
to open the options menu, touch Add subject to insert
icon to insert emoticons. When finished,
to send the multimedia message.
Touch to create a new message.
47 48
Page 26
Attach options:
•Take photo Access the Camera to capture a new picture for
attaching.
•Capture video Access the Camcorder to record a new video for
attaching.
•Record audio Enter the voice message recorder to record a
voice message for attaching.
•Contact card Enter Contacts to select a contact as an
attachment.
•Pictures Access the Gallery application or File Manager to
select a picture as an attachment.
•Videos Access the Gallery application or File manager to
select a video as an attachment.
•Audio Access to select an audio file as an attachment.
•Calendar Access the Calendar application to select one or
more event(s) to attach.
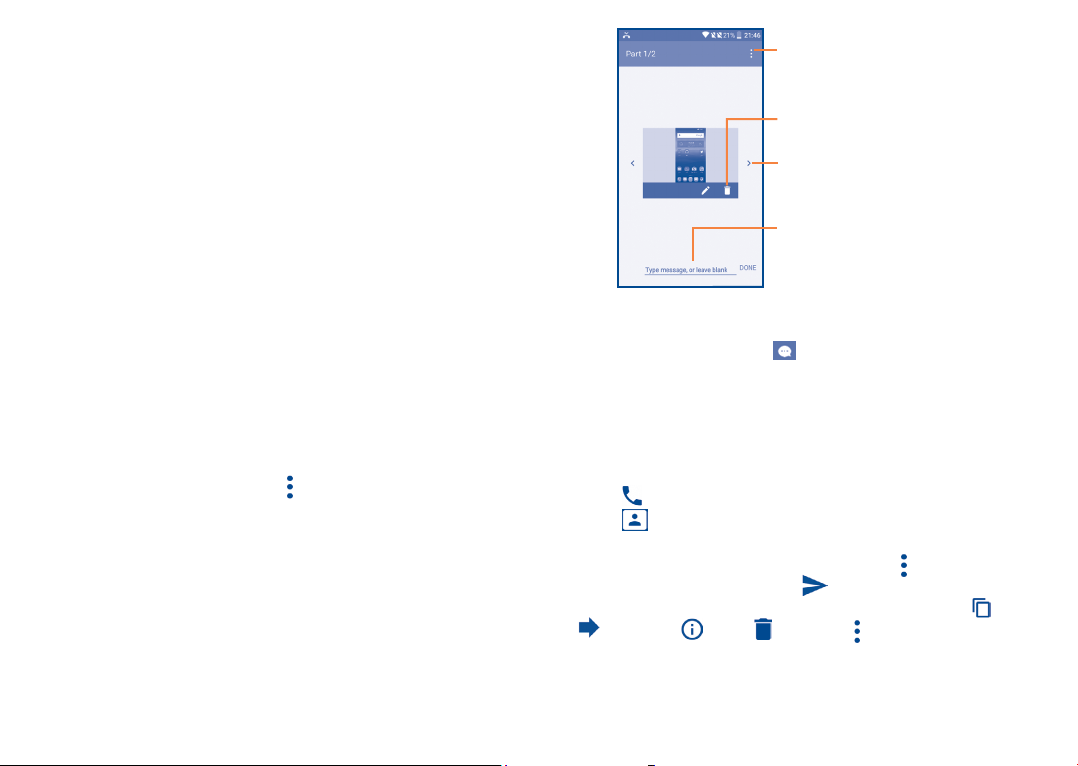
•Slide show Enter the Edit slideshow screen, touch Add
slide to create a new slide, and touch a currently
existing slide to delete or edit it (see following
picture). Touch
to get more actions, like setting
the slide duration, adding music, etc.
Touch to view more options.
Touch to delete current attachement.
Touch to view other slides.
Touch to edit current slide.
Touch to create a new message.
4�1�2 Manage messages
When receiving a message, an icon will appear on the status bar as
a notification. Drag down the status bar to open the Notification panel,
touch the new message to open and read it. You can also access the
Messaging application and touch the message to open it.
Messages are displayed in conversational order.
Touch a message to enter the message composing screen:
•Touch
•Touch
the number has been saved;
•To reply to a message, enter the text, or touch
contact etc., after edit then touch .
•Long press a message to show the following icons: copy text
card.
to call the number;
to save the number to contacts or view the contact detail if
to insert quick text,
, forward
, view detail , delete etc., touch to save the message to SIM
49 50
Page 27

4�1�3 Adjust message settings
You can adjust a range of message settings. From the Messaging application
screen, touch
•SMS enabled Touch to change your default SMS app.
Storage
•Delete old
messages
•Text message limit Touch to set the number of text messages to be
•Multimedia
message limit
Text message (SMS) settings
•Delivery reports Select to request a delivery report for each text
•Quick text Touch to add or edit message templates.
•Manage SIM
messages
•SMS Service
Center
•Validity period Touch to select the validity period, during which
•Alphabet
management
•Edit SMS
signature
and touch Settings.
Select to delete old messages when the maximum
number of stored messages is reached.
saved per conversation.
Touch to set the number of multimedia messages
to be saved per conversation.
message you send.
Touch to manage text messages stored on your
SIM card.
Touch to edit or view the service center number.
the network provider will continue to try to send
the message.
Touch to select the Alphabet mode.
Enter an SMS signature you want.
51 52
Multimedia message (MMS) settings
•Delivery reports Select to request a delivery report for each
•Read reports Select to request a report on whether each
•Auto-retrieve Select to download the full MMS message
•Roaming auto-
retrieve
•Creation mode Select to change creation mode.
•Maximum
message size
•Priority Touch to set the priority.
Notifications
•Notifications Select to display message notifications in the
•Select ringtone Touch to select a ringtone as a new message
•Vibrate Select to have phone vibrate as a notification
WAP messages setting
WAP message
enable
multimedia message you send.
recipient has read a multimedia message sent
by you.
(including message body and attachment)
automatically to your phone. Otherwise,
download only the MMS message header.
Select to download the full MMS message
(including message body and attachment)
automatically when roaming. Otherwise,
download only the MMS message header to
avoid extra charges.
Select to input the maximum message size.
status bar.
notification tone.
when receiving a new message.
Touch to enable receipt of push messages from
network.
Page 28

Cell broadcast settings
•Cell broadcast Mark the checkbox to enable receipt of cell
•Select CB
ringtone
•Enable CB LED
indicator
•Enable light up
screen
•Vibrate Select to have phone vibrate as a notification
•Cell broadcast
settings
broadcast messages.
Touch to select CB ringtone when receiving cell
broadcast messages.
Mark the checkbox to enable CB LED indicator.
Mark the checkbox to light up the screen when
receiving new cell broadcast.
when receiving a new message.
Touch to select channels and configure languages.
4�2 Gmail/Email
The first time you set up your phone, you can select to use an existing
Gmail or to create a new Email account.
4�2�1 Gmail ������������������������������������������������������������������
As Google's web-based email service, Gmail is configured when you first
set up your phone. Gmail on your phone can be automatically synchronized
with your Gmail account on the web.
To access Gmail
From the Home screen, touch
Gmail.
to enter the applications list, then touch
•Enter recipient(s)’s email address in To field, and if necessary, touch
and touch Cc/Bcc to add a copy or a blind copy to the message.
•Enter the subject and the content of the message.
•Touch
•Finally, touch the
•If you do not want to send the mail out right away, you can touch
Save draft or touch the Back key to save a copy. To view the draft,
touch the icon , then select Drafts.
•If you do not want to send or save the mail, you can touch
touch Discard.
To add a signature to emails, touch
choose an account, then touch Signature.
To receive and read your emails
When a new email arrives, you will be notified by a ringtone or vibration,
and an
Touch and drag the Status bar down to display the Notification panel and
touch the new email to view it. You can also access the Gmail Inbox label
and touch the new mail to read it.
You can search for an email by sender, subject, label, etc.
•Touch the
•Enter the keyword you want to search for in the search box and touch
to add an attachment.
icon to send.
and
and then
and Settings from inbox screen,
icon will appear on the Status bar.
icon from Inbox screen.
.
To create and send emails
•Touch the icon
from the Inbox screen.
53 54
Page 29

To reply or forward emails
•Reply
•Reply all
•Forward
•Add star Touch to add a star for the mail.
•Print Touch to print the mail.
Managing Gmails by Labels
To conveniently manage conversations and messages, you can organize
them using a Label.
To label a conversation when reading a conversation’s messages, touch
and then choose Move to.
To view conversations by labels when viewing your inbox or another
conversation list, touch the icon
conversations with that label.
Long press an email to activate batch mode and produce the following
options:
•
•
•
Touch to archive the email message. To display the archived
messages, you can touch in Inbox screen then touch All mail.
Touch to delete the email message.
Touch to mark an email message as read or unread.
When viewing an email, touch
sender of this mail.
Touch
message to all people in a mail loop.
Touch
received mail to other people.
and select “Reply all” to send the
and select “Forward” to forward the
, then touch a label to view a list of
to reply to the
to access the following options.
Touch
•Move to Touch to move the mail to other labels.
•Change labels Touch to change the label of the email message
•Add/Remove star To assign a star or remove the star from the
•Mark (not)
important
•Mute Touch to hide the mail and the mail could be
•Report spam To report the email message/conversation as
•Report phishing To report the email message/conversations
Gmail settings
To access Gmail settings, touch the icon
General settings
•Gmail default
action
•Swipe actions Mark the checkbox to enable a Swipe to archive
•Sender image Mark the checkbox to show the sender's image
•Reply all Mark the checkbox to define the default response
•Auto-fit messages Mark the checkbox to shrink messages to fit the
or conversation.
conversation.
To Mark the email as important or not important.
found by touching All mail.
spam.
phishing.
and select Settings.
Touch to set the default action: archive or delete.
messages within the conversation list.
beside their name in the conversation list.
to messages.
screen and allow zooming.
55 56
Page 30

•Auto-advance Touch to select which screen (Newer, Older or
•Confirm before
deleting
•Confirm before
archiving
•Confirm before
sending
Touch an account to view the following settings:
•Inbox type To set this inbox as the default or priority Inbox.
•Inbox categories Mark the checkbox to enable the folder to
•Notifications Mark the checkbox to activate a notification
•Inbox sound &
vibrate
•Signature To add a signature text to the end of each mail
•Vacation
responder
•Sync Gmail Mark the checkbox to turn on/off Gmail sync.
•Days of mail to
sync
•Manage labels Touch to open the Label screen, where you can
•Download
attachments
•Images Touch to set whether images are always shown
Conversation list) to show after you delete or
archive a conversation.
Mark the checkbox to receive a request to
confirm your action before deleting emails.
Mark the checkbox to receive a request to
confirm your action before archiving emails.
Mark the checkbox to receive a request to
confirm your action before sending emails.
appear under the Inbox folder.
when a new email arrives.
Touch to set Sync message, Ringtone, Vibrate and
Notify once.
you send.
Touch to set a notification when on vacation.
Touch to set the duration of days for mail sync.
manage synchronization and notifications.
Mark the checkbox to auto download
attachments to recent messages via Wi-Fi.
or if you will be prompted to show them.
4�2�2 Email ��������������������������������������������������������������������
Besides your Gmail account, you can also set up external POP3, IMAP or
Exchange email accounts in your phone.
To access this feature, touch
An email wizard will guide you through the steps to set up an email
account.
•Enter the email address and password of the account you want to set up.
•Touch Next. If the account you entered is not provided by your service
provider in the phone, you will be prompted to go to the email account
settings screen to enter settings manually. Alternatively, you can touch
Manual setup to directly enter the incoming and outgoing settings for
the email account you are setting up.
•Enter the account name and display name in outgoing emails.
•To add another email account, you can touch the icon
left corner and select Settings. And then touch Add account.
To create and send emails
•Touch the icon
•Enter recipient(s) email address(es) in the To field.
•If necessary, touch Cc/Bcc to add a copy or a blind carbon copy to the
message.
•Enter the subject and the content of the message.
•Touch
•If you do not want to send the mail right away, you can touch
draft or touch the Back key to save a copy.
•Finally, touch
If you do not want to send or save the email, you can touch
select Discard.
from the Inbox screen.
to add an attachment.
to send.
from the Home screen, then select Email.
on the upper
and Save
and then
57 58
Page 31

To add a signature to your emails, touch
choose the account where you want to create or modify the signature,
touch Signature to edit.
and select Settings, then
4�3 Google Hangouts �����������������������������������������
Google's instant messaging service, Google Hangouts, lets you communicate
with your friends whenever they are connected to this service.
To access this feature and sign in, touch
touch Hangouts.
All friends added by using Google Hangouts from the Web or device will
be displayed in your friends list.
4�3�1 Chatting with your friends
To start a chat, touch the name of a friend in your Friends list, then enter
your message and touch
You can invite other friends to join a group chat by touching
selecting the friend you want to add.
.
4�3�2 To add a new friend
From Friends list, touch to add a new friend.
Enter the name, email, number, or Circle of the friend you want to add,
and if the friend is not yet on Hangouts, the system will require sending
an invite by telling the friend via SMS or Gmail. A notification with this
invitation will be showed in your friend’s messaging or Gmail.
If your friends invite you to a video chat or if they send you a message
for the first time, you can select Decline or Reply by touching
Hangout requests.
from the Home screen, then
key then
and
4�3�3 To start and close a chat
Select the friend from your friends list that you would like to send a
message to or start a video call.
After you join Google+, you can send pictures to everyone in your Google
Hangouts.
When you want to end a chat, touch the Back key from the chatting
screen directly.
If you want to sign out, touch
and Settings\Sign out.
4�3�4 To manage your friends
Aside from adding new friends to your friends list, the following actions are
available for your choice:
•To view all friends By default, all of your friends are displayed in your
Friends list. Select the friend with whom you
want to start a conversation. Touch and hold the
friend to activate archive.
59 60
Page 32

4�3�5 Settings
A series of settings are available for you to choose from by touching
and Settings from the Friends list screen, and choose an account.
•Profile photo Touch to set or change your Google+ profile
•Share your status Touch to set your Hangouts status.
•Hangouts
messages & invites
•Video Calls Touch to set the notification type when
•Hidden contacts Touch to view hidden contacts.
•Sign out Touch to remove your accounts.
•Improve Hangout Mark the checkbox to report usage data to help
photo.
Mark the checkbox to activate the notification
type when receiving Hangouts requests.
receiving a video call.
improve Hangouts.
Calendar & Alarm clock &
5
Calculator ������������������������������
(1)
5�1 Calendar ���������������������������������������������������
Use the Calendar to keep track of important meetings, appointments, etc.
To access this function, touch
Calendar.
5�1�1 Multimode view
You can display the Calendar in Yearly, Monthly, Weekly and Schedule view.
Touch the button at the bottom to change your Calendar view.
Touch
to return to Today's view.
Year view
from the Home screen, then touch
Month view
Week view
Schedule
view
(1)
The icon will vary with date.
61 62
Page 33

5�1�2 To create new events
You can add new events from any Calendar view.
•Touch
•Fill in all required information for this new event. If it is a whole-day
event, you can select ALL DAY.
•Invite guests to the event. Enter the email addresses of the guests you
want to invite with commas to separate. The guests will receive an
invitation from Calendar and Email.
•When finished, touch
To quickly create an event from the Week view screens, touch an empty
spot to select a target area which will then turn
to create the new event.
Important options are available by touching
screen:
•Refresh
•Search
•Go to
•Calendars to
display
•Settings
to access a new event edit screen.
from the top of the screen.
, and touch New event
from the Calendar main
To refresh the calendar.
Search the event or schedule you added on
Calendar
Touch to enter the defined day.
To show or hide, remove or add calendars.
To set a series of Calendar settings.
5�1�4 Event reminder
If a reminder is set for an event, the upcoming event icon will appear on
the Status bar as a notification when the reminder time arrives.
Touch and drag down the status bar to open the notification panel, touch
an event name to view the Calendar notification list.
Touch the Back key to keep the reminders pending in the status bar and
the notification panel.
5�2 Time �������������������������������������������������������������
Your mobile phone has a built-in clock.
To access this function, touch
Time.
5�2�1 World clock
To access this function, touch on the Time screen.
According to the delivery location, the system will set a default clock.
•Touch the
icon to add a time zone.
5�2�2 Alarm
To set an alarm
from the Home screen, then touch
5�1�3 To delete or edit an event
To delete or edit an event, touch the event to enter its details screen,
touch the
touch
icon to edit the event or touch the icon to delete or
to share.
63 64
From the Time screen, touch
to add a new alarm. The following options will appear:
to enter the Alarm screen, touch
Page 34

•Label Touch to set a name for the alarm.
•Repeat Touch to select the days when you want the
•Vibrate Select to activate vibration.
•Ringtone Touch to select a ringtone for the alarm.
•Time Touch to set the alarm time.
When finished, touch OK to confirm.
Touch a currently existing alarm to enter the alarm editing screen.
Touch
To adjust alarm settings
Touch the
be adjusted:
•Style Touch to set the clock style to Analogy or Digital.
•Automatic home
•Home time zone Touch to set Home time zone.
•Silence after Touch to set a temporary turn off time for an
•Snooze length Touch to set the duration of alarms.
•Alarm volume Touch to set alarm volume.
•Volume buttons Touch to set side Volume up/down key
to delete the selected alarm.
icon from the Alarm screen, the following options can now
clock
alarm to work.
Mark the checkbox to enable the function when
travelling in an area where the time is different,
add a clock for home.
alarm.
behaviors when alarm sounds: None, Snooze
or Dismiss.
5�2�3 Countdown
From the Time screen, touch to enter the Countdown screen.
Touch the
be typed in hour, minute and second number sequence.
Touch
Touch
Touch
icon to set the countdown time in panel. The time should
icon to activate Countdown.
icon to deactivate Countdown.
icon to delete current countdown label.
5�2�4 Timer
From the Time screen, touch to enter the Timer screen.
Touch
Touch
Touch
is touched.
Touch
to activate the timer.
to show a list of records according to the updated time.
to halt the total and lap times. These will only restart after
to delete the record.
65 66
Page 35

5�3 Calculator ���������������������������������������������������
With the Calculator, you can solve many mathematical problems.
To access this function, touch
Calculator.
There are two panels available: Basic panel and Advanced panel.
To switch between panels, turn the device to the landscape mode from the
basic panel to open the Advanced panel
Enter a number and the arithmetic operation to be performed, enter the
second number, then touch “=” to display the result. Touch DEL to delete
digits one by one, long press DEL to delete all at one time.
(1)
If Settings\Display\When device is rotated\Rotate screen contents is
enabled, this item will display.
from the Home screen, then touch
(1)
.
67 68
Getting connected ����������������
6
To connect to the internet with this phone, you can use GPRS/
EDGE/3G/4G networks or Wi-Fi, whichever is most convenient.
6�1 Connecting to the Internet
6�1�1 GPRS/EDGE/3G/4G
The first time you turn on your phone with your SIM card inserted, it will
automatically configure your network service: GPRS, EDGE , 3G or 4G.
To check the network connection you are using, touch Settings\More���\
Mobile networks\Access Point Names or Network operators.
To create a new access point
A new GPRS/EDGE/3G/4G network connection can be added to your
phone with the following steps:
•Touch Settings\More���\Mobile networks\Access Point Names.
•Then touch the
•When finished, touch the
To activate/deactivate Data roaming
When roaming, you can decide to connect/disconnect to a data service.
•Touch Settings\More���\Mobile networks.
•Select Data roaming to set roaming mode.
•When Data roaming is disabled, you can still perform data exchange with
a Wi-Fi connection (refer to “6�1�2 Wi-Fi”).
icon to enter the required APN information.
key and touch Save.
Page 36

To set preferred network mode
•Touch Settings\More���\Mobile networks\Preferred network
mode.
6�1�2 Wi-Fi
Using Wi-Fi, you can connect to the Internet when your phone is within
range of a wireless network. Wi-Fi can be used on your phone even
without a SIM card inserted.
To turn Wi-Fi on and connect to a wireless network
•Touch Settings.
•Touch the switch
•Touch Wi-Fi, the detailed information of detected Wi-Fi networks is
displayed in the Wi-Fi networks section.
•Touch a Wi-Fi network to connect to it. If the network you selected is
secured, you are required to enter a password or other credentials (you
may contact the network operator for details). When finished, touch
Connect.
To activate notification when a new network is detected
When Wi-Fi is on and the network notification is activated, the Wi-Fi icon
will appear on the status bar whenever the phone detects an available
wireless network within range. The following steps activate the notification
function when Wi-Fi is on:
•Touch Settings.
•Touch Wi-Fi, then touch the
screen.
•Mark/Unmark the Network notification checkbox to activate/
deactivate this function.
beside Wi-Fi to turn on/off Wi-Fi.
key and Advanced from the Wi-Fi
To add a Wi-Fi network
When Wi-Fi is on, you may add new Wi-Fi networks according to your
preference.
•Touch Settings.
•Touch Wi-Fi, then touch the
screen.
•Enter the name of the network and any required network information.
•Touch CONNECT.
When successfully connected, your phone will be connected automatically
the next time you are within range of this network.
To forget a Wi-Fi network
The following steps prevent automatic connections to networks which you
no longer wish to use.
•Turn on Wi-Fi, if it’s not already on.
•In the Wi-Fi screen, long press the name of the saved network.
•Touch Forget in the dialog that opens.
key and Add network from the Wi-Fi
6�2 Chrome ���������������������������������������������������������
Using Chrome, you can enjoy surfing the Web.
To access this function, touch
from the Home screen,
69 70
Page 37

6�3 Connecting to Bluetooth devices
(1)
Bluetooth is a short-range wireless communication technology that you
can use to exchange data, or connect to other Bluetooth devices for
various uses.
To access this function, touch Settings\Bluetooth, your device and other
available ones will show on the screen.
To turn on Bluetooth
•Touch Settings�
•Touch
to activate/deactivate this function.
To make your phone more recognizable, you can change your phone's
name which is visible to others.
•Touch Settings\Bluetooth.
•Touch the
icon and Rename this device.
•Enter a name, and touch Rename to confirm.
To pair/connect your phone with a Bluetooth device
To exchange data with another device, you need to turn Bluetooth on
and pair your phone with the Bluetooth device with which you want to
exchange data.
•Touch Settings\Bluetooth.
•Touch
and Refresh.
•Touch a Bluetooth device you want to be paired with in the list.
•A dialog will pop up, touch Pair to confirm.
•If the pairing is successful, your phone connects to the device.
(1)
You are recommended to use ALCATEL ONETOUCH Bluetooth headsets,
which have been tested and proved compatible with your phone. You can go to
www.alcatelonetouch.com for more information about the ALCATEL
ONETOUCH Bluetooth headset.
71 72
To disconnect/unpair from a Bluetooth device
•Touch the Settings icon
beside the device you want to unpair.
•Touch Forget to confirm.
6�4 Connecting to a computer
With the USB cable, you can transfer media files and other files between
your internal storage and a computer.
To connect your phone to the computer:
To connect:
•Use the USB cable that came with your phone to connect the phone
to a USB port on your computer. You will receive a notification that the
USB is connected.
•Open the Notification panel and touch Connected as a media device,
then, in the next dialog, choose the way in which you want to transfer
files.
Before using MTP, make sure that the driver (Windows Media
Player 11 or higher version) has been installed.
To locate the data you have transferred or downloaded in internal storage,
touch File Manager. All data you have downloaded is stored in File
Manager, where you can view media files (videos, photos, music and
others), rename files, install applications into your phone, etc.
6�5 Sharing your phone's mobile data connection
You can share your phone's mobile data connection with a single computer
via a USB cable (USB tethering) or with up to eight devices at once by
turning your phone into a portable Wi-Fi hotspot.
The functions below may incur additional network charges from
your network operator. Extra fees may also be charged in roaming
areas.
Page 38

To share your phone's data connection via USB
Use the USB cable that come with your phone to connect the phone to a
USB port on your computer.
•Touch Settings\More���\Tethering & portable hotspot�
•Mark\unmark the checkbox of USB tethering to activate/deactivate
this function.
To share your phone's data connection as a portable Wi-Fi
hotspot
•Touch Settings\More���\Tethering & portable hotspot�
•Mark\unmark the checkbox of Portable Wi-Fi hotspot to activate/
deactivate this function.
To rename or secure your portable hotspot
When a Portable Wi-Fi hotspot is activated, you can change the name of
your phone's Wi-Fi network (SSID) and secure its Wi-Fi network.
•Touch Settings\More���\Tethering & portable hotspot�
•Touch Set up Wi-Fi hotspot to change the network SSID or set your
network security.
•Touch Save.
6�6 Connecting to virtual private networks
Virtual private networks (VPNs) allow you to connect to the resources
inside a secured local network from outside that network. VPNs are
commonly deployed by corporations, schools, and other institutions so
that their users can access local network resources when not inside that
network, or when connected to a wireless network.
To add a VPN
•Touch Settings\More���\VPN settings and then touch
.
•In the screen that opens, follow the instructions from your network
administrator to configure each component of the VPN settings.
•Touch Save.
The VPN is added to the list on the VPN settings screen.
Before adding a VPN, you should set a PIN code or password for
your phone.
To connect/disconnect VPN
To connect to a VPN:
•Touch Settings\More���\VPN settings.
•VPNs you have added are listed; touch the VPN you want to connect
with.
•In the dialog that opens, enter any requested credentials and touch
Connect.
To disconnect:
•Open the Notification panel and touch the resulting notification for the
VPN disconnection.
To edit/delete a VPN
To edit a VPN:
•Touch Settings\More���\VPN settings.
•VPNs you have added are listed; long press the VPN you want to edit.
•Touch Edit profile.
•After finishing, touch Save.
To delete:
•Long press the VPN you want to delete, in the dialog that opens, touch
Delete profile.
73 74
Page 39

Google Play Store
7
(1)
���������
Touch a category on Google Play Store screen to browse its contents. You
can also select a subcategory if there is any. Within each category you can
select to view items sorted by Top free, Top new free and Trending, etc.
Google Play Store is an online software store, where you can download
and install applications and games to your Android Powered Phone.
To open Google Play Store:
•Touch
•The first time you access Google Play Store, a screen with terms of
service pops up for your attention.
Touch the Menu key then touch Help to enter the Google Play Store help
page for more information on this function.
from the Home screen, then touch Play Store.
7�1 Locate the item you want to download and
install
The Google Play Store home page provides several ways to find
applications. It showcases applications and games in categorized listings.
Touch the
downloads.
icon at the top left corner and My Apps to see all your
Touch to search in Play Store.
Slide left and right to see all categories.
Touch the Google Play Store icon
touch the Back key to return to the previous screen.
on the top left of the screen or
7�2 Download and install
To download & install:
•Navigate to the item you want to download, and select to enter the
details screen from which you can read its description, overall rating or
comments, view developer’s information, etc.
•Touch Install to preview the functions and data the application can
access on your phone if you install it.
•Touch Accept.
•The progress of the download will show on the details screen, touch
to stop downloading the item. You can also access this screen
through the Notification panel.
(1)
Depending on your country and operator.
75 76
Page 40

•After download and installation have finished, you will see a notification
on the status bar.
icon
Be especially cautious with applications that have access to many
functions or to a significant amount of your data. Once you accept,
you are responsible for the results of using this item on your
phone.
To open the application you have downloaded:
•On the Google Play Store screen, touch
and My Apps.
•Touch the installed application in the list, then touch Open.
To buy an application
(1)
On Google Play Store, some applications are labelled as free, while some of
them are to be paid for before downloading and installing.
•Touch the application you want to buy.
•Touch the price on the upper-right of the screen to preview the functions
and data the application can access on your phone if you install it.
•Touch Continue to confirm.
•When making your first purchase, you are required to input your credit
card information and to log into the Google payment and billing service.
•If your account has multiple credit card accounts, select one to proceed.
•Select the Terms of service link and read the document. When finished,
touch the Back key.
•Mark the checkbox if you agree with the terms of service.
•Touch the Buy now at the bottom of the screen.
When finished, Android downloads the application.
To request a refund
If you are not satisfied with the application, you can ask for a refund within
15 minutes of the purchase. Your credit card will not be charged and the
application will be removed. If you change your mind, you can install the
application again, but you will not be able to request a refund.
•Touch
and My apps from the Google Play Store screen.
•Touch the application that you want to uninstall and refund.
•Touch Refund to uninstall the application and refund. If the button
becomes Uninstall, your trial period has expired.
•In the survey form, select the answer that best matches your reason,
and touch OK.
7�3 Manage your downloads
After you have downloaded and installed an application, the following
further operations are available for your selection.
View
On the Google Play Store screen, touch
Uninstall
On the Google Play Store screen, touch
application you want to uninstall to enter the details screen, touch
Uninstall, and finally touch OK to confirm.
Refund
On the Google Play Store screen, touch
application you want to uninstall for a refund, touch Refund, and finally
touch OK to confirm.
and My Apps.
and My Apps. Touch the
and My Apps. Touch the
(1)
Google Paid applications may not be available to users in some countries.
77 78
Page 41

Auto update
Touch
and Settings\Auto-update apps to enable this function. To
auto update one specific application, mark the checkbox of Do not auto-
update apps, Auto-Update apps at any time, o r Auto-update apps
over Wi-Fi only from the details screen.
Rate and review
Open the details screen for an application, touch the stars
under Rate this app to award and input comments, touch OK to confirm.
Flag
You can report an inappropriate application to the Google Play Store by
flagging it. Open the details screen for the application, scroll to the bottom
and touch Flag as inappropriate, enter the reason and finally touch
Submit.
Multimedia applications �������
8
8�1 Camera/Camcorder ����������������������������������
Your mobile phone is fitted with a Camera and a Camcorder for taking
photos and shooting videos.
Before using the Camera or Camcorder, be sure to remove the protective
lens cover to avoid it affecting your picture quality.
To access this function, touch
Camera.
Touch to select
modes and settings
Touch the screen
to set a focus
Double touch then
drag or pinch/spread
two fingers together
to zoom in/out
from the Home screen and then touch
Touch to switch between
front/back camera
Touch to select flash mode
Touch to take a picture
or record a video
To take a picture
The screen acts as the viewfinder. First, position the object or landscape in
the viewfinder, touch the screen to focus if necessary and touch the
icon to take the picture which will be automatically saved.
79 80
Touch to switch to Video
mode
Page 42

To shoot a video
Switch Camera mode to Video mode. First, position the object or landscape
in the viewfinder and touch the
icon to stop recording. The video will be automatically saved.
Further operations when viewing a picture/video you have taken
•Slide left to quick view the picture you taken.
•Touch the
or video you have taken.
•Touch the
•Touch the
icon then Gmail, Bluetooth, MMS, etc to share the photo
icon to access the Gallery.
icon to return to the Camera or Camcorder.
icon to start recording. Touch the
8�1�1 Settings in framing mode
Before taking a photo/shooting a video, touch the icon to adjust a
number of settings in framing mode.
Back camera shooting mode
Touch
available:
•Auto Mode Touch to turn on Auto Mode.
•HDR Touch to turn on HDR (high-dynamic range)
•Scanner Touch to scan QR codes.
to access camera settings and the following options will be
function. HDR photos can better reflect
the visual effects people have in the real
environment by synthesizing images under
different exposure time. The phone will then
automatically save the photo.
Advanced settings
Photo
•Size Touch to select picture size.
•Timer Touch to select timer.
•GPS tagging Switch the toggle to activate/deactivate the
function of tagging photos and videos with
your location. This option is available when
GPS location services and wireless network
are switched on.
•Shutter sound Switch the toggle to enable/disable shutter
sound when taking a photo.
•Grid Switch the toggle to enable/disable grid view.
It divides the screen into equal parts and helps
you take better photos by making it simple
to align compositional elements to the grid,
such as the horizon or buildings to the lines
in the grid.
•Exposure Touch to select the exposure time.
•Anti Banding Choose anti-banding from Auto, 50Hz, 60Hz
or Off.
Video
•Video quality Touch to select video progressive scan output
and definition.
•Sound recording Switch the toggle to enable/disable recording
videos with sound.
You can also reset the camera settings to factory default by touching the
red button at the very bottom of the screen
81 82
Page 43

8�2 Gallery ���������������������������������������������������������
Gallery acts as a media player for you to view photos and playback videos.
In addition, a set of further operations to pictures and videos are available
for your choice.
To access this function, touch
Gallery.
Touch to select
categories: Albums,
Locations, Times,
Videos.
To view a picture/play a video
Pictures and videos are displayed by albums in the Gallery.
Touch to return to the
Gallery's main screen
from the Home screen, then touch
Touch to open Camera.
•Touch an album and all pictures or videos will spread across the screen.
•Touch the picture/video directly to view or play it.
•Slide left/right to view previous or next pictures/videos.
Working with pictures
Gallery provides a multi-select function, so that you can work with
pictures/videos in batches.
You can touch one album, then slide left or right to view the pictures.
Touch a picture you want to work on, touch the
selected one. Touch
Touch the
Touch
icon to set them as contact ID or wallpaper, etc.
from full-screen picture view to access more options.
to share selected ones.
icon to delete a
83 84
Page 44

Batch operation
The Gallery provides a multi-select function, so that you can work with
pictures/videos in batches.
Open the main Gallery window or an album, touch
and touch Select
item to activate batch operation mode (you can also touch and hold one
album/picture), then touch videos/pictures you want to work on. Touch the
icon to delete selected files. Touch to share selected files.
Edit pictures with Polaroid
1. Touch
from full-screen picture view to access more options.
2. Touch Polaroid editor.
3. Adjust the pictures if needed, then touch the check mark on the top right
of the screen for confirmation.
4. In the application, you can personalize your photos by adding text,
locations, borders, and much more.
8�3 YouTube ������������������������������������������������������
YouTube is an online video-sharing service where the user can download,
share and view videos. It supports a streaming function that allows you to
start watching videos almost as soon as they begin downloading from the
Internet.
To access this function, touch
YouTube.
As an online video service, your phone must have a network
connection to access YouTube.
Touch to show more
information.
By touching the Menu key from the YouTube screen, you can set General
settings for YouTube. For details about these features, visit the YouTube
website: www.YouTube.com.
8�3�1 Watch videos
Touch a video to play it. In the Playing screen, you can view information
and comments of the video and also access related ones. You can also rate,
share, label as favorite, create a new playlist, etc. from this screen.
To exit the video playing screen, touch the Back key to return to the
video list.
from the Home screen, then touch
Touch to search for a video.
Touch to play the video .
85 86
Page 45

8�4 Mix ���������������������������������������������������������������
Using this menu, you can play music files stored on phone storage in your
phone. Music files can be downloaded from your computer to phone using
a USB cable.
To access this function, touch
8�4�1 Playing music
Touch a song to play it.
Touch to access the song list.
Touch to access more options.
Touch to play or pause.
Touch to toggle repeat mode: Repeating all songs, Repeating current
song, or Repeat is off.
Touch to label the song to your favorites.
While playing songs with Music, the operation of pause, play or skip
is still available even if the screen is locked.
from the Home screen, then touch Mix.
Google Maps ���������������������
9
9�1 Get My Location
9�1�1 Choose a data source to identify My Location
Touch Settings\Location and then touch the switch .
There are 3 modes to choose from to determine the location: High
accuracy, Battery saving and Device only.
9�1�2 Open Google Maps and view My Location
Touch from the Home screen, then touch Maps.
Touch the
The map will then center on a blue dot surrounded by a blue circle. Your
actual position is within the blue circle.
icon on the map to view My Location.
87 88
Page 46

To move the map, drag it with your finger.
To zoom in and out of a map, pinch or spread your fingers, or you can also
zoom in by double-tapping a location on screen.
9�2 Search for a location
While viewing a map, touch Google at the top search box to activate the
search function.
In the search box, enter an address, a city or a local business.
Touch
dots. You can touch one to show a label.
and in a while your search results will appear on the map as red
Touch to enter the search place.
Touch to show more information
9�3 Get driving, public transport or walking
directions
9�3�1 Get suggested routes for your trip
Touch the icon from the Maps screen.
•Touch the enter bar to edit your start point by one of the following
methods: entering an address or using My Location.
•Do likewise for your end point.
•To reverse directions, touch the icon
•Then select a transport mode: driving by car, using public transport, or
walking directions.
•A couple of suggested routes will appear in a list. Touch any routes to
view their respective detailed directions.
•Touch the
choosing to drive by car or for editing the departure and arrival time
when using public transport.
icon for route options to avoid motorways and tolls when
.
89 90
Page 47

9�4 Share a location
•Long press a location on a map.
•Touch the information at the bottom then touch the icon
the location.
to share
10
Others ���������������������������������
10�1 File Manager �����������������������������������������������
To access this function, touch from the Home screen, then touch File
Manager.
File Manager works with both external SD card and internal storage.
File Manager displays all data stored on the phone, including applications,
media files downloaded from Google Play Store, YouTube or other
locations; videos, pictures or audios you have captured; other data
transferred via Bluetooth, USB cable, etc.
When you download an application from PC to phone, you can locate the
application using File Manager, then touch it to install it in your phone.
File Manager allows you to perform and be really efficient with the
following common operations: create (sub) folder, open folder/file, view,
rename, move, copy, delete, play, share, etc.
10�2 Sound Recorder �����������������������������������������
To access this function, touch from the Home screen, then touch
Sound Recorder.
Sound Recorder allows you to record voice/sound for seconds/hours.
91 92
Page 48

10�3 Radio �����������������������������������������������������������
Your phone is equipped with a radio
(1)
with RDS
the application as a traditional radio with saved channels or with parallel
visual information related to the radio program on the display if you tune
to stations that offer Visual Radio service.
To access this function, touch
from the Home screen, then touch
Radio.
To use it, you must plug in your headset, which works as an antenna
connected with your phone.
(2)
functionality. You can use
Touch to open and view
the saved channels list.
Available options:
•Save channel Save the current tuned station to the channels
list.
•Scan channels Touch to search for channels.
•Delete Delete the channel
•Enter frequency Enter the frequency manually.
•Station Info Mark the checkbox to receive station
information.
•Exit Turn off the radio.
Touch to add the current
station to favorites.
Touch to decrease
Long press to search and
go to the nearest lower
previous saved channel.
Touch to play/stop.
(1)
The quality of the radio depends on the coverage of the radio station in that
particular area.
(2)
Depending on your network operator and market.
0.1MHz.
frequency channel.
Touch to go to
Drag to change current
frequency.
Touch to increase 0.1MHz.
Long press to search and
go to the nearest higher
frequency channel.
Touch to go to next saved
channel.
93 94
10�4 Notes �����������������������������������������������������������
To access this function, touch from the Home screen, then touch
Notes.
Use Notes to note down inspirations, ideas, excerpts, things to do and all
those things you may want to keep for future reference.
Existing notes can be sent via Bluetooth, message or Email.
10�5 Other applications
The previous applications in this section are preinstalled on your phone.
To read a brief introduction of the preinstalled 3rd party applications, refer
to the leaflet provided with the phone. You can also download thousands
of 3rd party applications by going to Google Play Store on your phone.
(1)
Application availability depends on country and operator.
(1)
������������������������������������������
Page 49

11
To access this function, touch from the Home screen, then touch
Settings.
Settings ��������������������������
11�1 Wireless & network
11�1�1 Wi-Fi
Using Wi-Fi you can now surf the Internet without using your SIM card
whenever you are in range of a wireless network. The only thing you
have to do is to enter the Wi-Fi screen and configure an access point to
connect your phone to the wireless network.
For detailed instructions on using Wi-Fi, refer to “6�1�2 Wi-Fi”.
11�1�2 Bluetooth
Bluetooth allows your phone to exchange data (videos, images, music, etc.)
within a small range with another Bluetooth supported device (phone,
computer, printer, headset, car kit, etc.).
For more information on Bluetooth, refer to “6�3 Connecting to
Bluetooth devices”.
11�1�3 Data usage
Mobile data
If you do not need to transmit data on all mobile networks, turn off
Data enabled to avoid incurring significant charges for data use on local
operator mobile networks, particularly if you do not have a mobile data
agreement.
Set mobile data limit
By touching the Set mobile data limit switch, your mobile data
connection will be disabled when your specified limit is reached. You can
also choose a data usage cycle to view the statistics and applications
related to the data use of your phone.
Data usage is measured by your phone, and your operator may
count differently. Consider using a conservative limit.
11�1�4 More���\Airplane mode
Touch the switch of Airplane mode to simultaneously disable all wireless
connections including Wi-Fi, Bluetooth and more.
11�1�5 More���\Default SMS app
Touch to set the default SMS app.
11�1�6 More���\Tethering & portable hotspot
This function allows you to share your phone's mobile data connection
via USB or as a portable Wi-Fi access point (refer to “6�5 Sharing your
phone's mobile data connection”).
11�1�7 More���\VPN settings
A mobile virtual private network (mobile VPN or mVPN) provides mobile
devices with access to network resources and software applications on
their home network, when they connect via other wireless or wired
networks. Mobile VPNs are used in environments where workers need to
keep application sessions open at all times, throughout the working day,
as the user connects via various wireless networks, encounters gaps in
coverage, or suspends-and-resumes their devices to preserve battery life.
A conventional VPN can't survive such events because the network tunnel
is disrupted, causing applications to disconnect, time out, fail, or even the
computing device itself to crash.
95 96
Page 50

For more information on VPN, refer to “6�6 Connecting to virtual
private networks”.
11�1�8 More���\Mobile networks
Data roaming
If you don’t need to transmit data on other operators’ mobile networks,
disable Data roaming to avoid incurring significant roaming charges.
Preferred network mode
You can set your preferred network mode, such as GSM/WCDMA, LTE
etc.
Access Point Names
You can select your preferred network with this menu.
Network operators
You can select a network operator.
11�2 Device
11�2�1 Gestures
The device allows you to select the following gestures:
•Turn over to mute Mark the checkbox to mute ringtones such as
alarms, incoming calls etc. by turning the phone
over.
11�2�2 Sound & notification
Use the Sound settings to configure many aspects of call and notification
ringtones, music, and other audio settings.
•Sound Touch to set volume for Media, Ringtone,
•Headset mode Mark the checkbox to enable headset mode.
•Vibrate for calls Touch to vibrate phone for incoming calls.
•Interruptions Touch to set whether interrupt and priority
•Ringtone Touch to set your incoming call ringtone.
•Default
notification
ringtone
•Mute power on &
off ringtone
•Other sounds Touch to set dial pad tones, screen locking
•When device is
locked
•App notifications Touch to set block and priority for app
•Notification access Touch to view the notification listeners.
Notifications and Alarm.
Ringtones will only be heard from the headset if
it is plugged in.
interruptions.
Touch to set the default sound for notifications.
Touch to enable/disable the power on & off
ringtone.
sounds, touch sounds and vibrate on touch.
Touch to show all notification content or don't
show notification at all.
notifications.
97 98
Page 51

11�2�3 Display
•Brightness level Touch to set the level of brightness.
•Adaptive
brightness
•Wallpaper Touch to set the wallpaper.
•Sleep Touch to set screen timeout.
•Daydream Touch to set the Daydream.
•Font size Touch to set the font size.
•When device is
rotated
Touch to enable automatic adjustment of the
screen brightness.
Touch to set whether rotate the contents of the
screen or stay in portrait view.
11�2�4 Lock screen
Func
After Func is activated, a couple of apk shortcuts will be displayed on your
lock screen.
Screen lock
•None Touch to disable screen unlock security.
•Swipe Touch to enable slide unlock mode.
•Pattern Touch to draw a pattern to unlock screen.
•PIN Touch to enter a numeric PIN to unlock screen.
•Password Touch to enter a password to unlock screen.
Owner info
Touch to input owner information which will display on the locked screen.
Smart Lock
You must set a screen lock first when you enable this function.
99 100
11�2�5 LED indicator
Touch to turn on/off the LED indicator.
11�2�6 Storage
Use these settings to monitor the total and available space on your phone,
if necessary, to reset the phone, erasing all of your personal information.
This menu displays the amount of internal phone storage in different
colors. The available space will be shown in grey, which shows the amount
of internal phone storage used by the operating system, its components,
applications (including those you downloaded), permanent and temporary
data.
11�2�7 Battery
Touch any category in the battery management screen to view its power
consumption.
You can adjust power use via the screen brightness or screen timeout
settings in the Display screen. You can also set your phone to saving mode
or ultimate saver mode. In the latter, only four functions can be used
including Phone, Contacts, Messaging and Calendar.
11�2�8 Applications
Use the Manage applications settings to view details about the
applications installed on your phone, to manage their data and force them
to stop, and to set whether you want to permit installation of applications
that you obtain from websites and emails.
Manage Apps
• Downloaded: Touch to manage and remove installed applications.
• Running: Touch to view and control currently running service.
• All: Touch to view storage used by applications.
Page 52

11�3 Personal
11�3�1 Location
On
Touch the
mobile networks to determine your approximate location, for use in
Google Maps, when you search, and so on. When you select this option,
you’re asked whether you consent to share your location anonymously
with Google’s location service.
Mode
Touch to select High accuracy, Battery saving or Device only mode.
• High accuracy: Use GPS, Wi-Fi and mobile network to determine
location.
• Battery saving: Use Wi-Fi to determine location.
• Device only: Use GPS to determine location.
Recent location requests
In the list, it will show recent location requests.
11�3�2 Security
Encrypt phone
Require a numeric PIN or passwords to decrypt your phone each time
you power it on.
SMS message limit
Display an alert dialog to prevent applications from sending SMS messages
too frequently. Select the limit.
switch to enable the use of information from Wi-Fi and
Make passwords visible
Mark the checkbox to show passwords as you type.
Device administrators
Touch to view or deactivate device administrators.
Unknown sources
Mark the checkbox to permit installation of applications that you obtain
from websites, emails, or other locations other than Google Play Store.
To protect your phone and personal data, download applications only from
trusted sources, such as Google Play Store.
Trusted credentials
Touch to display trusted CA certificates.
Install from SD card
Touch to install certificates from SD card.
Clear credentials
Touch to remove all certificates.
11�3�3 Language & input
Use the Language & input settings to select the language for the text
on your phone and for configuring the onscreen keyboard. You can also
configure voice input settings and the pointer speed.
Language
Touch to select the language and the region you want.
101 102
Page 53

Spell checker
Mark the checkbox to enable the system to show suggested words.
Personal dictionary
Touch to open a list of the words you’ve added to the dictionary. Touch a
word to edit or delete it. Touch the add button (+) to add a word.
Current Keyboard
Touch to select a default input method.
Android Keyboard (AOSP)
Set the following Android Keyboard functions:
Languages, Preferences, Appearance & layouts, Text correction, Advanced.
Google voice typing
Set the following Google voice typing functions:
Language, "OK Google" detection, Hands-free, Speech output, Offline
speech recognition, Block offensive words, Bluetooth headset.
Voice input
Touch to view settings about voice input
Text-to-speech output
•Preferred engine: Touch to choose a Preferred text-to-speech engine,
touch the settings icon
•Speech rate: Touch to open a dialog where you can select how quickly
you want the synthesizer to speak.
•Listen to an example: Touch to play a brief sample of the speech
synthesizer, using your current settings.
to show more choices for each engine.
Pointer speed
Touch to open a dialog where you can change the pointer speed, touch
OK to confirm.
11�3�4 Backup & reset
Back up my data
Touch the switch to back up your phone’s settings and other application
data to Google Servers, with your Google Account. If you replace your
phone, the settings and data you’ve backed up are restored onto the new
phone for the first time you sign in with your Google Account. If you mark
this option, a wide variety of settings and data are backed up, including your
Wi-Fi passwords, bookmarks, a list of the applications you’ve installed, the
words you’ve added to the dictionary used by the onscreen keyboard, and
most of the settings that you configure with the Settings application. If you
unmark this option, you stop backing up your settings, and any existing
backups are deleted from Google Servers.
Back up account
Touch to back up your account.
Automatic restore
Touch the switch to restore your backed up settings or other data when
you reinstall an application.
Factory data reset
Erase all of your personal data from internal phone storage, including
information about your Google Account, any other accounts, your system
and application settings, and any downloaded applications. Resetting the
phone does not erase any system software updates you’ve downloaded. If
you reset the phone in this way, you’re prompted to re-enter the same kind
of information as when you first started Android.
103 104
Page 54

When you are unable to power on your phone, there is another way to
perform a factory data reset by using hardware keys. Press the Volume up
key and the Power key at same time until the screen lights up.
11�4�2 Accessibility
Use the Accessibility settings to configure any accessibility plug-ins you
have installed on your phone.
11�4 System
11�4�1 Date & time
Use Date & time settings to customize your preferences for how date and
time are displayed.
Automatic date & time
Mark the checkbox to use the network-provided date and time. Unmark
to set all values manually.
Automatic time zone
Mark the checkbox to use the network-provided time zone. Unmark to
set all values manually.
Set date
Touch to open a dialog where you can manually set the phone’s date.
Set time
Touch to open a dialog where you can manually set the phone’s time.
Select time zone
Touch to open a dialog where you can set the phone’s time zone.
Use 24-hour format
Mark the checkbox to display the time using the 24-hour clock format.
105 106
TalkBack
When Talkback is on, your device provides spoken feedback to help blind
and low vision users.
Switch Access
Touch to turn on/off switch access.
Captions
Touch to activate/deactivate captions for phone screen.
Magnification gestures
Touch to turn on/off to activate/deactivate zoom in/out function by tripletapping the screen.
High contrast text
Mark the checkbox to activate high contrast text.
Speak passwords
Mark the checkbox to speak passwords while typing.
Accessibility shortcut
Touch to turn on/off to enable/disable accessibility features.
Touch & hold delay
Touch to adjust the duration of touch and hold delay. This function enables
your phone to differ touch and touch & hold, which may avoid incorrect
operations.
Page 55

Color inversion
Touch the switch to turn on/off color inversion.
Color correction
Touch to turn on/off color correction.
12
Making the most of your
phone ����������������������������������
11�4�3 Regulatory & Safety
Touch to view product information.
11�4�4 About phone
This contains information about things ranging from Legal information,
Model number, Firmware version, Baseband version, Kernel version, Build
number to those listed below:
System updates
Touch to check for system updates.
Status
This contains the status of the Battery status, Battery level, My phone
number, Network, Signal strength, etc.
Legal information
Touch to view legal information.
107 108
12�1 Upgrade
You can use the Over-the-air Upgrade tool to update your phone's
software.
12�1�1 Over-the-air Upgrade
Using the Over-the-air Upgrade tool you can update your phone's
software.
To access System updates, touch Settings\About phone\System
updates. Press
the latest software. If you want to update the system, touch the button
Download, after it is done touch Install to complete the upgrade. Now
your phone's software will be the latest version.
You should turn on data connection before searching for updates. Settings
for auto-check intervals is also available once you restart the phone.
If you have chosen auto-check, when the system discovers the new version,
dialog will pop up to choose Download or ignore, the notification also
will show in status bar.
to check for updates, and the phone will search for
Page 56

13
The latest generation of ALCATEL ONETOUCH mobile phones offers
a built-in handsfree feature that allows you to use the telephone from a
distance, placed on a table for example.
1. Charger
2. USB cable
Accessories ������������������������
Only use the ALCATEL ONETOUCH batteries, chargers, and
accessories included along with your device.
109 110
14
Your phone is warranted against any defect or malfunctioning which may occur in
conditions of normal use during the warranty period of twelve (12) months
the date of purchase as shown on your original invoice.
Batteries
defect which may occur during the first six (12) months
as shown on your original invoice.
In case of any defect of your phone which prevents you from normal use thereof,
you must immediately inform your vendor and present your phone with your proof
of purchase.
If the defect is confirmed, your phone or part thereof will be either replaced or
repaired, as appropriate. Repaired phone and accessories are entitled to a one (1)
month warranty for the same defect. Repair or replacement may be carried out using
reconditioned components offering equivalent functionality.
This warranty covers the cost of parts and labor but excludes any other costs.
This warranty shall not apply to defects to your phone and/or accessory due to
(without any limitation):
1) Non-compliance with the instructions for use or installation, or with technical and
safety standards applicable in the geographical area where your phone is used,
2) Connection to any equipment not supplied or not recommended by TCL
Communication Ltd. ,
3) Modification or repair performed by individuals not authorized by TCL
Communication Ltd. or its affiliates or your vendor,
4) Modification, adjustment or alteration of software or hardware performed by
individuals not authorized by TCL Communication Ltd.
5) Inclement weather, lightning, fire, humidity, infiltration of liquids or foods, chemical
products, download of files, crash, high voltage, corrosion, oxidation…
(1)
The warranty period may vary depending on your country.
(2)
The life of a rechargeable mobile phone battery in terms of conversation time
Warranty ����������������������������
(1)
from
(2)
and accessories sold with your phone are also warranted against any
standby time, and total service life, will depend on the conditions of use and
network configuration. Batteries being considered expendable supplies, the
specifications state that you should obtain optimal performance for your phone
during the first six months after purchase and for approximately 200 more
recharges.
(1)
from the date of purchase
Page 57

Your phone will not be repaired in case labels or serial numbers (IMEI) have been
removed or altered.
There are no express warranties, whether written, oral or implied, other than this
printed limited warranty or the mandatory warranty provided by your country or
jurisdiction.
In no event shall TCL Communication Ltd. or any of its affiliates be liable for indirect,
incidental or consequential damages of any nature whatsoever, including but not
limited commercial or financial loss or damage, loss of data or loss of image to the
full extent those damages can be disclaimed by law.
Some countries/states do not allow the exclusion or limitation of indirect, incidental
or consequential damages, or limitation of the duration of implied warranties, so the
preceding limitations or exclusions may not apply to you.
How to obtain Hardware Service within the terms of this warranty: Create
a user profile (alcatel.finetw.com) and then create an RMA for the defective
device. Ship the device with a copy of the original proof of purchase (e.g.
original copy of the dated bill of sale, invoice) with the owner’s return
address (No PO Boxes accepted), wireless operator’s name, alternate
daytime phone number, and email address with a complete problem
description. Only ship the device. Do not ship the SIM card, memory cards,
or any other accessories such as the power adapter. You must properly
package and ship the wireless device to the repair center. TCL Mobile Inc.
is not responsible for devices that do not arrive at the service center or
are damaged in transit. Insurance is recommended with proof of delivery.
Upon receipt, the service center will verify the warranty conditions, repair,
and return your device to the address provided in the RMA.
111 112
15
Troubleshooting �����������������
Before contacting the service center, you are advised to follow the
instructions below:
• You are advised to fully charge ( ) the battery for optimal operation.
• Avoid storing large amounts of data in your phone as this may affect its performance.
• Use Factory data reset and the upgrade tool to perform phone formatting or
software upgrading (to reset factory data, hold down the Power key and the Volume
up key at the same time). ALL User phone data: contacts, photos, messages, files, and
downloaded applications will be permanently lost. It is strongly advised to fully back
up the phone data and profile via Smart Suite before doing formatting or upgrading.
and carry out the following checks:
My phone cannot be switched on or is frozen
• If the phone cannot be switched on, charge for at least 20 minutes to ensure the
minimum battery power needed, then try to switch on again.
• If the phone falls into a loop during power on-off animation and the user interface
cannot be accessed, press and hold the Volume down key to enter Safe Mode. This
eliminates any abnormal OS booting issues caused by 3rd party APKs.
• If neither method is effective, reset the phone using the Power key and the Volume
up key, (holding both together).
My phone has not responded for several minutes
• Restart your phone by pressing and holding the Power key for more than 9s.
My phone turns off by itself
• Check that your screen is locked when you are not using your phone, and make
sure the Power key is not mis-contacted due to unlocked screen.
• Check the battery charge level.
My phone cannot charge properly
• Make sure you are using the ALCATEL ONETOUCH charger included in the box.
• Make sure that your battery is not completely discharged; if the battery power is
empty for a long time, it may take around 20 minutes to display the battery charger
indicator on the screen.
• Make sure charging is carried out under normal conditions (0°C to +40°C).
Page 58

• When abroad, check that the voltage input is compatible.
My phone cannot connect to a network or “No service” is
displayed
• Try connecting in another location.
• Verify the network coverage with your operator.
• Check with your operator that your SIM card is valid.
• Try selecting the available network(s) manually.
• Try connecting at a later time if the network is overloaded.
My phone cannot connect to the Internet
• Check that the IMEI number (press *#06#) is the same as the one printed on your
warranty card or box.
• Make sure that the internet access service of your SIM card is available.
• Check your phone's Internet connection settings.
• Make sure you are in a place with network coverage.
• Try connecting at a later time or another location.
Invalid SIM card
• Make sure the SIM card has been correctly inserted (see "Inserting or removing
the SIM card").
• Make sure the chip on your SIM card is not damaged or scratched.
• Make sure the service of your SIM card is available.
Unable to make outgoing calls
• Make sure you have dialled a valid number and have touched .
• For international calls, check the country and area codes.
• Make sure your phone is connected to a network, and the network is not
overloaded or unavailable.
• Check your subscription status with your operator (credit, SIM card valid, etc.).
• Make sure you have not barred outgoing calls.
• Make sure that your phone is not in flight mode.
Unable to receive incoming calls
• Make sure your phone is switched on and connected to a network (check for
overloaded or unavailable network).
• Check your subscription status with your operator (credit, SIM card valid, etc.).
• Make sure you have not forwarded incoming calls.
• Make sure that you have not barred certain calls.
113 114
• Make sure that your phone is not in flight mode.
The caller’s name/number does not appear when a call is received
• Check that you have subscribed to this service with your operator.
• Your caller has concealed his/her name or number.
I cannot find my contacts
• Make sure your SIM card is not broken.
• Make sure your SIM card is inserted properly.
• Import all contacts stored in SIM card to phone.
The sound quality of the calls is poor
• You can adjust the volume during a call by pressing the Volume Up/Down key.
• Check the network strength
• Make sure that the receiver, connector or speaker on your phone is clean.
.
I am unable to use the features described in the manual
• Check with your operator to make sure that your subscription includes this service.
• Make sure this feature does not require an ALCATEL ONETOUCH accessory.
When I select a number from my contacts, the number cannot
be dialled
• Make sure that you have correctly recorded the number in your file.
• Make sure that you have selected the country prefix when calling a foreign country.
I am unable to add a contact in my contacts
• Make sure that your SIM card contacts are not full; delete some files or save the files
in the phone contacts (i.e. your professional or personal directories).
My callers are unable to leave messages on my voicemail
• Contact your network operator to check service availability.
I cannot access my voicemail
• Make sure your operator’s voicemail number is correctly entered in "Voicemail
number".
• Try later if the network is busy.
I am unable to send and receive MMS
• Check your phone memory availability as it might be full.
• Contact your network operator to check service availability and check MMS
parameters.
• Verify the server center number or your MMS profile with your operator.
Page 59

• The server center may be busy, try again later.
SIM card PIN locked
• Contact your network operator to obtain the PUK code (Personal Unblocking
Key).
I am unable to connect my phone to my computer
• Install Smart Suite.
• Check that your USB driver is installed properly.
• Open the Notification panel to check if the Smart Suite Agent has activated.
• Check that your computer meets the requirements for Smart Suite Installation.
• Make sure that you’re using the cable included in the box.
I am unable to download new files
• Make sure there is sufficient phone memory for your download.
• Check your subscription status with your operator.
The phone cannot be detected by others via Bluetooth
• Make sure that Bluetooth is turned on and your phone is visible to other users .
• Make sure that the two phones are within Bluetooth’s detection range.
How to make your battery last longer
• Make sure you follow the complete charge time (minimum 3 hours).
• After a partial charge, the battery level indicator may not be exact. Wait for at least
20 minutes after removing the charger to obtain an exact indication.
• Adjust the brightness of screen as appropriate.
• Extend the email auto-check interval for as long as possible.
• Update news and weather information on manual demand, or increase their auto-
check interval.
• Exit background-running applications if they are not being used.
• Deactivate Bluetooth, Wi-Fi, or GPS when not in use.
The phone will become warm following prolonged calls, game
playing, internet surfing, or running other complex applications�
• This heating is a normal consequence of the CPU handling excessive data. Ending
above actions will make your phone return to normal temperatures.
16
Processor MSM8909
Platform Android™ 5.1
Memory 8GB ROM + 1GB RAM
Dimensions
(LxWxT)
Weight 173g
Display 5.5” HD (1280×720)
Network 5054S:
GPS Assisted GPS
Connectivity • Bluetooth v4.1
Specifications ���������������������
151.9x77.84x9.45mm
GSM: 850/900/1800/1900
UMTS: 850/1700/1900
CSFB FDD: B2/4/5/7/12/17
5054A:
GSM: 850/900/1800/1900
UMTS: 850/900/1900/2100 MHz
CSFB FDD:B1/2/4/7/28 full
(Band frequency and data speed are operator
dependent.)
•Wi-Fi 802.11 b/g/n
•Audio jack
•Micro-USB Cable
115 116
Page 60

Camera 5054S:
•2 megapixel front camera
•8 megapixel main camera
5054A:
•5 megapixel front camera
•10 megapixel main camera
Audio supported
MP3, AMR, MIDI, AAC, AAC+, FLAC
formats
Video supported
H.265, H.264, H.263, MPEG-4, XVID, VP8
formats
Battery
•Softpack
•Capacity: 2500 mAh
Expansion Slot microSD™ memory card
(Availability of microSD card depends on
market)
Special Features •G-sensor
•Light Sensor
•Proximity Sensor
ALCATEL is a trademark of Alcatel-Lucent
and is used under license by
TCL Communication Ltd.
© Copyright 2015 TCL Communication Ltd.
All rights reserved
TCL Communication Ltd. reserves
the right to alter material
or technical specification
(2)
without prior notice.
All "Signature" ringtones embedded in this phone have been composed,
arranged, and mixed by NU TROPIC (Amar Kabouche).
Note: Specifications are subject to change without prior notice.
(1)
The original battery has undergone rigorous safety inspections to meet
qualification standards, the use of non-original batteries may be dangerous.
(1)
117 118
English - CJA35HEOFAAA
Page 61

Page 62

Este manual del usuario es compartido para los modelos Alcatel Onetouch
5054S y 5054A.
Tabla de contenidos
Precauciones de uso .................................................................4
Informaciones generales ........................................................13
1 Su celular ...........................................................................15
1.1 Teclas y conectores ..................................................................................15
1.2 Puesta en marcha ......................................................................................18
1.3 Pantalla de Inicio ........................................................................................21
2 Ingresar texto ....................................................................33
2.1 Uso del teclado en pantalla ....................................................................33
2.2 Edición de texto ........................................................................................34
3 Llamadas, Registro y Contactos ......................................35
3.1 Llamar ..........................................................................................................35
3.2 Registro de llamadas .................................................................................42
3.3 Contactos....................................................................................................42
4 Mensajes, Gmail/Correo electrónico, Hangout .............. 49
4.1 Mensajes ......................................................................................................49
4.2 Gmail/Correo electrónico ......................................................................56
4.3 Google Hangouts ......................................................................................63
5 Calendario, alarma y calculadora .................................... 66
5.1 Calendario ...................................................................................................66
5.2 Reloj .............................................................................................................69
5.3 Calculadora .................................................................................................71
6 Cómo conectarse .............................................................. 73
6.1 Conexión a Internet .................................................................................73
6.2 Chrome .......................................................................................................75
6.3 Conexión a dispositivos Bluetooth .......................................................76
6.4 Conexión a una computadora ...............................................................77
6.5 Compartir la conexión de datos móviles del teléfono ....................78
6.6 Conexión a redes privadas virtuales ....................................................79
7 Google Play Store .............................................................81
7.1 Buscar el elemento que desea descargar e instalar ..........................81
7.2 Descargar e instalar ..................................................................................83
7.3 Gestión de las descargas .........................................................................85
8 Aplicaciones multimedia ..................................................87
8.1 Cámara/videocámara ................................................................................87
8.2 Galería ..........................................................................................................90
8.3 YouTube ....................................................................................................... 93
8.4 Mezcla ..........................................................................................................94
9 Google Maps ......................................................................96
9.1 Obtener mi ubicación ..............................................................................96
9.2 Buscar una ubicación ................................................................................97
9.3 Búsqueda de indicaciones para desplazarse conduciendo, en
transportes públicos o a pie .................................................................. 98
9.4 Compartir una ubicación ........................................................................99
10 Otros ................................................................................100
10.1 Gestión de archivos ................................................................................100
10.2 Grabador de sonido ...............................................................................100
10.3 Radio ..........................................................................................................101
10.4 Notas..........................................................................................................102
10.5 Otras aplicaciones ...................................................................................102
1 2
Page 63

11 Ajustes ..............................................................................103
11.1 Conexiones inalámbricas y redes ........................................................103
11.2 Dispositivo ................................................................................................106
11.3 Personal .....................................................................................................110
11.4 Sistema .......................................................................................................115
12 Disfrute al máximo su teléfono .....................................118
12.1 Actualizar ..................................................................................................118
13 Accesorios ........................................................................119
14 Garantía ...........................................................................120
15 Solución de problemas .................................................... 122
16 Especificaciones ................................................................128
Este producto respeta el límite SAR nacional aplicable
de 1,6 W/kg. Los valores SAR máximos específicos se
encuentran en la página 9 de este instructivo de uso.
Cuando transporte el producto o lo use pegado al
cuerpo, utilice un accesorio aprobado, tal como una
www.sar-tick.com
funda. De lo contrario, mantenga una distancia de
15 mm con el cuerpo para cumplir con los requisitos
de exposición a radiofrecuencias. Tenga en cuenta que
el producto puede emitir radiación aunque no esté
realizando una llamada.
PROTEJA SUS OÍDOS
Para evitar posibles daños auditivos, no escuche a un volumen alto durante
largos períodos. Tenga cuidado cuando escuche por el altavoz con el
dispositivo cerca del oído. Utilice siempre auriculares Alcatel.
3 4
Precauciones de uso ...................
Antes de utilizar su teléfono, lea detenidamente este capítulo. El fabricante no se hará
responsable de las consecuencias que resulten de un uso inadecuado del teléfono y/o
no conforme a las instrucciones contenidas en este instructivo de uso.
• SEGURIDAD EN VEHÍCULO:
Dados los estudios recientes en los cuales se ha demostrado que el uso del teléfono móvil
al conducir constituye un factor real de riesgo, incluso cuando se utiliza con el accesorio
Manos libres (kit de vehículo, manos libres portátil…), se prohíbe al conductor utilizar su
teléfono hasta que detenga su vehículo.
Cuando está encendido, su teléfono emite radiaciones que pueden interferir con los
equipos electrónicos de su vehículo, como por ejemplo los sistemas antibloqueo de las
ruedas (ABS), las bolsas de aire de seguridad, etc. Por lo tanto, debe:
-Evitar colocar su teléfono encima del tablero de instrumentos, o en la zona de
despliegue de las bolsas de aire.
-Consultar con el fabricante del vehículo o con su concesionario para comprobar la
correcta protección de los instrumentos de a bordo contra las radiofrecuencias del
teléfono móvil.
• CONDICIONES DE USO:
Se le recomienda apagar su teléfono de vez en cuando para optimizar su
funcionamiento.
Apague su teléfono antes de abordar a un avión.
No encienda el teléfono en un hospital, excepto en las zonas reservadas para este
efecto. El uso de este teléfono, como el de otros equipos, puede interferir con el
funcionamiento de dispositivos eléctricos, electrónicos o que utilicen radiofrecuencias.
No encienda el teléfono cerca de gas o de líquidos inflamables. Respete las normas de
uso cerca de depósitos de combustible, estaciones de servicio, fábricas de productos
químicos y en todos los lugares donde existan riesgos de explosión.
Cuando esté encendido, no coloque nunca el teléfono a menos de 10 cm de un
aparato médico (marcapasos, prótesis auditiva, bomba de insulina, etc.). En particular,
al realizar una llamada, lleve el teléfono a la oreja del lado opuesto al que lleva el
marcapasos o la prótesis auditiva, según el caso.
Para evitar deficiencia auditiva, descuelgue antes de acercar su teléfono al oído.
Al utilizar la función manos libres, aleje el teléfono de su oreja ya que el volumen
amplificado podría provocar daños auditivos.
Page 64

No deje que los niños utilicen el teléfono sin supervisión.
Al sustituir la carcasa desmontable, tenga en cuenta que el producto podría contener
sustancias que podrían provocar una reacción alérgica.
Sea siempre muy cuidadoso(a) con su teléfono y guárdelo en un lugar limpio y sin
polvo.
No exponga su teléfono a condiciones desfavorables (humedad o condensaciones,
lluvia, infiltración de líquidos, polvo, brisa marina, etc.). Las temperaturas recomendadas
por el fabricante van de -10°C a +55°C.
Si supera los 55°C, la pantalla puede volverse ilegible, pero esta alteración es temporal
y no repercute especial gravedad.
Los números de llamadas de emergencia no son accesibles en todas las redes del
teléfono. Usted no debe nunca confiar solamente en su teléfono para llamadas de
emergencia.
No intente abrir, desarmar o reparar usted mismo(a) el teléfono.
No deje que se le caiga, no lo arroge al vacío ni lo doble.
No pinte su teléfono.
Utilice sólo baterías, cargadores y accesorios Alcatel compatibles con el modelo de
su teléfono. En caso contrario, TCL Communication Ltd. y sus filiales declinan toda
responsabilidad en caso de daños.
El teléfono móvil no debe desecharse en un vertedero municipal.
Consulte las normas locales para la eliminación de productos electrónicos.
Recuerde realizar respaldos de seguridad o mantener un registro por escrito de toda
la información importante almacenada en su teléfono.
Algunas personas son propensas a padecer ataques epilépticos o pérdidas de
conocimiento causadas por las luces brillantes como las de los videojuegos. Estos
ataques epilépticos o pérdidas de conocimiento pueden producirse incluso aunque
la persona no los haya padecido antes. Si ha experimentado alguno de estos ataques
o pérdidas de conocimiento, o si su familia presenta un historial con antecedentes
de este tipo, consulte a su médico antes de utilizar videojuegos, o antes de activar
las luces brillantes en su teléfono. Los padres deberán supervisar el uso que
realicen sus hijos de estos videojuegos u otras características que incorporen el
uso de luces brillantes. Todas las personas deberán dejar de utilizar el teléfono
y consultar a su médico en caso de que se produzcan algunos de los siguientes
síntomas: convulsiones, contracciones oculares o musculares, pérdida de conciencia,
movimientos involuntarios, o desorientación. Para limitar las posibilidades de que se
produzcan estos síntomas, tome las siguientes precauciones:
-No juegue con el teléfono ni utilice la característica de luces brillantes si se
encuentra cansado(a) o necesita dormir.
5 6
-Descanse un mínimo de 15 minutos por cada hora.
-Juegue siempre en una habitación en la que las luces se encuentren encendidas.
-Juegue siempre a la máxima distancia posible de la pantalla.
Al utilizar los juegos de su teléfono, puede experimentar alguna incomodidad
ocasional en las manos, brazos, hombros, cuello, u otras partes del cuerpo. Siga las
instrucciones para evitar problemas como tendinitis, síndrome del túnel carpiano, u
otros desórdenes musculares u óseos.
-Descanse un mínimo de 15 minutos por cada hora cuando juegue.
-Si sus manos, muñecas o brazos se cansan o se sienten doloridos durante el juego,
deje de jugar y descanse durante varias horas antes de continuar jugando.
-Si sus manos, muñecas o brazos continúan doloridos durante o después de jugar, deje
de jugar y acuda a su médico.
Para evitar posibles daños auditivos, no escuche a un volumen alto durante
largos períodos. Tenga cuidado cuando escuche por el altavoz con el
dispositivo cerca del oído. Utilice siempre auriculares Alcatel.
• RESPETO DE LA VIDA PRIVADA:
Le recordamos que debe respetar las reglas y leyes en vigor en su país sobre la
toma de fotos y la grabación de sonidos con el teléfono móvil. Según a estas reglas
y leyes, puede estar estrictamente prohibido tomar fotos y/o grabar las voces de
otras personas o cualquiera de sus atributos personales, y reproducir o distribuir
estas fotos o grabaciones ya que se puede considerar una invasión de la vida privada.
Al usuario cabe la responsabilidad exclusiva de asegurarse que tiene la autorización
previa, si es necesaria, de grabar conversaciones privadas o confidenciales o tomar
fotos de otra persona; el fabricante, el distribuidor, o el vendedor de su teléfono móvil
(incluso el operador) no se harán responsables de las consecuencias que resulten de
un uso inadecuado del teléfono.
• BATERÍA Y ACCESORIOS:
Su teléfono es un dispositivo de una sola pieza, por lo que la batería no es extraible.
Tenga en cuenta las siguientes precauciones:
- No intente abrir la batería (riesgo de emanación de sustancias químicas
y quemaduras).
- No la perfore, no la desarme, no provoque un corto circuito.
- No la tire al fuego ni a la basura, no la exponga a temperaturas superiores a
60°C.
Page 65

Deseche la batería en conformidad con la legislación sobre la protección del medio
ambiente en vigor. No la utilice para un uso diferente para el que fue diseñada. Nunca
utilice baterías dañadas o no recomendadas por TCL Mobile Limited y/o sus filiales.
Si su teléfono, batería o accesorios tienen este símbolo, deberá llevarlos a
uno de estos puntos de recolección cuando finalice su vida útil:
- Centros de eliminación de residuos municipales, con contenedores
especiales para este tipo de elementos.
- Contenedores en los puntos de venta.
Los productos serán reciclados para evitar que se eliminen sustancias
dañinas para el medio ambiente, y sus componentes serán reutilizados.
El acceso a los puntos de recolección es gratuito y todos los productos que lleven
este símbolo deberán ser depositados en ellos.
Si el país o región cuenta con instalaciones de reciclaje y recolección, estos productos
no deberán tirarse en basureros normales. Se deberán llevar a los puntos de
recolección para su reciclaje.
¡ATENCIÓN! RIESGO DE EXPLOSIÓN AL SUSTITUIR LA BATERÍA POR OTRA
DE MODELO INCORRECTO. PARA DESECHAR LAS BATERÍAS USADAS, SIGA
LAS INSTRUCCIONES INDICADAS.
• CARGADORES
Los cargadores con alimentación de red funcionan dentro de una gama de
temperaturas que van de 0°C a 40°C.
Los cargadores de su teléfono móvil cumplen con la norma de seguridad para los
equipos de tratamiento de la información y de oficina y están diseñados sólo para
este uso. Debido a las diferentes características eléctricas aplicables, el cargador que
ha comprado en un país puede resultar incompatible en otro país.
Características eléctricas de la alimentación (según el país):
Cargador de viaje:
Entrada: 100-240 V, 50/60 Hz, 200 mA
Salida: 5 V, 1A
Batería: Litio 2500 mAh
• ONDAS DE RADIO:
ESTE TELÉFONO MÓVIL CUMPLE CON LAS EXIGENCIAS ESTATALES EN
MATERIA DE EXPOSICIÓN A LAS ONDAS DE RADIO.
Su teléfono móvil es un emisor/receptor radio. Ha sido diseñado y fabricado a fin de
respetar los límites de exposición a las radiofrecuencias (RF). Estos límites forman
parte de un conjunto de exigencias y establecen los niveles de radiofrecuencias
autorizados para el público.
Han sido establecidos por grupos de peritos independientes, basándose en
evaluaciones científicas regulares y detalladas. Dichos límites incluyen un margen de
seguridad importante destinado a garantizar la seguridad de todos, sea cual sea la
edad o el estado de salud.
La norma de exposición de los teléfonos móviles se define con una unidad de medida
llamada “SAR” (Specific Absorption Rate en inglés = Nivel específico de absorción).
El límite SAR recomendado por las autoridades públicas tales como la FCC (“Federal
Communications Commission”: Comisión Federal de Comunicaciones) del gobierno
estadounidense o “Industry Canada”, es de 1.6 W/kg en promedio sobre 1 gramo
de tejido humano. Las pruebas han sido efectuadas en teléfonos que emiten a su
nivel de potencia máximo en todas las bandas de frecuencias y en posiciones de
funcionamiento estándares.
Si bien el SAR es evaluado en el nivel de potencia más alto, el nivel real de SAR
del teléfono móvil durante su uso es, por lo general, bastante inferior a los valores
máximos obtenidos en las pruebas. Así pues, el teléfono móvil ha sido diseñado para
utilizar únicamente la potencia estrictamente necesaria para asegurar su conexión a
la red. En principio, cuánto más cerca se encuentre usted de una antena de estación
de base, más bajos serán los niveles de potencia del teléfono móvil. La validación de
la conformidad con las reglamentaciones y normas, condición previa a la introducción
en el mercado de todo modelo de teléfono móvil (5054S) es de 1.30 W/Kg para un
uso cerca a la oreja y 1.45 W/Kg junto al cuerpo. (5054A) es de 1.25 W/Kg para un
uso cerca a la oreja y 1.26 W/Kg junto al cuerpo.
Si bien los niveles SAR varían de un teléfono y modo de uso a otro, todos cumplen
con las exigencias internacionales y a la recomendación europea en vigor en materia
de exposición a las radiofrecuencias.
Este teléfono cumple con las exigencias de exposición FCC RF para ser llevado en el
cuerpo siempre que se lo utilice con un accesorio no metálico y a 15 mm al menos
del cuerpo. El uso de otro accesorio puede faltar en cumplir con las exigencias de
exposición FCC RF.
7 8
Page 66

La Organización Mundial de la Salud (OMS) considera que «el estado actual de los
conocimientos científicos no justifica la toma de precauciones particulares para el uso
de teléfonos móviles. En caso de inquietud, una persona puede optar por limitar su
exposición, o la de sus hijos, a las radiofrecuencias disminuyendo la duración de las
comunicaciones o utilizando la opción “manos libres” (o un kit manos libres portátil)
que permite alejar el teléfono de la cabeza y el cuerpo (Memo n°193). Para obtener
informaciones complementarias de la OMS sobre los campos electromagnéticos y la
salud pública, vaya al sitio web siguiente: http://www.who.int/peh-emf.
Nota: Este equipo ha sido probado y se confirma que cumple con los límites para un
dispositivo digital Clase B, de conformidad con la parte 15 de las Reglas FCC.
Estos límites están diseñados para ofrecer una protección razonable en contra de
la interferencia dañina cuando el equipo se opera en un entorno comercial. Este
equipo genera, usa y puede emitir energía de radiofrecuencia, por lo que en el caso
de no instalarse y no usarse de acuerdo con el instructivo de uso podría causar una
interferencia dañina en las radiocomunicaciones.
No obstante, no se garantiza que en una instalación doméstica no se produzca
ninguna interferencia en la recepción de radio o televisor, lo que puede averiguarse
encendiendo y apagando el equipo. Es recomendable que el usuario corrija dichas
interferencias mediante uno o varios de los siguientes procedimientos:
- Cambie la orientación o la ubicación de la antena receptora.
- Aumente la separación entre el equipo y el receptor.
- Conecte el equipo a una toma de corriente de un circuito distinto al que esté
conectado el receptor.
- Consulte con el distribuidor o técnico de radio o televisor cualificado para obtener
asistencia.
Los cambios o modificaciones que no hayan sido expresamente aprobados por la
parte responsable del cumplimiento de las normas, podría cancelar el derecho del
usuario a usar el equipo.
Para dispositivos de recepción asociados con un servicio de radio bajo licencia (Radio
FM por ejemplo), se aplica la siguiente declaración:
Este dispositivo cumple con la parte 15 de las Reglas FCC, a la condición que no
cause interferencias dañinas.
Para otros dispositivos, se aplica la siguiente declaración:
Este dispositivo cumple con la parte 15 de las Reglas FCC. La operación se encuentra
sujeta a las siguientes dos condiciones:
(1) Este dispositivo podría no causar interferencias dañinas.
(2) Este dispositivo debe aceptar cualquier interferencia recibida, incluyendo la
interferencia que podría causar una operación no deseada.
9 10
Su teléfono está equipado con una antena integrada. Para beneficiarse de una calidad
de funcionamiento óptima durante sus comunicaciones, no toque ni deteriore la
antena.
Puesto que los dispositivos móviles ofrecen distintas funciones, pueden utilizarse en
distintas posiciones además de junto al oído. Cuando se utilice con los auriculares o
el cable de datos USB, el dispositivo debe seguir las directrices correspondientes. Si
va a usar otro accesorio, asegúrese de que no incluya ningún tipo de metal y que el
teléfono se sitúe como mínimo a 15 mm del cuerpo.
Aviso IC
Este dispositivo cumple con la industria de Canadá RSS estándar (s) exento de
licencia. La operación está sujeta a las dos condiciones siguientes:
(1) este dispositivo no puede causar interferencias y
(2) este dispositivo debe aceptar cualquier interferencia, incluidas las interferencias
que puedan causar un funcionamiento no deseado del dispositivo.
Este aparato digital Clase B cumple con el ICES-003 canadiense.
IC Declaración de exposición a la radiación
Este EUT cumple el SAR para población en general / exposición incontrolada
límites en IC RSS-102 y habían sido probados de conformidad con la medida
métodos y procedimientos especificados en IEEE 1528 y IEC 62209. Este equipo
debe ser instalado y operado a una distancia mínima de 1.5 cm entre el
radiador y su cuerpo. Este dispositivo y su antena (s) no deben colocarse ni
operar en conjunto con cualquier otra antena o transmisor.
Tenga en cuenta que al utilizar este dispositivo es posible que algunos de sus datos
personales se compartan en el dispositivo. Es responsabilidad suya proteger sus datos
personales y no compartirlos con ningún dispositivo de terceros o no autorizado
conectado al suyo. Si tiene un dispositivo con Wi-Fi, conéctelo solo a redes Wi-Fi
de confianza. Además, cuando utilice su dispositivo como zona Wi-Fi (si tiene esta
capacidad), utilice las funciones de seguridad de redes. Estas precauciones impedirán
el acceso no autorizado a su dispositivo. El dispositivo puede almacenar información
personal en varias ubicaciones, como una tarjeta SIM, una tarjeta de memoria y la
memoria integrada. Asegúrese de eliminar o borrar toda la información personal
antes de reciclar, devolver o regalar el dispositivo. Elija con atención las aplicaciones
y las actualizaciones, e instale únicamente las que procedan de fuentes de confianza.
Algunas aplicaciones pueden influir en el rendimiento del producto y/o tener acceso
a información privada, como detalles de cuentas, datos de llamadas, detalles de
ubicación y recursos de red.
Page 67

Tenga en cuenta que todos los datos que comparta con TCL Communication Ltd.
se almacenarán de acuerdo con la legislación aplicable sobre protección de datos.
Con esta finalidad, TCL Communication Ltd. implementa y mantiene medidas
organizativas y técnicas para proteger todos los datos personales, por ejemplo contra
su procesamiento ilegal o no autorizado y contra daños o su pérdida o destrucción
accidental, por lo que estas medidas proporcionarán un nivel de seguridad adecuado
en relación con:
(I) Las opciones técnicas disponibles.
(II) Los costos de implementación de las medidas.
(III) Los riesgos implícitos en el procesamiento de los datos personales.
(IV) La confidencialidad de los datos personales procesados.
Puede tener acceso a su información personal, revisarla y modificarla en cualquier
momento iniciando sesión en su cuenta de usuario, entrando en su perfil de usuario o
poniéndose en contacto con nosotros directamente. Si nos solicita que modifiquemos
o eliminemos sus datos personales, podemos pedirle que presente un documento de
identidad antes de procesar su solicitud.
• LICENCIAS
El logotipo de microSD es una marca comercial.
La marca y el logotipo de la palabra Bluetooth son propiedad de
Bluetooth SIG, Inc. y el uso de dichas marcas por parte de TCL
Communication Ltd. y sus filiales está permitido bajo licencia.
Otras marcas comerciales y nombres comerciales pertenecen a sus
respectivos propietarios.
ALCATEL ONETOUCH 5054S/5054A
Bluetooth Declaration ID D026715
El logotipo de Wi-Fi es una marca de certificación de Wi-Fi Alliance.
Google, el logotipo de Google, Android, el logotipo de Android,
Google SearchTM, Google MapsTM, GmailTM, YouTube, Google Play
Store, Google LatitudeTM y HangoutsTM son marcas registradas
de Google Inc.
El robot de Android está reproducido o modificado a partir del trabajo creado
y compartido por Google y se utiliza según los términos que se describen en la
Licencia de atribución de Creative Commons 3.0 (el texto se mostrará cuando
toque y mantenga Condiciones de Google en Ajustes\Acerca del teléfono\
Información legal)
Ha adquirido un producto que usa programas de código abierto (http://opensource.
org/) mtd, msdosfs, netfilter/iptables e initrd en código de objetos y otros programas
de código abierto obtenidos bajo licencia según la Licencia pública general de GNU
y la Licencia de Apache.
Le proporcionaremos un respaldo completo de los códigos abiertos correspondientes
bajo petición dentro de un período de tres años a partir de la distribución del
producto por TCL.
Puede descargar los códigos de origen en http://sourceforge.net/projects/alcatel/files/.
El suministro del código de origen es gratuito cuando se obtiene de Internet.
Compatibilidad con Audífonos
Su teléfono está certificado para “Compatibilidad con Audífonos”, para ayudar
a usuarios con dispositivos de ayuda auditiva a encontrar teléfonos que sean
compatibles con sus aparatos.
5054S: Este teléfono es compatible con HAC M4/T4 Referencia ANSI C63.19-2011.
5054A: Este teléfono es compatible con HAC M4 Referencia ANSI C63.19-2011.
Para más información visite nuestra página web
http://www.alcatelonetouch.com
5054S:
FCC ID: 2ACCJA010
IC: 9238A-0047
5054A:
FCC ID: 2ACCJA011
(1)
(1)
Puede no estar disponible en algunos países.
11 12
Page 68

Informaciones generales ............
•Página web: www.alcatelonetouch.us
www.alcatelonetouch.ca
• Facebook: www.facebook.com/alcatelonetouchusa
www.facebook.com/alcatelonetouchcanada
• Twitter: http://www.twitter.com/alcatel1touch
•Número del Servicio de Atención al Cliente: En los Estados
Unidos, llame al 855-368-0829 para obtener soporte técnico.En Canadá,
llame al 855-844-6058 para obtener soporte técnico.
•Ruta de etiquetado electrónico: Toque Ajustes\Normativa y
Seguridad o ingrese *#07# para encontrar más información sobre el
(1)
teléfono
En nuestro sitio de Internet, podrá consultar nuestra sección de preguntas
frecuentes (FAQ). También puede ponerse en contacto con nosotros por correo
electrónico para consultarnos cualquier duda que tenga.
Puede descargar la versión electrónica de este instructivo de uso en inglés y en
otros idiomas según disponibilidad en nuestro sitio web:
www.alcatelonetouch.com.
5054S: Su teléfono es un transreceptor diseñado para operar en redes GSM/GPRS/
EDGE en cuatribanda con 850/900/1800/1900 MHz o UMTS en tribanda con (2/4/5)
y LTE FDD: B2/4/5/7/17.
5054A: Su teléfono es un transreceptor diseñado para operar en redes GSM/
GPRS/EDGE en cuatribanda con 850/900/1800/1900 MHz o UMTS en tribanda con
(850/900/1900/2100 MHz) y LTE FDD: B1/2/4/7/28 full.
.
Protección contra robos
Su teléfono móvil se identifica por un número IMEI (número de serie) que se
encuentra sobre la etiqueta del paquete así como en la memoria de su teléfono.
Le recomendamos que anote el número la primera vez que utilice el teléfono
introduciendo * # 0 6 # y que lo guarde en un lugar seguro. Es posible que la policía
o el operador se lo soliciten si le roban el teléfono. Con este número, si le roban el
teléfono, se podrá bloquear el funcionamiento del mismo e impedir su uso por otra
persona.
(1)
Excepción de responsabilidad
Usted puede encontrar diferencias entre la descripción en esta guía y el funcionamiento
real del teléfono en uso, dependiendo de la versión de software de su teléfono o de
los servicios específicos de cada operador.
TCL Communication Ltd. no se responsabiliza legalmente de dichas diferencias, si
existieran, ni tampoco de las posibles consecuencias, cuya responsabilidad debería
recaer en el operador.
Reciclaje de componentes electrónicos
Para obtener más información sobre el reciclaje de componentes electrónicos, realice
uno de los pasos siguientes:
1) Visite el sitio web del programa de reciclaje de
componentes electrónicos de ALCATEL ONETOUCH en
http://www.alcatelonetouch.us/Electronic-Recycling-Program-Accessibility-andCompliance/b/11522543011.
2) Llame al servicio de asistencia para clientes de ALCATEL ONETOUCH US al
número 1-855-368-0829.
(1)
Disponible para algunos países.
(1)
Verifique la disponibilidad de este servicio con su operador.
13 14
Page 69

Su celular ...............................
1
Flash/función linterna
de la cámara
Cámara
1.1 Teclas y conectores
Conector de auriculares
Cámara
frontal
Conector micro-USB
Sensor de
proximidad y de luz
Indicador LED
Pantalla táctil
Tecla Atrás
Tecla de inicio
Tecla Menú
Botón de
Encendido
Botón de
volumen
Tecla Atrás
•Toque para volver a la pantalla anterior o para cerrar
un cuadro de diálogo, el menú de opciones, el panel de
notificaciones, etc.
Tecla Inicio
•Desde cualquier aplicación o pantalla, toque para volver a la
pantalla de Inicio.
•Pulse prolongadamente para que aparezca el icono de
búsqueda de Google. Deslice el dedo hacia el icono para abrir
el buscador de Google.
Tecla de recientes
•Toque para ver las aplicaciones utilizadas recientemente.
15 16
Page 70

Botón de Encendido
•Pulsar: Bloquea/Ilumina la pantalla.
•Pulsar y mantener pulsado: Abre el menú emergente para
seleccionar entre las opciones Apagar/Reiniciar/Modo vuelo.
•Mantenga pulsado el botón de Encendido y el de Subir el
volumen para reiniciar.
•Mantenga pulsado el botón de Encendido y el de Bajar el
volumen para realizar una captura de pantalla.
•Pulse y mantenga pulsado el botón de Encendido durante 8
segundos para apagarlo o manténgalo pulsado 10 segundos o
más para reiniciar.
Teclas de volumen
•En modo llamada, ajusta el volumen del dispositivo o del
auricular.
•En modo Música/Video/Transmisión, ajusta el volumen.
•En modo General, ajusta el volumen del tono de llamada.
•Silencia el tono de llamada de una llamada entrante.
•Desde la cámara, pulse el botón de Subir o Bajar el
volumen para hacer fotografías.
1.2 Puesta en marcha
1.2.1 Configurar
Quitar/colocar la tapa trasera
Introducir y extraer la tarjeta SIM
Debe insertar su tarjeta SIM para poder realizar llamadas. Apague el celular
y extraiga la batería antes de insertar o extraer la tarjeta SIM.
Para instalar, primero desbloquee el seguro donde se inserta la SIM y
luego coloque la SIM en la ranura con el contacto dorado mirando hacia
abajo. Verifique que esté correctamente insertada. Para extraer la SIM,
desbloquee la tarjeta SIM y retírela de la ranura.
Antes de insertar o extraer la tarjeta SIM, debe asegurarse de que
el teléfono esté apagado para protegerlo contra daños.
Su teléfono solo es compatible con una tarjeta microSIM. No
intente insertar otra tarjeta SIM como tarjeta mini o nano SIM,
porque podría causar daños en el teléfono.
17 18
Page 71

Colocar y extraer la tarjeta microSD
Para instalar la tarjeta microSD, primero desbloquee el seguro y luego
coloque la tarjeta microSD con el contacto dorado mirando hacia abajo.
Para extraer la tarjeta microSD, desbloquee el seguro y retírela.
Antes de insertar o extraer la tarjeta microSD, debe asegurarse de
que el teléfono esté apagado para protegerlo contra daños.
Asimismo, si quita o inserta la tarjeta SD con frecuencia, es posible
que el teléfono se reinicie.
Cargar la batería
Conecte el cargador de la batería al teléfono y a una toma de corriente.
•Compruebe que ha insertado correctamente la batería antes de conectar
el cargador.
•Antes de utilizar el celular por primera vez, se recomienda cargar la
batería completamente (aproximadamente 5 horas).
Se recomienda cargar la batería completamente (
se indica con un porcentaje en la pantalla cuando el teléfono está apagado.
El porcentaje aumenta a medida que se carga el teléfono.
). El estado de carga
Si el nivel de carga de la batería es muy bajo, no se mostrará ninguna
indicación de que se recibe alimentación mientras no haya carga
suficiente para mostrar la barra de estado de la carga. Para reducir
el consumo y el gasto de energía, cuando la batería esté cargada
completamente, desconecte su cargador de la toma de corriente,
apague las aplicaciones Wi-Fi, GPS, Bluetooth o las que ejecuten Java
cuando no estén en uso, disminuya el tiempo de la luz de fondo, etc.
1.2.2 Encender el teléfono
Mantenga pulsado el botón de Encendido hasta que el celular se
encienda, desbloquéelo (deslizar, PIN, contraseña o patrón) si es necesario,
y confirme. Se visualizará la pantalla inicial.
Si desconoce el código PIN o lo ha olvidado, póngase en contacto con su
operador de red. No deje el código PIN cerca de su teléfono. Guarde su
tarjeta SIM en un lugar seguro cuando no la utilice.
Primera puesta en servicio del teléfono
Cuando encienda el teléfono por primera vez, deberá configurar los ajustes
siguientes:
•Seleccione el idioma del celular y toque
•Seleccione un Wi-Fi activo y toque SIGUIENTE; de lo contrario, toque
OMITIR.
•Configure los Servicios Google marcando las casillas de verificación
correspondientes, toque MÁS para saber más sobre los Servicios
Google y toque SIGUIENTE.
•Configure el Servicio de ubicación después de tocar el interruptor de
Ubicación y, a continuación, seleccione el modo de ubicación deseado.
•Toque FINALIZAR para completar el proceso de configuración.
Incluso si no hay ninguna tarjeta SIM instalada, podrá encender el teléfono,
conectarse a una red Wi-Fi (consulte la sección “6.1.2 Wi-Fi”), iniciar
sesión con su cuenta de Google y usar algunas de funciones.
.
19 20
Page 72

1.2.3 Apagar el teléfono
Mantenga pulsado el botón de Encendido en la pantalla de inicio hasta
que se muestren las opciones del teléfono y seleccione Apagar.
1.3 Pantalla de Inicio
Usted puede colocar los elementos que utiliza con más frecuencia
(aplicaciones, atajos, carpetas y widgets) en la pantalla de Inicio, para
acceder rápidamente a ellos. Toque la tecla Inicio para cambiar a la pantalla
de inicio.
Barra de estado
•Indicadores de estado/notificación.
•Toque y arrastre hacia abajo para
abrir el panel de notificaciones.
Barra de búsqueda
•Toque para entrar en la pantalla de
búsqueda de texto.
•Toque para entrar en la pantalla de
búsqueda por voz.
Toque un icono para abrir
una aplicación, carpeta, etc.
Bandeja de aplicaciones favoritas
•Toque para abrir la aplicación.
•Pulse prolongadamente para mover o cambiar
las aplicaciones.
Toque para ingresar en la lista de
todas las aplicaciones.
La pantalla de Inicio se presenta con un formato ampliado para ofrecerle
más espacio para añadir aplicaciones, atajos, etc. Deslice la pantalla de Inicio
horizontalmente de izquierda a derecha para obtener una vista completa.
Hacer reversible la pantalla
El celular es compatible con la función reversible; en la pantalla de inicio,
toque
Cuando se gire el dispositivo y seleccione Girar el contenido de la
pantalla o Permanecer en vista vertical.
para abrir la lista de aplicaciones, toque Ajustes\Pantalla\
1.3.1 Uso de la pantalla táctil
Tocar
Para acceder a una aplicación, tóquela con el dedo.
Mantenga pulsado
Para entrar en las opciones disponibles de cualquier elemento, manténgalo
pulsado. Por ejemplo, seleccione un contacto de Contactos y manténgalo
pulsado. Se mostrará una lista de opciones en la pantalla.
Arrastrar
Coloque el dedo sobre la pantalla para arrastrar el objeto a otra ubicación.
Deslizar
Deslice la pantalla para desplazarse arriba y abajo por las aplicaciones,
imágenes, páginas web, etc. según desee. También puede deslizar la pantalla
horizontalmente.
El dispositivo admite también hacer zoom con un dedo en las funciones
Mensajes, Navegador, Correo electrónico, Cámara y Galería. Toque dos
veces la pantalla y, a continuación, deslice con un dedo para ampliar o
reducir.
21 22
Page 73

Deslizar rápido
Es similar a deslizar pero a mayor velocidad.
Alejar/Extender
Coloque los dedos de una mano en la superficie de la pantalla y sepárelos
o acérquelos para reducir o ampliar la escala de un elemento de la pantalla.
Girar
Cambie automáticamente la orientación de la pantalla de horizontal a
vertical girando el teléfono lateralmente para obtener una visión mejorada
de la pantalla.
1.3.2 Barra de estado
Desde la barra de estado puede ver el estado del teléfono (en el lado
derecho) y la información de notificaciones (en el lado izquierdo).
Iconos de estado
GPRS conectado Sin señal
GPRS en uso Alarma configurada
EDGE conectado Bluetooth activado
EDGE en uso
3G conectado Altavoz activado
3G en uso Auriculares conectados
HSPA (3G+) conectado Roaming
HSPA (3G+) en uso
HSPA+ conectado Modo vibrar
HSPA+ en uso Nivel de batería muy bajo
Conectado a 4G Nivel de batería bajo
4G en uso Batería parcialmente vacía
Intensidad de la señal Batería llena
Wi-Fi conectado Batería en carga
Conectado a una red Wi-Fi GPS activado
Conectado a un dispositivo
Bluetooth
No hay una tarjeta SIM
insertada
Modo vuelo
23 24
Page 74

Iconos de notificación
Nuevo mensaje de Gmail Llamada perdida
Nuevo mensaje de correo
electrónico
Nuevo mensaje de texto o
multimedia
Problemas con el envío de
SMS o MMS.
Nuevo mensaje de Google
Hangouts
Nuevo mensaje de voz Envío de datos
Desvío de llamada activado
Archivo de audio en curso
Conectado a VPN
Radio encendida
Panel de notificaciones
Cuando haya notificaciones, toque y arrastre hacia abajo la barra de estado
para abrir el panel de notificaciones y leer más información detallada.
Toque aquí para cambiar al panel de ajustes
rápidos.
Toque para borrar todas las notificaciones
basadas en eventos (el resto de
notificaciones en curso se conservarán).
Evento próximo Descarga de datos
Captura de pantalla tomada
Módem USB y Zona Wi-Fi
activados
Módem USB activado
Zona Wi-Fi activada
Se han excedido los límites
de uso de datos o están a
punto de excederse.
Toque y arrastre hacia abajo la barra de estado para abrir el panel de ajustes
rápidos o de notificaciones. Toque y arrastre hacia arriba para cerrarlo. Si
hay notificaciones puede tocar para acceder a ellas directamente.
25 26
Seleccionar método de
entrada
Red Wi-Fi abierta
disponible
Teléfono conectado
mediante cable USB
Actualización del sistema
disponible
Más notificaciones ocultas
Panel de ajustes rápidos
Toque y arrastre hacia abajo el panel de notificaciones o toque
abrir el panel de ajustes rápidos. Puede habilitar o deshabilitar funciones, o
cambiar modos tocando los iconos.
Toque para acceder a la pantalla del usuario para
editar o guardar el nombre del propietario, el
número de teléfono y otra información.
Toque para acceder a Ajustes, donde
podrá ajustar otros elementos.
para
Page 75

1.3.3 Barra de búsqueda
El teléfono dispone de una función de búsqueda que puede utilizarse para
localizar información en las aplicaciones, en el teléfono o en la web.
Para crear un patrón de desbloqueo de pantalla (véase la sección
“Screen lock” para obtener más detalles de configuración)
•Desde la pantalla de inicio, toque
a continuación, toque Ajustes\Bloquear pantalla\Bloqueo de
pantalla\Patrón.
•Dibuje su patrón personal.
Dibuje el patrón de desbloqueo.
para abrir la lista de aplicaciones;
Búsqueda de texto
• Toque la barra de búsqueda desde la pantalla de inicio.
•Escriba el texto o la frase que desee buscar.
•Toque el icono
Búsqueda de voz
•Toque
•Diga la palabra o la frase que desee buscar. Aparecerá una lista con los
resultados de la búsqueda en la que podrá realizar una selección.
en la barra de búsqueda para que aparezca un diálogo.
en el teclado si desea buscar en la web.
1.3.4 Bloquear/Desbloquear la pantalla
Para proteger el teléfono y su privacidad, puede bloquear la pantalla del
teléfono deslizando con el dedo, creando distintos patrones, mediante un
PIN o contraseña, etc.
27 28
Repita el dibujo del patrón de desbloqueo
para confirmarlo.
Para crear un bloqueo de pantalla con PIN/contraseña
•Toque Bloquear pantalla\Bloqueo de pantalla\PIN o Contraseña.
•Establezca su PIN o Contraseña.
Para crear un bloqueo de pantalla con la función de deslizar
•Toque Bloquear pantalla\Bloqueo de pantalla.
•Toque Deslizar.
Para bloquear la pantalla del teléfono
Pulse el botón de Encendido una vez para bloquear la pantalla.
Page 76

Para desbloquear la pantalla del teléfono
Pulse el botón de Encendido una vez para iluminar la pantalla, dibuje el
patrón de desbloqueo que haya creado o ingrese su PIN o contraseña para
desbloquear la pantalla.
Si ha elegido Deslizar como bloqueo de pantalla, pulse el botón de
Encendido para iluminar la pantalla y, a continuación, deslice hacia arriba
para desbloquear la pantalla, hacia la izquierda para acceder a la Cámara o
hacia la derecha para ingresar en Llamar.
Toque dos veces para acceder a la pantalla
de detalles.
Deslice hacia arriba para desbloquear la pantalla
Deslice hacia la izquierda para acceder
a la Cámara y hacia la derecha para
acceder a Llamar
1.3.5 Personalizar la pantalla de Inicio
Añadir
Mantenga pulsada una carpeta, una aplicación o un widget para mover o
arrastrar el elemento seleccionado a su pantalla de inicio preferida.
Colocar en otro lugar
Pulse prolongadamente el elemento que desea colocar en otro lugar para
moverlo; arrastre el elemento a la posición deseada, y a continuación,
suéltelo. Puede mover elementos tanto en la pantalla de inicio como
en la bandeja Favoritos. Mantenga pulsado el icono de la izquierda o de
la derecha de la pantalla para arrastrar el elemento a otra página de la
pantalla de inicio.
Eliminar
Mantenga pulsado el elemento que desea eliminar para moverlo; arrastre
el elemento a la parte superior donde se encuentra el icono X y, cuando
cambie a color rojo, suéltelo.
Crear carpetas
Para mejorar la organización de los elementos (atajos o aplicaciones) en la
pantalla de Inicio y la bandeja de Favoritos, puede añadirlos a una carpeta
colocando un elemento encima de otro. Para renombrar una carpeta,
ábrala y toque la barra del nombre de la carpeta para introducir el nuevo
nombre.
Personalizar el fondo de pantalla
Mantenga pulsada el área vacía de la pantalla de inicio y luego toque
FONDO DE PANTALLA para personalizar el fondo de pantalla.
29 30
Page 77

1.3.6 Widgets y aplicaciones utilizadas recientemente
Consultar los widgets
Mantenga pulsada el área vacía de la pantalla de inicio y toque WIDGETS
para ver todos los widgets en la parte inferior de la pantalla de inicio.
Toque el widget seleccionado y deslícelo para llevarlo hasta la pantalla
que desee.
Consultar las aplicaciones utilizadas recientemente
Para consultar las aplicaciones usadas recientemente, toque la tecla
Reciente. Toque una miniatura en la ventana para abrir la aplicación
relacionada.
Toque una miniatura y toque X o deslícela hacia la derecha o la izquierda
para eliminarla.
Toque
miniaturas a la vez.
en la parte inferior de la pantalla para borrar todas las
1.3.7 Ajuste de volumen
Usar el botón de volumen
Pulse el botón de Volumen para ajustar el volumen. Para activar el modo
vibrar, pulse el botón de Bajar el volumen hasta que el celular vibre.
Uso del menú Ajustes
Desde la pantalla de inicio, toque
toque Ajustes\Sonido y notificación\Sonido para ajustar el volumen
de reproducción de los archivos multimedia, el tono de llamada, la alarma,
etc.
para abrir la lista de aplicaciones y
31 32
Page 78

Ingresar texto .......................
2
2.1 Uso del teclado en pantalla
Ajustes del teclado en pantalla
Toque Ajustes/Idioma y entrada de texto, toque el teclado que desea
configurar y se activarán una serie de ajustes para su selección.
Ajuste de la orientación del teclado en pantalla
Gire el teléfono de vertical a horizontal para ajustar la orientación del
teclado en pantalla. Puede ajustarla cambiando los ajustes (toque Ajustes/
Pantalla/Cuando se gire el dispositivo/Girar contenido de la
pantalla).
2.1.1 Teclado de Android
Toque para ingresar
texto o números.
Toque para cambiar entre
los modos "abc/Abc".
Mantenga pulsado para
cambiar entre los modos
Toque aquí para alternar
símbolos y el numérico.
"abc/ABC".
entre el teclado de
Toque para ingresar en entrada
por voz;
Mantenga pulsado para mostrar
opciones de entrada.
Mantenga pulsado para
seleccionar símbolos.
2.2 Edición de texto
Es posible editar el texto introducido.
•Pulse prolongadamente o toque dos veces el texto que desee editar.
•Arrastre para cambiar la selección resaltada.
•Aparecerán las siguientes opciones: Seleccionar todo
, Copiar y Pegar .
•Toque el icono
También puede insertar texto nuevo, si lo prefiere.
•Toque donde desea escribir, o mantenga pulsado un espacio vacío. El
cursor parpadeará y se mostrarán las pestañas. Arrastre la pestaña para
mover el cursor.
•Si tiene texto seleccionado, toque la pestaña para mostrar el icono
PEGAR, que le permitirá pegar inmediatamente.
para volver sin realizar ninguna acción.
, Cortar
33 34
Page 79

Llamadas, Registro y
3
Contactos ..............................
3.1 Llamar ..........................................................
3.1.1 Cómo realizar una llamada
Puede realizar llamadas fácilmente con Llamar. Toque el icono en la
pantalla de inicio para acceder a la aplicación Llamar.
Toque para llamar
al número de vista
previa.
Toque para enviar un
mensaje al número de vista
previa.
Deslice para acceder
a RECIENTES y a
CONTACTOS.
Toque para ocultar/
mostrar el teclado.
Muestra los
números
sugeridos.
Mantenga pulsado
para acceder al
buzón de voz.
Ingrese el número deseado directamente desde el teclado o toque
para realizar una llamada. También puede seleccionar un contacto desde
CONTACTOS o RECIENTES arrastrando o tocando las pestañas y, a
continuación, realice la llamada.
Puede guardar el número ingresado en Contactos tocando
posteriormente Crear contacto nuevo.
Si se equivoca, puede borrar los dígitos incorrectos tocando
Para colgar una llamada, pulse
Llamadas internacionales
Para realizar una llamada internacional, pulse prolongadamente
ingresar el signo “+”; a continuación, ingrese el prefijo de país internacional
seguido del número de teléfono completo y, por último, toque
Llamada de emergencia
Si el teléfono tiene cobertura de red, marque el número de emergencia y
toque
sin tarjeta SIM y sin necesidad de introducir el código PIN.
para realizar una llamada de emergencia. Esto funciona incluso
.
y tocando
.
para
.
35 36
Page 80

3.1.2 Responder o rechazar una llamada
Cuando reciba una llamada:
•Deslice el icono
•Deslice el icono
•Deslice el icono
mensaje preestablecido.
Para silenciar las llamadas entrantes, pulse la tecla Subir/Bajar volumen
o coloque el teléfono boca abajo (cuando la opción de Ajustes\Gestos\
Voltear para silenciar esté activada).
hacia la derecha para responder.
hacia la izquierda para rechazar.
hacia arriba para rechazar la llamada enviando un
3.1.3 Llamar a su buzón de voz
Para que no pierda ninguna llamada, la red dispone de un servicio de buzón
de voz. Este servicio funciona como un contestador que puede consultar
en cualquier momento.
Para acceder al Buzón de voz, pulse prolongadamente
Para establecer el número de su buzón de voz:
.
•En la pantalla de llamada toque
Ajustes de llamada\Ajustes de llamada dual\Buzón de voz\
Configurar\Número del buzón de voz.
Si recibe un mensaje en el buzón de voz, aparecerá el icono de buzón
de voz
Nuevo mensaje de voz.
en la barra de estado. Abra el panel de notificaciones y toque
y, a continuación, toque Ajustes\
3.1.4 En el transcurso de una llamada
Para ajustar el volumen durante una llamada, pulse la tecla Subir o bajar
el volumen.
37 38
Page 81

Toque aquí para finalizar la llamada en curso.
Toque para activar el altavoz durante la llamada en curso.
Toque de nuevo este icono para desactivar el altavoz.
Toque aquí para silenciar la llamada en curso. Toque de nuevo
este icono para volver a activar el sonido en la llamada.
Toque aquí para que se muestre el teclado de marcación.
Toque aquí para poner en espera la llamada en curso. Toque
de nuevo este icono para recuperar la llamada.
Toque aquí para añadir una llamada.
Para evitar operaciones accidentales en la pantalla táctil durante
una llamada, la pantalla se bloqueará automáticamente cuando se
acerque el teléfono a la oreja y se desbloqueará cuando lo aleje.
3.1.5 Gestionar varias llamadas
Este celular permite gestionar varias llamadas simultáneas.
Alternar llamadas
Cuando acepte dos llamadas, toque el icono
llamada a otra. La llamada en curso se pondrá en espera y podrá pasar a
la otra llamada.
Conferencia
(1)
Es posible establecer una conferencia telefónica como se indica a
continuación.
•Llame al primer participante de la conferencia telefónica.
(1)
Según su operador de red.
39 40
; así podrá pasar de una
•Toque el icono .
•A continuación, toque el icono
y el icono para empezar la
conferencia.
•Toque
para finalizar la conferencia y desconectar a todos los
participantes.
3.1.6 Ajustes de llamadas
Toque desde la pantalla de Llamada y, a continuación, toque Ajustes. Las
opciones siguientes están disponibles:
Ajustes de llamadas
• Ajustes de llamada dual: seleccione SIM 1 o SIM 2 para establecer las
opciones a continuación.
Buzón de Voz
- Servicio: Abre un cuadro de diálogo que permite seleccionar el
servicio de buzón de voz de su operador u otro servicio.
- Puesta en servicio: Si utiliza el servicio de buzón de voz de su
operador, se abre un cuadro de diálogo en el que puede ingresar el
número de teléfono del buzón de voz para gestionar y escuchar los
mensajes. Puede introducir una coma (,) para insertar una pausa en
el número, por ejemplo para agregar una contraseña después del
número de teléfono.
- Sonido: Toque aquí para establecer el sonido cuando llega un nuevo
mensaje de voz.
- Vibrar: Marque esta casilla de verificación para activar que vibre
cuando llegue un nuevo mensaje de voz.
Restricción de llamadas: Toque para configurar los ajustes de
Prohibición de llamada. Marque la casilla de verificación para activar la
prohibición de llamadas para las llamadas entrantes y salientes.
Números servicio de llamadas Puede realizar una llamada desde la
lista SDN.
Page 82

Desvío de llamada: Toque aquí para configurar el modo de desviar
llamadas cuando la línea esté ocupada, no haya respuesta o no tenga
cobertura.
Configuración adicional
- ID del emisor Toque para utilizar la configuración del operador
predeterminada con el fin de mostrar su número en las llamadas
salientes.
- Llamada en espera: Marque la casilla de verificación para que se le
notifiquen las nuevas llamadas entrantes durante una llamada.
Otras opciones de llamadas
• Modo TTY: El modo TTY está destinado a las personas sordas, con
problemas auditivos o con deficiencias de expresión.
• Audífonos: El modo de audífono está destinado a las personas sordas,
con problemas auditivos o con deficiencias de expresión. Una vez
conectados el móvil y el audífono, las llamadas se vinculan a un servicio
de transmisión que convierte la voz entrante en texto para la persona
que utiliza el audífono y el texto saliente en voz para el otro interlocutor.
• Tonos DTMF: DTMF (multifrecuencia de tonos dobles) es un método
que indica a un sistema de conmutación de llamadas el número de
teléfono que se debe marcar o que se usa para emitir comandos a los
sistemas de conmutación o equipos de telefonía relacionados. Toque aquí
para activar tonos DTMF.
Configuración de VoLTE
•Habilite el botón para activar el uso de voz por LTE cuando la red sea
compatible con la voz PS.
3.2 Registro de llamadas
Puede acceder al registro de llamadas tocando la pestaña RECIENTES en
la pantalla de Llamadas para ver las Llamadas perdidas, Llamadas salientes
y Llamadas entrantes.
Toque un contacto o un número para ver información u otras operaciones,
puede iniciar una nueva llamada, enviar un SMS al contacto o número, ver
información detallada de la llamada o cancelar la llamada.
También puede añadir el número a Contactos tocando Añadir a
contactos (solo disponible para los números de teléfono no guardados).
Toque Ver el historial de llamadas completo para ver todo el registro
de llamadas, toque
la memoria de llamadas.
y Borrar registro de llamadas para borrar toda
3.3 Contactos ....................................................
Contactos permite acceder de forma rápida y fácil al contacto
con el que desee ponerse en contacto.
Puede visualizar y crear contactos en el celular y sincronizarlos con sus
contactos de Gmail u otras aplicaciones de la web o de su celular.
3.3.1 Consultar los Contactos
Para acceder a esta función, toque de la pantalla de inicio y, a
continuación, seleccione Contactos.
41 42
Page 83

Toque aquí para
ver sus contactos
favoritos.
Toque aquí para
seleccionar y borrar
el contacto actual o
todos los contactos.
Toque aquí para buscar
en Contactos.
Toque esta imagen
para abrir el panel de
contacto rápido.
•Contactos que
Elija los contactos a mostrar.
mostrar
•Importar/
Exportar
Permite importar o exportar contactos entre el
teléfono, la tarjeta SIM, la tarjeta microSD
(1)
y el
almacenamiento interno.
•Cuentas Permite administrar los ajustes de sincronización de
distintas cuentas.
•Ajustes Toque para cambiar la pantalla de la lista ordenada
y los nombres de contactos.
Toque aquí para añadir un
nuevo contacto.
Borrar un contacto
Para eliminar un contacto, toque el contacto que desea eliminar, el icono
cambiará a
Toque
; a continuación, toque y confirme que desea eliminarlo.
para seleccionar todos los contactos; a continuación, toque
y confirme que desea eliminar todos los contactos.
El contacto borrado también se eliminará de otras aplicaciones del
teléfono o Internet la próxima vez que sincronice el teléfono.
Toque
para mostrar el menú de opciones de la lista de
contactos. Las siguientes acciones están habilitadas:
43 44
3.3.2 Añadir un contacto
Toque de la lista de contactos para crear un contacto nuevo.
Deberá ingresar el nombre del contacto junto con otra información. Para
pasar de un campo a otro, puede desplazarse hacia arriba o hacia abajo por
la pantalla fácilmente.
Toque aquí para guardar.
Toque aquí para seleccionar el teléfono o la tarjeta SIM.
Toque aquí para seleccionar una imagen para el contacto.
Toque aquí para agregar la organización.
Toque aquí para añadir nombres diferentes.
Toque aquí para añadir un número.
Toque para desplegar las otras etiquetas
predefinidas para esta categoría.
Si desea añadir más información, toque AÑADIR OTRO CAMPO de la
parte inferior para añadir una categoría nueva.
Page 84

Cuando haya terminado, toque
Para salir sin guardar, puede tocar
para guardar.
y, a continuación, tocar Descartar
cambios.
Añadir a/eliminar de Favoritos
(1)
Para añadir un contacto a favoritos, puede tocar un contacto para ver los
detalles y luego tocar
para añadir el contacto a favoritos (la estrella se
volverá de color blanco).
Para eliminar un contacto de favoritos, toque la estrella blanca
en la
pantalla de detalles del contacto.
3.3.3 Editar contactos
Para editar la información de un contacto, toque en la pantalla de
detalles del contacto.
Cuando haya terminado, toque
para guardar.
3.3.4 Uso de Contacto Rápido para Android
Toque un contacto para abrir Quick Contact for Android; a continuación,
puede tocar o el número para hacer una llamada o para enviar un
mensaje.
Cambio del número de teléfono predeterminado de un contacto
El número de teléfono predeterminado (el que tiene prioridad al realizar
una llamada o enviar un mensaje) aparecerá siempre debajo del nombre
del contacto.
Para cambiar el número de teléfono predeterminado, pulse prolongadamente
el número que desee establecer como número predeterminado en la
pantalla de detalles del contacto y luego seleccione Establecer como
predeterminado. Aparecerá
después del número.
Esta opción sólo está disponible cuando el contacto tiene más de un
número.
(1)
Solo los teléfonos de contactos pueden agregarse a Favoritos.
45 46
Los iconos disponibles en la barra de Contacto rápido dependerán de la
información que tenga del contacto y de las aplicaciones y cuentas del
teléfono.
3.3.5 Importar, exportar y compartir contactos
Este teléfono permite importar o exportar contactos entre el teléfono, la
tarjeta SIM y el almacenamiento interno.
En la pantalla Contactos, toque el icono
toque Importar/exportar y, a continuación seleccione Importar desde
la tarjeta SIM, Exportar a tarjeta SIM, Importar desde el teléfono,
Exportar al almacenamiento del teléfono o Compartir contactos
visibles.
para abrir el menú de opciones,
Page 85

Para importar/exportar un único contacto de/a la tarjeta SIM, seleccione
el contacto que desea importar/exportar y toque el icono
/ para
confirmar.
Para importar/exportar todos los contactos de/a la tarjeta SIM, toque el
icono
y luego el icono / para confirmar.
Puede compartir uno o varios contactos con otras personas enviando el
contacto a través de Bluetooth, Gmail, etc.
Toque el contacto que desee compartir, toque el icono
y Compartir
desde la pantalla de detalles del contacto y, por último, seleccione la
aplicación con la que realizará esta acción.
3.3.6 Visualizar contactos
Puede configurar para cada cuenta la lista de contactos que desea visualizar
en la lista Contactos. Toque
de lista de contactos; a continuación, puede elegir los contactos que
mostrar.
Toque
y Ajustes para ordenar la lista por nombre o por apellido,
además de ver primero el nombre o apellido de los contactos.
3.3.7 Agrupación y división de contactos
Para evitar duplicados, puede añadir cualquier información de contacto
nueva a contactos existentes con una sola acción.
Toque el contacto del cual quiere añadir información, toque
acceder a la pantalla de edición del contacto, toque nuevamente y toque
Agrupar.
En este momento, deberá seleccionar el contacto cuya información desee
agrupar con el primer contacto. La información del segundo contacto se
añadirá a la del primero, y el segundo contacto desaparecerá de la lista
Contactos.
(1)
Solo aplicable para los contactos del teléfono.
y Contactos que mostrar en la pantalla
(1)
para
47 48
Para dividir la información de los contactos, toque el contacto cuya
información desee dividir, toque para acceder a la pantalla de edición
del contacto, toque nuevamente y Separar, toque Aceptar para
confirmar.
3.3.8 Cuentas
Es posible sincronizar contactos, datos y otra información desde distintas
cuentas en función de las aplicaciones instaladas en el celular.
Para añadir una cuenta, toque
Añadir cuenta, o desde la pantalla de inicio, toque
Cuentas\Añadir cuenta.
Debe seleccionar el tipo de cuenta que va a añadir, como Google, la cuenta
del trabajo, etc.
Al igual que otras configuraciones de cuenta, deberá ingresar información
detallada, tales como el nombre de usuario, la contraseña, etc.
Puede eliminar una cuenta para borrarla del teléfono, así como toda
la información asociada. Toque la cuenta que desea borrar, toque
seleccione Eliminar cuenta y, a continuación, confirme.
Activar y desactivar la sincronización y la sincronización
automática
Toque una cuenta para acceder a la pantalla de cuentas, active o desactive
las casillas de verificación para activar o desactivar la sincronización
automática de la cuenta. Si se activa, todos los cambios aplicados a la
información del teléfono o en línea se sincronizarán automáticamente
entre sí.
Sincronización manual
Puede sincronizar manualmente una cuenta en la pantalla Cuentas. Toque
una cuenta en la lista y, a continuación, toque
ahora.
en la lista de contactos y toque Cuentas/
y luego Ajustes\
y seleccione Sincronizar
,
Page 86

Mensajes, Gmail/Correo
4
electrónico, Hangout ............
4.1 Mensajes ......................................................
Con este celular podrá crear, modificar y recibir SMS y MMS.
Para acceder a esta función, toque
continuación, seleccione Mensajes.
Para consultar los mensajes almacenados en la tarjeta SIM, toque el
de la pantalla Mensajes y, a continuación, toque Ajustes/
icono
Administrar mensajes de SIM.
4.1.1 Escribir mensaje
En la pantalla de la lista de mensajes, toque el icono de mensajes nuevos
para escribir mensajes de texto/multimedia.
• Toque para ver la cadena del mensaje
completo.
• Pulse prolongadamente para borrarlo.
Toque aquí para crear un nuevo mensaje.
en la pantalla de inicio y, a
Para los contactos guardados, toque la foto para abrir el panel
Contacto rápido para comunicarse con el contacto. En el caso de
los contactos no guardados, toque la foto para añadir el número a
sus Contactos.
Envío de un mensaje de texto
Ingrese el número de teléfono del destinatario en la barra Para o toque
para añadir destinatarios, y toque la barra Enviar mensaje para
insertar el texto del mensaje. Toque el icono
Cuando termine, toque
Un mensaje SMS de más de 160 caracteres será facturado como varios
mensajes SMS. Aparecerá un contador a la derecha del cuadro de texto
para recordarle cuántos caracteres se permite introducir en un mensaje.
Los caracteres especiales (acentos) aumentarán el tamaño del
mensaje SMS, lo que podría resultar en el envío de varios mensajes
SMS al destinatario.
Envío de un mensaje multimedia
Los mensajes multimedia son mensajes que permiten el envío de videos,
imágenes, fotos, animaciones, diapositivas y sonidos a otros móviles
compatibles y a direcciones de correo electrónico.
Un SMS se convertirá automáticamente a MMS cuando se adjunten
archivos multimedia (imagen, video, audio, diapositivas, etc.), un asunto o
direcciones de correo electrónico.
Para enviar un mensaje multimedia, ingrese el número del destinatario en
la barra Para y toque la barra Enviar mensaje para ingresar el texto del
mensaje. Toque
para insertar un asunto. Toque el icono para adjuntar una imagen, un
video, audio, etc.
Al finalizar, toque
para abrir el menú de opciones, toque Añadir asunto
para enviar el mensaje de texto.
para enviar el mensaje multimedia.
para insertar emoticonos.
49 50
Page 87

Opciones para adjuntar:
•Tomar foto Acceda a la cámara para capturar una nueva
imagen y adjuntarla.
•Capturar video Acceda a la videocámara para grabar un nuevo
video y adjuntarlo.
•Grabar audio Acceda al grabador de mensajes de voz para
grabar un mensaje de voz y adjuntarlo.
•Tarjeta de
contacto
Acceda a Contactos para seleccionar un contacto
como archivo adjunto.
•Imágenes Acceda a la galería o al administrador de archivos
para seleccionar una imagen como archivo adjunto.
•Videos Acceda a la Galería o a Gestión de Archivos para
seleccionar un video como archivo adjunto.
•Audio Acceda para seleccionar un archivo de audio
como archivo adjunto.
•Calendario Permite acceder a la aplicación Calendario para
seleccionar uno o más eventos y adjuntarlos.
•Presentación Acceda a la pantalla Editar presentación, toque
Añadir diapositiva para crear una nueva
diapositiva, y toque una diapositiva existente para
borrarla o editarla (vea la imagen siguiente). Toque
para realizar más acciones, como establecer la
duración de la diapositiva, añadir música, etc.
Toque aquí para ver más opciones.
Toque aquí para borrar el adjunto actual.
Pulse aquí para editar la diapositiva actual.
Toque aquí para crear un nuevo mensaje.
4.1.2 Gestionar mensajes
Cuando reciba un mensaje, aparecerá el icono en la barra de estado
como una notificación. Arrastre hacia abajo la barra de estado para abrir
el panel de notificaciones y toque el nuevo mensaje para abrirlo y leerlo.
También puede acceder a la aplicación Mensajes y tocar el mensaje para
abrirlo.
Los mensajes aparecerán en el orden de la conversación.
Toque un mensaje para acceder a la pantalla de redacción de mensaje.
•Toque
•Toque
contacto si el número se ha guardado.
•Para responder a un mensaje, ingrese el texto o toque
texto rápido, el contacto, etc.; una vez editado, toque .
•Pulse prolongadamente un mensaje para mostrar los siguientes iconos:
copiar texto
para guardar el mensaje en la tarjeta SIM.
para llamar al número.
para guardar el número en contactos o ver el detalle del
para ingresar
, reenviar , ver detalles , borrar , etc.; toque
51 52
Page 88

4.1.3 Configurar los ajustes de mensajes
Puede configurar una serie de ajustes de mensajes. En la pantalla de la
aplicación Mensajes, toque
•SMS activado Toque aquí para cambiar la aplicación de SMS
Almacenamiento
•Borrar mensajes
antiguos
•Límite de
mensajes de texto
•Límite de
mensajes
multimedia
y Ajustes.
predeterminada.
Seleccione esta opción para borrar mensajes
antiguos cuando se alcance el máximo de
mensajes almacenados.
Toque aquí para definir el número de mensajes de
texto a guardar por conversación.
Toque aquí para definir el número de mensajes
multimedia a guardar por conversación.
Ajustes de mensajes de texto (SMS)
•Informes de
entrega
•Texto rápido Toque aquí para añadir o editar plantillas de
•Gestionar
mensajes de SIM
•Centro de
servicios SMS
•Periodo de validez Toque para seleccionar el período de validez
•Gestión del
alfabeto
•Editar firma SMS Escriba la firma SMS que desee.
Seleccione esta opción para solicitar un informe
de entrega de cada mensaje de texto enviado.
mensaje.
Toque para gestionar los mensajes almacenados
en la tarjeta SIM.
Toque para editar o ver el número del centro de
servicios SMS.
durante el que el proveedor de red intentará
enviar el mensaje.
Toque para seleccionar el modo de alfabeto.
53 54
Page 89

Ajustes de mensajes multimedia (MMS)
•Informes de
entrega
•Informes de leídos Seleccione esta opción para solicitar un informe
•Recuperar
automáticamente
•Recup. autom. en
roaming
•Modo creación Seleccione para cambiar el modo de creación.
•Tamaño máximo
de mensaje
•Prioridad Toque aquí para definir la prioridad.
Notificaciones
•Notificaciones Seleccione esta opción para ver notificaciones de
•Seleccionar tono Toque aquí para seleccionar un tono para la
•Vibrar Seleccione para que el celular vibre a modo de
Seleccione esta opción para solicitar un informe
de entrega de cada mensaje multimedia enviado.
que avise de si el destinatario ha leído o no el
mensaje multimedia enviado.
Seleccione esta opción para descargar
automáticamente en el celular los mensajes
MMS completos (con el cuerpo del mensaje
y el archivo adjunto). De lo contrario, solo se
descargará el encabezado de los mensajes MMS.
Seleccione esta opción para descargar
automáticamente los mensajes MMS completos
(con el cuerpo del mensaje y el archivo adjunto)
en roaming. De lo contrario, solo se descargará
el encabezado de los mensajes MMS para evitar
costos adicionales.
Seleccione para introducir el tamaño máximo
del mensaje.
los mensajes en la barra de estado.
notificación de mensajes nuevos.
notificación al recibir un nuevo mensaje.
Configuración de mensajes WAP
Habilitar mensajes
WAP
Ajustes difusión de mensajes
•Emisión móvil Marque la casilla de verificación para habilitar la
•Seleccionar tono
de difusión de
mensajes.
•Activar indicador
LED CB
•Habilit. ilumin. de
pantalla
•Vibrar Seleccione para que el celular vibre a modo de
•Ajustes difusión de
mensajes
Toque para habilitar la recepción de mensajes
WAP de la red.
recepción de mensajes de difusión general.
Toque para seleccionar el tono de difusión de
mensajes al recibir mensajes de difusión general.
Marque esta casilla de verificación para habilitar
el indicador LED CB.
Marque esta casilla de verificación para iluminar
la pantalla cuando reciba un nuevo mensaje de
difusión.
notificación al recibir un nuevo mensaje.
Toque para seleccionar canales y configurar
idiomas.
4.2 Gmail/Correo electrónico
La primera vez que configure el celular, podrá seleccionar el uso de una
cuenta Gmail existente o crear una nueva.
4.2.1 Gmail ..................................................................
Como servicio de Correo electrónico online de Google, Gmail se
configura la primera vez que se configura el celular. El correo de Gmail del
celular se puede sincronizar automáticamente con su cuenta Gmail online.
55 56
Page 90

Para acceder a Gmail
Toque
continuación, toque Gmail.
Para crear y enviar mensajes de correo electrónico
•Toque el icono
•Escriba la dirección de correo electrónico del destinatario en el campo
•Ingrese el asunto y el contenido del mensaje.
•Toque
•Por último, toque el icono
•Si no desea enviar el correo electrónico inmediatamente, puede tocar
•Si no desea enviar ni guardar el correo, puede tocar
Para agregar una firma a los mensajes de correo electrónico, toque
Ajustes desde la pantalla Mensajes recibidos, elija una cuenta y toque
Firma.
Para recibir y leer los mensajes de correo electrónico
Cuando llegue un nuevo mensaje de correo electrónico, se le notificará con
un tono o vibrará y aparecerá el icono
Toque y arrastre hacia abajo la barra de estado para ver el panel de
notificaciones y toque el nuevo mensaje para verlo. También puede acceder
a la etiqueta Bandeja de entrada de Gmail y tocar el nuevo mensaje para
leerlo.
en la pantalla de inicio para acceder a la lista de aplicaciones; a
en la pantalla Bandeja de entrada.
Para y, si es necesario, toque
o copia oculta del mensaje.
para añadir un adjunto.
y Guardar borrador o bien tocar la tecla Atrás para guardar un
respaldo. Para ver el borrador, toque el icono y, a continuación,
seleccione Borradores.
Descartar.
y Añadir Cc/Bcc para incluir una copia
para enviar.
y luego tocar
y
en la barra de estado.
Puede buscar un mensaje de correo electrónico por remitente, por asunto,
por etiqueta, etc.
•Toque el ícono
•Escriba la palabra clave que desee buscar en el cuadro de búsqueda y
toque
Para responder a mensajes de correo electrónico o reenviarlos
•Responder Cuando visualice un correo electrónico, toque
•Responder a todos
•Reenviar
•Añadir estrella Toque aquí para añadir una estrella para el
•Imprimir Toque aquí para imprimir el correo.
Gestión de mensajes de Gmail por etiqueta
Para administrar con comodidad las conversaciones y los mensajes, puede
organizarlos con etiquetas.
Para etiquetar una conversación al leer mensajes de una conversación,
toque
y, a continuación, elija Mover a.
Para ver las conversaciones por etiqueta cuando consulte la bandeja de
entrada u otra lista de conversaciones, toque el icono
etiqueta para ver una lista de conversaciones con esa etiqueta.
Pulse prolongadamente el correo electrónico para activar el modo de lote
y ver las opciones siguientes:
de la pantalla Bandeja de entrada.
.
para responder al remitente de ese mensaje.
Toque
y seleccione Responder a todos para
enviar el mensaje a todas las personas de una
conversación.
y seleccione Reenviar para reenviar a
Toque
otras personas el mensaje recibido.
correo.
y toque una
57 58
Page 91

•
•
•
Toque
•Mover a Toque para mover el correo a otras etiquetas.
•Cambiar etiquetas Toque para cambiar la etiqueta del mensaje del
•Añadir/Borrar
•Marcar como (no)
•Silenciar Toque aquí para ocultar el correo; lo podrá
•Marcar como no
•Notificar
Toque aquí para archivar el mensaje de correo electrónico. Para
mostrar los mensajes archivados, puede tocar en la pantalla
Bandeja de entrada y, a continuación, Todo el correo.
Toque aquí para borrar el mensaje de correo electrónico.
Toque aquí para marcar un mensaje como leído o no leído.
para acceder a las opciones siguientes.
correo electrónico o la conversación.
estrella
importante
deseado
suplantación de la
identidad
Permite asignar o eliminar una estrella de la
conversación.
Para marcar el mensaje de correo electrónico
como importante o no importante.
encontrar tocando Todo el correo.
Permite marcar el mensaje de correo electrónico
o la conversación como correo no deseado.
Permite marcar el mensaje de correo electrónico
o las conversaciones como no permitidas.
59 60
Ajustes de Gmail
Para acceder a los ajustes de Gmail, toque el icono
Ajustes.
Ajustes generales
•Acción
predeterminada
de Gmail
•Acciones de
deslizar
•Imagen del
destinatario
•Responder a todos Marque la casilla de verificación para definir la
•Auto-ajustar
mensajes
•Avance
automático
•Confirmar antes
de borrar
•Confirmar antes
de archivar
•Confirmar antes
de enviar
Toque aquí para establecer la acción
predeterminada: guardar o eliminar.
Marque la casilla de verificación para habilitar.
Deslice con el fin de archivar los mensajes dentro
de la lista de conversaciones.
Marque la casilla de verificación para mostrar la
imagen del remitente junto a su nombre en la
lista de conversaciones.
respuesta predeterminada a los mensajes.
Marque la casilla de verificación para ajustar los
mensajes y que quepan en la pantalla, y para
poder utilizar el zoom.
Toque para seleccionar la pantalla que desea
que se muestre (Más nuevo, Más antiguo o
Lista de conversación) después de eliminar o
archivar una conversación.
Marque la casilla de verificación para recibir una
solicitud de confirmación de la acción antes de
eliminar correos electrónicos.
Marque la casilla de verificación para recibir una
solicitud de confirmación de la acción antes de
archivar correos electrónicos.
Marque la casilla de verificación para recibir una
solicitud de confirmación de la acción antes de
enviar correos electrónicos.
y seleccione
Page 92

Toque una cuenta para ver los ajustes siguientes:
•Tipo de bandeja
de entrada
•Categorías de
bandeja de
entrada
•Notificaciones Marque esta casilla para activar una notificación
•Sonido y vibrar
de la bandeja de
entrada
•Firma Permite añadir una firma al final de cada mensaje
•Respuesta
automática
•Sincronizar Gmail Marque la casilla de verificación para activar o
•Días de correo
para sincronizar
•Administrar
etiquetas
•Descargar
adjuntos
•Imágenes Toque esta opción para definir si las imágenes
Para establecer esta bandeja de entrada como
predeterminada o prioritaria.
Marque esta casilla de verificación para que la
carpeta aparezca en la carpeta de la bandeja de
entrada.
cuando llegue un nuevo correo electrónico.
Toque aquí para definir Sincronizar mensaje, Tono
de llamada, Vibrar y Notificar una vez.
enviado.
Toque esta opción para establecer una
notificación cuando se esté de vacaciones.
desactivar la sincronización con Gmail.
Toque aquí para establecer la duración de días
para la sincronización del correo.
Toque aquí para abrir la pantalla Etiquetas,
que permite administrar la sincronización y las
notificaciones.
Marque esta casilla de verificación para descargar
automáticamente los adjuntos de los mensajes
recientes a través de Wi-Fi.
desea que se muestren siempre o si se prefiere
que se le solicite si desea mostrarlas.
4.2.2 Correo electrónico .............................................
Además de la cuenta de Gmail, también puede configurar cuentas de
correo electrónico POP3, IMAP o Exchange externas en el teléfono.
Para acceder a esta función, toque
continuación, seleccione Correo electrónico.
El "Asistente de configuración del correo electrónico" lo guiará paso a
paso, para configurar una cuenta de correo electrónico.
•Ingrese la dirección de correo electrónico y la contraseña de la cuenta
que desea configurar.
•Toque Siguiente. Si su proveedor de servicios no ofrece en el teléfono
la cuenta introducida, se le pedirá que vaya a la pantalla de Configuración
de la cuenta para introducir los ajustes de forma manual. También puede
tocar CONFIGURACIÓN MANUAL para ir directamente a los
ajustes de entrada y salida de la cuenta de correo electrónico que esté
configurando.
•Ingrese el nombre de la cuenta y el nombre que se mostrará en los
mensajes salientes.
•Para añadir otra cuenta de correo electrónico, puede tocar el icono
de la esquina superior izquierda y seleccionar Ajustes. A continuación,
toque Añadir cuenta.
Para crear y enviar mensajes de correo electrónico
•Toque el icono
•Ingrese la dirección de correo electrónico del destinatario en el campo
Para
•Si es necesario, toque Cc/Cco para incluir una copia o una copia oculta
en el mensaje.
•Ingrese el asunto y el contenido del mensaje.
•Toque
en la pantalla Bandeja de entrada.
para añadir un adjunto.
en la pantalla de inicio y, a
61 62
Page 93

•Si no desea enviar el correo electrónico inmediatamente, puede tocar
y Guardar borrador o bien tocar la tecla Atrás para guardar un
respaldo.
•Finalmente, toque
Si no desea enviar ni guardar el correo, puede tocar
Descartar.
Para añadir una firma a sus correos electrónicos, toque
Ajustes, a continuación elija la cuenta en la que dese crear o modificar la
firma, y toque Firma para editarla.
para enviar.
y luego tocar
y seleccione
4.3.2 Para añadir un amigo nuevo
En la lista Amigos, toque para añadir un amigo nuevo.
Ingrese el nombre, el correo electrónico, el número o el círculo del amigo
que desea añadir y si el amigo no está aún en Hangouts, el sistema le
solicitará que le envíe una invitación a su amigo a través de SMS o Gmail.
Se mostrará una notificación junto a la invitación en el mensaje o Gmail
de su amigo.
Si sus amigos lo invitan a un chat de video o le envían un mensaje por
primera vez, puede seleccionar Rechazar o Responder tocando
Solicitudes de hangout.
y
4.3 Google Hangouts .........................................
Google Hangouts, el servicio de mensajes instantáneos de Google, le
permite comunicarse con sus amigos siempre que estén conectados a
este servicio.
Para acceder a esta función e iniciar una sesión, toque
inicio y, a continuación, toque Hangouts.
Aparecerán en la lista de amigos todos los amigos añadidos con Google
Hangouts desde Internet o el dispositivo.
4.3.1 Chat con los amigos
Para empezar a chatear, toque el nombre de un amigo de la lista Amigos,
escriba el mensaje y toque
Para invitar a otros amigos a unirse a un chat en grupo, toque la tecla
y seleccione el amigo que desea añadir.
.
63 64
en la pantalla de
4.3.3 Para iniciar y cerrar una conversación
Seleccione el amigo de su lista de amigos al que desee enviar un mensaje
o con el que desee iniciar una videollamada.
Después de unirse a Google+, podrá enviar imágenes a cualquier persona
en Google Hangouts.
Cuando quiera finalizar un chat, toque la tecla Atrás desde la pantalla del
chat directamente.
Si desea cerrar sesión, toque
y Ajustes\Cerrar sesión.
4.3.4 Para gestionar los amigos
Además de añadir amigos nuevos a la lista de amigos, existen las acciones
siguientes:
•Para ver todos los
amigos
Por defecto, puede ver a todos sus amigos de la
Lista de amigos. Seleccione el amigo con el que
desee iniciar una conversación. Toque y mantenga
el nombre del amigo para activar el archivado.
Page 94

4.3.5 Ajustes
Tendrá a su disposición una serie de ajustes si toca el icono y Ajustes
desde la pantalla de la lista de amigos y selecciona una cuenta.
•Foto de perfil Toque aquí para establecer o cambiar su foto de
•Compartir el
estado
•Mensajes e
invitados de
Hangouts
•Videollamadas Toque para establecer el tipo de notificación al
•Contactos ocultos Toque aquí para ver los contactos ocultos.
•Cerrar sesión Toque para eliminar sus cuentas.
•Mejorar Hangouts Marque esta casilla de verificación para informar
perfil de Google+
Toque aquí para establecer su estado de
Hangouts.
Marque la casilla de verificación para activar el
tipo de notificación cuando reciba solicitudes de
Hangouts.
recibir una videollamada.
de los datos de uso y ayudar a mejorar
Hangouts.
Calendario, alarma y
5
calculadora ............................
(1)
5.1 Calendario ................................................
Use el calendario para realizar un seguimiento de las reuniones, eventos
importantes, etc.
Para acceder a esta función, toque
continuación, toque Calendario.
5.1.1 Vista multimodo
Puede visualizar el Calendario en vista anual, mensual, semanal y horario.
Toque el botón en la parte inferior para cambiar la vista del Calendario.
Toque
para volver a la vista Hoy.
en la pantalla de inicio y, a
(1)
El icono variará según la fecha.
65 66
Page 95

Vista del Año
Vista del Mes
Vista de la Semana
Vista del
Horario
5.1.2 Para crear nuevos eventos
Puede añadir nuevos eventos desde cualquier vista del Calendario.
•Toque
•Complete toda la información necesaria para este evento nuevo. Si se
trata de un evento que dura todo un día, seleccione TODO EL DÍA.
•Invite a personas al evento. Escriba las direcciones de correo electrónico
de las personas que desee invitar separadas con comas. Estas recibirán
una invitación de Calendario y de Correo electrónico.
•Cuando haya terminado, toque
Para crear rápidamente un evento desde la vista semanal, toque un punto
vacío para seleccionar el área de destino (que pasará a ser
Evento nuevo para crear el evento nuevo.
Opciones importantes que estarán disponibles tocando
principal del Calendario:
para acceder a la pantalla de edición del evento nuevo.
en la parte superior de la pantalla.
) y toque
en la pantalla
•Actualizar
•Buscar
Permite actualizar el calendario.
Busque el evento o el horario que ha añadido al
Calendario.
•Ir a
•Calendarios a
mostrar
•Ajustes
Toque para ingresar el día definido.
Permite mostrar, ocultar, borrar o añadir
calendarios.
Permite definir una serie de ajustes del
Calendario.
5.1.3 Para borrar o editar un evento
Para eliminar o editar un evento, toque el evento para acceder a la pantalla
de detalles, toque el icono
borrarlo o toque
para compartirlo.
para editarlo, toque el icono para
5.1.4 Recordatorio de evento
Si se establece un recordatorio para un evento, el icono de evento próximo
aparecerá en la barra de estado como notificación cuando llegue la
hora del recordatorio.
Toque y arrastre hacia abajo la barra de estado para abrir el panel de
notificaciones y, a continuación, toque el nombre del evento para ver la lista
de notificaciones del Calendario.
Toque la tecla Atrás para mantener los recordatorios en estado pendiente
en la barra de estado y en el panel de notificaciones.
67 68
Page 96

5.2 Reloj ..............................................................
El teléfono móvil tiene un reloj incorporado.
Para acceder a esta función, toque
continuación, toque Reloj.
en la pantalla de inicio y, a
Toque
Para configurar los ajustes de la alarma
Toque el icono
opciones siguientes:
para eliminar la alarma seleccionada.
en la pantalla de la alarma. Ahora se pueden ajustar las
5.2.1 Reloj mundial
Para acceder a esta función, toque en la pantalla Reloj.
Según la ubicación, el sistema establecerá un horario predeterminado.
•Toque el icono
para añadir una zona horaria.
5.2.2 Alarma
Para definir una alarma
En la pantalla Reloj, toque
para añadir una nueva alarma. Aparecerán las siguientes opciones:
•Etiqueta Toque aquí para establecer un nombre para la
•Repetir Toque aquí para seleccionar los días en los que
•Vibrar Seleccione esta opción para activar el vibrar.
•Tono Toque aquí para seleccionar un timbre para la
•Hora Toque aquí para ajustar la hora de la alarma.
Al finalizar, toque Aceptar para confirmar.
Toque una alarma existente para acceder a la pantalla de edición de
alarmas.
para acceder a la pantalla Alarma y toque
alarma.
desea que suene la alarma.
alarma.
69 70
•Estilo Toque para establecer el estilo del reloj a
•Hora local
automática
•Zona horaria de
casa
•Silenciar después deToque aquí para desactivar temporalmente la
•Repetición de
alarmas
•Volumen de
alarma
•Botones de
volumen
analógico o digital.
Marque la casilla para activar el función cuando
viaje a una zona horaria diferente y añadir un
reloj para casa.
Toque aquí para establecer la Zona horaria de
casa.
hora de una alarma.
Toque aquí para establecer la duración de las
alarmas
Toque aquí para establecer el volumen de la
alarma.
Toque aquí para establecer el comportamiento
de las teclas laterales Subir el volumen/Bajar
el volumen cuando suene la alarma: Ninguno,
Posponer o Descartar.
5.2.3 Cuenta atrás
En la pantalla Reloj toque para acceder a la pantalla Cuenta atrás.
Toque el icono
El tiempo debería aparecer en una secuencia numérica de horas, minutos
y segundos.
para establecer el tiempo de la cuenta atrás en el panel.
Page 97

Toque el icono
Toque el icono
para activar la Cuenta atrás.
para desactivar la Cuenta atrás.
Toque el icono
para borrar la etiqueta actual de cuenta atrás.
5.2.4 Cronómetro
En la pantalla del Reloj toque para entrar a la pantalla Cronómetro.
Toque
para activar el temporizador. Toque para ver una lista de
registros según la hora de actualización.
Toque
volverán a iniciar tras tocar
Toque
para detener el tiempo total y los tiempos de vuelta. Solo se
.
para eliminar el registro.
5.3 Calculadora ................................................
La calculadora permite resolver muchos problemas matemáticos.
Para acceder a esta función, toque
continuación, toque Calculadora.
Hay dos paneles disponibles: Panel de funciones básicas y Panel de
funciones avanzadas.
Para cambiar entre paneles, cambie el dispositivo a modo horizontal desde
el panel de funciones básicas, a fin de abrir el panel de funciones avanzadas
(1)
.
(1)
Si Ajustes\Pantalla\Cuando se gire el dispositivo\Girar el contenido de
la pantalla está habilitado, se mostrará este elemento.
en la pantalla de inicio y, a
71 72
Ingrese un número, seleccione la operación aritmética que desee realizar,
ingrese el segundo número y pulse “=” para mostrar el resultado. Toque
DEL para eliminar dígitos uno a uno y mantenga pulsado DEL para
eliminarlos todos a la vez.
Page 98

Cómo conectarse .................
6
Para conectarse a Internet con este celular, puede utilizar las redes GPRS/
EDGE/3G/4G o Wi-Fi según le convenga.
6.1 Conexión a Internet
6.1.1 GPRS/EDGE/3G/4G
La primera vez que encienda el celular con la tarjeta SIM introducida, se
configurará automáticamente el servicio de red: GPRS, EDGE, 3G o 4G.
Para comprobar la conexión de red que está utilizando, toque Ajustes\
Más...\Redes móviles\Nombres de puntos de acceso u Operadores
de red.
Para crear un punto de acceso nuevo
Para añadir una conexión de red GPRS/EDGE/3G/4G al celular, siga los
pasos siguientes:
•Toque Ajustes\Más...\Redes móviles\Nombres de puntos de
acceso.
•A continuación, toque el icono
APN necesaria.
•Al finalizar, toque la tecla
Para activar o desactivar el roaming de datos
Durante el roaming, puede decidir conectarse a un servicio de datos o
desconectarse del mismo.
•Toque Ajustes\Más...\Redes móviles.
•Seleccione Roaming de datos para establecer el modo roaming.
para acceder a la información de
y toque Guardar.
•Cuando el roaming de datos esté inhabilitado, podrá seguir intercambiando
datos con una conexión Wi-Fi (consulte “6.1.2 Wi-Fi”).
Para establecer el modo de red preferido
•Toque Ajustes\Más...\Redes móviles\Preferencia de modo de red.
6.1.2 Wi-Fi
Mediante Wi-Fi, puede conectarse a Internet cuando su celular se
encuentre dentro del alcance de una red inalámbrica. Es posible utilizar
Wi-Fi en el teléfono aunque no tenga una tarjeta SIM insertada.
Para activar la función Wi-Fi y conectarse a una red inalámbrica:
•Toque Ajustes.
•Toque
•Toque Wi-Fi, la información detallada de las redes Wi-Fi detectadas se
mostrará en la sección redes Wi-Fi.
•Toque una red Wi-Fi para conectarse a ella. Si la red que ha seleccionado
es segura, se le exigirá que ingrese una contraseña u otras credenciales
(puede contactar con los operadores de red para obtener información
detallada). Cuando termine, toque Conectar.
Activar una notificación cuando se detecte una red nueva
Cuando la función Wi-Fi y notificación de redes esté activada, cada vez
que el celular detecte la cobertura de una red inalámbrica disponible,
se mostrará en la barra de estado. A continuación se exponen los pasos
necesarios para activar la función de notificación con el Wi-Fi activado:
•Toque Ajustes.
•Toque Wi-Fi, luego toque la tecla
•Marque o desmarque la casilla de verificación Notificación de red para
activar o desactivar esta función.
junto a Wi-Fi para activar o desactivar la función Wi-Fi.
y Avanzadas de la pantalla Wi-Fi.
73 74
Page 99

Para añadir una red Wi-Fi
Cuando la función Wi-Fi esté activada, podrá añadir redes Wi-Fi según sus
preferencias.
•Toque Ajustes.
•Toque Wi-Fi, luego toque la tecla
y Añadir red de la pantalla Wi-Fi.
•Escriba el nombre de la red y toda la información de red necesaria.
•Toque CONECTAR.
Una vez conectado correctamente, el celular se conectará automáticamente
la próxima vez que se encuentre en la cobertura de esta red.
Olvidar una red Wi-Fi
A continuación se exponen los pasos necesarios para evitar la conexión
automática a las redes que ya no desee utilizar.
•Active la función Wi-Fi, si no está activa.
•En la pantalla Wi-Fi, pulse prolongadamente el nombre de la red guardada.
•Toque Borrar en el cuadro de diálogo que se abrirá.
6.2 Chrome .........................................................
Al utilizar Chrome, podrá disfrutar navegando por la Web.
Para tener acceso a esta función, toque
en la pantalla de inicio.
6.3 Conexión a dispositivos Bluetooth
(1)
Bluetooth es una tecnología de comunicación inalámbrica de corto alcance
que le permite intercambiar datos o conectarse con otros dispositivos
Bluetooth para varios usos.
Para acceder a esta función, toque Ajustes\Bluetooth, y el dispositivo y
el resto de dispositivos disponibles se mostrarán en la pantalla.
Cómo activar el Bluetooth
•Toque Ajustes.
•Toque
para activar o desactivar esta función.
Para que resulte más fácil reconocer el teléfono, puede cambiarle el
nombre que ven los demás.
•Toque Ajustes\Bluetooth.
•Toque el icono
y Renombrar este dispositivo.
•Escriba un nombre y toque Cambiar nombre para confirmar.
Para sincronizar o conectar el teléfono con un dispositivo
Bluetooth
Para poder intercambiar datos con otro dispositivo, debe activar Bluetooth
y sincronizar el teléfono con el dispositivo Bluetooth con el que desee
realizar el intercambio.
•Toque Ajustes\Bluetooth.
•Toque
y Actualizar.
•Toque el dispositivo Bluetooth de la lista con el que desee sincronizarse.
•Aparecerá un cuadro de diálogo; toque Sincronizar para confirmar.
(1)
Se recomienda usar auriculares Bluetooth ALCATEL ONE TOUCH, ya que han
sido probados y puede garantizarse su compatibilidad con el teléfono. Puede ir a
www.alcatelonetouch.com para obtener más información sobre los auriculares
Bluetooth ALCATEL ONE TOUCH.
75 76
Page 100

•Si se realiza correctamente la sincronización, el teléfono se conectará al
dispositivo.
Para desconectar o desincronizar el teléfono de un dispositivo
Bluetooth
•Toque el icono Ajustes
cancelar la sincronización.
•Toque Olvidar para confirmar.
que hay junto al dispositivo en el cual desea
6.4 Conexión a una computadora
Con el cable USB, puede transferir archivos multimedia y otros archivos
entre su computadora y el almacenamiento interno del teléfono.
Para conectar el celular al equipo:
Para conectar:
•Utilice el cable USB que viene con su celular para conectarlo a un puerto
USB de su computadora. Aparecerá una notificación que indicará que el
cable USB está conectado.
•Abra el panel de notificaciones y toque Conectado como un
dispositivo multimedia; luego, en el siguiente diálogo, elija el modo en
el que desea transferir los archivos.
Antes de usar MTP asegúrese de que se haya instalado el
controlador (Windows Media Player 11 o superior).
Para localizar los datos que ha transferido o descargado en el
almacenamiento interno, toque Gestión de archivos. Todos los datos
descargados se almacenan en el Gestor de archivos, donde puede ver
los archivos multimedia (videos, fotos, música, etc.), renombrar archivos,
instalar aplicaciones en el teléfono, etc.
6.5 Compartir la conexión de datos móviles del
teléfono
Puede compartir la conexión de datos móviles del teléfono con un equipo
a través de un cable USB (módem USB) o con hasta ocho dispositivos
simultáneamente al convertir el celular en una zona Wi-Fi portátil.
La funciones siguientes pueden generar cargos de red de su
operador de red. Además, también es posible que se apliquen
cargos adicionales en zonas de roaming.
Cómo compartir la conexión de datos del teléfono a través de
USB
Utilice el cable USB que viene con el teléfono para conectarlo a un puerto
USB de su computadora.
•Toque Ajustes\Más...\Anclaje de red y zona Wi-Fi..
•Marque o desmarque la casilla de verificación Módem USB para activar
o desactivar esta función.
Cómo compartir la conexión de datos del teléfono como zona
Wi-Fi.
•Toque Ajustes\Más...\Anclaje de red y zona Wi-Fi..
•Marque o desmarque la casilla de verificación Zona Wi-Fi para activar
o desactivar esta función.
Cómo renombrar o proteger su zona Wi-Fi
Si activa la zona Wi-Fi portátil, puede cambiar el nombre de la red Wi-Fi
(SSID) del teléfono y protegerla.
•Toque Ajustes\Más...\Anclaje de red y zona Wi-Fi..
•Toque Configurar zona WI-Fi para cambiar la red SSID o configurar
la seguridad de la red.
•Toque Guardar.
77 78
 Loading...