

Page 1
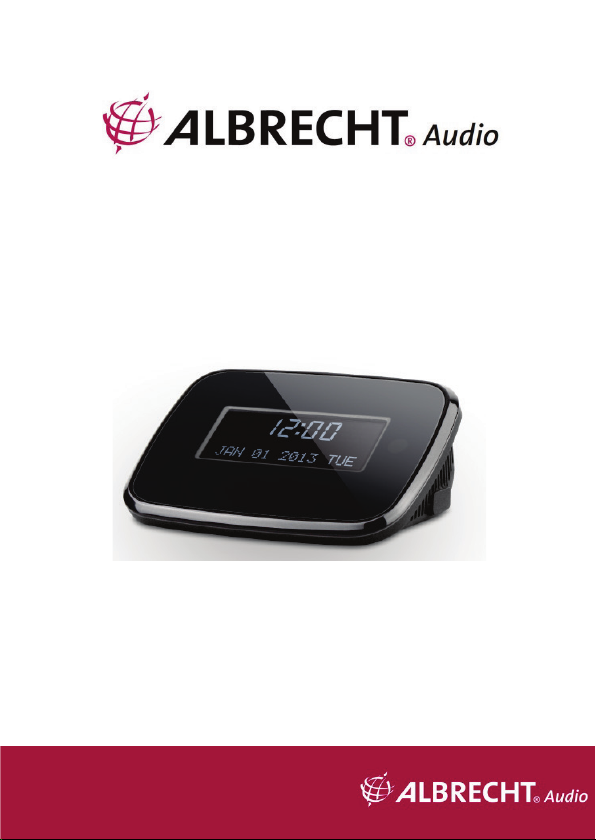
DAB/DAB+ und UKW-Adapter
DR 52
Benutzerhandbuch
Deutsch / English / Français
Page 2

1 Inhalt
1 Inhalt .................................................................... 2
2 Sicherheitshinweise ............................................. 3
3 Erscheinungsbild und Tastenbeschreibung ......... 6
4 Erste Schritte ....................................................... 7
5 DR 52 Funktionen .............................................. 10
6 Hauptmenü und Einstellungen ........................... 11
6.1 Sleep Timer .................................................... 11
6.2 Alarm .............................................................. 12
6.3 Sprache .......................................................... 14
6.4 Werkseinstellung ............................................ 14
6.5 SW-Version .................................................... 15
7 DAB ................................................................... 15
8 UKW .................................................................. 17
9 Senderspeicher .................................................. 18
10 Fehlerbehebung ................................................. 19
11 Technische Daten .............................................. 20
12 Gewährleistungs- und Recyclinginformationen .. 21
13 Serviceanschrift ................................................. 24
2 Deutsch
Page 3

2 Sicherheitshinweise
• Lassen Sie das DR 52 nicht fallen und setzen
Sie es keiner Flüssigkeit, Nässe oder
Luftfeuchtigkeit aus. Dies könnte zu Schäden
am Gerät führen.
• Wenn das DR 52 aus kalter Umgebung ins
Warme gebracht wird, lassen Sie es sich an
seine neue Temperatur anpassen, bevor es in
Betrieb gesetzt wird. Ansonsten könnte es zur
Kondensation führen, die Fehlfunktionen des
Geräts verursachen.
• Benutzen Sie das DR 52 nicht in einer
staubigen Umgebung, da der Staub die
inneren elektronischen Komponenten
beschädigen kann und zu Fehlfunktionen des
Geräts führen kann.
• Schützen Sie das DR 52 vor starken
Vibrationen und stellen Sie es auf eine stabile
Oberfläche.
Deutsch 3
Page 4

• Versuchen Sie nicht, das DR 52 zu zerlegen.
• Benutzen Sie nur das mitgelieferte Netzteil
• Fassen Sie den Netzstecker niemals mit
nassen Händen an. Wenn Sie den Stecker aus
der Netzsteckdose herausziehen wollen,
ziehen Sie niemals am Kabel.
• Stellen Sie sicher, dass die auf dem DR 52
angegebene Spannung und die Spannung
seines Netzsteckers der Spannung der
Netzsteckdose entsprechen. Eine falsche
Spannung zerstört das Gerät.
• Wenn das DR 52 längere Zeit nicht benutzt
wird, trennen Sie es vom Stromnetz durch
Ziehen des Netzsteckers, um das Brandrisiko
zu minimieren.
• Schalten Sie das DR 52 immer vor der
Reinigung ab.
• Verwenden Sie keine scharfen oder starken
Lösungsmittel, um das DR 52 zu reinigen, da
4 Deutsch
Page 5

diese die Oberfläche des Geräts beschädigen
können. Ein trockenes, weiches Tuch ist
zweckmäßig, aber wenn das DR 52 extrem
verschmutzt ist, kann es mit einem leicht
feuchten Tuch abgewischt werden. Achten Sie
darauf, dass das Gerät nach der Reinigung
abgetrocknet wird.
Deutsch 5
Page 6
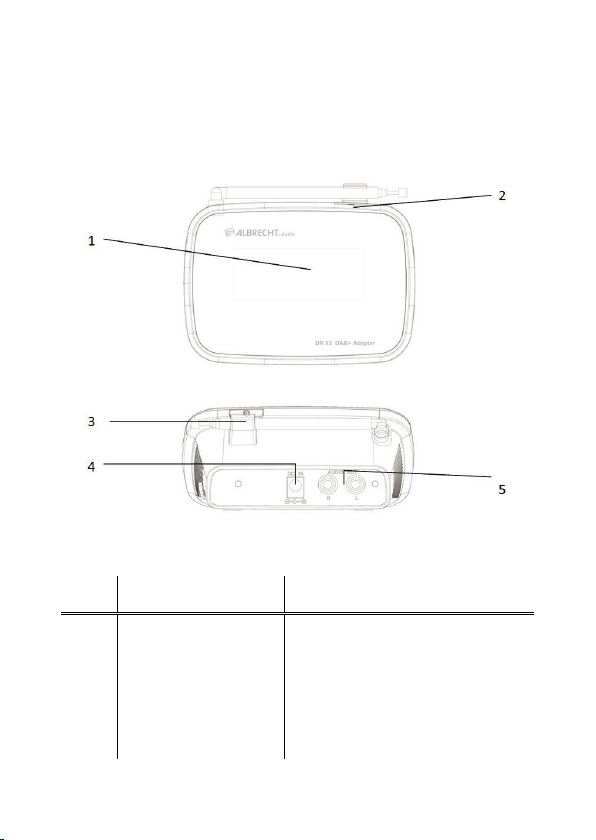
3 Erscheinungsbild und
Tastenbeschreibung
Nr. Beschreibung Funktionen
1 LC-Display Anzeige
2 Stand-by-Taste Stand-by ein/aus
3 Antenne Verbesserung des
DAB/UKW-Empfangs
6 Deutsch
Page 7

4 DC-IN Stromversorgung
5 Audioausgang Cinch (RCA) L/R Buchse
als Audioausgang
4 Erste Schritte
In der Verpackung sind folgende Teile enthalten:
• DR 52
• Fernbedienung
• 2 AAA-Batterien
• RCA-zu-RCA-Audiokabel
• Netzteil
• Benutzerhandbuch
Deutsch 7
Page 8
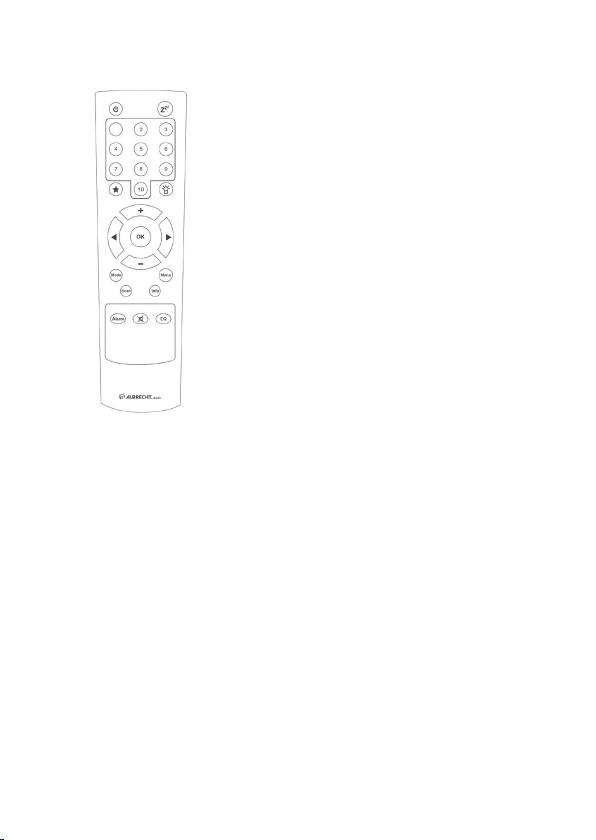
Setzen Sie die beiden
AAA-Batterien im Batteriefach
der Fernbedienung ein. Achten
Sie auf die korrekte Polarität, wie
im Batteriefach aufgedruckt.
• Schließen Sie das Netzteil an die Rückseite
des DR 52 an und stecken Sie es in die
Steckdose. Schalten Sie das DR 52 auf der
Rückseite ein.
8 Deutsch
Page 9
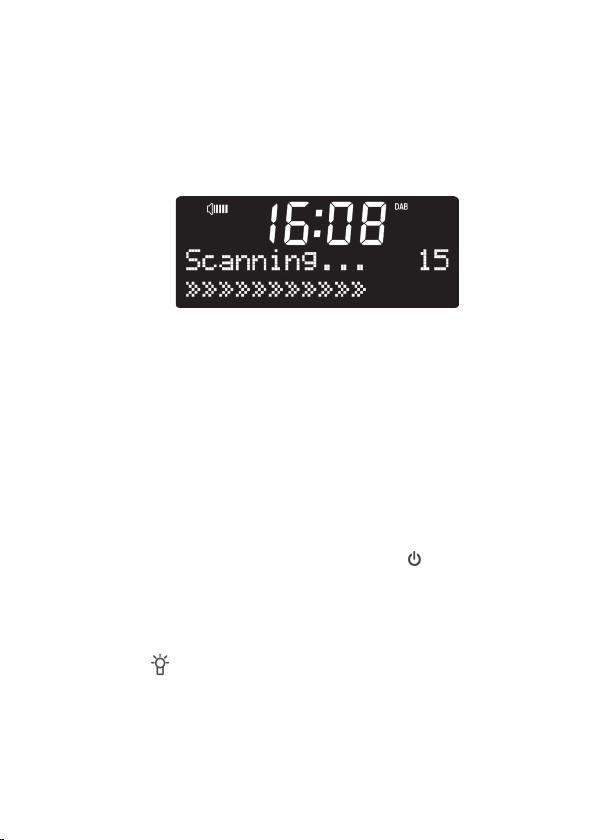
• Bei Erstgebrauch begibt sich das Radio in den
DAB-Modus und sucht automatisch nach
DAB/DAB+ Sendern.
• Das DR 52 synchronisiert automatisch die
Uhrzeit über DAB oder UKW RDS. Im
Stand-by-Modus drücken Sie Menu, um das
12- oder 24-Stundenformat einzustellen, dann
drücken Sie OK zur Bestätigung.
• Im Stand-by-Modus drücken Sie zum
Einschalten des Radios.
• Mit können Sie jederzeit die
Hintergrundbeleuchtung des Displays
Deutsch 9
Page 10
einstellen. Ihnen stehen drei
Beleuchtungspegel zur Verfügung.
5 DR 52 Funktionen
Drücken Sie Mode, um zwischen DAB und FM
Betrieb zu wechseln.
Im Radiobetrieb drücken Sie +/-, um die Lautstärke
einzustellen. Drücken Sie zur
Stummschaltung, drücken Sie +/-/ , um die
Stummschaltung wieder aufzuheben.
Drücken Sie EQ zum Einstellen des Equalizers:
Normal, Flat, Pop, Jazz, Rock und Klassik können
gewählt werden.
10 Deutsch
Page 11
6 Hauptmenü und Einstellungen
In jedem Betriebsmodus können Sie mit Menu das
Einstellungsmenü aufrufen. Drücken Sie /, um
das Untermenü zu wählen, dann drücken Sie OK
zur Bestätigung. Drücken Sie Menu, um das Menü
wieder zu verlassen.
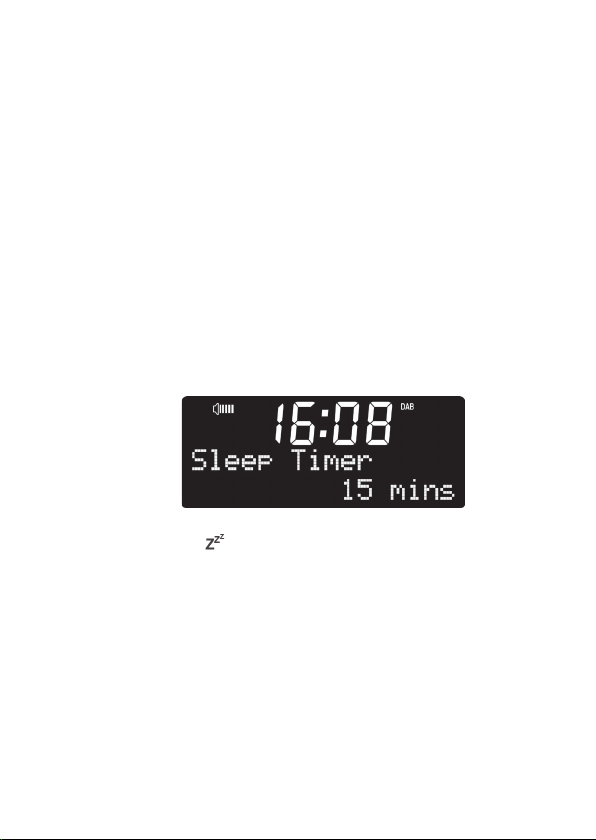
6.1 Sleep Timer
Drücken Sie zum direkten Aufrufen des
Sleeptimer-Menüs.
Drücken Sie /, um die Ausschaltzeit auf
15/30/45/60/90 Minuten einzustellen oder den
Sleeptimer zu deaktivieren. Drücken Sie OK, um
zu bestätigen.
Deutsch 11
Page 12

Nach dem Einstellen des Sleeptimers drücken Sie
erneut , um die verbleibende Zeit anzuzeigen,
bis das Gerät in den Stand-by-Modus wechselt.
6.2 Alarm
Zwei Alarme stehen Ihnen zur Verfügung.
Drücken Sie Alarm zum direkten Aufrufen der
Einstellungen für Alarm 1, drücken Sie erneut
Alarm zum Aufrufen der Einstellungen für Alarm 2.
Für alle nachstehenden Schritte müssen Sie
anschließend OK zur Bestätigung drücken.
• Nach der Wahl Ihres Alarms drücken Sie /,
um ihn ein- oder auszuschalten.
12 Deutsch
Page 13
• Ist der Alarm eingeschaltet, dann können Sie die
Weckzeit umstellen. Drücken Sie /, um die
Stunden und Minuten einzustellen.
• Alarmtyp: Drücken Sie / zum Umschalten
zwischen Signalton 1, Signalton 2, DAB und
UKW. (für DAB und UKW erfolgt der Weckalarm
mit dem zuletzt eingestellten Sender und der
entsprechenden Lautstärke).
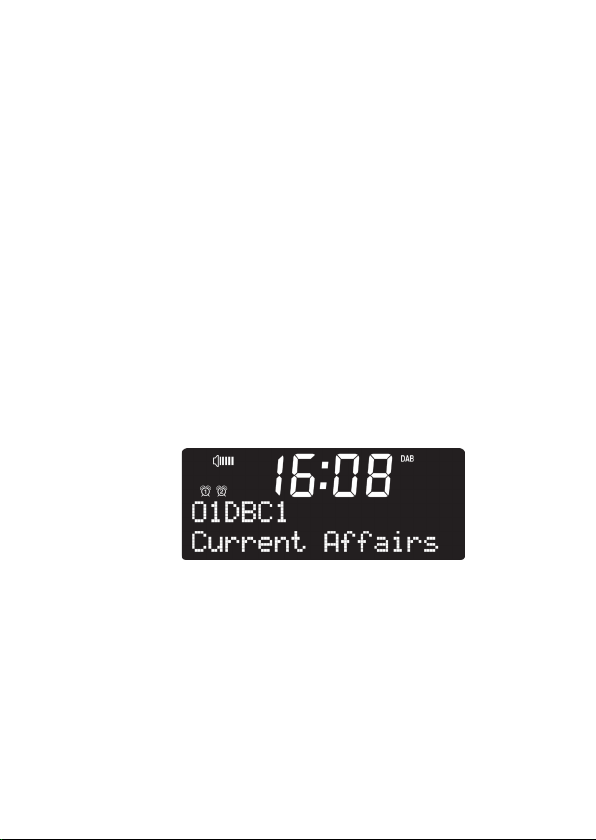
Nach dem Einstellen des Alarms wird ein
Alarmsymbol angezeigt.
Hinweis: Das Gerät hat einen integrierten
Summer. Wir empfehlen, die Weckalarme auf
Signalton einzustellen anstatt DAB oder UKW –
anderenfalls muss Ihr angeschlossenes
Lautsprechersystem ständig eingeschaltet sein,
Deutsch 13
Page 14

damit Sie das Radioprogramm hören, wenn der
Weckalarm ausgelöst wird.
Wenn der Alarm ausgelöst wird, drücken Sie ,
um für 5 Minuten weiterschlummern zu können.
Drücken Sie , um den Weckalarm bzw. die
Schlummerfunktion auszuschalten.
6.3 Sprache
Drücken Sie / zur Auswahl von Englisch oder
Deutsch, dann drücken Sie OK zur Bestätigung.
6.4 Werkseinstellung
Drücken Sie OK, um Rückstellung auf die
Werkseinstellung zu bestätigen. Das System wird
dann neu starten.
Hinweis: Alarmeinstellungen, eingestellte Sender
und Senderspeicher werden während der
Rückstellung zu den Werkseinstellungen gelöscht.
14 Deutsch
Page 15
6.5 SW-Version
Rufen Sie die Funktion zur Anzeige der
Firmware-Version des Systems auf.
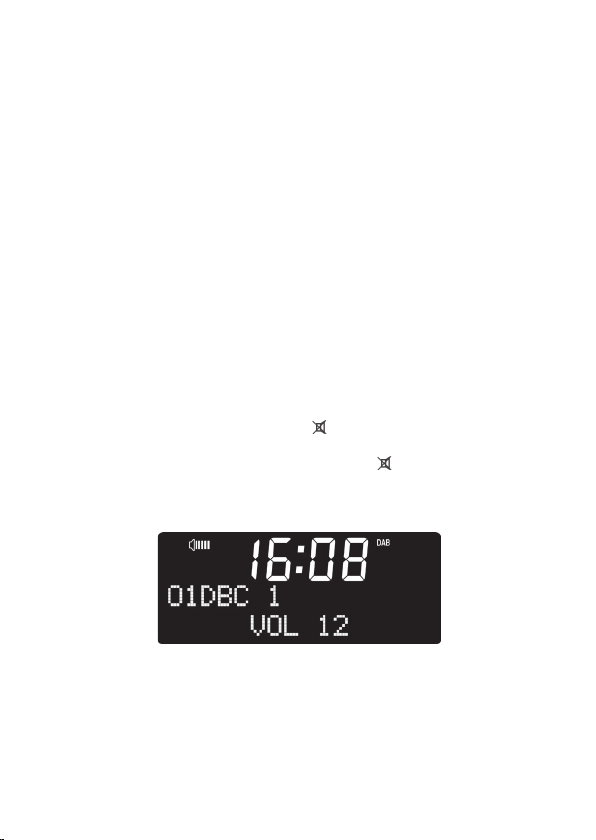
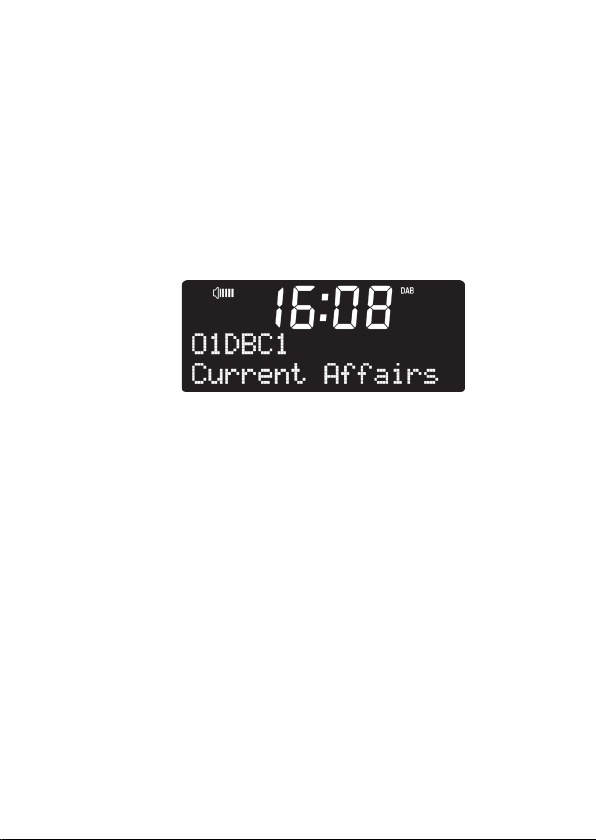
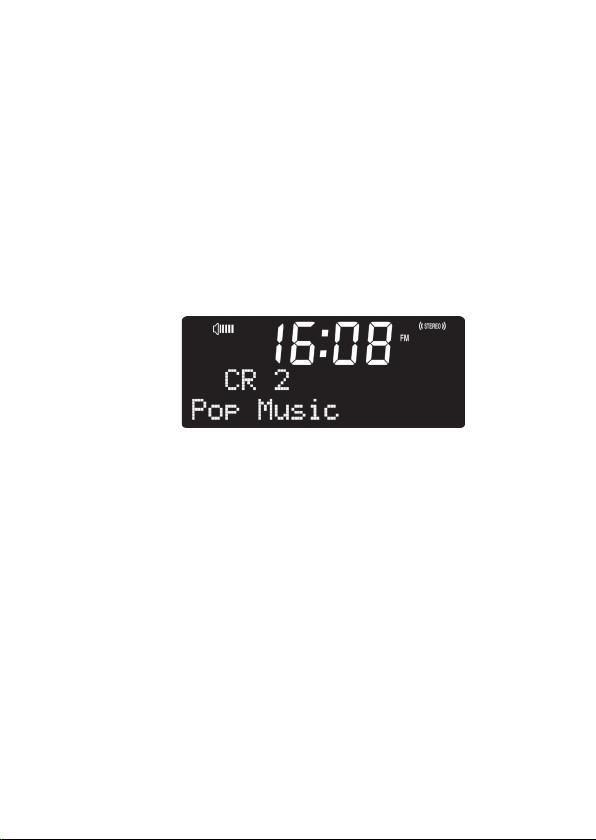
7 DAB
Die erste Textzeile ist der Name des
DAB-Senders.
Die zweite Zeile enthält Einzelheiten zum Sender,
drücken Sie Info zur Anzeige der zusätzlichen
Informationen wie DLS, Signalstärke,
Programmtyp, Ensemble-Name, Datum und
Uhrzeit, Frequenz, Signalfehler und Bitrate.
Mit / schalten Sie zum nächsten Sender um.
Deutsch 15
Page 16

Zum erneuten Scan nach Sendern drücken Sie
Menu, um das DAB-Menü aufzurufen.
Sie können einen vollständigen Scan oder eine
manuelle Sendersuche durchführen.
Alternativ drücken Sie Scan, um direkt einen
vollständigen Scan durchzuführen.
Im DAB-Modus gibt es zwei weitere Elemente im
Hauptmenü:
DRC: Hören Sie Musik mit einem hohen
Dynamikbereich in einer lauten Umgebung, so
können Sie den Audio-Dynamikbereich
komprimieren. Dies macht die leisen Töne lauter
und die lauten Töne leiser. Wählen Sie bei dem
DRC zwischen niedrig oder hoch aus. Diese
Funktion muss durch den Sender unterstützt
werden.
16 Deutsch
Page 17
Aktualisieren: Sie können die DAB-Liste
aktualisieren, falls sich darin ungültige Sender
befinden.
8 UKW
Die erste Zeile des Textes ist die Frequenz oder
der Name des UKW-Senders.
Die zweite Zeile enthält Einzelheiten zum Sender,
drücken Sie Info zur Anzeige von Radiotext,
Programmtyp oder Zeit und Datum.
Halten Sie / gedrückt oder drücken Sie Scan,
um den vorherigen/nächsten Sender aufzufinden.
Deutsch 17
Page 18

9 Senderspeicher
Im DAB oder UKW-Modus drücken und halten Sie
, um den Sender zu speichern. Drücken Sie
/, um die Senderspeichernummer zu wählen.
Es gibt 10 Senderspeicher für jeden Modus.
Drücken Sie kurz, um die gespeicherten Sender
aufzurufen.
Die Zifferntasten 1 bis 10 sind die Direktwahltasten
der einzelnen Senderspeicher. Halten Sie die
jeweilige Taste zum Speichern von Sendern
gedrückt und drücken Sie die Taste, um den
Sender aufzurufen.
18 Deutsch
Page 19

10 Fehlerbehebung
Fehler Abhilfe
Das Gerät
schaltet sich
nicht ein.
Kein Ton. 1. Schalten Sie den Ton ein, es
Kein Signal
oder
Rauschen im
DAB oder
UKW-Modus.
1. Vergewissern Sie sich, dass
das Netzteil in der Steckdose
steckt.
könnte stumm geschaltet sein
2. Erhöhen Sie die Lautstärke.
3. Das Audiokabel ist nicht
korrekt am
Lautsprechersystem
angeschlossen.
1. Überprüfen/bewegen Sie die
Antenne. Versuchen Sie
auch, die Antennenlänge
einzustellen.
2. Setzen Sie das Radio um.
Deutsch 19
Page 20

11 Technische Daten
Modell-Nummer DR 52
Beschreibung DAB/DAB+ und
UKW-Adapter
Anzeige Uhrzeit plus Symbole sowie
2 Zeilen x 16 Schriftzeichen
Dot-Matrix
UKW 87,5 - 108 MHz, RDS
unterstützt
DAB/DAB+ 174 – 240 MHz (Band III)
Netzteil 5V 600mA
Anschlüsse DC-IN (Netzversorgung)
Audioausgang (2 x Cinch
(RCA) L/R)
Abmessungen 125 mm (L) x 56 mm (H) x
85 mm (B)
Gewicht 170 g
20 Deutsch
Page 21

12 Gewährleistungs- und
Recyclinginformationen
Wir sind verpflichtet, jedem Gerät
Informationen über die Entsorgung, über die
gesetzlichen Gewährleistungsbestimmungen
und die EG Konformitätserklärungen mit
Hinweisen über das Benutzen der Geräte in
den verschiedenen Ländern beizufügen. Sie
finden daher diese Informationen im folgenden
Text.
Gesetzliche Gewährleistung von 2
Jahren nach Kaufdatum
Der Verkäufer dieses Geräts gewährt Ihnen
eine gesetzliche Gewährleistung von zwei
Jahren nach Kaufdatum des Geräts. Diese
Gewährleistung umfasst alle Fehler, die durch
defekte Bauteile oder fehlerhafte Funktionen
innerhalb der Gewährleistungsfrist auftreten
sollten, nicht jedoch Fehler, die auf normaler
Deutsch 21
Page 22

Abnutzung beruhen, wie z.B. verbrauchte
Akkus, Kratzer im Display, Gehäuse-defekte,
abgebrochene Antennen, sowie Defekte durch
äußere Einwirkung, wie Korrosion,
Überspannung durch unsachgemäße externe
Spannungsversorgung oder Verwendung
ungeeigneten Zubehörs. Ebenso sind Fehler
von der Gewährleistung ausgeschlossen, die
auf nicht bestimmungsgemäßen Umgang mit
dem Gerät beruhen.
Bitte wenden Sie sich bei
Gewährleistungsansprüchen zunächst
unmittelbar an den Händler, bei dem Sie das
Gerät erworben haben, oder auch gleich an
unseren Servicepartner. Der Händler wird Ihr
Gerät entweder reparieren oder austauschen,
oder er wird Ihnen eine für das Gerät
spezialisierte Serviceadresse nennen.
22 Deutsch
Page 23

Falls Sie Ihr Gerät einschicken, vergessen Sie
Ihre Kaufquittung als Nachweis über das
Kaufdatum nicht und beschreiben Sie bitte
den aufgetretenen Fehler möglichst genau.
Elektroschrottgesetz und Recycling
Europäische Gesetze verbieten das
Entsorgen von defekten oder nicht
mehr brauchbaren Geräten über den
Hausmüll. Sollten Sie eines Tages
Ihr Gerät entsorgen wollen, dann geben Sie es
bitte nur bei den überall eingerichteten
kommunalen Sammelstellen zum Recycling
ab. Dieses Sammelsystem wird von der
Industrie finanziert und sichert auch die
umweltgerechte Entsorgung und das
Recycling wertvoller Rohstoffe.
Deutsch 23
Page 24

13 Serviceanschrift
PST professional support technologies GmbH
Breitscheider Weg 117a
40885 Ratingen
Die Servicehotline ist unter 02102-1459546
(normale Festnetzpreise) bzw. per e-mail
unter alan-service@ps-tech.de erreichbar.
Bevor Sie bei einem Problem ein vermeintlich
defektes Gerät zurückschicken, können Sie
Zeit und Versandkosten sparen, indem Sie
zunächst ein paar einfache Tests (siehe
Kapitel Störungserkennung) durchführen, oder
lassen Sie sich per Hotline helfen.
© 2013 Alan Electronics GmbH
24 Deutsch
Page 25

DAB/DAB+ and FM Adaptor
DR 52
User Manual
English
English 25
Page 26

Content
1 Content ............................................... 25
2 Safety Precautions .............................. 27
3 Appearance and Key Descriptions ...... 29
4 Getting Started .................................... 30
5 DR 52 Functions ................................. 33
6 Main Menu and Settings ..................... 33
6.1 Sleep ............................................... 34
6.2 Alarm ............................................... 35
6.3 Language ......................................... 37
6.4 Factory Reset .................................. 37
6.5 SW version ...................................... 37
7 DAB .................................................... 38
8 FM ...................................................... 40
9 Preset ................................................. 40
10 Troubleshooting .................................. 42
11 Specifications...................................... 43
12 Warranty and Recycling Information ... 44
13 Service Address .................................. 47
26 English
Page 27

2 Safety Precautions
• Do not drop the DR 52 and do not expose it to
liquid, moisture or humidity. These might lead
to damage to the device.
• If the DR 52 is moved from a cold environment
into a warmer one, do let it adapt to the new
temperature before operating the device.
Otherwise it might lead to condensation and
cause malfunctions in the device.
• Do not use the DR 52 in a dusty environment
as dust can damage the interior electronic
components and lead to malfunctions in the
device.
• Protect the DR 52 from strong vibrations and
place it on stable surfaces.
• Do not attempt to disassemble the DR 52.
• Only use the power adapter included
English 27
Page 28

• Never touch the power plug with wet hands
and never pull on the power cable when
pulling the plug out of the power socket.
• Make sure the electrical voltage specified on
the DR 52 and its power plug is corresponding
to the voltage of the power socket. Incorrect
voltage will destroy the device.
• If the DR 52 is not used for a long period of
time, disconnect it from the power supply by
unplugging the power plug. This is to avoid the
risk of fire.
• Always power off the DR 52 when cleaning it.
• Never use any harsh or strong solvents to
clean the DR 52 since these may damage the
surface of the device. Dry, soft cloth is
appropriate. However, if the DR 52 is
extremely dirty, it may be wiped off with a
slightly moist cloth. Make sure the device is
dried off after cleaning.
28 English
Page 29

3 Appearance and Key
Descriptions
No. Description Functions
1 LCD screen Display
2 Standby button Standby on/off
3 Antenna Enhance DAB/FM
reception
English 29
Page 30

4 DC IN Power supply
5 Audio out RCA L/R jack for audio
out
4 Getting Started
The packaging box contains the following items:
• DR 52
• Remote Control
• 2pcs. AAA batteries
• RCA to RCA audio cable
• Power adaptor
• User Manual
30 English
Page 31

Install the two AAA batteries into
the battery compartment. Take
care to insert it with proper
polarity as indicated inside the
compartment.
• Connect the power adaptor to the back of the
DR 52 and plug it into power socket. Switch
the DR 52 on at the back of the adaptor.
• When using the device the first time, the radio
will enter DAB mode and automatically scan
for DAB/DAB+ stations.
English 31
Page 32

• The DR 52 automatically updates the time
from DAB or FM RDS. Under standby mode,
press to set time format 12hour or 24
hour, press to confirm.
• During standby mode, press to switch the
radio into operation mode.
• You can press anytime to adjust the
backlight of the screen. There are three levels
of backlight to choose from.
32 English
Page 33

5 DR 52 Functions
Press to toggle between DAB and FM
While you are in the radio mode, press /
to adjust the volume. Press to mute the
sound, press / / to resume the
volume.
Press to change the equalizer setting:
Normal, Flat, Pop, Jazz, Rock and Classic are
available.
6 Main Menu and Settings
At any operation modes, you may press to
enter the configurations. Press / to
English 33
Page 34

choose the submenu and then press to
confirm. Press to leave the menu.
6.1 Sleep
Press to enter the sleep timer menu directly.
Press / to set the sleep time to
15/30/45/60/90 minutes or turn off the sleep timer.
Press to confirm.
After the sleep timer is set, press again to
see the remaining time until the device turns into
standby mode.
34 English
Page 35

6.2 Alarm
There are two alarms available.
Press to enter the Alarm1 settings directly,
press once again to enter the Alarm2 setting.
For each step below, you have to press to
confirm.
• Once chosen your alarm, press / to
turn it on or off.
• When the alarm is turned on, you can change
the alarm time. Press / to adjust the
hour and minute.
• Alarm type: press / to swap among
BEEP tone1, BEEP tone2, DAB and FM. (for
English 35
Page 36

DAB and FM, the alarm will be the last listened
station and volume).
After setting up the alarm, there will be an alarm
icon on the display.
Note: The adaptor has an integrated buzzer, it is
recommended to set the alarms to BEEP instead
of DAB or FM – otherwise, your connected
speaker system needs to be turned on all the time
so you can hear the radio program when the alarm
goes off.
When the alarm rings, press to enter snooze
mode, it will alarm again in 5 minutes. Press
to turn off alarm and/or snooze.
36 English
Page 37

6.3 Language
Press / to choose between English or
German and press to confirm.
6.4 Factory Reset
Press to confirm the factory reset. The system
will then restart.
Note: the alarm settings, scanned stations and
stored preset stations will be removed during the
factory reset.
6.5 SW version
Enter to view the version of firmware of the
system.
English 37
Page 38

7 DAB
The first row of the text is the name of the DAB
station.
The second row is the details of the station, press
to view the additional information such as
DLS, signal strength, program type, ensemble
name, date and time, frequency, signal errors, and
bit rate.
Press / to change the station.
If you want to rescan the stations, press to
enter the DAB menu.
You can do a Full scan or Manual tune.
38 English
Page 39

You may also press to make the full station
scanning directly.
In DAB mode, there are two more items in the
main menu:
DRC: if you are listening to music with a high
dynamic range in a noisy environment, you may
wish to compress the audio dynamic range. This
make quiet sounds louder and loud sounds
quieter. You can choose between DRC off, low or
high. This feature needs to be supported by the
broadcasting station.
Prune: You may prune the DAB list if there are
invalid stations.
English 39
Page 40

8 FM
The first row of the text is the frequency or the
name of FM station.
The second row is displaying the details of the
station, press to view the radio text, program
type or time and date.
Press and hold / or press to scan
the previous / next station .
9 Preset
In DAB or FM mode, press and hold to save
the station. Press / to select the number.
40 English
Page 41

There are 10 presets for each mode. Press to
recall the stored preset station.
The number keys to are the hotkeys of
each preset. Press and hold to save stations and
press to recall that station.
English 41
Page 42

10 Troubleshooting
Error Remedy
The device
does not
switch on.
No sound. 1. Turn on the sound as it may be
No signal
or hiss in
DAB or FM
mode.
1. Check if the power adaptor is
connected properly with the power
supply.
muted.
2. Increase the volume.
3. The audio cable is connected
improperly to the speaker system.
1. Check/move the antenna. Also
try to adjust the length of antenna.
2. Move the radio to a different
location.
42 English
Page 43

11 Specifications
Model number DR 52
Description DAB/DAB+ and FM Adaptor
Display Clock + icons and 2 line x
16 characters dot matrix
FM 87.5 - 108 MHz, RDS
supported
DAB/DAB+ 174 – 240 MHz (Band III)
Power adaptor 5V 600mA
Connections DC IN (power supply)
Audio out (2 x RCA L/R)
Dimensions 125mm(L) x 56mm(H) x
85mm(D)
Weight 170g
English 43
Page 44

12 Warranty and Recycling
Information
We are legally obliged to include disposal and
warranty information as well as EU
declaration of conformity with the use
instructions in different countries for every
unit. Please find this information on the
following pages.
2-Year Warranty From Date Of
Purchase
The manufacturer/retailer guarantees this
product for two years from date of purchase.
This warranty includes all malfunctions
caused by defective components or incorrect
functions within the warranty period excluding
wear and tear, such as exhausted batteries,
scratches on the display, defective casing,
broken antenna and defects due to external
44 English
Page 45

effects such as corrosion, over voltage
through improper external power supply or the
use of unsuitable accessories. Defects due to
unintended use are also excluded from the
warranty.
Please contact your local dealer for warranty
claims. The dealer will repair or exchange the
product or forward it to an authorized service
center.
You can also contact our service partner
directly. Please include your proof of purchase
with the product and describe the malfunction
as clearly as possible.
WEEE and Recycling
The European laws do not allow any
more the disposal of old or defective
electric or electronic devices with the
household waste. Return your
English 45
Page 46

product to a municipal collection point for
recycling to dispose of it. This system is
financed by the industry and ensures
environmentally responsible disposal and the
recycling of valuable raw materials.
46 English
Page 47

13 Service Address And Technical Hotline (for units sold in Germany)
PST professional support technologies GmbH
Breitscheider Weg 117a
D - 40885 Ratingen
Contact our service hotline by phone 02102 1459546 (regular costs for German fixed
network) or e-mail at alan-service@pstech.de.
Before returning the product, check the
chapter “Troubleshooting” for some easy
steps and tests or contact our hotline.
English 47
Page 48

© 2013 Alan Electronics GmbH
48 English
Page 49

Adaptateur DAB/DAB+ et FM
DR 52
Guide d'utilisateur
Français 49
Page 50

Sommaire
1 Sommaire ................................................... 50
2 Précautions de sécurité .............................. 51
3 Présentation de la radio et de ses éléments
de commande...................................................... 53
4 Mise en route .............................................. 54
5 Fonctions du DR 52 .................................... 57
6 Menu principal et réglages ......................... 58
6.1 Option Sleep (Arrêt automatique) ......... 59
6.2 Alarme ................................................... 60
6.3 Langue .................................................. 62
6.4 Réinitialisation des options par défaut .. 62
6.5 Option SW version ................................ 63
7 Radio numérique ........................................ 63
8 FM ............................................................... 65
9 Présélection de station ............................... 66
10 Guide de dépannage .................................. 67
11 Spécifications ............................................. 68
12 Information importante................................ 69
50 Français
Page 51

2 Précautions de sécurité
• Evitez d'exposer le DR 52 à des chutes, du
liquide et à l'humidité. Ces négligences
risquent de provoquer des dommages à votre
radio.
• Si le DR 52 est déplacé d'un environnement
froid à un autre chaud, il faut le laisser
s'adapter à la nouvelle température avant de
l’utiliser. Autrement, de la condensation peut
se former et entraîner le dysfonctionnement de
l'appareil.
• N'utilisez pas le DR 52 dans un environnement
poussiéreux car la poussière peut
endommager les composants électroniques
internes et entraîner un dysfonctionnement de
l'appareil.
• Protégez votre radio DR 52 contre les fortes
vibrations et posez-la uniquement sur une
surface stable.
Français 51
Page 52

52
Français
• Ne tentez pas de démonter le DR 52.
• N’utilisez que l'adaptateur d'alimentation fourni
• Ne touchez jamais la prise du cordon
d'alimentation avec des mains humides et ne
tirez jamais sur le cordon d'alimentation même
pour le débrancher de la prise secteur.
• Assurez-vous que la tension électrique
indiquée sur la RD 52 et son cordon
d'alimentation correspond à la tension de la
prise de courant. Une tension inadaptée risque
d'endommager la radio.
• Il faut débrancher le DR 52 du courant s’il ne
va pas être utilisé pendant une longue période.
Cette précaution peut vous éviter des débuts
d'incendie.
• Il faut débrancher le DR 52 du courant avant
de le nettoyer.
• N'utilisez jamais de solvants forts pour nettoyer
le DR 52 car ils peuvent endommager la
Page 53

surface de l'appareil. Le sécher avec un chiffon
sec et doux, mais si le DR 52 est très sale, il
faut utiliser un chiffon légèrement humide pour
le nettoyer. Vérifiez que la radio est
complètement sèche avant de la brancher.
3 Présentation de la radio et de
ses éléments de commande
Français 53
Page 54

54
Français
Élément Description Fonctions
1 Ecran LCD Affichage
2 Touche Veille Mise en marche/veille
3 Antenne Améliore la réception
des stations
numériques et des
stations FM
4 Entrée DC IN
(courant
Alimentation
électrique
continu)
5 Sortie audio Prise RCA G/D pour
sortie audio
4 Mise en route
Vérifiez que la boîte qui vous a été remise contient
les éléments suivants :
• DR 52
• Télécommande
• 2 Piles AAA
Page 55

• Câble audio RCA vers RCA
• Adaptateur d'alimentation électrique
• Guide d'utilisateur
Installez les deux piles AAA dans
le compartiment de piles. Prenez
soin de les insérer avec les
polarités correctes dans le
compartiment.
• Branchez une extrémité de l'adaptateur
d'alimentation électrique à l'arrière de la radio
DR 52 et branchez l'autre extrémité dans une
Français 55
Page 56

56
Français
prise secteur. Allumez le DR 52 à l'arrière de
l'adaptateur.
• Lorsque vous utilisez l'appareil pour la
première fois, la radio passera en mode DAB
et recherchera automatiquement les stations
DAB/DAB+.
• Le DR 52 mets à jour automatiquement l'heure
depuis le DAB ou la FM RDS. En mode veille,
appuyez sur la touche Menu pour régler le
format de l'heure sur 12 heures ou 24 heures,
appuyez sur OK.
• En mode veille, appuyez sur
passer la radio en mode allumé.
pour faire
Page 57

• Vous pouvez appuyer à tout moment sur
pour régler le rétro éclairage de l'écran. Vous
pouvez choisir entre trois niveaux de rétro
éclairage.
5 Fonctions du DR 52
Appuyez sur Mode pour circuler entre DAB et FM
Lorsque vous êtes en mode radio, appuyez sur +/-
pour régler le volume. Appuyez sur
couper le son, appuyez sur +/-/
volume.
pour
pour réactiver le
Français 57
Page 58

58
Français
Appuyez sur EQ pour changer les réglages de
l'équaliseur : Vous pouvez choisir entre Normal,
Flat, Pop, Jazz, Rock et Classic.
6 Menu principal et réglages
Sous tous les modes de fonctionnement, vous
pouvez appuyer sur Menu pour entrer dans le
mode de configuration. Pour afficher les options
d'un sous-menu, appuyez sur la touche / puis
sur la touche OK pour valider l'opération. Appuyez
sur Menu pour sortir du menu.
Page 59

6.1 Option Sleep (Arrêt
automatique)
Appuyez sur pour entrer directement dans le
menu d'arrêt automatique.
Appuyez sur / pour régler le temps avant arrêt
sur 15/30/45/60/90 minutes ou désactiver l'arrêt
automatique. Appuyez sur OK pour confirmer.
Après avoir réglé le minuteur d'arrêt, appuyez sur
de nouveau pour voir le temps restant avant
que l'appareil ne passe en mode veille.
Français 59
Page 60

60
Français
6.2 Alarme
Vous pouvez régler deux heures de réveil
différentes.
Appuyez sur Alarm pour entrer directement dans
le menu de réglage de l'alarme 1, appuyez sur
Alarm de nouveau pour entrer dans le menu de
réglage de l'alarme 2.
Pour chaque étape susmentionnée, vous devez
appuyer sur OK pour confirmer.
• Une fois que vous avez choisi votre alarme,
appuyez sur / pour l'activer ou la désactiver.
• Lorsque l'alarme est activée, vous pouvez
changer l'heure de l'alarme. Appuyez sur /
pour régler les heures et le minutes.
Page 61

• Type d'alarme : appuyez sur / pour circuler
entre son de BIP 1, son de BIP 2, DAB et FM.
(Pour DAB et FM, l'alarme se réglera sur la
dernière station écoutée, avec le même
volume).
Après avoir réglé l'alarme, une icône d'alarme
s'affichera à l'écran.
Remarque : L'adaptateur dispose d'un buzzer
intégré, il est recommandé de régler l'alarme sur
BIP plutôt que sur DAB ou FM - Autrement, votre
système d'enceinte connecté doit rester allumé
tout le temps, pour que vous puissiez entendre le
programme radio lorsque l'alarme se déclenche.
Français 61
Page 62

62
Français
Lorsque l'alarme sonne, appuyez sur pour
activer le report d'alarme, l'alarme se déclenchera
de nouveau après 5 minutes. Appuyez sur
pour éteindre l'alarme et / ou la reporter.
6.3 Langue
Appuyez sur / pour choisir entre anglais et
allement, et appuyez sur OK pour confirmer.
6.4 Réinitialisation des options par
défaut
Appuyez sur la touche OK pour rétablir les
réglages effectués en usine. Votre système
redémarre avec ces réglages.
Remarque : les alarmes réglées, les stations
détectées et les stations sauvegardées seront
supprimées lors de la réinitialisation.
Page 63

6.5 Option SW version
Cette option affiche la version du microprogramme
qui est installée sur votre appareil.
7 Radio numérique
La première ligne du texte indique le nom de la
station numérique.
La deuxième ligne indique les détails de la station,
appuyez sur Info pour voir les informations
supplémentaires comme DLS, la force du signal, le
type de programme, le nom de l'ensemble, la date
et l'heure, la fréquence, les erreurs de signal et le
débit binaire.
Appuyez sur / pour changer la station.
Français 63
Page 64

64
Français
Si vous souhaitez rechercher des stations,
appuyez sur Menu pour entrer dans le menu DAB.
Vous pouvez effectuer une recherche intégrale ou
une recherche manuelle.
Vous pouvez également appuyer sur Scan pour
procéder directement à une recherche de toutes
les stations.
En mode radio numérique, vous avez accès à trois
options supplémentaires :
DRC : Lorsque vous écoutez une musique dont la
dynamique est très étendue dans un
environnement bruyant, vous pouvez essayer
d'améliorer l'écoute en appliquant une
compression audio dynamique. La compression
atténue les sons forts et amplifie les sons faibles.
Vous pouvez choisir entre DRC éteint, faible ou
Page 65

fort. Cette fonction doit être proposée par la station
diffusée.
Rafraichir : Vous pouvez rafraichir la liste DAB si
elle présente des stations invalides.
8 FM
La première ligne du texte indique la fréquence ou
le nom de la station FM.
La deuxième ligne indique les détails de la stations,
appuyez sur Info pour le radiotexte et le type de
programme de la station FM RDS et la date du
jour.
Tenez appuyée / ou appuyez sur Scan pour
rechercher la station précédente / suivante.
Français 65
Page 66

66
Français
9 Présélection de station
Depuis le mode radio numérique ou FM, appuyez
sur la touche et maintenez-la enfoncée pour
ajouter la station actuellement diffusée dans la liste
des présélections. Choisissez la position mémoire
de la présélection à l'aide des touches /. Vous
pouvez présélectionner jusqu'à 10 stations pour
chaque mode. Pour écouter une station
présélectionnée, appuyez sur la touche .
Les touches numériques 1 à 10 sont les touches
de rappel pour les stations sauvegardées. Tenez
appuyé pour sauvegarder des stations et appuyez
pour rappeler une station.
Page 67

10 Guide de dépannage
Erreur Suggestion
L'appareil ne
s'allume pas.
1. Vérifiez si l'adaptateur
d'alimentation est
correctement connecté sur le
secteur.
Aucun son. 1. Activez la sortie sonore si elle
a été désactivée.
2. Augmentez le volume
sonore.
3. Le câble audio est connecté
incorrectement sur le
système d'enceinte.
Aucun signal
ou un simple
sifflement en
mode radio
numérique
ou FM.
1. Vérifiez/déplacez l'antenne.
Vous pouvez également
essayer d'ajuster la longueur
de l'antenne.
2. Déplacez la radio dans un
endroit différent.
Français 67
Page 68

68
Français
11 Spécifications
Modèle DR 52
Description Adaptateur DAB/DAB+ et FM
Affichage Horloge et icônes et 2 lignes de
matrices de points de 16
caractères
FM 87,5 - 108 MHz, avec prise en
charge des informations RDS
DAB/DAB+ 174 – 240 MHz (Bande III)
Adaptateur 5 V 600 mA
Branchements Entrée pour la source
d'alimentation DC IN (courant
continu)
Sortie audio (2 x RCA L/R)
Dimensions 125mm(L) x 56mm(H) x
85mm(P)
Poids 170g
Page 69

12 Information importante
Nous sommes légalement tenus d'inclure les
dispositions et les informations de garantie et la
déclaration de conformité de l'UE avec le mode
d'emploi de chaque unité, et ce dans la langue de
chaque pays.
Veuillez trouvez ces informations dans les pages
suivantes.
Deux ans de garantie à compter de la date
d’achat
Le Fabricant/revendeur garantit ce produit pour
deux ans à compter de la date d’achat. Cette
garantie couvre tout dysfonctionnement dû à une
défaillance des composants ou à des fonctions
incorrectes pendant la période de la garantie à
l'exception des pièces d’usure, telles que batteries,
égratignures de l'écran, défectuosité du boîtier,
rupture de l'antenne et les défaillances dues à des
Français 69
Page 70

70
Français
raisons extérieures telles que corrosion, surtension
à cause d'une source d'alimentation externe
inappropriée ou l'utilisation d'accessoires
inadéquats. La garantie ne couvre pas les
défaillances dues à un usage non prévu. Contactez
votre revendeur local pour réclamation sous
garantie. Le revendeur réparera/remplacera ou
envoie le produit à un centre de service agréé.
Vous pouvez également contacter directement
notre station de réparation agrée. Incluez la preuve
d'achat avec le produit et décrivez l'anomalie de la
façon la plus précise.
Déchets d'Equipements Electriques et
Electroniques (DEEE) et recyclage
La loi Européennes ne permet pas la
mise au rebus des équipements
électriques et électroniques usagés avec
les ordures ménagères. Ramenez votre
Page 71

produit à un centre de collecte municipal pour être
recyclé. Ce système de collecte est financé par les
industriels pour garantir l’élimination respectueuse
de l’environnement et le recyclage de matières
premières précieuses.
Adresse du service d'assistance téléphonique
(en Allemagne)
PST professional support technologies GmbH
Breitscheider Weg 117a
40885 Ratingen
Contactez notre service d'assistance téléphonique
par téléphone au 02102-1459546 ou par courriel
au alan-service@ps-tech.de
.
Avant de retourner le produit consultez le chapitre
“Dépannage” pour vous aidera à effectuer certains
Français 71
Page 72

72
Français
tests faciles, sinon contactez notre service
d'assistance téléphonique.
© 2013 Alan Electronics GmbH
 Loading...