

Bitte le
Be
A
DA
Em
1

1 Inhaltsverzeichnis
11Inhaltsverzeichnis 2
21Lieferumfang 3
31Tastenbelegung 3
41Inbetriebnahme 5
4.11Schneller Suchlauf 5
4.21Voller Suchlauf 5
4.31Modus 6
51DAB-Modus 6
5.11Menü-Taste 6
5.21Sleep-Taste (Einschlaffunktion) 8
5.31Weckalarm-Tasten 8
5.41Zusätzliche Informationen 9
5.51Gespeicherte Sender 9
5.61Laden gespeicherter Sender 9
61UKW-Modus 10
6.11Menü-Taste 10
6.21Manuelle Sendersuche 10
6.31Automatischer Sendersuchlauf 10
6.41Informationsanzeige 11
6.51Gespeicherte Sender 11
6.61Laden gespeicherter Sender 11
71Gewährleistungs- und Recyclinginformationen 11
1
1
1
1
1
1
1
1
1
1
1
1
1
1
1
1
1
1
1
1
1
1
2
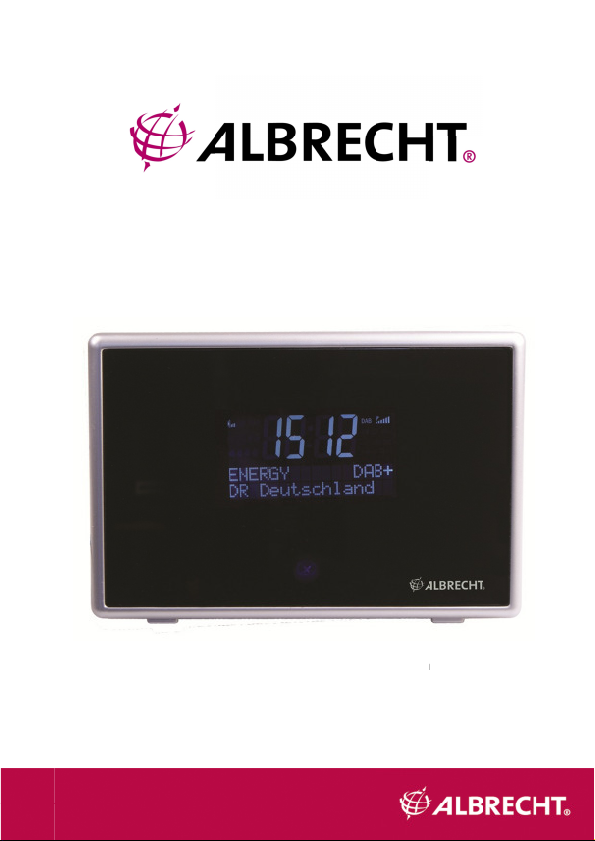
2 Lieferumfang
1. Albrecht DR50 DAB+ Radio 1x
2. Fernbedienung 1x
Das DR 50 wird mit der Fernbedienung gesteuert.
3. UKW/DAB Antennenkabel 1x
Die Antenne wird für den Empfang von Radiosendern in Gebieten mit normaler
bis hoher Signalstärke benötigt.
4. DC-Netzadapter 1x
Bitte benutzen Sie nur den Netz-Adapter, der mit dem DR 50 mitgeliefert wird.
5. 75 Ohm Adapter 1x
Dieser Adapter wird für den Anschluss unterschiedlicher Antennen an das DR
50 benötigt. In Gebieten mit niedriger Signalstärke kann eine DAB-Antenne die
Empfangsqualität verbessern.
6. Cinch-Kabel 1x
Mit diesem Kabel kann das DR 50 an Ihre Stereoanlage angeschlossen
werden.
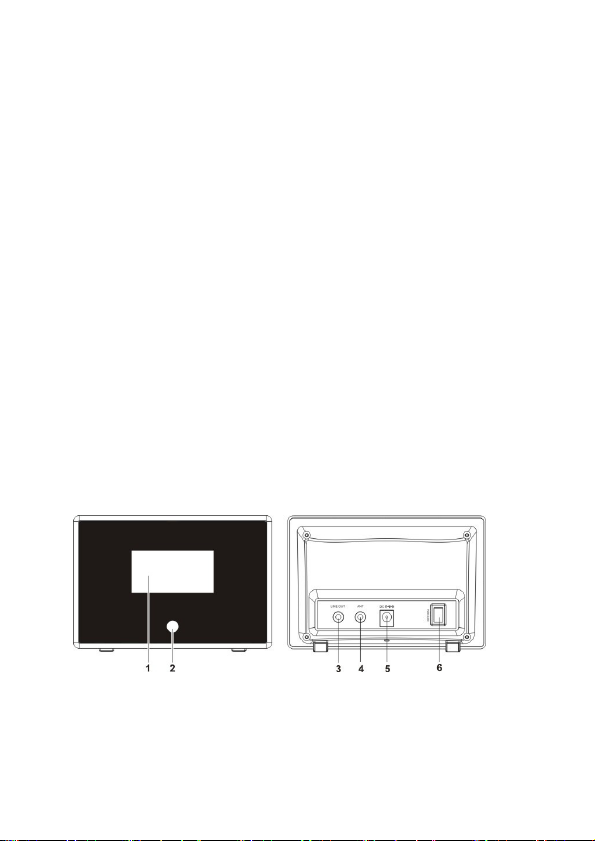
3 Tastenbelegung
1. LC-Display 4. Antennenbuchse
2. Infrarot-Empfangsfenster 5. DC-Buchse
3. Line-Ausgang 6. Ein- und Ausschalter
3
Fernb
1.
P
M
M
S
I
0
u
A
M
1
1
o
2
S
C
S
: E
: Sc
: Um
: Suc
Blät
: Num
:
Ruf
: Scrollt z
: Scrollt z
Sender o
Frequenz
: Be
E
: Ein
oder A
: Einstellen
F
Einstellen
oder
von Sen
Send
2.
3.
4.
5.
6.
7.
8.
9.
10.
--10
-
-
:
alarms.
:
-
.
11.
12.
13.
14.
4
4 Inbetriebnahme
1. Schließen Sie den Netzadapter des Radios an eine Steckdose an und schalten
Sie den Netzschalter auf der Rückseite des Gehäuses ein. Das Display zeigt
Welcome
Anschließend geht das Gerät in den Standby-Modus und zeigt die Uhrzeit
„00:00“ an.
2. Um das Radio einzuschalten, benutzen Sie bitte die Power-Taste auf der
Fernbedienung. Das Radio beginnt den schnellen Suchlauf nach verfügbaren
Radiosendern.
Scan services
Quick Scan
Wenn der Suchlauf beendet ist, wird der erste Sender (alphabetisch)
wiedergegeben. Wenn beim „Schnellen Suchlauf“ keine Sender gefunden wurden,
sollte ein „Full Scan" (Voller Suchlauf) durchgeführt werden, um nach
DAB-Sendern zu suchen, die auf anderen Frequenzen senden. Wenn immer noch
Schwierigkeiten beim Empfang von Radiosendern auftreten, setzen Sie das Radio
an einen anderen Ort um. Um die Empfangsqualität weiter zu verbessern, können
Sie auch bessere Antennen anschließen, die besonders für DAB-Signale
entwickelt wurden. Aus diesem Grund haben wir den 75 Ohm Antennenadapter
als Zubehör hinzugefügt.
Hinweis: Bitte bei der allerersten Inbetriebnahme in Deutschland bitte einen
„Full Scan“ durchführen, da sonst nicht alle Sender gefunden werden.
-------------------11B 72%
4.1 Schneller Suchlauf
Führt eine Sendersuche von Kanal 7A bis 13B durch. Zum Aufrufen des „Quick
Scan“ (Schnellen Suchlaufs) drücken Sie die Taste „Scan”.
4.2 Voller Suchlauf
Führt eine Sendersuche von Kanal 5A bis 13F durch. Um einen „Full Scan“ (Voller
Suchlauf) durchzuführen, halten Sie die Taste „Scan“ gedrückt.
Drücken Sie einmal die Taste „POWER“, das Radio wechselt vom Betriebsmodus
zum Standby-Modus und die Hintergrundbeleuchtung erlischt.
Hinweis: Die Hintergrundbeleuchtung schaltet sich nach 10 Sek. ohne
Tastenbedienung automatisch aus.
5

4.3 Modus
1. Das DAB-Radio besitzt zwei Betriebsarten:
•
DAB-Radio
•
UKW-Radio
2. Sie wechseln mit der Taste "Mode“ zwischen UKW- und DAB-Modus.
5 DAB-Modus
1. Wenn Sie sich im UKW-Modus befinden, drücken Sie die Taste „Mode“. Das Radio
wechselt in den DAB-Modus und beginnt mit der Wiedergabe des zuletzt
wiedergegebenen Senders.
2. Bei der ersten Inbetriebnahme wird kein DAB-Sender aufgelistet. Das Radio führt
automatisch einen „Quick Scan“ (Schneller Suchlauf) nach DAB-Radiosendern
durch.
3. Wenn der Suchlauf beendet ist und Sender gefunden wurden, werden die Namen
der Radiosender in alphanumerischer Reihenfolge aufgelistet und der erste
Sender wird wiedergegeben. Wenn beim „Quick Scan“ keine Sender gefunden
wurden, wird ein „Full Scan“ (Voller Suchlauf) nach DAB-Sendern durchgeführt,
die auf Frequenzen senden, die weniger häufig benutzt werden.
4. Wenn Sie das DAB-Radio vorher schon benutzt haben und wenn Sie wieder in
den DAB-Modus wechseln, wird der zuletzt gewählte DAB-Radiosender
wiedergegeben.
5.1 Menü-Taste
Mit dem Menü können Sie die Einstellungen für das DAB-Radio konfigurieren.
Drücken Sie die Taste „Menu“, um folgende Optionen aufzurufen:
•
Manuelle Sendersuche
•
Kontrasteinstellungen
•
System zurücksetzen
•
Softwareversion
5.1.1 Manuelle Sendersuche
6
BBC radio
Manual Tune
1. Rufen Sie mit der Taste „Menu“ das Menü auf.
2. Blättern Sie mit den Tasten „1“ und „2“ durch das Menü. Wenn „Manual
Tune“ (Manuelle Sendersuche) angezeigt wird, drücken Sie zum Bestätigen
die Taste „Select“ (Auswählen). Das Display zeigt folgendes an:

11B 218.640 MHz
3. Drücken Sie „1“ und die Taste „2“, um durch die Frequenzen zu scrollen und
bestätigen Sie sie mit „Select".
4. Wenn das Radio bei dieser Frequenz einen Sender empfängt, zeigt das Radio
den Namen des Senders an. Rufen Sie anschließend mit „Select“ die
Senderliste auf.
5. Wiederholen Sie die Schritte 1 bis 4, um weitere Sender zu suchen.
5.1.2 Kontrast
1. Blättern Sie mit den Tasten „1“ und „2“ durch das Menü, bis „Contrast“ (Kontrast)
angezeigt wird und bestätigen Sie mit „Select“.
2. Bitte passen Sie den Kontrast gemäß Ihren Wünschen im Bereich von 1 bis 5 an.
5.1.3 System zurücksetzen
Falls das Radio ein unerwartetes Verhalten zeigt oder nicht richtig funktioniert, können
Sie das System zurücksetzen. Sobald die Rücksetzung durchgeführt wurde, führt das
DAB-Radio automatisch einen „Quick Scan“ (Schnellen Suchlauf) durch.
1. Blättern Sie mit den Tasten „1“ und „2“ durch das Menü. Wenn „System Reset"
(System zurücksetzen) angezeigt wird, drücken Sie zum Bestätigen die Taste
„Select“ (Auswählen).
2. Drücken Sie zum Durchführen des Rücksetzvorgangs die Taste „Select“.
Hinweis: Wenn Sie diese Funktion durchführen, werden die meisten Einstellungen,
wie gespeicherte Sender, Weckalarm usw. gelöscht.
5.1.4 SW-Version
6. Blättern Sie mit "1" und "2" im Menü, um die Software-Version anzuzeigen.
Das Display wird etwas Ähnliches wie dies anzeigen:
Customer vN1.18
Hinweis: Verlassen Sie den Setup mit der Taste „MENU“.
7

5.2 Sleep-Taste (Einschlaffunktion)
Der Einschlaftimer schaltet das Radio aus, sobald die eingestellte Zeit verstrichen ist.
1. Wenn Sie die Einstellungen überprüfen möchten, drücken Sie die Taste „Sleep".
Sleep Info
Sleep 10 mins
2. Um den Einschlaftimer einzustellen, halten Sie die Taste „Sleep“ gedrückt. Die
Auswahl fängt an zu blinken. Wählen Sie mit „1“ oder „2“ (OFF, 10, 30, 60,
90min.) und bestätigen Sie anschließend mit „Select“.
Sleep time set
Sleep 60 mins
3. Wenn Sie den Einschlaftimer ausschalten möchten, halten Sie die Taste
„Sleep“ erneut gedrückt und wählen Sie „OFF“ (Aus).
5.3 Weckalarm-Tasten
Prüfen und Einstellen der Weckalarmzeit
1. Um die Einstellungen zu überprüfen, drücken Sie kurz die Taste „Alarm1“ oder
„Alarm2“.
Alarm 1 11:30
BEEP TONE 1
2. Halten Sie zum Einstellen des Weckalarms die Taste „Alarm 1” oder „Alarm 2”
gedrückt.
3. Die Auswahl fängt an zu blinken. Wählen Sie mit „1“ oder „2“ die Art des
Weckalarms aus: „OFF/Beep/DAB/FM“ (Aus/Signalton/DAB/UKW)
Hinweis: Wenn Sie DAB als die Audioquelle wählen, aber keinen DAB-Sender
empfangen, gibt das Radio automatisch einen Signalton aus.
4. Nachdem Sie die Signalart gewählt haben, können Sie den
Weckalarm-Zeitraum wie unten dargestellt einstellen.
a. „Täglich“: Der Weckalarm wird täglich aktiviert.
b. „Wochentag: Montag -> Freitag“: Der Alarm wird jeden Tag von Montag
bis Freitag aktiviert.
c. „Wochenende: Samstag -> Sonntag“: Der Alarm wird nur am
Wochenende aktiviert.
d. „Einmal“: Der Alarm wird nur für einen einmaligen Zeitpunkt aktiviert.
5. Anschließend fängt die „Stunden“-Ziffer an zu blinken. Stellen Sie die
„Stunden“ mit den Tasten „
Wiederholen Sie den Vorgang zum Einstellen der „Minuten“.
8
1
“ oder „2“ ein und bestätigen Sie mit „Select“.

6. Wählen Sie die Weckalarm-Lautstärke durch Drücken der Taste „1“ oder „2“.
7. Wenn Sie die Einstellungen beenden, wird der Alarm aktiviert.
8. Wenn Sie den Signalton ausgewählt haben, können Sie zwischen zwei
Klängen wählen: „TONE 1” und „TONE 2”
5.4 Zusätzliche Informationen
Sie können bei der Wiedergabe eines DAB-Radiosenders die Informationen ändern,
die in der zweiten Zeile des LC-Displays erscheinen. Es gibt mehrere
Informationsarten, die vom Radiosender übertragen werden. Sie können mit der Taste
„INFO“ die auf dem Display angezeigten Informationen wechseln.
Dynamischer Beschriftungsabschnitt (DLS)
Dies sind scrollende Textinformationen, die vom Rundfunksender angeboten werden.
Die Informationen könnten der Name eines Künstlers oder Musiktitels, der Name des
DJs oder die Kontaktdetails des Radiosenders sein.
Kanalfrequenz - z. B.: 5C 178,352MHz
Ensemblename
Zeit und Datum – vom Rundfunksender übermittelt
Programmtyp (PTY) – zeigt den Sender-Programmtyp an, zum Beispiel
‚Pop-Musik‘
Audioformat – z. B. Stereo 192Kpbs
5.5 Gespeicherte Sender
Die ‚Sendeplatzfunktion‘ speichert Ihre Lieblingssender, so dass Sie leicht auf diese
zugreifen können. Sie können bis zu 10 DAB-Radiosender im Speicher des Radios
ablegen.
1. Wählen Sie den gewünschten Sender zum Speichern.
2. Halten Sie die Nummer des Ziffernblocks (1-10) gedrückt, um den gewählten
Radiosender im Speicher abzulegen.
3. Auf dem LC-Display erscheint „Preset X Saved“ (Speicherplatz X gesichert). Der
Sender wurde jetzt erfolgreich unter der gewählten Nummer gespeichert.
5.6 Laden gespeicherter Sender
Aufrufen eines gespeicherten Senders:
1. Drücken Sie kurz die Nummer der Ziffernblocks (1-10), um den Sender zur
Wiedergabe auszuwählen. Das DAB-Radio wechselt zum gespeicherten Sender.
2. Wenn Sie kein Sender gespeichert haben, wird auf dem LC-Display „Preset X
Free“ (Speicherplatz X frei) angezeigt.
9

10
6 UKW-Modus
1. Schalten Sie das Radio auf der Rückseite des Gehäuses ein.
2. Wenn es sich schon in Standby-Modus befindet, drücken Sie die Taste „Standby“.
3. Drücken Sie die Taste „Mode“, bis der UKW-Modus auf dem LC-Display angezeigt
wird.
87.80 MHz
Auto (Mono)
6.1 Menü-Taste
Mit dem Menü können Sie die Einstellungen für das UKW-Radio konfigurieren.
Drücken Sie die Taste „Menu“, um folgende Optionen aufzurufen:
•
Kontrasteinstellungen
•
System zurücksetzen
•
Softwareversion
Für Details zu den Einstellungen, schauen Sie bitte in das entsprechende
DAB-Kapitel weiter oben.
•
Klangformat
Wählen Sie mit der Taste „Select“ entweder das „Mono“- oder das „Auto“-Format.
„Auto“: Wenn das Radio ein Stereosignal empfängt, gibt es den Sender mit
Stereoklang wieder.
„Mono“: Der Sender wird nur mit Monoklang wiedergegeben.
6.2 Manuelle Sendersuche
Mit diesen können Sie die Frequenz manuell ändern.
1. Drücken Sie „2“, um die Frequenz mit Schritten von 0,05 MHz zu erhöhen.
2. Drücken Sie „1“, um die Frequenz mit Schritten von 0,05 MHz zu verringern.
6.3 Automatischer Sendersuchlauf
Wenn Sie möchten, dass das Radio den nächsten verfügbaren Sender automatisch
sucht:
1. Drücken Sie die Taste „Scan". Das Radio sucht mit Schritten von 0,05 MHz nach
Sendern, bis es einer gefunden wurde.

2. Während der automatische Sendersuchlauf läuft, können Sie ihn mit „1“ oder
„2“ anhalten.
6.4 Informationsanzeige
Wechseln Sie mit der Taste „INFO“ die Informationen, die bei der Wiedergabe eines
UKW-Senders in der zweiten Zeile des LC-Displays angezeigt werden.
Im UKW-Modus empfängt das Radio RDS (Radiodatensystem)-Informationen. Zu den
RDS-Informationen gehören:
3
Klangformat – Zeigt an, ob der Sender in Mono oder Stereo wiedergeben wird.
3
Programmtyp (PTY) – Zeigt den Programmtyp des Senders an, zum Beispiel
„Pop-Musik“.
3
Radiotext – Scrollende Textinformationenen, die vom Rundfunksender
übermittelt werden. Die Informationen können der Name eines Künstlers oder
Musiktitels, der Name des DJs oder die Kontaktdetails des Radiosenders sein.
1
Aktuelles Datum und Uhrzeit:
6.5 Gespeicherte Sender
Die ‚Speicherfunktion‘ speichert Ihre Lieblingssender, so dass Sie leicht auf diese
zugreifen können. Sie können bis zu 10 UKW-Radiosender im Speicher des Radios
ablegen.
1. Wählen Sie den gewünschten Sender zum Speichern.
2. Halten Sie die Nummer des Ziffernblocks (1-10) gedrückt, um den gewählten
Radiosender im Speicher abzulegen.
3. Auf dem LC-Display erscheint „Preset X Saved“ (Speicherplatz X gesichert). Der
Sender wurde jetzt erfolgreich unter der gewählten Nummer gespeichert.
6.6 Laden gespeicherter Sender
Aufrufen eines gespeicherten Senders aus dem Speicher
1. Drücken Sie kurz die Nummer des Ziffernblocks (1-10), um den Sender zur
Wiedergabe auszuwählen. Das Radio wechselt zum gespeicherten Sender.
2. Wenn Sie kein Sender gespeichert haben, wird auf dem LC-Display „Preset X
Free“ (Speicherplatz X frei) angezeigt.
7 Gewährleistungs- und Recyclinginformationen
Wir sind verpflichtet, jedem Gerät Informationen über die Entsorgung, über die
gesetzlichen Gewährleistungsbestimmungen und die EG Konformitätserklärungen mit
Hinweisen über das Benutzen der Geräte in den verschiedenen Ländern beizufügen.
11

12
Sie finden daher diese Informationen im folgenden Text.
Gesetzliche Gewährleistung von 2 Jahren nach Kaufdatum
Der Verkäufer dieses Geräts gewährt Ihnen eine gesetzliche Gewährleistung von
zwei Jahren nach Kaufdatum des Geräts. Diese Gewährleistung umfasst alle Fehler,
die durch defekte Bauteile oder fehlerhafte Funktionen innerhalb der
Gewährleistungsfrist auftreten sollten, nicht jedoch Fehler, die auf normaler
Abnutzung beruhen, wie z.B. verbrauchte Akkus, Kratzer im Display, Gehäusedefekte,
abgebrochene Antennen, sowie Defekte durch äußere Einwirkung, wie Korrosion,
Überspannung durch unsachgemäße externe Spannungsversorgung oder
Verwendung ungeeigneten Zubehörs. Ebenso sind Fehler von der Gewährleistung
ausgeschlossen, die auf nicht bestimmungsgemäßen Umgang mit dem Gerät
beruhen.
Bitte wenden Sie sich bei Gewährleistungsansprüchen zunächst unmittelbar an den
Händler, bei dem Sie das Gerät erworben haben, oder auch gleich an unseren
Servicepartner. Der Händler wird Ihr Gerät entweder reparieren oder austauschen,
oder er wird Ihnen eine für das Gerät spezialisierte Serviceadresse nennen.
Falls Sie Ihr Gerät einschicken, vergessen Sie Ihre Kaufquittung als Nachweis über
das Kaufdatum nicht und beschreiben Sie bitte den aufgetretenen Fehler möglichst
genau.
Elektroschrottgesetz und Recycling
Europäische Gesetze verbieten das Entsorgen von defekten oder nicht mehr
brauchbaren Geräten über den Hausmüll. Sollten Sie eines Tages Ihr Gerät
entsorgen wollen, dann geben Sie es bitte nur bei den überall eingerichteten
kommunalen Sammelstellen zum Recycling ab. Dieses Sammelsystem wird
von der Industrie finanziert und sichert auch die umweltgerechte Entsorgung und das
Recycling wertvoller Rohstoffe.
Serviceanschrift und technische Hotline
PST professional support technologies GmbH
Breitscheider Weg 117a
40885 Ratingen
Die Servicehotline ist unter
alan-service@ps-tech.de
01805-012204 (14 Cent p. Minute)
erreichbar.
bzw. per e-mail unter
Bevor Sie bei einem Problem ein vermeintlich defektes Gerät zurückschicken, können
Sie Zeit und Versandkosten sparen, indem Sie zunächst ein paar einfache Tests
(siehe Kapitel Störungserkennung) durchführen, oder lassen Sie sich per Hotline
helfen
© 2011 Alan Electronics GmbH

User Manual
Albrecht DR50
DAB+ Radio Adapter
Please read this user manual carefully before using the receiver
1

1 Table of Contents
11 Table of Contents 21
21 Contents 31
31 Location of Controls 31
41 Start up 51
4.11 Quick scan 51
4.21 Full scan 51
4.31 Mode 61
51 DAB Mode 61
5.11 Menu Button 61
5.1.11 Manual tune 61
5.1.21 Contrast 71
5.1.31 System reset 71
5.1.41 SW version 71
5.21 Sleep Button 81
5.31 Alarm Buttons 81
5.41 Additional Information 91
5.51 Preset stations 91
5.61 Loading preset stations 91
61 FM Mode 101
6.11 Menu Button 101
6.21 Manual tune buttons 101
6.31 Auto scan buttons 101
6.41 Information Display 101
6.51 Presetting stations 111
6.61 Loading preset stations 111
71 Warranty and Recycling Information 111
2

2 Contents
1. Albrecht DR50 DAB+ Radio 1x
2. Remote Control 1x
The remote control is used to operate the DR 50.
3. FM/DAB Antenna cable 1x
The antenna is needed to receive radio stations in regions with normal
to high signal strength.
4. DC Power Adapter 1x
Please use only the supplied power adapter with the DR 50.
5. 75 Ohm Adapter 1x
This adapter is needed to connect different antennas to the DR 50. In
regions with low signal strength a DAB antenna can improve your
reception quality.
6. RCA cable 1x
This cable is for the connection of the DR 50 to your stereo audio
system.
3 Location of Controls
1. LC Display 4. Antenna socket
2. Infrared window 5. DC socket
3. Line Out 6. On/Off
3

Remote control:
1. POWER: Press to switch the radio ON/OFF.
2. MUTE: Press to mute the sound.
3. Mode: Press to switch between the DAB and FM
mode.
4. Scan: Press to scan for FM or DAB stations.
5. INFO: Press to browse through the information
6. 0--10: Numeric buttons for Store and Recall
functions.
7. Alarm 1/2: Press to set the alarm.
8. Menu: Press to open the menu.
9. 1 / 2: Press to set the Volume
10. 1: Scroll to the previous station
or frequency.
11. 2: Scroll to the next station
or frequency.
12. Select: Press to confirm the
operation.
13. CLK Set: Press to set the clock.
14. Sleep: Press to set the sleep timer.
4

4 Start up
1. Connect the radio to the main power using the power adapter and switch
on the main switch on the back cabinet. The display will show
Welcome
Then it will enter the standby mode with the clock set to “00:00”
2. To switch the radio on please use the power button on the remote control.
The radio will now do a quick search for available radio stations.
Scan services
Quick Scan
-----------------11B 72%
When the scan is completed, the first station (alphabetically) will begin to
play. If there were no stations found in “Quick Scan”, a “Full Scan” can be
done to find DAB stations which are broadcasting on other frequencies. If
you still encounter difficulties with the reception of radio stations please try
to put the radio in a different location. To improve the reception quality even
further you can connect better antennas which are engineered especially
for DAB signals. For this reason we included the 75 Ohm antenna adapter
in the contents.
4.1 Quick scan
It performs a station scan from channel 7A to 13B. Press the “Scan” button
shortly to do a “Quick scan”.
4.2 Full scan
It performs a station scan from channel 5A to 13F. Press and hold the “Scan”
button to do a “Full scan”.
Press the “POWER” button once, the radio will change from operation mode to
standby mode and the backlight will turn off.
Note: The backlight will automatically turn off after 10sec without any
operation.
5

4.3 Mode
1. The DAB Radio has two modes of operation:
• DAB Radio
• FM Radio
2. Press the “Mode” button to switch between the FM and DAB mode.
5 DAB Mode
1. If you are in the FM mode press the “Mode” button. The radio will switch to
the DAB mode and start to play the station which you have listened the last
time.
2. If it is your first use there is no DAB station listed, the radio will
automatically start a “quick scan” for DAB radio stations.
3. W hen the scanning is completed and stations have been found, the names
of the radio stations will be listed in alphanumeric order and the 1st one will
be played. If no stations are found with a “Quick Scan”, a “Full Scan” is
needed to find DAB stations which are broadcasting on frequencies which
are used less often.
4. If you have used the DAB Radio before, the most recently selected DAB
Radio station will be heard when you change back to DAB mode.
5.1 Menu Button
The menu allows you to configure the settings for the DAB Radio.
Press the ‘Menu’ button to select the following options:
• Manual Tune
• Contrast Settings
• System reset
• Software version
5.1.1 Manual tune
BBC radio
Manual Tune
1. Press the ‘Menu’ button to enter the menu.
2. Browse through the menu with the “1” and “2” buttons when “Manual
tune” is displayed press the “Select” button to confirm. The display will
show the following:
6

11B 218.640 MHz
3. Press “1” and “2 ” key to scroll through the frequencies and confirm it
by pressing “Select”.
4. If the radio receives a station at that frequency, the radio will show the
stations name. Then please press “select” to enter the station list.
5. Repeat 1-4 to tune to other broadcasting stations.
5.1.2 Contrast
1. Browse through the menu with the “1 ” and “2” buttons when “Contrast” is
displayed press the “Select” button to confirm.
2. Please adjust the contrast according to your needs in the range from 1 to 5
5.1.3 System reset
In case the radio shows some unexpected behavior or is not working properly
you can do a system reset. Once a reset has been performed, the DAB Radio
will automatically start a “Quick scan”.
1. Browse through the menu with the “1” and “2” buttons when “System
Reset” is displayed press the “Select” button to confirm.
2. Press “Select” to perform the reset
Note: Once you do this operation, most of the settings like preset stations,
alarm, etc. will be deleted.
5.1.4 SW version
6. Browse through the menu with the “1” and “2” buttons when “Manual
tune” is displayed press the “Select” button to confirm. The display will
show something similar to this:
Customer vN1.18
Note: To exit setup, press the ‘MENU’ button
7

5.2 Sleep Button
The sleep timer switches the radio off as soon as the selected time has
passed.
1. Press the ‘Sleep’ button shortly if you want to check the settings.
Sleep Info
Sleep 10 mins
2. To set the sleep timer, press and hold the “Sleep” button. The selection will
start blinking. Use the “1” or “2” (OFF, 10, 30, 60, 90) and then press the
“Select” button to confirm.
Sleep time set
Sleep 60 mins
3. If you want to cancel the sleep time, press and hold the “Sleep” button
again and select “OFF”.
5.3 Alarm Buttons
It allows you to check and set the alarm time
1. Press the “Alarm1” or “Alarm2” button shortly to check the settings
Alarm 1 11:30
BEEP TONE 1
2. To set the alarm press and hold “Alarm 1” or “Alarm 2”
3. The selection will start blinking. Press “1” or “2” key to select the type
of the alarm: “OFF/Beep/DAB/FM”
4. Note: If you select DAB as the sound source but do not receive any
DAB station, the radio will automatically sound the Beep tone.
5. After you select the sound type you can set the Alarm period as below
a. “Daily”: The alarm will be activated everyday.
b. “Weekday: Monday->Friday”: The alarm will be activated from
everyday from Monday till Friday.
c. “Weekend: Saturday -> Sunday”: The alarm will only be activated
on the weekend.
d. “Once”: The alarm will only be activated for one time.
6. Afterwards the “Hour” Digit will start blinking. Set the “Hour” by pressing
“1” or “2” key and press ‘Select’ to confirm. Repeat to set the “Minute”.
7. Select the alarm volume by pressing “1” or “2” key
8. When you finish the settings, the alarm will be activated.
8

9. If you have selected the beep sound, you can choose between two
sounds “TONE 1” and “TONE 2”
5.4 Additional Information
When listening to a DAB radio station you can change the information that will
appear on the second line of the LC Display. There are several types of
information that are broadcasted by the radio stations. You can change the
information shown on the display by pressing the “INFO” button.
Dynamic Label Segment (DLS)
This is a scrolling text information supplied by the broadcaster. Informations
could be the name of an artist or music title, the DJ’s name or the contact
details for the radio station.
Channel frequency – e.g.:5C 178.352MHz
Ensemble name
Time and Date – supplied by the broadcaster
Program Type (PTY) – displays the station program type, for example ‘POP
Music’
Audio format – e.g. Stereo 192Kpbs
5.5 Preset stations
The Preset function stores your favorite stations so you can easily access
them. You can preset up to 10 DAB radio stations in the radio memory.
1. Select the desired station to store.
2. Press and hold the preset number (1-10) button to store the selected radio
station into the memory.
3. The LC Display will show “Preset X Saved”. The station is now successfully
saved as the selected preset number.
5.6 Loading preset stations
To retrieve the preset station from stored memory
1. Press the preset number (1-10) button shortly to select the station you
would like to listen to and the DAB radio will re-tune to the selected preset
station.
2. If you have not preset any station, ‘Preset X Free’ will be displayed on the
LC Display.
9

6 FM Mode
1. Turn on the radio on the back cabinet
2. If it is already in standby mode, just press the Standby button
3. Press the Mode button until a FM mode is shown on the LC Display.
87.80 MHz
Auto (Mono)
6.1 Menu Button
The menu allows you to configure the settings for the FM Radio
Press the “Menu” button to select the following options:
• Contrast setting
• System reset
• Software version
For details on the settings please see the DAB chapter above.
• Sound Format
Press the “Select” key to select either “Mono” or “Auto” format.
“Auto”: If the radio receives a stereo signal, it will play the station in stereo
sound.
“Mono”: The station is only played in mono.
6.2 Manual tune buttons
They allow you to change the frequency manually
1. Press “2” to tune the frequency increasingly by 0.05MHz
2. Press “1” to tune the frequency decreasingly by 0.05MHz
6.3 Auto scan buttons
If you want to let the radio search for the next available station automatically:
1. Press the “Scan” button, the radio will scan the stations in 0.05 MHz steps
until it finds a station.
2. W hen the auto scan is in progress you can press the “1” or “2” button to
stop it.
6.4 Information Display
Press the “INFO” button to change the information that will appear on the
second line of the LC display when listening to a FM radio station.
1 0

In FM mode, the Radio will receive Radio Data System (RDS) information.
RDS information includes:
3Sound Format – shows if the station is played in mono or stereo.
3Program Type (PTY) – displays the station program type, for example ‘POP
Music’
3Radio text – scrolling text information supplied by the broadcaster.
Information could be the name or an artist or the music title, the DJ’s name or
the contact details for the radio station.
3Current Date and Time
6.5 Presetting stations
The Preset function stores your favorite stations so you can easily access
them. You can preset up to 10 FM radio stations in the radio memory.
1. Select the desired station to store.
2. Press and hold the preset number (1-10) button to store the selected radio
station into the memory.
3. The LC Display will show “Preset X Saved”. The station is now successfully
saved as the selected preset number.
6.6 Loading preset stations
To retrieve the preset station from stored memory
1. Press the preset number (1-10) button shortly to select the station you
would like to listen to and the radio will re-tune to the selected preset
station.
2. If you have not preset any station, ‘Preset X Free’ will be displayed on the
LC Display.
7 Warranty and Recycling Information
We are legally obliged to include disposal and warranty information as well as
EU declaration of conformity with the use instructions in different countries for
every unit. Please find this information on the following pages.
2-Year Warranty From Date Of Purchase
The manufacturer/retailer guarantees this product for two years from date of
purchase. This warranty includes all malfunctions caused by defective
components or incorrect functions within the warranty period excluding wear
and tear, such as exhausted batteries, scratches on the display, defective
11

casing, broken antenna and defects due to external effects such as corrosion,
over voltage through improper external power supply or the use of unsuitable
accessories. Defects due to unintended use are also excluded from the
warranty.
Please contact your local dealer for warranty claims. The dealer will repair or
exchange the product or forward it to an authorized service center.
You can also contact our service partner directly. Please include your proof of
purchase with the product and describe the malfunction as clearly as possible.
WEEE And Recycling
The European laws do not allow any more the disposal of old or
defective electric or electronic devices with the household waste.
Return your product to a municipal collection point f or recycling to
dispose of it. This system is financed by the industry and ensures
environmentally responsible disposal and the recycling of valuable raw
materials.
Service Address And Technical Hotline (for units sold in Germany)
PST professional support technologies GmbH
Breitscheider Weg 117a
D - 40885 Ratingen
Contact our service hotline by phone 01805-012204 (14 cent/minute from
German fixed network) or e-mail at alan-service@ps-tech.de.
Before returning the product, check the chapter “Troubleshooting” for some
easy steps and tests or contact our hotline.
© 2011 Alan Electronics GmbH
1 2

Guide d'utilisateur
Albrecht DR50
Adaptateur radio FM et numérique
Lisez attentivement ce guide avant d'utiliser votre récepteur
1

1 Sommaire
11 Sommaire 21
21 Sommaire 31
31 Emplacements des éléments de commande 31
41 Mise en route 51
4.11 Recherche rapide 51
4.21 Recherche complète 51
4.31 Mode 61
51 Mode radio numérique 61
5.11 Touche Menu 61
5.21 Touche Sleep (Arrêt automatique) 81
5.31 Touches de la fonction réveil 81
5.41 Informations supplémentaires 91
5.51 Présélection de stations 91
5.61 Écoute d'une station numérique présélectionnée 101
61 Mode FM 101
6.11 Touche Menu 101
6.21 Touches de recherche manuelle des stations de radio 111
6.31 Recherche automatique de stations 111
6.41 Informations affichées 111
6.51 Présélection de stations 111
6.61 Écoute d'une station présélectionnée 121
71 Information importante 12
2

2 Sommaire
1. Radio FM + numérique DR50 Albrecht 1x
2. Télécommande 1x
La télécommande vous permet d'exécuter les principales fonctions de
votre DR 50.
3. Câble d'antenne FM/radiodiffusion numérique 1x
L'antenne est nécessaire pour recevoir les stations de radio lorsque la
réception des signaux est normale à bonne.
4. Adaptateur d'alimentation CC 1x
Utilisez uniquement l'adaptateur d'alimentation fourni avec votre DR 50.
5. Adaptateur 75 Ohm 1x
Cet adaptateur est nécessaire pour brancher diverses antennes à votre
DR 50. Lorsque la réception est signaux est faible, une antenne de
radiodiffusion numérique peut l'améliorer.
6. Câble RCA 1x
Ce câble vous permet de brancher votre DR 50 à un système audio
stéréo.
3 Emplacements des éléments de commande
1. Écran LCD 4. Connecteur d'antenne
2. Détecteur infrarouge 5. Connecteur CC
3. Sortie ligne (Line out) 6. Marche/arrêt
3

Télécommande
1. POWER (Marche/Arrêt) : appuyez sur cette touche
pour allumer ou éteindre la radio.
2. MUTE (Désactivation du son) : appuyez sur
cette touche pour désactiver la sortie sonore.
3. Mode : appuyez sur cette touche pour passer
du mode radio numérique au mode FM et
vice versa.
4. Scan (Rechercher) : appuyez sur
cette touche pour rechercher des
stations FM ou des stations de
radio numériques.
5. INFO : appuyez sur cette
touche pour parcourir les
informations affichées.
6. 0—10 : touches
numériques pour
présélectionner des
stations et rappeler des stations présélectionnées.
7. Alarm ½ : appuyez sur cette touche pour régler l’heure de réveil.
8. Menu : appuyez sur cette touche pour accéder au menu.
9. 1 / 2 : appuyez sur ces touches pour régler le volume sonore.
10. 1 : appuyez sur cette touche pour revenir à la station ou à la fréquence
précédente.
11. 2 : appuyez sur cette touche pour passer à la station ou à la fréquence
suivante.
12. Select : appuyez sur cette touche pour confirmer une opération.
13. CLK Set : appuyez sur cette touche pour régler l’horloge.
14. Sleep : appuyez pour régler le délai avant l'arrêt automatique.
4

4 Mise en route
1. Branchez la radio sur une prise secteur à l'aide de l'adaptateur fourni et
basculez le commutateur de marche/arrêt sur la position marche, à l'arrière
de l'appareil. L'écran affiche alors
Welcome
La radio se place en mode veille avec l'horloge réglée sur "00:00".
2. Pour activer la radio en mode veille, appuyez sur la touche Power de la
télécommande. La radio effectue une recherche rapide des stations
disponibles.
Scan services
Quick Scan
----------------11B 72%
Une fois la recherche terminée, la radio diffuse la première station détectée
(selon l'ordre alphabétique). Si la "recherche rapide" ne fournit aucun
résultat, démarrez une "recherche complète" pour explorer d'autres
fréquences. Si la réception des signaux est faible, déplacez la radio pour un
endroit plus adapté. Des antennes spécialement conçues pour la
radiodiffusion numérique vous permettent d'améliorer encore davantage la
qualité de la réception des signaux. Pour connecter de telles antennes à
votre radio, nous vous fournissons un adaptateur 75 Ohm.
4.1 Recherche rapide
Cette recherche est limitée aux canaux 7A à 13B. Pour démarrer la recherche
rapide, appuyez brièvement sur la touche "Scan".
4.2 Recherche complète
Cette recherche parcourt les canaux 5A à 13F. Pour démarrer la recherche
complète, appuyez sur la touche "Scan" et maintenez-la enfoncée.
Pour ramener la radio en mode veille, appuyez une fois sur la touche
"POWER". Le rétroéclairage de l'écran s'éteint.
Remarque : en l'absence de toute opération pendant 10 s d'affilée, le
rétroéclairage de l'écran s'éteint.
5

4.3 Mode
1. Votre radio peut fonctionner selon deux modes :
• Radio numérique
• Radio FM
2. Pour passer d'un mode à l'autre, appuyez sur la touche "Mode".
5 Mode radio numérique
1. Si la radio est en mode FM, appuyez sur la touche "Mode". La radio se place
en mode radio numérique et diffuse le contenu de la dernière station
numérique que vous écoutiez.
2. Lorsque vous utilisez votre radio pour la première fois, une telle "dernière
station" n'existe pas et la radio procède automatiquement à une "recherche
rapide" des stations de radio numériques.
3. Si elle détecte des stations, elle affiche leur liste sur l'écran, par ordre
alphanumérique, et diffuse le contenu de la première station de cette liste.
Sinon, démarrez une "recherche complète" afin d'explorer les fréquences
moins utilisées.
4. Si vous avez déjà écouté une station de radio numérique, lorsque vous
passez ensuite en mode FM puis revenez au mode radio numérique, la
dernière station que vous écoutiez dans ce mode est automatiquement
sélectionnée.
5.1 Touche Menu
La touche Menu vous permet de configurer la radio numérique.
Appuyez sur la touche "Menu". La liste des options suivantes s'affiche sur
l'écran :
• Manual Tune (Recherche manuelle)
• Contrast Settings (Contraste)
• System reset (Réinitialisation)
• Software version (Version du logiciel) :
5.1.1 Manual tune (Recherche manuelle)
BBC radio
Manual Tune
1. Appuyez sur la touche "Menu" pour afficher la liste des options
associées.
2. Amenez la surbrillance sur l'option "Manual tune" (Recherche manuelle)
à l'aide des touches "1" et "2" et appuyez sur la touche "Select" pour
6

confirmer votre choix. La page suivante apparaît sur l'écran :
11B 218.640 MHz
3. Sélectionnez une fréquence à l'aide des touches "1" et "2" et appuyez
sur la touche "Select" pour confirmer votre choix.
4. Si la radio détecte une station à cette fréquence, elle affiche son nom sur
son écran. Pour écouter le contenu de cette station, appuyez sur la
touche "select".
5. Répétez les instructions 1-4 pour rechercher une autre station de radio
numérique.
5.1.2 Contrast (Contraste)
1. Amenez la surbrillance sur l'option "Contrast" (Contraste) à l'aide des
touches "1" et "2" et appuyez sur la touche "Select" pour confirmer votre
choix.
2. Réglez le contraste selon votre préférence, entre 1 et 5.
5.1.3 System reset (Réinitialisation)
Si la radio ne semble pas fonctionner normalement, la réinitialiser peut suffire à
résoudre le problème. Après chaque réinitialisation, la radio effectue
automatiquement une "recherche rapide".
1. Amenez la surbrillance sur l'option "System Reset" (Réinitialisation) à l'aide
des touches "1" et "2" et appuyez sur la touche "Select" pour confirmer
votre choix.
2. Appuyez sur la touche "Select" pour confirmer.
Remarque : cette opération efface la plupart de vos réglages, notamment vos
présélections de station et vos réglages de la fonction réveil.
5.1.4 SW version (Version logicielle)
6. Amenez la surbrillance sur l'option "SW version" (Version logicielle) à
l'aide des touches "1" et "2". Une page d'informations similaire à celle
ci-s'affiche sur l'écran :
Customer vN1.18
Remarque : pour quitter le menu de configuration, appuyez sur la touche
"MENU".
7

5.2 Touche Sleep (Arrêt automatique)
La fonction Sleep éteint automatiquement la radio après l'expiration d'un
certain délai.
1. Pour vérifier le délai que vous avez sélectionné, appuyez brièvement sur la
touche "Sleep".
Sleep Info
Sleep 10 mins
2. Pour activer la fonction Sleep (Arrêt automatique), appuyez sur la touche
"Sleep". La sélection clignote. Sélectionnez un délai (OFF, 10, 30, 60, 90) à
l'aide des touches "1" et "2" et appuyez sur la touche "Select" pour valider
votre choix.
Sleep time set
Sleep 60 mins
3. Pour désactiver la fonction Arrêt automatique, appuyez sur la touche
"Sleep", maintenez-la enfoncée et sélectionnez la valeur "OFF".
5.3 Touches de la fonction réveil
Ces touches vous permettent d'afficher et de régler les heures de réveil.
1. Pour afficher l'heure de réveil que vous avez programmée, appuyez
brièvement sur la touche "Alarm1" ou "Alarm2".
Alarm 1 11:30
BEEP TONE 1
2. Pour programmer une heure de réveil, appuyez sur la touche "Alarm 1"
ou "Alarm 2" et maintenez-la enfoncée.
3. La sélection clignote. Sélectionnez la source sonore de réveil à l'aide
des touches "1" et "2" : “OFF/Beep/DAB/FM”
4. Remarque : si vous avez sélectionné la source sonore DAB et que la
radio ne détecte aucune station de radio numérique à l'heure de réveil
choisie, elle déclenche automatiquement la sonnerie.
5. Sélectionnez ensuite la fréquence de déclenchement de l'heure de
réveil, parmi les options suivantes :
a. “Daily”: la source sonore de réveil retentit chaque jour.
b. “Weekday: Monday->Friday”: la source sonore de réveil retentit
chaque jour, du lundi au vendredi.
c. “Weekend: Saturday -> Sunday”: la source sonore de réveil ne
retentit que pendant le week-end.
d. Once : la source sonore de réveil ne retentit qu'une fois.
6. Ce réglage effectué, les chiffres des heures se mettent à clignoter.
8

Ajustez les chiffres des heures à l'aide des touches "1" et "2", et
appuyez sur la touche "Select" pour valider le réglage. Procédez de
même pour le réglage des chiffres des minutes.
7. Réglez le volume de la source sonore à l'aide des touches "1" et "2".
8. La fonction réveil est activée, avec les réglages que vous venez
d'effectuer.
9. Pour la sonnerie, deux tonalités sont disponibles : "TONE 1" et "TONE
2".
5.4 Informations supplémentaires
Lorsque vous écoutez une station de radio numérique, vous pouvez modifier
les informations affichées sur la deuxième ligne de l'écran LCD. Les signaux
transmis par les stations de radio numériques contiennent diverses
informations en plus des émissions radiodiffusées. Pour afficher toutes ces
informations, appuyez sur la touche "INFO".
3 Radiotexte (Dynamic Label Segment - DLS)
Ce texte est transmis par la station émettrice. Il peut inclure le nom de l'artiste,
le titre de la chanson, le nom du DJ ou les coordonnées pour contacter la
station de radio.
3 Fréquence de la station, par exemple 5C 178,352MHz
3 Nom d'ensemble
3 Heure et date – informations fournies par la station émettrice
3 Type d'émission – affiche le type de l'émission diffusée, par exemple
"Musique classique".
3 Format audio, par exemple Stéréo 192Kpbs
5.5 Présélection de stations
La fonction de présélection vous permet de mémoriser la fréquence de vos
stations préférées afin d'y accéder plus rapidement par la suite. Vous pouvez
présélectionner jusqu'à 10 stations de radio numériques dans la mémoire de
votre radio.
1. Recherchez la station que vous voulez présélectionner.
2. Appuyez sur la touche de la position mémoire que vous voulez affecter à
cette station (1-10) et maintenez la touche enfoncée.
3. L'écran LCD affiche le message "Preset X Saved" (Présélection X
enregistrée)”. La fréquence de la station a été affectée à la position
mémoire que vous avez choisie.
9

5.6 Écoute d'une station numérique présélectionnée
Pour rechercher une station de radio numérique présélectionnée :
1. Appuyez brièvement sur la touche de la position mémoire affectée à la
station de radio numérique que vous désirez écouter maintenant (1-10). La
radio recherche automatiquement la fréquence correspondante.
2. Si vous n'avez présélectionné aucune station à cette position mémoire, le
message "Preset X Free" (Présélection X non affectée) apparaît sur l'écran
LCD.
6 Mode FM
1. Allumez la radio à l'aide du commutateur placé à l'arrière du boîtier.
2. Si la radio est déjà allumée et en mode veille, appuyez simplement sur la
touche Standby.
3. Appuyez sur la touche Mode jusqu'à sélectionner le mode FM sur l'écran
LCD.
87.80 MHz
Auto (Mono)
6.1 Touche Menu
La touche Menu vous permet de configurer la radio FM.
Appuyez sur la touche "Menu". La liste des options suivantes s'affiche sur
l'écran :
• Contrast Settings (Contraste)
• System reset (Réinitialisation)
• Software version (Version du logiciel) :
Ces options sont identiques à celles décrites pour la radio numérique
ci-dessus.
• Sound Format (Format audio)
Appuyez sur la touche "Select" pour sélectionner la valeur "Mono" ou "Auto".
"Auto" : la radio diffuse le signal en stéréo lorsqu'il est émis en stéréo.
"Mono" : Le contenu audio est diffusé uniquement en mono.
10

6.2 Touches de recherche manuelle des stations de radio
Pour modifier manuellement la fréquence :
1. Appuyez sur la touche "2" pour augmenter la fréquence de 0,05 MHz.
2. Appuyez sur la touche "1" pour diminuer la fréquence de 0,05 MHz.
6.3 Recherche automatique de stations
Pour rechercher automatiquement la station suivante accessible :
1. Appuyez sur la touche "Scan" (Rechercher). La radio balaie la plage de
fréquences par incrément de 0,05 MHz jusqu'à recevoir les signaux d'une
station.
2. Pour arrêter le balayage automatique, appuyez sur la touche "1" ou "2".
6.4 Informations affichées
Appuyez sur la touche "INFO" pour modifier l'information affichée sur la
deuxième ligne de l'écran LCD lorsque vous écoutez une station de radio FM.
En mode FM, la radio reçoit diverses informations transmises par un système
RDS (Radio Data System). Les informations RDS incluent :
3 Format audio – mono ou stéréo.
3 Type d'émission (PTY) – affiche le type de l'émission diffusée, par
exemple "Musique classique"
3 Texte radio – texte transmis par la station émettrice. Ce texte peut inclure
le nom de l'artiste, le titre de la chanson, le nom du DJ ou les
coordonnées pour contacter la station de radio.
3 La date et l'heure
6.5 Présélection de stations
La fonction de présélection vous permet de mémoriser la fréquence de vos
stations préférées afin d'y accéder plus rapidement par la suite. Vous pouvez
présélectionner jusqu'à 10 stations FM dans la mémoire de votre radio.
1. Recherchez la station que vous voulez présélectionner.
2. Appuyez sur la touche de la position mémoire que vous voulez affecter à
cette station (1-10) et maintenez la touche enfoncée.
3. L'écran LCD affiche le message "Preset X Saved" (Présélection X
enregistrée). La fréquence de la station a été affectée à la position mémoire
que vous avez choisie.
11

6.6 Écoute d'une station présélectionnée
Pour écouter une station présélectionnée :
1. Appuyez brièvement sur la touche de la position mémoire affectée à la
station que vous désirez écouter maintenant (1-10). La radio recherche
automatiquement la fréquence correspondante.
2. Si vous n'avez présélectionné aucune station à cette position mémoire, le
message "Preset X Free" (Présélection X non affectée) apparaît sur l'écran
LCD.
7 Information importante
Nous sommes légalement tenus d'inclure les dispositions et les informations de
garantie et la déclaration de conformité de l'UE avec le mode d'emploi de
chaque unité, et ce dans la langue de chaque pays.
Veuillez trouvez ces informations dans les pages suivantes.
Deux ans de garantie à compter de la date d’achat
Le Fabricant/revendeur garantit ce produit pour deux ans à compter de la date
d’achat. Cette garantie couvre tout dysfonctionnement dû à une défaillance des
composants ou à des fonctions incorrectes pendant la période de la garantie à
l'exception des pièces d’usure, telles que batteries, égratignures de l'écran,
défectuosité du boîtier, rupture de l'antenne et les défaillances dues à des
raisons extérieures telles que corrosion, surtension à cause d'une source
d'alimentation externe inappropriée ou l'utilisation d'accessoires inadéquats. La
garantie ne couvre pas les défaillances dues à un usage non prévu.Contactez
votre revendeur local pour réclamation sous garantie. Le revendeur
réparera/remplacera ou envoie le produit à un centre de service agréé.
Vous pouvez également contacter directement notre station de réparation
agrée. Incluez la preuve d'achat avec le produit et décrivez l'anomalie de la
façon la plus précise.
Déchets d'Equipements Electriques et Electroniques (DEEE) et recyclage
La loi Européennes ne permet pas la mise au rebus des équipements
électriques et électroniques usagés avec les ordures ménagères.
Ramenez votre produit à un centre de collecte municipal pour être
recyclé. Ce système de collecte est financé par les industriels pour
garantir l’élimination respectueuse de l’environnement et le recyclage de
matières premières précieuses.
12

Adresse du service d'assistance téléphonique (en Allemagne)
PST professional support technologies GmbH
Breitscheider Weg 117a
40885 Ratingen
Contactez notre service d'assistance téléphonique par téléphone au
01805-012204 (14 cent/minute en Allemagne seulement) ou par courriel au
alan-service@ps-tech.de.
Avant de retourner le produit consultez le chapitre “Dépannage” pour vous
aidera à effectuer certains tests faciles, sinon contactez notre service
d'assistance téléphonique.
©
2011 Alan Electronics GmbH
13
 Loading...