

Page 1

KI51PV-754
Copyright
All rights are reserved. No part of this publication may be reproduced, transmitted, transcribed,
stored in a retrieval system or translated into any language or computer language, in any form
or by any means, electronic, mechanical, magnetic, optical, chemical, manual or otherwise,
without the prior written permission of the company. Brands and product names are trademarks
or registered trademarks of their respective companies.
The vendor makes no representations or warranties with respect to the contents herein and
especially disclaim any implied warranties of merchantability or fitness for any purpose. Further
the vendor reserves the right to revise this publication and to make changes to the contents
herein without obligation to notify any party beforehand. Duplication of this publication, in part or
in whole, is not allowed without first obtaining the vendor’s approval in writing.
Trademark
All the trademarks or brands in this document are registered by their respective owner.
Disclaimer
We make no warranty of any kind with regard to the content of this user’s manual. The content
is subject to change without notice and we will not be responsible for any mistakes found in this
user’s manual. All the brand and product names are trademarks of their respective companies.
FCC Compliance Statement
This equipment has been tested and found to comply with the limits of a Class B digital device,
pursuant to Part 15 of the FCC Rules. These limits are designed to provide reasonable
protection against harmful interference in a residential installation. This equipment generates,
uses and can radiate radio frequency energy and, if not installed and used in accordance with
the instructions, may cause harmful interference to radio communications. Operation of this
equipment in a residential area is likely to cause harmful interference in which case the user will
be required to correct the interference at his own expense. However, there is no guarantee that
interference will not occur in a particular installation.
CE Mark
The device is in accordance with 89/336 ECC-ENC Directive.
Ver: EG101
Page 2

KI51PV-754
nVIDIA® nForce4 C51PV & MCP51
Supports Socket 754
®
AMD
(The power consumption for the aforementioned
processors must be rated at 65W or less.)
AthlonTM 64/ SempronTM
Processor
User’s Manual
Dimensions (Micro-ATX Form-Factor):
z 170mm x 170mm ( W x L )
Operating System:
z Windows® 2000/ XP
Page 3
Things You Should Know
0 The images and pictures in this manual are for reference only and may vary from the
product you received depending on specific hardware models, third party components
and software versions.
0 This mainboard contains very delicate IC chips. Always use a grounded wrist strap
when working with the system.
0 Do not touch any IC chip, lead, connector or other components.
0 Always unplug the AC power when you install or remove any device on the mainboard
or when confuguring pins and switches.
Packing List
KI51PV-754 mainboard
I/O Bracket
IDE Cable
SATA Cable
Mainboard Setup Driver & User’s Manual CD
Mainboard Quick Installation Guide
Symbols
The following list explains the convention for symbols that will be used throughout this
manual:
Attention- Important Information
Follow the procedures below…
Troubleshooting Tips
Refer to other sections in this manual…
Page 4

Table of Contents
CHAPTER 1. GETTING STARTED .................................................... 1
INTRODUCTION.......................................................................................................1
SPECIFICATION .......................................................................................................2
CONFIGURATION .................................................................................................... 5
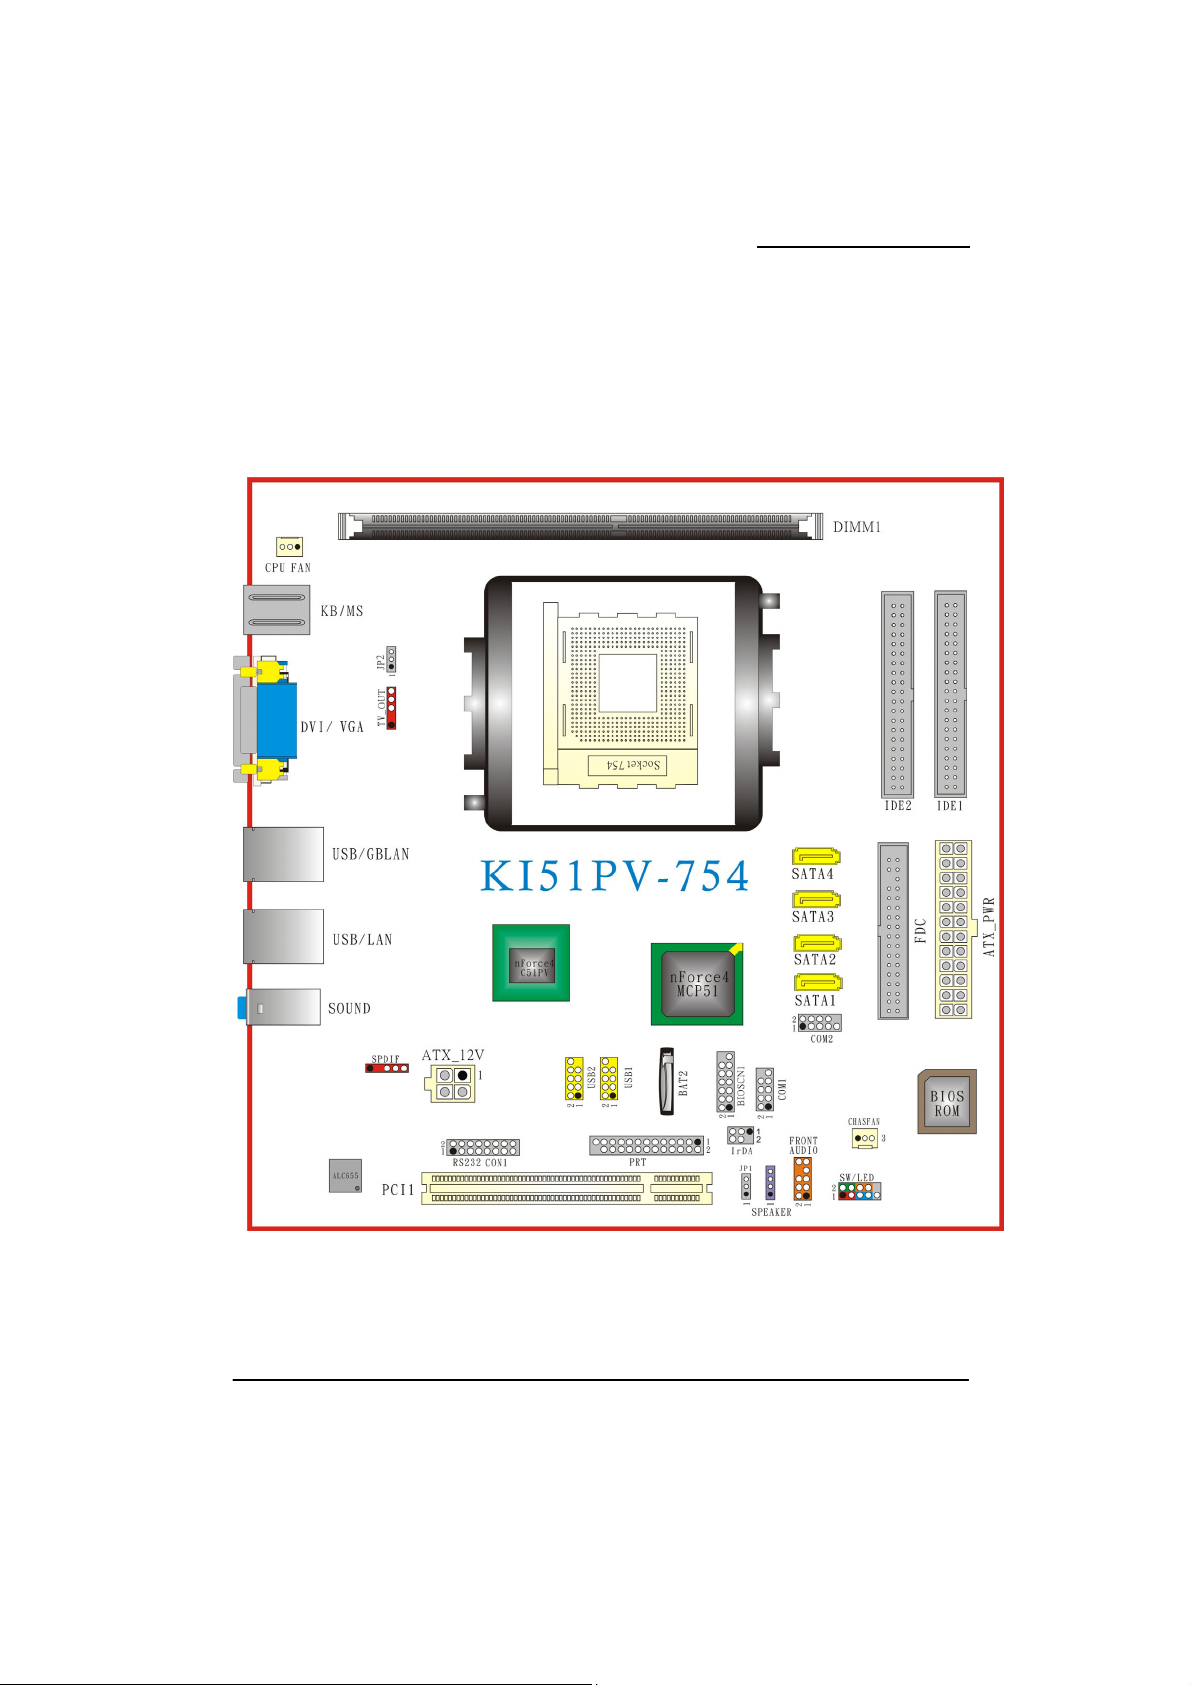
Layout of KI51PV-754 (Right Side)................................................................5
Layout of KI51PV-754 (Back Side) ................................................................6
HARDWARE INSTALLATION ................................................................................... 7
CPU Processor Installation.............................................................................. 7
Memory Installation: DIMM1.........................................................................8
Back Panel Configuration................................................................................ 9
Connectors..................................................................................................... 11
Front Panel Headers: SW/LED, SPEAKER.................................................. 12
Headers & Jumpers........................................................................................13
Audio Configuration......................................................................................17
Slots ...............................................................................................................18
Power Supply Attachments............................................................................ 19
CHAPTER 2. BIOS SETUP ........................................................... 20
INTRODUCTION..................................................................................................... 20
KEY FUNCTION.....................................................................................................20
MAIN MENU .........................................................................................................21
ADVANCED BIOS FEATURES..............................................................................23
INTEGRATED PERIPHERALS ................................................................................28
POWER MANAGEMENT ........................................................................................ 32
HARDWARE MONITOR .........................................................................................34
LOAD DEFAULTS..................................................................................................34
CHAPTER 3: SOFTWARE SETUP ................................................... 36
SOFTWARE LIST ...................................................................................................36
SOFTWARE INSTALLATION ...................................................................................36
CHAPTER 4: TROUBLESHOOTING................................................. 38
APPENDIX I: SUPER 5.1 CHANNEL AUDIO EFFECT SETUP....................................41
APPENDIX II: RAID SETUP...................................................................................42
APPENDIX III: ABS (ALBATRON BIOS SECURITY) CARD SETUP ........................50
Page 5

Mainboard KI51PV-754
Chapter 1. Getting Started
Introduction
Congratulations on choosing the KI51PV-754 Mainboard. It is based on the nVIDIA® nForce4
C51PV Northbridge chipset and the nVIDIA
possessing integrated graphics feature. The mainboard supports the AMD Athlon
Sempron
TM
®
nForce4 MCP51 Southbridge chipset; with
TM
64/
processor (The power consumption for the aforementioned processors must be
rated at 65W or less.) socket 754 with FSB (Front Side Bus) frequencies of 800 MHz (1600
MT/s).
The KI51PV-754 provides one DIMM (Dual In-Line Memory Modules) socket. It allows you
installing 184-pin, non-ECC and unbuffered DDR400 (PC3200)/ DDR333 (2700) SDRAM which
supports a total memory capacity of 1GB.
The mainboard provides one PCI slot for use with a graphics card or expansion cards which the
interfaces are compatible.
The KI51PV-754 provides one floppy disk drive connector that can be used with 360KB/
720KB/1.2MB/1.44MB/2.88MB drives. It also has two IDE connectors for hard drives supporting
Ultra ATA 66/100/133. In addition, the onboard Serial ATA II comes with four SATA II
connectors, which each interface can provide up to3 Gbps transfer rate and also support RAID
0/ 1/ 0+1/ JBOD/ 5 mode (See Appendix II).
Moreover, the KI51PV-754 provides onboard I/O facilities such as one VGA connector (=D-Sub
connector), one DVI connector, and a maximum of eight USB 2.0/ 1.1 ports that can be set.
Four headers are also available on this mainboard for a TV OUT connector, a printer connector,
and two COM connectors to be set externally with cables and used additionally.
The onboard AC’ 97 audio codec supports high quality 6-channel audio play (Super 5.1
Channel Audio Effect) (See Appendix I) and supports the Sony/Philips Digital Interfaces
(SPDIF) specifications (Optional).
This mainboard also comes with one onboard 10/100 Mbps and the other built-in 1 Gbps
Ethernet LAN chips. There are two LAN ports on the back panel of your computer case that you
can directly plug into an Internet cable.
In addition, this mainboard supports the ABS (Albatron BIOS Security) card (Optional), which is
a small circuit board inserted onto the mainboard providing full backup BIOS functionality in
case of BIOS failure or damage during the BIOS flash (See Appendix III).
All the information (including hardware installation and software installation) in this manual are
for reference only. The contents in this manual may be updated without notice. The company
will not assume any responsibility for any errors or mistakes within.
1
Page 6

Mainboard KI51PV-754
Specification
CPU:
z Supports Socket 754
z Supports AMD Athlon
aforementioned processors must be rated at 65W or less.)
z Supports Hyper-Transport
z Supports 800 MHz (1600 MT/s) FSB (Front Side Bus) Frequencies
Chipset:
z Northbridge Chipset – nVIDIA® nForce4 C51PV ( nVIDIA® GeForceTM 6150)
- Integrated nVIDIA
- Supports TV Encoder
- Supports 475 MHz Graphic Clock
- Supports MPEG-2 (DVD)/ WMV9 (HD-Video) Playback
- Supports Video Scaling
z Southbridge Chipset – nVIDIA
z I/O Controller – Winbond
z AC’ 97 Aduio Codec – Realtek
z Gbit LAN Controller – Marvell
z 10/100 Mbps LAN PHY – Marvell
TM
64/ SempronTM Processor (The power consumption for the
TM
Link Technology
®
Pure Video
®
W83627HF-AW
TM
Technology
®
nForce4 MCP51 ( nVIDIA® nForce 430)
®
ALC655
®
88E8056
®
88E8036
Memory:
z One DIMM socket with Dual Channel Technology supported, and also support a total
memory capacity of 1GB
z Supports to use 184-pin, non-ECC & unbuffered DDR400 (PC3200)/ DDR333
(PC2700) SDRAM
Slots:
z One PCI slot for expansion card
FDC Connector:
z Supports one connector for two floppy disk drives
z Supports 360KB/720KB/1.2MB/1.44MB/2.88MB
2
Page 7

Mainboard KI51PV-754
IDE Connector:
z Two IDE connectors, support up to four IDE devices can be set
z Supports Ultra ATA 66/100/133
z Supports high capacity hard disk drives
Serial ATA II Connector:
z Four SATA II connectors, support up to four SATA II HDDs can be set
z Supports SATA 2.0 specification and provides 3 Gbps transfer rate
z Supports RAID 0/1/ 0+1/ JBOD/ 5 mode
Onboard I/O facilities:
z One PS/2 mouse port and one PS/2 keyboard port
z One DVI connector
z One VGA connector (=D-Sub connector)
z One TV Out header, one IrDA header, one Printer header, one SPDIF header, and
two COM headers with cables externally are available to be set
Onboard USB Ports:
z Four onboard USB 2.0/ 1.1 ports
z Two front USB headers come with this mainboard for additional four USB ports
z Supports a maximum of eight USB ports can be set
Onboard AC’ 97 Audio CODEC:
z High performance CODEC with high S/N ratio (>90 db)
z Compliant with AC’ 97 2.3 specification
z Support 6-channel playback capability (Super 5.1 Channel Audio Effect)
z Support 3D stereo enhancement
z Support Sony/ Philips Digital Interfaces (S/PDIF) functionality
Onboard LAN Chip:
z Supports 10/100/1000 Mbps Ethernet LAN
z Supports nVIDIA
z Supports nVIDIA
®
Active Armor
®
Firewall
3
TM
which provides advanced data packet inspection
TM
to protect your system from hackers and viruses
Page 8

Mainboard KI51PV-754
BIOS:
z Phoenix-Award™ BIOS
z Supports APM 1.2
z Supports ACPI 2.0 power management
Green Function:
z Supports Phoenix-Award™ BIOS power management function
z Supports system-wake-from-power-saving-mode by keyboard or mouse touching
Shadow RAM:
z The onboard memory controller provides the shadow RAM functionality and ROM
BIOS functionality
Flash Memory:
z Supports flash memory functionality
z Supports ESCD funtionality
Hardware Monitor Function:
z Monitors CPU/ Chassis Fan Speed
z Monitors CPU and system temperatures
z Monitors system voltages
Watch Dog Timer:
z This function is used for detecting the system hangs during the POST stage due to
conflicts resulting from changing the system BIOS settings. Once the problem is
detected, the system will reset the configurations and reboot the system within five
seconds.
ABS (Albatron BIOS Security):
z Supports ABS Card (Optional)
z Supports BIOS backup
4
Page 9
Configuration
Layout of KI51PV-754 (Right Side)
Mainboard KI51PV-754
5
Page 10
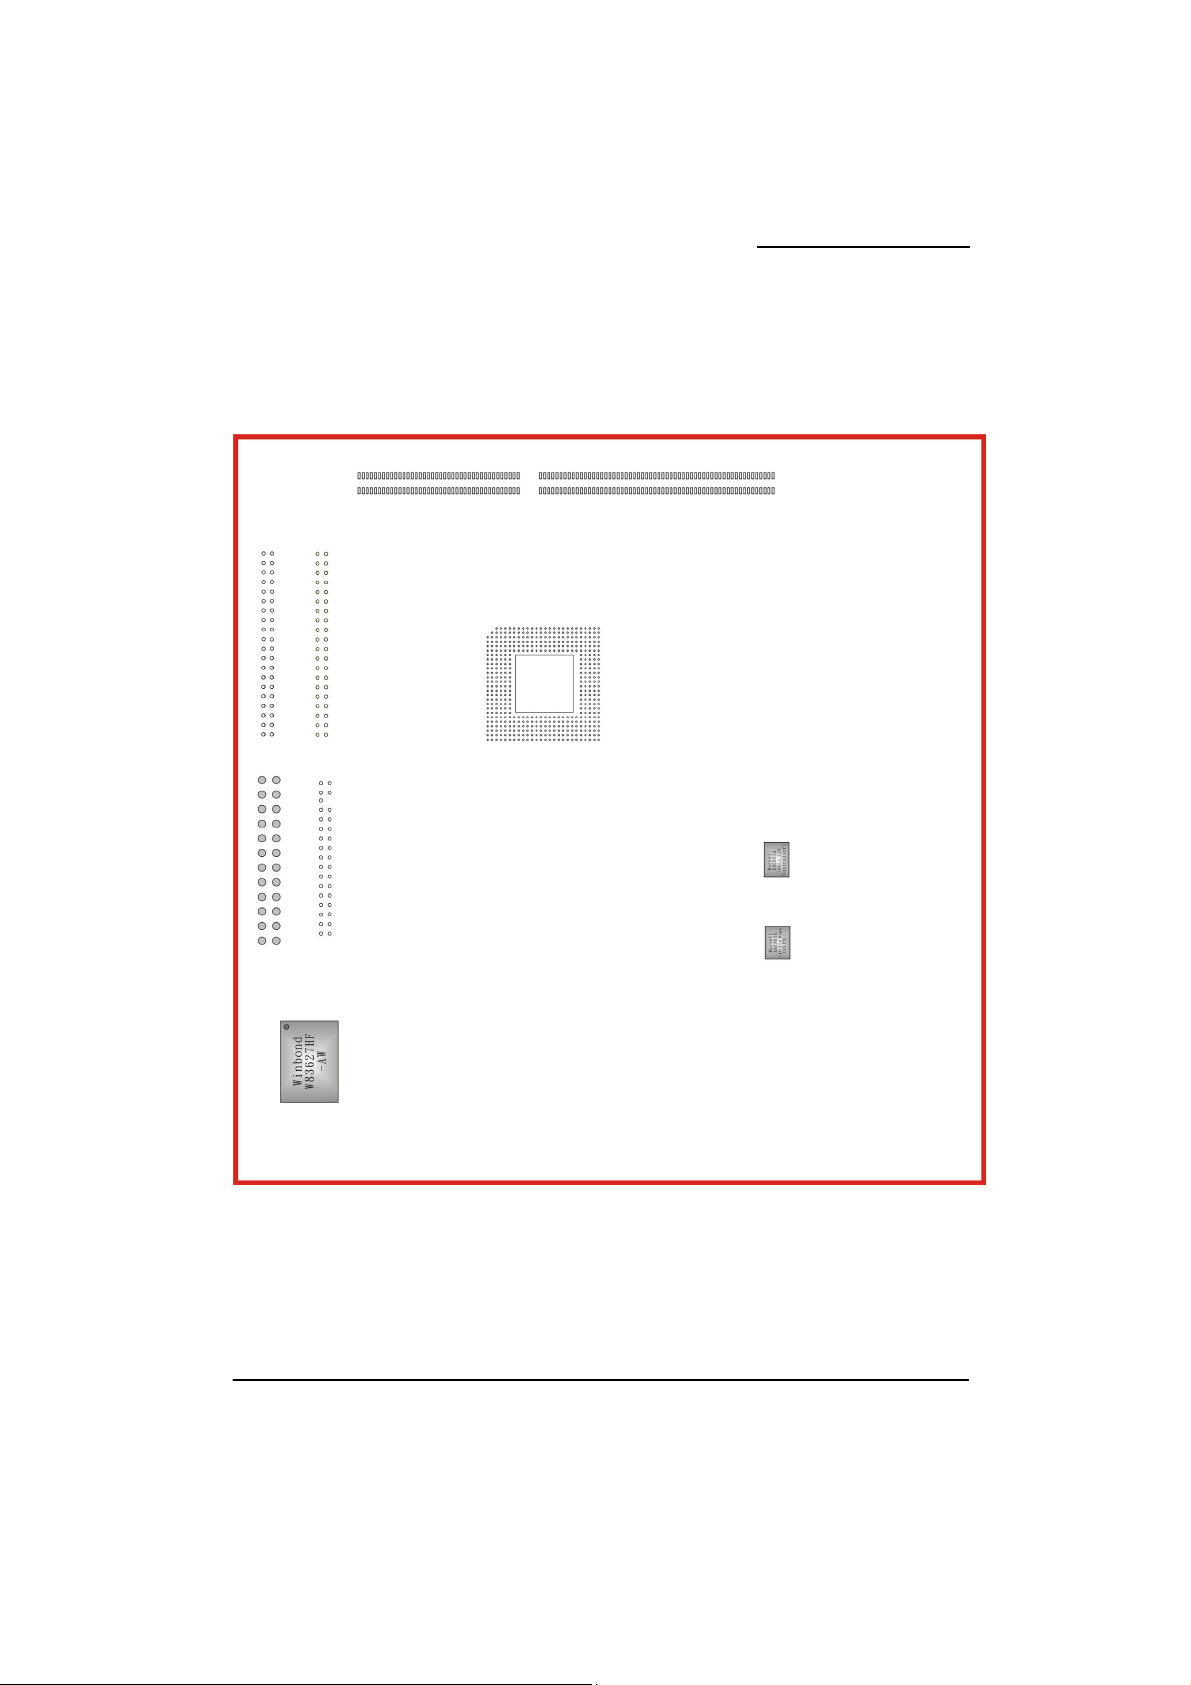
Layout of KI51PV-754 (Back Side)
Mainboard KI51PV-754
6
Page 11
Mainboard KI51PV-754
Hardware Installation
This section will assist you in quickly installing your system hardware. Wear a wrist ground strap
before handling components. Electrostatic discharge may damage your system components.
CPU Processor Installation
This mainboard supports AMD AthlonTM 64/ SempronTM processor using Socket 754. Before
building your system, we suggest you visit the AMD website and review the processor
installation procedures. http://www.amd.com
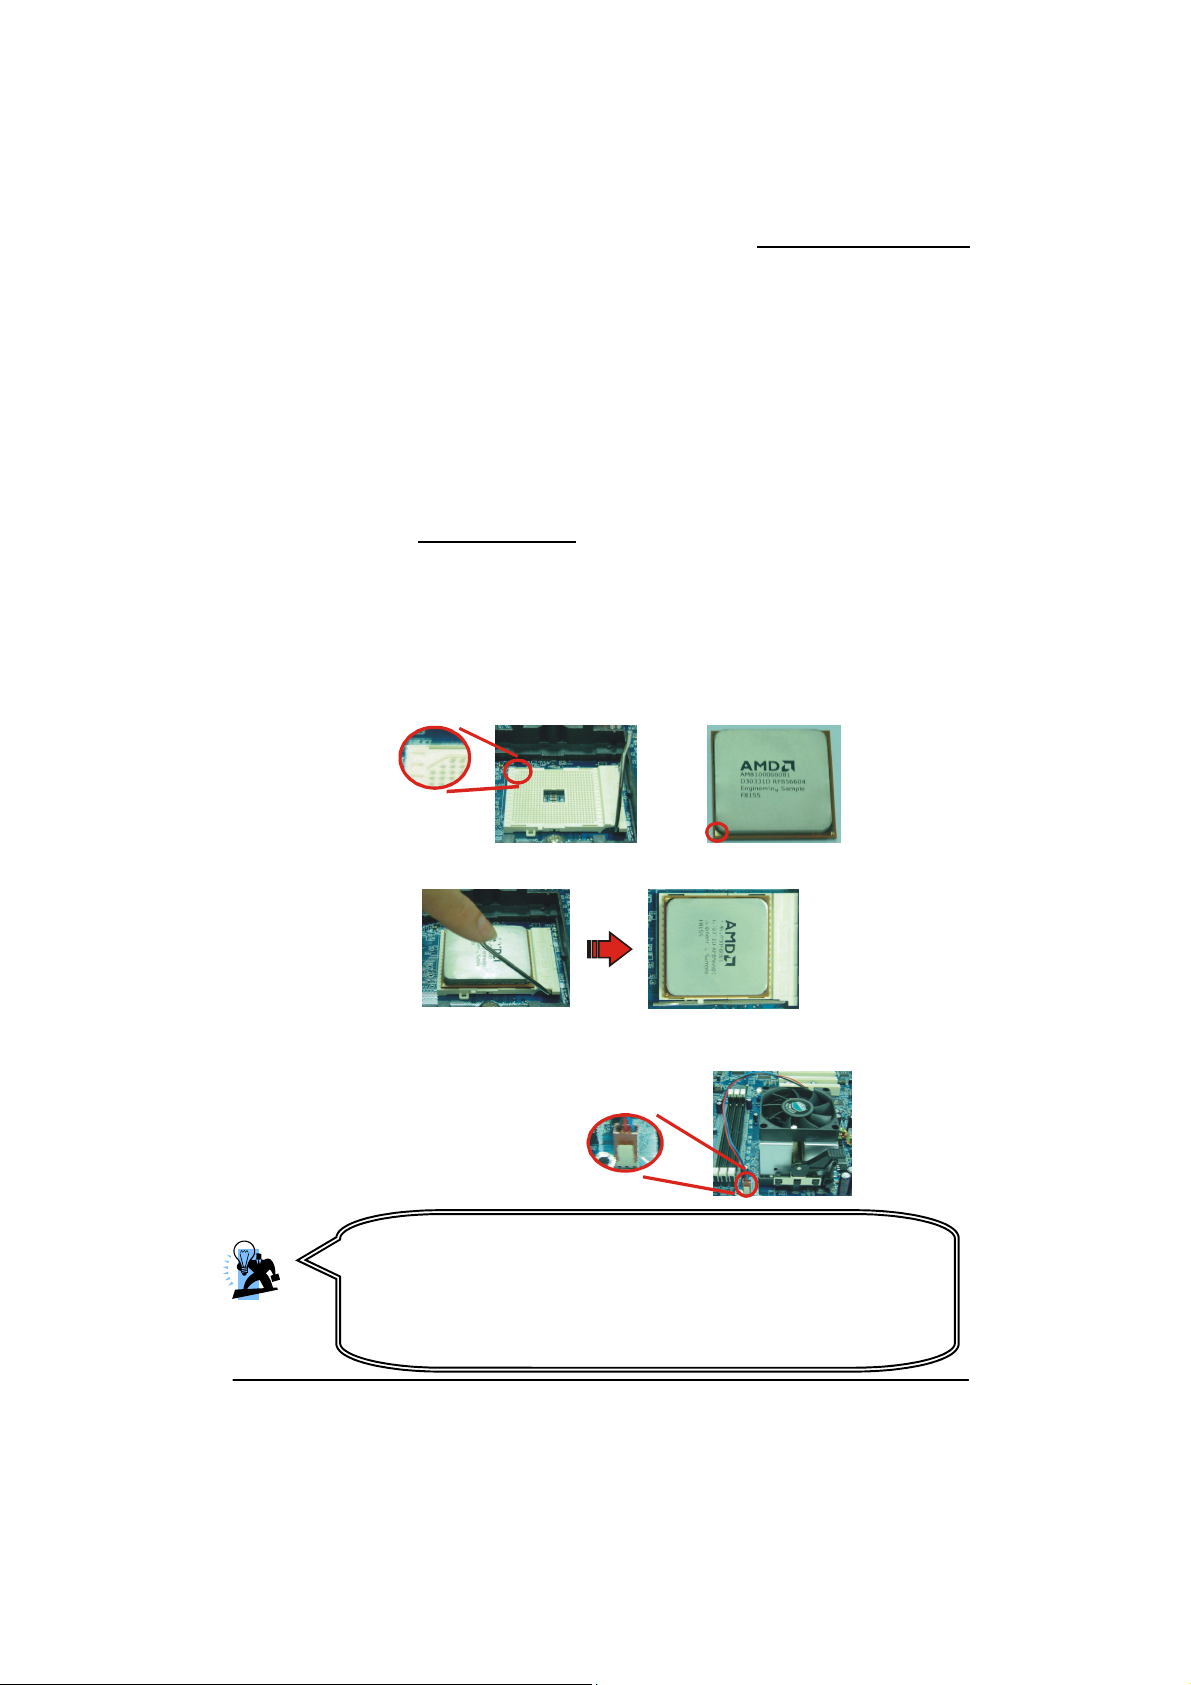
CPU Socket 754 Configuration Steps:
1. Locate the CPU socket on your mainboard and nudge the locking lever away from the
socket. Then lift the lever to a 90-degree angle.]
2. On the socket, locate the corner which has the “diagonally cut-corner” on the rectangular
shaped pattern of pinholes (see diagram below-left). Match that corner with the “gold
triangle” on the CPU (see diagram below-right) and lower the CPU onto the socket. The
bottom of the CPU should be flush with the face of the socket.
Diagonally
Cut-corner
3. Lower the lever until it snaps back into position. This will lock down the CPU.
4. Smear thermal grease on top of the CPU. Lower the CPU fan onto the CPU and use the
clasps on the fan to attach it to the socket. Finally, extend the power cable from the fan and
insert it onto the “CPUFAN” adapter.
Attention
DO NOT touch the CPU pins in case they are damaged. Also, make sure
that you have completed all installation steps before powered on the
system. Finally, double-check that the cooling fan is properly installed
and the CPU fan power cord is securely attached, in case your CPU and
other sensitive components are damaged because of high temperatures.
Gold triangle
7
Page 12

Mainboard KI51PV-754
FAN Headers: CPUFAN, CHASFAN
There are two fan headers available for cooling fans. The cooling fans play an important role in
maintaining ambient temperatures in your system. The CPUFAN header is attached with a CPU
cooling fan. The CHASFAN header is attached with other cooling fans.
Memory Installation: DIMM1
1
CPUFAN/ CHASFAN
Attention
You can avoid damaging your CPU due to high temperatures with
proper cooling equipment. It is recommended that attach a cooling fan
on top of your CPU. Use the CPUFAN header to attach the fan cord.
On most fan power cord, the black wire of the fan cable is the “ground”
and should be attached to pin-1 of the header.
Pin Assignment
1 Ground
2 Power (+12V)
3 FAN RPM rate sense
The KI51PV-754 provides one DIMM (Dual In-Line Memory Modules) socket. It allows you to
install 184-pin, non-ECC & unbuffered DDR400 (PC3200)/ DDR333 (PC2700) SDRAM that
supports a total memory capacity of 1GB.
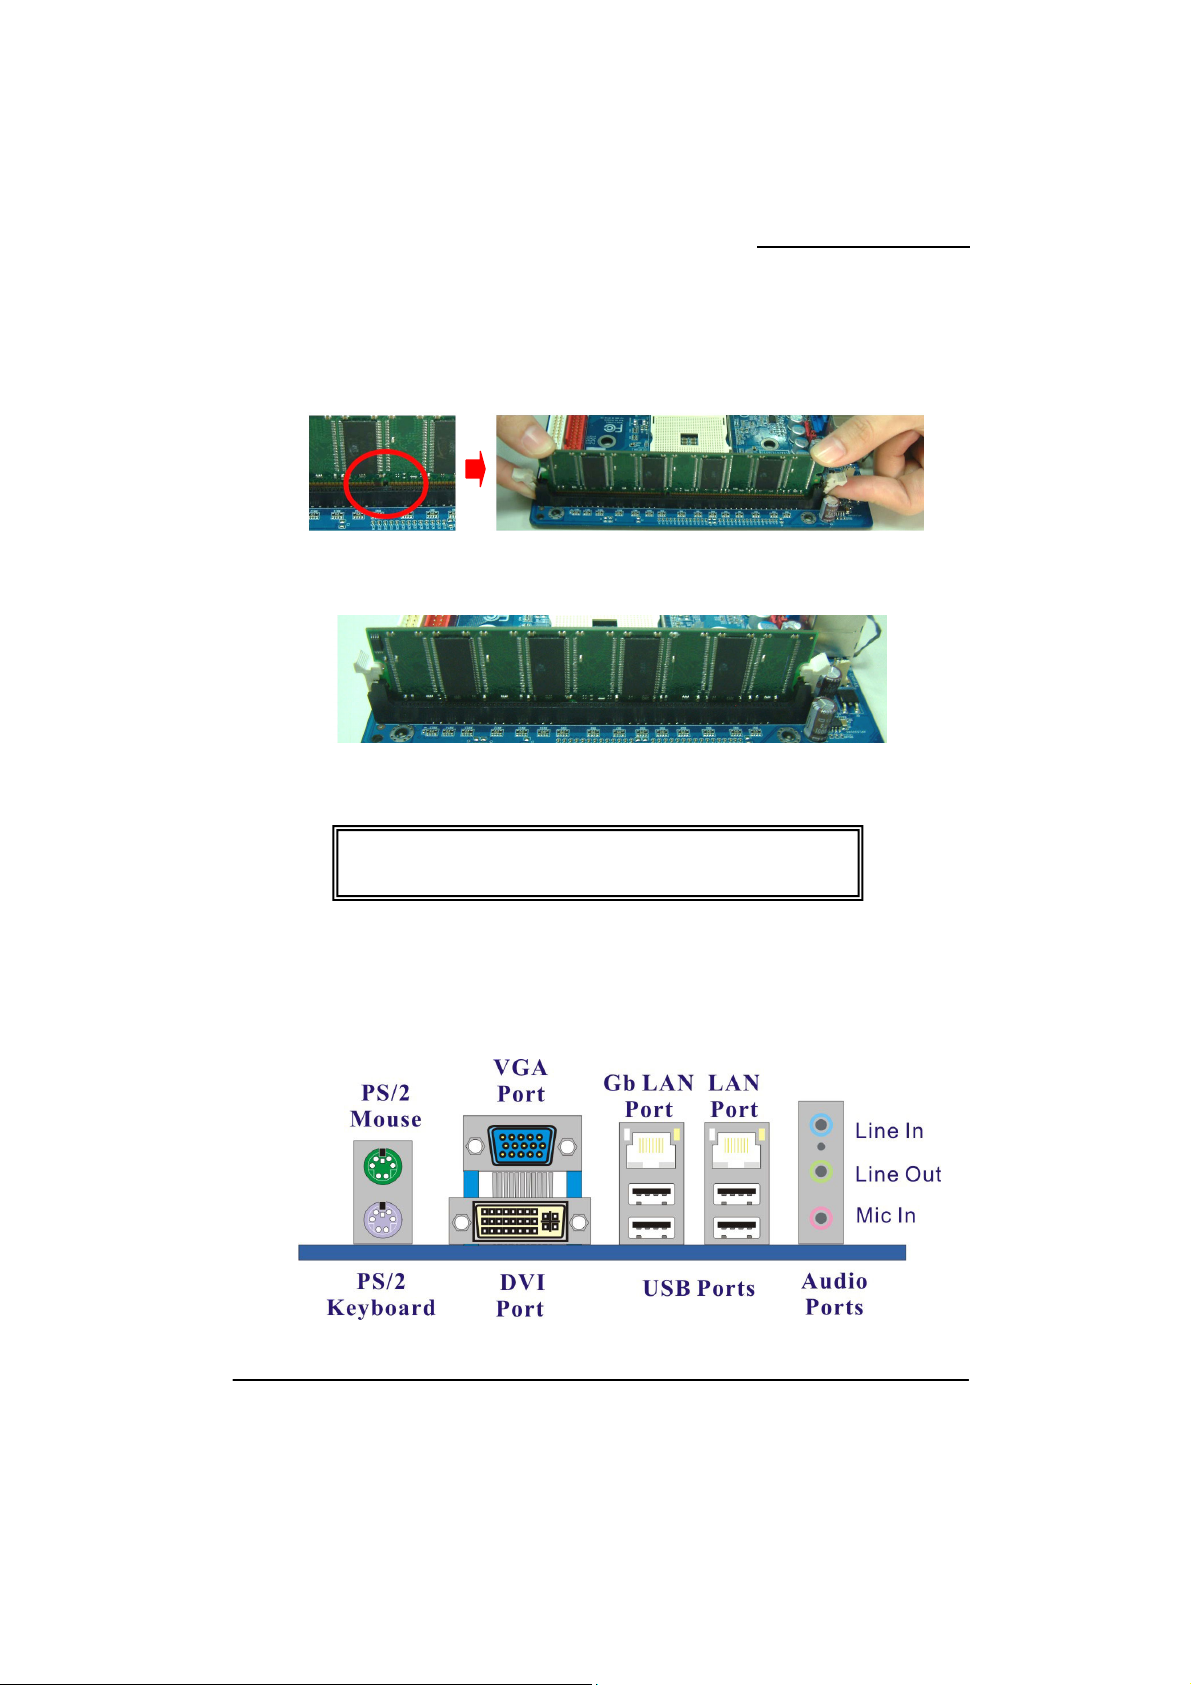
Memory Setup Steps:
1. Pull the white plastic tabs at both ends of the socket away.
8
Page 13
Mainboard KI51PV-754
2. Align a memory on the socket such that the notch on the memory matches the break on the
socket.
3. Lower the memory vertically into the socket and press firmly by using both thumbs until the
memory snaps into place.
4. Repeat steps 1, 2 & 3 for the remaining memory and DIMM sockets setup.
Back Panel Configuration
* The pictures shown above are for reference only. The actual
installation may vary depending on models.
9
Page 14
Mainboard KI51PV-754
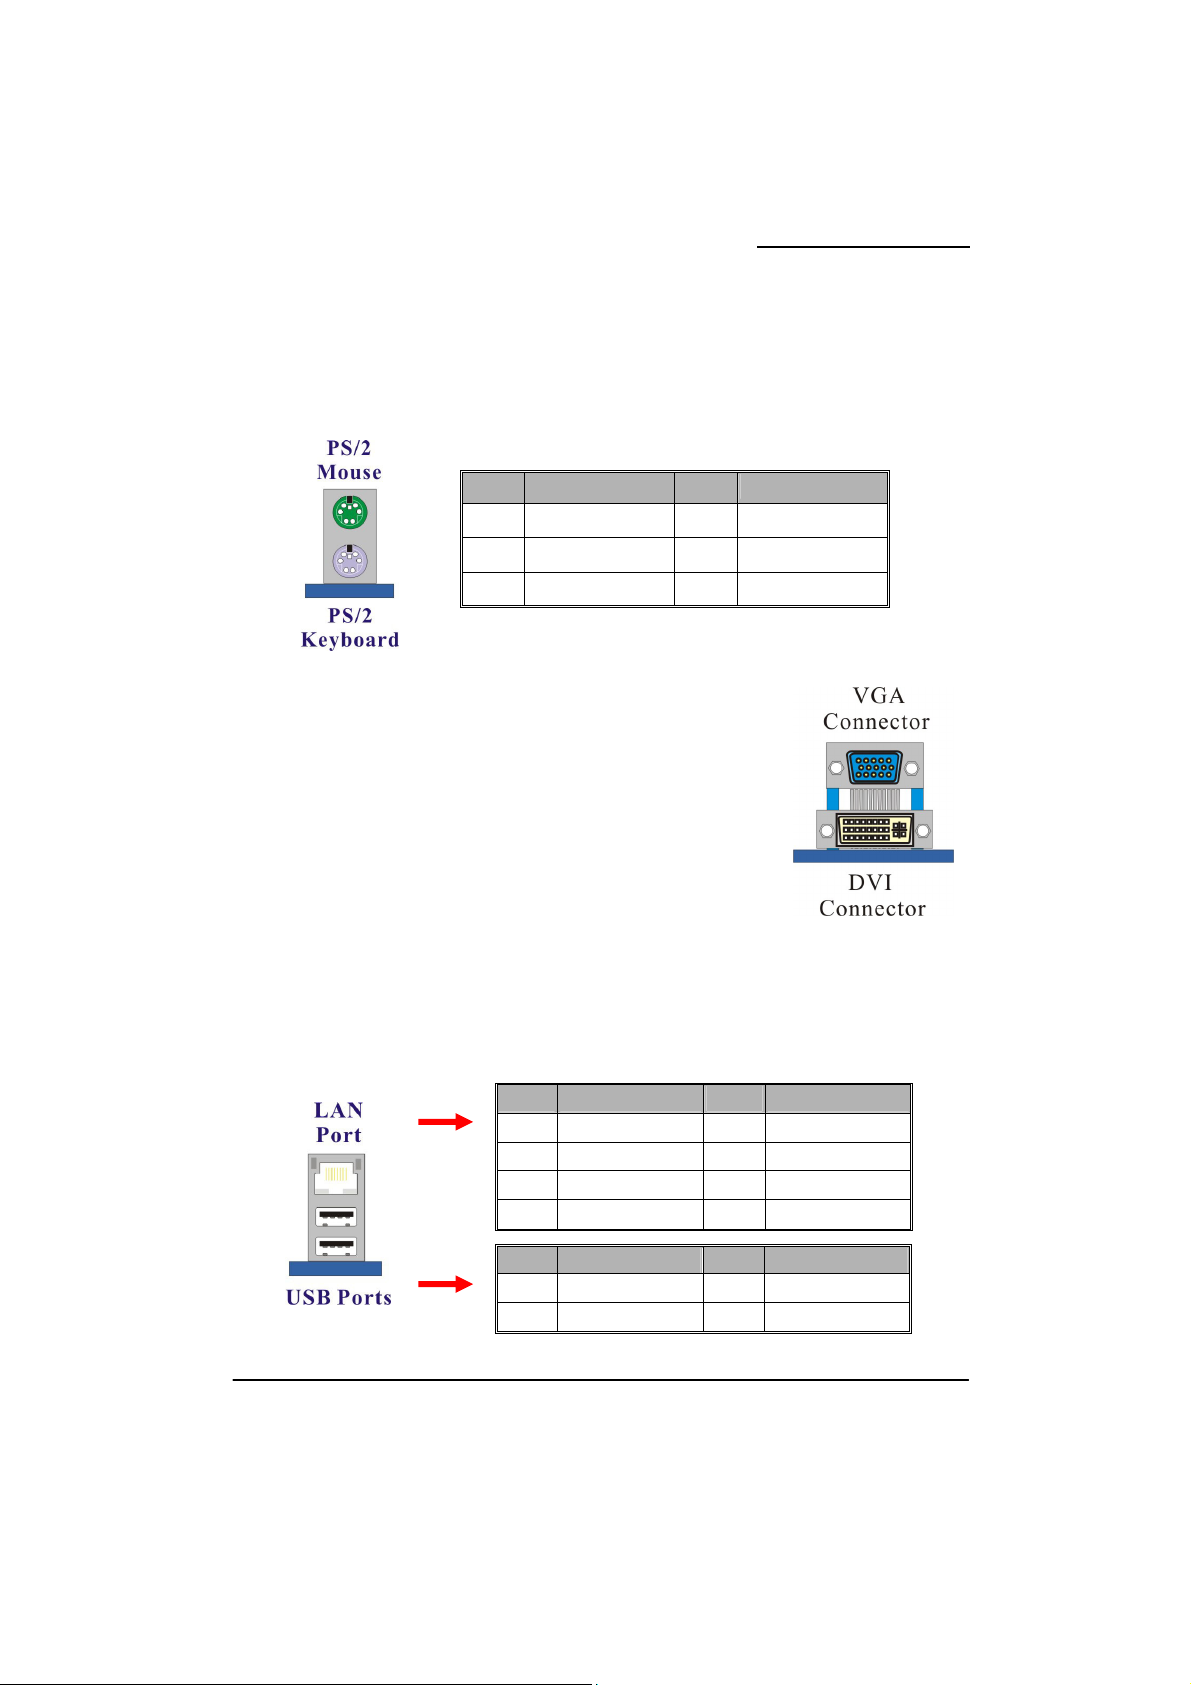
PS/2 Mouse & PS/2 Keyboard Ports: KB/MS
This mainboard provides a standard PS/2 mouse port and a PS/2 keyboard port. The pin
assignments are described below.
DVI & VGA Connectors: DVI, VGA
Pin Assignment Pin Assignment
1 Data 4 +5 V (fused)
2
3
N/A
Ground
5
6
Clock
N/A
The mainboard provides one DVI connector and one VGA connector
on the back panel of the computer case.
DVI connector delivers the digital signals, and is able to connect with
LCD display, plasma display, or other display device which with the
DVI interface compatible.
VGA connector (= D-Sub connector) delivers the analogy signals, and
is able to connect with traditional CRT display, flat display, or other
display device which with the D-Sub interface compatible.
USB & LAN Ports: USB1, USB2, USB/LAN
There are four onboard USB 2.0/ 1.1 ports on the back panel. These USB ports are used to
attach with USB devices, such as keyboard, mice and other USB supported devices. There are
also one 10/100 Mbps and one 1Gbps Ethernet LAN ports available for you to attach an internet
cable.
Pin Assignment Pin Assignment
1
2
3
4
TX+ (TX+)
TX- (TX-)
RX+ (RX+)
NC (TRD2+)
5
6
7
8
NC (TRD2-)
RX- (RX-)
NC (TRD3+)
NC (TRD3-)
Pin Assignment Pin Assignment
1/5
2/6
+5 V (fused)
USBP0-/P1-
3/7
4/8
USBP0+/P1+
Ground
10
Page 15
Mainboard KI51PV-754
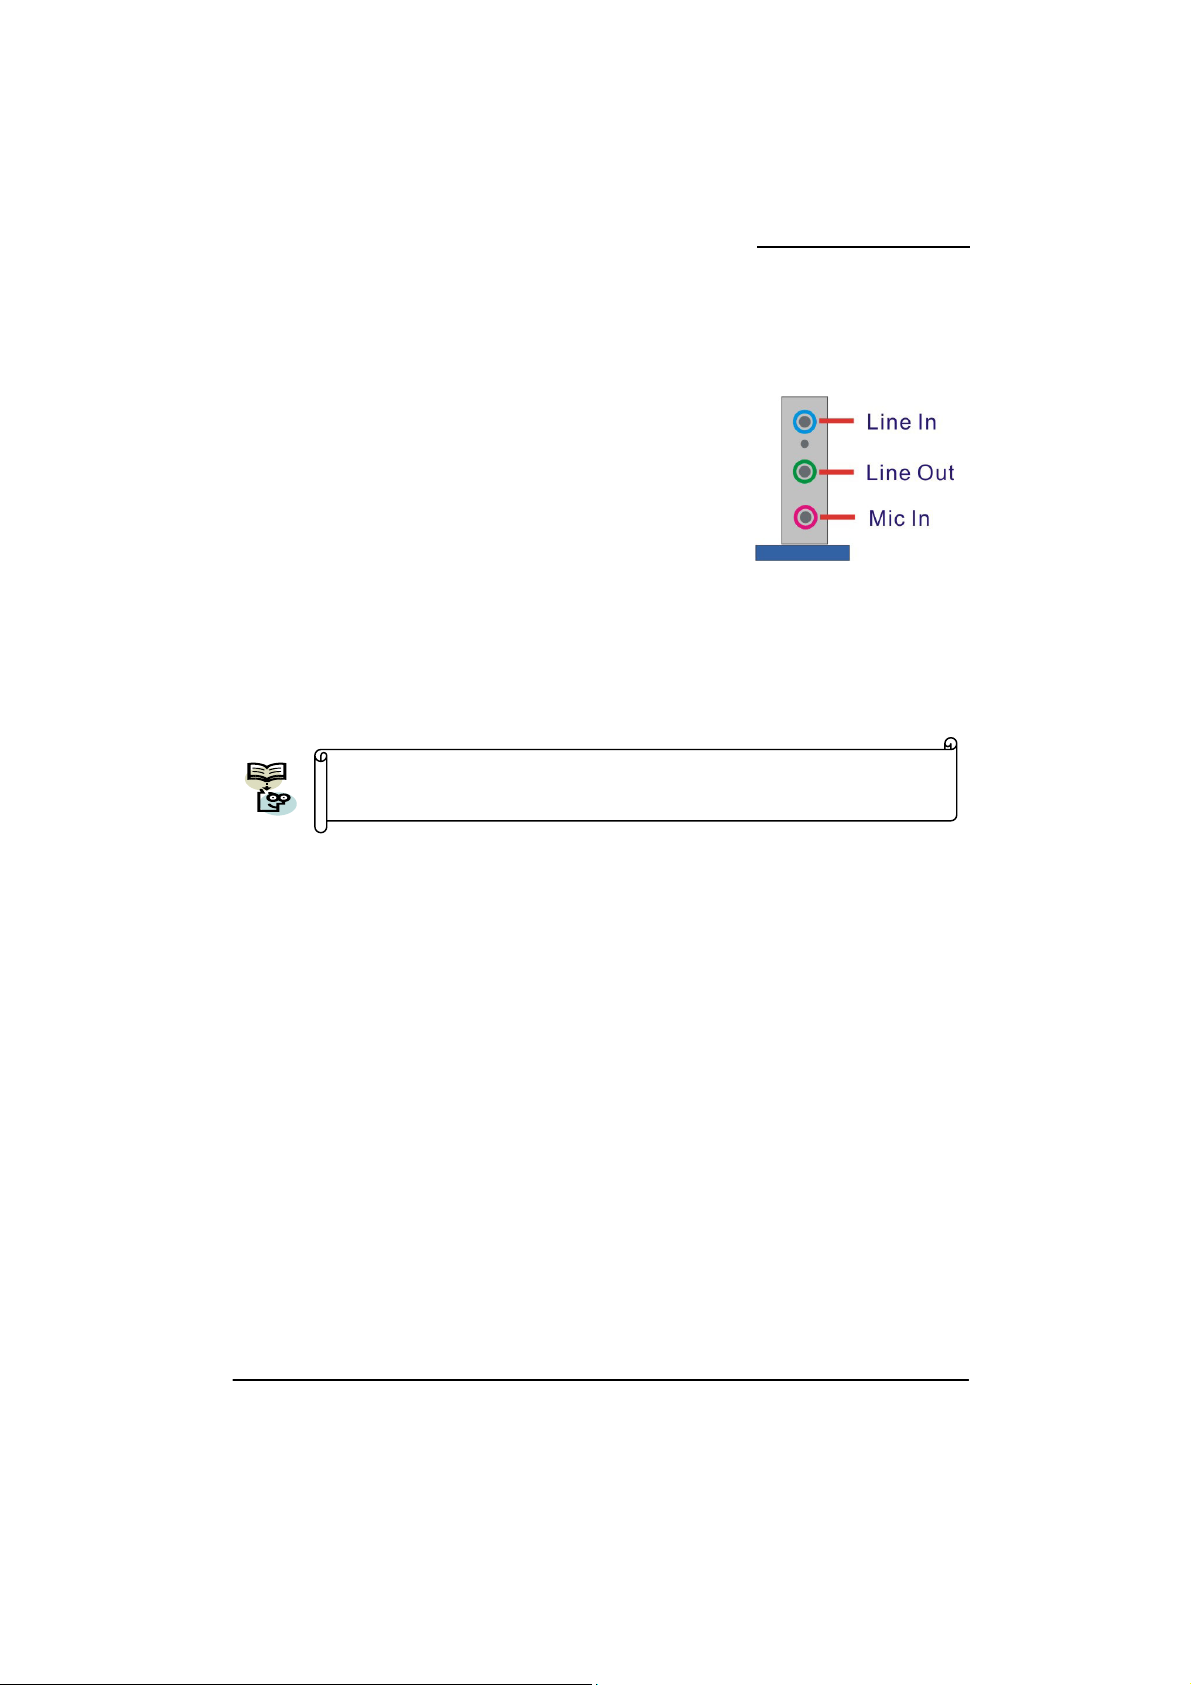
Audio Ports: Sound
This mainboard provides three audio ports, the Mic-in, Line-in
and Line-out. These are the standard audio ports that provide
basic audio function.
Line-In (Blue)
This port is for audio input and connects to external audio
devices such as CD player, tape player, etc. When the Super 5.1
Channel Audio Effect is enabled, this port will output audio for the
rear speakers.
Line-Out (Green)
This port is an output audio port used for connecting to speakers or a headset. When the Super
5.1 Channel Audio Effect is enabled, this port will output audio for the front speakers.
Mic-In (Pink)
This port is for connecting to a microphone. When the Super 5.1 Channel Audio Effect is
enabled, this port will output audio for your subwoofer/center speakers.
Connectors
Floppy Disk Drive Connector: FDC
This mainboard supports Super 5.1 Channel Audio Effect, and you can
transfer 2-channel to 6-channel audio by using a SPDIF Card (Optional) to
enable 6 speaker audio. See Appendix I for more information.
The mainboard provides a standard floppy disk drive connector (FDC) that supports 360KB/
720KB/1.2MB/1.44MB/2.88MB floppy disk drives using a FDD ribbon cable.
Hard disk drive Connectors: IDE1/IDE2
The mainboard provides two IDE connectors that support Ultra ATA 66/100/133 IDE devices.
You can attach a maximum of four IDE devices, such as hard disk drive (HDD), CD-ROM,
DVD-ROM, etc. using IDE ribbon cables.
Primary IDE Connector: IDE1
In general, two IDE devices can be attached onto one IDE connector. If you attach two IDE
HDDs, you must configure one drive as the master and the other one as the slave.
Secondary IDE Connector: IDE2
The IDE2 connector can also be attached with two IDE HDDs, and remember to configure one
drive as the Master and the other one as the Slave as well. In addition, it is recommended that
attach the optical devices such as CD-ROM, DVD-ROM, etc. onto this IDE2 connector.
11
Page 16
Mainboard KI51PV-754
SATA II Connector: SATA1/SATA2/SATA3/SATA4
The four SATA II connectors support 3 Gbps transmit rate and RAID 0/1/ 0+1/ JBOD/ 5 mode.
One SATA II connector only can attach one SATA II HDD of each time using SATA cables.
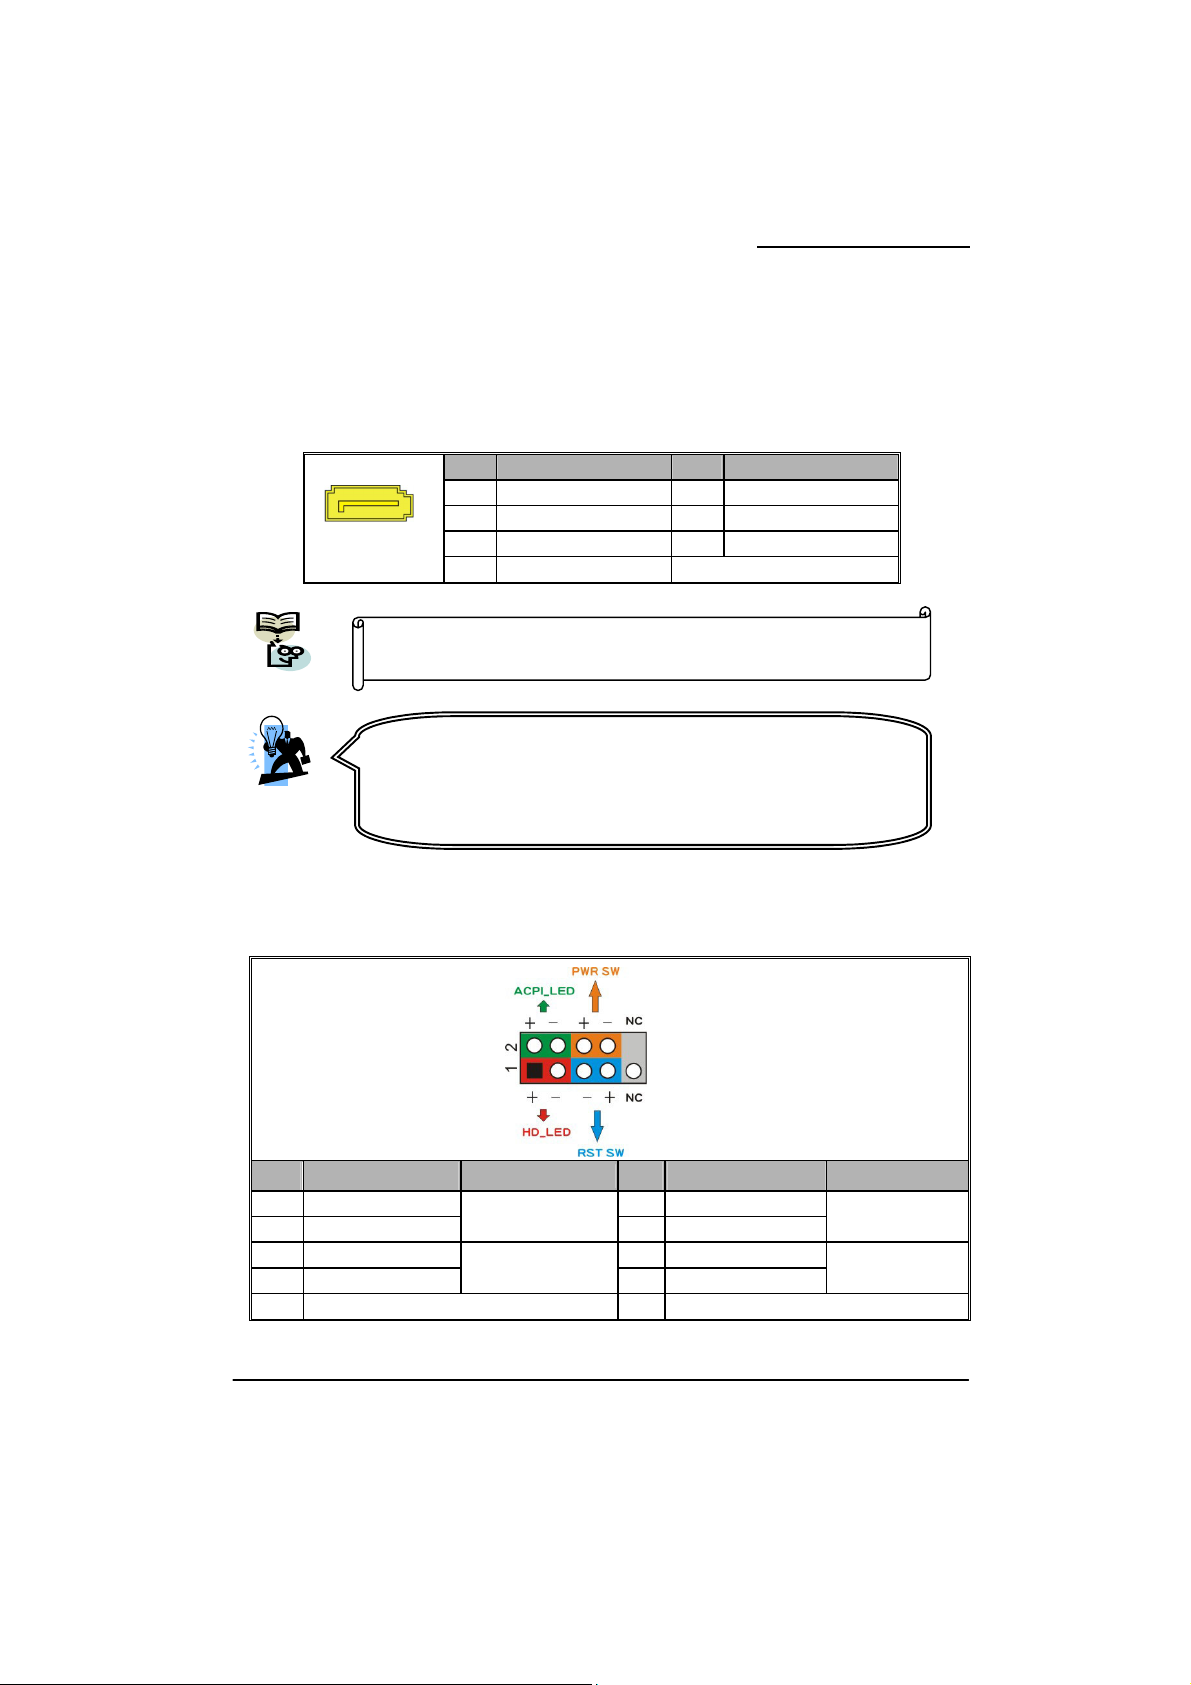
Front Panel Headers: SW/LED, SPEAKER
SATA1~4
This mainboard supports RAID 0/1/0+1/JBOD/5 modes, refer
Appendix II for more information.
Attention
The FDC/ IDE cable is designed and should be attached with a
specific direction. One edge of the cable will usually in color such
as red, to indicate that should line up with the header pin-1.
Pin Assignment Pin Assignment
1 Ground 2 TX+
1
3 TX- 4 Ground
5 RX- 6 RX+
7 Ground
SW/LED
Pin Assignment
1 HDD LED (+) 2 Power LED (+)
3 HDD LED (-)
5 Reset Control (-) 6 Power Switch (+)
7 Reset Control (+)
9 N/A 10 N/A
Function
Hard Drive LED
(HD_LED)
Reset Switch
(RST_SW)
Pin Assignment
4 Power LED (-)
8 Power Switch (-)
Function
Power LED
(ACPI_LED)
Power-on Switch
(PWR_SW)
12
Page 17
Mainboard KI51PV-754
Hard Drive LED Header (Red): HD_LED
If your case front panel has a hard drive LED cable, attach it to this header. The LED will flicker
when there is hard disk drive activity.
Reset Switch Header (Blue): RST_SW
This header can be attached to a momentary SPST switch (reset button) cable on your case
front panel. The switch is normally left open. When the switch closed, it will cause the
mainboard to reset and run the POST (Power-On Self Test).
Power-on Switch Header (Orange): PWR_SW
This header can be attached to a power switch cable on your case front panel. You can turn
your system on or off by pressing the button attached to this power switch cable.
Power LED Header (Green): ACPI_LED
Attach the power LED cord from the case front panel onto this header, then the power LED will
illuminate while the system is powered on.
Speaker Header (Purple): SPEAKER
A speaker cable on your case front panel can be attached to this header. When you reboot the
computer, this speaker will issue a short audible (beep). If there are problems during the Power
On Self-Test, the system will issue an irregular pattern of audible beeps through this speaker.
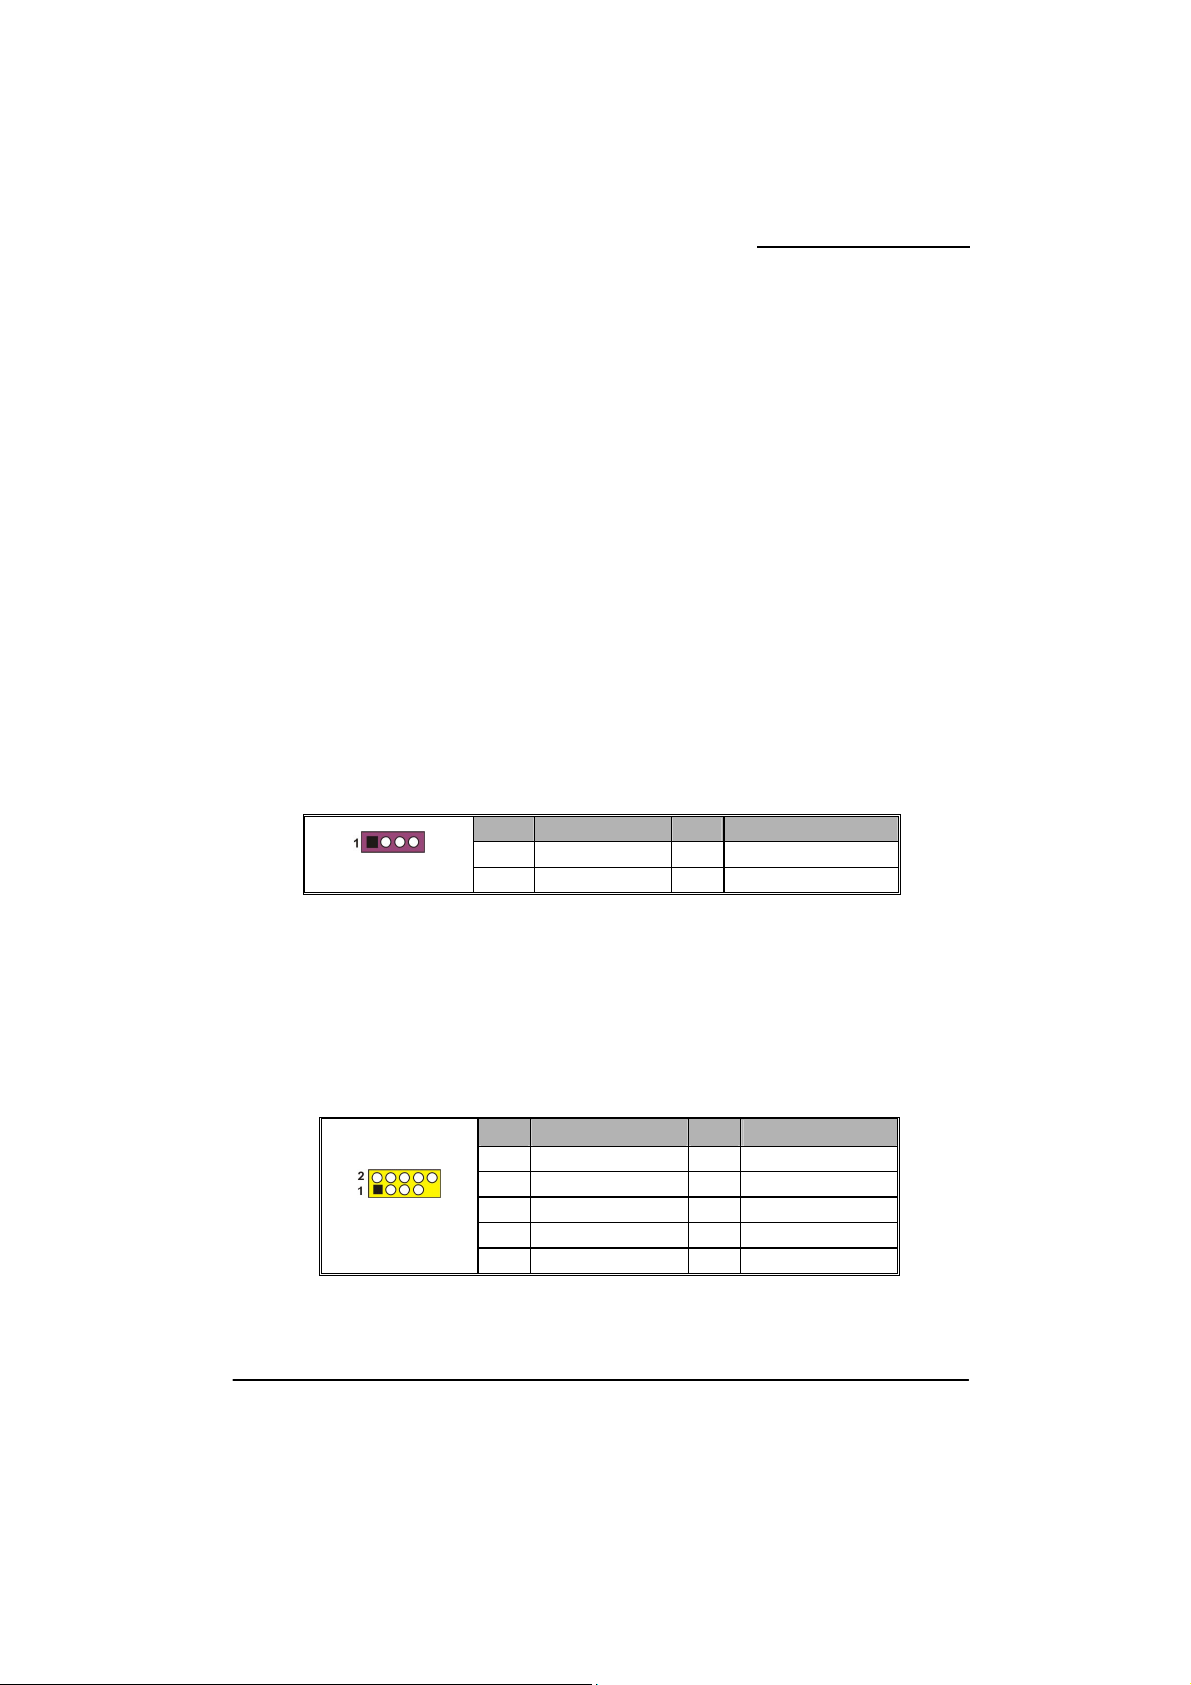
Headers & Jumpers
Front USB Header: USB1/2
This mainboard provides four onboard USB 2.0/1.1 ports (back panel) that attach to USB
devices. There are two additional USB headers that can be connected by cables to four more
USB ports on the front panel of your case giving you a maximum of eight USB ports.
SPEAKER
USB1/2
1 PC_BEEP 2 N/A
3 Ground 4 +5V
Pin Assignment Pin Assignment
1 +5V 2 +5V
Pin Assignment Pin Assignment
3 USB- 4 USB5 USB+ 6 USB+
7 Ground 8 Ground
9 Key 10 N/A
13
Page 18

Mainboard KI51PV-754
Attention
If you are using a USB 2.0 device with Windows 2000/ XP, you will
need to install the USB 2.0 driver from the Microsoft
TV OUT Header: TV_OUT
are using Service pack 1 (or later) for Windows
Service pack 4 (or later) for Windows® 2000, you will not have to
install the driver.
Attach the TV OUT cable (Optional) which the product provided onto this header. Then through
attaching the cable of TV devices onto the S-Video connector of TV out cable, the TV is able to
use as a monitor display.
TV_OUT
Pin Assignment Pin Assignment
1 Ground 2 Key
3 PB OUT 4 C OUT
5 Y OUT
IrDA Header: IrDA
S-Video Connector
The infrared sensing device attached to this header can support to provide wireless infrared.
You can transfer data connectionless to or from the portable device (i.e., laptop, PDA, etc.)
which with this header attached.
IrDA
Pin Assignment Pin Assignment
1 N/A 2 Key
3 Ground 4 +5V
5 IR_RX 6 IR_TX
®
website. If you
®
XP, and using
14
Page 19

Mainboard KI51PV-754
Serial Interface Header: COM1/COM2
This mainboard provides two COM headers for you to connect external serial connectors on the
back panel of your case. Attaching the serial connector cables (Optional) onto these two
headers, then you can use the serial connectors to attach with a mic, modem or other peripheral
devices.
Pin Assignment Pin Assignment
1 RIN1 2 RIN3
3 DOUT2 4 DOUT3
COM1/2
5 Ground 6 RIN2
7 DOUT1 8 RIN4
Printer Interface Header: PRT
9 -XRI1 10 N/A
This mainboard provides a PRT header for you connecting an external printer connector on the
back panel of your case. Attaching the printer connector cable (Optional) onto this header, then
you can use this printer connector to attach with a printer.
Pin Assignment Pin Assignment
1 RSTB- 2 RPDR0
3 RPDR1 4 RPDR2
5 RPDR3 6 RPDR4
7 RPDR5 8 RPDR6
9 RPDR7 10 ACK11 BUSY 12 PE
13 SLCT 14 RAFD15 ERR- 16 RINIT_P17 RSLIN- 18 Ground
PRT
19 Ground 20 Ground
21 Ground 22 Ground
23 Ground 24 Ground
25 Ground 26 Key
15
Page 20

Mainboard KI51PV-754
USB Power Selection Header: JP2
USB devices attached to USB ports of the back panel can awaken the system from sleep mode.
In order to enable this functionality, you must adjust the jumper caps on JP2 header for +5V or
+5VSB mode depending on which USB port that the USB device is attached to.
JP2 Assignment Assignment
S1 sleep mode (CPU stopped, DRAM
1
Pin 1-2 Close
+5V
refreshed, system running in low power
mode)
S3/S4/S5 sleep modes (no power to
1
Pin 2-3 Close
Note: Close stands for putting a jumper cap onto two header pins.
Clear CMOS Jumper: JP1
+5VSB
CPU, DRAM in slow refresh, power
supply in reduced power mode)
The “Clear CMOS” function is used when you are unable boot your system and need to reset
the BIOS settings (CMOS settings) back to the manufacturer’s original settings. This is also a
way to reset the system password if you have forgotten it.
JP1 Assignment
Pin 1-2 Close
Pin 2-3 Close
Note: Close stands for putting a jumper cap onto two header pins.
The following steps explain how to reset your CMOS
configurations when you forgot a system password.
1. Turn off your system and disconnect the AC power cable.
2. Set JP1 header to OFF (2-3 Closed).
3. Wait several seconds.
4. Set JP1 header to ON (1-2 closed).
5. Connect the AC power cable and turn on your system.
6. Reset your new password.
Normal (Default)
Clear CMOS Data
16
Page 21

Mainboard KI51PV-754
Audio Configuration
SPDIF Header: SPDIF (Optional)
S/PDIF is a recent audio transfer file format, which provides high quality audio using optical fiber
and digital signals. This mainboard is capable to deliver audio output and receive audio input
through a SPDIF Card (Optional) with this header attached. You can just simply set the SPDIF
Card on your case back panel, and attach the SPDIF cord and FRONT AUDIO cord onto
specific headers on the mainboard. The RCA or TOS-Link connectors will be provided on the
SPDIF Card and which are convenient you to output or input audio format files between your
system and the SPDIF styled devices.
Front Audio Connector: FRONT AUDIO
If your case front panel has audio ports, you can connect them to the Front Audio Header of this
mainboard. First, you must remove the jumper caps on this header and then attach the cables
from the front panel to the pins on this header. You can use both the front audio panel and back
panel audio simultaneously. If you are not using front panel audio ports, leave the jumper caps
on the header pins (Note: pins 5&6 and 9&10) to avoid problems with the back panel audio
ports.
SPDIF
Pin Assignment Pin Assignment
1 +5V 2 Key
3 SPDIF out 4 Ground
5 SPDIF in
17
Page 22

Mainboard KI51PV-754
FRONT AUDIO
Pin Assignment Pin Assignment
1 Mic in/center 2 Ground
3 Mic_VREF 4 Audio power +5V
5 Front out_R 6 Rear out_R
7 N/A 8 Key
9 Front out_L 10 Rear out_L
Slots
PCI Slot: PCI1
PCI stands for Peripheral Component Interconnect, which is a bus standard for installing
expansion cards such as network card, SCSI card, etc. to these PCI slots.
18
Page 23

Mainboard KI51PV-754
Power Supply Attachments
ATX Power Connector: ATX_PWR, ATX_12V
This mainboard provides two ATX power connectors, a 24-pin ATX_PWR connector and a 4-pin
ATX_12V connector. You must use a power supply that has both of these connectors and
both connectors must be attached before the system is powered on. These power connectors
support several power management functions such as the instant power-on function. The
connector pins are described below.
ATX_PWR
Pin Assignment Pin Assignment
1 +3.3V 13 +3.3V
2 +3.3V 14 -12V
3 Ground 15 Ground
4 +5V 16 PS_ON
5 Ground 17 Ground
6 +5V 18 Ground
7 Ground 19 Ground
8 PW_ON 20 -5V
9 +5V standby voltage 21 +5V
10 +12V 22 +5V
11 +12V 23 +5V
12 +3.3V 24 Ground
Pin Assignment Pin Assignment
1 Ground 3 +12V
ATX_12V
Attention
In general, power cords are designed and should be attached with a
specific direction. The black wire of the power cord is Ground and
should be attached onto the header location of Ground.
2 Ground 4 +12V
19
Page 24

Chapter 2. BIOS Setup
Mainboard KI51PV-754
Introduction
This section describes PHOENIX-AWARD™ BIOS Setup program which resides in the BIOS
firmware. The Setup program allows users to modify the basic system configuration. The
configuration information is then saved to CMOS RAM where the data is sustained by battery
after power-down.
The BIOS provides critical low-level support for standard devices such as disk drives, serial
ports and parallel ports. As well, the BIOS control the first stage of the boot process, loading
and executing the operating system.
The PHOENIX-AWARDTM BIOS installed in your computer system’s ROM is a custom version
of an industry standard BIOS. This means that it supports the BIOS of AMD based processors.
This version of the PHOENIX-AWARDTM BIOS includes additional features such as virus and
password protection as well as special configurations for fine-tuning the system chipset. The
defaults for the BIOS values contained in this document may vary slightly with the version
installed in your system.
Key Function
In general, you can use the arrow keys to highlight options, press <Enter> to select, use the
<PgUp> and <PgDn> keys to change entries, press <F1> for help and press <Esc> to quit. The
following table provides more detail about how to navigate within the BIOS Setup program.
Keystroke Function
Up arrow Move to previous option
Down arrow Move to next option
Left arrow Move to the option on the left (menu bar)
Right arrow Move to the option on the right (menu bar)
Esc Main Menu: Quit without saving changes
Move Enter Move to the option you desire
PgUp key Increase the numeric value or enter changes
PgDn key Decrease the numeric value or enter changes
+ Key Increase the numeric value or enter changes
- Key Decrease the numeric value or enter changes
Esc key Main Menu – Quit and do not save changes into CMOS
F1 key General help on Setup navigation keys
F5 key Load previous values from CMOS
F6 key Load the defaults from BIOS default table
Submenus: Exit Current page to the next higher level menu
Status Page Setup Menu and Option Page Setup Menu – Exit
Current page and return to Main Menu
20
Page 25

Mainboard KI51PV-754
Main Menu
When you enter the PHOENIX-AWARD™ BIOS Utility, the Main Menu will appear on the
screen. The Main menu allows you to select from several configuration options. Use the
left/right arrow keys to select a particular configuration screen from the top menu bar or use the
down arrow key to access and configure the information below.
21
Page 26

Main Menu Setup Configuration Options
Item Options Description
Date
Time
IDE Primary
Master
mm dd yyyy
hh: mm: ss Set the current time of the system.
Options contained
in sub menu.
Set the system date. Note that the ‘Day’ automatically
changes when you set the date.
Press <Enter> to enter the sub menu.
Mainboard KI51PV-754
IDE Primary
Slave
IDE Secondary
Master
IDE Secondary
Slave
IDE Channel
2/3/4/5 Master
Drive A
Drive B
Halt On
Security
Options contained
in sub menu.
Options contained
in sub menu.
Options contained
in sub menu.
Options contained
in sub menu.
360K, 5.25 in
1.2M, 5.25 in
720K, 3.5 in
1.44M, 3.5 in
2.88M, 3.5 in
None
All Errors
No Errors
All, but Keyboard
All, but Diskette
All, but Disk/ Key
Options contained
in sub menu.
Press <Enter> to enter the sub menu.
Press <Enter> to enter the sub menu.
Press <Enter> to enter the sub menu.
Press <Enter> to enter the sub menu.
Select the type of floppy disk drive installed in your system.
Select the situation in which you want the BIOS to stop the
POST process and notify you.
Press <Enter> to enter the sub menu.
Displays the amount of
Base Memory
Extended
Memory
Total Memory
N/A
N/A
N/A Displays the total memory available in the system.
extended memory detected during boot up.
conventional memory
detected during boot up.
Displays the amount of
22
Page 27

Mainboard KI51PV-754
Advanced BIOS Features
Removable Device Priority
Select removable device boot priority.
Hard Disk Boot Priority
Select hard disk drive boot priority.
First /Second/Third Boot Device
Select the order in which devices will be searched in order to find a boot device.
Options: Removable (default for first boot device), CD ROM (default for second boot device),
Hard Disk (default for third boot device), NVIDIA Boot Age, Disabled
Boot Other Device
This setting allows the system to try to boot from other devices if the system fails to boot from
the 1st/ 2nd/ 3rd boot devices. Options: Enabled (Default), Disabled
Boot Up Floppy Seek
When Enabled, the BIOS tests (seeks) the floppy drives to determine whether they have 40 or
80 tracks. Only 360 KB floppy drivers have 40 tracks. Drives with 720 KB, 1.2 MB and 1.44 MB
drive capacities have 80 tracks. Because very few modern PCs have 40-tracks floppy driver, we
recommend that you set this option to “Disabled”. Options: Enabled, Disabled (Default)
Advanced BIOS Features
23
Page 28

Mainboard KI51PV-754
Virus Warning
This option allows you to choose the Virus Warning feature for IDE Hard Disk boot sector
protection. If this function is enabled and a program attempts to write data into this area, BIOS
will display a warning message on the screen and sound an audio alarm (beep).
Options: Disabled (Default), Enabled
CPU Internal Cache
Make CPU internal cache active or inactive. System performance may degrade if you disable
this item. Options: Enabled (Default), Disable
External Cache
This option allows you to enable or disable “Level 2” secondary cache on the CPU to enhance
performance. Options: Enabled (Default), Disabled.
Quick Power On Self Test
It allows the system to skip certain tests while booting. This will speed up the boot process.
Options: Enabled (Default), Disabled
Swap Floppy Drive
If the system has two floppy drives, choose “Enabled” to assign physical drive B to logical drive
A and vice-versa. Options: Disabled (Default), Enabled
Boot Up NumLock Status
This item determines the initial power-on state for NumLock.
Options: On (Default) Numpad keys are number keys.
Off Numpad keys are arrow keys.
Typematic Rate Setting
When the options “Typematic Rate” and “Typematic Delay” are configured, the Typematic Rate
determines the keystroke repeat rate used by the keyboard controller.
Options: Disabled (Default), Enabled
Typematic Rate (Chars/Sec)
This option determines how many characters per second are generated when a key is held
down. Options: 6 (Default), 8, 10, 12, 15, 20, 24, 30
Typematic Delay (Msec)
This option represents the delay value before keystrokes begin to repeat.
Options: 250 (Default), 500, 750, 1000
APIC Mode
24
Page 29

Mainboard KI51PV-754
APIC stands for Advanced Programmable Interrupt Controller, and is used to extend the
number of available IRQs available in order to avoid sharing conflicts.
Options: Disabled, Enabled (Default).
MPS Version Control For OS
The 1.1 version is the older version that supports 8 more IRQs in the Windows NT environment.
Choose the new 1.4 version for Windows 2000 and Windows XP. Options: 1.4 (Default), 1.1.
OS Select For DRAM > 64MB
Select “OS2” only if you are running the OS/2 operating system with greater than 64 MB of RAM.
Options: Non-OS2 (Default), OS2.
HDD S.M.A.R.T. Capability
The SMART (Self Monitoring Analysis and Reporting Technology) technology enables a PC to
attempt to predict the possible failure of storage drives. Options: Disabled (Default), Enabled.
Small LOGO (EPA) Show
This option allows you to show or hide the small LOGO EPA.
Options: Disabled (Default), Enabled.
Advanced Chipset Features
DRAM Configuration
Timing Mode
This option determines DRAM clock/ timing using SPD or manual configuration.
Make sure your memory module has SPD (Serial Presence Data) if you want to use the “By
SPD” option. Options: Auto (Default), Manual
Memclock index value (Mhz)
This item allows you to select the memory clock. When it set to “auto”, the system will
automatically detect the memory clock. Options: 100, 133, 166, 200 (Default), 216, 233, 250
CAS# latency (Tcl)
This option determines CAS Latency. When synchronous DRAM is installed, the number of
clock cycles of CAS latency depends on the DRAM timing. Do not reset this option from the
default system manufacturer value. This option is adjustable only when “DRAM Timing
Selectable” is set to “Manual”. This option is locked when “DRAM Timing Selectable” is set to
“By SPD” and is automatically determined by the system. Options: 2, 2.5, 3 (Default)
Min RAS# active time (Tras)
This option allows you to select DRAM Active to Precharge Delay.
Options: Auto, 5T, 6T, 7T, 8T (Default), 9T, 10T, 11T, 12T, 13T, 14T, 15T
RAS# to CAS# delay (Trcd)
This option allows setting the RAS# to CAS# delay to Rd/Wr command on the same bank.
25
Page 30

Mainboard KI51PV-754
Options: Auto, 2T, 3T (Default), 4T, 5T, 6T, 7T
Row precharge Time (Trp)
You can set the Row precharge time. Precharge to Active or Auto-Refresh of the same bank.
Options: Auto, 2T, 3T (Default), 4T, 5T, 6T, 7T
1T/2T Memory Timing
Use this option to select the memory timing. Options: 1T, 2T (Default)
Frame Buffer Size
This option allows you to set for pure DOS mode of using. You can set the amount of value to
share main memory. Options: 32M, 64M (Default), 128M, Disabled
RGB/TV Display
This option allows you to set for display shade mode of using. Options: Auto (Default), RGB, TV
TV Mode Support
This option allows you to set the TV mode regarding your country formulated.
Options: NTSC-M, NTSC-J, PAL-M, PAL-BDGHI, PAL-N, PAL-NC, Disabled (Default)
System BIOS Cacheable
When enabled, accesses to system BIOS ROM addressed at F0000H-FFFFFH are cached,
provided that the cache controller is enabled. Options: Enabled, Disabled (Default)
PnP/PCI Configurations
PCI / VGA Palette Snoop
Some graphic controllers that are not VGA compatible take the output from a VGA controller
and map it to their display as a way to provide boot information and VGA compatibility.
Options: Disabled (Default), Enabled
PCI Latency Timer (CLK)
This option allows you to set up the PCI Latency Time (0-255). If you select “32” it will optimize
PCI speeds. Options: 0-255, 32 (Default)
**PCI Express relative items**
Maximum Payload Size
This item allows you to set the PCI-Express maximum payload size per time.
Options: 128, 256, 512, 1024, 2048, 4096(Default)
Frequency/Voltage Control
26
Page 31

Mainboard KI51PV-754
p
CPU Speed Detected
This option displays the default CPU speed.
CPU Host Frequency (MHz)
This option displays the CPU Host frequency. You can set it from 200 to 450. The default
depends on your CPU frequency and the CPU installed.
CPU Spread Spectrum
The Spread Spectrum function can reduce the EMI (Electromagnetic Interference) generated
for CPU. Options: Disabled, Center (Default), Down
DDR Speed (strobe/sec)
This option displays the current DDR speed (CPU Host frequency * Max Memclock ÷ 100).
Hammer Fid control
This option displays the CPU ratio information detected by the system.
Options: The options that will be available will depend on the default value of the CPU installed.
For example, if the CPU default value is 10 then the options will be from Start up, and 4 to 9.
Note: Before you try to make any adjustments to this option, make sure that your CPU Ratio is
adjustable and has not been locked by the CPU manufacturer.
CPU Speed Setting
This option displays the CPU speed.
K8 <—> NB HT Ratio
CPU Speed = Current CPU Host Frequency x CPU Clock Ratio
eed = Current CPU Host Frequency x (Max Memclock ÷ 100)
DDR S
This option allows you to set Hyper Transport frequency for Northbridge chipset.
Options: 1x, 2x, 3x, 4x (Default), 5x, Auto
K8 <—> NB HT Frequency
This option displays the result of your HT Ratio setting for Northbridge chipset.
NB <—> SB HT Ratio
This option allows you to set Hyper Transport frequency between Northbridge chipset and
Southbridge chipset. Options: 1x, 2x, 3x, 4x(Default), 5x
NB <—> SB HT Frequency
27
Page 32

Mainboard KI51PV-754
This option displays the result of your HT Ratio setting between Northbridge chipset and
Southbridge chipset
HT Spread Spectrum
The Spread Spectrum function can reduce the EMI (Electromagnetic Interference) generated
for Hyper Transport. Options: Disabled, Center (Default), Down
PCIE Clock
This option allows you to select PCIE clock form 100 Mhz (Default) to 145Mhz.
PCIE Spread Spectrum
The Spread Spectrum function can reduce the EMI (Electromagnetic Interference) generated
for PCI-Express. Options: Enabled (Default), Disabled
Attention
Before overclocking, please make sure your system components
are capable of overclocking. If you are familiar with the
overclocking, we strongly recommend you to set the clock to the
defult settings. We do not guarantee that damage will or will not
occur when overclocking.
Integrated Peripherals
28
Page 33

Mainboard KI51PV-754
Init Display First
With systems that have multiple video cards, this option determines whether the primary display
uses a PCI slot or a PCI-E slot. Options: PCI Slot, Onboard, PCIEx.
IDE Function Setup
If you highlight the “IDE Function Setup” label and then press the enter key, it will take you to a
submenu with the following options.
OnChip IDE Channel 0/1
The mainboard chipset contains a PCI IDE interface with support for two IDE channels. Select
“Enabled” to activate the first and/or second IDE interface. Select “Disabled” to deactivate an
interface if you are going to install a primary and/or secondary add-in IDE interface.
Options: Enabled (Default), Disabled
Primary/Secondary Master/Slave PIO
The IDE PIO (Programmed Input / Output) fields let you set a PIO mode (0-4) for each of the
IDE devices that the onboard IDE interface supports. Modes 0 to 4 will increase performance
incrementally. In Auto mode, the system automatically determines the best mode for each
device. Options: Auto (Default), Mode0, Mode1, Mode2, Mode3, Mode4
Primary/Secondary Master/Slave UDMA
Ultra DMA 100 functionality can be implemented if it is supported by the IDE hard drives in your
system. As well, your operating environment requires a DMA driver (Windows 95 OSR2 or a
third party IDE bus master driver). If your hard drive and your system software both support
Ultra DMA 100, select “Auto” to enable BIOS support. Options: Auto (Default), Disabled
IDE Prefetch Mode
The “onboard” IDE drive interface supports IDE prefetching for faster drive access. If you install
a primary and/or secondary add-in IDE interface, set this option to “Disabled” if the interface
does not support prefetching. Options: Enabled (Default), Disabled
IDE HDD Block Mode
Block mode is otherwise known as block transfer, multiple commands, or multiple sectors
read/write. Select the “Enabled” option if your IDE hard drive supports block mode (most new
drives do). The system will automatically determine the optimal number of blocks to read and
write per sector. Options: Enabled (Default), Disabled
RAID Config
If you highlight the “RAID Config” label and then press the enter key, it will take you to a
submenu with the following options.
RAID Enable
This allows you to enable or disable the RAID function. Options: Enabled, Disabled (Default)
29
Page 34

Mainboard KI51PV-754
SATA1/2 Primary/ Secondary RAID
This allows you to enable or disable the RAID function for the SATA1/2 Primary/Secondary
device. Options: Enabled, Disabled (Default)
Serial-ATA 1/2
This item allows you to enable or disable the SATA1/2 device.
Options: Enabled (Default), Disabled.
Onboard Device
If you highlight the “Onboard Device” label and then press the enter key, it will take you to a
submenu with the following options:
OnChip USB
This option should be enabled if your system has a USB port installed on the system board. You
will need to disable this feature if you add a higher performance controller.
Options: V1.1+V2.0 (Default), Disabled, V1.1.
USB Memory Type
This option allows you to set your USB Memory Type.
Options: SHADOW, Base Memory (640k) (Default).
USB Keyboard Support
This option allows you to enable the USB attached keyboards and storages.
Options: Disabled (Default), Enabled.
AC97 Audio
This option allows you to control the onboard AC’97 audio.
Options: Enabled (Default), Disabled.
MAC Lan
This option allows you to control the onboard LAN device. Options: Enabled (Default), Disabled.
MAC Media Interface
This option allows you to control MAC Media Interface. Options: Pin Strap (Default), MII, RGMII
Onboard I/O Chip Setup
If you highlight the “Onboard I/O Chip Setup” label and then press the enter key, it will take you
to a submenu with the following options:
Power On Function
This option allows you to select a method of awakening the system from sleep mode.
Options: Hot KEY, Mouse Left, Mouse Right, Any KEY, BUTTON ONLY (Default), Keyboard 98.
30
Page 35

Mainboard KI51PV-754
Hot Key Power ON
This option allows you to use the Ctrl key along with a hot key (function key) to power on your
system. This option is configurable only when “Power-On Function” is set to “Hot Key”.
Options: Ctrl-F1 (Default), Ctrl-F2, ……, Ctrl-F12.
Onboard FDC Controller
Select “Enabled” if your system has a floppy disk controller (FDC) installed on the system board
and you wish to use it. If you install an add-in FDC or the system has no floppy drive, select
“Disabled”. Options: Enabled (Default), Disabled.
Onboard Serial Port 1
Select an address and corresponding interrupt for the first/ second serial port.
Options: Disabled (Default for port1), 3F8/IRQ4, 2F8/IRQ3 (Default for port2), 3E8/IRQ4,
2E8/IRQ3, Auto.
Onboard Parallel Port
Select an address and corresponding interrupt for the onboard parallel port.
Options: 378/IRQ7, 278/IRQ5, 3BC/IRQ7, Disabled (Default).
Parallel Port Mode
This option allows you to select a parallel port mode for the onboard parallel port.
Options: SPP Standard Printer Port.
EPP Enhanced Parallel Port.
ECP(Default) Extended Capabilities Port.
ECP+EPP ECP & EPP mode.
Normal
EPP Mode Select
Select EPP port type 1.7 or 1.9. This field is only configurable if “Parallel Port Mode” is set to
“EPP” or “ECP+EPP”. Options: EPP 1.9(Default), EPP 1.7.
ECP Mode Use DMA
Select a DMA Channel for the parallel port when using the ECP mode. This option is only
configurable if “Parallel Port Mode” is set to “ECP”. Options: 3 (Default), 1.
PWRON After PWR-Fail
This option will determine whether your system will boot after restoring power after a power
failure. If you select “On”, the system will boot whether or not the system was on before power
failure. If you select “Former-Sts”, the system will be restored to the status before the power
failure. Options: Off (Default), On, Former-Sts.
31
Page 36

Mainboard KI51PV-754
Power Management
The Power Management Setup Menu allows you to configure your system to utilize energy
conservation features as well as power-up/ power-down options.
ACPI Suspend Type
The item allows you to select the suspend type using the ACPI operating system.
Options: S1 (POS) (Default) Power on Suspend
S3 (STR) Suspend to RAM
S1 & S3 POS and STR
Power Management
There are three options of Power Management:
1. Min. Saving
Minimum power management
Suspend Mode = 1 hour
HDD Power Down = 15 minutes
2. Max. Saving
Maximum power management (only available for sl CPUs).
Suspend Mode = 1 minute
HDD Power Down = 1 minute
3. User Defined (Default)
This option allows you to set each mode individually.
32
Page 37

Mainboard KI51PV-754
When this option is enabled, each of the ranges is from 1 minute to 1 hour except for HDD
Power Down, which ranges from 1 minute to 15 minute and includes a “disable” option.
Note: If you select Min. or Max. Power Saving modes, the “HDD Power Down” value will be
fixed. User Define, Min Saving, Max Saving
Video Off Method
This option determines the manner in which the monitor goes blank.
Options:
Blank Screen This option only writes blanks to the video buffer.
V/H SYNC+Blank This selection will cause the system to turn off the vertical and
horizontal synchronization ports and write blanks to the video buffer.
DPMS Support (Default) Initial display power management signaling.
HDD Power Down
When enabled, the hard disk drive will power down after a certain configurable period of system
inactivity. All other devices remain active.
Options: Disabled (Default), 1 Min, 2 Min, 3 Min, 4 Min, 5 Min, 6 Min, 7 Min, 8 Min, 9 Min, 10 Min,
11 Min, 12 Min, 13 Min, 14 Min, 15Min.
HDD Down In Suspend
This option allows you to enable/ disable the hard driver power down in the suspend state.
Options: Disabled (Default), Enabled.
Soft-Off by PWRBTN
In situations where the system enters a “hung” state, you can configure the BIOS so that you
are required to press the power button for more than 4 seconds before the system enters the
Soft-Off state. Options: Delay 4 Sec, Instant-Off (Default).
PCI PME Wake Up
This option will also cause the system to wake up with any onboard LAN activity.
Options: Disabled (Default), Enabled.
Ring Wake Up
This option allows you to awaken the system upon receiving an incoming call from a modem
device. Options: Disabled (Default), Enabled.
RTC Wake Up
When “Enabled”, you can set the date and time at which the RTC (real-time clock) alarm
awakens the system from Suspend mode. Options: Enabled, Disabled (Default).
Day of Month Alarm
33
Page 38

Mainboard KI51PV-754
You can choose which date of the month the system will boot up. This option is configurable
only when “RTC Wake Up” is set to “Enabled”. (Min=0 Max=31)
Time (hh: mm: ss) Alarm
You can choose the hour, minute and second the system will boot up. This option is
configurable only when “RTC Wake Up” is set to “Enabled”.
K8 Cool’n’Quiet Control
When this option is set to “Auto”, the system will auto control the CPU voltage and frequency
depends the loading of system. Options: Auto, Disabled (Default).
Hardware Monitor
This menu is for monitoring the system status such as temperature, voltage, and so on.
Load Defaults
34
Page 39

Mainboard KI51PV-754
Load System Default Settings
Load System Default Settings.
Load System Turbo Settings
Load System Turbo Settings.
Load CMOS From BIOS
Load defaults from flash ROM for systems without batteries.
Save CMOS To BIOS
Save defaults to flash ROM for systems without batteries.
Exit Menu
Save & Exit Setup
Save all configuration changes to CMOS (memory) and exit setup. A confirmation message will
be displayed before proceeding.
Exit Without Saving
Abandon all changes made during the current session and exit setup. A confirmation message
will be displayed before proceeding.
35
Page 40

Mainboard KI51PV-754
Chapter 3: Software Setup
Software List
Category Platform
Microsoft® DirectX 9.0c
nForce® Chipset Driver
nForce® Display Driver
nVIDIA® Firewall
Realtek® AC’97 Audio Driver
Marvell® LAN Driver
Windows 2000 /XP
Windows 2000 /XP
Windows 2000 /XP
Windows 2000 /XP
Windows 2000 /XP
Windows 2000 /XP
Software Installation
Place the Driver CD into the CD-ROM drive and the Installation Utility will auto-run. You can
also launch the Driver CD Installation Utility manually by executing the Intel.exe program
located on the Driver CD. (For more details, please refer to the Readme.txt files that in each
folder of the Driver.)
◎ The pictures shown below are for your reference only. The version of the software you
received and shown on the screen may vary depending on models.
1. When you insert the driver CD into the CD ROM, you’ll see the screen as the picture below.
There are several buttons displayed in the main screen as shown below.
36
Page 41

Mainboard KI51PV-754
z Microsoft DirectX9.0c – provides the software of Microsoft DirectX 9.0c.
z nForce Chipset Driver – provides all the drivers needed for the chipset.
z nForce Display Driver – provides the driver of Integrated GeForce Graphics Engine.
z nVIDIA Firewall – provides firewall to protect your system from hackers and viruses.
z Realtek AC’97 Audio Driver – provides the driver of Realtek AC’97 Audio CODEC.
z Marvell LAN Driver –
2. Click the “Utilities” and you can choose the software to install.
z Microsoft DirectX9.0c – provides the software of Microsoft DirectX 9.0c.
Attention
Please install Microsoft DirectX 9.0c (or the latest version), and
then install the nForce Chipset Driver.
provides the driver of Marvell Network
3. If you click the “Browse CD” button from the screen in step 1, you can browse all the files in
the Driver CD.
4. Click “Exit” button to exit the program.
37
Page 42

Mainboard KI51PV-754
Chapter 4: Troubleshooting
Problem 1:
No power to the system. Power light does not illuminate. Fan inside power supply does not turn
on. Indicator lights on keyboard are not lit.
Causes:
1. Power cable is unplugged.
2. Defective power cable.
3. Power supply failure.
4. Faulty wall outlet; circuit breaker or fuse blown.
Solutions:
1. Make sure power cable is securely plugged in.
2. Replace cable.
3.Contact technical support.
4.Use different socket, repair outlet, reset circuit breaker or replace fuse.
Problem 2:
System inoperative. Keyboard lights are on, power indicator lights are lit, hard drive is active but
system seems “hung”
Causes: Memory DIMM is partially dislodged from the slot on the mainboard.
Solutions:
1. Power Down
2. Using even pressure on both ends of the DIMM, press down firmly until the module snaps
into place.
Problem 3:
System does not boot from the hard disk drive but can be booted from the CD-ROM drive.
Causes:
1. Connector between hard drive and system board unplugged.
2. Damaged hard disk or disk controller.
3. Hard disk directory or FAT is corrupted.
Solutions:
1. Check the cable running from the disk to the disk controller board. Make sure both ends are
securely attached. Check the drive type in the standard CMOS setup.
2. Contact technical support.
3. Backing up the hard drive is extremely important. Make sure your periodically perform
backups to avoid untimely disk crashes.
38
Page 43

Mainboard KI51PV-754
Problem 4:
System only boots from the CD-ROM. The hard disk can be read and applications can be used
but booting from the hard disk is impossible.
Causes: Hard Disk boot sector has been corrupted.
Solutions: Back up data and applications files. Reformat the hard drive. Re-install applications
and data using backup disks.
Problem 5:
Error message reading “SECTOR NOT FOUND” displays and the system does not allow certain
data to be accessed.
Causes: There are many reasons for this such as virus intrusion or disk failure.
Solutions: Back up any salvageable data. Then performs low level format, partition, and then a
high level format the hard drive. Re-install all saved data when completed.
Problem 6:
Screen message says “Invalid Configuration” or “CMOS Failure.”
Causes: Incorrect information entered into the BIOS setup program.
Solutions: Review system’s equipment. Reconfigure the system.
Problem 7:
The Screen is blank.
Causes: No power to monitor.
Solutions: Check the power connectors to the monitor and to the system.
Problem 8:
Blank screen.
Causes:
1. Memory problem.
2. Computer virus.
Solutions:
1. Reboot computer. Reinstall memory. Make sure that all memory modules are securely
installed.
2. Use anti-virus programs to detect and clean viruses.
Problem 9:
Screen goes blank periodically.
Causes: Screen saver is enabled.
Solutions: Disable screen saver.
39
Page 44

Mainboard KI51PV-754
Problem 10:
Keyboard failure.
Causes: Keyboard is disconnected.
Solutions: Reconnect keyboard. Replace keyboard if you continue to experience problems.
Problem 11:
No color on screen.
Causes:
1. Faulty Monitor.
2. CMOS incorrectly set up.
Solutions:
1. If possible, connect monitor to another system. If no color appears, replace monitor.
2. Call technical support.
Problem 12:
The screen displays “C: drive failure.”
Causes: Hard drive cable not connected properly.
Solutions: Check hard drive cable.
Problem 13:
Cannot boot the system after installing a second hard drive.
Causes:
1. Master/slave jumpers not set correctly.
2. Hard drives are not compatible / different manufacturers.
Solutions:
1. Set master/slave jumpers correctly.
2.Run SETUP program and select the correct drive types. Call drive manufacturers for possible
compatibility problems with other drives.
Problem 14:
Missing operating system on hard drive.
Causes: CMOS setup has been changed.
Solutions: Run setup and select the correct drive type.
Problem 15:
Certain keys do not function.
Causes: Keys jammed or defective.
Solutions: Replace keyboard.
40
Page 45

Mainboard KI51PV-754
Appendix I: Super 5.1 Channel Audio Effect
Setup
Channels Setup
1. After starting your system, click the Sound Effect Manager icon from the tool bar on the
desktop. You can also find the icon by going to Start-> Setting -> Control Panel.
2. Click the Speaker Configuration button. One of the screens will display as shown below.
3. You can choose a 2, 4 or 6 channel (speaker) system.
2 Channels 4 Channels 6 Channels
Super 5.1 Channel Audio Effect
This mainboard comes with an ALC655 Codec which supports high quality 5.1 Channel audio
effects. With ALC655, you are able to use standard line-jacks for surround audio output without
connecting to any auxiliary external modules. To use this function, you have to install the audio
driver in the bonus Pack CD as well as an audio application supporting 5.1 Channel audio
effects. See the audio Port Connectors in the Hardware Installation section for a description of
the output connectors.
Speaker Test
Make sure the cable is firmly into the connector.
1. Click the audio icon from the Windows screen.
2. Click Speaker Test button, you can see the screen like the pictures below.
3. Select the speaker which you want to test by clicking on it.
2 Channels 4 Channels 6 Channels
Subwoofer
Front Left
Rear Left
41
Front Right
Center
Rear Right
Page 46

Mainboard KI51PV-754
Appendix II: RAID Setup
Introduction to RAID
RAID (Redundant Array of Independent Disks) technology is a sophisticated disk management
system that manages multiple disk drives. It enhances I/O performance and provides
redundancy in order to prevent the loss of data in case of individual disk failure. The RAID
facility on this board provides RAID 0, RAID 1, RAID 0+1, RAID JBOD, and RAID 5.
Disk Striping (RAID 0)
Striping is a performance-oriented, non-redundant disk storage technology. With RAID striping,
multiple disks are used to form a larger virtual disk. Data is then striped or mapped across all
the physical disks. In this way, multiple I/O operations can be executed in parallel, enhancing
performance. Striping does not provide fault tolerance. The minimum number of hard drives for
RAID 0 is 2.
Disk Mirroring (RAID 1)
With Disk Mirroring there are redundant disks that mirror the primary disks. Data that is written
to the primary disks are also written to the redundant disks. This redundancy provides fault
tolerant protection from a single disk failure. If a read/write failure occurs on one drive, the
system can still read and write data using the other drive. The minimum number of drives for a
RAID 1 configuration is 2. You are required to use an even number of drives.
Disk Striped Mirroring (RAID 0+1)
This mode combines both the performance benefits of RAID 0 with the fault tolerance of RAID 1.
The minimum number of drives for RAID 0+1 configuration is 4 drives. This configuration also
requires an even number of drives. Note: All mirrored configurations or striped/mirrored
configurations should use drives of the same size.
RAID SPAN (RAID JBOD)
RAID SPAN allows JBOD (Just a Bunch Of Disks) configurations which simply uses multiple
disks to form a larger virtual disk without any other specialized disk management functionality.
RAID SPAN is not considered a standard RAID implementation.
Disk Rotating Parity Array (RAID 5)
RAID 5 is one of the most popular implementations of RAID. It utilizes the configurations of Byte
Stripping and Block Stripping, and writes the data to multiple disks. The minimum number of
drives for a RAID 5 configuration is 3. It possesses the
therefore, once a read/write failure occurs on one drive,
write data using the other drive.
decrease in a write-heavy environment.
As result, the performance of RAID 5 can substantially
stripe error correction information;
the system can still read and
Before create RAID Array
Before you configure your RAID Array, you have to enable the “RAID Config” option in the BIOS
Setup Utility.
1. After you boot your system, press the “Del” key when prompted to enter the BIOS Setup
Utility.
42
Page 47

Mainboard KI51PV-754
2. The “RAID config” option for enabling RAID will be found on the “Peripherals” screen as part
of the “IDE Function Setup” section shown as below-left (Peripherals >> IDE Function Setup >>
RAID config). Arrow down to the IDE RAID item and press enter.
3.On the “RAID config” screen (shown below-right), enable the disks that you want to use as
RAID disks (in this example there are four SATA hard drives configured as RAID disks).
NVIDIA RAID Utility Configuration
The NVIDIA RAID Utility is used to configure RAID disk management into your hard disks. This
section will explain how to setup and maintain your RAID disk drives.
Starting up the NVIDIA BIOS RAID Utility
When the system boots up during the
POST (Power-On Self Test), you will be
given an opportunity to enter the NVIDIA
BIOS RAID Utility when the screen
prompts you with following message:
“Press F10 to enter RAID setup utility”
Press the <F10> key to enter the NVIDIA
BIOS RAID utility (note that you will only
have a short window of time to press
<F10> before the system continues with
the next step of the boot process). The
Raid Utility screen will display as shown
right.
Associating Screen Drive Names with Physical Drives on the Board
This section explains how to associate the drives listed on the “Define a New Array” screen with
the physical drives attached to the connectors on the mainboard. This becomes important when
identifying drives that need to be replaced or changed.
Channel, Controller, Master/Slave
Located here are 3 identifiers separated by periods. These identifiers represent the Channel,
Controller, and Master/Slave ID for a drive. With these identifiers, you can associate the drives
on this screen with a physical connector and drive on the board.
Channel 0 – Represents one of the PATA connectors
43
Page 48

Mainboard KI51PV-754
Channel 1 – Represents one of the SATA connectors
Controller 0 – 1st connector (e.g. PATA1 or SATA1)
Controller 1 – 2nd connector (e.g. PATA2 or SATA2)
Master/Slave – SATA drives will always be Master drives since an SATA connector can only
support 1 drive. PATA connectors can support a Master and a Slave drive.
For Example:
On a board with 4 connectors (PATA1, PATA2, SATA1, SATA2), the following applies:
0.0.M = PATA1 (master drive)
0.0.S = PATA1 (slave drive)
0.1.M = PATA2 (master drive)
0.1.S = PATA2 (slave drive)
1.0.M = SATA1
1.1.M = SATA2
Creating New RAID Array
The first screen you will see upon initial configuration is the “Define New Array” screen. First,
tab over to the “RAIDMode” text box and press <Enter>. The pop up menu will display as shown
below. According to your configuration requirements, select “Mirroring” (RAID 1), “Striping”
(RAID 0), “Striping Mirroring“ (RAID 0+1), “Spanning” (JBOD), or “RAID5”. Then press <Enter>.
Next, <Tab> over to the “Striping Block” option and press <Enter>. A pop menu will display as
shown below. With this option you can manually select the striping block size for your array.
This option will affect data access performance. We recommend that you to select “Optimal”
option for automatic configuration. Press <Enter>.
Attention
The “Loc” and “Disk Model Name”, located on this screen reflect the disk
drives installed on the PATA or SATA connectors. The example disk drive
information may differ with the information that displays on your screen.
44
Page 49

Mainboard KI51PV-754
Next, in the “Free Disks” section, you can use the up/down arrow keys to select disks to be used
in your RAID array. After highlighting a disk, use the right-arrow key to activate the disk as part
of the RAID Array. The selected disk will move over to the “Array Disks” section. You can use
the left-arrow key to reverse your selection. After you finish selecting all your disks, Press <F7>.
A confirmation message will display as shown below. Then press <Y> to complete the RAID
array creation.
After the array has been successfully created, the Array List screen will display as shown
below-left. You can press the Enter key to view the RAID details in the “Array Detail” screen.
45
Page 50

Mainboard KI51PV-754
RAID 1 mode (Array List)
RAID 1 mode (Array Detail)
Deleting an Array
You can delete an existing array on the “Array Detail” screen. Press the <D> key. A
warning/confirmation message will display (as shown below). Press <Y> to confirm.
46
Page 51

Mainboard KI51PV-754
After the array is successfully deleted, the screen will display as shown below.
Rebuilding a RAID Mirrored Array
This section applies to Mirrored, Striped Mirroring RAID and RAID 5 configurations and
describes how to reestablish the integrity of a mirrored environment after replacing one of the
drives (typically because of a single disk failure). After replacing the errant drive, the rebuild
process will move data from its mirrored sibling drive (the drive with information still intact) to the
newly installed drive. This only applies to mirrored configurations (RAID 1, RAID 0+1, RAID 5).
47
Page 52

Mainboard KI51PV-754
Before you rebuild a RAID Mirrored Array
Before you begin rebuilding a RAID Mirrored Array, you must copy the “NvRaidMan.exe” file
from the bundled CD Driver to your C: drive. [CD File Location Path => D: \ Driver \ nForce \
6.53 \ IDE \ WIN2K (or WINXP)\ NvRaidMan.exe]
To rebuild a mirrored array, bring up the NVIDIA RAID Utility. From the “Array List” screen,
select the array with the newly installed drive. Then go to the “Array Detail” screen (press Enter).
Then press the <R> key and use the up/down arrow keys to select the hard drive that you just
installed. Then press <F7>. A confirmation message will display (as shown below). Press <Y>
to confirm. Then press <Ctrl-X> to exit the “NVIDIA RAID Utility” setup.
Launch the NVRAID Management utility by double-clicking the NvRaidMan.exe that has been
copied to the C: drive. You can view the status of rebuilding under the Details section from the
screen as shown below.
48
Page 53

Mainboard KI51PV-754
Install the OS of Windows® 2000/XP into your RAID HDDs
In this section, it will tell you how to install the operating system of Windows® 2000/XP into your
RAID drives. The installation steps below will assume that your HDDs have already been
attached to either the PATA or SATA connectors, and also your BIOS RAID Utility has already
been configured (see NVIDIA BIOS RAID Utility Configuration section).
Preparation: Before starting to install the OS, copy the “RAID Driver” and associated files from
the bundle CD Driver to an empty floppy disk [The files location in CD-ROM => \ Driver \ nForce
\ 6.53 \ IDE \ Floppy \ *.*]. This will have to be done on another system if you are installing the
system from scratch.
1. During Windows installation, the “Windows Setup” screen will prompt you with “Press F6 if
you need to install third party SCSI or RAID driver”. Press <F6>.
2. Press 's' when setup asks if you want to specify an additional device. Insert the floppy disk
which includes the “RAID Driver” into the floppy drive. Press 'Enter' and select the appropriate
OS device driver.
3. Press 'Enter' again to continue the setup process.
4. Follow the setup instructions and select your choice for partition and file system.
5. After setup examines your disks, it will copy files to the Windows® 2000/ XP installation
folders and restart the system. After the system is rebooted the setup program will continue with
the installation all the way to completion.
6. Wait until Windows® 2000/ XP finishes installing devices, regional settings, networking
settings, components, and the final set of tasks. Reboot the system if you are asked to do so.
49
Page 54

Mainboard KI51PV-754
Appendix III: ABS (Albatron BIOS Security)
Card Setup
Introduction
The ABS (Albatron BIOS Security) system provides your system with a recovery BIOS backup
when your onboard BIOS has been damaged beyond system boot capability.
Preparation and Setup
You should prepare a boot floppy disk and have it ready in case of such BIOS failures.
Otherwise you will have to find another computer to make the boot floppy disk from. When you
make the disk, you should visit our website and download the latest version of the BIOS file for
your mainboard along with the AWDFLASH.exe executable, placing both onto the floppy disk.
Onoboard BIOS Recovery Procedures
1. Make sure your system is turned off.
2. Set the jumper cap on the ABS_JP1 header located on the ABS Card to the “Rescue BIOS”
position (figure 1).
3. Remove the jumper caps (on pins 1-2, pins 3-4) from the mainboard BIOSCN1 header
(figure 2).
4. Insert the ABS Card onto the BIOSCN1 header on the mainboard. The ABS will fit over the
entire BIOSCN1 header and can only be inserted in one direction.
Closed
Closed
(“Closed” means putting a jumper cap
onto two adjacent header pins.)
圖一
Figure 1
Figure2
50
Page 55

Mainboard KI51PV-754
Place the boot floppy disk (from the “Preparation and Setup” section) into the floppy drive and
turn on your system.
Note: If your system is not setup to use the floppy drive as the first boot drive, you must enter
the BIOS setup utility and make the appropriate adjustments. During the initial boot up
sequence the screen will display a message that will give you an opportunity to enter the BIOS
setup utility (typically, “Press Delete Key to enter BIOS utility”) .
Once in the BIOS Utility, follow this path: Advanced -> Hard Disk Boot Priority -> First Boot
Device and set the “First Boot Device” to “Removable”.
After the system boots from the floppy, the system will enter into the DOS mode (note that the
system has booted using the ABS card’s BIOS).
6. With the system still running, you must carefully
move the jumper cap on the ABS Card (ABS_JP1
header) back to its “Onboard BIOS” position.
This disables the ABS BIOS which will now allow
you to flash the corrupted mainboard BIOS from
the floppy disk.
7. At the DOS prompt, type “DIR” and take notice of the name of the BIOS file name which ends
with the extension “.bin” (e.g. K8N7003.bin”). There should also be an AWDFLASH.exe file
present. Then type: awdflash(space)(the file name of .bin).bin (For example: awdflash(space)
k8n7003.bin)
Closed
(“Closed” means putting a jumper cap
onto two adjacent header pins.)
Type “dir”
Note the file name
Type “awdflash(space)
xxxx.bin”
51
Page 56

Mainboard KI51PV-754
8. The initial AWARD BIOS FLASH screen (shown below-left) will appear and prompt you with
the message, “Do you want to save BIOS?” Type “N” (Note: Typing “Y” is only used when
saving the BIOS from the onboard BIOS to the floppy disk).
The next screen (shown above-right) will display a message “Press ’Y’ to Program or ‘N’ to Exit”.
Then type ‘Y’ to begin the onboard BIOS flash procedure.
9. The flashing procedure will take several minutes and will show its progress on the screen.
After the flash BIOS procedures have completed, press ‘F1’ to reboot the system.
Type N Type Y
When the flash process is complete, press ‘F1’
Attention
While processing the flash BIOS procedures, DO NOT power off or
restart your system. Otherwise, it may damage the onboard BIOS.
52
Page 57

Mainboard KI51PV-754
10. During the next boot sequence, enter the BIOS utility program (Note: During the boot
sequence you will be given a chance to enter the BIOS utility by pressing the “DEL” key on most
systems). Load the system with the default settings, and save the changes before exit the BIOS
utility program. Then the onboard BIOS recovery procedures are completed at this time.
Follow the path: Defaults -> Load System Default Settings -> Y .
Next, follow the path: Exit -> Save & Exit Setup -> Y
Follow the path: Exit -> Save & Exit Setup -> Y .
53
Page 58

Mainboard KI51PV-754
11. After you have recovered your onboard BIOS, you can choose to remove or not remove the
ABS Card from the mainboard.
If you do choose to remove the ABS Card from the mainboard, make sure that the system is
powered off before you remove the card. After you remove the ABS card you must replace the
two jumper caps on the BIOSCN1 header back to the default positions (pins 1-2 and pins 3-4
are both closed as shown).
If you choose not remove the ABS Card from the mainboard, make sure that the jumper caps on
the ABS_JP1 header located on the ABS Card to the “Onboard BIOS” as below, in order to
reduce the damage opportunity of the rescue BIOS in ABS Card and on the other hand to
extend the usage life of the ABS Card.
(“Closed” means putting a jumper cap
onto two adjacent header pins.)
Closed
BIOSCN1
Attention
If both your onboard BIOS and rescue BIOS are damaged
unfortunately, the ABS Card will fail the feature of providing BIOS
backup. Therefore, it is recommended that recover the onboard BIOS in
advance, and take the ABS Card as emergency happen.
54
 Loading...