

Page 1
RDVD1002.book Page 1 Tuesday, January 24, 2006 12:25 PM
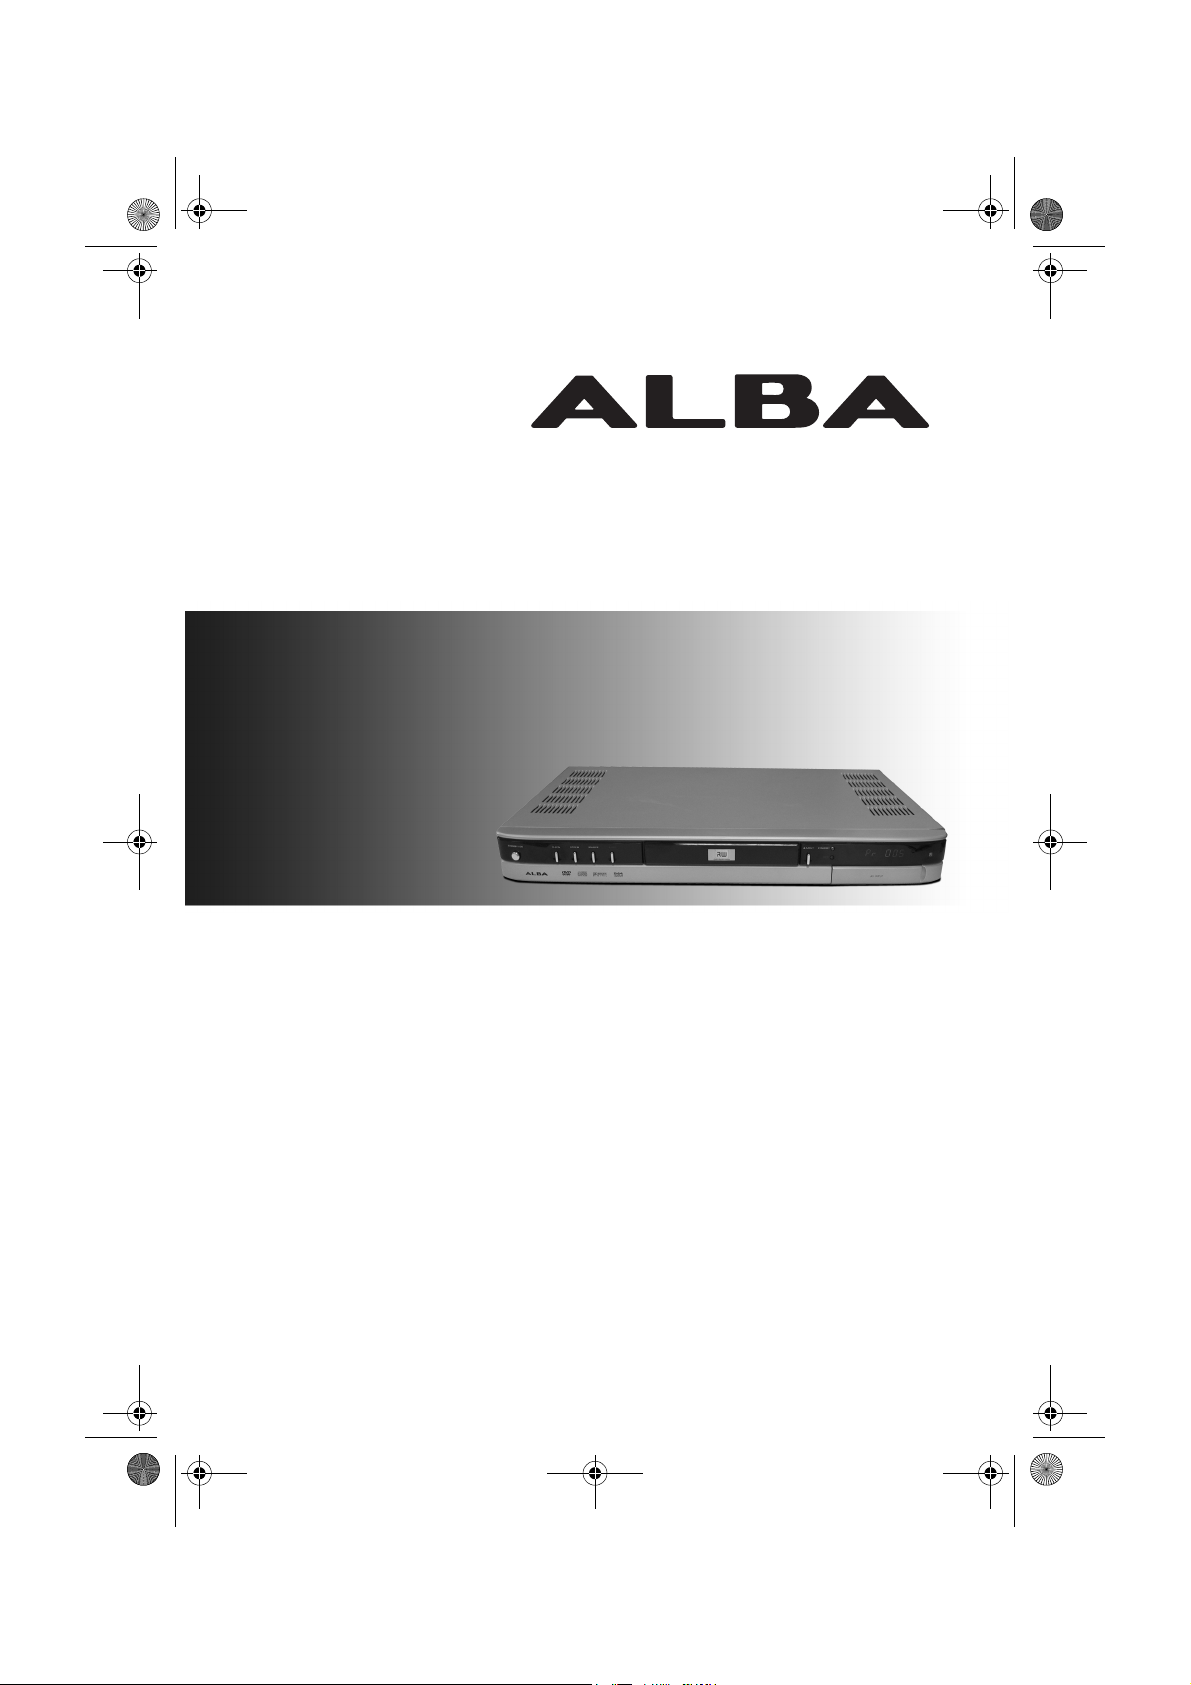
RDVD1002
DVD Recorder
User Guide
Page 2
RDVD1002.book Page 2 Tuesday, January 24, 2006 12:25 PM
RDVD1002
Introduction
Thank you for purchasing this DVD Recorder which has been designed
and manufactured to give you many years of trouble-free service.
You may already be familiar with using a similar product but please take
time to read these instructions which have been written to ensure you
get the very best from your purchase.
Safety is Important
To ensure your safety and the safety of others, please read the Safety
precautions before
Keep this information in a safe place for future reference.
WARNING! THIS DVD RECORDER UTILISES A CLASS 1
LASER. USE OF CONTROLS, ADJUSTMENTS OR
PROCEDURES NOT LISTED IN THIS USER GUIDE MAY
RESULT IN HAZARDOUS RADIATION EXPOSURE.
you operate this DVD Recorder.
NOTE: This DVD Recorder incorporates copyright
protection technology that is protected by method claims of
certain U.S. patents and other intellectual property rights
owned by Macrovision Corporation and other rights owners.
Use of this copyright technology must be authorised by
Macrovision Corporation, and is intended for home and
other limited viewing uses only, unless otherwise
authorised by Macrovision Corporation. Reverse
engineering or disassembly is prohibited.
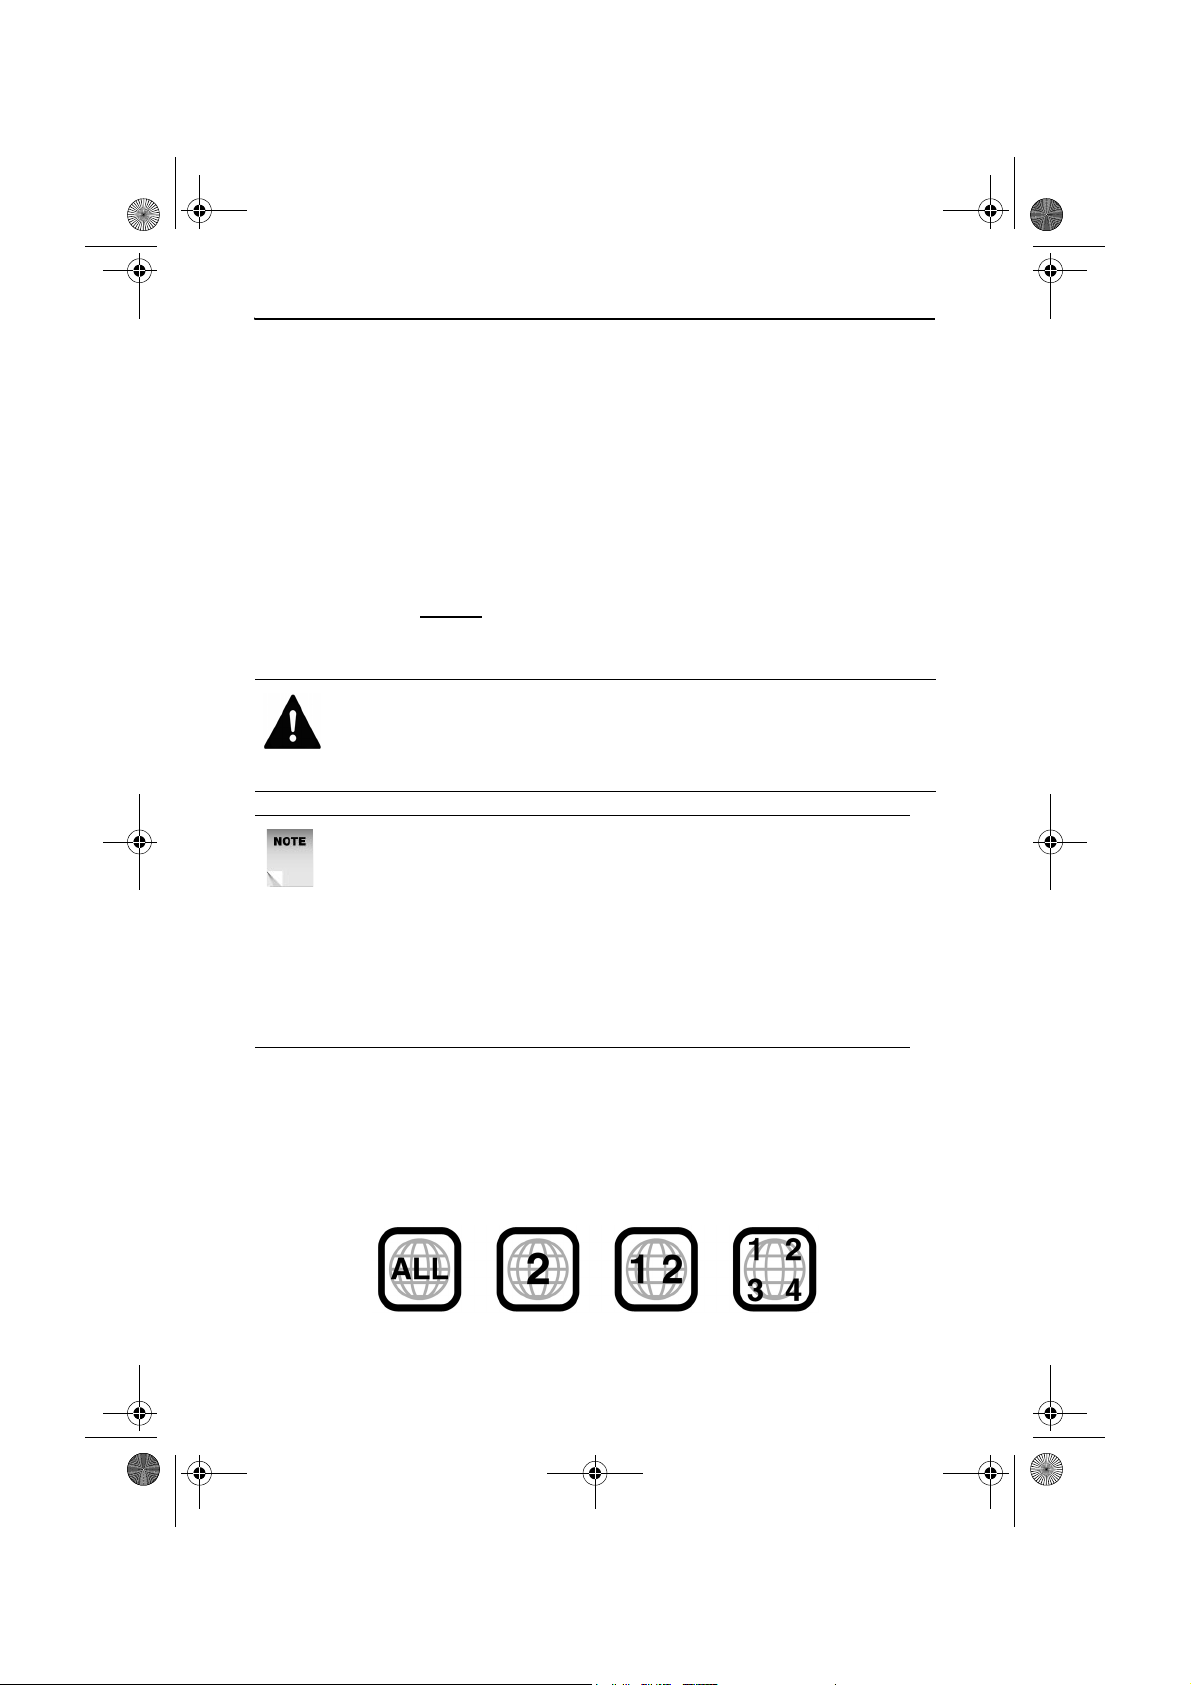
Region Code
If you load a disc which has a different region code to your DVD
Recorder you will see the region code notice on the screen. The disc will
not playback and should be unloaded. The region code for this DVD
Recorder is 2 (refer to the symbols below).
2
Page 3

DVD Recorder
Contents
Introduction ............................................................................................. 2
Safety is Important ......................................................................................2
Region Code ...............................................................................................2
Contents................................................................................................... 3
Safety Information................................................................................... 5
Electrical Information ............................................................................. 6
Wiring Instructions.......................................................................................6
Location of the Controls......................................................................... 7
Remote Control ...........................................................................................8
Getting Started ........................................................................................ 9
In the Box ....................................................................................................9
Compatible Discs ........................................................................................9
Remote Control .........................................................................................10
Connecting External Equipment.......................................................... 11
Using the DVD Recorder ...................................................................... 13
Turning the Unit On/Off .............................................................................13
Initial Setup............................................................................................ 14
Basic Operation..................................................................................... 17
Changing the TV Channel .........................................................................17
Muting the Volume ....................................................................................17
Selecting a Source ....................................................................................17
Getting Help ..............................................................................................18
Playing Discs.............................................................................................18
To Stop Play..............................................................................................19
To Pause Play...........................................................................................19
Fast Forward and Rewind .........................................................................19
Next/Previous Chapter ..............................................................................20
Slow-motion Play ......................................................................................20
Repeat Play...............................................................................................20
Zoom .........................................................................................................22
Subtitle ......................................................................................................22
Audio .........................................................................................................23
Angle .........................................................................................................23
GOTO Function.........................................................................................23
Viewing the On Screen Display (TV).........................................................26
Viewing the On Screen Display (DVD)......................................................26
Viewing the Disc Information Display (DVD Only).....................................26
The Title Function (DVD Only) ..................................................................26
The Program Function (Audio CD Only) ...................................................27
Manual Recording ................................................................................. 29
Setting the Recording Quality ...................................................................29
Setting the Auto Chapter Marker...............................................................30
OTR Recording .........................................................................................31
Timer Recording.................................................................................... 33
Setting the Correct Date and Time............................................................33
3
Page 4

RDVD1002
Setting a Timer Event................................................................................34
To Check/change a Timer Recording .......................................................37
To Delete a Timer Recording ....................................................................38
The Disc Menu....................................................................................... 39
To Play a Title ...........................................................................................39
To Erase a Title (DVD-RW Only) ..............................................................39
To Select a Title ........................................................................................40
To Select an Input Mode ...........................................................................40
To Label a Title .........................................................................................40
To Edit Chapters .......................................................................................41
To Add a Chapter......................................................................................42
To Play a Chapter .....................................................................................43
To Delete a Chapter..................................................................................43
To Hide a Chapter.....................................................................................44
To Unhide a Chapter.................................................................................44
To Change the Chapter Index Picture....................................................... 45
The Channel Menu ................................................................................ 46
Auto Tuning System..................................................................................46
Fine Tune ..................................................................................................47
Programme Swap .....................................................................................48
Erase Programme .....................................................................................49
Country Setup ...........................................................................................49
The Record/Disc Menu .............................................................................50
Record Quality ..........................................................................................51
Auto Chapter .............................................................................................51
Disc Info ....................................................................................................51
Make Compatible ......................................................................................51
Protect Disc...............................................................................................52
Unprotect Disc...........................................................................................52
Erase / Format ..........................................................................................52
Finalise Disc..............................................................................................52
The Video Menu..................................................................................... 54
TV Type.....................................................................................................54
TV System.................................................................................................55
Video Output .............................................................................................55
DVD Subtitle..............................................................................................55
The System Menu.................................................................................. 56
Rating........................................................................................................57
Password ..................................................................................................57
Version ......................................................................................................58
Factory Reset............................................................................................58
Help and Advice .................................................................................... 59
Product Support ........................................................................................60
How Do I Dispose of this Product? ...........................................................60
Technical Specification ........................................................................ 61
Guarantee .............................................................................................. 62
4
Page 5
RDVD1002.book Page 5 Tuesday, January 24, 2006 12:25 PM
Safety Information
WARNING! ENSURE THAT YOU READ ALL OF THE SAFETY
INSTRUCTIONS BEFORE USING YOUR DVD RECORDER.
Power Source
This DVD Recorder requires a 230-240V AC, 50Hz mains supply. Do
not use any other supply.
Safety Considerations
Position the power cable and other connected cables so that they are
not likely to be walked on, pinched or where items can be placed on or
against them.
Do not use this DVD Recorder in humid or damp conditions. Do not
allow the DVD Recorder to get wet, i.e. dripping or splashing. Do not
place water filled items, such as a vase, on top of the DVD Recorder.
Do not place naked flame sources, such as candles on top of the DVD
Recorder.
DVD Recorder
Cleaning
Disconnect the DVD Recorder from the mains supply before cleaning.
Do not use any liquids or aerosol cleaners, as this may damage the
DVD Recorder. Use a soft, damp (not wet) cloth.
Ventilation
Do not cover any of the ventilation slots on the unit, as this may cause
the DVD Recorder to overheat.
Never allow children to insert foreign objects into holes or slots on the
DVD Recorder.
Battery Disposal
Please ensure that used batteries are disposed of safely.
Servicing
There are no user serviceable parts in your DVD Recorder. When
servicing, refer to qualified service personnel.
Consult your dealer if you are ever in doubt about the installation,
operation, or safety of your DVD Recorder.
5
Page 6

RDVD1002.book Page 6 Tuesday, January 24, 2006 12:25 PM
RDVD1002
Electrical Information
This appliance is fitted with a BS1363/A 13 amp plug. If it is not suitable for
your supply sockets it must be removed and replaced with an appropriate plug.
If the plug becomes damaged and/or needs to be replaced please follow the
wiring instructions below. The plug removed must be disposed of immediately.
It must not be plugged into a supply socket as this will be an electrical hazard.
If the fuse needs to be replaced it must be of the same rating and ASTA
approved to BS1362. If the plug is changed, a fuse of the appropriate rating
must be fitted in the plug, adapter or at the distribution board. If the fuse in a
moulded plug is replaced, the fuse cover must be refitted before the appliance
can be used.
Wiring Instructions
The supply cable will be either a BS1362. Follow the appropriate wiring
instructions given below. In both cases ensure that the outer sheath of the
cable is firmly held by the cable clamp
.
2 - CORE
BLUE
(Neutral)
3 - CORE
GREEN and
YELLOW
(Earth)
BLUE
(Neutral)
Cable
clamp
Cable
clamp
Fuse
BROWN
(Live)
Fuse
BROWN
(Live)
WARNING! Do not connect either
!
wire to the earth terminal.
This symbol indicates that this 2-core
appliance is Class ll and does not
require an earth connection.
The wire coloured blue must be connected
to the terminal marked with the letter N or
coloured black.
The wire coloured brown must be connected
to the terminal marked with the letter L or
coloured red.
WARNING! This appliance must
!
be earthed.
The wire coloured green and yellow must
be connected to the terminal marked with
the letter E, or by the earth symbol, , or
coloured green or green and yellow.
The wire coloured blue must be connected
to the terminal marked with the letter N or
coloured black.
The wire coloured brown must be connected
to the terminal marked with the letter L or
coloured red.
6
Page 7
RDVD1002.book Page 7 Tuesday, January 24, 2006 12:25 PM
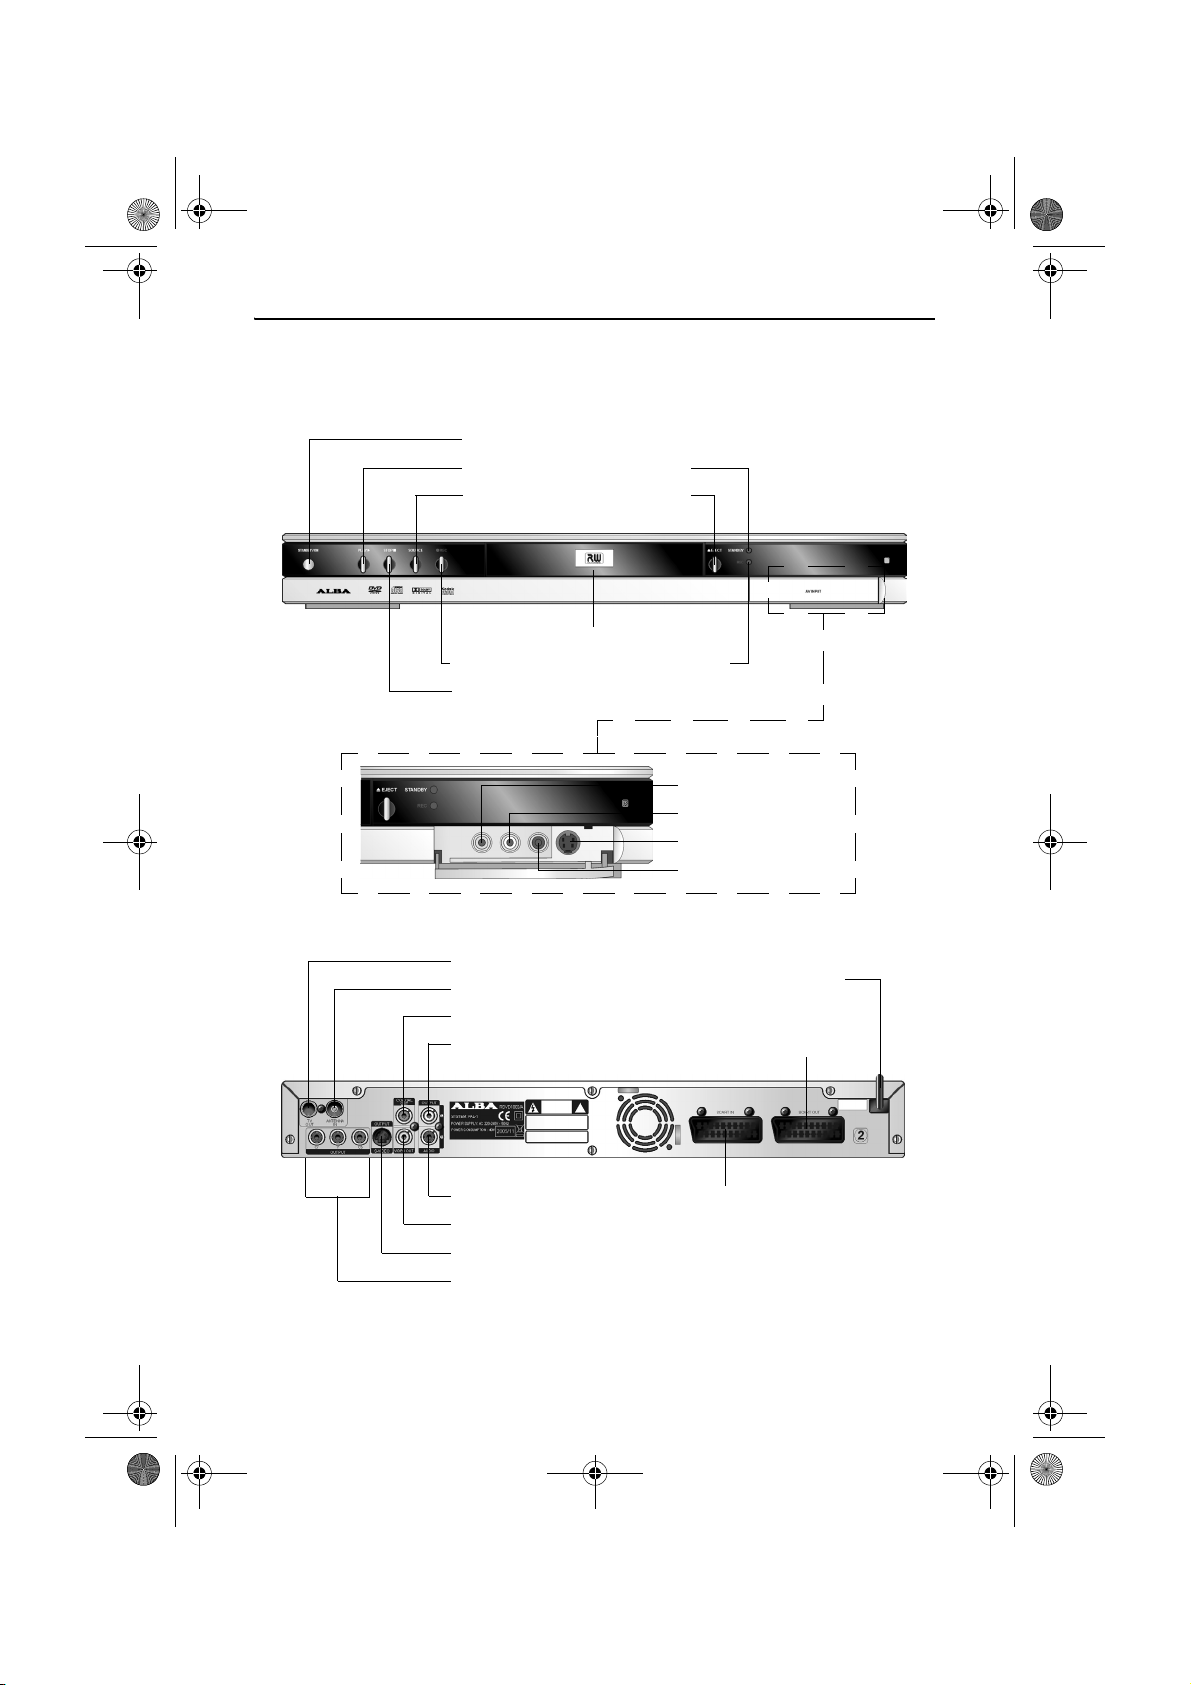
Location of the Controls
Standby
Play
Source
Disc Drawer
Record
Stop
DVD Recorder
Standby LED
Eject
Record LED
CVBS Input
Audio Input Left
S-Video Input
Audio Input Right
Aerial Output (To TV)
Aerial Input
Coaxial Output
Audio Output Left
Audio Output Right
CVBS Output
S-Video Output
RGB Component Video Output
SCART Socket 1
(Connection to TV)
SCART Socket 2
(Connection to
External Device)
Power Cable
7
Page 8
RDVD1002.book Page 8 Tuesday, January 24, 2006 12:25 PM
RDVD1002
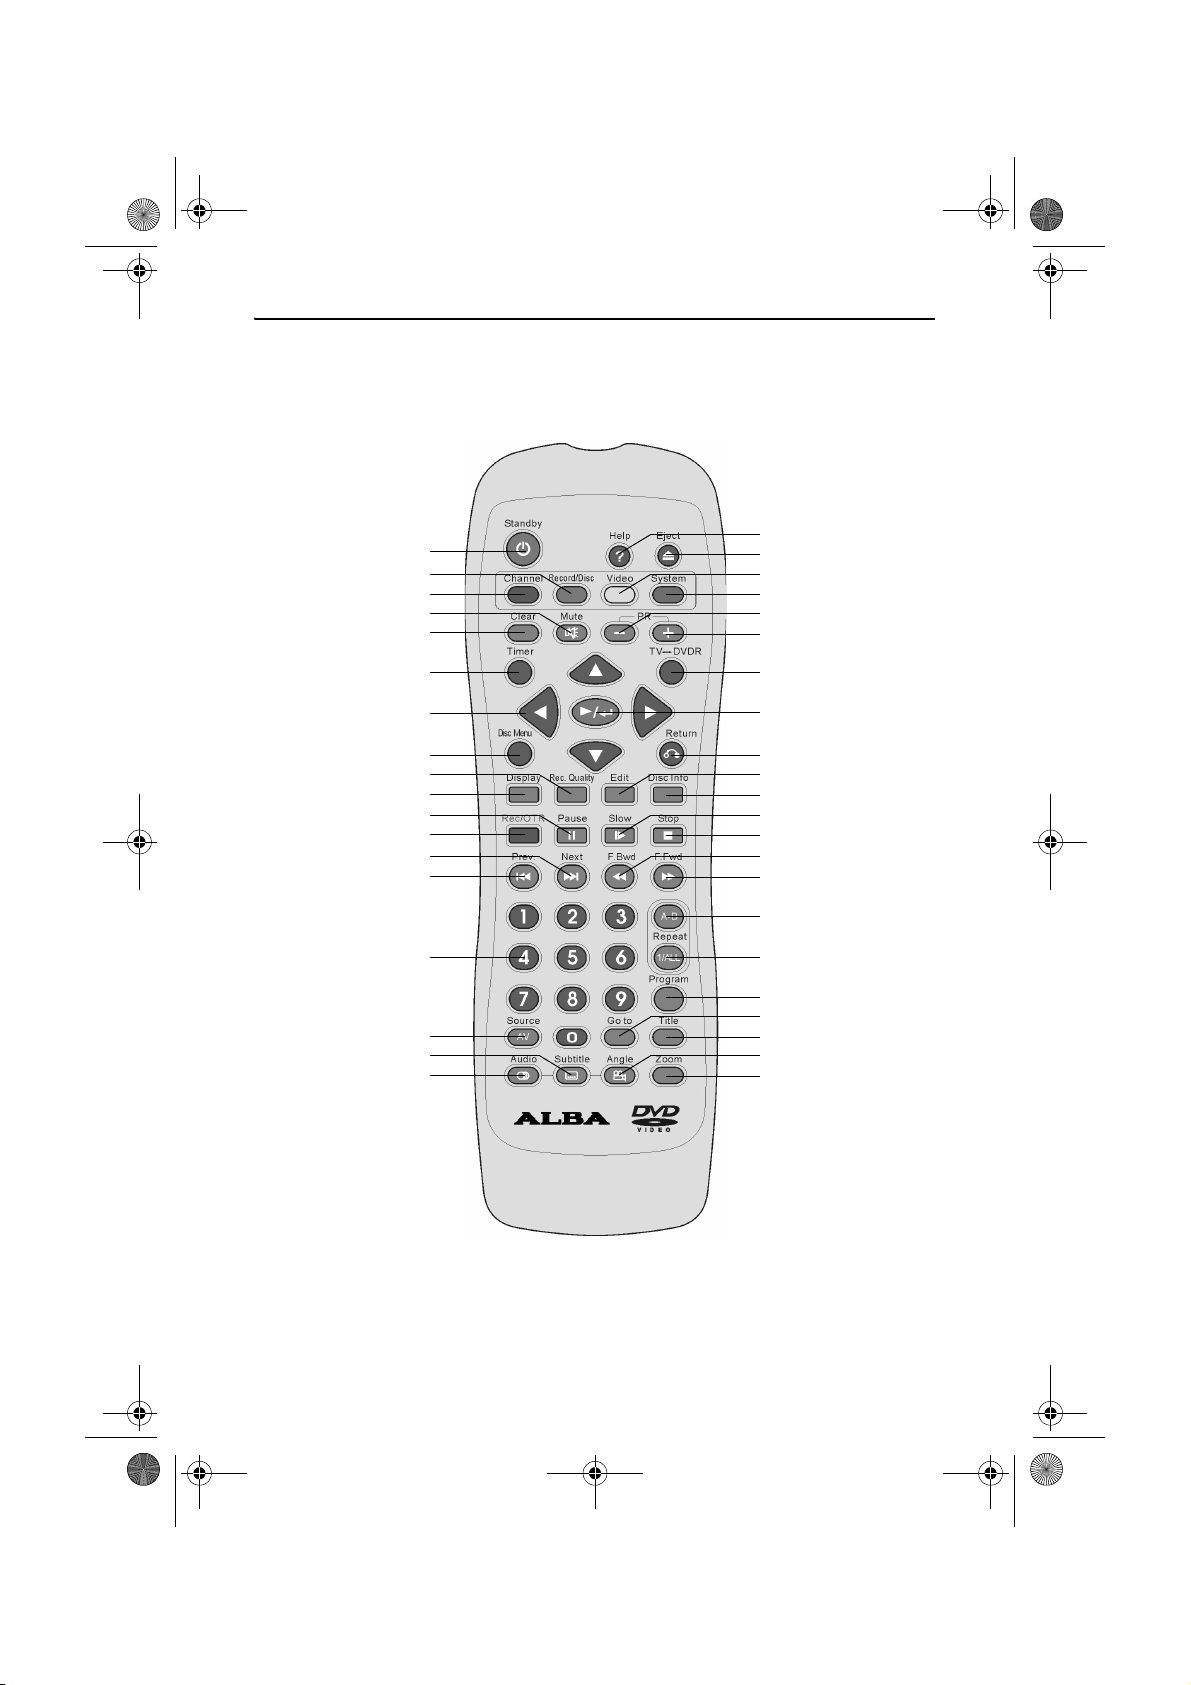
Remote Control
Standby
Record/Disc
Channel
Mute
Clear
Timer
Arrow Buttons
Disc Menu
Rec. Quality
Display
Pause
Record/OTR
Next
Prev
Numeric Buttons
Source AV
Subtitle
Audio
Help
Eject
Video
System
PRPR+
TV/DVDR
Play/Enter
Return
Edit
Disc Info
Slow
Stop
F. BW D
F. FW D
A-B Repeat
1/All Repeat
Program
Goto
Title
Angle
Zoom
8
Page 9
RDVD1002.book Page 9 Tuesday, January 24, 2006 12:25 PM
Getting Started
Remove your DVD Recorder carefully from the box. You may wish to
store the packaging for future use.
In the Box
Included in this package should be:
• Alba DVD Recorder
• Remote Control (including batteries)
• Blank DVD-RW Disc
• RF Aerial Cable
• Scart Lead
• RCA audio/video cable
• RGB Component video cable
• User Guide
DVD Recorder
Should any of these items be missing, please contact Product Support:
Telephone: 0870 873 0078
Internet: www.alba-radio.co.uk
Compatible Discs
Your DVD Recorder can play discs that are marked with the following
logos:
8cm/12cm DVD Video Discs including DVD-R/RW and
DVD+R/RW.
8cm/12cm Compact Disc Audio Discs including CD-R and
CD-RW.
8cm/12cm Photo Compact Discs including JPEG and Kodak
picture CDs.
Your DVD Recorder can record onto discs that are marked with the
following logos:
12cm DVD+RW rewritable DVD discs.
12cm DVD+R write once DVD discs.
9
Page 10
RDVD1002.book Page 10 Tuesday, January 24, 2006 12:25 PM
RDVD1002
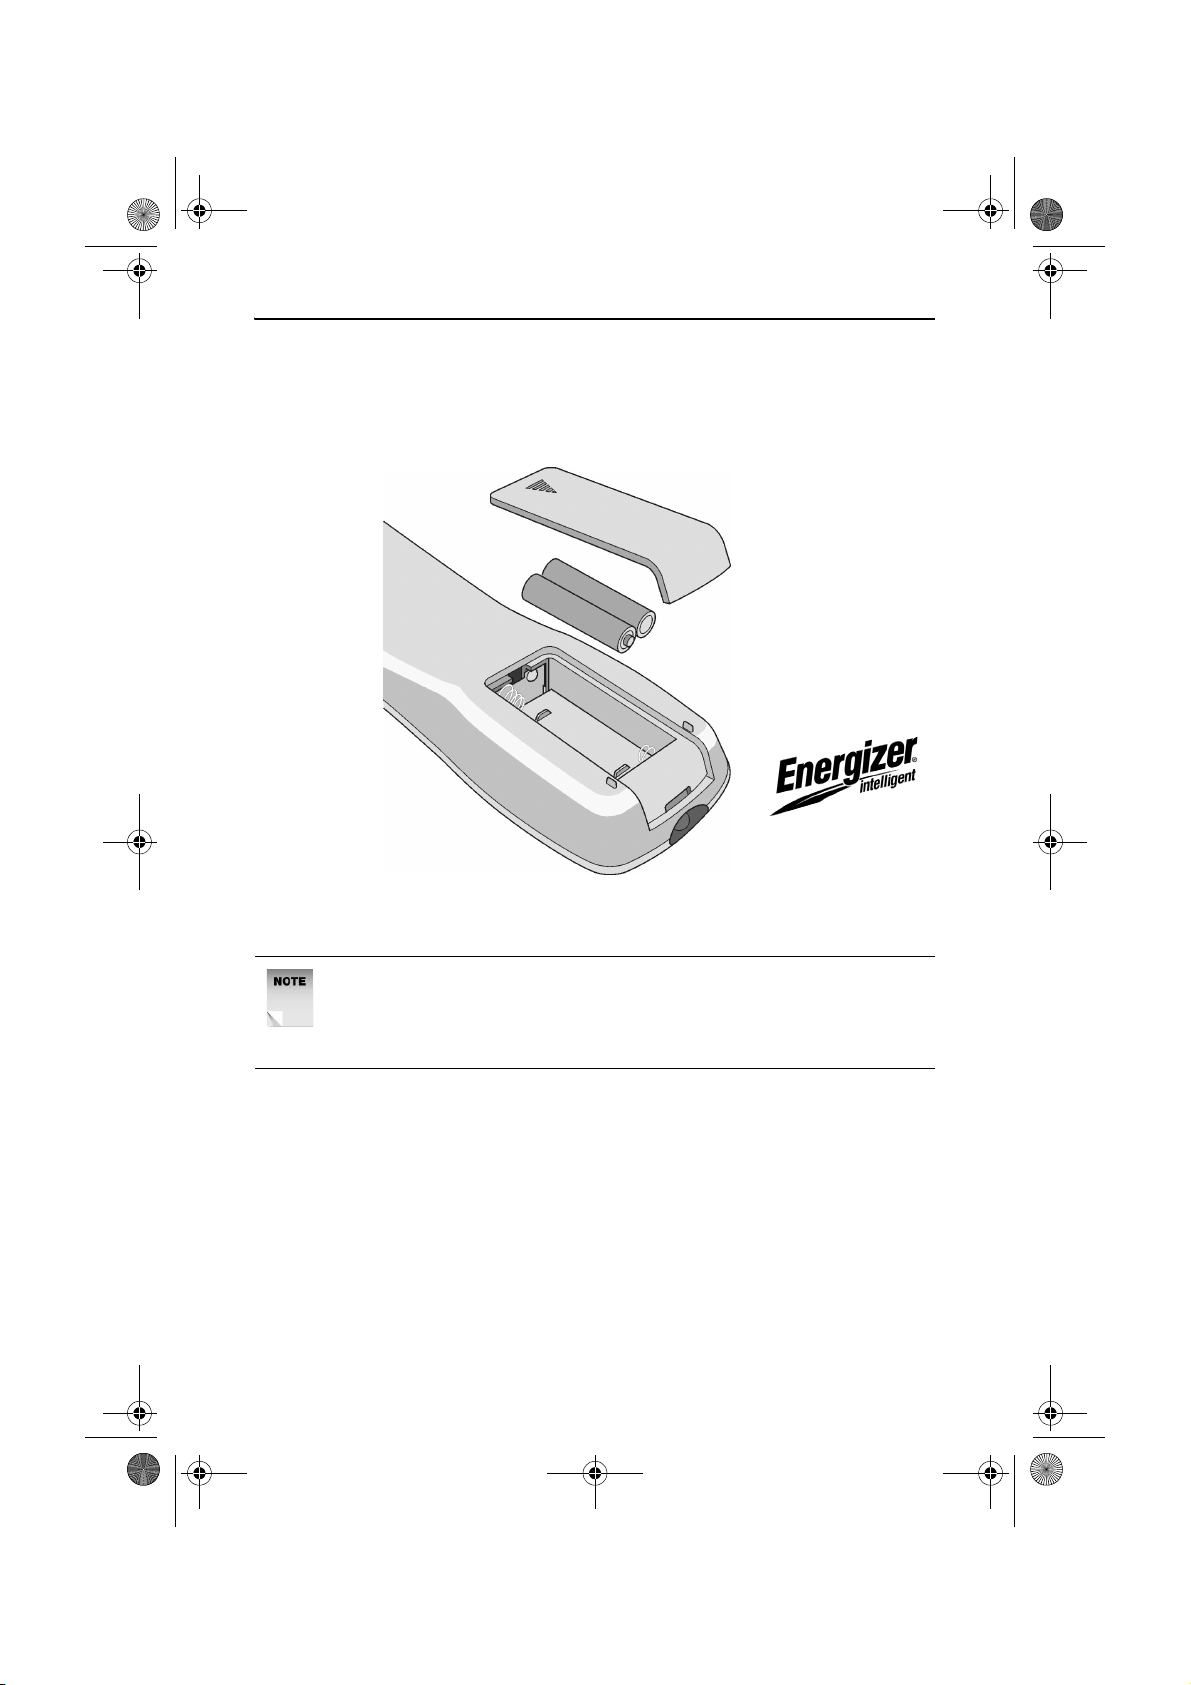
Remote Control
Remove the battery compartment cover on the rear of the remote
control. Insert 2 x AAA batteries (supplied), ensuring you follow the
polarity diagram inside the compartment.
We recommend the
of Ever Ready
use
Energizer batteries
Replace the battery compartment cover.
NOTE: Remove the batteries from the remote control if not in use
for a long period of time. Do not mix normal batteries with
rechargeable batteries. When batteries become weak the remote
control may not work properly.
Using the Remote Control
To use the remote control, point it at the front of the DVD Recorder.
The remote control has a range of up to 6 metres from the DVD
Recorder and at an angle of up to 60 degrees.
Do not block the path of the beam from the remote control to the DVD
Recorder.
10
Page 11
RDVD1002.book Page 11 Tuesday, January 24, 2006 12:25 PM
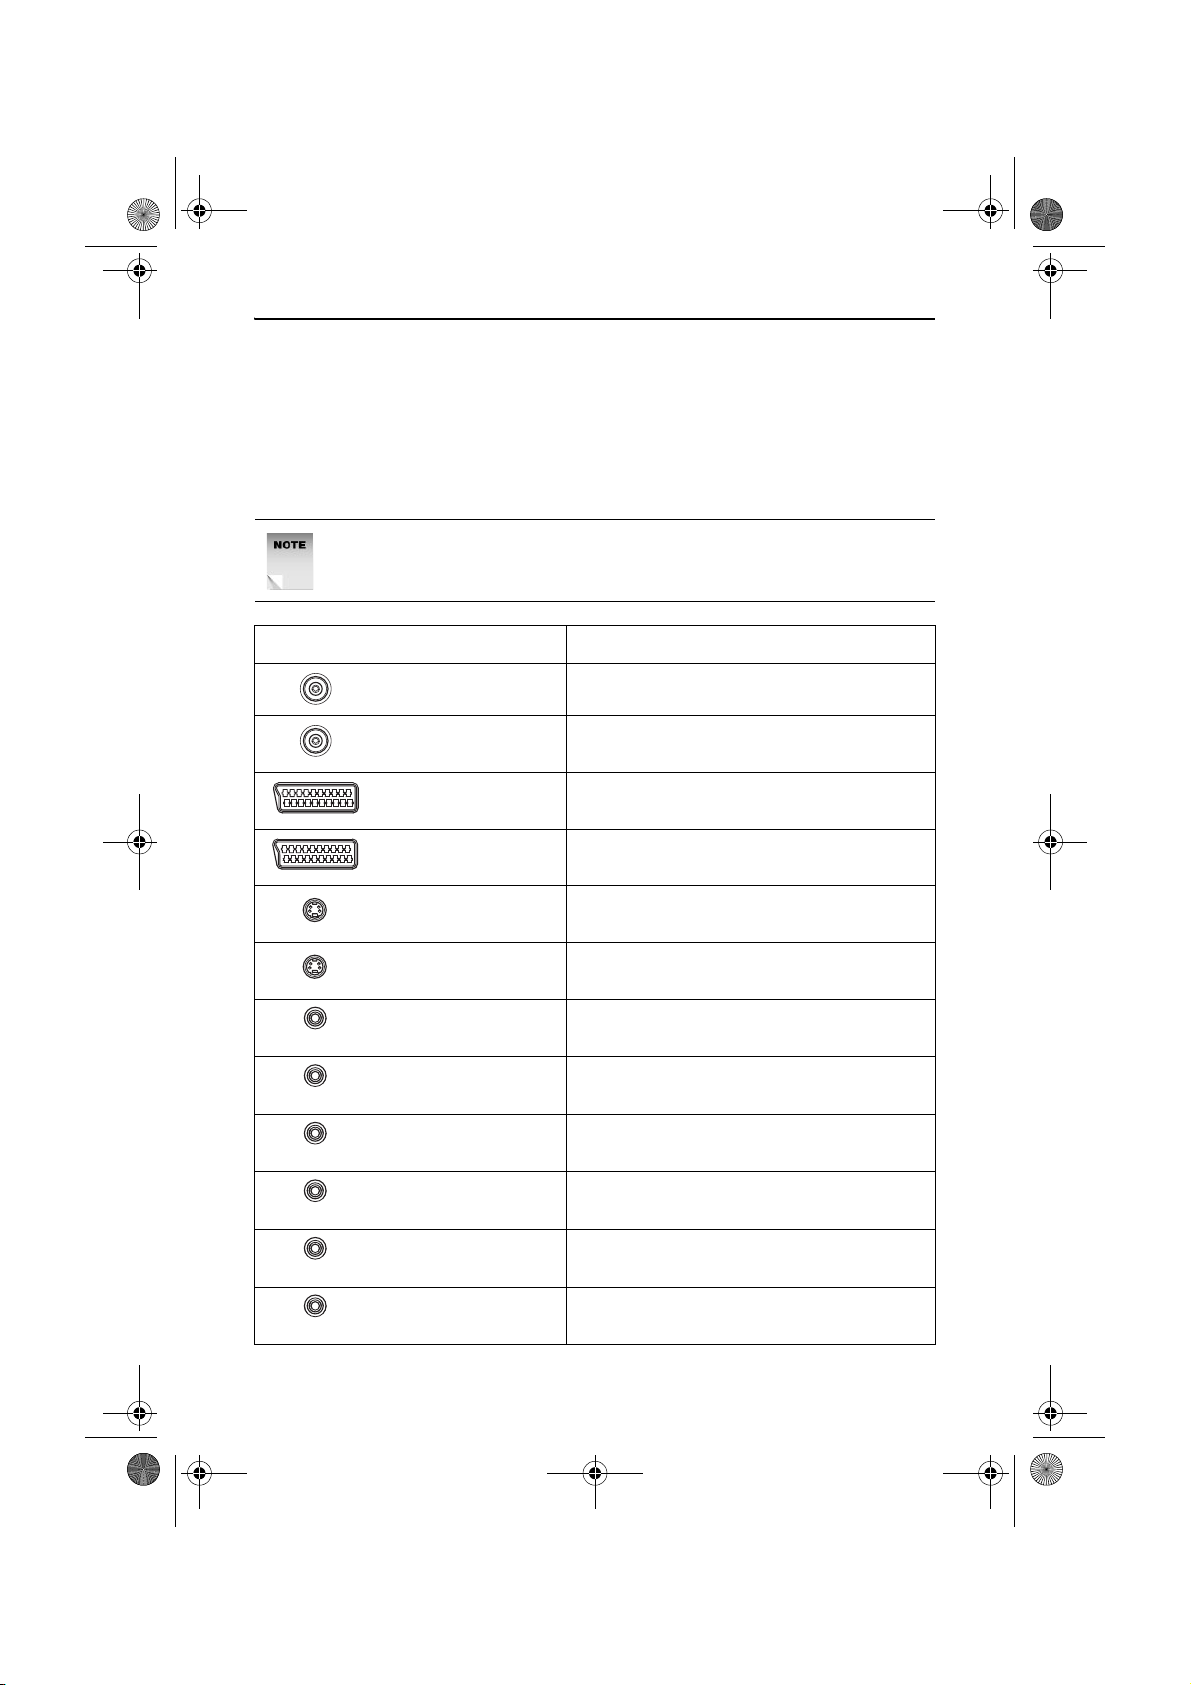
Connecting External Equipment
You can connect a wide range of audio and video equipment to and
from your DVD Recorder.
The following table lists a range of the available connectors on the DVD
Recorder.
NOTE: Refer to the manufacturer’s guide for further instructions on
how to connect the equipment.
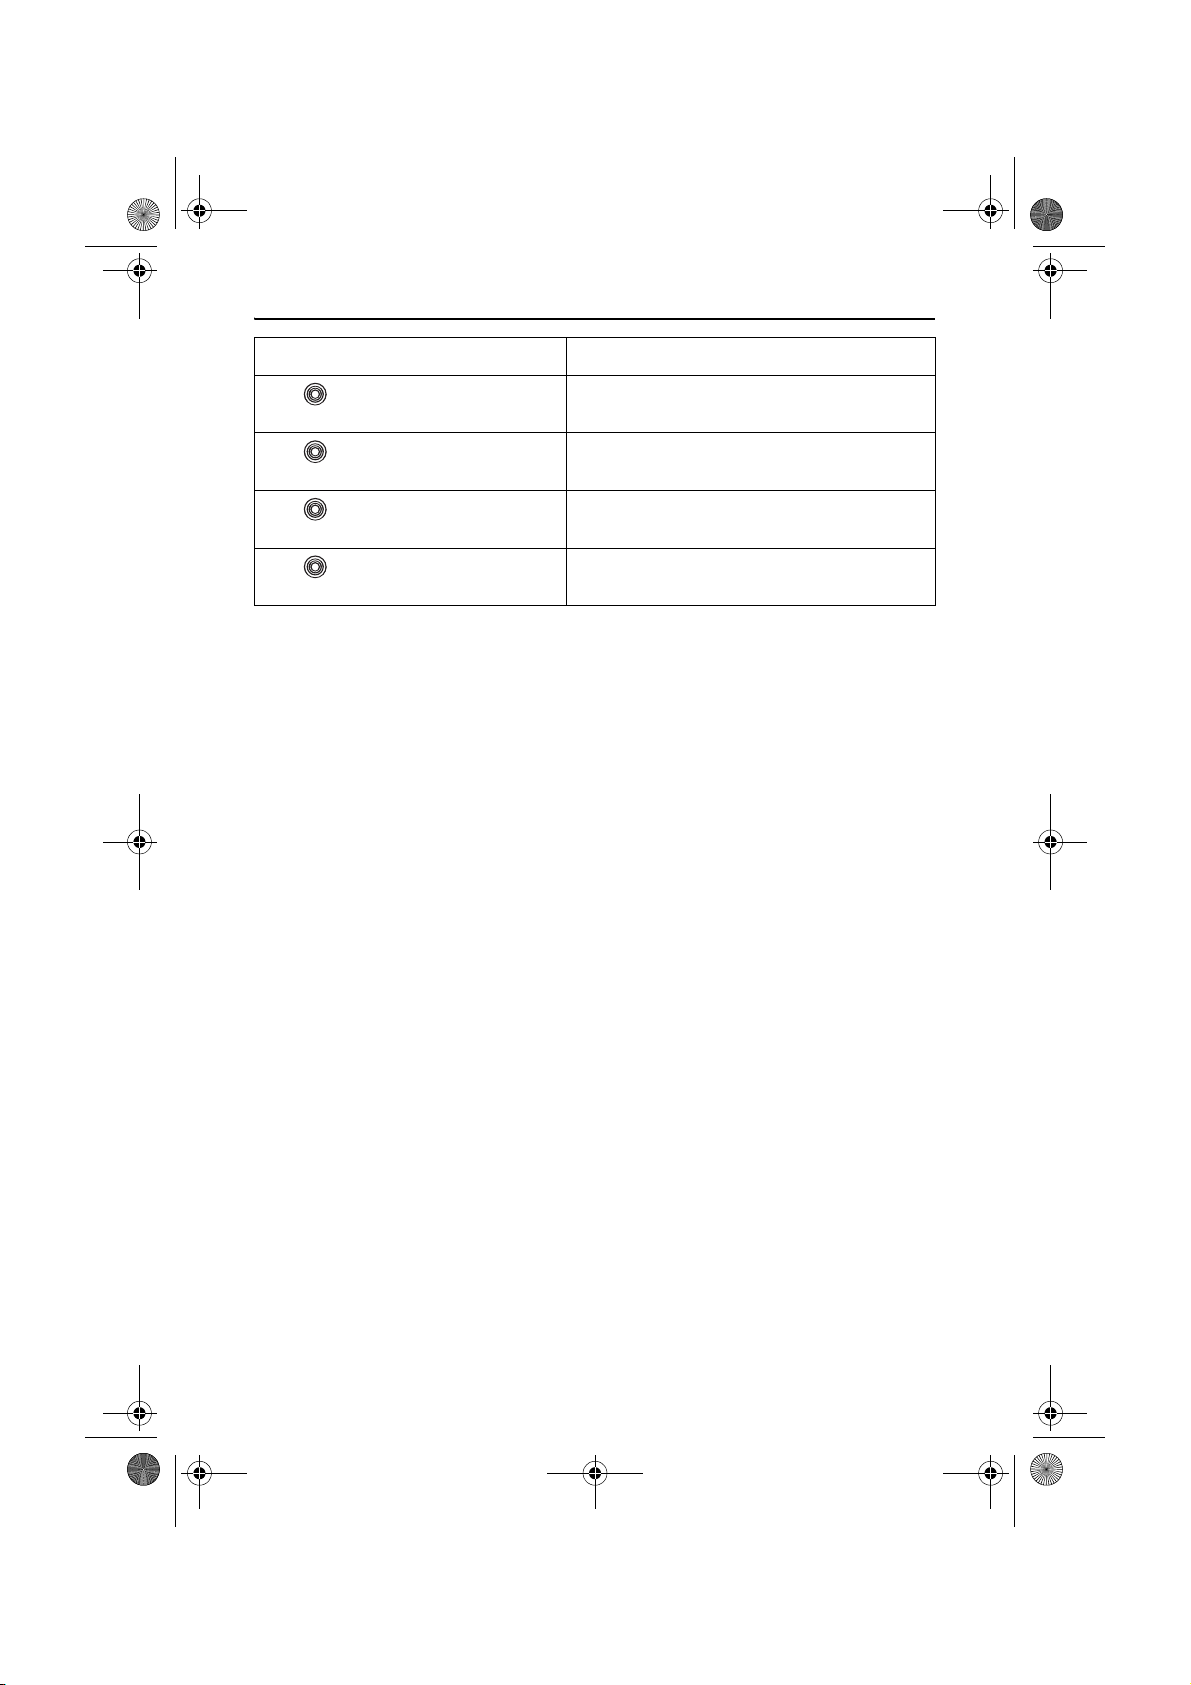
Connector Purpose
Antenna In Receives TV signals from an external
aerial.
TV Out Transmits TV signals to the television.
Scart In Receives a complete AV (Audio Visual)
signal from external devices.
DVD Recorder
(Yellow)
(Yellow)
(Orange)
(Red)
(Green)
(Blue)
Scart Out Transmits a complete AV (Audio Visual)
signal to the television.
S-Video In Receives high quality video signal only (no
audio) from external devices.
S-Video Out Transmits high quality video signal only (no
audio) to the television.
Video In Receives video signal only (no audio) from
external devices.
Video Out Transmits video signal only (no audio) to
the television.
Coaxial Out Transmits video signal only (no audio) to an
external device.
Cr Output Transmits the Cr component video signal
only (no audio) to the television.
Y Output Transmits the Y component video signal
only (no audio) to the television.
Cb Output Transmits the Cb component video signal
only (no audio) to the television.
11
Page 12
RDVD1002.book Page 12 Tuesday, January 24, 2006 12:25 PM
RDVD1002
Connector Purpose
Audio Input (L) Receives audio signals to the left audio
(White)
Audio Input (R) Receives audio signals to the right audio
(Red)
Audio Output (L) Transmits audio signals for the left audio
(White)
Audio Output (R) Transmits audio signals for the right audio
(Red)
channel only.
channel only.
channel to an external device.
channel to an external device.
12
Page 13
RDVD1002.book Page 13 Tuesday, January 24, 2006 12:25 PM
Using the DVD Recorder
Turning the Unit On/Off
Your DVD Recorder requires a mains supply of 230-240 Volts AC at
50Hz. Please ensure that your mains supply is compatible.
Insert the mains plug into a mains socket and switch on.
Initially the DVD Recorder will be in standby (Off) mode and the standby
indicator will glow red.
Press the STANDBY button (on the front of the DVD Recorder). The
standby indicator will glow green, indicating that the DVD Recorder is
on.
To switch the DVD Recorder to standby, press the STANDBY button on
remote control or on the DVD Recorder.
NOTE: The DVD Recorder is not disconnected from the mains
power supply while in the standby mode.
DVD Recorder
If the DVD Recorder is not going to be used for a long period disconnect
from the mains supply.
13
Page 14
RDVD1002.book Page 14 Tuesday, January 24, 2006 12:25 PM
RDVD1002
Initial Setup
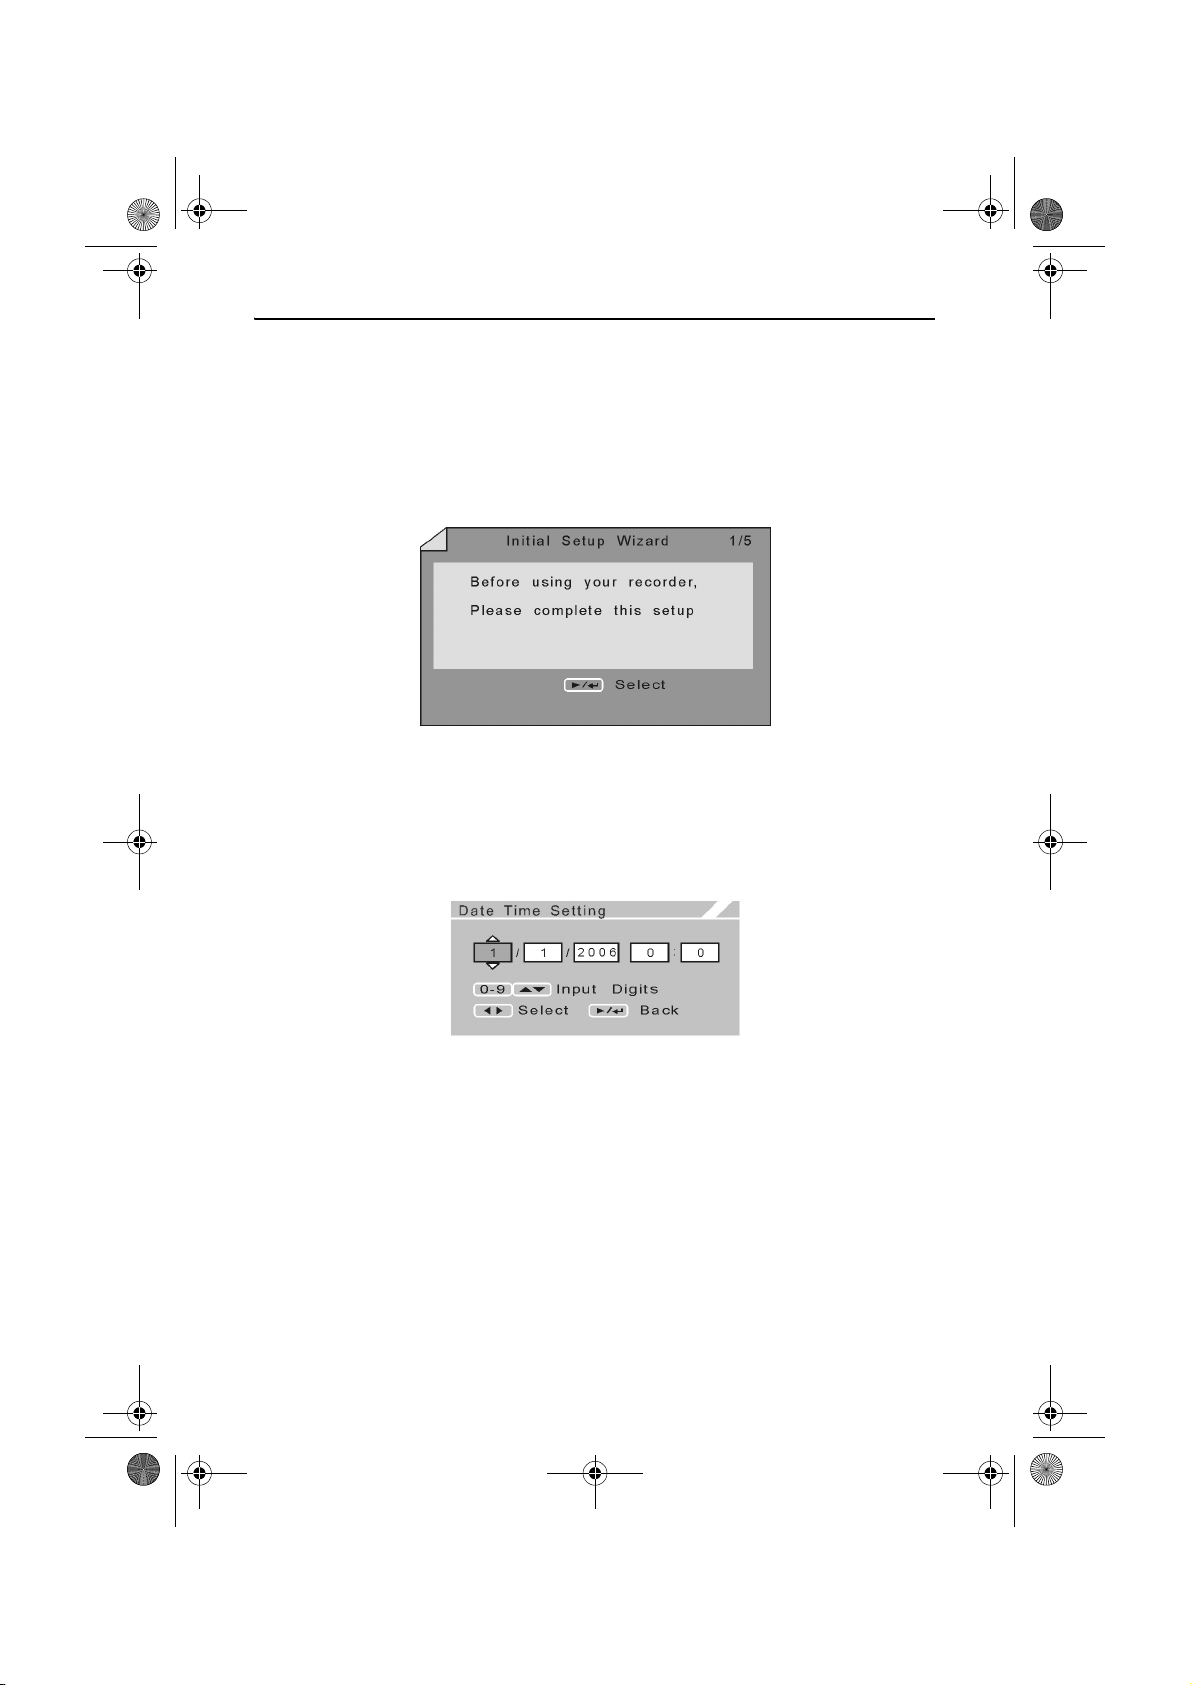
Starting the Initial Setup Wizard
When you switch on your DVD Recorder for the first time, you will need
to complete the initial setup wizard.
Press the STANDBY button to turn the DVD Recorder on. The Initial
Setup Wizard will appear as shown below.
Press the PLAY/ENTER button to begin the Initial Setup Wizard.
Entering the Date Time Settings
The DVD Recorder requires the correct date and time to be set for timer
recordings to be performed. The Date Time Settings screen will appear
as shown below.
Use the LEFT and RIGHT ARROW buttons to select the Day (D), Month
(M), Year (Y), Hours (H) and Minutes (M). To adjust the selection, use
the UP or DOWN ARROW buttons or alternatively enter a value using
the NUMERIC buttons.
Once the correct date and time have been set, press the PLAY/ENTER
button.
14
Page 15
RDVD1002.book Page 15 Tuesday, January 24, 2006 12:25 PM
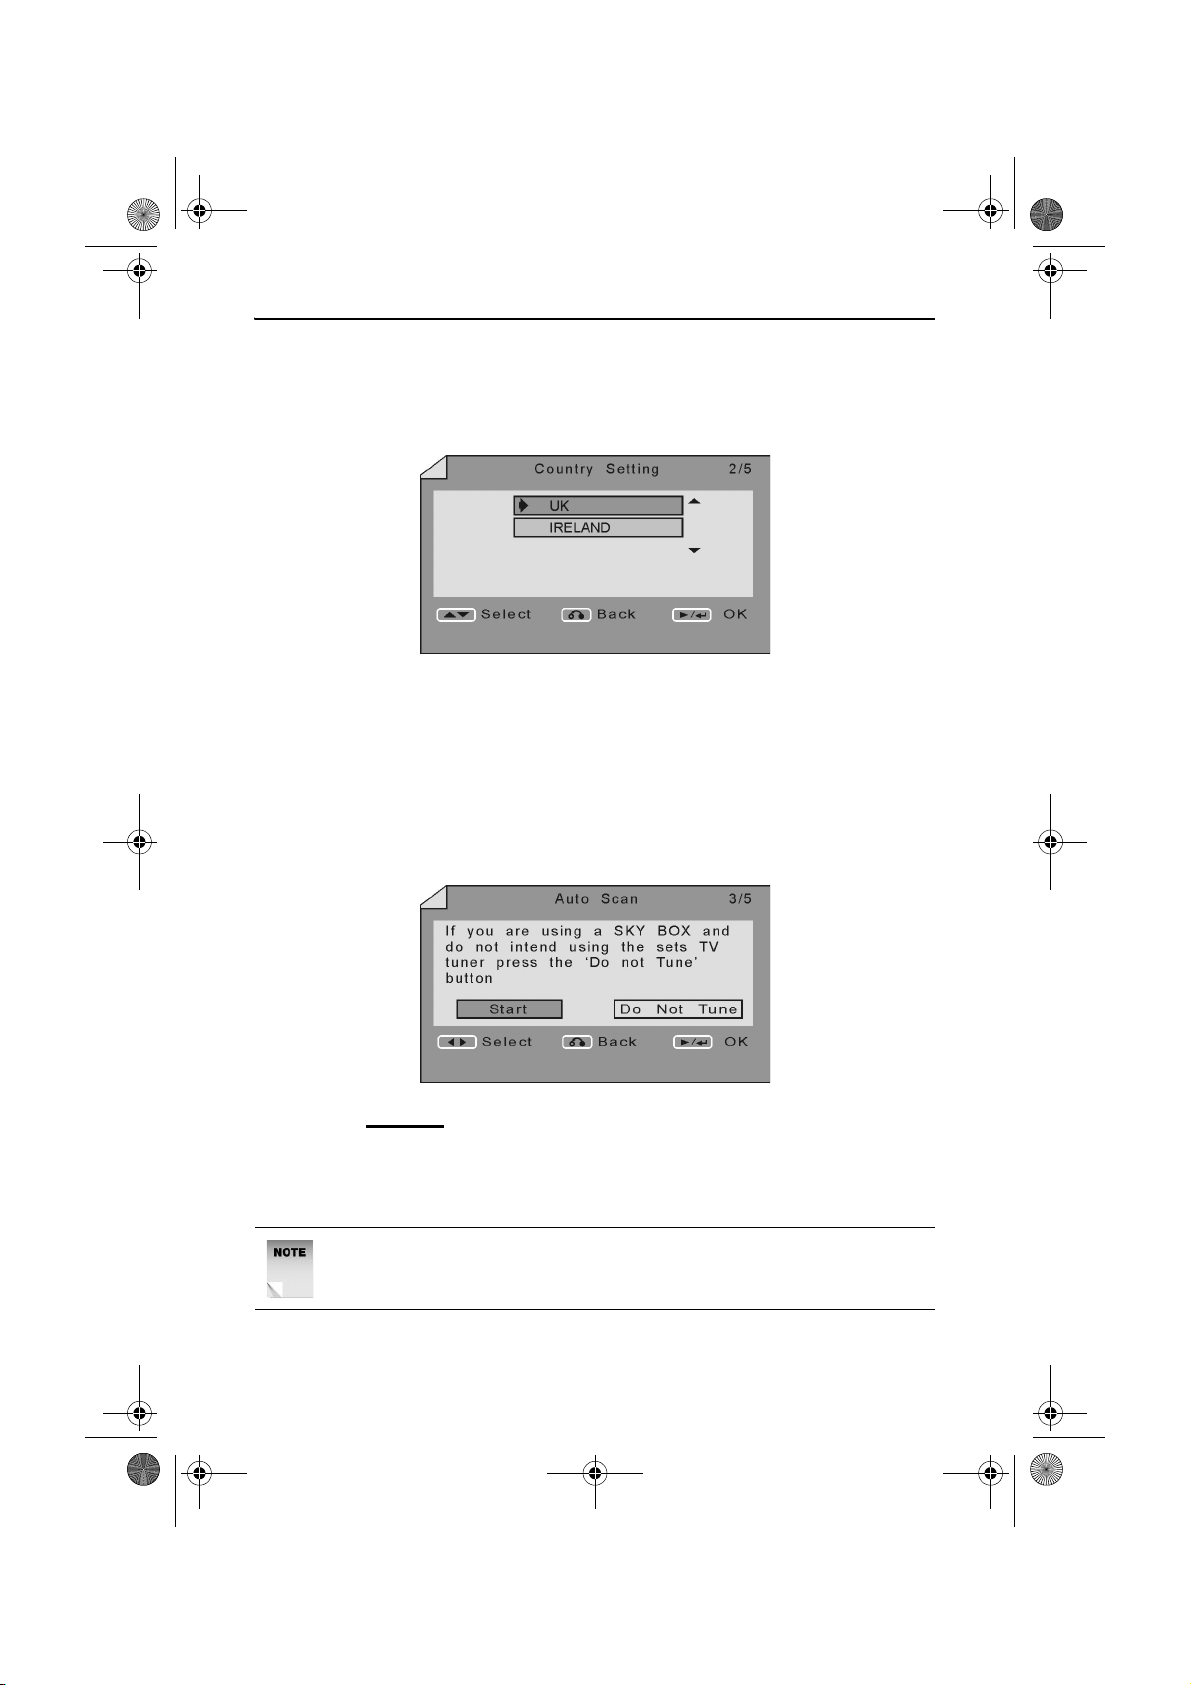
Country Setting
To ensure the DVD Recorder operates correctly, you must select an
appropriate country. The Country Setting screen will appear as shown
below.
Use the UP and DOWN ARROW buttons to select the appropriate
country.
Once the correct Country is selected, press the PLAY/ENTER button.
Auto Scanning for Channels
The Initial Setup Wizard allows the user to select between using the
DVD Recorder to receive terrestrial channels or to use a decoder. The
Auto Scan screen will appear as shown below.
DVD Recorder
If you DO NOT
want to use the DVD Recorder as a receiver, use the
LEFT and RIGHT ARROW buttons to select Do Not Tune. Press the
PLAY/ENTER button to confirm your selection. You will be presented
with the Complete screen as described below.
NOTE: It is possible to tune the DVD Recorder into all available
channels at a later date if required. See page 46.
15
Page 16
RDVD1002.book Page 16 Tuesday, January 24, 2006 12:25 PM
RDVD1002
If you DO
want to use the DVD Recorder as a receiver, use the LEFT
and RIGHT ARROW buttons to select Start. The DVD Recorder will
begin to scan for all available channels and automatically save them to
memory.
NOTE: The search may take a few minutes to complete, please be
patient.
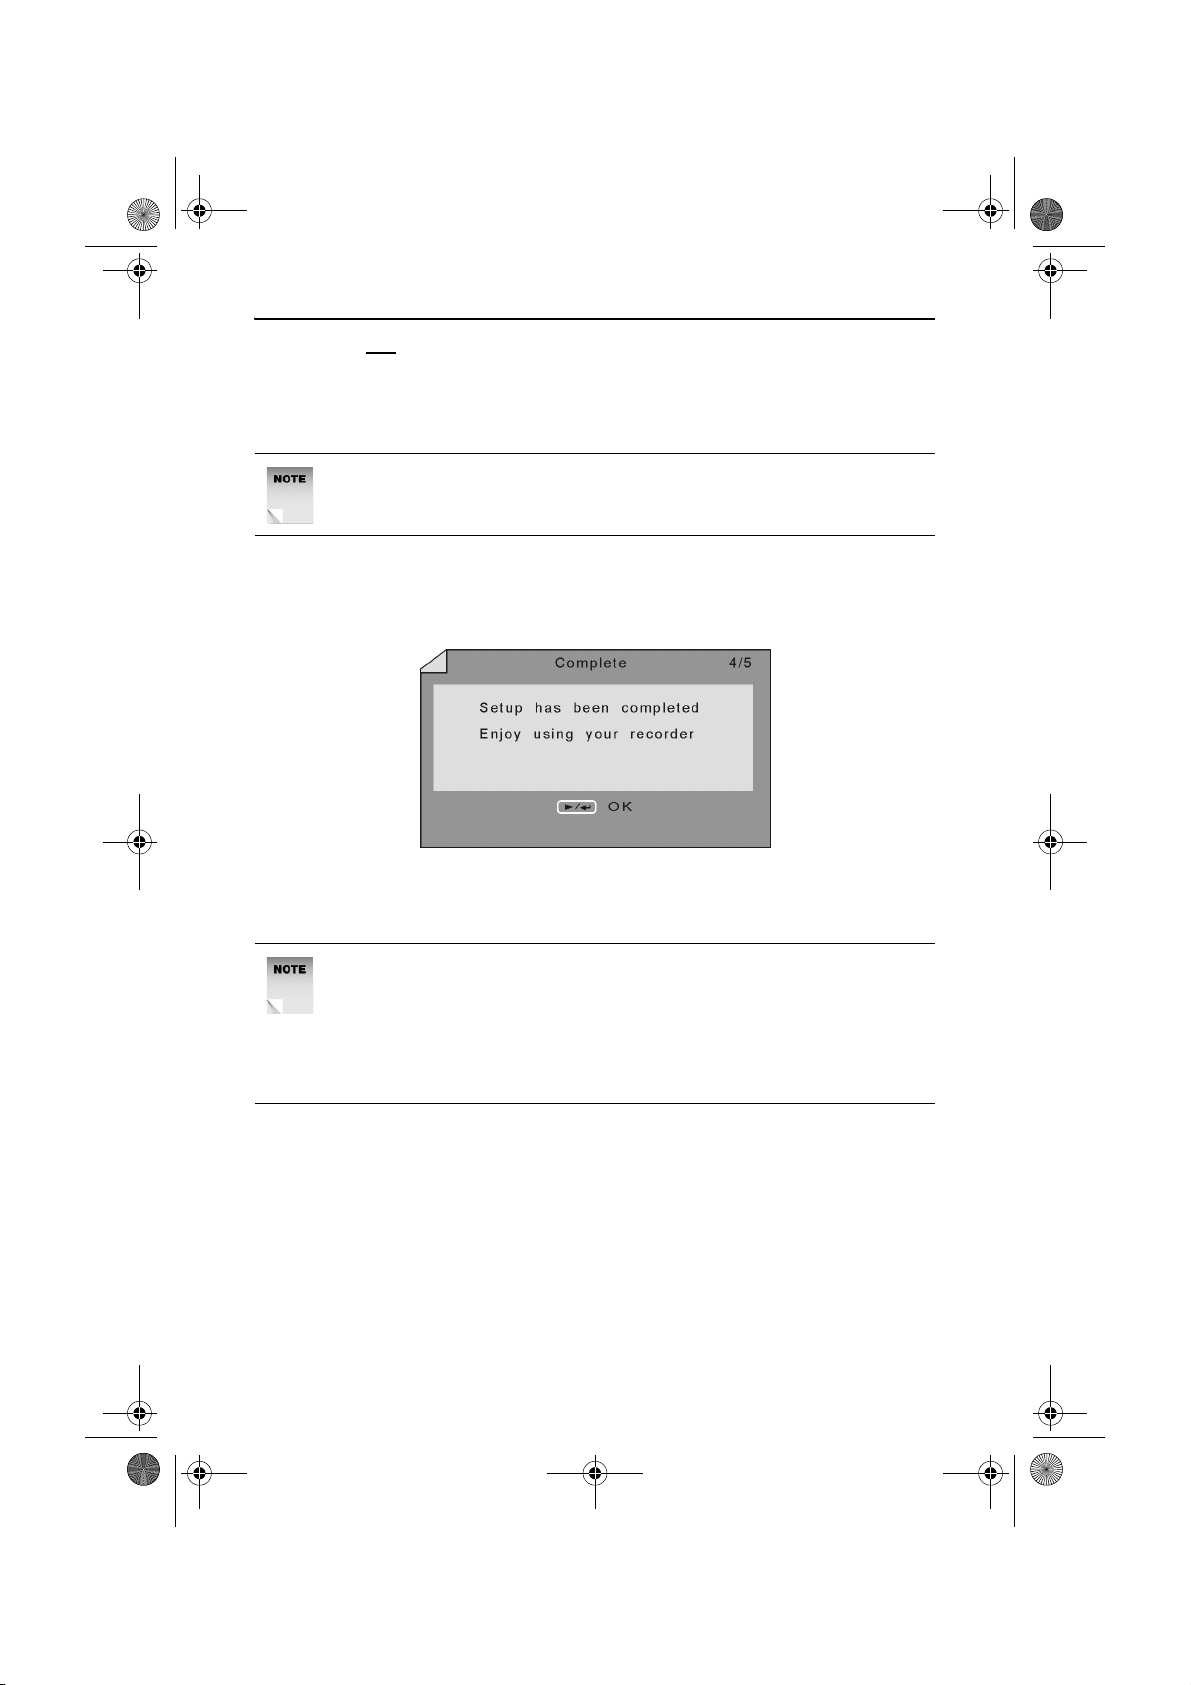
Initial Setup Wizard Completion
Once the Initial Setup Wizard has been successfully completed, the
Complete screen will appear as shown below.
Press the PLAY/ENTER button to finish the Initial Setup Wizard and
start using the DVD Recorder.
NOTE: If the order in which the channels are stored is incorrect and
you wish to rearrange them, please perform the Programme Swap
as described on page 48. Press the CHANNEL button to access
the Channel Menu and press the DOWN ARROW button to
highlight programme swap. Press the PLAY/ENTER button to
show the Program Swap Menu.
If the order in which the channels are stored is incorrect and you wish
to rearrange them, please perform the Programme Swap as described
on page 48.
16
Page 17
RDVD1002.book Page 17 Tuesday, January 24, 2006 12:25 PM
Basic Operation
Changing the TV Channel
Press the PR+ button to change the channel up.
Press the PR- button to change the channel down.
Muting the Volume
Press the MUTE button to turn the volume off.
Press the MUTE button again to turn the volume on.
Selecting a Source
To select a source, press the SOURCE button to cycle through the
available sources. The available sources are listed below.
Source Description
PR Records from the selected TV channel.
F AV Records from the front RCA component
video connectors.
F SV Records from the front S-Video
connectors.
SCART Records from the rear Scart In
connector.
DVD Recorder
17
Page 18
RDVD1002.book Page 18 Tuesday, January 24, 2006 12:25 PM
RDVD1002
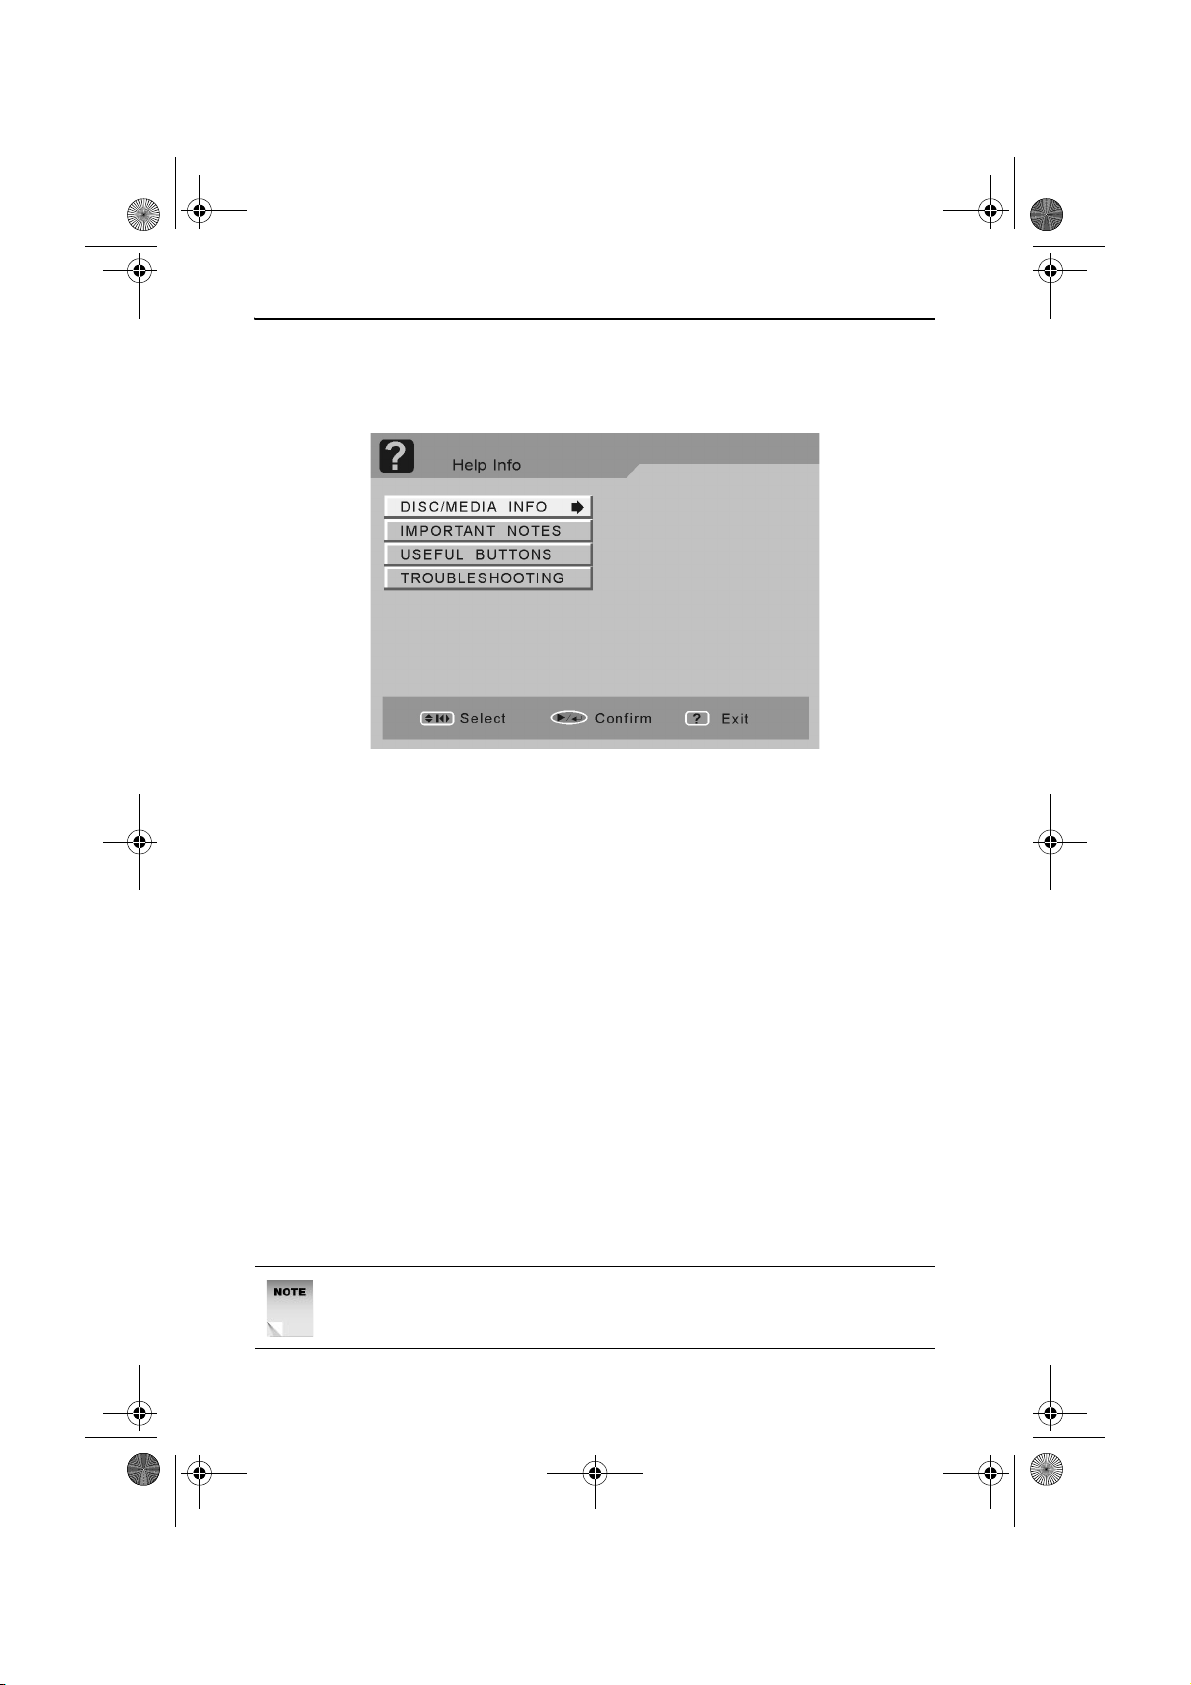
Getting Help
To view helpful information on using the DVD Recorder, press the
HELP button at any time. The following screen will appear.
Use the UP and DOWN ARROW buttons to highlight an option.
Press the PLAY/ENTER button to select an option.
Press the RETURN button to return to the main Help menu screen.
Press the HELP button to exit the Help menu screen.
Playing Discs
Press the STANDBY button to turn the DVD Recorder on.
Press the EJECT button to open the disc drawer and insert a disc.
Insert inside the disc drawer guides.
Insert one disc only.
Press the EJECT button to close the disc drawer.
Press the PLAY/ENTER button.
The disc drawer must be closed before playback begins.
The DVD Recorder takes some time to read the disc before playback
starts.
NOTE: If the disc is inserted upside down, the DVD Recorder will
not recognise that any disc has been inserted.
18
Page 19
RDVD1002.book Page 19 Tuesday, January 24, 2006 12:25 PM
If a DVD is Inserted
The film may start automatically or you may be presented with a menu
screen, this is dependent on the way the DVD disc has been created by
the movie company.
Some functions such as skip or search may be disabled during some
sections of the disc (usually the legal notices).
If a CD is Inserted
The ALBA screen will appear with the track number, elapsed track time
and the currently selected repeat mode in the top left hand corner of the
screen. Playback will automatically begin from the first track.
If a JPEG/Picture CD is Inserted
A menu will appear on screen displaying the files and folders on the
disc.
To Stop Play
Press the STOP button.
DVD Recorder
The DVD Recorder will enter Pre-Stop mode. The display will show
‘Press PLAY key to continue’. If the PLAY/ENTER button is pressed,
playback will start from the last played position of the disc.
If the disc is removed or the STOP button is pressed a second time the
pre-stop function will be cleared and playback will start from the start of
the disc.
To Pause Play
Press the PAUSE button.
A ‘freeze frame’ is shown on the screen until you resume playback.
Press the PAUSE button again to restart play.
Fast Forward and Rewind
During playback, press the F.FWD or the F.BWD button.
There are five search speeds (up to 32x when playing DVDs). Each
press increases the search speed.
Press the PLAY/ENTER button to restart play.
19
Page 20
RDVD1002.book Page 20 Tuesday, January 24, 2006 12:25 PM
RDVD1002
Next/Previous Chapter
During playback,
To jump to the next chapter, press the NEXT button.
To jump to the beginning of the previous chapter, press the PREV
button twice.
Slow-motion Play
During playback, press the SLOW button.
There are four slow-motion speeds (1/2, 1/4, 1/8, and 1/16). Each press
increases the slow-motion speed.
NOTE: Repeated presses of the SLOW button will cycle through
forward and reverse slow motion play modes.
Press the PLAY button to restart play.
Repeat Play
The repeat function allows you to repeat different sections of a DVD, CD
or KODAK Picture CD. The choices of repeat available depend on the
type of disc inserted.
Chapter Repeat (DVD Only)
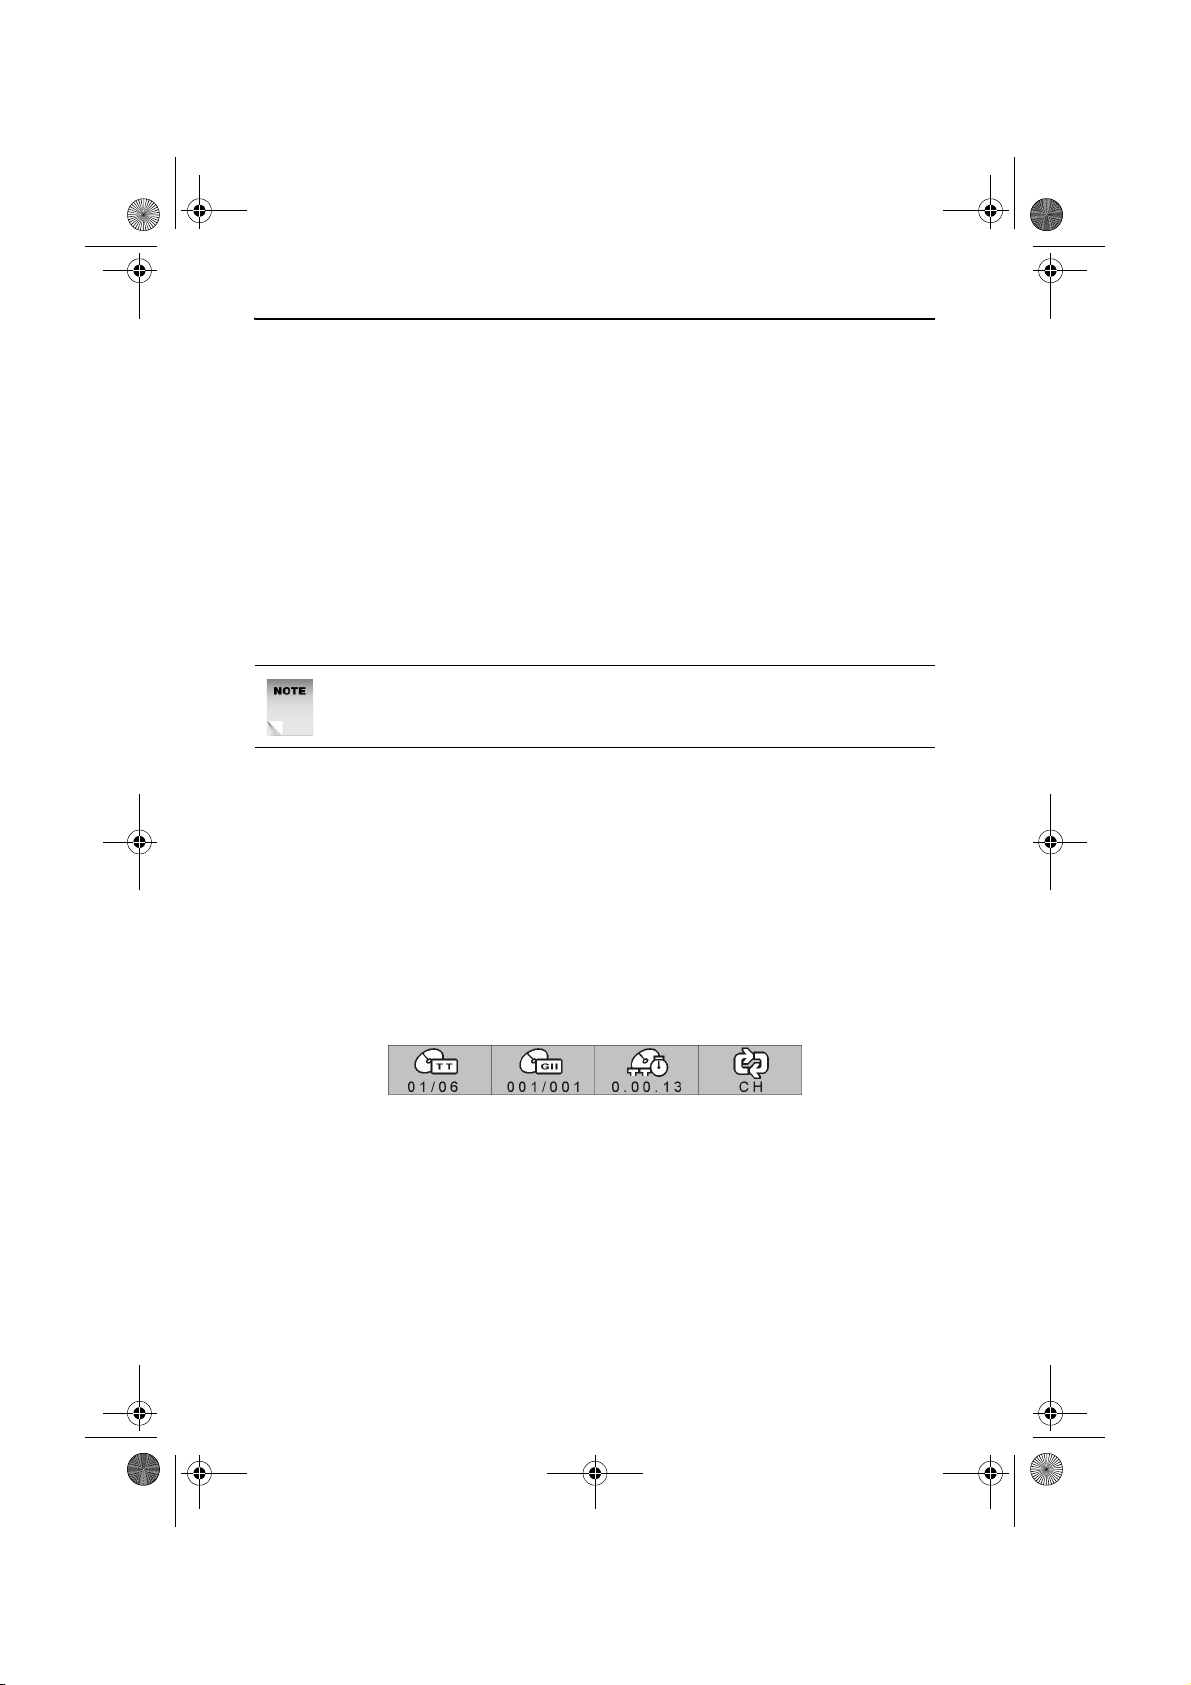
To repeat a chapter, press the REPEAT 1/ALL button once. The DVD
Information bar will appear as shown below with CH displayed under the
repeat icon.
The current chapter is repeated when the end of the chapter is reached.
Title Repeat (DVD Only)
To repeat a title, press the REPEAT 1/ALL button twice. The DVD
Information bar will appear as shown above with TT displayed under the
repeat icon.
The current title is repeated when the end of the chapter is reached.
20
Page 21

RDVD1002.book Page 21 Tuesday, January 24, 2006 12:25 PM
DVD Repeat (DVD Only)
To repeat the entire DVD, press the REPEAT 1/ALL button three times.
The DVD Information bar will appear as shown above with ALL
displayed under the repeat icon.
The entire DVD is repeated once the end of the DVD is reached.
Random Track Repeat (CD Only)
To randomly repeat tracks, press the REPEAT 1/ALL button once. The
CD Information bar will appear as shown below with RANDOM
displayed under the repeat icon.
The DVD Recorder will randomly play all the tracks on the CD
continuously.
Track Repeat (CD Only)
To repeat an individual track, press the REPEAT 1/ALL button twice.
The CD Information bar will appear as shown above with TRACK
displayed under the repeat icon.
DVD Recorder
The current track is repeated when the end of the track is reached.
CD Repeat (CD Only)
To repeat the entire CD, press the REPEAT 1/ALL button three times.
The CD Information bar will appear as shown above with ALL displayed
under the repeat icon.
The entire CD is repeated once the end of the last track is reached.
Cancelling Repeat Play (DVD and CD)
To cancel the repeat function, press the REPEAT 1/ALL button until Off
is displayed in either the DVD or CD Information bar.
Repeat a Specific Section (Repeat A-B)
The repeat A-B function allows a selected portion of a track, title or
chapter of any length to be repeated.
When the required start point has been reached, press the REPEAT
A-B button.
The Repeat 'A' Icon will be displayed.
21
Page 22

RDVD1002.book Page 22 Tuesday, January 24, 2006 12:25 PM
RDVD1002
When the required stop point has been reached, press the REPEAT
A-B button.
The Repeat 'A-B' Icon will be displayed. The selected portion will be
repeatedly played.
To cancel the Repeat A-B function, press the REPEAT A-B button. The
Repeat 'A-B' Icon will disappear.
Zoom
You have six preset zoom factors to choose from: x2, x3, x4, 1/2, 1/3,
1/4.
Press the ZOOM button repeatedly to cycle through the available zoom
levels until you reach the level you require. The zoom level and zoom
icon are displayed on screen.
When using the zoom factor, you can move around the picture using the
ARROW buttons.
To remove the zoom factor, repeatedly press the ZOOM button until the
zoom level and zoom icon disappear.
Subtitle
Some DVD discs contain subtitles in several languages.
During playback, press the SUBTITLE button repeatedly to select the
subtitle language of your choice.
The selected subtitle language will be displayed e.g. 6/15 English.
NOTE: The available languages will depend on the DVD used, see
the DVD cover for more details on the supported languages.
To turn the subtitles off, press the SUBTITLE button repeatedly until
SUBTITLE OFF is displayed.
22
Page 23

RDVD1002.book Page 23 Tuesday, January 24, 2006 12:25 PM
Audio
The AUDIO button allows you to select the audio language of a movie
or listen to any voice-over commentaries.
During playback, press the AUDIO button.
Each time you press the AUDIO button, the audio cycles to the next
available audio channel.
NOTE: The audio function is not supported on all DVD discs. See
the DVD disc cover for a list of audio tracks.
Angle
Some scenes in a DVD movie may be filmed using several cameras
shooting at different angles and these may be included on the DVD disc.
During playback, Press the ANGLE button to cycle through the
available angles.
DVD Recorder
NOTE: The angle function is not supported on all DVD discs.
GOTO Function
The GOTO function allows you to go to a selected point in the DVD or
audio CD by selecting the title (DVD), chapter (DVD), track (CD) or time
(DVD and CD).
NOTE: The GOTO function may not be supported by all DVD’s.
By Title (DVD)
During playback, press the GOTO button. The DVD Information bar will
appear as shown below.
23
Page 24

RDVD1002.book Page 24 Tuesday, January 24, 2006 12:25 PM
RDVD1002
The DVD Information bar will display the current title, chapter, time,
repeat mode and the total number of titles and chapters available.
Use the LEFT and RIGHT ARROW buttons to highlight the TT icon.
Enter the title number you want using the NUMERIC buttons or UP and
DOWN ARROW buttons.
The DVD Recorder will automatically begin playing the selected title.
NOTE: If you try and enter a title number that does not exist, the
DVD Recorder will ignore the request and continue playing the
current title.
By Chapter (DVD)
During playback, press the GOTO button. The DVD Information bar will
appear as shown above.
The DVD Information bar will display the current title, chapter, time,
repeat mode and the total number of titles and chapters available.
Use the LEFT and RIGHT ARROW buttons to highlight the CH icon.
Enter the chapter number you want using the NUMERIC buttons or UP
and DOWN ARROW buttons.
The DVD Recorder will automatically begin playing the selected
chapter.
NOTE: If you try and enter a chapter number that does not exist,
the DVD Recorder will ignore the request and continue playing the
current chapter.
By Time (DVD)
During playback, press the GOTO button once. The DVD Information
bar will appear as shown above.
The DVD Information bar will display the current title, chapter, time,
repeat mode and the total number of titles and chapters available.
Use the LEFT and RIGHT ARROW buttons to highlight the Time icon.
Enter the title or chapter time you want using the NUMERIC buttons in
hours, minutes and seconds format.
24
Page 25

RDVD1002.book Page 25 Tuesday, January 24, 2006 12:25 PM
The DVD Recorder will automatically begin playing the title or chapter
from the selected time.
NOTE: If you try and enter a time that does not exist in the current
title or chapter, the DVD Recorder will ignore the request and
continue playing the current title or chapter.
By Track (Audio CD)
During playback of an audio CD, the CD Information bar will be
constantly displayed as shown below.
The CD Information bar will display the current track, time, repeat mode
and the total number of tracks.
Use the LEFT and RIGHT ARROW buttons to highlight the Track icon.
Enter the track number you want using the NUMERIC buttons or UP
and DOWN ARROW buttons.
DVD Recorder
The DVD Recorder will automatically begin playing the track.
NOTE: If you try and enter a track number that does not exist, the
DVD Recorder will ignore the request and continue playing the
current track.
By Time (Audio CD)
During playback of an audio CD, the CD Information bar will be
constantly displayed as shown above.
The CD Information bar will display the current track, time, repeat mode
and the total number of tracks.
Use the LEFT and RIGHT ARROW buttons to highlight the TT icon.
Enter the track time you want using the NUMERIC buttons in hours,
minutes and seconds format.
25
Page 26

RDVD1002.book Page 26 Tuesday, January 24, 2006 12:25 PM
RDVD1002
The DVD Recorder will automatically begin playing the track from the
selected time.
NOTE: If you try and enter a time that does not exist in the current
track, the DVD Recorder will ignore the request and continue
playing the current track.
Viewing the On Screen Display (TV)
The on screen display (OSD) displays information about the current
source.
Press the DISPLAY button to show the on screen display.
The current input source and channel number are displayed in the top
right hand corner of the screen.
Press the DISPLAY button again to remove the on screen display.
Viewing the On Screen Display (DVD)
The on screen display (OSD) displays information about the chapter
and title currently playing.
Press the DISPLAY button to show the on screen display.
The current title and chapter is displayed on the right hand side of the
screen along with the audio, subtitle and repeat mode information.
Press the DISPLAY button again to remove the on screen display.
Viewing the Disc Information Display (DVD Only)
The disc information display shows information for any writable or
rewritable media currently loaded in the DVD Recorder.
Press the DISC INFO button to show the disc information display.
The disc label, media type, status, title number, amount of disc space
used and available disc space information is displayed.
Press the DISC INFO button to remove the disc information display.
The Title Function (DVD Only)
The title function allows you to return to the DVD Title Screen or Root
Menu.
26
Page 27

RDVD1002.book Page 27 Tuesday, January 24, 2006 12:25 PM
Press the TITLE button at any time during playback to return to the Title
Screen or Root Menu.
The Program Function (Audio CD Only)
The DVD Recorder can be programmed to play a preset selection of
tracks from an audio CD.
Press the PROGRAM button. The Program menu will appear as shown
below.
DVD Recorder
Use the UP, DOWN, LEFT and RIGHT ARROW buttons to select a list
number.
Use the NUMERIC buttons to enter a track number.
NOTE: The Program menu will only accept available track
numbers.
Once all the tracks have been entered, press the PLAY/ENTER button
to confirm the programmed track selection and begin playing in the
preset order.
27
Page 28

RDVD1002.book Page 28 Tuesday, January 24, 2006 12:25 PM
RDVD1002
To program more than ten tracks, press the NEXT button to display a
new program page.
NOTE: A maximum of 20 tracks can be programmed.
To clear a list entry, press the STOP or CLEAR buttons.
To exit the Program menu, press the PROGRAM button or select Exit.
28
Page 29

RDVD1002.book Page 29 Tuesday, January 24, 2006 12:25 PM
Manual Recording
Setting the Recording Quality
This DVD Recorder can record in 5 different quality settings, they are
Quality Setting Maximum Recording Time
HQ (High Quality) Approximately 60 Minutes
SP (Standard Play) Approximately 120 Minutes
LP (Long Play) Approximately 180 Minutes
EP (Extended Play) Approximately 240 Minutes
SLP (Standard Long Play) Approximately 360 Minutes
1. Press the RECORD/DISC button to enter the Record/Disc menu.
The following Record/Disc menu is displayed.
DVD Recorder
Use the UP or DOWN ARROW buttons to highlight Record Quality.
Press the RIGHT ARROW button to highlight the currently selected
Recording Quality.
Use the UP or DOWN ARROW buttons to highlight the Record Quality
you want.
Press the PLAY/ ENTER button to select the Record Quality.
Press the RECORD/DISC button to exit the Record/Disc menu.
29
Page 30

RDVD1002.book Page 30 Tuesday, January 24, 2006 12:25 PM
RDVD1002
Setting the Auto Chapter Marker
The auto chapter marker will automatically split any recorded program
into chapters, this setting allows you to select the length of each
chapter.
Press the RECORD DISC button to enter the Record/Disc menu. The
Record / Disc menu is displayed as shown on the previous page.
Use the UP or DOWN ARROW buttons to highlight Auto Chapter.
Press the RIGHT ARROW button to highlight the currently selected
Auto Chapter Time.
Use the UP or DOWN ARROW buttons to highlight the Auto Chapter
Time you want. You can select from 5 min, 10 min, 15 min and off.
Press the PLAY/ENTER button to select the Auto Chapter Time.
Press the RECORD/DISC button to exit the Record/Disc menu.
30
Page 31

RDVD1002.book Page 31 Tuesday, January 24, 2006 12:25 PM
OTR Recording
One Touch Recording (OTR) allows you to start recording at the touch
of a button.
Insert a Disc
Press the EJECT button to open the disc drawer and insert a disc.
Press the EJECT button to close the disc drawer. The Media Type will
be displayed, followed by the Disc Information Display. Press the
PLAY/ENTER button to remove the Disc Information DIsplay
NOTE: If the disc is inserted upside down, the DVD Recorder will
not recognise that any disc has been inserted.
Select a Source
To select source, press the SOURCE/AV button repeatedly to cycle
through the available options. These are Scart, Front AV, Front SV or
Tuner.
DVD Recorder
If you are recording from the TV Tuner, select the correct channel using
the PR+ or PR- buttons.
To Start/stop a Recording
Before recording, make sure that you have set the correct Recording
Quality as described in page 29 or alternatively press the
REC.QUALITY button repeatedly to cycle through the available
options.
To begin recording, press the REC/OTR button. The Record symbol will
be displayed in the top left corner of the screen. The Elapsed Recording
time is displayed on the LCD panel on the front of the DVD Recorder.
To Pause Recording
Press the PAUSE button to pause the recording process. The Record
Information bar will be displayed as shown below.
The Record Information bar will display the current elapsed recording
time, source, recording quality and the remaining recording time.
Press the PAUSE button to resume recording.
31
Page 32

RDVD1002.book Page 32 Tuesday, January 24, 2006 12:25 PM
RDVD1002
To stop recording, press the STOP button. The word ‘STOPPING’ will
be displayed on screen
.
NOTE: This may take up to a minute to complete.
32
Page 33

RDVD1002.book Page 33 Tuesday, January 24, 2006 12:25 PM
Timer Recording
Setting the Correct Date and Time
To perform timer recording events, the DVD Recorder must be set to the
correct date and time. This should have been done when completing the
Initial Setup Wizard when the DVD Recorder was first turned on. If this
has not been completed, follow the instructions below.
Press the TIMER button. The Timer menu will appear as shown below.
DVD Recorder
Use the UP and DOWN ARROW buttons to highlight Date Time Setting.
Press the RIGHT ARROW button to access the Date Time Setting
screen.
Use the LEFT and RIGHT ARROW buttons to select the Day (D), Month
(M), Year (Y), Hours (H) and Minutes (M). To adjust the selection, use
the UP or DOWN ARROW buttons or alternatively enter a value using
the NUMERIC buttons.
Once the correct date and time have been set, press the PLAY/ENTER
button.
33
Page 34

RDVD1002.book Page 34 Tuesday, January 24, 2006 12:25 PM
RDVD1002
Press the TIMER button to exit the Timer menu.
Setting a Timer Event
To setup the timer event recording, you will need to enter the following
information:
• The date of the recording
• The start time of the recording
• The end time of the recording
• The source of the recording
• The frequency of the recording (Once, Daily, Mon-Fri or Weekly)
• The recording quality
• The recording title.
Press the TIMER button. The Timer menu will appear as shown above.
Use the UP and DOWN ARROW buttons to highlight Timer Event
Settings.
Press the RIGHT ARROW button to access the Timer Recording menu.
The Timer Recording menu will appear as shown below.
The cursor will highlight the first available timer event slot.
Press the PLAY/ENTER button to edit a timer recording event. The
Timer Recording Menu will change to allow information to be entered as
shown below.
34
Page 35

RDVD1002.book Page 35 Tuesday, January 24, 2006 12:25 PM
The Timer Recording menu will highlight the day field within the Date
column.
Press the UP and DOWN ARROW buttons to modify the day.
Press the RIGHT ARROW button to highlight the month field within the
Date column.
DVD Recorder
Use the UP and DOWN ARROW buttons to modify the month.
Press the RIGHT ARROW button to highlight the hours field in the Start
column.
Use the UP and DOWN ARROW buttons to modify the start hours.
Press the RIGHT ARROW button to highlight the minutes field in the
Start column.
Use the UP and DOWN ARROW buttons to modify the start minutes.
Press the RIGHT ARROW button to highlight the hours field in the End
column.
Use the UP and DOWN ARROW buttons to modify the end hours.
Press the RIGHT ARROW button to highlight the minutes field in the
End column.
Use the UP and DOWN ARROW buttons to modify the end minutes.
Press the RIGHT ARROW button to highlight Source.
Use the UP and DOWN ARROW buttons to modify the source.
35
Page 36

RDVD1002.book Page 36 Tuesday, January 24, 2006 12:25 PM
RDVD1002
The available sources are listed in the table below.
Source Description
PR Records from the selected TV channel.
F AV Records from the front RCA component video
connectors.
F SV Records from the front S-Video connectors.
SCART Records from the rear Scart In connector.
NOTE: When choosing the PR source, use the LEFT and RIGHT
ARROW buttons to select the Channel field. Use the UP and
DOWN ARROW buttons to select the desired channel number to
record from.
Press the RIGHT ARROW button to highlight Freq.
Use the UP and DOWN ARROW buttons to modify the frequency.
The available frequencies are listed in the table below.
Frequency Description
Once Records the timer event once only.
Daily Records the timer event every day.
Mon-Fri Records the timer event every day between
Monday and Friday.
Weekly Records the timer event on the same day of
every week.
NOTE: If disc space is unavailable on the currently loaded disc, a
warning message will appear requesting you to modify the timer
events.
Press the RIGHT ARROW button to highlight Quality.
Use the UP and DOWN ARROW buttons to modify the recording
quality.
Press the RIGHT ARROW button to highlight Title. A standard
recording title will be displayed in the field.
To modify the title name, press the REC/OTR button. The Label Title
screen will appear as shown below.
36
Page 37

RDVD1002.book Page 37 Tuesday, January 24, 2006 12:25 PM
Use the LEFT, RIGHT, UP and DOWN ARROW buttons to navigate the
on screen keyboard.
Press the PLAY/ENTER button to select a character or function.
Press the NEXT or PREV buttons to view the alternative on screen
keyboards.
DVD Recorder
Once the desired label title has been entered, use the LEFT, RIGHT,
UP and DOWN ARROW buttons to highlight OK.
Press the PLAY/ENTER button to exit the Label Title screen.
Press the PLAY/ENTER button a second time to complete the timer
event recording.
To exit the Timer Recording menu and begin the timer recording, press
the PLAY/ENTER button.
NOTE: The DVD Recorder will start a timer event recording as long
as writable media is loaded in the disc drawer.
To Check/change a Timer Recording
Switch on the DVD Recorder by pressing the STANDBY button.
Press the TIMER button. The Timer menu will be displayed on screen.
Use the UP and DOWN ARROW buttons to highlight Timer Event
Settings.
Press the RIGHT ARROW button to access the Timer Recording menu.
37
Page 38

RDVD1002.book Page 38 Tuesday, January 24, 2006 12:25 PM
RDVD1002
Any current timer recordings are shown in the Timer Recording menu
with all the details.
To edit the program, follow the instructions described on page 34.
To Delete a Timer Recording
Switch on the DVD Recorder by pressing the STANDBY button.
Press the TIMER button. The Timer menu will be displayed on screen.
Use the UP and DOWN ARROW buttons to highlight Timer Event
Settings.
Press the RIGHT ARROW button to access the Timer Recording menu.
Use the UP and DOWN ARROW buttons to highlight the line with the
program you wish to delete.
Press the STOP button to delete the selected timer event recording.
A Confirmation Screen is displayed.
Select Yes to delete the timer event recording or cancel or return to the
Timer Recording menu.
38
Page 39

RDVD1002.book Page 39 Tuesday, January 24, 2006 12:25 PM
The Disc Menu
The Disc menu allows you to view, select and edit the titles recorded on
the DVD-R or DVD-RW disc.
Insert a disc into the DVD Recorder as described on page 18.
To access the Disc menu, press the DISC MENU button. The following
screen is displayed.
DVD Recorder
To Pla y a Title
Use the UP and DOWN ARROW buttons to highlight the desired title.
Use the LEFT and RIGHT ARROW buttons to highlight the Play Title
icon.
Press the PLAY/ENTER button. The title will begin to play.
To Erase a Title (DVD-RW Only)
Use the UP and DOWN ARROW buttons to highlight the desired title.
Use the LEFT and RIGHT ARROW buttons to highlight the Erase Title
icon.
Press the PLAY/ENTER button. The following options will appear.
Option Description
Erase selected title (s) Erases all the previously selected titles
from the disc.
Erase all titles Erases all the titles on the disc.
Cancel Returns to the main Disc menu screen.
39
Page 40

RDVD1002.book Page 40 Tuesday, January 24, 2006 12:25 PM
RDVD1002
Use the UP and DOWN ARROW buttons to highlight the desired option.
Press the PLAY/ENTER button. The title or titles will be deleted. While
the DVD Recorder is deleting the title, Please Wait will be displayed.
Once deleted, the title will be shown as free space.
To Select a Title
The Select a Title function allows you to select multiple titles for editing.
Use the UP and DOWN ARROW buttons to highlight the desired title.
Use the LEFT and RIGHT ARROW buttons to highlight the Select Title
icon.
Press the PLAY/ENTER button to select the title.
Repeat the above steps to select all the desired titles.
Use the LEFT and RIGHT ARROW buttons to highlight a function.
Press the PLAY/ENTER button to perform the function.
To Select an Input Mode
The Select an Input Mode function allows you to select a different input
source.
Use the LEFT and RIGHT ARROW buttons to highlight the Input Mode
icon.
Press the PLAY/ENTER button. The Disc menu screen will be removed
and the current source is displayed.
Press the SOURCE button repeatedly to scroll through the available
sources (see page 17).
Once the desired source has been chosen, press the PLAY/ENTER
button to return to the Disc menu screen.
To Label a Title
Use the UP and DOWN ARROW buttons to highlight the desired title.
Use the LEFT and RIGHT ARROW buttons to highlight the Label Title
icon.
Press the PLAY/ENTER button. The Label Title screen will appear as
shown below.
40
Page 41

RDVD1002.book Page 41 Tuesday, January 24, 2006 12:25 PM
Use the LEFT, RIGHT, UP and DOWN ARROW buttons to navigate the
on screen keyboard.
Press the PLAY/ENTER button to select a character or function.
Press the NEXT or PREV buttons to view the alternative on screen
keyboards.
DVD Recorder
Once the desired label title has been entered, use the LEFT, RIGHT,
UP and DOWN ARROW buttons to highlight OK.
Press the PLAY/ENTER button to exit the Label Title screen and return
to the Disc menu screen.
To Edit Chapters
The Chapter Edit function allows you to add, delete and edit chapter
marks within a selected title.
Use the UP and DOWN ARROW buttons to highlight the desired title.
Use the LEFT and RIGHT ARROW buttons to highlight the Chapter Edit
icon.
41
Page 42

RDVD1002.book Page 42 Tuesday, January 24, 2006 12:25 PM
RDVD1002
Press the PLAY/ENTER button. The Chap Edit screen appears as
shown below.
To Add a Chapter
Use the LEFT, RIGHT, UP and DOWN ARROW buttons to highlight
Add Chp.
Press the PLAY/ENTER button. The Chap Edit screen disappears and
the current title begins to play.
When the desired point in the title is reached, press the EDIT button.
The chapter will be added to the title.
Repeat the above step to add additional chapters.
Once all the chapters have been added, press the STOP button. The
DVD Recorder will return to the Chap Edit screen and display all the
chapters.
To exit the Chap Edit screen, use the LEFT, RIGHT, UP and DOWN
ARROW buttons to highlight Exit. Press the PLAY/ENTER button.
NOTE: It is possible to use fast forward, fast backward and pause
while searching for the chapter markers.
42
Page 43

RDVD1002.book Page 43 Tuesday, January 24, 2006 12:25 PM
To Play a Chapter
Use the LEFT, RIGHT, UP and DOWN ARROW buttons to highlight the
desired chapter.
Use the LEFT, RIGHT, UP and DOWN ARROW buttons to highlight
Play.
Press the PLAY/ENTER button to begin playing the chapter.
Press the STOP button to return to the Chapter Edit screen.
To Delete a Chapter
Use the LEFT, RIGHT, UP and DOWN ARROW buttons to highlight the
desired chapter.
Press the PLAY/ENTER button to select the desired title.
Repeat the above steps to select additional chapters.
Use the LEFT, RIGHT, UP and DOWN ARROW buttons to highlight Del
Chp.
DVD Recorder
Press the PLAY/ENTER button. A confirmation screen will appear.
Use the LEFT and RIGHT ARROW buttons to highlight Yes.
Press the PLAY/ENTER button. The chapter or chapters will be
deleted. While the DVD Recorder is deleting the chapter, Please Wait
will be displayed.
NOTE: It is not possible to delete the first chapter in a title.
To exit the Chap Edit screen, use the LEFT, RIGHT, UP and DOWN
ARROW buttons to highlight Exit. Press the PLAY/ENTER button.
43
Page 44

RDVD1002.book Page 44 Tuesday, January 24, 2006 12:25 PM
RDVD1002
To Hid e a Chapter
The Hide function allows you to prevent a selected chapter or chapters
from being played.
Use the LEFT, RIGHT, UP and DOWN ARROW buttons to highlight the
desired chapter.
Press the PLAY/ENTER button to select the desired chapter.
Repeat the above steps to select additional chapters.
Use the LEFT, RIGHT, UP and DOWN ARROW buttons to highlight
Hide.
Press the PLAY/ENTER button. The chapter or chapters will be hidden.
While the DVD Recorder is hiding the chapter, Please Wait will be
displayed.
To exit the Chap Edit screen, use the LEFT, RIGHT, UP and DOWN
ARROW buttons to highlight Exit. Press the PLAY/ENTER button.
To Unhide a Chapter
Use the LEFT, RIGHT, UP and DOWN ARROW buttons to highlight the
desired chapter.
Press the PLAY/ENTER button to select the desired chapter.
Repeat the above steps to select additional chapters.
Use the LEFT, RIGHT, UP and DOWN ARROW buttons to highlight
Unhide.
Press the PLAY/ENTER button. The chapter or chapters will be
restored for playback. While the DVD Recorder is restoring the chapter,
Please Wait will be displayed.
To exit the Chap Edit screen, use the LEFT, RIGHT, UP and DOWN
ARROW buttons to highlight Exit. Press the PLAY/ENTER button.
44
Page 45

RDVD1002.book Page 45 Tuesday, January 24, 2006 12:25 PM
To Change the Chapter Index Picture
The Index Picture functions allows you to change the title index picture
shown in the Disc menu.
Use the UP and DOWN ARROW buttons to highlight the desired title.
Press the LEFT and RIGHT ARROW buttons to highlight the Index
Picture icon.
Press the PLAY/ENTER button. The Disc menu screen disappears and
the current title begins to play.
When the desired index picture is displayed, press the REC/OTR
button. While the DVD Recorder is saving the index picture, Please Wait
will be displayed.
NOTE: It is possible to use fast forward, fast backward and pause
while searching for the index pictures.
Once the index picture has been saved, the DVD Recorder will return to
the Disc menu and the new index picture is displayed.
DVD Recorder
To exit the Disc menu, press the STOP button followed by the
TV-DVDR button.
45
Page 46

RDVD1002.book Page 46 Tuesday, January 24, 2006 12:25 PM
RDVD1002
The Channel Menu
The Channel menu allows you to set up the basic functions of the built
in tuner.
Press the CHANNEL button. The following screen is displayed.
Use the LEFT, RIGHT, UP and DOWN ARROW buttons to navigate the
menu screens and the PLAY/ENTER button to select an option.
The following options are available.
Auto Tuning System
The Auto Tuning System function allows you to automatically search for
all the available TV channels in your local area.
Use the UP and DOWN ARROW buttons to highlight Country Setup.
Press the RIGHT ARROW button. The Country Setting screen will
appear as shown below.
46
Page 47

RDVD1002.book Page 47 Tuesday, January 24, 2006 12:25 PM
Use the UP and DOWN ARROW buttons to select the appropriate
country.
Once the correct country is selected, press the PLAY/ENTER button.
Press the LEFT ARROW button to exit to the Country Setting screen.
Use the UP and DOWN ARROW buttons to highlight Auto Tuning
System.
Press the RIGHT ARROW button. The Auto Scan screen will appear as
shown below.
DVD Recorder
Use the LEFT and RIGHT ARROW buttons to select Start. The DVD
Recorder will begin to scan for all available channels and automatically
save them to memory.
NOTE: The search may take a few minutes to complete, please be
patient.
Fine Tune
The Fine Tune function allows you to fine tune a selected channel.
When selected the following screen will appear.
Use the PR+ or PR- buttons to select a channel to fine tune.
47
Page 48

RDVD1002.book Page 48 Tuesday, January 24, 2006 12:25 PM
RDVD1002
Use the LEFT and RIGHT ARROW buttons to fine tune the channel.
Once the channel is fine tuned, use the LEFT, RIGHT, UP and DOWN
ARROW buttons to highlight Confirm.
Press the PLAY/ENTER button. The new channel settings will be saved
and you will return to the Channel menu.
To exit the PR Fine Tune screen and return to the Channel menu, use
the LEFT, RIGHT, UP and DOWN ARROW buttons to highlight Exit and
press the PLAY/ENTER button.
Programme Swap
The Programme Swap screen allows you to change the channel
numbers. When selected the following screen will appear.
NOTE: Before accessing the Programme Swap screen, ensure the
channel you wish to change is selected.
The current and new programme numbers are displayed on screen.
Use the NUMERIC buttons to enter the new channel number in a three
digit format. For example to enter channel 1, press 0, 0 and 1.
Press the PLAY/ENTER button to confirm the new channel number and
exit to the Channel menu.
48
Page 49

RDVD1002.book Page 49 Tuesday, January 24, 2006 12:25 PM
Erase Programme
The Erase Programme function allows you to erase programmes from
the channel list. When selected the following screen will appear.
Use the UP and DOWN ARROW buttons to highlight the channel you
wish to erase.
Press the PAUSE button to change the text in the Add/Del column to
Del.
DVD Recorder
Use the LEFT, RIGHT, UP and DOWN ARROW buttons to highlight
OK.
Press the PLAY/ENTER button. The channel will be deleted and the
DVD Recorder will return to the Channel menu.
NOTE: The erased channel will still be available using the
NUMERIC buttons, however it will be skipped when using the
PR+/- buttons.
Country Setup
The Country Setup function allows you to specify the country in which
the product is being used. This will ensure the DVD Recorder will
operate correctly. The available options are UK and Ireland.
49
Page 50

RDVD1002.book Page 50 Tuesday, January 24, 2006 12:25 PM
RDVD1002
The Record/Disc Menu
The Recorder/Disc menu allows you to set the recording conditions and
perform basic disc maintenance.
Press the RECORD/DISC button. The following screen will appear.
Use the LEFT, RIGHT, UP and DOWN ARROW buttons to navigate the
menu screens and the PLAY/ENTER button to select an option.
The following options are available.
NOTE: Depending on the type of disc loaded and the amount of
recordings on the disc, some of the following options may not be
available.
50
Page 51

RDVD1002.book Page 51 Tuesday, January 24, 2006 12:25 PM
Record Quality
The Record Quality function allows you to set the recording quality. The
DVD Recorder has 5 different quality settings. The available options are
listed below.
Quality Setting Maximum Recording Time
HQ (High Quality) Approximately 60 Minutes
SP (Standard Play) Approximately 120 Minutes
LP (Long Play) Approximately 180 Minutes
EP (Extended Play) Approximately 240 Minutes
SLP (Standard Long Play) Approximately 360 Minutes
NOTE: The record quality function is explained in more detail on
page 29.
Auto Chapter
DVD Recorder
The Auto Chapter function allows you to automatically split any
recorded programs into chapters; this allows you to select the length of
each chapter. The available options are 5 min, 10 min, 15 min or off.
Disc Info
The Disc Info function accesses the disc information display. This
displays information for any writable or rewritable media currently
loaded in the DVD Recorder as described on page 26.
Make Compatible
The Make Compatible function allows you to make the disc editing
options compatible with other DVD Recorders. When this option is
selected, a confirmation screen is displayed.
Select Yes to make the disc compatible or cancel to return to the
Record/Disc menu.
While the DVD Recorder is making the disc compatible, Please Wait will
be displayed.
51
Page 52

RDVD1002.book Page 52 Tuesday, January 24, 2006 12:25 PM
RDVD1002
Protect Disc
The Protect Disc function allows you to prevent overwriting or adding
recordings to the disc. When this option is selected, a confirmation
screen is displayed.
Select Yes to protect the disc or cancel to return to the Record/Disc
menu.
While the DVD Recorder is protecting the disc, Please Wait will be
displayed.
Unprotect Disc
The Unprotect Disc function allows you to remove the disc protection.
When this option is selected, a confirmation screen is displayed.
Select Yes to unprotect the disc or cancel to return to the Record/Disc
menu.
While the DVD Recorder is unprotecting the disc, Please Wait will be
displayed.
Erase / Format
The Erase Disc function allows you to erase any recorded programs on
a DVD-RW disc. When this option is selected, a confirmation screen is
displayed.
Select Yes to erase/format the disc or cancel to return to the Record/
Disc menu.
While the DVD Recorder is erasing/formating the disc, Please Wait will
be displayed.
Finalise Disc
The Finalise Disc function prevents any more recordings from being
made and allows the disc to be played in almost any DVD Player. When
you select this option, a confirmation screen is displayed.
Select Yes to Finalise the disc or cancel to return to the Record/Disc
menu.
52
Page 53

RDVD1002.book Page 53 Tuesday, January 24, 2006 12:25 PM
While the DVD Recorder is finalising the disc, Please Wait will be
displayed.
NOTE: To enable the disc to be rewritten, follow the steps above
and select Yes to unfinalise the disc.
DVD Recorder
53
Page 54

RDVD1002.book Page 54 Tuesday, January 24, 2006 12:25 PM
RDVD1002
The Video Menu
The Video Setup menu allows you to set the display and external input
types.
Press the VIDEO button. The following screen will appear.
Use the LEFT, RIGHT, UP and DOWN ARROW buttons to navigate the
menu screens and the PLAY/ENTER button to select an option.
The following options are available.
TV Type
DVDs are produced in a variety of screen aspect ratios. This function
allows you to select the most appropriate ratio for the DVD being
viewed. The available options are 4:3 Letter Box, 4:3 Pan Scan and
16:9 Wide Screen.
4:3 Letter Box will show the DVD in its original aspect ratio so
depending on the size of your television screen; you may see black
borders above and below the picture. This is the default setting.
4:3 Pan Scan is used for most normal television broadcasts. It has an
aspect ratio of 4:3. If you select this setting when viewing a widescreen
picture the picture will fill the screen but, you will not see the left and
right edges of the picture.
16:9 Widescreen: Choose this setting if you have a widescreen
television.
54
Page 55

RDVD1002.book Page 55 Tuesday, January 24, 2006 12:25 PM
TV System
The TV Type function allows you to select the output signal type to your
TV. The available options are NTSC, PAL or AUTO.
NTSC should only be used if your TV only supports NTSC signals.
PAL should only be used if your TV only supports PAL signals.
AUTO allows the DVD Recorder to select the most suitable TV type.
Video Output
The Video Output function allows you to set the video output type. The
available options are Scart CVBS, RCA Component and Scart RGB.
DVD Subtitle
The DVD Subtitle function allows you to change the default subtitle
language. The available options are Default, Subtitle Off, English,
Espanol and Francais.
DVD Recorder
55
Page 56

RDVD1002.book Page 56 Tuesday, January 24, 2006 12:25 PM
RDVD1002
The System Menu
The System menu allows you to set the basic functions of the DVD
Recorder.
Press the SYSTEM button. The following screen will appear.
Use the LEFT, RIGHT, UP and DOWN ARROW buttons to navigate the
menu screens and the PLAY/ENTER button to select an option.
The following options are available.
56
Page 57

RDVD1002.book Page 57 Tuesday, January 24, 2006 12:25 PM
Rating
Some Pre-recorded DVDs are supplied with a parental control signal.
The Rating function allows you to prevent playback of unsuitable
material by setting the parental level to a certain age limit.
There are 8 levels to choose from. The available options are listed
below.
Setting BBFC Equivalent
1 G Uc
2U
3 PG PG
4 PG 13 12A
512
6 R 15
7 NC17 18
8 No Limit
DVD Recorder
Password
You can change the password to prevent children adjusting the rating
settings. When selected the following screen will appear.
Use the NUMERIC buttons to enter the default or old password. The
default password is 9999.
Use the NUMERIC buttons to enter the new password. This should be
a four digit number.
Use the NUMERIC buttons to re-enter the new password.
Press the PLAY/ENTER button to accept the new password and return
to the System menu.
57
Page 58

RDVD1002.book Page 58 Tuesday, January 24, 2006 12:25 PM
RDVD1002
Version
This displays the current firmware version of the DVD Recorder.
Factory Reset
The Factory Reset function allows you to return the DVD Recorder to
the factory set condition. When this option is selected, a confirmation
screen is displayed.
Select Yes to return the DVD Recorder to the factory set condition or
cancel to return to the System menu.
While the DVD Recorder is resetting, Please Wait will be displayed.
NOTE: The Factory Reset function will not be available if a disc is
loaded.
58
Page 59

RDVD1002.book Page 59 Tuesday, January 24, 2006 12:25 PM
Help and Advice
The DVD Recorder will not power up
• Ensure that the plug is connected to the mains socket and that it is
switched on.
• Replace the fuse in the plug.
Disc does not play
• Check that the disc has been correctly loaded, label facing up.
• Check that the format of the disc is supported. If it is a DVD, ensure
that it is Region 2.
No picture
• Ensure that the DVD Recorder and television are powered on.
• Check that the connecting cables are fitted securely.
• Ensure that the television has the AV channel or equivalent
selected.
DVD Recorder
• Try a disc that you know plays without problems.
No sound
• Check that the volume has not been set low on the television.
• Check that the sound has not been muted on either the DVD
Recorder or the television.
• Check that all cables are connected securely.
• Press the AUDIO button to select other audio tracks on the DVD.
Recording failed
• Check the disc is either DVD+R or DVD+RW.
• Check that the recording speed selected is compatible with the disc
(see disc packaging).
• Ensure that the disc is of good quality and is not damaged.
The picture quality is poor.
• Check that the disc surface has not been damaged.
• Try cleaning the disc.
• Check that the connecting cables are connected securely.
59
Page 60

RDVD1002.book Page 60 Tuesday, January 24, 2006 12:25 PM
RDVD1002
Cannot skip
• If the DVD has been recorded without chapter markers, the skip
functions will not operate.
Some functions do not work (e.g. Angle, Goto etc.)
• Refer to the DVD disc packaging. Not all functions are available on
all DVD discs.
No response from the remote control
• Check that there are no obstructions between the remote control
and the DVD Recorder.
• Check that the batteries are fitted correctly.
• Replace the batteries.
NOTE: If none of the above suggestions work, try switching your
DVD Recorder off and then on again.
WARNING! IF THIS DOES NOT WORK, CONTACT EITHER
YOUR SUPPLIER OR A QUALIFIED DVD REPAIR TECHNICIAN.
NEVER ATTEMPT TO REPAIR A DVD PLAYER YOURSELF.
Product Support
Telephone: 0870 873 0078
Internet: www.alba-radio.co.uk
How Do I Dispose of this Product?
When your DVD Recorder has reached the end of its life,
contact your local council regarding available recycling or
disposal options. Do not dispose of electrical products in the
general waste.
Please ensure that used batteries are disposed of safely.
60
Page 61

RDVD1002.book Page 61 Tuesday, January 24, 2006 12:25 PM
Technical Specification
Power Supply: 230-240V AC at 50Hz
Power Consumption: 35W during operation
18W during standby
Compatible Discs: Playback:
DVD, DVD+R, DVD+RW, DVD-R, DVD-RW
Audio CD, CD-R, CD-RW, CD-DA
Kodak Picture CD
Recording: DVD+RW, DVD+R
Output Terminals: RF TV out
Scart out
RCA audio/video cable
Coaxial digital output
S-Video output
RGB component video cable
DVD Recorder
Audio: Downmix stereo left and right
Input Terminals: Antenna in
Scart in
S-Video
RCA audio/video cable
RGB component video cable
Downmix stereo left and right
Dimensions (mm): 420 (W) x 270(D) x 53(H)
Weight: 2.5Kg
61
Page 62

RDVD1002.book Page 62 Tuesday, January 24, 2006 12:25 PM
RDVD1002
Guarantee
This product is guaranteed for twelve months from the date of the
original purchase. In the unlikely event of any defect arising due to faulty
materials or workmanship, the unit will be either replaced, a refund will
be given or the unit will be repaired free of charge (where possible)
during this period by the dealer from whom you purchased the unit.
This guarantee is subject to the following provisions:
• The guarantee is only valid within the boundaries of the country of
purchase.
• The product must be correctly installed and operated in accordance
with the instructions contained in these operating instructions.
• It must be used solely for domestic purposes.
• The guarantee does not cover accidental damage or misuse.
• The guarantee will be rendered invalid if the product is resold or has
been damaged by inexpert repairs. The manufacturers disclaim any
liability for incidental or consequential damages.
The guarantee is in addition to, and does not diminish, your statutory or
legal rights.
DCS JAN 06 RDVD1002/B
62
Page 63

RDVD1002.book Page 63 Tuesday, January 24, 2006 12:25 PM
Page 64

RDVD1002.book Page 64 Tuesday, January 24, 2006 12:25 PM
 Loading...