

Page 1
7" portable DVD player
With swivel screen
Instruction manual
CDVD7SW/ CDVD7SWP
Page 2
Table of contents
Disc handling ...................................3
Disc information ................................3
Copyright information ..........................3
Disc types ......................................3
Region Management Information ..............3
Accessories included ...........................4
Overview of controls ............................4
Overview of remote control .....................5
Remote control battery installation ............6
Connection to a TV .............................6
Connecting an external source to the display ...6
Supported formats ............................7
Charging the internal battery ..................7
Standby mode .................................7
Getting started ................................7
Setting the volume level .......................7
Menu and TFT function ........................7
Skipping forward and back. . . . . . . . . . . . . . . . . . . . .7
Quick search FWD & RWD ......................7
Stopping playback .............................7
Repeat playback (CD, DVD) .....................7
Display function ...............................7
GOTO function .................................8
Program playback (up to 20 tracks) ............8
Zoom function .................................8
Selecting an audio track .......................8
Change viewing angle ..........................8
Subtitles ......................................8
DVD menu .....................................8
Picture disc / JPG image viewer ................9
Earphone usage ...............................9
Adjusting the swivel display ...................9
Setup menu ................................. 10
GENERAL MENU .............................10
AUDIO MENU ................................. 10
AUDIO MENU (cont) ..........................11
VIDEO MENU ................................. 11
PREFERENCE MENU ........................ 11
PREFERENCE MENU (cont) .................. 11
Care & maintenance ......................... 12
Troubleshooting ............................. 12
Technical specifications ..................... 13
Disposal information ........................ 13
Battery disposal information ................ 13
Product Codes
CDVD7SW/SWP
Page 1
Page 3
Safety information
Important – Please read these instructions fully before using
CAUTION: TO REDUCE THE RISK OF ELECTRIC SHOCK, DO NOT REMOVE ANY COVER. NO USER-SERVICEABLE
PARTS INSIDE, REFER ANY SERVICING TO QUALIFIED SERVICE PERSONNEL.
• Please read this owner’s guide
• Please take the time to follow the instructions in
this owner’s guide carefully. It will help you set up
and operate your system properly and enjoy all of its
advanced features.
• Please save this owner’s guide for future reference.
• The product label is located on the back of the
product.
• Heed all warnings - on the product and in the
owner’s guide.
• Do not use this apparatus near water or moisture.
• Do not use this product near a bathtub, washbowl,
kitchen sink, and laundry tub, in a wet basement,
near a swimming pool, or anywhere else that water
or moisture is present.
• Only use attachments/accessories specified by
the manufacturer.
• Unplug this apparatus during lightning storms or
when unused for long periods of time - to prevent
damage to this product.
• Refer all servicing to qualified service personnel
• Servicing is required when the apparatus has been
damaged in any way: such as liquid has been
spilled or objects have fallen into the apparatus;
the apparatus has been exposed to rain or moisture,
does not operate normally, or has been dropped.
• Do not attempt to service this product yourself.
• Opening or removing covers may expose you to
dangerous voltages or other hazards.
• To prevent risk of fire or electric shock, avoid
overloading wall outlets, extension cords, or integral
convenience receptacles.
• Use suitable power sources - Plug the product
into a suitable power source, as described in the
operating instructions or as marked on the product.
• The mains plug is used as the disconnect device, the
disconnect device shall remain readily accessible.
CAUTION
RISK OF ELECTRIC SHOCK!
DO NOT OPEN!
This symbol means that this unit is double
insulated. An earth connection is not required.
CAUTION : CLASS 1 LASER PRODUCT
This product utilizes a Class 1 laser. This laser DVD
Player is equipped with safety switches to avoid
exposure when the door is open and the safety
interlocks are defeated. Invisible laser radiation is
present when the Player’s lid is open and the system’s
interlock has failed or been defeated. It is very important
that you avoid direct exposure to the laser beam at all
times. Please do not attempt to defeat or bypass the
safety switches.
LASER SAFETY
This unit employs a laser, only qualified
service personnel should attempt repair.
• Any electrical work that is required to install this
appliance MUST be carried out by a qualified
electrician.
• Before making any electrical connections,
ensure the following:
• Do not bend, stretch or pull the supply cable
in order to avoid electric shock.
• The supply voltage should be the same as that
indicated in the technical specifications and
the appliance rating plate.
• When installed, the power socket must be within
easy reach.
• If the socket outlets in your home are not suitable
for the plug supplied with this unit check with a
qualified electrician for replacement.
• The use of multiple connectors or extension cables
are not recommended.
• The appliance must be connected to a 100-240 volt
50/60Hz AC supply by means of a three pin socket.
• The main plug is used as the disconnect device,
the disconnect device shall remain readily operable.
• In order to disconnect the apparatus from the mains
completely, switch off the outlet and remove the
mains plug completely.
Page 2
Page 4
Safety information
Important – Please read these instructions fully before using
Disc handling
Do not touch the playback side of the disc.
Do not attach paper or tape to disc.
Fingerprints and dust on the disc cause picture and
sound deterioration. Wipe the disc from the centre
outwards with a soft cloth. Always keep the disc clean.
If you cannot wipe off the dust with a soft cloth, wipe
the disc lightly with a slightly moistened soft cloth and
finish with a dry cloth.
Do not use any type of solvent such as thinner, benzene,
commercially available cleaners or antistatic spray for
vinyl. It may damage the disc.
Do not store discs in a place subject to direct sunlight
or near heat source.
Do not store discs in a place subject to moisture
and dust such as a bathroom or near a humidifier.
Store discs vertically in a case, stacking or placing
object on discs outside or their case may cause warping.
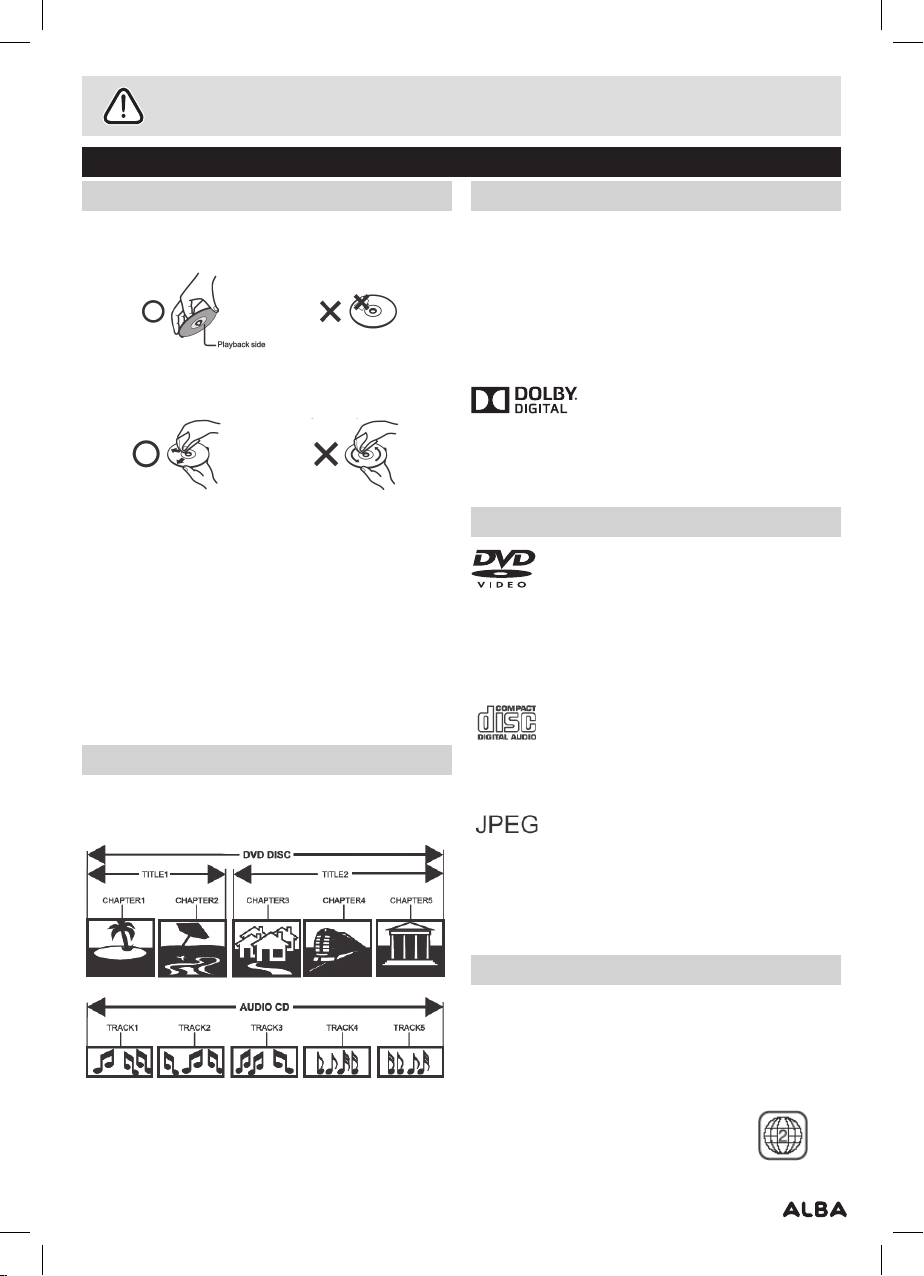
Disc information
Normally, DVD discs are divided into titles, and the
titles are sub-divided into chapters. Audio CD discs are
divided into tracks.
Copyright information
This product incorporates copyright protection
technology that is protected by U.S. patents and other
intellectual property rights. Use of this copyright
protection technology must be authorized by
Macrovision, and is intended for home and other
limited viewing uses only unless otherwise authorized
by Macrovision. Reverse engineering or disassembly
is prohibited.
Manufactured under license from Dolby Laboratories.
Dolby and the double-D symbol are trademarks of
Dolby Laboratories.
Disc types
- Audio and Video
Disc size 12cm
Single side, single layer / single side, double layer
PAL and NTSC DVD disc
Playback time 135min / 240min max
- Audio
Disc size 12cm / 8cm CD disc Playback time
74min/20min max
- Picture
Each title, chapter, or track is assigned a number,
which is called title number, chapter number or track
number respectively. There may be discs that do not
have these numbers.
Page 3
JPG format disc
* Player is DVD-Video, DVD+/-R, DVD+/-RW, CD-DA,
CD-R, CD-RW compatible.
Region Management Information
This DVD Player is designed and manufactured to
respond to the Region Management Information that is
recorded on a DVD disc. If the Region number described
on the DVD disc does not correspond to the Region
number of this DVD Player, this DVD player can¬not play
that disc.
The Region number of this DVD player is
Page 5
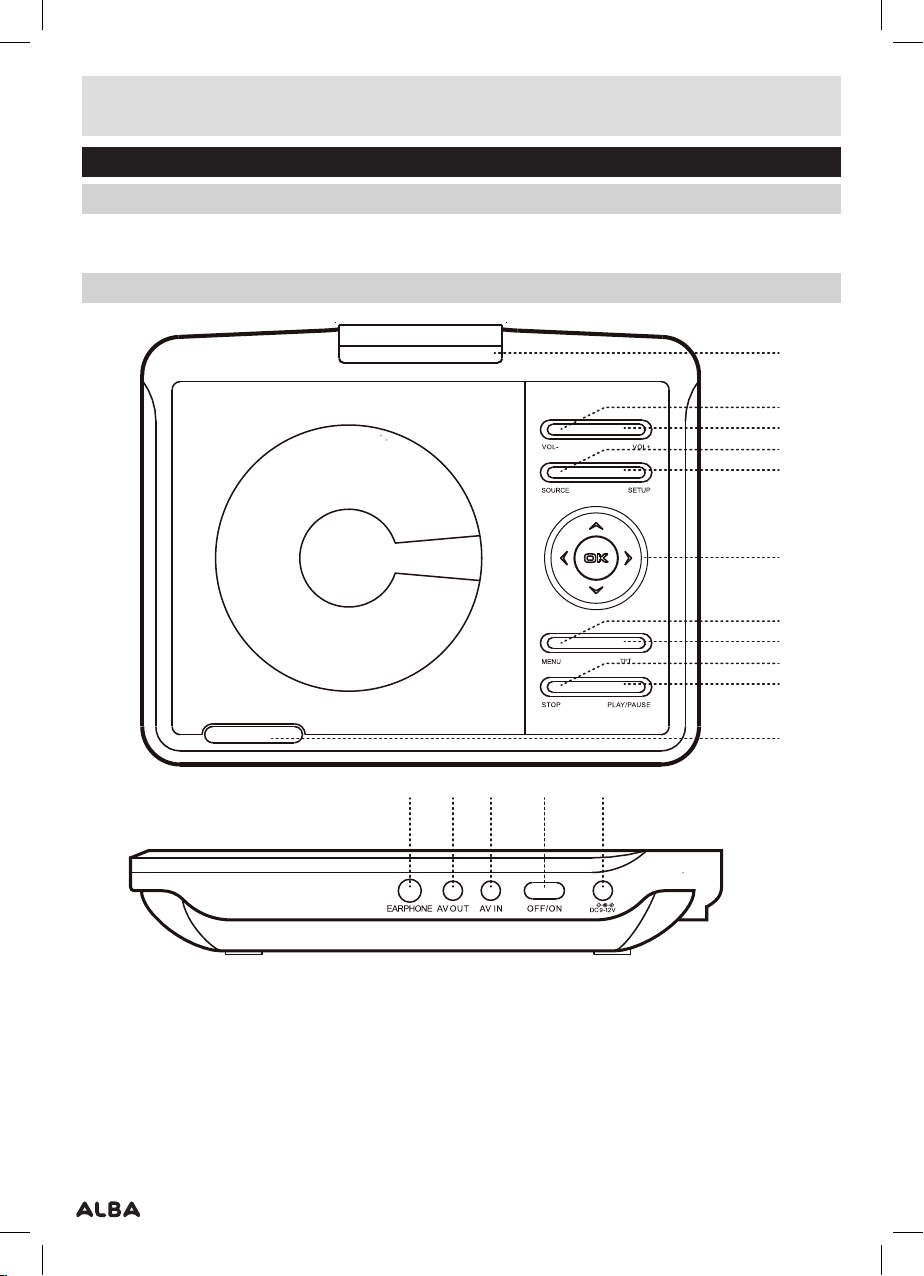
Functions & controls
1
3
6
2
5
4
8
7
10
9
11
Please familiarize yourself with the parts and accessories listed below
Accessories included
• 1 X CDVD7SW/SWP
1 X Instruction Manual
Overview of controls
• 1 X remote control
• 1 X AV cable
• 1 x Earphones
• 1 x Car power adapter
12 13 14 15 16
• 1 x Mains adapter
1
2
3
4
5
6
7
8
9
10
11
1: DISPLAY swivel
2: VOLUME - button
3: VOLUME + button
4: SOURCE button
5: SETUP button
6: NAVIGATION/ENTER buttons
7: MENU button
8: TFT button
9: STOP button
10: PLAY/PAUSE button
11: OPEN DISC TRAY button
12: EARPHONE output socket
13: AV OUTPUT socket
14: AV INPUT socket
15: POWER ON/OFF
16: DC INPUT socket
Page 4
Page 6

Functions & controls
Making the connections
Overview of remote control
RETURN: Return to ROOT menu
STA NDBY: STANDBY mode ON/OFF
SOURCE: Press repeatedly
to cycle through the input modes
TITLE: Press to display the DVD
Title menu (if available)
ENTER: Press to select
or activate a function
NAVIGATION BUTTONS: Navigate
menu’s and options.
VOLUME -: Press to decrease
the volume level
PROG: Program an alternate
playback sequence for DVD & CD
PL AY/P AU SE : Press to begin
playback or pause playback
NUMERIC BUTTONS: Used to
enter digits or direct skip to
chapter numbers.
QUICK SEARCH RWD/FWD: Press
repeatedly to cycle between the
fast rewind/forward speeds.
If you have damaged or missing parts,
call the Customer Helpline: 0870 600 3030
ST-BY
SOURCE ANGLESETUP TFT
ENTER
VOL- VOL+
PROG
1 2
5
4
7
8 9
0 10+
MUTE
DISPLAYRETURN
MENUTITLE
SUBTITLE
3
REPEAT
6
AUDIO
GOTOZOOM
SETUP: Press once to enter the
system menu
TFT: Press to disable the built-in
TFT screen. Press again to enable
DI SPL AY: Press repeatedly to cycle
through available information for
the current disc
MUTE: Press to temporarily silence
audio output. Press again to resume
ANGLE: Press repeatedly to cycle
through any available DVD angles
MENU: Press to display the DVD
menu (if available)
VOLUME +: Press to increase
the volume level
STOP: Press to STOP playback
of any media
SUBTITLE: Press repeatedly to
cycle through available subtitles
tracks on a DVD disc
REPEAT: Press repeatedly to cycle
through available information for
the current disc
AUDIO: Press repeatedly to cycle
through available audio tracks
GOTO: Specify an exact point on
a DVD or CD to jump to
ZOOM: Increase the image size
up to 4 x larger
SKIP PREV/NEX T: Press to skip
DVD chapters/CD tracks PREV
or NEXT.
Page 5
Page 7

Installation
Remote control battery installation
1: Remove the battery cover (as shown).
2: Insert 2 x AAA batteries, taking note that the polarities
match up.
3: Replace the battery cover, in the same manner as you
removed it.
1 2 3
Notes on battery usage
• Do not insert battery into the remote control in the
wrong direction.
• Do not charge, heat, open or short-circuit the
battery. Do not throw battery into a fire.
• If the remote control does not function correctly or
if the operating range becomes reduced, replace all
batteries with new ones.
• Improper replacement of batteries may result
in explosive hazard. It must be replaced only by
batteries with the same or equivalent type.
Connection to a TV (cont)
NOTE: before attempting to connect this unit to
a TV, ensure that the CDVD7SW/SWP and TV are
both switched off.
1: Insert the 3.5mm end of an AV cable (supplied ) into
the AV OUTPUT socket (13) on the side of the unit.
2: Insert the other ends ( coloured red, white & yellow )
into your TV.
3: The red & white sockets carry audio. They can be
connected to either the TV inputs or an external
amplifier. Take note to match the colours when
connecting.
4: The yellow cable is the video cable and must be
connected to the yellow video input on your TV.
5: After tuning your TV to the correct input the content
of the CDVD7SW/SWP will appear on the TV screen.
To disable playback on the CDVD7SW/SWP display
press the TFT button (8) on the unit or remote control.
Connecting an external source to the display
It is possible to connect an external source to
the CDVD7SW/SWP to allow playback on the
integrated display.
External DVD Player
Connection to a TV
AV Cable
TV
DVD Player
AV Cable
DVD Player
1: Insert the 3.5mm end of an AV cable (supplied )
into the AV INPUT socket on the side of the unit.
2: Insert the other ends ( coloured red, white & yellow )
into your VIDEO SOURCE outputs.
3: After making the connections you must press the
SOURCE button (4) to switch to the ‘AV IN’ mode.
4: Should you need to switch back to the internal DVD
player, press the SOURCE button (4) again.
Page 6
Page 8

User instructions
Supported formats
• Full compatibility with DVD, CD, Kodak picture CD,
CD-R & CD-RW
• Multi-language, multi-angle, multi-subtitle,
multi-mode of image zoom, parental control
Dolby Digital Audio CD
Multi-A ngle
Subtitle Choices
DVD Video
TV aspect ratio modes
Charging the internal battery
The CDVD7SW/SWP is fitted with a built-in
rechargeable battery.
Before using the battery, please make sure it is
fully charged.
Slide the power switch to the OFF position and connect
the DC adaptor to the DC input (16) & mains supply.
When the battery is fully charged the red LED charging
indicator will go off.
NOTE: Approx 4 hours charge, and 2 hours usage
1: If the unit is not in use for a prolonged period of time,
it is recommended to charge the built-in battery every
three months.
Standby mode
1: Press the ST-BY button on the remote control to
wake the unit from STANDBY mode.
2: Press the ST-BY button to enter STANDBY mode.
Getting started
• Slide the POWER switch (15) to the ON position
to turn on the player (the blue power LED will
light up).
• Press the disc lid button (11) to open the disc tray.
• Place a DVD disc onto the disc tray (label facing
upwards).
• Close the disc tray and the playback starts
automatically.
• When a menu screen appears on the screen, use the
navigation buttons to select the menu option you
require, then press the PLAY/PAUSE button to start
playback.
Setting the volume level
1: Use the VOLUME - / + buttons on either the main unit
(2, 3) or remote to increase or decrease the volume.
2: Use the MUTE button on the remote to silence the
audio, press again to resume.
TFT function
1: Press TFT (8) to disable the built-in TFT screen, press
again to enable.
Skipping forward and back
1: Press either PREVIOUS
or NEXT buttons
during playback to skip a chapter (DVD) or a track
(CD) ahead or backwards.
Quick search FWD & RWD
1: During playback press either
or buttons to
initiate fast scan at X2, press again repeatedly to cycle
through X4, X8, X16, X32 and normal speed. Press the
PLAY/PAUSE button to resume normal play.
Stopping playback
1: Press the STOP button on either the main unit (9) or
remote control to stop playback. To resume playback
from the stopped position, press PLAY/PAUSE (10)
again. To reset the playback position memory press
the STOP button twice or open the disc lid.
Repeat playback (CD, DVD)
1: Press the REPEAT button once during playback
to activate the REPEAT function.
2: Press repeatedly to cycle the REPEAT modes
available for the current disc type.
3: Press the REPEAT button until you reach OFF (no
icon visable) to disable the REPEAT mode.
Display function
1: When playing a disc, pressing the DISPLAY button will
display various information about the playing disc.
You will need to press the DISPLAY button a few times
to view all the info another press will hide the display
info.
TITLE
ELAPSED
TITLE
REMAINING
CHAPTER
ELAPSED
CHAPTER
REMAINING
OFF
Page 7
Page 9

User instructions
GOTO function
The GOTO function allows you to enter a specific
chapter, title, audio track, subtitle track, angle and
specific time codes.
1: Press the GOTO button during playback to activate
the GOTO menu screen.
2: Use the numeric buttons to enter specific digits.
3: Press the ENTER or OK (6) button to activate (if
required).
Program playback (up to 20 tracks)
1: Press the PROGRAM button, the below screen will be
displayed
_ _
1
_ _
2
_ _
3
_ _
4
5
_ _
Exit NEXT
_ _
6
_ _
7
_ _
8
_ _
9
_ _
10
2: Use the navigation buttons to select the playback
sequence number and then type in the chapter (DVD)
or track (CD) digits using the numeric buttons.
3: Should you need to program more than 10 chapters/
tracks navigate to the NEXT option and press ENTER
or OK (6) to advance to 11-20.
4: Once setup navigate to STAR T option and press
ENTER/ OK (6).
5: To clear the setup screen navigate to EXIT and
press ENTER/ OK (6).
Note: The start button does not appear until you
have entered track numbers to playback.
You must start entering track numbers at number
1 and continue numerically.
Zoom function
1: To use the zoom function, press the ZOOM button
to activate the default zoom setting ZOOM 2. Every
subsequent press cycles through the zoom options
eg: ZOOM X2, ZOOM X3, ZOOM X4, ZOOM 1/2, ZOOM
1/3 & ZOOM 1/4. The next press will return to the
OFF setting.
Selecting an audio track
When viewing a DVD, you may wish to change the
audio track for example You wish to use a 2 channel
version instead of 5.1 or you require another language
other than the default.
1: Press the AUDIO button, every press will cycle through
the available audio tracks, and the details will be
displayed on the screen.
NOTE: This DVD player does NOT support DTS
audio. If you select a DTS audio track or one is
selected automatically no sound will be output.
Should this occur select a compatible audio track.
2: When no extra audio tracks are available, pressing the
button will do nothing.
Change viewing angle
1:Press the ANGLE button to select the desired angle
you wish to view the scene in.
NOTE: Not all DVD discs have multi-angles and as
such pressing the button will do nothing.
Subtitles
You may wish to watch a DVD with a subtitle track
enabled. To activate and choose the correct subtitle
track follow these steps.
1: Press the SUBTITLE button to view the first
subtitle option.
2: Press repeatedly to cycle through the available
subtitle options.
3: When you have found the track you wish to view
release the button for a few seconds to activate.
4: To cancel press the SUBTITLE button until you see
[OFF].
DVD menu
To display a DVD’s menu at any time follow the below.
1: Press MENU (7) on the unit or remote to display the
DVD menu (if available).
2: Press the TITLE button to return to the DVD title
menu.
Page 8
Page 10

User instructions
Picture disc / JPG image viewer
Follow the steps to view images from a CD/DVD disc.
00:00 00:00
052/086
DSC00283
DSC00283
DSC00283
DSC00283
DSC00283
DSC00283
Resolution 2592 x 1944
1: Insert a CD/DVD containing JPG images into the unit.
2: Once loaded a file manager will appear listing
compatible images found on the disc.
3: Use the navigation buttons to scroll through the
images. Press the ENTER/ OK (6) button to display
an image
NOTE: View all images from every folder by
pressing the PROG button on the remote control.
4: To view an image for longer than the default slide
show duration press the PLAY/PAUSE button on
the unit (10) or remote control. Pressing once more
resumes the normal playback.
NOTE: You can navigate to the file manager at any
time by pressing the MENU button.
Earphone usage
1: Connect earphones (supplied) to the 3.5mm output
on the side of the main unit (12).
2: Adjust the volume in the normal manner
(see Setting the volume level, Page 7).
• Listen at moderate volumes to avoid hearing
damage.
• If you hear no sound during playing, do not turn up
volume up as the music may suddenly begin at a
high volume.
• Excessive sound pressure from earphones
and headphones can cause hearing loss.
• To avoid damaging your ears, adjust the volume
to the lowest safe level before playing, and turn
up to the desired level when playback has started.
Adjusting the swivel display
The display can be rotated a total of 270 degrees.
1: The display can be rotated 90 degrees Anti-clockwise
from the facing front position.
2: The display can be rotated 180 degrees Clockwise
from the facing front position.
NOTE: Take care not to rotate any further than
the specified angles, as internal wiring can be
damaged.
1: REPEAT MODES
Press the REPEAT button repeatedly to cycle through
the available play modes : Single, Repeat one, Repeat
folder, Folder, Shuffle, Random.
2. PICTURE ROTATION
Press the
/ navigation buttons to rotate the image
Anti-Clockwise or Clockwise.
3. PICTURE FLIP
Press the
/ navigation buttons to flip the image.
4. PICTURE ZOOM
To enlarge or reduce the image press the ZOOM button
repeatedly to cycle through the magnification modes.
EG:- 50%, 75%, 100%, 125%, 150% & 200%.
5. SLIDE SHOW TRANSITIONS
During the slide show, pressing the PROGRAM button
will cycle through all the available transition presets.
Page 9
Page 11

User instructions
Setup menu
The below diagram shows the complete set of
options and where to locate them.
SETUP
AUDIO VIDEOGENERAL
4:3 / PS
TV DISPLAY
ANGLE MARK
OSD LANG
SCREEN SAVER
LAST MEMORY
4:3 / LB
Wide
Wide Squeeze
On
Off
English
German
French
Spanish
On
Off
On
Off
SPEAKER SETUP
(DOWNMIX)
DOLBY DIGITAL
DUAL MONO
DYNAMIC
LT / RT
Stereo
Stereo
L-Mono
R-Mono
Mix -Mono
Full
3/4
1/2
1/4
Off
The SETUP MENU allows you to configure Language,
Video & other General settings of the DVD player.
1: Remove any discs in the loader and press the
SETUP button on the remote control to access the
setup menus.
2: Use the Navigation buttons to navigate the
menu options.
3: Press the ENTER button to select an option
4: Use the navigation buttons to adjust the settings.
GENERAL MENU
TV DISPLAY
When connected to an external TV these
settings will affect the way the image is displayed.
NORMAL 4:3 PAN SCAN
Select this mode when the DVD is
connected with a standard 4:3 TV.
Widescreen images are displayed
full screen,
but the sides will be cropped.
PREFERENCE
(SHARPNESS)
(BRIGHTNESS)
(CONTRAST)
High
Medium
Low
-20 / +20
-16 / +16
TV TYPE
AUDIO
SUBTITLE
DISC MENU
PARENTAL
PASSWORD
DEFAULT
PAL
AUTO
NTSC
Select
Lang
Select
Lang
Select
Lang
Select
rating
Enter
password
Reset
WIDE
Select this mode for standard wide screen DVDs
on your player (default setting).
WIDE SQUEEZE
Select this mode for older 4:3 DVDs on your player.
ANGLE MARK
Select ON of you wish an icon to
be displayed when the multi-angle option is available.
OSD LANGUAGE
This sets the On-Screen Display language.
Choose between: English, German, French & Spanish.
SCREEN SAVER
When the unit is not in use, the DVD logo will appear
as a screen saver to prevent screen burn in.
Choose ON or OFF.
LAST MEMORY
Set to ON if you wish the player to remember your last
played position on a DVD disc.
NORMAL 4:3 LETTER BOX
Select this mode when the DVD is
connected with a standard 4:3 TV.
Widescreen images are displayed
full screen, but there will be black
bars across the top and bottom.
AUDIO MENU
DOWNMIX
This option allows you to change the way the audio
is assigned to each speaker. Choose from :
LT/RT - Left / Right mixed mode
STEREO - Stereo audio output
Page 10
Page 12

User instructions
AUDIO MENU (cont)
DUAL MONO: Only applies to discs with AC3 DD5.1
STEREO: The audio frequency on the Left & Right
channels will be output respectively from the Left &
Right speakers.
LEFT-MONO: The audio frequency on the Left & Right
channels will be output only from the Left speaker.
RIGHT-MONO: The audio frequency on the Left & Right
channels will be output only from the Right speaker.
MIX-MONO: The audio frequency on the Left & Right
channels will be merged together and output from both
Left & Right speakers.
DYNAMIC
When watching a disc with high dynamic audio at low
volumes you can increase the dynamic range to reduce
the loss of sound details.
VIDEO MENU
SHARPNESS
Set the image sharpness value from HIGH, MEDIUM
or LOW.
BRIGHTNESS
Set the image brightness level from -20 to +20.
CONTRAST
Set the image contrast level from -16 to +16.
PREFERENCE MENU
TV TYPE
Set this option to whatever type of TV you have
connected. NTSC, PAL or AUTO (to set automatically).
PREFERENCE MENU (cont)
SUBTITLE LANG
Choose the default subtitle language.
DISC MENU
This option sets the default DVD menu language, once
set if the DVD you are watching contains a menu with
your specified language that is used by default.
PARENTAL
You can set a system rating so only movies that fall
within that rating can be played.
Choose between: Kid Safe, G, PG, PG13,
PG-R, R, NC-17 and Adult.
NOTE: To change the parental rating you will need
to enter the password (default is ‘1234’).
PASSWORD
A password can be set to prevent unwanted usage
of the unit.
1: Set the PASSWORD MODE to ON.
NOTE: The default password is ‘1234’.
2: Should you wish to change the default password,
navigate to the PASSWORD option and press the
ENTER/OK (6) button.
3: Input the default password ( the default is 1234).
4: You can now enter a new password using the numeric
buttons. Once entered you will need to enter once
more to confirm the password.
5: Press ENTER/ OK (6) button to confirm the new
password.
NOTE: Should you forget the new password you
can use the master code‘1369’ to gain access.
AUDIO LANG
Choose the default audio setting. This means the DVD
player will automatically select this language as the
audio track ( if available ).
Page 11
DEFAULT
This setting when activated restores the default settings
to the system.
NOTE: This is not reversible once activated.
Page 13

User instructions
Care & maintenance
Important: Always unplug the appliance from the power socket during cleaning and maintenance.
Never use any sharp instruments or abrasive substances, soap, household cleaner, detergent or wax polish
for cleaning.
Clean the external surfaces with a damp soft cloth only. Never use abrasive products or solvents as it may damage
the appliance.
Troubleshooting
In the unlikely event of difficulties with your appliance please follow the trouble shooting guide below.
If the problem persists, visit the technical support website: www.argos-support.co.uk
Problem Cause Solution
The disc cannot be played • Incorrectly loaded
No picture or sound • The TFT button has been
The remote does not
respond
Forgotten the Pass Code • Use the default override code ‘1369’.
• Unreadable disc
• The disc is dirty
• Disc format not supported
pressed disabling the image on
the internal display
• Incorrect connections made if
using external source or TV.
• The batteries may be inserted
incorrectly.
• The batteries may be low.
• Obsticle between the remote
& the unit.
• Remote is too far away
• Remote not aimed at the IR
sensor on the unit.
• Re-load the disc with the label facing
upwards
• Ensure the disc is not scratched or
dirty. Clean and re-insert the disc
or try another disc
• Ensure the disc is compatible see
‘Technical Specifications’ on page 13.
• Press the TFT button on the remote
to resume playback on the internal
display.
• Re-check the connections, see page 6
for details.
• Check the polarities match & the
batteries are correctly inserted.
• Replace the batteries.
• Remove the obsticle.
• Move closer. The range of the remote
is approx 6m
• Make sure you aim the remote at the
IR sensor on the front of the unit near
the LED indicators
Page 12
Page 14

User instructions
Technical specifications
Power Supply
Input voltage
Battery
Battery capacity
Dynamic range
Video output
Audio output
Frequency response
Screen size
Supported Discs
We apologise for any inconvenience caused by any minor inconsistencies in these instructions,
which may occur as a result of product improvements and development.
This appliance complies with the following EEC directives:
2006/95/EEC Low voltage directive
2004/108/EEC EMC directive
Disposal information
The symbol on the product or its packaging indicates that this product may not be treated as
household waste. Instead it should be handed over to the applicable collection point for the recycling
of electrical and electronic equipment. By ensuring this product is disposed of correctly, you will
help prevent potential negative consequences for the environment and human health, which could
otherwise be caused by inappropriate waste handling of this product. For more detailed information
about recycling this product, please contact your local council office, your household waste disposal
service or the shop where the product was purchased.
• Output - DC 9V 1000mA
• Input - AC 100~240V 50/60Hz 0.5A
• DC 9 -12V
• Lithium battery
• 1000mAh / 7.4V
• ≥ 85dB
• 1 Vp-p75 Ω unbalanced
• 1.4 Vrms / 10 KΩ
• 20Hz~20KHz
• 7” (17.8cm)
• CD, CD-R, DVD, DVD-R, DVD+R, PICTURE CD & JPG
Battery disposal information
Your product contains a built-in rechargable battery covered by the European Directive 2006/66/EC. To safeguard
the functionality and safety of your product, always take your product to an official collection point or service centre
where a professional can remove the battery.
Please inform yourself about the local rules on separate collection of batteries because the correct disposal will
help prevent negative consequences for the environmental and human health. Please do not dispose of your
batteries with your normal household waste. Always bring your product to a professional to remove the battery.
Page 13
Page 15

Guarantee
PRODUCT GUARANTEE
This product is guaranteed against manufacturing defects for a period of
Year
This product is guaranteed for twelve months from the date of original purchase.
Any defect that arises due to faulty materials or workmanship will either be replaced,
refunded or repaired free of charge where possible during this period by the dealer from
whom you purchased the unit.
The guarantee is subject to the following provisions:
The guarantee does not cover accidental damage, misuse, cabinet parts, knobs or
consumable items.
The product must be correctly installed and operated in accordance with the instructions
contained in this manual.
It must be used solely for domestic purpose.
The guarantee will be rendered invalided if the product is re-sold or has been damaged by
inexpert repair.
Specifications are subject to change without notice.
The manufacturer disclaims any liability for the incidental or consequential damages.
The guarantee is in addition to, and does not diminish your statutory or legal rights.
Guarantor: Argos Limited
489 - 499 Avebury Boulevard
Central Milton Keynes
MK9 2NW
Page 14
 Loading...