

Page 1
Dual Mode Speed & Cadence Sensor
SC002
User Manual
EN / TW / CH
2
1
front
cadence sensor
1
indication point
踏頻感應點
踏頻感應點
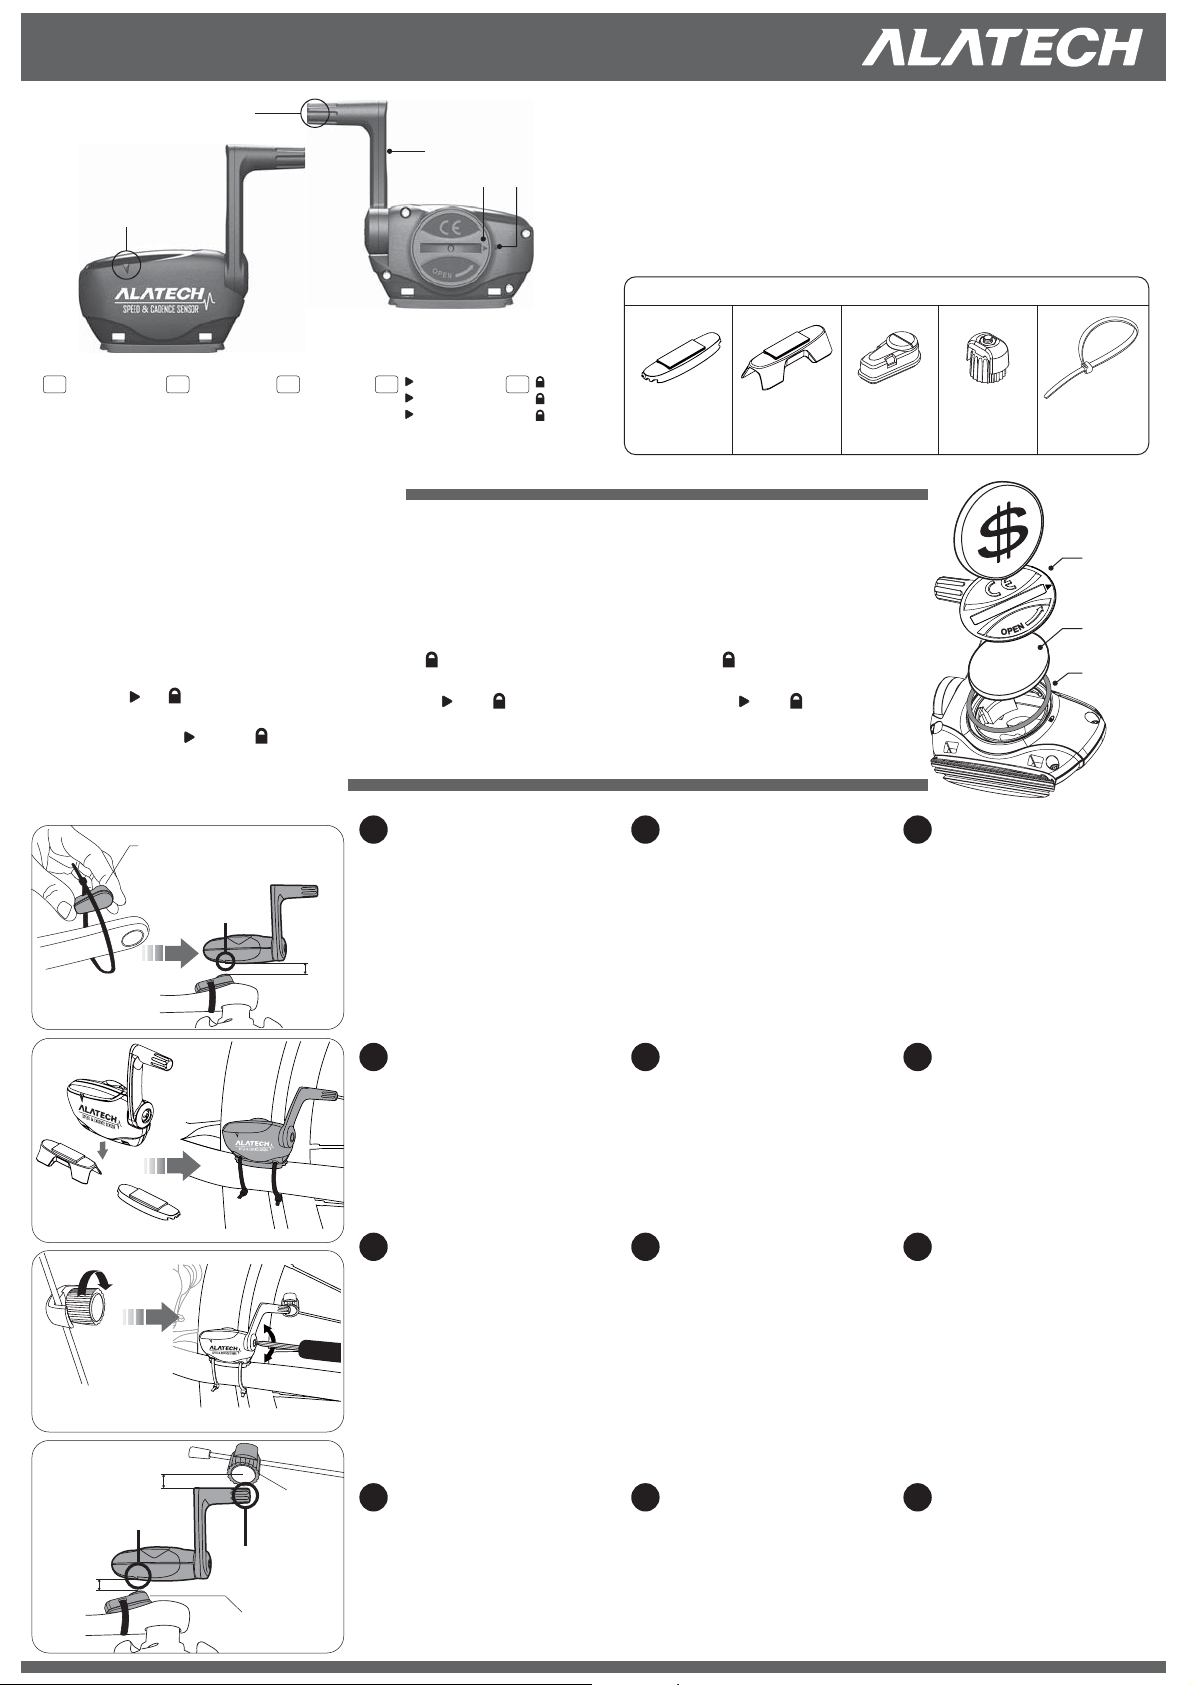
Replace Battery/
Please follow the steps below to install the
battery before first use.
Step 1:Use a coin, open the battery cover by
turning it counter-clockwise to OPEN.
Step 2:Remove the cover and insert (replace)
the battery into the sensor with positive
(+) side facing up.
Step 3:Place the battery cover (the distance
between and is within approx. 8mm).
Step 4:Use a coin to twist the cover clockwise
back into place ( points to ).
speed sensor
2
indication line
速度感應區
速度感應區
安裝電池/安裝電池
(Battery type: CR2032)
sensor arm
3
感測臂
感測臂
3
45
reverse
arrow indicator
4
箭號指示符
箭號指示符
首次使用感測器前,請先安裝電池(已隨產
品附上)。
步驟1:以硬幣如 OPEN箭頭所示方向逆
時針旋開電池蓋。
步驟2:將電池以正極朝上裝入。
(電池型號:CR2032)
步驟3:在 上方約 8mm處蓋上電池蓋。
步驟4:然後用硬幣以順時針方向旋緊背
蓋至 對齊 ,確實鎖緊背蓋。
locked icon
5
上鎖
上鎖
This Speed & Cadence Sensor (SC002) enables to track pedaling cadence and
bike speed in real time and sends data to the compatible display devices or Apps
via ANT+/Bluetooth Smart (Bluetooth 4.0) dual mode wireless technology.
本產品
(SC002)採用 ANT+/Bluetooth Smart無線傳輸雙技術,能支援各種ANT+或
4.0裝置和搭配運動 App,追蹤您騎乘時的踏頻、速度、距離等資訊。
藍牙
本產品
(SC002)採用 ANT+/Bluetooth Smart無線傳輸雙技術,能支援各種ANT+或
藍牙4.0裝置和搭配運動 App,追蹤您騎乘時的踏頻、速度、距離等資訊。
Accessories included with your product/
rubber pad
橡膠墊
橡膠墊
首次使用感測器前,請先安裝電池(已隨產
品附上)。
步驟1:以硬幣如 OPEN箭頭所示方向逆
步驟2:將電池以正極朝上裝入。
步驟3:在 上方約 8mm處蓋上電池蓋。
步驟4:然後用硬幣以順時針方向旋緊背
U style rubber pad
U型橡膠墊
U型橡膠墊
時針旋開電池蓋。
(電池型號:CR2032)
蓋至 對齊 ,確實鎖緊背蓋。
pedal magnet
踏頻感應磁鐵
踏頻感應磁鐵
包裝隨附配件/包裝隨附配件
+
cable ties
束帶
束帶
Cover
電池蓋/電池蓋
CR2032
電池/電池
O-ring
防水圈/防水圈
spoke magnet
速度感應磁鐵
速度感應磁鐵
Installation/
Pedal Magnet
A
or
B
Mount the magnet
on the spoke.
C
10mm
Cadence Sensor
Indication Point
10mm
D
安裝概述/安裝概述
Cadence Sensor
Indication Point
10mm
Spoke
Magnet
Speed Sensor
Indication Line
Pedal Magnet
A Install Pedal Magnet Set
1. Pre-fit Pedal Magnet on left crank
arm near pedal. Do not tighten
cable ties completely to allow
some adjustment.
2. Align Pedal Magnet with Cadence
Sensor Indication Point as
illustrated. Make sure the distance
between sensor and Pedal Magnet
is within 10mm and does not
interfere with your bicycling.
B Install SC002 Sensor
1. Choose a suitable rubber pad and
adhere it underneath SC002.
2. Place SC002 on left rear chainstay
(non-drive side). Make sure to put
the logo side outwards as
illustrated. Do not tighten cable ties
completely to allow some
adjustment.
C Install Spoke Magnet Set
1. Unscrew Spoke Magnet from the
plastic piece. Mount Spoke Magnet
on the spoke, and place the spoke
in the groove of the plastic piece.
2. Use one suitable cross head
screwdriver to adjust the sensor
NOTE
to within 10mm of Spoke
arm
Magnet, and the magnet is aligned
with Speed Sensor Indication Line.
NOTE: You can tilt the sensor arm closer to
either magnet for improved alignment.
D Reconfirm and then tighten
1. Reconfirm that the magnets have
to achieve recommended distances
and aligning sensing points.
2. Make sure that the magnets do not
interfere with each other nor
interfere with your bicycling. Then
tighten all of the cable ties.
A 安裝踏頻磁鐵
1. 將踏頻磁鐵安裝在左曲柄靠近踏板
的地方。先請勿將束帶完全束緊,
以便還可微調磁鐵位置。
2. 調整磁鐵位置,使之對齊感測器正
面的踏頻感應點且兩者感應距離小
於10mm,並請確保踩踏時,磁鐵
不會碰撞到感應器。
B 安裝 SC002感測器
1. 包裝隨附兩種橡膠墊,請從中選擇
合適的橡膠墊,先將橡膠墊黏貼在
感測器底部。
2. 將感測器以正面朝外安裝在左後下
叉處(非變速系統邊)。先請勿將束
帶完全束緊,以便還可微調感測器
位置。
C 安裝速度磁鐵
1. 轉開速度磁鐵並安裝在後輪的輻條
上。
2. 調整磁鐵位置,並使用適當的十字
起調整感測器臂的角度
和速度感應區互相對齊且兩者感應
距離小於10mm。
說明:用十字起轉鬆感測器臂和調整其
角度至建議的間距範圍,再轉緊螺絲。
說明
,使磁鐵
D 再次確認安裝無誤,然後束緊
1. 再次確認踏頻磁鐵和速度磁鐵的安
裝位置有在建議的間距範圍內並有
對齊感應點。
2. 確認踏頻磁鐵和速度磁鐵不受彼此
干擾,也不會妨礙騎乘自行車,確
認後請束緊所有束帶。
A 安裝踏頻磁鐵
1. 將踏頻磁鐵安裝在左曲柄靠近踏板
的地方。先請勿將束帶完全束緊,
以便還可微調磁鐵位置。
2. 調整磁鐵位置,使之對齊感測器正
面的踏頻感應點且兩者感應距離小
於10mm,並請確保踩踏時,磁鐵
不會碰撞到感應器。
B 安裝 SC002感測器
1. 包裝隨附兩種橡膠墊,請從中選擇
合適的橡膠墊,先將橡膠墊黏貼在
感測器底部。
2. 將感測器以正面朝外安裝在左後下
叉處(非變速系統邊)。先請勿將束
帶完全束緊,以便還可微調感測器
位置。
C 安裝速度磁鐵
1. 轉開速度磁鐵並安裝在後輪的輻條
上。
2. 調整磁鐵位置,並使用適當的十字
起調整感測器臂的角度
和速度感應區互相對齊且兩者感應
距離小於10mm。
說明:用十字起轉鬆感測器臂和調整其
角度至建議的間距範圍,再轉緊螺絲。
說明
,使磁鐵
D 再次確認安裝無誤,然後束緊
1. 再次確認踏頻磁鐵和速度磁鐵的安
裝位置有在建議的間距範圍內並有
對齊感應點。
2. 確認踏頻磁鐵和速度磁鐵不受彼此
干擾,也不會妨礙騎乘自行車,確
認後請束緊所有束帶。
www.alatech.com
Page 2
Dual Mode Speed & Cadence Sensor
SC002
User Manual
EN / TW / CH
Compatible App/
•Compatible App:
ALA COACH+
•Please visit our website
兼容
to get more information.
Pair with Receiving Device/
兼容
App/
A separate application is required to view
bicycling data on the receiving device. It is
recommended to use ALA COACH+ App but
it is also possible to use other applications
that support ANT+ and Bluetooth 4.0.
App
與行動裝置配對/與行動裝置配對
1 Preparing
This product supports any receiving device via
ANT+/Bluetooth 4.0 dual mode wireless technology.
When using this product for the first time, you need to
pair it with your receiving device. Please make sure
your device meets the following system requirements
before pairing and use.
•iOS 5.0 or later.
•Android 4.3 or later.
•Built-in ANT+/Bluetooth 4.0 low power wireless
connectivity.
2 Setting
If you would like to use the wireless Bluetooth
connection, please turn on your device's Bluetooth
before pairing and each use.
If you would like to use the wireless ANT+ connection,
see the App's instructions.
當使用行動裝置查看騎乘數據時會需要
App應用程式,建議您安裝 ALA COACH+
App,或其他可支援 ANT+和藍牙 4.0的應
用程式。
準備
1
本產品透過 ANT+/Bluetooth Smart 雙技術可支援任何顯
示裝置。第一次使用需先將本產與您的裝置進行配對。
配對之前,請先確認您的裝置是否符合以下系統需求。
•iOS 5.0以上
•Android 4.3以上
•內建 ANT+/藍牙 4.0低功耗無線傳輸技術
設定
2
若您想以藍牙無線連接本產品,在配對和每次使用前,
請先開啟裝置上的 Bluetooth系統。
若您想以 ANT+無線連接本產品,請參閱 App開發商的
應用程序來操作。
當使用行動裝置查看騎乘數據時會需要
App應用程式,建議您安裝 ALA COACH+
App,或其他可支援 ANT+和藍牙 4.0的應
用程式。
準備
1
本產品透過ANT+/Bluetooth Smart雙技術可支援任何顯
示裝置。第一次使用需先將本產與您的裝置進行配對。
配對之前,請先確認您的裝置是否符合以下系統需求。
•iOS 5.0以上
•Android 4.3以上
•內建 ANT+/藍牙 4.0低功耗無線傳輸技術
設定
2
若您想以藍牙無線連接本產品,在配對和每次使用前,
請先開啟裝置上的 Bluetooth系統。
若您想以 ANT+無線連接本產品,請參閱 App開發商的
應用程序來操作。
3 Pairing 3
配對
3
配對
Step 1 Step 2 Step 3
Automatically turn on when pairing is completed.
配對完成即轉為開啟/配對完成即轉為開啟
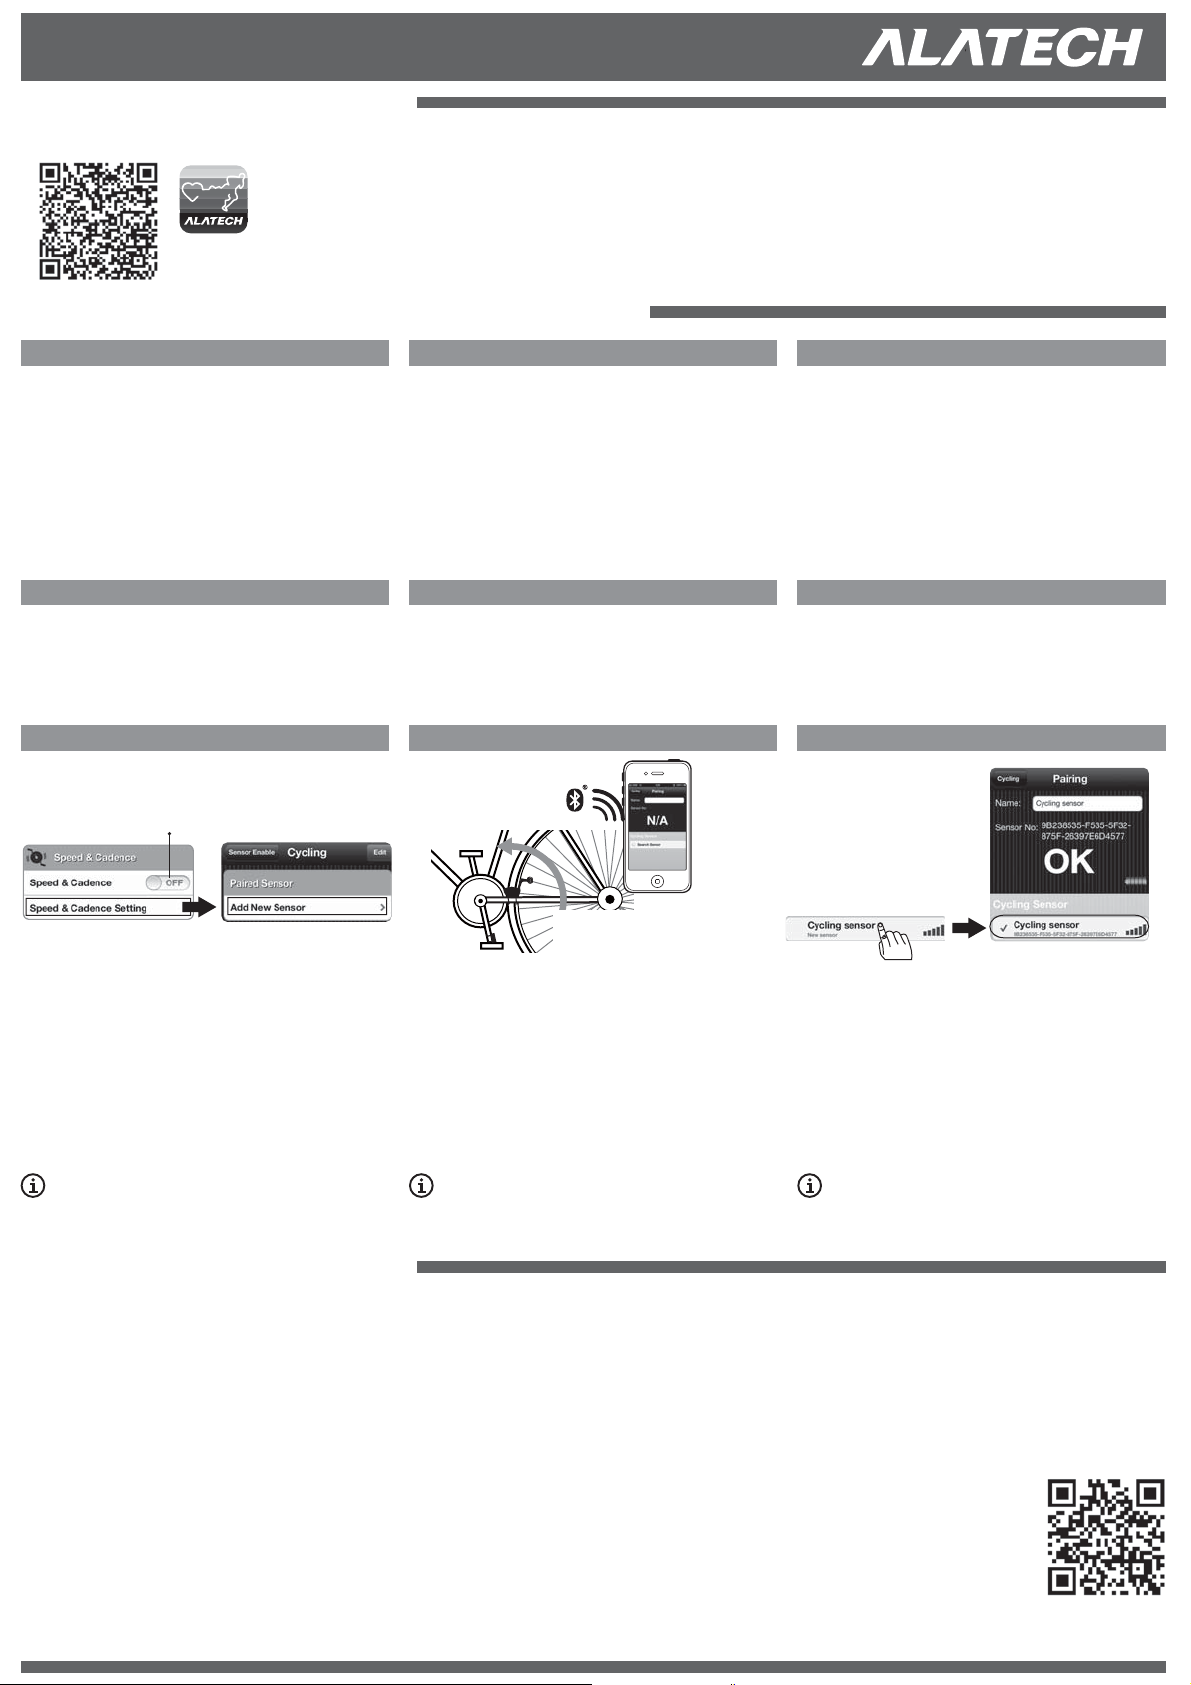
Below introducing you how to pair with your device via
Bluetooth within ALA COACH+ App:
Step 1:Open your ALA COACH+ App and go to
Setting〉My Sensors〉Speed & Cadence〉
Speed & Cadence Setting〉Add New Sensor.
Step 2:Turn the crank counter-clockwise to pair and
connect Speed & Cadence Sensor. ALA
COACH+ App will search for the sensor.
Step 3:You can re-name for sensor when the screen
displays “OK”.
•Make sure your SC002 is within 10 centimeters of your
device/smartphone and there are no other Bluetooth
sensors in the same range of 20 meters while the App is
trying to pair with your SC002.
Trouble Shooting/
疑難排除/疑難排除
Why can't I connect the SC002 in App?
1. When you are using Bluetooth connection, please
make sure the Bluetooth Setting in your device and
SC002 Sensor in your ALA COACH+ App have
been turned on. Check if Bluetooth signals are
stable (rendering all white rather than translucent)
which is showed on the upper right corner of your
smartphone.
2. Make sure the App you downloaded is compatible
with Bluetooth
3. SC002 will turn into sleep mode around one minute
without connecting with App. Please turn the crank
counter-clockwise to wake SC002 for connection if
not connected will go sleep mode again.
4. Keep the transmission distance between SC002
and your device/smartphone is within 2 meters.
5. Check the battery. If exhausted, please replace the
battery.
4.0 devices.
4.0
Turn the crank counter-clockwise.
逆時針轉動曲柄/逆時針轉動曲柄
以下介紹如何通過藍牙連接在 ALA COACH+上進行配對:
步驟1:開啟 ALA COACH+〉設定〉感測器〉速度與踏頻感
測器〉速度踏頻感測器設定〉新增感測器。
步驟2:以逆時針方向轉動曲柄,直到 App搜尋到感測器。
步驟3:當螢幕顯示 OK表示配對完成。此時,您可為感測器
重新命名。
•配對時,速度踏頻器與您的裝置或手機需相距 10cm內,
且遠離其它藍牙感測器 20m以上。
為何我的 App不能與SC002感測器連線?
1. 當您通過藍牙連接時,請檢查您手機上的
Bluetooth系統和 App裡的感測器是否開啟。並
檢查手機右上角的藍牙訊號是否接收不穩定(呈
現半透明狀而非全白),如是,請重新與感測器
進行配對。
2. 若不是用 ALA COACH+,請確認您的運動App
是否支援 Bluetooth 4.0。
3. SC002速度踏頻感測器內的藍牙同步功能在沒有
藍牙連線時會自動關閉,每次使用前請先轉動曲
柄,以啟動感測器與建立連線,喚醒後會持續一
分鐘,期間若沒有與 App進行藍牙連線,會再進
入休眠模式。
4. 請檢查手機或裝置與您的 SC002是否有在 2公尺
的傳輸距離範圍內。
5. 請檢查感測器是否有電,若沒電,請更換電池。
The App will find the sensor and
show as bellow image. Please
touch to complete paring.
確認螢幕下方所搜到的感測器無誤
,請點按一下以進行配對
確認螢幕下方所搜到的感測器無誤
,請點按一下以進行配對
以下介紹如何通過藍牙連接在 ALA COACH+上進行配對:
步驟1:開啟 ALA COACH+〉設定〉感測器〉速度與踏頻感
步驟2:以逆時針方向轉動曲柄,直到 App搜尋到感測器。
步驟3:當螢幕顯示 OK表示配對完成。此時,您可為感測器
•配對時,速度踏頻器與您的裝置或手機需相距 10cm內,
為何我的 App不能與SC002感測器連線?
1. 當您通過藍牙連接時,請檢查您手機上的 Bluetooth
系統和 App裡的感測器是否開啟。並檢查手機右上角
的藍牙訊號是否接收不穩定(呈現半透明狀而非全白)
,如是,請重新與感測器進行配對。
2. 若不是用 ALA COACH+,請確認您的運動App是否
支援 Bluetooth 4.0。
3. SC002速度踏頻感測器內的藍牙同
步功能在沒有藍牙連線時會自動關
閉,每次使用前請先轉動曲柄,以
啟動感測器與建立連線,喚醒後會
持續一分鐘,期間若沒有與 App進
行藍牙連線,會再進入休眠模式。
4. 請檢查手機或裝置與您的SC002是
否有在 2公尺的傳輸距離範圍內。
5. 請檢查感測器是否有電,若沒電,
請更換電池。
測器〉速度踏頻感測器設定〉新增感測器。
重新命名。
且遠離其它藍牙感測器 20m以上。
Please download the
latest version at:
2PF297210100069
www.alatech.com
08/2014. Rev. 1
Page 3
Dual Mode Speed & Cadence Sensor
SC002
User Manual
EN / TW / CH
Federal Communications Commission
(FCC) Statement
15.21
You are cautioned that changes or modifications not expressly
approved by the part responsible for compliance could void the
user’s authority to operate the equipment.
15.105(b)
This equipment has been tested and found to comply with the
limits for a Class B digital device, pursuant to part 15 of the FCC
rules. These limits are designed to provide reasonable protection
against harmful interference in a residential installation. This
equipment generates uses and can radiate radio frequency
energy and, if not installed and used in accordance with the
instructions, may cause harmful interference to radio
communications. However, there is no guarantee that interference
will not occur in a particular installation. If this equipment does
cause harmful interference to radio or television reception, which
can be determined by turning the equipment off and on, the user
is encouraged to try to correct the interference by one or more of
the following measures:
- Reorient or relocate the receiving antenna.
- Increase the separation between the equipment and receiver.
- Connect the equipment into an outlet on a circuit different from
that to which the receiver is connected.
- Consult the dealer or an experienced radio/TV technician for help.
This device complies with part 15 of the FCC rules.
Operation is subject to the following two conditions:
1. This device may not cause harmful interference, and
2. This device must accept any interference received, including
interference that may cause undesired operation.
FCC RF Radiation Exposure Statement:
environment. End users must follow the specific operating
instructions for satisfying RF exposure compliance. This
transmitter must not be co-located or operating in conjunction
with any other antenna or transmitter.
RISK OF EXPLOSION IF BATTERY IS REPLACED BY AN
CAUTION
INCORRECT TYPE.
DISPOSE OF USED BATTERIES ACCORDING TO THE
INSTRUCTIONS.
根據 NCC 低功率電波輻射性電機管理辦法
規定:
第十二條 經型式認證合格之低功率射頻電機,非經許可,公司
、商號或使用者均不得擅自變更頻率、加大功率或變
更原設計之特性及功能。
第十四條 低功率射頻電機之使用不得影響飛航安全及干擾合法
通信;經發現有干擾現象時,應立即停用,並改善至
無干擾時方得繼續使用。
前項合法通信,指依電信法規定作業之無線電通信。
低功率射頻電機須忍受合法通信或工業、科學及醫療
用電波輻射性電機設備之干擾。
www.alatech.com
2PF297210100079
10/2014. Rev. 0
 Loading...